

AEG DB1150 User Manual [de]
822 949 340 DB_1100.book Seite 1 Montag, 28. April 2008 11:51 11
PERFECT DB 1...
d Dampfbügler
g Steam iron
f Fer à repasser à vapeur
l Stoomstrijkijzer
i Ferro da stiro a vapore
p Ferro de engomar a vapor
r БфмпуЯдесп
Gebrauchsanweisung
Operating instructions
Mode d’emploi
Gebruiksaanwijzing
Istruzione per l'uso
Instruções de utilização
ЕгчейсЯдйп пдзгйюн чсЮузт
822 949 340 DB_1100.book Seite 2 Montag, 28. April 2008 11:51 11
1
D
E
F
GH
J
K
C
L
M
B
P
A
O
N
a
MAX
MAX
b
c
d
2
3
2

822 949 340 DB_1100.book Seite 3 Montag, 28. April 2008 11:51 11
ABC
6/A
4
5
6/B
7
8
3

822 949 340 DB_1100.book Seite 4 Montag, 28. April 2008 11:51 11
d
Bügeltabelle - Betriebshinweise
Gewebe Temperaturwähler
Chemiefasern
Polyacryl
Polyamid
Polyester
Zellulose
Naturfasern
Seide
Wolle
Dampfwähler
Dampf aus
„“
Dampf aus
„“
Dampf aus
„“
Dampf ein
d
Bemerkungen
Acrylan, Dralon, Leacryl, Orlon, Vonnel
Enkalon, Grilon, Nylon, Perlon,
Rilsan
Dacron, Diolen, Kodel, Trevira, Vestan
Zellulosefasern, Acetat, Cupro, Viskose
sind z.B.: Cuprama, Colvera, Phyron,
Reyon, Tricell
Seide und Chemiefasern können mit
einem zwischengelegten, feuchten
Tuch trockengebügelt werden
Dampfbügeln in niederer bis mittlerer
Einstellung des Dampfwählers
möglich
Baumwolle
Leinen
Einstellung
bei-Aufbewahrung
Für Mischgewebe wird empfohlen, mit der niedrigeren Temperatur (empfindlichste Faser) zu
bügeln, z.B. Polyester-Baumwolle auf Polyester-Stellung.
Wegen unterschiedlicher Bügelgeschwindigkeit, Gewebe-Restfeuchtigkeit usw. kann die optimale
Einstellung von der in der Tabelle aufgeführten Empfehlung abweichen!
= Kalt
Dampf ein
Dampf ein
Dampf aus
„“
Permanenter Dampf ab ••• Stellung
möglich
Super-Dampfstoß ab ••• Stellung für
hartnäckige Knitter
Stecker ziehen
4

822 949 340 DB_1100.book Seite 5 Montag, 28. April 2008 11:51 11
d
Sehr geehrte Kundin,
d
sehr geehrter Kunde,
lesen Sie bitte diese Gebrauchsanweisung sorgfältig durch. Beachten Sie vor
allem die Sicherheitshinweise auf den
ersten Seiten dieser Gebrauchsanweisung! Bewahren Sie bitte die Gebrauchsanweisung zum späteren
Nachschlagen auf. Geben Sie diese an
eventuelle Nachbesitzer des Gerätes
weiter.
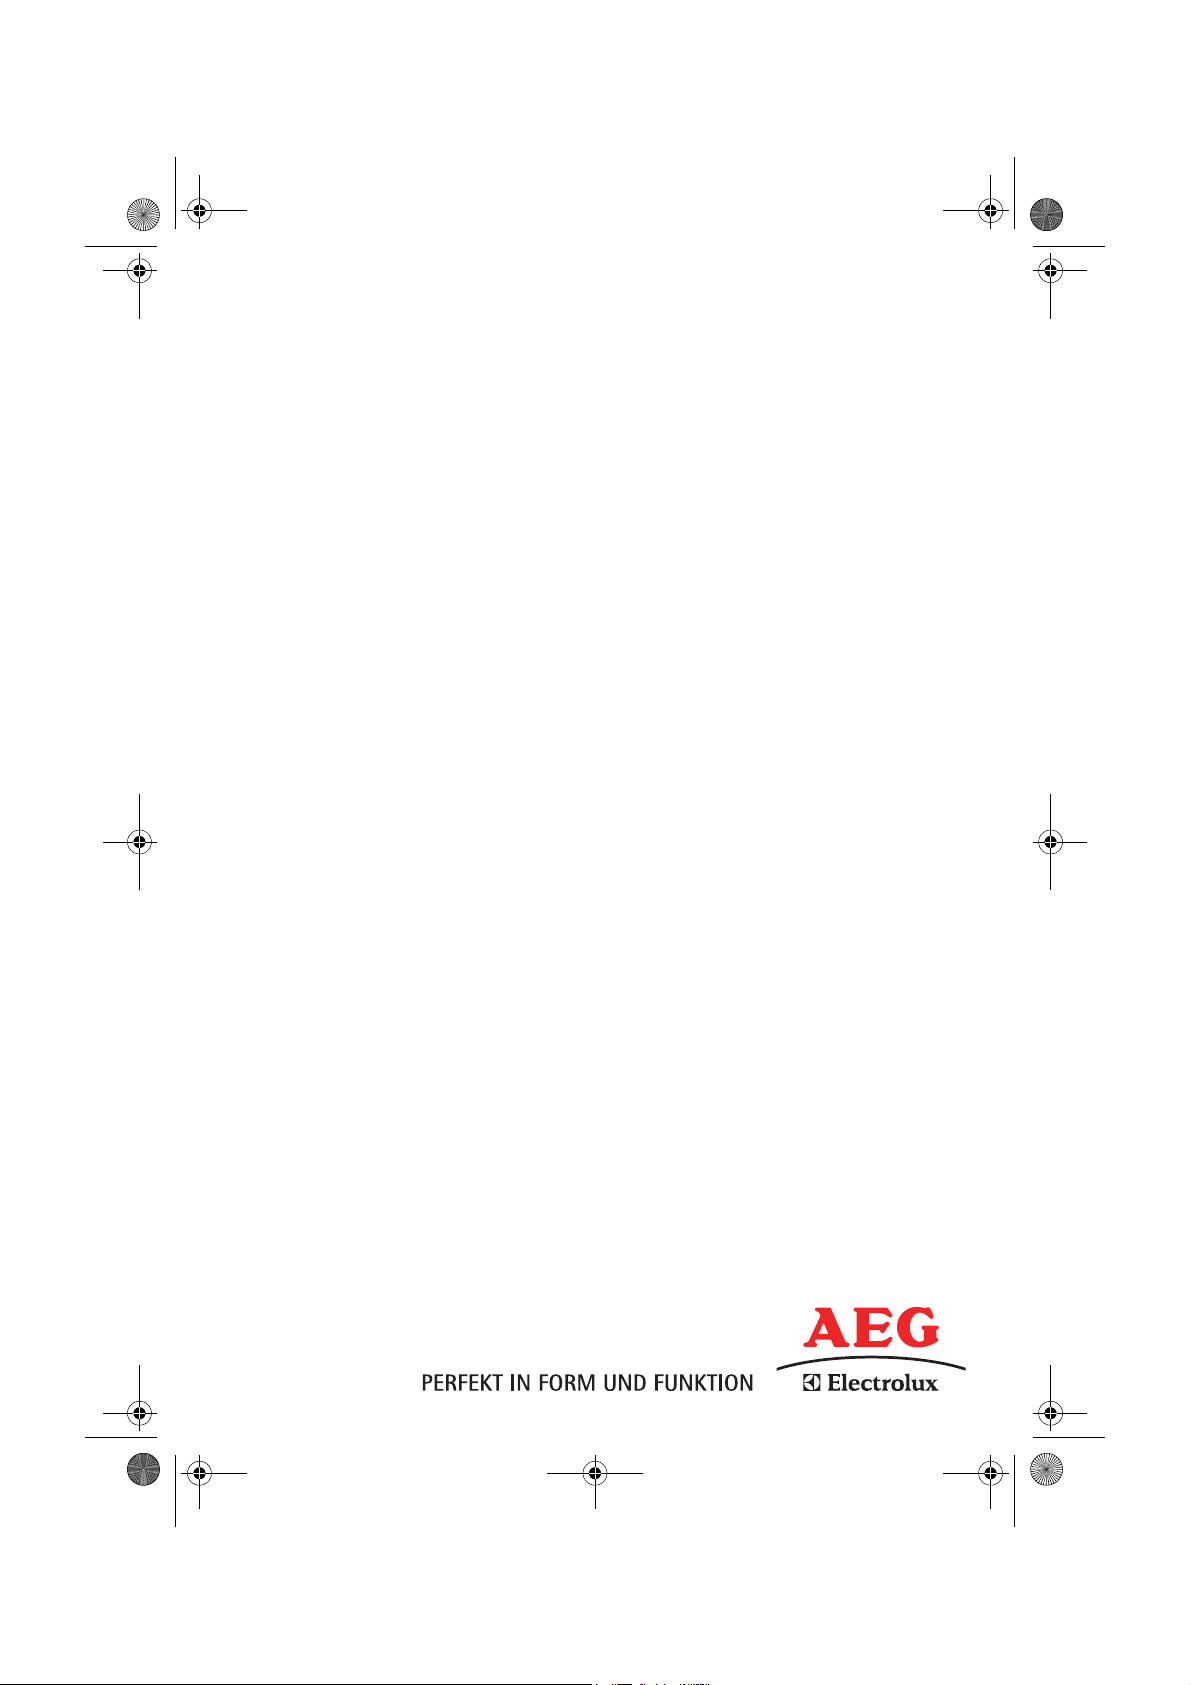
Ausstattung (Bild 1)
A Typschild
B Edelstahl-Bügelsohle
C Dampfaustrittsdüsen
D Spraydüse
E Wassereinfüllöffnung
F Dampfwähler
G Taste für Dampfstoß-Funktion
H Taste für Sprayfunktion
J Kontrolllampe
K Zuleitung
L Abstellfläche
M Kabelaufwicklung
N Temperaturwähler
O Transparenter Wassertank
P Meßbecher
Temperaturwähler (Bild 2)
a Einstellung „Kalt“
b Chemiefaser
c Seide/Wolle
d Baumwolle/Leinen
1 Sicherheitshinweise
• Das Gerät darf nur mit der Spannung
und der Stromart betrieben werden,
die auf dem Typschild angegeben ist
(Bild 1/A).
• Der Anschluß darf nur an eine vorschriftsmäßig installierte Steckdose
erfolgen.
• Dieses Gerät ist nicht dazu bestimmt,
von Personen (einschließlich Kinder),
die aufgrund Ihrer Unerfahrenheit oder
Unkenntnis nicht in der Lage sind es
sicher zu bedienen oder von Personen
(einschließlich Kinder) mit eingeschränkten physischen, sensorischen
oder geistigen Fähigkeiten, benutzt
oder betrieben zu werden, es sei denn
sie wurden durch eine für sie verantwortliche Person angewiesen wie das
Gerät sicher zu benutzen ist und
anfäglich von ihr beaufsichtigt.
• Vorsicht! Während des Betriebes werden Sohle und Haube des Dampfbüglers funktionsbedingt heiß!
• Gerät nur unter Aufsicht betreiben.
Auch bei kurzfristigem Verlassen des
Raumes Netzstecker ziehen. Kinder
fernhalten.
• Kinder müssen beaufsichtigt werden
um sicherzustellen, dass sie nicht mit
dem Gerät spielen.
Beim Dampfbügeln strömt Dampf aus
1
den Öffnungen in der Sohle – Verbrennungsgefahr!
• Der Netzstecker ist grundsätzlich zu ziehen, bevor der Dampfbügler gereinigt,
Wasser nachgefüllt oder entleert wird.
• Der Dampfbügler muss immer beaufsichtigt werden, sobald der Stecker
eingesteckt ist.
• Den Dampfbügler nie in Wasser tauchen!
• Den Dampfbügler immer senkrecht auf
der Abstellfläche abstellen. Der Dampfbügler darf nur auf einer stabilen
Oberfläche auf seine Abstellfläche
abgestellt werden.
• Der Dampfbügler muss auf einer stabilen Oberfläche benutzt und abgestellt
werden.
5

822 949 340 DB_1100.book Seite 6 Montag, 28. April 2008 11:51 11
d
• Die Anschlußleitung nicht knicken,
nicht um den noch heißen Dampfbügler wickeln. Bewahren Sie das Gerät
nur abgekühlt und ohne Wasser auf.
• Der Dampfbügler darf nicht mehr
benutzt werden, wenn er heruntergefallen ist, sichtbare Beschädigungen
aufweist oder undicht ist.
• Bitte prüfen Sie von Zeit zu Zeit die
Netzzuleitung auf Beschädigungen!
Um Beschädigungen der Anschlußleitung zu beheben, ist der Einsatz von
Spezialwerkzeug erforderlich. Wenn
die Netzzuleitung beschädigt ist, muss
der Austausch durch den Hersteller,
einen Fachhändler oder eine entsprechend qualifizierte Person durchgeführt werden, um jede Gefahr
auszuschließen.
Reparaturen an diesem Gerät dürfen
nur von Fachkräften durchgeführt
werden. Durch unsachgemäße Reparaturen können erhebliche Gefahren
entstehen. Wenden Sie sich im
Reparaturfall an den Kundendienst
oder an Ihren autorisierten Fachhändler.
Technische Daten
Leistungsaufnahme: 1600 - 2000 W
Netzspannung: 220 - 240 V
Dieses Gerät erfüllt folgende EC
;
Normen:
• Niedrig-Spannungs-Norm
2006/95/EC
• EMC Norm 89/336/EEC und Ergän-
zung 92/31/EEC sowie 93/68/EEC
Inbetriebnahme
Temperatur-Einstellung (Bild 2)
Beachten Sie bitte die Pflegekennzeichen, die international gültig sind und
auf dem Etikett in guter Wäsche auf
die richtige Bügeltemperatur hinweisen.
Die Zuordnung der Temperaturwahl zur
Gewebeart ersehen Sie aus der Bügeltabelle. Wir empfehlen, die Wäsche
vorzusortieren. Beginnen Sie mit dem
Bügeln von Stoffen, die niedrige
Bügeltemperaturen erfordern
(z.B. PERLON). Anschließend werden
Stoffe gebügelt, die jeweils höhere
Temperaturen erfordern. So vermeiden
Sie, daß ein empfindliches Gewebe
durch zu hohe Temperaturen Schaden
nimmt. Nach dem Einschalten leuchtet
die Kontrolllampe auf (Bild 1/J); sie
erlischt, wenn die eingestellte Temperatur erreicht ist. Wenn jedoch trotzdem einmal der Temperaturwähler
(Bild 1/N) zurückgedreht wird ist zu
beachten, daß die Abkühlung der Sohle
eine gewisse Zeit dauert. Erst nach
Aufleuchten der Kontrolllampe ist die
Bügelsohle auf eine niedrige Temperatur abgekühlt.
Trockenbügeln
0 Stellen Sie den Dampfwähler
(Bild 1/F) auf Position
0 Stellen Sie den Temperaturwähler
(Bild 1/N) auf die gewünschte Temperatur.
„“ (Bild 4/A).
Dampfbügeln
Füllen des Dampfbüglers (Bild 3)
Der Wassertank darf nur gefüllt werden, wenn der Netzstecker nicht in der
Steckdose ist.
0 Dampfwähler auf Position
kenbügeln (Bild 4/A) stellen und das
Gerät senkrecht halten.
0 Füllen Sie den Wassertank höchstens
bis zur Markierung „MAX“ auf. Sie können dazu den mitgelieferten Meßbecher verwenden (Bild 1/P).
„“ = Trok-
6
822 949 340 DB_1100.book Seite 7 Montag, 28. April 2008 11:51 11
d
Wasserqualität
Sie können Leitungswasser bis
3 mmol/I 17° dH Wasserhärte verwenden. Ihr Wasserwerk gibt Ihnen Auskunft über den Härtegrad Ihres
Leitungswassers. Bei härterem Wasser
verwenden Sie bitte destilliertes Wasser aus der Drogerie oder eine
Mischung aus ½ Leitungswasser und
½ destilliertem Wasser.
Bei Erstbenutzung bitte
beachten:
0 Wasser in den Tank einfüllen, Dampf-
wähler (Bild 1/F) auf maximale Position
(Bild 4/B) stellen.
0 Gerät aufheizen und auf einem
Abstellrost oder einem Teller (Bild 5)
mit der Bügelsohle nach unten
abdampfen lassen, um die Dampfkammer zu aktivieren.
Ein optimales Dampfergebnis und
3
Betriebsgeräusch wird erreicht, nachdem Sie die ersten 3 Tankfüllungen
verbraucht haben.
Bügeln mit Dampf
Zum Dampfbügeln den Temperaturwähler (Bild 1/N) auf die erforderliche
Gewebeart einstellen und warten, bis
die Kontrolllampe (Bild 1/J) erlischt –
erst dann den Dampfwähler (Bild 1/F)
auf die gewünschte Position (Bild 4/B)
stellen. Die zueinander passenden Einstellungen von Temperatur (Gewebeart) und Dampf können Sie der Bügeltabelle entnehmen. Sobald der Dampfbügler waagrecht gehalten wird,
beginnt sich der Dampf zu entwickeln.
Wenn der Dampfbügler wieder senkrecht abgestellt wird, wird die Dampfzufuhr automatisch gestoppt.
Spray-Funktion (Bild 6/A)
Beim ersten Betrieb oder wenn Sie längere Zeit nicht gebügelt haben, müssen
Sie die Taste für Sprayfunktion (Bild
1/H) mehrmals betätigen, bis Wasser
aus der Spraydüse (Bild 1/D) kommt.
Die Spray-Funktion können Sie auch
beim Trockenbügeln einsetzen.
Super-Dampfstoß-Funktion
(Bild 6/B)
Wertvolle Hilfe, z.B. beim Bügeln von
Falten, Stickereien u.ä., bringt der
Super-Dampfstoß. Sie können den
zusätzlichen Dampfstoß sowohl beim
Dampfbügeln als auch beim Trockenbügeln auslösen.
0 Stellen Sie den Temperaturwähler
(Bild 1/N) auf Position „MAX“ und warten Sie, bis die Temperatur erreicht ist,
d.h. bis die Kontrolllampe (Bild 1/J)
erlischt.
0 Heben Sie den Dampfbügler etwas vom
Stoff ab und betätigen Sie die Taste für
Dampfstoß-Funktion (Bild 1/G).
Warten Sie jeweils 5 Sekunden, bevor
Sie die Taste für Dampfstoß-Funktion
erneut betätigen.
Aufdampfen von hängenden
Kleidungsstücken
0 Stellen Sie den Temperaturwähler
(Bild 1/N) auf Position „MAX“ und warten Sie, bis die Kontrolllampe (Bild 1/J)
erlischt.
0 Hängen Sie das betreffende Kleidungs-
stück auf einen Bügel und halten Sie
den Dampfbügler in einem Abstand
von 10 - 20 cm über den Stoff.
0 Betätigen Sie nun die Taste für Dampf-
stoß-Funktion (Bild 1/G). Warten Sie
mindestens 5 Sekunden, bevor Sie die
Taste erneut betätigen.
Achtung: Kleidung nicht am Körper
1
auffrischen. Verbrennungsgefahr!
Tropf-Stop
Der Dampfbügler ist mit einem automatischen Tropf-Stop ausgestattet. Der
Tropf-Stop unterbricht sofort die
Dampfbildung, wenn eine zu niedrige
Temperatur gewählt wurde.
7

822 949 340 DB_1100.book Seite 8 Montag, 28. April 2008 11:51 11
d
Aufbewahrung
Netzstecker ziehen!
Den Temperaturwähler (Bild 1/N) auf
die Position „Kalt“ (Bild 2/a) und den
Dampfwähler (Bild 1/F) auf Position
„“ stellen (Bild 4/A).
Restwasser entleeren (Bild 7).
Das Gerät senkrecht stehend aufbewahren.
Zur sachgerechten Aufbewahrung
wickeln Sie das Netzkabel um die
Kabelaufwicklung (Bilder 1/M und 8).
Wartung und Pflege
Der Dampfbügler ist mit einer automatischen Entkalkungs-Einrichtung ausgestattet, durch die die Verkalkung der
Dampfkammer wesentlich verlangsamt wird.
Der Dampfbügler darf nicht entkalkt
1
werden! Es dürfen weder Essig noch
handelsübliche Entkalker in den
Wassertank eingefüllt werden!
Reinigung
Wir empfehlen, den Dampfbügler mindestens einmal monatlich zu reinigen.
0 Netzstecker ziehen.
0 Dampfwähler (Bild 1/F) auf Position
„“ stellen (Bild 4/A).
0 Befüllen Sie den Wassertank (Bild 1/O)
bis zur Markierung „MAX“ mit klarem
Wasser.
0 Stellen Sie den Temperaturwähler
(Bild 1/N) auf „MAX“.
0 Stecken Sie den Stecker in die Steck-
dose.
0 Warten Sie, bis die Kontrolllampe
(Bild 1/J) erlischt.
0 Stellen Sie den Dampfwähler (Bild 1/F)
auf die Stellung (Bild 4/C).
0 Das Gerät waagrecht über ein Wasch-
becken halten.
0 Drücken Sie den Dampfwähler (Bild
1/F) mindestens 1 Minute lang.
Wasser tritt aus den Dampfaustrittsdüsen. Nun ist Ihr Dampfbügler wieder
einsatzbereit.
Was tun, wenn...
• bei Dampfbetriebsstellung kein
„Dampf“ zu sehen ist?
– In warmer, trockener Luft (Winter-
zeit) ist eine geringere Abdampffahne normal, weil sie von der
trockenen Luft unkondensiert aufgenommen wird.
– Das Entleeren des gefüllten Wasser-
tanks kann Flusen herausspülen.
Netzstecker ziehen, gefülltes Gerät
schräg nach vorn kippen (Bild 7), so
daß das Wasser aus der Einfüllöffnung herauslaufen kann.
• Wassertropfen aus den Dampfaustritts-
öffnungen kommen?
– Dampfwähler erst dann auf eine
andere Position als
wenn die Temperatur für das Dampfbügeln erreicht ist. Falls die Temperatur für den Dampfbetrieb zu
niedrig eingestellt ist, höher stellen.
• beim Bügeln Flecken auf der Wäsche
entstehen?
– Reinigen Sie den Dampfbügler. Rei-
ben Sie die noch warme Sohle mit
Essigwasser oder einem nicht kratzenden Reinigungswasser ab.
– Beim Trockenbügeln können Flusen
in die Dampfkammern gelangen und
verschwelen. Dies kann durch austretendes Wasser zu Flecken führen.
Reinigen Sie deshalb auch das Innere
des Wasserbehälters. Füllen sie ihn
mit Wasser und schütteln sie den
Dampfbügler leicht. Gießen Sie das
Wasser danach aus.
• die Bügelsohle stumpf oder belegt ist?
– Die Bügeltemperatur war zu hoch
eingestellt.
– Wählen Sie die für die Faser geeig-
nete Bügeltemperatur (siehe Bügeltabelle).
„“ stellen,
8
822 949 340 DB_1100.book Seite 9 Montag, 28. April 2008 11:51 11
d
Entsorgung
2 Verpackungsmaterial
Die Verpackungsmaterialien sind
umweltverträglich und wiederverwertbar. Die Kunststoffteile sind gekennzeichnet, z. B. >PE<, >PS< etc. Entsorgen
Sie die Verpackungsmaterialien entsprechend ihrer Kennzeichnung bei den
kommunalen Entsorgungsstellen in den
dafür vorgesehenen Sammelbehältern.
2 Altgerät
Das Symbol W auf dem Produkt
oder seiner Verpackung weist darauf
hin, dass dieses Produkt nicht als normaler Haushaltsabfall zu behandeln ist,
sondern an einem Sammelpunkt für
das Recycling von elektrischen und
elektronischen Geräten abgegeben
werden muss. Durch Ihren Beitrag zum
korrekten Entsorgen dieses Produkts
schützen Sie die Umwelt und die Gesundheit Ihrer Mitmenschen. Umwelt
und Gesundheit werden durch falsches
Entsorgen gefährdet. Weitere Informationen über das Recycling dieses Produkts erhalten Sie von Ihrem Rathaus,
Ihrer Müllabfuhr oder dem Geschäft, in
dem Sie das Produkt gekauft haben.
Im Service-Fall
Bei einer evtl. erforderlichen Reparatur,
einschließlich Ersatz der Netzzuleitung,
wenden Sie sich bitte zunächst telefo-
nisch an unsere Serviceline AEGElectrolux.
Für Deutschland: 01805-30 60 80*:
*aus dem Festnetz der Deutschen Telekom Euro 0,14/Min.
Für Österreich:
Für Reparaturservice: 0810-955 400 *
Für Produktservice: 0810-955 200*
*aus dem Festnetz der TELEKOM AUSTRIA Euro 0,10/Min
9

822 949 340 DB_1100.book Seite 10 Montag, 28. April 2008 11:51 11
g
Ironing table - Recommendations for use
Fabric
Synthetics
Polyacrilic
Polyamide
Polyester
Cellulose
Natural fibres
Silk
Woollens
Temperature
Selector
Steam
Selector
Steam off
„“
Steam off
„“
Steam off
„“
Steam on
g
Comments
Acrylan, Dralon, Lycra, Orlon, Vonnel
Enkalon, Grilon, Nylon, Perlon
Rilsan
Dacron, Diolen, Kodel, Trevira, Vestan
Cellulose fibres, acetate, cupro,
viscose such as: Cuprama, Colvera,
Phyron, Rayon, Tricell
Silk, wool and synthetic fibres can
be dry-ironed by covering with a
damp cloth and ironing over the
cloth
Steam ironing can be used in the low
to medium setting of the steam selector .
Cotton
Linen
Setting when
-not in use
For mixed fibres we recommend ironing at the lower temperature (that of the more sensitive fibre),
e.g., polyester-cotton at the polyester setting.
Varied ironing speeds and fabric dampness can mean that the optimal setting can differ from that
recommended in the table!
= Cold
Steam on
Steam on
Steam off
„“
Constant steam possible from •••
position
Super steam jet from ••• position for
stubborn creases
Remove plug
10

822 949 340 DB_1100.book Seite 11 Montag, 28. April 2008 11:51 11
g
Dear customer
g
Please read these operating instructions carefully. Above all please
observe the safety instructions on
the initial pages of these operating
instructions! Please keep these operating instructions for future reference.
Pass them on to any subsequent owner
of the appliance.
Features (Figure 1)
A Rating plate
B Stainless steel soleplate
C Steam exit holes
D Spray nozzle
E Filling aperture
F Steam selector
G Jet button
H Spray function button
J Power indicator
K Mains cord
L Heel
M Cord storage
N Temperature selector
O Transparent water reservoir
P Measuring beaker
Temperature Selector (Figure 2)
a “Cold” setting
b Synthetics
c Silk/wool
d Cotton/linen
1 Safety Instructions
• The appliance may only be operated
using the voltage and current rating
indicated on the rating plate (Figure 1/A).
• The appliance should only be plugged
into a socket installed according to
regulations.
• This appliance is not intended for use
by persons (including children) with
reduced physical, sensory or mental
capabilities or lack of experience and
knowledge unless they have been given
initial supervision or instruction concerning use of the appliance by a person responsible for their safety.
• Caution! When in use, the soleplate
and cover of the steam iron reach high
operating temperatures!
• Do not leave the appliance alone when
switched on. Even when leaving the
room for a short period remove the
plug. Keep children away from the
appliance.
• Children should be supervised to ensure
that they do not play with the appliance.
When steam ironing, steam is emitted
1
from the holes in the soleplate – risk
of burns!
• Always remove the mains plug before
cleaning the steam iron, filling with
water or emptying.
• The iron must not be left unattended
while it is connected to the supply
mains.
• Never immerse the steam iron in water!
• Always stand the steam iron on its
heel. When placing the iron on its
stand, ensure that the surface on
which the stand is placed is stable.
• The iron must be used and rested on a
stable surface.
• Do not twist or bend the mains cord or
wrap it round the steam iron while it is
still hot. Only store the appliance once
it is cool and after emptying any
remaining water.
• The iron is not to be used if it has been
dropped, if there are visible signs of
damage or if it is leaking.
11

822 949 340 DB_1100.book Seite 12 Montag, 28. April 2008 11:51 11
g
• Please check the mains cord from time
to time for damage! Special tools are
required to repair a damaged mains
cord. If the supply cord is damaged, it
must be replaced by the manufacturer,
its service agent or similarly qualified
persons in order to avoid a hazard.
Repairs to this appliance may only be
carried out by qualified service engineers. Considerable danger may result
from improper repairs. If repairs
become necessary, please contact the
Customer Care Department or your
authorised dealer.
Technical Data
Power consumption: 1600 - 2000 W
Mains voltage: 220 - 240 V
This appliance conforms with the fol-
;
lowing EC Directives:
• Low Voltage Directive 2006/95/EC
• EMC Directive 89/336/EEC with
amendments 92/31/EEC and
93/68/EEC
Using for the First Time
Setting the Temperature
(Figure 2)
Please note the internationally applicable care symbols on garment labels.
On good quality garments they indicate the correct ironing temperatures.
The ironing table indicates which temperature is most appropriate for a particular type of fabric. We recommend
sorting the washing first. Start with
materials that require low temperature
ironing (e.g. PERLON). Follow on by
ironing materials that require progressively higher temperatures. In this way
you avoid damaging sensitive fabrics
by using too high a temperature. When
switched on, the power indicator lamp
lights up (Figure 1/J); it goes out when
the temperature set has been reached.
However, if the temperature selector
(Figure 1/N) is turned back, please note
that it takes a while for the soleplate
to cool down. Only when the power
indicator light comes on again has the
soleplate reached the cooler temperature.
Dry Ironing
0 Set the steam selector (Figure 1/F) to
position
0 Turn the temperature selector
(Figure 1/N) to the desired temperature.
„“ (Figure 4/A).
Steam Ironing
Filling the Steam Iron (Figure 3)
The water reservoir should only be
filled when the plug has been removed
from the socket.
0 Set the steam selector to position
„“= dry iron (Figure 4/A) and hold
the appliance upright.
0 Fill the water reservoir at most to the
“MAX” mark. To do this, you can use
the measuring beaker supplied
(Figure 1/P).
Water Quality
You can use tap water up to 3 mmol/I
17° dH water hardness level. Your local
Water Authority can advise you on the
hardness of the water in your area. If
the water from your tap is harder than
the above, please use distilled water
available from a chemist or a 50:50
mixture of tap water and distilled
water.
When using for the first time,
please note:
0 Fill the reservoir with water; set the
steam selector (Figure 1/F) to maximum position (Figure 4/B).
0 Heat the appliance and place it with
the soleplate facing downwards on an
iron rest or plate (Figure 5) to allow the
water to steam through and activate
the steam chamber.
12

822 949 340 DB_1100.book Seite 13 Montag, 28. April 2008 11:51 11
g
You will obtain optimal steaming
3
results and the noise produced by the
steaming will be steadier after the
water reservoir has been filled and
drained three times.
Ironing with Steam
To steam iron, set the temperature
selector (Figure 1/N) to the required
fabric type and wait until the power
indicator (Figure 1/J) goes out - only
then set the steam selector (Figure 1/F)
to the desired position (Figure 4/B). You
will find which temperature setting
(fabric type) matches which steam setting in the ironing table. As soon as the
steam iron is held horizontally steam
begins to form. When the steam iron is
set upright again the steam supply
stops automatically.
Spray Function (Figure 6/A)
The first time you use the appliance,
or if you have not used it for a long
time, you will need to press the spray
function button (Figure 1/H) several
times before water comes out of the
spray nozzle (Figure 1/D). You can also
use the spray function when dry ironing.
Super Steam Jet Function
(Figure 6/B)
The super steam jet function is of
valuable assistance when ironing, for
example, creases, embroidery etc. You
can trigger the additional steam jet
both when steam ironing and when dry
ironing.
0 Set the temperature selector
(Figure 1/N) to the “MAX” position and
wait until the correct temperature has
been reached, i.e., until the power indicator (Figure 1/J) goes out.
0 Raise the steam iron a little away from
the material and press the steam jet
button (Figure 1/G).
Always wait another 5 seconds before
pressing the steam jet button again.
Steaming hanging items of
clothing
0 Turn the temperature selector
(Figure 1/N) to the “MAX” position
and wait until the power indicator
(Figure 1/J) goes out.
0 Hang the article concerned on a
hanger and hold the steam iron at
a distance of 10 – 20 cm from the
material.
0 Now press the steam jet button
(Figure 1/G). Wait at least 5 seconds
before pressing the button again.
Warning: Do not attempt to freshen
1
up clothing whilst it is still being worn.
Risk of burning!
Drip Stop
The steam iron has an automatic drip
stop function. The drip stop immediately interrupts the creation of steam
if the temperature selected is too low.
Storage
Remove the plug from the socket!
Set the temperature selector
(Figure 1/N) to the “Cold” position
(Figure 2/a) and the steam selector
(Figure 1/F) to position
„“4/A).
Empty out remaining water (Figure 7).
Store the appliance standing upright.
To store properly wrap the mains cord
around the cord storage (Figures 1/M
and 8).
„“ (Figure
Care and Maintenance
The steam iron has an automatic decalcification feature, which significant
slows down the deposit of limescale in
the steam chamber.
The steam iron must not be des-
1
caled! Neither vinegar nor proprietary brands of descaler must be
filled into the water reservoir!
13

822 949 340 DB_1100.book Seite 14 Montag, 28. April 2008 11:51 11
g
Cleaning
As a precaution we recommend cleaning every three months.
0 Unplug from the mains.
0 Set the steam selector (Figure 1/F) to
position
0 Fill the water reservoir (Figure 1/O)
with clear water to the “MAX” mark.
0 Set the temperature selector
(Figure 1/N) to “MAX”.
0 Insert the plug into the socket.
0 Wait until the power indicator
(Figure 1/J) goes out.
0 Set the steam selector (Figure 1/F) to
position (Figure 4/C).
0 Place the appliance horizontally over a
sink.
0 Press the steam selector (Figure 1/F) for
at least 1 minute.
Water is flowing out of the steam exit
holes. Your steam iron is now ready for
use again.
„“ (Figure 4/A).
What to do, if ...
• no “steam” appears when using on a
steam setting?
– In warm, dry air (during the winter),
reduced amounts of vapour are normal because it is absorbed by the dry
air before condensing.
– Emptying the filled water reservoir
can wash out fluff. Remove the
mains cord and tip the filled appliance forwards at an angle (Figure 7)
so that the water can run out of the
filling aperture.
• drops of water are coming out of the
steam exit holes?
– Do not set the steam selector to
another position than
temperature for steam ironing has
been reached. If the temperature has
been set too low for steam ironing
increase the setting.
• stains appear on the washing while
ironing?
– Clean the steam iron. Rub the sole-
plate while still warm with a mixture
„“ until the
of water and vinegar or with a nonabrasive cleaning agent.
– When dry ironing fluff can enter the
steam chambers and carbonise. This
can lead to stains as the water
passes through. Therefore also clean
the inside of the water reservoir. Fill
it with water and gently shake the
steam iron. Then pour the water out.
• the soleplate is rough or furred?
– The iron temperature was set too
high.
– Select the correct ironing tempera-
ture for the fabric (see ironing
table).
Disposal
Packaging material
2
The packaging materials are environmentally friendly and can be recycled.
The plastic components are identified
by markings, e.g. >PE<, >PS<, etc.
Please dispose of the packaging materials in the appropriate container at
the community waste disposal facilities.
Old appliance
2
The symbol
its packaging indicates that this product may not be treated as household
waste. Instead it shall be handed over
to the applicable collection point for
the recycling of electrical and electronic equipment. By ensuring this
product is disposed of correctly, you
will help prevent potential negative
consequences for the environment and
human health, which could otherwise
be caused by inappropriate waste handling of this product. For more detailed
information about recycling of this
product, please contact your local city
office, your household waste disposal
service or the shop where you purchased the product.
W on the product or on
14

822 949 340 DB_1100.book Seite 15 Montag, 28. April 2008 11:51 11
f
Tableau de repassage - indications d'utilisation
Tissu
Fibres synthétiques
Polyacryle
Polyamide Enkalon, Grilon, Nylon, Perlon, Rilsan
Polyester
Cellulose
Fibres naturelles
Soie
Laine
Sélecteur de température
Sélecteur
de vapeur
Sans
vapeur
«»
Sans
vapeur
«»
Sans
vapeur
«»
Avec
vapeur
Remarques
Acrylan, Dralon, Leacryl, Orlon, Vonnel
Dacron, Diolen, Kodel, Trevira, Vestan
Fibres cellulosiques, acétate, Cupro,
viscose, p. ex.: Cuprama, Colvera, Phyron, Reyon, Tricell
La soie, la laine et les fibres synthétiques peuvent être repassées à sec
avec un chiffon humide
Repassage à la vapeur possible avec
réglage bas à moyen du sélecteur de
vapeur
f
Coton
Lin
Position de
rangement
Pour les textiles mélangés, on recommande de repasser à la température inférieure (correspondant
aux fibres les plus sensibles), p. ex. polyester-coton sur position polyester.
En raison des différentes vitesses de repassage, de l'humidité restante du textile, etc., le réglage
optimal peut s'écarter de la recommandation donnée dans le tableau!
= Froid
Avec
vapeur
Avec
vapeur
Sans
vapeur
«»
Vapeur en permanence possible à partir de la position •••
Super jet de vapeur à partir de la
position ••• pour les plis tenaces
Débrancher la fiche secteur
15
 Loading...