

1 2 3
f
c
Operating Instructions
56326 03.10
Extractor Hood
DASL55
DASL60
DASL82
DASL90
2 electrolux
Dear customer
Please read through these operating instructions carefully. You should pay particular
attention to the „Safety Instructions“ section.
Please keep these operating instructions in
a safe place for your reference, and pass
them on to any subsequent owner of the
appliance.
These operating instructions include hints to
help you correct any faults that may occur;
see the section headed „Remedial measures
in the event of a fault“.
Should these hints not be enough you have
two points of contact at all times, where someone will be happy to help you:
nstructions that are important for your
safety or for the operability of the
appliance are highlighted by means
of the warning triangle, and/or the
keywords „Caution!“ or „Beware!“.
These instructions must be followed
under all circumstances.
1. These numbers take you step by step
through the operating sequence for this
appliance.
2. . . .
3. . . .
After this symbol you will find additional information relating to the operation and practical application of the
appliance.
This symbol denotes tips and hints
relating to the economical and ecofriendly use of the appliance.
• Your local After Sales centre (see „After
Sales“ section) or the
Service-Helpline
0848 848 111
There you will get an answer to any question relating to the equipment and use of
your appliance. We will of course also be
happy to hear any wishes, suggestions or
criticisms that you may have. Our aim is
to continue improving our products and
services for the benefit of our customers.
• In the case of technical problems, our
After Sales service is at your disposal at
all times (addresses and phone numbers
can be found in the „After Sales“ section.).
In that context, please also note the „Service“ section.

electrolux 3
Contents
Safety instructions . . . . . . . . . . . . . . . . . . . . . . . . . . . . . . . . . . . . . . . . . . . . . . . . . . . . . . . 4
Electrical safety. . . . . . . . . . . . . . . . . . . . . . . . . . . . . . . . . . . . . . . . . . . . . . . . . . . . . . 4
Safety . . . . . . . . . . . . . . . . . . . . . . . . . . . . . . . . . . . . . . . . . . . . . . . . . . . . . . . . . . . . . 4
Safety during use . . . . . . . . . . . . . . . . . . . . . . . . . . . . . . . . . . . . . . . . . . . . . . . . . . . . 4
Safety when cleaning . . . . . . . . . . . . . . . . . . . . . . . . . . . . . . . . . . . . . . . . . . . . . . . . . 4
Disposal . . . . . . . . . . . . . . . . . . . . . . . . . . . . . . . . . . . . . . . . . . . . . . . . . . . . . . . . . . . . . .5
Appliance description . . . . . . . . . . . . . . . . . . . . . . . . . . . . . . . . . . . . . . . . . . . . . . . . . . . . 6
Extractor hood equipment . . . . . . . . . . . . . . . . . . . . . . . . . . . . . . . . . . . . . . . . . . . . .6
Control panel . . . . . . . . . . . . . . . . . . . . . . . . . . . . . . . . . . . . . . . . . . . . . . . . . . . . . . . 6
Grease and activated carbon filter monitor function. . . . . . . . . . . . . . . . . . . . . . . . . . .7
Items supplied . . . . . . . . . . . . . . . . . . . . . . . . . . . . . . . . . . . . . . . . . . . . . . . . . . . . . . 7
Before using for the first time . . . . . . . . . . . . . . . . . . . . . . . . . . . . . . . . . . . . . . . . . . . . . . . 7
Special accessories . . . . . . . . . . . . . . . . . . . . . . . . . . . . . . . . . . . . . . . . . . . . . . . . . .7
Extractor hood controls . . . . . . . . . . . . . . . . . . . . . . . . . . . . . . . . . . . . . . . . . . . . . . . . . . . 8
Switching the appliance on / off . . . . . . . . . . . . . . . . . . . . . . . . . . . . . . . . . . . . . . . . . 8
Switching on / off by means of the extending hood. . . . . . . . . . . . . . . . . . . . . . . . . . . 8
Intensive speed. . . . . . . . . . . . . . . . . . . . . . . . . . . . . . . . . . . . . . . . . . . . . . . . . . . . . . 8
Automatic overrun timer . . . . . . . . . . . . . . . . . . . . . . . . . . . . . . . . . . . . . . . . . . . . . . .9
Switching the light on / off. . . . . . . . . . . . . . . . . . . . . . . . . . . . . . . . . . . . . . . . . . . . . . 9
Grease filter monitor function . . . . . . . . . . . . . . . . . . . . . . . . . . . . . . . . . . . . . . . . . . 10
Activated carbon filter monitor function . . . . . . . . . . . . . . . . . . . . . . . . . . . . . . . . . . . 10
Cleaning and Maintenance . . . . . . . . . . . . . . . . . . . . . . . . . . . . . . . . . . . . . . . . . . . . . . .11
External cleaning . . . . . . . . . . . . . . . . . . . . . . . . . . . . . . . . . . . . . . . . . . . . . . . . . . . 11
Cleaning the metal filters. . . . . . . . . . . . . . . . . . . . . . . . . . . . . . . . . . . . . . . . . . . . . . 11
Cleaning the filter space . . . . . . . . . . . . . . . . . . . . . . . . . . . . . . . . . . . . . . . . . . . . . .12
Regenerating the activated carbon filter . . . . . . . . . . . . . . . . . . . . . . . . . . . . . . . . . .12
Replacing the halogen bulbs . . . . . . . . . . . . . . . . . . . . . . . . . . . . . . . . . . . . . . . . . . . . . .14
Remedial action in the event of faults. . . . . . . . . . . . . . . . . . . . . . . . . . . . . . . . . . . . . . . . 15
Installation Instructions . . . . . . . . . . . . . . . . . . . . . . . . . . . . . . . . . . . . . . . . . . . . . . . . . .16
Safety instructions . . . . . . . . . . . . . . . . . . . . . . . . . . . . . . . . . . . . . . . . . . . . . . . . . .16
Installation for exhaust extraction . . . . . . . . . . . . . . . . . . . . . . . . . . . . . . . . . . . . . . .16
Electrical connections / power lead. . . . . . . . . . . . . . . . . . . . . . . . . . . . . . . . . . . . . . 18
Technical data . . . . . . . . . . . . . . . . . . . . . . . . . . . . . . . . . . . . . . . . . . . . . . . . . . . . . . . . .18
Directives . . . . . . . . . . . . . . . . . . . . . . . . . . . . . . . . . . . . . . . . . . . . . . . . . . . . . . . . .18
Service . . . . . . . . . . . . . . . . . . . . . . . . . . . . . . . . . . . . . . . . . . . . . . . . . . . . . . . . . . . . . . 19
Before you call for After Sales . . . . . . . . . . . . . . . . . . . . . . . . . . . . . . . . . . . . . . . . . . 19
When you call on the services of After Sales . . . . . . . . . . . . . . . . . . . . . . . . . . . . . . . 19
After Sales. . . . . . . . . . . . . . . . . . . . . . . . . . . . . . . . . . . . . . . . . . . . . . . . . . . . . . . . . . . . 20
Service Centres . . . . . . . . . . . . . . . . . . . . . . . . . . . . . . . . . . . . . . . . . . . . . . . . . . . .20
Spare parts sales . . . . . . . . . . . . . . . . . . . . . . . . . . . . . . . . . . . . . . . . . . . . . . . . . . . 20
Technical advice / Sales . . . . . . . . . . . . . . . . . . . . . . . . . . . . . . . . . . . . . . . . . . . . . . 20
Warranty. . . . . . . . . . . . . . . . . . . . . . . . . . . . . . . . . . . . . . . . . . . . . . . . . . . . . . . . . . 20

4 electrolux
Safety instructions
The safety of this appliance complies
with the generally recognised codes
of practice and the applicable safety
regulations. Despite that we consider
it necessary to familiarise you with the
following safety instructions.
physical, sensory or mental, capabilities, or lacking experience and/or lacking
knowledge, unless they are supervised by
a person responsible for their safety, or
have been instructed by him/her in how
the appliance is to be used.
Electrical safety
• Check the extractor hood for any dama-
ge in transit. Do not under any circumstances connect a damaged appliance
to the power supply. Please contact your
supplier if there is any damage.
• Never operate the extractor hood if the
mains cable or the controls are damaged.
• The extractor hood must be correctly in-
stalled and connected. You will find everything that is necessary in that respect in
the installation instructions.
• Before using the appliance for the first
time you must ensure that the voltage
and type of electricity supply specified on
the appliance nameplate match those at
the installation location.
• Repairs are to be carried out exclusively
by one of our After Sales Centres. Furthermore, only genuine spare parts are to
be used.
• It is not permissible for safety reasons to
carry out any adaptations or modifications to the extractor hood.
• In the event of a fault, switch off the ap-
pliance and pull the plug out of the mains
socket.
• Never pull on the cable to pull the plug
out of the mains socket, but on the plug
itself.
Safety
• Packaging components (e.g. plastic film,
expanded polystyrene) can be dangerous
for children. Danger of suffocation!
• Keep all packaging components away
from children.
• Children should be supervised to ensure
that they do not play with the appliance.
• This appliance is not intended for use by
persons (including children) with limited
Safety during use
Caution! Parts of the extractor hood may
get hot during operation with cooking
equipment.
• Use the extractor hood for the ventilation
of the hob area only. If the appliance is
used incorrectly or for any purpose other
than the one intended, the manufacturer
can accept no liability for any damage or
loss.
• It is forbidden to flambé below the hood,
whether switched off or on (risk of fire).
• Never operate the extractor hood without
the grease filter when cooking.
• Should the appliance be relocated at a
later date, the precise installation instructions can be ordered by telephone from
our After Sales department.
• Should you sell or pass on the appliance
to any third party, please ensure that the
appliance is handed over complete with
these operating instruction so that the
new owner can find out how the appliance
functions.
• If the extractor hood is left unattended for
any length of time, such as in the holidays,
please ensure that the appliance is switched off.
Safety when cleaning
• Clean the grease filter at regular intervals;
excessive contamination can lead to a risk
of fire.
• Maintain and clean the extractor hood regularly in order to avoid expensive service
visits.
• Follow the „Cleaning and Maintenance“
section when doing so.
• For safety reasons it is not permissible to
clean the appliance with a steam-jet or
high-pressure cleaner.
Disposal
Packaging materials
The packaging materials are eco-friendly and recyclable. The plastic components are labelled, e.g. ‚PE‘, ‚PS‘, etc.
Dispose of the packaging materials according to their labelling in the containers provided for that purpose at local
authority waste disposal sites.
Old appliances
electrolux 5
The symbol
packaging indicates that this product is
not to be treated as normal household
waste but must be handed in at a collection point for the recycling of electrical
and electronic appliances. By means of
your contribution to the correct disposal of this product, you are protecting
the environment and the health of your
fellow human beings. Incorrect disposal
endangers health and the environment.
More information about the recycling of
this product can be obtained from your
refuse collection service or from the
shop where you bought the product.
Where to get rid of old appliances?
Wherever new appliances are sold, or
handover at the official SENS collection
points or official SENS recyclers. The list
of official SENS collection points can be
found at www.sens.ch.
Warning: Make the obsolete appliance
unusable before disposal, so that it can
no longer represent a hazard. Disconnect the appliance from the mains power supply and remove the mains cable
from the appliance.
on the product or on its
6 electrolux
Appliance description
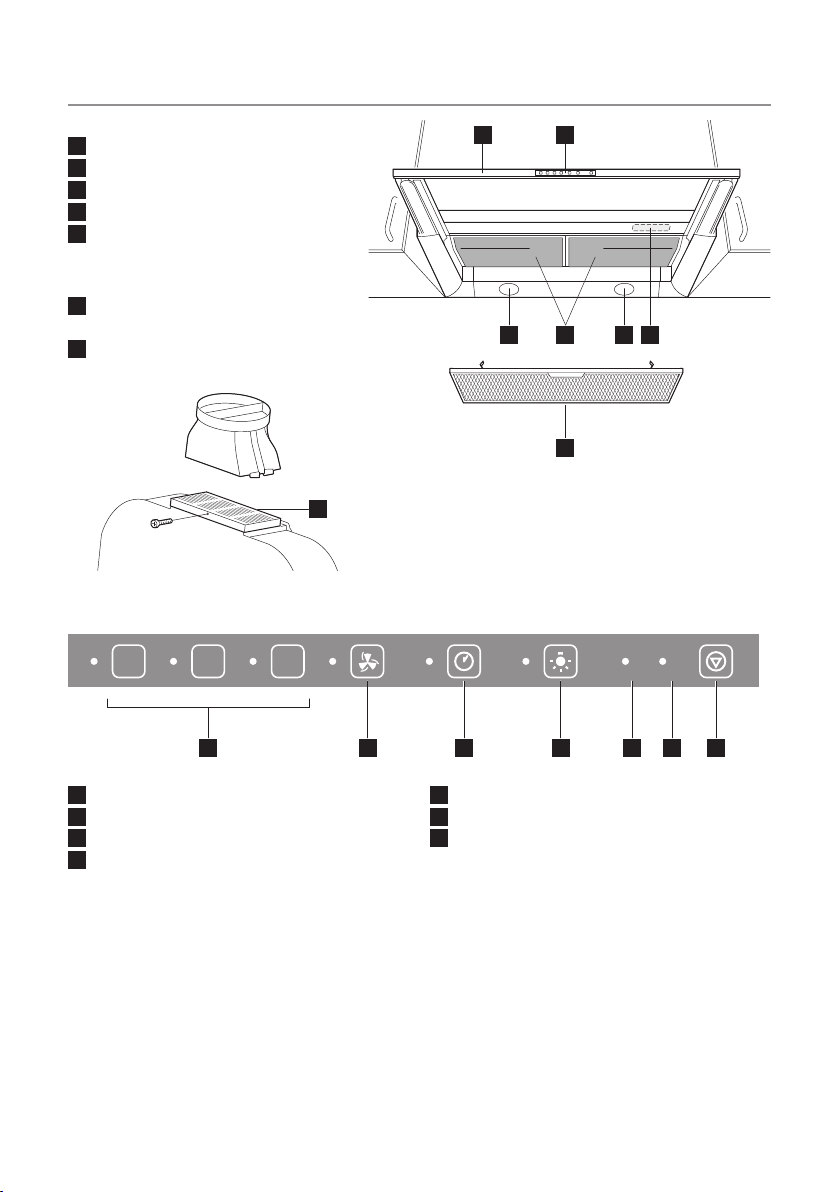
Extractor hood equipment
1 Extending hood
2 Control panel
3 Light
4 Metal filter
5 Appliance nameplate
Special accessories
6 Regeneratable long-life filter
AKF LL45-14
7 Safety grille DA-SG
21
3 4 3 5
6
7
Control panel
For special installations in open-plan kitchens the backflow flap can be removed
with a tool and the safety grille ( 7 ) can be
inserted.
1 2 3
1 2 3 4 5 6 7
1 Speed selector buttons
2 Intensive speed button
3 Automatic overrun button
4 Light button
The extractor hood can be installed for two different modes of operation:
Recirculating version
If for structural reasons it is not possible to
install an exhaust duct, the extractor hood
can be equipped with an additional activated
charcoal filter, in which bacteria and odours
are trapped. The cleaned air then flows back
into the kitchen area.
5 Grease filter reminder
6 Activated charcoal filter reminder
7 Function button
Exhaust extractor version
The vapours occurring above the cooker
hob are cleaned by the grease filter and taken via the exhaust duct into the open air.
c
f

electrolux 7
Grease and activated carbon filter monitor function
The extractor hood has a monitor function
for the grease filters and the activated carbon filter.
• After 40 hours of operation, indicator light
f reminds the user that the grease filters
are due for cleaning.
• If an activated carbon filter is fitted for
recirculating mode, indicator light C re-
Items supplied
1
2
3
minds the user when switching off after
120 hours of operation that the activated
carbon filter must be regenerated or replaced. This monitor function has to be
activated when the appliance is first commissioned.
For efficient and safe operation of the
extractor hood when subjected to intensive usage, it is necessary to clean
or regenerate the filters at shorter time
intervals.
4
5
D
I
F
6
1 Reducer 150/125
2 Connector with odour-proof
backflow flap
3 Extractor hood
4 Grease filters (2x)
5 Instruction and installation
manual (D,F,I)
6 Mounting materials
Before using for the first time
Special accessories
Regeneratable activated carbon filter:
The activated carbon filter must be regenerated before using the appliance for the first
time, as every activated carbon filter absorbs moisture. The moisture must be extracted.
Regeneration of the activated carbon filter:
Lay the filter cassette flat on the oven shelf in
the middle of your oven and heat it up for an
hour at 230 °C. Then allow the filter to cool
down completely for two hours. If the filter is
inserted to soon the extractor hood may be
damaged as a result of the residual heat of
the carbon. The regeneration process may
result in a normal discoloration of the filter.
The filter can then be placed in the extractor
hood again. Your appliance is now ready for
use.

8 electrolux
Extractor hood controls
Always switch the extractor hood on before starting cooking.
Switching the appliance on / off
• Pull out the extending hood.
Switching on / off by means of the extending hood
Pull out the extending hood. The most re-
• Press the button for the required speed.
cently use speed is automatically switched
on. Push in the extending hood as far as it
When a speed button is pressed the fan is
will go. The appliance is switched off
switched on and the associated LED lights
up. The fan speed is switched off by pressing the button again.
On / Off
1 2 3
Fan speeds
Fan speed Types of cooking
1 low keeping food warm
2 medium poaching, simmering below boiling point
3 high stewing, steaming, brazing, boiling
Intensive speed
In the case of large volumes of fumes or
steam, such as are created when searing
meat or boiling water, the intensive speed
intended especially for that purpose can be
activated.
Speed Types of cooking
INTENSIVE very high parboiling, searing, deep-frying
1. Switch on the appliance
2. Press the Intensive button

3
Intensive speed
3
Intensive speed
Automatic overrun timer
The intensive speed runs for five minutes,
then the fan is automatically reset to the
most recently selected speed (speeds 1-3),
provided that a speed has been preselected.
electrolux 9
To switch off the intensive speed prematurely:
• Press the intensive speed button again
while the fan is running.
The fan is automatically reset to the most
recently selected speed (speeds 1-3), provided that a speed has been selected.
Automatic overrun timer
The automatic overrun button ensures a
pleasant atmosphere in the room after the
cooking is finished.
At the end of the cooking process:
• Press the automatic overrun button.
The red indicator light comes on.
The automatic overrun timer switches
the fan off after five minutes, as well as
the light if it is switched on.
To switch the automatic overrun timer off
early:
3
Intensive speed
Automatic overrun timer
• Press the automatic overrun button
again while the fan is running.
The fan continues to run at the selected
speed.
Switching the light on / off
The light can be switched on and off by means of the light button, even when the extending hood is completely pushed in.
Light
c
f

10 electrolux
3
f
c
Intensive speed
Automatic overrun timer
Light
3
f
c
f
c
Intensive speed
Automatic overrun timer
Light
Grease filter
Function button
The monitoring functions can only be
set when the ventilation is switched off
and the glass extension cover is not
pulled out.
Grease filter monitor function
The monitor function for the grease filter is
enabled by default. After 40 hours of operation, indicator light f is continuously illuminated when the hood is extended. It is time to
clean the filter when indicator light f comes
on, if not sooner.
When the filters have been cleaned, press
the function button for 3 seconds until indicator light f goes out (the timer is reset, or
enabled if switched off).
Activated carbon filter monitor function
In recirculating mode and when an activated
carbon filter is fitted, it is advisable to enable
the monitor function for the activated carbon
filter. To enable this function, press and hold
button 2 for 10 seconds, until indicator light
C comes on.
After 120 hours of operation, indicator light
C is continuously illuminated when the hood
is extended. The activated carbon filter must
be regenerated after 120 hours. After the
activated carbon filter has been reinserted,
press the function button for 3 seconds until
indicator light C goes out (the timer is reset).
Function button
c
f
Grease filter
Function button
c
f
Activated charcoal filter
Displaying the Monitoring Functions
Pressing the function key makes the LEDs
for counters f and C light up, when they are
active.

Cleaning and Maintenance
Beware! Do not use any abrasive cleaners, brushes, sponges or scouring
powder.
Caution! The pull-out component
should not be removed!
External cleaning
The external components are to be cleaned
with a microfibre cloth.
When cleaning the exterior, ensure that
the cloth is worked in line with the texture of the stainless steel surface finish
(the fine horizontal lines).
No circular motions!
Cleaning the metal filters
The fan is running!
Caution: Non-adherence to these
cleaning instructions may result in
a risk of fire!
electrolux 11
Removing the metal filters
1. Push the metal filters up at the rear
and pull them out to the front.
3
Cleaning the metal filters
2. Wash the metal filters every 2 to 4
weeks in the dishwasher, or place
them in washing-up liquid and water,
rinse them with hot water and allow
them to dry completely.
Discoloration of the filters is normal;
this has no effect on their function.

12 electrolux
Reinserting the metal filters
3. Lift up the metal filters at the rear and
slot them in place at the front.
Cleaning the filter space
Clean the filter space with a dry piece
of kitchen roll each time the metal filters
are cleaned or replaced.
The fan is running!
Caution: Do not damage or remove the
appliance nameplate.
3
Regenerating the activated carbon
filter
Handling of the activated carbon filter according to operating instructions.
Insofar as the appliance is equipped for recirculating operation.
Removing the activated carbon filter
1. Remove the metal filters.
Pull down the activated carbon filter at
the front and remove it.
5

Regeneration
Moisture and grease particles reduce
the absorbent capacity of the activated
carbon, so it must be regenerated after
2 months at the latest.
3. Lay the filter cassette flat on the oven
shelf in the middle of your oven and
heat it up for an hour at 230 °C.
4. Then allow the filter to cool down
completely for two hours.
The filter can then be placed in the extractor hood again. Your appliance is
now ready for another 2 months use.
The filter loses its effectiveness after approx. 4 years, and should then be completely replaced (it is not possible to refill
the activated carbon).
Inserting the activated carbon filter
5. Push the activated carbon filter into
the brackets in the direction of the
arrow, than fold up at the front until
the springs click in place.
6. Insert metal filters.
electrolux 13
5

14 electrolux
Replacing the halogen bulbs
The extractor hood must be disconnected from the mains supply. (Pull
out the plug or switch off the circuit
breaker.)
Caution! All the bulbs become hot; be
careful when replacing them.
Please note that energy-saving halogen bulbs rated at 230 volts up to a
maximum of 25 watts can be used for
this appliance, or especially low-energy
bulbs with a GU10 fitting, rated at 250
volts and 3 to 7 watts (e.g. IP64-rated
LEDs).
Please bear in mind that halogen bulbs
have to be specially disposed of. You
can hand these back at any appropriate
sales outlet.

electrolux 15
Remedial action in the event of faults
Check whether you can correct any minor faults on the appliance yourself, by means of the
following instructions. If this information is of no help in your specific case, please contact
After Sales.
Fault Cause Solution
•The extractor hood will
not work at all.
•The fan motor will not
run.
•No light •Bulb blown. •Replace bulb.
•The appliance does not
„extract“ well.
•Smoke when hood is in
operation.
•Formation of grease
droplets
•Filter becomes clogged
with grease
•Hood becomes extremely dirty
•Grease and deposits on
furnishings
•Excessive contamination
behind the filters and in
the exhaust ducts.
•Condensation on the
extending hood.
•Inadequate extraction
power in exhaust
mode.
•No mains power supply. •Check whether the fuse/
circuit breaker is OK.
•Check whether the mains
cable is correctly plugged
in.
•Extending hood not pulled
out.
•Very airtight doors and windows, resulting in negative
pressure.
•Negative pressure •Install a valve for exter-
•Hood switched on too late.
•Boiling water without
switching on the extractor
hood.
•Operation at a too low fan
speed.
•There is excessively low negative pressure in the room.
•Excessively high air speed.
•There is excessively low
negative pressure in the
room.
High air resistance as a result
of:
•exhaust duct diameter too
small.
•exhaust duct badly routed.
•Pull out the extending
hood.
•Open doors and windows,
but not in the immediate
vicinity of the cooker. Ensure that there is adequate
ventilation.
nal ventilation, or open a
window.
•Switch on the extractor
hood in good time.
•Select a higher speed.
•Enable ventilation, open
ventilation valve or doors/
windows.
•Run the extractor hood at
a lower speed.
•Enable ventilation.
•Use 150 mm diameter
exhaust duct.
•Re-route exhaust duct
more effectively.
Caution! Damaged appliances must not be used. Switch off circuit breakers or unscrew fuses in the event of a fault or malfunction.
Caution! Do not attempt to mend the appliance. Any work incorrectly carried out may
lead to material damage and personal injury.
If you are not able to correct any faults or malfunctions by means of these tips, please contact After Sales.

16 electrolux
Installation Instructions
Safety instructions
Caution! The minimum safety gap bet-
ween the hob and the extractor hood
must be 50 cm in the case of electric
hobs, and 70 cm in the case of gas
hobs.
The appliance must be disconnected from the mains supply when being
serviced; pull out the mains plug. The
general directives for the operation of
electrical appliances, the regulations of
the responsible electricity supply companies and provisions of these installation instructions are to be followed to the
letter.
The incorrect installation of an extractor
hood may lead to a fire. The canton fire
brigade regulations are also to be observed.
Installation for exhaust extraction
The vapours occurring above the hob are
cleaned in the grease filters and led via an
exhaust duct into the open air.
150
The risk-free operation of appliances
(e.g chimney, gas cooker) and extractor hoods jointly connected to a single
flue is only guaranteed if the room and/
or apartment are ventilated from outside
by means of a suitable air inlet aperture
of approx. 500-600 sq cm, and hence
negative pressure is avoided when the
extractor hood is in operation. The negative pressure in the room must not be
greater than 4 Pa.
The extracted air has to be drawn off
through a separate pipe to the open air.
It should not be passed into a chimney.
If this principle is not observed, a drastic
loss of performance and increased operating noise are to be expected.
150
150
495
550
600
100
548
598
N 330
A 319
2050
325
138
0-50
319
max. 140
Removable
rear panel
200
49
17 ( Griff )
6/6= 762
5/6= 635
4/6= 508
5/6= 635
1502
1629

electrolux 17
Installation with herbs and spices cupboard,
height 635 mm (5/6), new, and installation
with herbs and spices cupboard, height 508
mm (4/6) with door 635 mm (5/6), replacement market.
max. 140
5/6= 635
Caution! If no back draught flap is installed it is absolutely necessary to have
an air vent of at least 200 cm2!
One option is to use the protective grid
accessory.
Use the templates and follow the instructions on them.
max. 140
4/6= 508
127
2050
325
138
0-50
319
max. 140
200
4/6= 508
49
17 ( Griff )
6/6= 762
5/6= 635
5/6= 635
1629
1502

18 electrolux
Electrical connections / power lead
Caution! The electrical connections
must be carried out by an approved installer.
Beware! The plug must be accessible
after installation.
A type 12 or type 13 mains socket is to be
provided. The connecting cable is approx.
1m in length.
When replacing the connecting cable, the
cable type must be at least H05RR-F (spare
part no. 375 0432-00/1).
Installation of an external ventilation
valve
There is the option of having an external ventilation valve or an electric window opener
installed by qualified electrician. This has the
tremendous advantage that the necessary
ventilation is automatically guaranteed at all
times.
Special accessories:
Automatic ventilation valve MK 150
Mains
connection
N NSL L
Grounding
intern
mains socket
External
ventilation valve
S=connected
Technical data
Appliance width A B
55 548 550
60 598 600
82 818 820
90 898 900
Directives
This appliance complies with the EC directives
73/23/EEC Low-voltage directive including amendment 90/683 EEC
89/336/EEC EMC directive including amendment 92/31/EEC
93/68/EEC CE marking directive
495
A
B
100
A 319
N 330

Service
The well-established Electrolux After Sales
service is available to all our customers.
Before you call for After Sales
Make sure that the problem is not one of an
operating error.
Check your extractor hood as set out in
the section „Remedial action in the event of
faults “.
When you call on the services of After Sales
• Make a note of the following details,
which are to be found on your appliance‘s
nameplate:
• Series number
• Model name
• Product number
• Please always provide these details
when:
• calling for After Sales service
• ordering spares or accessories
• making any technical enquiries
electrolux 19
The nameplate is located behind the
right-hand filter and on the warranty document.
• Make a precise note of your observations. This makes it easier for our service
engineer to prepare for and carry out the
work.
• Call the Service number 0848 848 111.
Your call will be automatically forwarded
to the nearest Service Centre.
• Please be at home when the service engineer comes, because he/she will be relying on your information and assistance,
and you will avoid the costs of a second
visit.
Product number
0,24 kW 230 V ~50Hz
+
S
SS23
Product no.:
Model
Series number
Series
DA SL 55 100
Model name

20 electrolux
After Sales
Service Centres
5506 Mägenwil/Zürich
Industriestr. 10
You can order spare parts, accessories and
care products online at:
www.electrolux.ch
9014 St. Gallen
Zürcherstrasse 204 e
4052 Basel
Birsstrasse 320 b
St. Jakob-Turm
6020 Emmenbrücke
Seetalstrasse 11
7000 Chur
Comercialstrasse 19
3018 Bern
Morgenstrasse 131
Préverenges
Le Trési 6
6916 Grancia
Zona Industriale E
Spare parts sales
5506 Mägenwil
Industriestrasse 10
Tel. 0848 / 848 023
Technical advice / Sales
8048 Zürich
Badenerstrasse 587
Tel. 044 / 405 81 11
Warranty
We provide a two-year warranty for every
product from the date of sale or delivery to
the consumer (warranty document, invoice
or sales receipt as proof of purchase).
The warranty covers the cost of materials,
labour and travel.
The warranty does not apply if the operating
instructions have not been followed, if the
appliance has been incorrectly installed or if
it has been damaged by external influences,
by force majeure, by the interventions of any
third party or the use of non-genuine parts.
Service-Helpline
0848 848 111
service@electrolux.ch
Modifications
The text, images and data represent the current technical status of the appliance at the
time that these operating instructions went to press. We retain the right to make modifications for the purpose of enhancing the product.
 Loading...