

Page 1

Cafe Classic CC 101, CC 102
Kaffeeautomaten
Coffee Machines
Cafetières
Koffiezetmachines
Caffettiere
Cafeteras automáticas
Máquina de café
Kávovary
Automata kávéfõzõk
Kahvinkeittimet
MзчбнЭт фпх кбцЭ
Gebrauchsanweisung
Operating instructions
Mode d’emploi
Gebruiksaanwijzing
Istruzioni per l’uso
Instrucciones para el uso
Instruções de utilização
Návod k použití
Használati útmutató
Käyttöohje
ПдзгЯет чсЮузт
Page 2
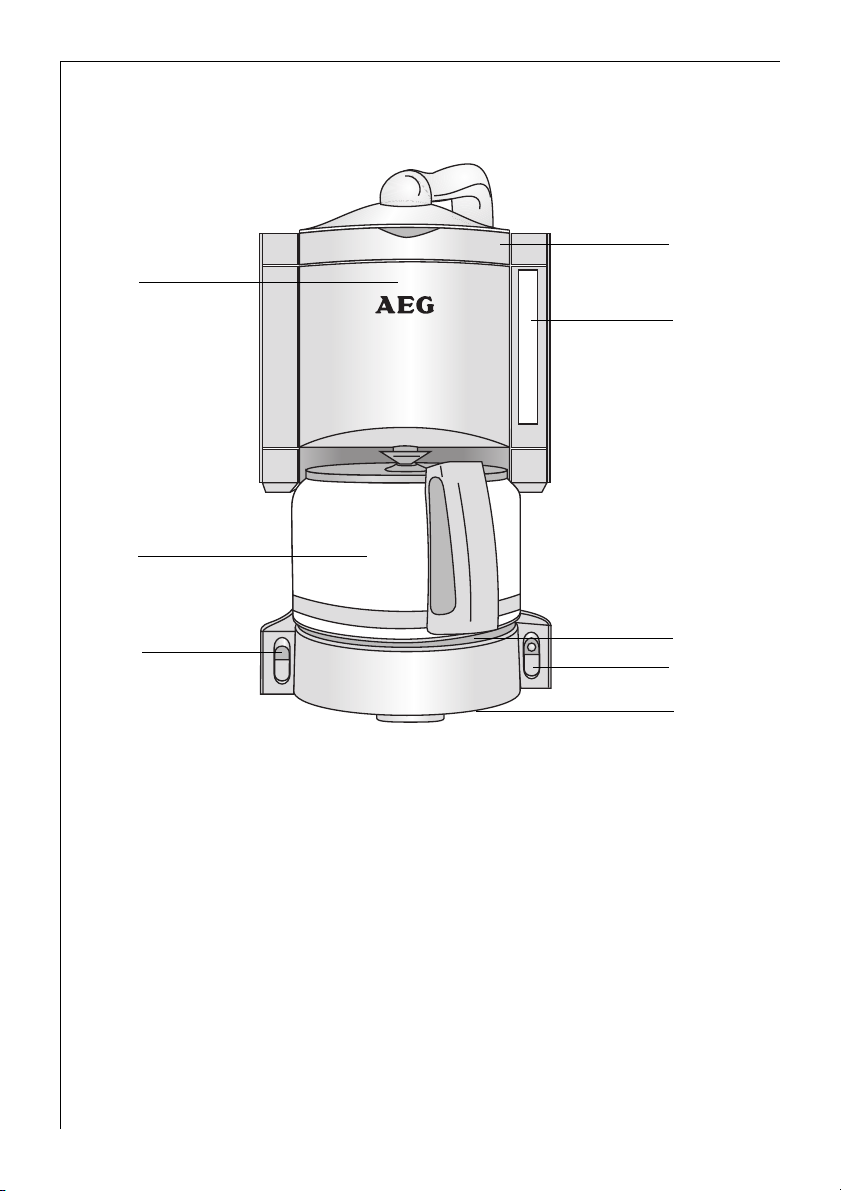
Bild 1
H
C
A
B
F
Ausstattung
A Frischwasserbehälter mit Deckel
B Frischwasseranzeige
C Kaffeekrug mit Tassenmarkierung und
Krugdeckel
D Warmhalteplatte beschichtet
E Typschild (auf Geräteunterseite)
F Aromaschalter (je nach Ausstattung)
G Ein-/Ausschalter mit Betriebsanzeige (je
nach Ausstattung mit automatischer
Abschaltung nach 2 Stunden)
H Schwenkfilter (je nach Ausstattung: Frisch-
Wasser-Filter innenliegend)
2
D
G
E
Features
A Fresh water container with lid
B Fresh water gauge
C Coffee jug with cup graduations and lid
D Coated hotplate
E Rating plate (on the underside of the
appliance)
F Aroma switch for number of cups and
strength of the coffee (depending on model)
G On/Off switch with power light (depending
on model: with automatic switch off after
2hours)
H Swivel filter (depending on model: with
fresh water filter inside)
Page 3

2
3
4
11
5
8
6
9
7
10
12
3
Page 4

g
Congratulations ...
g
... on the purchase of your new coffee
machine. You have purchased a modern, reliable appliance with which you
will certainly frequently enjoy preparing fresh, aromatic coffee.
As for all appliances, there are a number of basic points on this coffee
machine that need to be noted and
observed. Therefore, please read the
operating instructions carefully, and
retain them. Above all, please take note
of the safety instructions.
1 Safety instructions
• The appliance operating voltage and
the mains voltage must be the same!
(See the rating plate on the underside
of the coffee machine).
• Never let the mains lead touch the
hotplate when it is hot!
• Never pull the plug from the socket by
means of the mains lead!
• Do not use the appliance if:
– the mains lead is damaged,
– the housing shows visible signs of
damage.
• The hotplate, coffee jar and water
pipes become hot during operation due
to the nature of their function. Keep
children away!
• Do not fill the appliance with water
when hot! Switch off the coffee
machine and leave to cool for approx.
5 minutes!
• Follow the instructions on descaling!
• Prior to performing maintenance or
cleaning, ensure that the appliance is
switched off and unplugged from the
mains!
• Do not submerge the base unit in
water!
• If the appliance needs to be repaired,
including the replacement of the mains
cable, it must be sent to the dealer
(special tools are required) where the
coffee machine was purchased or to an
AEG Customer Service Centre (for listing see last page).
Repairs to electrical appliances may
only be performed by qualified service
engineers.
Improper repairs can give rise to significant hazards for the user.
If the appliance is used for purposes
other than those intended or used
incorrectly, no liability can be accepted
for any damage that may be caused.
This appliance complies with the fol-
;
lowing EC directives:
• 73/23/EWG dated 19.02.1973 "Low
Voltage Directive", including Directive
Amendment 93/68/EWG
• 89/336/EWG dated 03.05.1989 "EMC
Directive", including Directive Amendment 92/31/EWG
Cable Compartment (Figure 2)
Your coffee machine has a cable compartment. If the mains cable is too
long, you can store cable that is not
required in the base of the housing.
Prior to initial start-up
Depending on the model, your coffee
machine is fitted with a fresh water filter. The first filter element is in a bag
inside the swivel filter (Figure 1/H).
Substances that affect the taste of the
coffee, for example chlorine, are
removed to large degree with the aid
of the fresh water filter. The aroma of
your coffee can thus unfold to the full.
(For information on the usage and
replacement of the fresh water filter,
see the "Using and Replacing the Fresh
Water Filter" section.)
Before brewing coffee for the first
3
time, you should perform one or two
brews with water only, however with
the full quantity of water:
1. to clean the coffee machine;
2. because a new fresh water filter discolours the water when water first flows
through it. This does not spoil the taste
of coffee brewed subsequently.
8
Page 5

g
Fill the fresh water container with cold
water up to the top cup graduation.
Switch on the appliance and allow the
water to flow into the coffee jug without a filter paper or coffee. Pour away
the water that has run through the
appliance.
Making Coffee
1. Fill with Water (Figure 3)
Lift the lid on the fresh water container. Fill the container with clear,
cold tap water.
Never use hot water. Also, please never
1
fill the fresh water container with milk,
coffee, tea, etc.
You can use the coffee jug to add the
desired amount of water. There are cup
graduations
– on the coffee jug and
– on the water level gauge
(Figure 1/B).
The graduations apply to the quantity
of water used to make the coffee. The
actual quantity of coffee is less
because ground coffee absorbs water.
Close the lid again on the fresh water
container.
2. Insert a Filter Paper (Figure 4)
To open the filter, reach into the
recessed grip and swivel it to the left.
Place a size 4 paper filter in the filter
holder. Before placing in position,
please fold over the perforated sides.
3. Fill with Ground Coffee
(Figure 5)
Please use "medium" ground coffee.
The amount of coffee required depends
on your taste. One measurement spoon
(approx. 6-7 g) per cup is sufficient for
medium strength coffee. Swivel the filter back until it clicks into place.
4. Place the Coffee Jug with Lid
on the Hotplate
5. Switch on the Appliance
(Figure 6)
Your coffee machine has an aroma
switch (depending on the model). The
aroma switch guarantees a full coffee
flavour even with smaller quantities of
coffee (1-4 cups).
– 1-4 cups of coffee: toggle switch in
position "min-4" (Figure 6 A).
– 5-10 cups of coffee: put the toggle
switch in position "5-max"
(Figure 6 A).
Now switch the appliance on at the
On/Off switch (Figure 6 B). The power
light illuminates.
After a few seconds hot water flows
into the filter. Once all the water has
passed through, the coffee is kept
warm on the hotplate.
You should stir the coffee in the jug so
3
that it is of even strength.
6. Remove the Jug
When the jug is removed the filter
valve prevents drips falling onto the
hotplate (Figure 7). It is therefore
important when positioning the inner
filter that you ensure the inner filter is
placed in the holder on the inside of
the swivel filter, and the handle is
locked when folded over (Figure 8).
The hotplate will keep the coffee at the
correct temperature for drinking. It
remains in operation until you switch
off the appliance and the power light
extinguishes. Should you forget to
switch off the coffee machine manually, then the appliance will automatically switch off after approx. 2 hours
(depending on the model). When all
the water has passed through the filter
and you want to add more water for
another brew, you should switch off
the appliance and leave it to cool for
approx. 5 minutes.
9
Page 6

g
Using and Replacing the Fresh
Water Filter
(depending on the model)
After around 60 brews (or 6 weeks,
whichever occurs first), the fresh water
filter must be replaced as follows to
ensure that the filter retains its effectiveness:
1. Open the lid of the fresh water
filter compartment (Figure 9).
2. Remove the container by the handle
(Figure 10).
3. Turn the cap on the bottom of the
container to the left and remove
(Figure 11).
4. Remove the old filter from the cap.
Remove the new filter from its plastic
bag, hold under running water and
then place in position (Figure 12). The
old filter can be treated as general
household rubbish without cause for
concern, the filter is manufactured on
a vegetable base.
5. Place the cap on the container such
that the marker arrows on the cap and
the container are aligned (Figure 11).
Tighten the cap and insert the container such that the hooks on the container and hooks on the coffee
machine mesh together, and the container is firmly seated (arrows in
Figure 10).
6. Close the lid on the fresh water filter
compartment again.
Attach the appropriate section of the
3
date sticker supplied to the inside of
the fresh water container lid. You will
always know when the fresh water filter next needs to be replaced.
Independent of the frequency of use, it
1
is imperative that the fresh water filter
be replaced at the latest every six
months, this is necessary to avoid the
build up of bacteria in the filter.
Descaling – To Make Your Coffee
Machine Last Longer
The life of your coffee machine is
extended by regular descaling. We recommend descaling every three months
as a preventative measure.
If you use a permanent filter, this must
1
be removed from the swivel filter prior
to descaling.
The fresh water filter must not be fit-
1
ted to the coffee machine during descaling. Therefore remove the fresh
water filter container each time prior
to descaling (see Figure 10).
A liquid, environmentally acceptable,
descaler should be used for descaling,
these are generally available in the
shops. Only use the descaler in accordance with the manufacturer’s instructions. Do not use any descaler based on
concentrated formic acid. Fill the fresh
water container and only then add the
descaler – not the other way round!
Swivel the filter into the appliance.
Place the coffee jug with lid on the
hotplate. (Please note that the lid of
the coffee jug is used to open the filter
valve and must therefore be fitted for
the water to flow correctly.) Leave the
descaling solution to act for approx.
15 minutes, then switch on the appliance. Once the descaling solution has
run through, switch off the appliance.
If necessary, repeat the descaling process. Then repeat with plain water at
least twice. Thoroughly rinse the coffee
jug, lid and swivel filter under running
water. Operate the filter valve several
times whilst rinsing.
10
Page 7

g
Cleaning
The swivel filter can be removed for
cleaning. To do this, swivel it to the left
to the stop. The inner filter can be
removed by the handle (Figure 8). For
thorough cleaning, particularly of coffee particles, you should operate the
filter valve several times during rinsing.
Clean the appliance with a damp cloth,
never submerge it in water! The coffee jug and lid are dishwasher-safe.
Spare Parts/Accessories
(Customer Service addresses: see last
page)
1. Fresh Water Filter
You can purchase new fresh water filters in three-packs from your dealer or
AEG Customer Service under the following order numbers:
E No.: 950078802 (from your dealer)
ET No.: 663910450 (from AEG Customer Service)
2. Coffee Jug
If your coffee jug gets broken, you can
purchase a replacement jug from your
dealer or AEG Customer Service. You
will need to state the model of your
coffee machine; see the rating plate
(Figure 1). Please retain the jug lid
because replacement jugs are not supplied with lids.
ET No.: 663910460
3. Long-Life Filter
You can purchase an AEG long-life filter as an accessory, either from your
dealer or AEG Customer Service. The
long-life filter is used in place of paper
filters. It can be cleaned easily and is
also suitable for brewing tea.
ET No.: 663046470 (from AEG Customer Service)
2 Protecting the Environment
Do not simply throw packaging material away.
– The cardboard box can be deposited
in the old paper collection or the relevant refuse collection system.
– Deposit plastic bags made from
polyethylene (PE) at a PE collection
point for recycling.
– Foam polystyrene (PS) padding items
are free of CFCs.
Please inquire with your local authority
about your local recycling centre.
The paper filter and coffee grounds are
excellently suited to composting after
brewing coffee.
Customer Service
The highest quality requirements are
placed on our appliances.
Should you, nevertheless, have questions on the usage of this appliance,
then please write to us. It is only with
your support that we are in a position
to develop appliances that meet your
requirements.
11
Page 8

AEG Kundendienst in Europa
Deutschland Europa
Sollte dieses AEG Kleingerät wider Erwarten nicht
funktionieren, senden Sie es bitte an folgende Adresse:
Beginnt die Postleitzahl Ihres Wohnortes
mit 2 - 3 - 4 - 5
AEG Kleingeräte-Zentralwerkstatt
Firma Elektro Stefan Irsen
Sachtlebenstraße 1, 41541 Dormagen
Beginnt die Postleitzahl Ihres Wohnortes
mit 0 - 1 - 6 - 7 - 8 - 9
AEG Kleingeräte-Zentralwerkstatt
Firma Trepesch GmbH
Steinstraße 500, 90419 Nürnberg
In Deutschland stehen wir Ihnen für Fragen, Anregungen
oder bei Problemen rund um unsere Kleingeräte und
Raumpflegegeräte montags bis freitags von 8 bis 18 Uhr
zur Verfügung.
AEG Serviceline unter 01805-30 60 80*
Fax: 0911/ 3 23-49 19 30
E-Mail: service.kleingeraete@aeg-hausgeraete.de
Österreich, 4010 Linz, 0732 / 770101 - 30
Belgique/België, 1502 Lembeek, 02/363.04.44
Danmark, 7000 Fredericia, 70 11 74 00
España, Madrid, 1-885-2700
France, 60307 Senlis, 03-44 62 24 24
Great Britain, Service Force 08705 929 929
Hellas, 18346 MOÓXATO, 01/4822646
Island, Reykjavik (Bræóurnir Ormsson hf), 91-3 88 20
Italia, 20394 Agrate Brianza (Milano), 39 / 68 99-8 39
Luxembourg, 1273 Luxembourg-Hamm, 4 24 31-433
Nederland, 2400 AC Alphen aan den Rijn, 0172-468 300
Norge, 0516 Oslo, 22 72 58 00
Portugal, 2635-445 Rio de Mouro, (01) 926 75 75
Schweiz/Svizzera, 5506 Mägenwil, 0848 848 348
Suomi, Porissa, puh. (02) 622 3300
Sverige, 10545 Stockholm, 08-738 60 00
*(Deutsche Telekom 24 Pf/Min.)
Garantiebedingungen
Für dieses Gerät leisten wir - zusätzlich zu
der gesetzlichen Gewährleistung des
Händlers aus Kaufvertrag - dem Endabneh-
mer gegenüber zu den nachstehenden Bedingungen Garantie:
1. Die Garantiezeit beträgt 12 Monate und
beginnt mit dem Zeitpunkt der Übergabe
des Geräts, der durch Rechnung oder
andere Unterlagen zu belegen ist. Die
Garantiezeit ist auf 6 Monate beschränkt,
wenn das Gerät gewerblich genutzt wird.
2. Die Garantie umfaßt die Behebung aller
innerhalb der Garantiezeit auftretenden
Schäden oder Mängel des Geräts, die
nachweislich auf Material- oder Fertigungsfehlern beruhen. Nicht unter die
Garantie fallen Schäden oder Mängel aus
nicht vorschriftsmäßiger Handhabung
sowie Nichtbeachtung der Gebrauchsanweisungen.
3. Im Garantiefall senden Sie das Gerät an
die für Ihren Wohnort zuständige AEG
Kleingeräte-Zentralwerkstatt oder übergeben es Ihrem Fachhändler.
Bei Einsendung achten Sie bitte auf gute
Verpackung, Ihre vollständige AbsenderAnschrift und eine kurze Fehlerbeschreibung. Fügen Sie zum Nachweis Ihres
Garantieanspruchs den Kaufbeleg bei.
4. Die Garantieleistungen werden ohne jede
Berechnung durchgeführt; sie bewirken
weder eine Verlängerung noch einen
Neubeginn der Garantiezeit. Ausgewechselte Teile gehen in unser Eigentum über.
Guarantee
This appliance is covered by the following
guarantee and is in addition to your statutory and other legal rights. All components
which fail due to defective manufacture will
be repaired or replaced free of charge for a
period of 12 months from the date of
purchase. We will not accept claims if unauthorised modification is made or if nonstandard components are used. The appliance must be used in accordance with the
operating instructions and the guarantee
does not cover any damage caused during
transit or through misuse. In order to establish the date of purchase, advice note or similar document must be produced whenever
the guarantee is claimed.
Garantie
Pour toute mise en œvre de garantie ou de
service après vente, vous devez yous adresser
à votre vendeur.
AEG assure au vendeur le remplacement gratuit des pièces détachées nécessaires à la réparation pendant 1 an, à partir de la date de
votre facture, sauf en cas de non respect des
prescriptions d’utilisation ou lorsqu’une cause étrangère à l’appareil est responsable de la
défaillance.
Les dispositions stipulées ci-dessus ne sont
pas exclusives du bénéfice au profit de
l’acheteur de la garantie légale pour défaut
et vice cachés qui s’applique, en tout état de
cause, dans les conditions des articles 1641 et
suivants, du code civil.
Garantie
AEG Huishoudelijke Apparaten neemt voor
reparaties binnen de garantietermijn - voor
zover de defecten zijn terug te voeren op
materiaal - en/of constructiefouten - de kosten op zich voor materiaal en arbeidsloon.
De garantie bedraagt 12 maanden en gaat in
op de dag van aankoop. Wanneer garantie
wordt verlangd, dient de faktuur can aankoop te worden overlegd. De garantietermijn
wordt door reparaties niet verlengd. Buiten
elke garantieverplichting vallen losse onderdelen van glas en/of kunststof. Alle overige
kosten, zoals voorrijdkosten, kosten van opzending en administratie, zijn voor rekening
van de eigenaar.
Garanzia
Duranti i primi 12 mesi d’esercizio, vengono
fornite gratuitamente dall’AEG le parti di ricam bio r iconosc iute difet tose . La g aranz ia ha
inizio con il giorno dell’acquisto che deve venir comprovato a mezzo della fattura o boletta di consegna. Per il resto valgono le
condizioni generali di fornitura della rispettiva rappresentanza nazionale.
Garantia
Durante los primeros 12 meses, la AEG se
hace cargo de cuantos costes de material y
horas de trabajos invertidas se produzcan en
la subsanación de defectos. La garantia empieza a regir a partir de la fecha de la entrega, la que deberá justificarse mediante
presentación de la factura o de la nota de depacho. Por lo demás serán de aplicación las
condiciones generales de venta se gun rigen
en el respectivo pais de nuestra representación.
Garantie
In Belgien ist nur die durch belge AEG ausgegebene Garantiekarte gültig.
En Belgique, seule la carte de garantie émise
par la belge AEG est valable.
In België is slechts de door de belge AEG uitgegeven waarborgkaart geldig.
AEG Hausgeräte GmbH, Muggenhofer Straße 135, D-90429 Nürnberg
 Loading...