


CaFamosa
Kaffee-Espresso-Vollautomat
Fully Automatic Espresso-Maker
Macchina per espresso completamente automatica
Volautomatische koffie- en espressomachine
Täysin automaattinen espressokahviasema
Gebrauchsanweisung
Operating instructions
Istruzioni per l’uso
Gebruiksaanwijzing
Käyttöohje
1
B
M
A
C
D
E
O
G
F
H
L
N
J
K
P
2
A
B
C
D
E
F
G
H
J
K
L
M
N
O
P
2
3

4
5
6
78
9/B 10
11 /B
12
9/A
11 /A
13
3

14 15/A
15/B
16/A
16/B
4
17
19/A 19/B
21
18/A
22
18/B
20
23

g
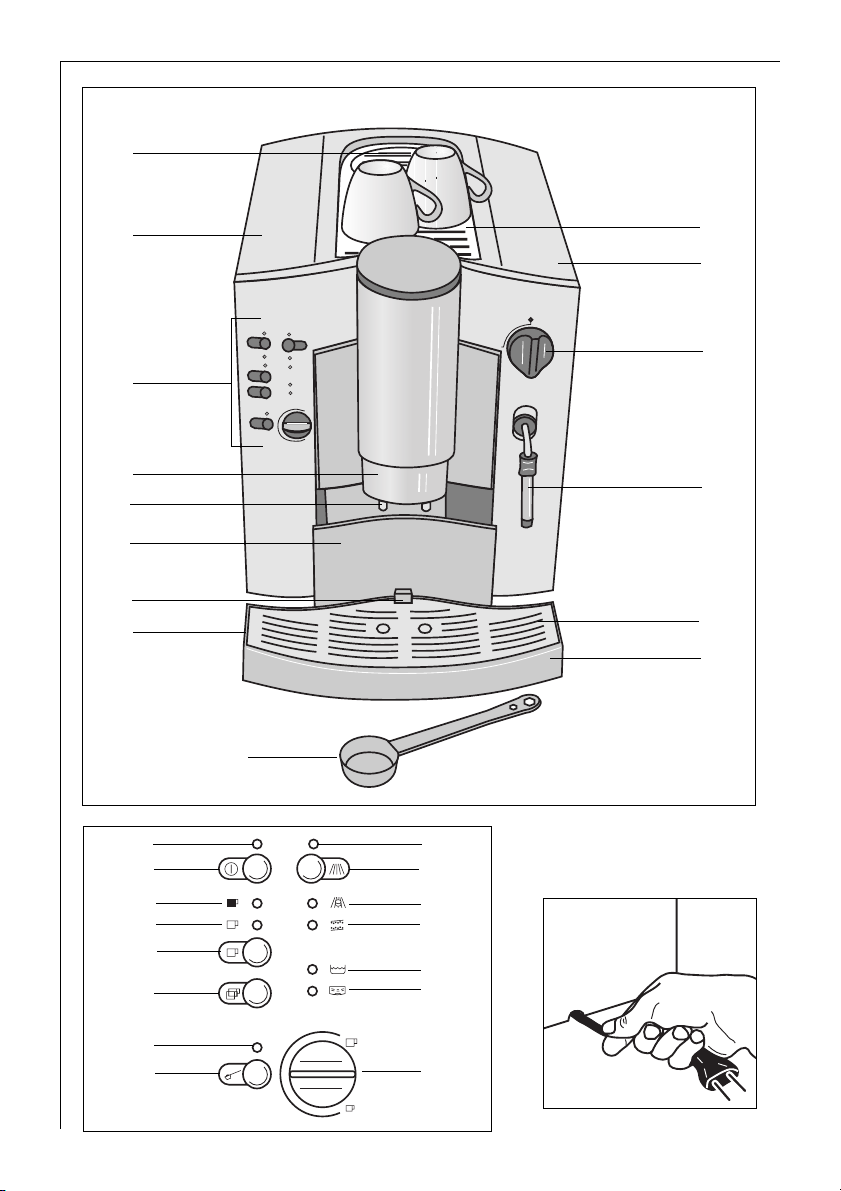
Features (Figure 1)
g
A Fresh Water Tank, Lid
B Filler Opening for Ground Coffee with
Lid
C Cup Rack
D Bean Container with Lid (inside: grind-
ing texture adjustment)
E Selector Dial for Steam and Hot Water
F Swivelling Nozzle for Steam and Hot
Water
G Height Adjustable Outlet
H Spouts
J Drip Grille
K Drip Catcher
L Spent Coffee Drawer with Spent Cof-
fee Container
M Float
N Rating Plate (on the underside of the
appliance)
O Controls and Indicators (see Figure 2)
P Measuring Spoon
Controls (Figure 2)
A Power Indicator: Illuminates when the
appliance is switched on
B Main Switch: Switches the appliance
on and off
C Indicator For 1 Cup of Strong Coffee
D Indicator For 1 Cup of Normal Coffee
E Button For 1 Cup of Coffee
F Button For 2 Cups of Coffee
G Indicator For Ground Coffee
H Button For Ground Coffee
J Indicator For “Flushing“
K Button For Flushing
L Indicator For “Cleaning“
M Indicator For “Descaling“
N Indicator For “Water Tank“
O Indicator For Emptying or Refitting The
“Drip Catcher and Spent Coffee Container“
P Selector Dial For Amount of Water per
Cup
Indicator illuminates:
Indicator flashes:
18
Dear customer,
Please read these operating instructions through carefully. Above all,
observe the safety instructions! Please
keep these operating instructions for
later reference, and pass them on to
any subsequent owners of the appliance.
The form and function of your AEG
coffee machine guarantee you
• straightforward operation and
• excellent, individual taste
• with the easiest of maintenance and
care.
The excellent, individual taste is
achieved by
• The pre-brewing system: prior to the
actual brewing process, the ground
coffee is moistened to extract its full
aroma,
• The individually adjustable quantity of
water per cup that can be varied
between a small espresso and a large
“frothy“ coffee,
• The grinding texture that can be
adjusted to suit the roasting of the
beans,
• The facility to choose between normal
or strong coffee,
• And last but not least, through the
guaranteed crema, that small crown of
froth that makes an espresso incomparable for connoisseurs.
Incidentally: The time that the water is
in contact with the ground coffee is
considerably shorter for espressos than
for conventional filter coffee. As a
result, less bitterness is released from
the coffee, it is this that makes
espresso coffee so much pleasanter!

g
Table of Contents
Safety Instructions
1. Before Using for the First Time
1.1. Setting Up the Appliance
1.2. Cable Compartment (Figure 3)
1.3. Adjusting the Water Hardness
1.4. Adjusting the Safety Cut-Out
2. Prior to Making Coffee
Filling the Water Tank (Figure 4)
2.1.
2.2. Filling the Bean Container
(Figure 5)
2.3. Adjusting the Grinding Texture
(Figure 6)
2.4. Switching On the Appliance
(Figure 7)
2.5.
“Flushing“ the Appliance (Figure 8)
3. Making Coffee
3.1. Adjusting the Amount of Water
(Figure 9/B)
3.2. One Cup of Normal Coffee from
Beans (Figure 10)
3.3. One Cup of Strong Coffee from
Beans (Figure 11/A)
3.4. One Cup of Extra Strong Coffee
from Beans (Figure 11/B)
3.5. Two Cups of Normal Coffee
from Beans (Figure 12)
3.6. One or Two Cups of Coffee from
Ground Coffee (Figure 13, 14)
4. Frothing Milk (for Cappuccino)
(Figure 15, 16)
5. Preparing Hot Water (Figure 16)
6. Switching Off the Appliance
7. Emptying the Water Tank, Drip
Catcher and Spent Coffee Container (Figure 17, 18)
8. Cleaning
Exterior Cleaning (Figure 19, 20)
8.1.
8.2. Internal Cleaning: “Clean“ Indicator Illuminates (Figure 21)
9. Descaling the Appliance: “Descale“ Indicator Illuminates (Figure 22, 23)
10. What to do if ...
11. Protecting the Environment
12. In the Case of Need for Service
1 Safety Instructions
• The appliance may only be connected
to a mains supply on which the voltage, type of supply, and frequency
match the information given on the
rating plate (see underside of the
appliance)!
• Never allow children to operate the
appliance unsupervised.
• Never bring the mains lead into contact with the hot parts of the appliance.
• Never pull the plug from the socket by
means of the mains lead!
• Do not use the appliance if:
– the mains lead is damaged or
– the housing shows visible signs of
damage.
• The coffee outlet, swivelling nozzle,
and cup rack will become hot during
use due to the nature of their functions. Keep children away!
• Only fill the water tank with cold
water, do not use hot water, milk or
other liquids.
• Do not place frozen or caramelised
coffee beans in the bean container,
only use roasted coffee beans! Remove
any foreign bodies from the coffee
beans. Otherwise the guarantee will be
void.
• Only put ground coffee in the ground
coffee filler opening.
• Observe the cleaning and descaling
instructions.
• Prior to maintaining or cleaning,
switch off the appliance and unplug it
from the mains!
• Never immerse the appliance in water.
• Do not allow any liquid to enter the
housing via the ventilation holes on
the cup rack.
• Do not wash the parts of the appliance
in a dishwasher.
• Do not leave the appliance switched on
longer than necessary.
• Do not expose the appliance to the
weather.
19

g
Do not open or repair the appliance.
Improper repairs can give rise to significant hazards for the user.
Repairs to electrical appliances are only
to be performed by qualified service
engineers.
In the case that repair becomes necessary, including the replacement of the
mains lead, please contact
• the dealer from whom you purchased
the appliance, or
• an AEG customer service centre.
In no circumstance should the appliance be sent by post - there is a risk of
transport damage that cannot be covered under the guarantee!
If the appliance is used for a purpose
other than that intended, or is incorrectly operated, no liability for any
resulting damage or claims under the
guarantee can be accepted - this is also
the case if the cleaning and descaling
programs are not performed immediately after the illumination of the corresponding indicators (Figure 2), and in
accordance with the information given
in these operating instructions.
This appliance complies with the fol-
;
lowing EC directives:
• 73/23/EWG dated 19.02.1973 “Low
Voltage Directive“, including Directive
Amendment 93/68/EWG
• 89/336/EWG dated 03.05.1989 “EMC
Directive“, including Amendment
Directive 92/31/EWG
20
1. Before Using for the First Time
1.1. Setting Up the Appliance
Choose a suitable, level, stable,
unheated, dry surface. Pay attention to
adequate air circulation.
Important: If the appliance is placed in
a warm room after being brought in
from the cold - wait approx. 2 hours
before switching on the appliance!
1.2. Cable compartment (Figure 3)
Your appliance has a cable compartment on the rear. If the mains lead is
too long, you can push the cable that is
not needed into the cable compartment.
1.3. Adjusting the Water Hardness
Your appliance can be adjusted to the
hardness of the water used. The correct
adjustment of the water hardness is
necessary for the correct function of
the automatic scaling indicator (see
also Section 9.).
Use the Aquadur® test strips supplied
to determine the hardness the local
water. Follow the instructions given on
the test strip packaging. Or: Ask your
water board about the hardness of
your water!
The appliance has 5 hardness settings,
the appliance is set to the middle set-
ting, 3, in the factory (corresponds to
16°-23° degrees German hardness).
You can change this setting as follows:
0 Plug the appliance into the mains.
0 Do not switch on the appliance.
0 Press the “1 Cup“ button for
approx. 3 seconds. The “Descale“
indicator flashes.
Pressing the “1 Cup“ button again
changes the water hardness setting by
one step to 4, 0, 1, 2, 3, and so on.
0 To store the water hardness setting and
to end the procedure, press the
“On/Off“ button. All indicators go out.
If a button is not pressed for more than
30 sec., the procedure is automatically
ended without changing the value
saved previously.
g
The individual water hardness settings
(degrees German hardness, ° dH) are
indicated as follows:
The “Descale“ indicator flashes
( ), in addition the following indicators illuminate ()
for setting 1 (1°-7° dH): “1 Strong
Cup“
for setting 2 (8°-15° dH): “1
Strong Cup“ and “Ground Coffee“
for setting 3 (16°-23° dH): “1
Strong Cup“, “Ground Coffee“
and “Spent Coffee“
for setting 4 (24°-30° dH): “1
Strong Cup“, “Ground Coffee“,
“Spent Coffee“ and “Clean“
for setting 0: no further indicators
illuminate. The automatic descale indicator is switched off.
Note: The water hardness setting is
only to be adjusted prior to using the
appliance for the first time, or if the
quality of the water used changes.
1.4. Adjusting the Safety
Cut-Out
If the appliance is not used for an
extended period of time, it switches
itself off for safety reasons and to save
energy.
The appliance has 3 timer settings;
after the expiry of the time set, the
appliance switches off automatically.
The middle setting 2 (switch off after
2 hours), is set in the factory.
You can change this setting as follows:
0 Plug the appliance into the mains.
0 Do not switch on the appliance.
0 Press the “2 Cups“ button for
approx. 3 seconds. The “Flush“
indicator illuminates.
0 Pressing the “2 Cups“ button again
adjusts the timer setting by one step to
3, 1, 2 and so on.
0 To save the safety cut-out setting and
end the procedure, press the “On/
Off“ button. All indicators go out.
If a button is not pressed for more than
30 sec., the procedure is automatically
ended without changing the value
saved previously.
The individual timer settings are indicated as follows:
The “Flush“ indicator flashes, in
addition the following indicators illu-
minate
for setting 2 (switch off after 2
hours): “Water Tank“ and
“Spent Coffee“
for setting 3 (switch off after 5
hours): “1 Strong Cup“,
“Ground Coffee“, “Clean“,
“Water Tank“ and “Spent Coffee“
for setting 1: no further indicator illuminates, the automatic cut-out is not
activated.
2. Prior to Making Coffee
2.1. Filling the Water Tank
(Figure 4)
Open the lid (Figure 1/A) and remove
the water tank by the handle. Please
only use cold, clear water, and do not
fill beyond the MAX mark.
Then refit the water tank in the appliance and press it down until it engages
so the valve on the base is opened.
For aromatic coffee, you should:
• Change the water in the tank daily,
• Not use mineral or distilled water and
• Clean the water tank at least once a
week in normal washing up water (not
in a dishwasher). Then rinse with clean
water.
Incidentally: When the “Water
Tank“ indicator (Figure 2/N) illuminates, your appliance is signalling to
you that the water tank must be
refilled.
21
g
2.2. Filling the Bean Container
(Figure 5)
Open the lid of the bean container
(Figure 1/D) and fill the container with
roasted coffee beans (do not use frozen and caramelised beans). Ensure
that no foreign bodies enter the bean
container. Close the lid.
Tip: You can use both espresso and filter coffee beans! Try out different sorts
of beans to find the ones that taste the
best to you!
2.3. Adjusting the Grinding Texture (Figure 6)
To release the full aroma from the
beans, you can adjust the grinding texture to suit the roasting of the beans.
The grinding texture adjustment is on
the rear right inside the bean container.
Important: The grinding texture is only
to be adjusted when the grinder is in
operation.
Starting from the factory medium setting, turn the adjustment knob clockwise for darker beans (coarser
grinding texture), anticlockwise for
lighter beans (finer grinding texture).
Tip: Try different grinding textures to
find the one that suits your taste the
best!
2.4. Switching On the Appliance
(Figure 7)
By pressing the “On/Off“ button
(Figure 2/B) for approx. 1 second, you
can switch on the appliance. The red
power indicator (Figure 2/A) illuminates.
Only when using the appliance for
the first time:
To show that the system must be filled,
the green “1 Strong Cup“, “1
Normal Cup“, “Ground Coffee“
and “Flush“ indicators flash
(Figure 7).
0 Place an empty cup under the swivel-
ling nozzle (Figure 1/F).
0 Turn the selector dial (Figure 1/E) anti-
clockwise to the stop.
0 Hot water runs out of the swivelling
nozzle and is stopped automatically.
0 Turn the selector dial clockwise back to
“0“. Please repeat this process until the
green flashing indicators go out.
This process is necessary to fill the system with water.
2.5. “Flushing“ the Appliance
(Figure 8)
When the operating temperature is
reached, the green “Flush“ indicator (Figure 2/J) illuminates. Place an
empty cup under the spouts (Figure
1/H) and press the “Flush“ button
(Figure 2/K). The flushing process stops
automatically. The “1 Cup of Normal Coffee“ indicator (Figure 2/D) then
illuminates. The appliance is now ready
for brewing coffee.
Note: The water left in the appliance is
removed from the the system by the
flushing action so that coffee is made
with fresh water.
3. Making Coffee
Although you are brewing espresso
coffee with your coffee machine, the
term coffee is used in the following for
clarity.
Note: The following process starts
completely automatically after
the “1 Cup“ or “2 Cups“ button
is pressed: grinding, portioning, pressing, pre-brewing, brewing, and ejection
of the used ground coffee.
You can interrupt this process at any
time by pressing the “1 Cup“
or “2 Cups“ button!
Store your cups upside down on the
cup rack (Figure 1/C). Steam escapes
through the openings in the cup rack,
this warms the cups!
The outlet (Figure 1/G) can be
adjusted in height and can thus be
adjusted to suit different sizes of cup.
22

g
To adjust the height, use the thumb
and index finger to grip the ribbing on
the side of the outlet and move it up or
down (Figure 9/A). Important: There is
a risk of burns!
3.1. Adjusting the Amount of
Water (Figure 9/B)
Using the selector dial (Figure 2/P),
adjust the amount of water per cup.
Depending on your taste, select a
“small“ espresso (turn selector dial
anticlockwise) or a large “frothy“ coffee (turn selector dial clockwise).
Note: You can also change the amount
of water during the brewing process.
To adjust the required quantity during
the brewing process: turn the selector
dial slowly anticlockwise from the
maximum setting, until coffee ceases
to run out at the required quantity.
When two cups of coffee are drawn,
the amount of water is more or less
doubled.
Note: While the appliance is heating
up, the “1 Normal Cup“ indicator
(Figure 2/D) flashes.
3.2. One Cup of Normal Coffee
from Beans (Figure 10)
The appliance is ready for use when
the “1 Normal Cup“ indicator (Figure 2/D) illuminates. Place an empty
cup centrally under the spouts. By
briefly pressing the “1 Cup“ but-
ton (Figure 2/E), you will obtain one
cup of normal coffee. “1 Normal Cup“
flashes.
3.3. One Cup of Strong Coffee
from Beans (Figure 11/A)
The appliance is ready for use when
the “1 Normal Cup“ indicator (Figure 2/D) illuminates. Place an empty
cup centrally under the spouts. Now
press the “1 Cup“ button (Figure
2/E) until the “1 Strong Cup“ indicator (Figure 2/C) illuminates and “1
Normal Cup“ flashes. You will then
obtain one cup of strong coffee.
3.4. One Cup of Extra Strong
Coffee from Beans (Figure 11/B)
The appliance is ready for use when the
“1 Normal Cup“ indicator (Figure 2/D)
illuminates. Place an empty cup centrally under the spouts. Now press the
“1 Cup“ button (Figure 2/E) until the “1
Normal Cup“ and “1 Strong Cup“ indicators flash. You will then obtain one
cup of extra strong coffee.
3.5. Two Cups of Normal Coffee
from Beans (Figure 12)
The appliance is ready for use when
the “1 Cup“ indicator (Figure 2/D)
illuminates. Place a cup under each of
the spouts.
Note: The correct position for the cups
is given by the two holes in the drip
grille (Figure 1/J) as these are directly
below the spouts.
By pressing the “2 Cups“ button
(Figure 2/F), you will obtain two cups
of normal coffee. “1 Normal Cup“
flashes.
3.6. One or Two Cups of Coffee
from Ground Coffee (Figure 13, 14)
Using this function you can, e.g., brew
decaffeinated coffee.
The appliance is ready for use when
the “1 Normal Cup“ indicator
(Figure 2/D) illuminates.
0 Place one or two cups under the
spouts.
0 Press the “Ground Coffee“ button
(Figure 2/H) until the “Ground Coffee“ indicator (Figure 2/G) illuminates
(Figure 13).
0 Open the lid (Figure 1/B) and place the
required amount of ground coffee for
one or two cups in the filler opening
(Figure 14).
0 Close the lid.
Note: Add a maximum of 2 portions of
ground coffee. The filler opening for
ground coffee is not a storage container. Do not add anything other than
ground coffee!
23
g
0 Now press the “1 Cup“ button for
one cup or the “2 Cups“ button
for two cups.
Note: If the “Ground Coffee“ but-
ton is pressed inadvertently, you can
cancel this setting by pressing the
“1 Cup“ button again. The appliance
then performs a normal flush.
4. Frothing Milk (for Cappuccino) (Figure 15, 16)
Hot steam can be used both for frothing milk for cappuccino and for heating liquids.
Note: For one cup of cappuccino, fill a
large cup up to 2/3 full with espresso
and then add the frothed milk.
Frothing milk:
Slide the moving tube on the swivelling nozzle all the way down (Figure
15/A).
Warming liquids:
Slide the moving tube up (Figure 15/B).
0 Switch on the appliance using the On/
Off switch (Figure 2/B) and flush if
necessary (see Section 2.5.). The appliance is ready for use when the “1
Normal Cup“ indicator (Figure 2/D)
illuminates.
0 Immerse the swivelling nozzle in the
container with the milk to be frothed
or the liquid to be heated, and start
the production of steam by turning the
selection dial (Figure 1/E) anticlock-
wise to the stop (Figure 16/A).
Due the nature of the system, a little
water runs out of the swivelling nozzle
first, this can be run off first, however
it will not affect the quality of the
result, e.g., on frothing milk.
Important: Only immerse the swivelling nozzle around half way into the
liquid so that air can be drawn in
unhindered. The swivelling nozzle
should not touch the base of the container to avoid the hindrance of the
outlet of steam. Important: There is a
risk of burns!
24
0 You can stop the outlet of steam by
turning the selector dial clockwise to
the O-position (Figure 16/B).
In particular after frothing milk, it is
recommended to briefly activate the
outlet of steam to “blow out the swivelling nozzle“. Then clean the any milk
residues from the swivelling nozzle
using a damp cloth. Move the moving
metal tube up and down during this
process.
After steam has been drawn off, all
4 green indicators flash to indicate
that the system must be refilled with
water. Proceed as follows:
0 Place a container under the swivelling
nozzle (Figure 1/F).
0 Turn the selector dial (Figure 1/E) anti-
clockwise to the stop (Figure 16/A).
0 Press the “Flush“ button (Figure
2/K). Wait until the flow of water stops
automatically. All 4 green indicators
then flash.
0 Turn the selector dial (Figure 1/E)
clockwise back to the 0-position (Figure 16/B). The appliance is now ready
for use again.
5. Preparing Hot Water
(Figure 16)
You can use the hot water function for
prewarming cups, for preparing instant
beverages or tea. Important: There is a
risk of burns!
0 Switch on the appliance using the On/
Off switch (Figure 2/B) and flush if
necessary (see Section 2.5.). The appliance is ready for use when the “1
Normal Cup“ indicator (Figure 2/D)
illuminates.
0 Hold a container under the swivelling
nozzle and initiate the preparation of
hot water by turning the selector dial
(Figure 1/E) anticlockwise to the stop
(Figure 16/A) and press the “Flush“
button (Figure 2/K).
0 You can stop the flow of hot water by
turning the selector dial clockwise
back to the O-position (Figure 16/B).

g
6. Switching Off the Appliance
By pressing the On/Off switch (Figure 2/B), you can switch off the appliance. The power indicator (Figure 2/A)
goes out.
7. Emptying the Water Tank,
Drip Catcher and Spent Coffee
Container (Figure 4, 17, 18)
Note: You should perform the following tasks daily!
0 Remove the water tank (Figure 4) and
pour away the remaining water. Use
fresh water each day.
At the end of the day, however at the
latest when the red float (Figure 1/M)
at the rear of the drip grille becomes
visible, you should empty the drip
catcher and the spent coffee container.
Leave the appliance switched on when
performing these tasks.
0 Lift the drip catcher slightly and
remove it carefully from the appliance
to the front (Figure 17).
0 Remove the spent coffee container and
empty it (Figure 18/A).
0
Remove the drip grille by pressing on
the left or right hand side (Figure 18/B).
Pour away the water left in the drip
catcher.
0 Then clean the drip catcher, drip grille,
as well as the spent coffee drawer and
spent coffee container.
8. Cleaning
8.1. Exterior Cleaning
(Figure 17, 18, 19, 20)
Water tank: Clean at least once a
week in normal washing up water, not
in a dishwasher. Then rinse with clean
water.
Drip grille, drip catcher, and spent
coffee drawer: Clean after use in nor-
mal washing up water, not in a dishwasher (Figure 17, 18).
Spent Coffee container: This part is
dishwasher-safe (Figure 18/A)!
Swivelling nozzle: Wipe with a damp
cloth after use. Unscrew with a coin if
blocked (Figure 19/A). Remove the lower
part of the nozzle and clear the frothing
duct with a needle (Figure 19/B). On
reassembly, ensure that the nozzle is
correctly seated.
Outlet and spouts: Clean with a damp
cloth as required.
Filler opening for ground coffee:
Clean with a damp cloth as required.
Then wipe dry.
Housing: Clean with a damp cloth as
required, also the inner parts of the
housing that only become accessible
when the drip catcher is removed
(Figure 20).
Bean container: Clean with a dry
cloth from time to time.
8.2. Internal Cleaning: “Clean“
Indicator Illuminates (Figure 21)
Important: Only use original AEG
cleaning tablets!
Incidentally: You can obtain original
AEG cleaning tablets from AEG customer service (ET No. 663 910 480) or
from your dealer (E No. 950 078 803).
Your appliance has a cleaning program
for the regular cleaning of the components inside the appliance (duration
approx. 15 min.); it is not necessary to
removing the brewing unit for cleaning
on this appliance.
25

g
If the “Clean“ indicator (Figure 2/L)
illuminates, you should run the cleaning program as described below. Cleaning can also be carried out as described
below before the indicator illuminates.
You can continue to use your appliance
and run the cleaning program later.
However, in this way you will endanger your rights to make a claim
under the guarantee, as the unit (and
thus also customer service) will detect
overdue cleaning!
0 Switch the appliance on using the On/
Off switch (Figure 2/B).
0
Press the “Flush“ button (Figure 2/K)
for approx. 3 seconds until the following
indicators illuminate: “Empty Spent
Coffee“, “Clean“ and “Ground
Coffee“ (Figure 21).
0 Fill the water tank to the maximum
mark, empty the spent coffee container and drip catcher, and refit them.
0 The “Water Tank“ (Figure 2/N) and
0 Now place one original AEG cleaning
0 Now press the “Ground Coffee“
0 If during the cleaning program the
“Spent Coffee“ indicators (Figure
2/O) go out.
tablet in the filler opening for ground
coffee (Figure 1/B).
button (Figure 2/H), the “Ground
Coffee“ indicator (Figure 2/G) goes out.
The “Clean“ indicator (Figure 2/L)
flashes to show that the cleaning program has started.
Note: The cleaning program can also
be started by pressing the “1 Cup“
or “2 Cups“ button!
Water is now pumped through the system at short intervals to release, with
the aid of the cleaning tablet, residues
of coffee inside the machine.
“Spent Coffee“ indicator (Figure 2/O)
illuminates, empty the drip catcher and
the spent coffee container, refit them
and press the “Flush“ button (Figure 2/K). The cleaning program is then
continued.
This action may need to be repeated up
to four times.
26
0 The cleaning program is at an end
when the “Flush“ indicator (Figure
2/J) illuminates. Flush the appliance by
pressing the “Flush“ button (Figure
2/K).
0 Then empty the spent coffee container
and the drip catcher, and refit them.
The appliance is now ready for use
again when the “1 Normal Cup“
indicator (Figure 2/D) illuminates.
9. Descaling the Appliance
(Figure 22, 23)
Your appliance has a descaling program for the regular descaling of the
appliance (duration approx. 60 min.).
If the “Descale“ indicator (Figure
2/M) illuminates, you should run the
descaling program as described below.
Descaling can also be performed before
the indicator illuminates by leaving the
appliance to cool down for 2 hours and
pressing the “Flush“ button (Figure
1/K) for approx. 3 seconds with the
appliance switched off. You can also
continue to use your appliance and run
the descaling program later. However,
you will endanger your rights to
make a claim under the guarantee,
as the appliance (and thus also customer service) will detect overdue
cleaning!
Important: Only use liquid (not powdered!), environmentally friendly des-
caler. Only use descaler exactly as per
the manufacturer's instructions. Do not
use any acid-based descaler.
0 Switch the appliance off using the On/
Off switch (Figure 2/B) and leave it
to cool down for at least 2 hours.
0 Fill the water tank with approx. 600 ml
of water, only then add the liquid
descaler (never the other way
round)!
Do not switch the appliance on!
0 With the appliance switched off, press
the "Flush" button (Figure 2/K) for
approx. 3 seconds until the following
indicators illuminate: "Empty Spent
Coffee", "Descale" (Figure 22).

g
0 Empty the spent coffee container and
the drip catcher, and refit them. The
“Spent Coffee“ indicator (Figure
1/O) goes out. All 4 green indicators
flash, the “Descale“ indicator (Figure 1/M) illuminates.
0 Place a sufficiently large container
under the swivelling nozzle (Figure 23).
0 Start the descaling program by turning
the selector dial (Figure 1/E) anticlock-
wise to the stop (Figure 16/A). The
“Descale“ indicator (Figure 2/M)
flashes.
Descaler is now pumped through the
system at short intervals.
0 If during the cleaning program the
“Spent Coffee“ indicator (Figure 2/O)
lights up, empty the drip catcher and
then replace it. All 4 green indicators
flash, the “Descale“ indicator illuminates (Figure 1/M).
0 Turn the selector dial (Figure 1/E)
clockwise back to the 0-position (Figure 16/B). The descaling program is
continued. If the “Spent Coffee“
indicator (Figure 2/O) lights up, empty
the drip catcher and then replace it. Do
not fill the water tank until the
"Water Tank" indicator (Figure 2/N)
illuminates.
After a period of time, the “Flush“
indicator (Figure 2/J) flashes while
the “Descale“ (Figure 2/M),
“Water Tank“ (Figure 2/N) and
“Spent Coffee“ indicators (Figure 2/O)
illuminate.
0 Now fill the water tank with fresh
water and refit it to the appliance.
0 Empty the drip catcher and refit. All 4
green indicators flash, the “Descale“ indicator (Figure 1/M) illuminates.
0 Place a sufficiently large container
under the swivelling nozzle (Figure 23)
and turn the selector dial (Figure 1/E)
anticlockwise to the stop (Figure16/A).
The indicators “Flush“ (Figure 2/J)
and “Descale“ (Figure 2/M) flash.
After a certain amount of time, the
“Flush“ indicator (Figure 2/J)
flashes while the “Descale“ (Figure
2/M) and “Spent Coffee“ (Figure
2/O) indicators illuminate.
0 Empty the drip catcher and refit. Turn
the selector dial (Figure 1/E) clockwise
back to the 0-position (Figure 16/B).
The indicators “Flush“ (Figure 2/J)
and “Descale“ (Figure 2/M) flash. If
the “Spent Coffee“ indicator (Figure 2/O) lights up, empty the drip
catcher and then replace it. The descaling program is continued.
After a certain amount of time, the
“Flush“ indicator (Figure 2/J)
flashes while the “Descale“ (Figure
2/M) and “Spent Coffee“ (Figure
2/O) indicators illuminate.
Empty the drip catcher and then
replace it. The “Flush“ indicator
(Figure 2/J) illuminates.
0 Flush the appliance by pressing the
“Flush“ button (Figure 2/K).
0 Rinse out the water tank.
The appliance is now ready for use
again when the “1 Normal Cup“
indicator (Figure 2/D) illuminates.
10. What to do if ...
• no coffee runs out of the spouts:
– Check that the water tank is cor-
rectly seated!
– Fill the water tank!
– Check the correct seating of the drip
catcher!
• coffee only drips out of the spouts:
– Set the grinding texture to a coarser
setting.
• too little froth is produced on the milk
during frothing?
– Always use cool, fresh (low fat) milk!
– Use a suitable container (e.g. jug)!
– Also cool the container if necessary!
– Dismantle the swivelling nozzle and
clean!
27

g
• the temperature of the coffee is too
low?
– Prewarm cups with steam or hot
water!
– Caution: Sugar and milk lower the
temperature of the coffee!
• coffee brewing is interrupted after
grinding?
– Fill the bean container as the brew-
ing unit has detected that too few
beans have been ground, as a result
the cycle has been interrupted.
• all green indicators are flashing simultaneously?
– See Section 4. (After drawing off
steam)!
– See Section 2.4. (Only when using
the appliance for the first time).
– Switch off the appliance. Wait 1/2
hour. Switch on the appliance, see
Section 2.4. (Only when using the
appliance for the first time).
– It is possible that the filter is clogged
with ground coffee. Disconnect the
appliance from the mains. Pull out
the spent coffee drawer. Feel inside
the appliance - you will find a movable flap at the top rear of the appliance. The filter is located behind this
flap. Wipe the filter clean with a dry
cloth. Replace the spent coffee
drawer. Finally, the system must be
filled with water again. See Section
4 (After drawing off steam).
• the spent coffee container is stuck in
the appliance?
– Pull out the drip catcher together
with the spent coffee drawer, carefully remove the spent coffee container from the appliance. Refit the
drip catcher with the spent coffee
drawer, but without the spent coffee container and wait until the
process is complete and the
“1 Cup“ indicator illuminates. Then
insert the drip catcher with the
spent coffee container and spent
coffee drawer!
• Indicators flash alternately?
– Appliance is too cold. Switch off and
wait approx. 1 hour before switching
on the appliance again!
• the 4 green and the 4 red indicators are
flashing alternately?
– Switch off the appliance, unplug
from the mains, plug into the mains
again, and switch on the appliance
again. If this malfunction is no
longer indicated, the appliance is
again ready for use.
– If the malfunction is still present,
please call customer service!
• the grinder is making loud noises?
– Check the grinder for foreign bodies.
If necessary, have the appliance
checked by AEG customer service.
• the appliance is to be transported?
– Keep the original packaging to pro-
vide protection during transport.
– Protect the appliance from knocks.
–In the case a risk of frost, drain the
heater system by drawing off steam
prior to transport:
–Switch off the appliance.
–Place a container under the swivel-
ling nozzle.
–Turn the selector dial (Figure 1/E)
anticlockwise to the stop (Figure
16/A).
–Switch on the appliance. All 4
green indicators flash.
–Press the “Flush“ button (Fig-
ure 2/K) until the only the
“Flush“ indicator (Figure 2/J) is still
flashing. Steam comes out after a
short delay.
–Wait until the steam stops auto-
matically.
–Turn the selector dial (Figure 1/E)
clockwise back to the 0-position
(Figure 16/B).
–Switch off the appliance.
–Empty the bean container, water
tank and drip catcher.
28

11. Protecting the Environment
Do not simply throw packaging material away.
• Please keep the box and the foam
packaging! They can be reused in the
case of the need for service to protect
the appliance during transport.
If used:
• deposit plastic bags made of polythene
(PE) at a collection point for recycling.
• The packing pieces made of foam polystyrene (PS) are CFC-free.
Please inquire with your local authority
about your local recycling centre.
Used coffee is ideally suited to composting.
12. In the Case of Need for Service
If repairs to the appliance become necessary, including the replacement of
the mains lead, please contact an AEG
customer service centre by telephone
initially (in Germany please use the
following hotline: 01805- 306080*).
Under no circumstances should you
send the appliance by post - risk of
transport damage that cannot be covered by the guarantee!
It is imperative that the original packing including foam parts is retained.
The guarantee is for 1 year from the
date of purchase. The guarantee is
restricted to 6 months if the appliance
is used commercially. Commercial
usage is deemed to be more than 3000
brewing cycles per year.
g
* = Euro 0.12/min.
29

AEG Kundendienst in Europa
Deutschland Europa
Sollte dieses AEG Kleingerät wider Erwarten nicht
funktionieren, wenden Sie sich bitte an unseren Service.
Wir werden die Abholung und Instandsetzung durch
unsere Werkstatt veranlassen.
AEG Kleingeräte-Zentralwerkstatt
Firma Trepesch GmbH
Steinstraße 500
90419 Nürnberg
In Deutschland stehen wir Ihnen für Fragen, Anregungen
oder bei Problemen rund um unsere Kleingeräte und
Raumpflegegeräte montags bis freitags von 8 bis 18 Uhr
zur Verfügung.
AEG-Serviceline: 0 18 05 – 30 60 80
(Deutsche Telekom 0,12 Euro/Min.)
Fax: 0911 - 323 49 19 30
E-Mail: service.kleingeraete@aeg-hausgeraete.de
Österreich, 4010 Linz, 0732 / 770101 - 30
Belgique/België, 1502 Lembeek, 02/363.04.44
Czech Republic, Hanusova ul., Praha 4, 02/6112 6112
Danmark, 7000 Fredericia, 70 11 74 00
España, Madrid, 1-885-2700
France, 60307 Senlis, 03-44 62 24 24
Great Britain, Service Force 08705 929 929
Hellas, 18346 MOÓXATO, 01/4822646
Island, Reykjavik (Bræóurnir Ormsson hf), 91-3 88 20
Italia, 33080 Porcia (PN), 0434 39 41
Kroatien, 10000 Zagreb, 385 1 6323 333
Luxembourg, 1273 Luxembourg-Hamm, 4 24 31-443
Magyarország, 1142 Budapest, 36-1-252-1773
Nederland, 2400 AC Alphen aan den Rijn, 0172-468 300
Norge, 0516 Oslo, 22 72 58 00
Poland, 02-034 Warszawa, 022 874 33 33
Portugal, 2635-445 Rio de Mouro, (21) 926 75 75
Romania, Bucuresti, B-dul Timisoara 90, 01-444-25-81
Russia, 129090 Moscow, +7 095 956 2917, 937 7893
Slovakia, 81105 Bratislava, 07/4333 9757
Slovenija,
Schweiz/Svizzera, 5506 Mägenwil, 062/889 93 00
Suomi, Porissa, puh. (02) 622 3300
Sverige, 10545 Stockholm, 08-672 53 60
Turkey,Tarlabasi cad no:35 Taksim/Istanbul-0, 262-7249420
Garantiebedingungen
Der Endabnehmer dieses Geräts (Verbraucher) hat bei einem Kauf dieses Geräts von einem Unternehmer (Händler)
in Deutschland im Rahmen der Vorschriften über den Verbrauchsgüterkauf gesetzliche Rechte, die durch diese
Garantie nicht eingeschränkt werden.
Diese Garantie räumt dem Verbraucher
also zusätzliche Rechte ein. Dies vorausgeschickt, leisten wir, AEG Hausgeräte GmbH, gegenüber dem Verbraucher Garantie für dieses Gerät für
den Zeitraum von 24 Monaten ab
Übergabe zu den folgenden Bedingun-
gen:
1. Mit dieser Garantie haften wir dafür, dass dieses neu hergestellte Gerät im Zeitpunkt der Übergabe vom
Händler an den Verbraucher die in
unserer Produktbeschreibung für
dieses Gerät aufgeführten Eigenschaften aufweist. Ein Mangel liegt
nur dann vor, wenn der Wert oder
die Gebrauchstauglichkeit dieses
Geräts erheblich gemindert ist. Zeigt
sich der Mangel nach Ablauf von
sechs (6) Monaten ab dem Übergabezeitpunkt, so hat der Verbraucher
nachzuweisen, dass das Gerät be-
reits im Übergabezeitpunkt mangelhaft war. Nicht unter diese Garantie
fallen Schäden oder Mängel aus
nicht vorschriftsmäßiger Handhabung sowie Nichtbeachtung der Gebrauchsanweisungen.
2. Dieses Gerät fällt nur dann unter
diese Garantie, wenn es in einem der
Mitgliedsstaaten der Europäischen
Union gekauft wurde, es bei Auftreten des Mangels in Deutschland betrieben wird und Garantieleistungen
auch in Deutschland erbracht werden können. Mängel müssen uns innerhalb von zwei (2) Monaten nach
dessen Kenntnis angezeigt werden.
3. Mängel dieses Geräts werden wir innerhalb angemessener Frist nach
Mitteilung des Mangels unentgeltlich beseitigen; die zu diesem Zweck
erforderlichen Aufwendungen, insbesondere Arbeits- und Materialkosten werden von uns getragen. Über
diese Nachbesserung hinausgehende Ansprüche werden durch diese
Garantie dem Verbraucher nicht
eingeräumt.
4. Im Garantiefall ist das Gerät vom
Verbraucher an die für seinen
Wohnort zuständige AEG-Zentral-
Tražaška 132, 1000 Ljubljana, 01 24 25 730
werkstatt zu versenden, wobei das
Gerät gut zu verpacken ist und die
vollständige Anschrift des Verbrauchers zusammen mit einer kurzen
Fehlerbeschreibung in das Paket zu
legen ist. Zum Nachweis des Garantie-Anspruchs ist der Sendung der
Original-Kaufbeleg (Kassenzettel,
Rechnung) beizufügen.
5. Garantieleistungen bewirken weder
eine Verlängerung noch einen Neubeginn der Garantiezeit für dieses
Gerät; ausgewechselte Teile gehen
in unser Eigentum über.
6. Mängelansprüche aus dieser Garantie verjähren in zwei (2) Jahren ab
dem Zeitpunkt der Übergabe des
Geräts vom Händler an den Verbraucher, der durch den OriginalKaufbeleg (Kassenzettel, Rechnung)
zu belegen ist; wenn dieses Gerät
gewerblich genutzt wird, beträgt die
Verjährungsfrist sechs (6) Monate.
AEG Hausgeräte GmbH, Muggenhofer Straße 135, D-90429 Nürnberg Änderungen vorbehalten

AEG Hausgeräte GmbH
Postfach 1036
D-90327 Nürnberg
http://www.aeg.hausgeraete.de
© Copyright by AEG
822 949 052 - 0702
 Loading...