

Page 1

BS7304001
OVEN USER MANUAL
EN
Page 2

2
FOR PERFECT RESULTS
Thank you for choosing this AEG product. We have
created it to give you impeccable performance for many
years, with innovative technologies that help make life
simpler – features you might not find on ordinary
appliances. Please spend a few minutes reading to get
the very best from it.
ACCESSORIES AND CONSUMABLES
In the AEG webshop, you’ll find everything you need to
keep all your AEG appliances looking spotless and
working perfectly. Along with a wide range of
accessories designed and built to the high quality
standards you would expect, from specialist cookware
to cutlery baskets, from bottle holders to delicate
laundry bags…
Visit the webshop at:
www.aeg-electrolux.com/shop
Page 3

CONTENTS
Contents
4 Safety information
7 Product description
9 Before first use
10 Control panel
12 Daily use
15 Clock functions
17 Automatic programmes
19 Using the accessories
21 Additional functions
23 Care and cleaning
27 What to do if…
28 Environment concerns
3
The following symbols are used in this
user manual:
Important information concerning
your personal safety and information
on how to avoid damaging the
appliance.
General information and tips
Environmental information
Subject to change without notice
Page 4

Safety information
4
SAFETY INFORMATION
Before the installation and use, read this manual carefully:
• For your personal safety and the safety of your property
• For the respect of the environment
• For the correct operation of the appliance.
Always keep these instructions with the appliance also if you move or sell it.
The manufacturer is not responsible if incorrect installation or use results in damage.
Children and vulnerable people safety
• This appliance can be used by children aged from 8 years and above and persons with
reduced physical, sensory or mental capabilities or lack of experience and knowledge if
they have been given supervision or instruction concerning use of the appliance in
safe way and understand the hazards involved. Children shall not play with the appliance.
• Keep all packaging away from children. There is the risk of suffocation or physical injury.
• Keep children and animals away from the appliance when the door is open or the appliance is in operation. There is the risk of injury or other permanent disability.
• If the appliance has Child Lock or Key Lock (Control Lock) function, use it. It prevents
children and animals from accidental operation of the appliance.
General safety
• Do not change the specifications of this appliance. There is the risk of injury and damage to the appliance.
• Do not let the appliance stay unattended during operation.
• Switch off the appliance after each use.
Installation
• Only an approved electrician can install and connect the appliance. Contact an approved service centre. This is to prevent the risks of structural damage or physical injury.
• Make sure that the appliance is not damaged because of transport. Do not connect a
damaged appliance. If necessary, contact the supplier.
• Remove all packaging, stickers and layers from the appliance before first use. Do not
remove the rating plate. It can invalidate the guarantee.
• Make sure that the appliance is disconnected from the power supply during the installation.
• Be careful when you move the appliance. The appliance is heavy. Always use safety
gloves. Do not lift the appliance by the handle.
• The electrical installation must have an isolation device which lets you disconnect the
appliance from the mains at all poles. The isolation device must have a contact opening width of minimum 3 mm.
• You must have correct isolation devices: line protecting cut-outs, fuses (screw type
fuses removed from the holder), earth leakage trips and contactors.
• Before the installation, make sure that the kitchen cabinet has the recess dimensions
applicable.
Page 5

Safety information
• Make sure that the appliance is installed below and adjacent safe structures.
• Keep the minimum distances to the other appliances and units.
• The appliance cannot be positioned on a base.
• Built in ovens and built in cooking surfaces are attached with special connection system. To prevent damage to the appliance, only use an appliance with the appliances
from the same manufacturer.
Electrical connection
• The appliance must be earthed.
• Make sure that the electrical data on the rating plate agree with your domestic power
supply.
• Information on the voltage is on the rating plate.
• Always use a correctly installed shockproof socket.
• Do not use multi-way plugs, connectors and extension cables. There is the risk of fire.
• Do not replace or change the mains cable. Contact the service centre.
• Make sure not to squash or cause damage to the mains plug (if applicable) and cable
behind the appliance.
• Do not pull the mains cable to disconnect the appliance. Always pull the mains plug –
if applicable.
Use
• The appliance is only for domestic use. Do not use the appliance for commercial and
industrial use.
• Only use the appliance for domestic cooking tasks. This is to prevent physical injury to
persons or prevent damage to property.
• Do not use the appliance as a work surface or storage surface.
• The interior of the appliance and the accessories become hot during use. There is the
risk of burns. Use safety gloves when you insert or remove the accessories or pots.
• Be careful when you remove or install the accessories to prevent damage to the oven
enamel.
• Always stay away from the appliance when you open the door while the appliance is
in operation. Hot steam can release. There is the risk of skin burns.
• To prevent damage or discoloration to the enamel:
– do not put any objects directly on the appliance floor and do not cover it with alu-
minium foil;
– do not put hot water directly into the appliance;
– do not keep moist dishes and food in the appliance after you finish the cooking.
• Discoloration of the enamel has no effect on the performance of the appliance so it is
not a defect in the sense of the warranty law.
• Do not apply pressure on the open door.
• Always close the appliance door when you cook, even while grilling.
5
Page 6

Safety information
6
Care and cleaning
• Before maintenance, switch off the appliance and disconnect the appliance from the
power supply.
• Before maintenance, make sure that the appliance is cold. There is the risk of burns.
There is the risk that the glass panels can break.
• Keep the appliance clean at all times. A build-up of fats or other foodstuff can result
in a fire.
• Regular cleaning prevents the surface material from deteriorating
• Use a deep baking tray for very moist cakes to prevent that fruit juices cause stains
that can be permanent.
• For your personal safety and the safety of your property, only clean the appliance with
water and a soap. Do not use flammable products or products that can cause corrosion.
• Do not clean the appliance with steam cleaners, high-pressure cleaners, sharp objects,
abrasive cleaning agents, abrasive sponges and stain removers
• If you use an oven spray, follow the instructions from the manufacturer.
• Do not clean the glass door with abrasive cleaning agents or metal scraper. Heat resistant surface of the inner glass can break and shatter.
• When the door glass panels are damaged they become weak and can break. You must
replace them. Contact the service centre.
• Be careful when you remove the door from the appliance. The door is heavy!
• Do not clean catalytic enamel (if applicable).
Risk of fire
• Open the door carefully. The use of ingredients with alcohol can cause a mixture of
alcohol and air. There is the risk of fire.
• Do not let sparks or open flames come near the appliance when you open the door.
• Do not put flammable products or items that are wet with flammable products, and/or
fusible objects (made of plastic or aluminium) in, near or on the appliance.
Steam cooking
• Do not open the oven door during Steam cooking. Steam can release. There is the risk
of skin burns. There is the risk that steam causes moisture damage to units.
Oven lamp
• Disconnect the appliance from the power supply before the replacement of the oven
lamp. There is the risk of electrical shock!
Service centre
• Only an approved engineer can repair or work on the appliance. Contact an approved
service centre.
• Use only original spare parts.
Disposal of the appliance
• To prevent the risk of physical injury or damage
Page 7

– Disconnect the appliance from the power supply.
– Cut off the mains cable and discard it.
– Discard the door catch. This prevents children or small animals from being closed
inside of the appliance. There is the risk of suffocation.
PRODUCT DESCRIPTION
General overview
1
5
4
Product description
2
3
4
5
6
7
11
3
2
1
10
1 Control panel
2 Electronic programmer
3 Water tank
4 Socket for the core temperature sensor
5 Heating element
6 Oven lamp
7 Fan
8 Rear wall heating element
9 Steam generator
10 Shelf support, removable
11 Shelf positions
7
8
9
Page 8

Product description
8
Oven accessories
•
Wire shelf
For cookware, cake tins, roasts.
•
Baking tray
For cakes and biscuits.
•
Grill / roasting pan
To bake and roast or as pan to collect fat.
•
Steam set
Unperforated and perforated food container.
Page 9

•
Sponge 150
For absorbing residual water from the
steam generator.
•
Core Temperature Sensor
To measure how far the food is cooked.
BEFORE FIRST USE
WARNING!
Refer to "Safety information" chapter.
Initial Cleaning
• Remove all parts from the appliance.
• Clean the appliance before first use.
Refer to chapter "Care and Cleaning".
Before first use
9
First connection to the mains
After first connection to the mains all symbols in the display are on for some seconds.
For the subsequent few seconds the display shows software version.
First setting the time of day
After the software version goes off, the display shows "h" and "12:00".
Setting the time of day:
1. Touch
2. Touch
3. Touch
4. Touch
The Temperature/Time display shows new time.
Changing the time of day
You can change the time of day only if the appliance is off.
Touch . flashes in the display. To set new time of day use the above procedure.
or to set hours.
or .
or to set minutes.
or .
Page 10

Control panel
10
If you do not touch at the end, the settings save automatically after five seconds.
CONTROL PANEL
Electronic programmer
1
2 3 4 5 6 7 8 9 10
Use the sensor fields to operate the appliance.
Sensor Field Function Description
1
2
- DISPLAY Shows the current settings of the appliance.
ON/OFF To activate and deactivate the appliance.
3
4
5
6
7
8
9
OPTIONS To set an oven function or programme.
MY FAVOURITE PRO-
GRAMME
TEMPERATURE / FAST
HEAT UP
UP, DOWN To choose an oven function, clock function and
OK To confirms the selection or setting.
OVEN LIGHT To set the oven lamp on or off.
CLOCK To set the clock function.
Straight access to the oven function when the
appliance is off.
You can store your favourite programme. Use it
to access your favourite programme directly, also when the appliance is off.
To set and examine cavity temperature or core
temperature sensor temperature. If you press it
and hold for three seconds, it turns Fast heat up
function ON and OFF.
Straight access to the temperature setting of
the first oven function when the appliance is
off.
to set the minute minder, temperature or time
of day.
Page 11
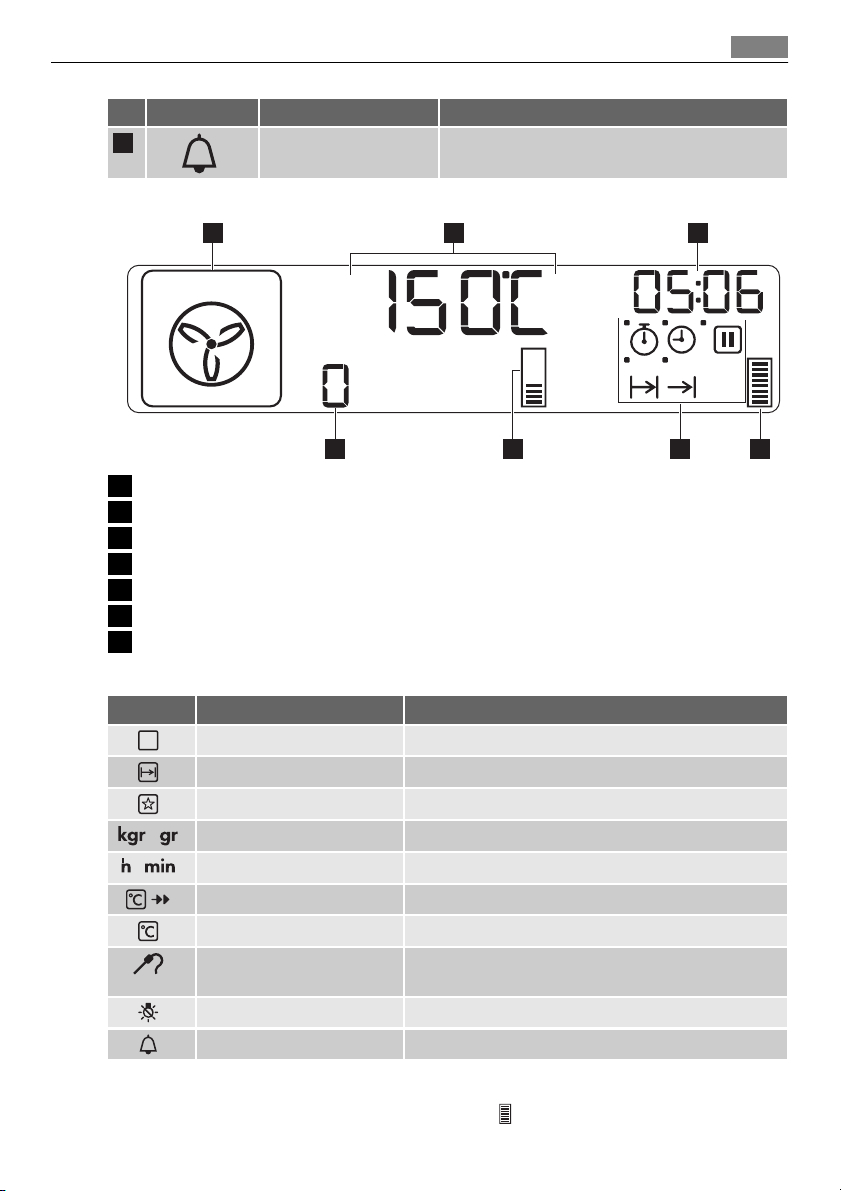
Display
Control panel
Sensor Field Function Description
10
1 2 3
MINUTE MINDER To set the minute minder.
11
1 Oven function symbol
2 Temperature/Time display
3 Clock/Residual heat display (also Minute minder and Time of day)
4 Residual heat indicator
5 Indicators for the clock functions (refer to the table "Clock functions")
6 Heat up indicator
7 Number of oven function/programme
Other indicators of display
Symbols Name Description
Options
Automatic programme
My favourite programme
kgr/gr
/
/
h/min
Temperature / fast heat up
Temperature
Core temperature sensor
Oven light
Minute minder
6
You can choose an oven function.
You can choose an oven programme.
The favourite programme operates.
An oven programme with weight input operates.
A clock function operates.
The function operates.
You can examine or change the temperature.
The core temperature sensor is in the core temperature sensor socket.
The light is off.
The minute minder function operates.
5 47
Heat up indicator
If you set an oven function, the bars in the display come on one by one. The bars
show that the temperature in the appliance increases or decreases.
Page 12
Daily use
12
When the appliance is at the set temperature Heat up indicator goes off the display.
DAILY USE
WARNING!
Refer to "Safety information" chapter.
To operate the appliance you can use:
•
manual mode -to set an oven function, the temperature and the cooking time manually.
•
automatic programmes -to prepare a dish when you do not have a knowledge or experience in cooking.
Setting the oven function
1. Touch .
The display shows a preset temperature, symbol and number of the oven function.
flashes in the display.
2. Touch
3. Touch
If you activate the appliance with or and do not set any oven function or programme the appliance will deactivate automatically after 20 seconds.
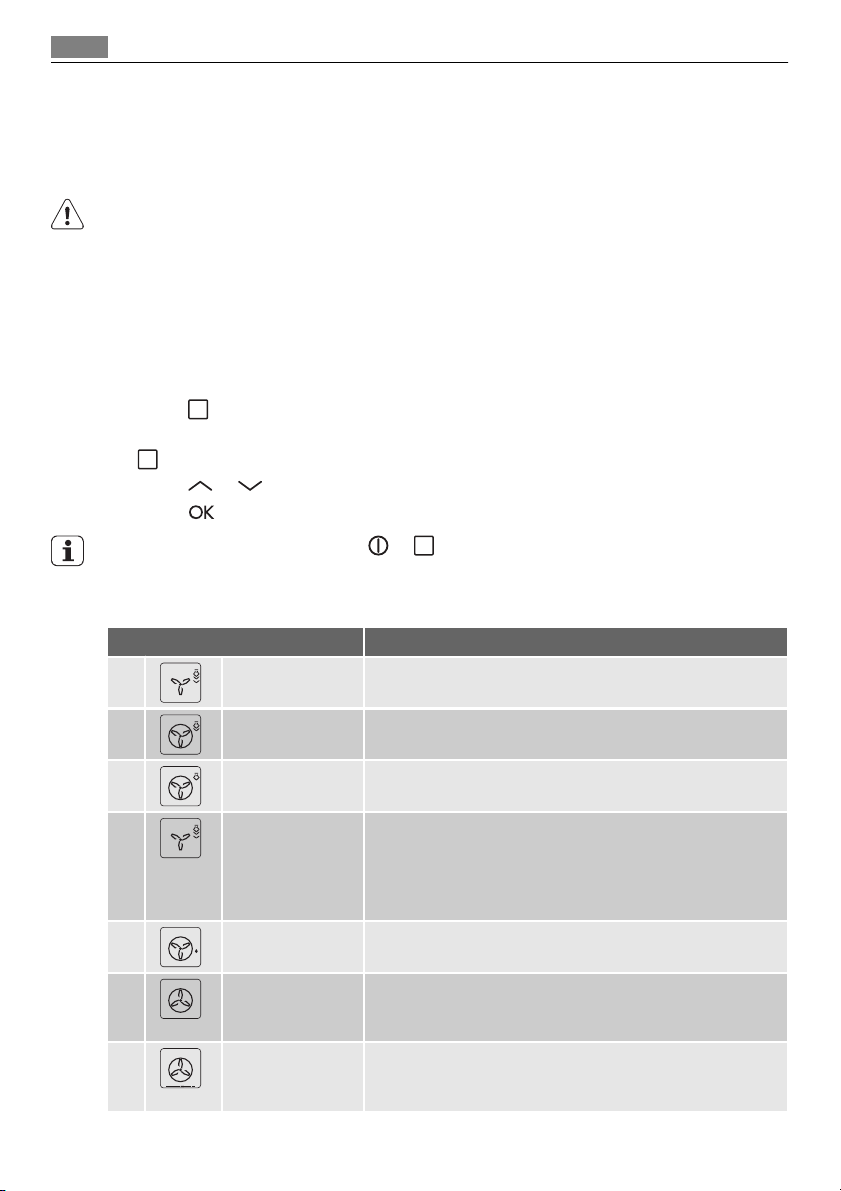
Oven Functions
1
2
3
4
5
6
7
or to set an oven function.
or the appliance starts automatically after five seconds.
Oven function Application
Full Steam For vegetables, fish, potatoes, rice, pasta or special side-
Half Steam + Heat For dishes with a high moisture content and for poaching
Quarter Steam +
Heat
ECO Steam ECO functions let you to optimize the energy consumption
Moist Fan Baking For energy-saving baking and cooking of mainly dry bakery
True Fan Cooking To bake maximum on three oven shelf positions at the
Pizza Setting To bake on one shelf position food with a more intensive
dishes.
fish, custard royale and terrines.
To bake bread, roast large pieces of meat or to warm up chilled and frozen meals.
during cooking. Thus it is necessary to set the cooking time
first. To get more information about the recommended settings, refer to the cooking tables with the equivalent usual
oven function.
items as well as for baking in tins on one shelf position.
same time. Decrease the oven temperatures (20-40 °C) compared with Conventional. And to dry food.
browning and a crispy base. Decrease the oven temperatures (20-40 °C) compared with Conventional cooking.
Page 13
Daily use
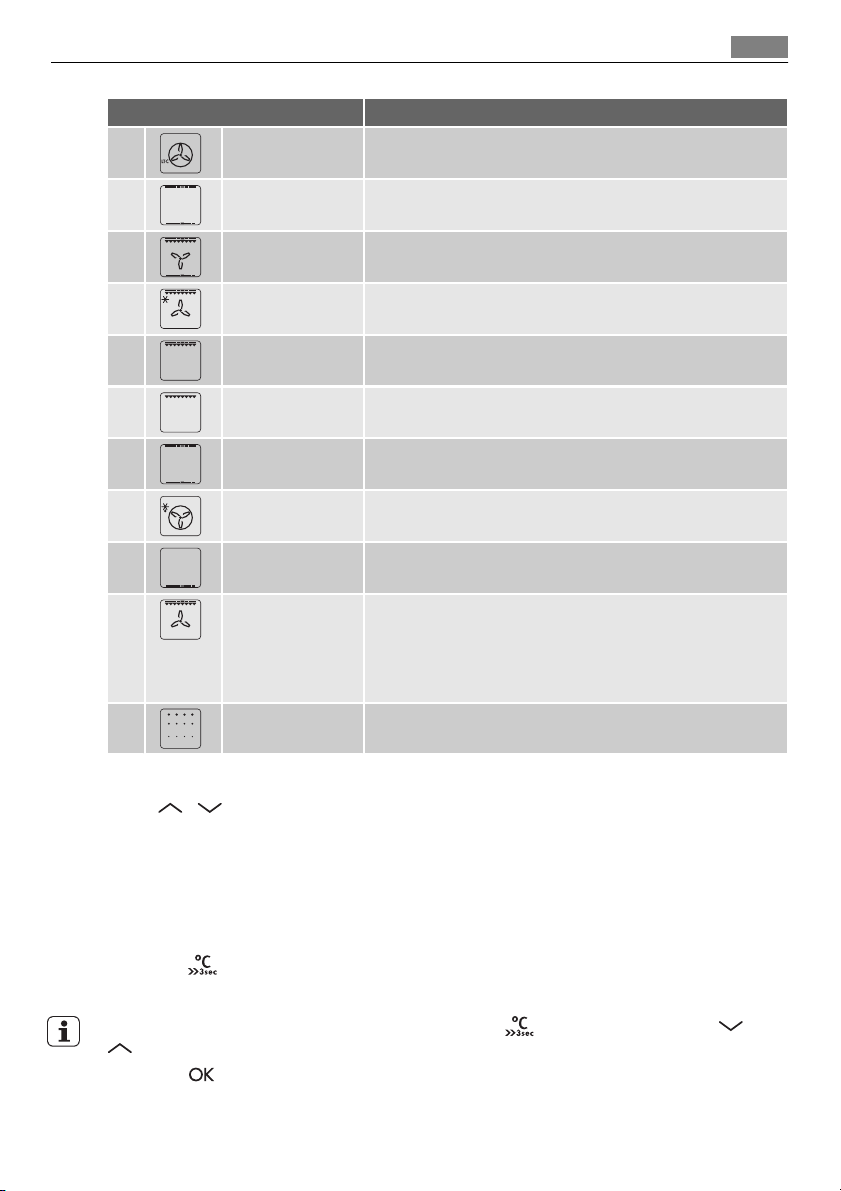
Oven function Application
8
Slow Cook To prepare very lean, tender roasted food.
13
10
11
12
13
14
15
16
17
18
9
Conventional
Cooking
Frozen Foods To make your convenience food like e.g. French Fries, Wedg-
Turbo Grilling To roast larger meat joints or poultry with bones on one
Fast Grilling To grill flat food in large quantities. To toast bread.
Grilling To grill flat food in the middle of the grill. To toast bread.
Keep Warm To keep food warm.
Defrost To defrost frozen food.
Bottom Heat To bake cakes with a crispy base, and to preserve food.
ECO Roasting ECO functions let you to optimize the energy consumption
Steam Cleaning To clean the oven interior using steam.
To bake and roast food on one shelf position.
es, spring rolls crispy.
shelf position. Also to gratinate and to brown.
during cooking. Thus it is necessary to set the cooking time
first. To get more information about the recommended settings, refer to the cooking tables with the equivalent usual
oven function.
Changing the oven temperature
Touch / to change the temperature in steps of 5 °C.
When the appliance is at the set temperature, an acoustic signal operates three times
and the Heat up indicator goes off.
Examining the oven temperature
You can examine the temperature in the appliance when the function or programme operates.
1. Touch
The Temperature/Time display shows the temperature in the appliance.
If you want to change the oven temperature, touch one more time and use or
.
2. Touch
after five seconds.
.
to go back to the set temperature or the display will show it automatically
Page 14
Daily use
14
Fast heat up function
The fast heat up function decreases the heat up time.
Do not put food in the oven when the fast heat up function operates.
Activating the fast heat up function : Touch and hold
If you activate the fast heat up function, the bars on the display
show that the function operates.
The fast heat up is not available with every oven function. An acoustic signal operates if
the fast heat up is not available for set function.
for more then three seconds.
flash one by one to
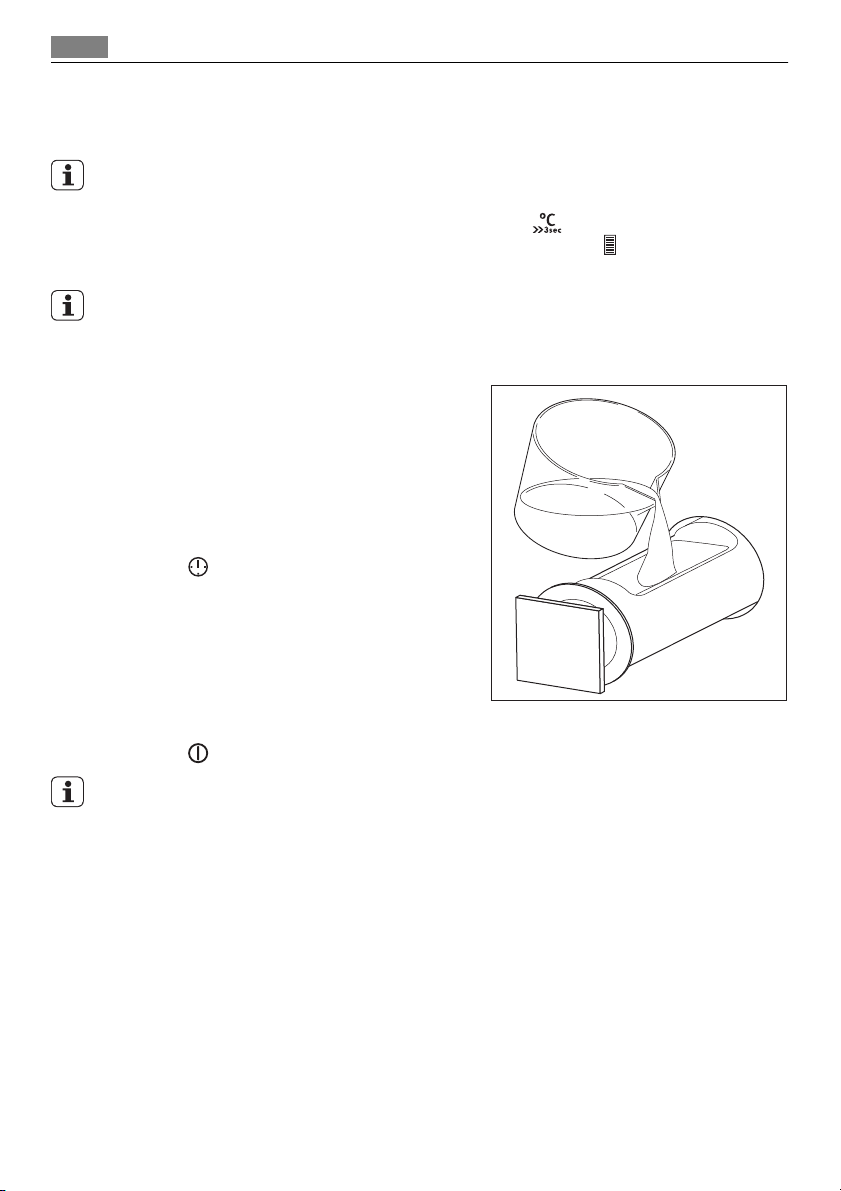
Steam cooking
1. Fill water (800 ml) into the water tank in
the control panel.
The water supply is for approximately 40
minutes.
2. Activate the appliance.
3. Set the Steam function (refer to table
"Oven function") and temperature.
4. Touch
function (refer to "Setting the END" or
"Setting the DURATION"). The first steam
shows after approximately two minutes.
An acoustic signal sounds when the temperature is approximately 96°C.
Another signal sounds at the end of cooking time.
5. Touch
When the water tank is empty an acoustic signal sounds.
to set the DURATION or END
to deactivate an acoustic signal and the appliance.
After the appliance cools down, soak up all remaining water from the steam generator
with the Sponge 150 and clean if it is necessary with some vinegar.
Let the appliance dry fully with the open door.
Page 15
Clock functions
Energy saving
The appliance has same features that help you save energy during everyday cooking:
•
Residual heat:
– the oven function or programme operates: the heating elements are deactivated
10% time earlier (the lamp and fan continue to operate). The condition: the cooking time is longer then 30 minutes or you use the clock functions (Duration, End,
Time delay).
– the oven is off: you can use the heat to keep the food warm. The indication: the clock/
Residual heat display shows the remaining temperature, the bars show the decreasing temperature.
•
Oven lamp off - touch
•
Display off - if necessary, deactivate the appliance. Touch
to deactivate the oven lamp during cooking;
and at the same
time until the display goes out (or on).
•
Eco functions - refer to "Oven function".
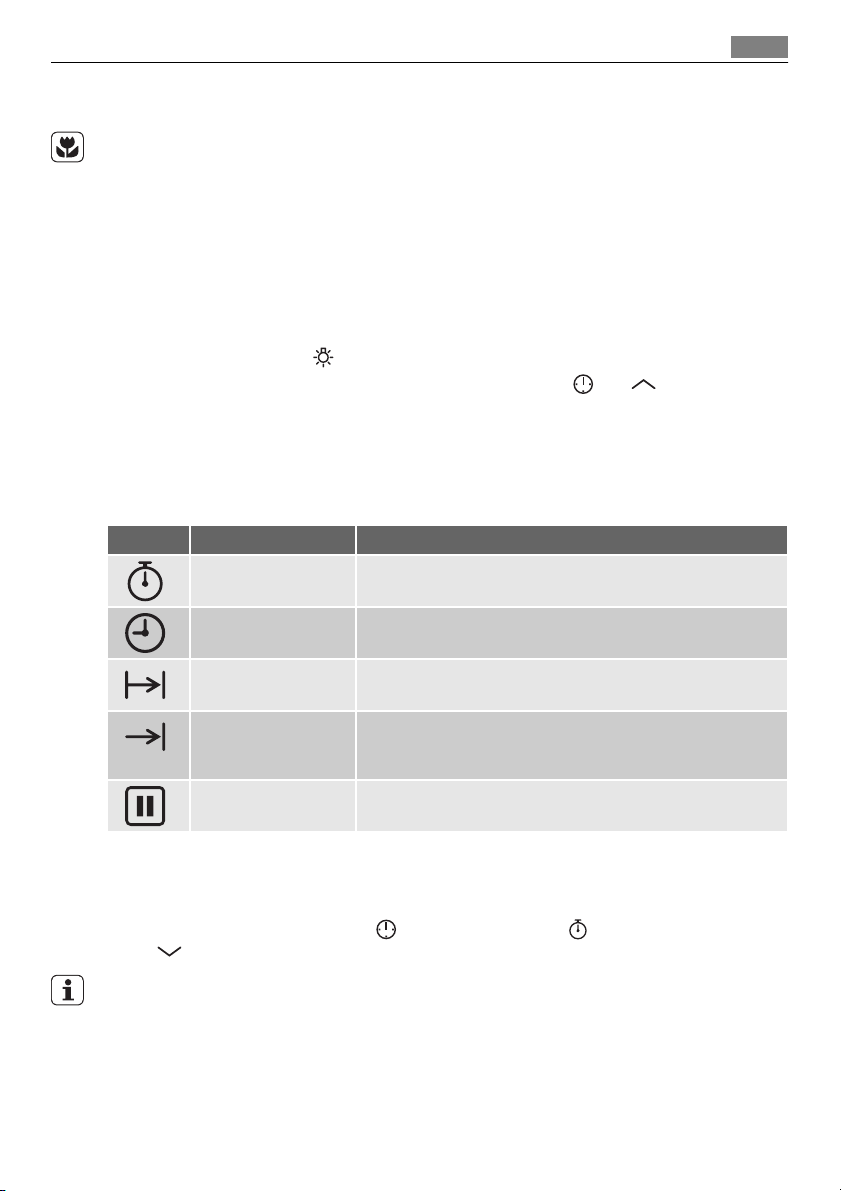
CLOCK FUNCTIONS
SYMBOL FUNCTION DESCRIPTION
COUNT UP TIMER To set count up. It shows how long the appliance operates.
TIME OF DAY To examine the time of day. For changing the time of day
DURATION To set how long the appliance operates.
This function has no effect on the operation of the appliance.
refer to 'Setting the time of day'.
15
END To set when the appliance deactivates. You can use Duration
SET+GO To start the appliance with necessary settings with only one
and End at the same time (Time delay), if the appliance is to
be activate and deactivate automatically later.
touch of the sensor field, any time later.
Count Up Timer
Use the Count Up Timer to monitor how long the appliance operates. It is on immediately when the appliance starts to heat.
Reset the Count Up Timer: touch
Touch
until the display shows "00:00" and the Count Up Timer starts to count up again.
again and again until flashes in the display.
You can not use Count Up Timer when Duration or End is set.
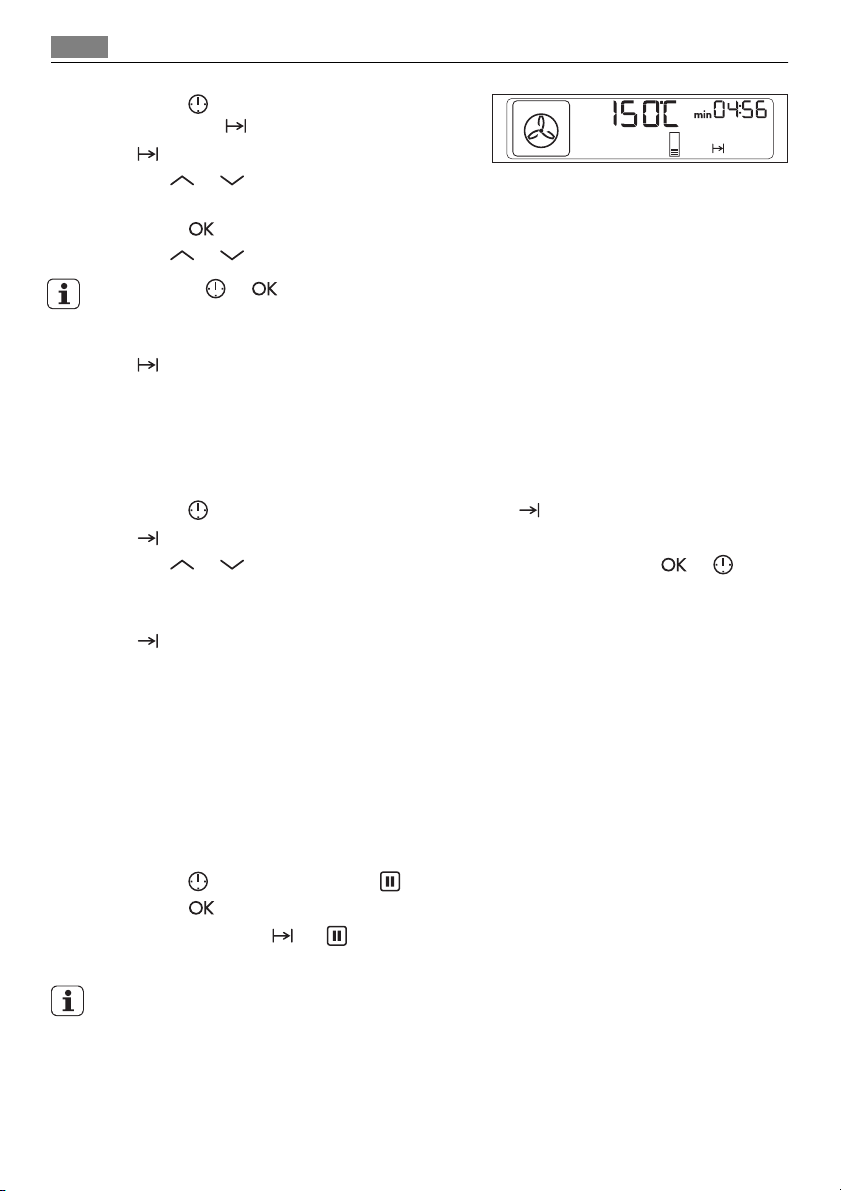
Setting the DURATION
1. Activate the appliance and set an oven function and temperature.
Page 16
Clock functions
16
2. Touch again and again until the display shows
flashes in the display.
3. Use
TION.
4. Touch
5. Use
If you touch or during setting hours for DURATION, the appliance goes to setting
of the END function.
6. When the set time ends, an acoustic signal operates for two minutes.
symbol and time setting flash in the display. The appliance deactivates.
Touch any sensor field or open the oven door to stop an acoustic signal.
7. Deactivate the appliance.
.
or to set minutes for DURA-
to confirm
or to set hours for DURATION.
Setting the END
1. Activate the appliance and set an oven function and temperature.
2. Touch
3. Use
confirm.
4. When the set time ends, an acoustic signal operates for two minutes.
5. Touch any sensor field or open the oven door to stop an acoustic signal.
6. Deactivate the appliance.
again and again until the display shows .
flashes in the display.
or to set END (first you set minutes and then hours) and or to
symbol and time setting flash in the display. The appliance deactivates.
Setting the SET+GO
To start of the appliance with necessary settings with only one touch of the sensor field,
any time later.
1. Set an oven function (or programme) and temperature (refer to "Setting the oven
function" and "Changing the oven temperature").
2. Set DURATION (refer to "Setting the DURATION").
3. Touch
4. Touch
The display shows
5. Touch any sensor field (apart from ON/OFF) to start the SET+GO function.
You can use SET+GO function only if DURATION is set.
again and again until will flash in the display.
to set the SET+GO function.
and with a dot. This dot shows which clock function is activated.
Check result (selected models only)
If you set END or DURATION function, 2 minutes before end of cooking an acoustic signal sounds and lamp activates. The appliance goes to the setting of the END or DURA-
Page 17
Automatic programmes
TION function. During these two minutes you can examine the cooking results and, if
necessary, add END or DURATION time.
Setting the Time delay function
DURATION and END can be used at the same time, if the oven is to be switched on
and off automatically later. In this case first set DURATION
(refer to "Setting the DURATION" and "Setting the END ").
When the Time delay function is activated the display shows static symbol of the oven
function,
Residual heat display.
with a dot and . The dot shows which clock function is on in the Clock/
and then END function
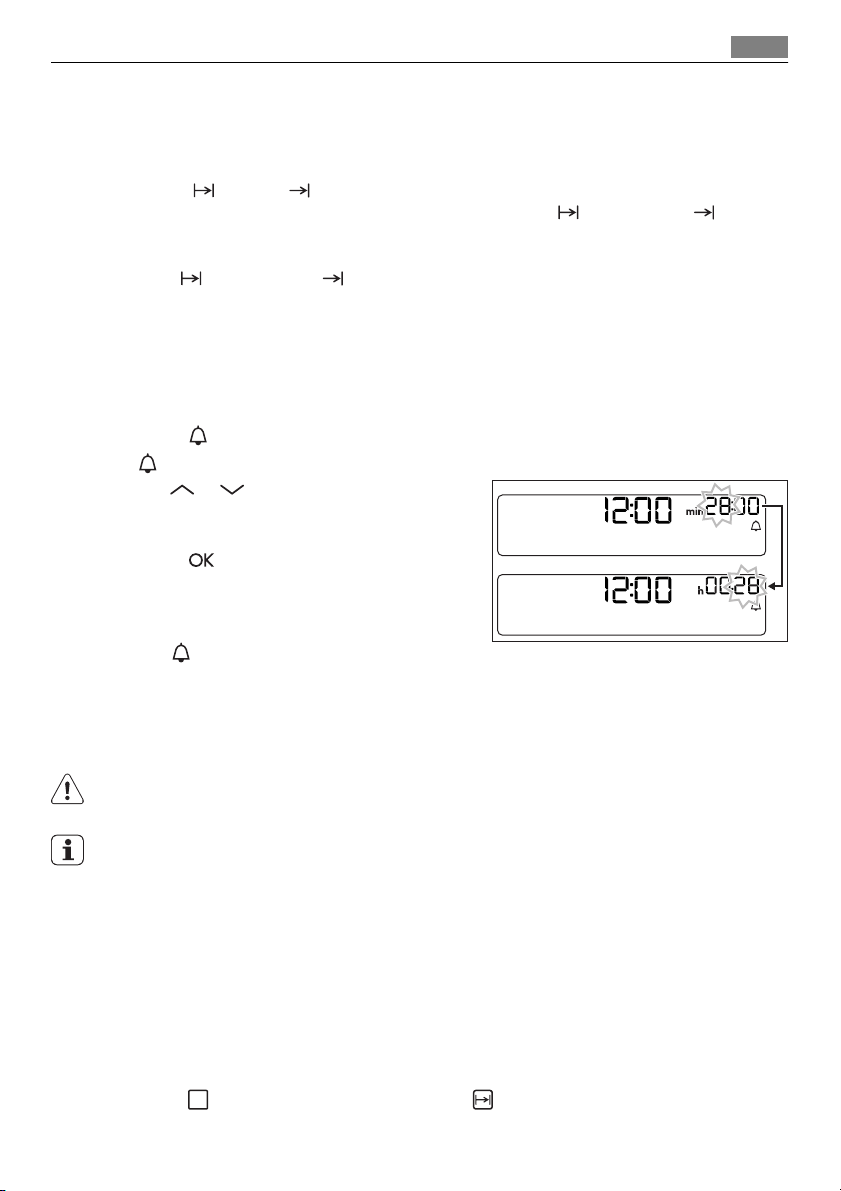
Setting the MINUTE MINDER
Use the MINUTE MINDER to set a countdown (maximum 23:59 minutes). This function
has no effect on the operation of the oven. You can set the MINUTE MINDER any time,
also if the appliance is off.
1. Touch
2. Use
First you set seconds and then minutes
and hours.
3. Touch
automatically after five seconds.
4. When set time ends, an acoustic signal
operates for two minutes and "00:00"
and
5. Touch any sensor field or open the oven door to stop an acoustic signal.
.
and "00" flash in the display.
or to set MINUTE MINDER.
or the MINUTE MINDER starts
flash in the display.
17
AUTOMATIC PROGRAMMES
WARNING!
Refer to "Safety information" chapter.
There are 25 automatic programmes and recipes. Use an automatic programme when
you do not have a knowledge or experience how to prepare a dish. You can find the recipes for the automatic programmes in the "Recipe book".
There are three types of automatic programmes:
• Automatic recipes;
• Automatic programmes with weight input;
• Automatic programmes with food sensor;
Automatic recipes
Setting an automatic recipe:
1. Touch
The display shows symbol and number of the automatic programme.
two times until the display shows .
Page 18
Automatic programmes
18
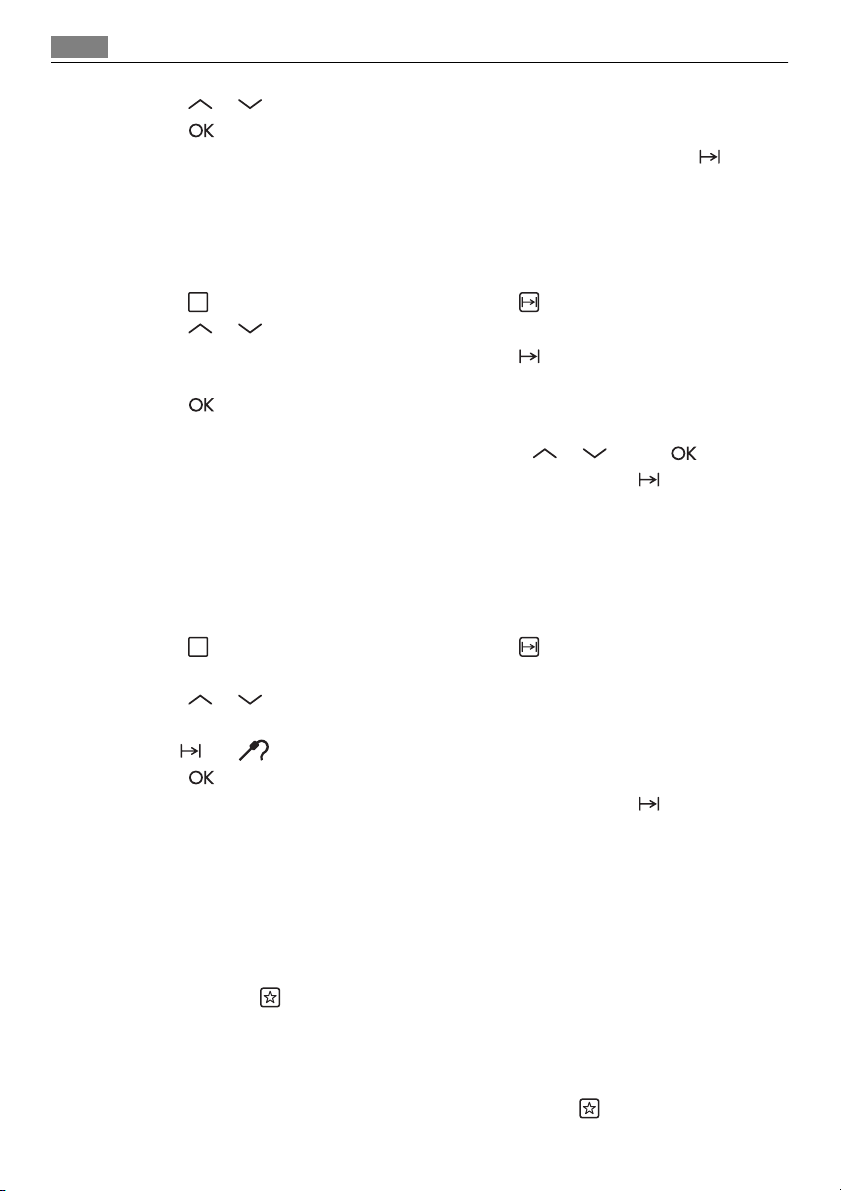
2. Touch or to choose the automatic recipes.
3. Touch
4. When set time ends, an acoustic signal operates for two minutes. Symbol
The appliance deactivates.
5. Touch any sensor field or open the oven door to stop an acoustic signal.
or the automatic recipe activates automatically after five seconds.
Automatic programmes with weight input
If you set the weight of the meat, the appliance calculates the roasting time.
1. Touch
2. Touch
The display shows: cooking time, duration symbol
measurement (kg, g).
3. Touch
4. The appliance starts. A symbol of the weight unit flashes in the display. During this
time you can change the default weight value with
5. When set time ends, an acoustic signal operates for two minutes.
The appliance deactivates.
6. Touch any sensor field or open the oven door to stop an acoustic signal.
again and again until the display shows .
or to set the weight programme (refer to "Recipe book").
, a default weight, a unit of
or the settings save automatically after five seconds.
or . Touch .
Automatic programmes with core temperature sensor
The core temperature of the food is default and fixed in programmes with core temperature sensor. The programme ends when the appliance is at the set core temperature.
1. Touch
2. Install the core temperature sensor (refer to "The core temperature sensor").
3. Touch
When a core temperature sensor programme is set, the display shows the cooking
time,
4. Touch
5. When set time ends, an acoustic signal operates for two minutes.
The appliance deactivates.
6. Touch any sensor field or open the oven door to stop an acoustic signal.
again and again until the display shows .
or to set the core temperature sensor programme.
and .
or the settings save automatically after five seconds.
flashes.
flashes.
flashes.
My favourite programme function
Use this function to save your favourite settings of temperature and time for oven function or programme.
1. Set the temperature and time for an oven function or programme.
2. Touch and hold
An acoustic signal sounds.
3. Deactivate the appliance.
Using the my favourite programme function:
•
Activating the my favourite programme function: Touch
vates your favourite programme.
for more then three seconds.
. The appliance acti-
Page 19
Using the accessories
19
•
Deactivating the my favourite programme function: Touch
When the my favourite programme function operates, you can change the time and temperature.
.
USING THE ACCESSORIES
WARNING!
Refer to "Safety information" chapter.
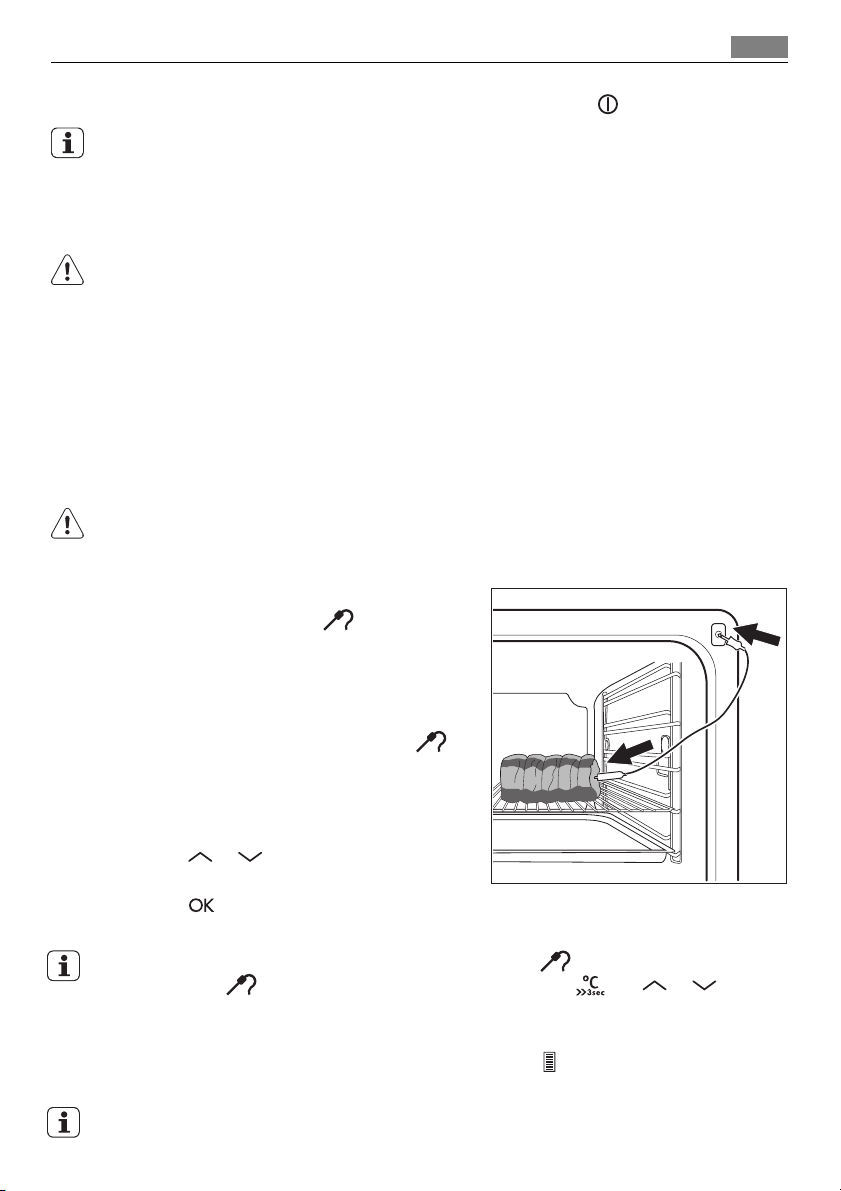
Core Temperature Sensor
The core temperature sensor measures the core temperature of the meat. When the
meat is at the set temperature, the appliance deactivates.
There are two temperatures to set:
• The oven temperature: refer to the table for roasting in the recipe book.
• The core temperature: refer to the table for the core temperature sensor in the recipe
book.
Only use the core temperature sensor supplied or original replacement parts.
1. Activate the appliance.
2. Put the point of the core temperature
sensor (with the symbol
dle) into the centre of the meat.
3. Put the plug of the core temperature sensor into the socket at the front of the appliance.
The display shows a flashing symbol
and the default set core temperature.
The temperature is 60 °C during the first
use, and the last set value during each
subsequent use.
4. Touch
ature.
5. Touch
ically after 5 seconds.
or to set the core temper-
or the settings save automat-
on the han-
You can set the core temperature only when the symbol flashes. If the display shows
a static symbol
new value.
6. Set the oven function and, if necessary, the oven temperature.
The display shows the current core temperature and
between the set oven temperature and the current oven temperature).
The core temperature sensor must stay in the meat and in the socket during the cooking.
before you set the core temperature, use and or to set a
(which shows the relation
Page 20
Using the accessories
20
While the appliance calculates the approximate duration time, the value of the Count Up
Timer function shows in the Timer/Residual heat display. When the first calculation ends,
the Timer/Residual heat display shows - , and then the approximate duration of the cooking.
The appliance continues to calculate the duration during the cooking. The display updates at intervals with the new duration value.
7.
When the meat is at the set core temperature, the core temperature and
An acoustic signal sounds for two minutes.
Touch a sensor field to deactivate the acoustic signal.
8. Remove the core temperature sensor from the socket and remove the meat from the
appliance.
WARNING!
Be careful when you remove the core temperature sensor. It is hot. There is a risk of burns.
9. Deactivate the appliance.
When you put the core temperature sensor into the socket, you cancel the settings for
the clock functions.
When you cook with the core temperature sensor, you can change the temperature
shown in the Temperature/Time display. After you put the core temperature sensor in the
socket and set an oven function and temperature, the display shows the current core temperature.
Touch
• The current core temperature
• The oven set temperature
• The current oven temperature.
The set core temperature changes into current core temperature and current oven temperature changes into set oven temperature.
again and again to see three other temperatures:
flash.
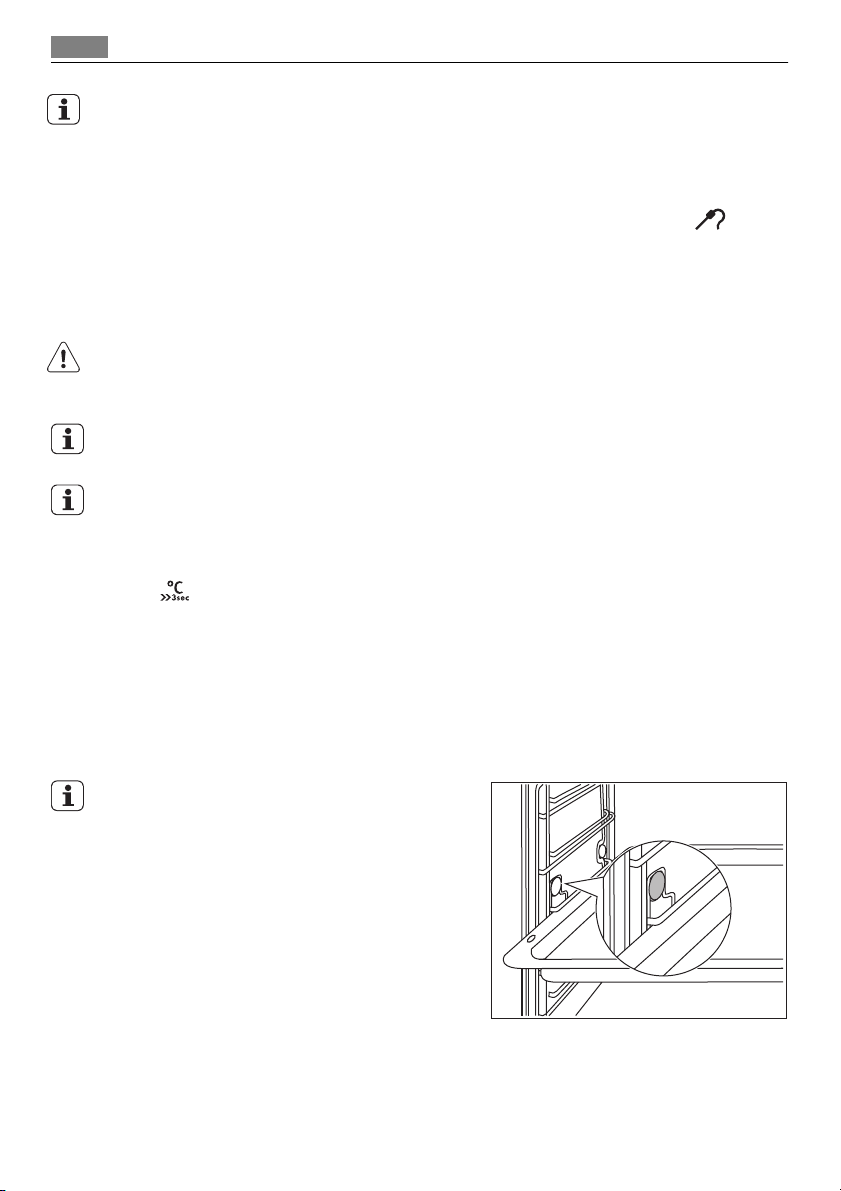
Inserting the Oven Accessories
The pan and the wire shelf have side edges.
These edges and the shape of the guide-bars causes the anti-tilt safety for the oven accessories.
Page 21
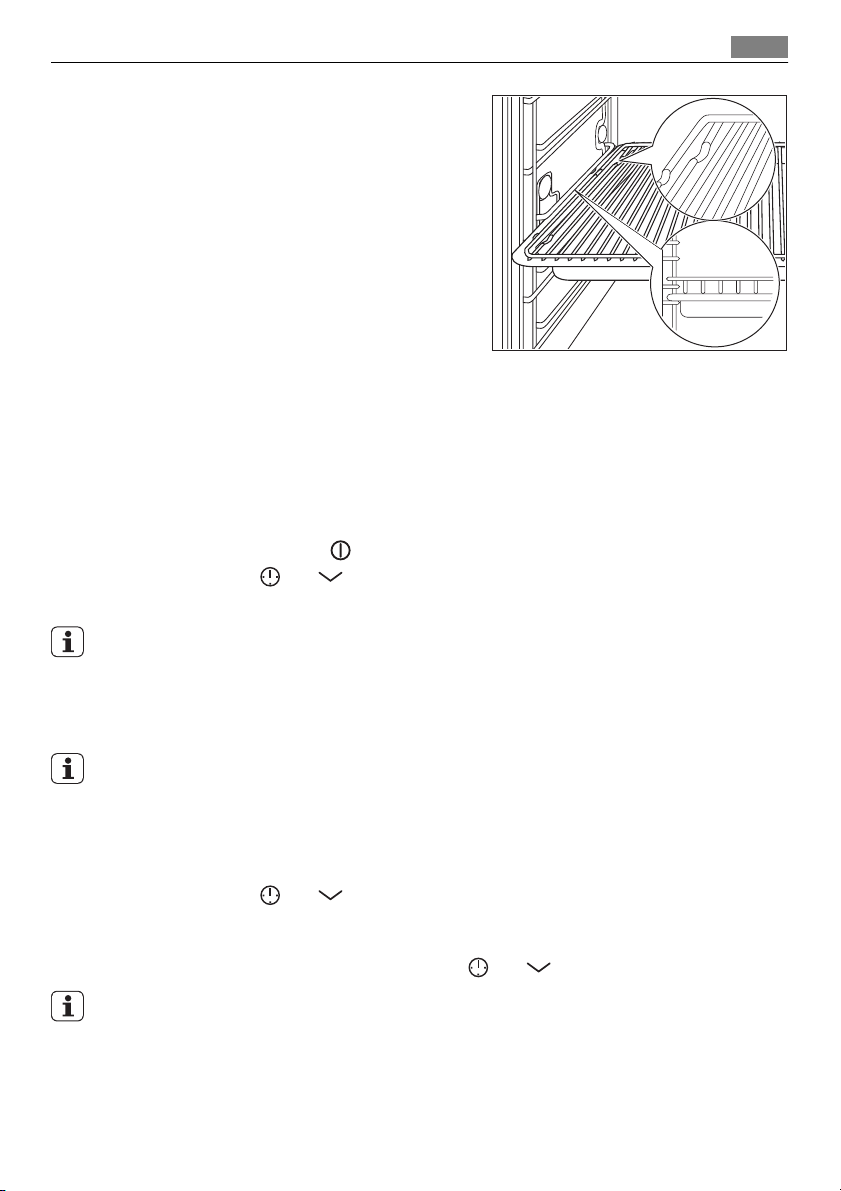
Inserting the wire shelf and pan together
Put the wire shelf on the pan. Push the pan between the guide-bars of one of the shelf positions.
ADDITIONAL FUNCTIONS
Child safety
You cannot activate the appliance on if the child safety device operates.
Activating/Deactivating the child safety device:
1. Deactivate the appliance
2. Touch and hold
3. An acoustic signal sounds.
SAFE goes on in the display when you touch any key.
If the oven has "Pyro Cleaning" function, the door is locked.
and at the same time for minimum 2 seconds.
. Do not set any oven function.
Additional functions
21
Control Lock
The Control Lock prevents you to accidentally change the oven functions.
You can activate the Control Lock only when the appliance operates.
Activate the Control Lock:
1. If necessary, activate the appliance.
2. Do the necessary settings.
3. Touch and hold
Loc goes on in the display. The Control Lock is on.
If you touch any of the sensor fields when the Control Lock, an acoustic signal operates.
To deactivate the Control Lock, touch and hold
The Control Lock does not prevent you accidentally deactivate the appliance. If you deactivate the appliance, the Control Lock is off.
and at the same time.
and at the same time.
Settings menu
The settings menu lets you to add or remove functions from the main menu (for example: you can set on or off the Residual heat indicator). Settings menu has maximum
Page 22
Additional functions
22
eight settings (from SET1 to SET7). The number of the settings is different for different
models. Look into the table below to see the possible value of each setting.
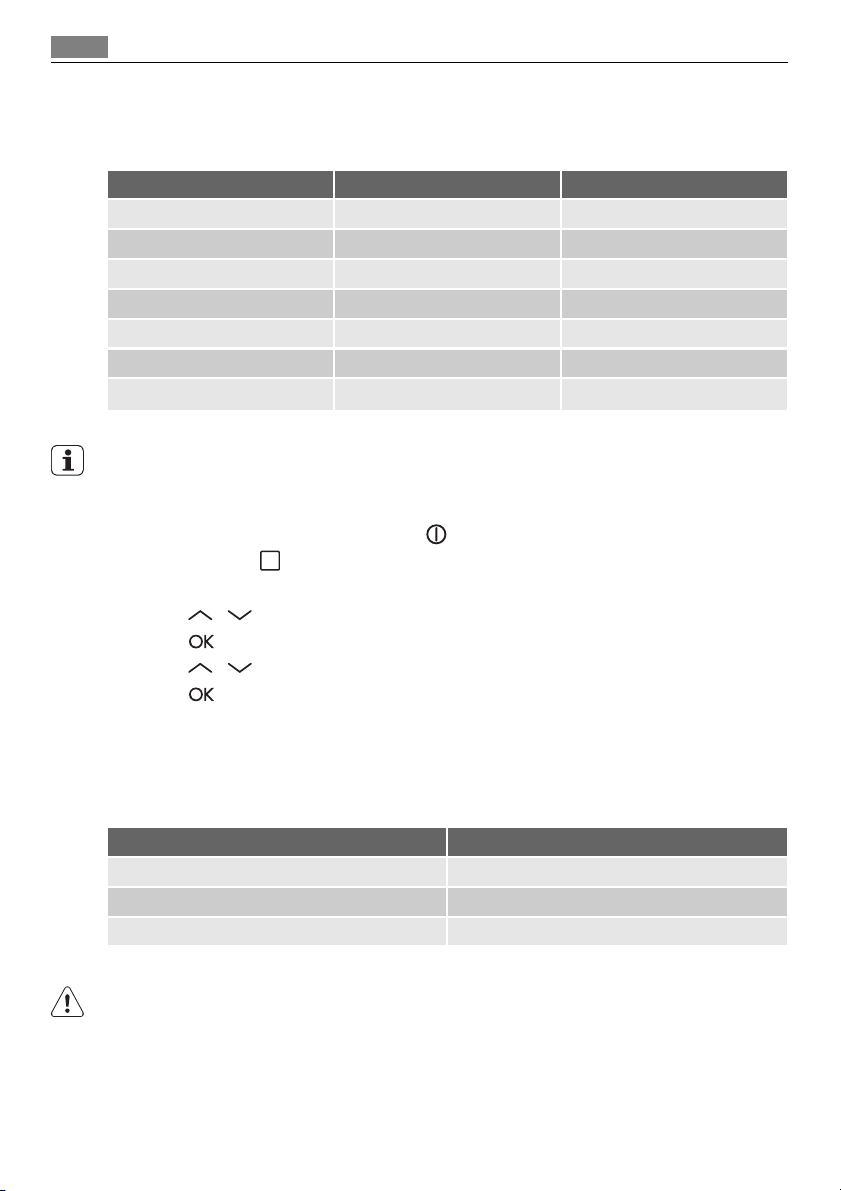
Settings menu
Indicator of the setting menu Description Value to set
SET1 SET+GO ON/OFF
SET2 RESIDUAL HEAT INDICATOR ON/OFF
SET3 KEY TONE CLIC/BEEP/OFF
SET4 FAULTY TONE ON/OFF
SET5 SERVICE MENU ON/OFF
SET6 RESTORE SETTINGS YES/NO
1)
SET7
1) Selected models only
TIME EXTENSION ON/OFF
You can set the settings menu only when the appliance is off.
Activate the Settings menu:
1. If necessary, deactivate the appliance
2. Touch and hold
for three seconds.
.
The display shows "SET1" and "1" flashes.
3. Touch
4. Touch
5. Touch
6. Touch
/ to set the setting.
.
/ to change the value of the setting.
.
Automatic switch-off
For safety reasons the appliance deactivates automatically after some time:
• if an oven function operates.
• if you do not change the oven temperature.
Oven temperature Switch-off time
30 °C -120 °C 12.5 h.
120 °C - 200 °C 8.5 h.
200 °C -230 °C 5.5 h.
After an automatic switch-off, touch a sensor field to operate the appliance again.
The Automatic switch-off works with all oven functions, apart from Light, Low temperature cooking, Core temperature sensor, Duration, End, Time delay.
Page 23

Care and cleaning
Brightness of the display
There are two modes of display's brightness:
• Night brightness - when the appliance is off, the brightness of the display is lower
between 22:00 and 06:00;
•Day brightness:
– when the appliance is on;
– if you touch any of the sensor fields during night brightness (apart from ON/OFF),
the display goes back to day brightness mode for next 10 seconds;
– if the appliance is off and you set the minute minder. When the minute minder func-
tion ends, the display goes back to night brightness;
Cooling fan
When the appliance operates, the cooling fan activates automatically to keep the surfaces of the appliance cool. If you deactivate the appliance, the cooling fan can continue
to operate until the appliance cools down.
CARE AND CLEANING
WARNING!
Refer to "Safety information" chapter.
Notes on cleaning:
• Clean the front of the appliance with a soft cloth with warm water and cleaning agent.
• To clean metal surfaces use a usual cleaning agent
• Clean the oven interior after each use. Thus you can remove dirt more easily and it
does not burn on.
• Clean stubborn dirt with a special oven cleaner.
• Clean all oven accessories (with a soft cloth with warm water and cleaning agent) af-
ter each use and let them dry.
• If you have nonstick accessories, do not clean them using an aggressive agents, sharp
edged objects or dishwasher. It can cause a damage to the nonstick coating.
23
Steam cleaning
1. Remove the worst of the residual dirt manually.
2. Place water (approximately 250 ml) and 3 tablespoons of vinegar directly into the
steam generator.
3. Set Steam cleaning function (refer to sections "Oven functions").
The display shows duration of the process (15 minutes) and preset temperature (96°C).
Touch OK .
The cleaning starts.
4. An acoustic signal sounds when steam cleaning is finished.
Touch any sensor field to stop an acoustic signal.
5. Wipe out the appliance with a soft cloth.
Page 24
Care and cleaning
24
Remove water from the steam generator with the Sponge 150 and rub dry.
Keep the door open for approximately 1 hour to let the appliance dry fully.
You can use the End function to delay start of cleaning process (refer to "Setting the END").
Shelf support
You can remove the shelf support to clean the side walls.
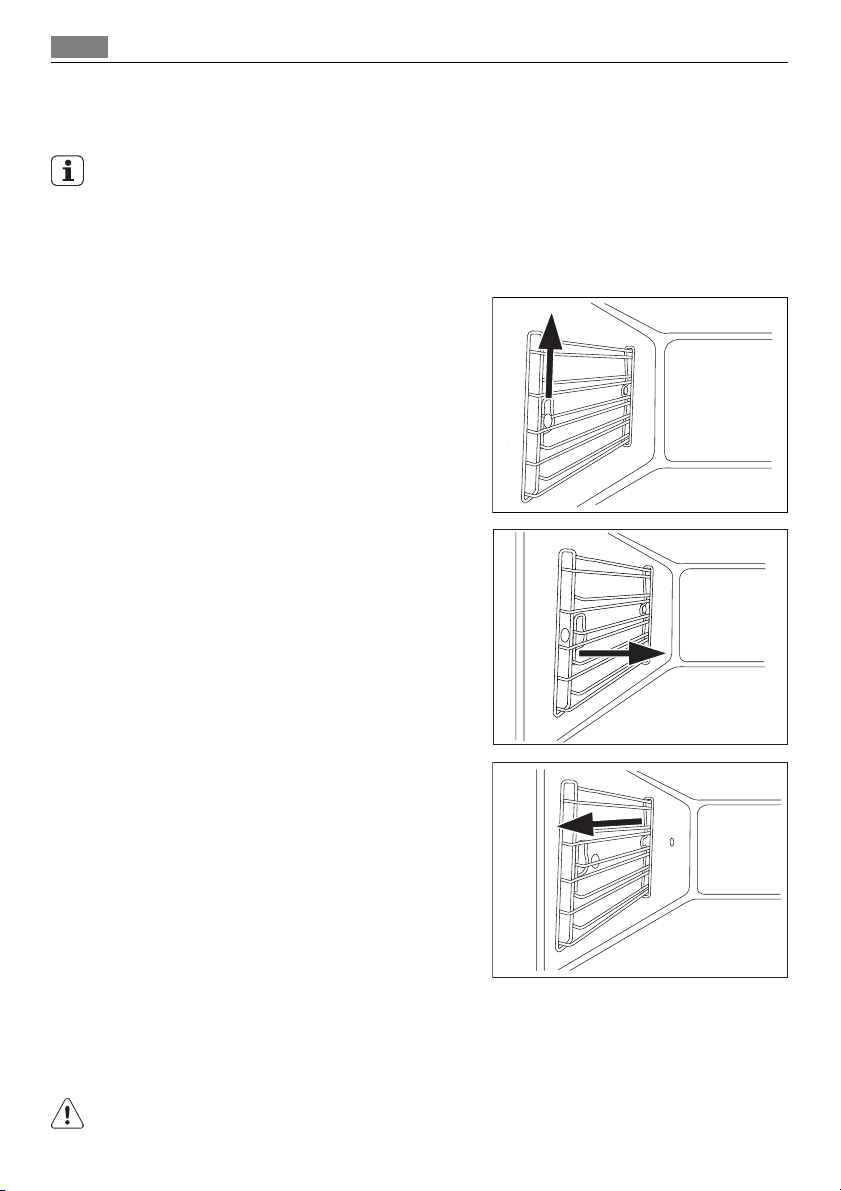
Removing the shelf support
1. Carefully pull the support up and out of
the front catch.
2. Lightly move the support on the front
catch inwards.
3. Pull the support out of the rear catch.
Installing the shelf support
Install the shelf support in the opposite sequence.
Steam generation system
CAUTION!
Dry the steam generator after each use . Soak up water with the Sponge 150.
Page 25
Care and cleaning
Remove a lime residue with water and vinegar.
CAUTION!
Chemical de-scaling agents can damage oven enamel. Obey instructions of the manufacturer!
Cleaning the Water Tank and the Steam Generator:
1.
Fill the water and vinegar mixture (approximately 250 ml) through the water tank
in the steam generator.
Wait for approximately 10 minutes.
2. Remove the water and vinegar with the Sponge 150.
3. Use clean water (100-200 ml) to flush the steam generation system through the water tank.
4. Remove water from the steam generator with the Sponge 150 and rub dry.
5. Keep the door open to let the appliance dry fully.
Oven lamp
WARNING!
There is a risk of electrical shock.
Oven lamp and the lamp glass cover can be hot.
Before you change the oven lamp:
• Deactivate the appliance.
• Remove the fuses from the fuse box or deactivate the circuit breaker.
CAUTION!
Put a cloth on the bottom of the interior of the appliance. It prevents damage to the
lamp glass cover and the cavity.
25
Replacing the oven lamp:
1. You can find the lamp glass cover at the cavity ceiling.
Turn the lamp glass cover counterclockwise to remove it.
2. Remove the metal ring and clean the glass cover.
3. If necessary, replace the oven lamp with applicable 300°C heat-resistant oven lamp.
Use the same oven lamp type.
4. Fit the metal ring to the glass cover.
5. Install the glass cover.
Replacing the oven lamp:
1. You can find the lamp glass cover at the left side of the cavity.
Remove the left shelf rail.
2. Use a torx 20 screwdriver to remove the cover.
3. Remove and clean the metal frame and the seal.
4. Replace the oven lamp with applicable 300°C heat-resistant oven lamp.
Page 26
Care and cleaning
26
Use the same oven lamp type.
5. Install metal frame and seal and tighten screws.
6. Install the left shelf rail.
Oven door and glass panels
To clean the oven door, remove it.
CAUTION!
Be careful when you remove the door from the appliance. The door is heavy!
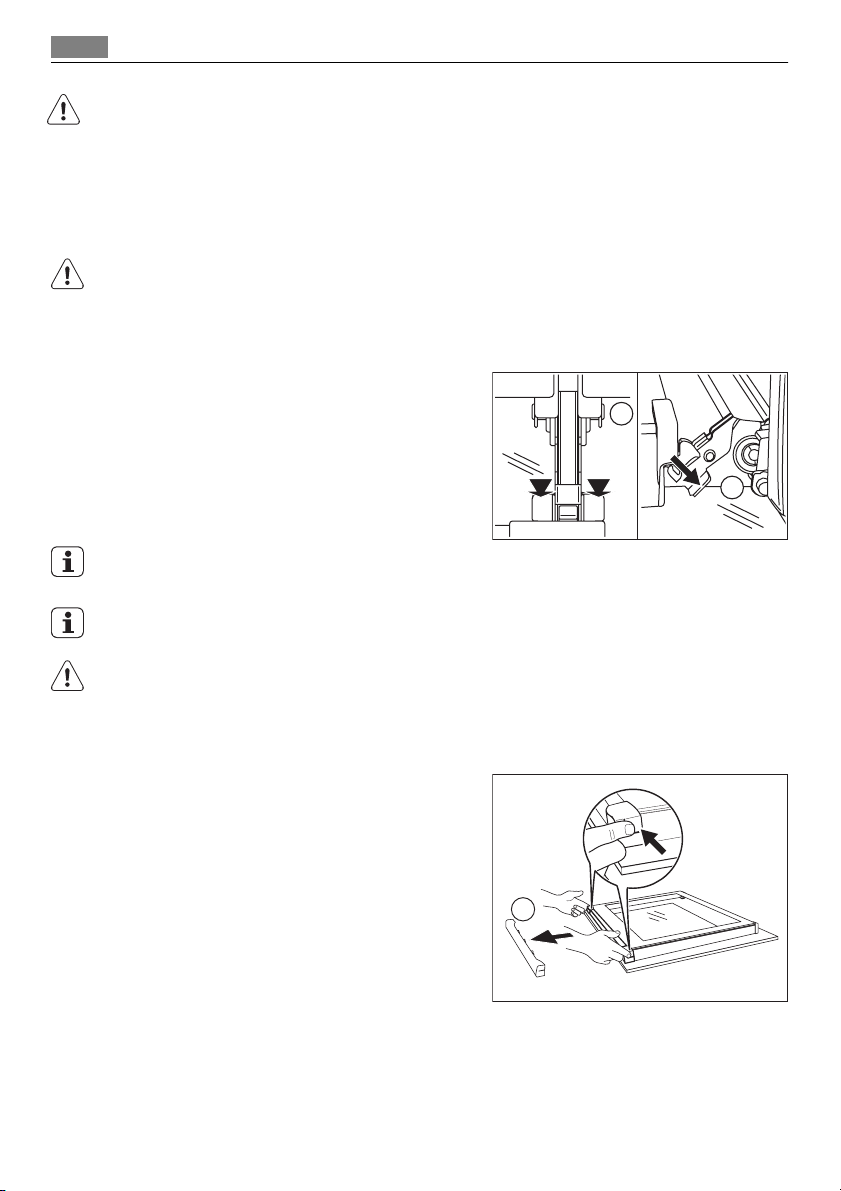
Removing the oven door
1. Open the oven door as far as it goes.
2. Fully press clamping levers (A) on the
two door hinges.
3. Close the oven door until the first position (angle approximately 70°).
4. Hold of the oven door with one hand on
each side and pull it away from the oven
at an up angle.
To install the door follow the procedure in reverse.
The number of glass panels if different for the different models.
A
A
CAUTION!
Put the oven door with the outer side down on a soft and level surface to prevent scratches.
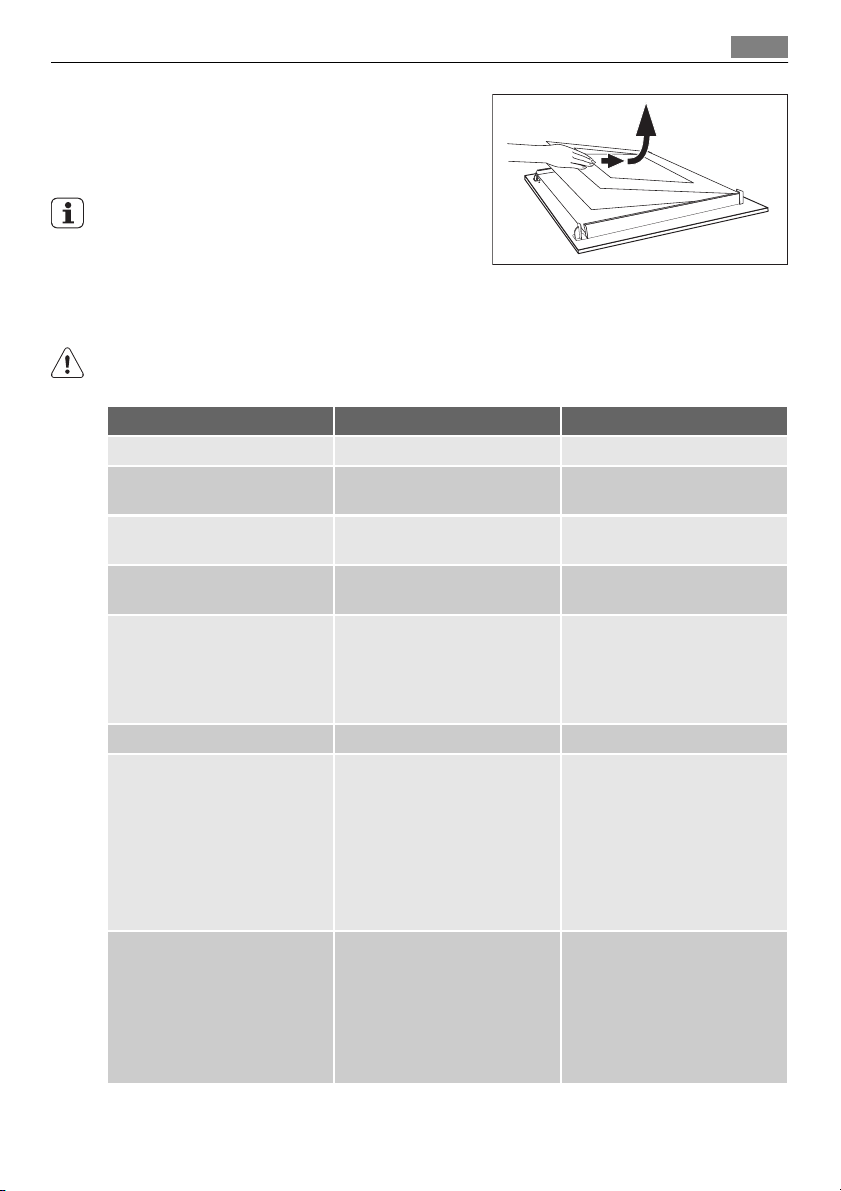
Removing and cleaning the door glass panels
1. Remove the oven door.
2. Hold the door t (B) on the top edge of
the door at the two sides and push inwards to release the clip seal.
3. Pull the door t to the front to remove it.
B
Page 27
What to do if…
4. Hold the door glass panels on their top
edge one by one and pull them up out of
the guide
5. Clean the door glass panels.
To install panels follow the procedure in reverse. Install the smaller panel first, then the
larger.
WHAT TO DO IF…
WARNING!
Refer to "Safety information" chapter.
Problem Possible cause Solution
The appliance does not heat up The appliance is deactivated Activate the appliance
The appliance does not heat up The time of day is not set Set the clock. Refer to "First set-
The appliance does not heat up The necessary settings are not
The appliance does not heat up The automatic switch-off is ac-
The appliance does not heat up The fuse is released Make sure, if the fuse is the
The oven lamp does not operate The oven lamp is defective Replace the oven lamp.
The display shows F102 The door lock is defect • Close the door correctly
The display shows an error
code that is not in this list
set
tivated
There is an electronic error • Deactivate the appliance
If you cannot find a solution to the problem yourself, contact your dealer or the service
centre.
ting the time of day"
Make sure, the settings are correct
Refer to „Automatic switchoff“
cause for the malfunction. If
the fuse releases again and
again, refer to an authorized
electrician
• Deactivate the appliance
with the house fuse or the
safety switch in the fuse
box and activate it again
• If the display shows F102
again, refer to the Service
Center
with the house fuse or the
safety switch in the fuse
box and activate it again
• If the display shows the error code again, refer to the
Service Center
27
Page 28

Environment concerns
28
The necessary data for the service centre is on the rating plate. The rating plate is on the
front frame of the oven cavity.
We recommend that you write the data here:
Model (MOD.) .........................................
Product number (PNC) .........................................
Serial number (S.N.) .........................................
ENVIRONMENT CONCERNS
The symbol on the product or on its packaging indicates that this product may not
be treated as household waste. Instead it should be taken to the appropriate collection
point for the recycling of electrical and electronic equipment. By ensuring this product is
disposed of correctly, you will help prevent potential negative consequences for the
environment and human health, which could otherwise be caused by inappropriate
waste handling of this product. For more detailed information about recycling of this
product, please contact your local council, your household waste disposal service or the
shop where you purchased the product.
Packaging material
The packaging material is environmentally-friendly and recyclable. Plastic parts are
marked with international abbreviations such as PE, PS, etc. Dispose of the packaging material in the containers provided for this purpose at your local waste management facility.
Page 29

293031
Page 30

Page 31

Page 32

www.aeg-electrolux.com/shop 892945539-A-292010
 Loading...