

Page 1

USER
MANUAL
BKB8S4B0
BKH8S4M0
DA Brugsanvisning 2
Dampovn
EN User Manual 39
Steam oven
FI Käyttöohje 77
Höyryuuni
IS Notendaleiðbeiningar 115
Gufusjóðandi ofn
NO Bruksanvisning 153
Dampovn
SV Bruksanvisning 190
Ångugn
Page 2

TIL PERFEKTE RESULTATER
Tak, fordi du valgte dette AEG-produkt. Vi har skabt det for at give dig upåklagelig
ydeevne i mange år med innovative teknologier, som gør livet lettere – funktioner, som du
måske ikke finder på almindelige apparater. Brug et par minutter på at læse mere – så du
kan få det bedste ud af det.
Besøg vores hjemmeside for at:
Få rådgivning, brochurer, fejlfinding, service- og reparationsinformation:
www.aeg.com/support
Registrér dit produkt for at få bedre service:
www.registeraeg.com
Køb tilbehør, forbrugsvarer og originale reservedele til dit apparat:
www.aeg.com/shop
Hent My AEG Kitchen-appen for flere opskrifter, tips og fejlfinding.
KUNDEPLEJE OG SERVICE
Brug altid originale reservedele.
Sørg for at have følgende data klar, når du kontakter vores autoriserede servicecenter:
Model, PNC, serienummer.
Oplysningerne findes på typeskiltet.
Advarsel/forsigtig-sikkerhedsanvisninger
Generelle oplysninger og råd
Miljøoplysninger
Ret til ændringer uden varsel forbeholdes.
INDHOLDSFORTEGNELSE
1. OM SIKKERHED.............................................................................................4
2. SIKKERHEDSANVISNINGER........................................................................ 5
3. INSTALLATION...............................................................................................9
4. PRODUKTBESKRIVELSE............................................................................ 10
5. BETJENINGSPANEL....................................................................................11
6. FØR BRUG FØRSTE GANG........................................................................ 12
7. DAGLIG BRUG............................................................................................. 13
8. URFUNKTIONER..........................................................................................18
9. ANVENDELSE: TILBEHØR.......................................................................... 20
10. EKSTRAFUNKTIONER...............................................................................23
11. RÅD OG TIPS............................................................................................. 24
12. VEDLIGEHOLDELSE OG RENGØRING....................................................27
13. FEJLFINDING............................................................................................. 32
14. ENERGIEFFEKTIV..................................................................................... 34
15. MENUSTRUKTUR...................................................................................... 35
16. DET ER NEMT!...........................................................................................37
17. MILJØHENSYN...........................................................................................38
2 DANSK
Page 3

My AEG Kitchen app
DANSK 3
Page 4

1. OM SIKKERHED
Læs brugsanvisningen grundigt, før apparatet installeres og
tages i brug. Producenten påtager sig intet ansvar for
eventuelle skader, der er resultatet af forkert installation eller
brug. Opbevar altid brugsanvisningen på et sikkert og
tilgængeligt sted til senere opslag.
1.1 Sikkerhed for børn og sårbare personer
• Apparatet må kun bruges af børn fra 8 år og opefter samt af
personer med nedsat fysisk, sensorisk eller psykisk
funktionsevne, eller som mangler den nødvendige erfaring
eller viden, hvis de er under opsyn eller er blevet instrueret i
at bruge apparatet på en sikker måde samt forstår de farer,
det indebærer. Børn under 8 år og personer med
omfattende og komplekst handicap skal holdes på afstand
af apparatet, medmindre de overvåges konstant.
• Børn skal holdes under opsyn for at sikre, at de ikke leger
med apparatet og mobile enheder med My AEG Kitchen .
• Opbevar al emballage utilgængeligt for børn, og bortskaf
det korrekt.
• ADVARSEL: Ovnen og de tilgængelige dele bliver meget
varme under brug. Lad ikke børn og husdyr komme tæt på
apparatet, mens det er i brug, eller når det køler af.
• Hvis apparatet har en børnesikring, skal den aktiveres.
• Børn må ikke udføre rengøring og vedligeholdelse på
produktet uden opsyn.
1.2 Generel sikkerhed
• Dette apparat må kun anvendes til tilberedning af
fødevarer.
• Dette apparat er beregnet til indendørs husholdningsbrug.
• Dette apparat kan bruges på kontorer, hotelværelser, bed &
breakfast-værelser, stue- og gæstehuse og anden lignende
indkvartering, hvor en sådan brug ikke overstiger
(gennemsnitlig) brugsniveauer i hjemmet.
4 DANSK
Page 5

• Kun en faguddannet installatør må installere apparatet og
udskifte kablet.
• Brug ikke apparatet, inden det monteres i den indbyggede
struktur.
• Før enhver vedligeholdelse skal apparatet kobles fra
elnettet.
• Hvis strømledningen er beskadiget, skal den af
sikkerhedsgrunde udskiftes af producenten, det
autoriserede servicecenter eller en tekniker med tilsvarende
kvalifikationer.
• ADVARSEL: Sørg for, at der er slukket for apparatet, inden
pæren skiftes for at undgå elektrisk stød.
• ADVARSEL: Ovnen og de tilgængelige dele bliver meget
varme under brug. Vær omhyggelig med at undgå at røre
ved varmeelementer eller ovnrummets overflade.
• Brug altid ovnhandsker til at fjerne eller isætte tilbehør eller
ovnartikler.
• Brug kun den anbefalede temperaturføler (termometer) til
dette apparat.
• Træk først ovnribberne og derefter den bageste ende væk
fra sidevæggene for at fjerne ovnribberne. Montér
ovnribberne i modsat rækkefølge.
• Brug ikke damprenser til at rengøre apparatet.
• Brug ikke skrappe slibende rengøringsmidler eller skarpe
metalskrabere til at rengøre glasset i kogesektionens
hængslede låg. De kan ridse overfladen, med det resultat,
at glasset knuses.
• Fjern al tilbehøret fra rummet i apparatet før
pyrolyserengøring.
2. SIKKERHEDSANVISNINGER
2.1 Installation
ADVARSEL!
Apparatet må kun installeres af en
sagkyndig.
• Fjern al emballagen.
• Undlad at installere eller bruge et
beskadiget apparat.
• Følg installationsvejledningen, der følger
med apparatet.
• Vær altid forsigtig, når du flytter apparatet,
da det er tungt. Brug altid
sikkerhedshandsker og lukket fodtøj.
DANSK 5
Page 6

• Træk aldrig i apparatet i håndtaget.
• Installér apparatet et sikkert og velegnet
sted, der opfylder installationskrav.
• Mindsteafstanden til andre apparater og
enheder skal overholdes.
• Før du monterer ovnen, skal du
kontrollere, om ovnlågen åbner uden
modstand.
• Apparatet er udstyret med et elektrisk
afkølingssystem. Det skal betjenes med
den elektriske strømforsyning.
Kabinettets minimumshøj‐
de (kabinets minimumshøj‐
de under bordpladen)
Kabinet, bredde 560 mm
Kabinet, dybde 550 (550) mm
Højde foran på apparatet 594 mm
Højde bagest på apparatet 576 mm
Bredde foran på apparatet 595 mm
Bredde bagest på appara‐
tet
Apparatets dybde 569 mm
Apparatets indbygnings‐
dybde
Dybde med åben dør 1022 mm
Ventilationsåbning mini‐
mumsstørrelse. Åbning pla‐
ceret på bundens bageste
side
Længden på ledninger til
strømforsyning. Ledning
placeret i højre hjørne af
bagsiden
Monteringsskruer 4x25 mm
590 (600) mm
559 mm
548 mm
560x20 mm
1500 mm
2.2 El-forbindelse
ADVARSEL!
Risiko for brand og elektrisk stød.
• Alle elektriske tilslutninger skal udføres af
en kvalificeret elektriker.
• Apparatet skal tilsluttes strøm m/jord, jvf.
Stærkstrømsreglementet.
• Sørg for, at parametrene på typeskiltet er
kompatible med nettilslutningens
elektriske mærkeværdier.
• Brug altid en korrekt monteret lovlig
stikkontakt.
• Brug ikke multistikadaptere og
forlængerledninger.
• Pas på, du ikke beskadiger netstikket og
netledningen. Hvis der bliver behov for at
udskifte netledningen, skal det udføres af
vores autoriserede servicecenter.
• Elledninger må ikke komme i berøring
med eller nær ved apparatets låge, især
når det er tændt, eller lågen er varm.
• Beskyttelsen mod elektrisk stød fra
strømførende og isolerede dele skal
fastgøres, så den ikke kan fjernes uden
værktøj.
• Sæt først netstikket i stikkontakten ved
installationens afslutning. Sørg for, at der
er adgang til elstikket efter installationen.
• Hvis stikkontakten er løs, må du ikke
sætte netstikket i.
• Undgå at slukke for apparatet ved at
trække i netledningen. Tag altid selve
netstikket ud af kontakten.
• Brug kun korrekte isoleringsenheder:
Gruppeafbrydere, sikringer (sikringer med
skruegevind skal tages ud af fatningen),
fejlstrømsrelæer og kontaktorer.
• Apparatets installation skal udføres med et
isolationsudstyr, så forbindelsen til
lysnettet kan afbrydes på alle poler.
Isolationsudstyret skal have en
brydeafstand på mindst 3 mm.
• Luk apparatets luge helt, inden du sætter
netstikket i stikkontakten.
• Dette apparat er forsynet med et stik og
en strømledning.
Tilgængelige tilslutningskabler til installati‐
on eller udskiftning for Europa:
H07 RN-F, H05 RN-F, H05 RRF, H05 VV-F, H05
V2V2-F (T90), H05 BB-F
Se den samlede effekt på typeskiltet for
denne del af kablet. Du kan også se i
tabellen:
Samlet effekt (W) Kablets tværsnit
maksimum 1380 3x0.75
maksimum 2300 3x1
(mm²)
6 DANSK
Page 7

Samlet effekt (W) Kablets tværsnit
(mm²)
maksimum 3680 3x1.5
Jordledningen (grønt/gult kabel) skal være 2
cm længere end den brun fase og de blå
neutrale kabler.
2.3 Brug
ADVARSEL!
Risiko for personskade, forbrændinger og
elektrisk stød eller eksplosion.
• Apparatets specifikationer må ikke
ændres.
• Sørg for, at ventilationsåbningerne ikke er
blokerede.
• Lad ikke apparatet være uden opsyn
under drift.
• Sluk for apparatet efter hver brug.
• Vær forsigtig, når du åbner apparatets
låge, hvis apparatet er i brug. Der kan
slippe varm luft ud.
• Betjen ikke apparatet med våde hænder,
eller når det har kontakt med vand.
• Tryk ikke på den åbne låge.
• Brug ikke apparatet som arbejds- eller
frasætningsplads.
• Åbn apparatets låge forsigtigt. Brug af
ingredienser med alkohol kan forårsage
en blanding af alkohol og luft.
• Lad ikke gnister eller åben ild komme i
kontakt med apparatet, når du åbner
lågen.
• Læg ikke brændbare produkter eller
genstande, der er våde med brændbare
produkter i nærheden af eller på
apparatet.
• Del ikke din Wi-Fi-adgangskode.
ADVARSEL!
Risiko for beskadigelse af apparatet.
• Sådan undgås skader eller misfarvning af
emaljen:
– Stil ikke ovnfaste fade eller andre
genstande direkte i apparatet.
– Læg ikke aluminiumsfolie direkte på
bunden af ovnrummet.
– Hæld ikke vand direkte ind i det varme
apparat.
– Hold ikke fugtige fade og madvarer i
apparatet, når du har afsluttet
tilberedningen.
– Vær forsigtig, når du fjerner eller
monterer tilbehøret.
• Farveændring af emaljen eller rustfrit stål
forringer ikke apparatets ydeevne.
• Brug en bradepande til fugtige kager.
Frugtsaft forårsager pletter, der kan være
permanente.
• Tilbered altid mad med lågen lukket.
• Hvis apparatet installeres bag et
møbelpanel (f.eks. en dør), skal du sørge
for, at døren aldrig lukkes, mens apparatet
er tændt. Der kan opbygges varme og fugt
bag et lukket møbelpanel, hvilket kan
forårsage efterfølgende skade på
apparatet, huset eller gulvet. Luk ikke
møbelpanelet, før apparatet er kølet helt
af efter brug.
2.4 Vedligeholdelse og rengøring
ADVARSEL!
Risiko for personskade, brand eller skade
på apparatet.
• Sluk for apparatet, og tag stikket ud af
kontakten inden vedligeholdelse.
• Kontrollér, at apparatet er kølet af. Der er
risiko for, at ovnglasset går i stykker.
• Udskift øjeblikkeligt ovnglassets paneler,
hvis de er beskadigede. Kontakt det
autoriserede servicecenter.
• Vær forsigtig, når du tager lågen af
apparatet. Døren er tung!
• Rengør jævnligt apparatet for at forhindre
forringelse af overfladematerialet.
• Rengør apparatet med en fugtig, blød
klud. Brug kun neutrale rengøringsmidler.
Brug ikke slibende midler, skuresvampe,
opløsningsmidler eller metalgenstande.
• Hvis du bruger en ovnspray, skal du følge
instruktionerne på dens emballage.
2.5 Pyrolyserengøring
ADVARSEL!
Risiko for personskade / brand / kemiske
emissioner (dampe) i pyrolyse-tilstand.
• Inden pyrolytisk rensning og forvarmning
skal følgende fjernes fra ovnrummet:
DANSK 7
Page 8

– Alle madrester, spildt olie og fedt
– alle udtagelige genstande (herunder
hylder, ovnribber osv., der følger med
apparatet), især alle non-stick gryder,
pander, plader, redskaber osv.
• Læs omhyggeligt alle anvisninger
vedrørende pyrolyserengøring.
• Hold børn væk fra apparatet, mens
pyrolyserengøringen er i gang. Ovnen
bliver meget varm, og varm luft afgives fra
de forreste køleåbninger.
• Pyrolyserengøring er en proces ved høj
temperatur, som kan frigive dampe fra
madrester og konstruktionsmaterialet.
Derfor rådes forbrugerne på det kraftigste
til at:
– Sørg for god udluftning under og efter
pyrolyserengøringen.
– giv god ventilation under og efter den
første forvarmning.
• Undgå at spilde eller komme vand på
ovnlågen under og efter den
pyrolyserengøringen for at undgå at
beskadige ovnglassene.
• Dampe fra alle pyrolytiske ovne /
madrester som beskrevet er ikke
skadelige for mennesker, herunder børn,
eller personer med helbredsproblemer.
• Hold kæledyr væk fra apparatet under og
efter pyrolyserengøringen og
forvarmningen. Små kæledyr (især fugle
og krybdyr) kan være meget følsomme
over for temperaturændringer og udsendt
røg.
• Non-stick-overflader på gryder, pander,
bakker, redskaber osv. kan blive
beskadiget af pyrolyserengøring ved høj
temperatur i pyrolytiske ovne og kan også
udgøre en kilde til skadelige dampe på
lavt niveau.
2.6 Tilberedning med kombidamp
ADVARSEL!
Risiko for forbrændinger og beskadigelse
af apparatet.
• Frigivet damp kan forårsage
forbrændinger:
– Åbn ikke apparatets låge under
tilberedning med damp.
– Åbn apparatets låge forsigtigt efter
tilberedning med damp.
2.7 Indvendig belysning
ADVARSEL!
Risiko for elektrisk stød.
• Vedrørende lampe(rne) i dette produkt og
reservedelslamper, der sælges separat:
Disse lamper er beregnet til at modstå
ekstreme fysiske forhold i
husholdningsapparater, såsom
temperatur, vibration, fugt, eller er
beregnet til at signalere information om
apparatets driftsstatus. De er ikke
beregnet til at blive brugt i andre
apparater, og de er ikke velegnede til
belysning af rum.
• Dette produkt indeholder en lyskilde i
energieffektivitetsklasse G.
• Brug kun lamper med de samme
specifikationer.
2.8 Service
• Kontakt det autoriserede servicecenter for
at få repareret apparatet.
• Brug kun originale reservedele.
2.9 Bortskaffelse
ADVARSEL!
Risiko for personskade eller kvælning.
• Kontakt din genbrugsplads ang.
oplysninger om, hvordan produktet
bortskaffes korrekt.
• Tag stikket ud af kontakten.
• Klip netledningen af tæt ved apparatet og
bortskaf den.
• Fjern lågelåsen for at forhindre, at børn
eller kæledyr bliver fanget i apparatet.
8 DANSK
Page 9

3. INSTALLATION
www.youtube.com/electrolux
www.youtube.com/aeg
How to install your AEG/Electrolux
Oven - Column installation
18
594
589
114
21548
595
+-1
min. 550
20
600
min. 560
3
5
60
20
80
520
60
198
523
(*mm)
min. 550
20
595
+-1
18
590
min. 560
594
589
114
21548
3
5
70
60
520
60
20
198
523
(*mm)
ADVARSEL!
Se kapitlerne om sikkerhed.
3.1 Indbygning
DANSK 9
Page 10

3.2 Fastgørelse af ovnen til skab
6
12
10
9
5
4
11
8
5
4
1
2
3
3
2 3
7
1
4. PRODUKTBESKRIVELSE
4.1 Oversigt over apparatet
Betjeningspanel
1
Elektronisk programur
2
Vandbeholder
3
Stik til termometer
4
Varmelegeme
5
Ovnpære
6
Blæser
7
Ovnribbe, udtagelig
8
Afløbsrør
9
Afløbsventil
10
Ovnriller
11
Dampåbning
12
4.2 Tilbehør
• Grillrist
Til kogegrej, kageforme, stege.
• Bageplade
Til kager og småkager.
• Grill-/bradepande
Til at bage og stege eller som en pande til
opsamling af fedt.
10 DANSK
• Termometer
Til måling af, hvor gennemstegt maden er.
• Teleskopskinner
Med teleskopskinnerne er det nemmere at
sætte ovnristene ind og tage dem ud.
Page 11

5. BETJENINGSPANEL
1 2 3 4
5 6
3s
150°C
12:30
15min
START
85°C
G F DE
C
A B
5.1 Oversigt over betjeningspanel
TIL / FRA Tryk og hold nede for at tænde og slukke apparatet.
1
Menu Angiver apparatets funktioner.
2
Favoritter Angiver favoritindstillingerne.
3
Skærm Viser apparatets aktuelle indstillinger.
4
Lampeafbryder Til at tænde og slukke lampen.
5
Hurtig opvarmning Til at tænde og slukke funktionen: Hurtig opvarmning.
6
Tryk på Flyt
Rør overfladen med en fingerspids.
5.2 Skærm
Lad fingerspids glide over overfla‐
den.
Display med vigtige funktioner indstillet.
A. Wi-Fi
B. Aktuel tid
C. START/STOP
D. Temperatur
E. Ovnfunktioner
F. Timer
G. Termometer (kun udvalgte modeller)
Tryk og hold inde
Rør overfladen i 3 sekunder.
DANSK 11
Page 12

Displaylamper
Grundlæggende lamper - til navigation på displayet.
For at bekræfte valget/indstillingen.
Akustisk alarm funktionslamper - når den indstillede tilberedningstid er slut, høres signalet.
Funktionen er tændt.
Timerlamper
For at indstille funktionen: Udskudt start.
Wi-Fi indikator - ovnen kan tilsluttes wi-fi.
Fjernbetjent tilstand indikator - ovnen kan fjernbetjenes.
For at gå ét ni‐
veau tilbage i
menuen.
Funktionen er tændt.
Tilberedningen stopper automatisk.
Wi-Fi Forbindelsen er koblet til.
Fjernbetjent tilstand er tændt.
For at fortryde den
sidste handling.
For at annullere indstillingen.
For at slå tilvalgene til og fra.
Den akustiske alarm slukkes.
6. FØR BRUG FØRSTE GANG
ADVARSEL!
Se kapitlerne om sikkerhed.
6.1 Indledende rengøring
Trin 1 Trin 2 Trin 3
Fjern al tilbehøret fra ovnen og tag
de udtagelige ovnribber ud af ov‐
nen.
Brug kun en mikrofiberklud, varmt
vand og et mildt rengøringsmiddel til
at rengøre apparatet og tilbehøret, .
Placér tilbehøret og de aftagelige
ribber i apparatet.
6.2 Første tilslutning
Displayet viser velkomstmeddelelsen efter den første forbindelse.
Du skal indstille: Sprog, Lysstyrke display, Panelsignal, Signal volume, Aktuel tid.
6.3 Trådløs forbindelse
For at tilslutte apparatet skal du bruge:
• Et trådløst netværk med internetforbindelsen.
• En mobilenhed, der er forbundet til det samme trådløse netværk.
12 DANSK
Page 13

Trin 1 Sådan downloades My AEG Kitchen app'en: Scan QR-koden på typeskiltet med kameraet på din
Trin 2 Følg instruktionerne i introduktionen til appen.
Trin 3 Tænd for apparatet.
Trin 4
Trin 5
Trin 6 Apparatets trådløse modul starter inden for 90 sek.
Frekvens 2,4 Ghz WLAN
Protokol IEEE 802.11b DSSS/802.11g/n OFDM
Maks. effekt EIRP < 20 dBm (100 mW)
Wi-fi-modul NIUS-50
mobilenhed for at blive omdirigeret til AEG's hjemmeside. Typeskiltet sidder på ovnens frontramme.
Du kan også downloade appen direkte fra app store.
Tryk på: . Vælg: Indstillinger / Forbindelser.
- skub eller tryk for at tænde: Wi-Fi.
2400 - 2483,5 Mhz
6.4 Softwarelicenser
Softwaren i dette produkt indeholder
komponenter, som er baseret på fri og open
source-software. AEG anerkender bidragene
fra de åbne software- og robotgrupper til
udviklingsprojektet.
For at få adgang til kildekoden for disse gratis
og åbne kildesoftwarekomponenter, hvis
Trin 1 Fjern al tilbehøret fra ovnen og tag de udtagelige ovnribber ud af ovnen.
Trin 2
Trin 3
Ovnen kan udsende lugt og røg under forvarmning. Kontroller, at rummet er udluftet.
Indstil den maksimale temperatur for funktionen: .
Lad ovnen være tændt i 1 time.
Indstil den maksimale temperatur for funktionen: .
Lad ovnen være tændt i 15 min.
licensbetingelser kræver offentliggørelse, og
for at se deres fulde oplysninger om copyright
og gældende licensbetingelser, bedes du gå
ind på: http://aeg.opensoftwarerepository.com
(mappe NIUS).
6.5 Indledende forvarmning
Forvarm den tomme ovn, inden ibrugtagning.
7. DAGLIG BRUG
ADVARSEL!
Se kapitlerne om sikkerhed.
DANSK 13
Page 14

7.1 Indstilling: Ovnfunktioner
Trin 1 Tænd for ovnen. Displayet viser standardovnfunktionen.
Trin 2 Tryk på symbolet for ovnfunktionen for at gå ind i undermenuen.
Trin 3
Trin 4
Trin 5
Trin 6 Sluk for ovnen.
Vælg varmefunktionen og tryk på: . Displayet viser: temperatur.
Indstil: temperatur. Tryk: .
Tryk på: .
Termometer - du kan når som helst tilslutte termometeret før eller under tilberedningen.
- tryk for at slukke for ovnfunktionen.
7.2 Sådan indstilles: - Damp-ovnfunktioner
Trin 1 Tænd for ovnen.
Trin 2 Indstil dampovnfunktionen.
Trin 3
Trin 4 Indstil temperaturen.
Trin 5
Trin 6 Tryk på vandbeholderens låg for at åbne den.
Trin 7 Kom vand i vandbeholderen til det maksimale niveau (omkring 900 ml), indtil signalet udsendes, el‐
Vælg symbolet for ovnfunktionen, og tryk på det for at gå ind i undermenuen.
Tryk på: . Displayet viser temperaturindstillingerne.
Tryk på: .
ler displayet viser beskeden. Fyld ikke vandbeholderen til over dens maksimale kapacitet. Der er
fare for vandlækage, overløb og møbelskader.
ADVARSEL!
Brug kun koldt postevand. Brug ikke filtreret (demineraliseret) eller destilleret
vand. Brug ikke andre væsker. Hæld ikke brændbare eller alkoholiske væsker
i vandbeholderen.
Trin 8 Skub vandbeholderen til dens oprindelige position.
Trin 9
Trin 10 Når vandbeholderen løber tør for vand, udsendes signalet. Fyld vandbeholderen igen.
Trin 11 Sluk for ovnen.
Tryk på: .
Når ovnen når den indstillede temperatur, udsendes et signal.
14 DANSK
Page 15

Trin 12 Tøm vandbeholderen, når tilberedningen med damp ender.
B
C
A
ADVARSEL!
Ovnen er varm. Der er risiko for forbrænding. Vær forsigtig, når du tømmer
vandbeholderen.
Trin 13 Restvand kan kondensere i ovnrummet. Åbn ovnlågen forsigtigt efter tilberedning. Når ovnen er
kold, skal du tørre ovnrummet med en blød klud. Vent mindst 60 minutter efter hver gang efter brug
for at forhindre det varme vand i at løbe ud fra afløbsventilen.
7.3 Vandtank
Lampe for vandtank
Lampe for vandtank
Tanken er fuld.
Beholderen er halvt fuld.
Hvis du hælder for meget vand i beholderen, sender
sikkerhedsafløbsventilen det overskydende vand til
bunden af ovnrummet. Fjern vandet med en svamp.
Beholderen er tom. Påfyld beholde‐
ren.
Tøm vandbeholderen
Trin 1
Trin 2
Trin 3
Trin 4 Tag C og B af, og tør ovnen med en blød svamp.
Sluk for ovnen, lad den stå åben, og vent, til ovnen
er kold.
Slut afløbsrøret (C) til afløbsventilen (A) gennem til‐
slutningen (B).
Hold enden af røret under niveauet A, og tryk gen‐
tagne gange på B for at opsamle resterende vand.
7.4 Indstilling: Hjælp til tilberedning
Hver ret i denne undermenu har en anbefalet funktion og temperatur. Du kan justere tiden og
temperaturen.
Til nogle retter kan du også tilberede med:
• Vægtautomatik
• Termometer
Den grad, en ret tilberedes ved:
• Rød eller Mindre
• Medium
• Gennemstegt eller Mere
Trin 1 Tænd for ovnen.
Trin 2
Tryk på: .
DANSK 15
Page 16

Trin 3
Trin 4 Vælg en ret eller en type af madvare.
Trin 5
Tryk på: . Angiv: Hjælp til tilberedning.
Tryk på: .
7.5 Ovnfunktioner
STANDARD
Ovnfunktion Applikation
Til grillstegning af tynde stykker mad og til ristning af brød.
Grillstegning
Til stegning af større stykker kød eller fjerkræ med ben på én hyldeposition. For at la‐
ve gratiner og til at brune.
Turbogrill
Bagning på op til tre ovnriller samtidig og til tørring af fødevarer. Indstil temperaturen
20 - 40°C lavere end ved Over-/undervarme.
Varmluft
Til tilberedning af sprøde færdigretter (f.eks. pommes frites, kartoffelbåde eller forårs‐
ruller).
Frosne madvarer
Til bagning og stegning af mad på én ovnrille.
Over-/undervarme
Til bagning af kager med sprød bund og til henkogning.
Undervarme
For at mindske tiden for hævning af gærdej. Det forhindrer, at dejoverfladen bliver tør
og holder dejen elastisk.
Hævning af dej
Varmluft, Over-/undervarme: Når du indstiller temperaturen til under 80 °C, slukkes
lampen automatisk efter 30 sekunder.
16 DANSK
Page 17

SPECIALPROGRAMMER
Ovnfunktion Applikation
Til henkogning af grøntsager (f.eks. pickles).
Henkogning
Til tørring af skåret frugt, grøntsager og champignoner.
Tørring
Til at forvarme tallerkener til servering.
Tallerkenvarmer
Til optøning af mad (grøntsager og frugt). Optøningstiden afhænger af mængde og
omfang af de de frosne madvarer.
Optøning
Til retter som lasagne eller kartoffelgratin. For at lave gratiner og til at brune.
Gratiner
Til tilberedning af møre, saftige stege.
Slow Cooking
Til at holde maden varm.
Holde varm
Denne funktion er beregnet til at spare energi under madlavning. Når du bruger den‐
ne funktion, kan temperaturen i ovnrummet variere fra den indstillede temperatur.
Fugtig varmluft
Restvarmen anvendes. Varmeeffekten kan blive reduceret. Få flere oplysninger i ka‐
pitlet "Daglig brug", Bemærkninger til: Fugtig varmluft.
DAMP
Ovnfunktion Applikation
Genopvarmning af mad med damp forhindrer udtørring af overfladen. Varme fordeles
på en mild og jævn måde, hvilket giver mulighed for at gendanne madens smag og
Opvarmning med damp
Pizza
aroma, som da den blev tilberedt. Denne funktion kan bruges til genopvarmning af
maden direkte på en tallerken. Du kan genopvarme flere tallerkener ad gangen ved at
bruge flere ovnribber.
Pizza-bagning.
DANSK 17
Page 18

Ovnfunktion Applikation
Brug denne funktion til at bage brød og småt gærbrød med en sprødhed, farve og
glans, som var de bagt af en professionel bager.
Brød
Funktionen er egnet til kød, fjerkræ, ovnretter og sammenkogte retter. Takket være
kombinationen af damp og varme får kød en mør og saftig konsistens og en sprød
Fugtighed lav
skorpe.
7.6 Bemærkninger til: Fugtig varmluft
Denne funktion blev anvendt til at overholde
kravene i energieffektivitetsklasse og
økodesign (i overensstemmelse med EU
65/2014 og EU 66/2014). Tests i
overensstemmelse med:
IEC/EN 60350-1
Ovnlågen skal være lukket under
tilberedningen, så funktionen ikke afbrydes,
8. URFUNKTIONER
8.1 Beskrivelse af urfunktioner
Urfunktio‐
ner
Tilbered‐
ningstid
Afslut hand‐
ling
Udskudt
start
8.2 Indstilling: Urfunktioner
Applikation
Indstilling af tilberedningslængden.
Maksimum er 23 t 59 min.
For at indstille hvad der sker, når time‐
ren ophører med at tælle.
For at udskyde starten og/eller tilbe‐
redningens afslutning.
og ovnen kører med den højeste
energieffektivitet, der er mulig.
Når du bruger denne funktion, slukkes
lampen automatisk efter 30 sekunder.
Se kapitlet "Råd" for at få oplysninger om
tilberedning, Fugtig varmluft. Se kapitlet
"Energieffektivitet", Energibesparelse for
generelle anbefalinger til energibesparelse.
Urfunktio‐
Applikation
ner
Forlængelse
af tid
Påmindelse Bruges til at indstille en nedtælling.
Optimer Overvåger, hvor længe funktionen er i
For at forlænge tilberedningstiden.
Maksimum er 23 t 59 min. Denne
funktion har ikke indflydelse på ovnen.
gang. Optimer - du kan tænde og sluk‐
ke den.
Indstilling af uret
Trin 1 Tryk på: Aktuel tid.
Trin 2
Indstil tid. Tryk på: .
Indstilling af tilberedningstid
Trin 1 Vælg ovnfunktion og indstil temperaturen.
18 DANSK
Page 19

Indstilling af tilberedningstid
Trin 2
Trin 3
Tryk på: .
Indstil tid. Tryk på: .
Sådan vælges tilvalg for sluttid
Trin 1 Vælg ovnfunktion og indstil temperaturen.
Trin 2
Trin 3 Indstil tilberedningstiden.
Trin 4
Trin 5 Tryk på: Afslut handling.
Trin 6 Vælg den foretrukne: Afslut handling.
Trin 7
Tryk på: .
Tryk: .
Tryk på: . Gentag handlingen, indtil displayet viser hovedskærmen.
Sådan udsættes tilberedningsstarten
Trin 1 Indstil en ovnfunktion og temperaturen.
Trin 2
Trin 3 Indstil tilberedningstiden.
Trin 4
Trin 5 Tryk på: Udskudt start.
Trin 6 Vælg værdien.
Trin 7
Tryk på: .
Tryk: .
Tryk på: . Gentag handlingen, indtil displayet viser hovedskærmen.
Forlængelse af tilberedningstid
Når der er 10% tilberedningstid tilbage, og maden ikke lader til at være klar, kan du forlænge tilberedningstiden.
Du kan også ændre ovnfunktionen.
Tryk på +1min for at forlænge tilberedningstiden.
Ændring af timerindstillinger
Trin 1
Trin 2 Indstil timerværdien.
Trin 3
Du kan ændre den indstillede tid under tilberedning når som helst.
Tryk på: .
Tryk på: .
DANSK 19
Page 20

9. ANVENDELSE: TILBEHØR
9.1 Isætning af tilbehør
En lille fordybning i toppen øger sikkerheden.
anordninger. Den høje kant rundt om hylden
forhindrer kogegrej i at glide af hylden.
Fordybningerne er også antivippe-
Grillrist:
Skub risten mellem ovnribbens skinner, og sørg
for, at fødderne peger nedad.
Bageplade / Dyb bradepande:
Skub den dybe bradepande ind mellem ovnrib‐
bens skinner.
9.2 Termometer
Termometer - måler temperaturen i maden. Du kan bruge det med hver ovnfunktion.
Der skal indstilles to temperaturer:
Ovntemperaturen: mindst 120 °C.
Ingredienserne bør være ved stue‐
temperatur.
For de bedste madlavningsresultater:
Brug den ikke til flydende retter. Under tilberedning skal det forblive i ret‐
Kernetemperaturen.
ten.
Ovnen beregner en omtrentlig afslutning af tilberedningstiden. Den afhænger af mængden af
mad, den indstillede ovnfunktion og temperaturen.
20 DANSK
Page 21

Anvendelse: Termometer
Trin 1 Tænd for ovnen.
Trin 2 Vælg en ovnfunktion og evt. ovntemperatur.
Trin 3 Indsæt: Termometer.
Kød, fjerkræ og fisk Sammenkogte retter
Indsæt spidsen af Termometer i midten af kød, fisk,
om muligt i den tykkeste del. Sørg for, at mindst 3/4
af Termometer er inde i retten.
Indsæt spidsen af Termometer lige midt i gryden. Termo‐
meter bør stabiliseres ét sted under bagning. Brug en fast
ingrediens til at opnå dette. Brug stegefadets kant til at
understøtte termometerets Termometer. Spidsen af Ter‐
mometer må ikke berøre bunden af et stegefad.
Trin 4 Stik: Termometer i stikket på ovnens forside.
Trin 5
Trin 6
Trin 7
Trin 8
Trin 9 Fjern Termometer stikket ud af stikket, og tag retten ud af ovnen.
Displayet viser den aktuelle temperatur af: Termometer.
- tryk for at indstille termometerets kernetemperatur.
- tryk for at indstille den foretrukne valgmulighed:
• Akustisk alarm - når maden når den indstillede kernetemperatur, udsendes et signal.
• Akustisk alarm og stop tilberedning - når maden når den indstillede kernetemperatur, udsendes
et signal, og ovnen stopper.
Vælg muligheden og tryk gentagne gange på: for at gå til hovedskærmen.
Tryk på: .
Når maden når den indstillede temperatur, udsendes et signal. Du kan vælge at stoppe eller fort‐
sætte tilberedningen for at sikre, at maden er gennemstegt.
ADVARSEL!
Der er risiko for forbrænding. Termometer bliver varm. Pas på, når du trækker
det ud og fjerner det fra maden.
DANSK 21
Page 22

9.3 Tilbehør til tilberedning med
C
D
damp
Dampsættets tilbehør leveres ikke
sammen med ovnen. Kontakt den lokale
forhandler for yderligere oplysninger.
Glasskål (A) Låg (B)
Dyse, dyserør og stålgrill.
Ildfast fad til damptilberedning
Det ildfaste fad består af en glasskål (A), et
låg (B), dyserør (C), dyse (D) og en stålgrill
(E).
Dyserør (C) er til tilberedning med damp, dyse (D) er til
direkte tilberedning med damp.
Stålgrill (E)
• Stil ikke det varme fad på kolde/våde
overflader.
• Hæld ikke kolde væsker i fadet, når det er
varmt.
• Brug ikke fadet på en varm kogesektion.
22 DANSK
• Rengør ikke fadet med skurepulver,
skuresvampe og pulvere.
Page 23

9.4 Tilberedning med damp i et bagefad
Trin 1
Trin 2 Tilslut dyserøret til dampåbningen.
Trin 3 Indstil ovnen til damptilberedning.
Stil bagepladen på stålristen, og dæk den til med låget. Sæt dyserøret i hullet i låget. Sæt bage‐
pladen på den anden ribbe fra bunden.
9.5 Direkte tilberedning med damp
Stil bagefadet på stålgrillen. Tilsæt noget vand. Brug ikke låget.
ADVARSEL!
Dysen kan være varm, når ovnen er tændt. Brug altid ovnhandsker. Fjern dysen fra ov‐
nen, når du ikke bruger dampfunktionen.
Trin 1 Forbind dysen med dyserør. Tilslut dyserøret til dampåbningen.
Trin 2
Trin 3 Indstil ovnen til damptilberedning.
Når du tilbereder mad som f.eks. kylling, and, kalkun eller stor fisk, skal du sætte dysen inde i maden.
Sæt bagepladen på første eller anden rille fra bunden.
Sørg for, at dyserøret ikke sidder fast. Hold dysen væk fra varmelegemet.
10. EKSTRAFUNKTIONER
10.1 Sådan gemmer du: Favoritter
Du kan gemme dine favoritindstillinger, som
f.eks. ovnfunktionen, tilberedningstiden,
temperaturen eller rengøringsfunktionen. Du
kan gemme 3 favoritindstillinger.
Trin 1 Tænd for apparatet.
Trin 2 Vælg den foretrukne indstilling.
Trin 3
Trin 4 Vælg: Gem aktuelle indstillinger.
Trin 5
- tryk for at nulstille indstillingen.
- tryk for at annullere indstillingen.
Tryk på: . Vælg: Favoritter.
Tryk på + for at føje indstillingen til listen over: Favoritter. Tryk på: .
10.2 Panel lås
Denne funktion forhindrer en utilsigtet ændring af ovnfunktionen.
DANSK 23
Page 24

Trin 1 Tænd for apparatet.
Trin 2 Indstil en ovnfunktion.
Trin 3
Gentag trin 3 for at slå funktionen fra.
, - tryk samtidigt for at aktivere funktionen.
10.3 Automatisk slukning
Af sikkerhedsgrunde slukkes ovnen efter
nogen tid, hvis en ovnfunktion er i gang, og
du ikke ændrer nogen af indstillingerne.
(°C) (t)
30 - 115 12.5
120 - 195 8.5
200 - 245 5.5
11. RÅD OG TIPS
11.1 Anbefalinger til tilberedning
(°C) (t)
250 - maksimum 3
Den automatiske slukning virker ikke med
funktionerne: Lys, Termometer, Sluttid, Slow
Cooking.
10.4 Køleblæser
Når ovnen er tændt, tændes køleblæseren
automatisk for at holde ovnens overflader
kølige. Hvis du slukker for ovnen, kan
køleblæseren fortsætte med at køre, indtil
ovnen køler ned.
Tabellernes temperaturer og tilberedningstider er kun vejledende. De afhænger af opskrifterne og kvaliteten og
mængden af de anvendte ingredienser.
Din ovn bager eller steger muligvis anderledes end den ovn, du havde før. Rådene herunder viser anbefalede
indstillinger for temperatur, tilberedningstid og hyldeposition for specifikke typer mad.
Hvis du ikke kan finde indstillinger til en speciel opskrift, kan du se efter en lignende.
11.2 Fugtig varmluft
For at få de bedste resultater skal du følge
forslagene angivet på nedenstående tabel.
(°C) (min.)
Søde boller, 16 stk. bageplade eller bradepande 180 2 20 - 30
Boller, 9 stk. bageplade eller bradepande 180 2 30 - 40
24 DANSK
Page 25

(°C) (min.)
Pizza, frossen, 0,35kggrillrist 220 2 10 - 15
Roulade bageplade eller bradepande 170 2 25 - 35
Brownie bageplade eller bradepande 175 3 25 - 30
Soufflè, 6 stk. keramiske ramekiner på grill‐
Sukkerbund til tærte flanform på grillrist 180 2 15 - 25
Victoriakager bageform på rist 170 2 40 - 50
Pocheret fisk, 0,3 kg bageplade eller bradepande 180 3 20 - 25
Hel fisk, 0,2 kg bageplade eller bradepande 180 3 25 - 35
Fiskefilet, 0,3 kg pizzaform på rist 180 3 25 - 30
Pocheret kød, 0,25 kg bageplade eller bradepande 200 3 35 - 45
Shashlik, 0,5 kg bageplade eller bradepande 200 3 25 - 30
Småkager, 16 stk. bageplade eller bradepande 180 2 20 - 30
Makroner, 24 stk. bageplade eller bradepande 180 2 25 - 35
Muffins, 12 stk. bageplade eller bradepande 170 2 30 - 40
Madtærte, 20 stk. bageplade eller bradepande 180 2 25 - 30
Småkager af mørdej,
20 stk.
Små tærter, 8 stk. bageplade eller bradepande 170 2 20 - 30
Grøntsager, pochere‐
de, 0,4 kg
Vegetarisk omelet pizzaform på rist 200 3 25 - 30
Grøntsager fra Mid‐
delhavslandene, 0,7
kg
rist
bageplade eller bradepande 150 2 25 - 35
bageplade eller bradepande 180 3 35 - 45
bageplade eller bradepande 180 4 25 - 30
200 3 25 - 30
11.3 Fugtig varmluft - anbefalet tilbehør
Brug mørke og ikke-reflekterende former og beholdere. De har en bedre varmeabsorbering
end lyse og reflekterende fade.
Pizzaform
Bageform
Ramekiner
Tærtebundform
DANSK 25
Page 26

Mørk, ikke-reflekterende
28 cm diameter
Mørk, ikke-reflekterende
26 cm diameter
Keramisk
8 cm diameter, 5
cm højde
11.4 Madlavningstabeller for testinstitutter
Information til testinstitutter
Test i henhold til IEC 60350-1.
( °C) (min)
Små kager
i form, 20
stk./plade
Små kager
i form, 20
stk./plade
Små kager
i form, 20
stk./plade
Æbletærte,
2 forme
Ø20 cm
Æbletærte,
2 forme
Ø20 cm
Fedtfattig
sandkage,
kageform Ø
26 cm
Fedtfattig
sandkage,
kageform Ø
26 cm
Fedtfattig
sandkage,
kageform Ø
26 cm
Smørkager Varmluft Bageplade 3 140 - 150 20 - 40 -
Smørkager Varmluft Bageplade 2 og 4 140 - 150 25 - 45 -
Smørkager Over-/under‐
Toast, 4 - 6
stykker
Over-/under‐
varme
Varmluft Bageplade 3 150 - 160 20 - 35 -
Varmluft Bageplade 2 og 4 150 - 160 20 - 35 -
Over-/under‐
varme
Varmluft Grillrist 2 160 70 - 90 -
Over-/under‐
varme
Varmluft Grillrist 2 160 40 - 50 Forvarm ovnen i 10
Varmluft Grillrist 2 og 4 160 40 - 60 Forvarm ovnen i 10
varme
Grillstegning Grillrist 4 maks. 1 - 5 Forvarm ovnen i 10
Bageplade 3 170 20 - 35 -
Grillrist 2 180 70 - 90 -
Grillrist 2 170 40 - 50 Forvarm ovnen i 10
Bageplade 3 140 - 150 25 - 45 -
Mørk, ikke-reflekterende
28 cm diameter
min.
min.
min.
min.
26 DANSK
Page 27

( °C) (min)
Burgerbøf,
6 stk., 0,6
kg
Grillstegning Grillrist, bra‐
depande
4 maks. 20 - 30 Stil grillristen på den
12. VEDLIGEHOLDELSE OG RENGØRING
ADVARSEL!
Se kapitlerne om sikkerhed.
12.1 Bemærkninger om rengøring
Rengør ovnens front med en mikrofiberklud med varmt vand og et mildt rengøringsmiddel.
Brug en rengøringsmiddelopløsning til at rengøre metaloverflader.
Rengør pletter med et mildt rengøringsmiddel.
Rengøringsmid‐
ler
Rengør altid ovnrummet efter brug. Ophobning af fedt eller andre rester kan forårsage
brand.
Damp kan sætte sig som fugt i ovnen eller på ovnruderne. Lad ovnen være tændt 10 minut‐
ter inden tilberedning for at mindske kondenseringen. Opbevar ikke madvarer i ovnen i mere
Hverdagsbrug
end 20 minutter. Ovnrummet tørres kun med en mikrofiberklud efter hver brug.
fjerde rille, og brade‐
panden på den tredje
rille i ovnen. Vend
madvaren, når halvde‐
len af tilberedningsti‐
den er gået.
Forvarm ovnen i 10
min.
Rengør alt tilbehør efter hver brug, og lad det tørre. Brug en mikrofiberklud med varmt vand
og et mildt rengøringsmiddel. Tilbehøret må ikke vaskes i opvaskemaskinen.
Rengør ikke non stick-tilbehøret med slibende rengøringsmiddel eller genstande med skarpe
kanter.
Tilbehør
12.2 Fjernelse: Ovnribber
Fjern ovnribberne, så ovnen kan rengøres.
DANSK 27
Page 28
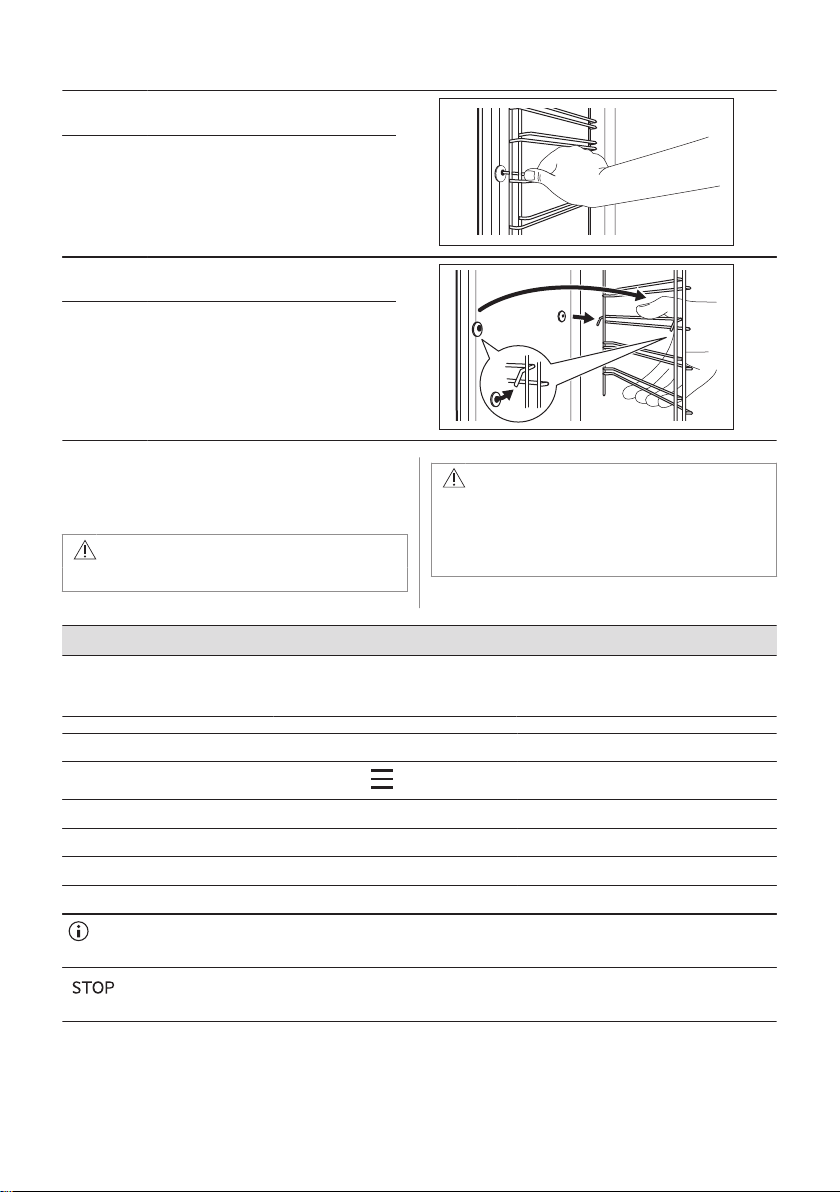
Trin 1 Sluk for ovnen, og vent, til den er
2
1
Trin 2 Træk forenden af ribben væk fra side‐
kold.
væggen.
Trin 3 Træk den bageste ende af ovnribben
Trin 4 Montér ovnribberne i modsat række‐
12.3 Anvendelse: Pyrolyserengøring
Rengør ovnen med Pyrolyserengøring.
Der er risiko for forbrænding.
væk fra sidevæggen, og tag den ud.
følge.
Sørg for, at tappene på teleskopskin‐
nerne vender fremad.
ADVARSEL!
FORSIGTIG!
Hvis der er andre apparater installeret i
det samme skab, bør de ikke bruges
samtidigt med denne funktion. Det kan
skade ovnen.
Før Pyrolyserengøring:
Sluk for ovnen, og vent, til den
er kold.
Trin 1 Trin 2 Trin 3
Tænd for ovnen.
Valgmulighed Rengøringstilstand Varighed
Pyrolyserengøring, kort Let rengøring 1 h
Pyrolyserengøring, normal Normal rengøring 1 h 30 min
Pyrolyserengøring, intens Grundig rengøring 2 h 30 min
Fjern al tilbehøret fra ovnen. Rengør ovnbunden og det indvendige
Tryk på: / Rengøring.
lågeglas med varmt vand, en blød klud
og et mildt rengøringsmiddel.
Vælg rengøringstilstanden.
Når rengøringen starter, låses ovnens låge, og lampen er slukket. Køleblæseren arbejder med en højere ha‐
stighed.
– tryk for at stoppe rengøringen, før den er færdig.
Brug ikke ovnen, før lågelås-symbolet forsvinder fra displayet.
28 DANSK
Page 29

Når rengøringen slutter:
Sluk for ovnen, og vent, til den
er kold.
Rengør ovnrummet med en blød
klud.
Fjern resterne fra bunden af ovnrum‐
met.
12.4 Rengøring: Vandtank
Trin 1 Sluk for ovnen.
Trin 2 Stil en dyb bradepande under dampåbningen.
Trin 3 Hæld vand i vandbeholderen: 850 ml. Tilsæt citronsyre: 5 tsk. Vent i 60 min.
Trin 4 Tænd for ovnen, og indstil funktionen: Fugtighed lav. Stil temperaturen på 230 °C. Sluk for ovnen
Trin 5 Tænd for ovnen, og indstil funktionen: Fugtighed lav. Stil temperaturen på mellem 130 og 230 °C.
Tøm vandbeholderen efter hver damptilberedning for at forhindre kalkrester.
Se intervallet af vandets hårdhed (dH) med det tilsvarende niveau af kalkaflejring og
vandkvalitet i tabellen nedenfor. Fyld vandbeholderen med flaskevand, når vandets hårdhed
overstiger niveau 4.
efter 25 minutter og vent, til den er kold.
Sluk for ovnen efter 10 minutter og vent, til den er kold.
Når rengøringen slutter:
Sluk for ovnen. Tøm vandtanken. Se ka‐
pitlet Daglig brug, "Tøm‐
ning af vandtanken".
Skyl vandtanken og fjern kalkre‐
sterne med en blød klud.
Rengør afløbsrøret med
varmt vand og mildt op‐
vaskemiddel.
Vandets hårdhed Teststrimmel Kalkaflejring
Niveau dH
1 0 - 7 0 - 50 blødt 75 cyklusser - 2,5
2 8 - 14 51 - 100 moderat hårdt 50 cyklusser - 2
3 15 - 21 101 - 150 hårdt 40 cyklusser - 1,5
4 22 - 28 over 151 meget hårdt 30 cyklusser - 1
(mg/l)
Vandklassifi‐
cering
Rengør vand‐
tanken hver
måned
måneder
måned
måned
12.5 Husk rengøring
Når påmindelsen vises, anbefales rengøring.
Brug funktionen: Pyrolyserengøring.
DANSK 29
Page 30

12.6 Fjernelse og installation: Låge
1
2
B
Ovnlågen har tre glaspaneler. Du kan fjerne lågen og de indvendige glaspaneler for at rengøre
dem. Læs hele instruktionen "Aftagning og montering af låge", inden du tager ovnglasset ud.
FORSIGTIG!
Brug ikke ovnen uden glaspanelerne.
Trin 1 Åbn lågen helt, og hold begge hængsler.
Trin 2 Løft og træk i låsene, indtil de klikker.
Trin 3 Sæt ovnlågen halvvejs i første åbne position.
Trin 4 Læg lågen på en blød klud på en stabil over‐
Trin 5 Hold i begge sider af lågelisten (B) i lågens
Trin 6 Træk lågelisten fremad, og tag den ud.
Løft og træk derefter for at fjerne lågen fra
lejet.
flade.
overkant, og tryk indad, indtil låsehagen slip‐
per.
30 DANSK
Page 31

Trin 7 Hold i overkanten af lågens glaspaneler, og
A B
A
B
træk dem forsigtigt ud et ad gangen. Start
med det øverste panel. Sørg for, at glasset
glider helt ud af støtterne.
Trin 8 Rengør glaspanelerne med vand og sæbe. Tør glaspanelerne omhyggeligt. Glaspanelerne må ikke
Trin 9 Montér glaspanelerne og ovnlågen efter rengøring.
Hvis døren er installeret korrekt, vil du høre et klik, når du lukker skydelåsene.
Sørg for at sætte glaspanelerne (A og B) på plads i
den rigtige rækkefølge. Se efter symbolet / trykket på
siden af glaspanelet, da hvert glaspanel ser forskelligt
ud for at gøre afmonteringen og monteringen lettere.
Når den er korrekt installeret, klikker lågelisten.
Sørg for at sætte det midterste glaspanel i de rigtige
lejer.
12.7 Udskiftning: Lampe
komme i opvaskemaskinen.
Hold altid halogenpæren med en klud for at
forhindre fedtrester i at brænde fast på
ADVARSEL!
pæren.
Risiko for elektrisk stød
Pæren kan være varm.
Før du udskifter pæren:
Trin 1 Trin 2 Trin 3
Sluk for ovnen. Vent, til ovnen er
kold.
Tag stikket ud af kontakten. Læg en klud i bunden af ovnrum‐
met.
DANSK 31
Page 32

Baglampe
Trin 1 Drej glasset, og tag det af.
Trin 2 Rengør glasdækslet.
Trin 3 Udskift pæren med en passende 300 °C varmefast pære.
Trin 4 Montér glasdækslet.
13. FEJLFINDING
ADVARSEL!
Se kapitlerne om sikkerhed.
13.1 Hvad gør du, hvis ...
Apparatet tænder ikke eller bliver ikke varmt
Mulig årsag
Apparatet er ikke tilsluttet lysnettet, eller også er det til‐
sluttet forkert.
Uret er ikke indstillet. Indstil uret. For yderligere oplysninger henvises til Ur‐
Lågen er ikke lukket korrekt. Luk lågen helt.
Sikringen er sprunget. Tjek, om problemet skyldes en defekt sikring. Hvis pro‐
Apparatet Børnesikring er tændt. Se kapitlet "Menu", Undermenu for: Tilvalg.
Afhjælpning
Kontrollér, om apparatet er tilsluttet korrekt til lysnettet.
Se tilslutningsdiagrammet.
funktioner kapitel, Sådan indstilles: Urfunktioner.
blemet forekommer igen, bedes du kontakte en kvalifi‐
ceret elektriker.
Komponenter
Beskrivelse
Pæren er sprunget. Udskift pæren. Se detaljer i kapitlet "Vedligeholdelse og
Afhjælpning
rengøring", Udskiftning: Ovnpære.
32 DANSK
Page 33

Rengøring
Beskrivelse
Der er vand i ovnrummet. Der er for meget vand i vandtanken.
Tilberedning med damp virker ikke. Der er ingen kalkrester i dampåbningen.
Tilberedning med damp virker ikke. Der er vand i vandbeholderen.
Det tager mere end tre minutter at tømme vandbehol‐
deren eller vandlækager fra dampåbningen.
Afhjælpning
Der er ingen kalkrester i dampåbningen. Rengør vand‐
beholderen.
Strømafbrydelse stopper altid rengøring.
Gentag rengøringen, hvis den afbrydes af
strømafbrydelse.
Problemer med Wi-Fi-signal
Mulig årsag
Problem med trådløst netværkssignal. Kontrollér, om din mobile enhed er tilsluttet det trådløse
Der er installeret en ny router, eller routerkonfiguratio‐
nen er ændret.
Det trådløse netværkssignal er svagt. Flyt routeren så tæt på apparatet som muligt.
Det trådløse signal afbrydes af en anden mikrobølge‐
ovn i nærheden af apparatet.
Afhjælpning
netværk.
Kontrollér dit trådløse netværk og router.
Genstart routeren.
For at konfigurere apparatet og mobilenheden igen, se
kapitlet "Før første brug", Trådløs forbindelse.
Sluk for mikrobølgeovnen.
Undgå at bruge en anden mikrobølgeovn og apparatets
fjernbetjening på samme tid. Mikrobølgeovne afbryder
Wi-Fi-signalet.
13.2 Håndtering: Fejlkoder
Når softwarefejlen opstår, viser displayet en fejlmeddelelse.
I dette afsnit finder du listen over de problemer, du selv kan håndtere.
Kode og beskrivelse Afhjælpning
C2 - Termometer er i ovnrummet under Pyrolyseren‐
gøring.
C3 - lågen er ikke helt lukket under Pyrolyserengøring. Luk lågen.
F111 - Termometer er ikke sat rigtigt i stikkontakten. Sæt Termometer ind i stikket.
Fjern Termometer.
DANSK 33
Page 34

Kode og beskrivelse Afhjælpning
F240, F439 - berøringsfelterne på displayet virker ikke
korrekt.
F601 - der er et problem med Wi-Fi signal. Kontrollér din netværksforbindelse. Se kapitlet "Før
F604 - den første tilslutning til Wi-Fi mislykkedes. Sluk og tænd for ovnen og prøv igen. Se kapitlet "Før
F908 - ovnsystemet kan ikke oprette forbindelse til
kontrolpanelet.
Rengør displayets overflade. Sørg for, at der ikke er
snavs på berøringsfelterne.
ibrugtagning", Trådløs forbindelse.
ibrugtagning", Trådløs forbindelse.
Sluk og tænd for ovnen.
Når en af disse fejlmeddelelser fortsætter med at blive vist på displayet, betyder det, at et
defekt undersystem muligvis er blevet deaktiveret. Kontakt i så fald din forhandler eller et
autoriseret servicecenter. Hvis en af disse fejl opstår, vil resten af ovnfunktionerne fortsætte
med at virke som normalt.
Kode og beskrivelse Afhjælpning
F602, F603 - Wi-Fi er ikke tilgængelig. Sluk og tænd for ovnen.
13.3 Servicedata
Kontakt din forhandler eller et autoriseret servicecenter, hvis du ikke selv kan løse problemet.
De nødvendige oplysninger til servicecenteret er angivet på maskinens typeskilt. Typeskiltet
sidder på ovnens frontramme. Typeskiltet må ikke fjernes fra ovnrummet.
Det anbefales, at du noterer oplysningerne her:
Model (MOD.) .........................................
Produktnummer (PNC) .........................................
Serienummer (S.N.) .........................................
14. ENERGIEFFEKTIV
14.1 Produktoplysninger og produktoplysningsark
Leverandørens navn AEG
Identifikation af model
Energieffektivitetsindeks 81.2
Energieffektivitetsklasse A+
Energiforbrug med en standardmængde, almindelig tilstand 0.93 kWh/cyklus
Energiforbrug med en standardmængde, blæsertvungen tilstand 0.69 kWh/cyklus
34 DANSK
BKB8S4B0 949494840
BKH8S4M0 949494839
Page 35

Antal ovnrum 1
Varmekilde Elektricitet
Lydstyrke 72 l
Type ovn Indbygningsovn
Vægt
IEC/EN 60350-1 - Elektriske husholdningsapparater til madlavning - Del 1: Komfurer, ovne, dampovne og grillap‐
parater - Metoder til måling af ydeevne.
BKB8S4B0 34.5 kg
BKH8S4M0 34.5 kg
14.2 Energibesparelse
Apparatet indeholder funktioner, som
hjælper dig med at spare energi ved
daglig madlavning.
Sørg for, at ovnens låge er lukket, når ovnen
er tændt. Åbn ikke ovnlågen for ofte under
tilberedningen. Hold dørpakningen ren og
sørg for, at den sidder godt fast.
Brug køkkengrej af metal for at øge
energibesparelsen.
Forvarm om muligt ikke ovnen inden
tilberedning.
Hold pauserne mellem bagning så korte som
muligt, når du tilbereder nogle få retter på én
gang.
Tilberedning med blæser
Brug om muligt tilberedningsfunktionerne
med blæser for at spare energi.
Restvarme
Hvis et program med Varighed er aktiveret,
og tilberedningstiden er længere end 30
minutter, slukkes varmelegemerne
automatisk tidligere i nogle apparatfunktioner.
Blæseren og lampen bliver ved med at være
tændt. Når du tænder for ovnen, viser
displayet eftervarmen. Du kan bruge varmen
til at holde maden varm.
Når tilberedningsvarigheden er længere end
30 min., skal du reducere ovntemperaturen til
minimum 3 - 10 min. inden tilberedningen er
slut. Eftervarmen i ovnen vil blive ved med at
tilberede maden.
Brug restvarmen til at opvarme andre retter.
Hold maden varm
Vælg den lavest mulige temperaturindstilling
for at bruge restvarme og holde et måltid
varmt. Restvarmelampen eller temperaturen
vises på displayet.
Tilberedning med slukket lampe
Sluk for lampen under tilberedning. Tænd kun
for det, når det er nødvendigt.
Fugtig varmluft
Denne funktion er beregnet til at spare energi
under madlavning.
Når du bruger denne funktion, slukkes
lampen automatisk efter 30 sekunder. Du kan
tænde det igen, men denne handling vil
mindske den forventede energibesparelse.
15. MENUSTRUKTUR
15.1 Menu
Menupunkt Applikation
Hjælp til tilberedning Angiver automatiske programmer.
DANSK 35
Page 36

Menupunkt Applikation
Rengøring Angiver rengøringsprogrammer.
Favoritter Angiver favoritindstillingerne.
Tilvalg For at indstille ovnkonfigurationen.
Indstillinger Forbindelser For at indstille netværkskonfigurationen.
Opsætning For at indstille ovnkonfigurationen.
Service Viser softwarens version og konfiguration.
15.2 Undermenu for: Rengøring
Undermenu Applikation
Pyrolyserengøring, kort Varighed: 1 h.
Pyrolyserengøring, normal Varighed: 1 h 30 min.
Pyrolyserengøring, intens Varighed: 2 h 30 min.
15.3 Undermenu for: Tilvalg
Undermenu Applikation
Lys Slår lampen til og fra.
Børnesikring Forhindrer utilsigtet aktivering af ovnen. Når tilvalget er slået til, vises
Hurtig opvarmning Afkorter opvarmningstiden. Den er kun tilgængelig for nogle af ovnens
Husk rengøring Slår påmindelsen til og fra.
Tidsangivelse Slår uret til og fra.
Digitalt ur Ændrer formatet på den viste tid.
teksten Børnesikring på displayet, når du tænder for apparatet. For at
aktivere brugen af ovnen skal du vælge kodebogstaverne i alfabetisk
rækkefølge. Når tilvalget er slået til, og apparatet er slukket, er appa‐
ratets låge låst. Adgang til timeren, fjernbetjent tilstand og pæren er
mulig med tilvalget slået til.
funktioner.
15.4 Undermenu for: Forbindelser
Undermenu Beskrivelse
Wi-Fi For at aktivere og deaktivere: Wi-Fi.
Fjernbetjent tilstand For at aktivere og deaktivere fjernbetjening.
Automatisk fjernbetjening For at starte fjernbetjent tilstand automatisk efter at have trykket på
Tilvalg kun muligt, efter du aktiverer: Wi-Fi.
START.
Tilvalg kun muligt, efter du aktiverer: Wi-Fi.
36 DANSK
Page 37

Undermenu Beskrivelse
Netværk For at kontrollere netværksstatussen og signaleffekten af: Wi-Fi.
Glem netværk For at deaktivere det aktuelle netværk fra automatisk forbindelse til
ovnen.
15.5 Undermenu for: Opsætning
Undermenu Beskrivelse
Sprog Indstiller ovnens sprog.
Lysstyrke display Indstiller displayets lysstyrke
Panelsignal Aktiverer og deaktiverer tonen i berøringsfelterne. Lydsignalet kan ik‐
ke slås fra for: .
Signal volume Indstiller lydstyrken af tastetoner og signaler.
Aktuel tid Indstiller den aktuelle tid og dato.
15.6 Undermenu for: Service
Undermenu Beskrivelse
Demo funktion Aktiverings- / deaktiveringskode: 2468
Softwareversion Oplysninger om softwareversion.
Nulstil alle indstillinger Gendanner fabriksindstillingerne.
16. DET ER NEMT!
Inden første anvendelse skal du indstille:
Sprog Lysstyrke display Panelsignal Signal volume Aktuel tid
Gør dig bekendt med de grundlæggende symboler på kontrolpanelet og displayet:
TIL / FRA Menu Favoritter
Timer
Termometer
Start med at bruge ovnen
Hurtig start Tænd for ovnen og
begynd tilberednin‐
gen med funktionens
standardtemperatur
og -tid.
Trin 1 Trin 2 Trin 3
Tryk på og hold: . - vælg den
foretrukne funktion.
Tryk på: .
DANSK 37
/
Page 38

Start med at bruge ovnen
Hurtigt sluk Sluk for ovnen, enh‐
ver skærm eller
meddelelse, til enh‐
ver tid.
- tryk og hold nede, indtil ovnen slukker.
Start tilberedning
Trin 1 Trin 2 Trin 3 Trin 4 Trin 5
- tryk for at tænde
ovnen.
- vælg ovnfunktion.
- indstil temperatu‐
Tilberedning med damp
Hæld koldt vand fra hanen i vandbeholderen. Følg
Opvarm‐
ning med
Genopvarm
maden.
anvisningerne på displayet.
damp
Pizza Brød
Fugtighed
lav
Tilberedning
med damp.
Sætter fart
på tilbered‐
ningen.
ren.
- tryk for at bekræfte.
Tilberedning med damp
130 °C
200 - 220°C150 - 210°C160 - 200
- tryk for at starte til‐
Lær at tilberede mad hurtigt
Brug de automatiske programmer for at tilberede en ret hurtigt med standardindstillingerne:
Hjælp til tilbe‐
redning
Trin 1 Trin 2 Trin 3 Trin 4
Tryk: . Tryk på: . Tryk: Hjælp til til‐
beredning.
Vælg retten.
Brug hurtigfunktioner til at indstille tilberedningstiden
10% Finish assist
Brug 10% Finish assist til at forlænge tiden, når der er
10% af tilberedningstiden er tilbage.
Forlæng tilberedningstiden ved at trykke på +1min.
beredning.
°C
17. MILJØHENSYN
Genbrug materialer med symbolet .
Anbring emballagematerialet i passende
beholdere til genbrug. Hjælp med at beskytte
miljøet og menneskelig sundhed samt at
genbruge affald af elektriske og elektroniske
apparater. Kasser ikke apparater, der er
38 DANSK
mærket med symbolet , sammen med
husholdningsaffaldet. Lever produktet tilbage
til din lokale genbrugsplads eller kontakt din
kommune.
Page 39

FOR PERFECT RESULTS
Thank you for choosing this AEG product. We have created it to give you impeccable
performance for many years, with innovative technologies that help make life simpler –
features you might not find on ordinary appliances. Please spend a few minutes reading
to get the very best from it.
Visit our website to:
Get usage advice, brochures, trouble shooter, service and repair information:
www.aeg.com/support
Register your product for better service:
www.registeraeg.com
Buy Accessories, Consumables and Original spare parts for your appliance:
www.aeg.com/shop
CUSTOMER CARE AND SERVICE
Always use original spare parts.
When contacting our Authorised Service Centre, ensure that you have the following data
available: Model, PNC, Serial Number.
The information can be found on the rating plate.
Warning / Caution-Safety information
General information and tips
Environmental information
Subject to change without notice.
CONTENTS
1. SAFETY INFORMATION.............................................................................. 41
2. SAFETY INSTRUCTIONS............................................................................ 43
3. INSTALLATION.............................................................................................46
4. PRODUCT DESCRIPTION........................................................................... 48
5. CONTROL PANEL........................................................................................ 48
6. BEFORE FIRST USE....................................................................................50
7. DAILY USE....................................................................................................51
8. CLOCK FUNCTIONS.................................................................................... 56
9. HOW TO USE: ACCESSORIES................................................................... 57
10. ADDITIONAL FUNCTIONS.........................................................................61
11. HINTS AND TIPS........................................................................................ 62
12. CARE AND CLEANING.............................................................................. 65
13. TROUBLESHOOTING................................................................................ 69
14. ENERGY EFFICIENCY...............................................................................72
15. MENU STRUCTURE...................................................................................73
16. IT'S EASY!...................................................................................................75
17. ENVIRONMENTAL CONCERNS................................................................76
ENGLISH 39
Page 40

My AEG Kitchen app
40 ENGLISH
Page 41

1. SAFETY INFORMATION
Before the installation and use of the appliance, carefully read
the supplied instructions. The manufacturer is not responsible
for any injuries or damage that are the result of incorrect
installation or usage. Always keep the instructions in a safe
and accessible location for future reference.
1.1 Children and vulnerable people safety
• This appliance can be used by children aged from 8 years
and above and persons with reduced physical, sensory or
mental capabilities or lack of experience and knowledge if
they have been given supervision or instruction concerning
the use of the appliance in a safe way and understand the
hazards involved. Children of less than 8 years of age and
persons with very extensive and complex disabilities shall
be kept away from the appliance unless continuously
supervised.
• Children should be supervised to ensure that they do not
play with the appliance and mobile devices with My AEG
Kitchen .
• Keep all packaging away from children and dispose of it
appropriately.
• WARNING: The appliance and its accessible parts become
hot during use. Keep children and pets away from the
appliance when in use and when cooling down.
• If the appliance has a child safety device, it should be
activated.
• Children shall not carry out cleaning and user maintenance
of the appliance without supervision.
1.2 General Safety
• This appliance is for cooking purposes only.
• This appliance is designed for single household domestic
use in an indoor environment.
ENGLISH 41
Page 42

• This appliance may be used in, offices, hotel guest rooms,
bed & breakfast guest rooms, farm guest houses and other
similar accommodation where such use does not exceed
(average) domestic usage levels.
• Only a qualified person must install this appliance and
replace the cable.
• Do not use the appliance before installing it in the built-in
structure.
• Disconnect the appliance from the power supply before
carrying out any maintenance.
• If the mains power supply cable is damaged, it must be
replaced by the manufacturer, its Authorised Service Centre
or similarly qualified persons to avoid an electrical hazard.
• WARNING: Ensure that the appliance is switched off before
replacing the lamp to avoid the possibility of electric shock.
• WARNING: The appliance and its accessible parts become
hot during use. Care should be taken to avoid touching
heating elements or the surface of the appliance cavity.
• Always use oven gloves to remove or insert accessories or
ovenware.
• Use only the food sensor (core temperature sensor)
recommended for this appliance.
• To remove the shelf supports first pull the front of the shelf
support and then the rear end away from the side walls.
Install the shelf supports in the opposite sequence.
• Do not use a steam cleaner to clean the appliance.
• Do not use harsh abrasive cleaners or sharp metal scrapers
to clean the glass door since they can scratch the surface,
which may result in shattering of the glass.
• Before pyrolytic cleaning, remove all accessories and
excessive deposits/spills from the appliance cavity.
42 ENGLISH
Page 43

2. SAFETY INSTRUCTIONS
2.1 Installation
WARNING!
Only a qualified person must install this
appliance.
• Remove all the packaging.
• Do not install or use a damaged
appliance.
• Follow the installation instructions supplied
with the appliance.
• Always take care when moving the
appliance as it is heavy. Always use safety
gloves and enclosed footwear.
• Do not pull the appliance by the handle.
• Install the appliance in a safe and suitable
place that meets installation requirements.
• Keep the minimum distance from other
appliances and units.
• Before mounting the appliance, check if
the appliance door opens without restraint.
• The appliance is equipped with an electric
cooling system. It must be operated with
the electric power supply.
Cabinet minimum height
(Cabinet under the worktop
minimum height)
Cabinet width 560 mm
Cabinet depth 550 (550) mm
Height of the front of the
appliance
Height of the back of the
appliance
Width of the front of the ap‐
pliance
Width of the back of the ap‐
pliance
Depth of the appliance 569 mm
Built in depth of the appli‐
ance
Depth with open door 1022 mm
Ventilation opening mini‐
mum size. Opening placed
on the bottom rear side
590 (600) mm
594 mm
576 mm
595 mm
559 mm
548 mm
560x20 mm
Mains supply cable length.
Cable is placed in the right
corner of the back side
Mounting screws 4x25 mm
1500 mm
2.2 Electrical connection
WARNING!
Risk of fire and electric shock.
• All electrical connections should be made
by a qualified electrician.
• The appliance must be earthed.
• Make sure that the parameters on the
rating plate are compatible with the
electrical ratings of the mains power
supply.
• Always use a correctly installed
shockproof socket.
• Do not use multi-plug adapters and
extension cables.
• Make sure not to cause damage to the
mains plug and to the mains cable. Should
the mains cable need to be replaced, this
must be carried out by our Authorised
Service Centre.
• Do not let mains cables touch or come
near the appliance door or the niche below
the appliance, especially when it operates
or the door is hot.
• The shock protection of live and insulated
parts must be fastened in such a way that
it cannot be removed without tools.
• Connect the mains plug to the mains
socket only at the end of the installation.
Make sure that there is access to the
mains plug after the installation.
• If the mains socket is loose, do not
connect the mains plug.
• Do not pull the mains cable to disconnect
the appliance. Always pull the mains plug.
• Use only correct isolation devices: line
protecting cut-outs, fuses (screw type
fuses removed from the holder), earth
leakage trips and contactors.
• The electrical installation must have an
isolation device which lets you disconnect
the appliance from the mains at all poles.
ENGLISH 43
Page 44

The isolation device must have a contact
opening width of minimum 3 mm.
• Fully close the appliance door before you
connect the mains plug to the mains
socket.
• This appliance is supplied with a main
plug and a main cable.
Cable types applicable for installation or re‐
placement for Europe:
H07 RN-F, H05 RN-F, H05 RRF, H05 VV-F, H05
V2V2-F (T90), H05 BB-F
For the section of the cable refer to the total
power on the rating plate. You can also refer
to the table:
Total power (W) Section of the cable
(mm²)
maximum 1380 3x0.75
maximum 2300 3x1
maximum 3680 3x1.5
The earth cord (green / yellow cable) must be
2 cm longer than the brown phase and blue
neutral cables.
2.3 Use
WARNING!
Risk of injury, burns and electric shock or
explosion.
• Do not change the specification of this
appliance.
• Make sure that the ventilation openings
are not blocked.
• Do not let the appliance stay unattended
during operation.
• Deactivate the appliance after each use.
• Be careful when you open the appliance
door while the appliance is in operation.
Hot air can release.
• Do not operate the appliance with wet
hands or when it has contact with water.
• Do not apply pressure on the open door.
• Do not use the appliance as a work
surface or as a storage surface.
• Open the appliance door carefully. The
use of ingredients with alcohol can cause
a mixture of alcohol and air.
• Do not let sparks or open flames to come
in contact with the appliance when you
open the door.
• Do not put flammable products or items
that are wet with flammable products in,
near or on the appliance.
• Do not share your Wi-Fi password.
WARNING!
Risk of damage to the appliance.
• To prevent damage or discoloration to the
enamel:
– do not put ovenware or other objects
in the appliance directly on the bottom.
– do not put aluminium foil directly on
the bottom of cavity of the appliance.
– do not put water directly into the hot
appliance.
– do not keep moist dishes and food in
the appliance after you finish the
cooking.
– be careful when you remove or install
the accessories.
• Discoloration of the enamel or stainless
steel has no effect on the performance of
the appliance.
• Use a deep pan for moist cakes. Fruit
juices cause stains that can be
permanent.
• Always cook with the appliance door
closed.
• If the appliance is installed behind a
furniture panel (e.g. a door) make sure the
door is never closed when the appliance
operates. Heat and moisture can build up
behind a closed furniture panel and cause
subsequent damage to the appliance, the
housing unit or the floor. Do not close the
furniture panel until the appliance has
cooled down completely after use.
2.4 Care and cleaning
WARNING!
Risk of injury, fire, or damage to the
appliance.
• Before maintenance, deactivate the
appliance and disconnect the mains plug
from the mains socket.
• Make sure the appliance is cold. There is
the risk that the glass panels can break.
44 ENGLISH
Page 45

• Replace immediately the door glass
panels when they are damaged. Contact
the Authorised Service Centre.
• Be careful when you remove the door from
the appliance. The door is heavy!
• Clean regularly the appliance to prevent
the deterioration of the surface material.
• Clean the appliance with a moist soft
cloth. Use only neutral detergents. Do not
use abrasive products, abrasive cleaning
pads, solvents or metal objects.
• If you use an oven spray, follow the safety
instructions on its packaging.
2.5 Pyrolytic cleaning
WARNING!
Risk of Injury / Fires / Chemical
Emissions (Fumes) in Pyrolytic Mode.
• Before carrying out the pyrolytic cleaning
and initial preheating remove from the
oven cavity:
– any excess food residues, oil or
grease spills / deposits.
– any removable objects (including
shelves, side rails, etc., provided with
the appliance) especially any non-stick
pots, pans, trays, utensils, etc.
• Read carefully all the instructions for
pyrolytic cleaning.
• Keep children away from the appliance
while the pyrolytic cleaning operates. The
appliance becomes very hot and hot air is
released from the front cooling vents.
• Pyrolytic cleaning is a high temperature
operation that can release fumes from
cooking residues and construction
materials, as such consumers are advised
to:
– provide good ventilation during and
after the pyrolytic cleaning.
– provide good ventilation during and
after the initial preheating.
• Do not spill or apply water on the oven
door during and after the pyrolytic cleaning
to avoid damaging the glass panels.
• Fumes released from all pyrolytic ovens /
cooking residues as described are not
harmful to humans, including children, or
persons with medical conditions.
• Keep pets away from the appliance during
and after the pyrolytic cleaning and initial
preheating. Small pets (especially birds
and reptiles) can be highly sensitive to
temperature changes and emitted fumes.
• Non-stick surfaces on pots, pans, trays,
utensils etc., can be damaged by the high
temperature pyrolytic cleaning operation of
all pyrolytic ovens and can be also a
source for low level harmful fumes.
2.6 Steam Cooking
WARNING!
Risk of burns and damage to the
appliance.
• Released Steam can cause burns:
– Do not open the appliance door during
the steam cooking operation.
– Open the appliance door with care
after the steam cooking operation.
2.7 Internal lighting
WARNING!
Risk of electric shock.
• Concerning the lamp(s) inside this product
and spare part lamps sold separately:
These lamps are intended to withstand
extreme physical conditions in household
appliances, such as temperature,
vibration, humidity, or are intended to
signal information about the operational
status of the appliance. They are not
intended to be used in other applications
and are not suitable for household room
illumination.
• This product contains a light source of
energy efficiency class G.
• Use only lamps with the same
specifications.
2.8 Service
• To repair the appliance contact the
Authorised Service Centre.
• Use original spare parts only.
2.9 Disposal
WARNING!
Risk of injury or suffocation.
ENGLISH 45
Page 46

• Contact your municipal authority for
www.youtube.com/electrolux
www.youtube.com/aeg
How to install your AEG/Electrolux
Oven - Column installation
18
594
589
114
21548
595
+-1
min. 550
20
600
min. 560
3
5
60
20
80
520
60
198
523
(*mm)
information on how to dispose of the
appliance.
• Disconnect the appliance from the mains
supply.
• Cut off the mains electrical cable close to
the appliance and dispose of it.
3. INSTALLATION
• Remove the door catch to prevent children
or pets from becoming trapped in the
appliance.
WARNING!
Refer to Safety chapters.
3.1 Building in
46 ENGLISH
Page 47

min. 550
20
595
+-1
18
590
min. 560
594
589
114
21548
3
5
70
60
520
60
20
198
523
(*mm)
3.2 Securing the oven to the cabinet
ENGLISH 47
Page 48

4. PRODUCT DESCRIPTION
6
12
10
9
5
4
11
8
5
4
1
2
3
3
2 3
7
1
1 2 3 4
5 6
4.1 General overview
Control panel
1
Electronic programmer
2
Water drawer
3
Socket for the food sensor
4
Heating element
5
Lamp
6
Fan
7
Shelf support, removable
8
Draining pipe
9
Water outlet valve
10
Shelf positions
11
Steam inlet
12
4.2 Accessories
• Wire shelf
For cookware, cake tins, roasts.
• Baking tray
For cakes and biscuits.
• Grill- / Roasting pan
To bake and roast or as pan to collect fat.
5. CONTROL PANEL
5.1 Control panel overview
48 ENGLISH
ON / OFF Press and hold to turn the appliance on and off.
1
Menu Lists the appliance functions.
2
• Food sensor
To measure how far the food is cooked.
• Telescopic runners
With the telescopic runners you can put in
and remove the shelves more easily.
Page 49

Favourites Lists the favourite settings.
3s
150°C
12:30
15min
START
85°C
G F DE
C
A B
3
Display Shows the current settings of the appliance.
4
Lamp switch To turn the lamp on and off.
5
Fast Heat Up To turn on and off the function: Fast Heat Up.
6
Press Move
Touch the surface with fingertip. Slide fingertip over the surface. Touch the surface for 3 seconds.
Press and hold
5.2 Display
Display with key functions set.
A. Wi-Fi
B. Time of day
C. START/STOP
D. Temperature
E. Heating functions
F. Timer
G. Food sensor (selected models only)
Display indicators
Basic indicators - to navigate on the display.
To confirm the selection / setting.
Sound alarm function indicators - when the set time of cooking ends, the signal sounds.
The function is on.
Timer indicators
To go one level
back in the menu.
The function is on.
Cooking stops automatically.
To undo the last
action.
To turn the options on and off.
Sound alarm is off.
To set the function: Delayed start.
Wi-Fi indicator - the appliance can be connected to Wi-Fi.
Remote operation indicator - the appliance can be controlled remotely.
To cancel the setting.
Wi-Fi connection is turned on.
ENGLISH 49
Page 50

Remote operation is turned on.
6. BEFORE FIRST USE
WARNING!
Refer to Safety chapters.
6.1 Initial Cleaning
Step 1 Step 2 Step 3
Remove all accessories and remov‐
able shelf supports from the appli‐
ance.
6.2 First connection
The display shows welcome message after the first connection.
You have to set: Language, Display brightness, Key tones, Buzzer volume, Time of day.
6.3 Wireless connection
To connect the appliance you need:
• Wireless network with the Internet connection.
• Mobile device connected to the same wireless network.
Clean the appliance and the acces‐
sories only with a microfibre cloth,
warm water and a mild detergent.
Place the accessories and the re‐
movable shelf supports in the appli‐
ance.
Step 1 To download My AEG Kitchen app: Scan the QR code on the rating plate with the camera on your
Step 2 Follow the app onboarding instructions.
Step 3 Turn on the appliance.
Step 4
Step 5
Step 6 The appliance wireless module starts within 90 sec.
Frequency 2.4 GHz WLAN
Protocol IEEE 802.11b DSSS, 802.11g/n OFDM
Max Power EIRP < 20 dBm (100 mW)
Wi-Fi module NIUS-50
mobile device to be redirected to AEG Homepage. The rating plate is on the front frame of the ap‐
pliance cavity. You can also download the app directly from the app store.
Press: . Select: Settings / Connections.
- slide or press to turn on: Wi-Fi.
2400 - 2483.5 MHz
50 ENGLISH
Page 51

6.4 Software licences
The software in this product contains
components that are based on free and open
source software. AEG acknowledges the
contributions of the open software and
robotics communities to the development
project.
To access the source code of these free and
license conditions require publishing, and to
see their full copyright information and
applicable license terms, visit: http://
aeg.opensoftwarerepository.com (folder
NIUS).
6.5 Initial preheating
Preheat the empty oven before the first use.
open source software components whose
Step 1 Remove all accessories and removable shelf supports from the oven.
Step 2
Step 3
The oven can emit an odour and smoke during preheating. Make sure that the room is ventilated.
Set the maximum temperature for the function: .
Let the oven operate for 1 h.
Set the maximum temperature for the function: .
Let the oven operate for 15 min.
7. DAILY USE
WARNING!
Refer to Safety chapters.
7.1 How to set: Heating functions
Step 1 Turn on the oven. The display shows the default heating function.
Step 2 Press the symbol of the heating function to enter the submenu.
Step 3
Step 4
Step 5
Step 6 Turn off the oven.
Select the heating function and press: . The display shows: temperature.
Set: temperature. Press: .
Press: .
Food Sensor - you can plug the sensor at any time before or during cooking.
- press to turn off the heating function.
7.2 How to set: Steam heating function
Step 1 Turn on the oven.
Step 2 Set the steam heating function.
Select the symbol of the heating function and press it to enter the submenu.
ENGLISH 51
Page 52

Step 3
Step 4 Set the temperature.
Step 5
Step 6 Press the cover of the water drawer to open it.
Step 7 Fill the water drawer with cold water to the maximum level (around 900 ml) until the signal sounds
Press: . The display shows the temperature settings.
Press: .
or the display shows the message. Do not fill the water drawer over its maximum capacity. There is
a risk of water leakage, overflow and furniture damage.
WARNING!
Use only cold tap water. Do not use filtered (demineralised) or distilled water.
Do not use other liquids. Do not pour flammable or alcoholic liquids into the
water drawer.
Step 8 Push the water drawer to its initial position.
Step 9
Step 10 When the water drawer runs out of water, the signal sounds. Refill the water drawer.
Step 11 Turn off the oven.
Step 12 Empty the water drawer after cooking ends.
Press: .
When the oven reaches the set temperature, the signal sounds.
WARNING!
The oven is hot. There is a risk of burns. Be careful when you empty the wa‐
ter drawer.
Step 13 Residual water can condensate in the cavity. After cooking, carefully open the oven door. When the
oven is cold, dry the cavity with a soft cloth. Wait for at least 60 minutes after each use to prevent
hot water from exiting the water outlet valve.
7.3 Water tank
Water tank indicator
Water tank indicator
The tank is full.
The tank is half full.
If you put too much water into the tank, the safety out‐
let moves the excess water to the bottom of the cavi‐
The tank is empty. Refill the tank.
ty. Remove the water with a sponge.
52 ENGLISH
Page 53

Emptying the water tank
B
C
A
Step 1
Step 2
Step 3
Turn off the oven, leave it with the door open and
wait until the oven is cold.
Connect the draining pipe (C) to the outlet valve (A)
through the connector (B).
Keep the end of the pipe below the level of A and
push B repeatedly to collect remaining water.
Step 4
Detach the C and B and dry the oven with a soft
sponge.
7.4 How to set: Assisted Cooking
Every dish in this submenu has a recommended function and temperature. You can adjust the
time and the temperature.
For some of the dishes you can also cook with:
• Weight Automatic
• Food Sensor
The degree to which a dish is cooked:
• Rare or Less
• Medium
• Well done or More
Step 1 Turn on the oven.
Step 2
Step 3
Step 4 Choose a dish or a food type.
Step 5
Press: .
Press: . Enter: Assisted Cooking.
Press: .
7.5 Heating functions
STANDARD
Heating function Application
To grill thin pieces of food and to toast bread.
Grill
To roast large meat joints or poultry with bones on one shelf position. To make gratins
Turbo Grilling
and to brown.
ENGLISH 53
Page 54

Heating function Application
To bake on up to three shelf positions at the same time and to dry food. Set the tem‐
perature 20 - 40 °C lower than for Conventional Cooking.
True Fan Cooking
To make convenience food (e.g., french fries, potato wedges or spring rolls) crispy.
Frozen Foods
To bake and roast food on one shelf position.
Conventional Cooking
To bake cakes with crispy bottom and to preserve food.
Bottom Heat
To speed up the rising of the yeast dough. It prevents dough surface from drying and
keeps the dough elastic.
Dough Proving
True Fan Cooking, Conventional Cooking: When you set the temperature below 80 °C the
lamp automatically turns off after 30 sec.
SPECIALS
Heating function Application
To preserve vegetables (e.g., pickles).
Preserving
Dehydrating
Plate Warming
Defrost
Au Gratin
54 ENGLISH
To dry sliced fruit, vegetables and mushrooms.
To preheat plates for serving.
To defrost food (vegetables and fruit). The defrosting time depends on the amount
and size of the frozen food.
For dishes such as lasagna or potato gratin. To make gratins and to brown.
Page 55

Heating function Application
To prepare tender, succulent roasts.
Slow Cooking
To keep food warm.
Keep Warm
This function is designed to save energy during cooking. When you use this function,
the temperature in the cavity may differ from the set temperature. The residual heat is
Moist Fan Baking
used. The heating power may be reduced. For more information refer to "Daily Use"
chapter, Notes on: Moist Fan Baking.
STEAM
Heating function Application
Food reheating with steam prevents surface drying. Heat is distributed in a gentle and
even way, which allows to recover taste and aroma of food as just prepared. This
Steam Regenerating
Pizza Function
Bread Baking
Humidity Low
function can be used to reheat food directly on a plate. You can reheat more than one
plate at the same time, using different shelf positions.
Baking pizza.
Use this function to prepare bread and bread rolls with a very good professional-like
result in terms of crispiness, colour and crust gloss.
The function is suitable for meat, poultry, oven dishes and casseroles. Thanks to the
combination of steam and heat, meat gets a tender and juicy texture along with a
crusty surface.
7.6 Notes on: Moist Fan Baking
This function was used to comply with the
energy efficiency class and ecodesign
requirements (according to EU 65/2014 and
EU 66/2014). Tests according to:
IEC/EN 60350-1
The oven door should be closed during
cooking so that the function is not interrupted
and the oven operates with the highest
energy efficiency possible.
When you use this function the lamp
automatically turns off after 30 sec.
For the cooking instructions refer to "Hints
and tips" chapter, Moist Fan Baking. For
general energy saving recommendations
refer to "Energy Efficiency" chapter, Energy
Saving.
ENGLISH 55
Page 56

8. CLOCK FUNCTIONS
8.1 Clock functions description
Clock
Clock
Application
function
Cooking time To set the length of cooking. Maximum
End action To set what happens when the timer
Delayed
start
is 23 h 59 min.
ends counting.
To postpone the start and / or end of
cooking.
8.2 How to set: Clock functions
How to set the clock
Step 1 Press: Time of day.
Step 2
How to set cooking time
Step 1 Choose the heating function and set the temperature.
Step 2
Step 3
Set the time. Press: .
Press: .
Set the time. Press: .
function
Time exten‐
sion
Reminder To set a countdown. Maximum is 23 h
Uptimer Monitors how long the function oper‐
Application
To extend cooking time.
59 min. This function has no effect on
the operation of the appliance.
ates. Uptimer - you can turn it on and
off.
How to choose end option
Step 1 Choose the heating function and set the temperature.
Step 2
Step 3 Set the cooking time.
Step 4
Step 5 Press: End action.
Step 6 Choose the preferred: End action.
Step 7
Press: .
Press: .
Press: . Repeat the action until the display shows the main screen.
How to delay start of cooking
Step 1 Set the heating function and the temperature.
Step 2
Press: .
56 ENGLISH
Page 57

How to delay start of cooking
Step 3 Set the cooking time.
Step 4
Step 5 Press: Delayed start.
Step 6 Choose the value.
Step 7
Press: .
Press: . Repeat the action until the display shows the main screen.
How to extend cooking time
When 10% of cooking time is left and the food seems not to be ready, you can extend cooking time. You can also
change the heating function.
Press +1min to extend the cooking time.
How to change timer settings
Step 1
Step 2 Set the timer value.
Step 3
You can change the set time during cooking at any time.
Press: .
Press: .
9. HOW TO USE: ACCESSORIES
9.1 Inserting accessories
A small indentation at the top increases
safety. The indentations are also anti-tip
Wire shelf:
Push the shelf between the guide bars of the shelf
support and make sure that the feet point down.
devices. The high rim around the shelf
prevents cookware from slipping of the shelf.
ENGLISH 57
Page 58

Baking tray / Deep pan:
Push the tray between the guide bars of the shelf
support.
9.2 Food Sensor
Food Sensor - measures the temperature inside the food. You can use it with every heating
function.
There are two temperatures to be set:
The oven temperature: minimum 120 °C.
The core temperature.
For the best cooking results:
Ingredients should be at room tem‐
perature.
Do not use it for liquid dishes. During cooking it must remain in the dish.
The oven calculates an approximate end of cooking time. It depends on the quantity of food,
the set oven function and the temperature.
How to use: Food Sensor
Step 1 Turn on the oven.
Step 2 Set a heating function and, if necessary, the oven temperature.
Step 3 Insert: Food Sensor.
Meat, poultry and fish Casserole
Insert the tip of Food Sensor into the centre of meat,
fish, in the thickest part if possible. Make sure that at
least 3/4 of Food Sensor is inside of the dish.
Insert the tip of Food Sensor exactly in the centre of the
casserole. Food Sensor should be stabilized in one place
during baking. Use a solid ingredient to achieve that. Use
the rim of the baking dish to support the silicone handle of
Food Sensor. The tip of Food Sensor should not touch the
bottom of a baking dish.
58 ENGLISH
Page 59

Step 4 Plug Food Sensor into the socket at the front of the oven.
Step 5
Step 6
Step 7
Step 8
Step 9 Remove Food Sensor plug from the socket and remove the dish from the oven.
The display shows the current temperature of: Food Sensor.
- press to set the core temperature of the sensor.
- press to set the preferred option:
• Sound alarm - when food reaches the core temperature, the signal sounds.
• Sound alarm and stop cooking - when food reaches the core temperature, the signal sounds
and the oven stops.
Select the option and repeatedly press: to go to main screen.
Press: .
When food reaches the set temperature, the signal sounds. You can choose to stop or to continue
cooking to make sure the food is well done.
WARNING!
There is a risk of burns as Food Sensor becomes hot. Be careful when you
unplug it and remove it from the food.
9.3 Accessories for steam cooking
The steam kit accessories are not
supplied with the oven. For more
information, please contact your local
supplier.
The dietary baking dish for steam cooking
functions
Dietary Baking dish consists of a glass bowl
(A), a lid (B), injector tube (C), injector (D),
and a steel grill (E).
ENGLISH 59
Page 60

Glass bowl (A) Lid (B)
C
D
Injector, injector tube, and a steel grill.
Injector tube (C) is for steam cooking, injector (D) is for
direct steam cooking.
Steel grill (E)
• Do not put the hot baking dish on cold /
wet surfaces.
• Do not pour cold liquids into the baking
dish when it is hot.
• Do not use the baking dish on a hot
cooking surface.
Step 1
Step 2 Connect the injector tube to the steam inlet.
Step 3 Set the oven for the steam cooking function.
Put the baking dish on the steel grill and cover it with the lid. Put the injector tube into the hole in
the lid. Put the baking dish onto the second shelf position from the bottom.
• Do not clean the baking dish with
abrasives, scourers and powders.
9.4 Steam cooking in a dietary
baking dish
60 ENGLISH
Page 61

9.5 Direct steam cooking
Put the baking dish on the steel grill. Add some water. Do not use the lid.
WARNING!
The injector may be hot when oven operates. Always use oven gloves. Remove the in‐
jector from the oven when you do not use steam function.
Step 1 Connect injector with injector tube. Connect injector tube to the steam inlet.
Step 2
Step 3 Set the oven for the steam cooking function.
When you cook food such as chicken, duck, turkey or large fish, put the injector inside the food.
Put the baking dish onto the first or second shelf position from the bottom.
Make sure that injector tube is not jammed. Keep the injector away from the heating element.
10. ADDITIONAL FUNCTIONS
10.1 How to save: Favourites
You can save your favourite settings, such as
temperature or the cleaning function. You can
save 3 favourite settings.
the heating function, the cooking time, the
Step 1 Turn on the appliance.
Step 2 Select the preferred setting.
Step 3
Step 4 Select: Save current settings.
Step 5
- press to reset the setting.
- press to cancel the setting.
Press: . Select: Favourites.
Press + to add the setting to the list of: Favourites. Press .
10.2 Function lock
This function prevents an accidental change of the heating function.
Step 1 Turn on the appliance.
Step 2 Set a heating function.
Step 3
To turn off the function repeat step 3.
, - press at the same time to turn on the function.
10.3 Automatic switch-off
For safety reasons the appliance turns off
after some time, if a heating function works
and you do not change any settings.
ENGLISH 61
Page 62

The Automatic switch-off does not work with
the functions: Light, Food sensor, End time,
(°C) (h)
30 - 115 12.5
120 - 195 8.5
200 - 245 5.5
250 - maximum 3
Slow Cooking.
10.4 Cooling fan
When the appliance operates, the cooling fan
turns on automatically to keep the surfaces of
the appliance cool. If you turn off the
appliance, the cooling fan can continue to
operate until the appliance cools down.
11. HINTS AND TIPS
11.1 Cooking recommendations
The temperature and cooking times in the tables are guidelines only. They depend on the recipes and the quality
and quantity of the ingredients used.
Your appliance may bake or roast differently to the appliance you had before. The hints below show recommen‐
ded settings for temperature, cooking time and shelf position for specific types of the food.
If you cannot find the settings for a special recipe, look for the similar one.
11.2 Moist Fan Baking
For the best results follow suggestions listed
in the table below.
(°C) (min)
Sweet rolls, 16 pieces baking tray or dripping pan 180 2 20 - 30
Rolls, 9 pieces baking tray or dripping pan 180 2 30 - 40
Pizza, frozen, 0.35 kg wire shelf 220 2 10 - 15
Swiss Roll baking tray or dripping pan 170 2 25 - 35
Brownie baking tray or dripping pan 175 3 25 - 30
Soufflè, 6 pieces ceramic ramekins on wire
shelf
Sponge flan base flan base tin on wire shelf 180 2 15 - 25
Victoria sandwich baking dish on wire shelf 170 2 40 - 50
Poached fish, 0.3 kg baking tray or dripping pan 180 3 20 - 25
Whole fish, 0.2 kg baking tray or dripping pan 180 3 25 - 35
Fish fillet, 0.3 kg pizza pan on wire shelf 180 3 25 - 30
200 3 25 - 30
62 ENGLISH
Page 63

(°C) (min)
Poached meat, 0.25kgbaking tray or dripping pan 200 3 35 - 45
Shashlik, 0.5 kg baking tray or dripping pan 200 3 25 - 30
Cookies, 16 pieces baking tray or dripping pan 180 2 20 - 30
Macaroons, 24 pieces baking tray or dripping pan 180 2 25 - 35
Muffins, 12 pieces baking tray or dripping pan 170 2 30 - 40
Savory pastry, 20
pieces
Short crust biscuits,
20 pieces
Tartlets, 8 pieces baking tray or dripping pan 170 2 20 - 30
Vegetables, poached,
0.4 kg
Vegetarian omelette pizza pan on wire shelf 200 3 25 - 30
Mediterranean vege‐
tables, 0.7 kg
baking tray or dripping pan 180 2 25 - 30
baking tray or dripping pan 150 2 25 - 35
baking tray or dripping pan 180 3 35 - 45
baking tray or dripping pan 180 4 25 - 30
11.3 Moist Fan Baking - recommended accessories
Use the dark and non-reflective tins and containers. They have better heat absorption than the
light colour and reflective dishes.
Pizza pan
Dark, non-reflective
28 cm diameter
Dark, non-reflective
26 cm diameter
11.4 Cooking tables for test institutes
Information for test institutes
Tests according to IEC 60350-1.
Baking dish
Ramekins
Ceramic
8 cm diameter, 5
cm height
Flan base tin
Dark, non-reflective
28 cm diameter
ENGLISH 63
Page 64

Small
cakes, 20
per tray
Small
cakes, 20
per tray
Small
cakes, 20
per tray
Apple pie, 2
tins Ø20
cm
Apple pie, 2
tins Ø20
cm
Fatless
sponge
cake, cake
mould Ø26
cm
Fatless
sponge
cake, cake
mould Ø26
cm
Fatless
sponge
cake, cake
mould Ø26
cm
Short bread True Fan
Short bread True Fan
Short bread Conventional
Toast, 4 - 6
pieces
Beef bur‐
ger, 6
pieces, 0.6
kg
Conventional
Cooking
True Fan
Cooking
True Fan
Cooking
Conventional
Cooking
True Fan
Cooking
Conventional
Cooking
True Fan
Cooking
True Fan
Cooking
Cooking
Cooking
Cooking
Grill Wire shelf 4 max. 1 - 5 Preheat the oven for
Grill Wire shelf,
( °C) (min)
Baking tray 3 170 20 - 35 -
Baking tray 3 150 - 160 20 - 35 -
Baking tray 2 and 4 150 - 160 20 - 35 -
Wire shelf 2 180 70 - 90 -
Wire shelf 2 160 70 - 90 -
Wire shelf 2 170 40 - 50 Preheat the oven for
Wire shelf 2 160 40 - 50 Preheat the oven for
Wire shelf 2 and 4 160 40 - 60 Preheat the oven for
Baking tray 3 140 - 150 20 - 40 -
Baking tray 2 and 4 140 - 150 25 - 45 -
Baking tray 3 140 - 150 25 - 45 -
4 max. 20 - 30 Put the wire shelf on
dripping pan
10 min.
10 min.
10 min.
10 min.
the fourth level and
the dripping pan on
the third level of the
oven. Turn the food
halfway through the
cooking time.
Preheat the oven for
10 min.
64 ENGLISH
Page 65

12. CARE AND CLEANING
2
1
WARNING!
Refer to Safety chapters.
12.1 Notes on cleaning
Clean the front of the appliance only with a microfibre cloth with warm water and a mild de‐
tergent.
Use a cleaning solution to clean metal surfaces.
Cleaning Agents
Everyday Use
Accessories
12.2 How to remove: Shelf supports
Remove the shelf supports to clean the oven.
Clean stains with a mild detergent.
Clean the cavity after each use. Fat accumulation or other residue may cause fire.
Moisture can condense in the appliance or on the door glass panels. To decrease the con‐
densation, let the appliance work for 10 minutes before cooking. Do not store the food in the
appliance for longer than 20 minutes. Dry the cavity only with a microfibre cloth after each
use.
Clean all accessories after each use and let them dry. Use only a microfibre cloth with warm
water and a mild detergent. Do not clean the accessories in a dishwasher.
Do not clean the non-stick accessories using abrasive cleaner or sharp-edged objects.
Step 1 Turn off the oven and wait until it is
cold.
Step 2 Pull the front of the shelf support
away from the side wall.
Step 3 Pull the rear end of the shelf support
away from the side wall and remove
it.
Step 4 Install the shelf supports in the oppo‐
site sequence.
The retaining pins on the telescopic
runners must point to the front.
ENGLISH 65
Page 66

12.3 How to use: Pyrolytic Cleaning
Clean the oven with Pyrolytic Cleaning.
WARNING!
There is a risk of burns.
CAUTION!
If there are other appliances installed in
the same cabinet, do not use them at the
same time as this function. It can cause
damage to the oven.
Before the Pyrolytic Cleaning:
Turn off the oven and wait until
it is cold.
Step 1 Step 2 Step 3
Turn on the oven.
Option Cleaning mode Duration
Pyrolytic cleaning, quick Light cleaning 1 h
Pyrolytic cleaning, normal Normal cleaning 1 h 30 min
Pyrolytic cleaning, intense Thorough cleaning 2 h 30 min
When the cleaning starts, the oven door is locked and the lamp is off. The cooling fan works at a higher
speed.
- press to stop the cleaning before it is completed.
Do not use the oven until the door lock symbol disappears from the display.
Remove all accessories. Clean the oven floor and the inner door
Press: / Cleaning.
glass with warm water, a soft cloth and
a mild detergent.
Select the cleaning mode.
When the cleaning ends:
Turn off the oven and wait until it
is cold.
Clean the cavity with a soft cloth. Remove the residue from the bottom of
the cavity.
12.4 How to clean: Water tank
Step 1 Turn off the oven.
Step 2 Place a deep pan below the steam inlet.
Step 3 Pour water into the water drawer: 850 ml. Add citric acid: 5 teaspoons. Wait for 60 min.
Step 4 Turn on the oven and set the function: Humidity Low. Set the temperature to 230 °C. Turn off the
Step 5 Turn on the oven and set the function: Humidity Low. Set the temperature between 130 and 230 °C.
To prevent limestone residue empty the water tank after each steam cooking.
oven after 25 min and wait until it is cold.
Turn off the oven after 10 minutes and wait until it is cold.
66 ENGLISH
Page 67

When the cleaning ends:
Turn off the oven. Empty the water tank.
Refer to Daily use,
"Emptying the water
tank" chapter.
Rinse the water tank and clean
the remaining limestone residue
with a soft cloth.
Clean the drain pipe with
warm water and a mild
detergent.
The table below shows water hardness range (dH) with the corresponding level of calcium
deposit and the quality of water. When water hardness exceeds level 4, fill the water drawer
with bottled water.
Water hardness Test strip Calcium deposit
Level dH
1 0 - 7 0 - 50 soft 75 cycles - 2.5
2 8 - 14 51 - 100 moderately hard 50 cycles - 2
3 15 - 21 101 - 150 hard 40 cycles - 1.5
4 22 - 28 over 151 very hard 30 cycles - 1
(mg/l)
Water classi‐
fication
Clean the wa‐
ter tank every
months
months
months
month
12.5 Cleaning Reminder
When the reminder appears, cleaning is recommended.
Use the function: Pyrolytic Cleaning.
12.6 How to remove and install: Door
The oven door has three glass panels. You can remove the oven door and the internal glass
panels to clean them. Read the whole "Removing and installing door" instruction before you
remove the glass panels.
CAUTION!
Do not use the oven without the glass panels.
Step 1 Open the door fully and hold both hinges.
ENGLISH 67
Page 68

Step 2 Lift and pull the latches until they click.
1
2
B
Step 3 Close the oven door halfway to the first
Step 4 Put the door on a soft cloth on a stable sur‐
Step 5 Hold the door trim (B) on the top edge of the
Step 6 Pull the door trim to the front to remove it.
Step 7 Hold the door glass panels by their top edge
Step 8 Clean the glass panels with water and soap. Dry the glass panels carefully. Do not clean the glass
Step 9 After cleaning, install the glass panels and the oven door.
If the door is installed correctly, you will hear a click when closing the latches.
opening position. Then lift and pull to remove
the door from its seat.
face.
door at the two sides and push inwards to re‐
lease the clip seal.
and carefully pull them out one by one. Start
from the top panel. Make sure the glass
slides out of the supports completely.
panels in the dishwasher.
68 ENGLISH
Page 69

Make sure that you put the glass panels (A and B)
A B
A
B
back in the correct sequence. Check for the symbol /
printing on the side of the glass panel, each of the
glass panels looks different to make the disassembly
and assembly easier.
When installed correctly the door trim clicks.
Make sure that you install the middle panel of glass in
the seats correctly.
12.7 How to replace: Lamp
Always hold the halogen lamp with a cloth to
prevent grease residue from burning on the
WARNING!
lamp.
Risk of electric shock.
The lamp can be hot.
Before you replace the lamp:
Step 1 Step 2 Step 3
Turn off the oven. Wait until the
oven is cold.
Disconnect the oven from the
mains.
Back lamp
Step 1 Turn the glass cover to remove it.
Step 2 Clean the glass cover.
Step 3 Replace the lamp with a suitable 300 °C heat-resistant lamp.
Step 4 Install the glass cover.
13. TROUBLESHOOTING
WARNING!
Refer to Safety chapters.
Put a cloth on the bottom of the cav‐
ity.
ENGLISH 69
Page 70

13.1 What to do if...
The appliance does not turn on or does not heat up
Possible cause
The appliance is not connected to an electrical supply
or it is connected incorrectly.
The clock is not set. Set the clock, for details refer to Clock functions chap‐
The door is not closed correctly. Fully close the door.
The fuse is blown. Make sure the fuse is the cause of the problem. If the
The appliance Child Lock is on. Refer to "Menu" chapter, Submenu for: Options.
Remedy
Check if the appliance is correctly connected to the
electrical supply.
Refer to the connection diagram.
ter, How to set: Clock functions.
problem recurs, contact a qualified electrician.
Components
Description
The lamp is burnt out. Replace the lamp, for details refer to "Care and Clean‐
Remedy
ing" chapter, How to replace: Lamp.
Cleaning
Description
There is water in the appliance cavity. There is not too much water in the water tank.
The steam cooking does not work. There is no lime residue in the steam inlet opening.
The steam cooking does not work. There is water in the water tank.
It takes more than three minutes to empty the water
tank or the water leaks from the steam inlet opening.
Remedy
There is no lime residue in the steam inlet opening.
Clean the water tank.
Power cut always stops cleaning. Repeat
cleaning if it's interrupted by power failure.
70 ENGLISH
Page 71

Problems with Wi-Fi signal
Possible cause
Trouble with wireless network signal. Check if your mobile device is connected to the wire‐
New router installed or router configuration changed. To configure appliance and mobile device again, refer
The wireless network signal is weak. Move router as close to the appliance as possible.
The wireless signal is disrupted by another microwave
oven placed near the appliance.
Remedy
less network.
Check your wireless network and router.
Restart the router.
to "Before first use" chapter, Wireless connection.
Turn off the microwave oven.
Avoid using another microwave oven and the Remote
Control of the appliance at the same time. Microwaves
disrupt Wi-Fi signal.
13.2 How to manage: Error codes
When the software error occurs, the display shows error message.
In this section, you will find the list of the problems that you can handle on your own.
Code and description Remedy
C2 - the Food sensor is in the appliance cavity during
Pyrolytic Cleaning.
C3 - the door is not fully closed during Pyrolytic Clean‐
ing.
F111 - Food sensor is not correctly inserted into the
socket.
F240, F439 - the touch fields on the display do not
work properly.
F601 - there is a problem with Wi-Fi signal. Check your network connection. Refer to "Before first
F604 - the first connection to Wi-Fi failed. Turn the appliance off and on and try again. Refer to
F908 - the appliance system cannot connect with the
control panel.
Take out the Food sensor.
Close the door.
Fully plug Food sensor into the socket.
Clean the surface of the display. Make sure there is no
dirt on the touch fields.
use" chapter, Wireless connection.
"Before first use" chapter, Wireless connection.
Turn the appliance off and on.
When one of these error messages continues to appear on the display, it means a faulty
subsystem may have been disabled. In such a case contact your dealer or an Authorized
Service Centre. If one of these errors occurs, the rest of the appliance functions will continue to
work as usually.
ENGLISH 71
Page 72

Code and description Remedy
F602, F603 - Wi-Fi is not available. Turn the appliance off and on.
13.3 Service data
If you cannot find a solution to the problem yourself, contact your dealer or an Authorised
Service Centre.
The necessary data for the service centre is on the rating plate. The rating plate is on the front
frame of the appliance cavity. Do not remove the rating plate from the appliance cavity.
We recommend that you write the data here:
Model (MOD.) .........................................
Product number (PNC) .........................................
Serial number (S.N.) .........................................
14. ENERGY EFFICIENCY
14.1 Product Information and Product Information Sheet
Supplier's name AEG
Model identification
Energy Efficiency Index 81.2
Energy efficiency class A+
Energy consumption with a standard load, conventional mode 0.93 kWh/cycle
Energy consumption with a standard load, fan-forced mode 0.69 kWh/cycle
Number of cavities 1
Heat source Electricity
Volume 72 l
Type of oven Built-In Oven
Mass
BKB8S4B0 949494840
BKH8S4M0 949494839
BKB8S4B0 34.5 kg
BKH8S4M0 34.5 kg
IEC/EN 60350-1 - Household electric cooking appliances - Part 1: Ranges, ovens, steam ovens and grills - Meth‐
ods for measuring performance.
72 ENGLISH
Page 73

14.2 Energy saving
The appliance has features which help
you save energy during everyday
cooking.
Make sure that the appliance door is closed
when the appliance operates. Do not open
the appliance door too often during cooking.
Keep the door gasket clean and make sure it
is well fixed in its position.
Use metal cookware to improve energy
saving.
When possible, do not preheat the appliance
before cooking.
Keep breaks between baking as short as
possible when you prepare a few dishes at
one time.
Cooking with fan
When possible, use the cooking functions
with fan to save energy.
Residual heat
If a programme with Duration is activated and
the cooking time is longer than 30 min, the
heating elements automatically turn off earlier
in some appliance functions.
The fan and lamp continue to operate. When
you turn off the appliance, the display shows
the residual heat. You can use that heat to
keep the food warm.
When the cooking duration is longer than 30
min, reduce the appliance temperature to
minimum 3 - 10 min before the end of
cooking. The residual heat inside the
appliance will continue to cook.
Use the residual heat to warm up other
dishes.
Keep food warm
Choose the lowest possible temperature
setting to use residual heat and keep a meal
warm. The residual heat indicator or
temperature appears on the display.
Cooking with the lamp off
Turn off the lamp during cooking. Turn it on
only when you need it.
Moist Fan Baking
Function designed to save energy during
cooking.
When you use this function the lamp
automatically turns off after 30 sec. You may
turn on the lamp again but this action will
reduce the expected energy savings.
15. MENU STRUCTURE
15.1 Menu
Menu item Application
Assisted Cooking Lists automatic programmes.
Cleaning Lists cleaning programmes.
Favourites Lists the favourite settings.
Options To set the appliance configuration.
Settings Connections To set the network configuration.
Setup To set the appliance configuration.
Service Shows the software version and configuration.
ENGLISH 73
Page 74

15.2 Submenu for: Cleaning
Submenu Application
Pyrolytic cleaning, quick Duration: 1 h.
Pyrolytic cleaning, normal Duration: 1 h 30 min.
Pyrolytic cleaning, intense Duration: 2 h 30 min.
15.3 Submenu for: Options
Submenu Application
Light Turns the lamp on and off.
Child Lock Prevents accidental activation of the appliance. When the option is on,
Fast Heat Up Shortens the heat up time. It is available only for some of the appli‐
Cleaning Reminder Turns the reminder on and off.
Time indication Turns the clock on and off.
Digital clock style Changes the format of the displayed time indication.
the text Child Lock appears in the display when you turn on the appli‐
ance. To enable the appliance use, choose the code letters in the al‐
phabetical order. When the option is on, and the appliance is turned
off the appliance door is locked. Access to the timer, the remote oper‐
ation and the lamp is available with the option on.
ance functions.
15.4 Submenu for: Connections
Submenu Description
Wi-Fi To enable and disable: Wi-Fi.
Remote operation To enable and disable remote control.
Auto remote operation To start remote operation automatically after pressing START.
Network To check network status and the signal power of: Wi-Fi.
Forget network To disable current network from auto connection with the appliance.
Option visible only after you turn on: Wi-Fi.
Option visible only after you turn on: Wi-Fi.
15.5 Submenu for: Setup
Submenu Description
Language Sets the appliance language.
Display brightness Sets the display brightness.
Key tones Turns the tone of the touch fields on and off. It is not possible to mute
the tone for: .
74 ENGLISH
Page 75

Submenu Description
Buzzer volume Sets the volume of key tones and signals.
Time of day Sets the current time and date.
15.6 Submenu for: Service
Submenu Description
Demo mode Activation / deactivation code: 2468
Software version Information about software version.
Reset all settings Restores factory settings.
16. IT'S EASY!
Before first use you have to set:
Language Display brightness Key tones Buzzer volume Time of day
Familiarize yourself with the basic icons on the control panel and the display:
ON / OFF Menu Favourites
Start using the appliance
Quick start Turn on the appli‐
ance and start cook‐
ing with the default
temperature and
time of the function.
Quick Off Turn off the appli‐
ance, any screen or
message at any
time.
Timer
Step 1 Step 2 Step 3
Press and hold: . - select the
- press and hold until the appliance turns off.
Food sensor
Press: .
preferred function.
/
Start cooking
Step 1 Step 2 Step 3 Step 4 Step 5
- press to turn on the
appliance.
- select the heating
function.
- set the tempera‐
ture.
- press to confirm.
Steam cooking
Pour the cold tap water to the water drawer. Fol‐
low the instructions on the display.
- press to start cook‐
ing.
ENGLISH 75
Page 76

Steam cooking
Steam Re‐
generating
Reheat the
food.
Function
Pizza
Bread
Baking
Humidity
Low
Steam
cooking.
Speeds up
cooking.
Steam cooking
130 °C
200 - 220°C150 - 210°C160 - 200
Get to know how to cook quickly
Use the automatic programmes to prepare a dish quickly with the default settings:
Assisted Cook‐
ing
Step 1 Step 2 Step 3 Step 4
Press: . Press: . Press: Assisted
Cooking.
Use quick functions to set the cooking time
10% Finish assist
Use 10% Finish assist to add extra time when 10% of
the cooking time is left.
To extend the cooking time press +1min.
17. ENVIRONMENTAL CONCERNS
°C
Choose the dish.
Recycle materials with the symbol . Put the
packaging in relevant containers to recycle it.
Help protect the environment and human
health by recycling waste of electrical and
electronic appliances. Do not dispose of
76 ENGLISH
appliances marked with the symbol with
the household waste. Return the product to
your local recycling facility or contact your
municipal office.
Page 77

TÄYDELLISIÄ TULOKSIA
Kiitos, kun valitsit tämän AEG-tuotteen. Olemme luoneet sen antamaan sinulle
moitteettoman suorituskyvyn monien vuosien ajan innovatiivisilla tekniikoilla, jotka
helpottavat elämää – nämä ovat ominaisuuksia, joita et ehkä löydä tavallisista laitteista.
Käytä muutama minuutti aikaasi lukeaksesi, kuinka saat kaiken kaiken hyödyn irti
laitteesta.
Vieraile verkkosivullamme:
Saat käyttöön liittyviä neuvoja, esitteitä, vianmääritysohjeita sekä huolto- ja
korjausohjeita:
www.aeg.com/support
Rekisteröi tuotteesi saadaksesi parempaa huoltoa:
www.registeraeg.com
Osta laitteeseesi lisävarusteita, kulutustuotteita ja alkuperäisiä varaosia:
www.aeg.com/shop
Saat lisää reseptejä, vinkkejä, vianetsintäohjeita lataamalla My AEG Kitchen sovellus.
ASIAKASPALVELU
Käytä aina alkuperäisiä varaosia.
Pidä seuraavat tiedot saatavilla ottaessasi yhteyttä valtuutettuun huoltoliikkeeseemme:
Malli, PNC-tuotenumero, sarjanumero.
Tiedot löytyvät arvokilvestä.
Varoitus / Varotoimi- ja turvallisuustietoja
Yleistietoa ja vinkkejä
Ympäristönsuojelutietoja
Oikeus muutoksiin pidätetään.
SISÄLTÖ
1. TURVALLISUUSTIEDOT.............................................................................. 79
2. TURVALLISUUSOHJEET............................................................................. 81
3. ASENNUS.....................................................................................................84
4. TUOTEKUVAUS........................................................................................... 86
5. KÄYTTÖPANEELI.........................................................................................86
6. ENNEN ENSIKÄYTTÖÄ................................................................................88
7. PÄIVITTÄINEN KÄYTTÖ.............................................................................. 89
8. KELLOTOIMINNOT.......................................................................................94
9. KÄYTTÖOHJEET: LISÄVARUSTEET.......................................................... 95
10. LISÄTOIMINNOT........................................................................................ 99
11. VIHJEITÄ JA NEUVOJA........................................................................... 100
12. HOITO JA PUHDISTUS............................................................................ 103
13. VIANMÄÄRITYS........................................................................................108
14. ENERGIATEHOKKUUS............................................................................110
15. VALIKKORAKENNE..................................................................................111
16. SE ON HELPPOA!.................................................................................... 113
17. YMPÄRISTÖNSUOJELU.......................................................................... 114
SUOMI 77
Page 78

My AEG Kitchen app
78 SUOMI
Page 79

1. TURVALLISUUSTIEDOT
Lue laitteen mukana toimitetut ohjeet ennen laitteen
asennusta ja käyttöä. Valmistaja ei ota vastuuta
henkilövahingoista tai vahingoista, jotka aiheutuvat
virheellisestä asennuksesta tai käytöstä. Säilytä ohjeita aina
varmassa ja helppopääsyisessä paikassa tulevia
käyttökertoja varten.
1.1 Lasten ja taitamattomien henkilöiden turvallisuus
• 8-vuotiaat ja sitä vanhemmat lapset sekä henkilöt, joilla on
fyysisiä, aisteihin liittyviä tai henkisiä rajoitteita tai
puutteellinen kokemus tai tuntemus, voivat käyttää tätä
laitetta vain, jos heitä valvotaan tai ohjataan laitteen
turvallisessa käytössä ja jos he ymmärtävät käyttöön
liittyvät vaarat. Tuote on pidettävä alle 8-vuotiaiden lasten ja
erittäin laajoista ja monimutkaisista toiminnallisista
rajoitteista kärsivien henkilöiden ulottumattomissa, ellei
heitä valvota jatkuvasti.
• Lapsia on valvottava, jotta he eivät ryhdy leikkimään
laitteella ja mobiililaitteilla My AEG Kitchen .
• Kaikki pakkaukset tulee pitää lasten ulottumattomissa ja
hävittää asianmukaisesti.
• VAROITUS: Uuni ja sen esilläolevat osat kuumentuvat
käytön aikana. Pidä lapset ja lemmikkieläimet poissa
laitteen lähettyviltä sen ollessa toiminnassa tai
jäähtymässä.
• Jos laitteessa on lapsilukko, sitä on käytettävä.
• Lapset eivät saa puhdistaa laitetta tai suorittaa siihen
kohdistuvia käyttäjän huoltotoimenpiteitä ilman valvontaa.
1.2 Yleinen turvallisuus
• Tämä laite on tarkoitettu ainoastaan ruoanlaittoon.
• Tämä laite on tarkoitettu yhden kotitalouden käyttöön
sisätiloissa.
SUOMI 79
Page 80

• Tätä laitetta voidaan käyttää toimistoissa, hotellihuoneissa,
aamiaismajoituspaikoissa, maatilamajoituspaikoissa ja
muissa samantyyppisissä majoitustiloissa, joissa kyseinen
käyttö ei ylitä (keskimääräisiä) kotitalouskäytön tasoja.
• Laitteen asennuksen ja virtajohdon vaihtamisen saa
suorittaa vain alan ammattilainen.
• Älä käytä laitetta ennen kuin se on asennettu kalusteeseen.
• Irrota laite sähköverkosta ennen huoltotoimenpiteiden
suorittamista.
• Jos virtajohto vaurioituu, sen saa vaihtaa vain valmistaja,
valtuutettu huoltoliike tai vastaava ammattitaitoinen henkilö,
jotta vältytään sähkövaaroilta.
• VAROITUS: Varmista, että laite on kytketty pois päältä
ennen kuin ryhdyt vaihtamaan lamppua välttääksesi
sähköiskun vaaran.
• VAROITUS: Uuni ja sen esilläolevat osat kuumentuvat
käytön aikana. Vältä koskettamasta lämpövastuksia tai
laitteen sisätilan pintoja.
• Käytä suojakäsineitä poistaessasi varusteita tai uunivuokia
tai asettaessasi niitä laitteen sisälle.
• Käytä ainoastaan tähän laitteeseen suositeltua
paistolämpömittaria.
• Poista hyllytuet vetämällä ensin hyllytuen etuosa ja sitten
takaosa irti sivuseinistä. Asenna hyllytuet päinvastaisessa
järjestyksessä.
• Laitteen puhdistuksessa ei saa käyttää höyrypesuria.
• Älä käytä hankausaineita tai teräviä metallikaapimia
lasiluukun puhdistamisessa, sillä ne voivat naarmuttaa
pintaa, mistä voi olla seurauksena lasin särkyminen.
• Kaikki varusteet ja liialliset roiskeet/jäämät on poistettava
laitteen lokerosta ennen pyrolyyttistä puhdistusta.
80 SUOMI
Page 81

2. TURVALLISUUSOHJEET
2.1 Asennus
VAROITUS!
Asennuksen saa suorittaa vain
ammattitaitoinen henkilö.
• Poista kaikki pakkausmateriaalit.
• Vaurioitunutta laitetta ei saa asentaa tai
käyttää.
• Noudata koneen mukana toimitettuja
asennusohjeita.
• Siirrä laitetta aina varoen, sillä se on
raskas. Käytä aina suojakäsineitä ja
suojaavia jalkineita.
• Älä koskaan vedä laitetta sen kahvasta
kiinni pitäen.
• Asenna laite turvalliseen ja sopivaan
paikkaan, joka täyttää
asennusvaatimukset.
• Noudata mainittuja vähimmäisetäisyyksiä
muihin laitteisiin ja kalusteisiin.
• Tarkista ennen laitteen asentamista, että
laitteen luukku avautuu esteettä.
• Laite on varustettu sähkötoimisella
jäähdytysjärjestelmällä. Sitä on käytettävä
sähkösyötöllä.
Kaapin vähimmäiskorkeus
(työtason alla olevan kaa‐
pin vähimmäiskorkeus)
Kaapin leveys 560 mm
Kaapin syvyys 550 (550) mm
Laitteen etuosan korkeus 594 mm
Laitteen takaosan korkeus 576 mm
Laitteen etuosan leveys 595 mm
Laitteen takaosan leveys 559 mm
Laitteen syvyys 569 mm
Laitteen asennussyvyys 548 mm
Leveys luukun ollessa auki 1022 mm
Tuuletusaukon vähimmäis‐
koko. Aukko alaosassa ta‐
kana
Virtajohdon pituus. Johto
sijaitsee oikeassa kulmas‐
sa takana
590 (600) mm
560x20 mm
1500 mm
Kiinnitysruuvit 4x25 mm
2.2 Sähkökytkentä
VAROITUS!
Tulipalo- ja sähköiskuvaara.
• Kaikki sähkökytkennät tulee jättää
asiantuntevan sähköasentajan vastuulle.
• Laite on kytkettävä maadoitettuun
pistorasiaan.
• Varmista, että arvokilvessä olevat
parametrit ovat verkkovirtalähteen
sähköarvojen mukaisia.
• Kytke pistoke maadoitettuun pistorasiaan.
• Älä käytä jakorasioita tai jatkojohtoja.
• Varmista, ettei pistoke ja virtajohto
vaurioidu. Jos virtajohto joudutaan
vaihtamaan, vaihdon saa suorittaa vain
valtuutettu huoltoliike.
• Älä anna virtajohtojen koskettaa laitteen
luukkua tai päästä niitä luukun tai laitteen
alapuolella olevan asennustilan lähelle,
varsinkaan laitteen ollessa toiminnassa tai
luukun ollessa kuuma.
• Jännitteenalaisten ja eristettyjen osien
suojat tulee asentaa niin, ettei niiden
irrotus onnistu ilman työkaluja.
• Kytke pistoke pistorasiaan vasta
asennuksen jälkeen. Varmista, että
laitteen verkkovirtakytkentä on ulottuvilla
laitteen asennuksen jälkeen.
• Jos pistoke on löysästi kiinni
virtajohdossa, älä kiinnitä sitä
pistorasiaan.
• Älä vedä virtajohdosta pistoketta
irrottaessasi. Vedä aina pistokkeesta.
• Käytä vain asianmukaisia eristyslaitteita:
suojakytkimet, sulakkeet (ruuvattavat
sulakkeet on irrotettava kannasta),
vikavirtakytkimet ja kontaktorit.
• Sähköasennuksessa on oltava erotin, joka
mahdollistaa laitteen irrottamisen
sähköverkosta kaikista navoista. Erottimen
kontaktiaukon leveys on oltava vähintään
3 mm.
• Sulje laitteen luukku kokonaan ennen
pistokkeen liittämistä pistorasiaan.
SUOMI 81
Page 82

• Laitteen mukana toimitetaan päävirtajohto
ja pääpistoke.
Asennuksen tai vaihdon käytettävissä ole‐
vat johtotyypit Euroopassa:
H07 RN-F, H05 RN-F, H05 RRF, H05 VV-F, H05
V2V2-F (T90), H05 BB-F
Kaapelin poikkileikkauksen osalta, ks.
arvokilpeen merkittyä kokonaistehoa. Ks.
myös taulukko:
Kokonaisteho (W) Virtajohdon poikki‐
pinta-ala (mm²)
enintään 1 380 3x0.75
enintään 2 300 3x1
enintään 3 680 3x1.5
Maadoitusjohdon (vihreä/keltainen johto) on
oltava 2 cm pidempi kuin ruskea vaihe- ja
sininen nollajohto.
2.3 Valitse
VAROITUS!
Henkilövahinkojen, palovammojen ja
sähköiskujen tai räjähdyksen vaara.
• Älä muuta laitteen teknisiä ominaisuuksia.
• Varmista, että tuuletusaukoissa ei ole
tukoksia.
• Laitetta ei saa jättää päälle valvomatta.
• Kytke laite pois päältä jokaisen
käyttökerran jälkeen.
• Noudata varovaisuutta avatessasi laitteen
luukun laitteen ollessa toiminnassa.
Laitteesta voi purkautua ulos kuumaa
ilmaa.
• Älä käytä laitetta, jos kätesi ovat märät tai
laitteen ollessa kosketuksessa veteen.
• Älä kohdista painetta avoimeen oveen.
• Älä käytä laitetta työtasona tai tavaroiden
säilytystasona.
• Avaa laitteen luukku varovaisuutta
noudattaen. Alkoholipitoisten ainesosien
käyttämisen tuloksena voi muodostua
alkoholin ja ilman seoksia.
• Älä päästä kipinöitä tai avotulta
kosketukseen laitteen kanssa avatessasi
sen luukun.
• Älä aseta helposti syttyviä tuotteita tai
helposti syttyvien aineiden kanssa
kosketuksissa olleita tuotteita laitteeseen,
laitteen päälle tai sen lähelle.
• Älä jaa Wi-Fi-salasanaasi muille.
VAROITUS!
Laite voi muutoin vaurioitua.
• Estä emalipinnan vaurioituminen tai
haalistuminen:
– Älä aseta ruoanlaittovälineitä tai muita
esineitä laitteeseen siten, että ne
olisivat suorassa kosketuksessa
laiteen pohjan kanssa.
– Älä aseta alumiinifoliota siten, että se
olisi suorassa kosketuksessa laitteen
pohjan kanssa.
– Älä laita vettä suoraan kuumaan
laitteeseen.
– Älä säilytä kosteita astioita tai ruokia
laitteessa lopetettuasi ruoanlaiton.
– Noudata varovaisuutta poistaessasi tai
asentaessasi lisäosia.
• Uunin emalipintojen tai ruostumattoman
teräksen värimuutokset eivät vaikuta
laitteen toimintaan.
• Käytä syvää pannua kosteita kakkuja
paistaessasi. Hedelmämehut voivat jättää
pysyviä tahroja.
• Laitteen luukku on pidettävä suljettuna
käytön aikana.
• Jos laite asennetaan kalusteen paneelin
(esim. oven) taakse, ovea ei saa koskaan
sulkea laitteen ollessa toiminnassa.
Lämpöä tai kosteutta voi kertyä suljetun
kalusteen paneelin taakse ja laite,
kalusteet tai lattia voivat sen seurauksena
vaurioitua. Älä sulje kalusteen paneelia
ennen kuin laite on täysin jäähtynyt käytön
jälkeen.
2.4 Hoito ja puhdistus
VAROITUS!
Ne voivat aiheuttaa henkilövahinkoja,
tulipaloja tai laitteen vaurioitumisen.
• Kytke laite pois toiminnasta ja irrota
pistoke pistorasiasta ennen ylläpitotoimien
aloittamista.
• Tarkista, että laite on kylmä. Vaarana on
lasilevyjen rikkoutuminen.
82 SUOMI
Page 83

• Vaihda välittömästi vaurioituneet luukun
lasipaneelit. Ota yhteyttä valtuutettuun
huoltoliikkeeseen.
• Ole varovainen irrottaessasi luukkua.
Luukku on painava!
• Puhdista laite säännöllisesti, jotta
pintamateriaali ei vaurioidu.
• Puhdista laite kostealla pehmeällä liinalla.
Käytä ainoastaan mietoja pesuaineita. Älä
käytä hankausainetta, hankaavia
pesulappuja, liuottimia tai metalliesineitä.
• Jos käytät uuninpuhdistussuihketta,
noudata tuotepakkauksessa olevia
turvallisuusohjeita.
2.5 Pyrolyyttinen puhdistus
VAROITUS!
Henkilövahinkojen / tulipalon /
kemiallisten päästöjen (höyryt) vaara
pyrolyysitoiminnossa.
• Ennen pyrolyyttisen puhdistamisen ja
esilämmityksen käynnistämistä, poista
seuraavat uunin sisätilasta:
– mahdolliset ruokajäämät, öljy- tai
rasvaroiskeet/-jäämät.
– mahdolliset irrotettavat varusteet
(mukaan lukien laitteen mukana
toimitetut ritilät, kiskot jne.) erityisesti
tarttumattomat kattilat, pannut,
leivinpellit, välineet jne.
• Lue huolella pyrolyyttistä puhdistusta
koskevat ohjeet.
• Pidä lapset poissa laitteen luota silloin,
kun pyrolyyttinen puhdistus on käynnissä.
Laite kuumenee hyvin voimakkaasti ja
kuumaa ilmaa poistuu etupuolella olevista
jäähdytysaukoista.
• Pyrolyyttinen puhdistus on korkeassa
lämpötilassa tapahtuva toimenpide, jonka
aikana voi vapautua höyryjä
ruoanlaittojäämistä ja
rakennemateriaaleista, ja siksi käyttäjää
suositellaan voimakkaasti toimimaan
seuraavasti:
– järjestämään hyvä tuuletus
pyrolyyttisen puhdistuksen aikana ja
sen jälkeen.
– järjestämään hyvä ilmanvaihto
esilämmityksen aikana ja sen jälkeen.
• Älä läikytä vettä uunin luukulle
pyrolyyttisen puhdistuksen aikana ja sen
jälkeen, jotta lasipaneelit eivät vahingoitu.
• Yllä kuvatut pyrolyyttisistä uuneista /
ruokajäämistä muodostuvat höyryt eivät
ole haitallisia ihmisille. Tämä koskee myös
lapsia ja heikkokuntoisia henkilöitä.
• Pidä lemmikkieläimet loitolla laitteesta
pyrolyyttisen puhdistamisen ja
esilämmityksen aikana ja sen jälkeen.
Pienet lemmikkieläimet (erityisesti linnut ja
matelijat) voivat olla erittäin herkkiä
lämpötilanmuutoksille ja laitteesta
poistuville höyryille.
• Kaikkien pyrolyyttisten uunien korkeassa
lämpötilassa tapahtuva pyrolyyttinen
puhdistus voi vaurioittaa kattiloiden,
pannujen, leivinpeltien, ruokailuvälineiden
jne. tarttumattomia pintoja, ja niistä voi
myös muodostua alhaisen tason haitallisia
höyryjä.
2.6 Höyrytoiminto
VAROITUS!
Siitä voi aiheutua palovammoja tai laite
voi vaurioitua.
• Laitteesta tuleva höyry voi aiheuttaa
palovammoja:
– Laitteen luukkua ei saa avata
höyrytoiminnon käytön aikana.
– Avaa laitteen luukku varoen
höyrytoiminnon käytön jälkeen.
2.7 Sisävalaistus
VAROITUS!
Sähköiskun vaara.
• Lisätietoa tämän tuotteen sisällä olevista
lampuista sekä erikseen myytävistä
varalampuista: Kyseiset lamput on
suunniteltu kestämään kodinkoneissa
vaativia fyysisiä olosuhteita (esim.
lämpötila, tärinä, kosteus) tai ne antavat
tietoa laitteen toimintatilasta. Niitä ei ole
tarkoitettu muihin käyttötarkoituksiin
eivätkä ne sovi huoneiden valaisemiseen.
• Tämä tuote sisältää valonlähteen, jonka
energiatehokkuusluokka on G.
• Käytä ainoastaan ominaisuuksiltaan
samanlaisia lamppuja.
SUOMI 83
Page 84

2.8 Huolto
www.youtube.com/electrolux
www.youtube.com/aeg
How to install your AEG/Electrolux
Oven - Column installation
18
594
589
114
21548
595
+-1
min. 550
20
600
min. 560
3
5
60
20
80
520
60
198
523
(*mm)
• Laitteen korjaukseen liittyvissä asioissa
tulee ottaa yhteyttä valtuutettuun
huoltopalveluun.
• Ainoastaan alkuperäisiä varaosia saa
käyttää.
2.9 Hävittäminen
VAROITUS!
Henkilövahinko- tai tukehtumisvaara.
3. ASENNUS
• Kysy tietoja laitteen oikeaoppisesta
hävittämisestä paikalliselta viranomaiselta.
• Irrota pistoke pistorasiasta.
• Leikkaa virtajohto laitteen läheltä ja hävitä
se.
• Poista luukun lukitus, jotta lapset, tai
lemmikit eivät jäisi loukkuun laitteen
sisälle.
VAROITUS!
Lue turvallisuutta koskevat luvut.
3.1 Asentaminen kalusteeseen
84 SUOMI
Page 85

min. 550
20
595
+-1
18
590
min. 560
594
589
114
21548
3
5
70
60
520
60
20
198
523
(*mm)
3.2 Uunin kiinnittäminen kaappiin
SUOMI 85
Page 86

4. TUOTEKUVAUS
6
12
10
9
5
4
11
8
5
4
1
2
3
3
2 3
7
1
1 2 3 4
5 6
4.1 Laitteen osat
Käyttöpaneeli
1
Elektroninen ohjelmointilaite
2
Vesilokero
3
Paistolämpömittarin pistorasia
4
Lämpövastus
5
Lamppu
6
Puhallin
7
Hyllykannatin, irrotettava
8
Tyhjennysputki
9
Vedentyhjennysventtiili
10
Hyllytasot
11
Höyryntuloaukko
12
4.2 Varusteet
• Paistoritilä
Ruoanlaittovälineille, kakkuvuokat, paistit.
• Paistolevy
Kakuille ja kekseille.
• Grilli / uunipannu
Leivinpelliksi ja uunipannuksi tai pannuksi
rasvan keräämiseen.
5. KÄYTTÖPANEELI
5.1 Ohjauspaneelin yleisnäkymä
Päällä / Pois Paina ja pidä painettuna laitteen kytkemiseksi toimintaan tai pois toiminnasta.
1
86 SUOMI
• Paistolämpömittari
Mittaamaan, kuinka pitkälle ruoka on
kypsynyt.
• Teleskooppikannattimet
Ritilät ja pellit voidaan asettaa ja poistaa
helpommin teleskooppikannattimilla.
Page 87

Valikko Luettelee laitteen toiminnot.
3s
150°C
12:30
15min
START
85°C
G F DE
C
A B
2
Suosikit Listaa omat ohjelmat
3
Näyttö Näyttää laitteen asetukset.
4
Lampun kytkin Kytkee lampun päälle ja pois päältä.
5
Pikakuumennus Toiminnon kytkeminen toimintaan ja pois toiminnasta: Pikakuumennus.
6
Paina Siirrä
Kosketa pintaa sormella. Liu’uta sormea pinnalla.
Paina ja pidä painettuna painiket‐
ta:
Kosketa pintaa kolmen sekunnin
ajan.
5.2 Näyttö
Näyttö esittäen asetetut toiminnot.
A. Wi-Fi-yhteys
B. Kellonaika
C. KÄYNNISTÄ/PYSÄYTÄ
D. Lämpötila
E. Uunitoiminnot
F. Ajastin
G. Paistolämpömittari (vain tietyt mallit)
Näytön merkkivalot
Perusmerkkivalot - näytön selaaminen.
Valinnan/asetuksen vahvistaminen.
Äänimerkki toiminnon merkkivalot - kun asetettu kypsennysaika päättyy, laitteesta kuuluu äänimerkki.
Toiminto on päällä.
Ajastimen merkkivalot
Valikossa siirtymi‐
nen takaisin yh‐
den tason verran.
Toiminto on päällä.
Kypsentäminen pysähtyy automaatti‐
Viimeisen toimin‐
non peruuttaminen.
sesti.
Lisätoimintojen kytkeminen toi‐
mintaan ja pois päältä.
Hälytysäänimerkki on pois pääl‐
tä.
Toiminnon asettaminen: Ajastettu käynnistyminen.
Asetuksen peruuttaminen.
SUOMI 87
Page 88

Wi-Fi-yhteys merkkivalo – laitteeseen voidaan muodostaa Wi-Fi-yhteys.
Wi-Fi-yhteys yhteys on kytketty toimintaan.
Etäohjaus merkkivalo – laitetta voidaan etäohjata.
Etäohjaus on kytketty toimintaan.
6. ENNEN ENSIKÄYTTÖÄ
VAROITUS!
Lue turvallisuutta koskevat luvut.
6.1 Alkupuhdistus
1. vaihe 2. vaihe 3. vaihe
Poista kaikki varusteet ja irrotettavat
uunipeltien kannattimet laitteesta.
6.2 Ensimmäinen yhteys
Ensimmäisen yhteyden jälkeen näyttöön tulee näkyviin tervetuloviesti.
Sinun on nyt asetettava: Kieli, Näytön kirkkaus, Painikeäänet, Äänenvoimakkuus, Kellonaika.
6.3 Langaton yhteys
Laitteen yhdistämiseen tarvitaan seuraavat asiat:
• langattoman verkon Internet-yhteydellä
• samaan langattomaan verkkoon yhdistetyn mobiililaitteen
Puhdista laite ja sen varusteet vain
lämpimällä vedellä ja miedolla pe‐
suaineella mikrokuituliinaa käyttäen.
Aseta varusteet ja irrotettavat uuni‐
peltien kannattimet laitteeseen.
1. vaihe Lataa My AEG Kitchen -sovellus: Skannaa arvokilvessä oleva QR-koodi mobiililaitteesi kameralla,
2. vaihe Noudata sovelluksen perehdytysohjeita.
3. vaihe Kytke laite päälle.
4. vaihe
5. vaihe
6. vaihe Laitteen langaton moduuli käynnistyy 90 sekunnin kuluessa.
Taajuus 2,4 GHz WLAN
jolloin sinut ohjataan AEG:n verkkosivuille. Arvokilpi löytyy laitteen sisätilan etukehyksestä. Voit
myös ladata sovelluksen suoraan sovelluskaupasta.
Paina: . Valitse: Asetukset / Yhteysasetukset.
- kytke toimintaan liu'uttamalla tai painamalla: Wi-Fi-yhteys.
2400 - 2483,5 MHz
88 SUOMI
Page 89

Protokolla IEEE 802.11b DSSS/802.11g/n OFDM
Enimmäisteho EIRP < 20 dBm (100 mW)
Wi-Fi-moduuli NIUS-50
6.4 Ohjelmistolisenssit
Tämän tuotteen ohjelmisto sisältää
komponentteja, jotka perustuvat
ilmaisohjelmistoihin ja avoimen lähdekoodin
ohjelmistoihin. AEG kiitollisena ilmoittaa, että
kehittämisprojektissa on käytetty avoimen
lähdekoodin ohjelmistoja ja
robotiikkayhteisöjen osallistumista.
Jos haluat käyttää näiden ilmaisten ja
avoimen lähdekoodin ohjelmistojen
1. vaihe Poista kaikki varusteet ja irrotettavat uunipeltien kannattimet uunista.
2. vaihe
3. vaihe
Uunista voi tulla hajua ja savua esikuumennuksen aikana. Varmista huoneen hyvä tuuletus.
Aseta toiminnon enimmäislämpötila: .
Anna uunin käydä yhden tunnin ajan.
Aseta toiminnon enimmäislämpötila: .
Anna uunin käydä 15 minuutin ajan.
komponentteja, joiden käyttöoikeusehdot
edellyttävät julkaisemista, ja nähdä kaikki ao.
tekijänoikeustiedot ja sovellettavat
käyttöoikeusehdot, vieraile sivustoilla: http://
aeg.opensoftwarerepository.com (kansio
NIUS).
6.5 Alustava esikuumennus
Esikuumenna tyhjä uuni ennen ensimmäistä
käyttökertaa.
7. PÄIVITTÄINEN KÄYTTÖ
VAROITUS!
Lue turvallisuutta koskevat luvut.
7.1 Asettaminen: Uunitoiminnot
1. vaihe Kytke uuni päälle. Oletusuunitoiminto näkyy näytöllä.
2. vaihe Siirry alavalikkoon painamalla uunitoiminnon symbolia.
3. vaihe
4. vaihe
5. vaihe
Valitse uunitoiminto ja paina: . Lämpötila-asetukset näkyvät näytössä.
Aseta lämpötila. Paina: .
Paina: .
Paistolämpömittari - paistolämpömittari voideen kytkeä pistokkeeseen milloin tahansa ennen
ruoanlaittoa ja sen aikana.
- paina kytkeäksesi uunitoiminnon pois päältä.
SUOMI 89
Page 90

6. vaihe Kytke uuni pois päältä.
7.2 Asetukset: Höyryuunitoiminnot
1. vaihe Kytke uuni päälle.
2. vaihe Aseta höyryuunitoiminto.
3. vaihe
4. vaihe Aseta lämpötila.
5. vaihe
6. vaihe Paina vesilokeron kantta avataksesi sen.
7. vaihe Täytä vesilokero kylmällä vedellä enimmäistasoon saakka (n. 900 millilitraa), kunnes kuulet ääni‐
Valitse uunitoiminnon symboli ja siirry alavalikkoon sitä painamalla.
Paina: . Lämpötila-asetukset näkyvät näytöllä.
Paina: .
merkin tai näyttöön ilmestyy ilmoitus. Vesilokeron maksimitasoa ei saa ylittää. Vesivuodon, ylivir‐
tauksen ja huonekalujen vaurioiden riski on olemassa.
VAROITUS!
Käytä ainoastaan kylmää hanavettä. Älä käytä suodatettua (mineraalitonta)
tai tislattua vettä. Älä käytä muita nesteitä. Älä kaada vesilokeroon helposti
syttyviä tai alkoholipitoisia nesteitä.
8. vaihe Työnnä vesilokero alkuasentoonsa.
9. vaihe
10. vaihe Kun vesi on loppumaisillaan vesilokerosta, laitteesta kuuluu äänimerkki. Täytä vesilokero.
11. vaihe Kytke uuni pois päältä.
12. vaihe Tyhjennä vesilokero kypsennyksen loputtua.
Paina: .
Kun uuni on kuumentunut asetettuun lämpötilaan, laitteesta kuuluu äänimerkki.
VAROITUS!
Uuni on kuuma. On olemassa palovammojen vaara. Ole varovainen vesiloke‐
roa tyhjentäessäsi.
13. vaihe Jäljelle jäävä vesi voi tiivistyä sisätilaan. Avaa uunin luukku varoen kypsennyksen jälkeen. Kun uuni
on kylmä, kuivaa sen sisätila pehmeällä liinalla. Odota vähintään 60 minuuttia aina höyrytoiminnon
käyttämisen jälkeen, jotta kuuma vesi ei pääsisi ulos tyhjennysventtiilistä.
7.3 Vesisäiliö
Vesisäiliön merkkivalo
Vesisäiliön merkkivalo
Säiliö on täysi.
Säiliö on täytetty puoleen väliin.
Jos lisäät säiliöön liikaa vettä, ylimääräinen vesi valuu
uunin pohjalle turvapoistoaukon kautta. Poista vesi
Säiliö on tyhjä. Täytä säiliö uudelleen.
käyttämällä sientä.
90 SUOMI
Page 91

Vesisäiliön tyhjentäminen
B
C
A
1. vaihe
2. vaihe
3. vaihe
4. vaihe Irrota C ja B ja kuivaa uuni sienen avulla.
Sammuta uuni, jätä sen luukku auki ja odota, kun‐
nes uuni on kylmä.
Kytke tyhjennysputki (C) poistoventtiiliin (A) liitti‐
men (B) kautta.
Pidä putken pää tason A alapuolella ja työnnä liitin‐
tä B toistuvasti, jotta voit poistaa jäljellä oleva ve‐
den.
7.4 Asetukset: Avustava ruoanvalmistus
Tämän alavalikon kaikki ruokalajit sisältävät toiminto- ja lämpötilasuosituksen. Voit säätää
aikaa ja lämpötilaa.
Joidenkin ruokalajien kohdalla voit valita myös seuraavaa:
• Painoautomatiikka
• Paistolämpömittari
Ruoan kypsyystaso:
• Puoliraaka tai Vähemmän
• Keskitaso
• Kypsä tai Lisää
1. vaihe Kytke uuni päälle.
2. vaihe
3. vaihe
4. vaihe Valitse ruoka tai ruokalaji.
5. vaihe
Paina: .
Paina: . Syötä: Avustava ruoanvalmistus.
Paina: .
7.5 Uunitoiminnot
VAKIOTOIMINNOT
Kuumennustoiminto Käyttökohde
Ohuiden ruokien grillaus ja leivän paahtaminen.
Grilli
Isohkojen, luisten liha- tai lintupaistien paistamiseen yhdessä ritiläasennossa. Grati‐
Tehogrillaus
nointi ja ruskistus.
SUOMI 91
Page 92

Kuumennustoiminto Käyttökohde
Korkeintaan kolmella kannatintasolla kypsentäminen samanaikaisesti ja ruokien kui‐
vaus. Aseta lämpötila 20–40 °C alhaisemmaksi kuin toiminnolle Ylä + alalämpö.
Kiertoilma
Puolivalmisteruokien (esim. ranskalaisten perunoiden, lohkoperunoiden, kevätkääry‐
leiden) valmistaminen rapeiksi.
Pakasteet
Kypsentäminen ja paistaminen yhdellä tasolla.
Ylä + alalämpö
Kakkujen paistamiseksi rapealla pohjalla ja ruoan säilömiseksi.
Alalämpö
Hiivataikinan nostatuksen nopeuttaminen. Estää taikinan pinnan kuivumisen ja säilyt‐
tää sen notkeuden.
Taikinan nostatus
Kiertoilma, Ylä + alalämpö: Kun lämpötila on asetettu alle 80 °C:seen, lamppu sammuu
automaattisesti 30 sekunnin kuluttua.
EKSTRAT
Kuumennustoiminto Käyttökohde
Vihannessäilykkeiden valmistus (esim. pikkelsit).
Säilöntä
Kuivattaminen
Lautasten lämmitys
Sulatus
Gratinointi
92 SUOMI
Siivutettujen hedelmien, vihannesten ja sienten kuivaus.
Lautasen esilämmitykseen tarjoilua varten.
Ruoan, (hedelmien ja vihannesten) sulattaminen. Sulatusaikaan vaikuttavat pakaste‐
tun ruoan määrä ja koko.
Ruokalajeille kuten lasagne ja perunagratiini. Gratinointi ja ruskistus.
Page 93

Kuumennustoiminto Käyttökohde
Mureiden, mehukkaiden paistien kypsentäminen.
Matalalämpö
Ruoan lämpimänä pitoon.
Lämpimänä pito
Tämä toiminto säästää energiaa ruoanlaiton aikana. Kun käytät tätä toimintoa, uunin
sisälämpötila voi poiketa lämpötila-asetuksesta. Jälkilämpötilaa käytetään. Kuumen‐
Kostea kiertoilma
nusteho voi laskea. Katso lisätietoa luvusta ”Päivittäinen käyttö”, Huomautus: Kostea
kiertoilma:
HÖYRY
Uunitoiminto Käyttökohde
Ruokien uudelleen lämmitys höyryttämällä estää pinnan kuivumisen. Lämpö jakautuu
kevyesti ja tasaisesti, mikä saa ruoan maistumaan yhtä hyvältä kuin vasta valmistettu
Lämmitys höyryllä
Pizza-toiminto
Leipä
Matala kosteus
ruoka. Tällä toiminnolla voidaan lämmittää ruokia uudelleen suoraan lautasella. Voit
uudelleenlämmittää useamman kuin yhden lautasellisen kerralla käyttämällä eri hylly‐
paikkoja.
Pizzan valmistaminen.
Tällä toiminnolla voit valmistaa leipää ja sämpylöitä saavuttaen korkealuokkaisen tu‐
loksen rapeuden, värin ja pinnan kiillon suhteen.
Toiminto soveltuu lihalle, lintupaistille, uuniruo'ille ja padoille/paistoksille. Höyryn ja
lämmön yhdistelmän ansiosta lihasta tulee mehukasta ja mureaa, sekä samalla ra‐
peapintaista.
7.6 Huomautus: Kostea kiertoilma
Tämän toiminnon avulla määritettiin
energiatehokkuusluokka (vastaamaan
standardeja EU 65/2014 ja EU 66/2014).
Testit seuraavan mukaisesti:
IEC/EN 60350-1
Uunin luukun on oltava kiinni ruoanlaiton
aikana, jotta toiminto ei keskeytyisi ja uunin
energiatehokkuus olisi mahdollisimman suuri.
Kun valitset tämän toiminnon, lamppu
sammuu automaattisesti 30 sekunnin
kuluttua.
Ruoanlaitto-ohjeet ovat luvussa ”Neuvoja ja
vinkkejä”Kostea kiertoilma. Yleissuosituksia
energiansäästämiseksi on luvussa
”Energiatehokkuus”.
SUOMI 93
Page 94

8. KELLOTOIMINNOT
8.1 Kellotoimintojen kuvaus
Kellotoi‐
minto
Kypsentä‐
misaika
Lopeta toi‐
minto
Ajastettu
käynnistymi‐
nen
8.2 Asetukset Kellotoiminnot
Kellon asettaminen
1. vaihe Paina: Kellonaika.
2. vaihe
Kypsennysajan asettaminen
1. vaihe Valitse uunitoiminto ja aseta lämpötila.
2. vaihe
3. vaihe
Käyttökohde
Kypsennysajan asettaminen. Enintään
23 tuntia 59 min.
Asetetaan, mitä tapahtuu, kun ajastin
lopettaa laskennan.
Toiminnon käynnistymisen ja/tai päät‐
tymisen ajastus.
Aseta aika. Paina: .
Paina: .
Aseta aika. Paina: .
Kellotoi‐
Käyttökohde
minto
Ajan lisäämi‐
nen
Muistutus Laskennan asettaminen. Enintään 23 t
Ajastin Tarkkailee toiminnon kestoa. Ajastin –
Kypsennysajan pidentäminen.
59 min. Tällä toiminnolla ei ole vaiku‐
tusta laitteen toimintaan.
voit kääntää sen päälle ja pois päältä.
Lopetusvalinnan valitseminen
1. vaihe Valitse uunitoiminto ja aseta lämpötila.
2. vaihe
3. vaihe Kypsennysaika on asetettu.
4. vaihe
5. vaihe Paina: Lopeta toiminto.
6. vaihe Valitse haluamasi: Lopeta toiminto.
7. vaihe
Paina: .
Paina: :
Paina: . Toista toimenpide, kunnes päänäyttö näkyy näytössä.
Toiminnon käynnistymisen ajastus
1. vaihe Valitse uunitoiminto ja aseta lämpötila.
94 SUOMI
Page 95

Toiminnon käynnistymisen ajastus
2. vaihe
3. vaihe Kypsennysaika on asetettu.
4. vaihe
5. vaihe Paina: Ajastettu käynnistyminen.
6. vaihe Valitse arvo.
7. vaihe
Paina: .
Paina: :
Paina: . Toista toimenpide, kunnes päänäyttö näkyy näytössä.
Kypsennysajan pidentäminen.
Kypsennysaikaa voidaan pidentää, kun kypsennysaikaa on jäljellä 10 %, eikä ruoka ole vielä valmis. Voit myös
muuttaa uunitoimintoa.
Pidennä kypsennysaikaa painamalla +1min.
Ajastimen asetuksen muuttaminen:
1. vaihe
2. vaihe Aseta ajastimen arvo.
3. vaihe
Asetettua aikaa on mahdollista muuttaa milloin tahansa kypsennyksen aikana.
Paina: .
Paina: .
9. KÄYTTÖOHJEET: LISÄVARUSTEET
9.1 Lisävarusteiden asennus
Pieni lovi yläosassa parantaa turvallisuutta.
Nämä lovet toimivat myös kaatumisen
Paistoritilä:
Paina ritilä liukukiskojen väliin kannatinkiskoon ja
varmista, että jalat osoittavat alaspäin.
estämisessä. Ritilän korkea reunus estää
keittoastioiden luisumisen hyllyltä.
SUOMI 95
Page 96

Leivinpelti / Syvä pannu:
Työnnä leivinpelti hyllykannattimen ohjauskiskojen
väliin.
9.2 Paistolämpömittari
Paistolämpömittari – mittaa ruoan sisälämpötilan. Sitä voi käyttää jokaisen
kuumennustoiminnon yhteydessä.
Asetettavia lämpötiloja on kaksi:
uunin lämpötila minimi 120 °C,
Sisälämpötila.
Näin saavutat parhaan kypsennystuloksen
Ainesosien pitäisi olla huoneenläm‐
pöisiä.
Älä käytä nestemäisten ruokien
suhteen.
Mittari on jätettävä ruokaan kypsentämi‐
sen ajaksi.
Uuni laskee likimääräisen kypsentämisen päättymisajan. Se riippuu ruoan määrästä, valitusta
uunitoiminnosta ja lämpötilasta.
Käyttöohje: Paistolämpömittari
1. vaihe Kytke uuni päälle.
2. vaihe Valitse uunitoiminto ja tarvittaessa uunin lämpötila.
3. vaihe Lisää: Paistolämpömittari.
Liha-, lintu- ja kalaruoka Vuokaruoka
Aseta kärki Paistolämpömittari lihan tai kalan keskel‐
le paksuimpaan kohtaan, jos mahdollista. Varmista,
että vähintään 3/4 Paistolämpömittari on ruoan sisäl‐
lä.
Aseta kärki Paistolämpömittari tarkalleen paistoksen kes‐
kelle. Paistolämpömittari tulee asettaa vakaasti paikalleen
yhteen kohtaan kypsennyksen ajaksi. Käytä sen vakautta‐
miseen kiinteää ruoka-ainesta. Aseta silikonikahva tuke‐
vasti uunivuoan reunaa vasten. Paistolämpömittari. Kärki
Paistolämpömittari ei saa koskettaa uunivuoan pohjaan.
96 SUOMI
Page 97

4. vaihe Liitä Paistolämpömittari laitteen etukehyksessä olevaan pistorasiaan.
5. vaihe
6. vaihe
7. vaihe
8. vaihe
9. vaihe Irrota Paistolämpömittari pistoke pistorasiasta ja ota ruoka uunista.
Senhetkinen lämpötila näkyy näytössä: Paistolämpömittari.
- aseta paistolämpömittarin lämpötila painamalla.
- paina asettaaksesi haluamasi valinnan:
• Äänimerkki - kun ruoka on kuumentunut asetettuun lämpötilaan, laitteesta kuuluu äänimerkki.
• Äänimerkki ja uunin sammutus - kun ruoka on kuumentunut asetettuun lämpötilaan, laitteesta
kuuluu äänimerkki ja uuni sammuu.
Valitse valinta ja paina toistuvasti: siirtyäksesi päänäytölle.
Paina: .
Kun ruoka on kuumentunut asetettuun lämpötilaan, laitteesta kuuluu äänimerkki. Voit halutessasi
lopettaa kypsennyksen tai jatkaa sitä ruoan oikean kypsyystason varmistamiseksi.
VAROITUS!
Laitteen kuumetessa on olemassa Paistolämpömittari palovammojen vaara.
Ole varovainen pistokkeen irrottamisen ja mittarin poistamisen aikana.
9.3 Varusteet höyrykypsennykseen
Höyrykypsennyssetin lisävarusteita ei
toimiteta uunin mukana. Lisätietoja saat
paikalliselta edustajalta
Uunivuoka ruoan
höyrykypsennystoimintoihin
Uunivuoka ruokaa varten koostuu
lasikulhosta (A), kannesta (B), suutinputkesta
(C), suuttimesta (D) ja teräsgrillistä (E).
SUOMI 97
Page 98

Lasikulho (A) Kansi (B)
C
D
Suutin, suutinputki ja teräsgrilli.
Suutinputki (C) on höyrykypsennystä varten, suutin (D)
on välitöntä höyrykypsennystä varten.
Teräsgrilli (E)
• Älä aseta kuumaa uunivuokaa kylmälle/
märälle alustalle.
• Älä kaada kylmiä nesteitä kuumaan
uunivuokaan.
• Älä käytä uunivuokaa kuumilla alustoilla.
1. vaihe
2. vaihe Yhdistä suutinputki höyryntuloaukkoon.
3. vaihe Aseta uuni höyrykypsennystoiminnolle.
Aseta uunivuoka teräsgrillille ja peitä se kannella. Aseta suutinputki kannessa olevaan reikään.
Aseta uunivuoka toiselle paikalle pohjalta katsoen.
98 SUOMI
• Älä puhdista uunivuokaa hankaavilla
aineilla, teräsharjalla ja jauheilla.
9.4 Höyrykypsennys uunivuoassa
Page 99

9.5 Välitön höyrykypsennys
Aseta uunivuoka teräsgrillille. Lisää vettä. Älä käytä kantta.
VAROITUS!
Suutin saattaa olla kuuma uunia käytettäessä. Käytä aina uunikintaita. Poista suutin uu‐
nista, kun et käytä höyrytoimintoa
1. vaihe Yhdistä suutin suutinputkeen. Yhdistä suutinputki höyryntuloaukkoon.
2. vaihe
3. vaihe Aseta uuni höyrykypsennystoiminnolle.
Kypsentäessäsi ruokia kuten kanaa, ankkaa, kalkkunaa tai suurta kalaa, aseta suutin ruoan sisälle.
Aseta uunivuoka ensimmäiselle tai toiselle paikalle pohjalta katsoen.
Varmista, ettei suutinputki ole tukossa. Pidä suutin loitolla kuumennuselementistä.
10. LISÄTOIMINNOT
10.1 Tallentaminen: Suosikit
Voit tallentaa suosikkiasetuksesi, kuten
puhdistustoiminnon. Voit tallentaa muistiin
kolme suosikkiasetusta.
uunitoiminnon, kypsennysajan, lämpötilan tai
1. vaihe Kytke laite päälle.
2. vaihe Valitse haluamasi asetus.
3. vaihe
4. vaihe Valitse: Tallenna nykyiset asetukset:
5. vaihe
- nollaa asetus painamalla.
- peruuta asetus painamalla.
Paina: . Valitse: Suosikit:
Lisää asetus seuraavaan luetteloon painamalla +: Suosikit. Paina .
10.2 Toimintolukitus
Tämä toiminto estää kuumennustoiminnon tahattoman muuttamisen.
1. vaihe Kytke laite päälle.
2. vaihe Aseta kuumennustoiminto.
3. vaihe
Toiminto kytketään pois päältä toistamalla vaihe 3.
, – paina samanaikaisesti kytkeäksesi toiminnon päälle.
10.3 Automaattinen virrankatkaisu
Turvallisuussyistä laite kytkeytyy pois päältä
jonkin ajan kuluttua, jos jokin uunitoiminto on
käynnissä eikä asetuksiin tehdä muutoksia.
SUOMI 99
Page 100

Automaattinen virrankatkaisu ei toimi
seuraavien toimintojen kanssa: Uunivalo,
(°C) (tunti)
30 - 115 12.5
120 - 195 8.5
200 - 245 5.5
250 – enintään 3
Paistolämpömittari, Lopetus, Matalalämpö.
10.4 Jäähdytyspuhallin
Kun laite on päällä, jäähdytyspuhallin
kytkeytyy automaattisesti päälle pitääkseen
laitteen pinnat viileinä. Kun kytket laitteen
pois päältä, jäähdytyspuhallin on käynnissä,
kunnes laite on jäähtynyt.
11. VIHJEITÄ JA NEUVOJA
11.1 Ruoanlaittoon liittyviä suosituksia
Taulukoissa mainitut lämpötilat ja paistoajat ovat ainoastaan suuntaa-antavia. Optimaalinen aika ja lämpötila riip‐
puvat reseptistä ja käytettyjen ainesten laadusta ja määrästä.
Laitteesi voi paistaa eri tavalla kuin entinen laitteesi. Alla olevat vinkit sisältävät suositellut lämpötilat, kypsenny‐
sajat ja kannatintasot eri ruokalajeille.
Jos taulukosta ei löydy reseptiisi sopivia asetuksia, voit soveltaa jonkin samantyyppisen paistoksen asetuksia.
11.2 Kostea kiertoilma
Noudata alla olevan taulukon ehdotuksia
parhaan tuloksen saavuttamiseksi.
(°C) (min)
Makeat sämpylät, 16
kappaletta
Sämpylät, 9 kappalet‐taleivinpelti tai uunipannu 180 2 30 - 40
Pizza, pakaste, 0,35kgritilä 220 2 10 - 15
Kääretorttu leivinpelti tai uunipannu 170 2 25 - 35
Brownie leivinpelti tai uunipannu 175 3 25 - 30
Kohokas, 6 kappaletta keraamiset annosvuoat ritilällä 200 3 25 - 30
Torttupohja torttuvuoka ritilällä 180 2 15 - 25
Victoria-voileipä uunivuoka ritilällä 170 2 40 - 50
Höyrytetty kala, 0,3 kg leivinpelti tai uunipannu 180 3 20 - 25
Kokonainen kala, 0,2kgleivinpelti tai uunipannu 180 3 25 - 35
leivinpelti tai uunipannu 180 2 20 - 30
100 SUOMI
 Loading...