

Page 1
BD431C
NL Gebruiksaanwijzing | Oven 2
EN User Manual | Oven 34
FR Notice d'utilisation | Four 65
DE Benutzerinformation | Backofen 98
Page 2

VOOR PERFECTE RESULTATEN
Bedankt dat je voor dit AEG-product hebt gekozen. We hebben het gecreëerd om
jarenlang onberispelijke prestaties te leveren, met innovatieve technologieën die het
leven eenvoudiger maken – functies die je wellicht niet op gewone apparaten aantreft.
Neem een paar minuten de tijd om het beste uit het apparaat te halen.
Ga naar onze website voor:
Advies over gebruik, brochures, het oplossen van problemen, service- en reparatieinformatie:
www.aeg.com/support
Registreer je product voor een betere service:
www.registeraeg.com
Koop accessoires, verbruiksartikelen en originele reserveonderdelen voor je apparaat:
www.aeg.com/shop
KLANTENSERVICE EN SERVICE
Gebruik altijd originele onderdelen.
Als u contact opneemt met onze erkende servicedienst, zorg er dan voor dat u de
volgende gegevens tot uw beschikking hebt: Model, PNC, serienummer.
De informatie vindt u op het typeplaatje.
Waarschuwingen en veiligheidsinformatie
Algemene informatie en tips
Milieu-informatie
Wijzigingen voorbehouden.
INHOUDSOPGAVE
1. VEILIGHEIDSINFORMATIE............................................................................3
2. VEILIGHEIDSVOORSCHRIFTEN...................................................................5
3. BESCHRIJVING VAN HET PRODUCT.......................................................... 8
4. BEDIENINGSPANEEL.................................................................................... 9
5. VOOR HET EERSTE GEBRUIK..................................................................... 9
6. DAGELIJKS GEBRUIK................................................................................. 10
7. KLOKFUNCTIES...........................................................................................12
8. GEBRUIK VAN DE ACCESSOIRES.............................................................13
9. EXTRA FUNCTIES....................................................................................... 14
10. AANWIJZINGEN EN TIPS.......................................................................... 14
11. ONDERHOUD EN REINIGING................................................................... 28
12. PROBLEEMOPLOSSING........................................................................... 31
13. ENERGIEZUINIGHEID............................................................................... 32
14. MILIEUBESCHERMING..............................................................................33
2 NEDERLANDS
Page 3

1. VEILIGHEIDSINFORMATIE
Lees zorgvuldig de meegeleverde instructies voor installatie
en gebruik van het apparaat. De fabrikant is niet
verantwoordelijk voor verwondingen of schade die voortvloeit
uit de onjuiste installatie of het onjuiste gebruik. Bewaar de
instructies altijd op een veilige, toegankelijke plek voor
toekomstig gebruik.
1.1 De veiligheid van kinderen en kwetsbare personen
• Dit apparaat kan worden gebruikt door kinderen van 8 jaar
en ouder en door mensen met een beperkt lichamelijk,
zintuiglijk of verstandelijk vermogen of een gebrek aan
ervaring en kennis, indien zij onder toezicht staan of
instructies hebben gekregen over het veilig gebruiken van
het apparaat en indien zij de gevaren begrijpen. Kinderen
jonger dan 8 jaar en personen met zware en complexe
beperkingen dienen altijd uit de buurt van het apparaat te
worden gehouden, tenzij ze voortdurend onder toezicht
staan.
• Houd toezicht op kinderen om te voorkomen dat zij met het
apparaat gaan spelen..
• Houd alle verpakking uit de buurt van kinderen en gooi het
op passende wijze weg.
• WAARSCHUWING: Het apparaat en de toegankelijke
onderdelen ervan worden heet tijdens het gebruik. Houd
kinderen en huisdieren uit de buurt van het apparaat tijdens
het gebruik en bij het afkoelen.
• Als het apparaat is voorzien van een kinderslot, dient dit te
worden geactiveerd.
• Kinderen mogen zonder toezicht geen reinigings- en
onderhoudswerkzaamheden aan het apparaat uitvoeren.
1.2 Algemene veiligheid
• Dit apparaat is uitsluitend bestemd om mee te koken.
NEDERLANDS 3
Page 4

• Dit apparaat is bedoeld voor binnenshuis huishoudelijk
gebruik.
• Dit apparaat kan worden gebruikt in kantoren, hotelkamers,
bed & breakfast-kamers, boerderijgasthuizen en andere
soortgelijke accommodaties waar dergelijk gebruik de
(gemiddelde) huishoudelijke gebruiksniveaus niet
overschrijdt.
• Alleen een erkende installatietechnicus mag dit apparaat
installeren en de kabel vervangen.
• Gebruik het apparaat niet voordat u het in de ingebouwde
constructie installeert.
• Trek de stekker van het apparaat uit het stopcontact
voordat u welke soort onderhoud dan ook gaat uitvoeren.
• Als het netsnoer beschadigd is, moet de fabrikant, een
erkend servicecentrum of een gekwalificeerde persoon
deze vervangen teneinde gevaarlijke situaties met
elektriciteit te voorkomen.
• WAARSCHUWING: Zorg ervoor dat het apparaat is
uitgeschakeld voordat u de lamp vervangt om elektrische
schokken te voorkomen.
• WAARSCHUWING: Het apparaat en de toegankelijke
onderdelen ervan worden heet tijdens het gebruik. Zorg
ervoor dat je de verwarmingselementen of het oppervlak
van de apparaatruimte niet aanraakt.
• Gebruik altijd ovenhandschoenen om accessoires of
ovenschalen te verwijderen of erin te plaatsen.
• Om de inschuifrailen te verwijderen trek eerst de voorkant
van de inschuifrail en dan de achterkant uit de zijwanden.
Plaats de inschuifrails in omgekeerde volgorde.
• Gebruik geen stoomreiniger om het apparaat schoon te
maken.
• Gebruik nooit agressieve reinigingsmiddelen of scherpe
metalen schrapers om de glazen deur schoon te maken.
Deze kunnen krassen veroorzaken op het oppervlak,
waardoor het glas zou kunnen breken.
4 NEDERLANDS
Page 5
2. VEILIGHEIDSVOORSCHRIFTEN
2.1 Installeren
WAARSCHUWING!
Alleen een erkende installatietechnicus
mag het apparaat installeren.
• Verwijder alle verpakkingsmaterialen.
• Installeer en gebruik geen beschadigd
apparaat.
• Volg de installatie-instructies die zijn
meegeleverd met het apparaat.
• Pas altijd op bij verplaatsing van het
apparaat, want het is zwaar. Gebruik altijd
veiligheidshandschoenen en gesloten
schoeisel.
• Trek het apparaat nooit aan de handgreep
van zijn plaats.
• Installeer het apparaat op een veilige en
geschikte plaats die aan alle installatieeisen voldoet.
• Houd de minimumafstand naar andere
apparaten en units in acht.
• Controleer, voordat je het apparaat
monteert, of de ovendeur onbelemmerd
opent.
• Het apparaat is uitgerust met een
elektrisch koelsysteem. Het moet worden
gebruikt met de elektrische voeding.
• De inbouwunit moet voldoen aan de
stabiliteitsvereisten van DIN 68930.
Minimumhoogte kast (Mini‐
mumhoogte kast onder
werkblad)
Kastbreedte 560 mm
Kastdiepte 550 (550) mm
Hoogte van de voorkant
van het apparaat
Hoogte van de achterkant
van het apparaat
Breedte van de voorkant
van het apparaat
Breedte van de achterkant
van het apparaat
Diepte van het apparaat 567 mm
Ingebouwde diepte van het
apparaat
578 (600) mm
594 mm
576 mm
595 mm
559 mm
546 mm
Diepte met open deur 1027 mm
Minimumgrootte ventilatie‐
opening. Opening geplaatst
aan de onderkant van de
achterzijde
Lengte netvoedingskabel.
Kabel wordt in de rechter‐
hoek van de achterzijde ge‐
plaatst
Bevestigingsschroeven 4x25 mm
560x20 mm
1500 mm
2.2 Elektrische aansluiting
WAARSCHUWING!
Gevaar voor brand en elektrische
schokken.
• Alle elektrische aansluitingen moeten door
een gediplomeerd elektromonteur worden
gemaakt.
• Dit apparaat moet worden aangesloten op
een geaard stopcontact.
• Zorg ervoor dat de parameters op het
vermogensplaatje overeenkomen met
elektrische vermogen van de netstroom.
• Gebruik altijd een juist geïnstalleerd
schokbestendig stopcontact.
• Gebruik geen adapters met meerdere
stekkers en verlengkabels.
• Zorg dat u de netstekker en het netsnoer
niet beschadigt. Indien de voedingskabel
moet worden vervangen, dan moet dit
gebeuren door onze Klantenservice.
• Laat de stroomkabel niet in aanraking
komen met de deur van het apparaat of de
niche onder het apparaat, met name niet
als deze werkt of als de deur heet is.
• De schokbescherming van delen onder
stroom en geïsoleerde delen moet op zo'n
manier worden bevestigd dat het niet
zonder gereedschap kan worden
verplaatst.
• Steek de stekker pas in het stopcontact
als de installatie is voltooid. Zorg ervoor
dat het netsnoer na installatie bereikbaar
is.
• Als het stopcontact los zit, mag u de
stekker niet in het stopcontact steken.
NEDERLANDS 5
Page 6
• Trek niet aan het netsnoer om het
apparaat los te koppelen. Trek altijd aan
de stekker.
• Gebruik enkel correcte
isolatievoorzieningen:
stroomonderbrekers, zekeringen
(schroefzekeringen moeten uit de houder
worden verwijderd), aardlekschakelaars
en contactgevers.
• De elektrische installatie moet een
isolatieapparaat bevatten waardoor het
apparaat volledig van het lichtnet
afgesloten kan worden. Het
isolatieapparaat moet een contactopening
hebben met een minimale breedte van 3
mm.
• Dit apparaat wordt geleverd met een
stekker en een netsnoer.
2.3 Gebruik
WAARSCHUWING!
Gevaar voor letsel, brandwonden,
elektrische schokken of een explosie.
• De specificatie van dit apparaat niet
wijzigen.
• Zorg ervoor dat de ventilatieopeningen
niet geblokkeerd worden.
• Laat het apparaat tijdens de werking niet
onbeheerd achter.
• Schakel het apparaat na elk gebruik uit.
• Wees voorzichtig met het openen van de
deur van het apparaat wanneer het
apparaat in werking is. Er kan hete lucht
vrijkomen.
• Gebruik het apparaat niet met natte
handen of als het contact maakt met
water.
• Oefen geen druk uit op de open deur.
• Gebruik het apparaat niet als werkblad of
als opslagoppervlak.
• Open de deur van het apparaat
voorzichtig. Het gebruik van ingrediënten
met alcohol kan een mengsel van alcohol
en lucht veroorzaken.
• Laat geen vonken of open vlammen in
contact met het apparaat komen wanneer
u de deur opent.
• Plaats geen ontvlambare producten of
artikelen die vochtig zijn met ontvlambare
producten in, bij of op het apparaat.
WAARSCHUWING!
Risico op schade aan het apparaat.
• Om schade of verkleuring van het email te
voorkomen:
– plaats ovenschalen of andere
voorwerpen niet rechtstreeks op de
bodem van het apparaat.
– leg geen aluminiumfolie op de bodem
van de ruimte in het apparaat.
– plaats geen water direct in het hete
apparaat.
– bewaar geen vochtige gerechten en
voedsel in het apparaat nadat u klaar
bent met koken.
– wees voorzichtig bij het verwijderen of
bevestigen van accessoires.
• Verkleuring van het email of roestvrij staal
is niet van invloed op de werking van het
apparaat.
• Gebruik een diepe pan voor vochtige
taarten. Vruchtensappen veroorzaken
vlekken die permanent kunnen zijn.
• Kook altijd met de deur van het apparaat
gesloten.
• Als het apparaat achter een meubelpaneel
gemonteerd is (bijv. een deur), zorg er dan
voor dat de deur nooit gesloten is als het
apparaat in werking is. Warmte en vocht
kunnen achter een gesloten meubelpaneel
ophopen en schade aan het apparaat, de
behuizing of de vloer veroorzaken. Sluit
het meubelpaneel niet tot het apparaat
compleet is afgekoeld na gebruik.
2.4 Onderhoud en reiniging
WAARSCHUWING!
Gevaar voor letsel, brand en schade aan
het apparaat.
• Schakel het apparaat uit en trek de
stekker uit het stopcontact voordat u
onderhoudshandelingen verricht.
• Zorg ervoor dat het apparaat is afgekoeld.
Er bestaat een risico dat de glasplaten
kunnen breken.
• Vervang direct de glazen deurpanelen als
deze beschadigd zijn. Neem contact op
met een erkend servicecentrum.
• Wees voorzichtig als u de deur van het
apparaat verwijdert. De deur is zwaar!
6 NEDERLANDS
Page 7
• Reinig het apparaat regelmatig om te
voorkomen dat het materiaal van het
oppervlak achteruitgaat.
• Maak het apparaat schoon met een
vochtige zachte doek. Gebruik alleen
neutrale schoonmaakmiddelen. Gebruik
geen schuurmiddelen, schuursponsjes,
oplosmiddelen of metalen voorwerpen.
• Volg als u een ovenspray gebruikt de
aanwijzingen op de verpakking.
• Reinig niet het katalytische email met
schoonmaakmiddelen.
2.5 Binnenverlichting
WAARSCHUWING!
Gevaar voor elektrische schokken.
• Met betrekking tot de lamp(en) in dit
product en reservelampen die afzonderlijk
worden verkocht: Deze lampen zijn
bedoeld om bestand te zijn tegen extreme
fysieke omstandigheden in huishoudelijke
apparaten, zoals temperatuur, trillingen,
vochtigheid, of zijn bedoeld om informatie
te geven over de operationele status van
het apparaat. Ze zijn niet bedoeld voor
gebruik in andere toepassingen en zijn
niet geschikt voor verlichting in
huishoudelijke ruimten.
• Dit product bevat een lichtbron van
energie-efficiëntieklasse G.
• Gebruik alleen lampjes met dezelfde
specificaties.
2.6 Service
• Neem contact op met de erkende
servicedienst voor reparatie van het
apparaat.
• Gebruik alleen originele
reserveonderdelen.
2.7 Verwijdering
WAARSCHUWING!
Gevaar voor letsel of verstikking.
• Neem contact op met uw plaatselijke
overheid voor informatie over het afvoeren
van het apparaat.
• Haal de stekker uit het stopcontact.
• Snijd het netsnoer vlak bij het apparaat af
en gooi het weg.
• Verwijder de deurvergrendeling om te
voorkomen dat kinderen of huisdieren
binnen in het apparaat vast komen te
zitten.
NEDERLANDS 7
Page 8
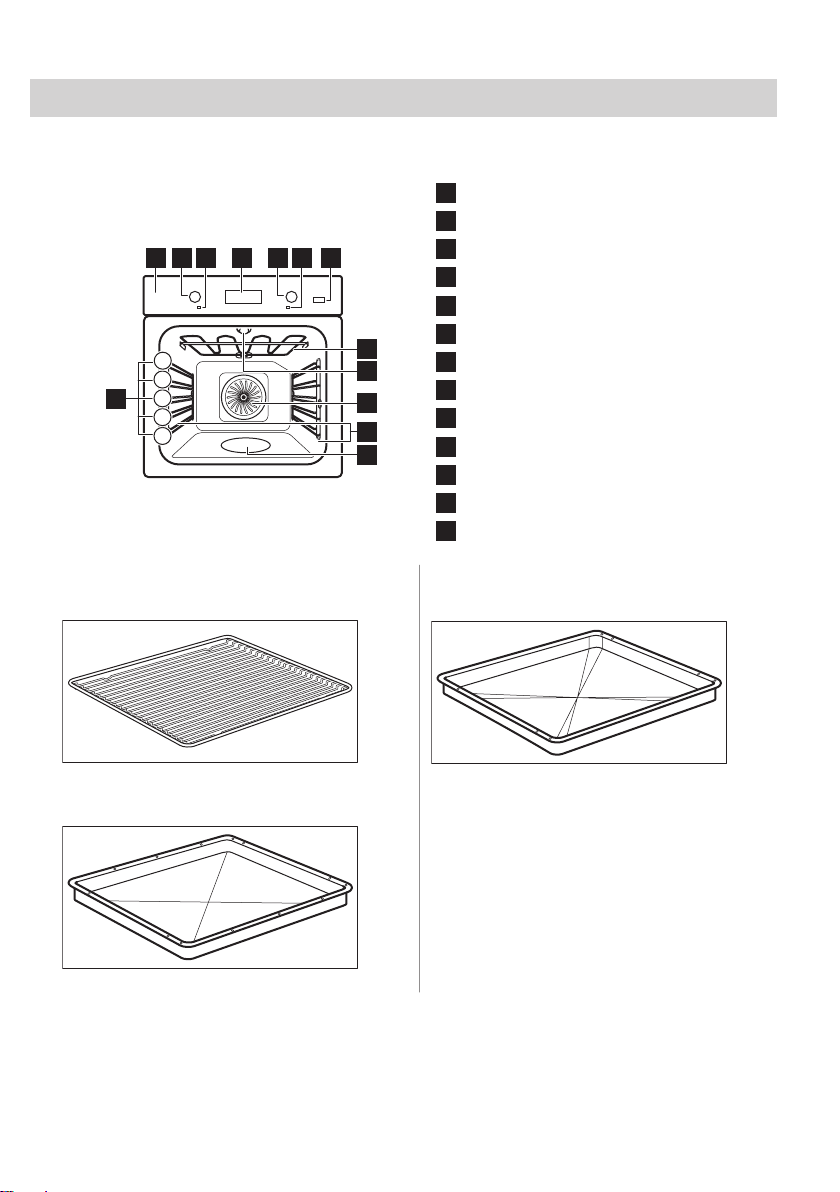
3. BESCHRIJVING VAN HET PRODUCT
1
2
3
4
5
2 3 5 641
7
13
8
11
9
10
12
3.1 Algemeen overzicht
Bedieningspaneel
Knop voor verwarmingsfuncties
Aan-uitlampje/symbool
Display
Bedieningsknop (voor de temperatuur)
Temperatuurindicator/symbool
Plus Stoom
Verwarmingselement
Lamp
Ventilator
Inschuifrails, verwijderbaar
Uitholling reliëf
Inzetniveaus
3.2 Accessoires
Bakrooster
Voor kookgerei, bak- en braadvormen.
Bakplaat
8 NEDERLANDS
Voor gebak en koekjes.
Grill-/braadpan
Om te bakken en braden of als een pan om
vet in op te vangen.
Page 9
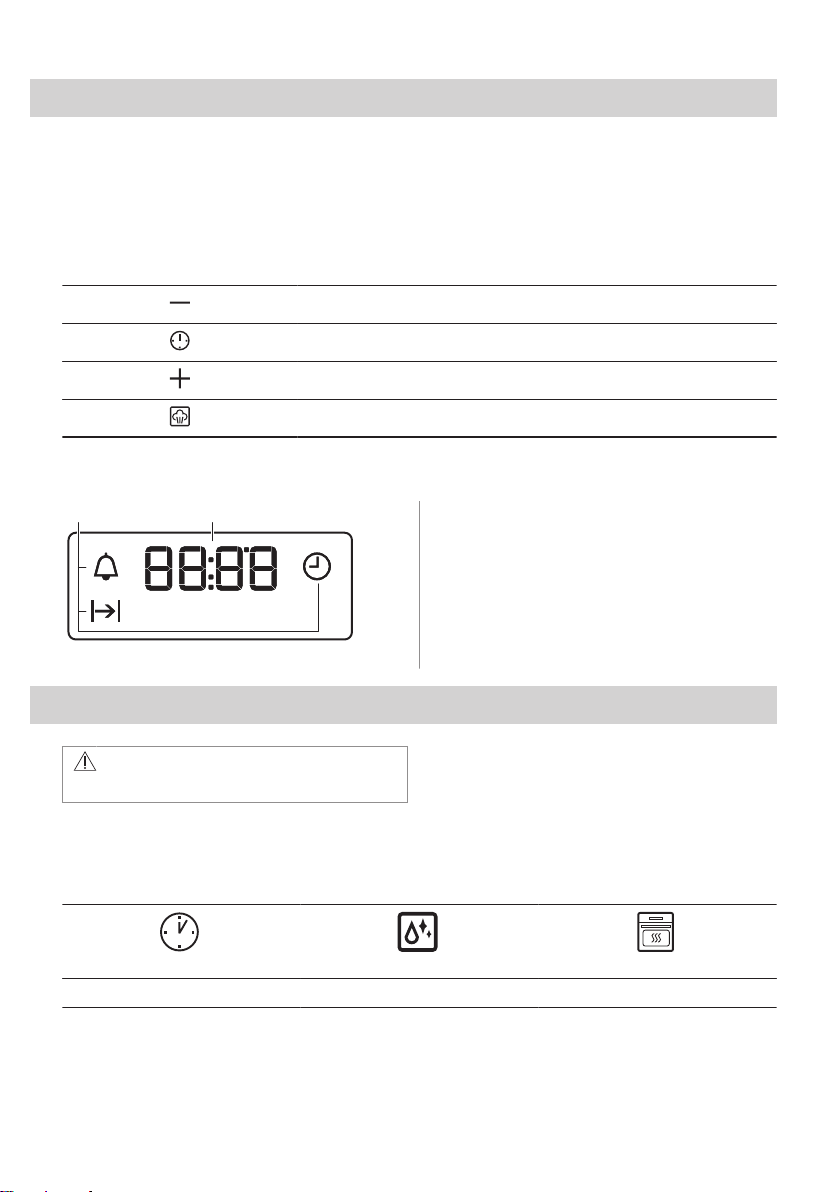
4. BEDIENINGSPANEEL
A B
4.1 Verzonken knoppen
Om het apparaat te bedienen, moet u de
bedieningsknop indrukken. De knop komt dan
naar buiten.
4.2 Sensorveld / Knoppen
De tijd instellen.
De klokfunctie instellen.
De tijd instellen.
Om de True Fan Cooking PLUS-functie in en uit te schakelen.
4.3 Display
A. Klokfuncties
B. Timer
5. VOOR HET EERSTE GEBRUIK
WAARSCHUWING!
Raadpleeg de hoofdstukken Veiligheid.
5.1 Voorafgaand aan het eerste gebruik
De oven kan een vreemde geur en rook afgeven tijdens het voorverwarmen. Zorg ervoor dat
de kamer goed is geventileerd.
Stap 1 Stap 2
Stel de klok in De oven reinigen Verwarm de lege oven voor
Stap 3
NEDERLANDS 9
Page 10
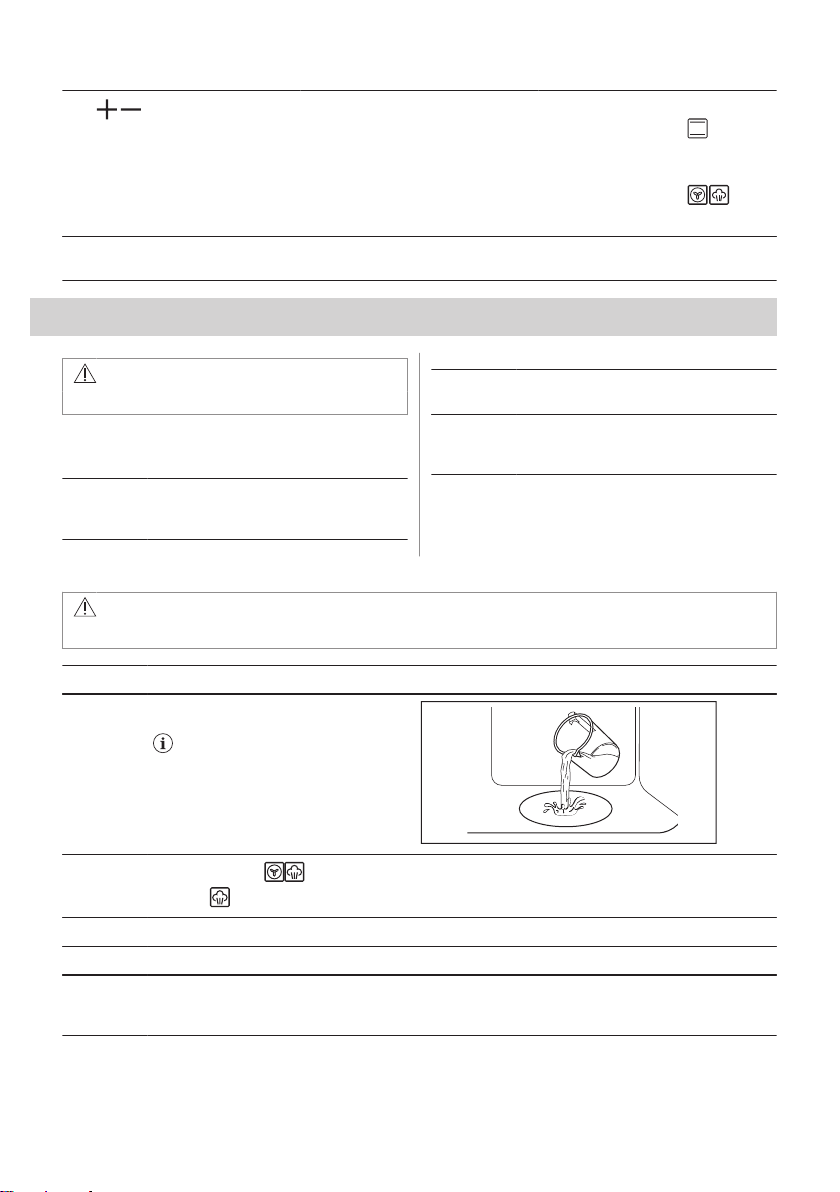
1. , - druk hierop om de tijd
in te stellen. Na ongeveer 5 se‐
conden stopt het knipperen en
geeft de klok de tijd weer.
Schakel de oven uit en wacht tot deze is afgekoeld. Plaats de accessoires en de verwijderbare inschuifrails in de
1. Haal alle accessoires en verwij‐
derbare inschuifrails uit de
oven.
2. Reinig de oven en de accessoi‐
res alleen met een microvezel‐
doek, warm water en een mild
reinigingsmiddel.
oven.
1. Stel de maximale temperatuur
in voor de functie: .
Tijd: 1 uur
2. Stel de maximale temperatuur
in voor de functie: .
Tijd: 15 min
6. DAGELIJKS GEBRUIK
WAARSCHUWING!
Raadpleeg de hoofdstukken Veiligheid.
6.1 Instellen: Verwarmingsfunctie
Stap 1 Draai aan de knop voor de verwar‐
mingsfuncties om een verwarmings‐
functie te selecteren.
Stap 2 Draai aan de regelknop om de tempera‐
tuur te selecteren.
Stap 3 Draai wanneer het bereiden stopt aan
de knoppen naar de uit-stand om de
oven uit te schakelen.
6.2 De functie instellen: Hete lucht PLUS
WAARSCHUWING!
Gevaar voor brandwonden en schade aan het apparaat.
Stap 1 Zorg ervoor dat de oven is afgekoeld.
Stap 2 Vul de uitsparing in de ovenruimte met
Stap 3
Stap 4 Draai aan de regelknop voor de temperatuur om de temperatuur in te stellen.
Stap 5 Verwarm de lege oven 10 minuten voor om vochtigheid te creëren.
Stap 6 Plaats het voedsel in de oven.
kraanwater.
De maximumcapaciteit van de uit‐
sparing in de ovenruimte is 250 ml. Vul
de uitsparing in de ovenruimte niet bij tij‐
dens de bereiding of als de oven heet is.
Stel de functie in: .
Druk op: . Het indicatielampje gaat branden. Het werkt alleen met de functie: Hete lucht PLUS.
Zie ‘Nuttige aanwijzingen en tips’.
De ovendeur niet openen tijdens het koken.
10 NEDERLANDS
Page 11
Stap 7 Draai de knop voor de verwarmingsfuncties naar de uit-stand om de oven uit te schakelen.
- druk hierop om de oven uit te schakelen. Het controlelampje gaat uit.
Stap 8 Nadat de functie eindigt, dient u de deur voorzichtig te openen. Vrijgekomen vocht kan brandwon‐
Stap 9 Zorg ervoor dat de oven is afgekoeld. Verwijder het resterende water uit de uitsparing in de oven.
den veroorzaken.
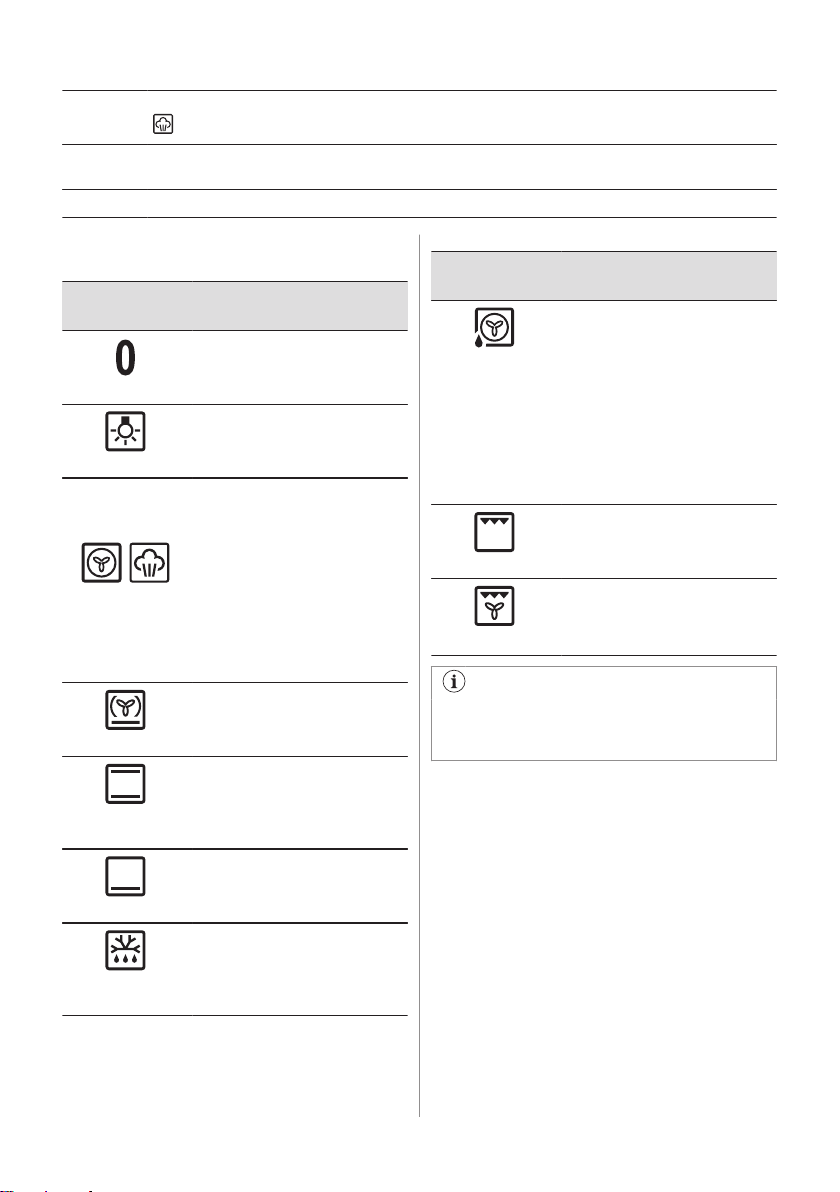
6.3 Verwarmingsfuncties
Verwarmings‐
functie
Uit-positie
Binnenverlichting
Hetelucht / Hete
lucht PLUS
Pizza-functie
Boven + onder‐
warmte / Katalyse
Onderwarmte
Ontdooien
Toepassing
De oven staat uit.
Inschakelen van de verlichting.
Bakken op maximaal drie rek‐
standen tegelijkertijd en voedsel
drogen.
Stel de temperatuur 20 tot 40°C
lager in dan voor Boven + on‐
derwarmte.
Om tijdens de bereiding vocht
toe te voegen. Om tijdens het
bakken de juiste kleur en knap‐
perigheid te krijgen. Om bij het
opwarmen meer sappigheid te
geven.
Voor het bakken van pizza. Voor
intensieve bruining en een kro‐
kante bodem.
Voor het bakken en roosteren
op één ovenniveau.
Zie het hoofdstuk "Onderhoud
en reiniging" voor meer informa‐
tie over katalytische reiniging.
Voor het bakken van taarten met
een krokante bodem en het be‐
waren van voedsel.
Om voedsel te ontdooien
(groenten en fruit). De ontdooi‐
tijd is afhankelijk van de hoe‐
veelheid ingevroren voedsel en
de grootte daarvan.
Verwarmings‐
functie
Warmelucht (voch‐
tig)
Grillen
Circulatiegrill
De lamp kan tijdens bepaalde
ovenfuncties automatisch uitgaan bij een
temperatuur die lager is dan 60° C.
6.4 Opmerkingen over:Warmelucht (vochtig)
Deze functie werd gebruikt om te voldoen
aan de eisen van de energie-efficiëntieklasse
en het ecologisch ontwerp (volgens EU
65/2014 en EU 66/2014). Tests volgens:
IEC/EN 60350-1.
De ovendeur dient tijdens de bereiding
gesloten te zijn zodat de functie niet wordt
onderbroken en de oven werkt op de hoogst
mogelijke energie-efficiëntie.
Voor de bereidingsinstructies raadpleegt u
het hoofdstuk "Aanwijzingen en
tips",Warmelucht (vochtig) .Voor algemene
Toepassing
Deze functie is ontworpen om tij‐
dens de bereiding energie te be‐
sparen. Bij het gebruik van deze
functie kan de temperatuur in de
ruimte verschillen van de inge‐
stelde temperatuur. De rest‐
warmte wordt gebruikt. Het ver‐
warmingsvermogen kan worden
verminderd. Raadpleeg voor
meer informatie het hoofdstuk
"Dagelijks gebruik", opmerkin‐
gen op: Warmelucht (vochtig) .
Om dunne stukken voedsel te
grillen en brood te roosteren.
Voor het braden van grote stuk‐
ken vlees of gevogelte met bot
op één niveau. Voor gratineren
en bruinen.
NEDERLANDS 11
Page 12
aanbevelingen voor energiebesparing
raadpleegt u het hoofdstuk "Energieefficiëntie", Energiebesparing.
7. KLOKFUNCTIES
7.1 Klokfuncties
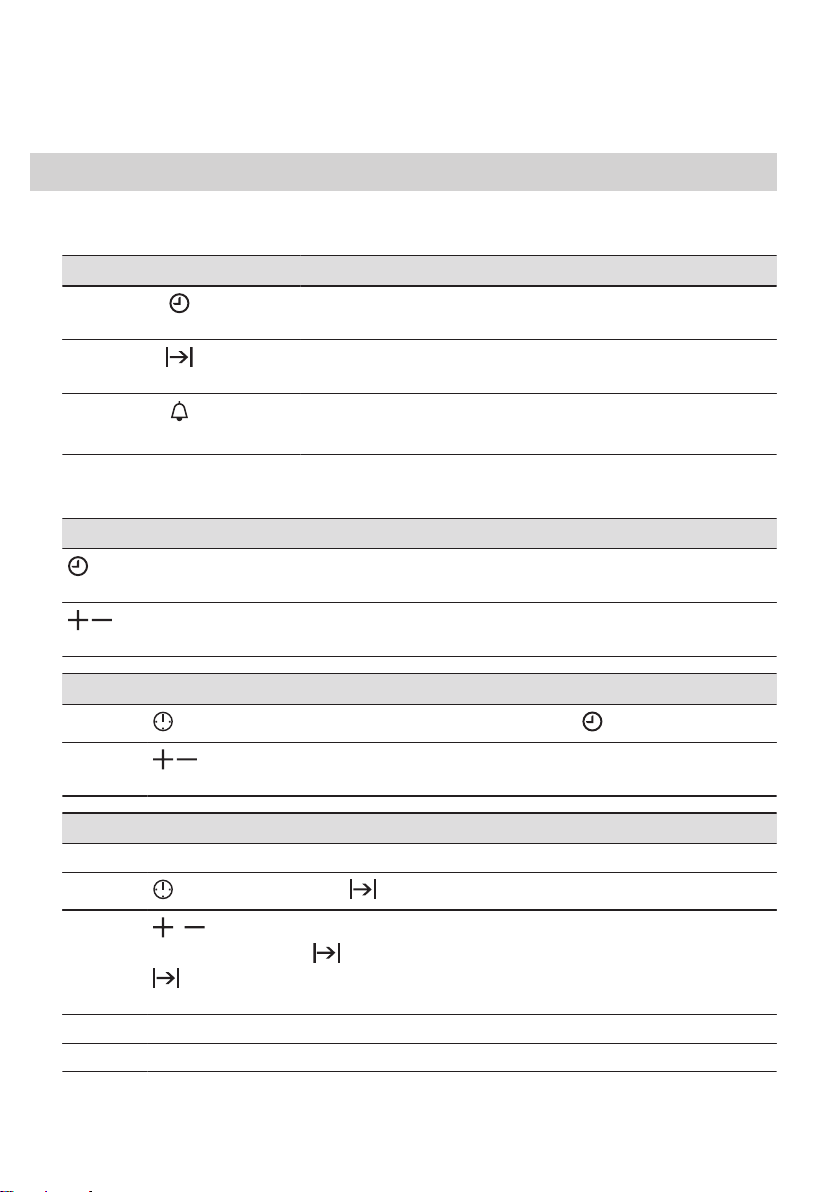
Klokfunctie Toepassing
Met deze functie kunt u de dagtijd instellen, wijzigen of controleren.
Dagtijd
Instellen hoe lang de oven in werking is.
Duur
Om een afteltijd in te stellen. Deze functie heeft geen invloed op de werk‐
Kookwekker
7.2 Instellen: Klokfuncties
Instellen: Dagtijd
- knippert als je de oven aansluit op het stopcontact, als er een stroomstoring is geweest of als de timer niet
is ingesteld.
, - druk hierop om de tijd in te stellen.
Na ongeveer 5 seconden stopt het knipperen en geeft de klok de tijd weer.
ing van de oven. U kunt deze functie op elk gewenst moment instellen, ook
als de oven uit staat.
Wijzigen: Dagtijd
Stap 1
Stap 2
- druk hier herhaaldelijk op om het tijdstip van de dag te wijzigen. - begint te knipperen.
, - druk hierop om de tijd in te stellen.
Na ongeveer 5 seconden stopt het knipperen en geeft de klok de tijd weer.
Instellen: Duur
Stap 1 Stel een ovenfunctie en de temperatuur in.
Stap 2
Stap 3
Stap 4 Druk op een willekeurige toets om het signaal te stoppen.
Stap 5 Draai de knoppen naar de uitstand.
- druk hier herhaaldelijk op. - begint te knipperen.
, - druk hierop om de duur in te stellen.
Op het display verschijnt: .
- knippert wanneer de ingestelde tijd is verstreken. Er weerklinkt een geluidssignaal en de
oven schakelt uit.
12 NEDERLANDS
Page 13
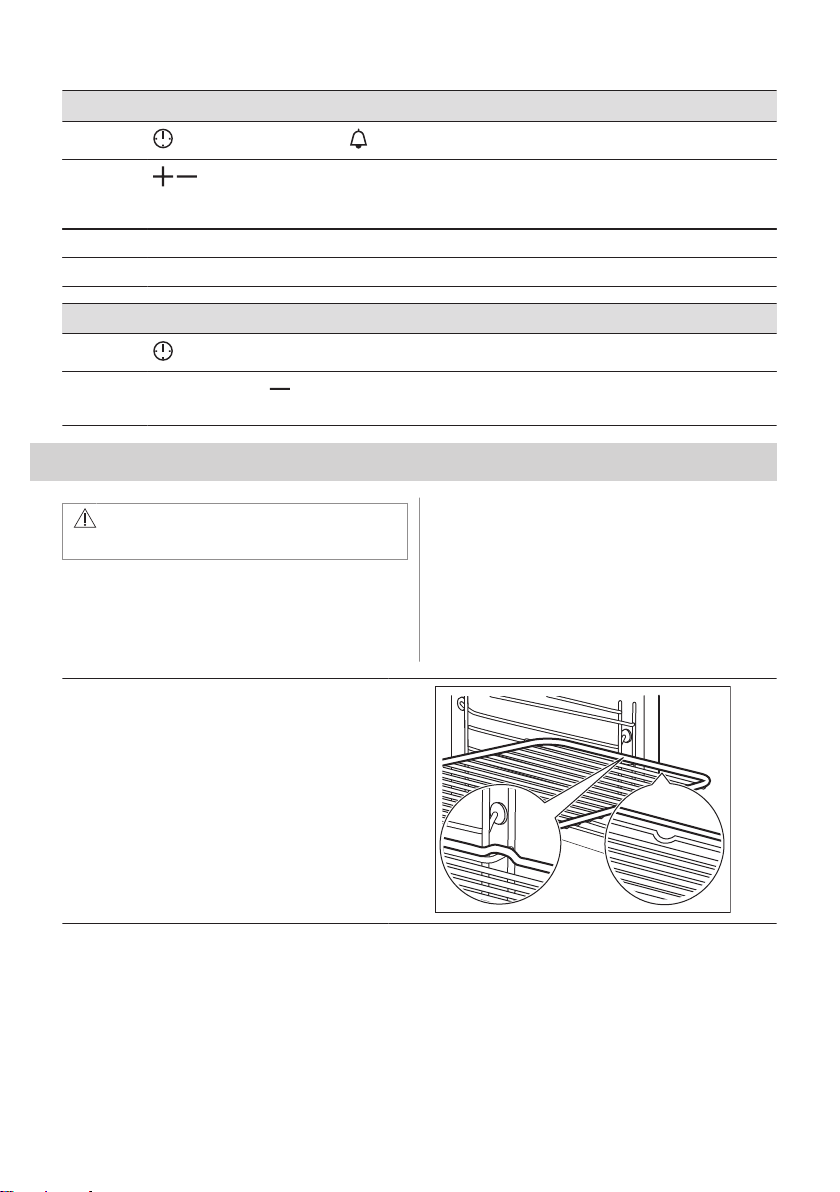
Instellen: Kookwekker
Stap 1
Stap 2
Stap 3 Druk op een willekeurige toets om het signaal te stoppen.
Stap 4 Draai de knoppen naar de uitstand.
- druk hier herhaaldelijk op. - begint te knipperen.
, - druk hierop om de tijd in te stellen.
De functie wordt automatisch na 5 seconden gestart.
Wanneer de ingestelde tijd is verstreken, klinkt er een geluidssignaal.
Annuleren: Klokfuncties
Stap 1
Stap 2
- druk herhaaldelijk totdat het klokfunctiesymbool begint te knipperen.
Ingedrukt houden: .
De klokfunctie schakelt na enkele seconden uit.
8. GEBRUIK VAN DE ACCESSOIRES
WAARSCHUWING!
Raadpleeg de hoofdstukken Veiligheid.
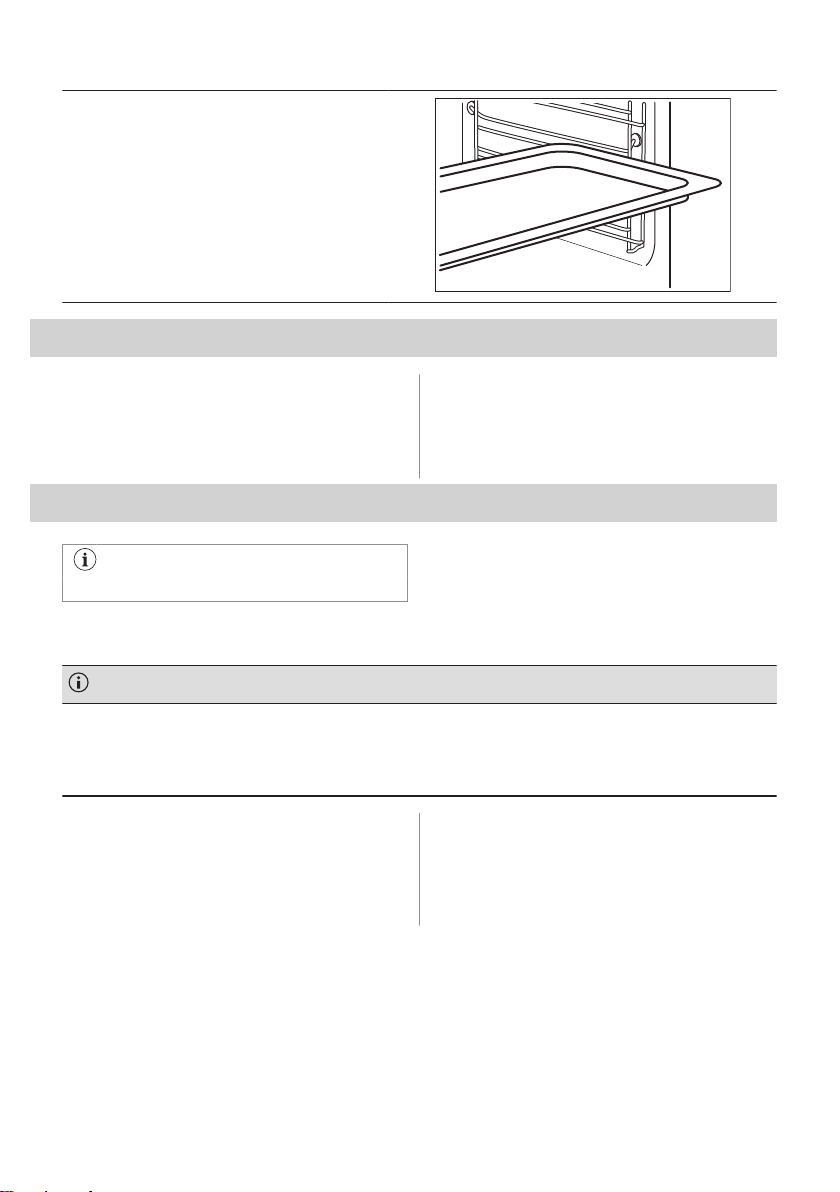
8.1 Accessoires plaatsen
Een kleine inkeping bovenaan verhoogt de
veiligheid. De inkepingen zijn ook anti-
Bakrooster:
Plaats het rooster tussen de geleidestangen van
de roostersteun.
kantelmechanismen. De hoge rand rond het
rooster voorkomt dat het kookgerei van het
rooster afglijdt.
NEDERLANDS 13
Page 14
Bakplaat / Diepe schaal:
Schuif de plaat tussen de geleidestangen van de
inschuifrail.
9. EXTRA FUNCTIES
9.1 Koelventilator
Als het apparaat in werking is, wordt de
koelventilator automatisch ingeschakeld om
de oppervlakken van het apparaat koel te
houden. Als je het apparaat uitschakelt, kan
de koelventilator blijven werken totdat het
apparaat is afgekoeld.
10. AANWIJZINGEN EN TIPS
Raadpleeg de hoofdstukken Veiligheid.
10.1 Kookadviezen
De temperatuur en kooktijden in de tabellen zijn slechts als richtlijn bedoeld. Ze zijn afhankelijk van het recept, de
kwaliteit en de kwantiteit van de gebruikte ingrediënten.
Je apparaat kan anders bakken of roosteren dan het apparaat dat je tot nu toe gebruikt hebt. De onderstaande
hints tonen aanbevolen instellingen voor temperatuur, kooktijd en rekstand voor specifieke soorten voedsel.
Als u voor een speciaal recept de instelling niet kunt vinden, zoek dan naar een soortgelijk recept.
10.2 Binnenzijde van de deur
Aan de binnenkant van de deur vindt u het
volgende:
• de nummers van de inzetniveaus.
10.3 Hete lucht PLUS
Gebruik de tweede rekstand.
Gebruik een bakplaat.
• informatie over de ovenfuncties,
aanbevolen niveaus en temperaturen voor
gerechten.
14 NEDERLANDS
Page 15
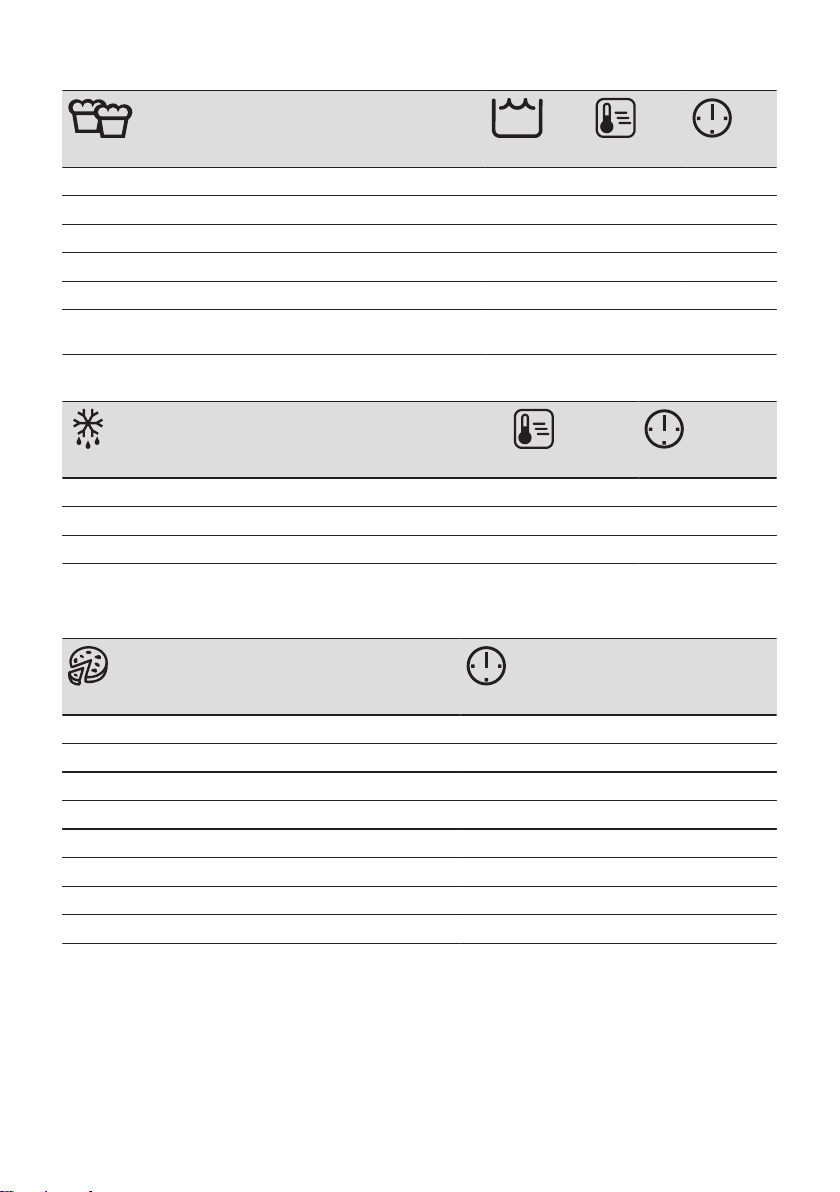
CAKE/GEBAK/BROOD
(ml) (°C) (min)
Koekjes / Scones / Croissants 100 150 - 180 10 - 20
Focaccia 100 200 - 210 10 - 20
Pizza 100 230 10 - 20
Brood/Broodjes 100 200 20 - 25
Brood 100 180 35 - 40
Pruimencake / Appeltaart / Kaneelbroodjes, gebakken in een
taartvorm
100 - 150 160 - 180 30 - 60
Gebruik 150 ml water, tenzij anders aangegeven.
BEVROREN KANT-EN-KLAARMAALTIJDEN
(°C) (min)
Pizza 200 - 210 10 - 20
Croissants 170 - 180 15 - 25
Lasagne, gebruik 200 ml 180 - 200 35 - 50
Gebruik 100 ml water.
Stel de temperatuur in op 110 °C.
VOEDSELHERSTEL
(min)
Brood/Broodjes 10 - 20
Brood 15 - 25
Focaccia 15 - 25
Vlees 15 - 25
Pasta 15 - 25
Pizza 15 - 25
Rijst 15 - 25
Groenten 15 - 25
Gebruik 200 ml water.
Gebruik een glazen ovenschaal.
NEDERLANDS 15
Page 16
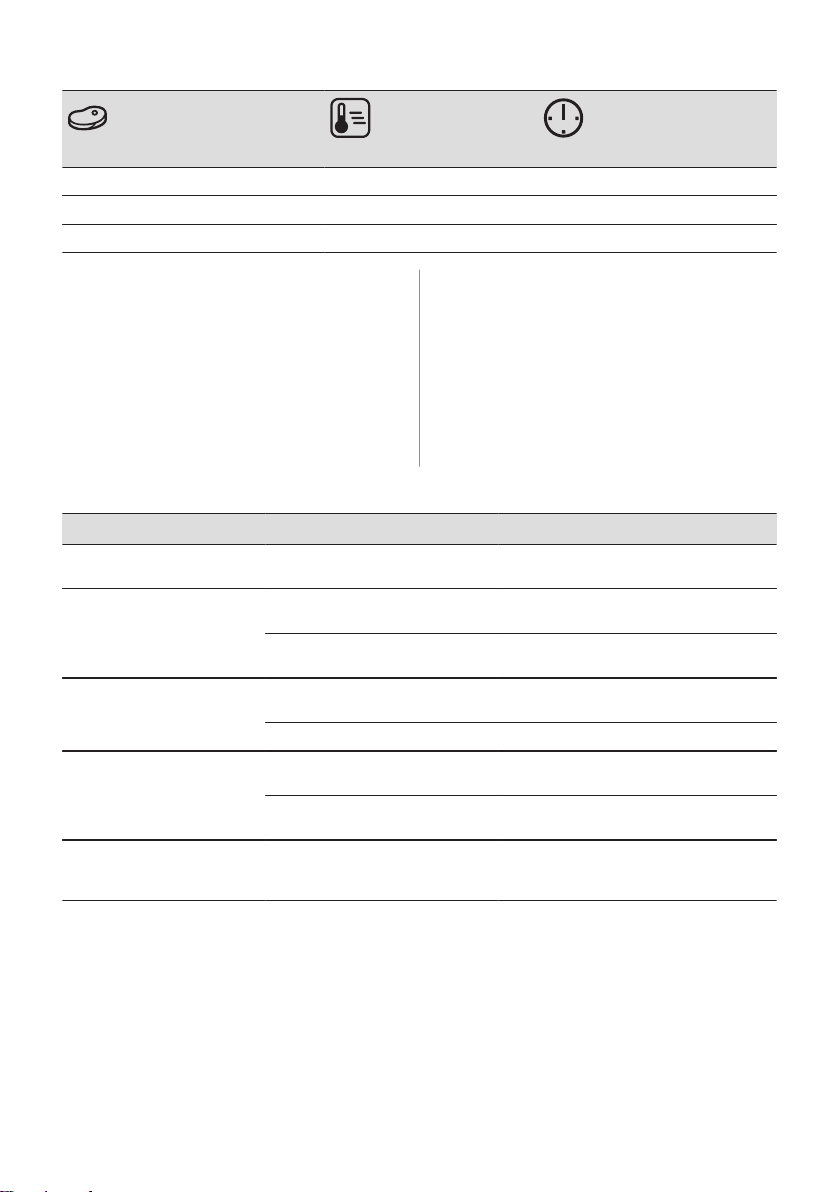
BRADEN
(°C) (min)
Biefstuk 200 50 - 60
Kip 210 60 - 80
Geroosterd varkensvlees 180 65 - 80
10.4 Bakken
Gebruik voor de eerste baksessie de lagere
temperatuur.
Bij het bereiden van cake op meerdere
niveaus kan de baktijd ca. 10 - 15 minuten
langer zijn.
niet overal even bruin wordt, hoeft u de
temperatuurinstelling niet te wijzigen. De
verschillen verminderen tijdens het bakken.
Tijdens het bakken kunnen bakplaten in de
oven vervormen. Wanneer de bakplaten weer
afgekoeld zijn, verdwijnt de vervorming.
Als de cake niet overal even hoog is, wordt
de cake niet overal even bruin. Als de cake
10.5 Baktips
Bakresultaat Mogelijke oorzaak Oplossing
De onderkant van de cake is
niet voldoende gebakken.
De cake zakt in en wordt klef,
of streperig.
De cake is te droog. De oventemperatuur is te laag. Stel de volgende keer de oventemperatuur
De cake wordt ongelijkmatig
gebakken.
De cake wordt niet gaar bin‐
nen de in het recept aangege‐
ven baktijd.
De rekstand is incorrect. Plaats de cake op een lagere rekstand.
De oventemperatuur is te hoog. Stel de volgende keer de oventemperatuur
De oventemperatuur is te hoog en
de baktijd te kort.
Te lange baktijd. Stel volgende keer een kortere baktijd in.
De oventemperatuur is te hoog en
de baktijd te kort.
Het cakebeslag is niet gelijkmatig
verdeeld.
De oventemperatuur is te laag. Stel de volgende keer de oventemperatuur
iets lager in.
Stel volgende keer een langere baktijd en
een lagere oventemperatuur in.
hoger in.
Stel volgende keer een langere baktijd en
een lagere oventemperatuur in.
Verspreid de volgende keer het cakebe‐
slag gelijkmatig over de bakplaat.
iets hoger in.
16 NEDERLANDS
Page 17
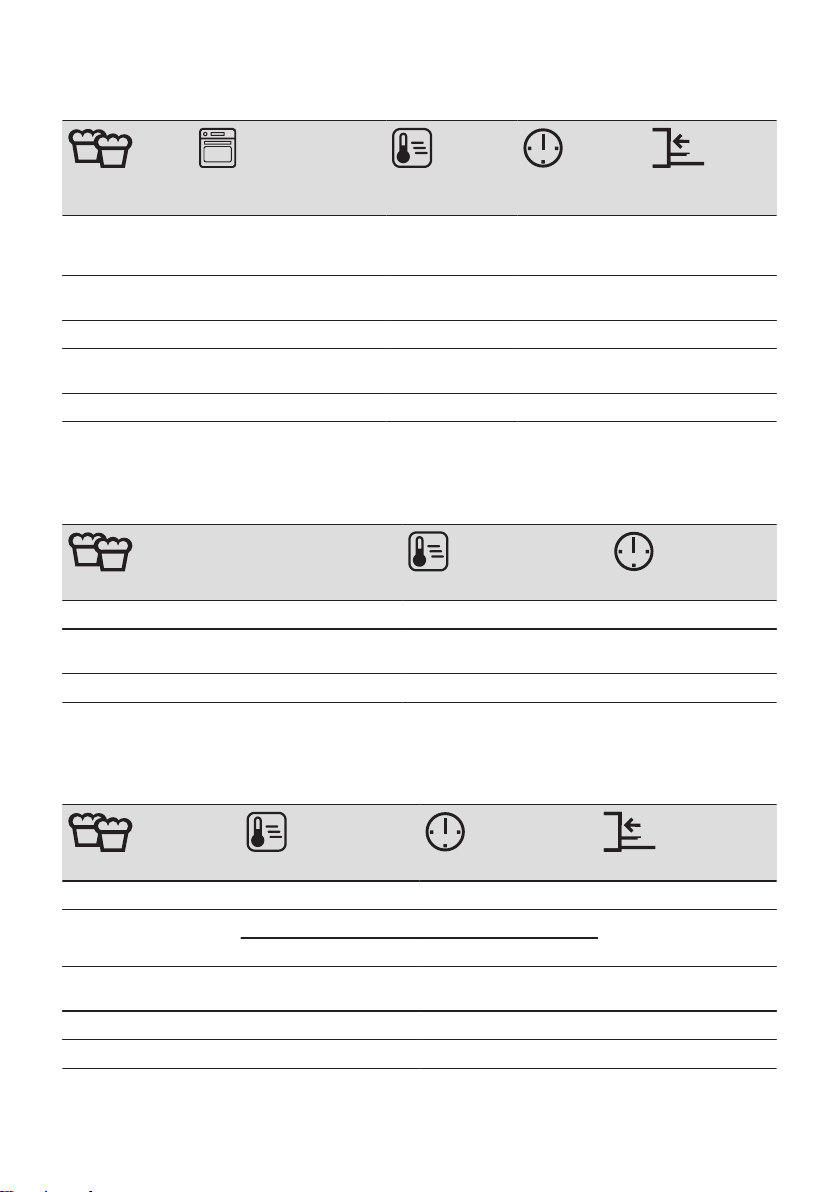
10.6 Bakken op 1 rekniveau
KEN IN BAK‐
(°C) (min)
VORMEN
BAK‐
Taartbodem - pas‐
teitjes, verwarm de
lege oven voor
Taartbodem zacht cakedeeg
Tulband / Brioche Hetelucht 150 - 160 50 - 70 1
Zandgebak /
Vruchtencakes
Cheesecake Boven + onderwarmte 170 - 190 60 - 90 1
Hetelucht 170 - 180 10 - 25 2
Hetelucht 150 - 170 20 - 25 2
Hetelucht 140 - 160 70 - 90 1
Gebruik de derde rekstand.
Gebruik de functie: Hetelucht.
Gebruik een bakplaat.
CAKE/GEBAK/BROOD
(°C) (min)
Kruimeltaart, droog 150 - 160 20 - 40
Vruchtenvlaaien (gemaakt van gistdeeg/zacht cake‐
deeg), gebruik een diepe pan
Vruchtenvlaaien gemaakt van pasteitjes 160 - 170 40 - 80
150 35 - 55
Verwarm de lege oven voor.
Gebruik de functie: Boven + onderwarmte.
Gebruik een bakplaat.
GEBAK/BROOD (°C) (min)
CAKE/
Biscuitrol 180 - 200 10 - 20 3
Roggebrood: eerst: 230 20 1
dan: 160 - 180 30 - 60
Beboterde amandeltaart /
Suikerkoek
Roomsoezen / Eclairs 190 - 210 20 - 35 3
Plaatbrood / Broodkrans 170 - 190 30 - 40 3
190 - 210 20 - 30 3
NEDERLANDS 17
Page 18
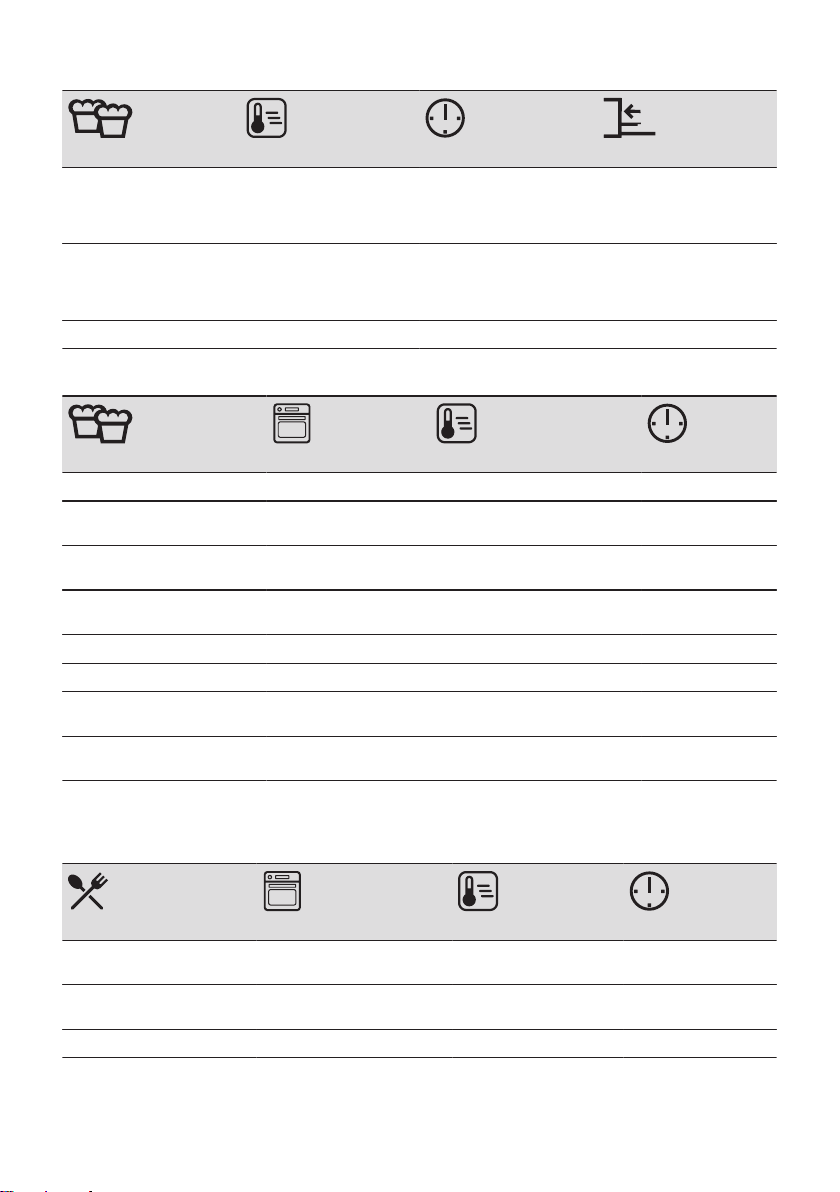
GEBAK/BROOD (°C) (min)
CAKE/
Vruchtenvlaaien (gemaakt
van gistdeeg/zacht cake‐
deeg), gebruik een diepe
pan
Plaatkoek met delicate
garnering (bijvoorbeeld
kwark, room, puddingvul‐
ling)
Kerststollen 160 - 180 50 - 70 2
170 35 - 55 3
160 - 180 40 - 80 3
Gebruik de derde rekstand.
BISCUITS (°C) (min)
KOEKJES EN
Zandkoekjes Hetelucht 150 - 160 10 - 20
Broodjes, verwarm de lege
oven voor
Koekjes gemaakt van spons‐
deeg
Bladerdeeggebakjes, verwarm
de lege oven voor
Koekjes gemaakt van gistdeeg Hetelucht 150 - 160 20 - 40
Bitterkoekjes Hetelucht 100 - 120 30 - 50
Eiwitgebakjes/schuimgebak‐
jes / Schuimgebakjes
Broodjes, verwarm de lege
oven voor
Hetelucht 160 10 - 25
Hetelucht 150 - 160 15 - 20
Hetelucht 170 - 180 20 - 30
Hetelucht 80 - 100 120 - 150
Boven + onderwarmte 190 - 210 10 - 25
10.7 Ovenschotels en gegratineerde gerechten
Gebruik de eerste rekstand.
(°C) (min)
Stokbrood bedekt met smelt‐
kaas
Groentegratin, verwarm de
lege oven voor
Lasagne Boven + onderwarmte 180 - 200 25 - 40
Hetelucht 160 - 170 15 - 30
Circulatiegrill 160 - 170 15 - 30
18 NEDERLANDS
Page 19
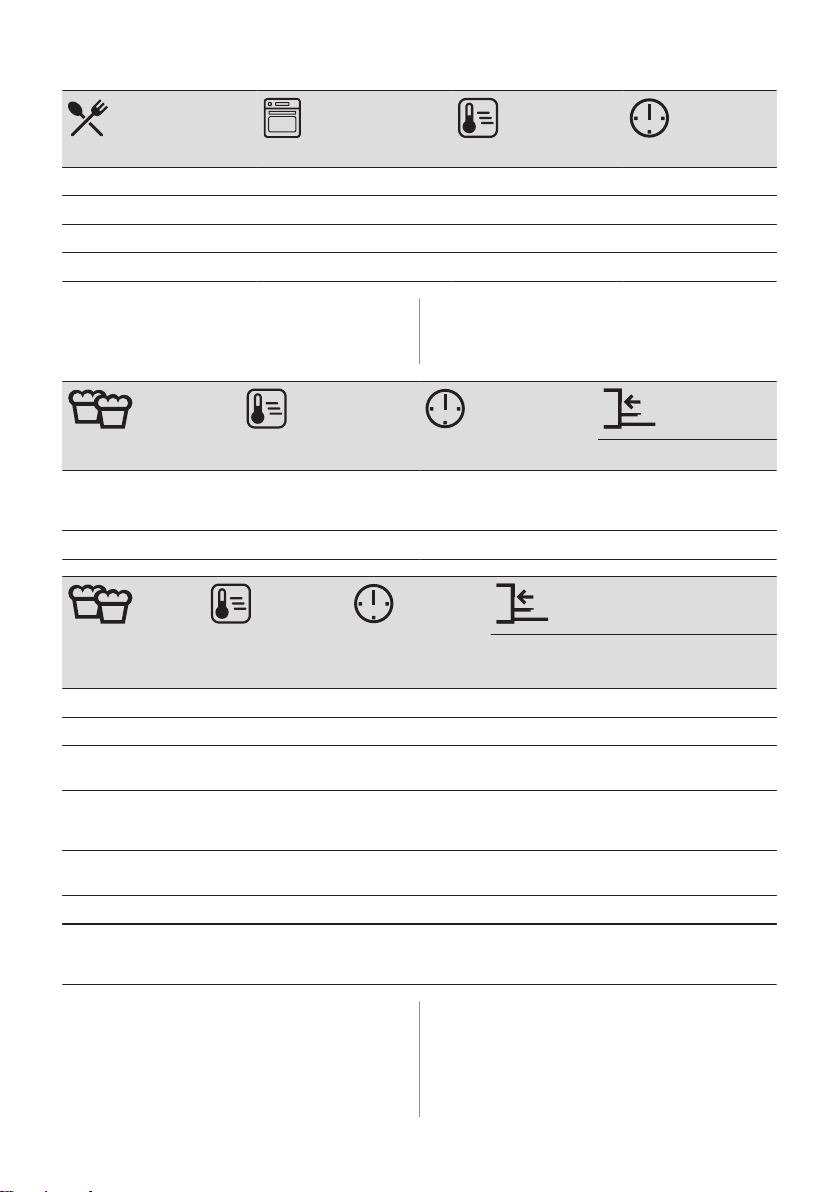
(°C) (min)
Visschotels Boven + onderwarmte 180 - 200 30 - 60
Gevulde groenten Hetelucht 160 - 170 30 - 60
Zoete baksels Boven + onderwarmte 180 - 200 40 - 60
Pasta gebakken Boven + onderwarmte 180 - 200 45 - 60
10.8 Bakken op meerdere niveaus
Gebruik de bakplaten.
Gebruik de functie: Hetelucht.
CAKE/
GEBAK (°C) (min)
Roomsoezen / Eclairs,
verwarm de lege oven
voor
Droge kruimeltaart 150 - 160 30 - 45 1 / 4
160 - 180 25 - 45 1 / 4
2 posities
KOEK‐
JES/CAKEJES/
GEBAK/BROOD‐
(°C) (min)
2 posities 3 posities
JES
Broodjes 180 20 - 30 1 / 4 -
Zandkoekjes 150 - 160 20 - 40 1 / 4 1 / 3 / 5
Koekjes gemaakt
van sponsdeeg
Bladerdeeggebak‐
jes, verwarm de lege
oven voor
Koekjes gemaakt
van gistdeeg
Bitterkoekjes 100 - 120 40 - 80 1 / 4 -
Koekjes gemaakt
van eiwit / Schuim‐
gebakjes
160 - 170 25 - 40 1 / 4 -
170 - 180 30 - 50 1 / 4 -
160 - 170 30 - 60 1 / 4 -
80 - 100 130 - 170 1 / 4 -
10.9 Tips voor braden
Gebruik hittebestendig kookgerei.
Geroosterd mager vlees bedekt (u kunt
aluminiumfolie gebruiken).
Rooster grote stukken vlees direct op de
bakplaat.
NEDERLANDS 19
Page 20
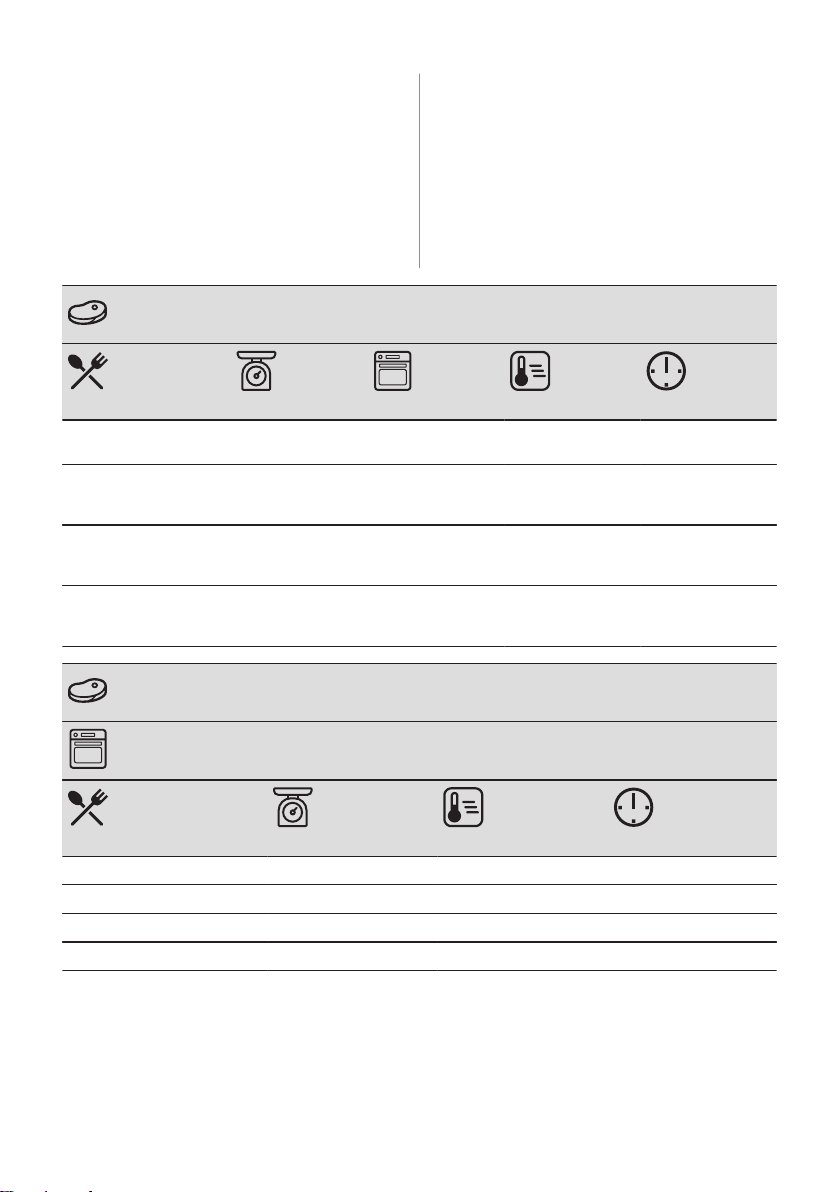
Doe wat water in de bakplaat om te
voorkomen dat druipend vet verbrandt.
Draai het braadstuk na 1/2 - 2/3 van de
gaartijd.
Rooster vlees en vis in grote stukken (1 kg of
Bedruip vleesstukken meerdere malen met
hun eigen sap tijdens het roosteren.
10.10 Braden
Gebruik de eerste rekstand.
meer).
Als niveau 1 wordt aanbevolen, plaatst u het
voedsel direct op de bakplaat
RUNDVLEES
Braadpan 1 - 1,5 kg Boven + onder‐
Biefstuk of filet, rauw,
verwarm de lege oven
voor
Biefstuk of filet, medium,
verwarm de lege oven
voor
Biefstuk of filet, gaar,
verwarm de lege oven
voor
per cm dikte Circulatiegrill 190 - 200 5 - 6
per cm dikte Circulatiegrill 180 - 190 6 - 8
per cm dikte Circulatiegrill 170 - 180 8 - 10
warmte
(°C) (min)
230 120 - 150
VARKENSVLEES
Gebruik de functie: Circulatiegrill.
(kg)
Schouder / Nek / Hamlap 1 - 1,5 160 - 180 90 - 120
Chops / Spare rib 1 - 1,5 170 - 180 60 - 90
Vleesbrood 0,75 - 1 160 - 170 50 - 60
Varkensvlees, gare schenkel 0,75 - 1 150 - 170 90 - 120
(°C) (min)
20 NEDERLANDS
Page 21
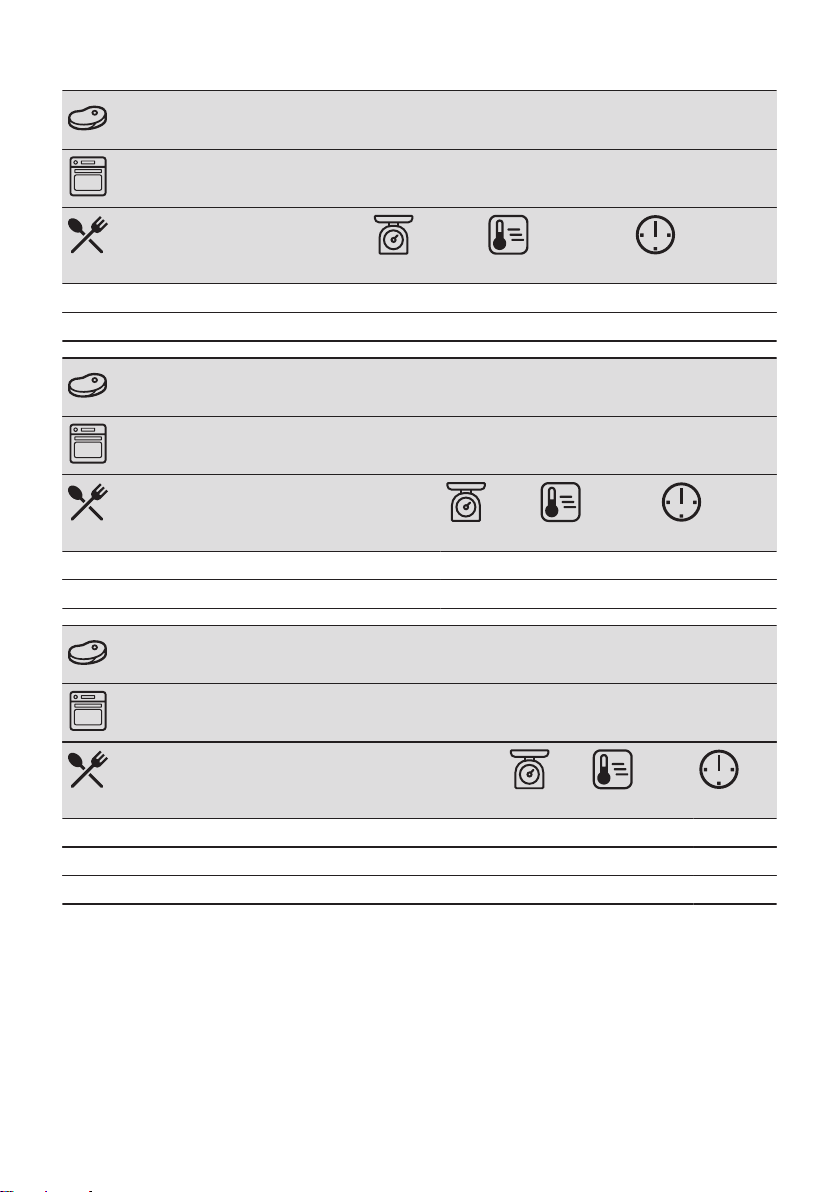
KALFSVLEES
Gebruik de functie: Circulatiegrill.
(kg)
Geroosterd kalfsvlees 1 160 - 180 90 - 120
Kalfsschenkel 1,5 - 2 160 - 180 120 - 150
(°C) (min)
LAMSVLEES
Gebruik de functie: Circulatiegrill.
(kg)
Lamspoot / Geroosterd lamsvlees 1 - 1,5 150 - 170 100 - 120
Lamsrugfilet 1 - 1,5 160 - 180 40 - 60
(°C) (min)
WILD
Gebruik de functie: Boven + onderwarmte.
(kg)
Rug / Hazenpoot, verwarm de lege oven voor tot 1 230 30 - 40
Hertenrugfilet 1,5 - 2 210 - 220 35 - 40
Reebout, hertenbout 1,5 - 2 180 - 200 60 - 90
(°C) (min)
NEDERLANDS 21
Page 22
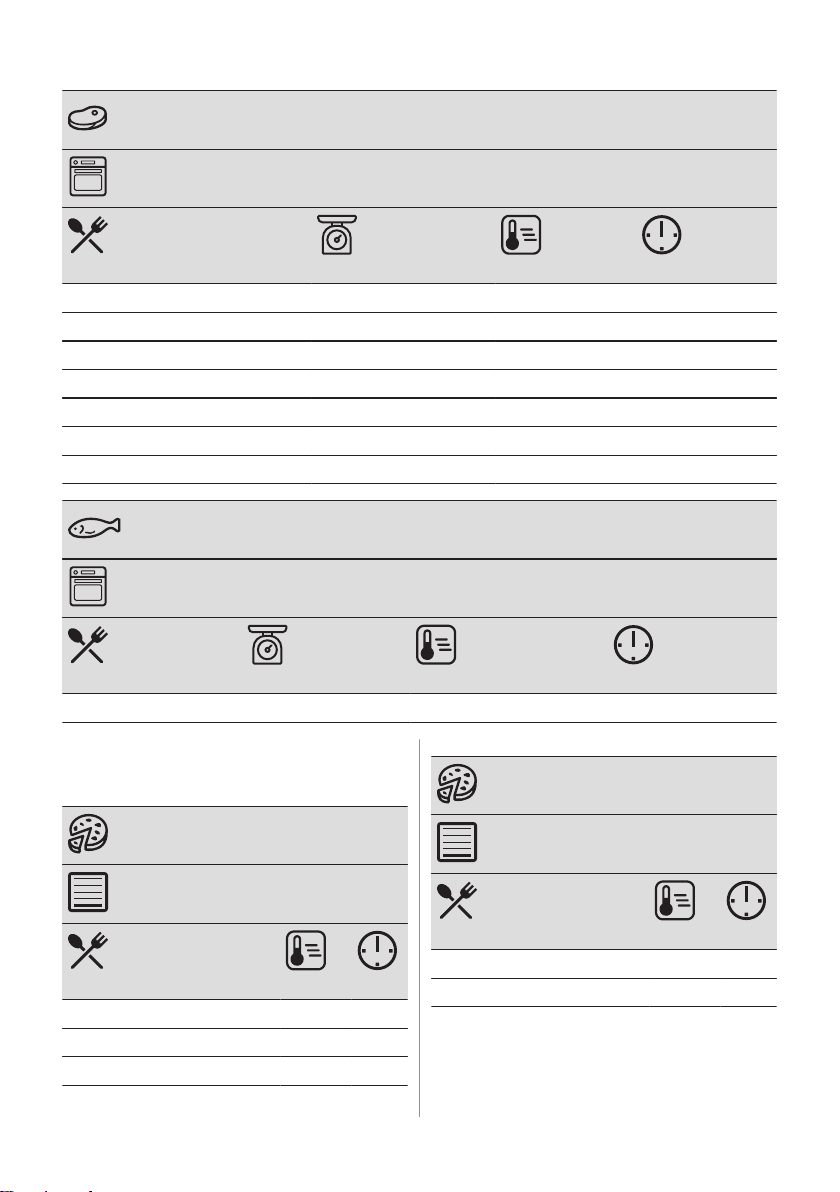
GEVOGELTE
Gebruik de functie: Circulatiegrill.
(kg)
Gevogelte, porties 0,2 - 0,25 elk 200 - 220 30 - 50
Halve kip 0,4 - 0,5 elk 190 - 210 35 - 50
Kip, poulard 1 - 1,5 190 - 210 50 - 70
Eend 1,5 - 2 180 - 200 80 - 100
Gans 3,5 - 5 160 - 180 120 - 180
Kalkoen 2,5 - 3,5 160 - 180 120 - 150
Kalkoen 4 - 6 140 - 160 150 - 240
(°C) (min)
VIS (GESTOOMD)
Gebruik de functie: Boven + onderwarmte.
(kg)
Hele vis 1 - 1,5 210 - 220 40 - 60
(°C) (min)
10.11 Knapperig bakken met:Pizzafunctie
PIZZA
PIZZA
Gebruik de eerste rekstand.
(°C) (min)
Taarten 180 - 200 40 - 55
Spinazievlaai 160 - 180 45 - 60
Quiche Lorraine / Zwitserse vlaai 170 - 190 45 - 55
22 NEDERLANDS
Gebruik de eerste rekstand.
(°C) (min)
Cheesecake 140 - 160 60 - 90
Groentetaart 160 - 180 50 - 60
Page 23
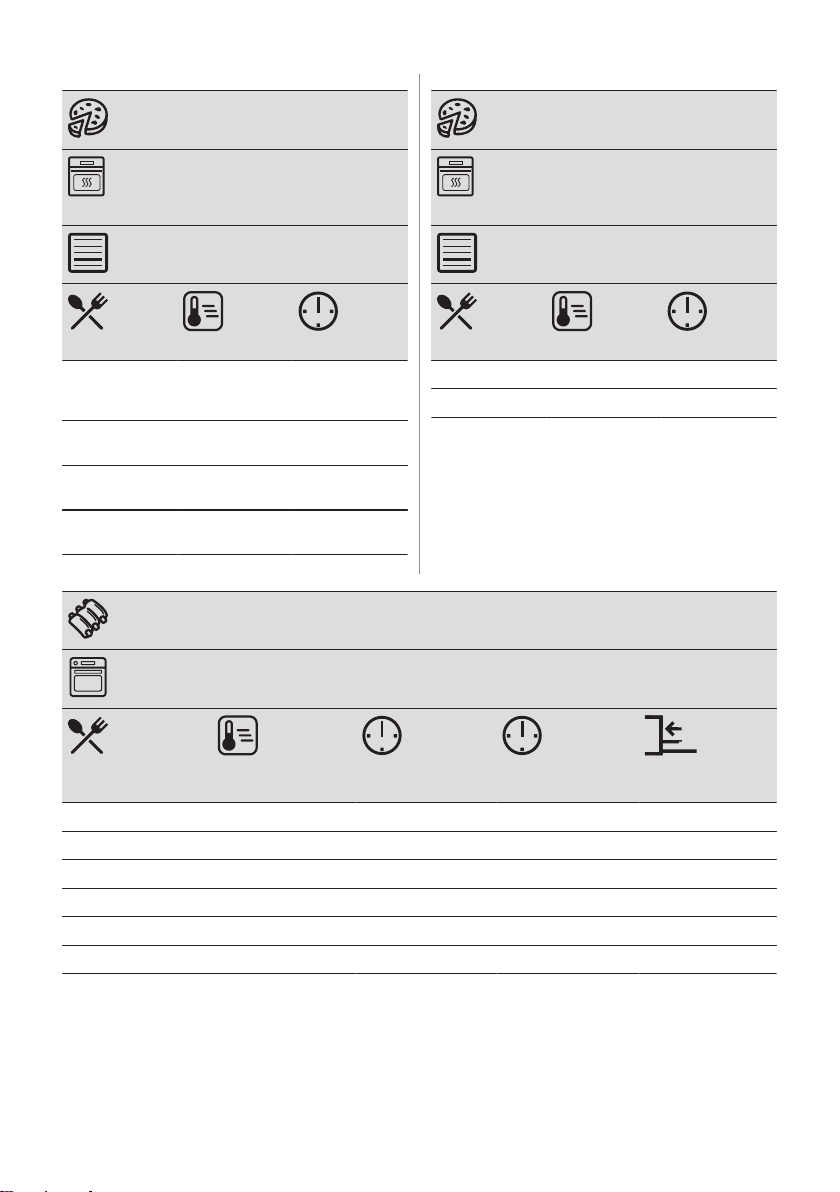
PIZZA
PIZZA
Warm de lege oven voor het koken
voor.
Gebruik de tweede rekstand.
(°C) (min)
Pizza, dunne
korst, gebruik
een diepe pan
Pizza, dikke
korst
Ongedesemd
brood
Vlaai blader‐
deeggebak
200 - 230 15 - 20
180 - 200 20 - 30
230 - 250 10 - 20
160 - 180 45 - 55
Warm de lege oven voor het koken
voor.
Gebruik de tweede rekstand.
(°C) (min)
Flammkuchen 230 - 250 12 - 20
Pierogi 180 - 200 15 - 25
10.12 Grillen
Warm de lege oven voor het koken voor.
Alleen dunne stukken vlees of vis grillen.
Plaats een pan op de eerste rekstand om vet
op te vangen.
GRILLEN
Gebruik de functie: Grillen
(°C) (min)
1e kant
Biefstuk 210 - 230 30 - 40 30 - 40 2
Runderfilet 230 20 - 30 20 - 30 3
Varkenshaas 210 - 230 30 - 40 30 - 40 2
Kalfslende 210 - 230 30 - 40 30 - 40 2
Lamsrugfilet 210 - 230 25 - 35 20 - 25 3
Hele vis, 0,5 kg - 1 kg 210 - 230 15 - 30 15 - 30 3 / 4
(min)
2e kant
NEDERLANDS 23
Page 24
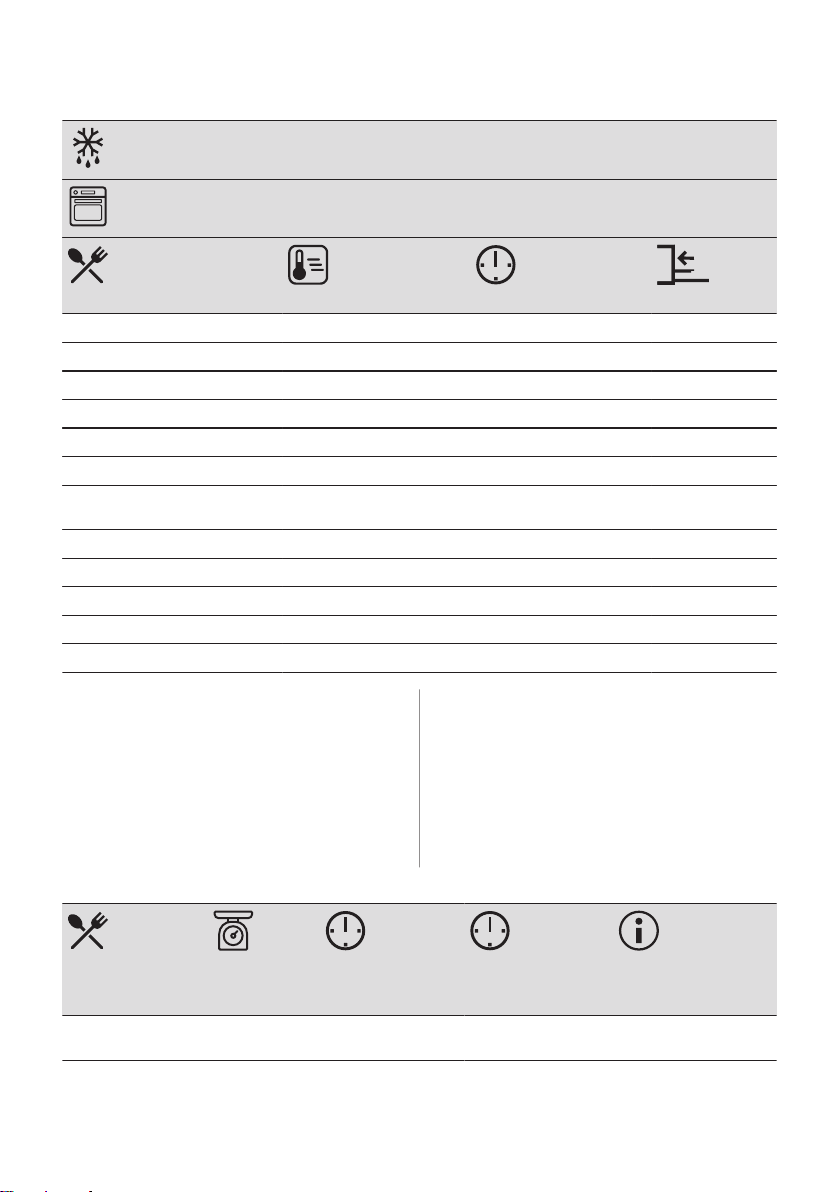
10.13 Bevroren gerechten
ONTDOOIEN
Gebruik de functie: Hetelucht.
(°C) (min)
Pizza, bevroren 200 - 220 15 - 25 2
American pizza, bevroren 190 - 210 20 - 25 2
Pizza, gekoeld 210 - 230 13 - 25 2
Pizzasnacks, bevroren 180 - 200 15 - 30 2
Frietjes, dun 200 - 220 20 - 30 3
Frietjes, dik 200 - 220 25 - 35 3
Aardappelpartjes / Aardappelkro‐
ketjes
Rösties 210 - 230 20 - 30 3
Lasagne / Cannelloni, vers 170 - 190 35 - 45 2
Lasagne / Cannelloni, bevroren 160 - 180 40 - 60 2
Gebakken kaas 170 - 190 20 - 30 3
Kippenvleugels 190 - 210 20 - 30 2
220 - 230 20 - 35 3
10.14 Ontdooien
Haal het gerecht uit de verpakking en plaats
het op een bord.
ovenruimte. Leg het voedsel op een diepe
schaal en zet deze bovenop het bord in de
oven. Verwijder indien nodig de
bakplaatsteunen.
Dek het voedsel niet af, want dat kan de
ontdooitijd verlengen.
Plaats voor grote porties voedsel een
omgedraaid bord op de bodem van de
Gebruik het eerste ovenniveau.
(kg)
(min)
Ontdooitijd
(min)
Verdere ontdooi‐
tijd
Kip 1 100 - 140 20 - 30 Halverwege de berei‐
dingstijd omdraaien.
24 NEDERLANDS
Page 25
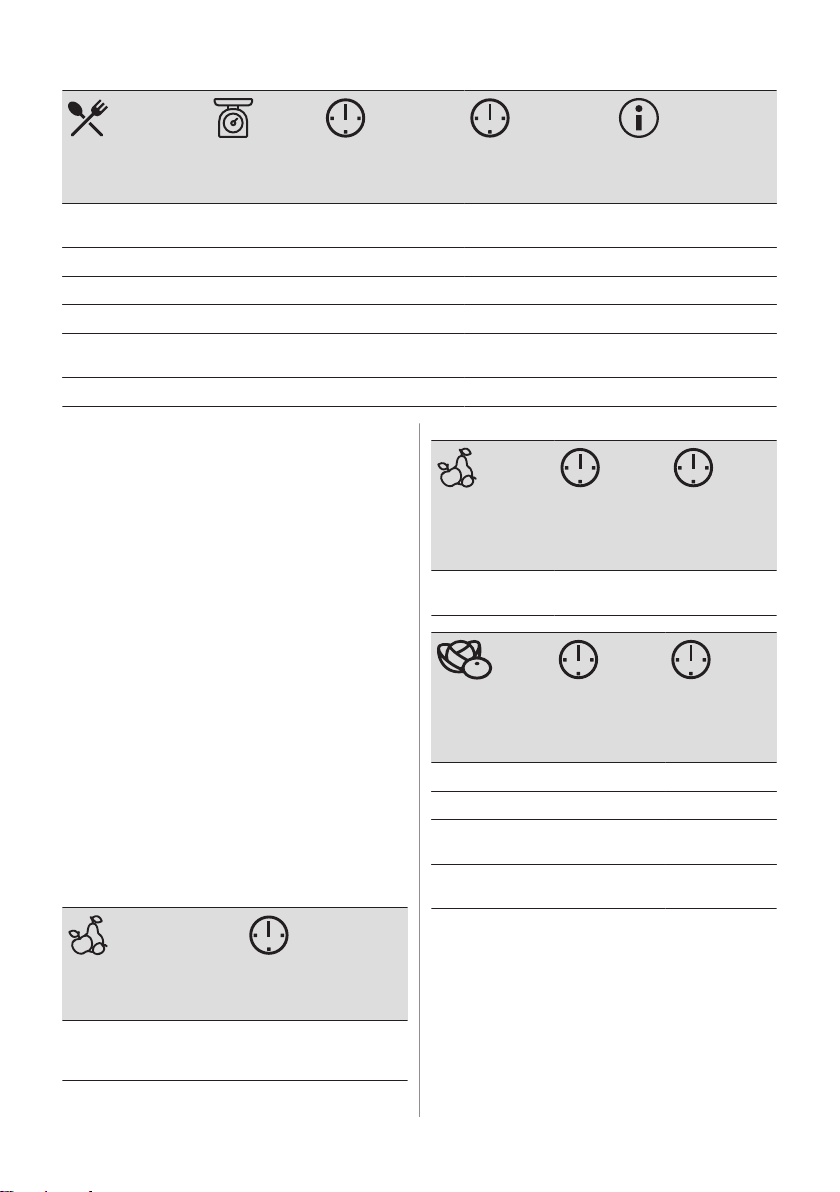
(kg)
(min)
Ontdooitijd
(min)
Verdere ontdooi‐
tijd
Vlees 1 100 - 140 20 - 30 Halverwege de berei‐
Forel 0,15 25 - 35 10 - 15 -
Aardbeien 0,3 30 - 40 10 - 20 -
Boter 0,25 30 - 40 10 - 15 -
Room 2 x 0,2 80 - 100 10 - 15 Klop de nog licht bevro‐
Gebak 1,4 60 60 -
dingstijd omdraaien.
ren slagroom.
10.15 Inmaken
Gebruik de functie Onderwarmte.
Gebruik alleen weckpotten van dezelfde
afmetingen.
Gebruik geen weckpotten met een draai- of
bajonetsluiting en metalen bakken.
Gebruik de eerste rekstand.
Zet niet meer dan zes weckflessen van 1 liter
op het bakrooster.
Vul de glazen potten gelijkmatig en sluit ze af
met een klem.
De potten mogen elkaar niet aanraken.
Doe ongeveer 1/2 liter water in de bakplaat
om voldoende vocht in de oven te geven.
Als de vloeistof in de weckpotten begint te
borrelen (na ca. 35 - 60 minuten bij
weckpotten van 1 liter), stop de oven of
verlaag de temperatuur tot 100 °C (raadpleeg
de tabel).
Stel de temperatuur in op 160 - 170 °C.
STEEN‐
VRUCHTEN (min)
Kooktijd tot
het sudderen
begint
Perziken / Kwee‐
peren / Pruimen
35 - 45 10 - 15
GROENTEN (min)
Kooktijd tot
het sudderen
begint
Wortels 50 - 60 5 - 10
Komkommers 50 - 60 -
Gemengde au‐
gurken
Kohlrabi / Erw‐
ten / Asperge
50 - 60 5 - 10
50 - 60 15 - 20
(min)
Door blijven
koken op
100 °C
(min)
Door blijven
koken op
100 °C
ZACHTE
VRUCHTEN (min)
Kooktijd tot het
sudderen begint
Aardbeien / Bosbessen /
Frambozen / Rijpe kruis‐
bessen
35 - 45
10.16 Drogen - Hetelucht
Bedek de bakplaten met vetbestendig papier
of bakpapier.
Voor een beter resultaat, stop de oven
halverwege de droogtijd, open de deur en
laat het een nacht afkoelen om het drogen af
te ronden.
NEDERLANDS 25
Page 26
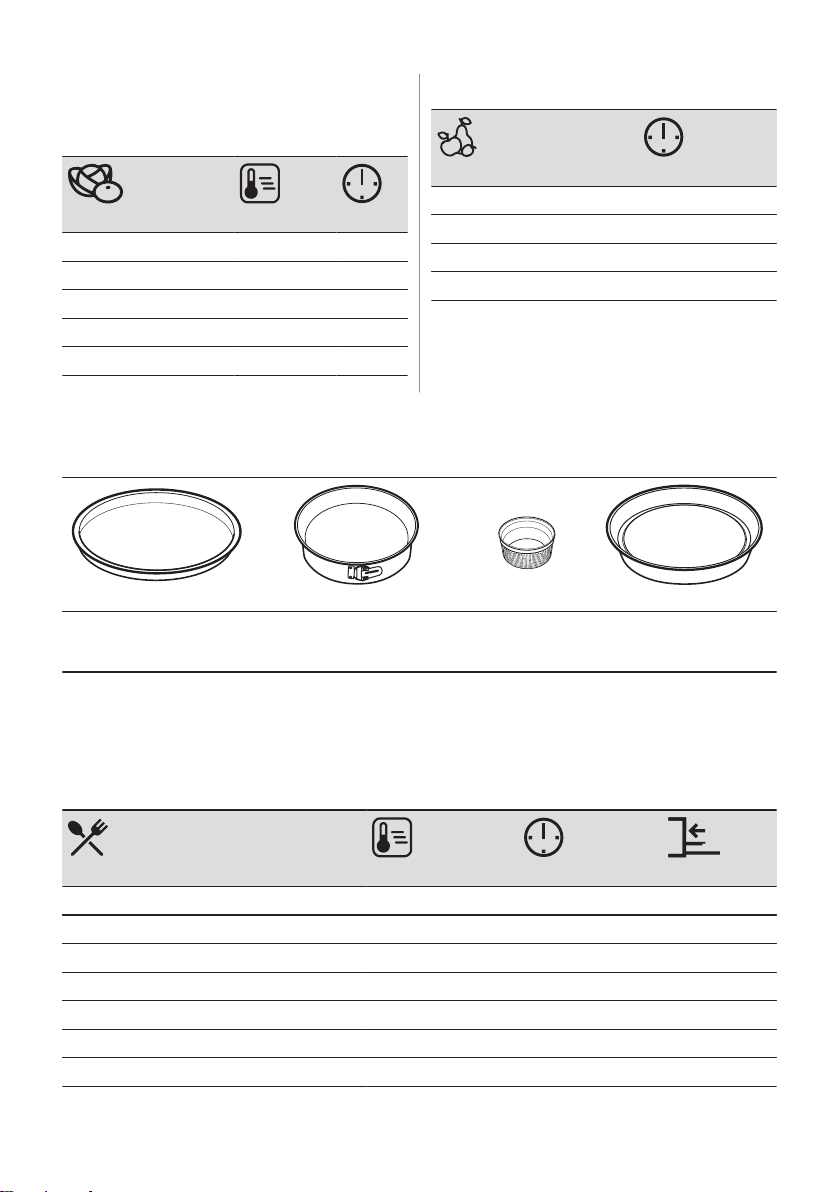
Gebruik de derde rekstand voor 1 bakplaat.
Stel de temperatuur in op 60 - 70 °C.
Gebruik de eerste en de vierde rekstand voor
2 bakplaten.
FRUIT
(u)
GROENTEN
(°C) (u)
Bonen 60 - 70 6 - 8
Paprika’s 60 - 70 5 - 6
Groenten voor soep 60 - 70 5 - 6
Paddenstoelen 50 - 60 6 - 8
Kruiden 40 - 50 2 - 3
Pruimen 8 - 10
Abrikozen 8 - 10
Appelplakjes 6 - 8
Peren 6 - 9
10.17 Warmelucht (vochtig) – aanbevolen accessoires
Gebruik de donkere en niet-reflecterende bakjes en schalen. Ze nemen de warmte beter op
dan licht en reflecterend servies.
Pizza pan
Donker, niet-reflecterend
Diameter van 28 cm
Ovenschaal
Donker, niet-reflecterend
Diameter van 26 cm
Ovenvormpjes
Keramiek
8 cm diameter, 5
cm hoog
Blik voor flanbodem
Donker, niet-reflecterend
Diameter van 28 cm
10.18 Warmelucht (vochtig)
Volg voor de beste resultaten de volgende
aanwijzingen op die hieronder in de tabel
staan.
(°C) (min)
Broodsticks, 0,5 kg in totaal 190 - 200 50 - 60 3
Sint-jakobsschelpen gebakken in hun schelp 180 - 200 30 - 40 4
Hele vis in zout, 0,3 - 0,5 kg 190 - 200 45 - 50 4
Hele vis in bakpapier, 0,3 - 0,5 kg 190 - 200 50 - 60 3
Amaretti (20; 0,5 kg in totaal) 170 - 180 40 - 50 3
Appelkruimel 190 - 200 50 - 60 4
Chocolade muffins (20; 0,5 kg in totaal) 160 - 170 35 - 45 3
26 NEDERLANDS
Page 27
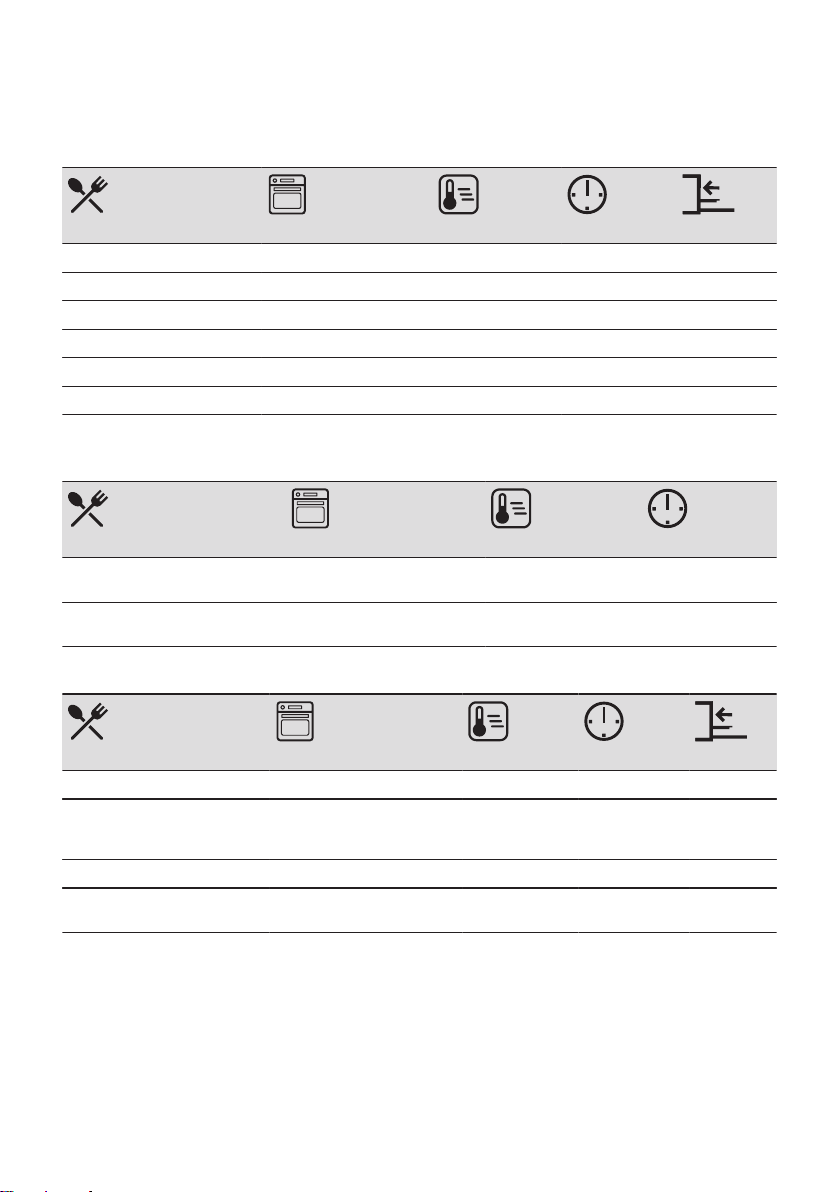
10.19 Informatie voor testinstituten
Testen in overeenstemming met: EN 60350, IEC 60350.
Bakken op één niveau - bakken in bakblikken
°C min
Zachte cake zonder vet Hetelucht 160 45 - 60 2
Zachte cake zonder vet Boven + onderwarmte 160 45 - 60 2
Appeltaart, 2 blikken Ø20 cm Hetelucht 160 55 - 65 2
Appeltaart, 2 blikken Ø20 cm Boven + onderwarmte 180 55 - 65 1
Zandtaartdeeg Hetelucht 140 25 - 35 2
Zandtaartdeeg Boven + onderwarmte 140 25 - 35 2
Bakken op één niveau - koekjes
Gebruik de derde rekstand.
°C min
Kleine cakes, 20 stuks per bak‐
plaat, verwarm de lege oven voor
Kleine cakes, 20 stuks per bak‐
plaat, verwarm de lege oven voor
Hetelucht 150 20 - 30
Boven + onderwarmte 170 20 - 30
Bakken op meerdere niveaus - koekjes
°C min
Zandtaartdeeg Hetelucht 140 25 - 45 2 / 4
Kleine cakes, 20 stuks per bak‐
plaat, verwarm de lege oven
voor
Zachte cake zonder vet Hetelucht 160 45 - 55 2 / 4
Appeltaart, 1 blik per rooster (Ø
20 cm)
Hetelucht 150 25 - 35 1 / 4
Hetelucht 160 55 - 65 2 / 4
Grillen
Verwarm de lege oven 5 minuten voor.
Grill met de maximale temperatuurinstelling.
NEDERLANDS 27
Page 28
min
Toast Grillen 1 - 2 5
Biefstuk, halverwege de bereidings‐
tijd omdraaien
Grillen 24 - 30 4
11. ONDERHOUD EN REINIGING
WAARSCHUWING!
Raadpleeg de hoofdstukken Veiligheid.
11.1 Opmerkingen over de reiniging
Reinig de voorkant van het apparaat uitsluitend met een microvezeldoek met warm water en
een mild reinigingsmiddel.
Gebruik een reinigingsoplossing om metalen oppervlakken te reinigen.
Reinigingsmid‐
delen
Dagelijks gebruik
Accessoires
Reinig vlekken met een mild reinigingsmiddel. Breng dat middel niet aan op de katalytische
oppervlakken.
Reinig de uitsparing telkens na gebruik. Vetophoping of andere resten kunnen brand veroor‐
zaken.
Bewaar het voedsel niet langer dan 20 minuten in het apparaat. Droog de ruimte na elk ge‐
bruik uitsluitend met een microvezeldoek.
Reinig alle accessoires na elk gebruik en laat ze drogen. Gebruik alleen een zachte doek
met warm water en een mild reinigingsmiddel. De accessoires niet in een afwasmachine rei‐
nigen.
Reinig de antiaanbakaccessoires niet met agressieve reinigingsmiddelen of scherpe voor‐
werpen.
11.2 Hoe schoon te maken: Uitsparing in de ovenruimte
Reinig de uitsparing van de ovenruimte om
kalksteenresten te verwijderen na het koken
met stoom.
Stap 1 Stap 2 Stap 3
28 NEDERLANDS
Page 29
Giet 250 ml witte azijn in de uitspa‐
2
1
ring van de ovenruimte. Gebruik
maximaal 6% azijn zonder toevoe‐
gingen.
Voor de functie: Hete lucht PLUS reinig de oven elke 5-10 kookcycli.
Laat de azijn de kalksteenresten ge‐
durende 30 minuten oplossen bij
omgevingstemperatuur.
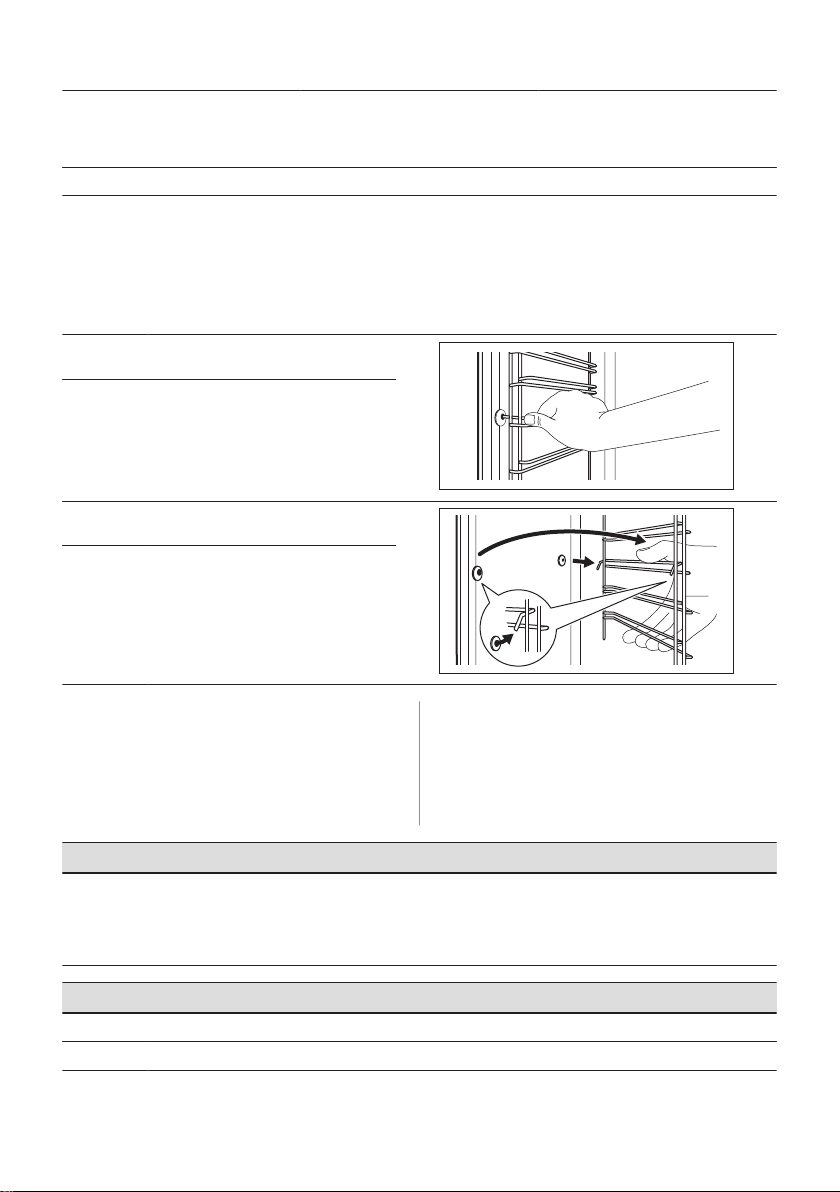
11.3 Hoe te verwijderen: Inschuifrails/
Verwijder de inschuifrails om de oven te
reinigen.
Reinig de ruimte met warm water en
een zachte doek.
Stap 1 Schakel de oven uit en wacht totdat
Stap 2 Trek de inschuifrail bij de voorkant uit
Stap 3 Trek de geleider bij de achterkant uit
Stap 4 Plaats de inschuifrails in omgekeerde
deze is afgekoeld.
de zijwand.
de zijwand en verwijder het.
volgorde.
11.4 Hoe gebruikt u: Katalytische ventilatorkap
De ventilatorkap is gecoat met een
katalytische emaille. Deze absorbeert op de
wand opgehoopt vet tijdens de werking van
Vóór de katalytische reiniging
Schakel de oven uit en wacht totdat
deze is afgekoeld.
Verwijder alle accessoires uit de
oven en de verwijderbare inschuif‐
de oven. Ter ondersteuning van het
zelfreinigende proces moet u regelmatig de
lege oven verwarmen.
Verkleuring van de katalytische coating heeft
geen invloed op de reiniging.
Reinig de onderkant van de oven‐
rails.
ruimte en de glazen deur aan de
binnenkant met warm water, een
zachte doek en een mild reinigings‐
middel.
Reinig de oven met katalytische reiniging
Stap 1 Schakel de oven uit en wacht totdat deze is afgekoeld.
Stap 2 Verwijder alle accessoires uit de oven en de verwijderbare inschuifrails.
NEDERLANDS 29
Page 30
Reinig de oven met katalytische reiniging
A
A
1
2
B
Stap 3 Reinig de ovenruimte met warm water en afwasmiddel en droog deze af.
Stap 4
Stap 5 Stel de temperatuur in: 250 °C.
Stap 6 Wanneer de oven koud is, reinigt u de ovenruimte met een natte zachte doek.
Stel de functie in: .
Duur: 1 uur
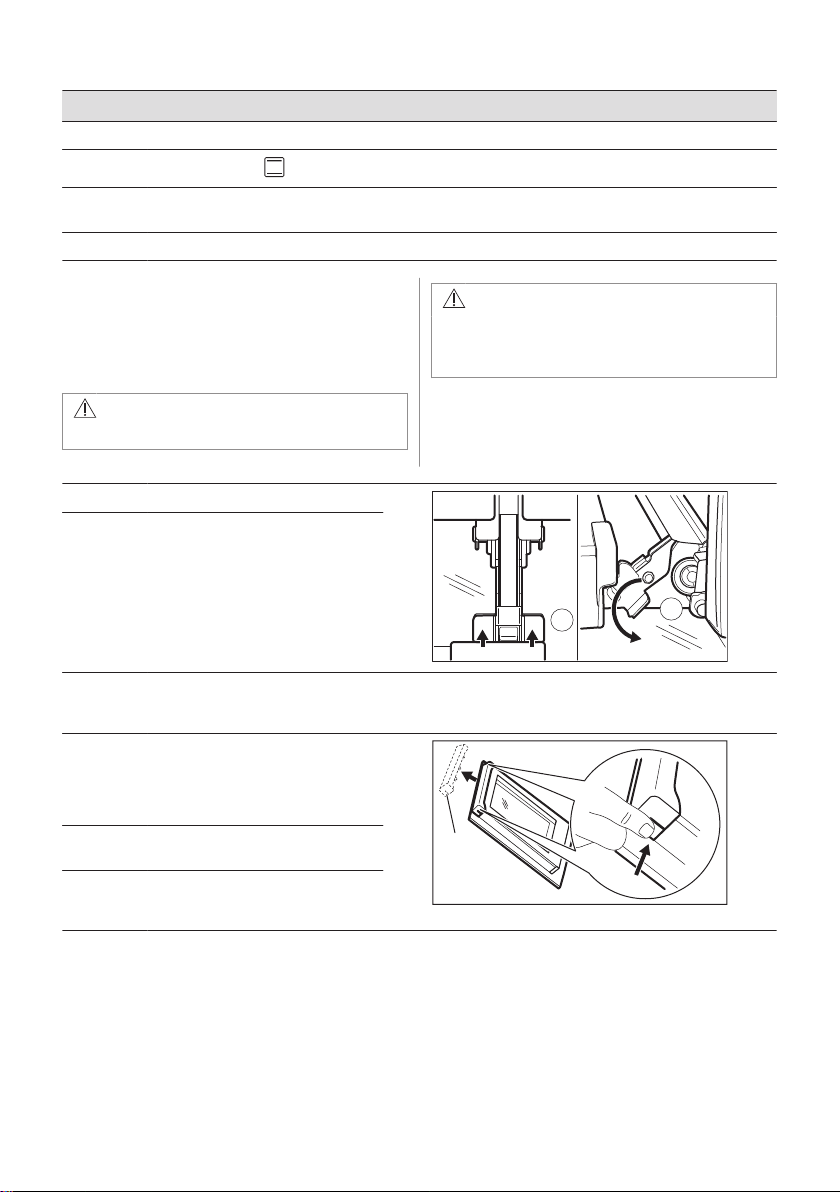
11.5 Verwijderen en installeren: Deur
U kunt de deur en de binnenste glasplaten
verwijderen om ze te reinigen. U Het aantal
glasplaten verschilt per model.
LET OP!
Behandel het glas voorzichtig, vooral
rond de randen van het voorpaneel. Het
glas kan breken.
WAARSCHUWING!
De deur is zwaar.
Stap 1 Open de deur volledig.
Stap 2 Hef en druk de klemhendels (A) op
Stap 3 Sluit de ovendeur in de eerste openingsstand (in een hoek van ongeveer 70°). Houd de deur aan
Stap 4 Pak de deurafdekking (B) aan de
Stap 5 Trek de deurlijst naar voren om
Stap 6 Houd de glasplaten aan hun boven‐
de twee deurscharnieren.
beide kanten vast en trek deze onder een opwaartse hoek weg van de oven. Plaats de ovendeur
met de buitenkant omlaag op een zachte doek op een stabiele ondergrond.
bovenkant van de deur aan beide
kanten vast en druk deze naar bin‐
nen om de klemsluiting te ontgren‐
delen.
hem te verwijderen.
kant vast en trek deze een voor een
omhoog uit de geleider.
30 NEDERLANDS
Page 31
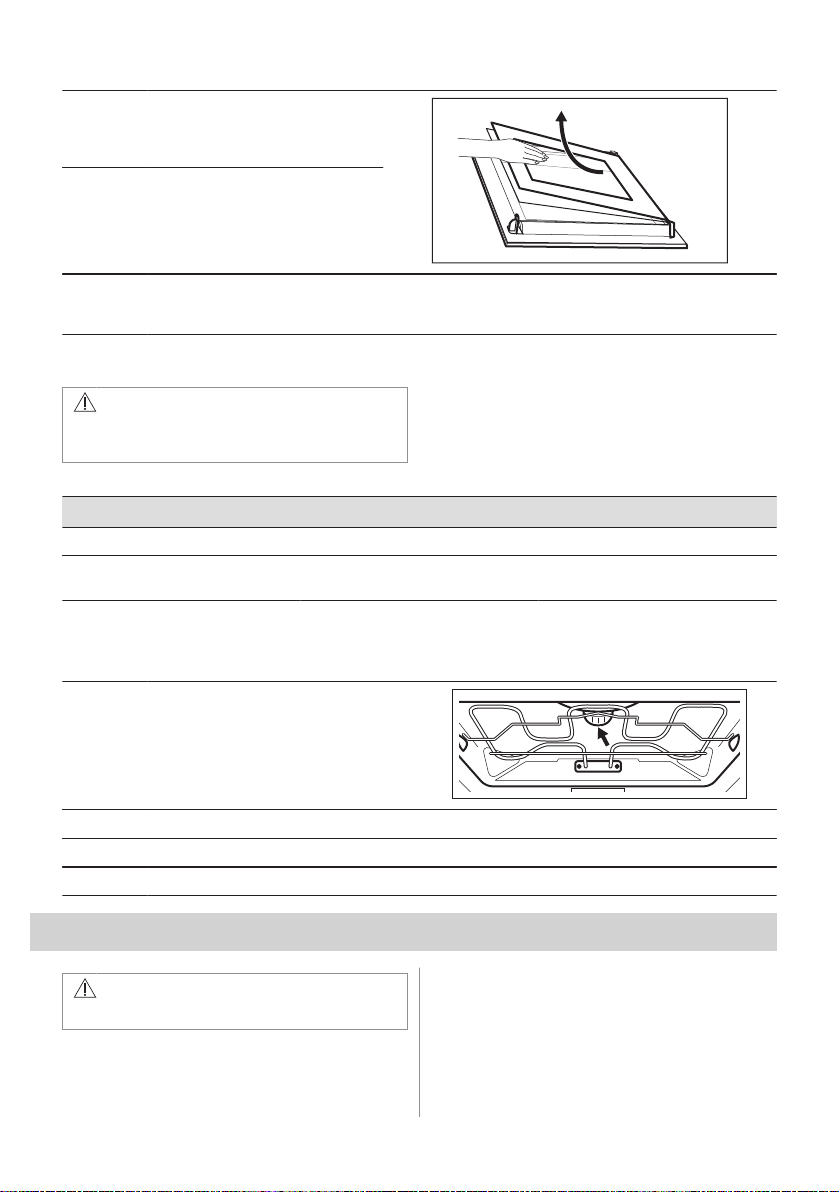
Stap 7 Reinig de glasplaat met een sopje.
Stap 8 Voer na het reinigen de boven‐
Droog de glasplaat voorzichtig af.
Reinig de glasplaten niet in de vaat‐
wasser.
staande stappen in de omgekeerde
volgorde uit.
Stap 9 Plaats de kleinste glasplaat eerst, daarna de grotere glasplaat en de deur.
Zorg ervoor dat de glasplaten op de juiste manier worden geplaatst, anders kan het oppervlak van
de deur oververhit raken.
11.6 Hoe te vervangen: Lamp
WAARSCHUWING!
Gevaar voor elektrische schokken.
Het lampje kan heet zijn.
Voordat u de lamp vervangt:
Stap 1 Stap 2 Stap 3
Schakel de oven uit. Wacht tot de
oven afgekoeld is.
Trek de oven uit het stopcontact. Plaats een doek op de bodem van
Bovenlamp
Stap 1 Draai de glazen afdekking om die te ver‐
Stap 2 Reinig de glasafdekking.
Stap 3 Vervang de lamp door een geschikte 300 °C hittebestendige lamp.
Stap 4 Installeer het glazen deksel.
wijderen.
de holte.
12. PROBLEEMOPLOSSING
WAARSCHUWING!
Raadpleeg de hoofdstukken Veiligheid.
12.1 Wat te doen als...
Neem in alle gevallen die niet in deze tabel
zijn opgenomen contact op met een erkend
servicecentrum.
NEDERLANDS 31
Page 32

Probleem Controleer of de vol‐
gende zaken van
toepassing zijn...
De oven wordt niet warm. De zekering is doorgesla‐
Het display toont "12.00". Er is een stroomstoring
Het water lekt uit de uit‐
holling in de ovenruimte.
gen.
opgetreden. Stel de dag‐
tijd in.
Er zit te veel water in de
uitholling van de oven‐
ruimte.
Probleem Controleer of de vol‐
gende zaken van
toepassing zijn...
Onbevredigende kook‐
prestaties van de functie:
Hete lucht PLUS .
De verlichting werkt niet. De lamp is opgebrand.
U heeft de uitholling van
de ovenruimte met water
gevuld.
12.2 Service-informatie
Als je niet zelf het probleem kunt verhelpen, neem dan contact op met je verkoper of een
erkende serviceafdeling.
De contactgegevens van de servicedienst staan op het typeplaatje. Het typeplaatje bevindt
zich op het voorframe van de apparaatruimte. Verwijder het typeplaatje niet uit de
apparaatruimte.
Wij raden je aan om de gegevens hier te noteren:
Model (MOD.) .........................................
Productnummer (PNC) .........................................
Serienummer (S.N.) .........................................
13. ENERGIEZUINIGHEID
13.1 Productinformatie en productinformatieblad volgens de EUvoorschriften voor ecologisch ontwerp en energie-etikettering
Naam leverancier AEG
Modelnummer BD431C 944188129, 944188457
Energie-efficiëntie-index 81.2
Energie-efficiëntieklasse A+
Energieverbruik met een standaard belading, conventionele modus 0.99kWh/cyclus
Energieverbruik met een standaard belasting, heteluchtmodus 0.69kWh/cyclus
Aantal holtes 1
Warmtebron Elektriciteit
Volume 71l
Soort oven Inbouwoven
Massa 33.5kg
32 NEDERLANDS
Page 33
IEC/EN 60350-1 - Huishoudelijke elektrische kooktoestellen - Deel 1: Fornuizen, ovens, stoomovens en grills Methoden voor het meten van prestaties.
13.2 Energiebesparing
Dit apparaat heeft functies die u helpen
energie te besparen tijdens het dagelijks
koken.
Zorg ervoor dat de deur van het apparaat
gesloten is als het apparaat in werking is.
Open de deur van het apparaat niet te vaak
tijdens het koken. Houd het deurrubber
schoon en zorg ervoor dat het goed op zijn
plaats vastzit.
Gebruik metalen kookgerei om meer energie
te besparen.
Verwarm het apparaat niet voor alvorens te
koken als dat niet hoeft.
Houd onderbrekingen tussen het bakken zo
kort mogelijk als je een aantal gerechten
tegelijkertijd bereidt.
14. MILIEUBESCHERMING
Recycleer de materialen met het symbool .
Gooi de verpakking in een geschikte
afvalcontainer om het te recycleren.
Bescherm het milieu en de volksgezondheid
en recycleer op een correcte manier het afval
van elektrische en elektronische apparaten.
Koken met hete lucht
Gebruik indien mogelijk de bereidingsfuncties
met hete lucht om energie te besparen.
Restwarmte
Wanneer de kookduur langer is dan 30
minuten, verlaag dan de oventemperatuur tot
minimaal 3-10 minuten voor het einde van het
koken. De restwarmte binnen in het apparaat
zal blijven koken.
Je kunt de restwarmte gebruiken om andere
maaltijden op te warmen.
Eten warm houden
Kies de laagst mogelijke
temperatuurinstelling om de restwarmte te
gebruiken en een maaltijd warm te houden.
Warmelucht (vochtig)
Functie is ontworpen om tijdens de bereiding
energie te besparen.
Gooi apparaten gemarkeerd met het symbool
niet weg met het huishoudelijk afval.
Breng het product naar het milieustation bij u
in de buurt of neem contact op met de
gemeente.
NEDERLANDS 33
Page 34

FOR PERFECT RESULTS
Thank you for choosing this AEG product. We have created it to give you impeccable
performance for many years, with innovative technologies that help make life simpler –
features you might not find on ordinary appliances. Please spend a few minutes reading
to get the very best from it.
Visit our website to:
Get usage advice, brochures, trouble shooter, service and repair information:
www.aeg.com/support
Register your product for better service:
www.registeraeg.com
Buy Accessories, Consumables and Original spare parts for your appliance:
www.aeg.com/shop
CUSTOMER CARE AND SERVICE
Always use original spare parts.
When contacting our Authorised Service Centre, ensure that you have the following data
available: Model, PNC, Serial Number.
The information can be found on the rating plate.
Warning / Caution-Safety information
General information and tips
Environmental information
Subject to change without notice.
CONTENTS
1. SAFETY INFORMATION.............................................................................. 35
2. SAFETY INSTRUCTIONS............................................................................ 36
3. PRODUCT DESCRIPTION........................................................................... 39
4. CONTROL PANEL........................................................................................ 40
5. BEFORE FIRST USE....................................................................................40
6. DAILY USE....................................................................................................41
7. CLOCK FUNCTIONS.................................................................................... 43
8. USING THE ACCESSORIES........................................................................44
9. ADDITIONAL FUNCTIONS...........................................................................45
10. HINTS AND TIPS........................................................................................ 45
11. CARE AND CLEANING.............................................................................. 59
12. TROUBLESHOOTING................................................................................ 62
13. ENERGY EFFICIENCY...............................................................................63
14. ENVIRONMENTAL CONCERNS................................................................64
34 ENGLISH
Page 35

1. SAFETY INFORMATION
Before the installation and use of the appliance, carefully read
the supplied instructions. The manufacturer is not responsible
for any injuries or damage that are the result of incorrect
installation or usage. Always keep the instructions in a safe
and accessible location for future reference.
1.1 Children and vulnerable people safety
• This appliance can be used by children aged from 8 years
and above and persons with reduced physical, sensory or
mental capabilities or lack of experience and knowledge if
they have been given supervision or instruction concerning
the use of the appliance in a safe way and understand the
hazards involved. Children of less than 8 years of age and
persons with very extensive and complex disabilities shall
be kept away from the appliance unless continuously
supervised.
• Children should be supervised to ensure that they do not
play with the appliance.
• Keep all packaging away from children and dispose of it
appropriately.
• WARNING: The appliance and its accessible parts become
hot during use. Keep children and pets away from the
appliance when in use and when cooling down.
• If the appliance has a child safety device, it should be
activated.
• Children shall not carry out cleaning and user maintenance
of the appliance without supervision.
1.2 General Safety
• This appliance is for cooking purposes only.
• This appliance is designed for single household domestic
use in an indoor environment.
• This appliance may be used in, offices, hotel guest rooms,
bed & breakfast guest rooms, farm guest houses and other
ENGLISH 35
Page 36

similar accommodation where such use does not exceed
(average) domestic usage levels.
• Only a qualified person must install this appliance and
replace the cable.
• Do not use the appliance before installing it in the built-in
structure.
• Disconnect the appliance from the power supply before
carrying out any maintenance.
• If the supply cord is damaged, it must be replaced by the
manufacturer, its Authorised Service Centre or similarly
qualified persons to avoid an electrical hazard.
• WARNING: Ensure that the appliance is switched off before
replacing the lamp to avoid the possibility of electric shock.
• WARNING: The appliance and its accessible parts become
hot during use. Care should be taken to avoid touching
heating elements or the surface of the appliance cavity.
• Always use oven gloves to remove or insert accessories or
ovenware.
• To remove the shelf supports first pull the front of the shelf
support and then the rear end away from the side walls.
Install the shelf supports in the opposite sequence.
• Do not use a steam cleaner to clean the appliance.
• Do not use harsh abrasive cleaners or sharp metal scrapers
to clean the glass door since they can scratch the surface,
which may result in shattering of the glass.
2. SAFETY INSTRUCTIONS
2.1 Installation
WARNING!
Only a qualified person must install this
appliance.
• Remove all the packaging.
• Do not install or use a damaged
appliance.
• Follow the installation instructions supplied
with the appliance.
36 ENGLISH
• Always take care when moving the
appliance as it is heavy. Always use safety
gloves and enclosed footwear.
• Do not pull the appliance by the handle.
• Install the appliance in a safe and suitable
place that meets installation requirements.
• Keep the minimum distance from other
appliances and units.
• Before mounting the appliance, check if
the appliance door opens without restraint.
• The appliance is equipped with an electric
cooling system. It must be operated with
the electric power supply.
Page 37
• The built-in unit must meet the stability
requirements of DIN 68930.
Cabinet minimum height
(Cabinet under the worktop
minimum height)
Cabinet width 560 mm
Cabinet depth 550 (550) mm
Height of the front of the
appliance
Height of the back of the
appliance
Width of the front of the ap‐
pliance
Width of the back of the ap‐
pliance
Depth of the appliance 567 mm
Built in depth of the appli‐
ance
Depth with open door 1027 mm
Ventilation opening mini‐
mum size. Opening placed
on the bottom rear side
Mains supply cable length.
Cable is placed in the right
corner of the back side
Mounting screws 4x25 mm
578 (600) mm
594 mm
576 mm
595 mm
559 mm
546 mm
560x20 mm
1500 mm
2.2 Electrical connection
WARNING!
Risk of fire and electric shock.
• All electrical connections should be made
by a qualified electrician.
• The appliance must be earthed.
• Make sure that the parameters on the
rating plate are compatible with the
electrical ratings of the mains power
supply.
• Always use a correctly installed
shockproof socket.
• Do not use multi-plug adapters and
extension cables.
• Make sure not to cause damage to the
mains plug and to the mains cable. Should
the mains cable need to be replaced, this
must be carried out by our Authorised
Service Centre.
• Do not let mains cables touch or come
near the appliance door or the niche below
the appliance, especially when it operates
or the door is hot.
• The shock protection of live and insulated
parts must be fastened in such a way that
it cannot be removed without tools.
• Connect the mains plug to the mains
socket only at the end of the installation.
Make sure that there is access to the
mains plug after the installation.
• If the mains socket is loose, do not
connect the mains plug.
• Do not pull the mains cable to disconnect
the appliance. Always pull the mains plug.
• Use only correct isolation devices: line
protecting cut-outs, fuses (screw type
fuses removed from the holder), earth
leakage trips and contactors.
• The electrical installation must have an
isolation device which lets you disconnect
the appliance from the mains at all poles.
The isolation device must have a contact
opening width of minimum 3 mm.
• This appliance is supplied with a main
plug and a main cable.
2.3 Use
WARNING!
Risk of injury, burns and electric shock or
explosion.
• Do not change the specification of this
appliance.
• Make sure that the ventilation openings
are not blocked.
• Do not let the appliance stay unattended
during operation.
• Deactivate the appliance after each use.
• Be careful when you open the appliance
door while the appliance is in operation.
Hot air can release.
• Do not operate the appliance with wet
hands or when it has contact with water.
• Do not apply pressure on the open door.
• Do not use the appliance as a work
surface or as a storage surface.
• Open the appliance door carefully. The
use of ingredients with alcohol can cause
a mixture of alcohol and air.
ENGLISH 37
Page 38
• Do not let sparks or open flames to come
in contact with the appliance when you
open the door.
• Do not put flammable products or items
that are wet with flammable products in,
near or on the appliance.
WARNING!
Risk of damage to the appliance.
• To prevent damage or discoloration to the
enamel:
– do not put ovenware or other objects
in the appliance directly on the bottom.
– do not put aluminium foil directly on
the bottom of cavity of the appliance.
– do not put water directly into the hot
appliance.
– do not keep moist dishes and food in
the appliance after you finish the
cooking.
– be careful when you remove or install
the accessories.
• Discoloration of the enamel or stainless
steel has no effect on the performance of
the appliance.
• Use a deep pan for moist cakes. Fruit
juices cause stains that can be
permanent.
• Always cook with the appliance door
closed.
• If the appliance is installed behind a
furniture panel (e.g. a door) make sure the
door is never closed when the appliance
operates. Heat and moisture can build up
behind a closed furniture panel and cause
subsequent damage to the appliance, the
housing unit or the floor. Do not close the
furniture panel until the appliance has
cooled down completely after use.
2.4 Care and cleaning
• Replace immediately the door glass
panels when they are damaged. Contact
the Authorised Service Centre.
• Be careful when you remove the door from
the appliance. The door is heavy!
• Clean regularly the appliance to prevent
the deterioration of the surface material.
• Clean the appliance with a moist soft
cloth. Use only neutral detergents. Do not
use abrasive products, abrasive cleaning
pads, solvents or metal objects.
• If you use an oven spray, follow the safety
instructions on its packaging.
• Do not clean the catalytic enamel with
detergents.
2.5 Internal lighting
WARNING!
Risk of electric shock.
• Concerning the lamp(s) inside this product
and spare part lamps sold separately:
These lamps are intended to withstand
extreme physical conditions in household
appliances, such as temperature,
vibration, humidity, or are intended to
signal information about the operational
status of the appliance. They are not
intended to be used in other applications
and are not suitable for household room
illumination.
• This product contains a light source of
energy efficiency class G.
• Use only lamps with the same
specifications.
2.6 Service
• To repair the appliance contact the
Authorised Service Centre.
• Use original spare parts only.
WARNING!
Risk of injury, fire, or damage to the
appliance.
• Before maintenance, deactivate the
appliance and disconnect the mains plug
from the mains socket.
• Make sure the appliance is cold. There is
the risk that the glass panels can break.
38 ENGLISH
2.7 Disposal
WARNING!
Risk of injury or suffocation.
• Contact your municipal authority for
information on how to dispose of the
appliance.
• Disconnect the appliance from the mains
supply.
Page 39
• Cut off the mains electrical cable close to
1
2
3
4
5
2 3 5 641
7
13
8
11
9
10
12
the appliance and dispose of it.
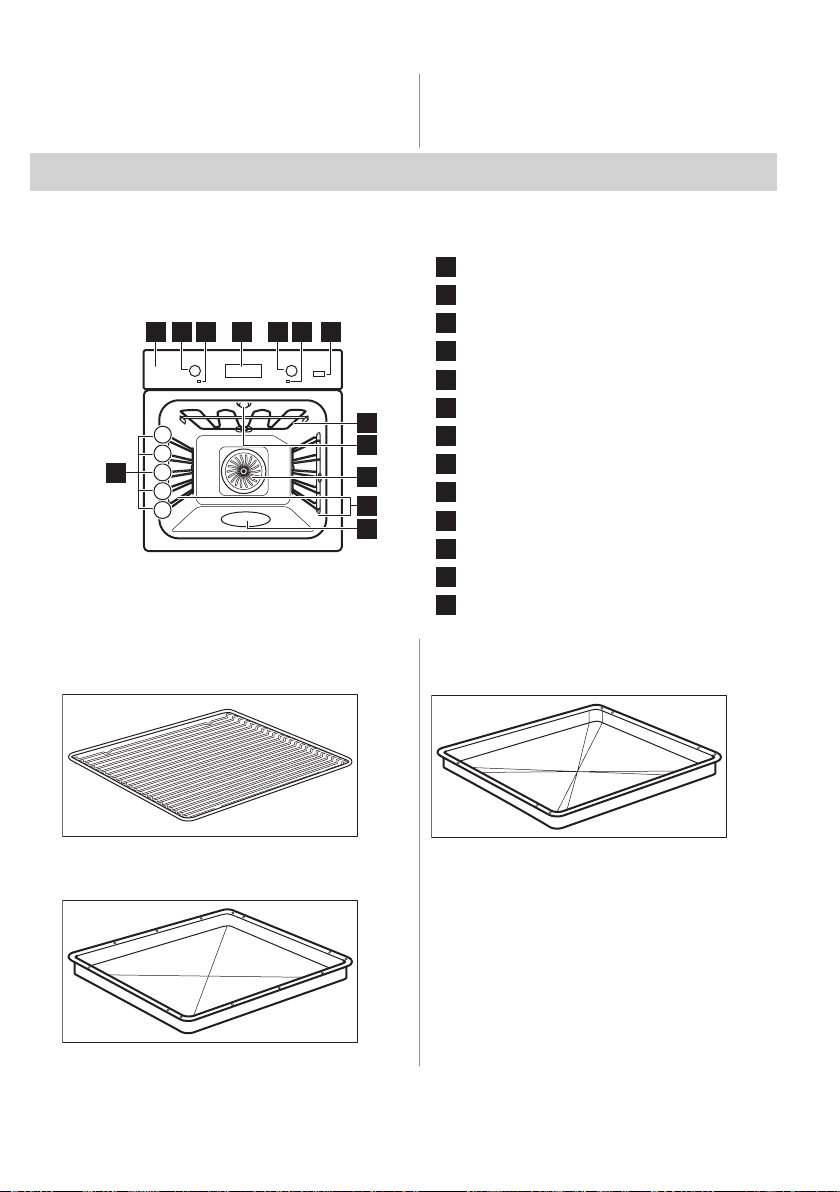
3. PRODUCT DESCRIPTION
3.1 General overview
• Remove the door catch to prevent children
or pets from becoming trapped in the
appliance.
Control panel
Knob for the heating functions
Power lamp / symbol
Display
Control knob (for the temperature)
Temperature indicator / symbol
Plus Steam
Heating element
Lamp
Fan
Shelf support, removable
Cavity embossment
Shelf positions
3.2 Accessories
Wire shelf
For cookware, cake tins, roasts.
Baking tray
For cakes and biscuits.
Grill- / Roasting pan
To bake and roast or as a pan to collect fat.
ENGLISH 39
Page 40
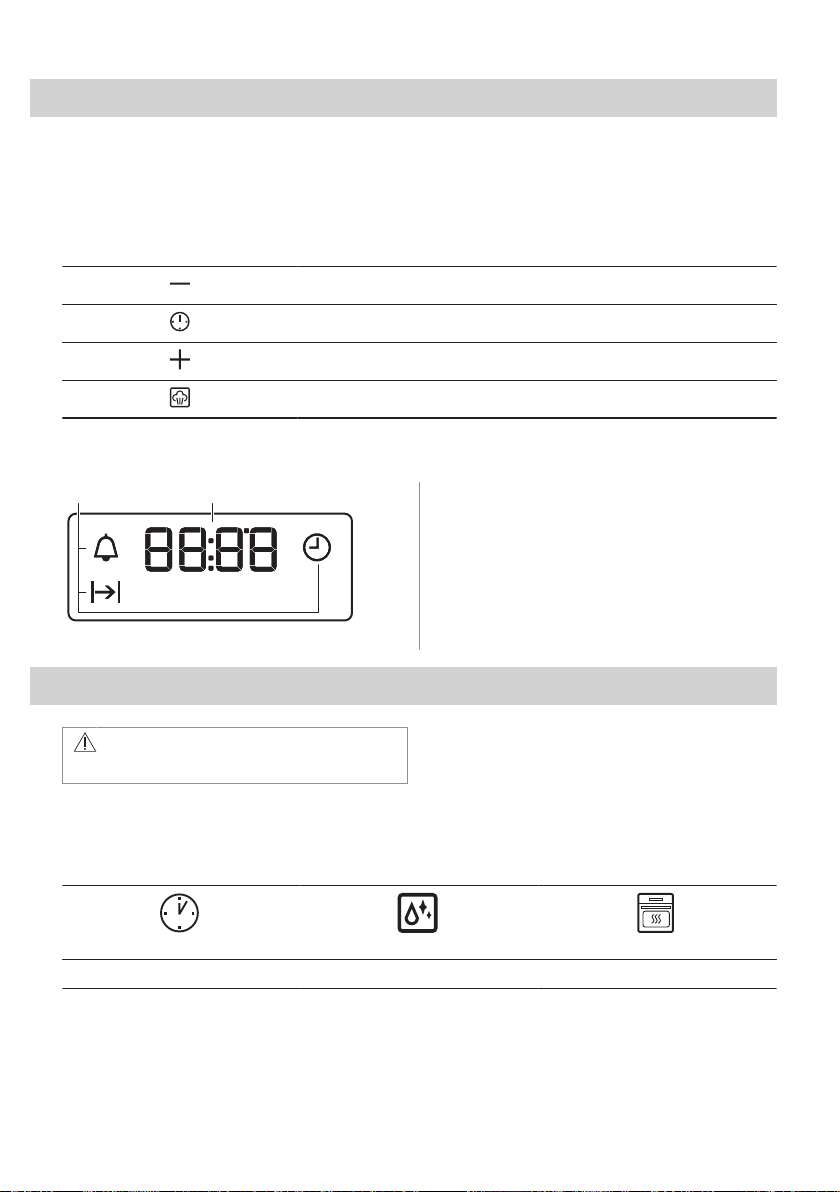
4. CONTROL PANEL
A B
4.1 Retractable knobs
To use the appliance press the knob. The
knob comes out.
4.2 Sensor fields / Buttons
To set the time.
To set a clock function.
To set the time.
To turn the True Fan Cooking PLUS function on and off.
4.3 Display
A. Clock functions
B. Timer
5. BEFORE FIRST USE
WARNING!
Refer to Safety chapters.
5.1 Before first use
The oven can emit an odour and smoke during preheating. Make sure that the room is
ventilated.
Step 1 Step 2
Set the clock Clean the oven Preheat the empty oven
40 ENGLISH
Step 3
Page 41
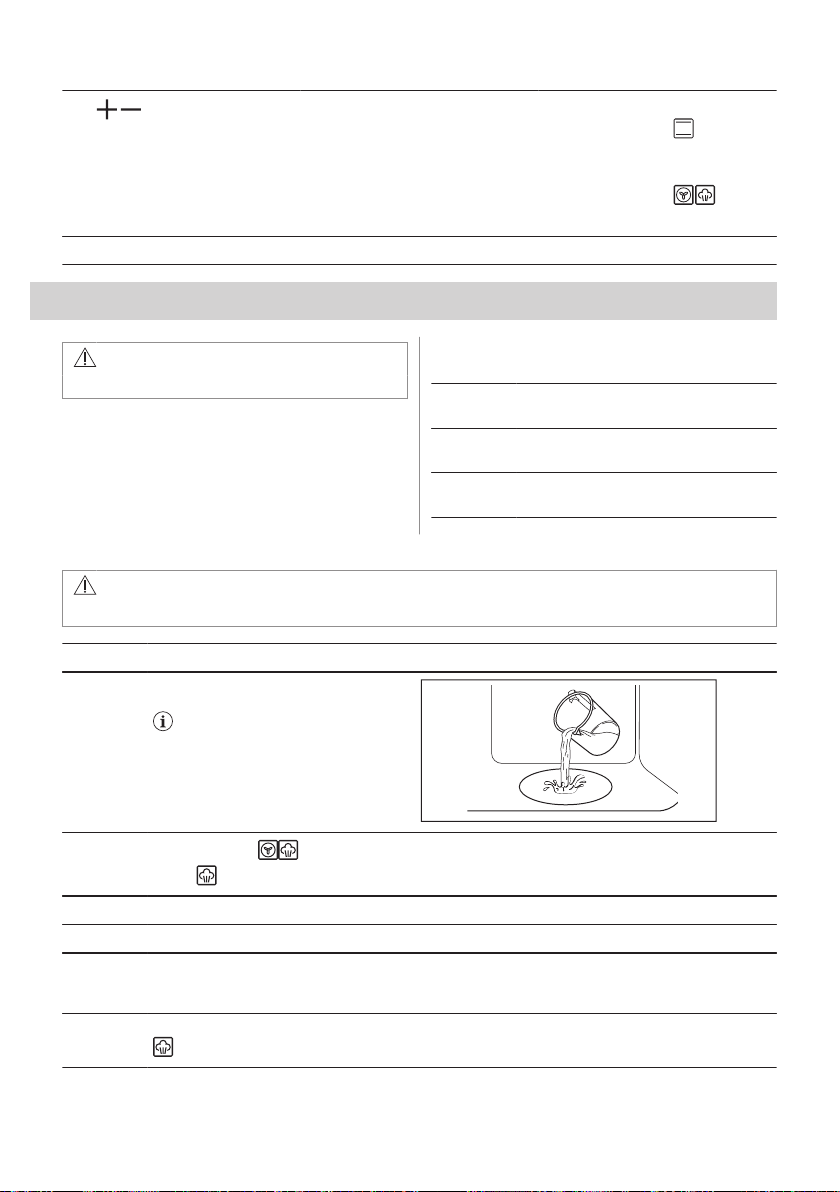
1. , - press to set the time.
After approximately 5 sec., the
flashing stops and the display
shows the time.
Turn off the oven and wait until it is cold. Place the accessories and the removable shelf supports in the oven.
1. Remove all accessories and re‐
movable shelf supports from
the oven.
2. Clean the oven and the acces‐
sories only with a microfibre
cloth, warm water and a mild
detergent.
1. Set the maximum temperature
for the function: .
Time: 1 h.
2. Set the maximum temperature
for the function: .
Time: 15 min.
6. DAILY USE
WARNING!
Refer to Safety chapters.
6.1 How to set: Heating function
Step 1 Turn the knob for the heating functions
to select a heating function.
Step 2 Turn the control knob to select the tem‐
perature.
Step 3 When the cooking ends, turn the knobs
to the off position to turn off the oven.
6.2 Setting the function: True Fan Cooking PLUS
WARNING!
Risk of burns and damage to the appliance.
Step 1 Make sure that the oven is cold.
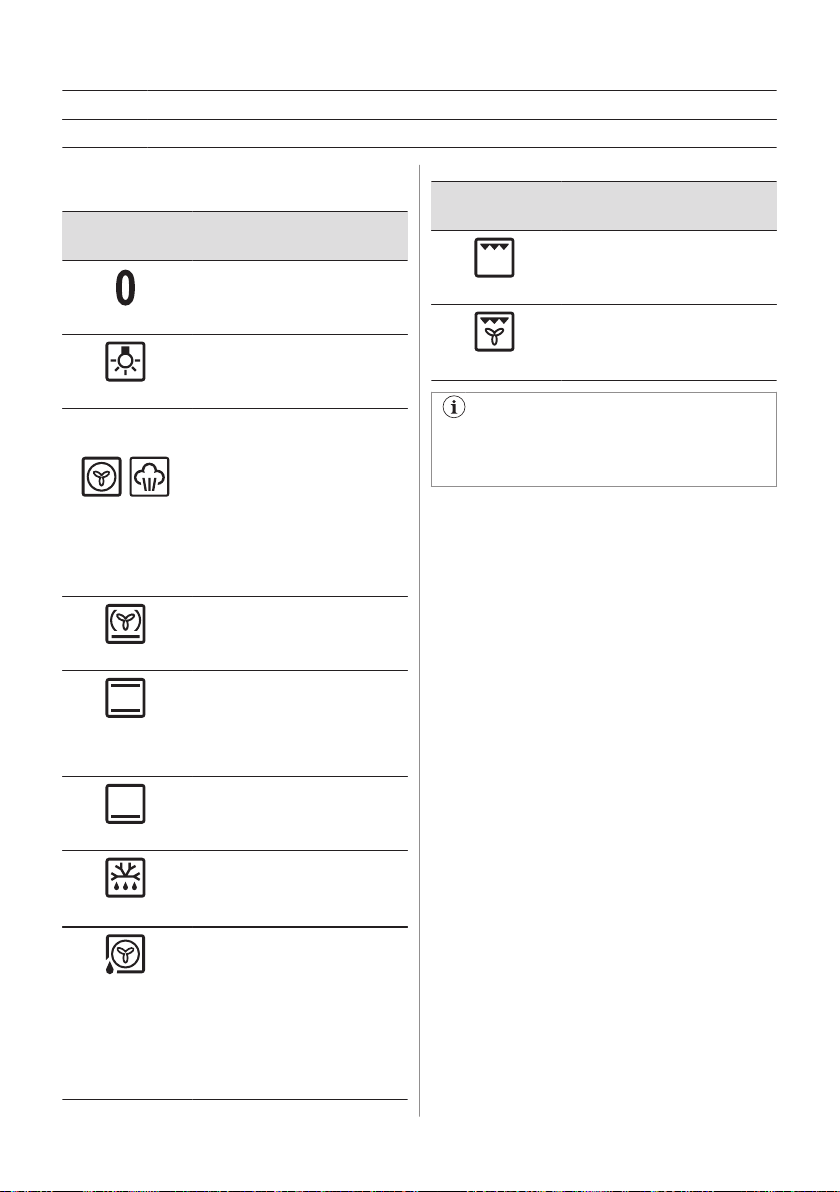
Step 2 Fill the cavity embossment with tap wa‐
Step 3
Step 4 Turn the control knob for the temperature to set temperature.
Step 5 Preheat the empty oven for 10 min to create humidity.
Step 6 Put food in the oven.
Step 7 Turn the knob for the heating functions to the off position to turn off the oven.
ter.
The maximum capacity of the cavity
embossment is 250 ml. Do not refill the
cavity embossment during cooking or
when the oven is hot.
Set the function: .
Press: . The indicator turns on. It works only with the function: True Fan Cooking PLUS.
Refer to "Hints and tips" chapter.
Do not open the oven door during cooking.
- press to turn off the oven. The indicator turns off.
ENGLISH 41
Page 42
Step 8 After the function ends, carefully open the door. Released humidity can cause burns.
Step 9 Make sure that the oven is cold. Remove the remaining water from the cavity embossment.
6.3 Heating functions
Heating func‐
tion
Off position
Light
True Fan Cook‐
ing / True Fan
Cooking PLUS
Pizza Function
Conventional
Cooking / Cataly‐
sis
Bottom Heat
Defrost
Moist Fan Baking
Application
The oven is off.
To turn on the lamp.
To bake on up to three shelf po‐
sitions at the same time and to
dry food.
Set the temperature 20 - 40 °C
lower than for Conventional
Cooking.
To add humidity during the
cooking. To get the right colour
and crispy crust during baking.
To give more juiciness during re‐
heating.
To bake pizza. To make inten‐
sive browning and a crispy bot‐
tom.
To bake and roast food on one
shelf position.
Refer to "Care and Cleaning"
chapter for more information
about Catalytic cleaning.
To bake cakes with crispy bot‐
tom and to preserve food.
To defrost food (vegetables and
fruit). The defrosting time de‐
pends on the amount and size of
the frozen food.
This function is designed to save
energy during cooking. When
you use this function, the tem‐
perature in the cavity may differ
from the set temperature. The
residual heat is used. The heat‐
ing power may be reduced. For
more information refer to "Daily
Use" chapter, Notes on: Moist
Fan Baking.
Heating func‐
tion
Grill
Turbo Grilling
The lamp may turn off automatically at a
temperature below 60 °C during some
oven functions.
6.4 Notes on: Moist Fan Baking
This function was used to comply with the
energy efficiency class and ecodesign
requirements (according to EU 65/2014 and
EU 66/2014). Tests according to: IEC/EN
60350-1.
The oven door should be closed during
cooking so that the function is not interrupted
and the oven operates with the highest
energy efficiency possible.
For the cooking instructions refer to "Hints
and tips" chapter, Moist Fan Baking. For
general energy saving recommendations
refer to "Energy Efficiency" chapter, Energy
Saving.
Application
To grill thin pieces of food and to
toast bread.
To roast large meat joints or
poultry with bones on one shelf
position. To make gratins and to
brown.
42 ENGLISH
Page 43
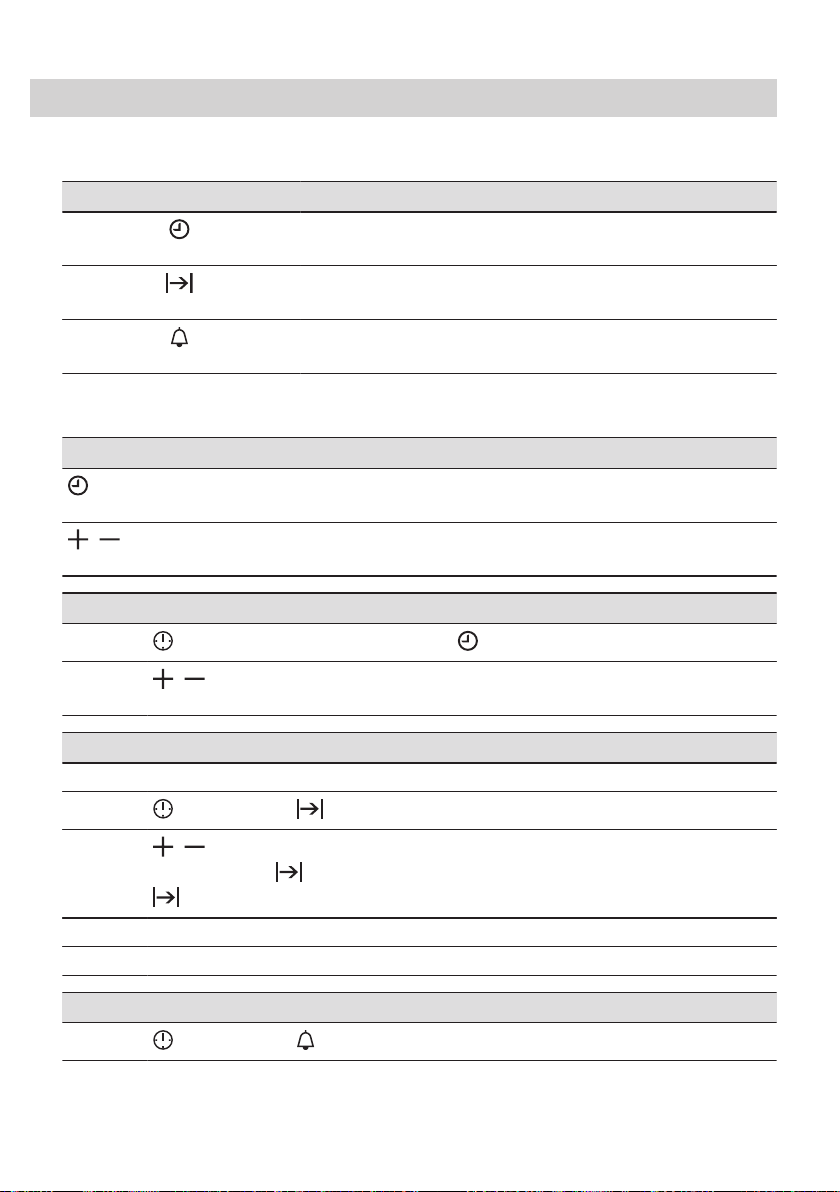
7. CLOCK FUNCTIONS
7.1 Clock functions
Clock function Application
To set, change or check the time of day.
Time of Day
To set how long the oven works.
Duration
To set a countdown. This function has no effect on the operation of the
Minute Minder
7.2 How to set: Clock functions
How to set: Time of Day
- flashes when you connect the oven to the electrical supply, when there was a power cut or when the timer is
not set.
, - press to set the time.
After approximately 5 sec., the flashing stops and the display shows the time.
How to change: Time of Day
Step 1
Step 2
- press repeatedly to change the time of day. - starts to flash.
, - press to set the time.
After approximately 5 sec., the flashing stops and the display shows the time.
oven. You can set this function at any time, also when the oven is off.
How to set: Duration
Step 1 Set an oven function and the temperature.
Step 2
Step 3
Step 4 Press any button to stop the signal.
Step 5 Turn the knobs to the off position.
- press repeatedly. - starts to flash.
, - press to set the duration.
The display shows: .
- flashes when the set time ends. The signal sounds and the oven turns off.
How to set: Minute Minder
Step 1
- press repeatedly. - starts to flash.
ENGLISH 43
Page 44
How to set: Minute Minder
Step 2
Step 3 Press any button to stop the signal.
Step 4 Turn the knobs to the off position.
, - press to set the time.
The function starts automatically after 5 sec.
When the set time ends, the signal sounds.
How to cancel: Clock functions
Step 1
Step 2
- press repeatedly until the clock function symbol starts to flash.
Press and hold: .
The clock function turns off after few seconds.
8. USING THE ACCESSORIES
WARNING!
Refer to Safety chapters.
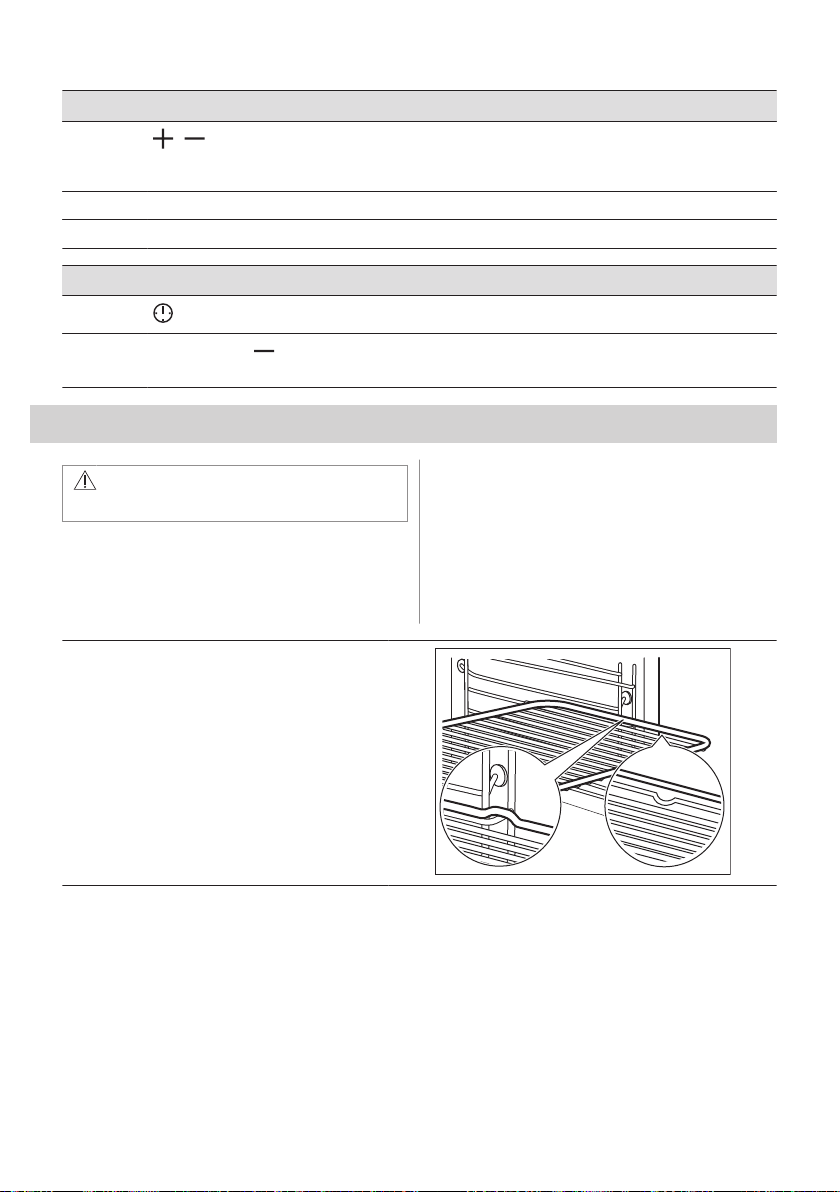
8.1 Inserting accessories
A small indentation at the top increases
safety. The indentations are also anti-tip
Wire shelf:
Push the shelf between the guide bars of the shelf
support.
devices. The high rim around the shelf
prevents cookware from slipping of the shelf.
44 ENGLISH
Page 45
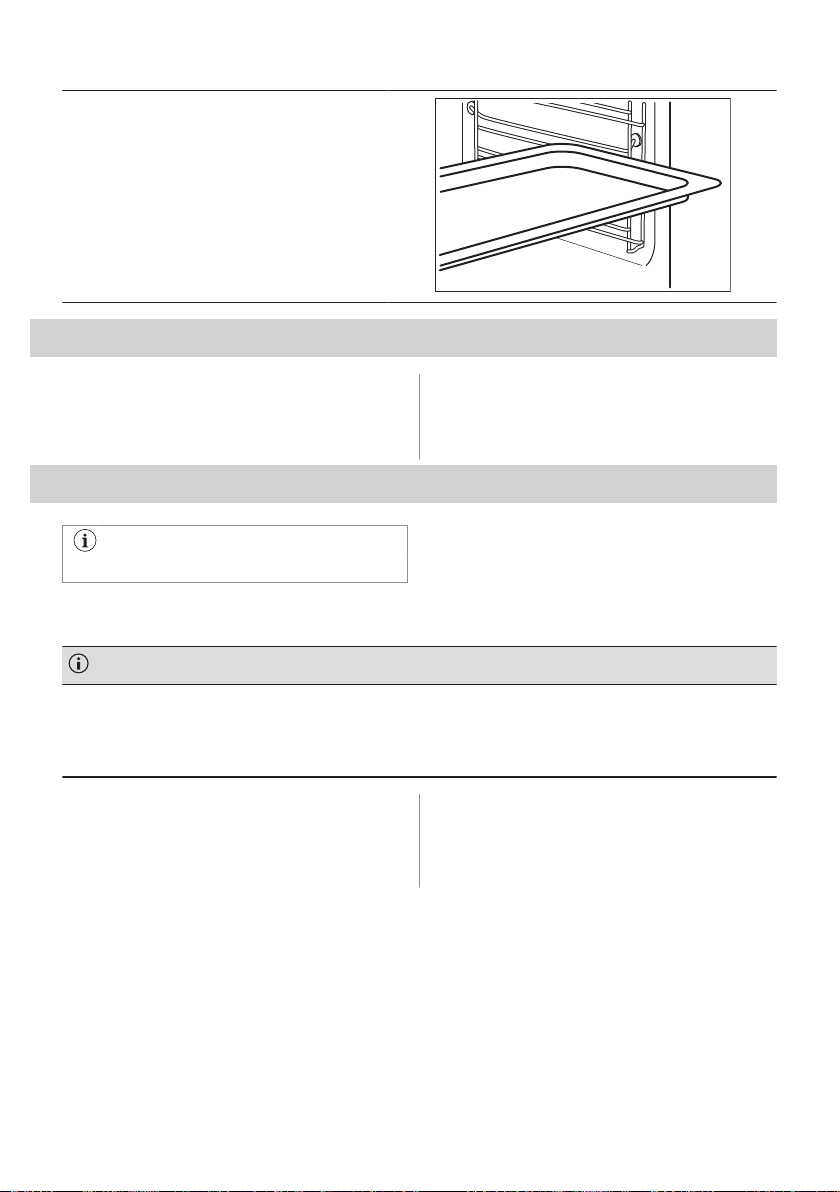
Baking tray / Deep pan:
Push the tray between the guide bars of the shelf
support.
9. ADDITIONAL FUNCTIONS
9.1 Cooling fan
When the appliance operates, the cooling fan
turns on automatically to keep the surfaces of
the appliance cool. If you turn off the
appliance, the cooling fan can continue to
operate until the appliance cools down.
10. HINTS AND TIPS
Refer to Safety chapters.
10.1 Cooking recommendations
The temperature and cooking times in the tables are guidelines only. They depend on the recipes and the quality
and quantity of the ingredients used.
Your appliance may bake or roast differently to the appliance you had before. The hints below show recommen‐
ded settings for temperature, cooking time and shelf position for specific types of the food.
If you cannot find the settings for a special recipe, look for the similar one.
10.2 Inner side of the door
On the inner side of the door you can find:
• the numbers of the shelf positions.
10.3 True Fan Cooking PLUS
Use the second shelf position.
Use a baking tray.
• information about the oven functions,
recommended shelf positions and
temperatures for dishes.
ENGLISH 45
Page 46
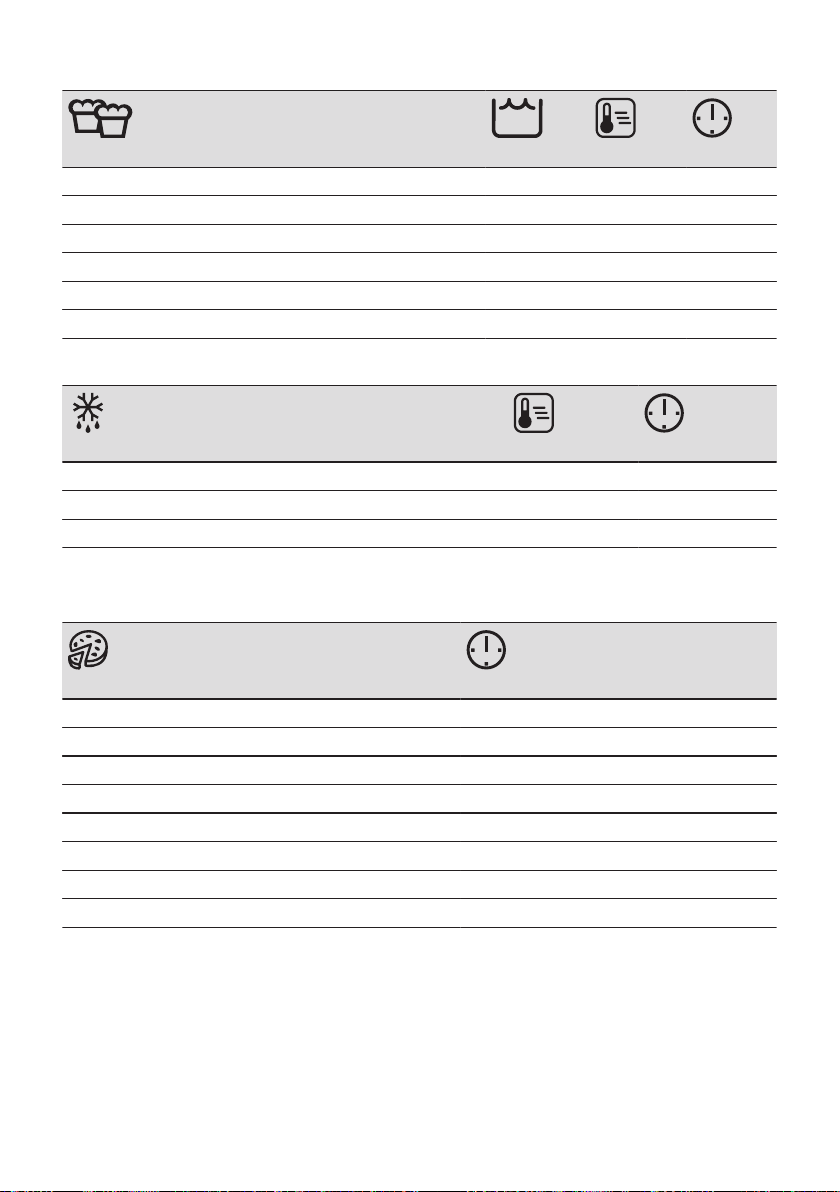
CAKES / PASTRIES / BREADS
(ml) (°C) (min)
Cookies / Scones / Croissants 100 150 - 180 10 - 20
Focaccia 100 200 - 210 10 - 20
Pizza 100 230 10 - 20
Bread rolls 100 200 20 - 25
Bread 100 180 35 - 40
Plum cake / Apple pie / Cinnamon rolls, baked in a cake mould 100 - 150 160 - 180 30 - 60
Use 150 ml of water unless specified otherwise.
FROZEN READY MEALS
(°C) (min)
Pizza 200 - 210 10 - 20
Croissants 170 - 180 15 - 25
Lasagne, use 200 ml 180 - 200 35 - 50
Use 100 ml of water.
Set the temperature to 110 °C.
FOOD REGENERATION
(min)
Bread rolls 10 - 20
Bread 15 - 25
Focaccia 15 - 25
Meat 15 - 25
Pasta 15 - 25
Pizza 15 - 25
Rice 15 - 25
Vegetables 15 - 25
Use 200 ml of water.
Use a glass baking dish.
46 ENGLISH
Page 47
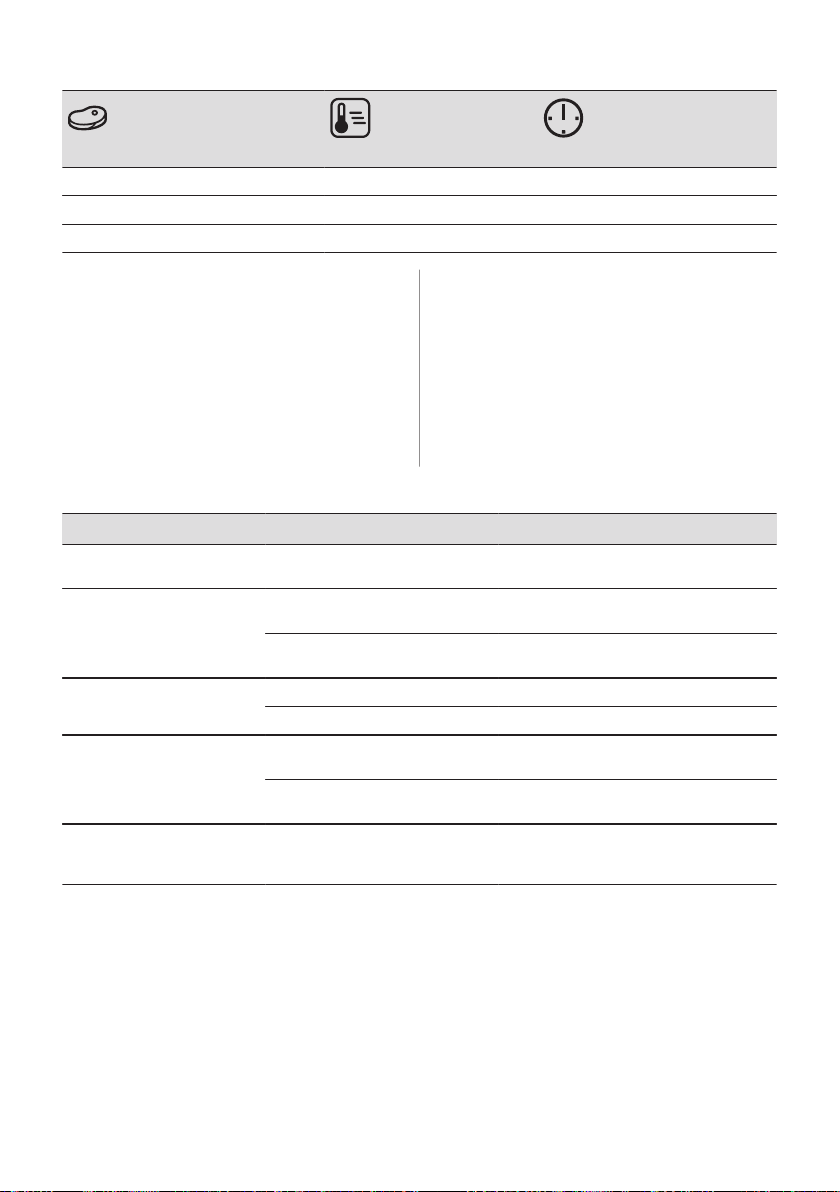
ROASTING
(°C) (min)
Roast beef 200 50 - 60
Chicken 210 60 - 80
Roast pork 180 65 - 80
10.4 Baking
For the first baking, use the lower
temperature.
You can extend the baking time by 10 – 15
minutes if you bake cakes on more than one
shelf position.
change the temperature setting if an unequal
browning occurs. The differences equalize
during baking.
Trays in the oven can distort during baking.
When the trays are cold again, the distortions
disappear.
Cakes and pastries at different heights do not
always brown equally. There is no need to
10.5 Tips on baking
Baking results Possible cause Remedy
The bottom of the cake is not
baked sufficiently.
The cake sinks and becomes
soggy or streaky.
The cake is too dry. The oven temperature is too low. Next time set higher oven temperature.
The cake bakes unevenly. The oven temperature is too high
The cake is not ready in the
baking time specified in a rec‐
ipe.
The shelf position is incorrect. Put the cake on a lower shelf.
The oven temperature is too high. Next time set slightly lower oven tempera‐
The oven temperature is too high
and the baking time is too short.
The baking time is too long. Next time set shorter baking time.
and the baking time is too short.
The cake batter is not evenly dis‐
tributed.
The oven temperature is too low. Next time set a slightly higher oven tem‐
ture.
Next time set a longer baking time and
lower oven temperature.
Next time set a longer baking time and
lower oven temperature.
Next time spread the cake batter evenly on
the baking tray.
perature.
ENGLISH 47
Page 48
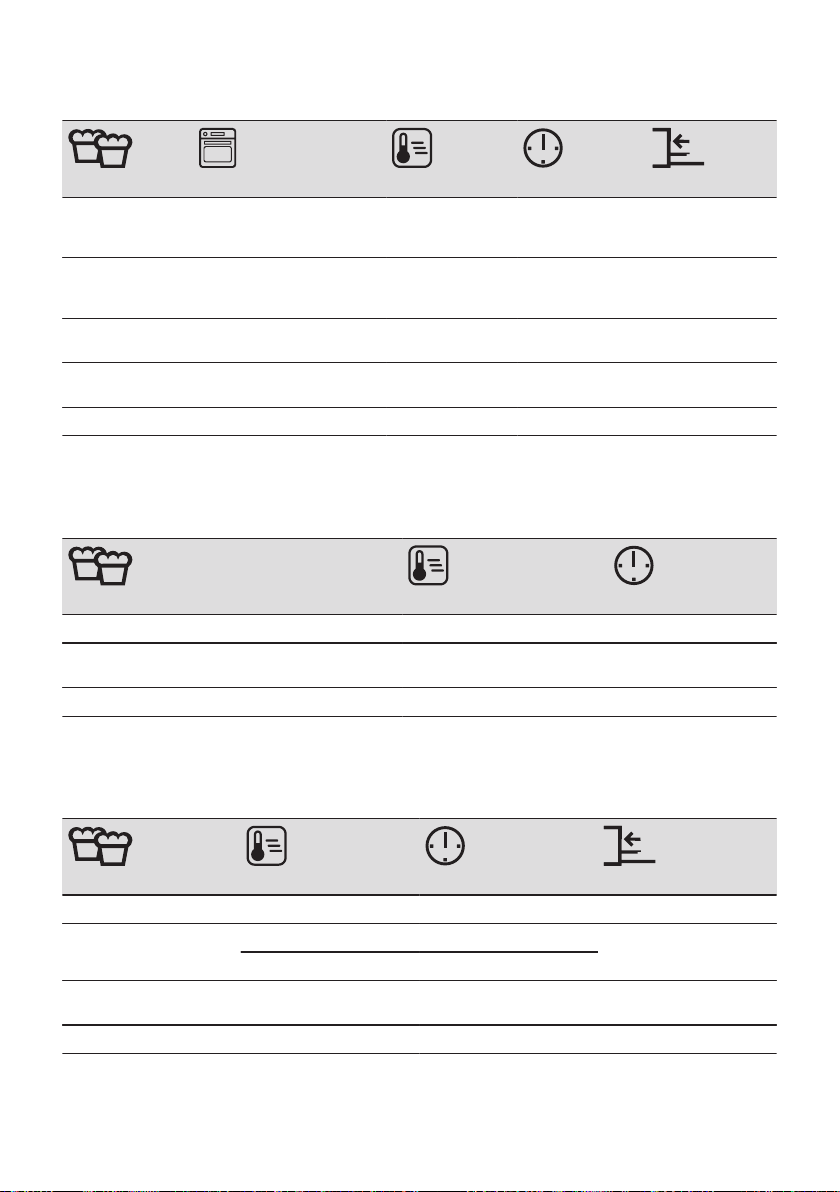
10.6 Baking on one shelf level
ING IN TINS (°C) (min)
BAK‐
Flan base - short
pastry, preheat the
empty oven
Flan base sponge cake mix‐
ture
Ring cake / Brio‐
che
Madeira cake /
Fruit cakes
Cheesecake Conventional Cooking 170 - 190 60 - 90 1
True Fan Cooking 170 - 180 10 - 25 2
True Fan Cooking 150 - 170 20 - 25 2
True Fan Cooking 150 - 160 50 - 70 1
True Fan Cooking 140 - 160 70 - 90 1
Use the third shelf position.
Use the function: True Fan Cooking.
Use a baking tray.
CAKES / PASTRIES / BREADS
(°C) (min)
Cake with crumble topping 150 - 160 20 - 40
Fruit flans (made of yeast dough / sponge cake mix‐
ture), use a deep pan
Fruit flans made of short pastry 160 - 170 40 - 80
150 35 - 55
Preheat the empty oven.
Use the function: Conventional Cooking.
Use a baking tray.
PASTRIES / BREADS (°C) (min)
CAKES /
Swiss roll 180 - 200 10 - 20 3
Rye bread: first: 230 20 1
then: 160 - 180 30 - 60
Buttered almond cake /
Sugar cakes
Cream puffs / Eclairs 190 - 210 20 - 35 3
190 - 210 20 - 30 3
48 ENGLISH
Page 49
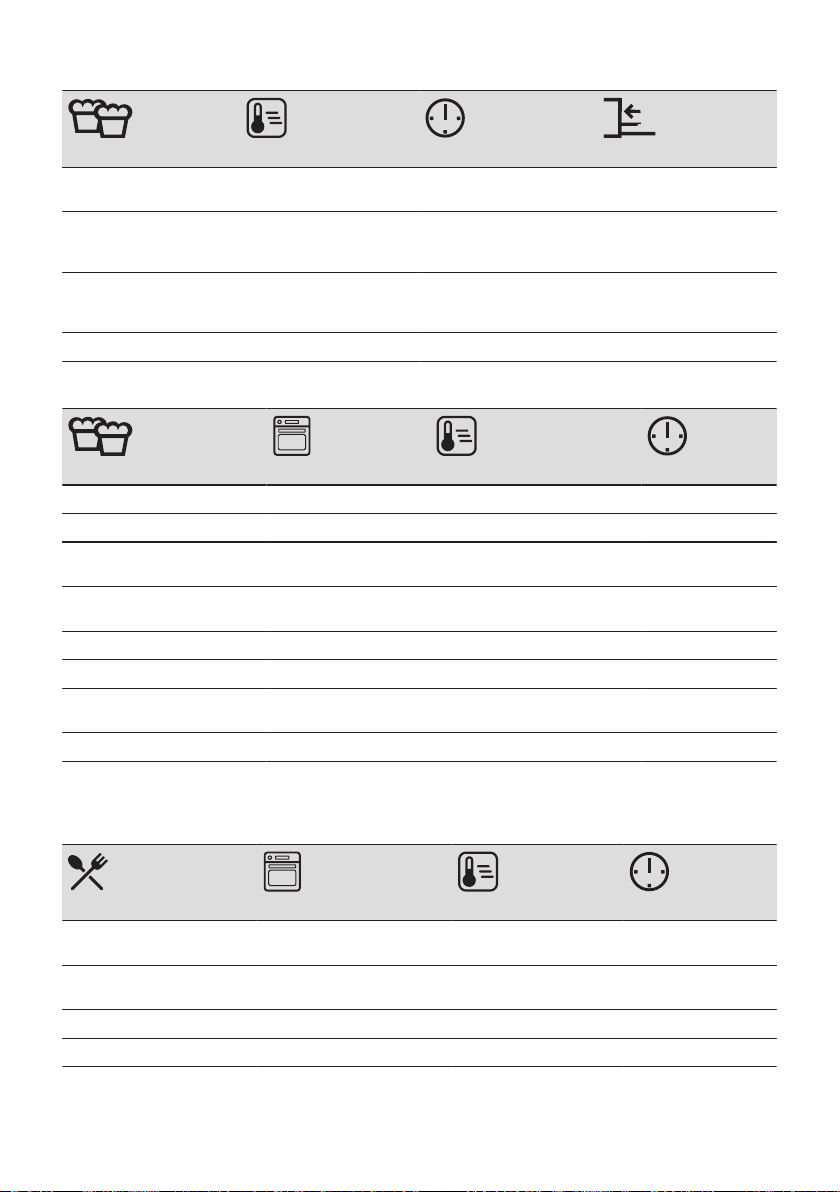
PASTRIES / BREADS (°C) (min)
CAKES /
Plaited bread / Bread
crown
Fruit flans (made of yeast
dough / sponge cake mix‐
ture), use a deep pan
Yeast cakes with delicate
toppings (e.g. quark,
cream, custard)
Christstollen 160 - 180 50 - 70 2
170 - 190 30 - 40 3
170 35 - 55 3
160 - 180 40 - 80 3
Use the third shelf position.
BISCUITS
(°C) (min)
Short pastry biscuits True Fan Cooking 150 - 160 10 - 20
Rolls, preheat the empty oven True Fan Cooking 160 10 - 25
Biscuits made of sponge cake
mixture
Puff pastries, preheat the emp‐
ty oven
Biscuits made of yeast dough True Fan Cooking 150 - 160 20 - 40
Macaroons True Fan Cooking 100 - 120 30 - 50
Pastries made of egg white /
Meringues
Rolls, preheat the empty oven Conventional Cooking 190 - 210 10 - 25
True Fan Cooking 150 - 160 15 - 20
True Fan Cooking 170 - 180 20 - 30
True Fan Cooking 80 - 100 120 - 150
10.7 Bakes and gratins
Use the first shelf position.
(°C) (min)
Baguettes topped with mel‐
ted cheese
Vegetables au gratin, pre‐
heat the empty oven
Lasagne Conventional Cooking 180 - 200 25 - 40
Fish bakes Conventional Cooking 180 - 200 30 - 60
True Fan Cooking 160 - 170 15 - 30
Turbo Grilling 160 - 170 15 - 30
ENGLISH 49
Page 50
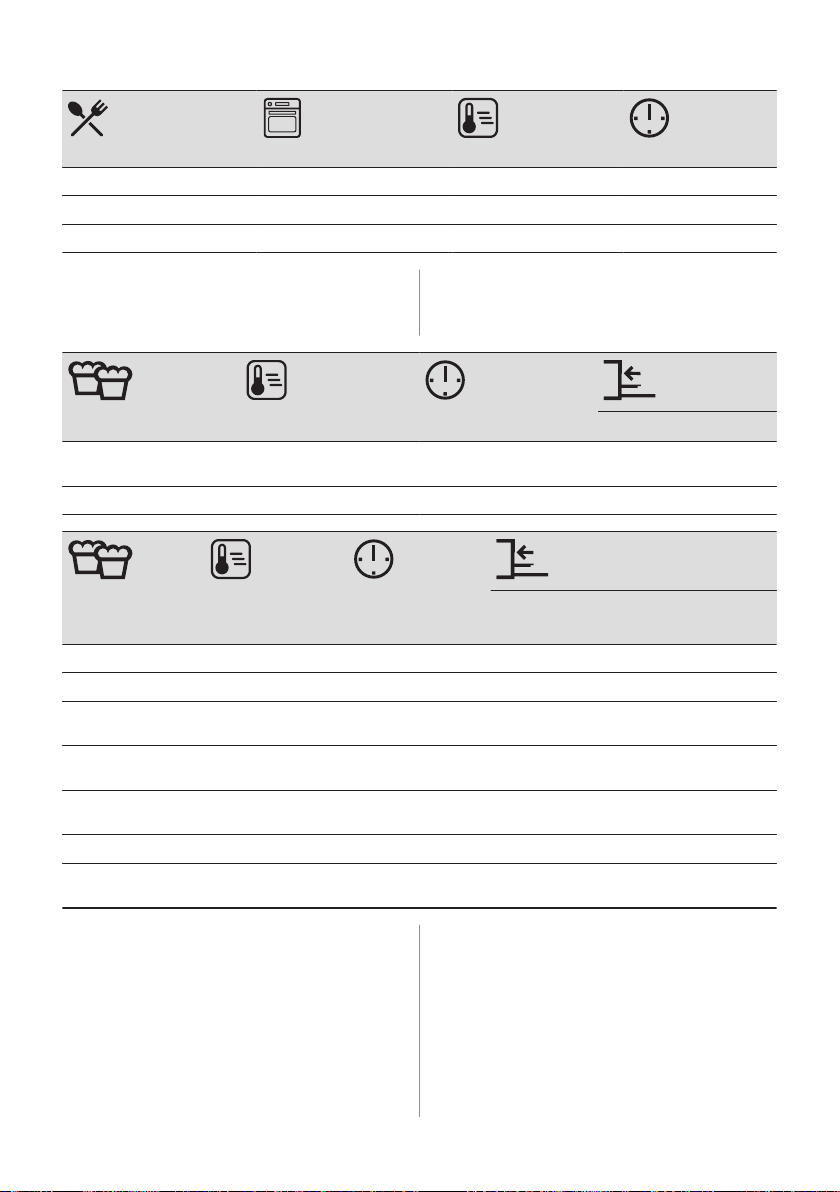
(°C) (min)
Stuffed vegetables True Fan Cooking 160 - 170 30 - 60
Sweet bakes Conventional Cooking 180 - 200 40 - 60
Pasta bake Conventional Cooking 180 - 200 45 - 60
10.8 Multilevel Baking
Use the baking trays.
Use the function: True Fan Cooking.
CAKES /
PASTRIES (°C) (min)
Cream puffs / Eclairs, pre‐
heat the empty oven
Dry streusel cake 150 - 160 30 - 45 1 / 4
160 - 180 25 - 45 1 / 4
2 positions
BIS‐
CUITS / SMALL
CAKES / PAS‐
(°C) (min)
2 positions 3 positions
TRIES / ROLLS
Rolls 180 20 - 30 1 / 4 -
Short pastry biscuits 150 - 160 20 - 40 1 / 4 1 / 3 / 5
Biscuits made of
sponge cake mixture
Puff pastries, pre‐
heat the empty oven
Biscuits made of
yeast dough
Macaroons 100 - 120 40 - 80 1 / 4 -
Biscuits made of egg
white / Meringues
160 - 170 25 - 40 1 / 4 -
170 - 180 30 - 50 1 / 4 -
160 - 170 30 - 60 1 / 4 -
80 - 100 130 - 170 1 / 4 -
10.9 Tips on Roasting
Use heat-resistant ovenware.
Roast lean meat covered (you can use
aluminium foil).
Roast large meat joints directly in the tray.
50 ENGLISH
Put some water in the tray to prevent dripping
fat from burning.
Turn the roast after 1/2 - 2/3 of the cooking
time.
Roast meat and fish in large pieces (1 kg or
more).
Page 51
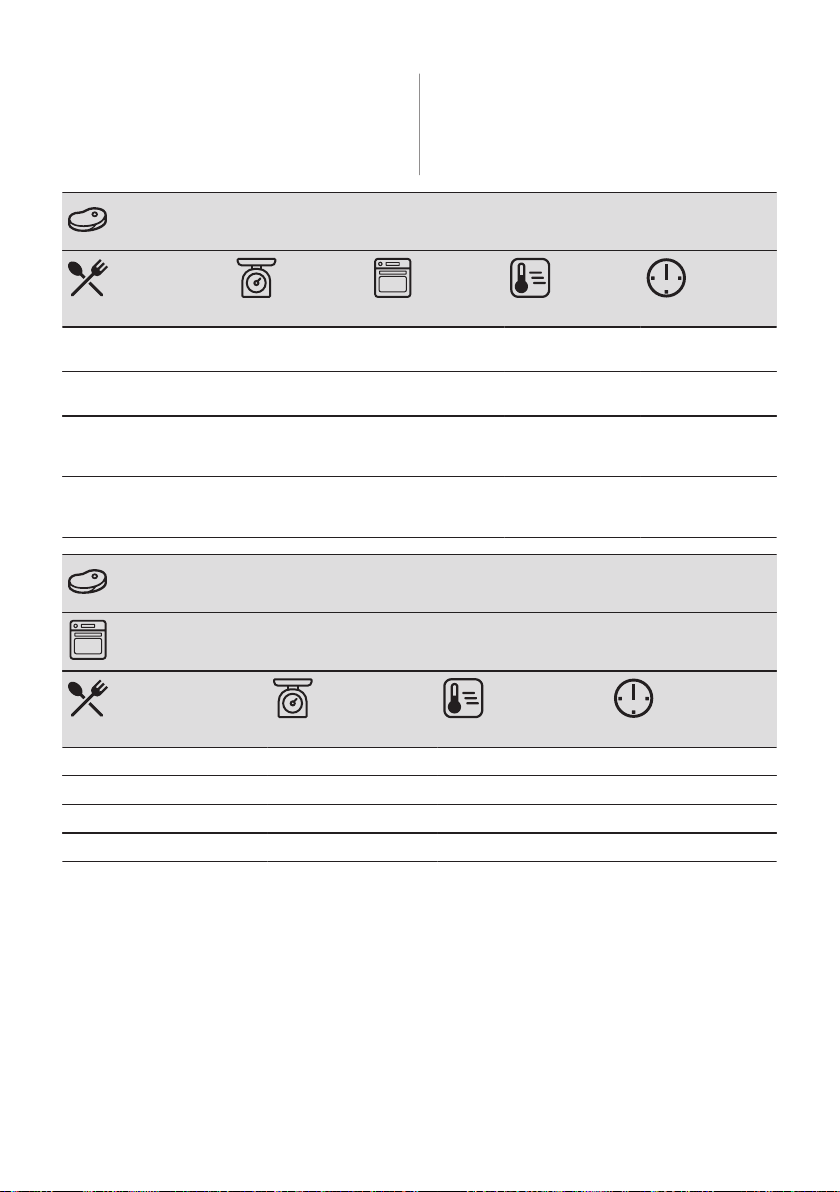
If level one is suggested put the food directly
on the baking tray
10.10 Roasting
Use the first shelf position.
Baste meat joints with their own juice several
times during roasting.
BEEF
Pot roast 1 - 1.5 kg Conventional Cook‐
Roast beef or fillet, rare,
preheat the empty oven
Roast beef or fillet, medi‐
um, preheat the empty
oven
Roast beef or fillet, well
done, preheat the empty
oven
per cm of thickness Turbo Grilling 190 - 200 5 - 6
per cm of thickness Turbo Grilling 180 - 190 6 - 8
per cm of thickness Turbo Grilling 170 - 180 8 - 10
ing
PORK
Use the function: Turbo Grilling.
(°C) (min)
230 120 - 150
(kg)
Shoulder / Neck / Ham joint 1 - 1.5 160 - 180 90 - 120
Chops / Spare rib 1 - 1.5 170 - 180 60 - 90
Meatloaf 0.75 - 1 160 - 170 50 - 60
Pork knuckle, precooked 0.75 - 1 150 - 170 90 - 120
(°C) (min)
ENGLISH 51
Page 52
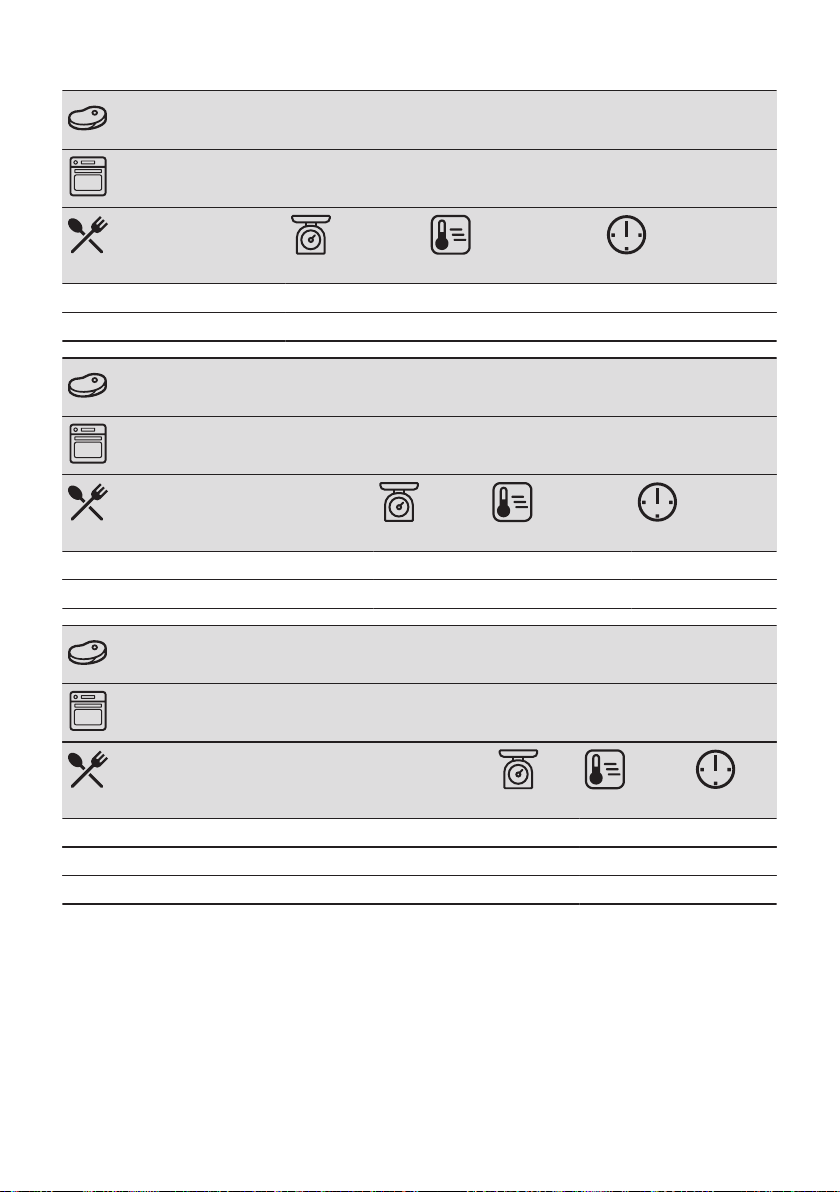
VEAL
Use the function: Turbo Grilling.
(kg)
Roast veal 1 160 - 180 90 - 120
Veal knuckle 1.5 - 2 160 - 180 120 - 150
(°C) (min)
LAMB
Use the function: Turbo Grilling.
(kg)
Lamb leg / Roast lamb 1 - 1.5 150 - 170 100 - 120
Lamb saddle 1 - 1.5 160 - 180 40 - 60
(°C) (min)
GAME
Use the function: Conventional Cooking.
(kg)
Saddle / Hare leg, preheat the empty oven up to 1 230 30 - 40
Venison saddle 1.5 - 2 210 - 220 35 - 40
Haunch of venison 1.5 - 2 180 - 200 60 - 90
(°C) (min)
52 ENGLISH
Page 53
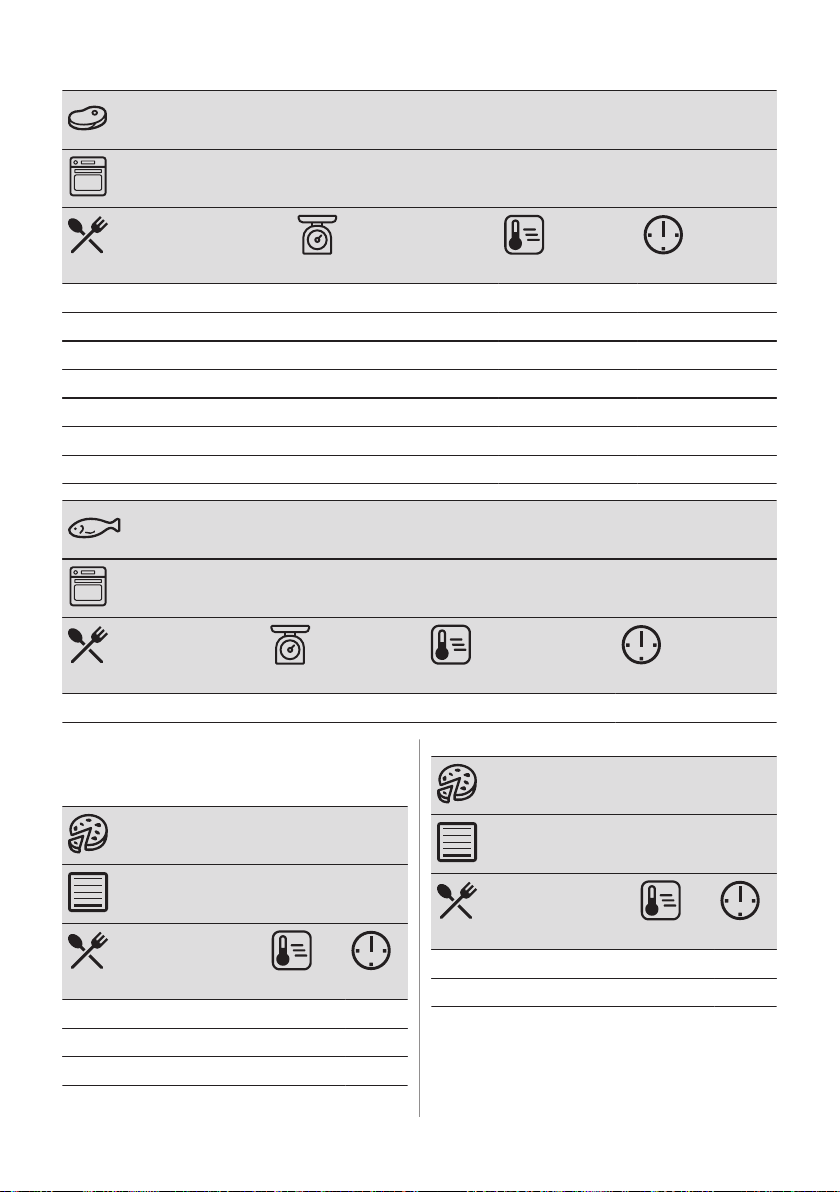
POULTRY
Use the function: Turbo Grilling.
(kg)
Poultry, portions 0.2 - 0.25 each 200 - 220 30 - 50
Chicken, half 0.4 - 0.5 each 190 - 210 35 - 50
Chicken, poulard 1 - 1.5 190 - 210 50 - 70
Duck 1.5 - 2 180 - 200 80 - 100
Goose 3.5 - 5 160 - 180 120 - 180
Turkey 2.5 - 3.5 160 - 180 120 - 150
Turkey 4 - 6 140 - 160 150 - 240
(°C) (min)
FISH (STEAMED)
Use the function: Conventional Cooking.
(kg)
Whole fish 1 - 1.5 210 - 220 40 - 60
(°C) (min)
10.11 Crispy baking with: Pizza Function
PIZZA
PIZZA
Use the first shelf position.
(°C) (min)
Tarts 180 - 200 40 - 55
Spinach flan 160 - 180 45 - 60
Quiche lorraine / Swiss flan 170 - 190 45 - 55
Use the first shelf position.
(°C) (min)
Cheesecake 140 - 160 60 - 90
Vegetable pie 160 - 180 50 - 60
ENGLISH 53
Page 54
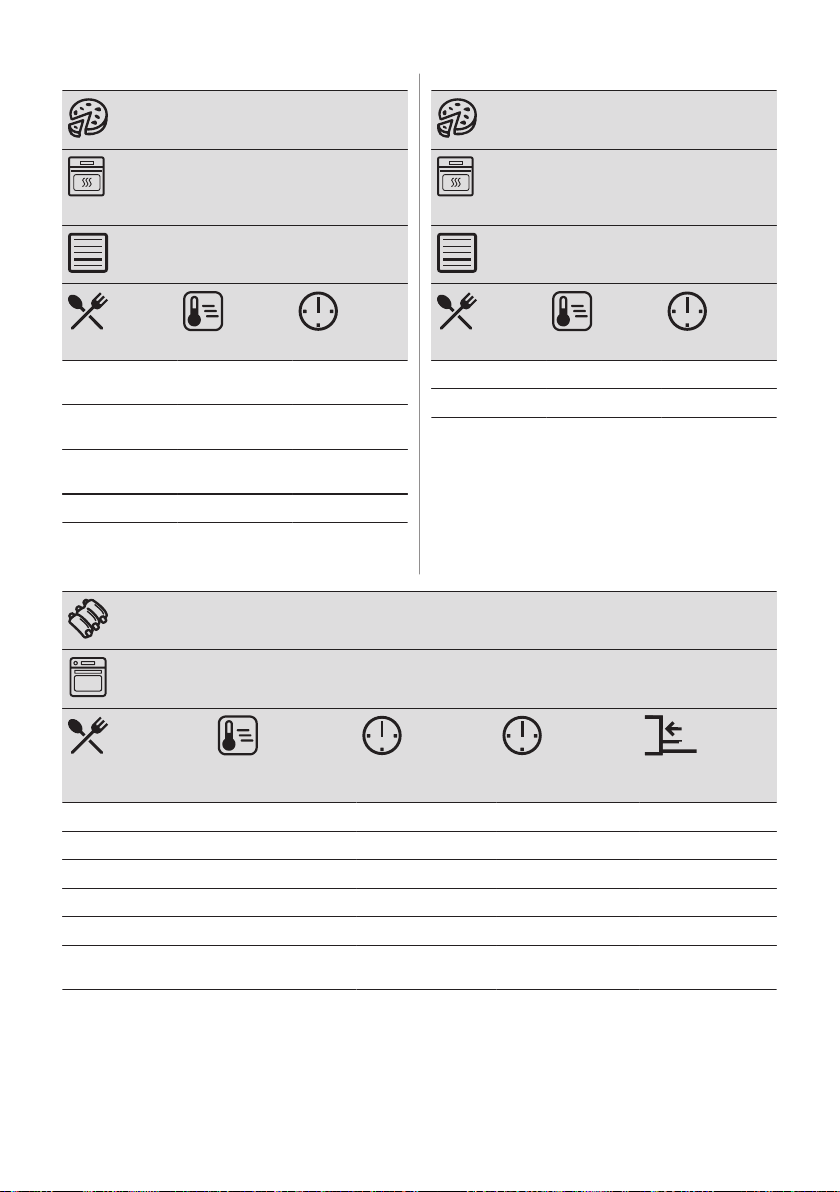
PIZZA
PIZZA
Preheat the empty oven before cook‐
ing.
Use the second shelf position.
(°C) (min)
Pizza, thin crust,
use a deep pan
Pizza, thick
crust
Unleavened
bread
Puff pastry flan 160 - 180 45 - 55
200 - 230 15 - 20
180 - 200 20 - 30
230 - 250 10 - 20
Preheat the empty oven before cook‐
ing.
Use the second shelf position.
(°C) (min)
Flammkuchen 230 - 250 12 - 20
Pierogi 180 - 200 15 - 25
10.12 Grill
Preheat the empty oven before cooking.
Grill only thin pieces of meat or fish.
Put a pan on the first shelf position to collect
fat.
GRILL
Use the function: Grill
(°C) (min)
1st side
Roast beef 210 - 230 30 - 40 30 - 40 2
Beef fillet 230 20 - 30 20 - 30 3
Pork loin 210 - 230 30 - 40 30 - 40 2
Veal loin 210 - 230 30 - 40 30 - 40 2
Lamb saddle 210 - 230 25 - 35 20 - 25 3
Whole fish, 0.5 kg - 1kg210 - 230 15 - 30 15 - 30 3 / 4
(min)
2nd side
54 ENGLISH
Page 55
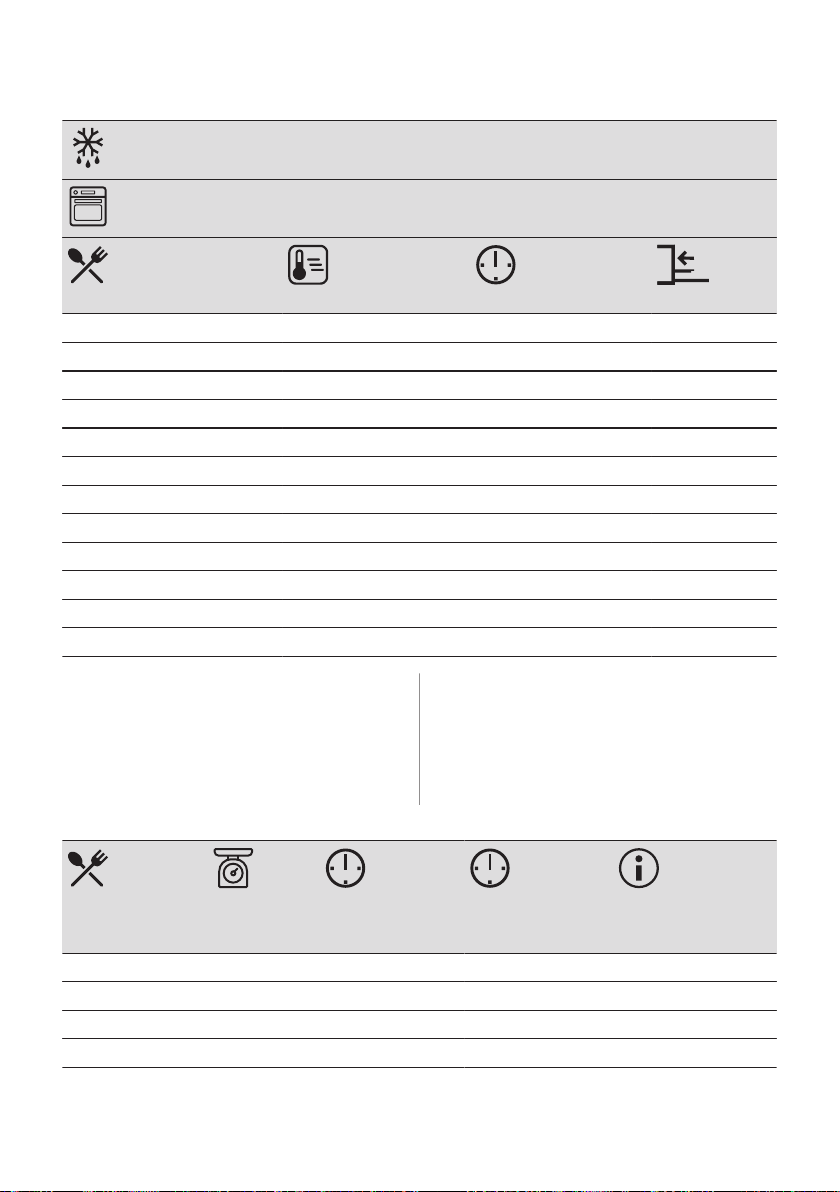
10.13 Frozen Foods
DEFROSTING
Use the function: True Fan Cooking.
(°C) (min)
Pizza, frozen 200 - 220 15 - 25 2
Pizza American, frozen 190 - 210 20 - 25 2
Pizza, chilled 210 - 230 13 - 25 2
Pizza snacks, frozen 180 - 200 15 - 30 2
French fries, thin 200 - 220 20 - 30 3
French fries, thick 200 - 220 25 - 35 3
Wedges / Croquettes 220 - 230 20 - 35 3
Hash browns 210 - 230 20 - 30 3
Lasagne / Cannelloni, fresh 170 - 190 35 - 45 2
Lasagne / Cannelloni, frozen 160 - 180 40 - 60 2
Baked cheese 170 - 190 20 - 30 3
Chicken wings 190 - 210 20 - 30 2
10.14 Defrost
Remove the food packaging and put the food
on a plate.
Do not cover the food, as this can extend the
For large portions of food place an upturned
empty plate on the bottom of the oven cavity.
Put the food in a deep dish and set it on top
of the plate inside the oven. Remove the shelf
supports if necessary.
defrost time.
Use the first shelf position.
(kg)
(min)
Defrosting time
(min)
Further defrost‐
ing time
Chicken 1 100 - 140 20 - 30 Turn halfway through.
Meat 1 100 - 140 20 - 30 Turn halfway through.
Trout 0.15 25 - 35 10 - 15 -
Strawberries 0.3 30 - 40 10 - 20 -
ENGLISH 55
Page 56
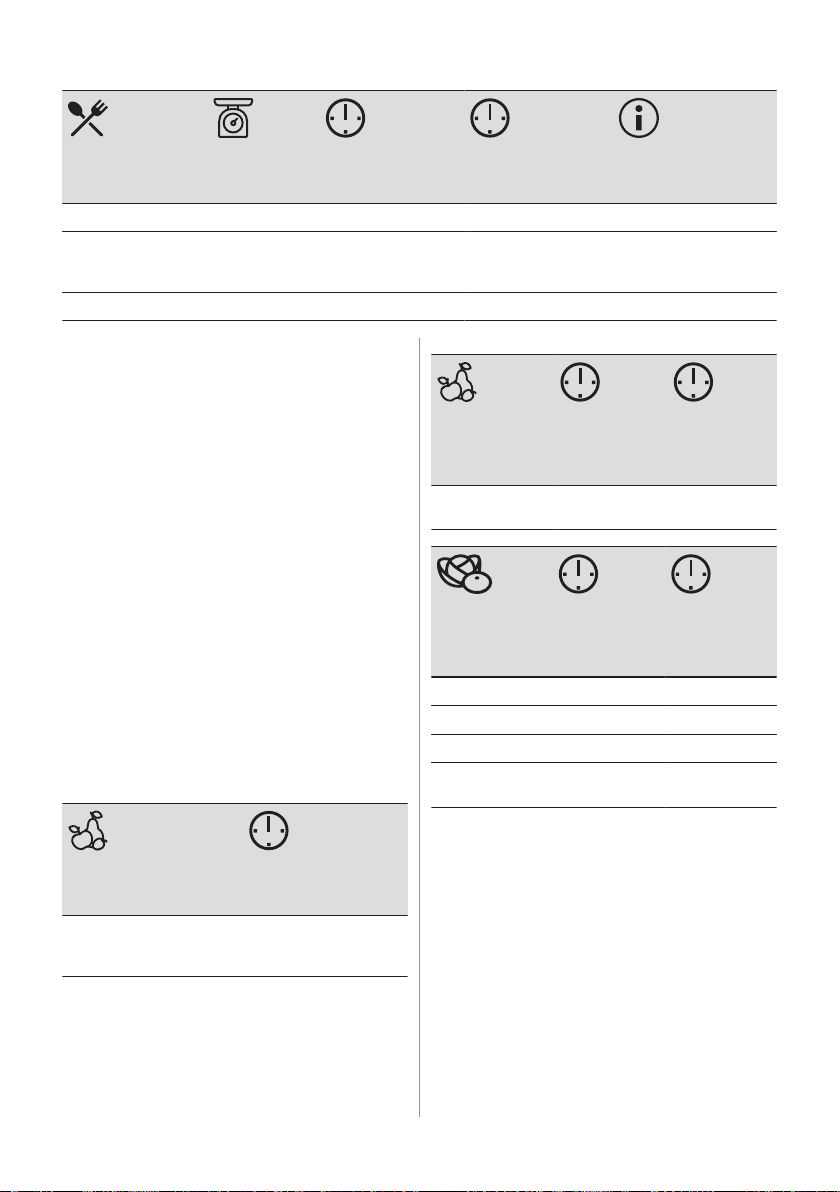
(kg)
Butter 0.25 30 - 40 10 - 15 -
Cream 2 x 0.2 80 - 100 10 - 15 Whip the cream when
Gateau 1.4 60 60 -
(min)
Defrosting time
(min)
Further defrost‐
ing time
still slightly frozen in pla‐
ces.
10.15 Preserving
Use the function Bottom Heat.
Use only preserve jars of the same
dimensions available on the market.
Do not use jars with twist-off and bayonet
type lids or metal tins.
Use the first shelf position.
Put no more than six one-litre preserve jars
on the baking tray.
Fill the jars equally and close with a clamp.
The jars cannot touch each other.
Put approximately 1/2 litre of water into the
baking tray to give sufficient moisture in the
oven.
When the liquid in the jars starts to simmer
(after approximately 35 - 60 minutes with
one-litre jars), stop the oven or decrease the
temperature to 100 °C (see the table).
Set the temperature to 160 - 170 °C.
STONE
FRUIT (min)
Peaches / Quin‐
ces / Plums
VEG‐
ETABLES (min)
Carrots 50 - 60 5 - 10
Cucumbers 50 - 60 -
Mixed pickles 50 - 60 5 - 10
Kohlrabi / Peas /
Asparagus
Cooking time
until simmer‐
ing
35 - 45 10 - 15
Cooking
time until
simmering
50 - 60 15 - 20
(min)
Continue to
cook at 100
°C
(min)
Continue to
cook at 100
°C
SOFT FRUIT
Strawberries / Blueberries /
Raspberries / Ripe goose‐
berries
56 ENGLISH
(min)
Cooking time until
simmering
35 - 45
10.16 Dehydrating - True Fan Cooking
Cover trays with grease proof paper or baking
parchment.
For a better result, stop the oven halfway
through the drying time, open the door and let
it cool down for one night to complete the
drying.
For 1 tray use the third shelf position.
For 2 trays use the first and fourth shelf
position.
Page 57
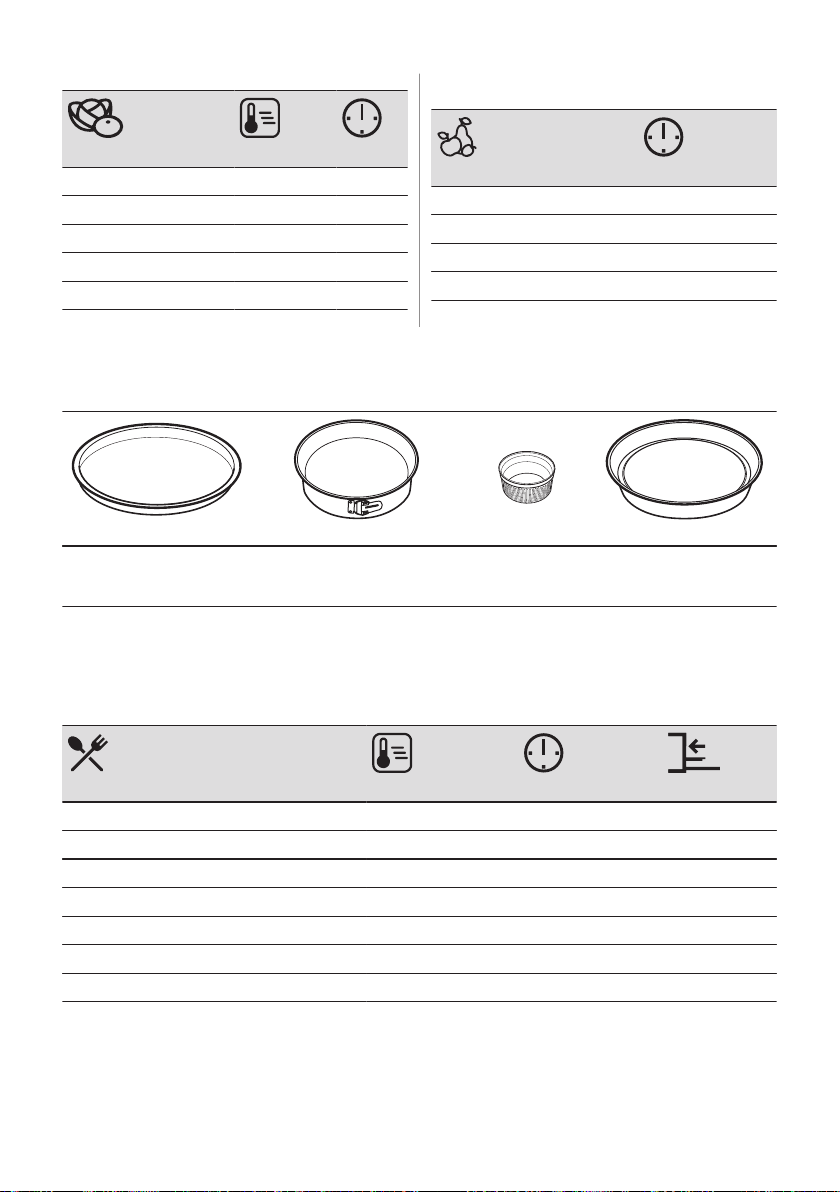
Set the temperature to 60 - 70 °C.
VEGETA‐
BLES (°C) (h)
Beans 60 - 70 6 - 8
Peppers 60 - 70 5 - 6
Vegetables for soup 60 - 70 5 - 6
Mushrooms 50 - 60 6 - 8
Herbs 40 - 50 2 - 3
FRUIT
(h)
Plums 8 - 10
Apricots 8 - 10
Apple slices 6 - 8
Pears 6 - 9
10.17 Moist Fan Baking - recommended accessories
Use the dark and non-reflective tins and containers. They have better heat absorption than the
light colour and reflective dishes.
Pizza pan
Dark, non-reflective
28 cm diameter
Baking dish
Dark, non-reflective
26 cm diameter
Ramekins
Ceramic
8 cm diameter, 5
cm height
Flan base tin
Dark, non-reflective
28 cm diameter
10.18 Moist Fan Baking
For the best results follow suggestions listed
in the table below.
(°C) (min)
Bread sticks, 0.5 kg in total 190 - 200 50 - 60 3
Baked scallops in shells 180 - 200 30 - 40 4
Whole fish in salt, 0.3 - 0.5 kg 190 - 200 45 - 50 4
Whole fish in parchment, 0.3 - 0.5 kg 190 - 200 50 - 60 3
Amaretti (20; 0.5 kg in total) 170 - 180 40 - 50 3
Apple crumble 190 - 200 50 - 60 4
Chocolate muffins (20; 0.5 kg in total) 160 - 170 35 - 45 3
10.19 Information for test institutes
Tests according to: EN 60350, IEC 60350.
ENGLISH 57
Page 58
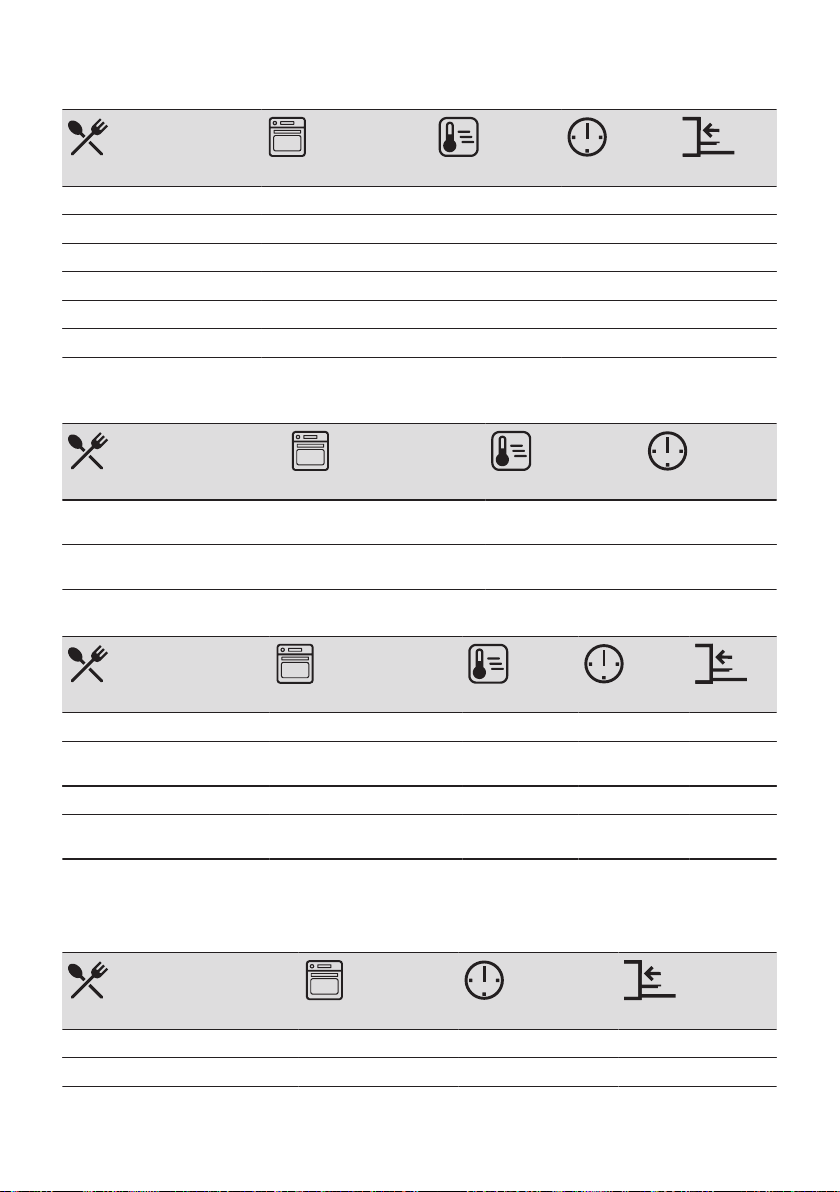
Baking on one level - baking in tins
°C min
Fatless sponge cake True Fan Cooking 160 45 - 60 2
Fatless sponge cake Conventional Cooking 160 45 - 60 2
Apple pie, 2 tins Ø20 cm True Fan Cooking 160 55 - 65 2
Apple pie, 2 tins Ø20 cm Conventional Cooking 180 55 - 65 1
Short bread True Fan Cooking 140 25 - 35 2
Short bread Conventional Cooking 140 25 - 35 2
Baking on one level - biscuits
Use the third shelf position.
°C min
Small cakes, 20 per tray, preheat
the empty oven
Small cakes, 20 per tray, preheat
the empty oven
True Fan Cooking 150 20 - 30
Conventional Cooking 170 20 - 30
Multilevel baking - biscuits
°C min
Short bread True Fan Cooking 140 25 - 45 2 / 4
Small cakes, 20 per tray, pre‐
heat the empty oven
Fatless sponge cake True Fan Cooking 160 45 - 55 2 / 4
Apple pie, 1 tin per grid (Ø 20
cm)
True Fan Cooking 150 25 - 35 1 / 4
True Fan Cooking 160 55 - 65 2 / 4
Grill
Preheat the empty oven for 5 minutes.
Grill with the maximum temperature setting.
min
Toast Grill 1 - 2 5
Beef steak, turn halfway through Grill 24 - 30 4
58 ENGLISH
Page 59
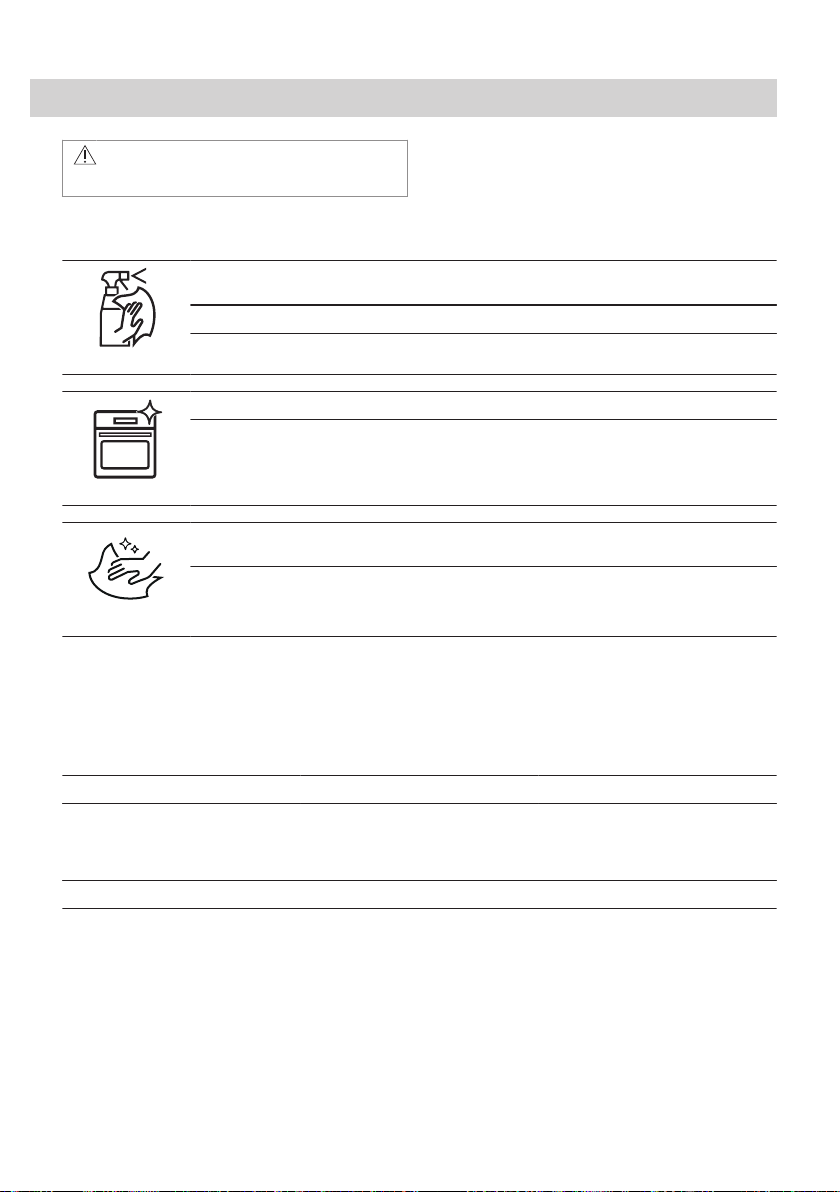
11. CARE AND CLEANING
WARNING!
Refer to Safety chapters.
11.1 Notes on cleaning
Clean the front of the appliance only with a microfibre cloth with warm water and a mild de‐
tergent.
Use a cleaning solution to clean metal surfaces.
Cleaning Agents
Everyday Use
Accessories
11.2 How to clean: Cavity embossment
Clean the cavity embossment to remove
limestone residue after cooking with steam.
Clean stains with a mild detergent. Do not apply it on the catalytic surfaces.
Clean the cavity after each use. Fat accumulation or other residue may cause fire.
Do not store the food in the appliance for longer than 20 minutes. Dry the cavity only with a
microfibre cloth after each use.
Clean all accessories after each use and let them dry. Use only a microfibre cloth with warm
water and a mild detergent. Do not clean the accessories in a dishwasher.
Do not clean the non-stick accessories using abrasive cleaner or sharp-edged objects.
Step 1 Step 2 Step 3
Pour: 250 ml of white vinegar into
the cavity embossment. Use maxi‐
mum 6% vinegar without any addi‐
tives.
For the function: True Fan Cooking PLUS clean the oven for every 5 - 10 cooking cycles.
Let the vinegar dissolve the lime‐
stone residue at the ambient tem‐
perature for 30 minutes.
Clean the cavity with warm water
and a soft cloth.
11.3 How to remove: Shelf supports
Remove the shelf supports to clean the oven.
ENGLISH 59
Page 60
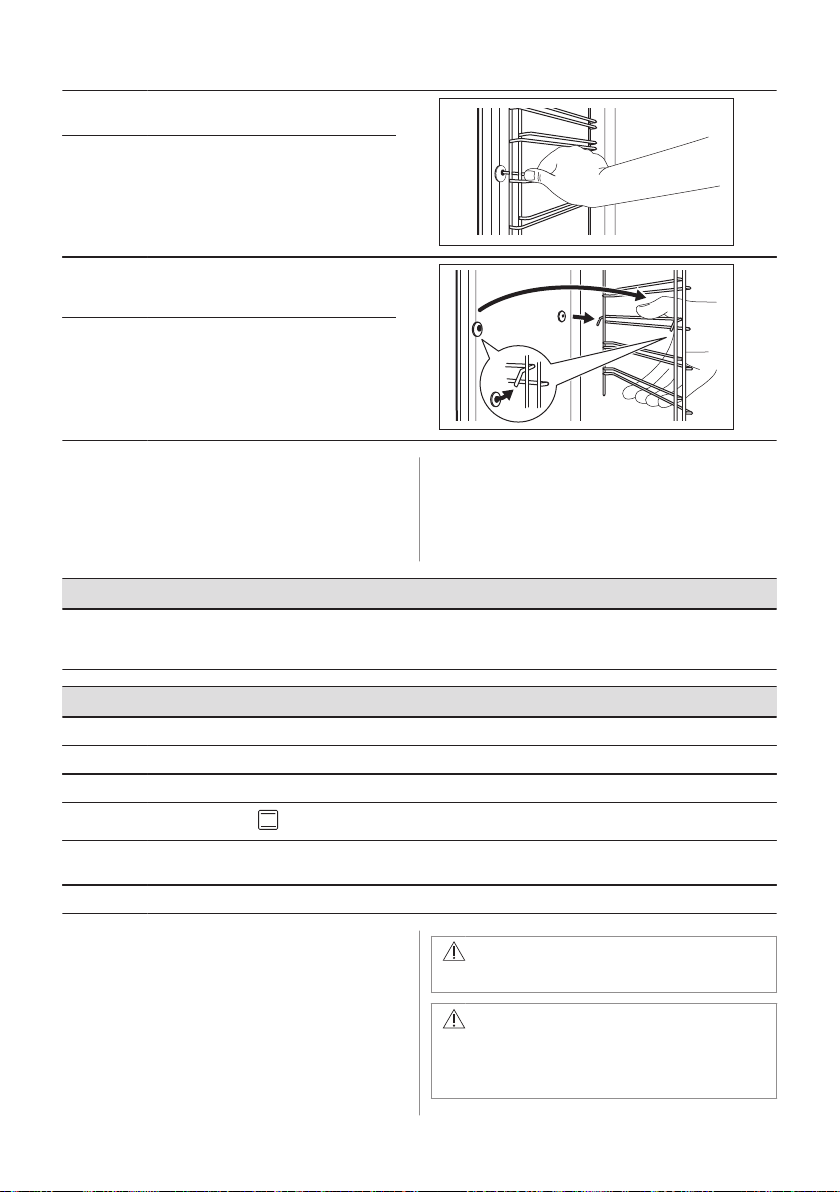
Step 1 Turn off the oven and wait until it is
2
1
Step 2 Pull the front of the shelf support
cold.
away from the side wall.
Step 3 Pull the rear end of the shelf support
Step 4 Install the shelf supports in the oppo‐
11.4 How to use: Catalytic fan cover
The fan cover is coated with a catalytic
enamel. It absorbs fat which collects on the
walls while the oven works. To support the
away from the side wall and remove
it.
site sequence.
self-cleaning procedure, heat the empty oven
on a regular basis.
Spots or discolouration of the catalytic
coating have no effect on the cleaning.
Before the catalytic cleaning
Turn off the oven and wait until it is
cold.
Remove all accessories and remova‐
ble shelf supports.
Clean the oven floor and the inner
door glass with warm water, soft
Clean the oven with catalytic cleaning
Step 1 Turn off the oven and wait until it is cold.
Step 2 Remove all accessories and removable shelf supports.
Step 3 Clean the oven cavity with warm water and washing-up liquid, then dry it.
Step 4
Step 5 Set the temperature: 250 °C.
Step 6 When the oven is cold, clean the cavity with a wet soft cloth.
Set the function: .
Duration: 1 h
cloth and mild detergent.
11.5 How to remove and install: Door
You can remove the door and the internal
glass panels to clean it. The number of glass
panels is different for different models.
60 ENGLISH
WARNING!
The door is heavy.
CAUTION!
Carefully handle the glass, especially
around the edges of the front panel. The
glass can break.
Page 61
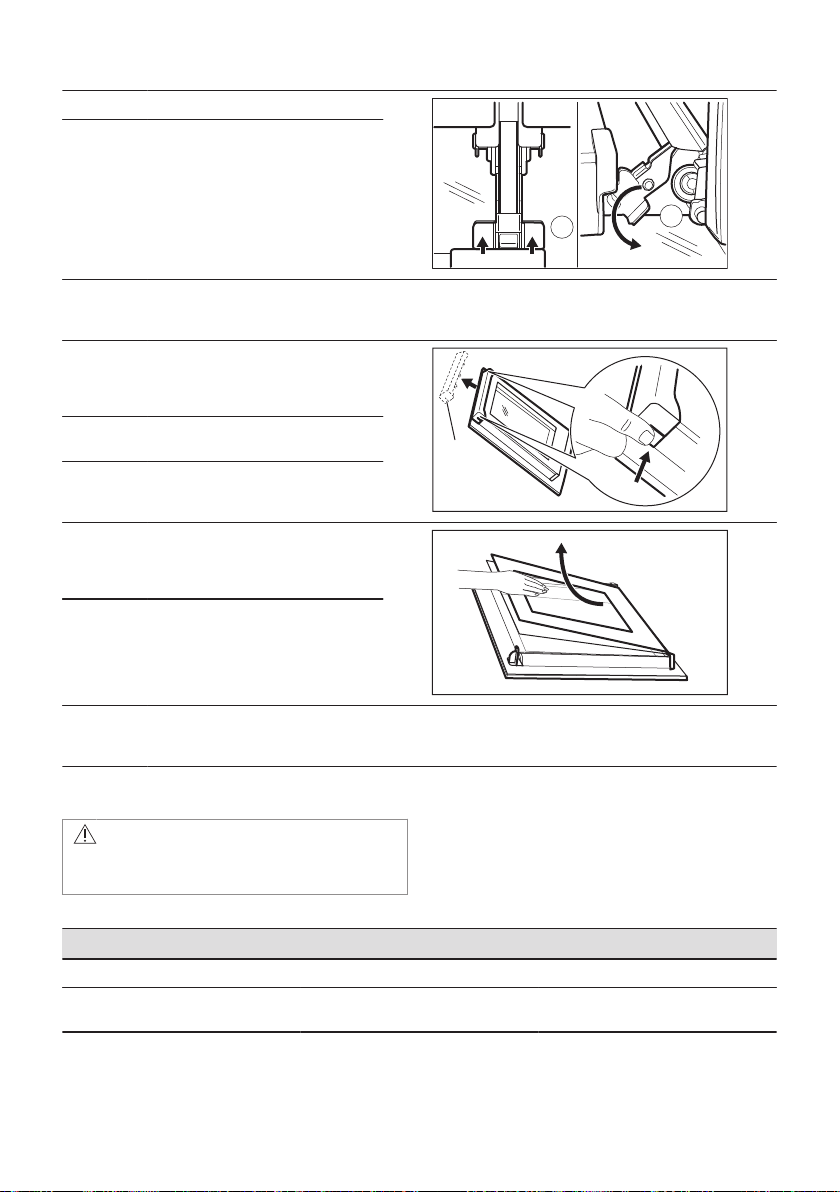
Step 1 Fully open the door.
A
A
1
2
B
Step 2 Lift and press the clamping levers
(A) on the two door hinges.
Step 3 Close the oven door to the first opening position (approximately 70° angle). Hold the door at both
Step 4 Hold the door trim (B) on the top
Step 5 Pull the door trim to the front to re‐
Step 6 Hold the door glass panels on their
Step 7 Clean the glass panel with water
Step 8 After cleaning, do the above steps
Step 9 Install the smaller panel first, then the larger and the door.
sides and pull it away from the oven at an upwards angle. Put the door with the outer side down on
a soft cloth on a stable surface.
edge of the door at the two sides
and push inwards to release the clip
seal.
move it.
top edge one by one and pull them
up out of the guide.
and soap. Dry the glass panel care‐
fully. Do not clean the glass panels
in the dishwasher.
in the opposite sequence.
Make sure that the glasses are inserted in the correct position otherwise the surface of the door
may overheat.
11.6 How to replace: Lamp
WARNING!
Risk of electric shock.
The lamp can be hot.
Before you replace the lamp:
Step 1 Step 2 Step 3
Turn off the oven. Wait until the
oven is cold.
Disconnect the oven from the
mains.
Put a cloth on the bottom of the cav‐
ity.
ENGLISH 61
Page 62
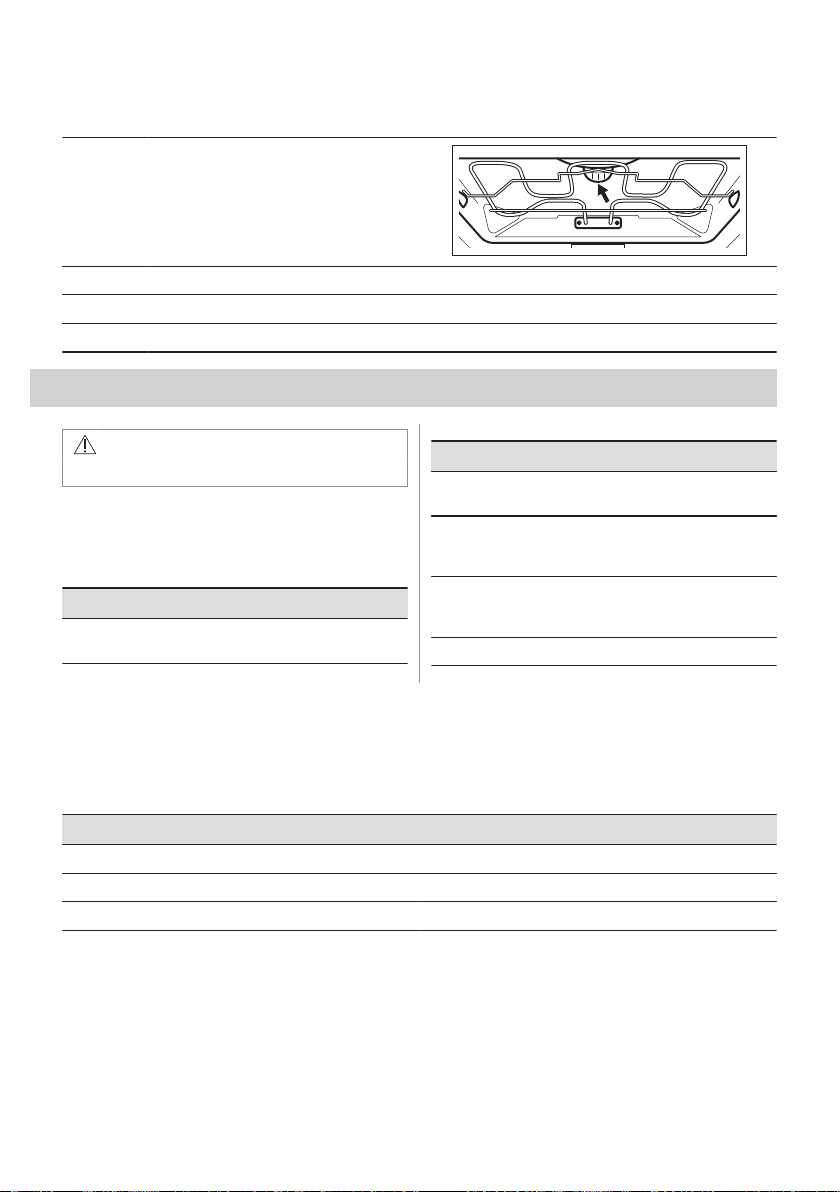
Top lamp
Step 1 Turn the glass cover to remove it.
Step 2 Clean the glass cover.
Step 3 Replace the lamp with a suitable 300 °C heat-resistant lamp.
Step 4 Install the glass cover.
12. TROUBLESHOOTING
WARNING!
Refer to Safety chapters.
12.1 What to do if...
In any cases not included in this table please
contact with an Authorised Service Centre.
Problem Check if...
The oven does not heat
up.
The fuse is blown.
Problem Check if...
The display shows
"12.00".
The water leaks out of the
cavity embossment.
Unsatisfying cooking per‐
formance of the function:
True Fan Cooking PLUS .
The lamp does not work. The lamp is burnt out.
There was a power cut.
Set the time of day.
There is too much water
in the cavity emboss‐
ment.
You filled the cavity em‐
bossment with water.
12.2 Service data
If you cannot find a solution to the problem yourself, contact your dealer or an Authorised
Service Centre.
The necessary data for the service centre is on the rating plate. The rating plate is on the front
frame of the appliance cavity. Do not remove the rating plate from the appliance cavity.
We recommend that you write the data here:
Model (MOD.) .........................................
Product number (PNC) .........................................
Serial number (S.N.) .........................................
62 ENGLISH
Page 63
13. ENERGY EFFICIENCY
13.1 Product Information and Product Information Sheet according to EU Ecodesign and Energy Labelling Regulations
Supplier's name AEG
Model identification BD431C 944188129, 944188457
Energy Efficiency Index 81.2
Energy efficiency class A+
Energy consumption with a standard load, conventional mode 0.99 kWh/cycle
Energy consumption with a standard load, fan-forced mode 0.69 kWh/cycle
Number of cavities 1
Heat source Electricity
Volume 71 l
Type of oven Built-In Oven
Mass 33.5 kg
IEC/EN 60350-1 - Household electric cooking appliances - Part 1: Ranges, ovens, steam ovens and grills - Meth‐
ods for measuring performance.
13.2 Energy saving
The appliance has features which help
you save energy during everyday
cooking.
Make sure that the appliance door is closed
when the appliance operates. Do not open
the appliance door too often during cooking.
Keep the door gasket clean and make sure it
is well fixed in its position.
Use metal cookware to improve energy
saving.
When possible, do not preheat the appliance
before cooking.
Keep breaks between baking as short as
possible when you prepare a few dishes at
one time.
Cooking with fan
When possible, use the cooking functions
with fan to save energy.
Residual heat
When the cooking duration is longer than 30
min, reduce the appliance temperature to
minimum 3 - 10 min before the end of
cooking. The residual heat inside the
appliance will continue to cook.
Use the residual heat to warm up other
dishes.
Keep food warm
Choose the lowest possible temperature
setting to use residual heat and keep a meal
warm.
Moist Fan Baking
Function designed to save energy during
cooking.
ENGLISH 63
Page 64

14. ENVIRONMENTAL CONCERNS
Recycle materials with the symbol . Put the
packaging in relevant containers to recycle it.
Help protect the environment and human
health by recycling waste of electrical and
electronic appliances. Do not dispose of
appliances marked with the symbol with
the household waste. Return the product to
your local recycling facility or contact your
municipal office.
64 ENGLISH
Page 65

POUR DES RÉSULTATS PARFAITS
Merci d’avoir choisi ce produit AEG. Nous l’avons conçu pour qu’il vous offre des
performances irréprochables pendant de nombreuses années, en intégrant des
technologies innovantes vous simplifiant la vie – fonctions que vous ne trouverez peutêtre pas sur des appareils ordinaires. Veuillez prendre quelques instants pour lire cette
notice afin d’utiliser au mieux votre appareil.
Consultez notre site pour :
Obtenir des conseils d’utilisation, des brochures, un dépanneur, des informations sur
le service et les réparations :
www.aeg.com/support
Enregistrer votre produit pour un meilleur service :
www.registeraeg.com
Acheter des accessoires, consommables et pièces de rechange d’origine pour votre
appareil :
www.aeg.com/shop
SERVICE ET ASSISTANCE À LA CLIENTÈLE
N’utilisez que des pièces de rechange d’origine.
Avant de contacter notre centre de service agréé, assurez-vous de disposer des
informations suivantes : Modèle, PNC, numéro de série.
Ces informations figurent sur la plaque signalétique.
Avertissement/Consignes de sécurité
Informations générales et conseils
Informations environnementales
Sous réserve de modifications.
TABLE DES MATIÈRES
1. INFORMATION SUR LA SÉCURITÉ............................................................ 66
2. CONSIGNES DE SÉCURITÉ........................................................................68
3. DESCRIPTION DE L'APPAREIL...................................................................71
4. BANDEAU DE COMMANDE.........................................................................72
5. AVANT LA PREMIÈRE UTILISATION.......................................................... 72
6. UTILISATION QUOTIDIENNE...................................................................... 73
7. FONCTIONS DE L'HORLOGE......................................................................75
8. UTILISATION DES ACCESSOIRES.............................................................76
9. FONCTIONS SUPPLÉMENTAIRES............................................................. 77
10. CONSEILS ET ASTUCES...........................................................................77
11. ENTRETIEN ET NETTOYAGE................................................................... 91
12. DÉPANNAGE..............................................................................................95
13. RENDEMENT ÉNERGÉTIQUE.................................................................. 96
14. EN MATIÈRE DE PROTECTION DE L'ENVIRONNEMENT.......................97
FRANÇAIS 65
Page 66

1. INFORMATION SUR LA SÉCURITÉ
Avant d'installer et d'utiliser cet appareil, lisez soigneusement
les instructions fournies. Le fabricant ne pourra être tenu pour
responsable des blessures et dégâts résultant d'une
mauvaise installation ou utilisation. Conservez toujours les
instructions dans un lieu sûr et accessible pour vous y référer
ultérieurement.
1.1 Sécurité des enfants et des personnes vulnérables
• Cet appareil peut être utilisé par des enfants âgés d'au
moins 8 ans et par des personnes ayant des capacités
physiques, sensorielles ou mentales réduites ou dénuées
d’expérience ou de connaissance, s'ils sont correctement
surveillés ou si des instructions relatives à l'utilisation de
l'appareil en toute sécurité leur ont été données et s’ils
comprennent les risques encourus. Les enfants de moins
de 8 ans et les personnes ayant un handicap très important
et complexe doivent être tenus à l'écart de l’appareil, à
moins d'être surveillés en permanence.
• Veillez à ce que les enfants ne jouent pas avec l’appareil.
• Ne laissez pas les emballages à la portée des enfants et
jetez-les convenablement.
• AVERTISSEMENT : L'appareil et ses parties accessibles
deviennent chauds pendant l'utilisation. Tenez les enfants
et les animaux éloignés de l’appareil lorsqu’il est en cours
d’utilisation et de refroidissement.
• Si l'appareil est équipé d'un dispositif de sécurité enfants,
nous vous recommandons de l'activer.
• Le nettoyage et l'entretien par l'usager ne doivent pas être
effectués par des enfants sans surveillance.
1.2 Sécurité générale
• Cet appareil est exclusivement destiné à un usage
culinaire.
66 FRANÇAIS
Page 67

• Cet appareil est conçu pour un usage domestique unique,
dans un environnement intérieur.
• Cet appareil peut être utilisé dans les bureaux, les
chambres d’hôtel, les chambres d’hôtes, les maisons
d’hôtes de ferme et d’autres hébergements similaires
lorsque cette utilisation ne dépasse pas le niveau (moyen)
de l’utilisation domestique.
• Cet appareil doit être installé et le câble remplacé
uniquement par un professionnel qualifié.
• N'utilisez pas l'appareil avant de l'avoir installé dans la
structure encastrée.
• Débranchez l'appareil de l'alimentation électrique avant
toute opération d'entretien.
• Si le cordon d'alimentation est endommagé, il doit être
remplacé par le fabricant, son service après-vente agréé ou
toute personne disposant de qualifications similaires afin
d'éviter tout danger électrique.
• AVERTISSEMENT : Assurez-vous que l'appareil est éteint
avant de remplacer l'ampoule pour éviter tout risque
d'électrocution.
• AVERTISSEMENT : L'appareil et ses parties accessibles
deviennent chauds pendant l'utilisation. Des précautions
doivent être prises pour éviter de toucher les éléments
chauffants ou la surface de la cavité de l'appareil.
• Utilisez toujours des gants de cuisine pour retirer ou insérer
des accessoires ou des plats allant au four.
• Pour retirer les supports de grille, tirez d'abord l'avant du
support de grille, puis l'arrière à distance des parois
latérales. Installez les supports de grille dans l'ordre
inverse.
• N'utilisez pas de nettoyeur à vapeur pour nettoyer l'appareil.
• N'utilisez pas de produits abrasifs ni de racloirs pointus en
métal pour nettoyer la porte en verre car ils peuvent rayer la
surface, ce qui peut briser le verre.
FRANÇAIS 67
Page 68
2. CONSIGNES DE SÉCURITÉ
2.1 Installation
AVERTISSEMENT!
L'appareil doit être installé uniquement
par un professionnel qualifié.
• Retirez l'intégralité de l'emballage.
• N'installez pas et ne branchez pas un
appareil endommagé.
• Suivez scrupuleusement les instructions
d'installation fournies avec l'appareil.
• Soyez toujours vigilants lorsque vous
déplacez l'appareil car il est lourd. Utilisez
toujours des gants de sécurité et des
chaussures fermées.
• Ne tirez jamais l'appareil par la poignée.
• Installez l'appareil dans un lieu sûr et
adapté répondant aux exigences
d'installation.
• Respectez l'espacement minimal requis
par rapport aux autres appareils et
éléments.
• Avant de monter l'appareil, vérifiez si la
porte de l'appareil s'ouvre sans retenue.
• L’appareil est équipé d’un système de
refroidissement électrique. Il doit être
utilisé avec l’alimentation électrique.
• L’unité intégrée doit répondre aux
exigences de stabilité de la norme DIN
68930.
Hauteur minimale du meu‐
ble (Hauteur minimale du
meuble sous le plan de tra‐
vail)
Largeur du meuble 560 mm
Profondeur du meuble 550 (550) mm
Hauteur de l’avant de l’ap‐
pareil
Hauteur de l’arrière de l’ap‐
pareil
Largeur de l’avant de l’ap‐
pareil
Largeur de l’arrière de l’ap‐
pareil
Profondeur de l'appareil 567 mm
578 (600) mm
594 mm
576 mm
595 mm
559 mm
Profondeur d’encastrement
de l’appareil
Profondeur avec porte ou‐
verte
Dimensions minimales de
l’ouverture de ventilation.
Ouverture placée sur la
partie inférieure de la face
arrière
Longueur du câble d’ali‐
mentation secteur. Le câble
est placé dans le coin droit
de la face arrière
Vis de montage 4x25 mm
546 mm
1027 mm
560x20 mm
1500 mm
2.2 Branchement électrique
AVERTISSEMENT!
Risque d'incendie ou d'électrocution.
• Tous les raccordements électriques
doivent être effectués par un électricien
qualifié.
• L’appareil doit être relié à la terre.
• Assurez-vous que les paramètres figurant
sur la plaque signalétique correspondent
aux données électriques nominale de
l’alimentation secteur.
• Utilisez toujours une prise de courant de
sécurité correctement installée.
• N'utilisez pas d'adaptateurs multiprise et
de rallonges.
• Veillez à ne pas endommager la fiche
secteur ni le câble d'alimentation. Le
remplacement du câble d’alimentation de
l’appareil doit être effectué par notre
service après-vente agréé.
• Ne laissez pas les câbles d'alimentation
entrer en contact ou s'approcher de la
porte de l'appareil ou de la niche
d'encastrement sous l'appareil,
particulièrement lorsqu'il est en marche ou
que la porte est chaude.
• La protection contre les chocs des parties
sous tension et isolées doit être fixée de
telle manière qu'elle ne puisse pas être
enlevée sans outils.
68 FRANÇAIS
Page 69
• Ne branchez la fiche secteur dans la prise
secteur qu'à la fin de l'installation.
Assurez-vous que la prise secteur est
accessible après l'installation.
• Si la prise secteur est détachée, ne
branchez pas la fiche secteur.
• Ne tirez pas sur le câble secteur pour
débrancher l'appareil. Tirez toujours sur la
fiche de la prise secteur.
• N'utilisez que des systèmes d'isolation
appropriés : des coupe-circuits, des
fusibles (les fusibles à visser doivent être
retirés du support), un disjoncteur
différentiel et des contacteurs.
• L'installation électrique doit comporter un
dispositif d'isolation qui vous permet de
déconnecter l'appareil du secteur à tous
les pôles. Le dispositif d'isolement doit
avoir une largeur d'ouverture de contact
de 3 mm minimum.
• Cet appareil est fourni avec une fiche
électrique et un câble d’alimentation.
2.3 Utilisation
AVERTISSEMENT!
Risque de blessures, de brûlures,
d'électrocution ou d'explosion.
• Ne modifiez pas les spécifications de cet
appareil.
• Assurez-vous que les orifices d'aération
ne sont pas obstrués.
• Ne laissez pas l'appareil sans surveillance
durant son fonctionnement.
• Éteignez l'appareil après chaque
utilisation.
• Soyez prudent lors de l'ouverture de la
porte de l'appareil lorsque celui-ci
fonctionne. De l'air chaud peut se
dégager.
• N'utilisez pas l'appareil avec des mains
mouillées ou en contact avec de l'eau.
• N'exercez pas de pression sur la porte
ouverte.
• N'utilisez pas l'appareil comme plan de
travail ou comme espace de rangement.
• Ouvrez la porte de l'appareil avec
précaution. L'utilisation d'ingrédients avec
de l'alcool peut provoquer un mélange
d'alcool et d'air.
• Ne laissez pas des étincelles ou des
flammes nues entrer en contact avec
l'appareil lorsque vous ouvrez la porte.
• Ne placez pas de produits inflammables
ou d’éléments imbibés de produits
inflammables à l’intérieur, à proximité ou
au-dessus de l’appareil.
AVERTISSEMENT!
Risque d'endommagement de l'appareil.
• Pour éviter tout endommagement ou
décoloration de l’émail :
– ne posez pas de plats allant au four ou
d'autres objets directement dans le
fond de l'appareil.
– ne placez jamais de feuilles
d'aluminium directement sur le fond de
la cavité de l'appareil.
– ne versez pas d'eau directement dans
l'appareil chaud.
– ne conservez pas de plats et de
nourriture humides dans l'appareil
après avoir terminé la cuisson.
– Installez ou retirez les accessoires
avec précautions.
• La décoloration de l'émail ou de l'acier
inoxydable est sans effet sur les
performances de l'appareil.
• Utilisez un plat à rôtir pour des gâteaux
moelleux. Les jus de fruits provoquent des
taches qui peuvent être permanentes.
• Cuisinez toujours avec la porte de
l’appareil fermée.
• Si l’appareil est installé derrière la paroi
d’un meuble (par ex. une porte), veuillez à
ce que la porte ne soit jamais fermée
lorsque l’appareil fonctionne. La chaleur et
l’humidité peuvent s’accumuler derrière la
porte fermée du meuble et provoquer
d’importants dégâts sur l’appareil, votre
logement ou le sol. Ne fermez pas la paroi
du meuble tant que l’appareil n’a pas
refroidi complètement.
2.4 Entretien et Nettoyage
AVERTISSEMENT!
Risque de blessure, d'incendie ou de
dommages matériels sur l'appareil.
FRANÇAIS 69
Page 70
• Avant toute opération d'entretien, éteignez
l'appareil et débranchez la fiche de la prise
secteur.
• Vérifiez que l'appareil est froid. Les
panneaux de verre risquent de se briser.
• Remplacez immédiatement les vitres de la
porte si elles sont endommagées.
Contactez le service après-vente agréé.
• Soyez prudent lorsque vous retirez la
porte de l'appareil. La porte est lourde !
• Nettoyez régulièrement l'appareil afin de
maintenir le revêtement en bon état.
• Nettoyez l'appareil avec un chiffon doux
humide. Utilisez uniquement des produits
de lavage neutres. N'utilisez pas de
produits abrasifs, de tampons à récurer,
de solvants ni d'objets métalliques.
• Si vous utilisez un spray pour four, suivez
les consignes de sécurité figurant sur son
emballage.
• Ne nettoyez pas l'émail catalytique avec
des détergents.
2.5 Éclairage interne
AVERTISSEMENT!
Risque d'électrocution !
• Concernant la/les lampe(s) à l’intérieur de
ce produit et les lampes de rechange
vendues séparément : Ces lampes sont
conçues pour résister à des conditions
physiques extrêmes dans les appareils
électroménagers, telles que la
température, les vibrations, l’humidité, ou
sont conçues pour signaler des
informations sur le statut opérationnel de
l’appareil. Elles ne sont pas destinées à
être utilisées dans d'autres applications et
ne conviennent pas à l’éclairage des
pièces d’un logement.
• Ce produit contient une source lumineuse
de classe d’efficacité énergétique G.
• Utilisez uniquement des ampoules ayant
les mêmes spécifications.
2.6 Service
• Pour réparer l'appareil, contactez le
service après-vente agréé.
• Utilisez uniquement des pièces de
rechange d'origine.
2.7 Mise au rebut
AVERTISSEMENT!
Risque de blessure ou d'asphyxie.
• Contactez votre service municipal pour
obtenir des informations sur la marche à
suivre pour mettre l’appareil au rebut.
• Débranchez l'appareil de l'alimentation
électrique.
• Coupez le câble d'alimentation au ras de
l'appareil et mettez-le au rebut.
• Retirez le dispositif de verrouillage du
hublot pour empêcher les jeunes et les
animaux de s'enfermer dans l'appareil.
70 FRANÇAIS
Page 71
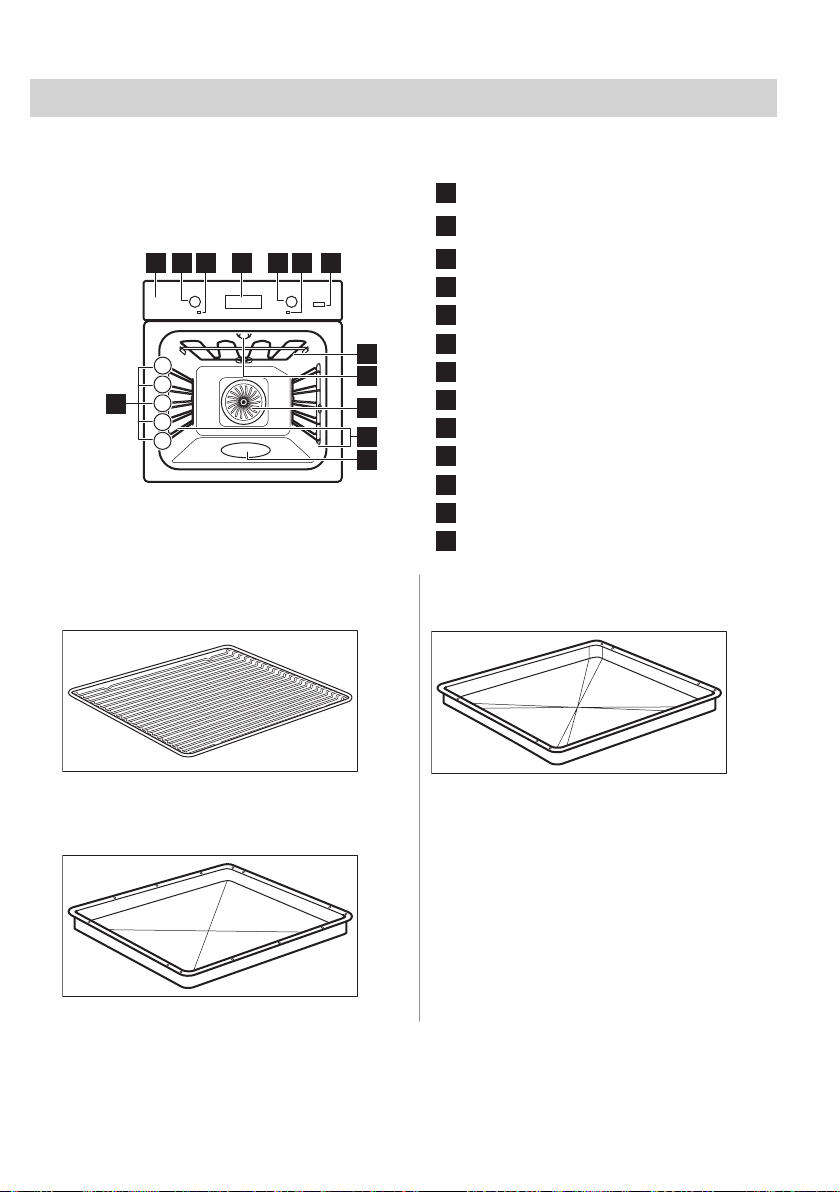
3. DESCRIPTION DE L'APPAREIL
1
2
3
4
5
2 3 5 641
7
13
8
11
9
10
12
3.1 Vue d’ensemble
Bandeau de commande
Manette de sélection des modes de
cuisson
Voyant / symbole de mise sous tension
Affichage
Manette de commande (de la température)
Indicateur / symbole de température
Vapeur plus
Résistance
Éclairage
Chaleur tournante
Support de grille, amovible
Bac de la cavité
Niveaux de la grille
3.2 Accessoires
Grille métallique
Pour les plats de cuisson, les moules à
gâteaux, les rôtis.
Plateau de cuisson
Pour les gâteaux et biscuits.
Plat à rôtir
Pour cuire et rôtir ou comme plat pour
récupérer la graisse.
FRANÇAIS 71
Page 72
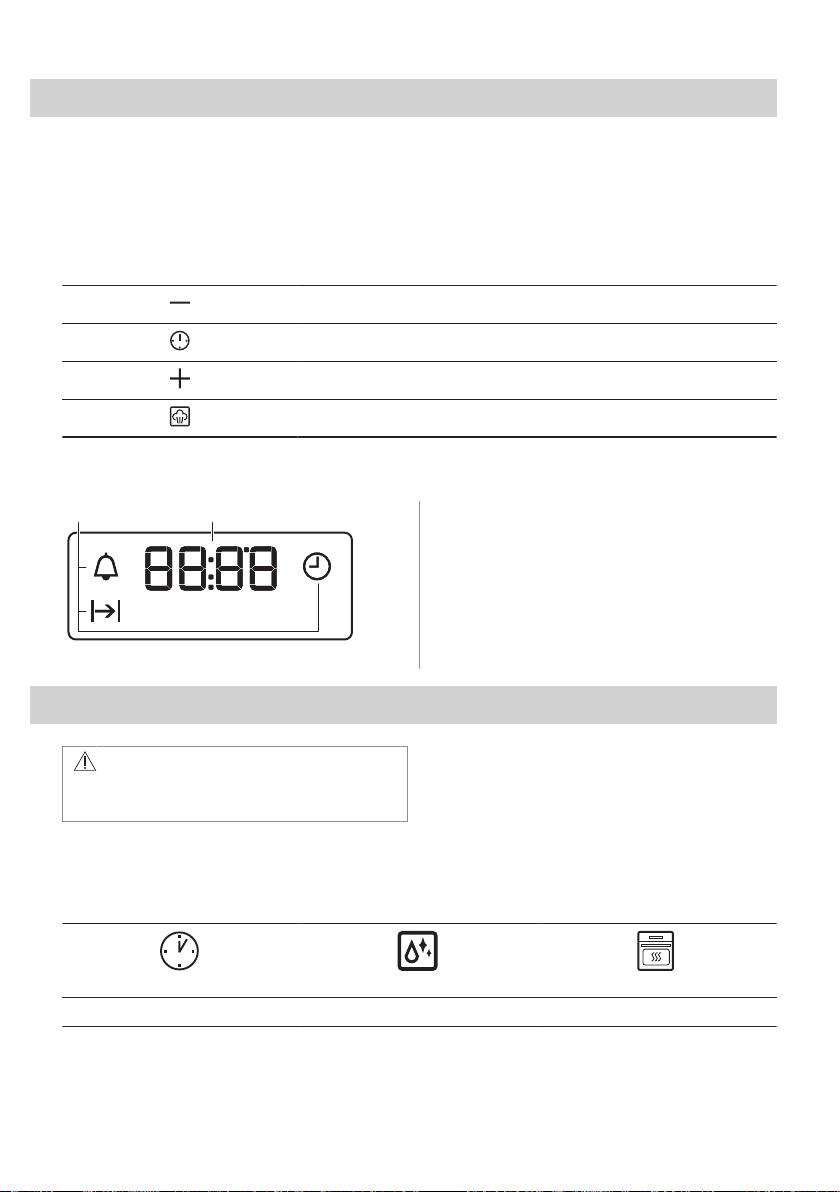
4. BANDEAU DE COMMANDE
A B
4.1 Manettes rétractables
Pour utiliser l'appareil, appuyez sur la
manette. La manette sort alors de son
logement.
4.2 Touches sensitives
Pour régler l'heure.
Pour régler une fonction de l'horloge.
Pour régler l'heure.
Pour activer et désactiver la fonction Chaleur tournante PLUS.
4.3 Affichage
A. Fonctions de l’horloge
B. Minuteur
5. AVANT LA PREMIÈRE UTILISATION
AVERTISSEMENT!
Reportez-vous aux chapitres concernant
la sécurité.
5.1 Avant la première utilisation
Une odeur et de la fumée peuvent s'échapper du four durant le préchauffage. Assurez-vous
que la pièce est ventilée.
Étape 1 Étape 2
Réglez l’horloge Nettoyez le four Préchauffez le four à vide
72 FRANÇAIS
Étape 3
Page 73
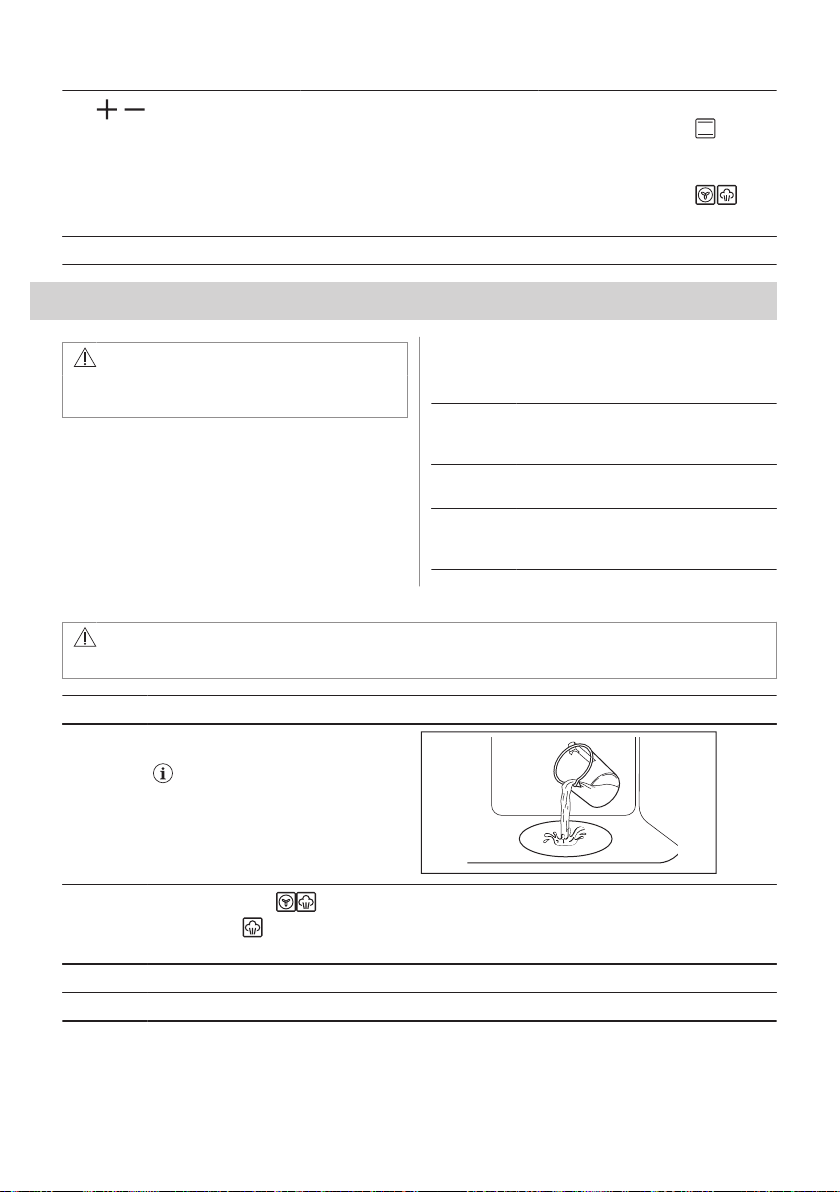
1. , - appuyez pour régler
l’heure. Après environ 5 s, le
symbole cesse de clignoter et
l'heure s'affiche.
Éteignez le four et attendez qu’il soit froid. Placez les accessoires et les supports de grille amovibles dans le four.
1. Retirez du four les accessoires
et les supports de grille amovi‐
bles.
2. Nettoyez le four et les acces‐
soires avec un chiffon en micro‐
fibre, de l’eau chaude et un dé‐
tergent doux.
1. Réglez la température maxima‐
le pour la fonction : .
Durée : 1 h.
2. Réglez la température maxima‐
le pour la fonction : .
Durée : 15 min.
6. UTILISATION QUOTIDIENNE
AVERTISSEMENT!
6.1 Comment régler : Mode de cuisson
Reportez-vous aux chapitres concernant
la sécurité.
Étape 1 Tournez la manette des modes de cuis‐
son pour sélectionner un mode de cuis‐
son.
Étape 2 Tournez la manette pour sélectionner la
température.
Étape 3 Une fois la cuisson terminée, tournez
les manettes sur la position Arrêt pour
éteindre le four.
6.2 Réglage de la fonction : Chaleur tournante PLUS
AVERTISSEMENT!
Risque de brûlures et de dommages matériels à l'appareil.
Étape 1 Assurez-vous que le four est froid.
Étape 2 Remplissez le bac de la cavité d’eau du
Étape 3
Étape 4 Tournez la manette de température pour régler la température.
Étape 5 Préchauffez le four à vide pendant 10 minutes pour créer de l’humidité.
robinet.
La capacité maximale du bac de la
cavité est de 250 ml. Ne remplissez pas
le bac de la cavité en cours de cuisson,
ou lorsque le four est chaud.
Réglez la fonction : .
Appuyez sur : . Le voyant s'allume. Elle ne fonctionne qu'avec la fonction : Chaleur tournante
PLUS.
FRANÇAIS 73
Page 74
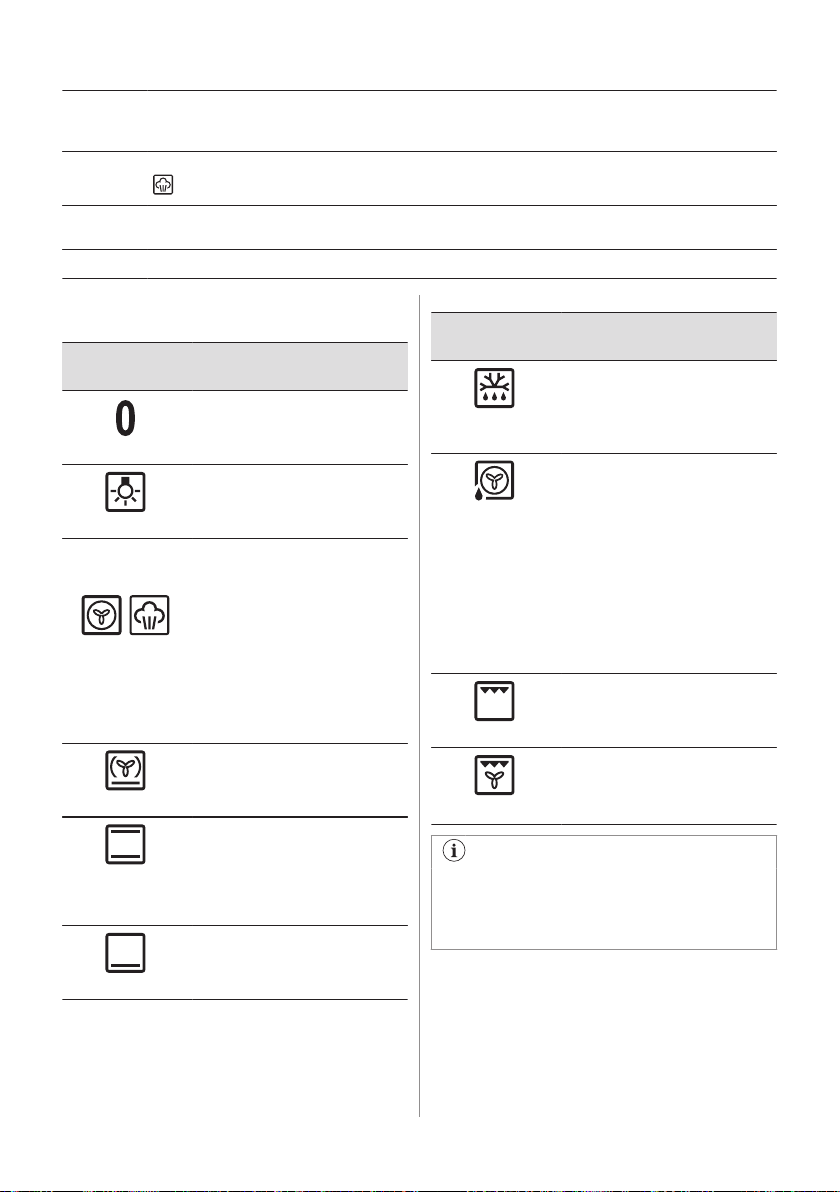
Étape 6 Enfournez les aliments.
Étape 7 Tournez la manette des modes de cuisson sur la position Arrêt pour éteindre le four.
Étape 8 Une fois la fonction terminée, ouvrez délicatement la porte. L'humidité qui s'échappe peut provo‐
Étape 9 Assurez-vous que le four est froid. Videz l'eau restante du bac de la cavité.
Reportez-vous au chapitre « Conseils ».
Au cours de la cuisson, n'ouvrez pas la porte du four.
- appuyez pour éteindre le four. Le voyant s'éteint.
quer des brûlures.
6.3 Modes de cuisson
Mode de cuis‐
son
Position Arrêt
Eclairage four
Chaleur tournan‐
te / Chaleur tour‐
nante PLUS
Fonction Pizza
Chauffage
Haut/Bas / Cataly‐
se
Cuisson de sole
Application
Le four est à l’arrêt.
Pour allumer l’éclairage.
Pour faire cuire sur 3 niveaux en
même temps et pour sécher des
aliments.
Diminuez les températures du
four de 20 à 40 °C par rapport à
Chauffage Haut/Bas.
Pour ajouter de l’humidité en
cours de cuisson. Pour obtenir
la bonne couleur et une croûte
croustillante pendant la cuisson.
Pour rendre plus juteux pendant
le réchauffement.
Pour cuire des pizzas. Pour faire
dorer de façon intensive et obte‐
nir un dessous croustillant.
Pour cuire et rôtir des aliments
sur un seul niveau.
Reportez-vous au chapitre « En‐
tretien et nettoyage » pour obte‐
nir plus d'informations sur le net‐
toyage catalytique.
Pour cuire des gâteaux avec
dessous croustillant et pour sté‐
riliser des aliments.
Mode de cuis‐
son
Décongélation
Chaleur tournante
humide
Gril
Turbo gril
Pour certaines fonctions du four,
l’éclairage peut s’éteindre
automatiquement à une température
inférieure à 60 °C.
6.4 Remarques sur : Chaleur tournante humide
Cette fonction était utilisée pour se conformer
à la classe d'efficacité énergétique et aux
exigences Ecodesign (selon les normes EU
Application
Pour décongeler des aliments
(fruits et légumes). Le temps de
décongélation dépend de la
quantité et de la grosseur des
plats surgelés.
Cette fonction est conçue pour
économiser de l'énergie en
cours de cuisson. Lorsque vous
utilisez cette fonction, la tempé‐
rature à l’intérieur de la cavité
peut différer de la température
sélectionnée. La chaleur rési‐
duelle est utilisée. La puissance
peut être réduite. Pour plus d’in‐
formations, consultez la partie
sur les remarques du chapitre
« Utilisation quotidienne ». Cha‐
leur tournante humide.
Pour faire griller des aliments
peu épais et du pain.
Pour rôtir de gros morceaux de
viande ou de volaille avec os sur
un seul niveau. Pour gratiner et
faire dorer.
74 FRANÇAIS
Page 75
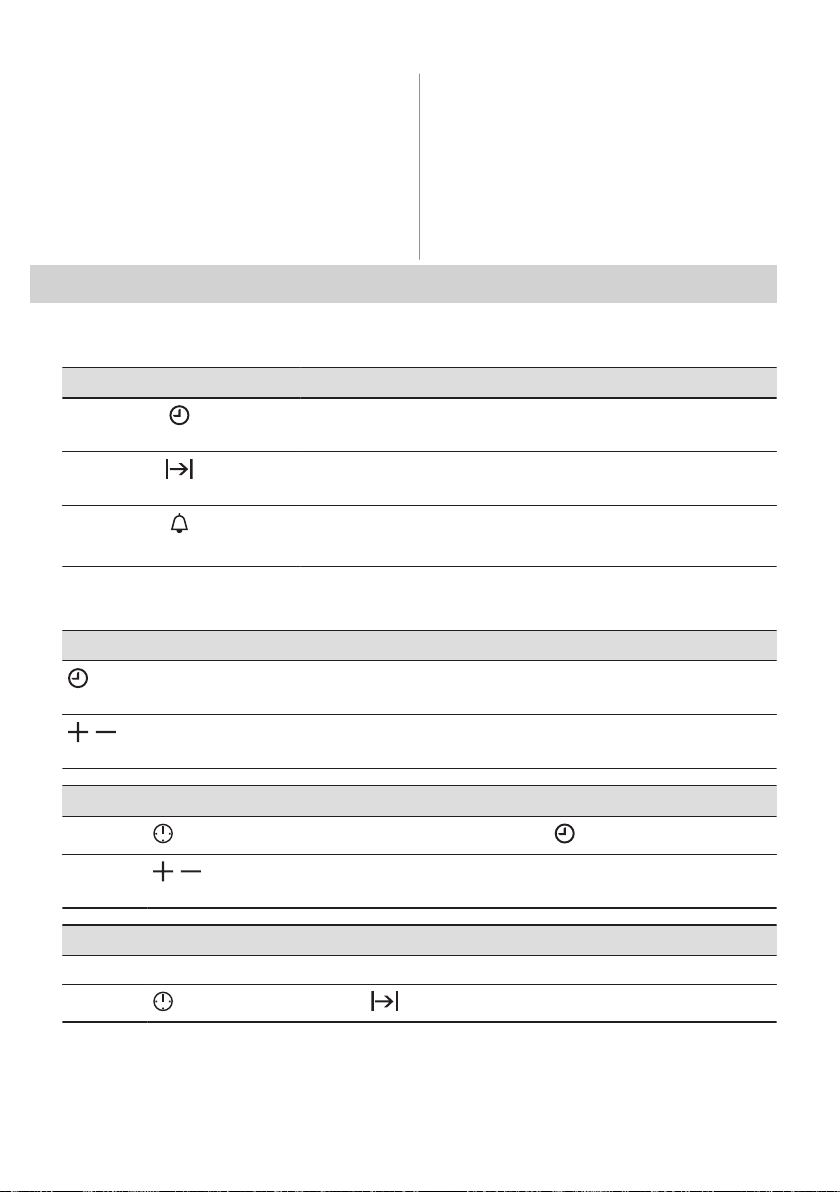
65/2014 et EU 66/2014). Tests conformes à
la norme : IEC/EN 60350-1.
La porte du four doit être fermée pendant la
cuisson pour que la fonction ne soit pas
interrompue et que le four fonctionne avec la
Chaleur tournante humide.Pour obtenir des
recommandations générales sur l'économie
d'énergie, reportez-vous au chapitre
« Efficacité énergétique », « Économie
d'énergie ».
plus grande efficacité énergétique possible.
Pour consulter les instructions de cuisson,
reportez-vous au chapitre « Conseils »,
7. FONCTIONS DE L'HORLOGE
7.1 Fonctions de l’horloge
Fonction de l'horloge Utilisation
Pour régler, changer ou vérifier l'heure.
Heure actuelle
Pour régler la durée de fonctionnement du four.
Durée
Pour régler la minuterie. Cette fonction est sans effet sur le fonctionnement
Minuteur
7.2 Comment régler : Fonctions de l’horloge
Comment régler : Heure actuelle
du four. Vous pouvez régler cette fonction à tout moment, même quand le
four est éteint.
- clignote lorsque vous branchez le four à l'alimentation électrique, lorsqu'il y a eu une coupure de courant ou
que le minuteur n'est pas réglé.
, - appuyez pour régler l’heure.
Après environ 5 s, le symbole cesse de clignoter et l'heure s'affiche.
Comment modifier : Heure actuelle
Étape 1
Étape 2
- appuyez à plusieurs reprises pour modifier l'heure actuelle. - commence à clignoter.
, - appuyez pour régler l’heure.
Après environ 5 s, le symbole cesse de clignoter et l'heure s'affiche.
Comment régler : Durée
Étape 1 Sélectionnez la fonction et la température du four.
Étape 2
- appuyez à plusieurs reprises. - commence à clignoter.
FRANÇAIS 75
Page 76
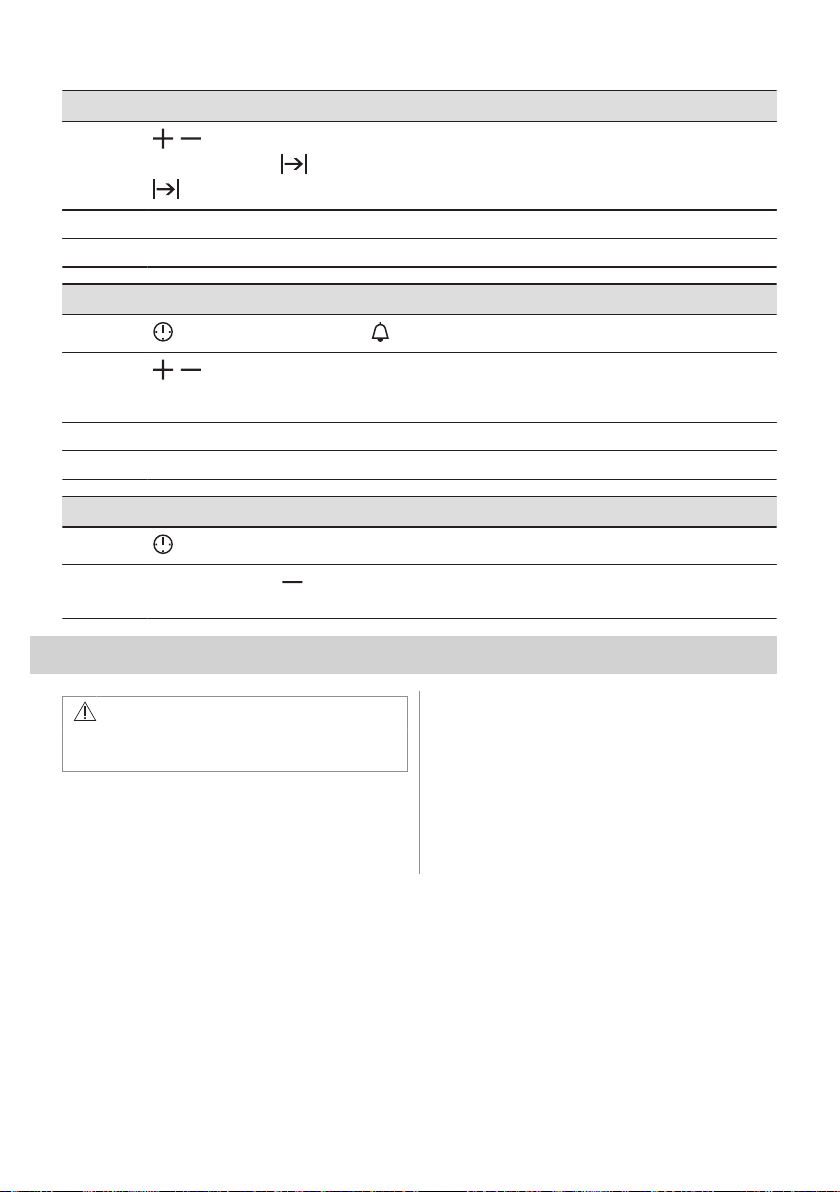
Comment régler : Durée
Étape 3
Étape 4 Appuyez sur n’importe quelle touche pour arrêter le signal sonore.
Étape 5 Tournez la manette sur la position Arrêt.
, - appuyez pour régler la durée.
L'affichage indique : .
- clignote lorsque la durée définie est écoulée. Le signal sonore retentit et le four s'éteint.
Comment régler : Minuteur
Étape 1
Étape 2
Étape 3 Appuyez sur n’importe quelle touche pour arrêter le signal sonore.
Étape 4 Tournez la manette sur la position Arrêt.
- appuyez à plusieurs reprises. - commence à clignoter.
, - appuyez pour régler l’heure.
La fonction démarre automatiquement au bout de 5 s.
Lorsque la durée définie s’est écoulée, un signal sonore retentit.
Comment annuler : Fonctions de l’horloge
Étape 1
Étape 2
- appuyez plusieurs fois jusqu’à ce que le symbole de la fonction horloge se mette à clignoter.
Maintenez la touche .
La fonction horloge est désactivée au bout de quelques secondes.
8. UTILISATION DES ACCESSOIRES
AVERTISSEMENT!
Reportez-vous aux chapitres concernant
la sécurité.
8.1 Insertion des accessoires
Une petite indentation sur le dessus apporte
plus de sécurité. Les indentations sont
76 FRANÇAIS
également des dispositifs anti-bascule. Le
rebord élevé de la grille empêche les
ustensiles de cuisine de glisser sur la grille.
Page 77
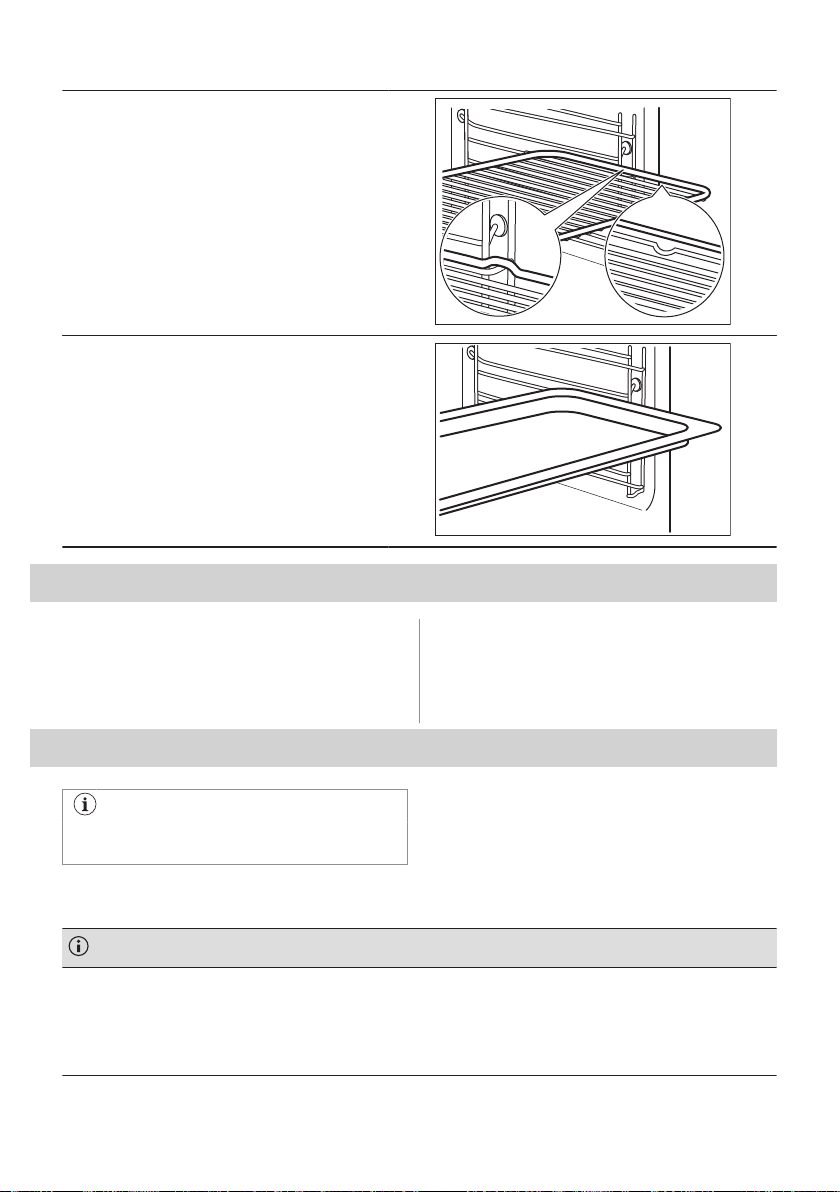
Grille métallique:
Poussez la grille entre les barres de guidage des
supports de grille.
Plateau de cuisson / Plat à rôtir:
Poussez la plaque entre les rails du support de
grille.
9. FONCTIONS SUPPLÉMENTAIRES
9.1 Ventilateur de refroidissement
Lorsque l'appareil fonctionne, le ventilateur
de refroidissement se met automatiquement
en marche pour refroidir les surfaces de
l'appareil. Si vous éteignez l'appareil, le
ventilateur de refroidissement peut continuer
à fonctionner jusqu'à ce que l'appareil
refroidisse.
10. CONSEILS ET ASTUCES
Reportez-vous aux chapitres concernant
la sécurité.
10.1 Recommandations de cuisson
Les températures et temps de cuisson se trouvant dans les tableaux ne sont indiqués qu'à titre indicatif. Ils va‐
rient selon les recettes, la qualité et la quantité des ingrédients utilisés.
Votre appareil peut cuire ou rôtir les aliments différemment de l'appareil que vous aviez auparavant. Les conseils
ci-dessous contiennent les réglages de température, les temps de cuisson et les positions de grilles recomman‐
dés pour des types de plats en particulier.
Si vous ne trouvez pas les réglages appropriés pour une recette spécifique, cherchez-en une qui s'en rapproche.
FRANÇAIS 77
Page 78
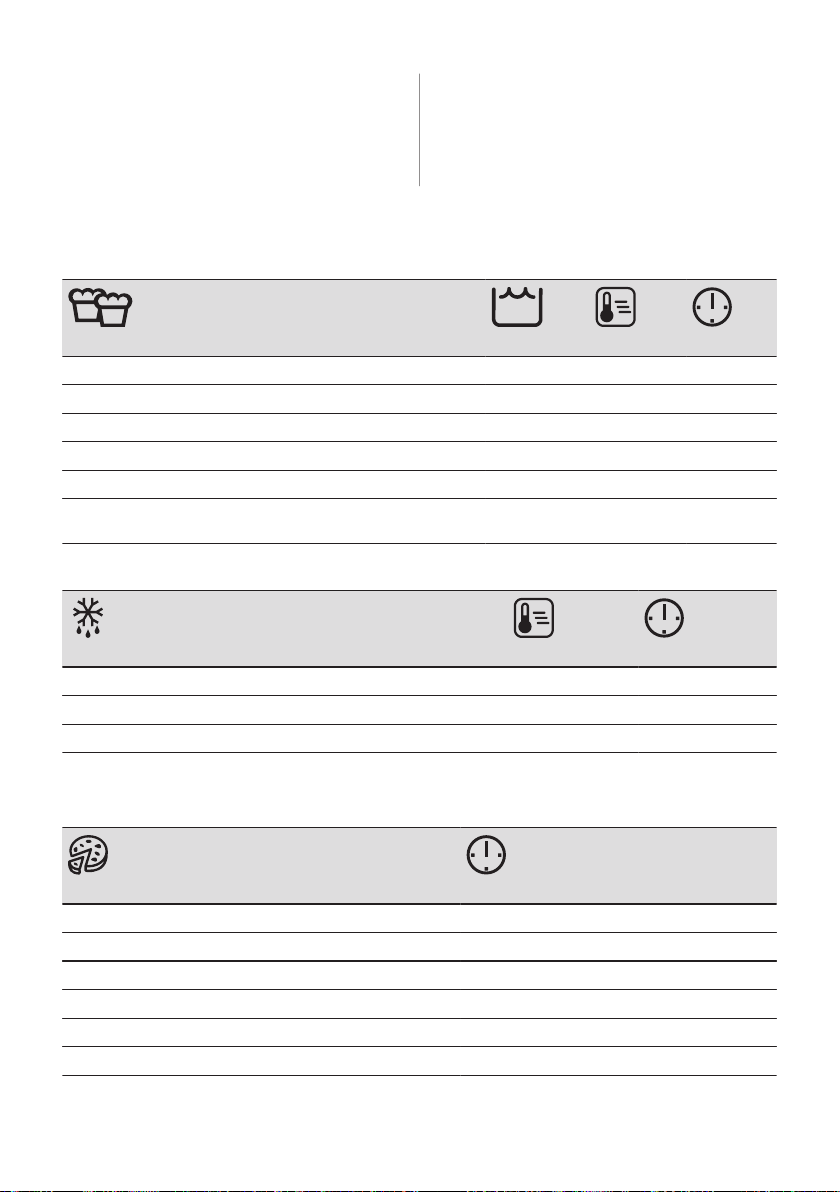
10.2 Intérieur de la porte
Vous trouverez à l'intérieur de la porte du
four :
• les numéros des niveaux d'enfournement.
10.3 Chaleur tournante PLUS
Utilisez le deuxième niveau de la grille.
Utilisez un plateau de cuisson.
• des informations sur les fonctions du four,
les niveaux d'enfournement et les
températures recommandés pour certains
plats.
GÂTEAUX / PÂTISSERIES / PAINS
(ml) (°C) (min)
Cookies / Scones / Croissants 100 150 - 180 10 - 20
Focaccia 100 200 - 210 10 - 20
Pizza 100 230 10 - 20
Pain & Petits pains 100 200 20 - 25
Pain 100 180 35 - 40
Gâteau aux prunes / Tarte aux pommes / Petits pains à la cannel‐
le, cuits dans un moule à gâteaux
100 - 150 160 - 180 30 - 60
Utilisez 150 ml d'eau, sauf indication contraire.
PLATS PRÉPARÉS SURGELÉS
(°C) (min)
Pizza 200 - 210 10 - 20
Croissants 170 - 180 15 - 25
Lasagnes, utilisez 200 ml 180 - 200 35 - 50
Utilisez 100 ml d'eau.
Réglez la température sur 110 °C.
RÉGÉNÉRATION DES ALIMENTS
(min)
Pain & Petits pains 10 - 20
Pain 15 - 25
Focaccia 15 - 25
Viande 15 - 25
Pâtes 15 - 25
Pizza 15 - 25
78 FRANÇAIS
Page 79
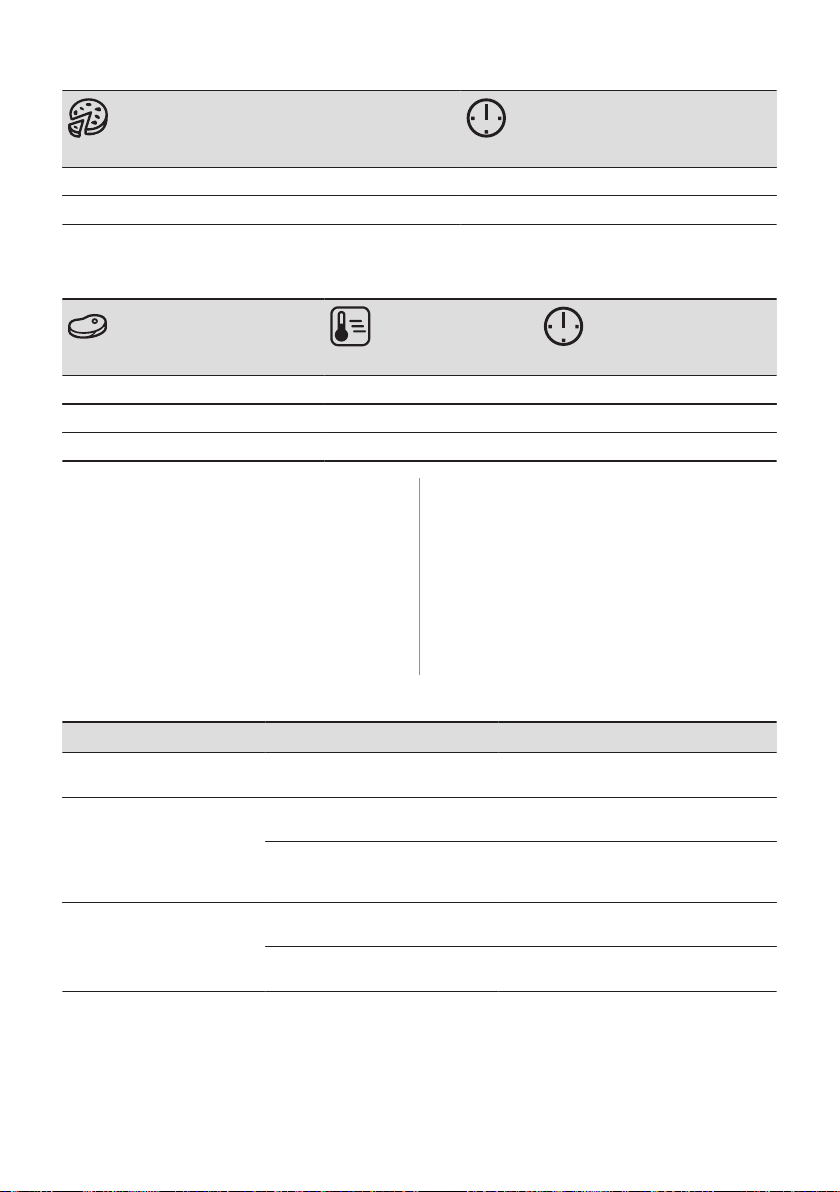
RÉGÉNÉRATION DES ALIMENTS
(min)
Riz 15 - 25
Légumes 15 - 25
Utilisez 200 ml d'eau.
Utilisez un plat de cuisson en verre.
RÔTI
(°C) (min)
Rôti de bœuf 200 50 - 60
Poulet 210 60 - 80
Rôti de porc 180 65 - 80
10.4 Cuisson
Pour la première cuisson, utilisez la
température inférieure.
Le temps de cuisson peut être prolongé de
10 à 15 minutes, si vous cuisez des gâteaux
sur plusieurs niveaux.
Les gâteaux et petites pâtisseries placés à
de manière homogène. S'ils ne dorent
uniformément, il n'est pas nécessaire de
modifier la température. Les différences
s'atténuent en cours de cuisson.
Les plateaux insérés dans le four peuvent se
déformer en cours de cuisson. Une fois les
plateaux refroidis, les déformations
disparaissent.
différentes hauteurs ne dorent pas toujours
10.5 Conseils de cuisson
Résultats de cuisson Cause possible Solution
Le dessous du gâteau n'est
pas suffisamment cuit.
Le gâteau s'affaisse et devient
mou ou plein de grumeaux.
Le gâteau est trop sec. Température de cuisson trop bas‐
La position de la grille est incorrec‐
te.
La température du four est trop éle‐
vée.
Température du four trop élevée et
durée de cuisson trop courte.
se.
Durée de cuisson trop longue. La prochaine fois, réduisez le temps de
Placez le gâteau sur un niveau plus bas.
La prochaine fois, réglez une température
du four légèrement plus basse.
Réglez une température de cuisson légè‐
rement inférieure et un temps de cuisson
plus long la prochaine fois.
La prochaine fois, réglez une température
du four plus élevée.
cuisson.
FRANÇAIS 79
Page 80
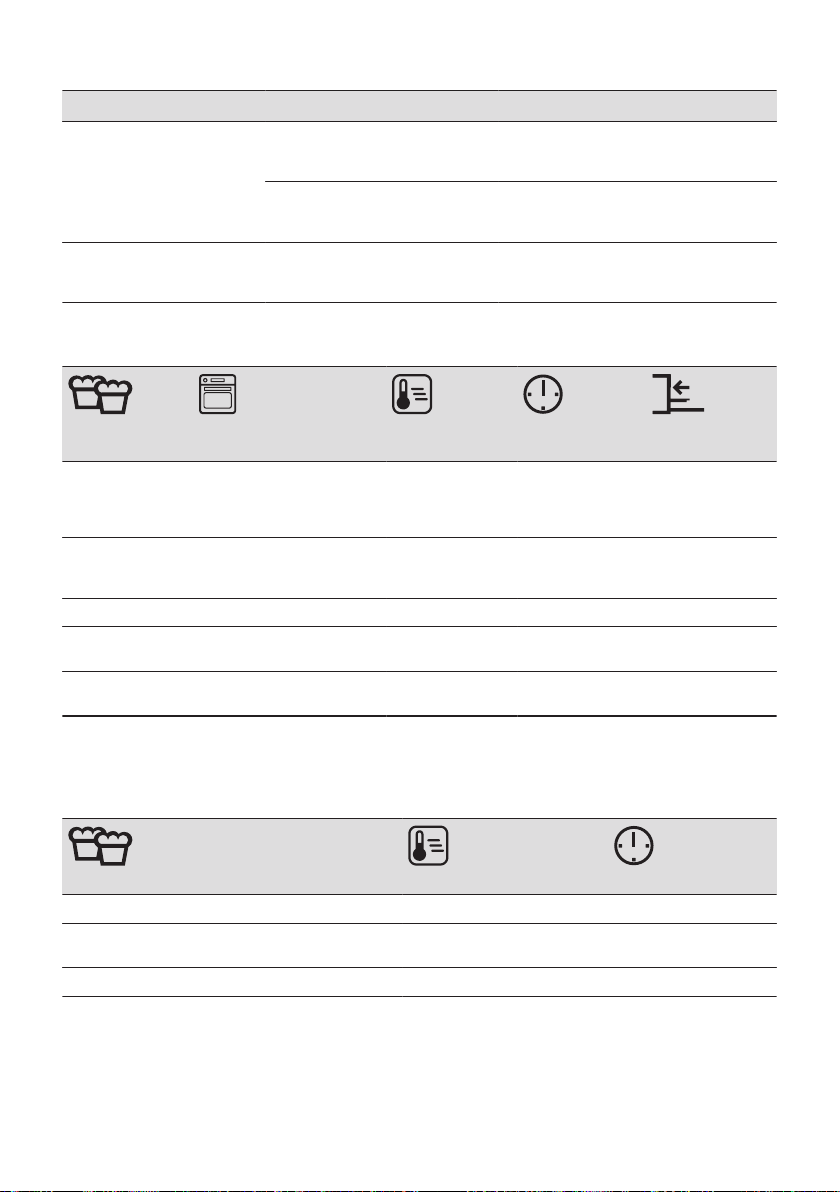
Résultats de cuisson Cause possible Solution
La cuisson du gâteau n'est
pas homogène.
Le gâteau n'est pas cuit à la
fin de la durée de cuisson indi‐
quée dans la recette.
Température du four trop élevée et
durée de cuisson trop courte.
La pâte à gâteau n'est pas correc‐
tement répartie.
Température de cuisson trop bas‐
se.
Réglez une température de cuisson légè‐
rement inférieure et un temps de cuisson
plus long la prochaine fois.
La prochaine fois, étalez la préparation de
façon homogène sur le plateau de cuis‐
son.
La prochaine fois, réglez une température
du four légèrement plus élevée.
10.6 Cuisson sur un seul niveau
SON DANS
(°C) (min)
DES MOULES
CUIS‐
Fond de tarte - pâ‐
te sablée, pré‐
chauffer le four à
vide
Fond de tarte mélange de génoi‐
se
Kouglof / Brioche Chaleur tournante 150 - 160 50 - 70 1
Cake de madère /
Cakes aux fruits
Gâteau au froma‐geChauffage Haut/Bas 170 - 190 60 - 90 1
Chaleur tournante 170 - 180 10 - 25 2
Chaleur tournante 150 - 170 20 - 25 2
Chaleur tournante 140 - 160 70 - 90 1
Utilisez le troisième niveau de la grille.
Utilisez la fonction : Chaleur tournante.
Utilisez un plateau de cuisson.
GÂTEAUX / PÂTISSERIES / PAINS
(°C) (min)
Gâteau avec garniture à base de crumble 150 - 160 20 - 40
Tartes aux fruits (à base de pâte levée/mélange de
génoise), utilisez un plat à rôtir
Tartes aux fruits à base de pâte sablée 160 - 170 40 - 80
150 35 - 55
Préchauffez le four à vide.
Utilisez la fonction : Chauffage Haut/Bas.
Utilisez un plateau de cuisson.
80 FRANÇAIS
Page 81
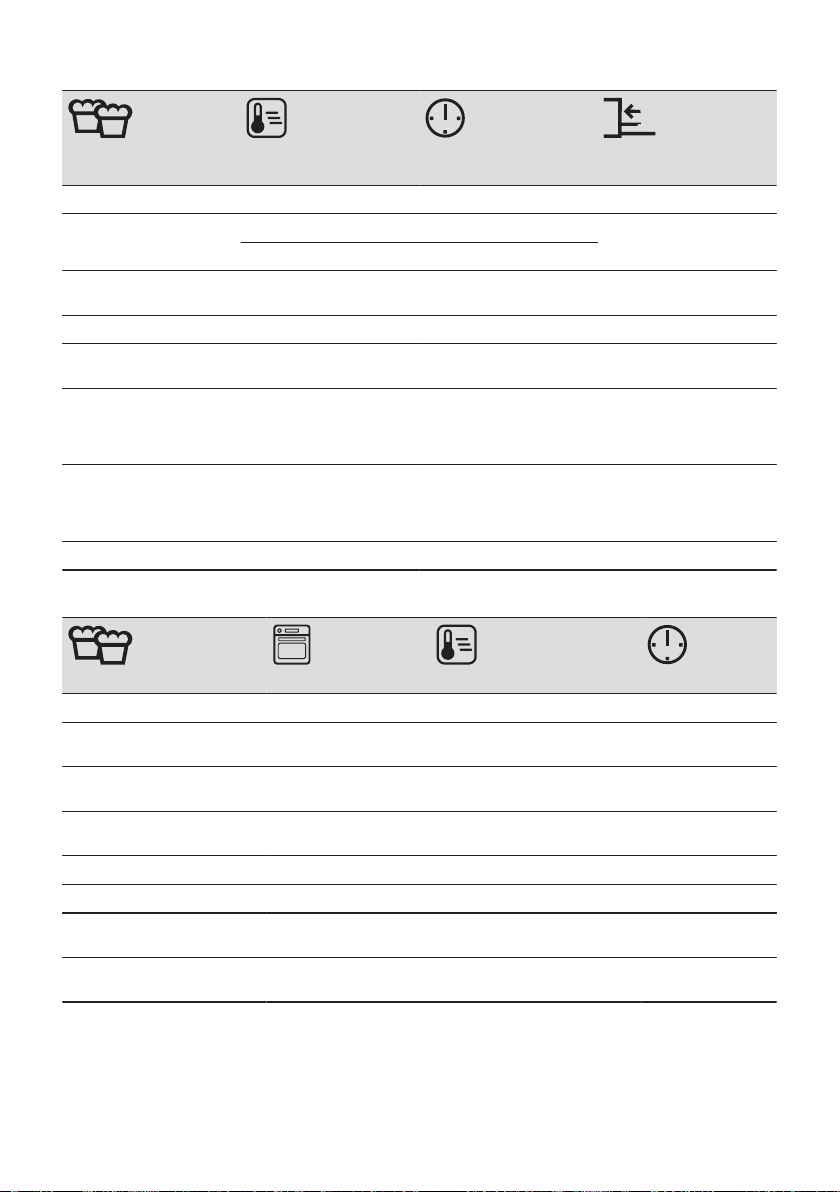
PÂTISSERIES /
(°C) (min)
PAINS
GÂTEAUX /
Gâteau Roulé 180 - 200 10 - 20 3
Pain de seigle: d'abord : 230 20 1
puis : 160 - 180 30 - 60
Gâteau aux amandes
beurré / Gâteaux au sucre
Choux à la crème / Éclairs 190 - 210 20 - 35 3
Pain tressé / Pain en for‐
me de couronne
Tartes aux fruits (à base
de pâte levée/mélange de
génoise), utilisez un plat à
rôtir
Gâteaux à base de levure
avec garnitures délicates
(par ex. fromage blanc,
crème, crème anglaise)
Brioche de Noël 160 - 180 50 - 70 2
190 - 210 20 - 30 3
170 - 190 30 - 40 3
170 35 - 55 3
160 - 180 40 - 80 3
Utilisez le troisième niveau de la grille.
BISCUITS
(°C) (min)
Biscuits sablés Chaleur tournante 150 - 160 10 - 20
Petits pains, préchauffer le
four à vide
Biscuits à base de mélange de
génoise
Pâte feuilletée, préchauffer le
four à vide
Biscuits à base de pâte levée Chaleur tournante 150 - 160 20 - 40
Meringues Chaleur tournante 100 - 120 30 - 50
Petites pâtisseries à base de
blanc d'œuf / Meringues
Petits pains, préchauffer le
four à vide
Chaleur tournante 160 10 - 25
Chaleur tournante 150 - 160 15 - 20
Chaleur tournante 170 - 180 20 - 30
Chaleur tournante 80 - 100 120 - 150
Chauffage Haut/Bas 190 - 210 10 - 25
10.7 Gratins
Utilisez le premier niveau de la grille.
FRANÇAIS 81
Page 82
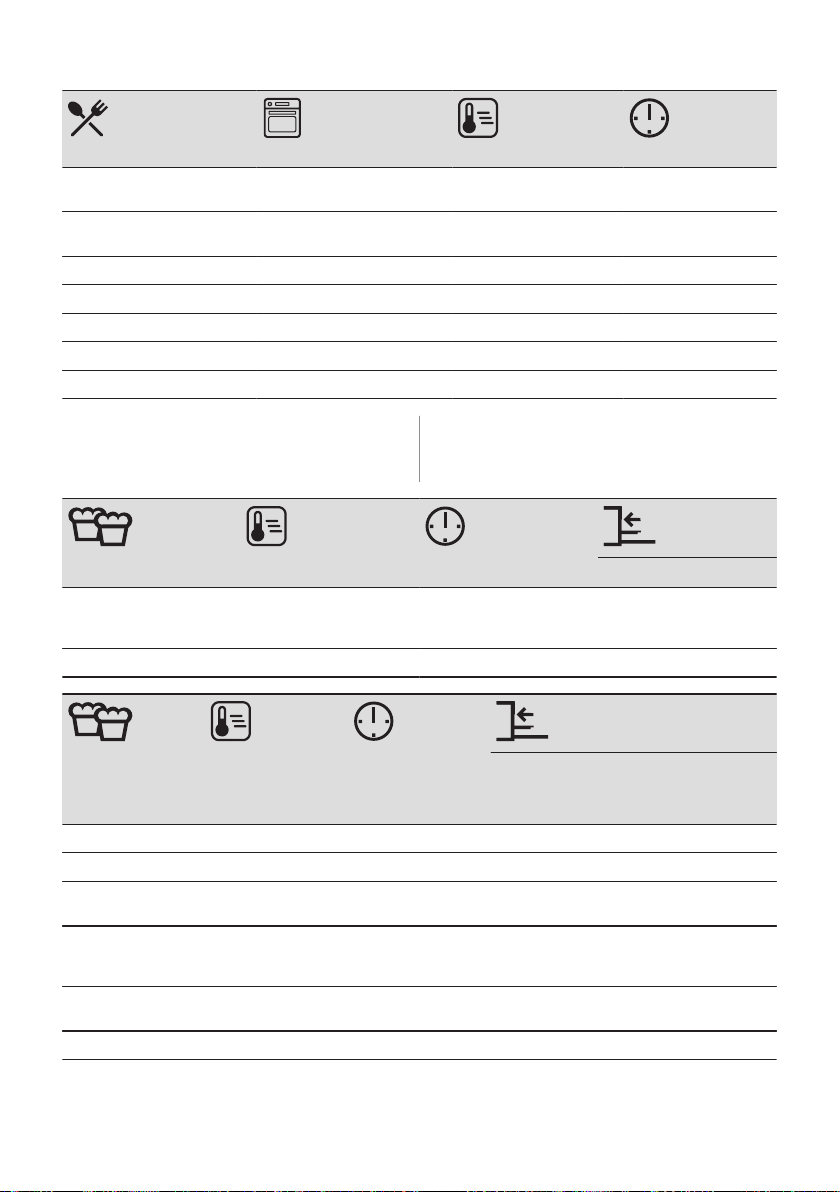
(°C) (min)
Baguettes nappées de fro‐
mage fondu
Gratin de légumes, préchauf‐
fer le four à vide
Lasagnes Chauffage Haut/Bas 180 - 200 25 - 40
Gratins de poisson Chauffage Haut/Bas 180 - 200 30 - 60
Légumes farcis Chaleur tournante 160 - 170 30 - 60
Gâteaux sucrés Chauffage Haut/Bas 180 - 200 40 - 60
Pâtes au four Chauffage Haut/Bas 180 - 200 45 - 60
Chaleur tournante 160 - 170 15 - 30
Turbo gril 160 - 170 15 - 30
10.8 Cuisson sur plusieurs niveaux
Utilisez les plateaux de cuisson.
Utilisez la fonction : Chaleur tournante.
GÂTEAUX /
PÂTISSERIES (°C) (min)
Choux à la crème /
Éclairs, préchauffer le four
à vide
Crumble sec 150 - 160 30 - 45 1 / 4
160 - 180 25 - 45 1 / 4
2 positions
BIS‐
CUITS / PETITS
GÂTEAUX /
(°C) (min)
2 positions 3 positions
VIENNOISE‐
RIES / ROULÉS
Petits pains 180 20 - 30 1 / 4 -
Biscuits sablés 150 - 160 20 - 40 1 / 4 1 / 3 / 5
Biscuits à base de
mélange de génoise
Pâte feuilletée, pré‐
chauffer le four à vi‐
de
Biscuits à base de
pâte levée
Meringues 100 - 120 40 - 80 1 / 4 -
160 - 170 25 - 40 1 / 4 -
170 - 180 30 - 50 1 / 4 -
160 - 170 30 - 60 1 / 4 -
82 FRANÇAIS
Page 83
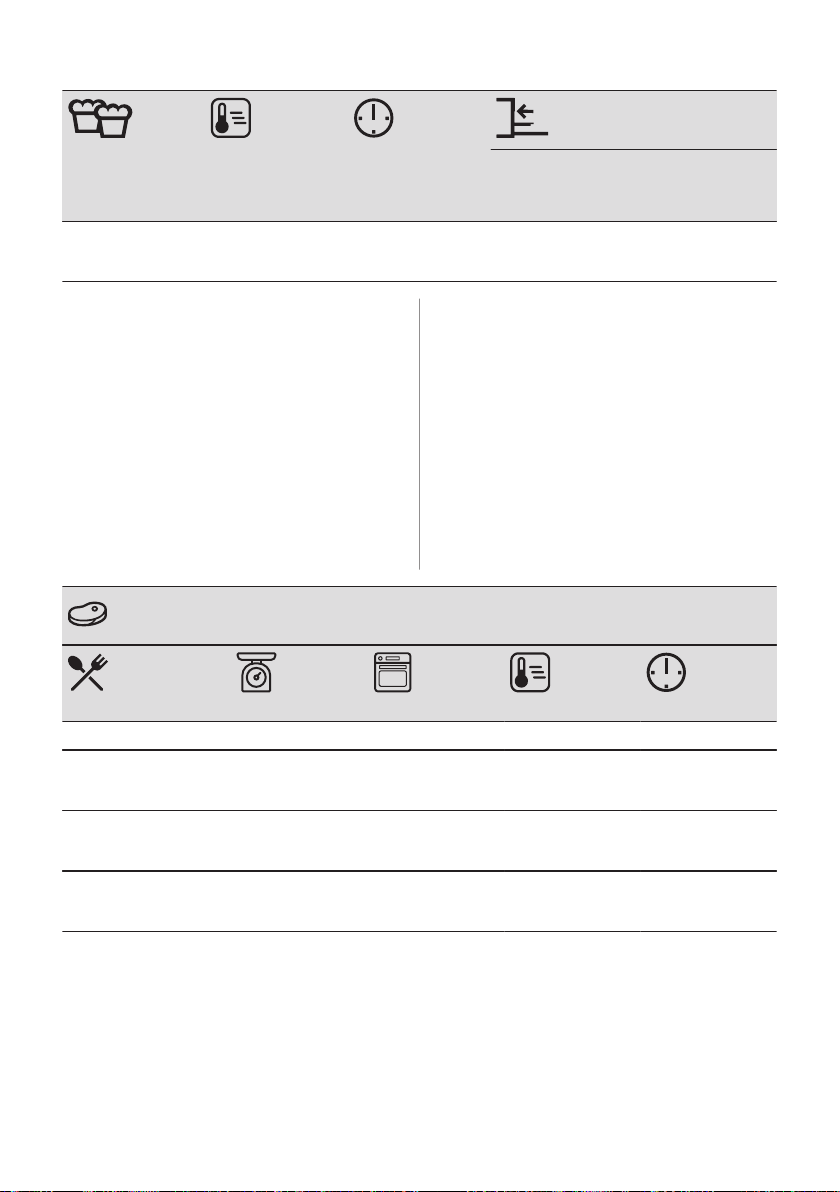
CUITS / PETITS
BIS‐
GÂTEAUX /
VIENNOISE‐
RIES / ROULÉS
Biscuits à base de
blanc d'œuf / Merin‐
gues
(°C) (min)
80 - 100 130 - 170 1 / 4 -
2 positions 3 positions
10.9 Conseils de rôtissage
Utilisez des plats résistant à la chaleur.
Viande maigre rôtie couverte (vous pouvez
utiliser du papier aluminium).
Faites rôtir les gros morceaux de viande
directement sur le plateau.
Pour éviter que les graisses de cuisson ne
Faites rôtir la viande et le poisson par gros
morceaux (au moins 1 kg).
Si le niveau un est suggéré, placez les
aliments directement sur le plateau de
cuisson
Arrosez les morceaux de viande avec leur
propre jus de cuisson plusieurs fois durant la
cuisson.
brûlent, versez un peu d'eau dans le plat à
rôtir.
Si nécessaire, retournez le rôti à la moitié ou
10.10 Rôtissage
Utilisez le premier niveau de la grille.
aux deux tiers du temps de cuisson.
BŒUF
(°C) (min)
Bœuf braisé 1 - 1,5 kg Chauffage Haut/Bas 230 120 - 150
Rôti ou filet de bœuf, sai‐
gnant, préchauffer le four
à vide
Rôti ou filet de bœuf, à
point, préchauffer le four
à vide
Rôti ou filet de bœuf,
bien cuit, préchauffer le
four à vide
par cm d'épaisseur Turbo gril 190 - 200 5 - 6
par cm d'épaisseur Turbo gril 180 - 190 6 - 8
par cm d'épaisseur Turbo gril 170 - 180 8 - 10
FRANÇAIS 83
Page 84
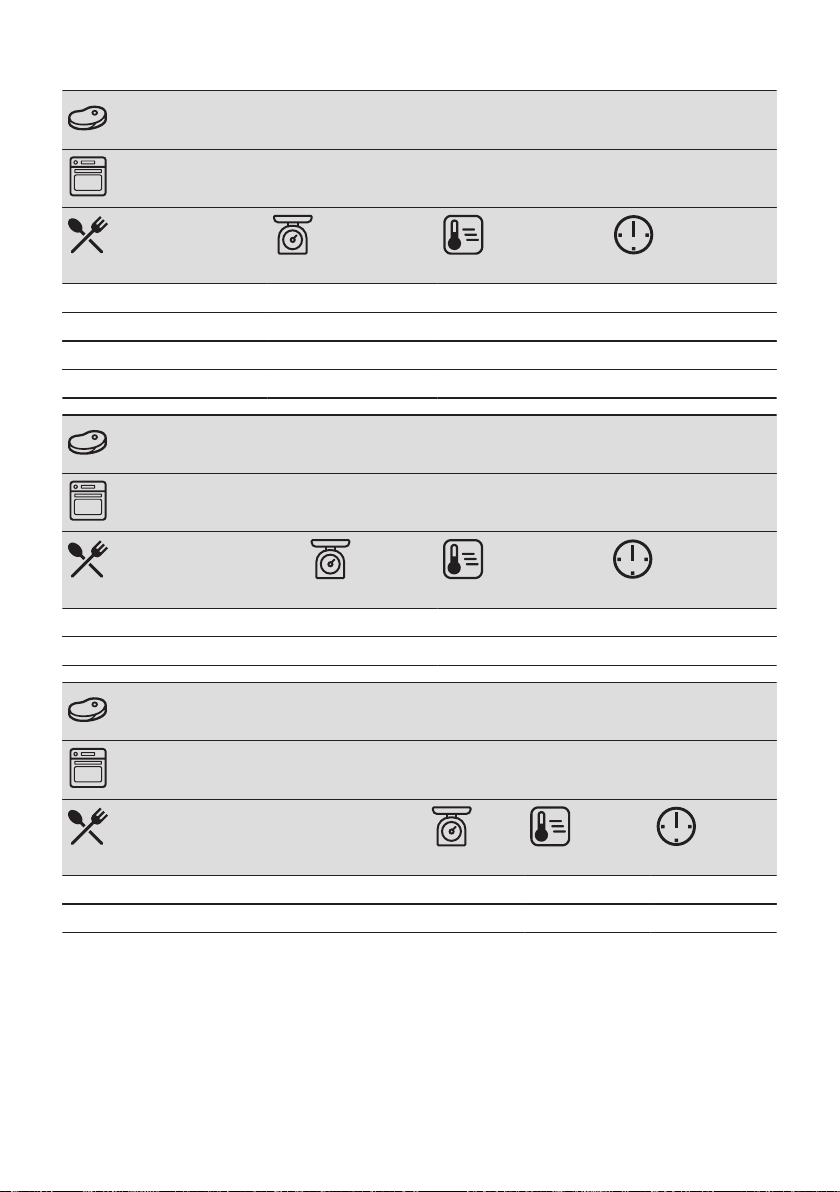
PORC
Utilisez la fonction : Turbo gril.
(kg)
Épaule / Cou / Noix de jambon 1 - 1.5 160 - 180 90 - 120
Côtelettes / Travers de porc 1 - 1.5 170 - 180 60 - 90
Rôti haché 0.75 - 1 160 - 170 50 - 60
Jarret de porc, précuit 0.75 - 1 150 - 170 90 - 120
(°C) (min)
VEAU
Utilisez la fonction : Turbo gril.
(kg)
Rôti de veau 1 160 - 180 90 - 120
Jarret de veau 1.5 - 2 160 - 180 120 - 150
(°C) (min)
AGNEAU
Utilisez la fonction : Turbo gril.
(kg)
Gigot d'agneau / Rôti d'agneau 1 - 1.5 150 - 170 100 - 120
Râble d'agneau 1 - 1.5 160 - 180 40 - 60
(°C) (min)
84 FRANÇAIS
Page 85
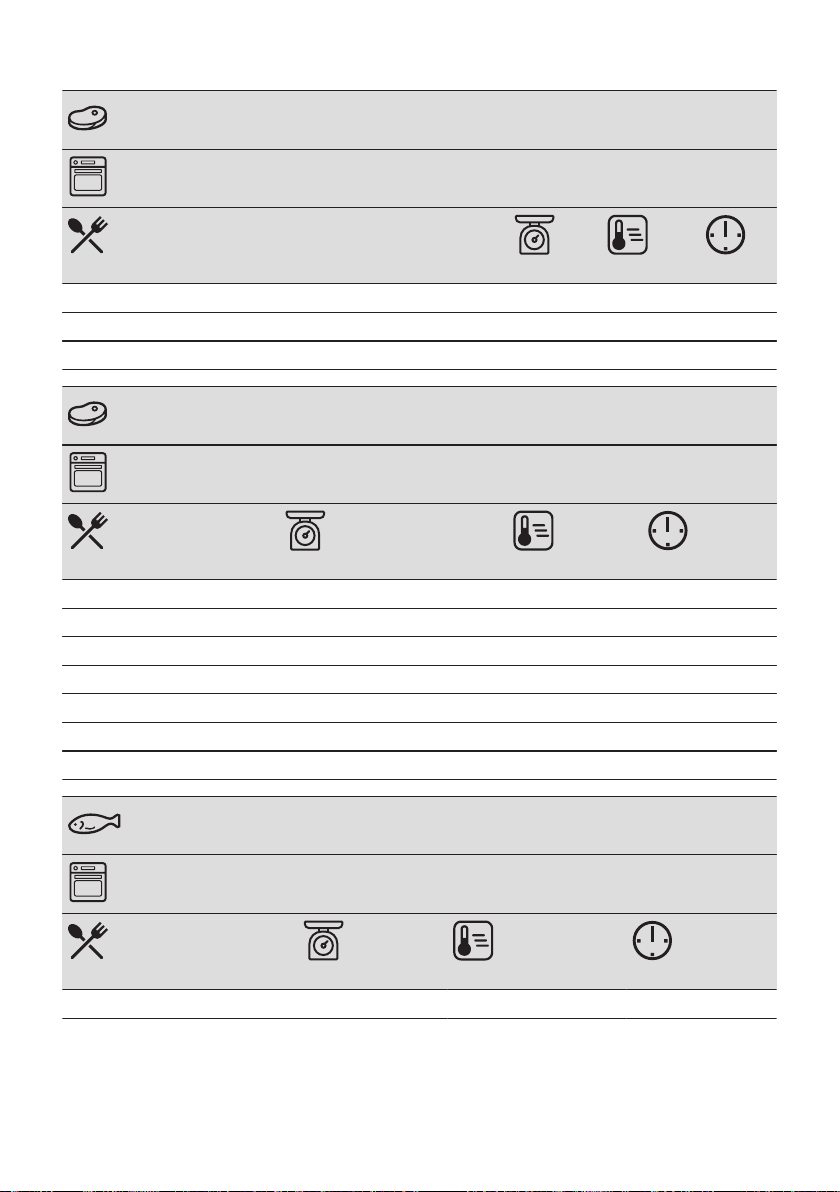
GIBIER
Utilisez la fonction : Chauffage Haut/Bas.
(kg)
Râble / Cuisse de lièvre, préchauffer le four à vide jusqu'à 1 230 30 - 40
Râble de cerf 1.5 - 2 210 - 220 35 - 40
Cuissot de chevreuil 1.5 - 2 180 - 200 60 - 90
(°C) (min)
VOLAILLE
Utilisez la fonction : Turbo gril.
(kg)
Volaille, portions 0,2 - 0,25 chacun 200 - 220 30 - 50
Poulet, moitié 0,4 - 0,5 chacun 190 - 210 35 - 50
Poulet, poularde 1 - 1.5 190 - 210 50 - 70
Canard 1.5 - 2 180 - 200 80 - 100
Oie 3.5 - 5 160 - 180 120 - 180
Dinde 2.5 - 3.5 160 - 180 120 - 150
Dinde 4 - 6 140 - 160 150 - 240
(°C) (min)
POISSON (À LA VAPEUR)
Utilisez la fonction : Chauffage Haut/Bas.
(kg)
Poisson entier 1 - 1.5 210 - 220 40 - 60
(°C) (min)
FRANÇAIS 85
Page 86
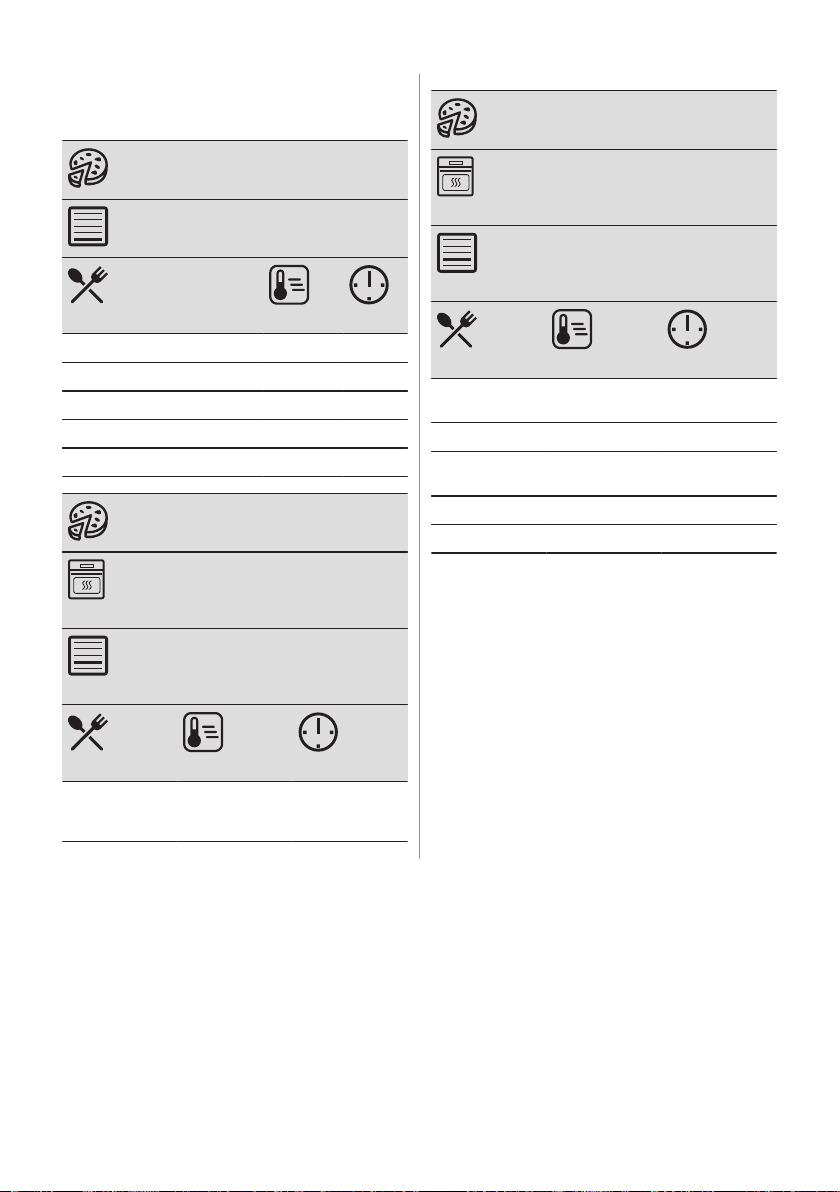
10.11 Cuisson croustillante avec la fonction :Fonction Pizza
PIZZA
PIZZA
Utilisez le premier niveau de la grille.
(°C) (min)
Tartes 180 - 200 40 - 55
Flan d'épinards 160 - 180 45 - 60
Quiche lorraine / Flan suisse 170 - 190 45 - 55
Gâteau au fromage 140 - 160 60 - 90
Tarte aux légumes 160 - 180 50 - 60
PIZZA
Avant la cuisson, faites préchauffer
votre four vide.
Utilisez le deuxième niveau de la gril‐
le.
Avant la cuisson, faites préchauffer
votre four vide.
Utilisez le deuxième niveau de la gril‐
le.
(°C) (min)
Pizza, croûte
épaisse
Pain sans levain 230 - 250 10 - 20
Flan de pâte
feuilletée
Tarte flambée 230 - 250 12 - 20
Raviolis russes 180 - 200 15 - 25
180 - 200 20 - 30
160 - 180 45 - 55
10.12 Gril
Avant la cuisson, faites préchauffer votre four
vide.
Ne faites griller que des morceaux plats de
viande ou de poisson.
Placez un plat au premier niveau pour
récupérer les graisses.
(°C) (min)
Pizza, croûte fi‐
ne, utilisez un
plat à rôtir
200 - 230 15 - 20
86 FRANÇAIS
Page 87
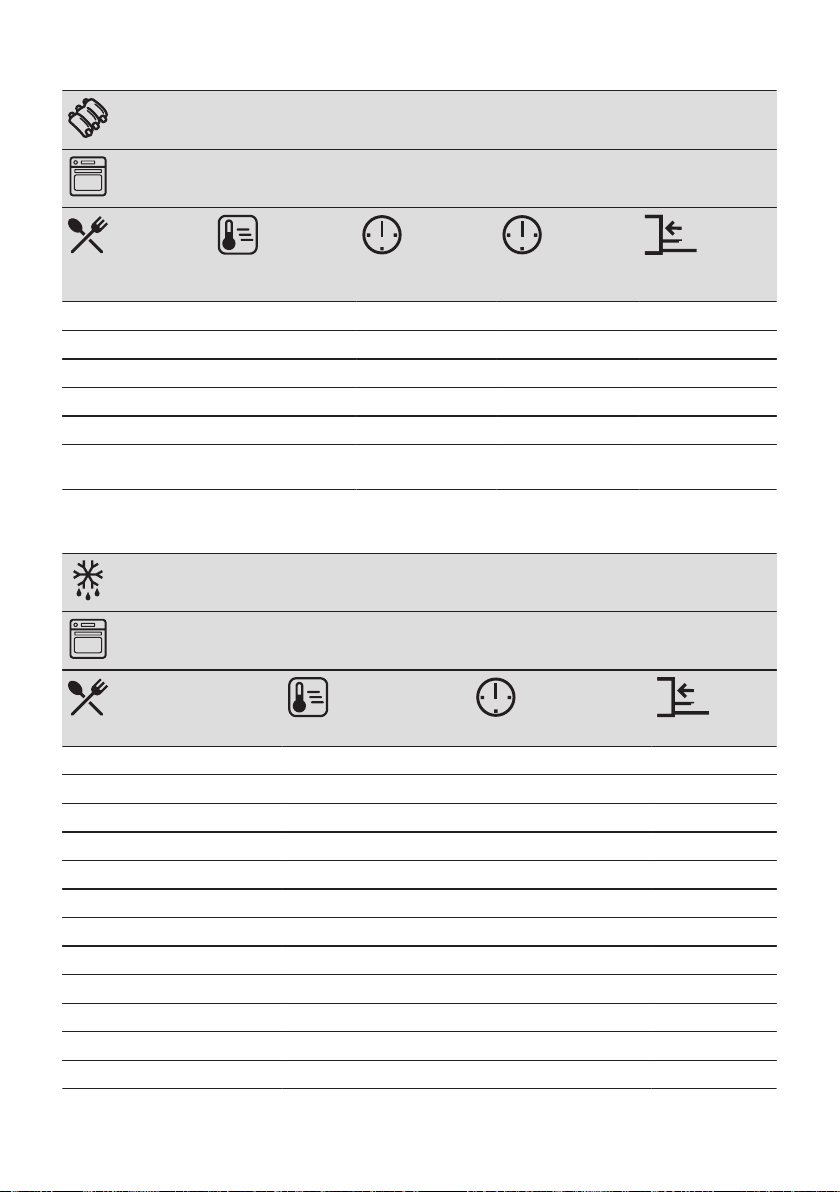
GRIL
Utilisez la fonction : Gril
(°C) (min)
1re face
Rôti de bœuf 210 - 230 30 - 40 30 - 40 2
Filet de bœuf 230 20 - 30 20 - 30 3
Filet mignon de porc 210 - 230 30 - 40 30 - 40 2
Filet mignon de veau 210 - 230 30 - 40 30 - 40 2
Râble d'agneau 210 - 230 25 - 35 20 - 25 3
Poisson entier, 0,5 kg
- 1 kg
210 - 230 15 - 30 15 - 30 3 / 4
(min)
2e face
10.13 Plats Surgelés
DÉCONGÉLATION
Utilisez la fonction : Chaleur tournante.
(°C) (min)
Pizza, surgelée 200 - 220 15 - 25 2
Pizza américaine, surgelée 190 - 210 20 - 25 2
Pizza, froide 210 - 230 13 - 25 2
Parts de pizza surgelées 180 - 200 15 - 30 2
Frites, fines 200 - 220 20 - 30 3
Frites, épaisses 200 - 220 25 - 35 3
Pommes quartiers / Croquettes 220 - 230 20 - 35 3
Rösti 210 - 230 20 - 30 3
Lasagnes / Cannelloni, frais 170 - 190 35 - 45 2
Lasagnes / Cannelloni, surgelés 160 - 180 40 - 60 2
Fromage cuit au four 170 - 190 20 - 30 3
Ailes de poulet 190 - 210 20 - 30 2
FRANÇAIS 87
Page 88
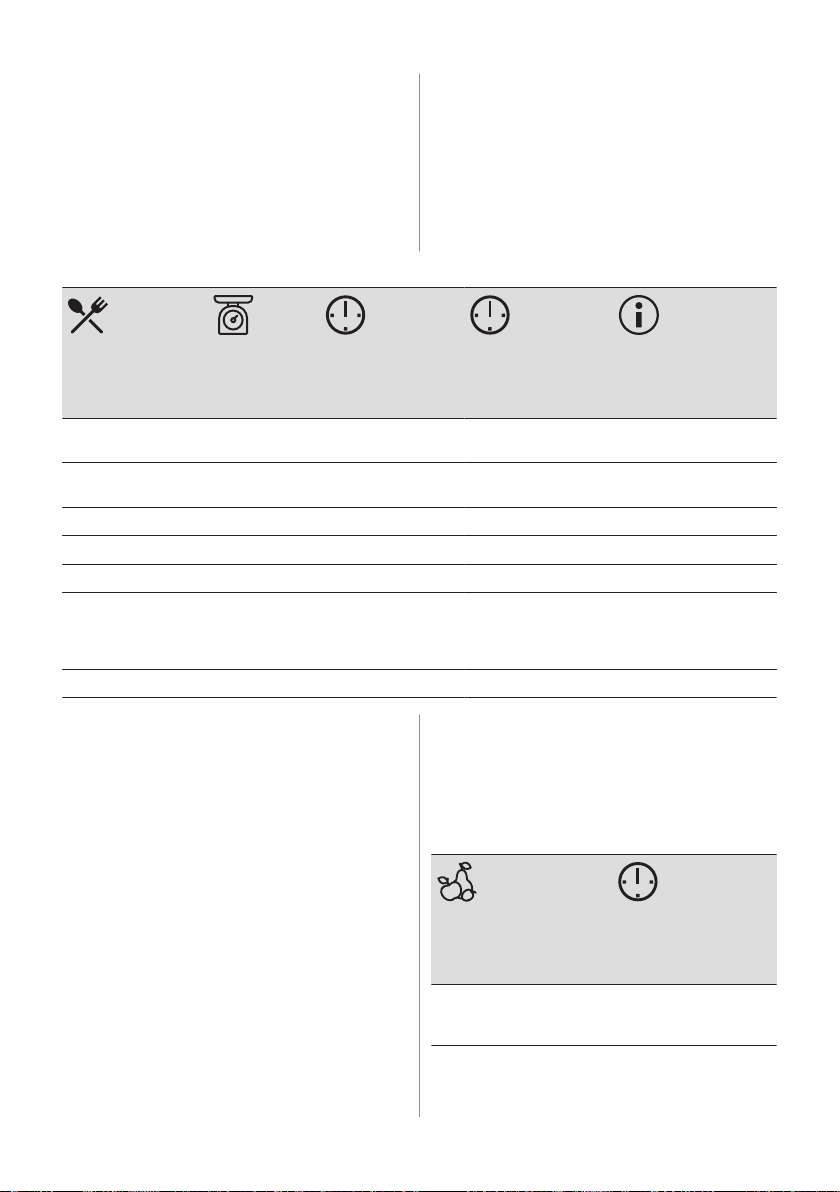
10.14 Décongélation
Retirez l'emballage des aliments puis placezles dans une assiette.
Ne couvrez pas les aliments car cela peut
rallonger le temps de décongélation.
Pour les grosses quantités d'aliments, placez
une assiette vide retournée au fond de la
Utilisez le premier niveau de la grille.
cavité. Placez les aliments dans un plat
creux, et posez le tout sur l'assiette retournée
dans le four. Retirez les supports de grille si
nécessaire.
(kg)
Poulet 1 100 - 140 20 - 30 Retournez à la moitié du
Viande 1 100 - 140 20 - 30 Retournez à la moitié du
Truite 0,15 25 - 35 10 - 15 -
Fraises 0,3 30 - 40 10 - 20 -
Beurre 0,25 30 - 40 10 - 15 -
Crème 2 x 0,2 80 - 100 10 - 15 La crème fraîche peut
Gâteau 1,4 60 60 -
10.15 Stérilisation
Utilisez la fonction Cuisson de sole.
Utilisez toujours des bocaux à stériliser de
dimensions identiques, disponibles dans le
commerce.
(min)
Temps de décon‐
gélation
Lorsque le liquide contenu dans les pots
commence à frémir (au bout d'environ 35 à
60 minutes pour des pots d'un litre), éteignez
le four ou réduisez la température à 100 °C
(reportez-vous au tableau).
Réglez la température sur 160 - 170 °C.
(min)
Temps de décon‐
gélation supplé‐
mentaire
temps.
temps.
être battue même si elle
n'est pas complètement
décongelée.
N'utilisez pas de bocaux à couvercles à
visser ou à baïonnette, ni de boîtes
métalliques.
Utilisez le premier niveau de la grille.
Ne mettez pas plus de six bocaux à
conserves d'un litre sur le plateau de cuisson.
Remplissez les bocaux au même niveau et
enclenchez le système de fermeture.
Les bocaux ne doivent pas se toucher.
BAIES
Fraises / Myrtilles / Fram‐
boises / Groseilles à ma‐
quereau mûres
(min)
Cuisson jusqu'à ce
que la préparation
commence à frémir
35 - 45
Mettez environ 1/2 litre d'eau dans le plateau
de cuisson pour humidifier le four.
88 FRANÇAIS
Page 89
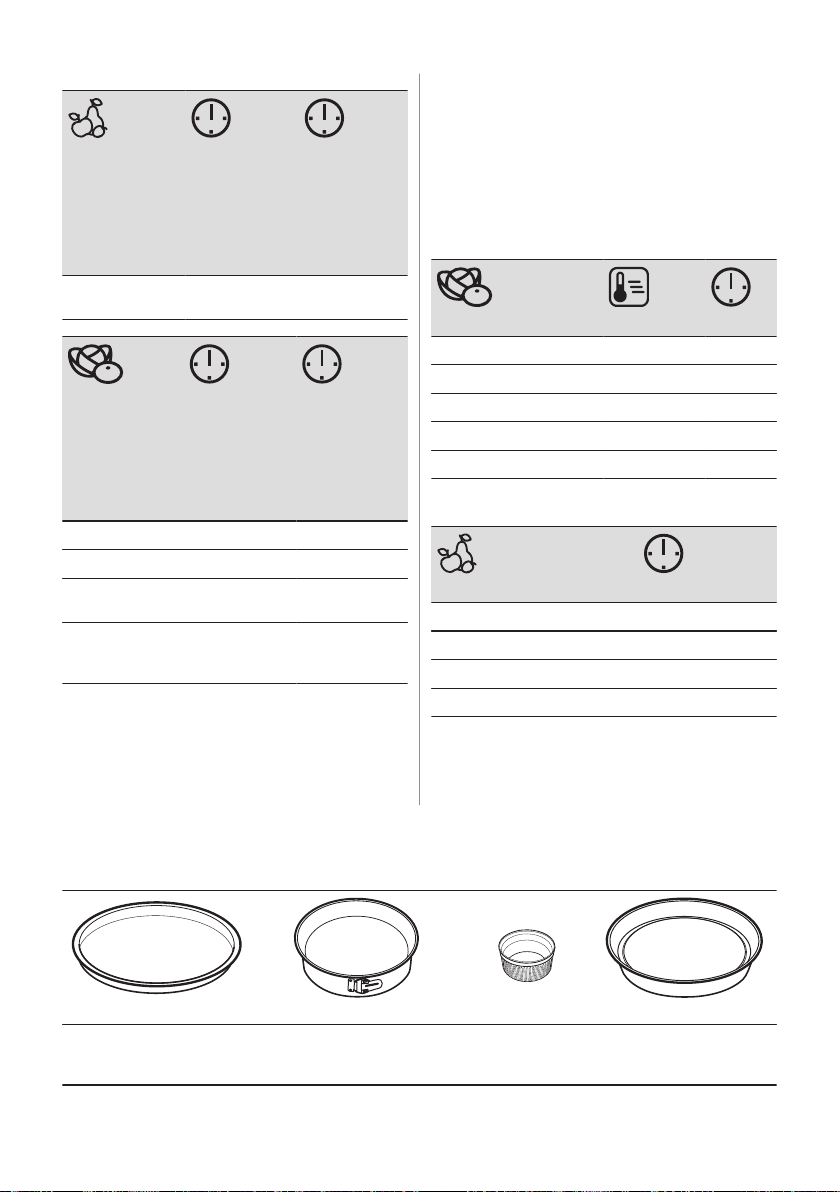
FRUITS
À NOYAU (min)
Cuisson jus‐
qu'à ce que
la prépara‐
(min)
Continuez la
cuisson à
100 °C
tion com‐
mence à fré‐
mir
Pêches / Coings /
Prunes
35 - 45 10 - 15
LÉ‐
GUMES (min)
Cuisson jus‐
qu'à ce que
la prépara‐
(min)
Continuez la
cuisson à
100 °C
tion com‐
mence à fré‐
mir
Carottes 50 - 60 5 - 10
Concombres 50 - 60 -
Conserves au vi‐
naigre
Chou-rave / Pe‐
tits pois / Asper‐
ges
50 - 60 5 - 10
50 - 60 15 - 20
10.16 Déshydratation - Chaleur tournante
Couvrez les plateaux avec du papier sulfurisé
ou du papier de cuisson.
Pour de meilleurs résultats, arrêtez le four à
mi-cuisson, ouvrez la porte et laissez-la
refroidir pendant une nuit pour terminer le
séchage.
Pour un plateau, utilisez le troisième niveau
de la grille.
Pour deux plateaux, utilisez les premier et
quatrième niveaux de la grille.
LÉGUMES
(°C) (h)
Haricots 60 - 70 6 - 8
Poivrons 60 - 70 5 à 6
Légumes pour soupe 60 - 70 5 à 6
Champignons 50 - 60 6 - 8
Herbes 40 - 50 2 à 3
Réglez la température sur 60 - 70 °C.
FRUITS
(h)
Prunes 8 à 10
Abricots 8 à 10
Tranches de pommes 6 - 8
Poires 6 à 9
10.17 Chaleur tournante humide - accessoires recommandés
Utilisez les moules et récipients foncés et non réfléchissants. Ils offrent une meilleure
absorption de la chaleur que les plats réfléchissants de couleur claire.
Plaque à pizza
Sombre, non réfléchissant
Diamètre de 28 cm
Plat de cuisson
Sombre, non réfléchissant
Diamètre : 26 cm
Ramequins
Céramique
8 cm de diamètre,
5 cm de hauteur
Moule pour fond de tarte
Sombre, non réfléchissant
Diamètre de 28 cm
FRANÇAIS 89
Page 90
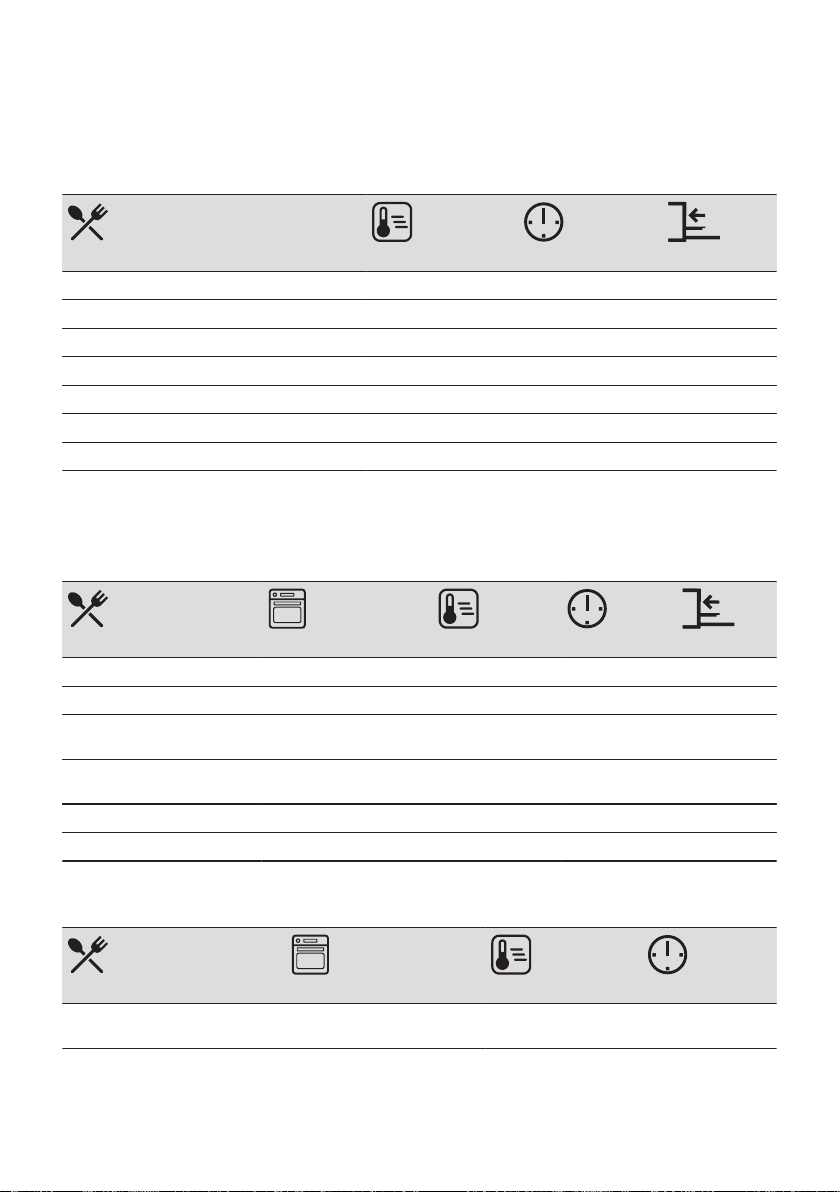
10.18 Chaleur tournante humide
Pour de meilleurs résultats, suivez les
suggestions indiquées dans le tableau cidessous.
(°C) (min)
Gressins, 0,5 kg au total 190 - 200 50 - 60 3
Coquilles Saint-Jacques cuites au four 180 - 200 30 - 40 4
Poisson entier en sel, 0,3 - 0,5 kg 190 - 200 45 - 50 4
Poisson entier en papier sulfurisé, 0,3 - 0,5 kg 190 - 200 50 - 60 3
Amaretti (20 ; 0,5 kg au total) 170 - 180 40 - 50 3
Crumble aux pommes 190 - 200 50 - 60 4
Muffins au chocolat (20 ; 0,5 kg au total) 160 - 170 35 - 45 3
10.19 Informations pour les organismes de contrôle
Tests conformes aux normes : EN 60350, IEC 60350.
Cuisson sur un niveau - cuisson en moule
°C min
Génoise allégée Chaleur tournante 160 45 - 60 2
Génoise allégée Chauffage Haut/Bas 160 45 - 60 2
Tarte aux pommes, 2 moules
Ø20 cm
Tarte aux pommes, 2 moules
Ø20 cm
Sablé Chaleur tournante 140 25 - 35 2
Sablé Chauffage Haut/Bas 140 25 - 35 2
Chaleur tournante 160 55 - 65 2
Chauffage Haut/Bas 180 55 - 65 1
Cuisson sur un niveau - biscuits
Utilisez le troisième niveau de la grille.
Petits gâteaux, 20 par plateau,
préchauffer le four à vide
Chaleur tournante 150 20 - 30
90 FRANÇAIS
°C min
Page 91
°C min
Petits gâteaux, 20 par plateau,
préchauffer le four à vide
Chauffage Haut/Bas 170 20 - 30
Cuisson sur plusieurs niveaux - biscuits
°C min
Sablé Chaleur tournante 140 25 - 45 2 / 4
Petits gâteaux, 20 par plateau,
préchauffer le four à vide
Génoise allégée Chaleur tournante 160 45 - 55 2 / 4
Tarte aux pommes, 1 pain
moulé par grille (Ø 20 cm)
Chaleur tournante 150 25 - 35 1 / 4
Chaleur tournante 160 55 - 65 2 / 4
Gril
Préchauffez le four vide pendant 5 minutes.
Réglez le gril à la température maximale.
min
Pain grillé Gril 1 - 2 5
Steak de bœuf, tourner à mi-cuis‐
son
Gril 24 - 30 4
11. ENTRETIEN ET NETTOYAGE
AVERTISSEMENT!
Reportez-vous aux chapitres concernant
la sécurité.
11.1 Remarques concernant le nettoyage
Nettoyez l’avant de l’appareil uniquement avec un chiffon en microfibre imbibé d’eau tiède et
d’un détergent doux.
Utilisez une solution de nettoyage pour nettoyer les surfaces métalliques.
Agent nettoyant
Nettoyez les taches avec un détergent doux. Ne l'appliquez sur les surfaces catalytiques.
FRANÇAIS 91
Page 92
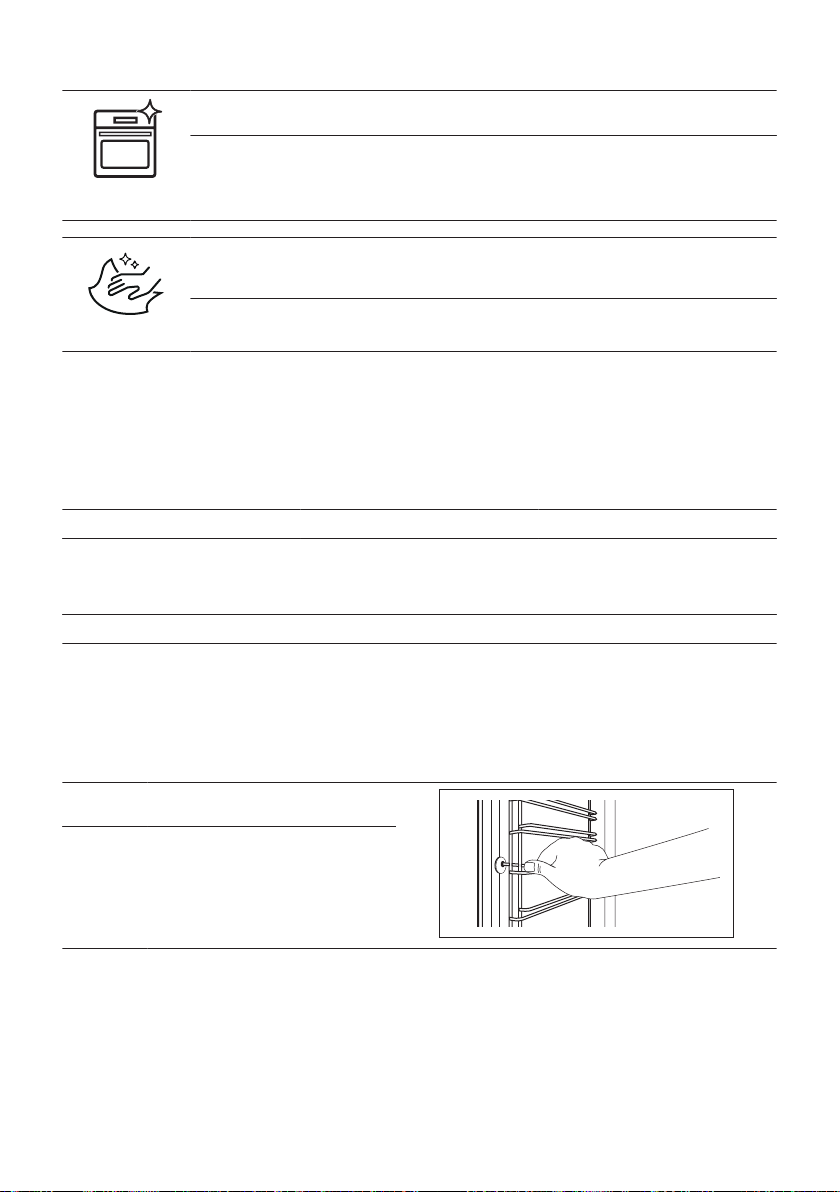
Nettoyez la cavité après chaque utilisation. L’accumulation de graisse ou d’autres résidus
peut provoquer un incendie.
Ne conservez pas les aliments dans l'appareil pendant plus de 20 minutes. Séchez la cavité
Utilisation quoti‐
dienne
Accessoires
uniquement avec un chiffon en microfibre après chaque utilisation.
Nettoyez tous les accessoires après chaque utilisation et laissez-les sécher. Utilisez unique‐
ment un chiffon en microfibre avec de l’eau tiède et un détergent doux. Ne lavez pas les ac‐
cessoires au lave-vaisselle .
Ne nettoyez pas les accessoires anti-adhésifs avec un produit nettoyant abrasif ou des ob‐
jets tranchants.
11.2 Comment nettoyer : Bac de la cavité
Nettoyez le bac de la cavité pour retirer les
résidus de calcaire après une cuisson à la
vapeur.
Étape 1 Étape 2 Étape 3
Versez 250 ml de vinaigre blanc
dans le bac de la cavité. Utilisez du
vinaigre à 6 % maximum, sans addi‐
tifs.
Pour la fonction : Chaleur tournante PLUS nettoyez le four tous les 5 à 10 cycles de cuisson.
Laissez le vinaigre dissoudre les ré‐
sidus de calcaire à température am‐
biante pendant 30 minutes.
Nettoyez la cavité avec de l’eau
chaude et un chiffon doux.
11.3 Comment retirer : Supports de grille
Retirez les supports de grille pour nettoyer le
four.
Étape 1 Éteignez le four et attendez qu’il soit
Étape 2 Écartez l'avant du support de grille de
froid.
la paroi latérale.
92 FRANÇAIS
Page 93
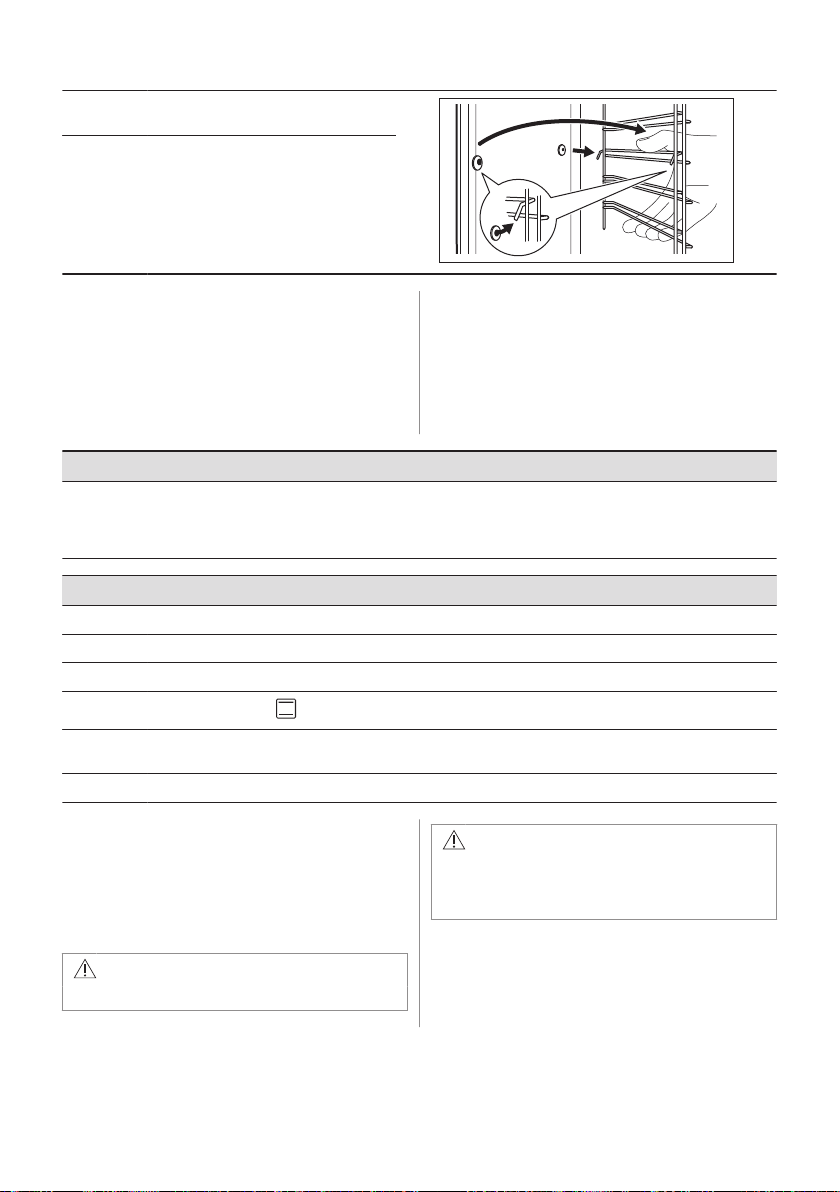
Étape 3 Écartez l'arrière du support de grille
2
1
Étape 4 Installez les supports de grille dans
de la paroi latérale et retirez-le.
l'ordre inverse.
11.4 Comment utiliser : Couvercle du ventilateur catalytique
Le couvercle du ventilateur est revêtu d'émail
catalytique. Il absorbe les graisses qui se
déposent sur les parois pendant que le four
nettoyage, chauffez régulièrement le four à
vide.
Les taches ou la décoloration du revêtement
catalytique n’ont aucune incidence sur le
nettoyage.
fonctionne. Pour faciliter la procédure d'auto-
Avant le nettoyage catalytique
Éteignez le four et attendez qu’il
Nettoyage du four par catalyse
Étape 1 Éteignez le four et attendez qu’il soit froid.
Étape 2 Retirez les accessoires et les supports de grille amovibles.
Étape 3 Nettoyez la cavité du four à l'eau chaude et au liquide vaisselle, puis faites-la sécher.
Étape 4
Étape 5 Réglez la température : 250 °C.
Étape 6 Lorsque le four est froid, nettoyez la cavité avec un chiffon doux et humide.
soit froid.
Réglez la fonction : .
Durée : 1 h
11.5 Comment démonter et installer : Porte
Vous pouvez retirer la porte ainsi que les
panneaux de verre intérieurs pour les
nettoyer. Le nombre de vitres diffère selon les
Retirez les accessoires et les sup‐
ports de grille amovibles.
ATTENTION!
Manipulez soigneusement la vitre, en
particulier autour des bords du panneau
avant Le verre peut se briser.
Nettoyez le sol du four et la vitre in‐
terne de la porte avec de l’eau tiède,
un chiffon doux et un détergent
doux.
modèles.
AVERTISSEMENT!
La porte est lourde.
FRANÇAIS 93
Page 94
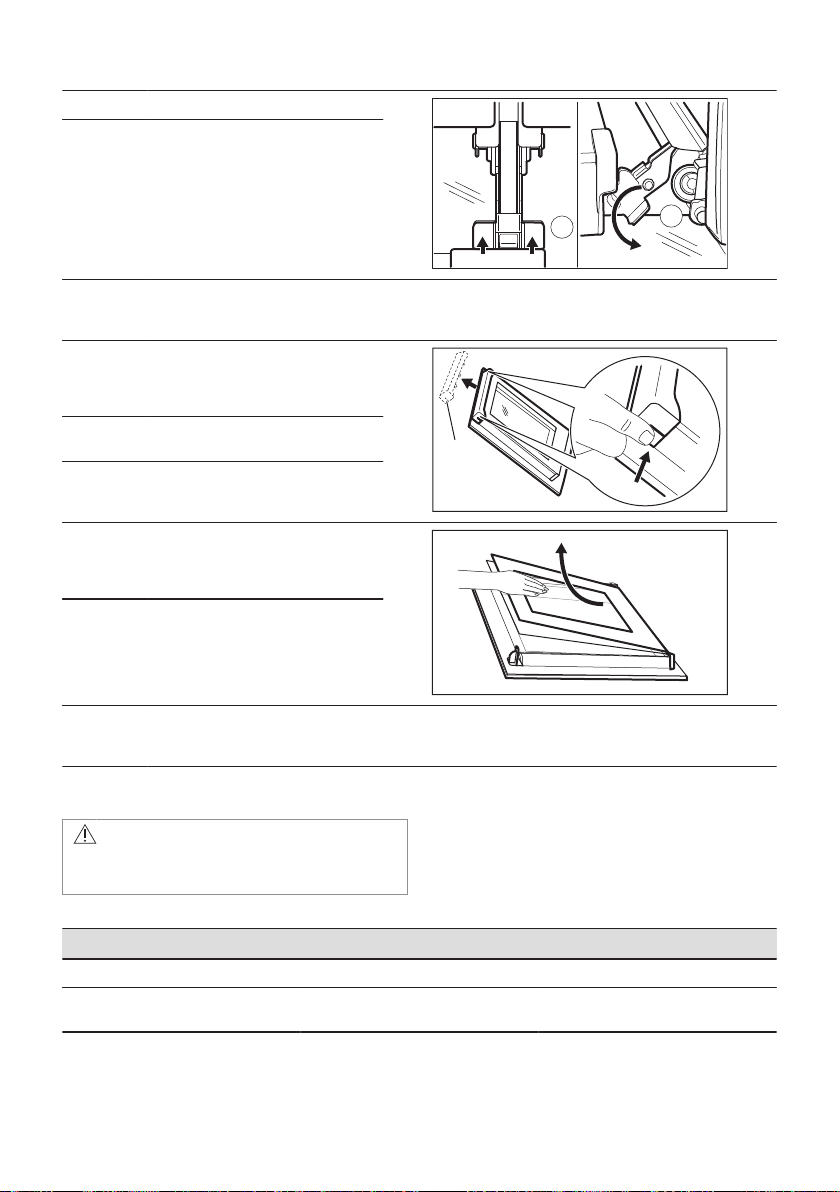
Étape 1 Ouvrez entièrement la porte.
A
A
1
2
B
Étape 2 Soulevez et appuyez sur les leviers
de blocage (A) sur les deux char‐
nières de la porte.
Étape 3 Fermez la porte du four à la première position (à un angle d'environ 70°). Tenez la porte des deux
Étape 4 Tenez la garniture de porte (B) sur
Étape 5 Retirez le cache de la porte en le ti‐
Étape 6 Saisissez les panneaux de verre de
Étape 7 Nettoyez la vitre à l'eau savonneu‐
Étape 8 Après le nettoyage, effectuez les
Étape 9 Installez d'abord le plus petit des panneaux, puis le plus grand, et terminez par la porte.
côtés et retirez-la du four en la soulevant. Posez la porte, face extérieure vers le bas, sur un linge
doux posé sur une surface stable.
le bord supérieur de la porte des
deux côtés et poussez vers l'inté‐
rieur pour libérer le joint du clip.
rant vers l'avant.
la porte par leur bord supérieur un
par un et dégagez-les du guide.
se. Essuyez soigneusement la vitre.
Ne passez pas les panneaux en
verre au lave-vaisselle.
étapes ci-dessus dans le sens in‐
verse.
Assurez-vous que les panneaux en verre sont insérés dans la bonne position, car la surface de la
porte pourrait surchauffer.
11.6 Comment remplacer : Éclairage
AVERTISSEMENT!
Risque d'électrocution.
L'éclairage peut être chaud.
Éteignez le four. Attendez que le
four ait refroidi.
94 FRANÇAIS
Avant de remplacer l'éclairage :
Étape 1 Étape 2 Étape 3
Débranchez le four de l'alimentation
secteur.
Placez un chiffon au fond de la cavi‐
té.
Page 95
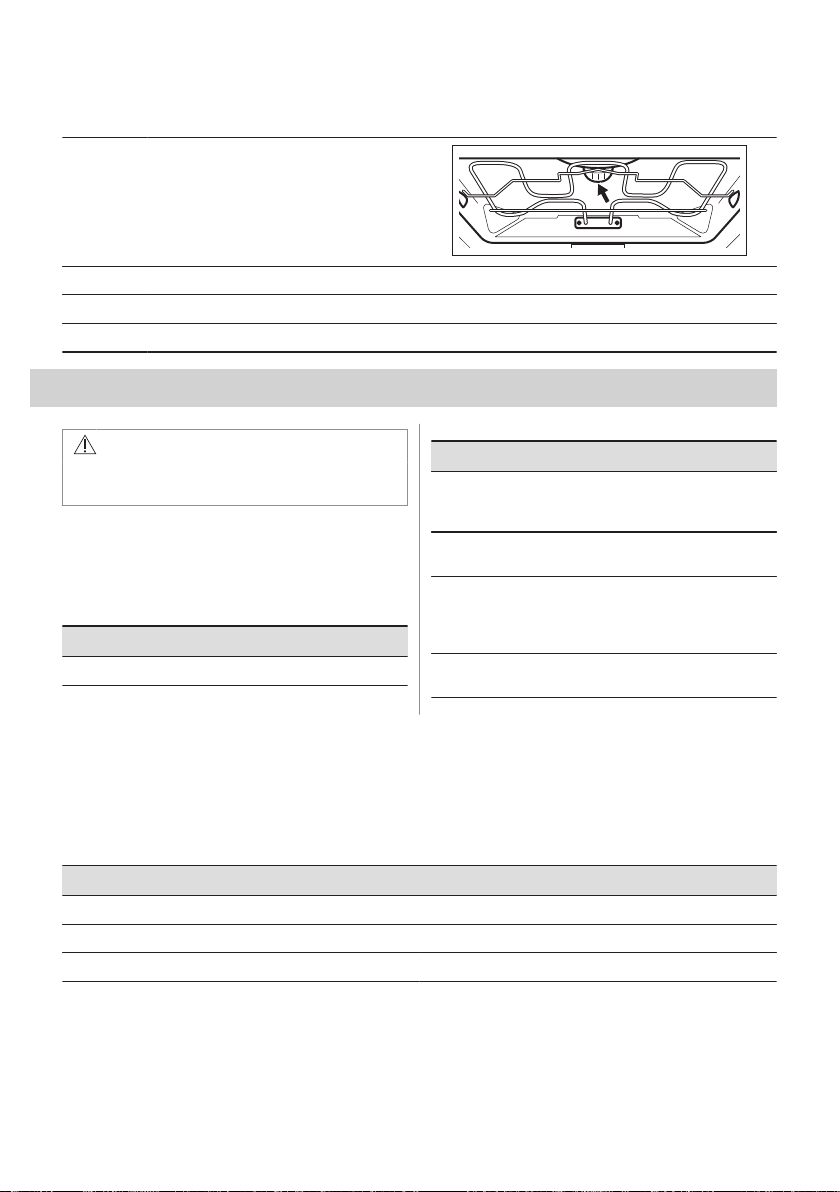
Lampe supérieure
Étape 1 Tournez le diffuseur en verre pour le reti‐
Étape 2 Nettoyez le diffuseur en verre.
Étape 3 Remplacez l’ampoule par une ampoule adéquate résistant à une température de 300 °C.
Étape 4 Installez le diffuseur en verre.
rer.
12. DÉPANNAGE
AVERTISSEMENT!
Reportez-vous aux chapitres concernant
la sécurité.
12.1 Que faire si...
Dans tous les cas ne figurant pas dans ce
tableau, veuillez contacter un service aprèsvente agréé.
Problème Vérifiez si...
Le four ne chauffe pas. Le fusible a disjoncté.
12.2 Données de maintenance
Si vous ne trouvez pas de solution au problème, veuillez contacter votre revendeur ou un
service après-vente agréé.
Les informations nécessaires au service après-vente figurent sur la plaque signalétique. La
plaque signalétique se trouve sur le cadre avant de la cavité de l'appareil. Ne retirez pas la
plaque signalétique de la cavité de l'appareil.
Problème Vérifiez si...
L’affichage indique
« 12.00 ».
L’eau fuit du bac de la ca‐
vité.
Performances de cuisson
insatisfaisantes de la
fonction : Chaleur tour‐
nante PLUS .
L’éclairage ne fonctionne
pas.
Une coupure de courant
s’est produite. Réglez
l’heure actuelle.
Le bac de la cavité est
trop rempli.
Vous avez rempli le bac
de la cavité avec de l’eau.
L’ampoule est grillée.
Nous vous recommandons d’écrire les informations ici :
Modèle (Mod.) .........................................
Référence produit (PNC) .........................................
Numéro de série (SN) .........................................
FRANÇAIS 95
Page 96
13. RENDEMENT ÉNERGÉTIQUE
13.1 Informations sur le produit et fiche d'information sur le produit conformément aux réglementations européennes sur l'écoconception et l'étiquetage énergétique
Nom du fournisseur AEG
Identification du modèle BD431C 944188129, 944188457
Indice d’efficacité énergétique 81.2
Classe d’efficacité énergétique A+
Consommation d’énergie avec charge standard, en mode conven‐
tionnel
Consommation d’énergie avec charge standard, en mode chaleur
tournante
Nombre de cavités 1
Source de chaleur Électricité
Volume 71l
Type de four Four encastrable
Masse 33.5kg
IEC/EN 60350-1 - Appareils de cuisson domestiques électriques - Partie 1 : Cuisinières, fours, fours à vapeur et
grils : Méthodes de mesure des performances.
0.99kWh/cycle
0.69kWh/cycle
13.2 Économie d'énergie
Cet appareil est doté de caractéristiques
qui vous permettent d'économiser de
l'énergie lors de votre cuisine au
quotidien.
Assurez-vous que la porte de l'appareil est
fermée lorsque l'appareil est en
fonctionnement. Évitez d'ouvrir l'appareil trop
souvent pendant la cuisson. Nettoyez
régulièrement le joint de porte et assurezvous qu’il est bien en place.
Utilisez des plats en métal pour accroître les
économies d'énergie.
Dans la mesure du possible, ne préchauffez
pas l'appareil avant la cuisson.
Lorsque vous préparez plusieurs plats à la
fois, faites en sorte que les pauses entre les
cuissons soient aussi courtes que possible.
96 FRANÇAIS
Cuisson avec ventilation
Si possible, utilisez les fonctions de cuisson
avec la ventilation pour économiser de
l'énergie.
Chaleur résiduelle
Si la cuisson doit durer plus de 30 minutes,
réduisez la température de l'appareil au
minimum 3 à 10 minutes avant la fin de la
cuisson. La chaleur résiduelle à l'intérieur de
l'appareil poursuivra la cuisson.
Utilisez la chaleur résiduelle pour réchauffer
d'autres plats.
Maintien des aliments au chaud
Sélectionnez la température la plus basse
possible pour utiliser la chaleur résiduelle et
maintenir le repas au chaud.
Chaleur tournante humide
Fonction conçue pour économiser de
l'énergie en cours de cuisson.
Page 97
14. EN MATIÈRE DE PROTECTION DE L'ENVIRONNEMENT
Concerne la France uniquement :
Recyclez les matériaux portant le symbole
. Déposez les emballages dans les
conteneurs prévus à cet effet. Contribuez à la
protection de l'environnement et à votre
sécurité, recyclez vos produits électriques et
électroniques. Ne jetez pas les appareils
portant le symbole avec les ordures
ménagères. Emmenez un tel produit dans
votre centre local de recyclage ou contactez
vos services municipaux.
FRANÇAIS 97
Page 98

FÜR PERFEKTE ERGEBNISSE
Danke, dass Sie sich für dieses AEG Produkt entschieden haben. Wir haben es
geschaffen, damit Sie viele Jahre von seiner ausgezeichneten Leistung und den
innovativen Technologien, die Ihnen das Leben erleichtern, profitieren können. Es ist mit
Funktionen ausgestattet, die in gewöhnlichen Geräten nicht vorhanden sind. Bitte
nehmen Sie sich ein paar Minuten Zeit, um das Beste aus ihm herauszuholen.
Besuchen Sie uns auf unserer Website, um:
Anwendungshinweise, Prospekte, Informationen zu Fehlerbehebung, Service und
Reparatur zu erhalten:
www.aeg.com/support
Registrieren Sie Ihr Produkt, um einen erstklassigen Service zu erhalten:
www.registeraeg.com
Um Zubehör, Verbrauchsmaterial und Original-Ersatzteile für Ihr Gerät zu kaufen:
www.aeg.com/shop
KUNDENDIENST UND SERVICE
Verwenden Sie immer Original-Ersatzteile.
Halten Sie folgende Angaben bereit, wenn Sie sich an einen autorisierten Kundendienst
wenden: Modell, PNC, Seriennummer.
Die Daten finden Sie auf dem Typenschild.
Warnungs-/Sicherheitshinweise
Allgemeine Informationen und Empfehlungen
Informationen zum Umweltschutz
Änderungen vorbehalten.
INHALTSVERZEICHNIS
1. SICHERHEITSHINWEISE............................................................................ 99
2. SICHERHEITSANWEISUNGEN................................................................. 101
3. GERÄTEBESCHREIBUNG.........................................................................104
4. BEDIENFELD..............................................................................................105
5. VOR DER ERSTEN INBETRIEBNAHME................................................... 105
6. TÄGLICHER GEBRAUCH.......................................................................... 106
7. UHRFUNKTIONEN..................................................................................... 108
8. VERWENDUNG DES ZUBEHÖRS.............................................................109
9. ZUSATZFUNKTIONEN............................................................................... 110
10. TIPPS UND HINWEISE............................................................................ 110
11. REINIGUNG UND PFLEGE...................................................................... 124
12. FEHLERSUCHE........................................................................................128
13. ENERGIEEFFIZIENZ................................................................................ 128
14. INFORMATIONEN ZUR ENTSORGUNG................................................. 129
98 DEUTSCH
Page 99

1. SICHERHEITSHINWEISE
Lesen Sie vor der Montage und dem Gebrauch des Geräts
zuerst die Bedienungsanleitung. Bei Verletzungen oder
Schäden infolge nicht ordnungsgemäßer Montage oder
Verwendung übernimmt der Hersteller keine Haftung.
Bewahren Sie die Anleitung zum Nachschlagen an einem
sicheren und zugänglichen Ort auf.
1.1 Sicherheit von Kindern und schutzbedürftigen Personen
• Das Gerät kann von Kindern ab 8 Jahren und Personen mit
eingeschränkten physischen, sensorischen oder geistigen
Fähigkeiten oder mit mangelnder Erfahrung/mangelndem
Wissen benutzt werden, wenn sie durch eine für ihre
Sicherheit zuständige Person beaufsichtigt werden oder
von dieser Person Anweisungen erhalten haben, wie das
Gerät sicher zu bedienen ist und welche Gefahren bei nicht
ordnungsgemäßer Bedienung bestehen. Kinder unter 8
Jahren und Personen mit schweren Behinderungen oder
Mehrfachbehinderung sollten vom Gerät ferngehalten
werden, wenn sie nicht ständig beaufsichtigt werden.
• Kinder sollten beaufsichtigt werden, um sicherzustellen,
dass sie nicht mit dem Gerät.
• Halten Sie sämtliches Verpackungsmaterial von Kindern
fern und entsorgen Sie es ordnungsgemäß.
• WARNUNG: Das Gerät und die zugänglichen Geräteteile
werden während des Betriebs heiß. Halten Sie Kinder und
Haustiere von dem Gerät fern, wenn es in Betrieb oder in
der Abkühlphase ist.
• Falls Ihr Gerät mit einer Kindersicherung ausgestattet ist,
empfehlen wir, diese einzuschalten.
• Kinder dürfen keine Reinigung und Wartung des Geräts
ohne Beaufsichtigung durchführen.
DEUTSCH 99
Page 100

1.2 Allgemeine Sicherheit
• Dieses Gerät ist nur zum Kochen bestimmt.
• Dieses Gerät ist für den häuslichen Gebrauch im Haushalt
in Innenräumen konzipiert.
• Dieses Gerät darf in Büros, Hotelzimmern, Gästezimmern
in Pensionen, Bauernhöfen und anderen ähnlichen
Unterkünften verwendet werden, wenn diese Nutzung das
(durchschnittliche) Nutzungsniveau im Haushalt nicht
überschreitet.
• Die Montage des Geräts und der Austausch des Kabels
muss von einer Fachkraft vorgenommen werden.
• Verwenden Sie das Gerät nicht, bevor es in den
Einbauschrank gesetzt wird.
• Vor Wartungsarbeiten ist das Gerät von der elektrischen
Stromversorgung zu trennen.
• Wenn das Netzkabel beschädigt ist, muss es vom
Hersteller, seinem autorisierten Kundenservice oder einer
gleichermaßen qualifizierten Person ausgetauscht werden,
um Gefahren durch elektrischen Strom zu vermeiden.
• WARNUNG: Vergewissern Sie sich, dass das Gerät
ausgeschaltet ist, bevor Sie die Lampe austauschen, um
einen Stromschlag zu vermeiden.
• ACHTUNG: Das Gerät und die zugänglichen Geräteteile
werden während des Betriebs heiß. Es ist darauf zu achten,
die Heizelemente oder die Oberfläche des Garraums nicht
zu berühren.
• Verwenden Sie stets Topfhandschuhe, um Zubehör oder
Geschirr herauszunehmen oder zu verstauen.
• Ziehen Sie die Einhängegitter zuerst vorne und dann hinten
von den Seitenwänden weg. Setzen Sie die Einhängegitter
in umgekehrter Reihenfolge ein.
• Reinigen Sie das Gerät nicht mit einem
Dampfstrahlreiniger.
• Benutzen Sie zum Reinigen der Glastür keine scharfen
Scheuermittel oder Metallschwämmchen; sie könnten die
100 DEUTSCH
 Loading...