


COMPETENCE CB8920-1
Built In Fan / Steam Oven
Installation and Operating Instructions

Dear Customer,
Please read this instruction book carefully.
Above all, please observe the “safety” section on the first few pages. Please retain this instruction book for later reference. Pass them on to any subsequent owners of the appliance.
The following symbols are used in the text:
1 Safety Instructions
Warning: Information concerning your personal safety. Important: Information on how to avoid damaging the appliance.
3 Information and practical tips
2 Environmental information
1.These numbers indicate step by step how to use the appliance.
2.…
3.…
These operating instructions contain information on steps you can take yourself to rectify a possible malfunction. Refer to the section “What to do if...”.
Your local AEG Service Force Centre is available to deal with technical problems (addresses and telephone numbers are listed under “Customer Service Centres”).
For additional information, also see the section “Service & Spare Parts”.
Printed on recycled paper.
Thinking ecologically means acting ecologically …
2

Contents |
|
Operating Instructions. . . . . . . . . . . . . . . . . . . . . . . . . . . . . . . . . . . . . |
5 |
Safety . . . . . . . . . . . . . . . . . . . . . . . . . . . . . . . . . . . . . . . . . . . . . . . . . . . . . . . . . |
5 |
Disposal . . . . . . . . . . . . . . . . . . . . . . . . . . . . . . . . . . . . . . . . . . . . . . . . . . . . . . . |
6 |
Description of the Appliance. . . . . . . . . . . . . . . . . . . . . . . . . . . . . . . . . . . . . |
7 |
General Overview. . . . . . . . . . . . . . . . . . . . . . . . . . . . . . . . . . . . . . . . . . . . . . . . |
7 |
Control Panel . . . . . . . . . . . . . . . . . . . . . . . . . . . . . . . . . . . . . . . . . . . . . . . . . . . |
8 |
Oven Features. . . . . . . . . . . . . . . . . . . . . . . . . . . . . . . . . . . . . . . . . . . . . . . . . . . |
8 |
Oven Accessories . . . . . . . . . . . . . . . . . . . . . . . . . . . . . . . . . . . . . . . . . . . . . . . . |
9 |
Before using for the first time . . . . . . . . . . . . . . . . . . . . . . . . . . . . . . . . . . . |
10 |
Setting the clock . . . . . . . . . . . . . . . . . . . . . . . . . . . . . . . . . . . . . . . . . . . . . . . . |
10 |
Setting the Language . . . . . . . . . . . . . . . . . . . . . . . . . . . . . . . . . . . . . . . . . . . . |
11 |
Setting the Display Brightness . . . . . . . . . . . . . . . . . . . . . . . . . . . . . . . . . . . . . |
12 |
Initial Cleaning. . . . . . . . . . . . . . . . . . . . . . . . . . . . . . . . . . . . . . . . . . . . . . . . . . |
13 |
Operating the Oven . . . . . . . . . . . . . . . . . . . . . . . . . . . . . . . . . . . . . . . . . . . . . |
14 |
The Electronic Oven Control . . . . . . . . . . . . . . . . . . . . . . . . . . . . . . . . . . . . . . . |
14 |
Oven Functions. . . . . . . . . . . . . . . . . . . . . . . . . . . . . . . . . . . . . . . . . . . . . . . . . . |
15 |
Switching the Oven On and Off . . . . . . . . . . . . . . . . . . . . . . . . . . . . . . . . . . . . |
17 |
Inserting the combination shelf, baking tray and general purpose tray . . . |
19 |
Steam Cooking Functions . . . . . . . . . . . . . . . . . . . . . . . . . . . . . . . . . . . . . . . . . |
19 |
Additional Functions . . . . . . . . . . . . . . . . . . . . . . . . . . . . . . . . . . . . . . . . . . . . . |
21 |
Clock Functions . . . . . . . . . . . . . . . . . . . . . . . . . . . . . . . . . . . . . . . . . . . . . . . . . |
24 |
Other Functions . . . . . . . . . . . . . . . . . . . . . . . . . . . . . . . . . . . . . . . . . . . . . . . . . |
30 |
Switching off the clock display . . . . . . . . . . . . . . . . . . . . . . . . . . . . . . . . . |
30 |
Child Safety Device . . . . . . . . . . . . . . . . . . . . . . . . . . . . . . . . . . . . . . . . . . . |
31 |
Button lock . . . . . . . . . . . . . . . . . . . . . . . . . . . . . . . . . . . . . . . . . . . . . . . . . . |
31 |
Oven Safety Cut-out . . . . . . . . . . . . . . . . . . . . . . . . . . . . . . . . . . . . . . . . . . |
32 |
Usage, Tables and Tips . . . . . . . . . . . . . . . . . . . . . . . . . . . . . . . . . . . . . . . . . . |
33 |
Steam Cooking . . . . . . . . . . . . . . . . . . . . . . . . . . . . . . . . . . . . . . . . . . . . . . . . . . |
33 |
Vigorous Steam . . . . . . . . . . . . . . . . . . . . . . . . . . . . . . . . . . . . . . . . . . . . . . |
34 |
Vigorous Steam Table. . . . . . . . . . . . . . . . . . . . . . . . . . . . . . . . . . . . . . . . . . |
34 |
Fan Cooking and Vigorous Steam in succession . . . . . . . . . . . . . . . . . . . . |
35 |
Fan Cooking and Vigorous Steam in succession . . . . . . . . . . . . . . . . . . . . |
35 |
Interval Steam . . . . . . . . . . . . . . . . . . . . . . . . . . . . . . . . . . . . . . . . . . . . . . . |
36 |
Interval Steam Cooking Table . . . . . . . . . . . . . . . . . . . . . . . . . . . . . . . . . . . |
36 |
Baking . . . . . . . . . . . . . . . . . . . . . . . . . . . . . . . . . . . . . . . . . . . . . . . . . . . . . . . . . |
37 |
Baking Table . . . . . . . . . . . . . . . . . . . . . . . . . . . . . . . . . . . . . . . . . . . . . . . . . |
39 |
Table for Bakes and Gratins. . . . . . . . . . . . . . . . . . . . . . . . . . . . . . . . . . . . . |
43 |
Frozen Ready Meals Table . . . . . . . . . . . . . . . . . . . . . . . . . . . . . . . . . . . . . . |
44 |
3

Roasting . . . . . . . . . . . . . . . . . . . . . . . . . . . . . . . . . . . . . . . . . . . . . . . . . . . . . . . |
46 |
Roasting Table. . . . . . . . . . . . . . . . . . . . . . . . . . . . . . . . . . . . . . . . . . . . . . . . |
47 |
Meat Probe Table . . . . . . . . . . . . . . . . . . . . . . . . . . . . . . . . . . . . . . . . . . . . . |
49 |
Grill Sizes . . . . . . . . . . . . . . . . . . . . . . . . . . . . . . . . . . . . . . . . . . . . . . . . . . . . . . |
50 |
Grilling Table. . . . . . . . . . . . . . . . . . . . . . . . . . . . . . . . . . . . . . . . . . . . . . . . . |
50 |
Drying . . . . . . . . . . . . . . . . . . . . . . . . . . . . . . . . . . . . . . . . . . . . . . . . . . . . . . . . |
52 |
Drying Table . . . . . . . . . . . . . . . . . . . . . . . . . . . . . . . . . . . . . . . . . . . . . . . . . |
52 |
Defrosting . . . . . . . . . . . . . . . . . . . . . . . . . . . . . . . . . . . . . . . . . . . . . . . . . . . . . |
53 |
Defrosting Table . . . . . . . . . . . . . . . . . . . . . . . . . . . . . . . . . . . . . . . . . . . . . . |
53 |
Bio Functions . . . . . . . . . . . . . . . . . . . . . . . . . . . . . . . . . . . . . . . . . . . . . . . . . . . |
54 |
Making Yoghurt . . . . . . . . . . . . . . . . . . . . . . . . . . . . . . . . . . . . . . . . . . . . . . |
54 |
Raising yeast dough . . . . . . . . . . . . . . . . . . . . . . . . . . . . . . . . . . . . . . . . . . . |
54 |
Low Temperature Cooking. . . . . . . . . . . . . . . . . . . . . . . . . . . . . . . . . . . . . . |
55 |
Low Temperature Cooking Table . . . . . . . . . . . . . . . . . . . . . . . . . . . . . . . . |
55 |
Making Preserves . . . . . . . . . . . . . . . . . . . . . . . . . . . . . . . . . . . . . . . . . . . . . . . . |
56 |
Preserving Table . . . . . . . . . . . . . . . . . . . . . . . . . . . . . . . . . . . . . . . . . . . . . . |
56 |
Programmed Functions and Recipes . . . . . . . . . . . . . . . . . . . . . . . . . . . . . . . . |
57 |
Cleaning and care . . . . . . . . . . . . . . . . . . . . . . . . . . . . . . . . . . . . . . . . . . . . . . |
65 |
Exterior of the Appliance . . . . . . . . . . . . . . . . . . . . . . . . . . . . . . . . . . . . . . . . . |
65 |
Oven Interior . . . . . . . . . . . . . . . . . . . . . . . . . . . . . . . . . . . . . . . . . . . . . . . . . . . |
65 |
Accessories . . . . . . . . . . . . . . . . . . . . . . . . . . . . . . . . . . . . . . . . . . . . . . . . . . . . . |
65 |
Side Rails. . . . . . . . . . . . . . . . . . . . . . . . . . . . . . . . . . . . . . . . . . . . . . . . . . . . . . . |
66 |
Steam Generation System. . . . . . . . . . . . . . . . . . . . . . . . . . . . . . . . . . . . . . . . . |
68 |
Oven Light . . . . . . . . . . . . . . . . . . . . . . . . . . . . . . . . . . . . . . . . . . . . . . . . . . . . . |
69 |
Oven Door. . . . . . . . . . . . . . . . . . . . . . . . . . . . . . . . . . . . . . . . . . . . . . . . . . . . . . |
71 |
What to do if ... . . . . . . . . . . . . . . . . . . . . . . . . . . . . . . . . . . . . . . . . . . . . . . . . |
72 |
Technical Data . . . . . . . . . . . . . . . . . . . . . . . . . . . . . . . . . . . . . . . . . . . . . . . . . |
73 |
Oven Interior Dimensions . . . . . . . . . . . . . . . . . . . . . . . . . . . . . . . . . . . . . . . . . |
73 |
Regulations, Standards, Directives . . . . . . . . . . . . . . . . . . . . . . . . . . . . . . . . . . |
73 |
Installation Instructions . . . . . . . . . . . . . . . . . . . . . . . . . . . . . . . . . . . |
74 |
Safety Instructions for the Installer. . . . . . . . . . . . . . . . . . . . . . . . . . . . . . . . . |
74 |
Index . . . . . . . . . . . . . . . . . . . . . . . . . . . . . . . . . . . . . . . . . . . . . . . . . . . . . . . . |
78 |
Service and Spare Parts . . . . . . . . . . . . . . . . . . . . . . . . . . . . . . . . . . . |
79 |
4

Operating Instructions
1 Safety
Electrical Safety
•This appliance must be connected by a qualified electrician or competent person.
•In the event of a fault or damage to the appliance: disconnect from the mains supply.
•For safety reasons, do not clean the appliance with steam jet or highpressure cleaning equipment.
•Repairs to the appliance must be carried out by a trained service engineer only. Considerable danger may result from improper repairs. If repairs become necessary, please contact your local Service Force Centre.
Child Safety
• Never leave children unsupervised when the appliance is in use.
Safety during Operation
This appliance should be used only for the domestic cooking, roasting and baking of food.
•Be careful if connecting electrical appliances to sockets near this appliance. Electrical leads should not be allowed to come near the hotplates or to become caught under the hot oven door.
•Warning: Danger of burns! When in use, the oven interior surfaces become very hot.
•Warning: When cooking with the Vigorous Steam function, do not under any circumstances open the oven door. The escaping steam can cause moisture damage to furniture and cabinets. Avoid any direct contact with escaping steam as it could cause scalding.
•If you use alcohol in your cooking, a slightly flammable alcohol/air mixture may ensue. In this case, be careful when opening the door. Do not handle any sources of heat, sparks or naked flames when doing so.
5

How to avoid damage to the appliance
•Do not line the oven with aluminium foil and do not place baking trays, ovenware, etc. on the oven floor, as the heat that builds up will damage the oven enamel.
•Fruit juices dripping from the baking tray will leave stains, which you will not be able to remove. For very moist cakes, use the all-purpose tray.
•Do not put any strain on the oven door when open.
•Never pour water directly into the hot oven. This could cause electrical faults or damage to the enamel.
•Rough handling, especially around the edges of the front panel, can cause the glass to break.
•Do not store any inflammable materials inside the oven. These could ignite when the oven is switched on.
•Do not store any moist foods inside the oven. This could damage the oven enamel.
2 Disposal
Packaging material
The packaging materials are environmentally friendly and can be recycled. The plastic components are identified by markings, e.g. >PE<, >PS<, etc. Please dispose of the packaging materials in the appropriate container at your local waste disposal facilities.
Old appliance
Please dispose of your old appliance in line with the guidelines for disposal in your area.
1 Warning: Before disposing of old appliances please make them inoperable so that they cannot be a source of danger.
To do this, disconnect the appliance from the mains supply and remove the mains cable from the appliance.
6
Description of the Appliance
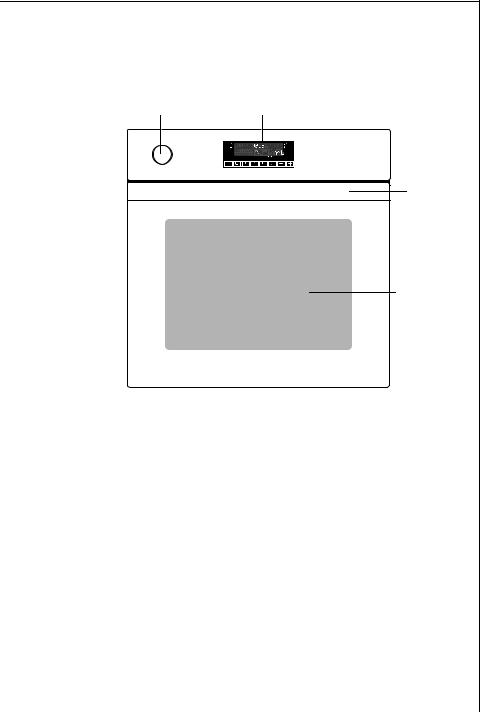
General Overview
Water Drawer |
Control Panel |
Door
Handle
Full Glass
Door
7
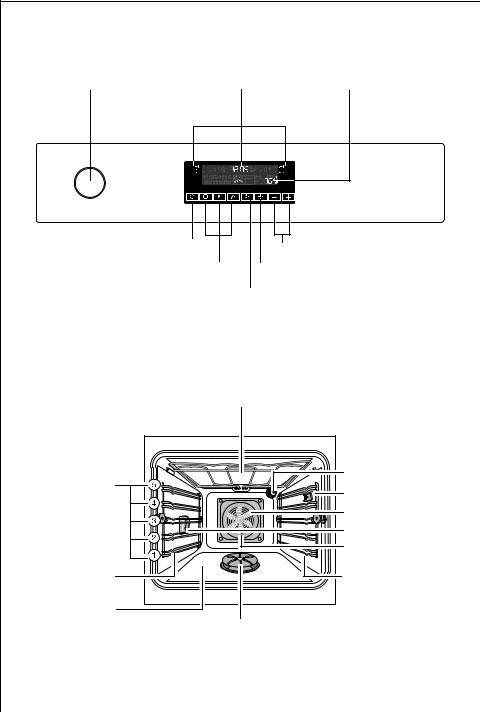
Control Panel |
|
|
|
Water Drawer |
Oven/Time Display |
Temperature Display |
|
Main Power Button |
Selector Buttons |
||
|
Oven Functions |
Clock Functions |
|
|
|
Oven Light |
|
Oven Features |
|
|
|
|
Top heat and grill elements |
|
|
|
|
|
Oven lighting |
Shelf positions |
|
|
Meat probe socket |
|
|
|
|
|
|
|
Fan |
|
|
|
Oven lighting |
|
|
|
Rear wall heating ele- |
|
|
|
ment/Fat filter |
Side rails, |
|
|
Side rails, |
removable |
|
|
removable |
Bottom heat |
|
|
|
|
Steam generator/Steam rosette |
||
8 |
|
|
|
Oven Accessories
Combination shelf
For dishes, cake tins, items for roasting and grilling.
Baking Tray
For cakes and biscuits
(not suitable for Vigorous Steam cooking)
All-purpose tray
For roasting or for collecting meat juices or fat (not suitable for Vigorous Steam cooking)
Inner tray
For fatty meat (for positioning in the All-Purpose tray, not suitable for steam cooking)
Meat probe
Used on joints of meat to determine the internal temperature and exactly how well done they are during cooking (not suitable for Vigorous Steam cooking)
9
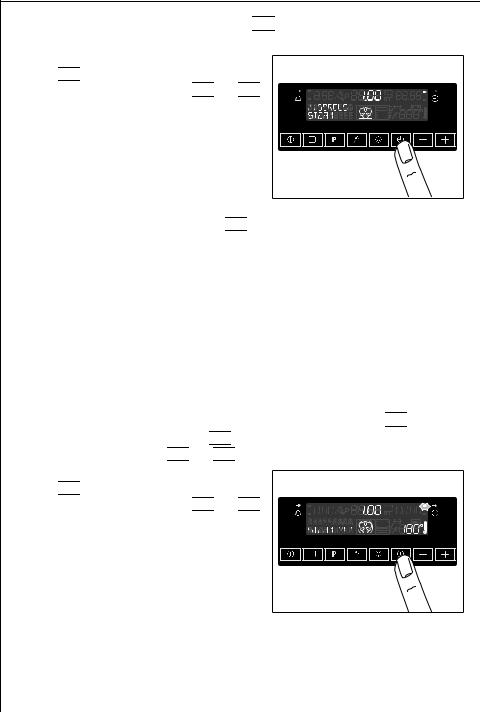
Before using for the first time
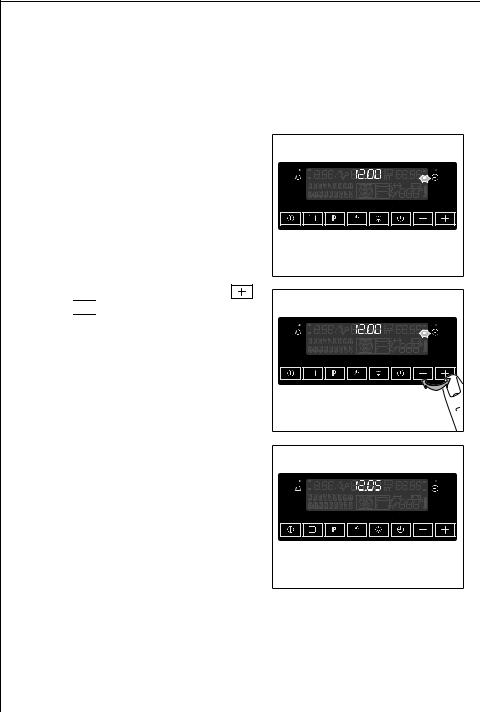
Setting the clock
3 The oven only operates when the time has been set.
When the appliance is connected to the electrical supply or when there has been a power cut, the arrow for the clock  flashes.
Set the current time with the or 

 button.
Wait 5 seconds.
The flashing stops and the clock displays the time of day set.
The appliance is now ready to use.
10
Setting the Language
1.Switch the appliance on by pressing the main power button 

 .
.
2.Press the main power 

 and the clock function

 buttons at the same time.
3.Using the selector buttons 

 and
and 

 select one of the languages available.
4.Press the main power 

 and the clock function

 buttons at the same time, to store the selected language.
11
Setting the Display Brightness
The brightness of the display can be adjusted, to make it easier to read in ovens built-in at higher levels.
1.Switch the appliance on by pressing the main power button 

 .
.
2. Press the main power 

 and the clock function

 buttons at the same time.
3.Press the Oven Functions 

 button.
4.Set the brightness with the 

 or
or 

 button.
5.Press the main power 

 and the clock function

 buttons at the same time, to store the brightness setting selected.
12

Initial Cleaning
You should clean the oven thoroughly before using for the first time.
1 Attention: Do not use sharp or abrasive cleaning materials. These could damage the oven surface.
3 For ovens with metal fronts, use normal commercially available cleaning agents.
1.Press the Main Power 

 button, then press the Oven Light


 button. The oven light comes on.
Open the oven door.
2.Remove all accessories and the side rails and clean them with warm water and washing-up liquid.
3.Also wash out the oven with warm water and washing-up liquid and and leave to dry.
4.Wipe the front of the appliance with a damp cloth.
13
Operating the Oven
The Electronic Oven Control
Display |
|
|
Time Display |
Temperature Display |
||
Oven Functions |
|
|
|
|
|
|
|
|
|
|
|
|
|
Cooking Time |
|
Display |
|
End Time |
|
Display |
Time Functions |
|
|
|
|
Time Functions |
|
|
Time/Countdown |
|||||
|
|
|
|
|
|
|
|
|
|
|
|
|
|
|
|
|
|
|
|
|
|
|
|
|
|
|
|
|
|
|
|
|
|
|
|
|
|
|
|
|
|
|
|
|
|
|
|
|
|
|
|
|
|
|
|
|
|
|
|
|
|
|
|
|
|
|
|
|
|
|
|
|
|
|
|
|
|
|
|
|
|
|
|
Main Power Button |
|
Meat Probe |
|
|
Selector Buttons |
||||||
Oven Functions |
|
|
|
|
Clock Functions |
||||||
|
|
|
|
|
|
|
|
|
|
|
|
|
|
Programme |
|
Oven Light |
|||||||
3 General Instructions
•Always switch the appliance on first by pressing the mains power button 

 .
.
•When the selected function is lit, the oven begins to heat up or the clock begins to count down to the start time set.
•When the temperature selected is reached, an audible signal sounds.
•The oven light can be switched on and off while the oven is operating by pressing the 


 button.
•Switch the appliance off by pressing the mains power button 

 .
.
14

Oven Functions
The oven has the following functions:
3 The functions Pizza Setting, Rotitherm and Conventional (Top/Bottom Heat) have an automatic rapid heating function. This ensures that the selected temperature is reached as quickly as possible.
Vigorous Steam
Fixed temperature setting: 96°C.
For fruit, vegetables, fish, potatoes, rice, pasta and other side dishes. Steam generator, bottom heating element and fan are on.
Interval Steam
Suggested temperature: 180°C.
For baking and roasting and warming up frozen or chilled meals. Fan and steam generator operate alternately.
Fan Cooking
Suggested temperature: 150°C.
For baking on up to three oven shelves and for roasting. The rear heating element is on and the fan is also switched on.
Pizza Setting
Suggested temperature: 200°C.
For baking cakes on one oven shelf and for cakes, pastries and biscuits that require a more intensive browning and a crispy base. This might include pizzas, quiches, fruit flans.
Bottom and rear heating elements are on and in addition the fan is switched on.
Rotitherm
Suggested temperature: 180 °C
For roasting larger pieces of meat or poultry on one level. This function is also suited to cooking foods au gratin and browning.
The grill heating element and top heat operate alternately with the fan.
Dual Grill
Suggested temperature: 230°C
For grilling flat foodstuffs in large quantities, for example, steaks, escalopes, fish, or for toasting.
Top heat and grill heating elements are on.
15

Single Grill
Suggested temperature: 230°C.
For grilling flat foodstuffs placed in the centre of the grill, for example, steaks, escalopes, fish, or for toasting.
The grill heating element is on.
Top/Bottom Heat (conventional oven)
Suggested temperature: 200°C
For baking and frying/roasting on one shelf position. The Top and Bottom Heat heating elements are on.
Drying/Defrosting
Suggested temperature: 30°C.
For drying herbs, fruit and vegetables and for defrosting. Bottom heating element and fan are on.
Low Temperature Cooking
Fixed temperature setting: 120/80 °C.
For preparing especially tender, succulent roasts. Rear heating element and fan are on.
16
Switching the Oven On and Off
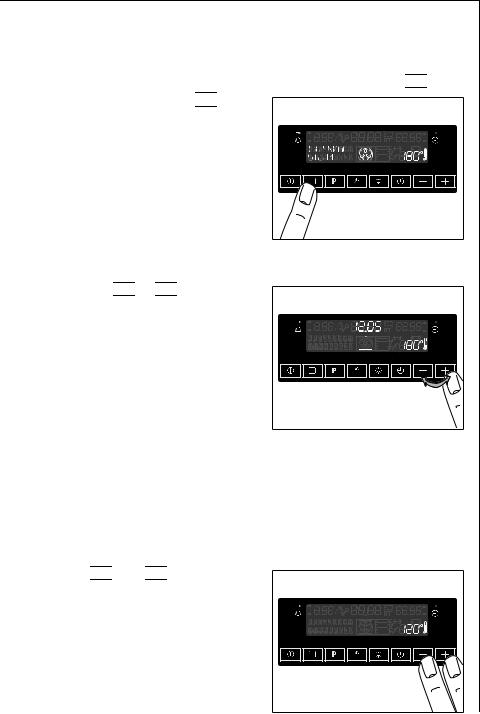
Switching on the oven function
1.Switch the appliance on by pressing the main power switch 

 .
.
2.Press the Oven Function 

 button
as often as necessary, until the desired oven function is lit.
• A suggested temperature appears on the temperature display.
• If the suggested temperature is not changed within approx. 5 seconds, the oven begins to heat up.
Changing oven temperature
Press the 

 or
or 

 button, to raise or lower the temperature.
The setting changes in steps of 5°C.
Thermometer symbol
•The slowly rising thermometer symbol indicates how hot the oven is as it heats.
•The three segments of the thermometer symbol show how quickly the oven is heating up..
Checking the temperature
Press 

 and
and 

 at the same time.
The current temperature appears in the temperature display.
17
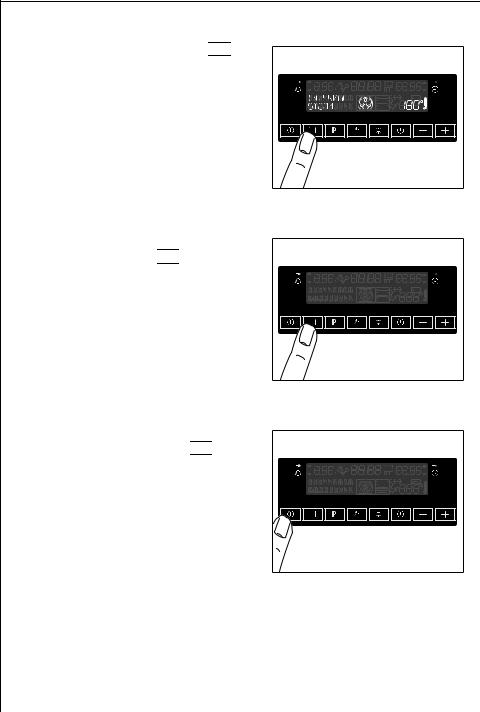
Changing the oven function
Press the OVEN FUNCTION 


button as often as necessary, until the desired oven function appears.
Switching off the oven function
To switch off the oven, press the OVEN FUNCTION 

 button, as often as necessary, until no oven function is displayed any more.
Switching off the oven
Switch the appliance off by pressing the main power switch 

 .
.
3 Cooling fan
When the oven is switched on, the fan comes on automatically to keep the surfaces of the appliance cool. When the oven is switched off, the fan continues to operate to cool the appliance down, then switches itself off.
18

Inserting the combination shelf, baking tray and general purpose tray
Inserting the baking tray and general purpose tray:
The trays have a little bulge on the left and right edges. These act as an anti-tip device and must always be located towards the rear when inserting the tray.
Inserting oven shelves:
Insert the shelf at the desired position.
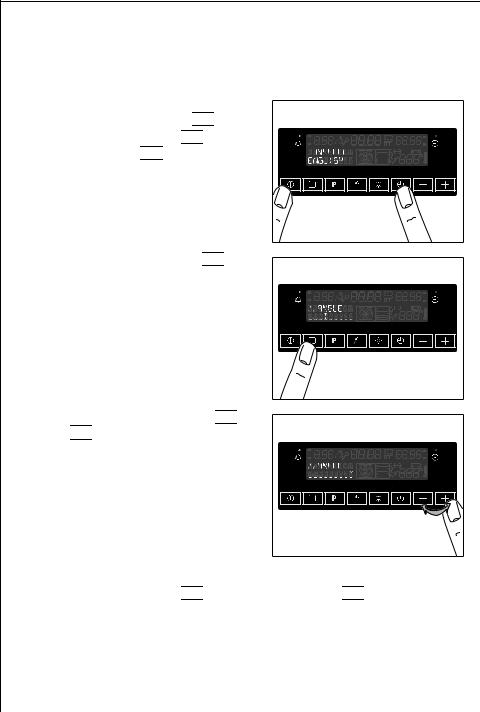
Steam Cooking Functions
1 Attention: The steam cooking functions must always be set in conjunction with the clock functions Cook Time  or End Time
  (see section Clock Functions Cook Time and End Time).
1 Attention: Only water is to be used as the liquid for the steam cooking function.
A buzzing sound is heard when the water has been used up. When more water is added, the buzzing sound is switched off again.
3
3
To prevent limescale forming, use decalcified water only, for example, from a water filter.
Due to the automatic steam dispersal period of approx. 5 minutes at the end of the cooking time and the heating up time of approx.
2 minutes, settings of less than 10 minutes have little effect. Steam will also escape when the door is opened.
Vigorous Steam
1.Water (approx. 700 ml) is not poured directly into the steam generator, but into the drawer in the control panel.
The water supply lasts for approx. 30 minutes.
2.Switch the oven on by pressing the mains power button 

 .
.
19
3.Using the Oven Functions button 

 select the Vigorous Steam function.
4.Using the Clock Functions button


 select Cook Time
  or End Time
  and using the

 or
or 

 button set the desired cooking time. After about 2 minutes, the first steam appears. A single audible signal indicates when the cooking temperature of around 96°C is reached. A triple signal is sounded at the end of cooking time.
5.Use the mains power button 

 to stop the signal and switch off the oven.
After the oven has cooled down, soak up any remaining water from the steam generator using a sponge and wipe if necessary with a little vinegar.
Leave the door ajar to let the oven dry out completely.
Interval steam
The continual change from hot air to steam takes place automatically.
1.Do not pour the water directly into the steam generator, but into the drawer in the control panel.
2.Switch the oven on by pressing the mains power button 

 .
.
3.Using the Oven Functions 

 button, select the Interval Steam function and using the

 or
or 

 button select the temperature.
4.Using the Clock Functions button


 select Cook Time
  or End Time
  and using the

 or
or 

 button set the desired cooking time.
Then proceed as for Vigorous Steam
Cooking.
20
Additional Functions
Programmes
3 For this function, use the recipes supplied in the chapter “Programmed Functions and Recipes”.
Selecting programmes
1.Press the Programme 

 button repeatedly until the desired pro-
gramme appears.
– In the Function Display the symbol for the corresponding Oven Function and the recommended shelf position appear.
– The suggested temperature appears in the Temperature Display.
–The cooking time and the end of cooking time appear in the Time Display.
–After about 5 seconds the oven is switched on.
–10 minutes before the end of the programme an audible signal sounds.
2.Check the cooking at this point.
3 Does not apply to Vigorous Steam!
–When the cooking time is completed, an audible signal sounds. “0:00” flashes in the Time Display.
3.The signal can be stopped by pressing any button.
Delaying the start
The start of the cooking time can be delayed (see Clock Functions End Time).
3 The Clock Function End Time can be set, if the programme has been running for less than two minutes.
Ending the cooking time early
Press the Programme 

 button repeatedly until no programme is displayed.
21

Meat Probe
Ensures that the oven switches itself off as soon as the temperature at the centre of a roast reaches a set temperature.
The meat probe is best used together with the Conventional (Top/Bottom heat) and Rotitherm.
There are two temperatures to be set:
–Oven temperature: see Roasting Table
–The core temperature: see Meat Probe Table
1Important: Only the meat probe supplied may be used. If replacing, please use only genuine spare parts.
1.Push the tip of the meat probe in as
fully as possible, so that the tip is in the centre of the meat and not in contact with any bone.
2. Insert the meat probe plug into the socket on the side wall of the oven, pushing it in fully.
3. Repeatedly press the Oven Function 

 button until the desired oven function appears.
4. Start setting the desired core temperature within 5 seconds, using the 

 or
or 

 buttons.
The display changes to the current core temperature.
22

3 • The core temperature is displayed from 30°C.
• Should the current core temperature already be displayed, before the desired core temperature is set, press the meat probe 


button and carry out the setting process. To set the oven temperature, press the meat probe 

 button twice.
•Start setting the desired oven temperature within 5 seconds, us-
ing the 

 or
or 

 buttons.
– As soon as the core temperature set is reached, an audible signal sounds and the oven switches itself off automatically.
5. To switch off the signal, press any button.
1 Warning: The meat probe is very hot. There is a risk of being burned when removing the plug and the tip of the meat probe.
6. Remove the meat probe’s plug from the socket and take the meat out of the oven with the meat probe still inserted.
7. Switch off the appliance.
Checking or changing the core temperature
–By pressing the meat probe 

 button, you can change between the current and the set core temperatures and the set oven temperature.
–Change the temperature using the 

 or
or 

 buttons.
23

Clock Functions
Countdown 
To set a countdown. A signal sounds after the time has elapsed. This function does not affect the operation of the oven.
Cook time 
To set how long the oven is to be in use.
End time 
To set when the oven is to switch off again.
Time 
To set, change or check the time
(See also section “Before Using for the First Time”).
3 General hints
•When a clock function has been selected, the related arrow flashes
for around 5 seconds. During this time, the desired setting can be made using 

 or
or 

 .
.
•After the desired time has been set, the arrow flashes again for around 5 seconds. The arrow then remains lit. The set time begins to run.
24
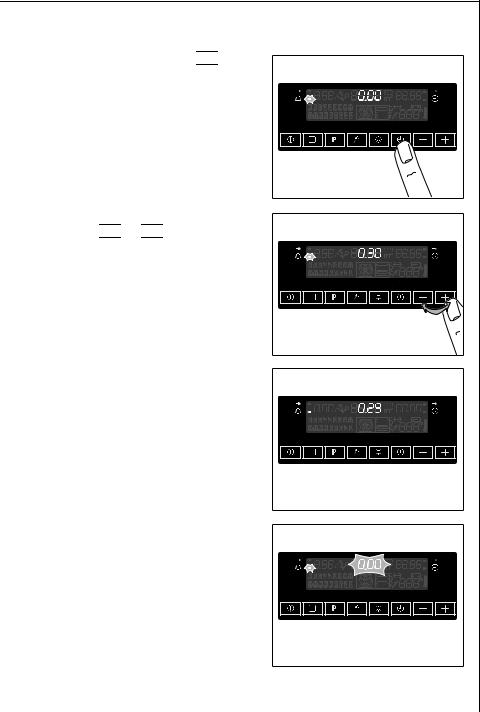
Countdown 
1.Press the clock function 

 but-
but-
ton as often as necessary, until the Countdown arrow  flashes.
2.Set the desired Countdown time using the 

 or
or 

 button
(max. 99 minutes).
After about 5 seconds the display shows the time remaining.
The Countdown arrow  lights up.
When the time has elapsed, an audible signal sounds for 2 minutes. “0.00“ and the Countdown arrow  flash.
To turn off the audible signal: Press any button.
25
 Loading...