

AEG AVQ2500, AVQ2500SCH User Manual
DE Gebrauchsanweisung
EN Operating Instructions
NL Gebruiksaanwijzing
PT Instruções de utilização
ES Instrucciones de uso
IT Istruzioni per l‘uso
GR Οδηγίες χρήσεως
FR Mode d‘emploi
SV Bruksanvisning
TR Kullanma Kılavuzu
VivaQuickstop
2193094-05.indd 1 1/18/07 4:31:41 PM
2
2193094-05.indd 2 1/18/07 4:31:41 PM

Deutsch 4-16
Vielen Dank, dass Sie sich für den AEG-Electrolux Viva Quickstop- Staubsauger entschieden
haben. Diese Bedienungsanleitung gilt für alle
Viva Quickstop-Modelle. Das bedeutet, dass
Ihr Modell bestimmte Zubehörteile und/oder
Funktionen möglicherweise nicht enthält. Um
bestmögliche Ergebnisse zu erzielen, sollten Sie
ausschließlich das speziell für Ihren Staubsauger
entwickelte Original-AEG-Electrolux-Zubehör
verwenden.
Português 5-17
Obrigado por ter escolhido um aspirador
AEG-Electrolux Viva Quickstop. Estas instruções
de funcionamento abrangem todos os modelos Viva Quickstop. Isto signica que alguns
acessórios/funções podem não estar incluídos
no seu modelo especíco. De modo a assegurar
os melhores resultados utilize sempre acessórios
originais AEG-Electrolux. Estes foram concebidos especialmente para o seu aspirador.
Ελληνικά 18-30
Ευχαριστούμε που επιλέξατε την ηλεκτρική σκούπα
AEG-Electrolux Viva Quickstop. Οι παρούσες
Οδηγίες Λειτουργίας καλύπτουν όλα τα μοντέλα
Viva Quickstop. Επομένως, ορισμένα εξαρτήματα ή
λειτουργίες που αναφέρονται εδώ ενδέχεται να μη
συμπεριλαμβάνονται στο μοντέλο που διαθέτετε.
Για να έχετε τα καλύτερα δυνατά αποτελέσματα,
χρησιμοποιείτε πάντα τα γνήσια εξαρτήματα AEG-Electrolux. Έχουν σχεδιαστεί αποκλειστικά για τη δική σας
ηλεκτρική σκούπα.
Türkçe 19-31
AEG-Electrolux Viva Quickstop elektrikli süpürgeyi
seçtiğiniz için teşekkür ederiz. Bu Kullanım Talimatları
tüm Viva Quickstop modelleri için geçerlidir. Bu, bahsi
geçen aksesuarların/özelliklerin bazılarının sahip
olduğunuz modelde bulunmayabileceği anlamına
gelmektedir. En iyi sonuçları elde etmek için daima orjinal AEG-Electrolux aksesuarlarını kullanın. Bu aksesuarlar elektrikli süpürgeniz için özel olarak tasarlanmıştır.
English 4-16
Thank you for having chosen an AEG-Electrolux
Viva Quickstop vacuum cleaner. These Operating Instructions cover all Viva Quickstop models.
This means that with your specic model, some
accessories/features may not be included. In order to ensure the best results, always use original AEG-Electrolux accessories. They have been
designed especially for your vacuum cleaner.
Español 5-17
Gracias por elegir una aspiradora AEG-Electrolux
Viva Quickstop. En este manual de instrucciones
se incluyen todos los modelos Viva Quickstop.
Es posible que su modelo no incluya algunos
accesorios o funciones. Para lograr el mejor resultado, utilice únicamente los accesorios originales de AEG-Electrolux, que han sido diseñados
especícamente para su aspiradora.
Français 19-31
Nous vous remercions d’avoir choisi l’aspirateur
AEG-Electrolux Viva Quickstop. Ces instructions
d’utilisation portent sur l’ensemble des modèles
Viva Quickstop. Cela signie qu’il est possible
que certains accessoires ou fonctions ne soient
pas fournis avec le modèle que vous avez en
votre possession. An d’obtenir des performances optimales, utilisez toujours des accessoires
originaux AEG-Electrolux. Ils ont été spécialement conçus pour votre aspirateur.
Nederlands 5-17
Gefeliciteerd met uw keuze van een AEG-Electrolux Viva Quickstop-stofzuiger. Deze bedieningsinstructies zijn van toepassing op alle Viva
Quickstop-modellen. Dit betekent dat mogelijk
niet alle accessoires/kenmerken van uw model
worden beschreven. Gebruik altijd originele
AEG-Electrolux-accessoires voor de beste resultaten. Deze accessoires zijn speciaal ontworpen
voor uw stofzuiger.
Italiano 18-30
Grazie per avere scelto un aspirapolvere AEGElectrolux Viva Quickstop. Queste Istruzioni
per l’uso sono valide per tutti i modelli Viva
Quickstop. Questo signica che per il modello
specico acquistato, alcuni accessori o funzionalità potrebbero non essere inclusi. Per ottenere
sempre i migliori risultati, utilizzare esclusivamente accessori originali AEG-Electrolux, pensati in modo specico per questo aspirapolvere.
Svenska 19-31
Tack för att du valde en AEG-Electrolux Viva
Quickstopdammsugare. De här instruktionerna gäller alla Viva Quickstop-modeller. Det
är möjligt att inte alla funktioner och tillbehör
för just din modell nns med. Använd alltid
originaltillbehör från AEG-Electrolux så uppnår
du bästa resultat. De är speciellt utformade för
din dammsugare.
2193094-05.indd 3 1/18/07 4:31:41 PM

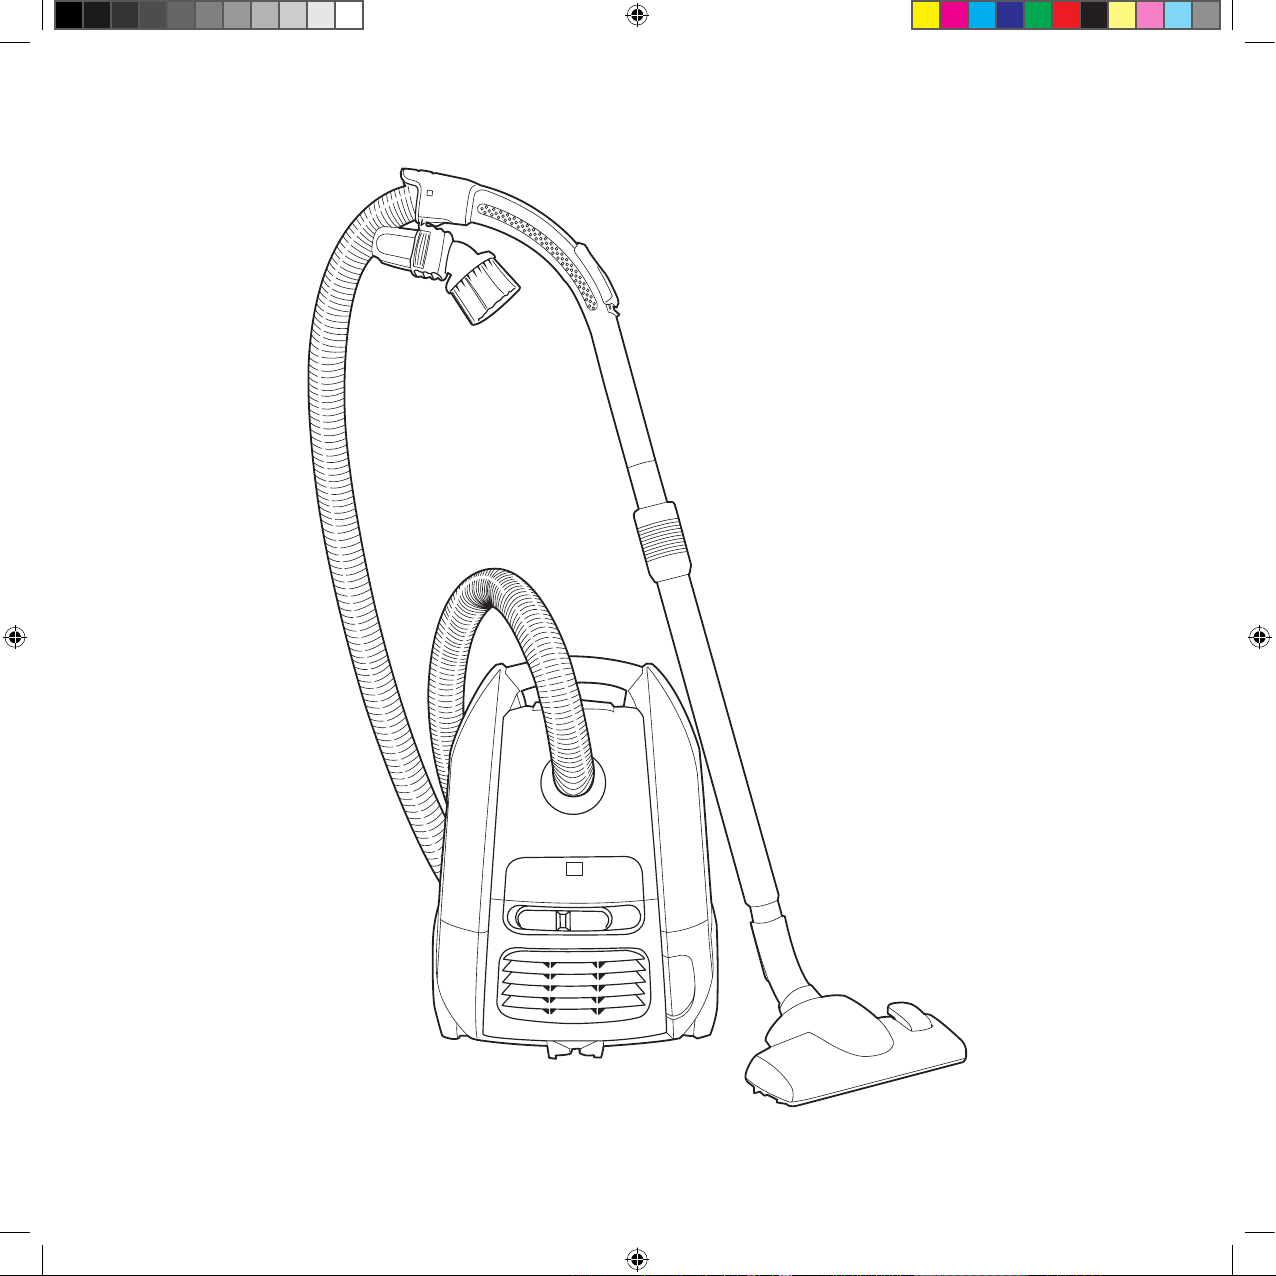
1
7
2
3a
8
4
9
6
10
5
3b
Deutsch
Zubehör
1* Teleskoprohr
2* Verlängerungsrohre
3 Schlauchgri + Schlauch
4* Kleine Kombinationsdüse
5 Kombinationsbodendüse
6* Fugendüse
7* Polsterdüse
8 Staubbeutel, s-bag®
9* Turbobürste
10* Parkettbürste
Sicherheitsvorkehrungen
Der Viva Quickstop-Staubsauger darf nur von
Erwachsenen und nur für normales Staubsaugen im
Haushalt verwendet werden. Der Staubsauger ist
doppelt isoliert und muss nicht geerdet werden. Vor dem
Reinigen oder der Durchführung von Servicearbeiten am
Staubsauger den Netzstecker aus der Steckdose ziehen.
Sicherstellen, dass der Staubsauger an einem trockenem
Ort aufbewahrt wird. Wartungs- und Reparaturarbeiten
dürfen nur vom autorisierten AEG-ElectroluxKundendienst durchgeführt werden.
Niemals staubsaugen:
• In nassen Bereichen.
• In der Nähe von brennbaren Gasen etc.
• Ohne eingesetzten s-bag®-Staubbeutel, um eine
Beschädigung des Staubsaugers zu vermeiden.
Damit vermieden wird, dass der Deckel ohne den
s-bag® geschlossen werden kann, ist eine Sicherheitseinrichtung vorhanden. Nicht versuchen, den
Deckel mit Gewalt zu schließen
• Wenn das Gehäuse sichtbare Schäden aufweist.
Niemals staubsaugen:
• Scharfkantige und spitze Objekte, Flüssigkeiten.
• Heiße oder kalte Asche, brennende Zigarettenkippen
etc.
• Z. B. feiner Gips-, Beton-, Mehl- oder Aschenstaub.
Oben Genanntes kann den Motor ernsthaft beschädigen
- Schäden, die nicht durch die Garantie abgedeckt sind.
Vorkehrungen bei elektrischen Kabeln:
Regelmäßig Kabel auf Schäden prüfen. Den Staubsauger
niemals benutzen, wenn das Kabel beschädigt ist. Schäden
am Staubsagerkabel sind durch die Gerätegarantie nicht
gedeckt.
* Nur bestimmte Modelle.
English
Accessories
1* Telescopic tube
2* Extension tubes
3 Hose handle + hose
4* Small combination nozzle
5 Combination oor nozzle
6* Crevice nozzle
7* Upholstery nozzle
8 Dust bag, s-bag®
9* Turbo nozzle
10* Parquet nozzle
Safety precautions
Viva Quickstop should only be used by adults and only
for normal vacuuming in a domestic environment. The
vacuum cleaner features double insulation and does not
need to be earthed. Disconnect the plug from the mains
before cleaning or maintenance of the vacuum cleaner.
Be sure to keep the vacuum cleaner in a dry place. All
servicing and repairs must be carried out by an authorised
AEG-Electrolux-service centre.
Never vacuum:
• In wet areas.
• Close to flammable gases etc.
• Without a dust bag s-bag® to avoid damaging the
cleaner. A safety device is fitted, which prevents the
cover closing without a s-bag®. Do not attempt to
force the cover shut.
• When housing shows visible signs of damage.
Never vacuum:
• Sharp objects, fluids.
• Hot or cold cinders, lit cigarette butts, etc.
• Fine dust, for example from plaster, concrete, flour,
hot or cold ashes.
The above may cause serious damage to the motor
– damage which is not covered by the warranty.
Electrical cable precautions:
Regularly check that the cable is not damaged. Never
use the vacuum cleaner if the cable is damaged.
Damage to the machine’s cable is not covered by the
warranty.
* Certain models only.
4
2193094-05.indd 4 1/18/07 4:31:42 PM

Nederlands
Accessoires
1* Telescopische buis
2* Verlengingsbuizen
3 Slanggreep + slang
4* Klein combinatiemondstuk
5 Combinatiemondstuk
voor vloeren
6* Mondstuk voor kieren
7* Mondstuk voor bekleding
8 Stofzak, s-bag®
9* Turbomondstuk
10* Mondstuk voor parket
Veiligheidsinstructies
Viva Quickstop mag alleen door volwassenen worden
gebruikt en is bedoeld voor huishoudelijk gebruik. De
stofzuiger is dubbel geïsoleerd en hoeft dus niet te
worden geaard. Neem eerst de stekker uit het stopcontact
voordat u de stofzuiger gaat reinigen of onderhouden.
Bewaar de stofzuiger op een droge plaats. Onderhoud en
reparaties moeten altijd door een erkend AEG-Electrolux
Service Centre worden uitgevoerd.
Stofzuig nooit:
• In natte ruimtes
• In de buurt van ontvlambare gassen, enz.
• Zonder een stofzak/s-bag®, om schade aan de stof
zuiger te voorkomen. De stofzuiger is voorzien van een
veiligheidsmechanisme welke voorkomt dat de deksel
zonder een s-bag® sluit. De deksel nooit met kracht
proberen te sluiten.
• Als de behuizing zichtbare tekenen van schade ver
-
toont.
Stofzuig nooit:
• Scherpe voorwerpen, vloeistoffen.
• Hete of koude as, brandende sigarettenpeuken, enz.
• Fijne stof van bijvoorbeeld gips, beton, bloem of as.
Bovengenoemde voorwerpen en vloeistoffen kunnen
schade aan de motor veroorzaken. Dergelijke schade valt
niet onder de garantie.
Voorzorgsmaatregelen betreende het
elektrische snoer
Controleer regelmatig of het snoer niet is beschadigd.
Gebruik de stofzuiger nooit als het snoer is
beschadigd. Schade aan het snoer van de machine valt
niet onder de garantie.
* Alleen bepaalde modellen.
Português
Acessórios
1* Tubo telescópico
2* Tubos de extensão
3 Pega da mangueira +
mangueira
4* Pequena combinação bocal
5 Combinação bocal piso
6 Bocal de fenda
7* Bocal de forro interno
8 Saco de pó, s-bag®
9* Bocal turbo
10* Bocal para parquete
Precauções de segurança
O Viva Quickstop deverá ser utilizado apenas por adultos
para aspirar normalmente num ambiente doméstico. O
aspirador conta com isolamento duplo e não é necessário
que seja ligado à terra. Desligue a ficha da corrente antes
de limpar ou fazer a manutenção do aspirador. Certifiquese de que guarda o aspirador num local seco. Qualquer
serviço ou reparação deve ser executado por um centro de
assistência AEG-Electrolux autorizado.
Nunca aspire:
• Em áreas molhadas.
• Perto de gases inflamáveis, etc.
• Sem um saco de pó s-bag® para evitar danificar o
aspirador. Está instalado um dispositivo de segurança
que evita que a tampa feche sem um s-bag®. Não tente
fechar a tampa à força.
• Quando a caixa apresenta sinais visíveis de danos.
Nunca aspire:
• Objectos aguçados, líquidos.
• Cinzas quentes, pontas de cigarros acesas, etc.
• Pó fino de gesso, cimento, farinha ou cinzas, por exem
-
plo.
Estes podem causar sérios danos ao motor, não
cobertos pela garantia.
Precauções com cabos eléctricos:
Verifique com regularidade se o cabo não está
danificado. Nunca utilize o aspirador se o cabo estiver
danificado. A garantia não cobre os danos do cabo da
máquina.
* Apenas determinados modelos.
Español
Accesorios
1* Tubo telescópico
2* Tubos alargadores
3 Mango de la manguera
exible y manguera
4* Pequeña boquilla combina
-
da
5 Boquilla para suelos combi
-
nados
6* Boquilla con ranura
7* Boquilla para tapicería 8
Bolsa para el polvo, s-bag®
9* Boquilla turbo
10* Boquilla para parquet
Advertencias de seguridad
Viva Quickstop sólo debe ser utilizado por personas
adultas y únicamente para la limpieza normal
doméstica. La aspiradora dispone de un dispositivo
de doble aislamiento y no necesita conexión a tierra.
Desconecte el enchufe de la toma de corriente antes
de limpiar o llevar a cabo tareas de mantenimiento
en la aspiradora. Guarde siempre la aspiradora en
un lugar seco. Cualquier tipo de reparación debe ser
realizada por un centro técnico autorizado de AEGElectrolux.
Nunca pase la aspiradora:
• En zonas mojadas.
• Cerca de gases inflamables, etc.
• Sin colocar antes una bolsa para el polvo s-bag® ya
que podría dañarse la aspiradora. Un dispositivo de
seguridad evita que se cierre la tapa sin que haya una
bolsa s-bag® en el interior. No intente forzar la tapa
para cerrarla.
• Cuando la carcasa presente daños visibles.
Nunca pase la aspiradora:
• Por objetos cortantes, líquidos.
• Por cenizas candentes o frías, colillas de cigarro encen
-
didas, etc.
• Para recoger polvo fino, como yeso, cemento, harina,
cenizas, etc.
Estas materias podrían ocasionar graves daños en
el motor (este tipo de daños no está cubierto por la
garantía).
Advertencias acerca del cable de alimentación:
Compruebe periódicamente que el cable no está
deteriorado. No utilice nunca la aspiradora si el cable
no está en perfectas condiciones. La garantía no cubre
los daños en el cable del aparato.
* Sólo algunos modelos.
5
2193094-05.indd 5 1/18/07 4:31:42 PM
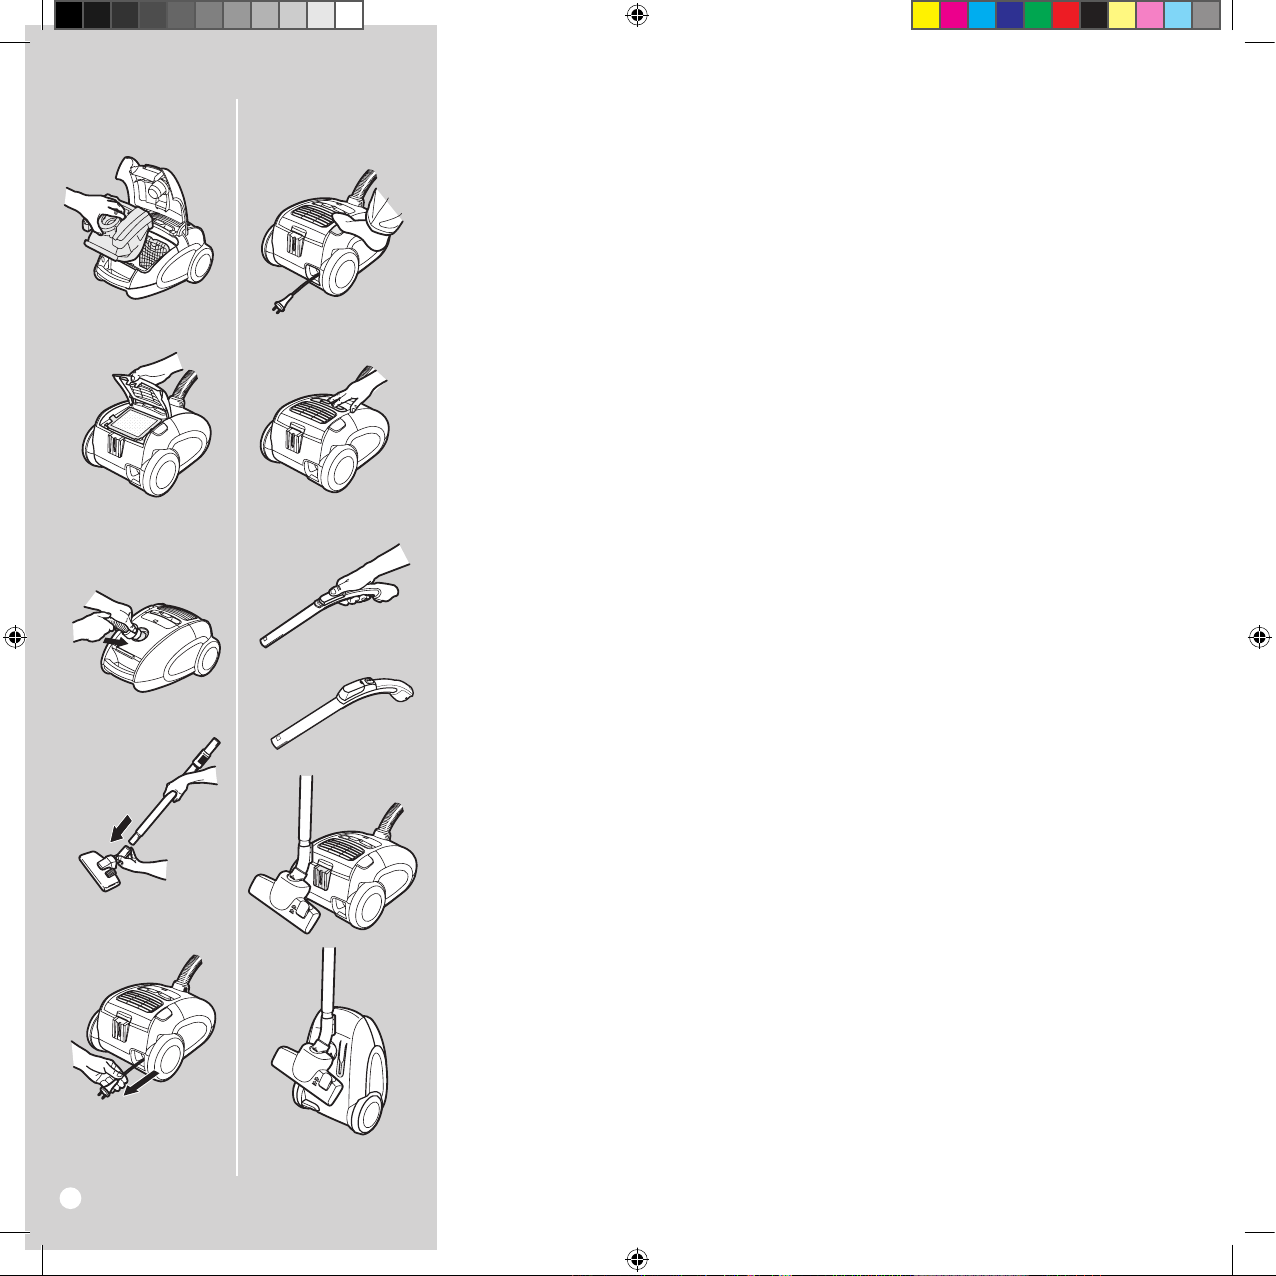
11
16
12
13
14
15
17a
17b
17c
18a
18b
Deutsch
Vorbereitungen
11 Frontabdeckung des Geräts öffnen und kontrollieren,
dass Staubbeutel s-bag® und Kombinationsfilter
(Motorfilter + Mikrofilter)* / Motorfilter* eingesetzt
sind (siehe auch “Filterwechsel”).
12* Hintere Abdeckung* des Geräts öffnen und kontrol
-
lieren, dass Abluftfilter* eingesetzt ist.
3a Schlauch in den Schlauchgriff einführen, bis Ver
riegelung einrastet. Zur Freigabe des Schlauches
Verriegelung drücken.
13 Schlauch einführen, bis Verriegelung einrastet. Zur
Freigabe des Schlauches Verriegelung drücken.
14 Verlängerungsrohre* oder Teleskoprohr* durch
Drehen und Zusammenschieben an Schlauchgriff
und Bodendüse anbringen. (Zum Zerlegen drehen
und auseinanderziehen.)
15 Elektrokabel herausziehen und an Steckdose
anschließen. Der Staubsauger verfügt über eine automatische Kabelaufwicklung. Nach dem Herausziehen des Kabels arretiert die Kabelaufwicklung.
16 Zum Zurückspulen des Kabels Fußpedal drücken. Das
Kabel wird dann aufgewickelt.
17a Zum Einschalten des Staubsaugers Leistungsregler
in Richtung “Ein” schieben. Saugleistung durch Schieben des Leistungsreglers in Richtung “Max” erhöhen.
Zum Ausschalten des Staubsaugers Leistungsregler
in die entgegengesetzte Richtung in die Stellung
“Aus” schieben.
17b* Die Saugleistung kann auch mithilfe der Saugs
-
teuerung am Schlauchgriff eingestellt werden.
18a Praktischer Power Clip, der den Staubsauger automa
tisch ausschaltet, wenn die Düse bzw. der Schlauch
hier platziert wird. Ideale Parkposition für Arbeitspausen und (18b) Aufbewahrung.
* Nur bestimmte Modelle.
English
Before starting
11 Open the front cover on the machine and check
that the dust bag s-bag®, and the combination filter
(motor+micro filter)*/ motor filter* are in place. (See
also Replacement of filter)
12* Open the back lid* on the machine and check that
the exhaust filter* is in place.
3a Insert the hose into the hose handle until the catches
click to engage (press the catches to release the
hose).
13 Insert the hose until the catches click to engage
(press the catches to release the hose).
14 Attach the extension tubes* or telescopic tube* to
the hose handle and nozzle by pushing and twisting
together. (Twist and pull apart to dismantle.)
15 Extend the electric cable and connect it to the mains.
The vacuum cleaner is fitted with a cable winder.
Once the electric cable has been extended, it stays in
that position.
16 To rewind the cable, press the cord rewinder pedal.
The cable will then rewind.
17a Start the vacuum cleaner by sliding the power
control in the “On” direction. Increase suction power
by sliding the control further up to “Max” position.
Stop the vacuum cleaner by sliding in the opposite
direction to “Off” position.
17b* Suction power can also be adjusted by using the suc
-
tion control on the hose handle.
18a Practical on/off Power Clip, the Power Clip automati
cally turns the vacuum cleaner off when nozzle/tube
is placed here. Ideal parking position for pausing and
(18b) storing,
* Certain models only.
6
2193094-05.indd 6 1/18/07 4:31:43 PM

Nederlands
Voordat u begint
11 Open de voorkant van de machine en controleer of
de stofzak/s-bag® en het combinatiefilter (motorplus microfilter)* of motorfilter* in de stofzuiger zijn
geplaatst. (Zie ook Vervangen van het motorfilter)
12* Open vervolgens de achterkant* van de machine en
controleer of het uitlaatfilter* is aangebracht.
3a Schuif de slang in de slanggreep totdat deze in de
vergrendelingen klikt (druk op de vergrendelingen
om de slang los te maken).
13 Schuif de slang in de machine totdat deze in de
vergrendelingen klikt (druk op de vergrendelingen
om de slang los te maken).
14 Bevestig de verlengingsbuizen* of de telescopische
zuigbuis* aan de slanggreep door deze op elkaar te
drukken en te draaien (Draai en trek om de delen uit
elkaar te halen.)
15 Trek het elektrische snoer uit en steek de stekker in
het stopcontact. De stofzuiger is voorzien van een
kabelhaspel. Wanneer het elektrische snoer is uitgetrokken, blijft het in die positie.
16 Druk op het voetpedaal van het oprolmechanisme om
het snoer op te rollen. Het snoer wordt vervolgens
automatisch opgerold.
17a Zet de stofzuiger aan door de schuifregelaar op On
te zetten. U kunt de zuigkracht vergroten door de
regelaar door te schuiven naar Max. Zet de stofzuiger
uit door de regelaar in tegengestelde richting naar
Off te schuiven.
17b* U kunt de zuigkracht ook instellen met de regelaar
op de slanggreep.
18a Handige powerklem: de stofzuiger wordt automa
tisch uitgeschakeld als u hierin het mondstuk of de
zuigbuis plaatst. Een ideale parkeerstand als u het
stofzuigen tijdelijk onderbreekt of (18b) de stofzuiger
opbergt.
* Alleen bepaalde modellen.
Português
Antes de começar
11 Abra a tampa frontal da máquina e verifique se o
saco do pó s-bag® e o filtro de combinação (filtro do
motor+microfiltro)*/ filtro do motor estão correctamente colocados. (Consulte também Substituição do
filtro)
12* Abra a tampa traseira* da máquina e verifique se o
filtro de escape * está correctamente colocado.
3a Introduza a mangueira na pega da mangueira até
o engate fazer clique ao prender (prima o engate
paralibertar a mangueira).
13 Insira a mangueira até o engate fazer clique ao pren
-
der. (Prima o engate para libertar a mangueira.)
14 Prenda os tubos de extensão* ou o tubo telescópico*
à pega e ao bocal da mangueira empurrando e rodando os mesmos. (Rode e separe para desmontar.)
15 Estique o cabo eléctrico e ligue-o à corrente. O
aspirador está equipado com um enrolador de cabos.
Uma vez desenrolado, o cabo eléctrico ficará nessa
posição.
16 Para enrolar o cabo, prima o pedal do enrolador do
cabo. O cabo será então enrolado.
17a Ligue o aspirador empurrando o controlo de
potência na direcção “Ligado”. Aumente o poder de
sucção empurrando o controlo para a posição “Max”.
Desligue o aspirador empurrando-o na posição
“Desligado” na direcção oposta.
17b* O poder de sucção também pode ser ajustado
utilizando o controlo do poder de sucção na pega da
mangueira.
18a Um prático interruptor de encaixe para ligar/ desligar
o aspirador automaticamente quando o bocal/tubo
é aí colocado. Uma posição de arrumação ideal para
pausas e (18b) e armazenamento,
* Alleen bepaalde modellen.
Español
Introducción
11 Abra la tapa delantera del aparato y compruebe que
la bolsa de polvo s-bag® y el filtro combinado (filtro
del motor y microfiltro)* o el filtro del motor* están
bien colocados. (Consulte también el apartado sobre
la sustitución de filtros)
12* Abra la tapa posterior* del aparato y compruebe que
el filtro de salida de aire* está bien colocado.
3a Introduzca la manguera en el mango hasta que
el enganche suene al encajarse (presione sobre el
enganche para soltar la manguera).
13 Introduzca el tubo flexible hasta que el cierre haga
un sonido de clic al encajarse (presione sobre el
cierre para soltar el tubo).
14 Fije los tubos alargadores* o el tubo telescópico* al
mango de la manguera y a la boquilla presionando
y girando hasta que se unan. (Gire de nuevo y tire de
ellos para desmontarlos.)
15 Extienda el cable de alimentación y conéctelo a
la toma de corriente. La aspiradora dispone de un
dispositivo para enrollar el cable. Una vez que se ha
extendido el cable eléctrico, permanece en dicha
posición.
16 Para enrollar el cable, pise el pedal para enrollarlo. El
cable se recoje automáticamente.
17a Ponga en marcha la aspiradora deslizando el control
de alimentación hacia la posición “On”. Aumente la
potencia de aspiración deslizando el control más
hacia la posición “Máx”. Pare la aspiradora deslizando
el control en la dirección contraria, hacia la posición
“Off”.
17b* También se puede ajustar la potencia de aspiración
con el control en el mango de la manguera.
18a Práctico soporte que activa y desactiva la alimenta
ción. La aspiradora se apaga automáticamente cuando se coloca aquí la boquilla o el tubo. Posición ideal
cuando se hace una pausa en la limpieza o cuando se
guarda el aparato (18b),
* Sólo algunos modelos.
7
2193094-05.indd 7 1/18/07 4:31:43 PM
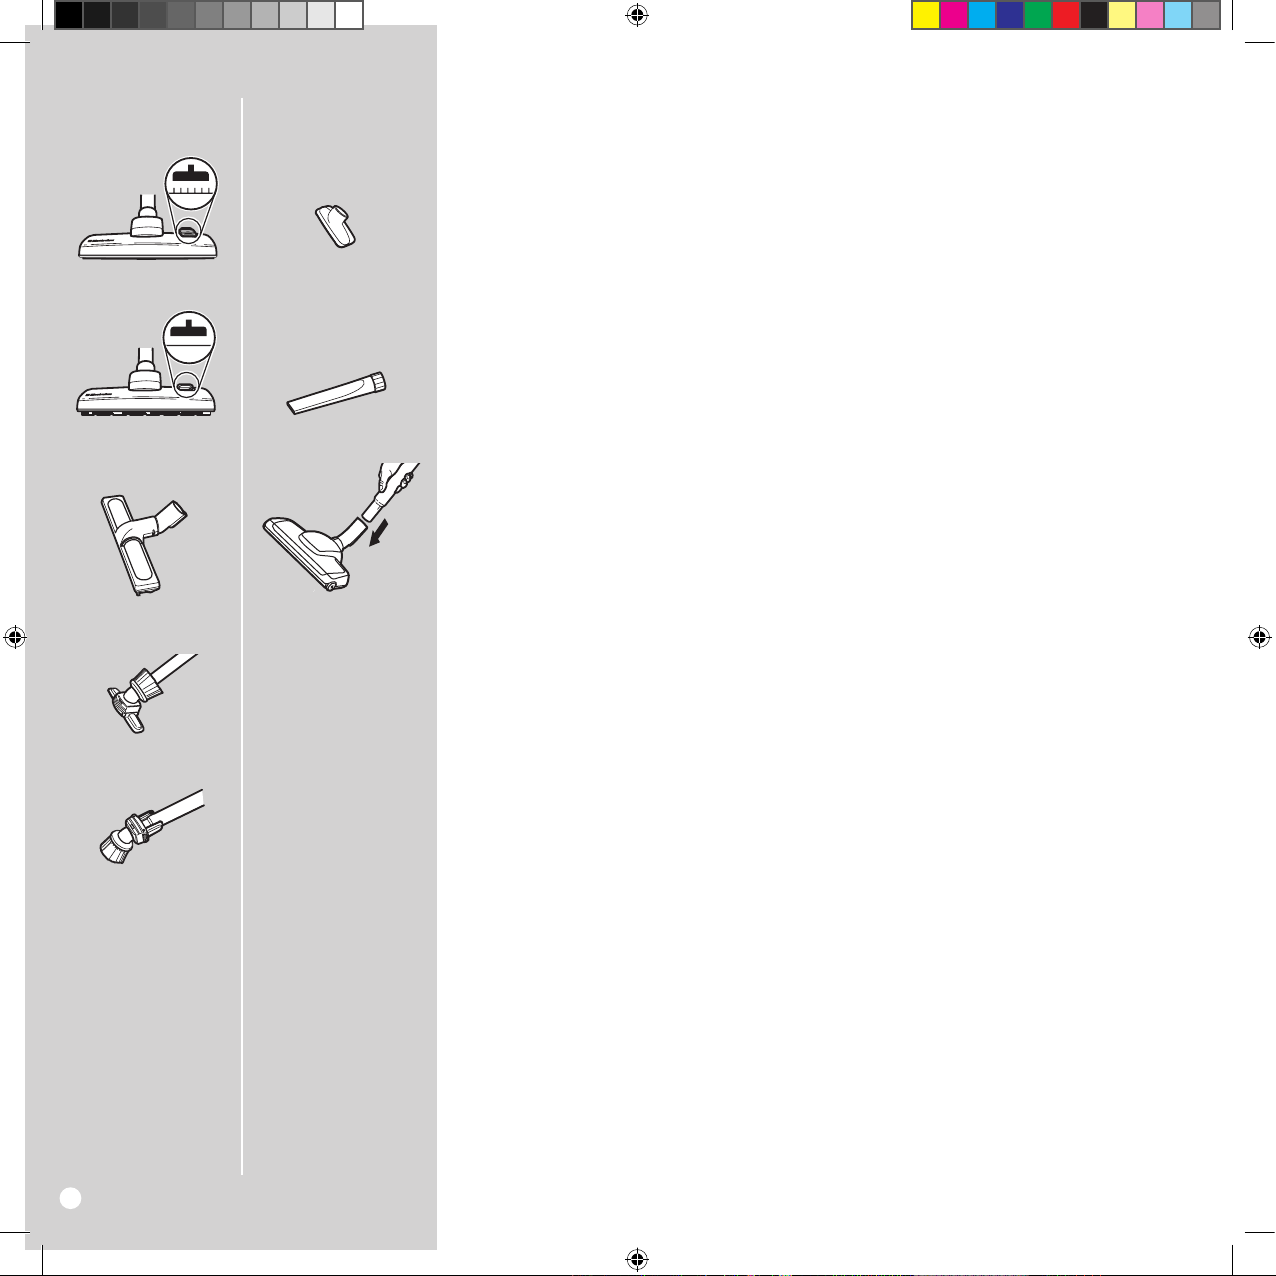
19
22a
20
22b
21
23
24
25
Deutsch
Bestmögliche Resultate erzielen
Die Düsen wie folgt benutzen:
Teppiche: Die Kombinationsbodendüse mit dem Hebel in
Stellung (19) verwenden.
Hartböden: Die Kombinationsbodendüse mit dem Hebel
in Stellung (20) verwenden.
Holzböden: Die Parkettdüse* verwenden (21). Polstermöbel und Stoffe: Für Sofas, Vorhänge, leichte Stoffe usw.
Polsterfunktion der kleinen Kombinationsdüse* (22a) /
Polsterdüse* (23) verwenden. Gegebenfalls Saugleistung
reduzieren.
Bilderrahmen, Bücherregale usw.: Staubbürstenfunktion
der kleinen Kombinationsdüse* (22b).
Fugen, Ecken etc.: Fugendüse* verwenden (24).
Verwendung der Turbodüse:*
25 Ideal für die Entfernung von hartnäckigen Flusen und
Tierhaaren von Teppichen und Teppichböden.
Hinweis: Turbodüse nicht auf Vorlegern aus Tierhaut oder
Teppichfransen verwenden. Um Schäden am Teppich zu
vermeiden, Düse bei rotierender Bürste nicht auf einer Stelle
lassen. Mit der Düse nicht über elektrische Kabel fahren und
Staubsauger unmittelbar nach der Verwendung ausschalten.
* Nur bestimmte Modelle.
English
Getting the best results
Use the nozzles as follows:
Carpets: Use the combination floor nozzle with the lever in
position (19).
Hard oors: Use the combination floor nozzle with the
lever in position (20).
Wooden oors: Use the parquet nozzle* (21). Upholstered
furniture and fabrics: Use the upholstery function of the
small combination nozzle* (22a)/ upholstery nozzle* (23)
for sofas, curtains, lightweight fabrics etc. Reduce suction
power if necessary.
Frames, bookshelves, etc: Use the dusting brush function
of the small combination nozzle* (22b).
Crevices, corners, etc.: Use the crevice nozzle* (24).
Using the turbo nozzle*
25 Ideal for carpets and wall-to-wall carpeting to
remove stubborn fluff and pet hairs.
Note: Do not use the turbo nozzle on skin rugs or carpet
fringes. To avoid damaging the carpet, do not keep the nozzle
stationary whilst the brush is rotating. Do not pass the nozzle
across electric cables, and be sure to switch o the vacuum
cleaner immediately after use.
* Certain models only.
8
2193094-05.indd 8 1/18/07 4:31:44 PM

Nederlands
Voor het beste resultaat
Gebruik de mondstukken als volgt:
Tapijt: Gebruik het combinatiemondstuk met de handgreep in positie (19).
Harde vloeren: Gebruik het combinatiemondstuk met de
handgreep in positie (20).
Houten vloeren: Gebruik het mondstuk voor parket* (21).
Gestoeerde meubels en stoen: Gebruik de stofferingsstand van het kleine combinatiemondstuk* (22a) of het
mondstuk voor stoffering* (23) voor banken, gordijnen,
lichtgewicht stoffen, enz. Verminder zo nodig de zuig-
kracht.
Frames, boekenplanken, enz.: Gebruik de afstofstand van
het kleine combinatiemondstuk* (22b).
Kieren, hoeken, enz.: Gebruik het mondstuk voor kieren*
(24).
Het gebruik van het turbomondstuk*
25 Ideaal voor tapijten en kamerbrede vloerbedek-
king om hardnekkige pluizen en dierenharen op te
zuigen.
Opmerking: gebruik het turbomondstuk niet op dierenhuiden
of franjes van tapijten. Zorg ervoor dat u het tapijt niet
beschadigt door het mondstuk op één plaats te zetten terwijl
de borstel ronddraait. Beweeg het mondstuk niet over het
snoer en schakel de stofzuiger meteen na gebruik weer uit.
* Alleen bepaalde modellen.
Português
Obter os melhores resultados
Use os bocais como se segue:
Tapetes: Utilize a combinação bocal piso com a alavanca
na posição (19).
Pisos duros: Utilize a combinação bocal piso com a alavanca na posição (20).
Pisos de madeira: Utilize o bocal para parquete* (21).
Mobiliário e tecidos estofados: Utilize a função de forro
interno da pequena combinação bocal* (22a)/ bocal de
forro interno* (23) para sofás, cortinas, tecidos leves etc.
Reduza o poder de sucção caso seja necessário.
Molduras, estantes, etc: Utilize a função escova do pó da
pequena combinação bocal* (22b).
Fendas, cantos, etc.: Utilize o bocal de fendas* (24).
Utilização do bocal turbo*
25 Ideal para remover cotão e pelos de animais de
tapetes e alcatifas.
Nota: Não utilize o bocal turbo em tapetes de pele ou com
franjas. Para evitar danicar o tapete, não mantenha o
bocal parado enquanto a escova estiver a rodar. Não passe
o bocal sobre cabos eléctricos e certique-se de que desliga o
aspirador imediatamente após a sua utilização.
* Apenas determinados modelos.
Español
Para obtener los mejores resultados
Utilice las boquillas tal y como se describe a
continuación:
Alfombras: Utilice la boquilla para suelos combinados con
la palanca en la posición (19).
Supercies duras: Utilice la boquilla para suelos combinados con la palanca en la posición (20).
Suelos de madera: Utilice la boquilla para parquet* (21).
Muebles tapizados y tejidos: Utilice la función para tapicería
de la boquilla pequeña combinada* (22a) o la boquilla
para tapicería* (23) para sofás, cortinas, tejidos ligeros, etc.
Reduzca la potencia de aspiración si fuera necesario.
Marcos, estanterías, etc.: Utilice la función del cepillo para
quitar el polvo de la pequeña boquilla combinada* (22b).
Grietas, esquinas, etc.: Utilice la boquilla con ranuras (24).
Utilizar la boquilla turbo*
25 Perfecto para alfombras y moqueta, para eliminar
pelusas y pelos difíciles de aspirar.
Nota: No utilice la boquilla turbo en alfombras de piel ni
en los ecos de las alfombras. Para evitar que se deteriore
la alfombra, no mantenga la boquilla ja mientras gira el
cepillo. No pase la boquilla sobre cables de alimentación
eléctrica y asegúrese de que apaga la aspiradora
inmediatamente después del uso.
* Sólo algunos modelos.
9
2193094-05.indd 9 1/18/07 4:31:44 PM
27
28
30
31
29
Deutsch
Austauschen des Staubbeutels, s-bag®
27 Den s-bag®-Staubbeutel austauschen, wenn das
Anzeigefenster vollständig rot ist. Ablesen, wenn die
Düse angehoben ist.
28 Frontabdeckung öffnen und Einsatz mit Staubbeutel
s-bag® herausheben.
29 Durch Ziehen des Pappstreifens Staubbeutel s-bag®
aus dem Einsatz entnehmen. Auf diese Weise wird
der Staubbeutel s-bag® automatisch staubdicht verschlossen und das Austreten von Staub verhindert.
30 Neuen s-bag®-Staubbeutel einsetzen, indem der
Kartonhalter in das Ende der Führung im Einsatz
gedrückt wird.
31 Einsatz wieder in das Staubbeutelfach einsetzen und
Abdeckung schließen.
Hinweis: Nach dem Aufsaugen von Teppichreinigungspulver
Staubbeutel s-bag® austauschen. Nur Original- Staubbeutel
(s-bag® Classic, s-bag® Clinic, s-bag® Long Performance oder
s-bag® Anti-odour) verwenden.
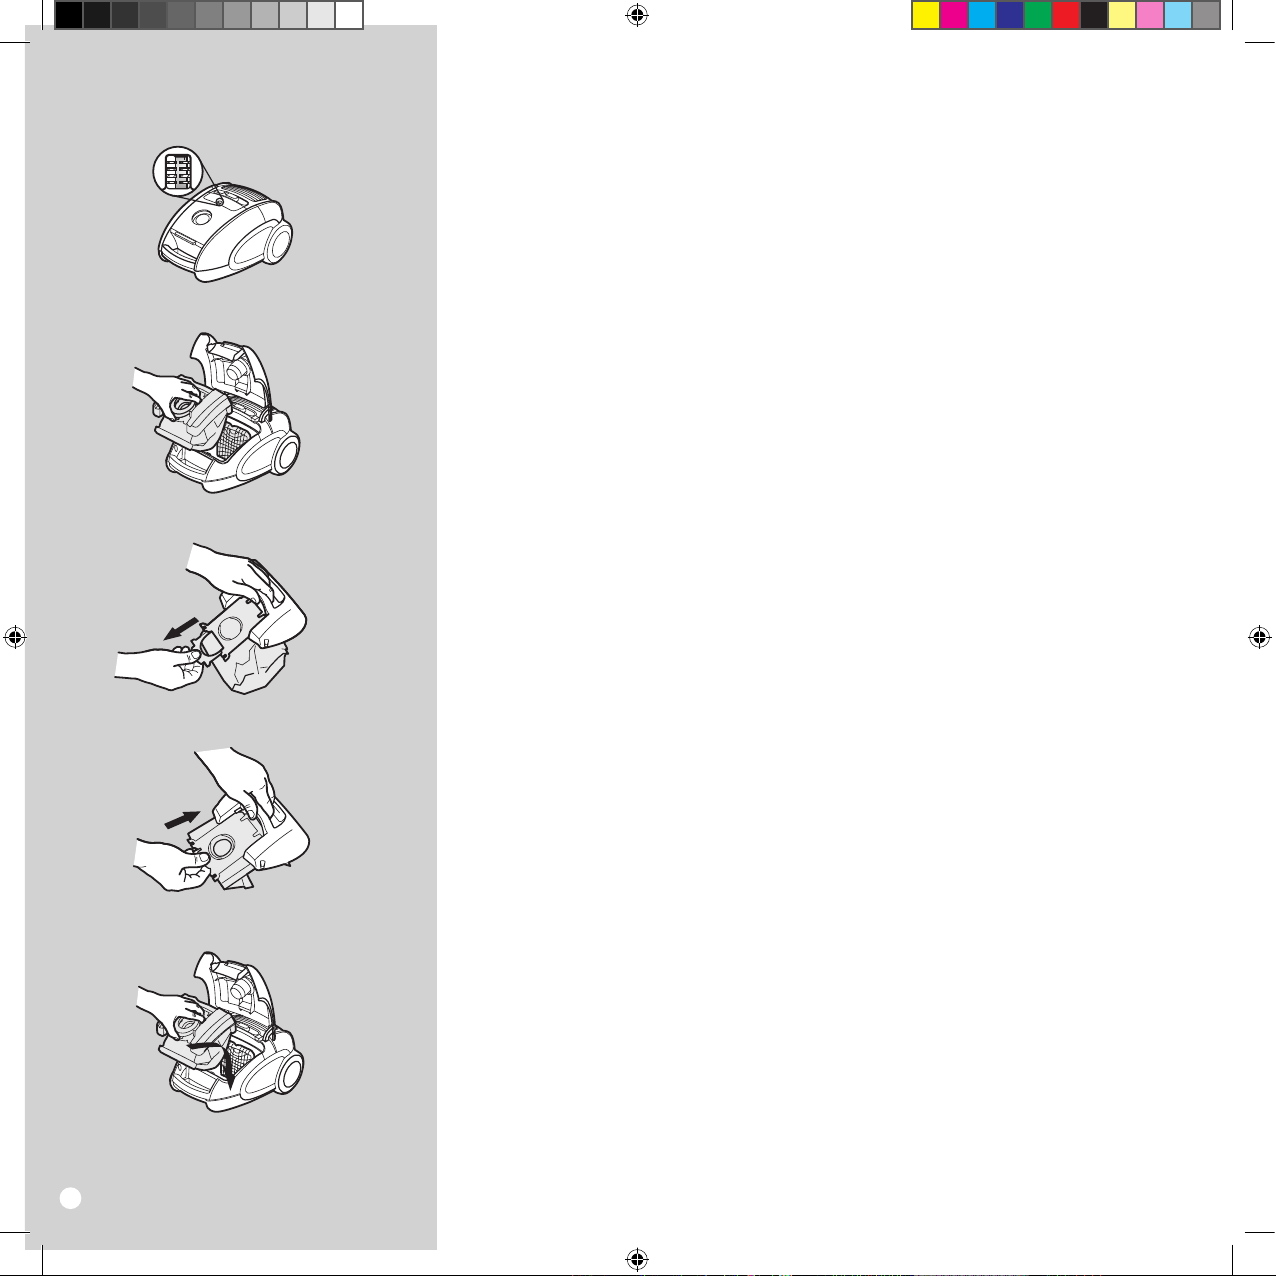
English
Replacing the dust bag, s-bag®
27 The dust bag, s-bag® must be replaced latest when
the indicator window is completely red. Read with
the nozzle lifted up.
28 Open the front lid and lift out the insert holding the
s-bag®.
29 Pull the cardboard to remove the s-bag® from the in
sert. This automatically seals the s-bag® and prevents
dust leaking out. 30 Insert a new s-bag® by pushing
the cardboard right into the end of the groove in the
insert.
31 Put the insert back into the bag compartment and
close the lid.
Note. Replace the s-bag® after vacuuming carpetcleaning
powder. Be sure to use only original dust bags: s-bag® Classic,
s-bag® Clinic, s-bag® Long Performance or s-bag® Anti-odour.
10
2193094-05.indd 10 1/18/07 4:31:44 PM

Nederlands
Vervangen van de stofzak/s-bag®
27 De stofzak/s-bag® moet in ieder geval worden
vervangen als het indicatorvenster helemaal rood is.
Lees het venster af terwijl u het mondstuk omhoog
houdt.
28 Open de voorklep en verwijder de insteekhouder
met de s-bag®.
29 Trek aan het karton om de s-bag® uit de insteekhoud
er te tillen. De s-bag® wordt automatisch gesloten
zodat er geen stof kan ontsnappen.
30 Breng een nieuwe s-bag® aan door het karton tot
aan het einde van de groef op de insteekhouder te
duwen.
31 Plaats de insteekhouder terug in de stofzakruimte en
sluit de klep.
Opmerking: vervang de s-bag® na het gebruik van een tapijtreiniger in poedervorm. Gebruik alleen originele stofzakken
zoals s-bag® Classic, s-bag® Clinic, s-bag® Long Performance
of s-bag® Anti-odour.
Português
Substituição do saco de pó, s-bag®
27 O saco de pó, s-bag® deve ser substituído pelo
menos quando a janela indicadora ficar completamente vermelha. Verificar com o bocal levantado.
28 Abra a tampa frontal e retire o encaixe que segura o
s-bag®.
29 Puxe o cartão para retirar o s-bag® do encaixe. Esta
acção fecha automaticamente o s-bag® e evita perdas de pó.
30 Insira um s-bag® novo puxando o cartão até ao fim
da ranhura do encaixe.
31 Coloque o encaixe de volta no compartimento do
saco e feche a tampa.
Nota. Substitua o s-bag® depois de aspirar pó de limpeza de
tapetes. Certique-se de que utiliza apenas sacos de pó originais: s-bag® Classic, s-bag® Clinic, s-bag® Long Performance
ou s-bag® Anti-odour.
Español
Cambio de la bolsa s-bag®
27 No debe cambiar la bolsa para el polvo, s-bag®, hasta
que el indicador de la ventana se ponga en rojo completamente. Puede mirarlo con la boquilla levantada.
28 Abra la tapa delantera y saque el compartimento que
contiene la bolsa s-bag®.
29 Tire del cartón para sacar la bolsa s-bag® del compar
timento. Así se sella automáticamente la bolsa s-bag®
y se evita que se salga el polvo.
30 Introduzca una nueva bolsa para el polvo s-bag®
empujando el soporte de cartón hacia abajo hasta el
fondo de las guías del compartimento.
31 Vuelva a introducir el compartimento y cierre la tapa.
Nota: Si aspira polvo de limpieza para alfombras debe
cambiar la bolsa. Asegúrese de utilizar únicamente bolsas de
polvo originales: s-bag® Classic, s-bag® Clinic, s-bag® Long
Performance o s-bag® Anti-odour.
11
2193094-05.indd 11 1/18/07 4:31:45 PM
 Loading...