

AEG AUP3820RP, AUP3840C, AUP3820R, AUP3840CST User Manual


English ........................................................ 2–13
Thank you for ch oosing an AEG UltraPerform er vacuum
cleaner. This User Ma nual describes all UltraPer former
models. So me of the accessories/feature s may not apply
to your specic m odel. In order to ensure the best re sults,
always use origi nal AEG accessories. They have b een
designed especially for your vacuum cleaner.
Deutsch ........................................................2-13
Wir freuen uns, dass Sie sich für den AEG UltraPerformerStaubsauger entschieden haben. Die vorliegende
Bedienungsanleitung beschreibt alle UltraPerformerModelle. Bestimmte Zubehörteile/Funktionen beziehen
sich möglicherweise nicht auf Ihr Modell. Um bestmögliche
Ergebnisse zu erzielen, sollten Sie ausschließlich das
Original-AEG-Zubehör verwenden, das speziell für Ihren
Staubsauger entwickelt wurde.
2
3.
18.
17.
16.
15.
12.
11.
14.
13.
10.
7.
1.
9.
8.
19.
4.
2.
5.
6.
20.
22.21. 23. 26.
24. 25.

Content
Inhalt
3
English
Before starting
• Unpack your UltraPerformer model and the accessory system and check that all
accessories are included*.
• Read the Operation Instruction carefully.
• Pay special at tention to the Safety advice chapter.
Enjoy your AEG UltraPe rformer !
Table of contents:
How to use the vacuum cleaner ...................................................4-5
Tips on how to get the best results ................................................6-7
Emptying and cleaning the dust container ..........................................8
Replacing and cleaning the lters ...................................................9
Cleaning the nozzles. . . . . . . . . . . . . . . . . . . . . . . . . . . . . . . . . . . . . . . . . . . . . . . . . . . . . . . . . . . .10 -11
Changing the battery in remote handle ............................................11
Troubleshooting ...................................................................12
Safety advice ......................................................................13
Consumer information and sustainability policy ...................................13
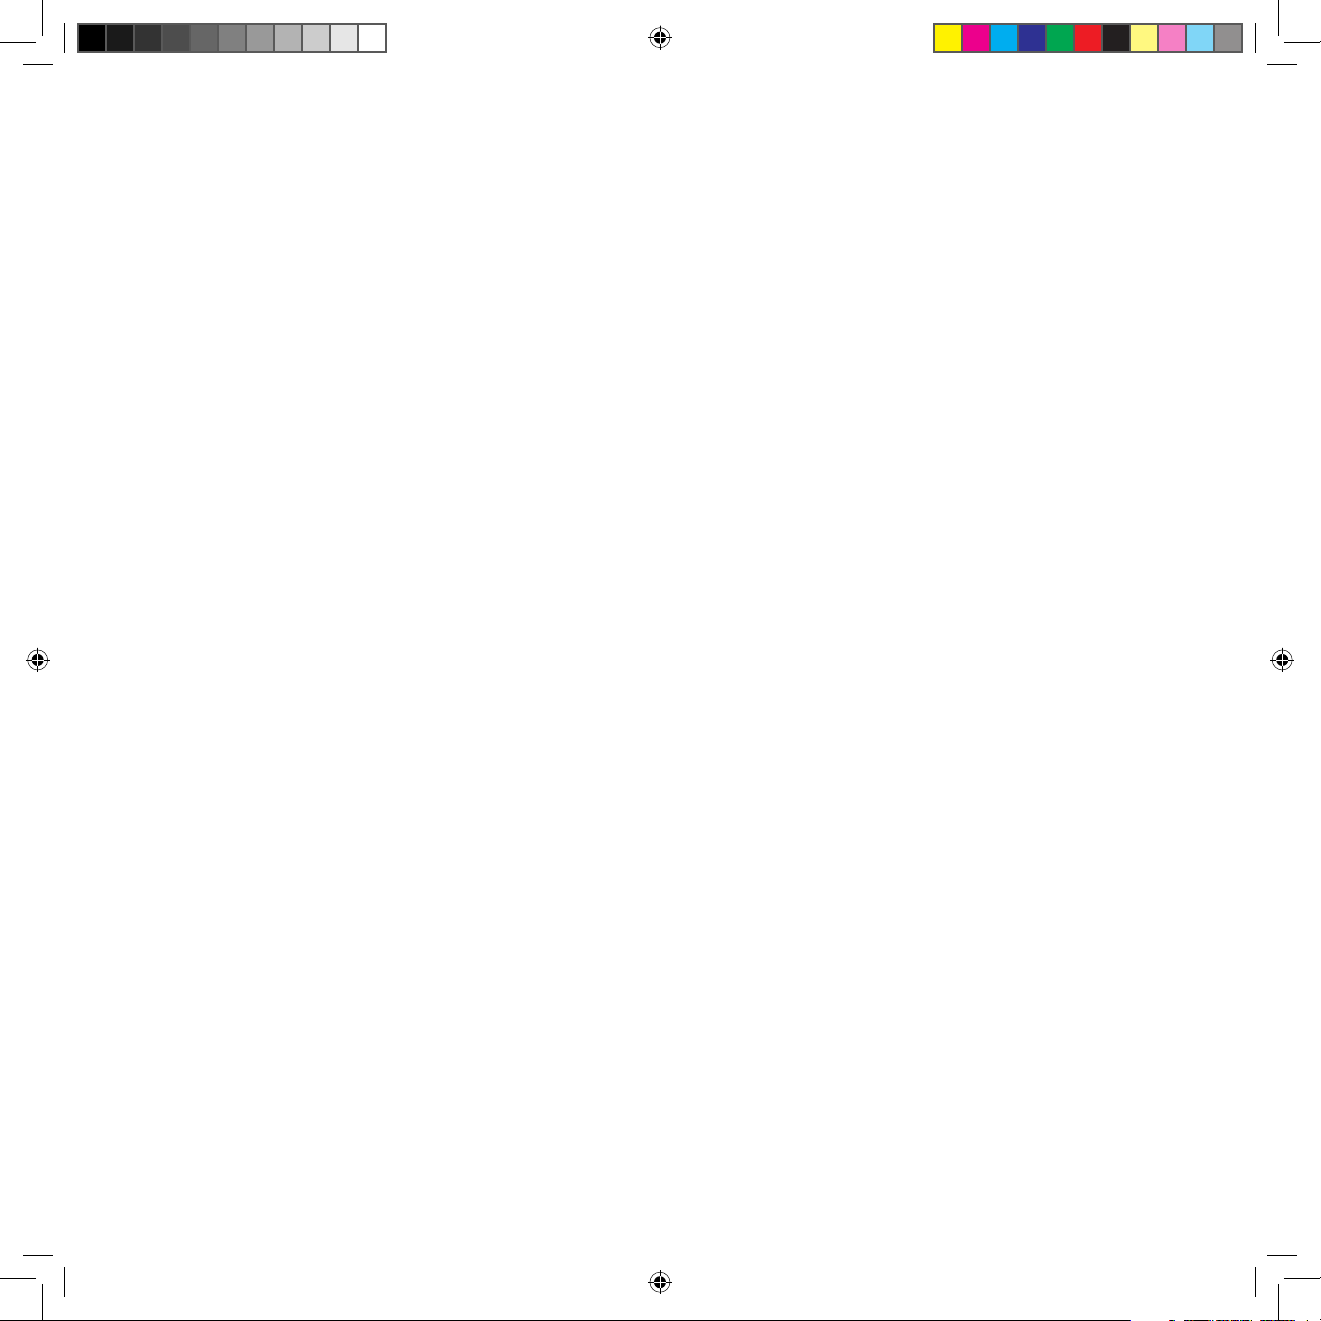
Description of your UltraPerformer :
1 Dust container
2 Power adjustment
3 Exhaust lter lid
4 Exhaust lter
5 Power cord
6 Ergoshock
7 Foam lter (Frame + Filter)
8 Motor lter
9 AeroPro hose *
10 AeroPro classic handle*
11 AeroPro 3in1 nozzle
12 AeroPro 3in1 accessories clip
13 AeroPro telescopic tube *
14 AeroPro nozzle
15 Standard hose
16 Standard handle *
17 Interlocked telescopic tube *
18 Dust magnet nozzle *
19 Power regulation button for models with manual control*
20 Display for models with remote control*
21 AeroPro ergo handle*
22 AeroPro remote control handle *
23 AeroPro remote control handle for motorized nozzle*
24 AeroPro motorized nozzle*
25 Turbo nozzle*
26 Parketto nozzle*
Deutsch
Vorbereitungen
• Packen Sie Ihren UltraPerformer Staubsauger und das Zubehörsystem aus.
Überprüfen Sie dann, ob alle Zubehörteile enthalten sind*.
• Lesen Sie die Bedienungsanleitung sorgfältig durch.
• Beachten Sie dabei besonders das Kapitel mit den Sicherheitshinweisen.
Wir wünschen Ih nen viel Freude mit Ihrem AEG UltraPer former!
Inhaltsverzeichnis:
Verwendung des Staubsaugers ...................................................4-5
Tipps für beste Ergebnisse ........................................................6 -7
Leeren und Reinigen des Staubbehälters ...........................................8
Austauschen und Reinigen der Filter ................................................9
Reinigen der Düsen .............................................................10 -11
Auswechseln der Batterie im Fernbediengri ......................................11
Fehlersuche .......................................................................12
Sicherheitshinweise ...............................................................13
Verbraucherinformationen und Nachhaltigkeitsgrundsätze ........................13
Beschreibung Ihres UltraPerformer Staubsaugers:
1 Staubbehälter
2 Leistungsregulierung
3 Abdeckung des Luftaustrittlters
4 Luftaustrittlter
5 Netzkabel
6 Ergoshock
7 Schaumstolter (Rahmen + Filter)
8 Motorlter
9 AeroPro-Schlauch *
10 AeroPro Classic-Gri*
11 AeroPro 3in1-Düse
12 AeroPro 3in1-Zubehör-Clip
13 AeroPro-Teleskoprohr *
14 AeroPro- Düse
15 Standardschlauch
16 Standardgri *
17 Interlocking-Teleskoprohr *
18 Dust-Magnet-Düse *
19 Leistungsregulierungstaste für Modelle mit manueller Steuerung*
20 Display bei Modellen mit Fernsteuerung *
21 AeroPro Ergo -Gri*
22 AeroPro-Fernbedienungsgri *
23 AeroPro-Fernbediengri für Elektrodüse*
24 AeroPro-Elektrodüse*
25 Tu rbo düse*
26 Parkettdüse*
* Accessories may var y from model to model .
(see specication s ticker on the packaging box)
* Zubehör kann je nach Modell variieren.
(siehe Datenaufkleber auf dem Verpackungskarton)
4
How to use the vacuum cleaner
/ Verwendung des Staubsaugers
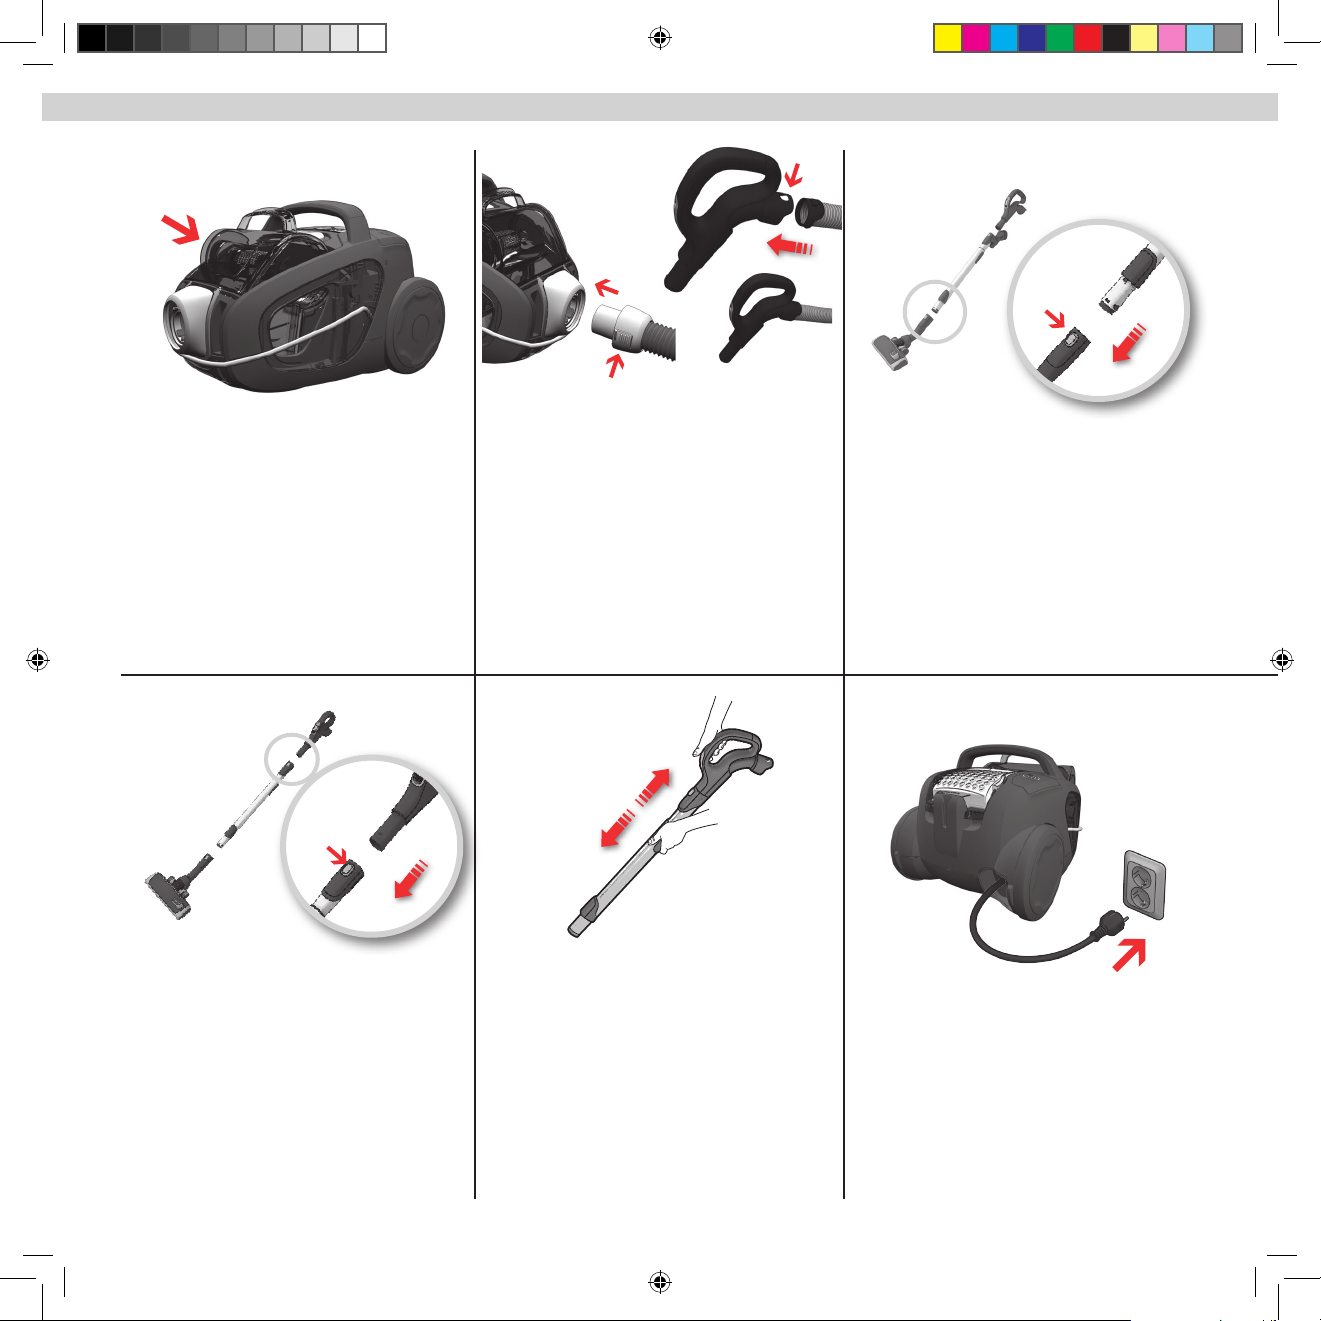
Click
Ensure that the dust container and foam lter are in
place!
Sicherstellen, dass Staubbehälter und
Schaumstolter eingesetzt sind!
Click
Attach t he telescopic tu be to the hose handle (to
remove it, press the release button and pull the hose
handle out).
Insert the hose (to remove it, press the release buttons
and pull the hose out).
Insert the hose into the hose handle until the catches
click to engage (press the catches to release the hose).
Schlauch einsetzen (zum Abnehmen die
Verriegelungsknöpfe drücken und den Schlauch
herausziehen).
Schlauch in den Schlauchgri einführen, bis Verriegelung
einrastet. Zur Freigabe des Schlauches Verriegelung
drücken.
Adjust the telescopic tube by holding the lock and pull
the handle with the other hand.
Attach t he telescopic tu be to the oor nozz le (to
remove it, press the release button and pull the nozzle
o).
Teleskoprohr in Bodendüse einstecken (zum
Abnehmen den Verriegelungsknopf drücken und die
Düse herausziehen)
Pull out the power cor d and plug it into the mains.
Teleskoprohr auf Schlauchgri stecken (zum
Abnehmen den Verriegelungsknopf drücken und den
Schlauchgri herausziehen).
Teleskoprohr auf passende Länge einstellen, indem
Sie die Verriegelung festhalten und mit der anderen
Hand den Gri ziehen.
Stromkabel herausziehen und Stecker in die
Steckdose stecken.
 Loading...