

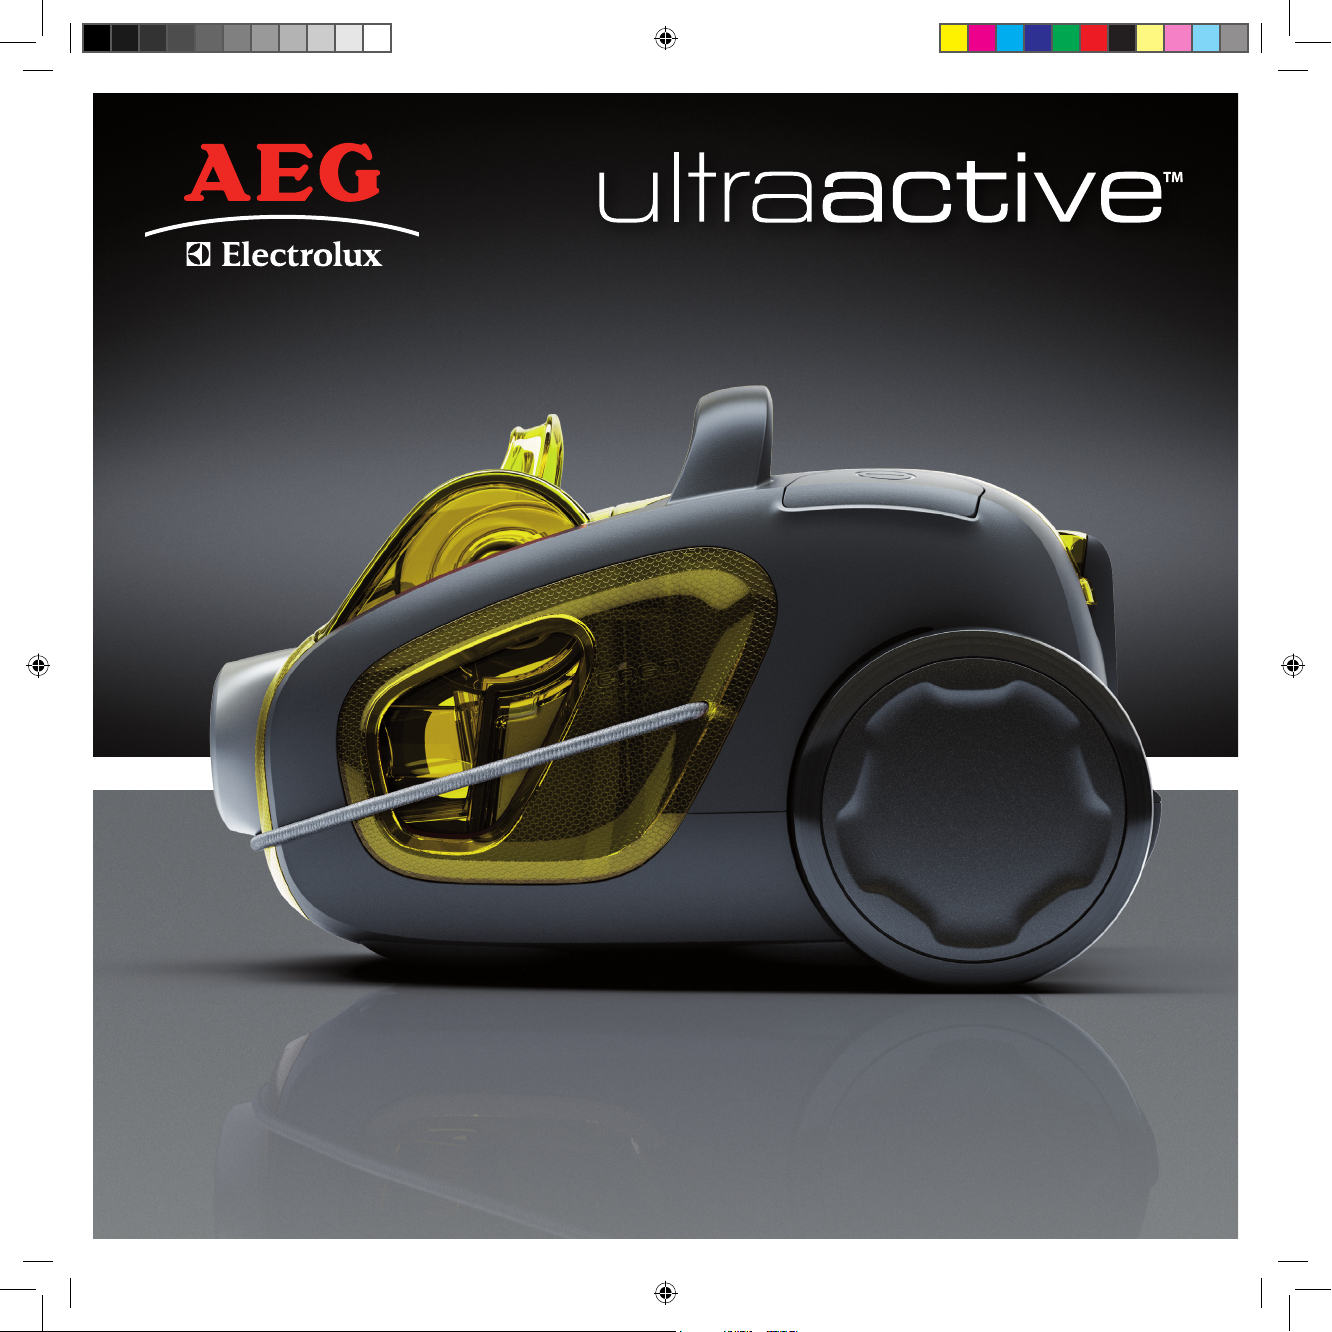
Perfekte Reinigungsergebnisse mit weniger Aufwand
Perfect cleaning result with less effort


Thank you for ch oosing an AEG-Elec trolux UltraActive
vacuum cleane r. This User Man ual describes all UltraAc tive
models. So me of the accessories/featu res may not apply
to your specic m odel. In order to ensure the be st results,
always use orig inal AEG-Electro lux accessories. They have
been design ed especially for your vacu um cleaner.
English ........................................................2–13
Wir freue n uns, dass Sie sich f ür den AEG-Elec trolux
UltraActive -Staubsaug er entschieden hab en. Die vorliegende Be dienungsanleitung b eschreibt alle Ultra ActiveModelle. Bestimmte Zubehör teile/Funktionen beziehen
sich mögli cherweise nicht au f Ihr Modell. Um b estmögliche
Ergebnisse zu erzielen, sollte n Sie ausschließlich d as
Original -AEG-Electrolu x-Zubehör verwenden , das speziell
für Ihren Staubsauger entwicke lt wurde.
Deutsch ........................................................2-13
1.
2.
9.
8.
5.
3.
13.
12.
11.
14.
15.
16.
10.
4.
6.
7.
17.
18.
19.
24. 25.
20.
22.21. 23. 26.
2
3
English
Before start ing
Unpack your UltraActive model and the accessory system and check that all acces-•
sories are included*.
Read the Operation Instruction carefully.•
Pay special at tention to the Safety advice chapter.•
Enjoy your AEG -Electrolux UltraAc tive !
Table of conte nts:
How to use the vacuum cleaner ...................................................4-5
Tips on how to get the best results ................................................6-7
Emptying and cleaning the dust container ..........................................8
Replacing and cleaning the lters ...................................................9
Cleaning the nozzles. . . . . . . . . . . . . . . . . . . . . . . . . . . . . . . . . . . . . . . . . . . . . . . . . . . . . . . . . . . .10 - 11
Changing the batter y in remote handle ............................................11
Troubleshooting ...................................................................12
Safety advice . . . . . . . . . . . . . . . . . . . . . . . . . . . . . . . . . . . . . . . . . . . . . . . . . . . . . . . . . . . . . . . . . . . . . .13
Consumer information and sustainability policy . . . . . . . . . . . . . . . . . . . . . . . . . . . . . . . . . . .13
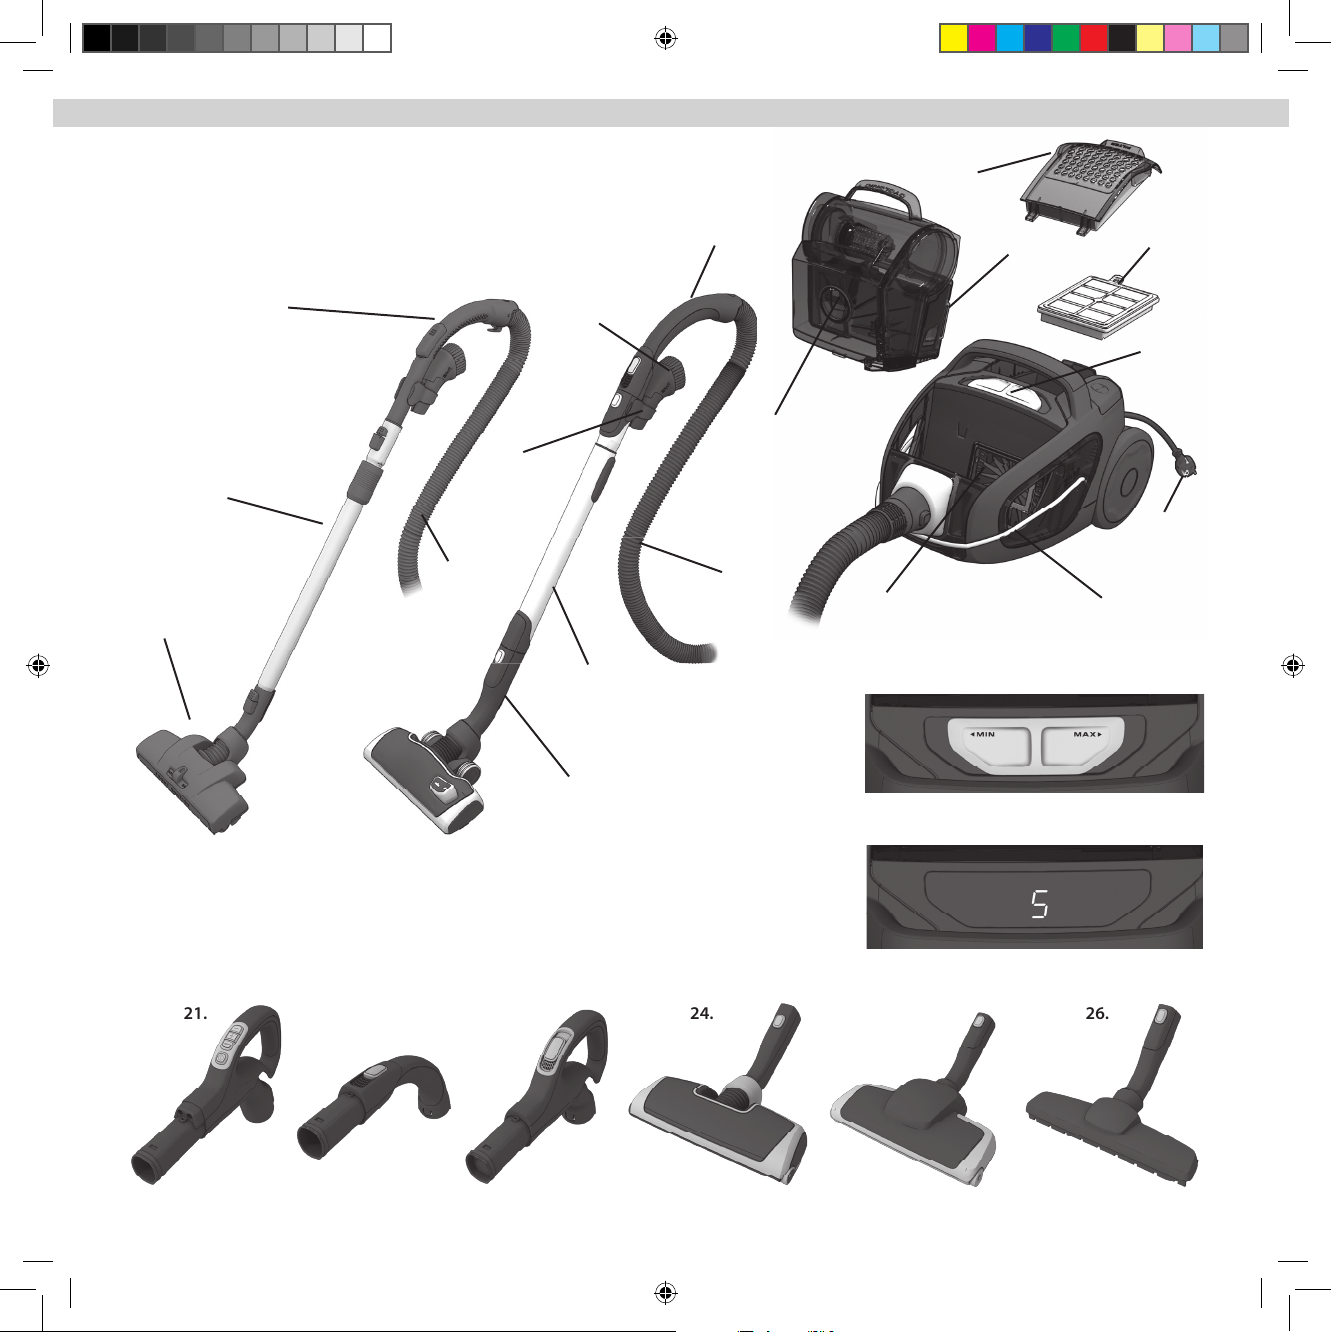
Descri ption of your Ult raActive :
1 Dust container
2 Power adjustment
3 Exhaust lter lid
4 Exhaust lter
5 Power cord
6 Ergoshock
7 Foam lter (Frame + Filter)
8 Motor lter
9 AeroPro hose *
10 AeroPro classic handle*
11 AeroPro 3in1 nozzle
12 AeroPro 3in1 accessories clip
13 AeroPro telescopic tube *
14 AeroPro nozzle
15 Standard hose
16 Standard handle *
17 Interlocked telescopic tube *
18 Dust magnet nozzle *
19 Power regulation button for models with manual control*
20 Display for models with remote control*
21 AeroPro ergo handle*
22 AeroPro remote control handle *
23 AeroPro remote control handle for motorized noz zle*
24 AeroPro motorized noz zle*
25 Turbo nozzle*
26 Parketto noz zle*
* Accessories may va ry from model to mode l.
(see specicatio n sticker on the packaging b ox)
Content
Deutsch
Vorbereitungen
Packen Sie Ihren UltraActive Staubsauger und das Zubehörsystem aus. Überprüfen •
Sie dann, ob alle Zubehörteile enthalten sind*.
Lesen Sie die Bedienungsanleitung sorgfältig durch.•
Beachten Sie dabei besonders das Kapitel mit den Sicherheitshinweisen.•
Wir wünschen I hnen viel Freude mit Ihrem AEG -Electrolux UltraA ctive!
Inhaltsverzeichnis:
Verwendung des Staubsaugers . . . . . . . . . . . . . . . . . . . . . . . . . . . . . . . . . . . . . . . . . . . . . . . . . . . 4-5
Tipps für beste Ergebnisse ........................................................6-7
Leeren und Reinigen des Staubbehälters . . . . . . . . . . . . . . . . . . . . . . . . . . . . . . . . . . . . . . . . . . . 8
Austauschen und Reinigen der Filter ................................................9
Reinigen der Düsen .............................................................10 -11
Auswechseln der Batterie im Fernbediengri . . . . . . . . . . . . . . . . . . . . . . . . . . . . . . . . . . . . . .11
Fehlersuche . . . . . . . . . . . . . . . . . . . . . . . . . . . . . . . . . . . . . . . . . . . . . . . . . . . . . . . . . . . . . . . . . . . . . . .12
Sicherheitshinweise . . . . . . . . . . . . . . . . . . . . . . . . . . . . . . . . . . . . . . . . . . . . . . . . . . . . . . . . . . . . . . .13
Verbraucherinformationen und Nachhaltigkeitsgrundsätze ........................13
Beschr eibung Ihres UltraAc tive Staubsaug ers:
1 Staubbehälter
2 Leistungsregulierung
3 Abdeckung des Luftaustrittlters
4 Luftaustrittlter
5 Netzkabel
6 Ergoshock
7 Schaumstoflter (Rahmen + Filter)
8 Motorlter
9 AeroPro-Schlauch *
10 AeroPro Classic-Gri*
11 AeroPro 3in1-Düse
12 AeroPro 3in1-Zubehör-Clip
13 AeroPro-Teleskoprohr *
14 AeroPro- Düse
15 Standardschlauch
16 Standardgri *
17 Interlocking-Teleskoprohr *
18 Dust-Magnet-Düse *
19 Leistungsregulierungstaste für Modelle mit manueller Steuerung*
20 Display bei Modellen mit Fernsteuerung *
21 AeroPro Ergo -Gri*
22 AeroPro- Fernbedienungsgri *
23 AeroPro- Fernbediengri für Elektrodüse*
24 AeroPro- Elektrodüse*
25 Turbodüse*
26 Parkettdüse*
* Zubehör kann j e nach Modell variieren .
(siehe Datenauf kleber auf dem Verpac kungskarton)
Inhalt
Click
Click
4
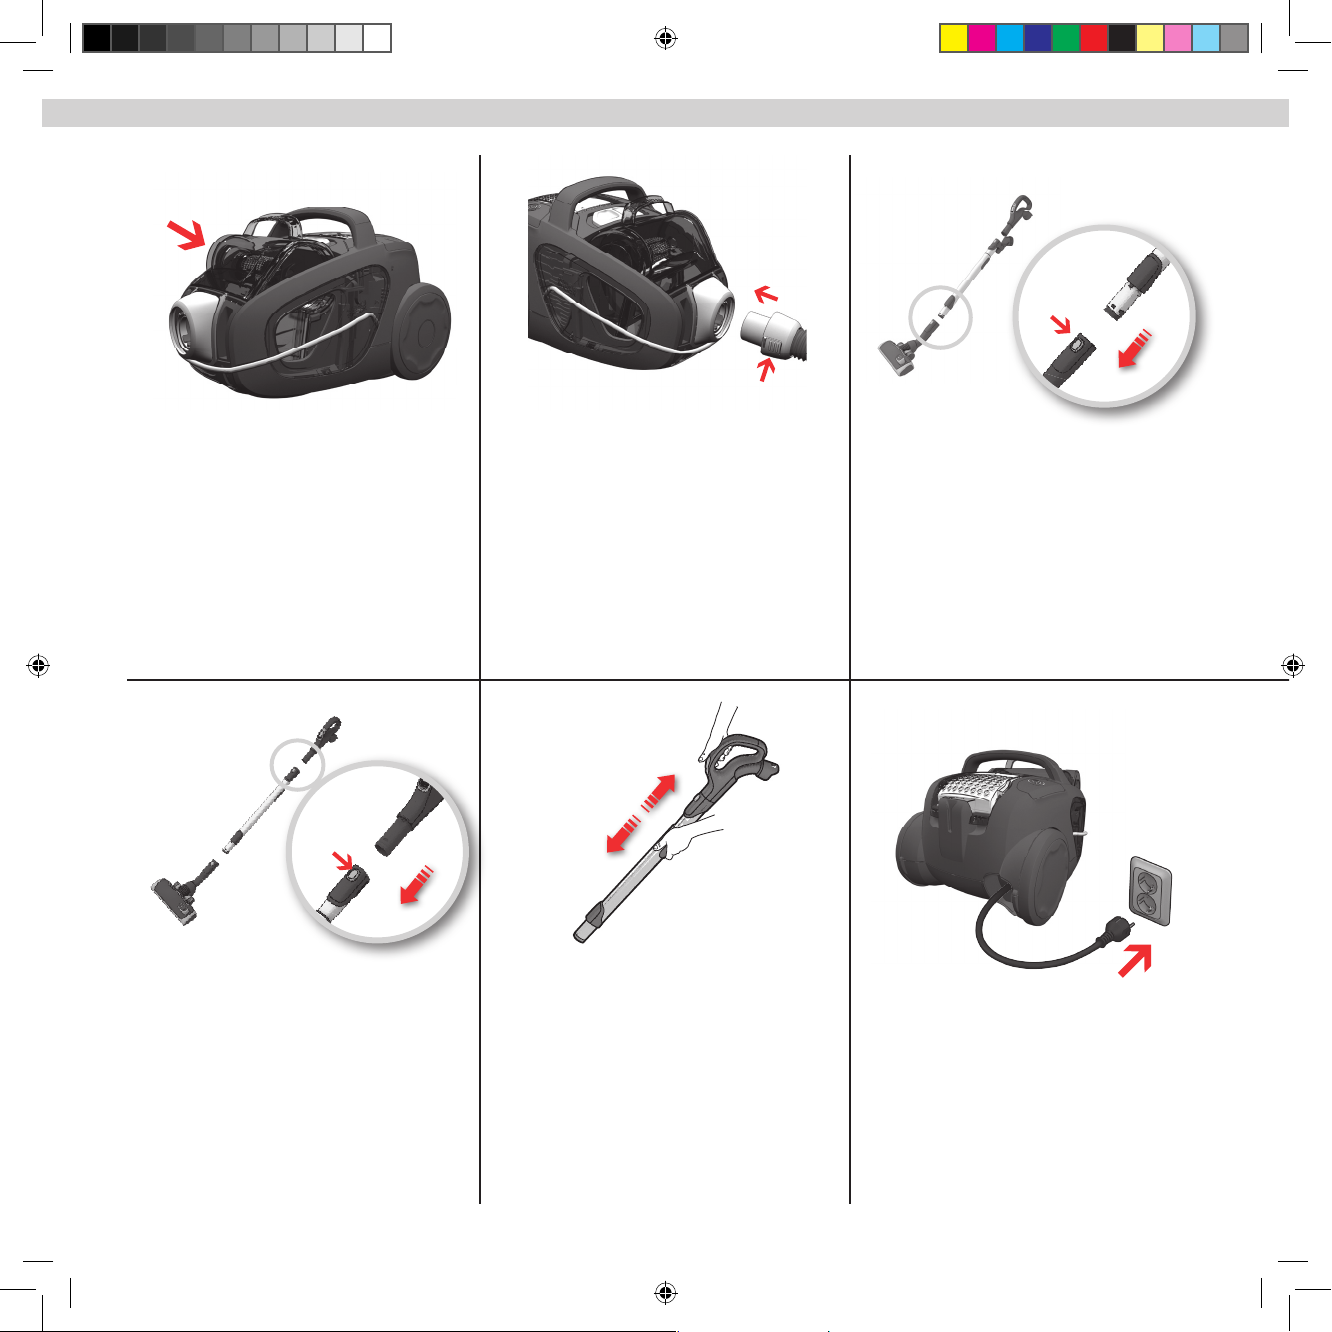
Ensure t hat the dust cont ainer and foam l ter are in
place!
Attach t he telescopic tube to t he hose handle (to
remove it, press the release button and pull the hose
handle out).
Adjust the telescopic t ube by holding the lock and pull
the handle with the other hand.
Pull out t he power cord and pl ug it into the mains.
Inser t the hose (to remove it, press the release buttons
and pull the hose out).
Attach t he telescopic tube to t he oor nozzle (to remove it, press the release button and pull the nozzle o ).
How to use the vacuum cleaner
Sicher stellen, dass Staubb ehälter und Schaumst olter eingesetzt sind!
Teleskoprohr auf Sc hlauchgri st ecken (zum Abneh-
men den Verriegelungsknopf drücken und den Schlauchgri herausziehen).
Teleskoprohr auf pa ssende Länge einstellen, indem
Sie die Verriegelung festhalten und mit der anderen
Hand den Gri ziehen.
Stromk abel herausziehen und Stecker in die Steckdose ste cken.
Schlau ch einsetzen (zum Abnehmen die Verriegelungs-
knöpfe drücken und den Schlauch herausziehen).
Teleskoprohr in Bodendüse einst ecken (zum Abnehmen den Verriegelungsknopf drücken und die Düse
herausziehen)
/ Verwendung des Staubsaugers

5
Switch on/o the vac uum cleaner by pushing the ON/
OFF button.
Adjust su ction power. (Mode ls with remote co ntrol.)
To regulate press ” – ” button (decrease) or ” + ” button
(increase)
Models with remote con trol and AeroPro motori zed
nozzle. To turn the motorized nozzle on and o, press
BRUSH button on the handle. The indicator light on the
nozzle will come on when BRUSH is operating.
After vacuuming rewind the power cor d by pushing
the REWIND but ton.
Models with remote con trol can also be operated by
the (ON/OFF)
button on the handle.
How to use the vacuum cleaner
Adjust su ction power.
Use the slider on the cleaner or the air valve on the handle to adjust the suction power.
Staubsauger ein-/ausschalt en durch Drücken der EIN -/
AUS -Tas te .
Saugle istung einste llen. (Modell e mit Fernbedie nung.)
Regulieren durch Drücken der Tasten „ – “ (schwächer)
oder „ + “ (stärker).
Modelle mit Fernsteuerung un d AeroPro-Elekt rodüse. Zum Ein- und Ausschalten der Elektrodüse die
Taste BRUSH am Gri drücken. Die Anzeige an der Düse
leuchtet, wenn die Düse in der Betriebsart BÜRSTEN
betrieben wird.
Nach dem Staubsaugen das Strom kabel durch Be täti-
gen der AUFROLL-Taste aufwickeln.
Modelle mit Fernbedienung können auch mit der Taste
(EIN/AUS) des Gris bedient werden.
/ Verwendung des Staubsaugers
Saugle istung einste llen.
Zum Regulieren der Saugleistung den Schieberegler am
Staubsauger oder das Luftventil am Gri verwenden.

3in1
3in1
6
Models with manual powe r regulation:
Models with display and remote contro l:
Curtains
Delicate carpets Rugs Hard oors
Bookshelves, upholster y, crevices, co rners
Brushes up
Brushes up
Brushes down
Motorized nozzle gives the best dust pick-up and deep
cleaning of carpets through the rotating brush roller
agitating the carpet. Do not leave the motorized nozzle
stationary with brush roller on.
Brush roller on or o as preferred
Tips on how to get the best results
Use Turbo nozzle
(depending on model).
Use Hard oor nozzle.
(depending on model)
Attention: on fur rugs, rugs with long fringes or deep
pile exceeding 15 mm the moto rized nozzle s hould
have the brush roller o. Press BRUSH button to turn
the brush roller o.
See the reference numbers
below to nd an optimal
performance.
(1 = MIN ; 5 = MAX)
Follow the numbers for
optimal performance.
(1 = MIN ; 5 = MAX)
Modelle mit man ueller Leistungsregelung:
Modelle mit Anz eige und Fernste uerung:
Vorhänge
Empndliche Tepp iche
Vorleger
Hartböden
Bücherregal e, Polster, Fugen, Ec ken
Borsten eingezogen
Borsten eingezogen
Borsten ausgefahren
Die Elek trodüse gewährleistet optimale Stauba ufnahme und Tie fenreinig ung von Teppichen durch die me chanische Bewegung
mit der rotierenden Bü rstenrolle. Lass en Sie die Elektrod üse nicht
an einer Stell e stehen, wenn die Bür stenrolle ausgefa hren ist.
Bürstenrolle je nach Wunsch ein- oder ausgefahren
/ Tipps für beste Ergebnisse
Turbodüse ve rwenden
(modellabhängig).
Düse für H artböden verwenden.
(modellabhängig)
Achtung: auf Fellvorlegern, Vorlegern mit langen Fransen oder Florhöhen ü ber 15 mm sollte bei de r Elekt-
rodüse die Bürs tenrolle ausg eschaltet wer den. Zum
Ein- und Ausschalten der Bürstenrolle den BRUSH Knopf
drücken.
Siehe unten stehende Nummernangaben zur Ermittlung der optimalen Leistung. (1 = MIN ; 5 = MAX )
Für optimale Leistung den
Nummernangaben folgen.
(1 = MIN ; 5 = MAX)

7
Flexible storage:
Store and c arry the appliance ea sily by using the
Ergoshock.
Keep the hose in place while storing the vacuum cleaner by extending the elastic bumper cord and placing it
across the hose.
Keep the noz zle on the cleaner by using the parking
slots on the rear or under the cleaner.
The elastic bumper protects the cleaner from getting
scratched at the sharp corners.
The dust container must be emptied when it is lled to the MAX indication mark on the dust container.
The dust container mu st never be overll ed.
Clean the foam lter ever y 3-4 months or when it’s visually dirt y.
Allow it to dry for 6-12 hours before putting it back .
Tips on how to get the best results
Dust container
Flexible Aufbewahrung:
Ergosh ock zum einfach en Aufbewahre n und Tragen
des Geräts.
Schlauch für die Aufbewahrung des Staubsaugers xieren. Dazu elastischen Gummizug herausziehen und um
den Schlauch legen.
Die Düse kann mithilfe der Parkaufnahmen auf der
Rückseite oder der Unterseite des Staubsaugers am
Gerät befestigt werden.
Der elastische Gummizug schüt zt den Staubsauger vor
Kratzern und scharfen Kanten.
Der Staubbehälter muss entleer t werden, wenn sein Füllstand die
MAX-Anzeige erreicht. Der Staubbehälter dar f niemals über diese
Markierung hi naus gefüllt werden.
Den Schaumstoflter alle 3- 4 Monate oder bei sichtbarer Verschmutzung mit warmen Wasser auswaschen. Vor dem erneuten
Einsetzen 6-12 Stunden trocknen lassen.
/ Tipps für beste Ergebnisse
Staubbehälter

8
Lift ou t the dust container by pulling the handle
straight upwards.
Warning: D o not use the conta iner handle to ca rry
the cleaner !
Open the dust container by pushing the release button
downwards.
Hold the container over the waste bin and empty it
completely.
Remove the cyclonic lter by pulling out the lter grip.
Emptying and cleaning the dust container
Remove the dust and bres from lter. Clean the cone
under the tap.
Let it dry completely before putting it back into the dust
container.
Put the dust container back until it clicks into place.
Den Staubbehälter he rausnehmen, indem Sie ihn am
Gri gerade nach oben ziehen.
Warnung: D en Behältergri nicht zum Tragen des
Staubsaugers verwen den!
Den Staubbehälter önen, indem Sie den Entriegelungsknopf drücken.
Den Behälter über einen Abfalleimer halten und vollständig entleeren.
Den Zyklonlter herausnehmen, indem Sie den Filtergri
herausziehen.
/ Leeren und Reinigen des Staubbehälters
Den Filter von Staub und Fasern reinigen. Den Kegel unter ießendem Leitungswasser reinigen. Den Kegel vor
dem erneuten Einsetzen in den Staubbehälter vollständig trocknen lassen.
Den Staubbehälter wieder einsetzen, bis er einrastet.

9
Lift out the lter.
Use AEG-Electrolux original lters: EFH12, EFH12W,
EF H13W.
Open the lter lid by pulling the back edge back wards
and upwards.
To close the lid, insert the front hook s into the rails. Push the lid forward and press down. Pull the grip and remove the lter frame.
Remove / Clean the lter
Re-assemble lter holder by placing back in the lower
part and put the frame in place at the top.
Replacing / Cleaning the exhaust lter
Replacing the motor lter
Cleaning the washable exhaus t lter
Wash the lter every three months. If the lter is dam aged, replace it with a new lter.
Rinse the inside (dirt y side) in lukewarm tap water. Tap
the lter frame to remove the water. Repeat the process
four times.
Note: Do not use cle aning agents and avoid to uching the
lter surface . Let the lter dr y completel y before putt ing
back !
Filter herausnehmen.
Nur original AEG-Electrolux-Filter verwenden: HEPA-H12 non-washable AEF12 oder den HEPA-H-12 washable
AEF12 W oder HEPA-H-13 washable.
Die Filterabdeckung önen, indem Sie die hintere Kante
nach hinten und oben ziehen.
Zum Schließen der Abdeckung die vorderen Haken in die
Führungen einsetzen.
Die Abdeckung nach vorn drücken und nach unten
drücken.
Motorlter bei Verschmutzung wechseln. Den Gri ziehen und den Filterrahmen herausnehmen.
Filter austauschen.
Filterhalterung wieder einsetzen, indem Sie ihn in den unteren Teil einsetzen und den Rahmen darauf anbringen.
Austauschen/Reinigen des Abluftlters
Wechseln des Motorlters
Reinigen des waschbaren Abluftlters Den Filte r alle drei
Monate oder b ei sichtbarer Verschmutz ung auswaschen. Bei
Beschädigu ng den Filter ersetzen.
Innenseite (verschmutzte Seite) des Filters unter lauwarmem
Leitungswasser spülen. Gegen den Filterrahmen klopfen, um
das Wasser zu ent fernen. Reinigung vier Mal wiederholen.
Hinweis: Keine Re inigungsmittel verw enden und die Filteroberäche nicht berühren. Den Filter vor de m erneuten Ein setzen
vollstä ndig trockn en lassen!

10
Cleaning the motorized nozzle
Always dis connect the nozzle before c leaning it ! /
Disconnect the noz zle from the tube. Use the hose handle to clean the nozzle.
If the wh eels are stuck , clean them by removing the
wheel cap (only at the AeroPro nozzle) with a small
screwdriver.
Unscrew the wheel axis and clean all parts. Ret in re verse order.
Open brush roll cover by pushing the latches. This will
free the front wheels for cleaning.
Pull out the brush roll and remove entangled threads by
snipping them away with scissors. Use the hose handle
to clean the nozzle. Ret in reverse order.
If the wh eels are stuck , remove them carefully by using
a small screwdriver.
Cleaning the nozzle
/ Reinigen der Aeropro Elektrodüse
Düse vor dem Reini gen immer abne hmen!
Die Düse vom Rohr abnehmen. Mit dem Schlauchgri
die Düse reinigen.
Wenn die Räder blo ckiert sind, zum Reinigen die
Radabdeckung (nur bei der AeroPro-Düse) mit einem
kleinen Schraubendreher abhebeln.
Die Radachse abschrauben und alle Teile reinigen. Zusammenbau in umgekehrter Reihenfolge.
Abdeckung der Bürste nrolle durch Zi ehen der Riege l
önen. Dadurc h werden die vorde ren Räder zum Re inigen fr eigegeben.
Bürstenrolle herausziehen und verwickelte Fäden mit
einer Schere durchschneiden und entfernen. Mit dem
Schlauchgri die Düse absaugen. Zusammenbau in umgekehrter Reihenfolge.
Wenn die Räder blo ckiert sind , diese vorsichtig mithilfe eines kleinen Schraubendrehers abnehmen.
/ Reinigen der Düse

11
Changing battery in remote handle
Cleaning the Turbo nozzle
(certain mode ls only)
Disconnect the noz zle from the vacuum cleaner tube
and remove entangled threads, etc. by snipping them o
with scissors. Use the hose handle to clean the nozzle.
Change bat tery when the light indicator is not respond ing when pressing any but ton.
Use only bat teries type LITHIUM CR2032. Bat teries must
be removed from the appliance before it is scrapped and
are to be disposed of safely.
Remote handle with motorized nozzle system DOES
NOT have any batteries or light indicator, so DO NOT try
to open the motorized handle.
/ Auswechseln der Batterie im Fernbediengri
Reinigen der Turbobürste
(nur bestimmte Mo delle)
Düse vom Staubsaugerrohr entfernen und in der Düse
verwickelte Fäden etc. zum Entfernen mit einer Schere
durchschneiden. Mit dem Schlauchgri die Düse absau gen.
Batterie wechseln, wenn die Leuchtanzeige nicht auf
Drücken der Knöpfe reagiert.
Nur Batterien des Typs LITHIUM CR2032 verwenden. Vor
dem Entsorgen des Geräts die Batterien entfernen und
sicher entsorgen.
Der Handgri mit Fernbedienung des Elek trodüsensystems (BRUSH-Knopf) besitzt K EINE Batterien und
Leuchtanzeigen. Deshalb diesen Handgri NIEMALS
önen.

12
The vacuum cleaner doe s not start
Check that the cable is connected to the mains.•
Check that the plug and cable are not damaged.•
Check for a blown fuse.•
Check if the batter y indicator lamp responds (certain models only).•
The vacuum cleaner stops
Check if dust container is full. If so, empty it and clean both the dust container and •
the lters before putting it back in the cleaner.
Check if the nozzle, tube or hose is blocked.•
Check the motor and exhaust lter are clean.•
The cleaner sto ps
The cleaner might be overheated: disconnec t it from the mains; check if the nozzle,
tube or hose are blocked. Let the cleaner cool down for 30 minutes before plugging it
in again.
If the cleaner still does not work , contact an authorized AEG- Electrolux ser vice centre.
Cleaning the hose
Clean the hose by “squeezing“ it. However, be careful in case the obstruc tion has been
caused by glass or needles caught inside the hose.
Note: The warrant y does not cover any damage to h oses caused by cleaning them .
Water has entered the vacuum cleaner
It will be necessary to replace the motor at an authorized AEG-Electrolux service centre.
Damage to the motor caused by the penetration of water is not covered by the warranty. For any further problems, contact an authorized AEG- Electrolux ser vice centre.
Der Staubsauger star tet nicht
Prüfen, ob das Netzkabel an die Netzsteckdose angeschlossen ist.•
Prüfen, ob der Stecker und das Kabel nicht beschädigt sind.•
Prüfen, ob eine Sicherung durchgebrannt ist.•
Prüfen, ob Batterieanzeige reagiert (nur bestimmte Modelle).•
Die Saug leistung läss t nach.
Prüfen, ob der Staubbehälter voll ist. In diesem Fall sowohl den Staubbehälter als •
auch die Filter reinigen, bevor sie wieder in den Staubsauger eingesetzt werden.
Prüfen, ob eine Verstopfung in Düse, Rohr oder Schlauch besteht.•
Prüfen, ob Motor- und Abluftlter sauber sind.•
Der Staubsauger schal tet sich automatisch ab.
Staubsauger ist möglicherweise überhitzt: Vom Stromnetz trennen; Düse, Rohr oder
Schlauch auf Verstopfung prüfen. Vor erneuter Verwendung den Staubsauger 30 Minuten abkühlen lassen.
Falls der Staubsauger danach immer noch nicht funk tioniert, wenden Sie sich an ein
autorisiertes AEG-Elec trolux Kundendienstzentrum.
Reinig en des Schlauch es
Verstopfungen im Schlauch durch Biegen und Beugen lockern und lösen. Dabei jedoch
vorsichtig vorgehen, falls die Blockierung durch Scherben oder spitze Gegenstände (z.
B. Nadeln) im Schlauch verursacht wurde.
Hinweis: Die G arantie deckt keinerle i durch Reinigung verursa chte Schäden an den Schläu chen ab.
Wasser ist in den Staubsauger eingedrungen.
Es ist notwendig, den Motor in einem autorisierten AEG-Electrolux-Servicezentrum auszutauschen. Schäden am Motor, die durch eingedrungenes Wasser verursacht wurden,
werden nicht durch die Garantie abgedeckt. Falls weitere Probleme auftreten, wenden
Sie sich an ein autorisier tes AEG-Electrolux-Ser vicezentrum.
Troubleshooting Fehlersuche

13
This appliance is not intended for use by persons (including children) with reduced
physical, sensory or mental capabilities or lack of experience and knowledge, unless
they are given supervision or instructions concerning the use of the appliance by a
person responsible for their safety.
Children should be supervised to ensure that they do not play with the appliance.
Always disconnect th e plug from the mains before cleaning or maintaining the ap pliance.
Never use the vacuum cleaner without its lters.
Caution
This appliance contains electrical connections:
Never vacuum any liquid•
Do not immerse in any liquid for cleaning•
Disconnect the appliance from the mains when not in use•
The hose should be checked regularly and must not be used if damaged.•
The above can cause serious damage to the motor, which is not covered by the warran ty.
Never use vacuum cleaner
Close to ammable gases, etc.•
On sharp objects•
On hot or cold cinders, lit cigaret te butts, etc.•
On ne dust, for instance plaster, concrete, our.•
Power cord p recautions
Regularly check that the plug and cord are not damaged. Never use the vacuum •
cleaner if the cord is damaged.
If the cord is damaged, it must be replaced only by an authorized AEG- Electrolux •
service centre in order to avoid a hazard. Damage to the vacuum cleaner ’s cord is not
covered by the warranty.
Never pull or lift the vacuum cleaner by the cord.•
All servi cing and repairs must be p erformed by an author ized AEG-Electrolu x service centre.
Store the vacuum clea ner in a dry place.
Safety requirement and warning
AEG-Electrolux declines all responsibility for all damages arising from any improper use
of the appliance or in cases of tampering with the appliance.
For more details of warranty and consumers’ contacts see the Warranty Booklet in the
packaging
If you have any comments on the cleaner or the Operating Instructions manual please
e-mail us at oorcare@electrolux.com
Sustai nability policy
This product is designed with the environment in mind. All plastic parts are marked for
recycling purposes. For details see our website: www.aeg-electrolux.com
The packaging material is chosen to be environmentally friendly and can be recycled.
Consumer information and sustainability policy
Personen (einschließlich Kindern) mit eingeschränkten körperlichen, sensorischen oder
geistigen Fähigkeiten oder mit fehlender Er fahrung und Kenntnissen dürfen dieses
Gerät nur unter Aufsicht oder nach Anleitung durch eine für ihre Sicherheit verantwortliche Person benutzen.
Kinder müssen beaufsichtigt werden, um zu gewährleisten, dass diese mit dem Gerät
nicht spielen.
Trennen Sie das Gerät vor Reinigungs- oder Wartungsarbeiten immer vom Stromnetz.
Benutzen Sie den Staubsauger niemals ohne Filter.
Vorsicht
Dieses Gerät besit zt elektrische Verbindungen:
Keine Flüssigkeiten aufsaugen•
Zum Reinigen nicht in Flüssigkeit tauchen•
Gerät bei Nichtbenutzung immer vom Stromnetz trennen•
Der Schlauch ist rege lmäßig zu überprüfen und darf bei Beschädigung nicht benut zt werden.•
Oben Genanntes kann den Motor ernsthaft beschädigen. Solche Schäden sind nicht
durch die Garantie abgedeckt.
Benutzen Sie den Staubsauger niemals ...
In der Nähe von brennbaren Gasen etc.•
Für scharf kantige Gegenstände•
Für heiße oder kalte Asche, brennende Zigarettenkippen etc.•
Für feinen Staub, z. B. Gips, Beton oder Mehl.•
Der Einsatz des Staubsaugers unter den oben genannten Bedingungen kann zu schweren Schäden führen, diese sind nicht durch die Garantieleistung abgedeckt.
Vorsicht smaßnahmen hinsicht lich des Netzkabel s
Stecker und Netzkabel regelmäßig auf Beschädigungen überprüfen. Staubsauger •
niemals benutzen, wenn das Net zkabel beschädigt ist.
Wenn das Netzkabel beschädigt ist, muss es zur Vermeidung von Gefahren von •
einem autorisierten AEG-Electrolux-Ser vicezentrum ausgetauscht werden. Schäden
am Kabel des Staubsaugers werden von der Garantie nicht abgedeckt.
Den Staubsauger niemals am Netzkabel ziehen oder hochheben.•
Alle Wartungs- u nd Reparaturarbeiten müss en vom autorisierten AEG- Electrolux-Kund endienst durchgeführ t werden.
Staubsauger an ei nem trockenen Ort au fbewahren.
Sicherheitsanforderung und Warnung
AEG-Electrolux übernimmt keine Verantwortung für Schäden, die durch den unsachgemäßen Einsatz des Geräts oder unbefugten Eingri in den Staubsauger entstehen.
Nähere Einzelheiten zur Garantie sowie Ansprechstellen für Verbraucher fragen nden
Sie im Garantieheft in der Packung.
Wenn Sie Fragen oder Hinweise zum Staubsauger oder zur Bedienungsanleitung haben
oder aber wenn Sie prak tisches Zubehör benötigen, senden Sie uns bitte eine E-Mail
an service.kleingeraete@aeg-electrolux.de oder rufen Sie uns an, unsere Kontaktdaten
entnehmen Sie bitte dem beiliegenden Garantieheft.
Nachhaltigkeitsgrundsätze
Dieses Produkt wurde mit Rück sicht auf die Umwelt hergestellt. Alle Plastik teile sind für
Recyclingzwecke markiert.
Einzelheiten darüber nden Sie auf unserer Website: www.aeg-electrolux.de
Das Verpackungsmaterial wurde mit Blick auf Umweltfreundlichkeit ausgewählt und
kann wiederver wertet werden.
Verbraucherinformationen und Nachhaltigkeitsgrundsätze

14
English
The symbol on the product or on its packaging indicates that this product may
not be treated as household waste. Instead it shall be handed over to the applicable
collection point for the recycling of electrical and electronic equipment. By ensuring this
product is disposed of correc tly, you will help prevent potential negative consequences
for the environment and human health, which could otherwise be caused by inappropriate waste handling of this product. For more detailed information about recycling of this
product, please contact your local city office, your household waste disposal service or
the shop where you purchased the product.
Deutsch
Das Symbol auf dem Produkt oder seiner Verpackung weist darauf hin, dass dieses
Produkt nicht als normaler Haushaltsabfall zu behandeln ist, sondern an einem Sammelpunk t für das Recycling von elektrischen und elektronischen Geräten abgegeben
werden muss. Durch Ihren Beitrag zum korrek ten Entsorgen dieses Produkt s schützen
Sie die Umwelt und die Gesundheit Ihrer Mitmenschen. Umwelt und Gesundheit werden
durch falsches Entsorgen gefährdet. Weitere Informationen über das Recycling dieses
Produkt s erhalten Sie von Ihrem Rathaus, Ihrer Müllabfuhr oder dem Geschäf t, in dem
Sie das Produk t gekauft haben.

15


2194103-02 PERFEKT IN FORM UND FUNKTION
 Loading...