

D E P I GB PL
AR4030BT-USB-CR_IM 05 .07.1 6
Bedienungsanleitung / Garantie 04
Instrucciones de servicio 15
Manual de instruções 25
Istruzioni per l’uso 36
Instruction Manual 46
Instrukcja obsługi / Gwarancja 56
D Autoradio mit Bluetooth, USB & Card Reader
E Autorradio con Bluetooth, USB & Lector de tarjeta
P Rádio automóvel com Bluetooth, usb e card reader
I Autoradio con Bluetooth, USB & Lettore card
GB Car Radio with Bluetooth, USB & Card Reader
PL Radio samochodowe z złączem Bluetooth, USB & czytnik kart
AUTORADIO
MIT BLUETOOTH,
USB & CARD READER
AR 4030 BT/USB/CR
2
AR4030BT-USB-CR_IM 05 .07.1 6
2
Inhalt
Deutsch
Italiano
Inhalt
Übersicht der Bedienelemente ..................................... Seite 3
Bedienungsanleitung ...................................................... Seite 4
Technische Daten ............................................................ Seite 12
Garantie ..............................................................................Seite 12
Entsorgung ........................................................................ Seite 13
Stichwortverzeichnis – Index .......................................... Seite 14
Español
Contenidos
Indicación de los elementos de manejo ..................Página 3
Instrucciones de servicio ..............................................Página 15
Datos técnicos ...............................................................Página 22
Eliminación .....................................................................Página 23
Índice ...............................................................................Página 24
Português
Índice
Descrição dos elementos de serviço ........................Página 3
Manual de instruções ...................................................Página 25
Características técnicas ................................................Página 33
Deposição.......................................................................Página 33
Registo de palavras-chave – Índice ...........................Página 35
Contenuto
Elementi di comando ...................................................Pagina 3
Istruzioni per l’uso..........................................................Pagina 36
Dati tecnici .....................................................................Pagina 43
Smaltimento ...................................................................Pagina 44
Elenco tematico - Indice ..............................................Pagina 45
English
Contents
Overview of the Components .......................................Page 3
Instruction Manual............................................................Page 46
Technical Data ..................................................................Page 53
Disposal ..............................................................................Page 53
Index ...................................................................................Page 55
Język polski
Spis treści
Przegląd elementów obłsugi ...................................... Strona 3
Instrukcja obsługi ........................................................... Strona 56
Dane techniczne ............................................................ Strona 63
Ogólne warunki gwarancji ........................................... Strona 64
Usuwanie ......................................................................... Strona 64
Indeks rzeczowy ............................................................. Strona 65
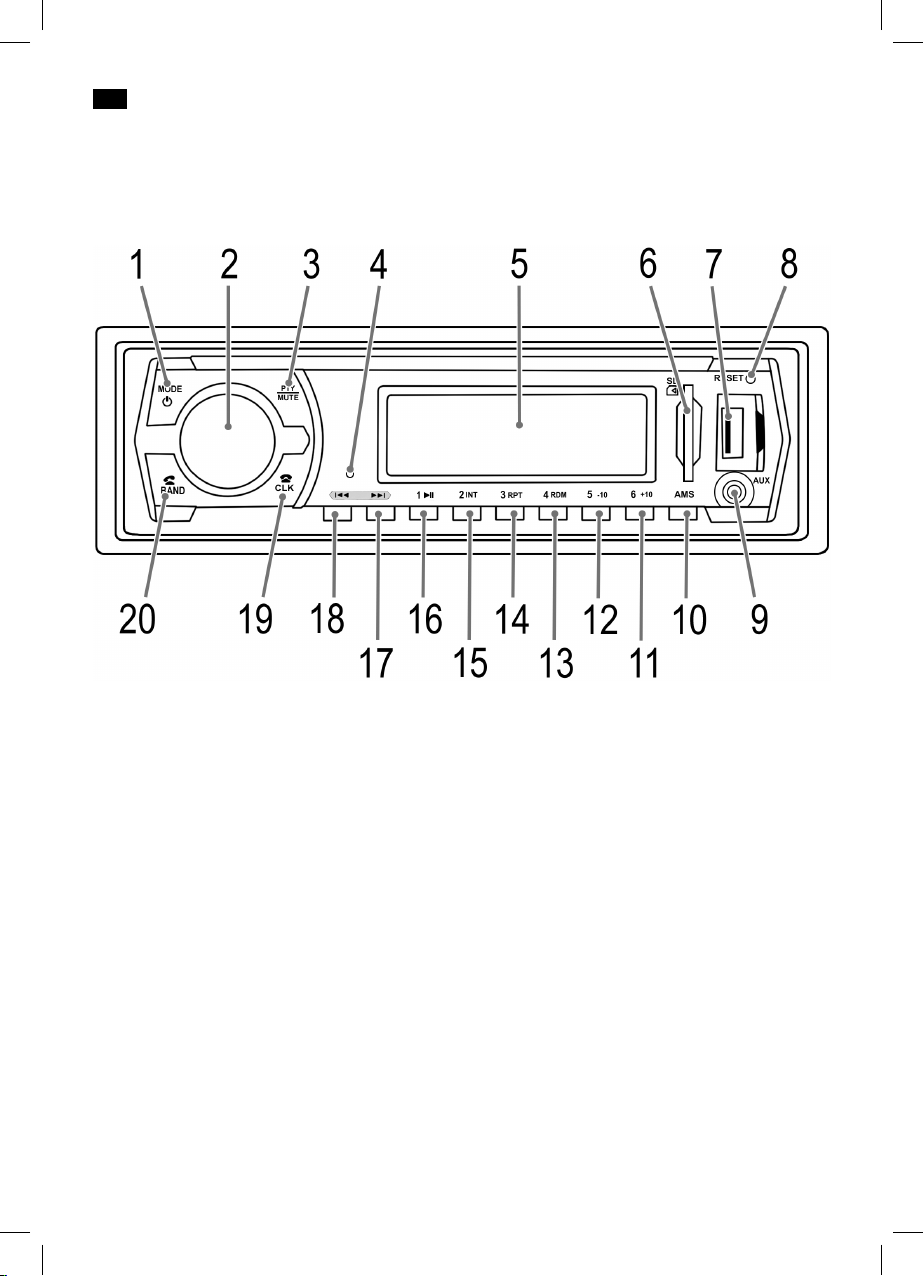
3
Indicación de los elementos de manejo
Descrição dos elementos de serviço
Elementi di comando
Overview of the Components
Przegląd elementów obsługi
AR4030BT-USB-CR_IM 05 .07.1 6
Übersicht der Bedienelemente
4
AR4030BT-USB-CR_IM 05 .07.1 6
4
Deutsch
Bedienungsanleitung
Vielen Dank, dass Sie sich für unser Produkt entschieden
haben. Wir wünschen Ihnen viel Freude mit dem Gerät.
Symbole in dieser Bedienungsanleitung
Wichtige Hinweise für Ihre Sicherheit sind besonders ge
kennzeichnet. Beachten Sie diese Hinweise unbedingt, um
Unfälle und Schäden am Gerät zu vermeiden:
WARNUNG:
Warnt vor Gefahren für Ihre Gesundheit und zeigt mögliche
Verletzungsrisiken auf.
ACHTUNG:
Weist auf mögliche Gefährdungen für das Gerät oder
andere Gegenstände hin.
HINWEIS: Hebt Tipps und Informationen für Sie hervor.
-
Sicherheitshinweise
Lesen Sie vor Inbetriebnahme dieses Gerätes die Bedienungsanleitung sehr sorgfältig durch und bewahren Sie diese
inkl. Garantieschein, Kassenbon und nach Möglichkeit den
Karton mit Innenverpackung gut auf. Falls Sie das Gerät an
Dritte weitergeben, geben Sie auch die Bedienungsanleitung mit.
• Verwenden Sie das Gerät nur für den vorgesehenen
Zweck.
• Das Gerät so einbauen, dass vorhandene Lüftungsöffnun
gen nicht verdeckt werden.
• Niemals das Gehäuse des Gerätes öffnen. Durch unsachgemäße Reparaturen können erhebliche Gefahren für
den Benutzer entstehen. Bei Beschädigung des Gerätes,
das Gerät nicht mehr in Betrieb nehmen, sondern von
einem Fachmann reparieren lassen.
Diese Symbole können sich ggf. auf dem Gerät befinden
und sollen Sie auf folgendes hinweisen:
Das Symbol mit Ausrufezeichen soll den Benutzer
auf wichtige Bedienungs- oder Wartungs-Hinweise
in den Begleitpapieren hinweisen.
Kinder und gebrechliche Personen
Zur Sicherheit Ihrer Kinder lassen Sie keine Verpackungsteile
(Plastikbeutel, Karton, Styropor etc.) erreichbar liegen.
WARNUNG:
Lassen Sie kleine Kinder nicht mit Folie spielen. Es besteht
Erstickungsgefahr!
Verkehrssicherheit
WARNUNG:
• Die Verkehrssicherheit ist oberstes Gebot. Benutzen Sie
daher Ihre Autoradioanlage immer so, dass Sie stets
der aktuellen Verkehrssituation gewachsen sind.
• Bedenken Sie, dass Sie bei einer Geschwindigkeit von
50 km/h in der Sekunde 14 m fahren.
• In kritischen Situationen raten wir von einer Bedienung
ab.
• Die Warnhinweise z. B. von Polizei und Feuerwehr müs
sen im Fahrzeug rechtzeitig und sicher wahrgenommen
werden können.
• Hören Sie deshalb während der Fahrt Ihr Programm nur
in angemessenerer Lautstärke.
• Um ernste Verkehrsunfälle zu vermeiden, installieren
Sie das Gerät so, dass es Sie bei der Bedienung des
Lenkrades, Ganghebels usw. nicht behindert.
• Ebenfalls dürfen Sicherheitseinrichtungen, wie z. B.
Airbag und die freie Sicht nicht behindert werden.
Sicherheitshinweise für die Dauer
der Montage / Anschluss
• Zuerst den Minuspol, dann den Pluspol der Batterie
abklemmen. (Anklemmen in umgekehrter Reihenfolge.)
Bitte beachten: Ist die Batterie vom Netz, verlieren alle
flüchtigen Speicher ihre Informationen. Beachten Sie die
Sicherheitshinweise des KFZ-Herstellers.
-
• Die Hauptsicherung muss möglichst nahe (maximal nach
30 cm) am Pluspol der Batterie installiert werden, damit
das Auto vor einem eventuellen Kabelbrand z. B. durch
Unfall geschützt ist. Sollte die Installation dieser Vorgabe
nicht entsprechen, erlischt der Versicherungsschutz.
• Der Querschnitt des Plus- und Minuskabels darf 1,5 mm²
nicht unterschreiten.
Installationstipps:
• Kabelschutztüllen schützen Kabel vor Durchscheuern an
scharfen Karosserieteilen.
• Die Isolierung der Kabel darf bei der Installation nicht
beschädigt werden.
• Das richtige Werkzeug ist bei einer Car-HiFi-Installation
selbstverständlich.
Je nach Bauart kann Ihr Fahrzeug von dieser Beschreibung
abweichen. Für Schäden durch Einbau- oder Anschlussfehler
und für Folgeschäden übernehmen wir keine Haftung.
-
AR4030BT-USB-CR_IM 05 .07.1 6
Wichtige Zusatzinformation zum Einbau
Ihres Autoradios!
1. Das Gerät ist für den Minuspol der Batterie ausgelegt,
der an die Fahrzeugkarosserie angeschlossen sein muss.
Dies vor der Installation überprüfen.
2. Bitte beachten Sie beim Einbau/Anschluss Ihres Gerätes,
dass nicht jedes Fahrzeug mit einem „ISO Anschluss“
versehen ist. In diesem Fall empfehlen wir Ihnen den
Einsatz eines KFZ spezifischen ISO Adapter.
Adapter erhalten Sie im Autozubehörhandel und/oder
bei Ihrer KFZ Werkstatt.
3. Bei der Belegung des „Dauer +“ (Dauerstromanschluss)
kann es je nach Fahrzeugtyp zu Abweichungen kommen.
(Dies ist jedoch für die Speicherung der Senderstationen
notwendig.)
Um alle Funktionen zu gewährleisten ist der Einbau
entsprechend dieser Anleitung zwingend erforderlich.
Im Zweifel wenden Sie sich an eine autorisierte KFZ
Werkstatt.
Bedingt durch die verschiedenen Fahrzeugtypen bzw.
Fahrzeughersteller, ist eine korrekte Belegung des ISO
Steckers nicht gewährleistet; selbst wenn die ISO Steckeranschlüsse mechanisch aufeinander passen. Daher ist es
eventuell erforderlich den Stromanschluss zu ändern bzw.
Kfz-spezifische Adapter zu verwenden.
HINWEIS:
Bei korrektem Anschluss lässt sich das Radio über die
Zündung ein- bzw. ausschalten. Bei eventuellem Verlust
der gespeicherten Sender erhält das Radio keinen, für
die Senderspeicherung erforderlichen, „Dauer +“.
Deutsch
6. Beim Antennenanschluss gibt es zwei verschiedene
Normen. Erstens den alten (50 Ohm) mit langem, herausstehendem Rundkontakt fahrzeugseitig und einer
Rundbuchse auf der Radioseite. Zweitens ISO-genormte
Antennenstecker (150 Ohm). Adapter für beide Formate
bieten Zubehörhersteller und/oder Ihrer KFZ Werkstatt an.
HINWEIS:
Bei VW / Audi unbedingt beachten: Bei der Antenne
in Ihrem Fahrzeug kann es sich um eine aktive Antenne
handeln. Diese benötigt eine Spannungsversorgung
die nur von den originalen Autoradios ausgegeben
wird. Sollte dies der Fall sein, verwenden Sie einen
Antennen-Adapter für Phantomspeisung.
Antennen-Adapter erhalten Sie im Autozubehörhandel
und/oder bei Ihrer KFZ Werkstatt.
Installation
Montieren Sie das Radiogerät gemäß folgender Darstellungen.
5
ACHTUNG:
Bei einem Anschluss an „Dauer +“ ohne Zündung,
kann es trotz ausgeschaltetem Radio zu einer unnötigen
Belastung der Autobatterie kommen. Im schlimmsten
Fall zu einer Entladung der Autobatterie.
4. Je nach Fahrzeugtyp können in Ausnahmefällen Störgeräusche im Betrieb auftreten. Diese lassen sich mit einem
zusätzlichen Entstörfilter entsprechend beseitigen. Ihr
Gerät ist bereits serienmäßig mit einem Entstörfilter
ausgerüstet. Trotzdem kann es fahrzeugbedingt zu
Beeinträchtigungen kommen.
Entstörfilter erhalten Sie im Autozubehörhandel und/oder
bei Ihrer KFZ Werkstatt.
5. Bitte achten Sie beim Einbau Ihres Radios darauf, dass die
Rückseite des Radios genügend Freiraum hat, damit eine
ausreichende Kühlung gewährleistet ist.
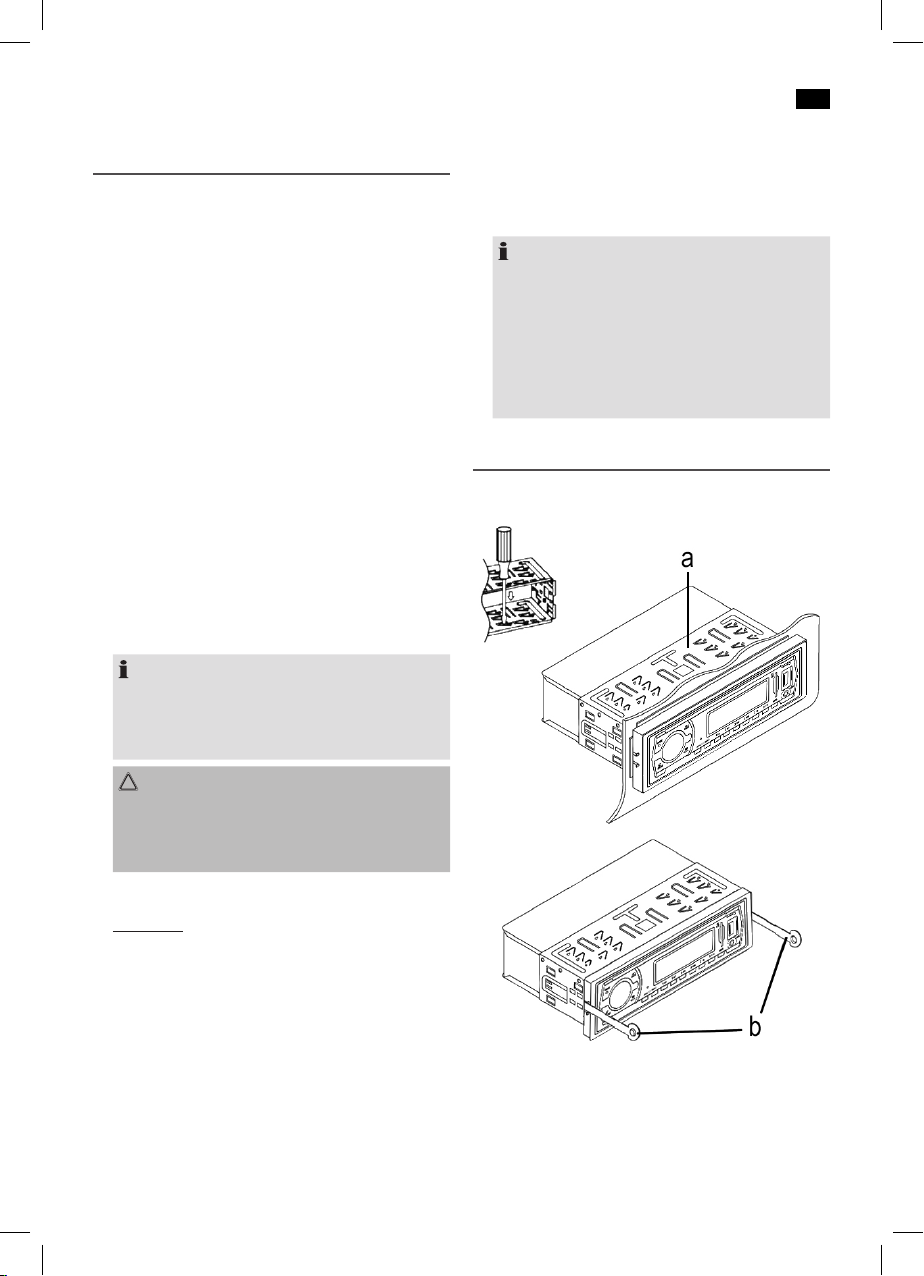
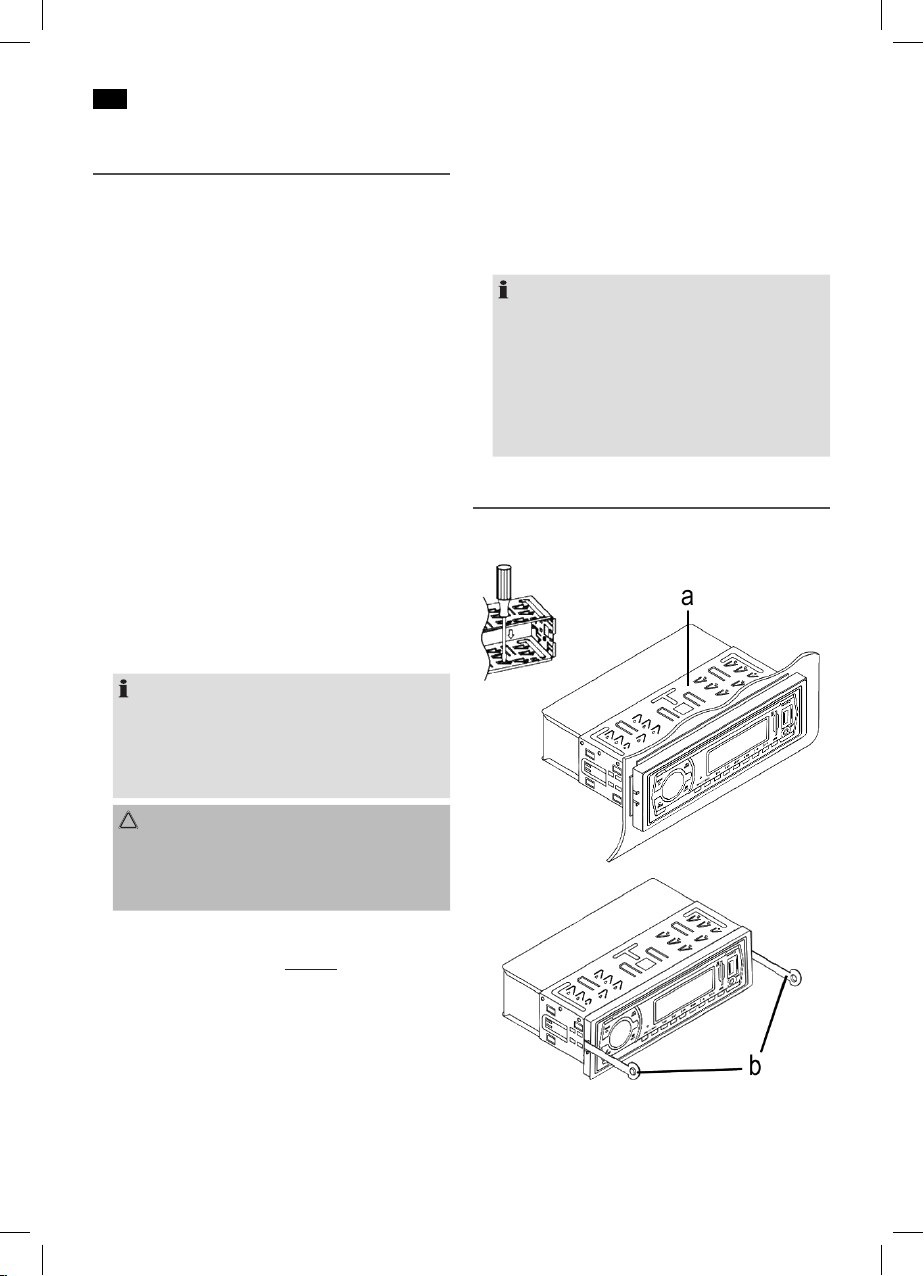
a Einschubgehäuse
b Ausziehwerkzeug (Schlüssel für die Demontage)
6
AR4030BT-USB-CR_IM 05 .07.1 6
6
Deutsch
Anschluss
ACHTUNG: Anschluss eines externen Verstärkers
• Verwenden Sie Lautsprecher mit einer Impedanz von
4Ohm.
• Die Lautsprecherverkabelung muss Massefrei sein.
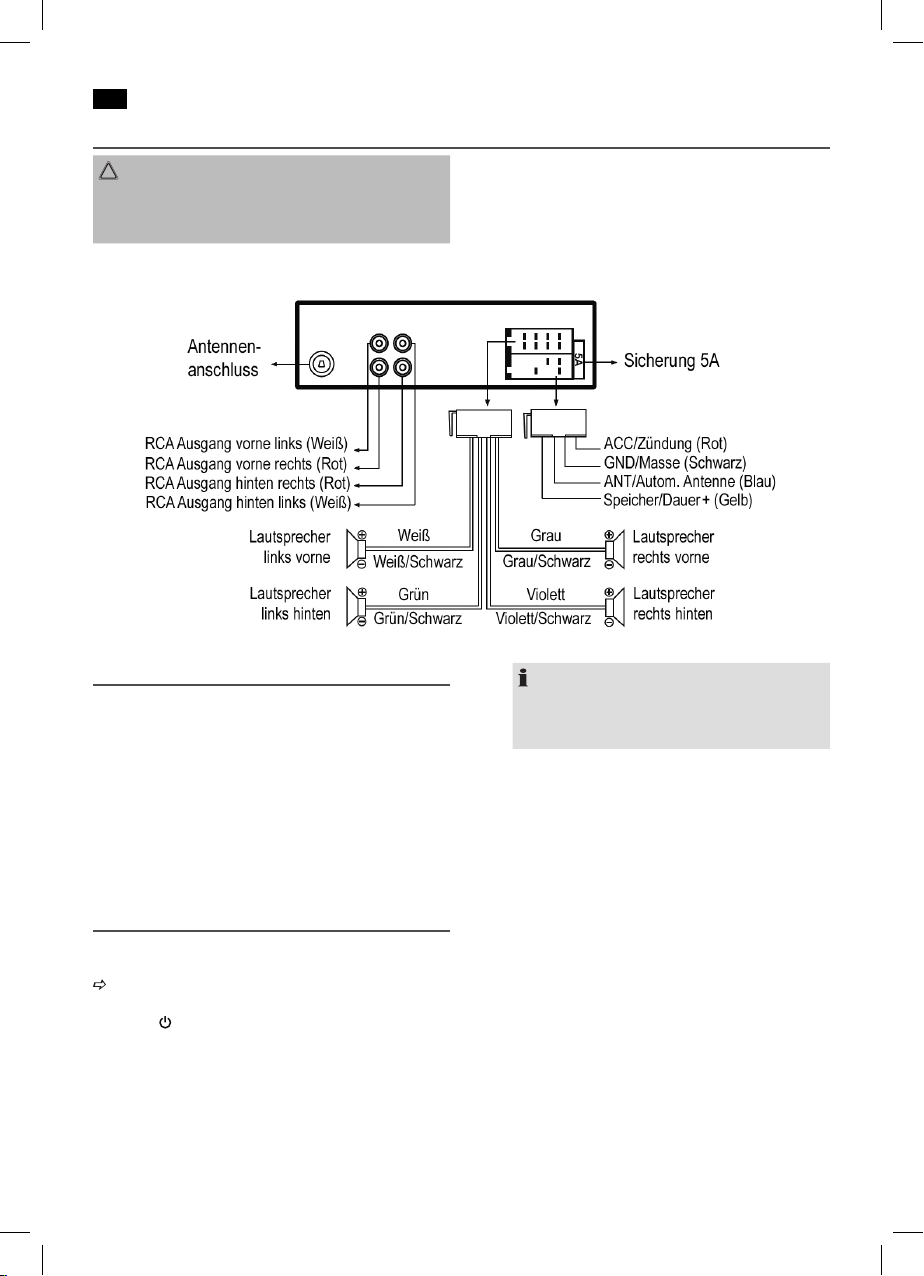
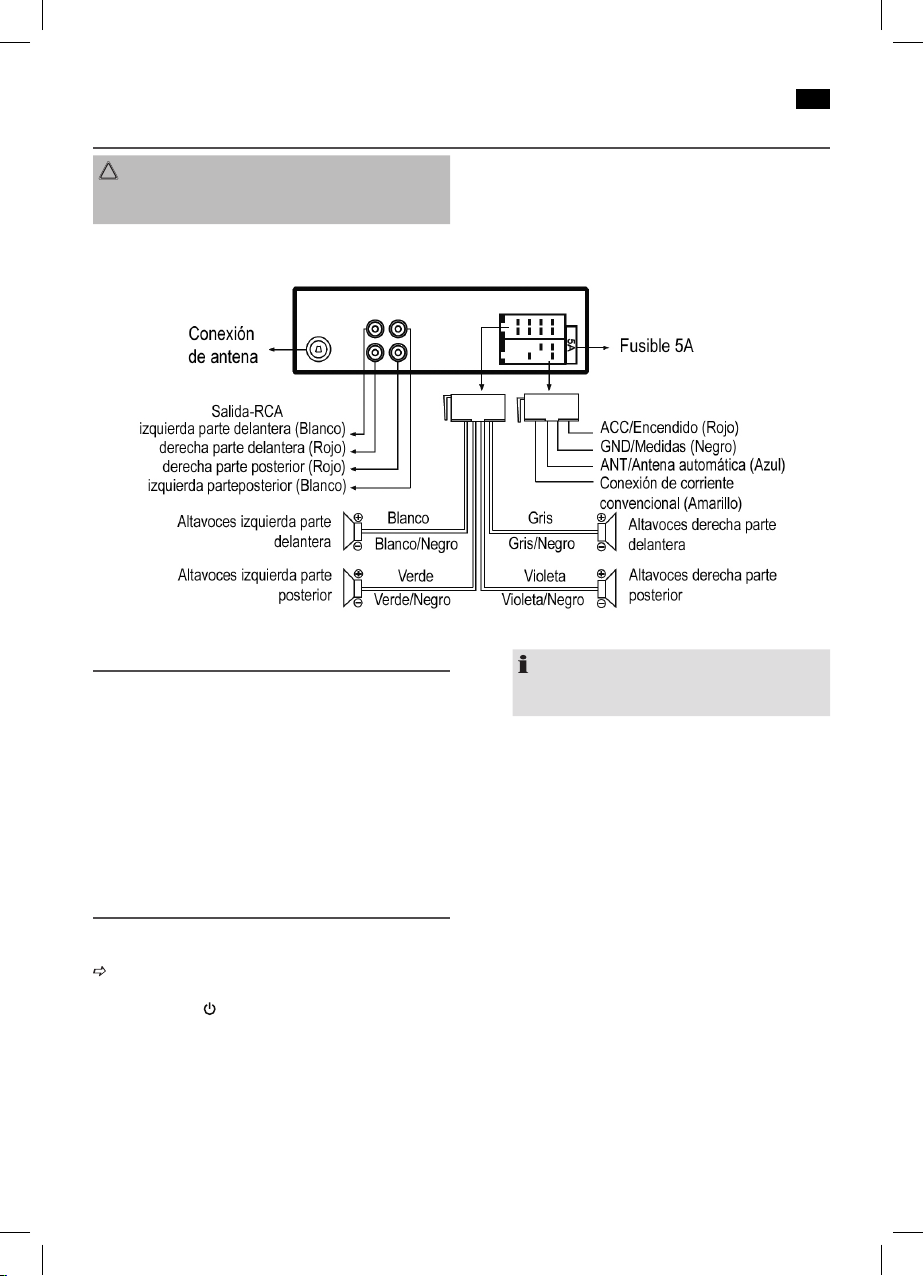
Stellen Sie die Anschlüsse gemäß des Schaubildes her:
Für den Anschluss eines externen Verstärkers benutzen Sie
die Audio-Cinch-Ausgänge LINE OUTPUT auf der Rückseite
des Gerätes. Beachten Sie hierzu die Bedienungsanleitung
des externen Verstärkers.
Bedienhinweise
1. Wenn das Fahrzeuginnere extrem heiß ist, z. B. nach einer
längeren Parkdauer in praller Sonne, das Gerät nicht
einschalten, bis das Fahrzeug nach einer kurzen Fahrzeit
im Inneren etwas abgekühlt ist.
2. Etwaige Fehlfunktionen während des Betriebs können
durch Drücken der RESET Taste behoben werden. Drücken Sie mit Hilfe eines Drahtes o. ä. die Taste RESET (8),
um die Elektronik wieder zurückzustellen (RESETEN).
3. Die Uhrzeit, die im Standby angezeigt wird, stellt sich
automatisch ein sobald Sie einen Radiosender hören.
Bedienung
Nachfolgend werden die Funktionen der einzelnen Gerätetasten, entsprechend der Abbildung, beschrieben
„Übersicht der Bedienelemente“.
1 MODE
(Ein-/Aus) – Taste
a) Drücken Sie diese Taste, um das Gerät einzuschalten.
Im Display erscheint kurz die Anzeige „WELCOME“.
Zum Ausschalten des Gerätes halten Sie die Taste
gedrückt. Im Display erscheint kurz die Anzeige
„GOODBYE“.
b) Drücken Sie diese Taste zur Auswahl der verschiede
nen Modi. (Radio, BT, USB, CARD und AUX IN)
-
HINWEIS:
Der USB- und CARD-Modus kann nur angewählt
werden, wenn Sie ein entsprechendes Medium
angeschlossen haben.
2
Multifunktionsregler / SEL – Taste
a) Im normalen Spielbetrieb dient der Regler zur Einstel
lung der Lautstärke.
In Verbindung mit dem zuvor gedrückten Regler (SEL
Taste) können Änderungen im Menü z. B. dem Klangmodus vorgenommen werden.
b) Drücken Sie die SEL Taste kurz, um in das Auswahl
menü zu gelangen. Durch wiederholtes Drücken der
SEL - Taste können Sie nun die einzelnen Menüpunkte
anwählen. Sie ändern die Einstellungen der einzelnen
Menüpunkte durch Drehen des Lautstärkereglers.
BAS (Bässe)
TRE (Höhen)
BAL (Balance)
FAD (Überblendregelung)
BEEP (Alarmton bei Tastendruck)
• BEEP ON: Bei jedem Tastendruck wird ein
Alarmton ausgegeben.
• BEEP OFF: Kein Alarmton.
(Lautstärke / Auswahl)
-
-

AR4030BT-USB-CR_IM 05 .07.1 6
LOUD (Loudness)
Bei aktivierter Loudness-Funktion werden die Bässe
verstärkt.
• LOUD OFF: Loudness-Funktion ausgeschaltet.
• LOUD ON: Loudness-Funktion eingeschaltet.
EQ (Equalizer / Digital Sound Processing) : EQ OFF,
FLAT, POP, ROCK, CLASS
VOL LAS / ADJ (Einschaltlautstärke)
• VOL LAS: Das Gerät schaltet sich mit der zuletzt
• VOL ADJ: Stellen Sie hier eine feste Lautstärke
CLK (Uhrzeit-Anzeigenformat)
Wählen Sie zwischen der 24 oder 12 Stunden Anzeige.
HINWEIS: Bei der 12 Stunden Anzeige erscheint
DX / LOC (Umschalten zwischen lokalen und weiter
entfernten Sendern)
• DX: Empfang von weiter entfernten Sendern.
• LOC: Empfang von lokalen Sendern.
STEREO / MONO (Umschalten zwischen Stereo und
Mono)
VOL (Lautstärke)
weitere Einstellungen über den Multifunktionsregler
• Halten Sie den Multifunktionsregler für einige
Sekunden gedrückt, um weitere Einstellmöglichkeiten
aufzurufen. Jeder weitere Druck des Multifunktions
reglers ruft den nächsten Einstellungspunkt auf.
• Drehen Sie den Multifunktionsregler, um die ange-
zeigte Einstellung zu ändern.
Folgende Einstellungen sind möglich:
AF ON / AF OFF
AF (Alternativ Frequenzen) ist eine Funktion die mit
Hilfe des RDS (Radio Data System) arbeitet und nur
bei FM Sendern genutzt werden kann. Das Gerät
sucht im Hintergrund die am besten zu empfangene
Frequenz des eingestellten Senders.
• ON: Bei schlechtem Empfang eines bestimmten
• OFF: Die Funktion ist deaktiviert.
TA OFF / TA ON (Verkehrsfunkeinstellungen)
TA OFF / ON (Verkehrsfunk / „Traffic Announcement“)
• OFF: Die Funktion ist deaktiviert.
• ON: Bei eingeschalteter Funktion wird TA ange-
eingestellten Lautstärke ein.
ein, mit der sich das Gerät einschalten
soll (A – VOL).
AM = Vormittags, PM = Nachmittags.
Radiosenders wird automatisch zu einem
Sender umgeschaltet, der dasselbe Pro
gramm über dieselbe RDS - Senderkette
sendet.
zeigt.
Im TA-Modus wird beim Empfang einer
Verkehrsfunkmeldung von einer anderer
-
-
3 PTY / MUTE – Taste
a) Drücken Sie die Taste, um das Gerät stumm zu schal
b) Radio-Betrieb:
Deutsch
Betriebsart (z. B. USB Betrieb) sofort auf den
Radiosender umgeschaltet. Der Lautstärkepegel wird auf den im Menü eingestellten
Wert für die Übertragung von Verkehrsnachrichten angehoben. Im Display erscheint die
Anzeige „TRAFFIC“.
TA VOL (Lautstärke der Verkehrsfunkinformationen)
REG OFF / REG ON
Einige Sender teilen zu bestimmten Zeiten ihr Programm in Regionalprogramme mit unterschiedlichem
Inhalt auf.
• ON: Es werden nur die Regionalprogramme
des Senders wiedergegeben, bzw. bei der
Senderverfolgung bevorzugt.
• OFF:
Es werden auch die überregionalen Programme wiedergeben.
HINWEIS:
Bei aktivierter Funktion kann es in Randgebieten
vorkommen, dass der Sender nicht mehr störungs
frei empfangen wird.
EON ON / OFF
Das Gerät kann RDS EON Daten empfangen. Unter
EON versteht man die Übermittlung von zusätzlichen
Senderinformationen innerhalb einer Senderkette.
Im Falle einer Verkehrsdurchsage (TA) wird innerhalb
einer Senderkette von einem Nicht-Verkehrsfunksender auf den entsprechenden Verkehrsfunksender der
Senderkette umgeschaltet.
• ON: Das Gerät versucht, die EON TA Informa
tionen von einem erreichbaren Sender zu
erhalten und so die Empfangsqualität zu
verbessern.
• OFF: Ein Umschalten zu einem Sender mit zu
schwachem Signalpegel wird verhindert.
HINWEIS:
Das Symbol „TP“ im Display signalisiert das der
Sender Verkehrsfunknachrichten sendet. Entweder
direkt oder über einen verknüpften Sender (EON).
ten.
Zum Deaktivieren der Funktion drücken Sie die Taste
erneut.
PTY Wahl des Programmtyps
Neben dem Sendername übermitteln einige FM-Sender auch Informationen über den Programmtyp ihres
Programms. Diese Informationen können von Ihrem
Autoradio angezeigt werden.
Solche Programmtypen können z. B. sein:
SPORT NEWS POP CLASSICS
7
-
-
-
8
AR4030BT-USB-CR_IM 05 .07.1 6
8
Deutsch
Mit der PTY-Funktion können Sie gezielt Sender eines
bestimmten Programmtyps auswählen. Die einzelnen
Programmtypen sind in zwei Sparten unterteilt: Musik
und Sprache. Eine Auflistung der Programmtypen
finden Sie auf Seite 13.
• Halten Sie die PTY / MUTE Taste 1 x gedrückt,
um die Funktion einzuschalten und die Sparte
„Sprache“ auszuwählen.
• Halten Sie die PTY / MUTE Taste 2 x gedrückt wird
die Sparte „Musik“ ausgewählt.
HINWEIS: Funktion ausschalten
Wenn Sie die PTY / MUTE Taste ein drittes Mal
gedrückt halten, wird die Funktion ausgeschaltet.
Drücken Sie anschließend die Stationstasten 1 – 6, um
die PTY Auswahl zu treffen. Im Display erscheint die
Einblendung des gewählten Programmtyps.
Wenn PTY angewählt wird, startet das Radiogerät die
Suche nach entsprechenden PTY-Informationen und
stoppt, wenn die gesuchte PTY-Information gefunden
wurde.
Wird der gesuchte Programmtyp nicht gefunden,
erscheint im Display die Meldung „NO PTY“.
Wenn die gesuchte PTY-Information nicht mehr
besteht, schaltet sich die PTY-Funktion automatisch
auf normalen Modus um.
4 Mikrofon
5 LCD-Display (Flüssigkristallanzeige)
6 SD – Kartenleser
Stecken Sie die Speicherkarte mit dem Label nach links
in die dafür vorgesehene Öffnung, bis diese mit einem
„Klick“ einrastet. Im Display erscheint die Anzeige CARD.
Die Daten werden automatisch abgespielt.
HINWEIS:
Um bestimmte Tracks zu suchen / auszuwählen, verfahren
Sie wie unter Punkt 11 – 16 beschrieben.
Um die Speicherkarte zu entnehmen, drücken Sie erneut
auf das Ende der Speicherkarte. Diese rastet mit einem
„Klick“ aus und kann entnommen werden.
ACHTUNG:
Einfaches Herausziehen kann den Schacht und / oder
die Speicherkarte beschädigen.
HINWEIS:
• Schließen Sie ein USB Speichermedium immer
direkt an den USB Anschluss an, um etwaige
Betriebsstörungen vorzubeugen.
• Es gibt eine Vielzahl von Komprimierungsverfahren,
sowie Qualitätsunterschiede bei USB-Sticks.
Des Weiteren hält die Musikindustrie keine festen
Standards ein (Kopierschutz).
Aus diesen Gründen kann es in seltenen Fällen zu
Problemen bei der Wiedergabe von MP3 Dateien
kommen. Dies ist keine Fehlfunktion des Gerätes.
• Um bestimmte Tracks zu suchen / auszuwählen,
verfahren Sie wie unter Punkt 11 – 16 beschrieben.
• Bitte beachten: Der USB Anschluss dient aus
schließlich zur Wiedergabe von Speichermedien
und nicht zum Aufladen von anderen externen
Geräten. Es kann nur eine Low Power (100 mA)
Stromversorgung zugesichert werden. Für eine
Verwendung von z. B. externen 2,5“ Festplatten,
die Anlaufströme von bis zu 1100 mA aufweisen
können, ist dieser USB Anschluss nicht ausgelegt.
Zur Wiedergabe mit Ihrem Smartphone oder iPod
bzw. iPhone nutzen Sie die dafür vorgesehene
AUX-IN Buchse.
8 Reset – Taste (Zurücksetzen)
Siehe Abschnitt „Bedienhinweise“ auf Seite 6.
9 AUX - Buchse
Zum Anschluss von analogen Wiedergabegeräten. Über
diese Buchse können Sie auch den Ton anderer Wieder
gabegeräte wie MP3 - Player, CD - Player usw. über die
Lautsprecher hören.
1. Schließen Sie bitte das externe Gerät, mit einem
3,5 mm Stereo-Klinkenstecker, an die AUX Buchse an.
2. Drücken Sie die MODE /
Display „AUX IN“ erscheint.
3. Über die Lautsprecher hören Sie die Tonwiedergabe
aus dem externen Gerät, mit dem Lautstärkeregler
können Sie die Lautstärke verändern.
4. Die weitere Vorgehensweise entnehmen Sie bitte der
Bedienungsanleitung der externen Tonquelle.
HINWEIS:
Stellen Sie die Lautstärke des externen Gerätes auf eine
hörgerechte Lautstärke.
Taste (1) so oft, bis im
-
-
7 USB-Anschluss
Wollen Sie Daten von einem USB-Stick abspielen,
stecken Sie diesen in die dafür vorgesehene Öffnung. Im
Display erscheint die Anzeige USB.
Die Daten werden automatisch abgespielt.
10 AMS – Taste
Radio-Betrieb:
a) Drücken Sie die Taste kurz, werden die abgespeicher
ten Radiosender der Reihe nach für ca. 5 Sekunden
angespielt. Drücken Sie die gewünschte Stationstaste,
um diesen Vorgang abzubrechen und den Radiosen
der wiederzugeben.
-
-
AR4030BT-USB-CR_IM 05 .07.1 6
b) Halten Sie diese Taste gedrückt, um den automati-
schen Sendersuchlauf zu starten. Der Suchvorgang
kann einige Minuten dauern. Die Sender werden nach
Empfangsstärke abgespeichert. Anschließend werden
die abgespeicherten Radiosender kurz angespielt.
Drücken Sie eine der Stationstasten, um diesen
Vorgang abzubrechen.
USB / CARD-Betrieb:
Zur Direktanwahl einer Musikdatei.
Drücken Sie die AMS Taste. Im Display wird zuerst
„TRKSCH“ und anschließend „T−−−“ angezeigt. Drehen
Sie den Lautstärkeregler und wählen Sie die „erste Zahl“
aus. Nach ca. 3Sekunden rückt diese nach links. Geben Sie
die nächste Zahl ein. Wird die gewünschte Titelzahl angezeigt, bestätigen Sie Ihre Auswahl mit der SEL Taste.
HINWEIS: Die maximale Titelanwahl ist „999“.
11 – 16 Taste 6
+10, 5–10, 4RDM, 3RPT, 2INT, 1
Stationstasten (1 − 6)
a) Im Radio-Betrieb:
• Halten Sie die gewünschte Stationstaste gedrückt,
um einen Radiosender abzuspeichern.
• Um einen Radiosender anzuwählen, drücken Sie
die entsprechende Stationstaste kurz.
• Zur Auswahl eines Programmtyps.
Seite 7
„PTY / MUTE Taste“
b) Im USB / CARD-Betrieb:
Direktanwahl einer Musikdatei. Seite 8 „AMS Taste“
Taste 1
Drücken Sie die Taste, um das Abspielen eines Musikstücks zu unterbrechen (Pausenfunktion). Drücken
Sie diese Taste erneut, um diese Funktion wieder
aufzuheben.
Taste 2
INT
Drücken Sie die Taste. Im Display wird kurz „INT ON“
angezeigt. Es werden nacheinander alle Titel für ca.
10 Sekunden angespielt. Ein erneutes Drücken setzt
die normale Wiedergabe in Gang.
Taste 3
RPT
Standardmäßig werden alle Musiktitel wiederholt wiedergegeben. Drücken Sie die Taste, um den aktuellen
Musiktitel zu wiederholen. Im Display erscheint „RPT“.
Taste 4
RDM
Drücken Sie die Taste. Im Display wird „RDM“ angezeigt. Es wird eine zufallsgesteuerte Wiedergabe aller
Titel gestartet. Ein erneutes Drücken setzt die normale
Wiedergabe in Gang.
Taste 5
–10 / 6+10
• Drücken Sie die Tasten, um jeweils 10 Titel zurück
bzw. nach vorne springen. Voraussetzung ist, dass
mehr als 10 Musiktitel auf dem Speichermedium
vorhanden sind.
Deutsch
• Halten Sie die Tasten kurz gedrückt, um den vorigen
oder nächsten Ordner auszuwählen. (Sofern Ordner
auf dem Speichermedium vorhanden sind)
17 – Taste
a) Im Radio-Betrieb zum Einstellen eines Radiosenders.
b) Im USB / CARD-Betrieb:
Drücken Sie die Taste, um das nächste Musikstück
anzuwählen.
18
– Taste
a) Im Radio-Betrieb zum Einstellen eines Radiosenders.
b) Im USB / CARD-Betrieb:
Drücken Sie die Taste, um das vorherige Musikstück
anzuwählen.
19
CLK – Taste
Radio-Betrieb:
a) Display-Informationen anzeigen (ID3-Tag)
Drücken Sie die Taste mehrfach, um sich nacheinander
folgende Informationen auf dem Display anzeigen zu
lassen:
Uhrzeit (wird bei RDS-Empfang automatisch eingestellt), Frequenz des aktuell eingestellten Radiosenders, aktueller Programmtyp (PTY), Radiosender.
HINWEIS:
• Wenn keine entsprechenden Informationen
vorliegen, wird NO PTY auf dem Display
angezeigt.
• Ist die Information für das Display zu lang, wird
diese als Laufschrift angezeigt.
b) Uhrzeit manuell einstellen
Die Uhrzeit wird bei RDS-Empfang automatisch einge
stellt. Sollte dies einmal nicht der Fall sein, können Sie
die Uhrzeit wie folgt manuell einstellen:
1. Halten Sie die
beginnt die Stunden-Anzeige zu blinken.
2. Stellen Sie mit den / Tasten die Stunden
ein.
3. Drücken Sie die CLK Taste erneut. Die Minuten
beginnen zu blinken.
4. Stellen Sie mit den / Tasten die Minuten
ein.
5.
Bestätigen Sie Ihre Einstellungen mit der
Taste. Die Uhrzeit ist eingestellt.
Telefon-Betrieb:
Eingehenden Anruf ablehnen, Gespräch beenden.
20
BAND – Taste
a) Radio-Betrieb:
Drücken Sie kurz die
den drei FM- (UKW) Ebenen umzuschalten. Die
Bezeichnung der entsprechenden Ebene wird in der
CLK Taste gedrückt. Im Display
BAND Taste, um zwischen
CLK
9
-
10
AR4030BT-USB-CR_IM 05 .07.1 6
10
Deutsch
LCD-Anzeige während der Anzeige der Frequenz
(siehe CLK Taste) angezeigt.
b) Telefon-Betrieb:
Eingehenden Anruf annehmen, gewählte Rufnummer
anrufen.
c) USB / CARD Betrieb:
Drücken Sie die Taste. Im Display wird Ihnen der
Ordner angezeigt.
Telefonieren via Bluetooth
Bei Bluetooth handelt es sich um eine Technologie zur drahtlosen Funkverbindung von Geräten über eine kurze Distanz.
Die Bluetooth Technologie ermöglicht den Freisprechbetrieb
von Mobiltelefonen. Während der Fahrt wird dem Fahrer so
ermöglicht ein Gespräch über sein Mobiltelefon zu führen,
ohne dieses ans Ohr halten zu müssen.
Dieses Gerät bietet Ihnen die Möglichkeit ein Bluetooth
fähiges Mobiltelefon zu verwenden. Der Funktionsradius
beschränkt sich dabei geräteabhängig auf ca. 3 Meter.
Für eine optimale Tonqualität während eines Telefonge
sprächs:
Stellen Sie die Lautstärke nicht zu hoch ein. Eine Rückkopp
lung (Pfeifton) aus den Lautsprechern könnte die Folge sein.
HINWEIS:
Die Einstellung der Lautstärke ist abhängig von den Ein
baupositionen der Lautsprecher zum Mikrofon und kann
daher nicht benannt werden.
Geräte anmelden (PAIRING)
Bevor Sie über das Autoradio telefonieren können, müssen
Sie die Geräte untereinander anmelden.
1. Wählen Sie mit der MODE
Im Display blinkt die Anzeige BT. Dies signalisiert dass
sich das Gerät im Pairing-Modus befindet.
2. Wählen Sie in Ihrem Mobiltelefon das Bluetooth Menü
und melden Sie das Autoradio in Ihrem Mobiltelefon
an. Beachten Sie hierfür die Bedienungsanleitung Ihres
Mobiltelefons. Als Auswahl erscheint das Gerät „AEG
AR4030“ in Ihrem Mobiltelefon.
3. Je nach Gerätehersteller, Modelle und Softwareversionen
geben Sie nun das Passwort „0000“ in Ihrem Mobiltelefon ein.
Wurde die Anmeldung erfolgreich durchgeführt, leuchtet
die BT Anzeige im Display des Autoradios und MEDIA wird
angezeigt.
HINWEIS:
• Je nach Mobiltelefonhersteller müssen Sie die Anmeldung (PAIRING) erneut durchführen, um Ihr Mobiltelefon
im Autoradio anzumelden.
• Die Bluetooth-Kompatibilität kann nicht für zukünftig
erscheinende Mobiltelefone gewährleistet werden.
Taste den BT Modus aus.
-
-
-
-
HINWEIS:
• Um eine optimale Verbindung zu gewährleisten, achten
Sie darauf dass der Akku Ihres Mobiltelefons vollständig
geladen ist.
• Einige Mobiltelefonmarken verfügen über einen Energiesparmodus. Deaktivieren Sie bitte den Energiesparmo
dus, da es ansonsten zu Problemen beim Telefonieren
über Bluetooth geben kann.
• Um ein ankommendes bzw. abgehendes Gespräch
führen zu können, muss Bluetooth in Ihrem Mobiltelefon
aktiviert bleiben. Bitte beachten Sie die Bedienungsan
leitung Ihres Mobiltelefons.
• Bitte beachten Sie, dass Sie in Richtung des eingebauten Mikrofons (4) sprechen. Der Anschluss eines
externen Mikrofons ist nicht möglich.
Geräte trennen
Die Geräte werden getrennt, wenn Sie das Autoradio über
die Zündung oder am Gerät ausschalten.
Geräte wieder verbinden
Dieses Gerät unterstützt die erneute automatische Verbin
dung.
Voraussetzung hierfür ist:
• die Geräte waren bereits untereinander angemeldet
• Bluetooth ist in Ihrem Mobiltelefon aktiviert
• Ihr Mobiltelefon unterstützt diese Funktion.
Nachdem das Autoradio, über die Zündung oder am Gerät,
aus- und wieder eingeschaltet wurde, wird die erneute
automatische Verbindung aktiviert. Dies kann einige Sekun
den dauern.
Wurde die Verbindung wiederhergestellt, leuchtet die Anzeige BT im Display.
Wahlwiederholung
Das Gerät speichert die zuletzt gewählte Rufnummer. Um
diese aufzurufen, gehen Sie bitte wie folgt vor:
Halten Sie die
CALLING angezeigt.
Gespräch beenden
Drücken Sie die Taste
gehende Gespräche zu beenden. Im Display wird END
angezeigt.
HINWEIS:
Um ein eingehendes Gespräch abzulehnen, drücken Sie
ebenfalls die Taste
Ankommende Gespräche
Bei ankommenden Anrufen, ertönt aus den Lautsprechern in
Klingelton und sofern der Anrufer über ein CLIP „Calling Line
Identification Presentation (Rufnummernübermittlung)“-fähi
BAND Taste gedrückt. Im Display wird
CLK, um abgehende bzw. ein-
CLK.
-
-
-
-
-
AR4030BT-USB-CR_IM 05 .07.1 6
ges Telefon verfügt, erscheint im Display des Autoradios die
Nummer des Anrufers. Ansonsten erscheint im Display die
Anzeige „0000“.
Um ein ankommendes Gespräch entgegen zu nehmen,
betätigen Sie die Taste
über die Lautsprecher in Ihrem Auto.
BAND. Sie hören den Anrufer
Musikwiedergabe via A2DP
(Advanced Audio Distribution Profile)
Hierbei handelt es sich um ein herstellerübergreifendes
Bluetooth-Profil. Per Streaming werden Stereo-Audio- Signale zwischen Abspielgerät (Quelle) und Empfängergerät
kabellos übertragen. Um die Quelle fernsteuern zu können,
muss das Abspielgerät das AVRCP Profil (Audio Video
Remote Control Profile) unterstützen.
Aufgrund der unterschiedlichen Gerätehersteller, Modelle
und Softwareversionen kann eine volle Funktionalität nicht
gewährleistet werden.
• Nachdem Sie die Geräte untereinander verbunden
haben, starten Sie die Musikwiedergabe in Ihrem Mobil
telefon. Im Display erscheint „A2DP“.
• Mit den Tasten oder wählen Sie den nächsten
bzw. vorherigen Musiktitel aus.
• Drücken Sie die 1
Musik stücks zu unterbrechen (Pausenfunktion). Im Display
erscheint „MEDIA“. Drücken Sie diese Taste erneut, um
diese Funktion wieder aufzuheben.
Taste, um das Abspielen eines
-
Reinigung
Sicherheitshinweise
ACHTUNG:
Mögliche Beschädigung des Gerätes
Stellen Sie sicher, dass bei der Reinigung keine Feuchtig
keit in das Gerät eindringt, um eine irreparable Beschädigung des Gerätes zu vermeiden.
Reinigung
Reinigen Sie das Gehäuse ausschließlich mit einem leicht
feuchten Tuch.
-
Fehlerbehebung
In diesem Kapitel erhalten Sie wichtige Hinweise zur Störungslokalisierung und Störungsbehebung. Beachten Sie die
Hinweise um Gefahren und Beschädigungen zu vermeiden.
Deutsch
Sicherheitshinweise
WARNUNG:
Beachten Sie die folgenden Sicherheitshinweise um
Gefahren und Sachschäden zu vermeiden:
• Reparaturen an Elektrogeräten dürfen nur von Fachleu
ten durchgeführt werden, die vom Hersteller geschult
sind. Durch unsachgemäße Reparaturen können
erhebliche Gefahren für den Benutzer und Schäden am
Gerät entstehen.
Fehlerursachen und -behebung
Bevor Sie das Gerät an den Kundendienst einschicken,
überprüfen Sie anhand der folgenden Tabelle, ob Sie den
Fehler selbst beseitigen können.
Fehler Mögliche Ursache Lösung
Gerät lässt
sich nicht
einschalten.
Kein Ton Die Lautstärke steht
Funktionstas
ten funktionieren nicht.
Radio und /
oder die
Automatische
Senderspei
cherung
funktionieren
nicht
Senderspei
cher funktioniert nicht.
Gerät am
USB-An
schluss funktioniert nicht.
Die Zündung ist
nicht eingeschaltet.
auf Minimum.
Die Kabel sind
nicht richtig ange
schlossen.
-
Am Gerät liegt eine
Störung vor.
Das Antennenkabel
ist nicht korrekt
angeschlossen
-
Die Sendersignale
sind zu schwach
-
Der Anschluss 4 im
ISO-Anschluss A
(Dauerplus) ist nicht
richtig angeschlossen.
Der USB-Anschluss
-
ist für Geräte, die
nach der USBNorm funktionieren,
bestimmt. Nicht alle
am Markt erhältliche Geräte erfüllen
diese Norm. Unter
Umständen ist ein
Gerät, das nicht
nach USB-Norm
funktioniert, angeschlossen.
Schalten Sie die
Zündung durch
Drehen des Schlüs
sels ein.
Heben Sie die
Lautstärke an.
Überprüfen Sie die
-
Kabelverbindungen.
Drücken Sie die
Taste RESET (8).
Überprüfen Sie das
Antennenkabel auf
korrekten Sitz.
Stellen Sie die
Sender manuell ein.
Überprüfen Sie die
Kabelverbindungen.
Beachten Sie hierzu
das Kapitel „Anschluss“
Schließen Sie
ein Gerät an, das
nach USB-Norm
funktioniert. Stellen
Sie sicher, das der
Datenträger mit
dem Dateisystem
FAT32 formatiert ist.
11
-
-
12
AR4030BT-USB-CR_IM 05 .07.1 6
12
Deutsch
Fehler Mögliche Ursache Lösung
-
SD-Speicher
karte funktioniert nicht.
-
Eine Ver
bindung via
Bluetooth ist
nicht möglich.
Das Gerät liest die
Karte nicht.
Bluetooth ist in
Ihrem Mobiltelefon
ausgeschaltet.
Überprüfen Sie die
Karte. Stellen Sie
sicher, das der Datenträger mit dem
Dateisystem FAT32
formatiert ist.
Aktivieren Sie
Bluetooth in Ihrem
Mobiltelefon.
Technische Daten
Modell: ........................................................... AR 4030 BT/USB/CR
Allgemeines
Netzspannung .................................... DC 12 V (negative Erdung)
Stromaufnahme ...................................................................5 A Max.
Leistung ..................................................................4 x 40 W (PMPO)
Abspielbare Dateiformate ...........................................MP3, WMA
Nettogewicht ................................................................... ca. 0,45 kg
Gehäuseabmessungen (Einbau) .................. 182 B x 52 H x 110 T
FM-Bereich
Frequenzbereich ........................................87,5 MHz ~ 108,0 MHz
Nutzbare Empfindlichkeit ....................................................... 10 dB
I.F. Frequenz ....................................................................... 10,7 MHz
Bluetooth
Bluetooth Unterstützung ..........................................................V 2.0
Reichweite .......................................................................ca. 8 Meter
Sendefrequenz ................................................... 2,402 − 2,480 GHz
Protokolle ...................................................................A2DP / AVRCP
Technische und gestalterische Änderungen im Zuge stetiger
Produktentwicklungen vorbehalten.
Hinweis zur Richtlinienkonformität
Hiermit erklärt der Hersteller, dass sich das Gerät AR 4030 BT /
USB / CR in Übereinstimmung mit den folgenden Anforderun
gen befindet:
• EU-Richtlinie für elektromagnetische Verträglichkeit
2014 / 30 / EU
• RoHS-Richtlinie 2011 / 65 / EU
• Grundlegende Anforderungen und den anderen relevanten Vorschriften der R&TTE Richtlinie 1999 / 5 / EC
Fundstelle der EG-Konformitätserklärung
Die Konformitätserklärung kann unter folgender Internetadresse gefunden werden: www.sli24.de
-
Garantie
Garantiebedingungen
1. Gegenüber Verbrauchern gewähren wir bei privater
Nutzung des Geräts eine Garantie von 24 Monaten ab
Kaufdatum.
Ist das Gerät zur gewerblichen Nutzung geeignet, ge
währen wir beim Kauf durch Unternehmer für das Gerät
eine Garantie von 12 Monaten.
Die Garantiezeit für Verbraucher reduziert sich auf 12 Mo
nate, sofern sie ein zur gewerblichen Nutzung geeignetes
Gerät – auch teilweise – gewerblich nutzen.
2. Voraussetzung für unsere Garantieleistungen sind der
Kauf des Geräts in Deutschland bei einem unserer
Vertragshändler sowie die Übersendung einer Kopie des
Kaufbelegs und dieses Garantiescheins an uns.
Befindet sich das Gerät zum Zeitpunkt des Garantiefalls
im Ausland, muss es auf Kosten des Käufers uns zur
Erbringung der Garantieleistungen zur Verfügung gestellt
werden.
3. Mängel müssen innerhalb von 14 Tagen nach Erkennbar
keit uns gegenüber schriftlich angezeigt werden. Besteht
der Garantieanspruch zu Recht, entscheiden wir, auf
welche Art der Schaden/Mangel behoben werden soll,
ob durch Reparatur oder durch Austausch eines gleichwertigen Geräts.
4. Garantieleistungen werden nicht für Mängel erbracht, die
auf der Nichtbeachtung der Gebrauchsanweisung, un
sachgemäßer Behandlung oder normaler Abnutzung des
Geräts beruhen. Garantieansprüche sind ferner ausgeschlossen für leicht zerbrechliche Teile, wie zum Beispiel
Glas oder Kunststoff. Schließlich sind Garantieansprüche
ausgeschlossen, wenn nicht von uns autorisierte Stellen
Arbeiten an dem Gerät vornehmen.
5. Durch Garantieleistungen wird die Garantiezeit nicht
verlängert. Es besteht auch kein Anspruch auf neue
Garantieleistungen. Diese Garantieerklärung ist eine
freiwillige Leistung von uns als Hersteller des Geräts.
Die gesetzlichen Gewährleistungsrechte (Nacherfüllung,
Rücktritt, Schadensersatz und Minderung) werden durch
diese Garantie nicht berührt.
Garantieabwicklung
24 Stunden am Tag, 7 Tage in der Woche
Sollte Ihr Gerät innerhalb der Garantiezeit einen Mangel
aufweisen, steht Ihnen die schnellste und komfortabelste
Möglichkeit der Reklamationsanmeldung über unser SLI Internet-Serviceportal zur Verfügung.
www.sli24.de
Bitte melden Sie direkt den Servicevorgang auf unserem
Online Serviceportal www.sli24.de an. Sie erhalten wenige
Sekunden nach Abschluss der Anmeldung ein kostenloses
Versandticket per E-Mail übermittelt. Zusätzlich erhalten Sie
weitere Informationen zur Abwicklung Ihrer Reklamation.
Mit Ihren persönlichen Zugangsdaten, die direkt nach Ihrer
Anmeldung per E-Mail an Sie übermittelt werden, können
-
-
Stand 06 2012
-
-
AR4030BT-USB-CR_IM 05 .07.1 6
Sie den Status Ihres Vorgangs auf unserem Serviceportal
www.sli24.de online verfolgen.
Sie brauchen das kostenlose Versandticket nur noch auf die
Verpackung Ihres gut verpackten Gerätes zu kleben und das
Paket bei der nächsten Annahmestelle der Deutschen Post/
DHL abzugeben. Der Versand erfolgt für Sie kostenlos an
unser Servicecenter bzw. Servicepartner.
So einfach kann Service sein!
1. Anmelden
2. Einpacken
3. Ab zur Post damit
Fertig, so einfach geht es!
Bitte vergessen Sie nicht, dem Gerät eine Kopie Ihres Kaufbeleges (Kassenbon, Rechnung, Lieferschein) als Garantienachweis beizulegen, da wir sonst keine kostenlosen Garantieleistungen erbringen können.
Unser Serviceportal www.sli24.de bietet Ihnen weitere
Leistungen an:
• Downloadbereich für Bedienungsanleitungen
• Downloadbereich für Firmwareupdates
• FAQ‘s, die Ihnen Problemlösungen anbieten
• Kontaktformular
• Zugang zu unseren Zubehör- und Ersatzteile-Webshops
Auch nach der Garantie sind wir für Sie da! – Kostengüns
tige Reparaturen zum Festpreis!
-
PTY – Programmtypen
Deutsch
Bitte nehmen Sie in keinem Fall eine unfreie Einsendung
Ihres Gerätes vor. Unfreie Lieferungen werden von uns nicht
angenommen. Es entstehen Ihnen damit erhebliche Kosten.
13
Stand 06 2012
Entsorgung
Bedeutung des Symbols „Mülltonne“
Schonen Sie unsere Umwelt, Elektrogeräte
gehören nicht in den Hausmüll.
Nutzen Sie die für die Entsorgung von Elekt
rogeräten vorgesehenen Sammelstellen und
geben dort Ihre Elektrogeräte ab, die Sie nicht
mehr benutzen werden.
Sie helfen damit die potenziellen Auswirkungen, durch
falsche Entsorgung, auf die Umwelt und die menschliche
Gesundheit zu vermeiden.
Sie leisten damit Ihren Beitrag zur Wiederverwertung, zum
Recycling und zu anderen Formen der Verwertung von
Elektro- und Elektronik-Altgeräten.
Informationen, wo die Geräte zu entsorgen sind, erhalten Sie
über Ihre Kommunen oder die Gemeindeverwaltungen.
-
Stationstasten
1
2
3
4
5
6
PTY der Sparte
„Sprache“
NEWS
AFFAIRS
INFO
SPORT
EDUCATION
DRAMA
CULTURE
SCIENCE
VARIED
WEATHER
FINANCE
CHILDREN
SOCIAL
RELIGION
PHONE IN
TRAVEL
LEISURE
DOCUMENT
Stationstasten
1
2
3
4
5
6 FOLK M
PTY der Sparte
„Musik“
POP M
ROCK M
LIGHT M
EASY M
CLASSIC
OTHER M
COUNTRY
JAZZ
NATIONAL M
OLDIES

14
AR4030BT-USB-CR_IM 05 .07.1 6
14
Deutsch
Stichwortverzeichnis – Index
A
Alternativ Frequenzen (AF) .............................................................7
AMS Taste ..........................................................................................8
Anschluss ...........................................................................................6
Ausschalten ....................................................................................... 6
AUX Buchse .......................................................................................8
B
Bedienhinweise ................................................................................6
Bedienung ......................................................................................... 6
BAND Taste .......................................................................................9
E
EG Konformitätserklärung ............................................................12
Einschalten ......................................................................................... 6
Einstellungen (SEL Taste) ................................................................6
F
Fehlerbehebung ............................................................................11
G
Garantie ............................................................................................12
I
Installation .......................................................................................... 5
Installationstipps ............................................................................... 4
L
Lautstärke einstellen ........................................................................ 6
M
Montage (Sicherheitshinweise) .....................................................4
MODE Taste ......................................................................................6
Musikwiedergabe via A2DP .........................................................11
MUTE Taste (Stumm) .......................................................................7
P
Play / Pause (
PTY - Programmtypen ...................................................................13
PTY / MUTE Taste ..............................................................................7
Regionalprogramme .......................................................................7
Reinigung .........................................................................................11
Richtlinienkonformität ...................................................................12
SD – Kartenleser ...............................................................................8
SEL Taste ............................................................................................6
Sicherheitshinweise ..........................................................................4
Stummschaltung ..............................................................................7
Technische Daten ...........................................................................12
/ Tasten ................................................................................9
Telefonieren via Bluetooth ...........................................................10
Uhrzeit .................................................................................................9
USB Anschluss ..................................................................................8
Verkehrsfunk (TA) ..............................................................................7
Verkehrssicherheit ............................................................................4
Wichtige Zusatzinformationen zum Einbau ................................5
Wiedergabefunktionen...................................................................9
) ...............................................................................9
R
S
T
U
V
W
AR4030BT-USB-CR_IM 05 .07.1 6
Instrucciones de servicio
Le agradecemos la confianza depositada en este producto y
esperamos que disfrute de su uso.
Símbolos en este manual del usuario
Advertencias importantes para su seguridad están señaladas
en especial. Siga estas advertencias incondicionalmente,
para evitar accidentes y daños en el aparato:
AVISO:
Advierte de riesgos para su salud, e indica riesgo potencial
de heridas.
ATENCIÓN:
Indica peligros potenciales para el dispositivo u otros
objetos.
NOTA:
Indica recomendaciones e información para usted.
Avisos de seguridad
Antes de usar este dispositivo, lea cuidadosamente este
manual del usuario y consérvelo junto con el certificado de
garantía, el recibo de compra y, si es posible, el embalaje
original, incluyendo el embalaje interno. Si entrega el dispositivo a terceros, incluya también el manual del usuario.
• Utilice el aparato únicamente para la finalidad para la que
ha sido construido.
• Monte el equipo de tal manera que no se tapen las
aberturas de ventilación disponibles.
• Jamás se abrirá la carcasa del cuerpo del aparato. Las
reparaciones mal hechas pueden generar considerables
peligros para el usuario. En el caso de daños en el equipo
no siga utilizándolo, sino déjelo reparar por un experta.
Estos símbolos pueden encontrarse en caso dado en el
aparato, y son para indicar lo siguiente:
El símbolo con el signo de exclamación advierte al
usuario que hay instrucciones de manejo y de
mantenimiento importantes en la documentación
que va adjunta.
Niños y personas débiles
Para la seguridad de sus niños no deje material de embalaje
(Bolsas de plástico, cartón, poliestireno etc.) a su alcance.
AVISO:
No deje jugar a los niños con la lámina. ¡Existe peligro de
asfixia!
Español
15
Seguridad en el transporte
AVISO:
• La seguridad en el transporte es el aspecto más
importante. Le rogamos que siempre utilice el radio de
automóvil de tal manera, que Ud. esté capaz en cada
momento de adaptarse a la situación de tráfico actual.
• Por favor observe que a una velocidad de 50 km/h el
automóvil conduce 14 m por segundo.
• Le recomendamos que no utilice el equipo en
situaciones críticas.
• Es necesario que pueda percibir las advertencias, por
ejemplo de la policía y los bomberos, en el vehículo a
tiempo.
• Por esta razón, por favor solamente escuche los
programas a un volumen apropiado.
• Para evitar serios accidentes de tráfico, instale el
aparato de tal manera que no estorbe al manejar el
volante, la palanca de cambio etc.
• Asimismo no se deben entorpecer las instalaciones de
seguridad, como p.ej. el airbag o la vista libre. Durante
el montaje y la conexión por fa.
Notas de seguridad para el momento de
montaje / conexión
• Primero desconecte el polo negativo y luego el polo
positivo de la batería. (Conectar por orden contrario.)
Por favor observe: Si la batería no está conectada toda
la información grabada provisionalmente se perderá. Por
favor observe los avisos de seguridad del fabricante de
automóviles.
• El fusible principal tiene que ser instalado muy cerca
(con una distancia máxima 30 cm) en el polo positivo de
la batería, para que el vehículo esté protegido contra
un eventual incendio de los cables, por ejemplo por un
accidente. Si la instalación no concuerda con este pre-requisito, se perderá la cobertura del seguro.
• La sección transversal del cable positivo y negativo
respectivamente no debe ser inferior a 1,5 mm².
Consejos para la instalación:
• Capas protectoras para cables impiden que ellos deso
llen en las partes agudas de la carrocería.
• El material aislante del cable no debe ser dañado en la
instalación.
• Para la instalación de equipos Car-HiFi siempre hay que
utilizar las herramientas adecuadas.
Según el sistema de construcción, el vehículo puede divergir
de esta descripción. No asumimos ninguna responsabilidad
por daños causados por errores de instalación o conexión y
daños resultantes.
-
16
AR4030BT-USB-CR_IM 05 .07.1 6
16
Español
¡Informaciones adicionales de importancia
para el montaje de su autorradio!
1. El aparato está expuesto al polo negativo de la pila que
debe estar conectado a la carrocería del coche. Se ruega
controlar esto antes de iniciar la instalación.
2. En la instalación / conexión del equipo le rogamos que
observe que no todos los vehículos disponen de una
“conexión ISO”. En este caso le recomendamos que
utilice un adaptador ISO específico para automóviles.
Puede adquirir adaptadores en el comercio de accesorios
automovilísticos y / o en su taller automovilístico.
3. En la puesta en estado de ocupación de “Duración +”
(Conexión de corriente convencional) se podrían originar,
dependiendo del tipo de vehículo, irregularidades. (Pero
esto es necesario para la memorización de las estaciones
de las emisoras).
Para garantizar todas las funciones es absolutamente
necesario que la instalación se efectúe según este manual
de usuario. En el caso de que tenga dudas le rogamos
que se dirija a un taller automovilístico autorizado.
A causa de los diferentes tipos de automóviles es decir
fabricantes de automóviles, no se puede garantizar la
ocupación correcta de la clavija ISO, aunque las conexio
nes de las clavijas ISO coincidan mecánicamente. Por ello,
quizás sea necesario cambiar la acometida eléctrica es
decir utilizar un adaptador específico para automóviles.
NOTA:
Si la conexión es correcta la radio se podrá conectar es
decir desconectar a través del encendido. En causa de
la eventual pérdida del emisor almacenado, la radio no
recibirá ningún “Duración +”, necesario para el almace
namiento del emisor.
6. Referente a la conexión de la antena hay dos normas
diferentes. Primero, existe la conexión antigua (50 Ohm)
con un largo contacto redondo que sale de la parte del
vehículo y un enchufe redondo en la parte de la radio.
Segundo, hay el enchufe de la antena según la norma
ISO (150 Ohm). Fabricantes de accesorios y / o su taller
automovilístico disponen de adaptadores para ambos
formatos.
NOTA:
En los casos de VW / Audi es absolutamente necesa
rio que observe lo siguiente: Su coche puede tener
una antena activa. Precisa de una alimentación proporcionada solamente por la radio para coche original. En
tal caso, use un adaptador de antena con alimentación
fantasma.
Dispone de adaptadores de antena en vendedores de
accesorios automovilísticos y / o su taller mecánico.
Instalación
Monte el receptor de radio según las siguientes presentaciones.
-
-
-
ATENCIÓN:
En caso de una conexión en “Duración +” sin encen
dido, se puede cargar demasiado la batería de coche,
aunque esté la radio desconectada. En el peor de los
casos se puede haber descargado la batería de coche.
4. Según el tipo concreto de coche, pueden surgir inter
ferencias durante el funcionamiento. Estas se eliminan
con un correspondiente filtro adicional eliminador de
interferencias. Su aparato ya está equipado de serie con
un filtro eliminador de interferencias. De todas formas
se pueden originar perturbaciones a causa del tipo de
vehículo.
Los filtros eliminadotes de interferencias se obtienen en
negocios de piezas de recambio para el coche y / o en su
taller de coches.
5. Al incorporar su radio se ruega prestar atención de que la
parte posterior de la radio tenga suficiente espacio libre,
para que se pueda garantizar una refrigeración suficiente.
-
-
a Carcasa de unidad enchufable
b Herramienta extractora (Llave para el desmontaje)
AR4030BT-USB-CR_IM 05 .07.1 6
Conexión
ATENCIÓN: Conexión de un amplificador externo
• Haga uso de altavoces con una impedancia de 4 ohmios.
• La conexión de altavoces debe ser sin conexión a masa.
Realice las conexiones según la presentación:
Para conectarlo a un amplificador externo, utilice las salidas
de audio LINE OUTPUT en el panel trasero de la unidad.
Consulte el manual de instrucciones del amplificador externo.
Español
17
Avisos de manejo
1. No encienda el dispositivo si el interior del coche está
muy caliente, por ejemplo pasado un estacionamiento
prolongado a la luz del sol directa. Espere a que el interior se haya enfriado tras una breve circulación.
2. Cualquier posible funcionamiento incorrecto puede
rectificarse pulsando el tecla RESET. Pulse el tecla RESET
con un alambre o similar (8) para reiniciar la electrónica
(RESET).
3. La hora mostrada en modo espera se establece automáticamente en cuanto escucha una emisora de radio.
Manejo
A continuación se describen las funciones de los botones
según la ilustración
“Indicación de los elementos de manejo“.
1 Tecla – MODE (Encendido / Apagado)
a) Pulse este tecla para encender la unidad. Aparecerá la
notificación “WELCOME” brevemente en la pantalla.
Mantenga pulsado la tecla para apagar la unidad.
Aparecerá la notificación “GOODBYE” brevemente
en la pantalla.
b) Pulse este tecla para seleccionar los distintos modos.
(Radio, BT, USB, CARD y AUX IN)
NOTA:
El modo -USB y -CARD sólo se podrá seleccionar, si
tiene un medio correspondiente conectado.
2
Mando múltiple /
a) Durante el modo de reproducción normal, el control
se usa para controlar el volumen.
Junto con el control previamente pulsado (tecla SEL),
puede realizar cambios en el menú, por ejemplo el
modo de sonido.
b) Pulse el tecla SEL brevemente para acceder al menú
de selección. Pulsando repetidamente el tecla SEL
selecciona entradas individuales del menú. Puede
cambiar la configuración de las entradas individuales
del menú girando el mando de volumen.
BAS (Graves)
TRE (Agudos)
BAL (Balance)
FAD (Fader)
BEEP (Sonido que se escucha al pulsar un botón)
• BEEP ON: Se emite un pitido siempre que se
• BEEP OFF: Sin pitido
Tecla –
SEL (Volumen / Selección)
pulsa un botón.

18
AR4030BT-USB-CR_IM 05 .07.1 6
18
Español
LOUD (Loudness)
Se amplifican los graves cuando se amplifica la función de volumen.
• LOUD OFF: Función de volumen desactivada.
• LOUD ON: Función de volumen activada.
EQ (Ecualizador / procesamiento digital de sonido) :
EQ OFF, FLAT, POP, ROCK, CLASS
VOL LAS / ADJ (encender volumen)
• VOL LAS: La unidad se enciende con el nivel de
• VOL ADJ: Aquí puede establecer un volumen
CLK (formato de presentación de hora)
Seleccione entre el formato de 24 horas o 12 horas.
NOTA:
Si selecciona el formato de 12 horas, aparecerá lo
siguiente:
DX / LOC (Cambia entre emisora local y otras más
distantes)
• DX: Recepción de emisoras más distantes.
• LOC: Recepción de emisoras locales.
STEREO / MONO (Cambia entre estéreo y mono)
VOL (Volumen)
Más configuraciones mediante el mando múltiple
• Mantenga pulsado el mando múltiple unos segundos
para acceder a más opciones de configuración. Pulse
el mando múltiple cada vez para seleccionar la opción
siguiente.
• Gire el mando múltiple para ajustar la configuración
mostrada.
Dispone de las configuraciones siguientes:
AF ON / AF OFF
AF (Frecuencias Alternativas) es una función compa-
tible con RDS (Radio Data System) y puede usarse
solamente en emisoras FM. En segundo plano, el
dispositivo busca la mejor frecuencia para la emisora
seleccionada.
• ON: Si una emisora concreta tiene una mala
• OFF: La función está desactivada.
TA OFF / TA ON (Configuración de notificaciones de
tráfico)
TA OFF / ON (Servicio de tráfico de radio / „Traffic
Announcement“ (Notificación de tráfico))
• OFF: La función está desactivada.
volumen establecido anteriormente.
fijado con el que la unidad debe en
cenderse (A – VOL).
AM = mañana, PM = tarde.
recepción, el dispositivo pasa automática
mente a una emisora que emita el mismo
programa mediante la misma cadena de
emisión RDS.
-
3 Tecla – PTY / MUTE
a) Pulse la tecla para silenciar la unidad.
b) En modo radio:
• ON: Se mostrará TA si la función está activada.
En el modo TA, una vez recibido un mensaje
de tráfico, la unidad cambia a la emisora de
radio desde un modo distinto (por ejemplo,
modo USB). El volumen se ajusta al valor
establecido en el menú para transmitir información de tráfico. Aparecerá la notificación
“TRAFFIC” en la pantalla.
TA VOL (Volumen de la información de tráfico)
REG OFF / REG ON
En ciertos momentos, algunas emisoras segmentan
sus programas en programas regionales con contenido distinto.
• ON: Solo se reproducirán programas regionales
de la emisora de radio de radio o sugeridos
como preferencias cuando se sintonice una
emisora seleccionada.
• OFF:
Reproducir también programas nacionales.
NOTA:
Cuando la función esté activada, es posible que ya
no se reciba la emisora de radio sin interferencias en
las zonas periféricas.
EON ON / OFF
La unidad puede recibir datos RDS EON. EON indica
la transmisión de información adicional de emisora
en un grupo de emisoras. En caso de notificación de
tráfico (TA) cambiará de un grupo de emisoras de una
emisión que no sea de tráfico a la emisora de radio de
tráfico correspondiente del grupo de emisoras.
• ON: La unidad intenta recibir la información EON
TA de una emisora al alcance y así mejorar la
calidad de la recepción.
• OFF: Evita cambiar a una emisora con una señal
demasiado débil.
NOTA:
El icono “TP” en pantalla indica que la emisora transmite mensajes de tráfico. Puede hacerlo directamente o a través de un transmisor vinculado (EON).
Pulse de nuevo la tecla para desactivar la función.
PTY Seleccionar el tipo de programa
Aparte del nombre de la emisora, algunas emisoras
emiten información sobre el tipo de programa. Esta
información puede mostrarse en la radio del coche.
El programa puede ser de los tipos siguientes, por
ejemplo:
SPORT NEWS POP CLASSICS
Usando la función PTY, puede seleccionar emisoras
concretas de cierto tipo de programa. Los tipos de
AR4030BT-USB-CR_IM 05 .07.1 6
programa individuales se dividen en dos categorías:
Música y Voz. Puede encontrar una lista de tipos de
programa en la página 23.
• Mantenga pulsado el tecla PTY / MUTE 1 vez para
activar la función y seleccionar la categoría “Voz“.
• Mantenga pulsado el tecla PTY / MUTE 2 veces
para seleccionar la categoría “Música”.
NOTA: Apagar la función
Si mantiene pulsado el tecla PTY / MUTE por tercera
vez la función se apaga.
A continuación, pulse los botones de emisora 1 – 6
para realizar la selección PTY. El tipo de programa
seleccionado aparecerá en pantalla.
Si se selecciona PTY, la radio comenzará a buscar la
información PTY respectiva y se detendrá cuando
encuentre la información PTY deseada.
Si no se encuentra el tipo de programa deseado, el
mensaje “NO PTY” aparecerá en pantalla.
Si la información PTY ya no existe, la función PTY
cambiará automáticamente a modo normal.
4 Micrófono
5 Display -LCD (Visualizador de cristal líquido)
6 Ranura SD-Card
Inserte la tarjeta de memoria con la etiqueta a la izquierda
en la abertura dispuesta para tal fin hasta que “haga clic”
en su lugar. En el display figura CARD.
Los datos se reproducirán de forma automática.
NOTA:
Para buscar / seleccionar títulos determinados, proceda
como descrito debajo de punto 11 – 16 .
Para retirar la tarjeta de memoria, pulse de nuevo el
extremo de la tarjeta de memoria. Se desacoplará con un
chasquido y podrá sacarse.
ATENCIÓN:
Sacarla directamente puede dañar la ranura y / o la
tarjeta de memoria.
Español
NOTA:
• Existe gran diversidad de métodos de compresión y
diferencias de calidad en unidades USB.
La industria de la música además no sigue ningunos
estándares fijos (Protección contra copia).
Por este motivo, puede experimentar problemas
rara vez cuando reproduzca archivos MP3. Esto no
es ninguna función de error del aparato.
• Para buscar / seleccionar títulos determinados,
proceda como descrito debajo de punto 11 – 16.
• Observe: La conexión USB solamente está dise
ñada para reproducir medios de almacenamiento,
no para cargar dispositivos externos. Solamente se
puede ofrecer una alimentación de baja potencia
(100 mA). Esta conexión USB no está diseñada para
conducir, por ejemplo, discos duros externos de
2,5“, que precisan corriente inicial de hasta 1100 mA.
Para reproducir desde su teléfono, iPod o iPhone,
use la toma AUX-IN, diseñada para tal fin.
8 Tecla – Reset (reinicio)
Consulte la sección “Avisos de manejo” en la página 17.
9 AUX conector
Para la conexión a aparatos análogos de reproducción. A
través de esta hembrilla también le es posible escuchar
por el altavoz el sonido de otros aparatos de reproduc
ción, como MP3-Player, CD-Player, etc.
1. Conecte por favor el aparato externo, con una clavija
jack estéreo 3,5 mm, a la toma hembra AUX.
2. Pulse el tecla MODE /
en el panel de control.
3. Escuchará la reproducción del dispositivo externo
por los altavoces. Puede cambiar el volumen con el
control de volumen.
4. Para proseguir tome las indicaciones de operación del
equipo / aparato externo.
NOTA:
Ajuste el volumen del aparato externo a un volumen
apropiado.
(1) hasta que figure “AUX IN”
19
-
-
7 Conexión-USB
En el caso de que desee reproducir datos de una tarjeta
USB, metála en la abertura prevista. En el display figura
USB.
Los datos se reproducen automáticamente.
NOTA:
• Conecte siempre un medio de almacenamiento
USB directamente al puerto USB para evitar averías.
10 Tecla – AMS
En modo radio:
a) Pulse brevemente el tecla para reproducir las emi
soras guardadas secuencialmente durante aprox.
5segundos. Pulse la emisora deseada para salir de la
operación y reproducir la emisora de radio.
b) Mantenga pulsado este tecla para iniciar la explora
ción automática de emisoras. El proceso de búsqueda
puede tardar unos minutos. Las emisoras se almacenan según la fuerza de la señal. A continuación,
las emisoras guardadas se reproducen brevemente.
Pulse un tecla de emisora para salir de la operación.
-
-
20
AR4030BT-USB-CR_IM 05 .07.1 6
20
Español
En modo USB / CARD:
Selección directa de un archivo de música.
En la pantalla aparecerá primero “TRKSCH” y después
“T−−−”. Gire el control de volumen y seleccione el
“primer número”. Tras unos 3 segundos, se moverá a la
izquierda. Introduzca el siguiente número. Cuando aparezca el número de pista deseado, confirme su selección
pulsando la tecla SEL.
NOTA: La selección máxima de pistas es “999“.
11 – 16 Tecla 6
Memorias de emisora (1 − 6)
a) En modo radio:
b) En modo USB / CARD:
17 Tecla –
a) En modo radio para elegir una emisora de radio.
+10, 5–10, 4RDM, 3RPT, 2INT, 1
• Mantenga pulsado el tecla de memoria de emisora
deseado para guardar una emisora.
• Para elegir una emisora de radio, pulse brevemen
te el tecla de emisora correspondiente.
• Para seleccionar un tipo de programa. Página 18
“Tecla – PTY / MUTE“
Selección directa de un archivo de música.
19 “
Tecla –
AMS“
Tecla 1
Pulse este tecla para interrumpir la reproducción de
música (función de pausa). Presione esta tecla de
nuevo, para anular esta función.
Tecla 2
INT
Pulse la tecla. Aparecerá “INT ON” brevemente en
la pantalla. Todas las pistas se reproducirán en orden
durante aproximadamente 10 segundos. Vuelva a
pulsar la tecla para establecer la velocidad normal de
reproducción.
Tecla 3
RPT
Por defecto se repiten todas las pistas musicales.
Pulse la tecla para repetir solo la pista actual. “RPT”
aparecerá en pantalla.
Tecla 4
RDM
Pulse la tecla. “RDM” aparecerá en pantalla. Se iniciará
una reproducción aleatoria de todas las pistas. Vuelva
a pulsar la tecla para establecer la reproducción
normal.
Tecla 5–10 / 6+10
• Pulse las teclas para saltar 10 pistas hacia atrás
o hacia delante. Se requiere que haya 10 pistas
disponibles en el soporte de almacenamiento.
• Pulse y mantenga pulsadas las teclas brevemente
para seleccionar la carpeta anterior o siguiente. (Si
hay carpetas en el soporte de almacenamiento)
Página
b) En modo USB / CARD:
Pulse el tecla para elegir el siguiente título de música.
18 Tecla –
a) En modo radio para elegir una emisora de radio.
b) En modo USB / CARD:
19 Tecla –
En modo radio:
a) Mostrar la información de pantalla (Etiqueta ID3)
-
b) Establecer hora manualmente
En modo teléfono:
Rechazar una llamada entrante, finalizar una conversa
ción.
20 Tecla –
a) En modo radio:
b) En modo teléfono:
c) En modo USB / CARD:
Pulse el tecla para elegir el anterior título de música.
CLK
Pulse repetidamente la tecla para mostrar la siguiente
información sucesivamente en pantalla:
Hora (se establecerá automáticamente para la
recepción RDS), frecuencia de la emisora de radio
seleccionada actualmente, tipo de programa actual
(PTY) y emisora de radio.
NOTA:
• Si no hay información correspondiente
disponible, se muestra NO PTY en pantalla.
• Si la información en pantalla es demasiado larga
se muestra como un texto corriendo.
La hora se establecerá automáticamente para la
recepción RDS. De lo contrario, puede establecer la
hora manualmente como se muestra a continuación:
1. Pulse y mantenga pulsada la tecla
dígitos de la hora comenzarán a parpadear en
pantalla.
2. Establezca las horas con las teclas / .
3. Vuelva a pulsar la tecla . CLK. Los dígitos de los
minutos comienzan a parpadear.
4. Establezca los minutos con las teclas / .
5.
Pulse la tecla
ción. La hora está establecida.
BAND
Pulse brevemente el tecla
entre las tres zonas FM (VHF). El nombre del nivel
correspondiente se muestra en la pantalla LCD cuando se indica la frecuencia (ver tecla CLK).
Aceptar una llamada entrante, llamar al número
marcado.
Pulse la tecla. La carpeta se mostrará en pantalla.
CLK
para confirmar su configura-
BAND para cambiar
CLK. Los
-

AR4030BT-USB-CR_IM 05 .07.1 6
Llamar mediante Bluetooth
Bluetooth es una tecnología de conexión de radio inalámbrica de dispositivos en distancias cortas. La tecnología Bluetooth permite un uso con manos libres de teléfonos móviles.
El conductor puede mantener una conversación por teléfono
móvil sin tener que tener el móvil contra el oído.
La unidad le ofrece la opción de usar un teléfono móvil con
capacidad Bluetooth. El alcance de la función está limitado a
unos 3 metros, según el dispositivo.
Para una calidad de sonido óptima durante una llamada:
No ponga el volumen demasiado alto. Hacerlo puede
provocar retroalimentación (silbidos) de los altavoces.
NOTA:
La configuración del altavoz depende de las posiciones
de instalación con el micrófono, por lo que no puede
especificarse.
Emparejamiento de dispositivos (PAIRING)
Antes de poder usar la radio del coche para realizar llamadas
debe emparejar las unidades.
1. Pulse la tecla MODE
comenzará a parpadear en pantalla. Esto indica que el
dispositivo está en modo de acoplamiento.
2. Seleccione el menú Bluetooth del teléfono móvil y registre la radio del coche en el teléfono móvil. Para hacerlo,
consulte el manual del usuario de su teléfono móvil. El
dispositivo ”AEG AR4030“ se seleccionará en su teléfono
móvil.
3. Según el fabricante del dispositivo, el modelo y la versión
de software, introduzca la clave “0000” en su teléfono
móvil.
Si la unidad se ha acoplado correctamente, se mostrará BT
en la pantalla y se indicará MEDIA.
NOTA:
• Según el fabricante del teléfono móvil, debe ejecutar de
nuevo el mensaje (PAIRING) para emparejar el teléfono
móvil con la radio del coche.
• La compatibilidad Bluetooth no puede garantizarse
para modelos de móvil futuros en el mercado.
• Para garantizar una conexión óptima, asegúrese de que
la batería del teléfono móvil esté totalmente cargada.
• Algunas marcas de teléfono móvil tienen un modo de
ahorro de energía. Desactive el modo de ahorro de
energía, en caso contrario pueden producirse problemas
al llamar por Bluetooth.
• Para realizar una conversación entrante o saliente, debe
mantener el Bluetooth del teléfono activado. Consulte
el manual del usuario de su teléfono móvil.
• Asegúrese de hablar en dirección al micrófono integrado (4). No puede conectarse un micrófono externo.
para seleccionar el modo BT. BT
Español
Desconectar los dispositivos
Los dispositivos se desconectan cuando apaga la radio del
coche mediante el contacto o en la unidad.
Volver a conectar los dispositivos
La unidad soporta la conexión automática.
Sus requisitos son:
• Los dispositivos ya se han emparejado
• Bluetooth está activado en su teléfono móvil
• Su teléfono móvil soporta esta función.
Cuando se haya apagado la radio del coche y se vuelva a
encender mediante el contacto o en la unidad se activa la
conexión automática. Tardará unos segundos.
Si se ha establecido una conexión, BT se iluminará en pantalla.
Remarcar
La unidad guarda el último número marcado. Para acceder,
proceda del modo siguiente:
Pulse y mantenga pulsada la tecla
en pantalla.
Finalizar llamada
Pulse la tecla
salientes. Se mostrará END en pantalla.
NOTA:
También puede pulsar el botón
llamada entrante.
Llamada entrante
Si recibe una llamada entrante, el tono se emite por los
altavoces y, si el interlocutor tiene un teléfono con capacidad
CLIP “Calling Line Identification Presentation (presentación
de identificación de línea de llamada) (ID de interlocutor)”, el
número del interlocutor aparecerá en la pantalla de la radio
del coche. En caso contrario, aparecerá “0000“ en pantalla.
Para responder una llamada entrante, pulse el botón
BAND. Podrá escuchar al interlocutor mediante el altavoz
del coche.
CLK para finalizar llamadas entrantes o
. CALLING aparecerá
CLK para rechazar una
21
Reproducir música con A2DP
(Advanced Audio Distribution Profile)
Esta aplicación implica un perfil Bluetooth de fabricante
cruzado. Las señales de audio estéreo se transmiten de
forma inalámbrica por retransmisión entre la unidad de
reproducción (fuente) y la unidad de recepción. Para con
trolar la fuente de forma remota, la unidad de reproducción
debe soportar el perfil AVRCP (Audio Video Remote Control
Profile (perfil de control remoto de audio y vídeo)).
No se puede garantizar una total funcionalidad debido a los
distintos fabricantes de unidades, modelos y versiones de
software.
-

22
AR4030BT-USB-CR_IM 05 .07.1 6
22
Español
• Cuando haya conectado las unidades, comience a reproducir música en su teléfono móvil. “A2DP” aparecerá en
pantalla.
• Use la tecla o para seleccionar el título de
música siguiente o anterior.
• Pulse la tecla 1 para pausar la reproducción de música
(función de pausa). “MEDIA” aparecerá en pantalla. Pulse
la tecla de nuevo para desactivar la función.
Limpieza
Recomendaciones de seguridad
ATENCIÓN:
Posibles daños a la unidad
Asegúrese de que no entre humedad en la unidad durante
la limpieza para evitar daños irreparables.
Limpieza
Limpie el chasis con una gamuza ligeramente húmeda.
Solución de problemas
Este capítulo contiene información importante sobre la
identificación de averías y solución de problemas. Siga las
instrucciones para evitar riesgos y daños.
Recomendaciones de seguridad
AVISO:
Siga las instrucciones de seguridad siguientes para evitar
riesgos y daños materiales:
• Las reparaciones de dispositivos eléctricos solamente
pueden ser realizadas por personas cualificadas
preparadas por el fabricante. Pueden producirse
riesgos graves para el usuario y daños en la unidad por
reparaciones defectuosas.
Causas de problemas y soluciones
Antes de enviar la unidad al servicio al cliente, use la tabla
siguiente para comprobar si puede reparar el problema
usted mismo.
Avería Causa potencial Solución
No se puede
encender la
unidad
Sin sonido Volumen al mínimo. Aumente el volu
Los botones
no funcionan.
Contacto no
activado.
El cable no está
correctamente
conectado.
Fallo de la unidad. Pulse el botón
Gire el contacto
para activar.
men.
Compruebe las
conexiones del
cable.
RESET (8).
-
Avería Causa potencial Solución
La radio y / o
la memoria
automática no
funciona
La memoria
de emisora no
funciona.
La unidad no
funciona en el
puerto USB.
La tarjeta de
memoria SD
no funciona.
No se puede
establecer
una conexión
-
por Blue
tooth.
El cable de antena
no está correcta
mente conectado.
Las señales del
transmisor son
demasiado débiles.
Conexión 4 de la
conexión ISO A
(positivo perma
nente) no conectada correctamente.
El puerto USB está
diseñado para
dispositivos que
cumplan con el
estándar USB. No
todos los dispositivos del mercado
cumplen con
él. Puede haber
conectado un
dispositivo que no
funcione según el
estándar USB.
El dispositivo no
está leyendo la
tarjeta.
Bluetooth apagado
en el móvil.
Compruebe que la
-
antena esté conectada con seguridad.
Sintonice las emiso
ras manualmente.
Compruebe las
conexiones del
cable. Para hacerlo,
consulte el capítulo
“Conexión”.
Conecte un dispositivo que cumpla
con el estándar USB.
Asegúrese de que
el dispositivo de
almacenamiento de
datos esté formateado con sistema de
archivos FAT32.
Compruebe la tar
jeta. Asegúrese de
que el dispositivo de
almacenamiento de
datos esté formateado con sistema de
archivos FAT32.
Active el Bluetooth
en el teléfono móvil.
-
-
Datos técnicos
Modelo: .......................................................... AR 4030 BT/USB/CR
Generalidades
Tensión de alimentación ....................... DC 12 V (tierra negativo)
Consumo de energía .........................................................5 A Máx.
Potencia..................................................................4 x 40 W (PMPO)
Formatos de archivo reproducibles ..........................MP3, WMA
Peso neto .................................................................... aprox. 0,45 kg
Medidas de la carcasa
(Instalación) ..................................182 ancho x 52 alto x 110 largo

AR4030BT-USB-CR_IM 05 .07.1 6
Gama-FM
Gama de frecuencias .................................87,5 MHz ~ 108,0 MHz
Sensibilidad utilizable .............................................................. 10 dB
Frecuencia I.F. ..................................................................... 10,7 MHz
Bluetooth
Soporte Bluetooth .....................................................................V 2.0
Alcance .....................................................................aprox. 8 metros
Frecuencia de transmisión ............................... 2,402 − 2,480 GHz
Protocolos ..................................................................A2DP / AVRCP
El derecho de realizar modificaciones técnicas y de diseño en
el curso del desarrollo continuo del producto está reservado.
Este dispositivo cumple con todas las directrices CE actuales,
como la directriz de compatibilidad electromagnética y de
bajo voltaje, y está fabricada según las últimas normas de
seguridad.
PTY – Tipos de programa
Español
23
Eliminación
Significado del símbolo “cubo de basura”
Cuide del medio ambiente, no deseche aparatos eléctricos con los residuos domésticos.
Deseche los aparatos eléctricos obsoletos
o defectuosos en los puntos de recolección
municipales.
Ayude a evitar potenciales impactos medioambientales y en
la salud por una eliminación de residuos inadecuada.
Contribuye al reciclaje y otros modos de uso de aparatos
eléctricos y electrónicos viejos.
Su municipalidad le proporcionará información sobre los
puntos de recolección.
Botones de emisora PTY de categoría “Voz”
NEWS
1
2
3
4
5
6
AFFAIRS
INFO
SPORT
EDUCATION
DRAMA
CULTURE
SCIENCE
VARIED
WEATHER
FINANCE
CHILDREN
SOCIAL
RELIGION
PHONE IN
TRAVEL
LEISURE
DOCUMENT
Botones de emisora PTY de categoría “Música”
1
2
3
4
5
6 FOLK M
POP M
ROCK M
LIGHT M
EASY M
CLASSIC
OTHER M
COUNTRY
JAZZ
NATIONAL M
OLDIES

24
AR4030BT-USB-CR_IM 05 .07.1 6
24
Español
Índice
A
Ajustar el volumen .........................................................................17
Apagar ..............................................................................................17
AUX conector ..................................................................................19
Avisos de manejo ...........................................................................17
Avisos de seguridad ......................................................................15
C
Conexión..........................................................................................17
Conexión-USB ................................................................................19
Configuración (Tecla SEL) .............................................................17
Consejos para la instalación .........................................................15
D
Datos técnicos ................................................................................22
E
Encender ..........................................................................................17
M
Manejo .............................................................................................17
N
Notificación de tráfico (TA) ...........................................................18
P
Programas regionales ...................................................................18
PTY – Tipos de programa .............................................................23
R
Ranura SD-Card ..............................................................................19
Reproducir música con A2DP ......................................................21
S
Seguridad en el transporte ..........................................................15
Silenciado.........................................................................................18
Solución de problemas .................................................................22
F
Frecuencias alternativas (AF) ........................................................18
Funciones de reproducción .........................................................20
H
Hora ..................................................................................................20
I
Informaciones adicionales de importancia para el montaje .16
Instalación ........................................................................................16
Instalación (Avisos de seguridad) ................................................15
L
Limpieza ...........................................................................................22
Llamar mediante Bluetooth .........................................................21
T
Tecla AMS ........................................................................................19
Tecla BAND .....................................................................................20
Tecla MODE ....................................................................................17
Tecla MUTE (silencio) .....................................................................18
Tecla Play / Pause (
Tecla PTY / MUTE ............................................................................ 18
Tecla SEL ..........................................................................................17
Teclas / ..............................................................................20
) ...................................................................20

AR4030BT-USB-CR_IM 05 .07.1 6
Manual de instruções
Obrigado por escolher o nosso produto. Esperamos que
goste de utilizar o aparelho.
Símbolos nestas Instruções de uso
Indicações importantes para a sua segurança estão marca
das de forma especial. Preste incondicionalmente atenção
a estas indicações, para evitar acidentes e estragos no
aparelho:
AVISO:
Chama a atenção para perigos existentes para a sua saúde
e para possíveis riscos de ferimento.
ATENÇÃO:
Chama a atenção para possíveis perigos existentes para o
aparelho ou para outros objectos.
INDICAÇÃO: Realça sugestões e informações para si.
-
Indicações de segurança
Antes de pôr este aparelho a funcionar, leia muito atentamente as instruções de emprego e guardeas muito bem,
juntamente com o talão de garantia, o talão de compra e,
tanto quanto possível, a embalagem com os elementos
interiores. Se puser o aparelho à disposição de terceiros,
entregue-lhes também as Instruções de Utilização.
• Utilize o aparelho só para o fim previsto.
• Montar o aparelho de forma a que as aberturas de
ventilação não fiquem tapadas.
• Nunca se deve abrir a caixa do aparelho. Devido a con
sertos inadquados poderão resultar da’grandes perigos
para o utilizador do aparelho. No caso de estragos no
aparelho, principalmente referentes ao cabo da rede,
nunca se deverá voltar a pôr o aparelho a funcionar, mas
sim mandar consertálo por um especialista.
Poderão encontrarse estes símbolos no aparelho. Eles
servem para chamar a atenção para o seguinte:
O simbolo com pontos de exclamação deverá
chamar a atenção ao utilizador para importantes
instruções de serviço e de assistência que se
encontram nas folhas anexas.
Crianças e pessoas débeis
Para a segurança dos seus filhos, não deixe partes da emba
lagem (sacos plásticos, papelão, esferovite, etc.) ao alcance
dos mesmos.
AVISO:
Não deixe crianças pequenas brincarem com folhas de
plástico. Perigo de asfixia!
-
-
Português
25
Segurança no tráfego
AVISO:
• A segurança no tráfego é um preceito de importância
máxima. Utilize por isso o seu rádio de automóvel
sempre de maneira, a que tenha a situação actual do
trânsito bem controlada.
• Tenha em conta que com uma velocidade de 50 km/h
percorre 14 m num segundo.
• Em situações críticas desaconselhamos a utilização do
rádio.
• As indicações de aviso por ex. da polícia e dos bom
beiros têm de ser perceptíveis no automóvel a tempo e
com segurança.
• Oiça por isso o seu programa durante a condução com
o volume de som adequado.
• Para evitar acidentes de viação sérios, instale o apare
lho de modo a não impedir a utilização do volante, da
alavanca das mudanças, etc.
• Também dispositivos de segurança, como por exemplo
o Airbag e a vista livre não se devem encontrar impe
didos.
-
-
-
Notas de segurança para o momento da
instalação / ligação
• Desapertar primeiro o pólo negativo da bateria e só
depois o pólo positivo. (Para apertar os pólos, em ordem
contrária.)
Observar por favor: Se a bateria foi retirada da rede,
todas as memórias temporárias perdem as suas informações. Observe as indicações de segurança do fabricante
do veículo.
• O fusível principal deve ser montado o mais próximo
possível (no máximo 30 cm depois) do pólo positivo da
bateria, para o carro ficar protegido de um eventual
incêndio dos cabos, originado por ex. por um acidente. A
cobertura do seguro deixa de ter efeito se esta directiva
não for observada.
• O diâmetro do cabo positivo e negativo não deve ser
menor do que 1,5 mm².
Propostas para montagem:
• Tubos de protecção de cabos protegem os mesmos de
desgastes contra partes da carrossaria com arestas vivas.
• O isolamento dos cabos não deve ser danificado durante
a montagem.
• Partese do princípio de que são usadas as ferramentas
adequadas na montagem da aparelhagem HIFI no
automóvel.
O seu automóvel pode, consoante o modelo, não corres
ponder a esta descrição. Não assumimos a responsabilidade
por erros de montagem ou de ligação e pelos danos que
possam surgir em consequência disso.
-

26
AR4030BT-USB-CR_IM 05 .07.1 6
26
Português
Informação importante para a instalação
do deu auto-rádio
1. O aparelho está concebido para o pólo negativo da
bateria, que tem de ser ligado à carrossaria do veículo.
Verifique isto por favor antes da montagem.
2. Tenha ao montar / ligar o seu aparelho por favor atenção
a que, nem todo o veículo está equipado com uma
“ligação ISO”. Neste caso aconselhamos o uso de um
adaptador ISO específico para veículos.
Obtém adaptadores junto do seu comerciante de aces
sórios para automóveis e / ou na sua oficina de veículos.
3. Na ocupação do “Pólo permanente +“ (ligação de
corrente de regime permanente) pode haver variações
conforme o modelo de veículo. (Tal é contudo necessário
para a memorização das estações de emissão.)
Para garantir todas as funções a montagem de acordo
com estas instruções é absolutamente necessária. Em
caso de dúvidas dirijase a uma oficina autorizada.
Devido à existência de diferentes tipos de viaturas e de
fabricantes de viaturas, não é garantido que a ficha de
ligação ISO seja a correcta, mesmo quando as fichas de
ligação ISO encaixam mecanicamente uma na outra.
Pode por isso ser eventualmente necessário de alterar
a ligação à corrente, ou melhor, utilizar um adaptador
específico para veículos motorizados.
INDICAÇÃO:
Com uma ligação correcta o rádio pode ser ligado ou
desligado por meio da ignição. No caso de uma even
tual perda das emissoras memorizadas, o rádio não
dispõe da necessária “Duração +“ para a memorização
de emissoras.
-
-
6. Há na ligação da antena duas normas diferentes. Primeiramente a ligação antiga com o contacto circular (50 Ohm)
comprido e preponderante e com uma tomada circular
do lado do rádio. Segundo a ficha de antena de norma
ISO (150 Ohm). Adaptadores para os dois formatos são
oferecidos por fabricantes de acessórios e / ou pela sua
oficina.
INDICAÇÃO:
Para VW / Audi ter imprescindivelmente em conta:
O seu veículo poderá ter uma antena activa. Esta
necessita de uma fonte de abastecimento de energia
fornecida apenas pelos rádios originais dos veículos.
Neste caso, utilize um adaptador de antena com
alimentação fantasma.
Os adaptadores de antena estão disponíveis em forne
cedores de acessórios automóveis e/ou na sua oficina
automóvel.
Instalação
A instalação do auto-rádio deve ser efectuada de acordo
com as figuras seguintes:
-
ATENÇÃO:
Com uma ligação a “Duração +“ sem ignição pode
ocorrer uma descarga desnecessária da bateria do
carro. No pior dos casos a bateria pode descarregarse
por completo.
4. Dependendo do tipo específico de veículo, podem
ocorrer interferências durante o funcionamento. Estes
podem ser eliminados com um filtro adicional de supres
são de interferências. O seu aparelho já está equipado
de fábrica com um filtro de supressão de interferências.
Apesar de tudo pode, conforme os veículos, haver
interferências.
Obtém filtros de supressão de interferências no comércio
de acessórios de automóveis e / ou na sua oficina de
veículos.
5. Atenda a que, ao montar o seu rádio, haja na parte de
trás do mesmo espaço livre suficiente para garantir uma
refrigeração adequada.
-
a Passagem da caixa
b Ferramenta (chave) de extracção

AR4030BT-USB-CR_IM 05 .07.1 6
Ligação
ATENÇÃO: Ligação de um amplificador externo
• Não colocar o painel de controle antes de ligar todos
os cabos.
• Utilize as colunas com uma impedância de 4 ohm.
Ligue o aparelho de acordo com o seguinte diagrama:
Para ligar um amplificador externo, use as saídas de áudio
cinch LINE OUTPUT no painel posterior da unidade. Con
sulte o manual de instruções relativamente ao amplificador
externo.
Português
27
-
Instruções de funcionamento
1. Não ligue o aparelho se o interior do veículo estiver
extremamente quente, por exemplo, após estacionamento prolongado sob luz directa solar. Aguarde até que
o interior arrefeça após um curto tempo de condução.
2. Possíveis avarias durante o funcionamento podem ser
resolvidas premindo o botão RESET. Prima o botão
RESET com um arame ou algo do género (8) para repor a
electrónica (RESET).
3. As horas apresentadas durante o modo de espera são
definidas automaticamente assim que escutar uma
estação de rádio.
Utilização
Seguidamente, as funções dos botões de função individuais
são descritos de acordo com a ilustração
“Descrição dos elementos de serviço”.
1 Botão – MODE
a) Prima este botão para ligar a unidade. A notificação
“WELCOME” será apresentada brevemente no ecrã.
Mantenha o botão premido para desligar a unidade.
A notificação “GOODBYE” será apresentada breve
mente no ecrã.
b) Prima este botão para selecionar modos diferentes.
(Radio, BT, USB, CARD e AUX IN)
(Ligar / Desligar)
INDICAÇÃO:
O modo USB e CARD só pode ser seleccionado se
tiver ligado um media correspondente.
2 Multicontrolo / Botão – SEL (Volume / Selecção)
a) Durante o modo normal de reprodução, o controlo é
utilizado para controlar o volume.
Juntamente com o controlo previamente premido
(botão SEL), é possível efectuar alterações no menu,
por exemplo, o modo de som.
b) Prima o botão SEL brevemente para entrar no menu
de selecção. Premir repetidamente o botão SEL
selecciona entradas do menu individuais. É possível
alterar as definições das entradas do menu individuais
rodando o controlo do volume.
BAS (Graves)
TRE (Agudos)
BAL (Equilíbrio)
FAD (Variação gradual)
BEEP (É o som que é ouvido quando é pressionado
um botão)
-
• BEEP ON: É emitido um sinal sonoro sempre que
é pressionado um botão.
• BEEP OFF: Nenhum sinal sonoro é emitido.

28
AR4030BT-USB-CR_IM 05 .07.1 6
28
Português
LOUD (Loudness)
Os graves são amplificados quando a função Volume
do som é activada.
• LOUD OFF: A função Volume do som é desactiva
• LOUD ON: A função Volume do som é activada.
EQ (Equalizador / Processamento Sonoro Digital) :
EQ OFF, FLAT, POP, ROCK, CLASS
VOL LAS / ADJ (ligar volume)
• VOL LAS: A unidade liga com o nível de volume
• VOL ADJ: Aqui, é possível definir um volume fixo
CLK (formato de apresentação da hora)
Selecione entre a apresentação de 24 ou 12 horas.
INDICAÇÃO:
Se seleccionou 12 horas a apresentar no ecrã, será
apresentado o seguinte:
DX / LOC (Muda para estações locais e / ou mais
remotas.)
• DX: Recebe outras estações mais remotas.
• LOC: Recebe estações locais.
STEREO / MONO (Muda para os modos Estéreo e /
ou Mono)
VOL (Volume)
Mais definições através do botão “Multicontrolo”
• Mantenha o botão “Multicontrolo” pressionado
durante alguns segundos para aceder a mais opções
de definições. Pressione o botão “Multicontrolo”
sempre que tenha de seleccionar a opção seguinte.
• Rode o botão “Multicontrolo” para ajustar a definição
apresentada.
Estão disponíveis as seguintes definições:
AF ON / AF OFF
AF (Alternative Frequencies – frequências alternativas)
é uma função que funciona com o RDS (Radio Data
System – sistema de dados de rádio) e apenas pode
ser utilizada com estações FM. Sem se notar, o aparelho pesquisa a melhor frequência para a estação
pretendida.
• ON: Se uma certa estação emissora possuir má
• OFF: A função é desactivada.
da.
definido anteriormente.
com o qual a unidade deverá ser ligada
(A – VOL).
AM = manhã, PM = tarde.
recepção, o aparelho muda automatica
mente para uma estação emissora a emitir o
mesmo programa através da mesma cadeia
de emissão RDS.
-
-
3 Botão – PTY / MUTE
TA OFF / TA ON (Definições das informações de
trânsito)
TA OFF / ON (Serviço de Informações de Trânsito do
rádio / „Traffic Announcement“)
• OFF: A função é desactivada.
• ON: TA é apresentado se esta função estiver
activada.
No modo TA, quando uma mensagem de
tráfego é recebida, a unidade muda para
a estação de rádio a partir de um modo
diferente (por ex., modo USB). O nível de
volume é ajustado através dos números
definidos no menu para a transmissão de
informações de trânsito. A notificação “TRAFFIC” será apresentada brevemente no ecrã.
TA VOL (Volume das informações de trânsito)
REG OFF / REG ON
Em certos momentos, algumas estações segmentam
os seus programas em programas regionais de dife
rente conteúdo.
• ON: Só serão reproduzidos os programas regio
nais da estação de rádio, ou sugeridos como
preferências, quando sintonizar para uma
estação selecionada.
• OFF:
Reproduz também programas nacionais.
INDICAÇÃO:
Quando a funcionalidade está ativada, a estação de
rádio poderá deixar de ser recebida sem interferên
cia nas áreas periféricas.
EON ON / OFF
A unidade pode receber dados RDS EON. EON
significa a transmissão de informações adicionais de
estações dentro de um grupo de estações. No caso
de informações de trânsito (TA) a função mudará
de um grupo de estações para uma transmissão de
informações sem ser de trânsito para a estação de
rádio correspondente a informações de trânsito do
grupo de estações.
• ON: A unidade tenta receber as informações
EON TA de uma estação dentro do grupo
para melhorar assim a qualidade de recep
ção.
• OFF: Evita a mudança de uma estação com um
nível muito fraco de sinal.
INDICAÇÃO:
O ícone “TP” no ecrã indica que a estação transmite
mensagens de tráfego. Quer seja diretamente ou
através de um transmissor ligado (EON).
a) Pressione o botão para ligar o som da unidade.
Pressione o botão de novo para desligar o som da
unidade.
-
-
-
-

AR4030BT-USB-CR_IM 05 .07.1 6
b) Modo de rádio:
PTY Seleccionar o tipo de programa
Além do nome da estação, algumas estações emitem informações sobre o tipo de programa. Estas
informações podem ser apresentadas no seu rádio
automóvel.
O programa pode ser dos seguintes tipos, por
exemplo:
SPORT NEWS POP CLASSICS
Utilizando a função PTY, é possível seleccionar esta
ções específicas de um certo tipo de programa. Os
tipos de programas individuais estão divididos em
duas categorias: música e língua. É possível encontrar
uma lista dos tipos de programas na página 34.
• Segure o botão PTY / MUTE 1x para ligar a função
e para seleccionar a categoria “língua”.
• Segure o botão PTY / MUTE 2xs para seleccionar a
categoria “música”.
INDICAÇÃO: Desligar a função
Se segurar o botão PTY / MUTE uma terceira vez, a
função será desligada.
Então, prima os botões de estação 1 – 6 para efectuar
a escolha de PTY. O tipo de programa seleccionado
aparece no visor.
Se PTY estiver seleccionado, o rádio inicia uma
pesquisa pelas informações PTY respectivas e pára
quando as informações PTY pretendidas são encon
tradas.
Se o tipo de programa pretendido não for encontrado, a mensagem “NO PTY” aparece no visor.
Se as informações PTY já não existirem, a função PTY
muda automaticamente para o modo normal.
4 Microfone
5 Ecrã LCD (Indicação em cristais líquidos)
6 Ranhura para cartão SD
Insira o cartão de memória com a etiqueta à esquerda
na abertura fornecida para esta finalidade até encaixar
emitindo um “clique”. No ecrã visualiza-se a indicação
CARD.
Os dados são lidos automaticamente.
INDICAÇÃO:
Para procurar / seleccionar determinadas pistas, proceda
como descrito sob o ponto11 – 16.
Para remover o cartão de memória, prima novamente a
extremidade do cartão de memória. Este desprende-se
com um „clique“ e pode ser removido.
ATENÇÃO:
Simplesmente puxar o cartão pode danificar a ranhura
e / ou o cartão de memória.
7 Ligação USB
Se quiser ter acesso a dados gravados num Stick USB,
enfie o mesmo na abertura para tal prevista. Visualiza-se
no ecrã a indicação USB.
Os dados são lidos automaticamente.
INDICAÇÃO:
• Conecte um dispositivo de memória USB sempre
diretamente à porta USB para evitar qualquer mau
-
-
funcionamento.
• Há uma variedade de esquemas de compressão,
bem como as diferenças de qualidade em unidades
flash USB.
A indústria da música padrões sem fortes Além
disso, segurando um (proteção contra cópia).
Por estas razões pode causar problemas durante a
reprodução de MP3 em arquivos de casos raros. Isto
não é um mau funcionamento da unidade.
• Para procurar / seleccionar determinadas pistas,
proceda como descrito sob o ponto 11 – 16.
• Indicação: A ligação USB destina-se apenas à
reprodução de dispositivos de memória e não ao
carregamento de dispositivos externos. Apenas é
possível fornecer uma potência baixa (100 mA). Esta
ligação USB não se destina a discos rígidos, por
exemplo, discos rígidos externos de 2,5“, que ne
cessitam de correntes até 1100 mA. Para reproduzir
a partir do seu smartphone, iPod ou iPhone, utilize a
entrada AUX-IN, concebida para esse propósito.
8 Botão – Reset (repor)
Consulte a secção “Instruções de funcionamento” na
página 27.
9 Tomada AUX
Para ligação de aparelhos de leitura analógicos. Também
pode por meio desta tomada e dos altifalantes ouvir o
som de outros aparelhos de leitura tais como o leitor
MP3, o leitor de CDs, etc.
1. Ligue por favor o aparelho externo com uma ficha de
jaque estéreo de 3,5 mm à tomada AUX.
2. Prima o botão MODE /
necessárias até se visualizar “AUX IN“ no ecrã.
3. Escuta a reprodução do dispositivo externo através
das colunas. É possível alterar o volume através do
controlo do volume.
4. Para o restante procedimento consulte o manual de
instruções da fonte de som externa.
INDICAÇÃO:
Regule o volume de som do aparelho externo para o
volume de som que deseja ouvir.
Português
(1) tantas vezes quantas
29
-

30
AR4030BT-USB-CR_IM 05 .07.1 6
30
Português
10 Botão – AMS
Modo de rádio:
a) Prima o botão brevemente para reproduzir as esta
ções gravadas sequencialmente durante cerca de
5segundos. Prima a estação pretendida para sair da
operação e reproduzir a estação de rádio.
b) Segure este botão para iniciar a pesquisa automática
de estações. O processo de pesquisa pode demorar
alguns minutos. As estações são armazenadas de
acordo com a intensidade do sinal. Então, as estações
gravadas são reproduzidas durante um curto espaço
de tempo. Prima um botão de estação para sair da
operação.
Modo de USB / CARD:
Selecção directa de um ficheiro de música.
Será apresentado no ecrã primeiro “TRKSCH” e, em seguida, “T−−−”. Rode o controlo de volume e selecione o
“primeiro número”. Após aproximadamente 3 segundos,
mover-se-á para a esquerda. Introduza o número seguinte.
Quando o número da faixa pretendido aparecer, confirme
a sua seleção premindo o botão SEL.
INDICAÇÃO: A seleção de faixas máxima é “999“.
11 – 16 Botão 6
Estações predefinidas (1 − 6)
a) Modo de rádio:
• Segure o botão predefinido da estação pretendida
• Para seleccionar uma estação de rádio, prima
• Para seleccionar o tipo de programa.
b) Modo de USB / CARD:
Selecção directa de um ficheiro de música. Página
30 „Botão AMS“
Botão 1
Prima o botão para interromper a reprodução de uma
música (função de pausa). Volte a premir esta tecla
para voltar à leitura do música.
Botão 2
Prima o
ecrã. Todas as faixas serão reproduzidas em sucessão
durante aproximadamente 10 segundos. Prima
novamente o
reprodução normal.
Botão 3
Por predefinição, todas as faixas de música são repetidas. Prima a tecla para repetir apenas a faixa atual.
“RPT” será apresentado no ecrã.
Botão 4
Prima o
iniciada uma reprodução aleatória de todas as faixas.
+10, 5–10, 4RDM, 3RPT, 2INT, 1
para guardar uma estação de rádio.
brevemente o respectivo botão de estação.
„Botão PTY / MUTE“
INT
botão
. “INT ON” aparece brevemente no
botão
para definir a velocidade de
RPT
RDM
botão
. “RDM” será apresentado no ecrã. Será
Página 28
-
Prima novamente a tecla para definir a reprodução
normal.
Botão 5
–10 / 6+10
• Prima os botões para saltar 10 faixas para a frente
ou para trás. É necessário que estejam disponíveis
mais de 10 faixas no suporte de armazenamento.
• Mantenha
selecionar a pasta anterior ou seguinte. (Se existirem pastas no suporte de armazenamento)
17 Botão –
a) Para selecionar uma estação de rádio no modo de
rádio.
b) No modo USB / CARD:
Prima o botão para selecionar a anterior música.
18 Botão –
a) Para seleccionar uma estação de rádio no modo de
rádio.
b) Modo de USB / CARD:
Prima o botão para seleccionar a próxima música.
19 Botão –
Modo de rádio:
a) Mostrar as informações do ecrã (etiqueta ID3)
Prima o botão repetidamente para visualizar as seguintes informações sucessivamente no ecrã:
Hora (será definido automaticamente para receção
RDS), frequência da estação de rádio atualmente
selecionada, tipo de programa atual (PTY), estação
de rádio.
INDICAÇÃO:
• Se não estiverem disponíveis informações
• Se as informações apresentadas no visor forem
b) Definir a hora manualmente
A hora será definida automaticamente para receção
RDS. Se não for o caso, poderá definir a hora manual
mente da seguinte forma:
1. Mantenha o
2. Defina as horas usando os botões / .
3. Prima novamente o
4. Defina os minutos usando os botões / .
5.
Modo de telefone:
Rejeitar chamada recebida, terminar uma conversa.
os botões
premidas brevemente para
CLK
correspondentes, nenhum NO PTY é apresen
tado no visor.
muito longas, são apresentadas como texto
deslizante.
botão
hora começam a piscar no ecrã.
minutos começam a piscar.
Prima o botão CLK
definições. A hora é definida.
CLK premida. Os dígitos da
botão
CLK. Os dígitos dos
para confirmar as suas
-
-

AR4030BT-USB-CR_IM 05 .07.1 6
20 Botão – BAND
a) Modo de rádio:
Prima brevemente o botão
entre as três áreas FM (VHF). O nome do nível correspondente é apresentado no ecrã LCD quando a
frequência é indicada (consulte o
b) Modo de telefone:
Aceitar uma chamada recebida, ligar para o número
marcado.
c) Modo de USB / CARD:
Prima o
botão
. A pasta será apresentada no ecrã.
BAND para alternar
botão
CLK).
Chamadas telefónicas via Bluetooth
A tecnologia Bluetooth é uma tecnologia para a ligação
radiofónica sem fios de dispositivos a curta distância. A
tecnologia Bluetooth permite a utilização de telemóveis em
alta voz. O condutor pode falar através do seu telemóvel
sem ter de o colocar ao ouvido.
Esta unidade dá-lhe a opção de utilizar um telemóvel com
Bluetooth activado. A função de raio tem um limite de cerca
de 3 metros dependendo do dispositivo.
Para uma óptima qualidade de som durante uma chamada
telefónica:
Não ajuste o volume para uma definição muito alta. Ao fazer
isso, pode causar eco (repercussão) através dos altifalantes.
INDICAÇÃO:
A definição dos altifalantes depende da posição em que
foram instalados no sentido dos microfones e, por isso,
não pode ser determinada.
Emparelhar dispositivos (PAIRING)
Antes de utilizar o auto-rádio para fazer chamadas telefóni
cas, deve emparelhar as unidades.
1. Prima o
2. Seleccione o menu do Bluetooth no seu telemóvel e
3. Dependendo do fabricante do dispositivo, do modelo e
Se a unidade tiver sido registada com êxito, BT será apresen
tado no ecrã e MEDIA será indicado.
• Dependendo do fabricante do telemóvel, deve execu-
botão
começa a piscar no ecrã. Isto indica que o dispositivo está
no modo de emparelhamento.
registe o auto-rádio no telemóvel. Para o fazer, consulte
o manual do utilizador do seu telemóvel. O dispositivo
”AEG AR4030“ é seleccionado no seu telemóvel.
das versões de software, introduza agora a palavra-passe
“0000“ no seu telemóvel.
INDICAÇÃO:
tar o emparelhamento (PAIRING) de novo entre o seu
telemóvel e o auto-rádio.
MODE para selecionar o modo BT. BT
-
Português
INDICAÇÃO:
• A compatibilidade do Bluetooth não pode ser
garantida para os telemóveis que estejam à venda no
mercado futuramente.
• Para garantir uma óptima ligação, certifique-se de
que a bateria do seu telemóvel está completamente
carregada.
• Alguns telemóveis dispõem do modo de poupança de
energia. Desactive o modo de poupança de energia,
caso contrário podem ocorrer problemas ao efectuar
chamadas telefónicas através do Bluetooth.
• Para efectuar e receber chamadas telefónicas, deve
manter o Bluetooth activado do seu telemóvel. Consulte o manual do utilizador do seu telemóvel.
• Certifique-se de que fala para o microfone integrado
(4). Não é possível ligar um microfone externo.
Desligar os dispositivos
Os dispositivos são desligados quando desliga o auto-rádio
através da ignição ou na unidade.
Voltar a ligar os dispositivos
Esta unidade suporta uma ligação automática.
Os requisitos são:
• os dispositivos terem sido já emparelhados
• o Bluetooth estar activado no seu telemóvel
• o seu telemóvel suportar esta função.
Depois do auto-rádio ter sido ligado de novo através da
ignição ou na unidade, é activada a ligação automática de
novo. Isto pode demorar alguns segundos.
Se tiver sido estabelecida uma ligação, BT acenderá no ecrã.
Marcar um número de telefone
A unidade armazena o último número de telefone marcado.
Para aceder ao último número de telefone marcado, proce
da da seguinte maneira:
botão
Mantenha o
no ecrã.
Terminar chamadas telefónicas
Prima o
botão
efetuadas. END é apresentado no visor.
INDICAÇÃO:
Prima também o botão
da recebida.
-
Receber chamadas telefónicas
Se receber uma chamada telefónica, o toque do telefone
é emitido através dos altifalantes e se o chamador tiver
um telefone com a função CLIP “Calling Line Identification
Presentation (Identificação do chamador), o número do
chamador aparece no visor do auto-rádio. Caso contrário,
“0000“ aparece no visor.
BAND premida. CALLING aparecerá
CLK para terminar chamadas recebidas ou
CLK para rejeitar uma chama-
31
-

32
AR4030BT-USB-CR_IM 05 .07.1 6
32
Português
Para receber uma chamada telefónica, pressione o botão
BAND. Pode ouvir o chamador através dos altifalantes
do seu automóvel.
Reprodução de música via A2DP
(Advanced Audio Distribution Profile)
O A2DP envolve um perfil do Bluetooth compatível com
diferentes unidades de fabricantes. Os sinais de áudio
estéreo são transmitidos sem fios através do fluxo da unidade de reprodução (fonte) e da unidade do receptor. Para
controlar a fonte por via remota, a unidade de reprodução
deve suportar o perfil AVRCP (Audio Video Remote Control
Profile).
As funcionalidades completas não podem ser asseguradas
devido aos diferentes fabricantes de unidades, modelos e
versões de software.
• Depois de ter ligado as unidades uma com a outra, inicie
a reprodução de música no seu telemóvel. “A2DP” será
apresentado no ecrã.
• Utilize o botão
música anterior ou o seguinte.
• Prima o
botão
(funcionalidade de pausa). “MEDIA” será apresentado
no ecrã. Prima novamente o botão para cancelar a
funcionalidade.
ou para seleccionar o título da
1 para pausar a reprodução de música
Limpeza
Conselhos sobre segurança
ATENÇÃO:
Possíveis danos na unidade!
Assegure-se de que a unidade não tem humidade durante
a limpeza para evitar danos irreparáveis.
Limpeza
Limpe sempre a caixa com um pano ligeiramente húmido.
Resolução de problemas
Este capítulo contém conselhos importantes sobre identificação de erros e resolução de problemas. Siga as instruções
para evitar perigos e danos.
Conselhos sobre segurança
AVISO:
Siga as instruções de segurança abaixo para evitar perigos
e danos materiais:
• As reparações em dispositivos eléctricos só podem
ser realizadas por pessoas qualificadas que receberam
formação do fabricante. Podem resultar riscos signifi
cativos para o utilizador e danos na unidade devido a
reparações incorrectas.
Causas e resolução de erros
Antes de entregar a unidade ao nosso serviço de atendimen
to ao cliente, leia a seguinte tabela no caso de poder reparar
um erro por si próprio.
Erro Causa possível Solução
-
Não é pos
sível ligar a
unidade.
Sem som. O volume foi
O botão de
funções não
funciona.
O rádio e/
ou a estação
predefinido
automatica
mente não
funciona.
A estação
predefinida
não funciona.
A ignição não foi
ligada.
definido para o
nível mínimo.
O cabo não está
ligado correcta
mente.
A unidade apresen
ta um erro.
O cabo da antena
não está ligado
correctamente.
-
Os sinais transmi
tidos são muito
fracos.
A ligação 4 na
ligação ISO A (per
manente positiva)
não está correcta.
Rode a chave para
ligar a ignição.
Aumente o volume.
Verifique a ligação
-
do cabo.
-
Pressione o botão
RESET (8).
Verifique se a antena
está bem ligada.
-
Sintonize manualmente as estações.
Verifique a ligação
-
do cabo. Para o
fazer, consulte o
capítulo “Ligação”.
-
-

AR4030BT-USB-CR_IM 05 .07.1 6
Erro Causa possível Solução
A unidade
não funciona
na porta USB.
O cartão de
memória SD
não funciona.
Não é possí
vel estabelecer a ligação
através do
Bluetooth.
-
A porta USB foi
concebida para
dispositivos que
funcionem de
acordo com as
normas relativas a
USBs. Nem todos
os dispositivos à
venda no mercado
estão em conformidade com essas
normas. Pode ter
sido ligado um
dispositivo que não
funcione de acordo
com as normas de
USBs.
O dispositivo não
lê o cartão.
O Bluetooth está
desactivado no seu
telemóvel.
Ligue um dispositivo
que funcione de
acordo com as
normas de USBs.
Assegure-se de que
o dispositivo de
armazenamento de
dados é formatado
com o sistema de
ficheiro FAT32.
Verifique o cartão.
Assegure-se de que
o dispositivo de
armazenamento de
dados é formatado
com o sistema de
ficheiro FAT32.
Active o Bluetooth
no seu telemóvel.
Características técnicas
Modelo: .......................................................... AR 4030 BT/USB/CR
Português
Bluetooth
Bluetooth apoio..........................................................................V 2.0
Acance ................................................................... cerca de 8 metro
Frequência de transmissão .............................. 2,402 − 2,480 GHz
Protocolo ....................................................................A2DP / AVRCP
Reservado o direito de efectuar modificações técnicas e de
concepção no decurso do desenvolvimento contínuo do
produto.
Este aparelho foi controlado nos termos das actuais directi
vas da CEE aplicáveis, tais como inocuidade electromagnética e directiva sobre baixa tensão, e fabricado de acordo com
as mais novas prescrições da segurança técnica.
33
-
Deposição
Significado do símbolo “contentor do lixo”
Poupe o nosso meio ambiente, não deite
aparelhos eléctricos para o lixo doméstico.
Dirija-se ao locais destinados à recolha especial
de aparelhos eléctricos e entregue aí os apare
lhos que não pretende continuar a utilizar.
Desta forma, contribuirá para ajudar a evitar os potenciais
efeitos perniciosos que um falso depósito de objectos
usados terão, tanto no que diz respeito ao ambiente, como
à saúde humana.
Dará igualmente a sua contribuição para o reaproveitamento
de materiais, para a reciclagem e outras formas de aproveita
mento de aparelhos eléctricos e electrónicos usados.
Receberá, nas autarquias e juntas de freguesia, informações
sobre os locais onde poderá entregar tais aparelhos.
-
-
Generalidades
Tensão da rede ........................................DC 12 V (terra negativo)
Consumo de energia .........................................................5 A Máx.
Capacidade ...........................................................4 x 40 W (PMPO)
Formatos de ficheiros reprodutívei ...........................MP3, WMA
Peso líquido ............................................................cerca de 0,45 kg
Dimensões da caixa (Instalação) ...182 larg. x 52 alt. x 110 prof.
Área FM
Gama de frequências ................................87,5 MHz ~ 108,0 MHz
Sensibilidade utilizávelt ........................................................... 10 dB
I.F. Frequência .................................................................... 10,7 MHz

34
AR4030BT-USB-CR_IM 05 .07.1 6
34
Português
PTY – Tipos de programas
Botões de estação PTY da categoria “língua”
NEWS
1
2
3
4
5
6
AFFAIRS
INFO
SPORT
EDUCATION
DRAMA
CULTURE
SCIENCE
VARIED
WEATHER
FINANCE
CHILDREN
SOCIAL
RELIGION
PHONE IN
TRAVEL
LEISURE
DOCUMENT
Botões de estação PTY da categoria “música”
1
2
3
4
5
6 FOLK M
POP M
ROCK M
LIGHT M
EASY M
CLASSIC
OTHER M
COUNTRY
JAZZ
NATIONAL M
OLDIES

AR4030BT-USB-CR_IM 05 .07.1 6
Registo de palavras-chave – Índice
B
Botão AMS ......................................................................................30
Botão BAND ...................................................................................31
Botão MODE ..................................................................................27
Botão MUTE (mudo) .....................................................................28
Botão Play / Pause (
Botão PTY / MUTE .......................................................................... 28
Botão SEL ........................................................................................27
Botões / ............................................................................30
Características técnicas .................................................................33
Chamadas telefónicas via Bluetooth .........................................31
Definições (Botão SEL) ..................................................................27
Desligar ............................................................................................27
Emudecer ........................................................................................28
) .................................................................30
C
D
E
Português
L
Ligar ..................................................................................................27
Ligação .............................................................................................27
Ligação USB ....................................................................................29
Limpeza ............................................................................................32
P
Programas regionais ......................................................................28
Propostas para montagem ..........................................................25
PTY – Tipos de programas ...........................................................34
R
Ranhura para cartão SD ................................................................29
Regule o volume ............................................................................27
Reprodução de música via A2DP ...............................................32
Resolução de problemas ..............................................................32
S
Segurança no tráfego ....................................................................25
Serviço de Informações de Trânsito do rádio (TA) ..................28
35
F
Frequências alternativas (AF) .......................................................28
Funcionalidades de reprodução .................................................30
H
Horário ..............................................................................................30
I
Indicações de segurança ..............................................................25
Informação importante para a instalação .................................26
Instalação .........................................................................................26
Instalação (Indicações de segurança) ........................................25
Instruções de funcionamento ......................................................27
T
Tomada AUX ...................................................................................29
U
Utilização ..........................................................................................27

36
AR4030BT-USB-CR_IM 05 .07.1 6
36
Italiano
Istruzioni per l’uso
Grazie per aver scelto il nostro prodotto. Vi auguriamo un
buon utilizzo del dispositivo.
Simboli per questo manuale di istruzioni per l’uso
Le indicazioni importanti per la propria sicurezza sono indicati
appropriatamente. Osservare assolutamente queste indica
zioni, per evitare incidenti e danni all’apparecchio:
AVVISO:
Avvertimenti di pericoli alla salute e indica rischi potenziali
di lesioni.
ATTENZIONE:
Indica pericoli potenziali per il dispositivo e altri oggetti.
NOTA: Sottolinea consigli e informazioni.
-
Avvertenze di sicurezza
Prima di mettere in funzione questo apparecchio, leggere
molto attentamente le istruzioni per l’uso e conservarle con
cura unitamente al certificato di garanzia, allo scontrino e, se
possibile, alla scatola di cartone con la confezione interna.
• Utilizzare l’apparecchio solo per l’uso previsto.
• Montare l’apparecchio in modo che le aperture per la
ventilazione presenti non vengano coperte.
• Non togliere mai la protezione dell’apparecchio.
Riparazioni non a regola d’arte possono causare note
voli pericoli per l’utente. Nel caso di danneggiamento
dell’apparecchio non metterlo più in funzione ma farlo
riparare da un esperto.
Questi simboli possono trovarsi eventualmente sull’apparec
chio e rimandano ai seguenti elementi:
Il simbolo del lampo fa presente all’utente la
presenza di pezzi all’interno dell’apparecchio che
possono produrre alte tensioni pericolose.
Bambini e persone fragili
Per sicurezza tenere l’imballaggio (sacchetto di plastica,
scatola, polistirolo, ecc,) fuori dalla portata dei bambini.
AVVISO:
Non lasciar giocare i bambini piccoli con la pellicola. Pericolo di soffocamento!
-
Sicurezza della circolazione
AVVISO:
• La sicurezza della circolazione è sempre l’obiettivo
principale. Quindi utilizzare sempre l’autoradio in modo
da essere sempre pronti a far fronte alla situazione
stradale attuale.
AVVISO:
• Tenere conto che ad una velocità di 50 km/h si percorro
no 14 m al secondo.
• In situazioni critiche se ne sconsiglia il comando.
• Le avvertenze, p.e. della polizia e dei vigili del fuoco,
devono poter essere sempre percepite tempestiva
mente e con sicurezza nel veicolo.
• Per questa ragione durante il viaggio ascoltate sempre
il vostro programma con un volume adeguato.
• Per evitare gravi incidenti della strada, installare l’appa
recchio in modo tale da non ostacolare il conducente
durante la guida (uso del volante, cambio delle marce
eccetera).
• Anche i dispositivi di sicurezza, per esempio air bag, e il
campo visivo non devono essere ostacolati.
Note sulla sicurezza per il tempo di
montaggio / connessione
• Scollegare prima il polo negativo poi quello positivo della
batteria. (Collegare in ordine inverso.)
Attenzione: Se la batteria è staccata dalla rete, tutte le
memorie volatili perdono le loro informazioni. Per cortesia
osservare le avvertenze di sicurezza del produttore del
veicolo.
• La sicura principale deve essere installata possibilmente
vicina (max. dopo 30 cm) al polo positivo della batteria
affinché, in caso di incidente, l’auto sia protetta da un
eventuale incendio dei cavi. Se l’installazione non dovesse
corrispondere a questa direttiva di produzione, la prote
zione assicurativa cessa.
• La sezione trasversale del cavo positivo e negativo non
deve essere inferiore a 1,5 mm².
Consigli per l’installazione:
• I tubi di protezione per cavi proteggono i cavi dall’abra
sione su parti spigolose della carrozzeria.
• L’isolamento dei cavi non deve essere danneggiato
durante l’installazione.
• Ovviamente nell’installazione di un HiFi per auto si devono usare gli utensili corretti.
A seconda del tipo di costruzione il vostro veicolo può differi
re da questa descrizione. Decliniamo ogni responsabilità per
danni insorti a causa di errori di montaggio o collegamento e
per danni successivi.
Informazioni importanti per il montaggio
della vostra autoradio!
1. L’apparecchio è configurato per il polo negativo della
batteria, il quale deve essere collegato alla carrozzeria del
veicolo. Accertarsene prima di procedere all’installazione.
-
-
-
-
-
-

AR4030BT-USB-CR_IM 05 .07.1 6
2. Durante il montaggio / collegamento del vostro apparecchio tener conto che non ogni veicolo è dotato di un
“collegamento ISO”. In questo caso consigliamo l’impiego di un adattatore ISO specifico per autoveicoli.
Gli adattatori sono disponibili nei negozi di accessori per
auto e / o presso la vostra officina di fiducia.
3. Nel caso di “Durata +” (Collegamento di corrente per
manente), a seconda del tipo di veicolo possono esserci
differenze. (Questo è necessario per memorizzare le
stazioni emittenti).
Per garantire tutte le funzioni è assolutamente necessario
eseguire il montaggio conformemente a queste istruzioni.
In caso di dubbio rivolgersi ad un’officina autorizzata.
A causa dei diversi tipi di autovetture e produttori, una
configurazione corretta della spina ISO non è garantita
nemmeno quando i collegamenti a spina ISO coincidono
meccanicamente. Perciò può essere eventualmente
necessario cambiare il collegamento elettrico o l’adatta
tore specifico dell’autovettura.
NOTA:
Se il collegamento è corretto, si può accendere e
spegnere la radio mediante l’accensione. In caso di
perdita delle emittenti memorizzate, la radio non riceve
“Durata +”, necessaria per la memorizzazione delle
emittenti.
ATTENZIONE:
Con un collegamento a “Durata +” senza accensione,
può verificarsi un carico inutile della batteria della
macchina malgrado la radio sia spenta. Nel peggiore
dei casi può accadere che la batteria della macchina si
scarichi.
4. In base al tipo di macchina specifico, le interferenze
possono verificarsi durante il funzionamento. Questi si
possono eliminare con un filtro antidisturbo supplemen
tare. Malgrado il vostro apparecchio CD sia già dotato in
serie di un filtro antidisturbo, possono esserci ugualmente
limiti dovuti alla vettura.
Potete avere questo filtro nei negozi di accessori auto e/o
presso la vostra officina di fiducia.
5. Durante il montaggio della radio fare attenzione che il
retro della radio abbia abbastanza spazio affinché sia
garantita una ventilazione sufficiente.
6. Nel collegamento dell’antenna ci sono due norme diverse. Prima la spina vecchia (50 Ohm) con contatto radio
lungo sporgente verso l’esterno sul lato veicolo e una
presa rotonda sul lato radio. Poi la spina antenna ISO
(150 Ohm). Adattatori per entrambi i formati sono disponibili presso i produttori di accessori e / o presso la vostra
officina autorizzata.
Italiano
NOTA:
Con VW / Audi osservare assolutamente: La macchina
potrebbe avere un‘antenna attiva. Necessita di un‘ali
mentazione come fornita dalle radio per auto originali.
In questo caso, usare l‘adattatore antenna con alimentazione fantasma.
-
-
Gli adattatore fantasma sono disponibili ai fornitori di
accessori per auto e / o officine.
Installazione
Montare la radio operando conformemente alle illustrazioni
seguenti.
-
a Alloggiamento di inserimento
b Dispositivo di estrazione
(chiave per le operazioni di smontaggio)
37
-

38
AR4030BT-USB-CR_IM 05 .07.1 6
38
Italiano
Allacciamento
ATTENZIONE: Connessione ad un amplificatore esterno
• Si consiglia di utilizzare altoparlanti con un’impedenza
pari a 4 ohm.
• Il cablaggio degli altoparlanti deve essere privo di
massa.
Realizzare l’allacciamento conformemente a quanto indicato dal grafico:
Per collegare un amplificatore esterno, usare le uscite
cinch LINE OUTPUT sul pannello posteriore dell’unità. Far
riferimento al manuale d‘istruzione relativo all‘amplificatore
esterno.
Avvertenze per l’uso
1. Non accendere il dispositivo se l‘interno della macchina
è molto caldo, ad esempio dopo un parcheggio lungo
alla luce solare diretta. Attendere che l‘interno si raffreddi
dopo un breve periodo di tempo.
2. Possibili malfunzionamenti durante il funzionamento
possono essere risolti premendo il tasto RESET. Premere
il tasto RESET con un cavo o simile (8) per ripristinare
l‘elettronica (RESET).
3. L‘ora visualizzata in modalità di standby è impostata automaticamente non appena si ascolta una stazione radio.
Funzionamento
Di seguito le funzioni dei tasti del singolo dispositivo sono
descritte secondo l‘immagine “Elementi di comando“.
1 Tasto MODE (Accendere / Spegnere)
a) Premere questo tasto per accendere l’unità. Il messag
gio “WELCOME” apparirà brevemente sul display.
Premere e tenere premuto il tasto per spegnere
l’unità. Il messaggio “GOODBYE”apparirà brevemen
te sul display.
b) Premere questo tasto per selezionare diverse modali
tà. (Radio, BT, USB, CARD e AUX IN)
NOTA:
La modalità USB e CARD può essere selezionata
solo quando è stato collegato un corrispettivo
mezzo.
2
Multicontrollo /
a) Durante la riproduzione in modalità normale, il con-
trollo è usato per controllare il volume.
Assieme al controllo precedentemente premuto
(tasto SEL), le modifiche possono essere effettuate nel
menu, ad. es. la modalità audio.
b) Premere il tasto SEL per breve tempo per accedere al
menu di selezione. Premendo ripetutamente il tasto
SEL si selezionano le voci del menu singole. È pos
sibile cambiare le impostazioni delle voci del menu
individuale girando il controllo volume.
BAS (Bassi)
-
-
-
TRE (Acuti)
BAL (Bilanciamento)
FAD (Dissolvenza)
BEEP (Suono udito quando viene premuto un tasto)
• BEEP ON: Viene emesso un beep ogni volta che
Tasto
SEL (Volume / Selezione)
viene premuto un tasto.
-

AR4030BT-USB-CR_IM 05 .07.1 6
• BEEP OFF: Nessun beep.
LOUD (Loudness)
Il basso viene amplificato quando viene attivata la
funzione Intensità viene.
• LOUD OFF: La funzione Intensità è disattivata.
• LOUD ON: La funzione Intensità è attivata.
EQ (Equalizzatore / Processore di Segnale Digitale) :
EQ OFF, FLAT, POP, ROCK, CLASS
VOL LAS / ADJ (accensione volume)
• VOL LAS: L’unità si accende con il livello di volu
• VOL ADJ: Qui è possibile impostare un volume
CLK (formato visualizzazione ora)
Selezionare il formato visualizzazione tra 24 o 12 ore.
NOTA:
Se si seleziona la visualizzazione 12 ore, viene visua
lizzato il seguente messaggio:
DX / LOC (Passa da stazioni locali a stazioni più
distanti)
• DX: Riceve ulteriori stazioni più distanti.
• LOC: Riceve stazioni locali.
STEREO / MONO (Passaggio da Stereo a Mono)
VOL (Volume)
Ulteriori impostazioni tramite la manopola multi jog
• Tenete premuta la manopola multi jog per alcuni
secondi per accedere a ulteriori opzioni di imposta
zione. Premete ogni volta la manopola multi jog per
selezionare l’opzione successiva.
• Girate la manopola multi jog per regolare le imposta-
zioni illustrate.
Sono disponibili le seguenti impostazioni:
AF ON / AF OFF
AF (Alternative Frequencies) è una funzione che si
attiva con RDS (Radio Data System) e può essere usata
solo con stazioni FM. In sottofondo, il dispositivo cerca
la frequenza migliore per la stazione selezionata.
• ON: Se una certa stazione di trasmissione ha
• OFF: La funzione è disattivata.
TA OFF / TA ON (Impostazione degli annunci sul
traffico)
TA OFF / ON (Servizio traffico della radio / „Annunci
sul Traffico“)
• OFF: La funzione è disattivata.
me precedentemente impostato.
fisso, con cui l’unità deve accendersi
(A – VOL).
AM = mattina, PM = pomeriggio.
-
una cattiva ricezione, il dispositivo passa in
automatico ad una stazione che trasmette lo
stesso programma tramite la stessa catena di
trasmissione RDS.
-
-
3 Tasto PTY / MUTE
a) Premete il tasto per far passare l’unità in modalità
b) Modalità radio
Italiano
• ON: TA appare se questa funzione viene attivata.
In modalità IT, quando si riceve un messaggio sul traffico l’unità passa alla stazione radio
da una modalità diversa (es., modalità USB).
Il livello del volume viene regolato sul valore
impostato nel menu per la trasmissione di
informazioni sul traffico. Il messaggio “TRAFFIC” apparirà sul display.
TA VOL (Volume delle informazioni sul traffico)
REG OFF / REG ON
In determinati momenti, alcune stazioni segmentano i
loro programmi in programmi regionali con contenuti
diversi.
• ON: Saranno riprodotti soltanto i programmi
regionali della stazione radio, o suggeriti
come preferenze quando si sintonizza una
stazione selezionata.
• OFF:
Riproduci anche programmi a livello nazionale.
NOTA:
Quando la funzione è abilitata la stazione radio
potrebbe non essere più ricevuta senza interferenze
nelle aree periferiche.
EON ON / OFF
L’unità può ricevere dati RDS EON. EON significa la
trasmissione di informazioni aggiuntive sulle stazioni
all’interno di un gruppo di stazioni. Nel caso di un
annuncio sul traffico (TA) passerà all’interno di un
gruppo di stazioni da una trasmissione non sul traffico
alla corrispondente stazione radio sul traffico del
gruppo di stazioni.
• ON: l’unità tenta di ricevere le informazioni EON
TA da una stazione raggiungibile e migliora
re così la qualità della ricezione.
• OFF: Evita il passaggio a una stazione con un
livello di segnale troppo basso.
NOTA:
L’icona “TP” sul display segnala che la stazione
trasmette messaggi sul traffico. Sia direttamente sia
attraverso un traspettitore collegato (EON).
silenziosa.
Premete il tasto di nuovo per disattivare la funzione.
PTY Selezionando il tipo di programma
Oltre al nome della stazione, alcune stazioni trasmettono informazioni sul tipo di programma del programma. Queste informazioni possono essere visualizzate
sulla radio della macchina.
Il programma può essere dei seguenti tipi, ad esempio:
39
-

40
AR4030BT-USB-CR_IM 05 .07.1 6
40
Italiano
SPORT NEWS POP CLASSICS
Usando la funzione PTY, è possibile selezionare stazio
ni specifiche di un determinato tipo di programma. I
tipi di programmi singoli sono divisi in due categorie:
Musica e discorsi. È possibile trovare un elenco di tipi
di programmi su pagina 44.
• Tenere premuto il tasto PTY / MUTE 1 volta per
attivare la funzione e selezionare la categoria
“Discorso”.
• Tenere premuto il tasto PTY / MUTE 2 volte per
selezionare la categoria “Musica”.
NOTA: Disattivare la funzione
Se si tiene premuto il tasto PTY / MUTE per una terza
volta, la funzione si disattiverà.
Poi, premere i tasti stazione 1 – 6 per effettuare la scelta
PTY. Il tipo di programma selezionato compare sul
display.
Se viene selezionato PTY, la radio inizia a cercare le
rispettive informazioni PTY e si ferma quando vengo
no trovate le informazioni PTY desiderate.
Se il tipo di programma desiderato non è trovato, il
messaggio “NO PTY” compare sul display.
Se le informazioni PTY non esistono più, la funzione
PTY passerà in automatico alla modalità normale.
4 Microfono
5 Display LCD (display a cristalli liquidi)
6 Fessura scheda SD
Inserire la memory card con l’etichetta rivolta a sinistra
nell’apertura dedicata, finché “scatta” in posizione. Nel
display compare la scritta CARD.
NOTA:
Per cercare / selezionare determinati track procedere
come descritto al punto 11 – 16.
Per rimuovere la scheda di memoria, premere di nuovo la
fine della scheda di memoria. Si sgancia con un “clic” e
può essere rimosso.
ATTENZIONE:
La semplice estrazione può danneggiare la fessura e / o
la scheda di memoria.
7 Collegamento USB
Se si desidera riprodurre dati da un supporto USB, infilarlo
nell’apertura prevista. Nel display compare la scritta USB.
I dati vengono riprodotti automaticamente.
NOTA:
• Collegare sempre un supporto di memoria USB
direttamente alla porta USB per evitare eventuali
malfunzionamenti.
NOTA:
• Ci sono molti metodi di compressione e diverse
-
-
qualità per penne USB.
Inoltre l’ industria della musica non fa uso di stan
dard ben definiti (protezione contro copie).
Per questo motivo riscontrerete problemi in rari casi
nella riproduzione di file MP3. Questo fatto non è
dovuto ad un funzionamento scorretto dell’appa
recchio.
• Per cercare / selezionare determinati track procedere
come descritto al punto 11 – 16.
• Tenete presente che: La connessione USB è
destinata solo alla riproduzione di supporti di archi
viazione e non per dispositivi esterni di caricamento.
Può essere fornito solo un alimentatore a bassa
tensione (100 mA). Questa connessione USB non
è adatta durante la giuda ad es. dischi fissi esterni
2,5“, che necessitano correnti fino a 1100 mA. Per la
riproduzione di smartphone, iPod o iPhone, usare la
presa AUX-IN, prevista a tale scopo.
8 Tasto Reset (ripristino)
Vedi sezione “Avvertenze per l’uso” a pagina 38.
9 Presa AUX
Per il collegamento di apparecchi analogici per la ripro
duzione. Grazie a questa boccola si può ricevere il tono
anche da altri apparecchi di riproduzione come MP3player, lettore cd ecc.
1. Collegare l’apparecchio esterno alla presa AUX con
un jack stereo di 3,5 mm.
2. Premere il tasto MODE /
pare “AUX IN”.
3. È possibile ascoltare la riproduzione dal dispositivo
esterno tramite gli altoparlanti. È possibile cambiare il
volume con il controllo volume.
4. Seguire poi le istruzioni d’uso dell’apparecchio
esterno.
NOTA:
Adeguare il volume dell‘apparecchio esterno.
10 Tasto AMS
Modalità radio
a) Premere per breve tempo il tasto per riprodurre le
stazioni salvate in modo sequenziale per ca. 5 secondi.
Premere la stazione desiderata per interrompere il
funzionamento e riprodurre la stazione radio.
b) Tenere premuto questo tasto per avviare la ricerca
automatica delle stazioni. Il processo di ricerca può im
piegare alcuni minuti. Le stazioni sono memorizzate in
base alla forza del segnale . Quindi, le stazioni salvate
sono riprodotte per breve tempo. Premere un tasto
stazione per interrompere il funzionamento.
(1) finché nel display com-
-
-
-
-
-

AR4030BT-USB-CR_IM 05 .07.1 6
Modalità USB / CARD:
Selezione diretta di un file musicale.
Premere il tasto AMS. Prima “TRKSCH” e poi “T−−−”
appariranno sul display. Ruotare il controllo volume e selezionare il “primo numero”. Dopo circa 3 secondi questo si
sposterà a sinistra. Inserire il numero successivo. Quando
appare il numero della traccia desiderata, confermare la
scelta premendo il tasto SEL.
NOTA: La traccia più alta selezionabile è “999“.
11 – 16 Tasto 6
Preimpostazioni di stazioni (1 − 6)
a) Modalità radio
b) Modalità USB / CARD:
17 Tasto
a) In modalità radio per selezionare una stazione radio.
b) In modalità USB / CARD:
+10, 5–10, 4RDM, 3RPT, 2INT, 1
• Tenere premuto il tasto preimpostato della stazione
desiderata per salvare la stazione radio.
• Per scegliere una stazione radio, premere per breve
tempo il relativo tasto della stazione.
• Per selezionare un tipo di programma.
„Tasto PTY / MUTE“
Selezione diretta di un file musicale. Pagina 40
„Tasto AMS“
Tasto 1
Premere il tasto per interrompere la riproduzione di
una traccia musicale (funzione di pausa). Per avviare
nuovamente la riproduzione, azionare nuovamente
questo pulsante.
Tasto 2
INT
Premere il tasto. “INT ON” appare rapidamente sul
display. Tutte le tracce saranno riprodotte in sequenza
per circa 10 secondi. Premere di nuovo il tasto per
impostara la normale velocità di riproduzione.
Tasto 3
RPT
Tutte le tracce musicali sono ripetute per impostazione predefinita. Premere il tasto per ripetere solo la
traccia corrente. “RPT” apparirà sul display.
Tasto 4
RDM
Premere il tasto. “RDM” apparirà sul display. Inizierà
la riproduzione casuale di tutte le tracce. Premere di
nuovo il tasto per impostara la riproduzione normale.
Tasto 5
–10 / 6+10
• Premere i tasti per saltare avanti o indietro di 10
tracce. E’ necessario che ci siano più di 10 tracce sul
supporto di memorizzazione.
• Premere e tenere premuti brevemente i tasti per selezionare la cartella precedente o quella successiva.
(Se ci sono cartelle sul supporto di memorizzazione)
Premere il tasto per selezionare il titolo musicale
successivo.
Pagina 39
Italiano
18 Tasto
a) In modalità radio per selezionare una stazione radio.
b) In modalità USB / CARD:
Premere il tasto per selezionare il titolo musicale
precedente.
19 Tasto
20 Tasto
CLK
Modalità radio
a) Mostra informazioni sul display (ID3 tag)
Premere ripetutamente il tasto per visualizzare le
seguenti informazioni in successione sul display:
Ora (sarà impostata automaticamente per la ricezione
RDS), frequenza della stazione radio attualmente
selezionata, tipo programma corrente (PTY), stazione
radio.
NOTA:
• Se non è disponibile nessuna informazione
corrispondente, sul display appare NO PTY.
• Se l’informazione sullo schermo è troppo lunga
appare un testo a scorrimento.
b) Impostare l’ora manualmente
L’ora sarà impostata automaticamente per la ricezione
RDS. Se questo non dovesse essere il caso, è possibile
impostare l’ora manualmente nel seguente modo:
1. Premere e tenere premuto il tasto
dell'ora iniziano a lampeggiare sul display.
2. Impostare le ore usando i tasti / .
3. Premere di nuovo il tasto CLK. Le cifre dei
minuti iniziano a lampeggiare.
4. Impostare i minuti usando i tasti / .
5. Premere il tasto CLK per confermare le
impostazioni. L'ora è impostata.
Modalità telefono:
Rifiutare una chiamata in arrivo, terminare una conversa
zione.
BAND
a) Modalità radio
Premere per breve tempo il tasto
selezionare le tre aree FM (VHF). Il nome del livello
corrispondente è visualizzato sul display LCD quando
è indicata la frequenza (vedere il tasto CLK).
b) Modalità telefono:
Accettare una chiamata in arrivo, chiamare il numero
composto.
c) Modalità USB / CARD:
Premere il tasto. La cartella sarà visualizzata sul display.
BAND per
41
CLK. Le cifre
Telefonare tramite Bluetooth
Il Bluetooth è una tecnologia per la connessione radio senza
fili su brevi distanze. La tecnologia Bluetooth permette l’utiliz
zo di telefoni cellulari senza mani. Il guidatore può sostenere
-
-

42
AR4030BT-USB-CR_IM 05 .07.1 6
42
Italiano
una conversazione con il suo telefono cellulare senza doverlo
tenere all’orecchio.
Quest’unità vi offre l’opzione di utilizzare un telefono cellulare
abilitato Bluetooth. La funzione radius è limitata a circa 3metri,
a seconda del dispositivo.
Per un’ottima qualità del suono durante una telefonata:
Non impostate il volume troppo alto. Se lo fate si può creare
una retroazione (fischio) dagli altoparlanti.
NOTA:
L’impostazione degli altoparlanti dipende dalle posizioni di
installazione dell’altoparlante rispetto al microfono e quindi
non può essere specificata.
Dispositivi di accoppiamento (PAIRING)
Prima di poter utilizzare l’autoradio per effettuare chiamate,
dovete accoppiare le unità.
1. Premere il tasto MODE
BT inizia a lampeggiare sul display. Questo indica che il
dispositivo è in modalità abbinamento.
2. Selezionate il menu Bluetooth nel vostro telefono cellulare e registrate l’autoradio sul vostro telefono cellulare.
Per far questo, fate riferimento al manuale dell’utente del
vostro telefono cellulare. Il dispositivo “AEG AR4030”
viene selezionato sul vostro telefono cellulare.
3. A seconda del produttore del dispositivo, del modello
e delle versioni del software, inserite ora la password
“0000” sul vostro telefono cellulare.
Se l’unità è stata registrata correttamente BT sarà visualizzato
sul display e MEDIA sarà indicato.
NOTA:
• A seconda del produttore del telefono cellulare, dovete
eseguire di nuovo il messaggio (PAIRING) per accoppiare il vostro telefono cellulare all’autoradio.
• La compatibilità Bluetooth non può essere garantita
per telefoni cellulari che potranno essere disponibili sul
mercato in futuro.
• Per garantire un’ottima connessione, assicuratevi che la
batteria del vostro telefono cellulare sia completamente
carica.
• Alcuni modelli di telefono cellulare hanno una modalità
di risparmio energia. Vi preghiamo di disattivare la mo
dalità di risparmio energia, altrimenti possono sorgere
problemi quando si telefona tramite Bluetooth.
• Per sostenere una conversazione in entrata o in uscita,
dovete tenere il Bluetooth attivato sul vostro telefono
cellulare. Vi preghiamo di fare riferimento al manuale
dell’utente del vostro telefono cellulare.
• Vi preghiamo di assicurarvi di parlare verso il microfono
integrato (4). Non può essere connesso un microfono
esterno.
per selezionare la modalità BT.
-
Disconnessione dei dispositivi
I dispositivi vengono disconnessi quando spegnete l’autora
dio tramite l’accensione dell’automobile o tramite l’unità.
Riconnessione dei dispositivi
Questa unità supporta la riconnessione automatica.
I requisiti sono:
• che i dispositivi siano già stati accoppiati
• che il Bluetooth sul vostro telefono cellulare sia attivato
• che il vostro telefono cellulare supporti questa funzione.
Dopo che l’autoradio è stata spenta e riaccesa tramite
l’accensione dell’automobile o dall’unità, viene attivata la
riconnessione automatica. Questa può richiedere alcuni
secondi.
Se è stata stabilita una connessione BT si accende sul display.
Richiamata
L’unità memorizza l’ultimo numero chiamato. Per accedere a
quest’ultimo, procedete come segue:
Premere e tenere premuto il tasto
apparirà sul display.
Termine della chiamata
Premere il tasto
ingresso. Sullo schermo appare END.
NOTA:
Premere il tasto
in arrivo.
Chiamata in entrata
Se ricevete una chiamata in entrata, la suoneria viene emessa
dagli altoparlanti e se chi chiama ha un telefono che suppor
ta CLIP “Calling Line Identification Presentation (Presentazio-
ne Identificazione Linea Connessa) (ID chiamante)”, il numero
di chi chiama appare sullo schermo dell’autoradio. Altrimenti
sullo schermo appare “0000”.
Per rispondere a una chiamata in entrata, premete il tasto
BAND. Potete sentire chi vi chiama tramite la cassa della
vostra automobile.
CLK per terminare chiamate in uscita o in
CLK anche per rifiutare una chiamata
BAND. CALLING
-
-
Riproduzione della musica tramite A2DP
(Advanced Audio Distribution Profile)
Questo implica un profilo Bluetooth compatibile tra produttori di diverse unità. I segnali audio stereo vengono trasmessi
senza fili tramite streaming tra l’unità di riproduzione (sorgente) e l’unità di ricezione. Per controllare la sorgente in remoto,
l’unità di riproduzione deve supportare il profilo AVRCP
“Audio Video Remote Control Profile” (Profilo di Controllo
Remoto Audio e Video).
Non può essere garantita una piena funzionalità a causa dei
diversi produttori di unità, di modelli e delle diverse versioni
del software.

AR4030BT-USB-CR_IM 05 .07.1 6
• Dopo aver connesso le unità tra di loro, iniziate la riproduzione della musica nel vostro telefono cellulare. “A2DP”
apparirà sul display.
• Utilizzate il tasto o per selezionare il brano
musicale precedente o successivo.
• Premere il tasto 1 per mettere in pausa la riproduzione
musicale (funzione pausa). “MEDIA” apparirà sul display.
Premere di nuovo il tasto per cancellare la funzione.
Pulizia
Consiglio di sicurezza
ATTENZIONE:
Possibile danno all’unità
Assicuratevi che non entri umidità nell’unità durante la
pulizia per evitare un danno irreparabile all’unità.
Pulizia
Pulite sempre l’alloggiamento con un panno leggermente
umido.
Risoluzione dei problemi
Questo capitolo contiene consigli importanti per identificare
guasti e la risoluzione dei problemi. Seguite le istruzioni per
prevenire pericoli e danni.
Consiglio di sicurezza
AVVISO:
Seguite le istruzioni di sicurezza riportate di seguito per
prevenire pericoli e danni alla proprietà:
• Le riparazioni dei dispositivi elettronici possono essere
effettuate solo da persone qualificate che sono state
addestrate dal produttore. Da riparazioni difettose
possono derivare rischi significativi per l’utente e danni
all’unità.
Cause di guasto e risoluzione dei problemi
Prima di spedire l’unità ai nostri servizi clienti, utilizzate la
seguente tabella per verificare se potete riparare voi stessi il
guasto.
Guasto Causa potenziale Soluzione
Non si può
accendere
l’unità.
Nessun suono Il volume è im
L’accensione non è
avviata.
postato al livello
minimo.
Il cavo non è
connesso corretta
mente.
Girate la chiave per
avviare l’accensione.
Aumentate il volume.
Controllate le con-
-
nessioni del cavo.
Italiano
Guasto Causa potenziale Soluzione
Il tasto
funzione non
funziona.
La radio e / o
la preimposta
zione automatica delle
stazioni non
funzionano.
La preimpo
stazione delle
stazioni non
funziona.
L’unità non
funziona sulla
porta USB.
La scheda di
memoria SD
non funziona.
Non si può
stabilire una
connessione
tramite
Bluetooth.
-
-
C’è un guasto
nell’unità.
Il cavo dell’antenna
non è connesso
correttamente.
I segnali del
trasmettitore sono
troppo deboli.
La connessione
4nella connessione
A ISO (positivo
permanente) non è
connessa correttamente.
La porta USB è progettata per dispositivi che funzionano
conformemente
allo standard USB.
Non tutti i dispositivi sul mercato sono
conformi a questo
standard. Può esse
re stato connesso
un dispositivo che
non funziona in
base allo standard
USB.
Il dispositivo non
sta leggendo la
scheda.
Il Bluetooth sul
vostro telefono
cellulare è spento.
Premete il tasto (8).
Controllate che l’antenna sia connessa
in maniera sicura.
Sintonizzate manual
mente le stazioni.
Controllate le
connessioni dei cavi.
Per far questo, fate
riferimento al capitolo “Connessioni”.
Connettete un
dispositivo che
funzioni conformemente allo standard
USB. Assicuratevi
che il dispositivo di
memorizzazione dati
sia formattato con il
-
sistema file FAT32.
Controllate la
scheda. Assicuratevi
che il dispositivo di
memorizzazione dati
sia formattato con il
sistema file FAT32.
Attivate il Bluetooth
sul vostro telefono
cellulare.
43
-
Dati tecnici
Modello: ......................................................... AR 4030 BT/USB/CR
Generalità
Tensione di rete .......................................DC 12 V (terra negativo)
Consumo energetico .........................................................5 A Max.
Potenza ...................................................................4 x 40 W (PMPO)
Formati file riproducibili ...............................................MP3, WMA
Peso netto ......................................................................... ca. 0,45 kg
Dimensioni dell’alloggiamento
(Installazione) .....................................................182 L x 52 H x 110 P

44
AR4030BT-USB-CR_IM 05 .07.1 6
44
Italiano
Ambito FM
Ambito di frequenza ..................................87,5 MHz ~ 108,0 MHz
Sensibilità utile .......................................................................... 10 dB
Frequenza I.F. ..................................................................... 10,7 MHz
Bluetooth
Supporto Bluetooth ...................................................................V 2.0
Gamma ............................................................................. ca. 8 metri
Frequenza di trasmissione ................................2,402 − 2,480 GHz
Protocolli ....................................................................A2DP / AVRCP
Si riserva il diritto di apportare modifiche tecniche e di design
nel corso dello sviluppo del prodotto.
Questo dispositivo risponde a tutte le direttive della CE,
come la direttiva sulla compatibilità elettromagnetica e
quella sul basso voltaggio ed è prodotto secondo le più
recenti norme di sicurezza.
PTY – Tipi di programma
Smaltimento
Significato del simbolo “Cassonetto con ruote”
Rispettare l’ambiente, non smaltire dispositivi
elettrici nei rifiuti domestici.
Lo smaltimento di dispositivi obsoleti o difettosi
deve avvenire tramite consegna presso punti di
raccolta locali.
Aiutate ad evitare pericoli potenziali per l’ambiente e la
nostra salute tramite uno smaltimento non corretto.
Voi contribuite al riciclaggio e altro forme di utilizzo di dispo
sitivi elettrici e elettronici.
Il vostro comune è in grado di fornirvi informazioni sui punti
di raccolta.
-
Tasti stazione
1
2
3
4
5
6
PTY della categoria
“Discorso”
NEWS
AFFAIRS
INFO
SPORT
EDUCATION
DRAMA
CULTURE
SCIENCE
VARIED
WEATHER
FINANCE
CHILDREN
SOCIAL
RELIGION
PHONE IN
TRAVEL
LEISURE
DOCUMENT
Tasti stazione
1
2
3
4
5
6 FOLK M
PTY della categoria
“Musica”
POP M
ROCK M
LIGHT M
EASY M
CLASSIC
OTHER M
COUNTRY
JAZZ
NATIONAL M
OLDIES

AR4030BT-USB-CR_IM 05 .07.1 6
Elenco tematico - Indice
A
Accensione ......................................................................................38
Allacciamento .................................................................................38
Avvertenze di sicurezza .................................................................36
Avvertenze per l’uso ......................................................................38
C
Collegamento USB ........................................................................40
Consigli per l’installazione ............................................................36
D
Dati tecnici .......................................................................................43
Disattivare l’audio ...........................................................................39
F
Fessura scheda SD .........................................................................40
Frequenze Alternative (AF) ...........................................................39
Funzionamento ...............................................................................38
Funzioni di riproduzione ...............................................................41
I
Importanti informazioni aggiuntive per il montaggio ............36
Impostare il volume .......................................................................38
Impostazioni (Tasto SEL) ...............................................................38
Installazione .....................................................................................37
M
Montaggio (avvertenze di sicurezza) ..........................................36
Italiano
O
Ora ....................................................................................................41
P
Presa AUX ........................................................................................40
Programmi regionali ......................................................................39
PTY – Tipi di programma ..............................................................44
Pulizia ................................................................................................43
R
Riproduzione della musica tramite A2DP .................................42
Risoluzione dei problemi ..............................................................43
S
Servizio Traffico della Radio (TA)..................................................39
Sicurezza della circolazione ..........................................................36
Spegnere .........................................................................................38
T
Tasti
/ .................................................................................41
Tasto AMS ........................................................................................40
Tasto BAND .....................................................................................41
Tasto MODE ....................................................................................38
Tasto MUTE (silenzioso) ................................................................39
Tasto Play / Pause ( ) ..................................................................41
Tasto PTY / MUTE ............................................................................39
Tasto SEL ..........................................................................................38
Telefonare tramite Bluetooth .......................................................41
45

46
AR4030BT-USB-CR_IM 05 .07.1 6
46
English
Instruction Manual
Thank you for choosing our product. We hope you will enjoy
using the appliance.
Symbols in these Instructions for Use
Important information for your safety is specially marked. It is
essential to comply with these instructions in order to avoid
accidents and prevent damage to the machine:
WARNING:
Warns of dangers for your health and indicates potential
risks of injury.
CAUTION:
Indicates potential dangers for the device or other objects.
NOTE: Highlights tips and information for you.
WARNING:
• Please remember that at a speed of 30 mph (50 kph)
you travel 15 yards (14 metres) in one second.
• We advise you not to operate the radio in critical
situations.
• It must be possible to hear the sirens of police and fire
brigade vehicles etc. from inside the vehicle in good
time.
• When driving you should therefore not turn the radio
volume up excessively.
• In order to avoid serious road accidents, the device
should be installed in such a way that you are not
hindered when operating the steering wheel, gear
lever etc.
• Similarly, safety aspects such as airbags and your clear
view of the road must not be obstructed either.
Safety Information
Before using this device, carefully read this user manual and
keep it together with the Warranty Certificate, cashier receipt
and if possible, the original package inclusive its interior
packing. If you hand on the device to any third person,
include the user manual as well.
• Use the device only for the intended purpose.
• The device should be installed in such a way that existing
ventilation holes are not covered.
• Never open the housing of the device. Incorrect repairs
can constitute a considerable risk for the user. If the
device is damaged it should not be used, but repaired by
a specialist.
These symbols may be found on the machine and are in
tended to indicate the following:
The lightning symbol should advise the user of
parts in the inside of the device which carry dangerously high voltage levels.
Children and Frail Individuals
In order to ensure your children’s safety, please keep all
packaging (plastic bags, boxes, polystyrene etc.) out of their
reach.
WARNING:
Do not allow small children to play with the foil. There is a
danger of suffocation!
-
Road Safety
WARNING:
• Road safety is of paramount importance. You should
therefore use your car radio at all times in such a
way that you are able to cope with the current traffic
situation.
Safety Notes for the Time of Assembly /
Connection
• First disconnect the minus pole and then the plus pole of
the battery. (Connection in the reverse order.)
Please note: Once the battery has been disconnected
the information is lost from all volatile memory. Please
note the safety information provided by the vehicle
manufacturer.
• The main fuse must be installed as closely as possible (not
more than 30 cm away) to the plus pole of the battery so
that the car is protected from any cable fire caused, for
example, by an accident. If the above is not complied
with the insurance protection no longer applies.
• The cross-section of the plus and minus cable must not
exceed 1.5 mm².
Installation Tip:
• Cable protection sleeves protect cables against fraying on
sharp body parts.
• The insulation of the cables must not be damaged during
installation.
• It is essential to use the correct tools when installing car
hi-fi.
Depending on the model, your vehicle may deviate from the
above description. We do not accept any liability for damage
caused by installation or connection errors or for consequen
tial damage.
Important Additional Information for
Installing your Carradio!
1. The device is designed for the minus pole of the battery,
which must be connected to the body of the vehicle.
Please check this before installation.
-

AR4030BT-USB-CR_IM 05 .07.1 6
2. When installing/connecting your device please note that
not every vehicle is equipped with an “ISO connection”.
In this case we recommend the use of an ISO adapter
specifically designed for your vehicle.
Adapters are available from car accessory shops and / or
from your vehicle workshop.
3. Depending on the specific car type, different wiring
connection of the “Duration +” wire (Constant current
connection) are available. (However, this is necessary for
storing the radio stations).
In order to guarantee all functions, installation in line with
these instructions is essential. In cases of doubt please
contact an authorised car workshop.
Due to the various types of motor vehicles and motor
manufacturers, it is not possible to guarantee that the pin
assignment of the ISO plug is correct, even if the ISO plug
connections fit together mechanically. It may therefore
be necessary to modify the electrical connection or use
vehicle-specific adapters.
NOTE:
If the device is correctly connected, the radio can be
switched on and off via the ignition. If the stored stations
are lost, this indicates that the radio is not receiving any
“continuous +”, current which is required for storing the
stations.
CAUTION:
Where there is a connection to “continuous +” without
the ignition being switched on, the car battery might be
drained of power even if the radio is switched off. This
may even result in the battery becoming completely flat.
4. Depending on the specific car type, interferences may
arise during operation. These interferences can avoided
easily with an additional Interferences filter. Your car
radio is originally prepared with an Interference Filter
already.
In these case, please contact your authorized car dealer.
5. When installing your radio please ensure that there is
enough space at the rear of the radio to ensure sufficient
cooling.
6. For the antenna connection there are two different norms.
The first of these is the old (50 ohm) version with a long
protruding round contact on the vehicle and a round
socket on the radio end. The second is the ISO-standardised antenna plug (150 ohm). Adapters for both formats
are available from accessory manufacturers and / or your
car workshop.
English
NOTE:
Important information for VW / Audi vehicles: Your car
may have an active antenna. It requires a power supply
as it is provided only by original car radios. In this case,
use a phantom-powered antenna adapter.
Antenna adapters are available at car accessory suppli
ers and / or your automotive workshop.
Installation
Please install the car radio as shown below.
a Slide-in housing
b Extraction tool (spanner for dismantling)
47
-

48
AR4030BT-USB-CR_IM 05 .07.1 6
48
English
Connection
CAUTION: Connection of an External Amplifier
• Please use loudspeakers with an impedance of 4 ohm. For connection of an external amplifier, use the audio cinch
• The loudspeaker cables must be unearthed.
Connect the device as shown in the diagram:
outputs LINE OUTPUT on the rear panel of the unit. Refer to
the instruction manual concerning the external amplifier.
Operating Instructions
1. Do not switch on the device if the car interior is extremely
hot, for example after an extended parking in direct
sunlight. Wait until the interior is cooled down after a
short drive.
2. Possible malfunctions during operation can be resolved
by pushing the RESET button. Push the RESET button
with a wire or similar (8) to reset the electronics (RESET).
3. The time displayed in standby mode is set automatically
as soon as you listen to a radio station.
Operation
In the following, the functions of the individual device buttons
are described according to the illustration
“Overview of the Components”.
1 MODE (On / Off) – Button
a) Press this button to turn on the unit. The notification
“WELCOME” will appear briefly on the display.
Press and hold the button to switch off the unit. The
notification “GOODBYE” will appear briefly on the
display.
b) Press this button to select the different modes. (Radio,
BT, USB, CARD and AUX IN)
NOTE:
The USB and CARD mode can only be selected if
you have connected a corresponding medium.
2
Multicontrol / SEL – Button (Volume / Select)
a) During normal playback mode, the control is used to
control the volume.
Together with the previously pressed control (SEL
button), changes can be made in the menu, e. g. the
sound mode.
b) Press the SEL button shortly to enter the selection
menu. Repeated pressing of the SEL button selects
individual menu entries. You can change the settings
of the individual menu entries by turning the volume
control.
BAS (Bass)
TRE (Treble)
BAL (Balance)
FAD (Fader)
BEEP (Sound heard when a button is pressed)
• BEEP ON: A beep sounds whenever a button is
• BEEP OFF: No beep.
pressed.

AR4030BT-USB-CR_IM 05 .07.1 6
LOUD (Loudness)
The bass is amplified when the Loudness function is
activated.
• LOUD OFF: Loudness function is deactivated.
• LOUD ON: Loudness function is activated.
EQ (Equalizer / Digital Sound Processing) : EQ OFF,
FLAT, POP, ROCK, CLASS
VOL LAS / ADJ (switch-on volume)
• VOL LAS: The unit turns on with the previously set
• VOL ADJ: Here, you can set a fixed volume, with
CLK (time display format)
Select between the 24 or 12 hour display.
NOTE:
If 12 hour display is selected, the following is displayed:
DX / LOC (Switches between local and more distant
stations)
• DX: Receive other more distant stations.
• LOC: Receive local stations.
STEREO / MONO (Switch between Stereo and Mono)
VOL (Volume)
More Settings via the Multicontrol
• Keep the multicontrol pressed for a few seconds to
access more settings options. Press the multicontrol
each time to select the next option.
• Turn the multicontrol to adjust the displayed setting.
The following settings are available:
AF ON / AF OFF
AF (Alternative Frequencies) is a function working with
RDS (Radio Data System) and can only be used with
FM stations. In the background, the device searches
the best frequency for the selected station.
• ON: If a certain broadcast station has bad recep
• OFF: The function is deactivated.
TA OFF / TA ON (Traffic announcement settings)
TA OFF / ON (Radio traffic service / „Traffic Announce-
ment“)
• OFF: The function is deactivated.
• ON: TA is displayed if this function is activated.
volume level.
which the unit should switch on (A –
VOL).
AM = morning, PM = afternoon.
tion, the device switches automatically to a
broadcast station broadcasting the same
program via the same RDS broadcast chain.
In the TA mode, once a traffic message is received, the unit switches to the radio station
from a different mode (e. g. USB mode). The
volume level is adjusted to the figure set in
the menu for transmitting traffic information.
The notification “TRAFFIC” will appear on
the display.
TA VOL (Traffic information volume)
REG OFF / REG ON
At certain times, some stations are segmenting their
programs in regional programs with different content.
• ON: Only the regional programs of the radio
station will be played, or suggested as pref
erences when tuning to a selected station.
• OFF:
Play nationwide programs as well.
NOTE:
When the feature is enabled, the radio station
may no longer be received without interference in
peripheral areas.
EON ON / OFF
The unit can receive RDS EON data. EON means the
transmission of additional station information within a
station group. In the event of a traffic announcement
(TA) it will switch within a station group from a non-traffic broadcast to the corresponding traffic radio station
of the station group.
• ON: The unit attempts to receive the EON TA
information from a station within range and
thus to improve the reception quality.
• OFF: Prevents switching over to a station with too
weak a signal level.
NOTE:
The icon “TP” on the display signals that the station
transmits traffic messages. Either directly or through
a linked transmitter (EON).
3 PTY / MUTE – Button
a) Press the button to switch the unit to mute.
Press the button again to deactivate the function.
b) Radio operation:
PTY Selecting the program type
-
Besides the station name, some stations broadcast
information about the program type of your program.
This information can be displayed on your car radio.
The program can be of the following types, for
example:
SPORT NEWS POP CLASSICS
Using the PTY function, you can select specific stations
of a certain program type. The individual program
types are divided into two categories: Music and
Speech. You can find a list of program types on page
54.
• Hold down the PTY / MUTE button 1 x to switch on
the function and to select the category “Speech”.
• Hold down the PTY / MUTE button 2 x to select
category “Music”.
English
49
-

50
AR4030BT-USB-CR_IM 05 .07.1 6
50
English
NOTE: Switch off the function
If you hold down the PTY / MUTE button for a third
time, the function will be switched off.
Then, press station buttons 1 – 6 to make the PTY
choice. The selected program type appears in the
display.
If PTY is selected, the radio starts to search for respec
tive PTY information and stops when the desired PTY
information is found.
If the desired program type is not found, the message
“NO PTY” appears on the display.
If the PTY information does not exist anymore, the PTY
function will automatically switch to normal mode.
4 Microphone
5 LCD (liquid crystal display)
6 SD Card Slot
Insert the memory card with the label to the left into the
opening provided for this purpose, until it “clicks” into
place. The word CARD appears in the display.
The data are automatically played back.
NOTE:
In order to search for/select certain tracks proceed as
described under section 11 – 16.
To remove the memory card, press again onto the end of
the memory card. It unlatches with a “click“ and can be
removed.
CAUTION:
Simple pulling out can damage the slot and/or the
memory card.
7 USB Connection
If you would like to play back data contained on a USB
stick, please insert the stick into the opening provided. e
word USB appears in the display.
The data is played back automatically.
NOTE:
• Always directly connect a USB storage medium to
the USB port to prevent any malfunctions.
• There is a huge variety of compression methods as
well as quality differences for USB sticks.
Furthermore, the music industry does not adhere to
fixed standards (copy protection).
For that reason you might experience problems in
some rare cases when playing back MP3 files. This is
not a malfunction of the device.
• In order to search for / select certain tracks proceed
as described under section 11 – 16.
NOTE:
• Please note: The USB connection is only designed
for playing back storage media and not for charging
external devices. Only a low power (100 mA) supply
can be provided. This USB connection is not
designed for driving e. g. external 2.5“ hard discs,
-
needing starting currents of up to 1100 mA. For
playing back your smartphone, iPod or iPhone, use
the AUX-IN socket, intended for that purpose.
8 Reset – Button (reset)
See section “Operating Instructions” on page 48.
9 AUX Socket
To connect analogue replay devices. Using this socket it is
possible to hear the sound of other playback devices such
as MP3 players, CD players etc. through the loudspeaker.
1. Please connect the external device with a 3.5 mm
stereo jack plug to the AUX socket.
2. Press the MODE /
IN” appears in the display.
3. You hear the playback from the external device via the
loudspeakers. You can change the volume with the
volume control.
4. For the remaining procedure please see the operating
instructions of the external sound source.
NOTE:
Adjust the volume of the external device to a comfort
able level.
10 AMS – Button
Radio operation:
a) Press the button shortly to play the saved stations
sequentially for approx. 5 seconds. Press the desired
station to quit the operation and to play the radio
station.
b) Hold down this button to start the automatic station
scanning. The search process can take some minutes.
The stations are stored according to signal strength.
Then, the saved stations are played for a short time.
Press a station button to quit the operation.
USB / CARD mode:
Direct selection of a music file.
Press the AMS button. First „TRKSCH“ and then „T−−−“
will appear on the display. Turn the volume control and
select the “first number”. After approx. 3 seconds, this will
move to the left. Enter the next number. When the desired
track number appears, confirm your selection by pressing
the SEL button.
NOTE: The maximum track selection is “999“.
button (1) repeatedly until “AUX
-

AR4030BT-USB-CR_IM 05 .07.1 6
11 – 16 Button 6+10, 5–10, 4RDM, 3RPT, 2INT, 1
Station Buttons (1 − 6)
a) Radio operation:
• Hold down the desired station preset button to
save a radio station.
• To choose a radio station, shortly press the respec
tive station button.
• To select a program type
Button“
b) USB / CARD mode:
Direct selection of a music file. Page 50 „AMS
Button“
Button 1
Press the button to interrupt the playback of a music
title (pause function). Press this button again to continue the playback.
Button 2
INT
Press the button. “INT ON” appears briefly on the
display. All tracks will be played in succession for
approx. 10 seconds. Press the button again to set the
normal playback speed.
Button 3
RPT
All music tracks are repeated by default. Press the
button to repeat the current track only. “RPT” will
appear on the display.
Button 4
RDM
Press the button. “RDM” will appear on the display.
A random playback of all tracks will start. Press the
button again to set the normal playback.
Button 5
–10 / 6+10
• Press the buttons to jump 10 tracks backward or
forward. It is required that over 10 tracks be available on the storage medium.
• Press and hold the button briefly to select the
previous or the next folder. (If there are folders on
the storage medium)
17 – Button
a) In radio mode to choose a radio station.
b) In USB / CARD mode:
Press the button to choose the next music title.
18
– Button
a) In radio mode to choose a radio station.
b) In USB / CARD mode:
Press the button to choose the previous music title.
19
CLK – Button
Radio operation:
a) Show the display information (ID3 tag)
Press the button repeatedly to display the following
information successively on the display:
Page 49 „PTY / MUTE
English
Time (will be set automatically for RDS reception),
frequency of the currently selected radio station,
current program type (PTY), radio station.
NOTE:
• If no corresponding information is available, NO
-
20
Phoning via Bluetooth
Bluetooth is a technology for wireless radio connection of
devices over short distances. Bluetooth technology enables
hands-free use of mobile phones. The driver can hold a
conversation via his mobile phone without having to hold it
to his ear.
This unit offers you the option of using a Bluetooth-enabled
mobile phone. The function radius is limited to around 3
metres depending on the device.
For optimum sound quality during a telephone call:
Do not set the volume too high. Doing so may lead to
feedback (whistling) from the speakers.
PTY is shown on the display.
• If the information on the display is too long it is
shown as scrolling text.
b) Set time manually
The time will be set automatically for RDS reception.
Should this not be the case, you may set the time
manually as follows:
1. Press and hold the
start flashing on the display.
2. Set hours using the / buttons.
3. Press the CLK button again. The minute digits
start flashing.
4. Set minutes using the / buttons.
5.
Press the
The time is set.
Telephone operation:
Reject incoming call, end a conversation.
BAND – Button
a) Radio operation:
Shortly press the
the three FM (VHF) areas. The name of the corresponding level is shown in the LCD display when the
frequency is indicated (see CLK button).
b) Telephone operation:
Accept an incoming call, call the number dialed.
c) USB / CARD mode:
Press the button. The folder will be shown in the
display.
NOTE:
The speaker setting depends on the installation positions
of the speaker to the microphone and therefore cannot be
specified.
CLK button. The hour digits
CLK
button to confirm your settings.
BAND button to switch between
51

52
AR4030BT-USB-CR_IM 05 .07.1 6
52
English
Pairing Devices (PAIRING)
Before you can use the car radio to make phone calls, you
must pair the units.
1. Press the MODE
starts flashing on the display. This indicates that the
device is in pairing mode.
2. Select the Bluetooth menu in your mobile phone and
register the car radio in your mobile phone. To do so, re
fer to the user manual of your mobile phone. The device
”AEG AR4030“ is selected on your mobile phone.
3. Depending on the device manufacturer, model and
software versions, now enter the password “0000“ in your
mobile phone.
If the unit has been logged in successfully, BT will be shown
in the display, and MEDIA will be indicated.
NOTE:
• Depending on the mobile phone manufacturer, you
must execute the (PAIRING) message again to pair your
mobile telephone to the car radio.
• Bluetooth compatibility cannot be guaranteed for
mobile phones which may be available on the market
in future.
• To guarantee an optimum connection, make sure that
the battery of your mobile phone is fully charged.
• Some makes of mobile phone have a power saving
mode. Please deactivate power saving mode since otherwise problems may arise when phoning via Bluetooth.
• To conduct an incoming or outgoing conversation, you
must keep Bluetooth activated on your mobile phone.
Please refer to the user manual of your mobile phone.
• Please make sure that you speak towards the integrated
microphone (4). An external microphone cannot be
connected.
Disconnecting the Devices
The devices are disconnected when you switch off the car
radio via the ignition or on the unit.
Reconnecting the Devices
This unit supports automatic reconnection.
Requirements are:
• the devices have already been paired
• Bluetooth is activated in your mobile telephone
• your mobile telephone supports this function.
After the car radio has been switched off and switched on
again via the ignition or on the unit, automatic reconnection
is activated.
If a connection has been established, BT will light up on the
display.
Redial
The unit stores the last dialed number. To access this, pro
ceed as follows:
button to select the BT mode. BT
-
Press and hold the BAND button. CALLING will appear
on the display.
End Call
Press the
END is shown on the display.
Press the
Incoming Call
If you receive an incoming call, the ring tone sounds from
the speakers and if the caller has a CLIP “Calling Line
Identification Presentation (Caller ID)“ capable phone, the
caller number appears on the car radio display. Otherwise,
“0000“ appears on the display.
To answer an incoming call, press the
can hear the caller via the loudspeaker in your car.
CLK button to end outgoing or incoming calls.
NOTE:
CLK button also to reject an incoming call.
BAND button. You
Music Playback via A2DP
(Advanced Audio Distribution Profile)
This involves a cross-manufacturer Bluetooth profile.
Stereo-audio signals are transmitted wireless via streaming
between the playback unit (source) and receiver unit. To
control the source remotely, the playback unit must support
the AVRCP profile (Audio Video Remote Control Profile).
Full functionality cannot be guaranteed due to the different
unit manufacturers, models and software versions.
• After you have connected the units to each other, start
playing the music in your mobile phone. “A2DP” will
appear on the display.
• Use the button
music title.
• Press the 1 button to pause the music playback (pause
feature). “MEDIA” will appear on the display. Press the
button again to cancel the feature.
or to select the next or previous
Cleaning
Safety Advice
CAUTION:
Possible damage to the unit
Ensure that no moisture gets into the unit during cleaning
to prevent irreparable damage to the unit.
Cleaning
Always clean the housing with a slightly damp cloth.
Troubleshooting
This chapter contains important advice on identifying faults
and troubleshooting. Follow the instructions to prevent
hazards and damage.

AR4030BT-USB-CR_IM 05 .07.1 6
Safety advice
WARNING:
Follow the safety instructions below to prevent hazards and
damage to property:
• Repairs to electrical devices may only be carried out
by qualified persons who have been trained by the
manufacturer. Significant risks for the user and damage
to the unit may arise from faulty repairs.
Fault Causes and Troubleshooting
Before sending the unit to our customer services, use the
following table to check whether you can repair the fault
yourself.
Fault Potential Cause Solution
Cannot switch
on the unit.
No sound The volume is set at
Function
button does
not work.
Radio and / or
the automatic
station preset
does not work
Manually tune
the stations.
Unit does not
work on the
USB port.
The ignition is not
turned on.
the minimum level.
The cable is not
connected properly.
There is a fault on
the unit.
The antenna cable
is not connected
properly
The transmitter
signals are too
weak
Connection 4 in the
ISO connection A
(permanent posi
tive) is not properly
connected.
The USB port
is designed for
devices which work
according to the
USB standard. Not
all devices on the
market conform
to this standard. A
device which does
not function according to the USB
standard may have
been connected.
-
Turn the key to start
the ignition.
Increase the volume.
Check the cable
connections.
Press the RESET
button (8).
Check that the
antenna is connect
ed securely.
Manually tune the
stations.
Check the cable
connections. To
do so, refer to the
“Connection“
chapter
Connect a device
which works
according to the
USB standard.
Ensure that the data
storage device is
formatted with the
FAT32 file system.
English
Fault Potential Cause Solution
SD memory
card does not
work.
A connection
cannot be
established
via Bluetooth.
Technical Data
Model: ............................................................ AR 4030 BT/USB/CR
General
Supply voltage .................................... DC 12 V (negative ground)
Power consumption............................................................5 A Max.
Power ......................................................................4 x 40 W (PMPO)
Playable file formats ......................................................MP3, WMA
Net weight ............................................................... approx. 0.45 kg
Housing dimensions (Installation) .............. 182 W x 52 H x 110 D
FM Band
Frequency range ........................................87.5 MHz ~ 108.0 MHz
Effective sensitivity ...................................................................10 dB
-
I.F. frequency ...................................................................... 10.7 MHz
Bluetooth
Bluetooth support ......................................................................V 2.0
Range .....................................................................approx. 8 metres
Transmission frequency .....................................2.402 − 2.480 GHz
Protocols ....................................................................A2DP / AVRCP
The right to make technical and design modifications in
the course of continuous product development remains
reserved.
This device complies with all current CE directives, such as
electromagnetic compatibility and low voltage directive and
is manufactured according to the latest safety regulations.
Disposal
Meaning of the “Wheelie Bin” Symbol
and health impacts through improper waste disposal.
You contribute to recycling and other forms of utilization of
old electric and electronic appliances.
Your municipality provides you with information about col
lecting points.
The device is not
reading the card.
Bluetooth is turned
off on your mobile
phone.
Take care of our environment, do not dispose of
electrical appliances via the household waste.
Dispose of obsolete or defective electrical
appliances via municipal collection points.
Please help to avoid potential environmental
Check the card.
Ensure that the data
storage device is
formatted with the
FAT32 file system.
Activate Bluetooth
in your mobile
phone.
53
-

54
AR4030BT-USB-CR_IM 05 .07.1 6
54
English
PTY – Program Types
Station Buttons
1
2
3
4
5
6
PTY of the Category
“Speech”
NEWS
AFFAIRS
INFO
SPORT
EDUCATION
DRAMA
CULTURE
SCIENCE
VARIED
WEATHER
FINANCE
CHILDREN
SOCIAL
RELIGION
PHONE IN
TRAVEL
LEISURE
DOCUMENT
Station Buttons
1
2
3
4
5
6 FOLK M
PTY of the Category
“Music”
POP M
ROCK M
LIGHT M
EASY M
CLASSIC
OTHER M
COUNTRY
JAZZ
NATIONAL M
OLDIES

AR4030BT-USB-CR_IM 05 .07.1 6
Index
A
Adjust the volume ..........................................................................48
Alternative Frequencies (AF) ........................................................49
AMS button .....................................................................................50
AUX Socket......................................................................................50
B
BAND button ..................................................................................51
C
Cleaning ...........................................................................................52
Connection ......................................................................................48
English
P
Phoning via Bluetooth ...................................................................51
Play / Pause (
Playback features ............................................................................51
PTY – Program Types .....................................................................54
PTY / MUTE button ......................................................................... 49
/ buttons ...........................................................................51
Radio Traffic Service (TA) ...............................................................49
Regional programmes ..................................................................49
Road Safety .....................................................................................46
) .............................................................................51
R
55
I
Important Additional Information for Installing .......................46
Installation ........................................................................................47
Installation (Safety Information) ...................................................46
Installation Tips ...............................................................................46
M
MODE button .................................................................................48
Music Playback via A2DP ..............................................................52
MUTE button (mute) ......................................................................49
Muting ..............................................................................................49
O
Operating Instructions ..................................................................48
Operation ........................................................................................48
S
Safety Information ..........................................................................46
SD Card Slot ....................................................................................50
SEL button .......................................................................................48
Settings (SEL button) .....................................................................48
Switching off ....................................................................................48
Switching on ....................................................................................48
T
Technical Data .................................................................................53
Time ..................................................................................................51
Troubleshooting .............................................................................52
U
USB Connection .............................................................................50

56
AR4030BT-USB-CR_IM 05 .07.1 6
56
Język polski
Instrukcja obsługi
Dziękujemy za wybór naszego produktu. Mamy nadzieję, że
korzystanie z urządzenia sprawi Państwu radość.
Symbole użyte w tej instrukcji obsługi
Ważne informacje dotyczące bezpieczeństwa użytkownika są
specjalnie wyróżnione. Koniecznie stosuj się do tych wskazó
wek, aby uniknąć wypadków i uszkodzenia urządzenia:
OSTRZEŻENIE:
Niebezpieczeństwo dla zdrowia oraz potencjalne ryzyko
obrażeń ciała.
UWAGA:
Oznacza potencjalne zagrożenie urządzenia lub innych
obiektów.
WSKAZÓWKA:
Podświetlone wskazówki oraz informacje.
-
Wskazówki bezpieczeństwa
Przed użyciem urządzenia, należy dokładnie przeczytać
podręcznik użytkowania i zachować go wraz z gwarancją,
paragonem oraz w razie możliwości wraz z oryginalnym
opakowaniem zawierającym wewnętrzne elementy. W razie
przekazania urządzenia osobom trzecim, należy dołączyć
podręcznik użytkowania.
• Urządzenie należy używać tylko zgodnie z jego przezna
czeniem.
• Urządzenie wbudować uważając, aby nie zasłonić otworów wentylacyjnych.
• Nigdy nie wolno otwierać obudowy urządzenia. Niefachowo przeprowadzone naprawy mogą być groźne w
skutkach dla użytkownika. Nie włączać uszkodzonego
urządzenia, jedynie przekazać go fachowcowi do
naprawy.
Poniższe symbole mogą znajdować się na urządzeniu i mają
zwracać Państwa uwagę na:
Symbol błyskawicy ma zwrócić uwagę użytkownika
na znajdujące się we wnętrzu urządzenia części,
które są pod niebezpiecznie wysokim napięciem.
Dzieci i osoby niepełnosprawne
Dla bezpieczeństwa dzieci proszę nie zostawiać swobodnie
dostępnych części opakowania (torby plastikowe, kartony,
styropian itp.).
OSTRZEŻENIE:
Nie pozwalaj dzieciom bawić się folią. Niebezpieczeństwo
uduszenia!
-
Bezpieczeństwo ruchu drogowego
OSTRZEŻENIE:
• Bezpieczeństwo ruchu drogowego jest najważniejszym
przykazaniem. Dlatego też z odbiornika
samochodowego należy korzystać tak, aby w pełni
panować nad aktualnymi sytuacjami drogowymi.
• Należy pamiętać o tym, że przy prędkości jazdy
50 km/h w ciągu sekundy pojazd pokonuje 14 m.
• W krytycznych sytuacjach odradzamy obsługę radia.
• Wskazówki bezpieczeństwa np. policji lub straży
pożarnej muszą być w pojeździe odbierane
niezwłocznie i świadomie.
• Słuchania wybranego programu należy podczas jazdy
dokonywać wyłącznie z odpowiednim nastawienia
głośności.
• Aby uniknąć poważnych wypadków drogowych,
urządzenie należy zainstalować w taki sposób, aby nie
przeszkadzało w korzystaniu z kierownicy, przekładni
biegów i innych elementów wyposażenia pojazdu.
• Należy również pamiętać o tym, że instalacja urządzenia
nie może wpływać na elementy zabezpieczające, na
przykład poduszki powietrzne, ani zakłócać widoczności.
Środki ostrożności dotyczące
czasu montażu / połączeń
• Od baterii odłączać najpierw biegun ujemny, a następnie
dodatni. (Podłączać w odwrotnym kierunku.)
Uwaga: Przy odłączonej baterii następuje wygaszenie
wszystkich informacji niestałej pamięci. Należy postępować wg wskazówek bezpieczeństwa producenta pojazdu.
• Bezpiecznik główny musi być zainstalowany możliwie
blisko (maks. 30 cm) bieguna dodatniego baterii w celu
zabezpieczenia samochodu przed ewentualnym pożarem
kabla spowodowanym np. wypadkiem. Postępowanie
niezgodne z powyższym powoduje wygaszenie gwarancji.
• Średnica kabli Plus i Minus nie może być mniejsza od
1,5 mm².
Porady instalacyjne:
• Tulejki ochrony kabla zabezpieczają kabel przed przecie
ra-niem na ostrych częściach karoserii.
• Izolacja kabla nie może być uszkodzona podczas instalacji.
• Podczas instalacji Car-HiFi niezbędne są właściwe
narzędzia.
W zależności od rodzaju budowy pojazdu możliwe są
odchyłki od niniejszego opisu. Nie przejmujemy żadnej
odpowiedzialności za uszkodzenia spowodowane błędnym
wbudowaniem i podłączeniem oraz za uszkodzenia będące
rezultatem powyższego.
-

AR4030BT-USB-CR_IM 05 .07.1 6
Ważne informacje dodatkowe, dotyczące
instalacji Waszego radioodbiornika samochodowego!
1. Urządzenie dostosowane jest do podłączenia do ujemnego bieguna akumulatora, który musi być podłączony
do karoserii pojazdu. Prosimy o sprawdzenie tego przez
instalacją.
2. Podczas instalacji / podłączania odbiornika zwróci uwagę
na fakt, że nie każdy pojazd wyposażony jest „łącze ISO”.
W takim przypadku zalecamy zastosowanie specyficzne
go dla pojazdu adaptera normy ISO.
Adapter jest do nabycia w ośrodkach handlowych części
samochodowych i/albo w warsztatach samochodowych.
3. Przy zajęciu „czas trwania +“ (Przyłącze prądu ciągłego),
w zależności od typu pojazdu, może dojść do odchyleń.
(Potrzebne jednak do zapisywania stacji nadawczych do
pamięci).
Dla zapewnienia wszystkich funkcji niezbędne jest postę
powanie zgodne z instrukcją. W niepewnych przypadkach
należy skontaktować się z autoryzowanym warsztatem
samochodowym.
Prawidłowy rozkład złącza ISO nie jest gwarantowany
nawet wtedy, gdy złącza pasują do siebie pod względem
mechanicznym, ponieważ zależy to od rodzaju i produ
centa pojazdu. Może być konieczne zmodyfikowanie
przyłącza lub zastosowanie adaptera do samochodów
mechanicznych.
WSKAZÓWKA:
Jeżeli przyłącze jest właściwe, radio można włączać i
wyłączać za pomocą zapłonu. Zapisane stacje mogą
zostać utracone, ponieważ do radia nie jest przypisywa
ne złącze „Trwałe +”, niezbędne do zapisywania stacji.
-
-
-
-
Język polski
6. Przy podłączeniu anteny istnieją dwie różne normy. W
pierwszym przypadku; stare (50 Ohm) z długim, wystającym, okrągłym kontaktem po stronie pojazdu i okrągłym
gniazdem po stronie radia. W drugim przypadku wtyk
antenowy wg normy ISO (150 Ohm). Adaptery dla każdego z tych przypadków są do nabycia u producentów części
samochodowych i / albo w warsztatach samochodowych.
WSKAZÓWKA:
Do niezbędnej uwagi przy VW / Audi: Państwa
samochód może posiadać aktywną antenę. Wymaga
zasilania takiego jak zapewniają oryginalne radia sa
mochodowe. W tym przypadku należy użyć zasilanego
fantomowo adaptera anteny.
Adaptery antenowe dostępne są u sprzedawców
akcesoriów samochodowych i / lub w warsztacie samochodowym.
Instalacja
Radioodbiornik należy zamontować zgodnie z poniższą
ilustracją.
57
-
UWAGA:
Jeżeli radio jest podłączone do złącza „Trwałe +” i nie
jest połączone z zapłonem, to nawet mimo jego wyłą
czenia akumulator samochodu może być niepotrzebnie
obciążony. W najgorszym przypadku może dojść do
jego rozładowania.
4. Zależnie od danego typu samochodu, mogą pojawić się
zakłócenia podczas pracy. Można je odpowiednio usunąć
przez dodatkowy filtr przeciwzakłóceniowy. Mimo tego,
że Wasz aparat już seryjnie wyposażony jest w filtr prze
ciwzakłóceniowy, to w zależności od pojazdu może dojść
do pogorszonego odbioru.
Otrzymają je Państwo w handlu z akcesoriami samocho
dowymi i / lub w Waszym warsztacie samochdowym.
5. Podczas instalacji radioodbiornika proszę zwrócić
uwagę na to, by jego tył miał wystarczająco dużo wolnej
przestrzeni, aby zagwarantowane było dostateczne
chłodzenie.
-
-
a Wsuwana obudowa
b Narzędzie do wysuwania sprzętu (klucz do demontażu)

58
AR4030BT-USB-CR_IM 05 .07.1 6
58
Język polski
Podłączenie
UWAGA: Podłączenie zewnętrznego wzmacniacza
• Należy stosować głośniki o impedancji 4 ohm. W celu podłączenia zewnętrznego wzmacniacza, użyć wyjść
• Oprzewodowanie głośników nie może być połączone
z masą.
Wykonać połączenia zgodnie ze schematem:
typu audio cinch LINE OUTPUT na tylnym panelu urządzenia.
Sprawdzić w instrukcjach punkty dotyczące zewnętrznego
wzmacniacza.
Instrukcja obsługi
1. Nie włączać urządzenia jeśli wnętrze samochodu jest
bardzo gorące, na przykład po przedłużonym w czasie
parkowaniu w miejscu bezpośrednio nasłonecznionym.
Poczekać na schłodzenie wewnątrz po krótkiej jeździe.
2. Możliwe nieprawidłowości podczas pracy mogą być
rozwiązane poprzez naciśnięcie przycisku RESET. Nacisnąć
przycisk RESET przewodem lub podobnym (8) aby zresetować elektronikę (RESET).
3. Czas wyświetlany w trybie czuwania ustawiany jest automatycznie dopiero gdy słuchamy stacji radiowej.
Obsługa
Poniżej funkcje poszczególnych przycisków urządzenia opisane są według ilustracji „Przegląd elementów obsługi”.
1 Przycisk MODE (wł / wył)
a) Nacisnąć przycisk, aby włączyć urządzenie. Powiado
mienie „WELCOME” pojawi się na krótko na wyświetlaczu.
Nacisnąć i przytrzymać przycisk, aby wyłączyć urzą
dzenie. Powiadomienie „GOODBYE” pojawi się na
krótko na wyświetlaczu.
b) Nacisnąć ten przycisk, aby wybrać różne tryby. (Radio,
BT, USB, CARD oraz AUX IN)
-
WSKAZÓWKA:
Tryb USB i CARD można wybrać tylko wtedy, gdy
urządzenie zawiera odpowiedni nośnik.
2
Pokrętło wielofunkcyjne /
a) W normalnym trybie odtwarzania, kontrolka używana
jest do sterowania głośnością.
Razem z poprzednio wciśniętą kontrolką (przycisk SEL),
w menu można dokonywać zmian, np. trybu dźwięku.
b) Nacisnąć szybko przycisk SEL aby wprowadzić menu
wyboru. Kilkakrotne powtarzanie przycisku SEL to
wybór poszczególnych wpisów menu. Można zmienić
ustawienia poszczególnych wpisów menu poprzez
obracanie kontrolką głośności.
BAS (Basy)
TRE (Soprany)
-
BAL (Balans)
FAD (Wzmacniacz)
BEEP (Dźwięk słyszany po wciśnięciu przycisku)
• BEEP ON: Dźwięk rozlega się po wciśnięciu
• BEEP OFF: Brak dźwięku.
LOUD (Loudness)
Włączenie tej funkcji powoduje wzmocnienie basów.
Przycisk
każdego przycisku.
SEL (Głośność / wybór)

AR4030BT-USB-CR_IM 05 .07.1 6
• LOUD OFF: Podbicie basów jest wyłączone.
• LOUD ON: Podbicie basów jest włączone.
EQ (Korektor dźwięku / cyfrowa obróbka dźwięku) :
EQ OFF, FLAT, POP, ROCK, CLASS
VOL LAS / ADJ (włączanie głośność)
• VOL LAS: Urządzenie włącza się z ustawionym
• VOL ADJ: Tu możemy ustawić ustaloną głośność,
CLK (format wyświetlania czasu)
Wybrać pomiędzy wyświetlaczem 24 a 12 godziny.
WSKAZÓWKA:
Jeśli wybieramy 12 godzinny wyświetlacz, wyświetla
ją się następujące informacje:
DX / LOC (Przełącza pomiędzy stacjami lokalnymi a
tymi o większym zasięgu nadawania)
• DX:
• LOC: Odbiór stacji lokalnych.
STEREO / MONO (Przełącza pomiędzy Stereo i Mono)
VOL (Głośność)
Więcej opcji ustawień przez pokrętło wielofunkcyjne
• Wcisnąć pokrętło i przytrzymać kilka sekund, aby
uzyskać dostęp do większej liczby opcji. Wciskać
pokrętło, aby wybrać opcję.
• Aby zmienić ustawienia wyświetlanej opcji, należy
obrócić pokrętło.
Dostępne są następujące ustawienia:
AF ON / AF OFF
AF (ang. Alternative Frequencies- alternatywne często-
tliwości) to funkcja działająca z RDS (Radio Data Sys-
tem- radiowy system danych) i może być użyta tylko
z stacjami FM. W tle urządzenie wyszukuje najlepszej
częstotliwości dla wybranej stacji.
• ON: Jeśli dana stacja radiowa ma słaby odbiór,
• OFF: Funkcja nie jest aktywna.
TA OFF / TA ON (Komunikaty o ruchu drogowym)
TA OFF / ON (Radiowa usługa / „Traffic Announce-
ment - Komunikaty o ruchu drogowym“)
• OFF: Funkcja nie jest aktywna.
• ON: Po włączeniu funkcji, na wyświetlaczu wyświe-
poprzednio poziomem głośności.
za pomocą której urządzenie powinno
się włączyć (A – VOL).
AM = rano, PM = po południu.
Odbiór stacji o większym zasięgu nadawania.
urządzenie przełącza się automatycznie na
stację nadawczą, nadająca ten sam program
poprzez ten sam łańcuch nadawczy RDS.
tla się TA.
W trybie TA po otrzymaniu komunikatu o
ruchu ulicznym, urządzenie przełącza się na
stację radiową z innego trybu (np. tryb USB).
Głośność zostaje wyregulowana do poziomu
ustawionego w menu komunikatów o ruchu
Język polski
drogowym. Powiadomienie „TRAFFIC”
pojawi się na wyświetlaczu.
TA VOL (Głośność komunikatów o ruchu drogowym)
REG OFF / REG ON
O pewnych godzinach, niektóre stacje grupują swoje
programy w programach regionalnych o różnej treści.
• ON: Odtwarzane będą tylko programy regionalne
ze stacji radiowych lub sugerowane jako
preferencje podczas dostrajania wybranej
stacji.
• OFF:
Odtwarzane są również programy ogólnokrajowe.
WSKAZÓWKA:
-
Kiedy cecha jest włączona, stacja radiowa może
już nie być odtwarzana bez zakłóceń na obszarach
zewnętrznych.
EON ON / OFF
Urządzenie może odbierać dane RDS EON. EON to
transmisja informacji dodatkowych ze stacji należącej
do grupy. W momencie nadawania komunikatów o
ruchu drogowym (TA), przełączy stację z zakresie grupy
z takiej, która nie nadaje komunikatów na taką, która je
nadaje i znajduje się w grupie stacji.
• ON: Urządzenie może odbierać dane RDS EON.
EON to transmisja informacji dodatkowych
ze stacji należącej do grupy. W momencie
nadawania komunikatów o ruchu drogowym
(TA), przełączy stację z zakresie grupy z takiej,
która nie nadaje komunikatów na taką, która
je nadaje i znajduje się w grupie stacji.
• OFF: Zapobiega przełączaniu na stację o słabym
poziomie sygnału.
WSKAZÓWKA:
Ikona „TP” na wyświetlaczu sygnalizuje, ze stacja
transmituje komunikaty o ruchu ulicznym. Bezpo
średnio lub poprzez połączony nadajnik (EON).
3 Przycisk PTY / MUTE
a) Aby włączyć tryb wyciszony, należy wcisnąć przycisk.
Aby wyłączyć tę funkcję, ponownie wcisnąć przycisk.
b) Tryb radia:
PTY Wybór typu programu
Poza nazwą stacji, kilkoma informacjami na temat stacji
radiowej na temat typu programu w Państwa programie, taka informacja może wyświetlić się na radiu
samochodowym.
Programem może być jeden z poniższych rodzajów,
na przykład:
SPORT NEWS POP CLASSICS
Za pomocą funkcji PTY można wybrać specyficzne
stacje dla pewnego typu programu. Poszczególne
typy programów dzielą się na dwie kategorie: Muzyka
59
-

60
AR4030BT-USB-CR_IM 05 .07.1 6
60
Język polski
i Słowa. Można znaleźć listę z typami programu na
stronie 64.
• Przytrzymać 1x przycisk PTY / MUTE aby włączyć
funkcje i wybrać kategorię „Słowa”.
• Przytrzymać 2x przycisk PTY / MUTE aby wybrać
kategorię „Muzyka”.
WSKAZÓWKA: Wyłączyć funkcję
Jeśli po raz trzeci przytrzymamy przycisk PTY / MUTE,
funkcja zostanie wyłączona.
Następnie nacisnąć przyciski stacji 1 – 6, aby dokonać
wyboru PTY. Na wyświetlaczu pojawia się wybrany typ
programu.
Jeśli wybrano PTY radio zaczyna wyszukiwać swojej
informacji PTY i zatrzymuje się, kiedy żądana informa
cja PTY jest odnaleziona.
Jeśli nie odnaleziono wybranego typu programu, na
wyświetlaczu pojawia się komunikat „NO PTY”.
Jeśli nie ma już informacji PTY, funkcja PTY automatycznie przełączy się do trybu normalnego.
4 Mikrofon
WSKAZÓWKA:
• Dostępnych jest wiele metod kompresji, a także
występują znaczne różnice w jakości urządzeń USB.
Ponadto w przemyśle fonograficznym nie ma ogól
nie obowiązujących standardów (zabezpieczenia
przed kopiowaniem).
Z tego względu podczas odtwarzania plików MP3
mogą w rzadkich przypadkach wystąpić problemy.
Nie oznacza to wadliwego działania urządzenia.
• W celu wyszukiwania/wyboru specjalnych ścieżek
należy postępować wg kroków opisanych w punkcie
11 – 16
.
• Prosimy zauważyć: Połączenie USB jest
-
przeznaczone tylko do odtwarzania mediów, a
nie do ładowania urządzeń zewnętrznych. Tylko
niskie zasilanie (100 mA) może być zapewnione. To
połączenie USB nie jest przeznaczone do obsługi
np. zewnętrznych twardych dysków 2,5“, wymagając
natężenia na rozruchu do 1100 mA. Do odtwarzania
smartfonu, urządzeń iPod lub iPhone, użyć gniazdka
AUX-IN, przeznaczonego do tego celu.
-
5 Wyświetlacz LCD (wyświetlacz ciekłokrystaliczny)
6 Szczelina na kartę SD
Włożyć kartę pamięci etykietą zwróconą na lewo z
otworem dostarczonym w tym celu, aż „zatrzaśnie się” na
miejscu. Na wyświetlaczu pojawia się informacja CARD.
Dane zawarte na niej odtwarzane są automatycznie.
WSKAZÓWKA:
W celu wyszukiwania / wyboru specjalnych ścieżek należy
postępować wg kroków opisanych w punkcie 11 – 16.
Aby wyjąc kartę pamięci, należy ponownie nacisnąć na
końcówkę karty pamięci. Otwiera się za pomocą „kliknięcia” i można ją wyjąć.
UWAGA:
Proste wyciąganie może uszkodzić slot i / lub kartę
pamięci.
7 Podłączenie USB
W przypadku zamiaru odtwarzania danych z pamięci
„USB styk” należy wetknąć ją do przeznaczonego do
tego otworu. Na wyświetlaczu pojawia się informacja.
Następuje automatyczne odtwarzanie danych.
WSKAZÓWKA:
• Zawsze podłączaj pamięć USB bezpośrednio do
portu USB, aby uniknąć niepoprawnego działania.
8 Przycisk Reset (resetowanie)
Patrz rozdział „Instrukcja obsługi” na stronie 58.
9 Gniazdko AUX
Dla podłączenia urządzeń odtwarzania analogowego. Za
pomocą tego gniazdka można odsłuchiwać przez głośniki
także nagrania z innych odtwarzaczy, np. odtwarzacza
MP3, odtwarzacza CD.
1. Podłącz zewnętrzne urządzenie za pomocą wtyczki
jack 3,5 mm stereo do gniazda AUX.
2. Naciskaj przycisk MODE /
ukaże się napis „AUX IN”.
3. Słychać odtwarzanie z zewnętrznego urządzenia
poprzez głośniki. Można zmienić głośność za pomocą
kontrolki głośności.
4. Dalej proszę postępować jak podano na instrukcji
obsługi zewnętrznego źródła dźwięku.
WSKAZÓWKA:
Ustaw optymalną głośność w zewnętrznym urządzeniu.
10 Przycisk AMS
Tryb radia:
a) Nacisnąć szybko przycisk, aby odtworzyć zapisane
stacje w ciągu przez ok. 5 sekund. Nacisnąć wybrana
stację, aby zamknąć operację i odtworzyć stacje
radiową.
b) Przytrzymać przycisk, aby uruchomić automatyczne
skanowanie stacji. Proces wyszukiwania może zabrać
kilka minut. Stacje są zapisywane według siły sygnału.
Następnie zapisane stacje są odtwarzane przez krótki
czas. Nacisnąć przycisk stacji, aby zakończyć operację.
(1) aż na wyświetlaczu

AR4030BT-USB-CR_IM 05 .07.1 6
W trybie USB / CARD:
Bezpośredni wybór pliku muzycznego.
Nacisnąć przycisk AMS. Najpierw „TRKSCH” a potem
„T−−−” pojawią się na wyświetlaczu. Uruchomić
regulator głośności i wybrać „pierwszą liczbę”. Po ok. 3
sekundach przesunie się to na lewo. Wpisać kolejną liczbę.
Kiedy pojawi się numer wybranej ścieżki, potwierdzić wybór
poprzez naciśnięcie przycisku SEL.
WSKAZÓWKA: Maksymalny wybór to „999“.
11 – 16 Przycisk 6
Ustawienia stacji (1 − 6)
a) Tryb radia:
• Przytrzymać przycisk ustawień wybranej stacji, aby
• Aby wybrać stację radiową szybko nacisnąć odpo
• Aby wybrać typ programu.
b) W trybie USB / CARD:
Bezpośredni wybór pliku muzycznego Strona 60
„
Przycisk
Przycisk 1
Nacisnąć przycisk, aby przerwać odtwarzanie tytułu
muzycznego (funkcja pauzy). Ponowne naciśnięcie
tego przycisku wznowi odtwarzanie płyty.
Przycisk 2
Nacisnąć przycisk. „INT ON” pojawia się na krótko na
wyświetlaczu. Wszystkie ścieżki zostaną odtworzone
w kolejności przez ok. 10 sekund. Nacisnąć przycisk
ponownie, aby przywrócić normalną prędkość odtwarzania.
Przycisk 3
Wszystkie ścieżki muszą być powtórzone domyślnie.
Naciśnij ten przycisk, aby powtórzyć tylko bieżącą
ścieżkę. „RPT” pojawi się na wyświetlaczu.
Przycisk 4
Nacisnąć przycisk. „RDM” pojawi się na wyświetlaczu.
Rozpocznie się losowe odtwarzanie wszystkich ścieżek.
Nacisnąć przycisk ponownie, aby przywrócić normalne
odtwarzanie.
Przycisk 5
• Nacisnąć przyciski, aby przeskoczyć 10 ścieżek do
• Nacisnąć i przytrzymać nośniki szybko, aby wybrać
17 Przycisk
a) W trybie radiowym wybór stacji.
b) W trybie USB / CARD:
Nacisnąć przycisk, aby wybrać następny tytuł muzyczny.
+10, 5–10, 4RDM, 3RPT, 2INT, 1
zapisać stację radiową.
wiedni przycisk stacji.
PTY / MUTE“
AMS“
INT
RPT
RDM
–10 / 6+10
tyłu lub do przodu. Wymaga się, aby ponad 10
ścieżek było dostępnych na nośniku.
poprzedni lub kolejny folder. (jeśli są foldery na
nośniku)
Strona 59 „Przycisk
Język polski
18 Przycisk
a) W trybie radiowym wybór stacji.
b) W trybie USB / CARD:
Nacisnąć przycisk, aby wybrać poprzedni tytuł mu
zyczny.
19 Przycisk
Tryb radia:
a) Pokazuje informacje na wyświetlaczu (tag ID3)
-
b) Ręczne ustawianie czasu
Tryb telefonu:
Odrzucanie przychodzącego połączenia, zakończenie
konwersacji.
20 Przycisk
a) Tryb radia:
b) Tryb telefonu:
c) W trybie USB / CARD:
Wykonywanie rozmów telefonicznych
przez Bluetooth
Bluetooth to technologia bezprzewodowego połączenia
radiowego urządzeń na krótką odległość. Technologia
CLK
Nacisnąć przycisk kilkakrotnie, aby wyświetlić kolejno
poniższe informacje na wyświetlaczu:
Czas (będzie ustawiony automatycznie w celu odbioru
RDS), częstotliwości wybranej stacji radiowej, bieżącego typu programu (PTY), stacji radiowej.
WSKAZÓWKA:
• Jeśli informacje są niedostępne, na wyświetlaczu
pojawi się komunikat NO PTY.
• Jeśli informacja jest za długa, będzie się przewija
ła przez wyświetlacz.
Czas zostanie ustawiony automatycznie do odbioru
RDS. Jeśli nie jest to taki przypadek, można ustawić
czas ręcznie:
1. Nacisnąć i przytrzymać przycisk
godzin migają na wyświetlaczu.
2. Ustawić godziny za pomocą przycisków
3. Nacisnąć ponownie przycisk
cyfry minut.
4. Ustawić minuty za pomocą przycisków
5. Nacisnąć przycisk
nia. Czas jest ustawiony.
BAND
Szybko nacisnąć przycisk
czania między trzema obszarami FM (UKF). Nazwa
odpowiedniego poziomu pojawia się na wyświetlaczu
LCD, kiedy podana jest częstotliwość (patrz przycisk
CLK).
Przyjmowanie połączeń przychodzących, wywołanie
wybranego numeru.
Nacisnąć przycisk. Na wyświetlaczu pojawi się folder.
CLK
CLK
, aby potwierdzić ustawie-
BAND w celu przełą-
-
CLK. Cyfry
/
. Zaczną migać
/
61
-
.
.

62
AR4030BT-USB-CR_IM 05 .07.1 6
62
Język polski
Bluetooth umożliwia prowadzenie rozmowy telefonicznej bez
użycia rąk. Kierowca może prowadzić rozmowę przez telefon,
bez konieczności przykładania go do ucha.
To urządzenie oferuje użytkownikowi opcję korzystania z
telefonu komórkowego wyposażonego w funkcję Bluetooth.
Promień zasięgu wynosi około 3 metry, w zależności od
urządzenia.
Aby uzyskać najlepszą jakość dźwięku podczas rozmowy:
Nie ustawiać zbyt wysokiego poziomu głośności. Może to
powodować sprzężenie w głośnikach.
WSKAZÓWKA:
Ustawienie głośnika zależy od jego umieszczenia wzglę
dem mikrofonu. Dlatego nie można go określić.
Parowanie urządzeń (PAIRING)
Zanim prowadzenie rozmowy przez radio stanie się możliwe,
należy sparować urządzenia.
1. Nacisnąć przycisk MODE
zaczyna migać na wyświetlaczu. Oznacza to, że urządzenie
jest w trybie parowania.
2. Wybrać menu Bluetooth w telefonie komórkowym i zapisać radio w jego ustawieniach. Aby to wykonać, należy
zapoznać się z instrukcją obsługi telefonu. Na telefonie
komórkowym wybrane jest urządzenie „AEG AR4030”.
3. W zależności od producenta urządzenia, jego modelu i
wersji oprogramowania, wprowadzić w telefonie hasło
„0000”.
Jeśli urządzenie zostało pomyślnie zalogowane, BT pojawi się
na wyświetlaczu i pokazane zostanie MEDIA.
WSKAZÓWKA:
• W zależności od producenta telefonu, należy ponownie
wywołać komunikat (PAIRING), aby sparować telefon
komórkowy z radiem samochodowym.
• Nie możemy zagwarantować kompatybilności funkcji
Bluetooth z modelami telefonów, które pojawią się na
rynku w przyszłości.
• Aby zagwarantować najlepsze połączenie, należy
upewnić się, że bateria telefonu jest naładowana.
• Niektóre modele telefonów komórkowych posiadają tryb
oszczędzania energii. Należy wyłączyć tryb oszczędzania
energii. W przeciwnym razie, podczas prowadzenia rozmowy telefonicznej przez Bluetooth, wystąpią problemy.
• Aby prowadzenie rozmowy przychodzącej lub wychodzącej było możliwe, funkcja Bluetooth musi być włączona również w telefonie. Należy zapoznać się z instrukcją
obsługi telefonu.
• Należy mówić w kierunku zintegrowanego mikrofonu (4).
Nie można podłączyć zewnętrznego mikrofonu.
Odłączanie urządzeń
Urządzenia zostają rozłączone, gdy radio samochodowe
zostanie wyłączone z panelu lub za pomocą zapłonu.
, aby wybrać tryb BT. BT
-
Ponownie podłączanie urządzeń
Urządzenie posiada funkcję automatycznego ponownego
podłączania.
Wymagania:
• urządzenia były wcześniej sparowane
• w telefonie włączona jest funkcja Bluetooth
• telefon komórkowy obsługuje tę funkcję.
Po wyłączeniu i ponownym włączeniu radia z panelu lub
zapłonem, aktywuje się funkcja automatycznego ponownego
podłączania. Może to trwać kilka sekund.
Jeśli ustanowiono połączenie, BT wyświetli się na wyświetlaczu.
Wybieranie ostatniego numeru
Urządzenie zapisuje ostatnio wybierany numer. Aby go
wybrać ponownie, należy:
Nacisnąć i przytrzymać przycisk
się na wyświetlaczu.
Kończenie rozmowy
Nacisnąć przycisk
przychodzące połączenia. Na wyświetlaczu pojawi się komunikat END.
WSKAZÓWKA:
Nacisnąć przycisk
dzące połączenia.
Połączenie przychodzące
Jeśli nadejdzie połączenie przychodzące, z głośników
rozlegnie się dźwięk dzwonka, a jeśli telefon ma aktywną
funkcję identyfikacji numeru (CLIP „Calling Line Identification
Presentation”), numer telefonu wyświetli się na wyświetlaczu
radiowym. Jeśli nie, na wyświetlaczu pojawi się komunikat
„0000”.
Aby odebrać połączenie przychodzące, należy wcisnąć
przycisk
samochodowych.
CLK, aby zakończyć wychodzące lub
CLK również, aby odrzucić przycho-
BAND. Głos rozmówcy słychać w głośnikach
BAND. CALLING pojawi
Odtwarzanie muzyki przez A2DP
(Advanced Audio Distribution Profile)
Ta funkcja wykorzystuje międzyfabryczny profil Bluetooth.
Sygnały audio stereo są przesyłane bezprzewodowo i strumieniowo pomiędzy urządzeniem odtwarzającym (źródłem) a
urządzeniem-odbiornikiem. Aby zdalne sterowanie źródłem
było możliwe, urządzenie odtwarzające musi obsługiwać
profil AVRCP (Audio Video Remote Control Profile).
Z powodu występowania różnych producentów urządzeń, ich
modeli i wersji oprogramowania, nie możemy zagwaranto
wać pełnej funkcjonalności.
• Po połączeniu urządzeń, rozpocząć odtwarzanie
muzyki z telefonu komórkowego. „A2DP” pojawi się na
wyświetlaczu.
-

AR4030BT-USB-CR_IM 05 .07.1 6
• Wcisnąć przycisk lub , aby przejść do następnego lub poprzedniego utworu.
• Nacisnąć przycisk 1 aby zatrzymać odtwarzanie muzyki
(funkcja pauzy). „MEDIA” pojawi się na wyświetlaczu. Aby
anulować funkcję, ponownie nacisnąć ten przycisk.
Czyszczenie
Porady dotyczące bezpieczeństwa
UWAGA:
Możliwe jest uszkodzenie urządzenia!
Upewnić się, że podczas czyszczenia do urządzenia nie
dostaje się wilgoć. Grozi nieodwracalnym uszkodzeniem
urządzenia.
Czyszczenie
Obudowę czyścić lekko wilgotną szmatką.
Usuwanie usterek
W tym rozdziale znajdą Państwo ważne porady na temat
identyfikacji usterek oraz ich usuwania. Aby uniknąć zagrożeń
i szkód, należy przestrzegać podanych instrukcji.
Porady dotyczące bezpieczeństwa
OSTRZEŻENIE:
Aby uniknąć zagrożeń i szkód, należy przestrzegać nastę
pujących instrukcji bezpieczeństwa:
• Naprawy urządzeń elektrycznych powinny być przepro
wadzane wyłącznie przez wykwalifikowanych specjalistów, którzy przeszli szkolenie producenta. Nieprawidłowo przeprowadzone naprawy mogą stanowić poważne
ryzyko dla użytkownika oraz dla sprzętu.
Przyczyny usterek i ich usuwanie
Przed przekazaniem urządzenia do punktu serwisowego,
należy skorzystać z informacji zawartych w poniższej tabeli,
aby sprawdzić, czy usterkę można usunąć samodzielnie.
Usterka Prawdopodobna
Nie można
włączyć
urządzenia.
Brak dźwięku Głośność jest usta
Przycisk
funkcyjny nie
działa.
przyczyna
Zapłon nie jest
włączony.
wiona na poziom
minimalny.
Kabel jest podłą
czony nieprawidłowo.
Błąd urządzenia. Wcisnąć przycisk
Rozwiązanie
Przekręcić kluczyk,
aby włączyć zapłon.
-
Zwiększyć poziom
głośności.
-
Sprawdzić
przyłącza kabla.
RESET (8).
-
-
Język polski
Usterka Prawdopodobna
Radio i / lub
automatycznie
ustawiona
stacja nie
działa.
Pamięć stacji
nie działa.
Urządzenie
nie współpra
cuje z portem
USB.
Karta pamięci
SD nie działa.
Nie można
nawiązać
połączenia
Bluetooth.
przyczyna
Kabel antenowy
jest podłączony
nieprawidłowo.
Sygnały z nadajnika
są zbyt słabe.
Podłączenie 4 do
przyłącza ISO A
(stały plus) jest
nieprawidłowe.
Port USB jest
-
przeznaczony dla
urządzeń działających zgodnie
ze standardem
USB. Nie wszystkie
urządzenia dostępne na rynku
są zgodne z tym
standardem. Być
może podłączono
urządzenie, które
nie jest zgodne ze
standardem USB.
Urządzenie nie
odczytuje karty.
Funkcja Bluetooth
jest wyłączona w
telefonie komór
kowym.
-
Rozwiązanie
Sprawdzić, czy antena jest podłączona
w sposób pewny.
Dostroić stacje
ręcznie.
Sprawdzić przyłącza
kabla. Zapoznać się
z rozdziałem „Podłą
czanie”
Podłączyć urządzenie, które
działa zgodnie ze
standardem USB.
Sprawdzić, czy
nośnik pamięci
został sformatowany
w systemie plików
FAT32.
Sprawdzić kartę.
Sprawdzić, czy
nośnik pamięci
został sformatowany
w systemie plików
FAT32.
Włączyć funkcję
Bluetooth w telefonie komórkowym.
63
-
Dane techniczne
Model: ............................................................ AR 4030 BT/USB/CR
Ogólne
Napięcie zasilania ...........................DC 12 V (ujemne uziemienie)
Pobór mocy ........................................................................5 A Maks.
Moc .........................................................................4 x 40 W (PMPO)
Formaty pliku odtwarzalnego .....................................MP3, WMA
Waga netto .......................................................................ok. 0,45 kg
Wymiaru obudowy (Instalacja) .....182 szer. x 52 wys.x 110 głęb.
Zakres FM
Zakres częstotliwości ..................................87,5 MHz ~ 108,0 MHz
Czułość używalna ......................................................................10 dB
Częstotliwość pośrednia .................................................. 10,7 MHz

64
AR4030BT-USB-CR_IM 05 .07.1 6
64
Język polski
Bluetooth
Obsługiwany standard Bluetooth ...........................................V 2.0
Zakres ............................................................................ok. 8 metrów
Częstotliwość transmisji .................................... 2,402 − 2,480 GHz
Protokoły ....................................................................A2DP / AVRCP
Zastrzegamy sobie prawo wprowadzania zmian technicznych
i projektowych w trakcie ciągłego rozwoju produktu.
Niniejsze urządzenie odpowiada wymaganiom normy bez
pieczeństwa użytkowania oraz spełnia wymagania dyrektywy
niskonapięciowej i kompatybilności elektromagnetycznej.
-
Ogólne warunki gwarancji
Producent / Dystrybutor udziela 24 miesięcy gwarancji na
zakupione urządzenie. Okres gwarancji liczony jest od daty
zakupu urządzenia.
W tym okresie uszkodzone urządzenie będzie bezpłatnie
wymienione na wolne od wad. W przypadku, gdy wymiana
będzie niemożliwa do zrealizowania, Nabywca otrzyma zwrot
ceny zakupu urządzenia.
Za uszkodzone urządzenie uważa się takie, które nie spełnia
funkcji określonych w instrukcji obsługi, a przyczyną takiego
stanu jest wewnętrzna wada fabryczna lub materiałowa.
Gwarancją nie są objęte uszkodzenia mechaniczne, chemicz
ne, termiczne, powstałe w wyniku działania sił zewnętrznych
(np. przepięcie w sieci energetycznej czy wyładowania
atmosferyczne), jak również wady powstałe w wyniku obsługi
niezgodnej z instrukcją obsługi urządzenia.
Nabywcy przysługuje prawo do wymiany urządzenia na
wolne od wad lub, jeśli wymiana jest niemożliwa, zwrotu
gotówki tylko po dostarczeniu do punktu zakupu kompletne
go urządzenia z oryginalnymi akcesoriami, instrukcją obsługi
i w oryginalnym opakowaniu wraz z dowodem zakupu i
prawidłowo wypełnioną kartą gwarancyjną (pieczątka sklepu,
data sprzedaży urządzenia).
Gwarancja oraz zawarte w niej warunki obowiązują na terenie
Rzeczpospolitej Polskiej.
Niniejsza gwarancja nie wyłącza, nie ogranicza ani nie zawie
sza uprawnień Nabywcy wynikających z przepisów Ustawy
z dnia 27 lipca 2002 r. o szczególnych warunkach sprzedaży
konsumenckiej oraz o zmianie kodeksu cywilnego (Dz. U. z
2002 r. Nr 141, poz. 1176).
Dystrybutor:
CTC Clatronic Sp. z o.o
ul. Opolska 1 a karczów
49 - 120 Dąbrowa
-
-
-
Usuwanie
Znaczenie symbolu „Pojemnik na śmieci”
Należy zadbać o środowisko i nie wyrzucać
urządzeń elektrycznych razem z odpadami
gospodarstwa domowego.
Stare lub uszkodzone urządzenia elektryczne
należy odstawić do miejskich punktów zbiórki.
Prosimy unikać potencjalnych zagrożeń dla zdrowia i środowi
ska poprzez nieprawidłowe metody utylizacji odpadów.
Przyczyniasz się do recyklingu i innych form utylizacji zużytych
urządzeń elektrycznych i elektronicznych.
Informacje na temat punktów zbiórki znajdują się na terenie
danego miasta.
PTY – Typy programów
Przycisk stacji PTY kategorii „Słowa”
NEWS
1
2
3
4
5
6
AFFAIRS
INFO
SPORT
EDUCATION
DRAMA
CULTURE
SCIENCE
VARIED
WEATHER
FINANCE
CHILDREN
SOCIAL
RELIGION
PHONE IN
TRAVEL
LEISURE
DOCUMENT
-

AR4030BT-USB-CR_IM 05 .07.1 6
Przycisk stacji PTY kategorii „Muzyka”
1
2
3
4
5
6 FOLK M
POP M
ROCK M
LIGHT M
EASY M
CLASSIC
OTHER M
COUNTRY
JAZZ
NATIONAL M
OLDIES
Indeks rzeczowy
B
Bezpieczeństwo ruchu drogowego............................................56
C
Czas ...................................................................................................61
Czyszczenie ......................................................................................63
Częstotliwości alternatywne (AF) .................................................59
D
Dane techniczne .............................................................................63
F
Funkcje odtwarzania ......................................................................61
G
Gniazdko AUX ................................................................................60
I
Instalacja ...........................................................................................57
Instrukcja obsługi ............................................................................58
M
Montaż (wskazówki bezpieczeństwa) .........................................56
O
Obsługa ............................................................................................58
Odtwarzanie muzyki przez A2DP ................................................63
Ogólne warunki gwarancji ............................................................64
Język polski
P
Podłączenie .....................................................................................58
Podłączenie USB ............................................................................60
Porady instalacyjne ........................................................................56
Programy regionalne .....................................................................59
Przycisk AMS ...................................................................................60
Przycisk BAND ................................................................................61
Przycisk MODE ...............................................................................58
Przycisk MUTE (wyciszenie) ..........................................................59
Przycisk Play / Pause (
Przycisk PTY / MUTE ...................................................................... 59
Przycisk SEL......................................................................................58
Przyciski / ...........................................................................61
PTY - Typy programów ..................................................................64
Radiowa usługa (TA) ......................................................................59
Regulacja głośności .......................................................................58
Szczelina na kartę SD .....................................................................60
Ustawienia (Przycisk SEL) ...............................................................58
Usuwanie usterek ...........................................................................63
Ważne informacje dodatkowe dotyczące wbudowania ........57
Wskazówki bezpieczeństwa .........................................................56
Wyciszanie .......................................................................................59
Wykonywanie rozmów telefonicznych przez Bluetooth .........62
Wyłączenie .......................................................................................58
Włączenie .........................................................................................58
) ..............................................................61
R
S
U
W
65

AR 4030 BT/USB/CR
Stand 07 / 2016
AR4030BT-USB-CR_IM 05 .07.1 6
Elektro-technische Vertriebsges. mbH
www.etv.de
 Loading...