

AEG AGS58800S0 User Manual [de]

AGS58800S0
FREEZER USER MANUAL
EN
CONGÉLATEUR NOTICE D'UTILISATION
FR
GEFRIERGERÄT BENUTZERINFORMATION
DE
CONGELADOR MANUAL DE INSTRUCCIONES
ES
22
43
64
2
2
FOR PERFECT RESULTS
Thank you for choosing this AEG product. We have created it to give you
impeccable performance for many years, with innovative technologies that help
make life simpler – features you might not find on ordinary appliances. Please
spend a few minutes reading to get the very best from it.
ACCESSORIES AND CONSUMABLES
In the AEG webshop, you’ll find everything you need to keep all your AEG
appliances looking spotless and working perfectly. Along with a wide range of
accessories designed and built to the high quality standards you would expect,
from specialist cookware to cutlery baskets, from bottle holders to delicate
laundry bags…
Visit the webshop at:
www.aeg.com/shop

CONTENTS
4 Safety information
7 Control panel
8 First use
8Daily use
9 Helpful Hints and Tips
10 Care and cleaning
12 What to do if…
13 Technical data
14 Installation
19 Noises
21 Environmental concerns
Contents
3
The following symbols are used in this user
manual:
Important information concerning your
personal safety and information on how to
avoid damaging the appliance.
General information and tips
Environmental information
Subject to change without notice
4 Safety information
SAFETY INFORMATION
In the interest of your safety and to ensure the correct use, before installing and first using
the appliance, read this user manual carefully, including its hints and warnings. To avoid
unnecessary mistakes and accidents, it is important to ensure that all people using the appliance are thoroughly familiar with its operation and safety features. Save these instructions and make sure that they remain with the appliance if it is moved or sold, so that everyone using it through its life will be properly informed on appliance use and safety.
For the safety of life and property keep the precautions of these user's instructions as the
manufacturer is not responsible for damages caused by omission.
Children and vulnerable people safety
• This appliance is not intended for use by persons (including children) with reduced physical, sensory or mental capabilities, or lack of experience and knowledge, unless they have
been given supervision or instruction concerning use of the appliance by a person responsible for their safety.
Children should be supervised to ensure that they do not play with the appliance.
• Keep all packaging well away from children. There is risk of suffocation.
• If you are discarding the appliance pull the plug out of the socket, cut the connection
cable (as close to the appliance as you can) and remove the door to prevent playing children to suffer electric shock or to close themselves into it.
• If this appliance featuring magnetic door seals is to replace an older appliance having a
spring lock (latch) on the door or lid, be sure to make that spring lock unusable before
you discard the old appliance. This will prevent it from becoming a death trap for a child.
General safety
WARNING!
Keep ventilation openings, in the appliance enclosure or in the built-in structure, clear of
obstruction.
• The appliance is intended for keeping foodstuff and/or beverages in a normal household
as explained in this instruction booklet.
• Do not use a mechanical device or any artificial means to speed up the thawing process.
• Do not use other electrical appliances (such as ice cream makers) inside of refrigerating
appliances, unless they are approved for this purpose by the manufacturer.
• Do not damage the refrigerant circuit.
• The refrigerant isobutane (R600a) is contained within the refrigerant circuit of the appliance, a natural gas with a high level of environmental compatibility, which is nevertheless flammable.
During transportation and installation of the appliance, be certain that none of the components of the refrigerant circuit become damaged.
If the refrigerant circuit should become damaged:
– avoid open flames and sources of ignition

Safety information
– thoroughly ventilate the room in which the appliance is situated
• It is dangerous to alter the specifications or modify this product in any way. Any damage
to the cord may cause a short-circuit, fire and/or electric shock.
WARNING!
Any electrical component (power cord, plug, compressor) must be replaced by a certified
service agent or qualified service personnel to avoid hazard.
1. Power cord must not be lengthened.
2. Make sure that the power plug is not squashed or damaged by the back of the ap-
pliance. A squashed or damaged power plug may overheat and cause a fire.
3. Make sure that you can come to the mains plug of the appliance.
4. Do not pull the mains cable.
5. If the power plug socket is loose, do not insert the power plug. There is a risk of
electric shock or fire.
6. You must not operate the appliance without the lamp cover (if foreseen) of interior
lighting.
• This appliance is heavy. Care should be taken when moving it.
• Do not remove nor touch items from the freezer compartment if your hands are damp/
wet, as this could cause skin abrasions or frost/freezer burns.
• Avoid prolonged exposure of the appliance to direct sunlight.
• Bulb lamps (if foreseen) used in this appliance are special purpose lamps selected for
household appliances use only. They are not suitable for household room illumination.
5
Daily Use
• Do not put hot pot on the plastic parts in the appliance.
• Do not store flammable gas and liquid in the appliance, because they may explode.
• Do not place food products directly against the air outlet on the rear wall. (If the appliance is Frost Free)
• Frozen food must not be re-frozen once it has been thawed out.
• Store pre-packed frozen food in accordance with the frozen food manufacturer's instructions.
• Appliance's manufacturers storage recommendations should be strictly adhered to. Refer
to relevant instructions.
• Do not place carbonated or fizzy drinks in the freezer compartment as it creates pressure
on the container, which may cause it to explode, resulting in damage to the appliance.
• Ice lollies can cause frost burns if consumed straight from the appliance.
Care and cleaning
• Before maintenance, switch off the appliance and disconnect the mains plug from the
mains socket.
• Do not clean the appliance with metal objects.
• Do not use sharp objects to remove frost from the appliance. Use a plastic scraper.
6 Safety information
Installation
For electrical connection carefully follow the instructions given in specific paragraphs.
• Unpack the appliance and check if there are damages on it. Do not connect the appliance if it is damaged. Report possible damages immediately to the place you bought it.
In that case retain packing.
• It is advisable to wait at least four hours before connecting the appliance to allow the oil
to flow back in the compressor.
• Adequate air circulation should be around the appliance, lacking this leads to overheating. To achieve sufficient ventilation follow the instructions relevant to installation.
• Wherever possible the back of the product should be against a wall to avoid touching or
catching warm parts (compressor, condenser) to prevent possible burn.
• The appliance must not be located close to radiators or cookers.
• Make sure that the mains plug is accessible after the installation of the appliance.
• Connect to potable water supply only (If a water connection is foreseen).
Service
• Any electrical work required to do the servicing of the appliance should be carried out by
a qualified electrician or competent person.
• This product must be serviced by an authorized Service Centre, and only genuine spare
parts must be used.
Environment Protection
This appliance does not contain gasses which could damage the ozone layer, in either its
refrigerant circuit or insulation materials. The appliance shall not be discarded together
with the urban refuse and rubbish. The insulation foam contains flammable gases: the appliance shall be disposed according to the applicable regulations to obtain from your local
authorities. Avoid damaging the cooling unit, especially at the rear near the heat exchanger. The materials used on this appliance marked by the symbol
are recyclable.
Control panel
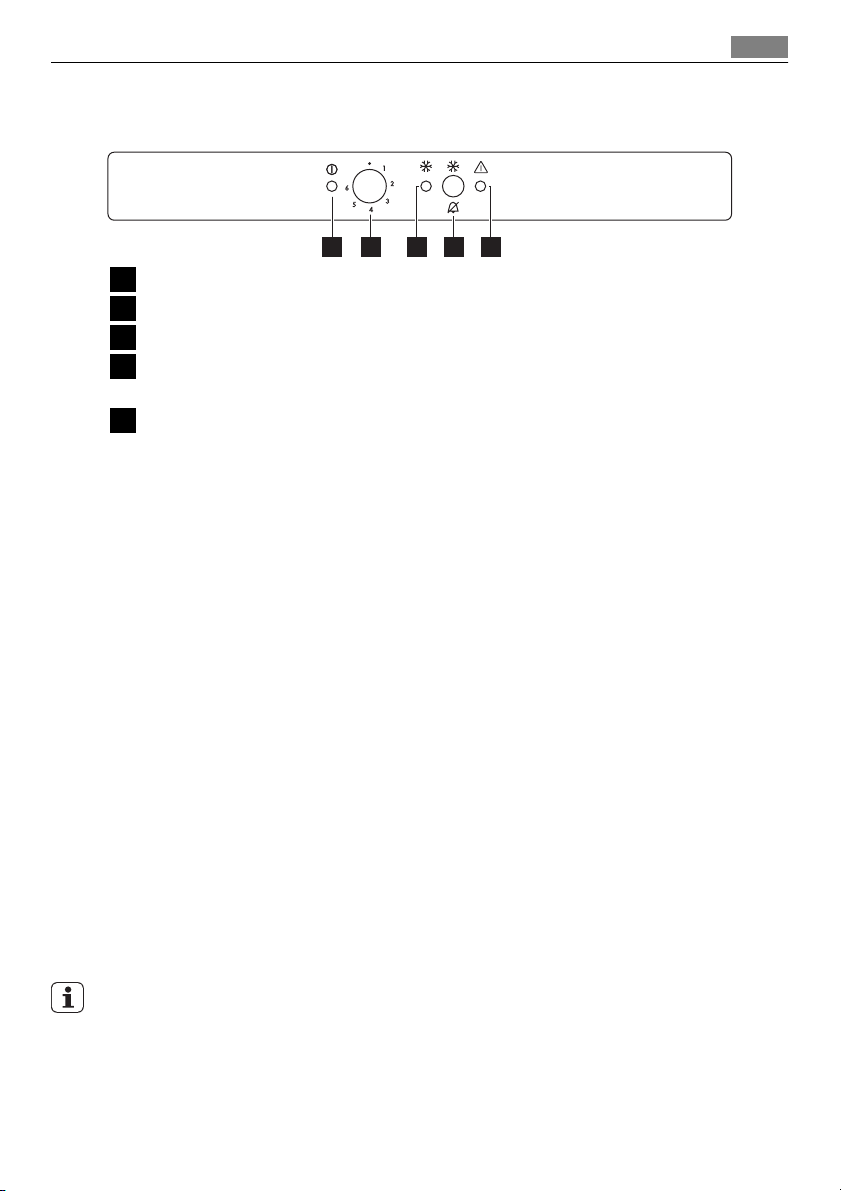
CONTROL PANEL
1 2 3 54
Pilot light
1
Temperature regulator
2
FROSTMATIC light
3
FROSTMATIC switch
4
Acoustic alarm reset switch
Alarm light
5
Switching on
1. Insert the plug into the wall socket.
2. Turn the Temperature regulator clockwise to a medium setting.
3. The Pilot light will light up and a sound is on only for 2 sec. indicating that the appli-
ance is powered.
4. The Alarm light will blink and the sound signal alarm will get on, indicating that the
temperature inside the appliance is too high.
5. Push the FROSTMATIC switch and the sound signal alarm will get off.
6. Push the FROSTMATIC switch once again and the FROSTMATIC light will light up. The
freezer will start to operate.
7
Switching off
1. To turn off the appliance, turn the Temperature regulator to the "O" position and a
sound is on only for 2 sec.
2. The pilot light will switch off.
Temperature regulation
The temperature within the appliance is controlled by the Temperature regulator situated at
the top of the cabinet.
To operate the appliance, proceed as follows:
• turn the Temperature regulator toward lower settings to obtain the minimum coldness.
• turn the Temperature regulator toward higher settings to obtain the maximum coldness.
A medium setting is generally the most suitable.
However, the exact setting should be chosen keeping in mind that the temperature inside
the appliance depends on:
• room temperature
• how often the door is opened
8 First use
• the quantity of food stored
• the location of the appliance.
FROSTMATIC function
The FROSTMATIC function accelerates the freezing of fresh food and, at the same time, protects foodstuffs already stored from undesirable warming.
To activate the function, do these steps:
1. Press the FROSTMATIC switch.
2. The FROSTMATIC light switches on.
To deactivate the function, do these steps:
1. Press the FROSTMATIC switch.
2. The FROSTMATIC light switches off.
The FROSTMATIC function stops automatically after about 52 hours.
Excessive temperature alarm
If the temperature inside the freezer has risen to a point where the safe storage of frozen
food is no longer ensured (for example due to an power failure) the Alarm light will blink
and an acoustic alarm will sound.
1. Switch off the warning tone by pressing the FROSTMATIC switch.
The Alarm light blinks until the required temperature has been reached again.
When the freezer is first switched on, the Alarm light blinks until the temperature has dropped to a safe level for the storage of frozen food.
FIRST USE
Cleaning the interior
Before using the appliance for the first time, wash the interior and all internal accessories
with lukewarm water and some neutral soap so as to remove the typical smell of a brandnew product, then dry thoroughly.
Do not use detergents or abrasive powders, as these will damage the finish.
DAILY USE
Freezing fresh food
The freezer compartment is suitable for freezing fresh food and storing frozen and deepfrozen food for a long time.
To freeze fresh food activate the FROSTMATIC function at least 24 hours before placing the
food to be frozen in the freezer compartment.
Place the fresh food to be frozen in the two top compartments.
The maximum amount of food that can be frozen in 24 hours is specified on the rating
plate, a label located on the inside of the appliance.

Helpful Hints and Tips 9
The freezing process lasts 24 hours: during this period do not add other food to be frozen.
To utilize the maximum quantity indicated on the rating plate, remove all the drawers from
the freezer compartment.
To guarantee the best functionality and performance of the appliance, the food must be not
placed in contact with the back wall of the freezer
in the area as shown in the figure.
Storage of frozen food
When first starting-up or after a period out of use, before putting the products in the compartment let the appliance run at least 2 hours on the higher settings.
In the event of accidental defrosting, for example due to a power failure, if the power has
been off for longer than the value shown in the technical characteristics chart under "rising
time", the defrosted food must be consumed quickly or cooked immediately and then refrozen (after cooling).
Thawing
Deep-frozen or frozen food, prior to being used, can be thawed in the refrigerator compartment or at room temperature, depending on the time available for this operation.
Small pieces may even be cooked still frozen, directly from the freezer: in this case, cooking
will take longer.
Ice-cube production
This appliance is equipped with one or more trays for the production of ice-cubes. Fill these
trays with water, then put them in the freezer compartment.
Do not use metallic instruments to remove the trays from the freezer.
HELPFUL HINTS AND TIPS
Hints for freezing
To help you make the most of the freezing process, here are some important hints:
• the maximum quantity of food which can be frozen in 24 hrs. is shown on the rating
plate;
10 Care and cleaning
• the freezing process takes 24 hours. No further food to be frozen should be added during
this period;
• only freeze top quality, fresh and thoroughly cleaned, foodstuffs;
• prepare food in small portions to enable it to be rapidly and completely frozen and to
make it possible subsequently to thaw only the quantity required;
• wrap up the food in aluminium foil or polythene and make sure that the packages are
airtight;
• do not allow fresh, unfrozen food to touch food which is already frozen, thus avoiding a
rise in temperature of the latter;
• lean foods store better and longer than fatty ones; salt reduces the storage life of food;
• water ices, if consumed immediately after removal from the freezer compartment, can
possibly cause the skin to be freeze burnt;
• it is advisable to show the freezing in date on each individual pack to enable you to keep
tab of the storage time.
Hints for storage of frozen food
To obtain the best performance from this appliance, you should:
• make sure that the commercially frozen foodstuffs were adequately stored by the retailer;
• be sure that frozen foodstuffs are transferred from the foodstore to the freezer in the
shortest possible time;
• not open the door frequently or leave it open longer than absolutely necessary.
• Once defrosted, food deteriorates rapidly and cannot be refrozen.
• Do not exceed the storage period indicated by the food manufacturer.
CARE AND CLEANING
CAUTION!
Unplug the appliance before carrying out any maintenance operation.
This appliance contains hydrocarbons in its cooling unit; maintenance and recharging must
therefore only be carried out by authorized technicians.
Periodic cleaning
The equipment has to be cleaned regularly:
• clean the inside and accessories with lukewarm water and some neutral soap.
• regularly check the door seals and wipe clean to ensure they are clean and free from
debris.
• rinse and dry thoroughly.
Do not pull, move or damage any pipes and/or cables inside the cabinet.
Never use detergents, abrasive powders, highly perfumed cleaning products or wax polishes
to clean the interior as this will damage the surface and leave a strong odour.
Care and cleaning 11
Clean the condenser (black grill) and the compressor at the back of the appliance with a
brush. This operation will improve the performance of the appliance and save electricity
consumption.
Take care of not to damage the cooling system.
Many proprietary kitchen surface cleaners contain chemicals that can attack/damage the
plastics used in this appliance. For this reason it is recommended that the outer casing of
this appliance is only cleaned with warm water with a little washing-up liquid added.
After cleaning, reconnect the equipment to the mains supply.
Defrosting the freezer
A certain amount of frost will always form on the freezer shelves and around the top compartment.
Defrost the freezer when the frost layer reaches a thickness of about 3-5 mm.
About 12 hours prior to defrosting, set the Temperature regulator toward higher settings ,
in order to build up sufficient chill reserve for the interruption in operation.
To remove the frost, follow the instructions below:
1. Switch off the appliance.
2. Remove any stored food, wrap it in several layers of newspaper and put it in a cool
place.
CAUTION!
Do not touch frozen goods with wet hands. Hands can freeze to the goods.
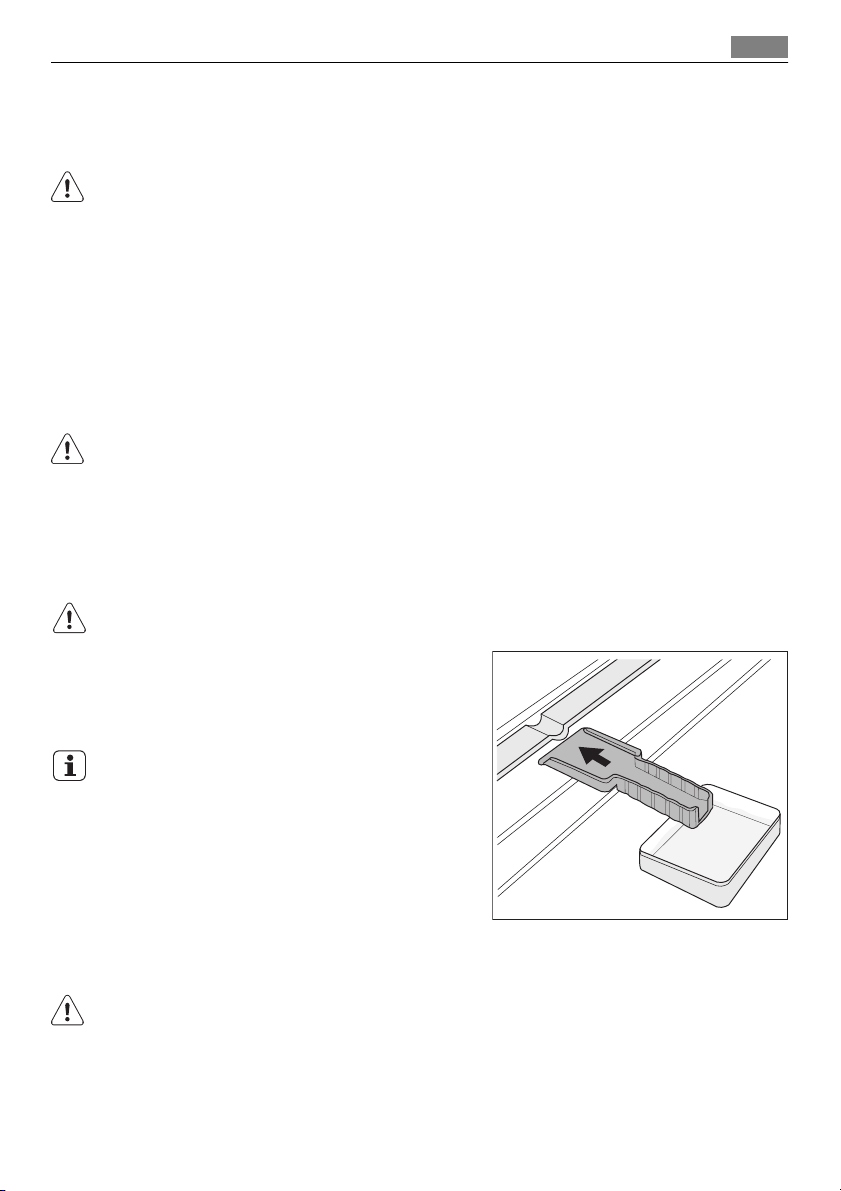
3. Leave the door open and insert the plas-
tic scraper in the appropriate seating at
the bottom centre, placing a basin underneath to collect the defrost water
In order to speed up the defrosting process,
place a pot of warm water in the freezer
compartment. In addition, remove pieces of
ice that break away before defrosting is complete.
4. When defrosting is completed, dry the
interior thoroughly and keep the scraper
for future use.
5. Switch on the appliance.
6. After two or three hours, reload the previously removed food into the compartment.
Never use sharp metal tools to scrape off frost from the evaporator as you could damage it.
Do not use a mechanical device or any artificial means to speed up the thawing process
other than those recommended by the manufacturer.
A temperature rise of the frozen food packs, during defrosting, may shorten their safe storage life.
12 What to do if…
Periods of non-operation
When the appliance is not in use for long periods, take the following precautions:
• disconnect the appliance from electricity supply
• remove all food
• defrost (if foreseen) and clean the appliance and all accessories
• leave the door/doors ajar to prevent unpleasant smells.
If the cabinet will be kept on, ask somebody to check it once in a while to prevent the food
inside from spoiling in case of a power failure.
WHAT TO DO IF…
WARNING!
Before troubleshooting, disconnect the mains plug from the mains socket.
Only a qualified electrician or competent person must do the troubleshooting that is not in
this manual.
Problem Possible cause Solution
The appliance does not
operate. The Pilot light
does not flash.
The mains plug is not connected
The appliance has no power.
The Pilot light flashes. The appliance is not working
The Alarm light flashes. The temperature in the freezer is
The compressor operates
continually.
The door is not closed correctly. Refer to "Closing the door".
The door has been opened too
The product temperature is too
The room temperature is too
The FROSTMATIC function is
The appliance is switched off. Switch on the appliance.
to the mains socket correctly.
There is no voltage in the mains
socket.
properly.
too high.
The temperature is not set cor-
rectly.
frequently.
high.
high.
switched on.
Connect the mains plug to the
mains socket correctly.
Connect a different electrical appliance to the mains socket.
Contact a qualified electrician.
Contact a qualified electrician.
Refer to "High temperature
alarm"
Set a higher temperature.
Do not keep the door open longer
than necessary.
Let the product temperature decrease to room temperature before storage.
Decrease the room temperature.
Refer to "FROSTMATIC function".
Problem Possible cause Solution
The temperature in the
freezer is too low.
The FROSTMATIC function is
The temperature in the
freezer is too high.
The door is not closed correctly. Refer to "Closing the door".
The product temperature is too
Many products are stored at the
Products are too near to each
There is too much frost. Food is not wrapped correctly. Wrap the food correctly.
The door is not closed correctly. Refer to "Closing the door".
The temperature regulator is not
The temperature regulator is not
set correctly.
switched on.
The temperature regulator is not
set correctly.
high.
same time.
other.
set correctly.
Set a higher temperature.
Refer to "FROSTMATIC function".
Set a lower temperature.
Let the product temperature decrease to room temperature before storage.
Store less products at the same
time.
Store products so that there is
cold air circulation.
Set a higher temperature.
Closing the door
1. Clean the door gaskets.
2. If necessary, adjust the door. Refer to "Installation".
3. If necessary, replace the defective door gaskets. Contact the Service Center.
Technical data
13
TECHNICAL DATA
Dimension of the recess
Height 880 mm
Width 560 mm
Depth 550 mm
Rising Time 20 h
Voltage 230-240 V
Frequency 50 Hz
The technical information are situated in the rating plate on the internal left side of the
appliance and in the energy label.
14 Installation
INSTALLATION
Positioning
WARNING!
If you are discarding an old appliance that has a lock or catch on the door, you must ensure
that it is made unusable to prevent young children being trapped inside.
The appliance shall have the plug accessible after installation.
Install this appliance at a location where the ambient temperature corresponds to the climate class indicated on the rating plate of the appliance:
Climate class Ambient temperature
SN +10°C to + 32°C
N +16°C to + 32°C
ST +16°C to + 38°C
T +16°C to + 43°C
Electrical connection
Before plugging in, ensure that the voltage and frequency shown on the rating plate correspond to your domestic power supply.
The appliance must be earthed. The power supply cable plug is provided with a contact for
this purpose. If the domestic power supply socket is not earthed, connect the appliance to a
separate earth in compliance with current regulations, consulting a qualified electrician.
The manufacturer declines all responsibility if the above safety precautions are not observed.
This appliance complies with the E.E.C. Directives.
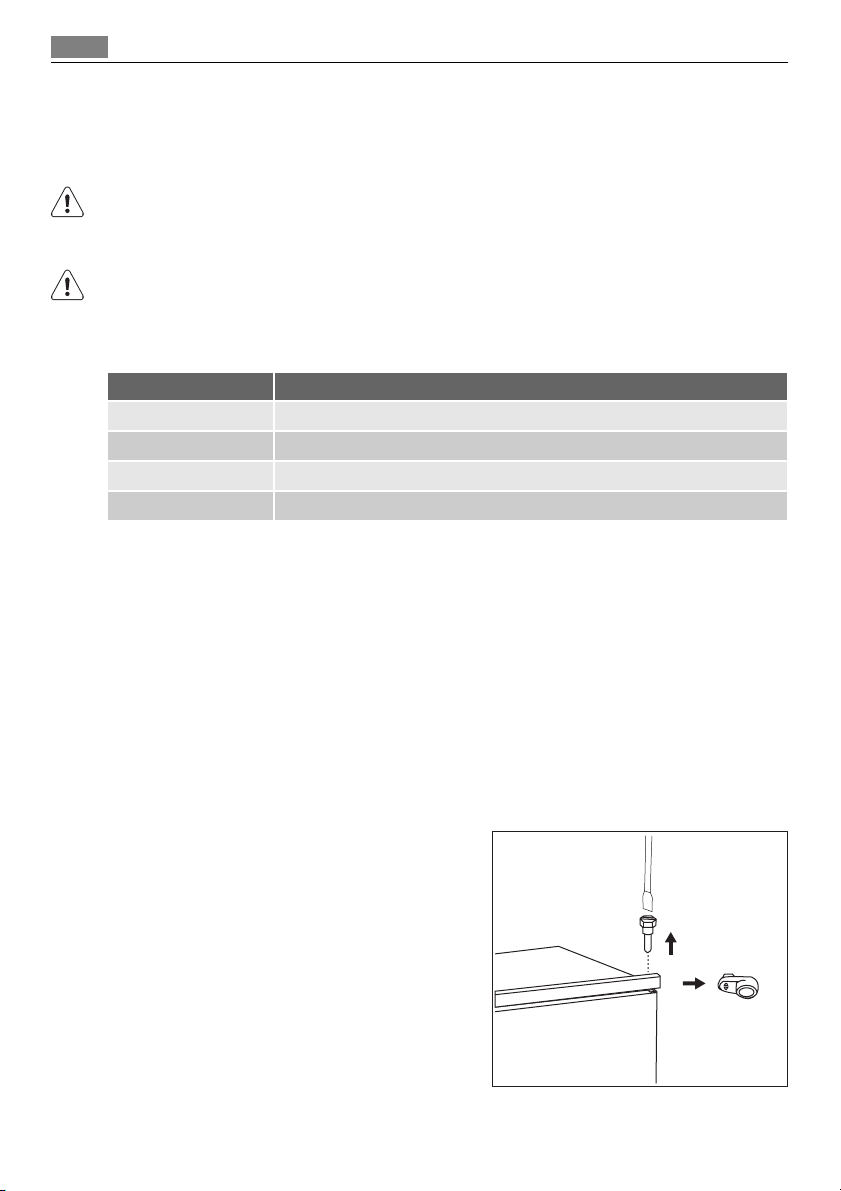
Door reversibility
The door of the appliance opens to the right. If you want to open the door to the left, follow these steps before you install the appliance:
1. Loosen and remove the upper pin.
2. Remove the door.
3. Remove the spacer.
4. With a key, loosen the lower pin.
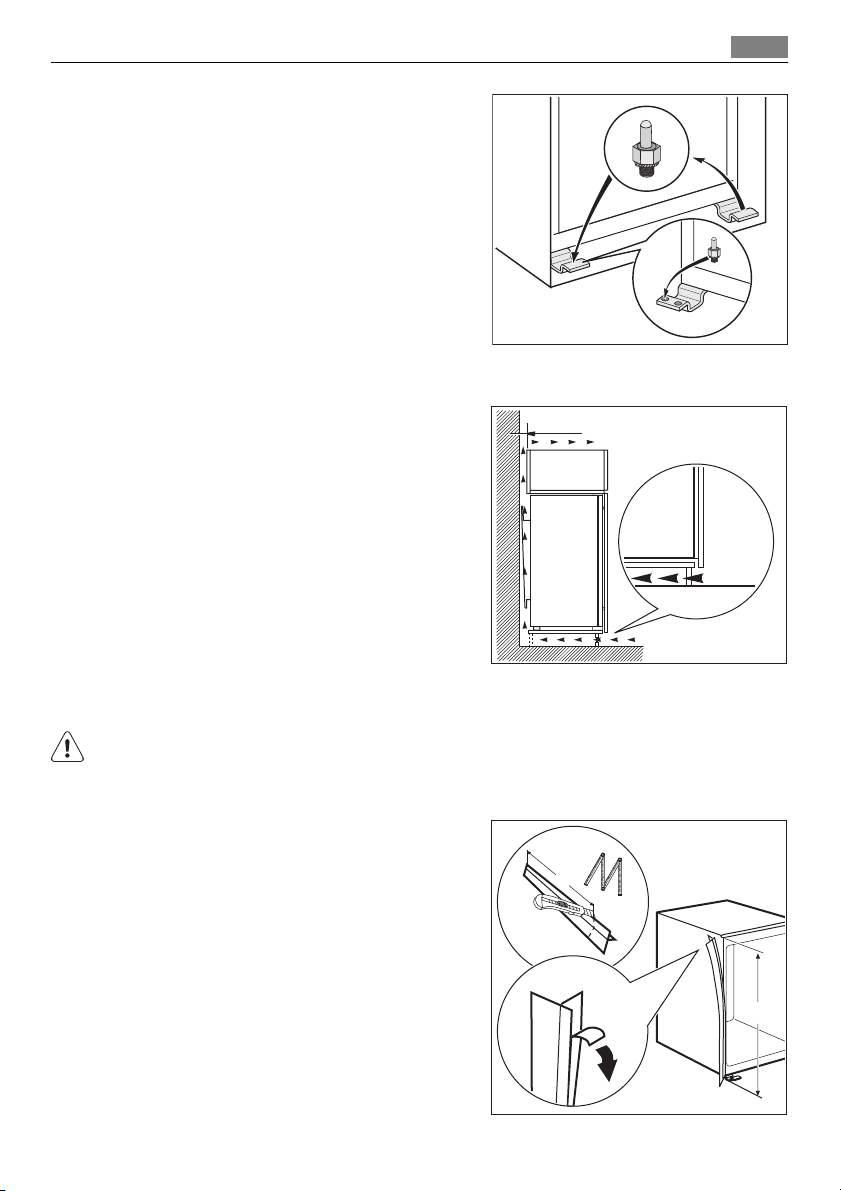
On the opposite side:
1. Tighten the lower pin.
2. Install the spacer.
3. Install the door.
4. Tighten the upper pin.
Ventilation requirements
The airflow behind the appliance must be sufficient.
5 cm
Installation 15
min.
2
200 cm
min.
200 cm
2
Installing the appliance
CAUTION!
Make sure that the mains cable can move freely.
Do the following steps:
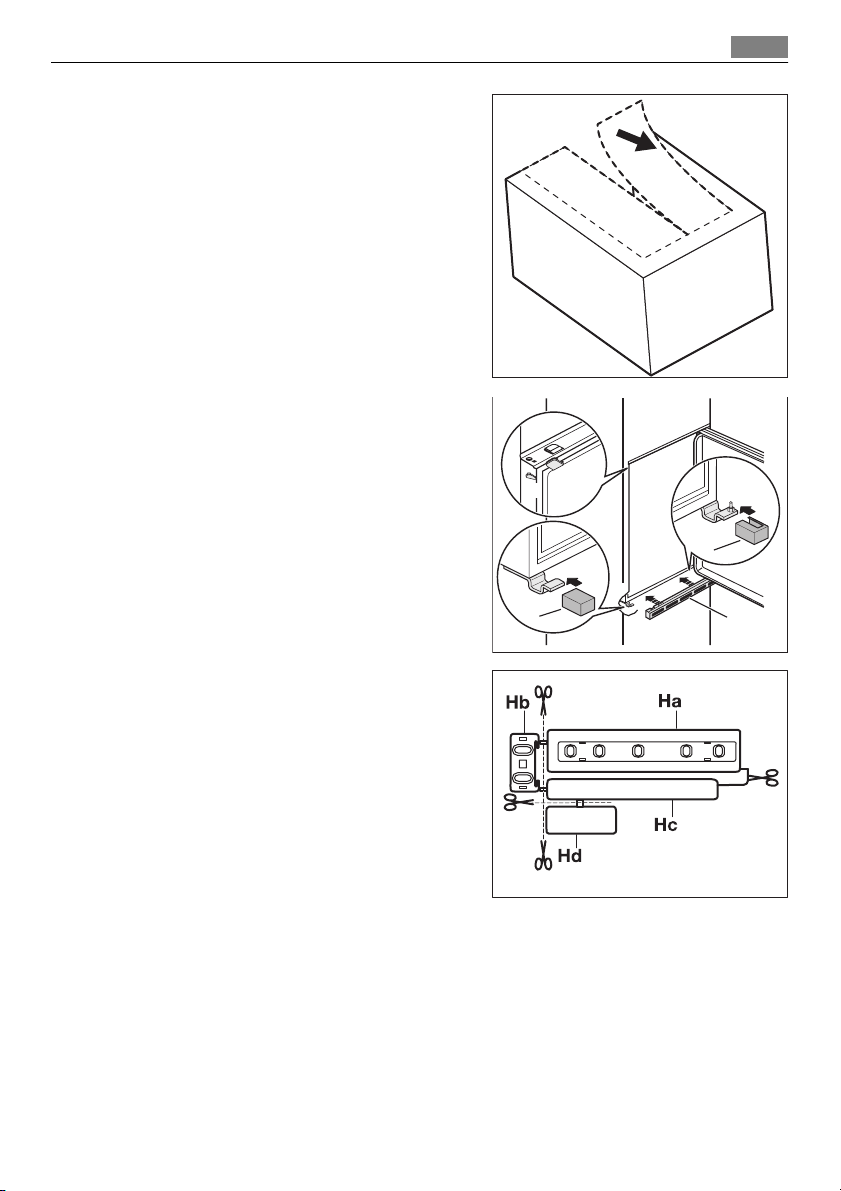
1. If necessary cut the adhesive sealing
strip and then apply it to the appliance
as shown in figure.
x
x
16 Installation
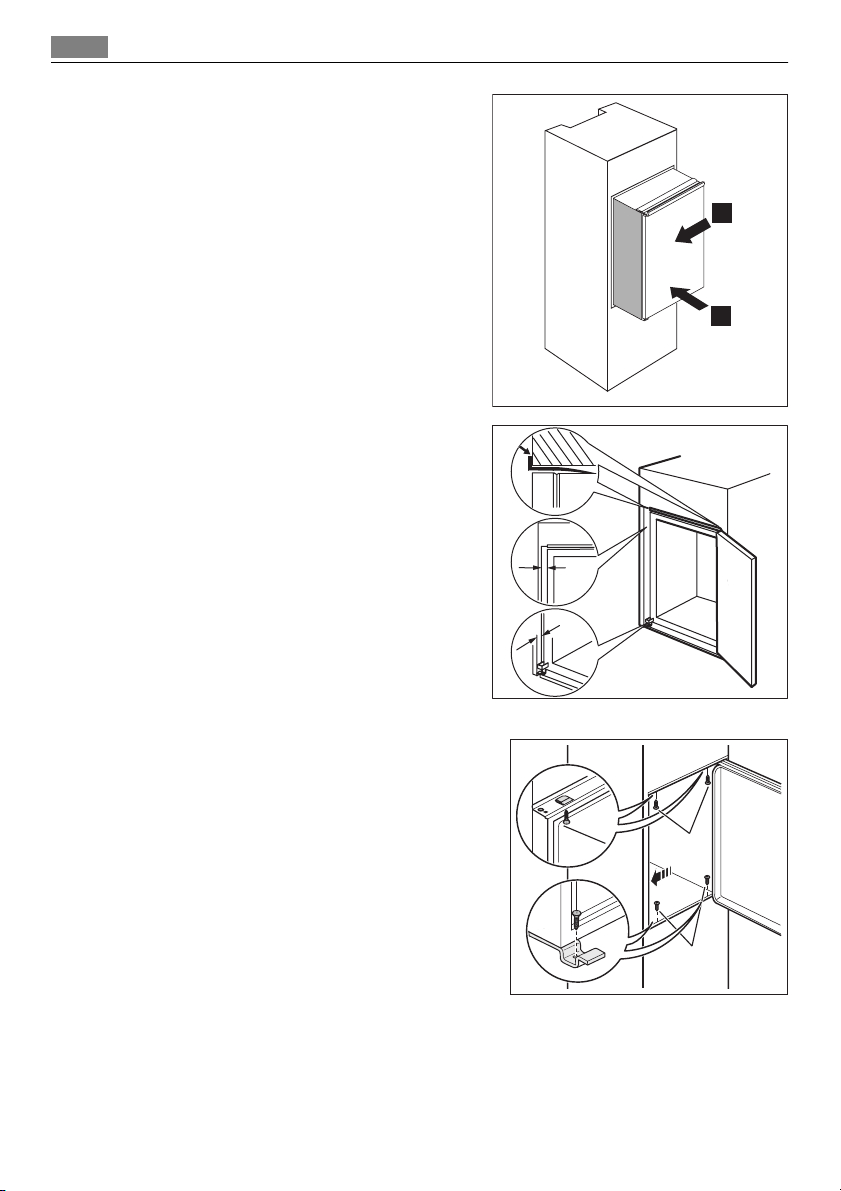
2. Install the appliance in the niche.
Push the appliance in the direction of
the arrow (1) until the upper gap cover
stops against the kitchen furniture.
Push the appliance in the direction of
the arrow (2) against the cupboard on
the opposite side of the hinge.
3. Adjust the appliance in the niche.
The lower hinge cover (in the accessories
bag) makes sure that the distance between the appliance and the kitchen
furniture is correct.
Make sure that the distance between
the appliance and the cupboard frontedge is 44 mm.
Make sure that the clearance between
the appliance and the cupboard is 4
mm.
Open the door. Put lower hinge cover in
position.
4. Attach the appliance to the niche with 4
screws.
2
1
4mm
44mm
I
I
5. Remove the correct part from the hinge
cover (E). Make sure to remove the part
DX, in the case of right hinge, SX in opposite case.
6. Attach the covers (C, D) to the lugs and
the hinge holes.
Install the vent grille (B).
Attach the hinge covers (E) to the hinge.
Installation 17
C
D
E
7. Disconnect the parts (Ha), (Hb), (Hc) and
(Hd).
E
B

18 Installation
8. Install the part (Ha) on the inner side of
the kitchen furniture.
9. Push the part (Hc) on the part (Ha).
10. Open the appliance door and the kitchen furniture door at an angle of 90°.
Insert the small square (Hb) into guide
(Ha).
Put together the appliance door and the
furniture door and mark the holes.
ca. 50 mm
ca. 50 mm
Hc
90°
21 mm
90°
21 mm
Ha
8 mm
Hb
Ha
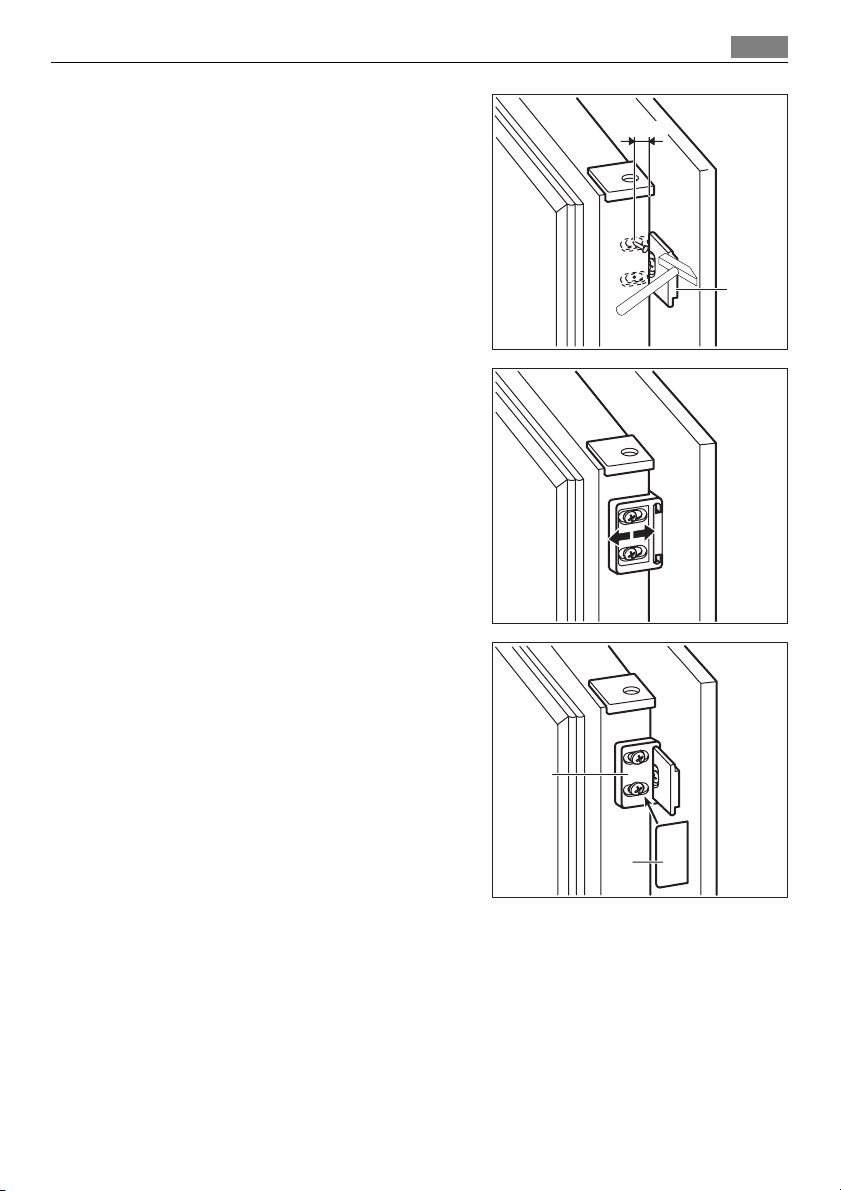
11. Remove the brackets and mark a distance of 8 mm from the outer edge of
the door where the nail must be fitted
(K).
12. Place the small square on the guide
again and fix it with the screws supplied.
Align the kitchen furniture door and the
appliance door by adjusting the part Hb.
Noises 19
8 mm
K
Ha
Hb
13. Press the part (Hd) on the part (Hb).
Do a final check to make sure that:
• All screws are tightened.
• The sealing strip is attached tightly to the
cabinet.
• The door opens and closes correctly.
Hb
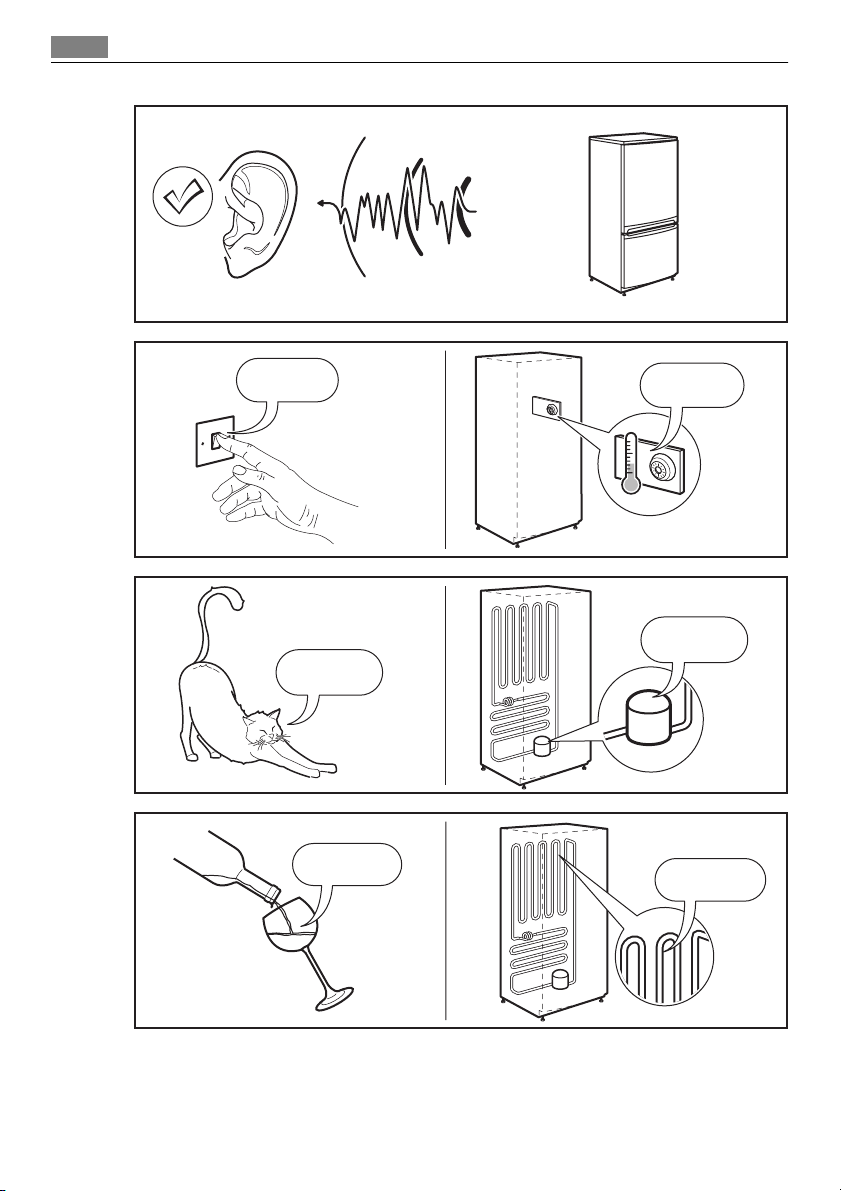
NOISES
There are some sounds during normal running (compressor, refrigerant circulation).
Hd
20 Noises
SSSRRR!
HISSS!
CLICK!
BRRR!
OK
CLICK!
BRRR!
CRACK!
BLUBB!
CLICK!
BRRR!
BLUBB!
BLUBB!
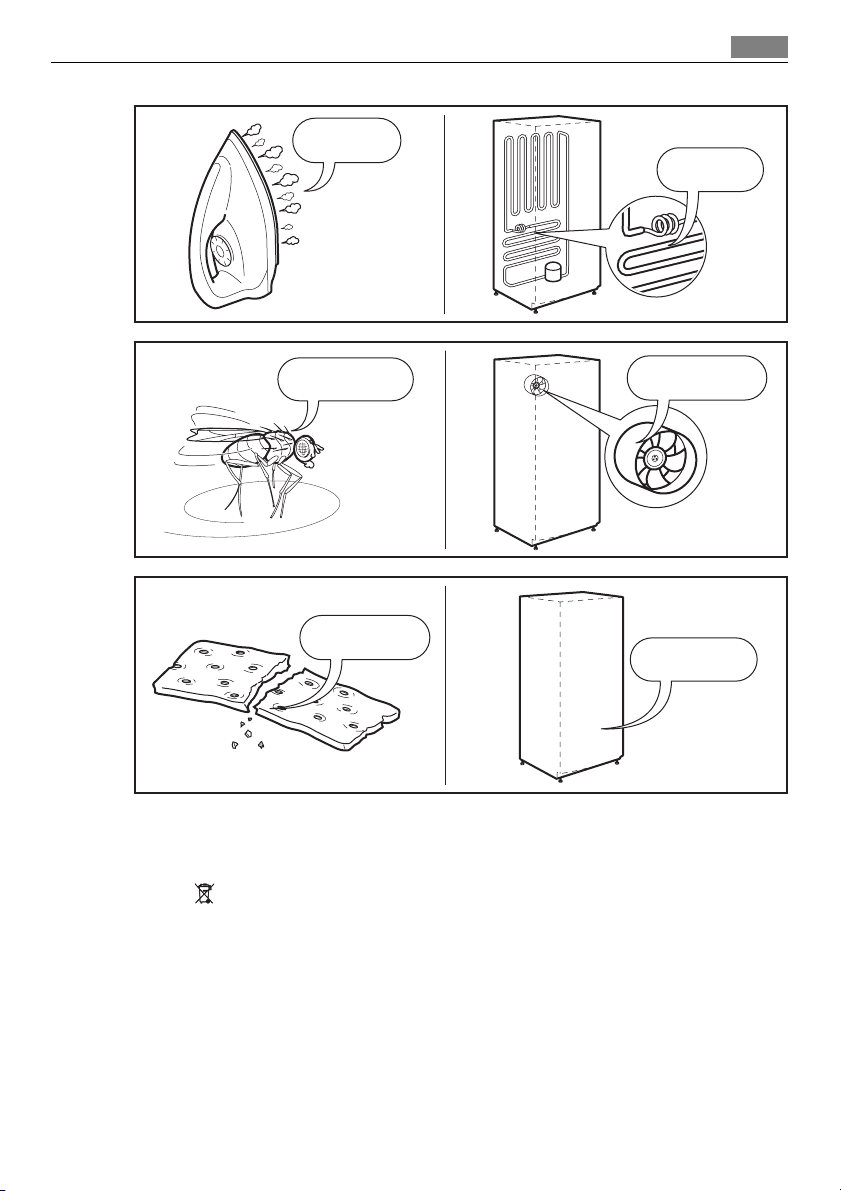
HISSS!
Environmental concerns
HISSS!
21
SSSRRR!
SSSRRR!
CRACK!
CRACK!
ENVIRONMENTAL CONCERNS
The symbol on the product or on its packaging indicates that this product may not be
treated as household waste. Instead it should be taken to the appropriate collection point
for the recycling of electrical and electronic equipment. By ensuring this product is
disposed of correctly, you will help prevent potential negative consequences for the
environment and human health, which could otherwise be caused by inappropriate waste
handling of this product. For more detailed information about recycling of this product,
please contact your local council, your household waste disposal service or the shop where
you purchased the product.
22
POUR DES RÉSULTATS PARFAITS
Merci d'avoir choisi ce produit AEG. Nous l'avons créé pour vous offrir la
meilleure performance pour une longue durée, avec des technologies innovantes
qui vous simplifient la vie - autant de caractéristiques que vous ne trouverez pas
sûrement pas sur d'autres appareils. Veuillez prendre quelques instants pour lire
cette notice afin d'utiliser au mieux votre appareil.
ACCESSOIRES ET CONSOMMABLES
Dans la boutique en ligne d'AEG, vous trouverez tout ce qu'il vous faut pour que
vos appareils AEG fonctionnent parfaitement. Sans oublier une vaste gamme
d'accessoires conçus et fabriqués selon les critères de qualité les plus élevés qui
soient, des articles de cuisine spécialisés aux range-couverts, des porte-bouteilles
aux sacs à linge délicats...
Visitez la boutique en ligne sur
www.aeg.com/shop

SOMMAIRE
Sommaire
24 Consignes de sécurité
27 Bandeau de commande
28 Première utilisation
28 Utilisation quotidienne
30 Conseils
30 Entretien et nettoyage
32 En cas d'anomalie de
fonctionnement
34 Caractéristiques techniques
34 Installation
40 Bruits
42 En matière de sauvegarde de
l'environnement
23
Les symboles suivants sont utilisés dans ce
manuel:
Informations importantes pour votre sécurité
et pour éviter d’abîmer l’appareil.
Informations générales et conseils
Informations écologiques
Sous réserve de modifications

24 Consignes de sécurité
CONSIGNES DE SÉCURITÉ
Pour votre sécurité et garantir une utilisation correcte de l'appareil, lisez attentivement cette notice, y compris les conseils et avertissements, avant d'installer et d'utiliser l'appareil
pour la première fois. Pour éviter toute erreur ou accident, veillez à ce que toute personne
qui utilise l'appareil connaisse bien son fonctionnement et ses fonctions de sécurité. Conservez cette notice avec l'appareil. Si l'appareil doit être vendu ou cédé à une autre personne, veillez à remettre cette notice au nouveau propriétaire, afin qu'il puisse se familiariser
avec son fonctionnement et sa sécurité.
Pour la sécurité des personnes et des biens, conservez et respectez les consignes de sécurité
figurant dans cette notice. Le fabricant décline toute responsabilité en cas de dommages
dus au non-respect de ces instructions.
Sécurité des enfants et des personnes vulnérables
• Cet appareil n'est pas destiné à être utilisé par des enfants ou des personnes dont les
capacités physiques, sensorielles ou mentales, ou le manque d'expérience et de connaissance les empêchent d'utiliser l'appareil sans risque lorsqu'ils sont sans surveillance ou en
l'absence d'instruction d'une personne responsable qui puisse leur assurer une utilisation
de l'appareil sans danger.
Empêchez les enfants de jouer avec l'appareil.
• Ne laissez pas les différents emballages à portée des enfants. Ils pourraient s'asphyxier.
• Si l'appareil doit être mis au rebut, veillez à couper le câble d'alimentation électrique au
ras de l'appareil pour éviter les risques d'électrocution. Démontez la porte pour éviter que
des enfants ne restent enfermés à l'intérieur.
• Cet appareil est muni de fermetures magnétiques. S'il remplace un appareil équipé d'une
fermeture à ressort, nous vous conseillons de rendre celle-ci inutilisable avant de vous en
débarrasser. Ceci afin d'éviter aux enfants de s'enfermer dans l'appareil et de mettre ainsi
leur vie en danger.
Consignes générales de sécurité
AVERTISSEMENT
Veillez à ce que les orifices de ventilation, situés dans l'enceinte de l'appareil ou la structure
intégrée, ne soient pas obstrués.
• Les appareils sont destinés uniquement à la conservation des aliments et/ou des boissons
dans le cadre d’un usage domestique normal, tel que celui décrit dans la présente notice.
• N'utilisez pas d'appareils électriques, d'agents chimiques ou tout autre système artificiel
pour accélérer le processus de dégivrage.
• Ne faites pas fonctionner d'appareils électriques (comme des sorbetières électriques, ...) à
l'intérieur des appareils de réfrigération à moins que cette utilisation n'ait reçu l'agrément du fabricant.
• N'endommagez pas le circuit frigorifique.
Consignes de sécurité
• Le circuit frigorifique de l’appareil contient de l’isobutane (R600a), un gaz naturel offrant
un haut niveau de compatibilité avec l’environnement mais qui est néanmoins inflammable.
Pendant le transport et l'installation de votre appareil, assurez-vous qu'aucune partie du
circuit frigorifique n'est endommagée.
Si le circuit frigorifique est endommagé :
– évitez les flammes vives et toute autre source d'allumage
– aérez soigneusement la pièce où se trouve l'appareil
• Ne modifiez pas les spécifications de l'appareil. Si le câble d'alimentation est endommagé, il peut causer un court circuit, un incendie et/ou une électrocution.
AVERTISSEMENT
Les éventuelles réparations ou interventions sur votre appareil, ainsi que le remplacement
du câble d'alimentation, ne doivent être effectuées que par un professionnel qualifié.
1. Ne branchez pas le cordon d'alimentation à une rallonge.
2. Assurez-vous que la prise n'est pas écrasée ou endommagée par l'arrière de l'appa-
reil. Une prise de courant écrasée ou endommagée peut s'échauffer et causer un incendie.
3. Vérifiez que la prise murale de l'appareil est accessible.
4. Ne débranchez pas l'appareil en tirant sur le câble.
5. Si la prise murale n'est pas bien fixée, n'introduisez pas de prise dedans. Risque
d'électrocution ou d'incendie.
6. N'utilisez pas l'appareil sans le diffuseur de l'ampoule (si présent) de l'éclairage in-
térieur.
• Cet appareil est lourd. Faite attention lors de son déplacement.
• Ne touchez pas avec les mains humides les surfaces givrées et les produits congelés (risque de brûlure et d'arrachement de la peau).
• Évitez une exposition prolongée de l'appareil aux rayons solaires.
• Les ampoules (si présentes) utilisées dans cet appareil sont des ampoules spécifiques uniquement destinées à être utilisées sur des appareils ménagers. Elles ne sont pas adaptées
à l'éclairage d'une habitation.
25
Utilisation quotidienne
• Ne posez pas d'éléments chauds sur les parties en plastique de l'appareil.
• Ne stockez pas de gaz ou de liquides inflammables dans l'appareil (risque d'explosion).
• Ne placez pas d'aliments directement contre la sortie d'air sur la paroi arrière de l'appareil. (Si l'appareil est sans givre.)
• Un produit décongelé ne doit jamais être recongelé.
• Conservez les aliments emballés conformément aux instructions de leur fabricant.
• Respectez scrupuleusement les conseils de conservation donnés par le fabricant de l'appareil. Consultez les instructions respectives.

26 Consignes de sécurité
• Ne mettez pas de bouteilles ni de boîtes de boissons gazeuses dans le compartiment congélateur, car la pression se formant à l'intérieur du contenant pourrait le faire éclater et
endommager ainsi l'appareil.
• Ne consommez pas certains produits tels que les bâtonnets glacés dès leur sortie de l'appareil, car ils peuvent provoquer des brûlures.
Entretien et nettoyage
• Avant toute opération d'entretien, mettez l'appareil à l'arrêt et débranchez-le.
• N'utilisez pas d'objets métalliques pour nettoyer l'appareil.
• N'utilisez pas d'objet tranchant pour gratter la couche de givre. N'employez pour cela
qu'une spatule en plastique.
Installation
Avant de procéder au branchement électrique, respectez scrupuleusement les instructions
fournies dans cette notice.
• Déballez l'appareil et vérifiez qu'il n'est pas endommagé. Ne branchez pas l'appareil s'il
est endommagé. Signalez immédiatement au revendeur de l'appareil les dommages
constatés. Dans ce cas, gardez l'emballage.
• Il est conseillé d'attendre au moins quatre heures avant de brancher l'appareil pour que
le circuit frigorifique soit stabilisé.
• Veillez à ce que l'air circule librement autour de l'appareil pour éviter qu'il ne surchauffe.
Pour assurer une ventilation suffisante, respectez les instructions de la notice (chapitre
Installation).
• Placez l'appareil dos au mur pour éviter tout contact avec le compresseur et le condenseur (risque de brûlure).
• Placez de préférence votre appareil loin d'une source de chaleur (chauffage, cuisson ou
rayons solaires trop intenses).
• Assurez-vous que la prise murale reste accessible après l'installation de l'appareil.
• Branchez à l'alimentation en eau potable uniquement. (Si un branchement sur le réseau
d'eau est prévu.)
Maintenance
• Les branchements électriques nécessaires à l'entretien de l'appareil doivent être réalisés
par un électricien qualifié ou une personne compétente.
• Cet appareil ne doit être entretenu et réparé que par un Service après-vente autorisé,
exclusivement avec des pièces d'origine.
Protection de l'environnement
Le système frigorifique et l'isolation de votre appareil ne contiennent pas de C.F.C. contribuant ainsi à préserver l'environnement. L'appareil ne doit pas être mis au rebut avec les
ordures ménagères et les déchets urbains. La mousse d'isolation contient des gaz inflammables : l'appareil sera mis au rebut conformément aux règlements applicables disponibles auprès des autorités locales. Veillez à ne pas détériorer les circuits frigorifiques, notamment au
niveau du condenseur. Les matériaux utilisés dans cet appareil identifiés par le symbole
sont recyclables.

Bandeau de commande
BANDEAU DE COMMANDE
1 2 3 54
Voyant
1
Dispositif de réglage de température
2
Voyant FROSTMATIC
3
Touche FROSTMATIC
4
Touche de réinitialisation de l'alarme sonore
Voyant Alarme
5
Mise en fonctionnement
1. Branchez l'appareil à une prise murale.
2. Tournez le thermostat dans le sens des aiguilles d'une montre sur une position média-
ne.
3. Le voyant s'allume et un signal sonore retentit pendant seulement deux secondes pour
confirmer la mise sous tension de l'appareil.
4. Le voyant Alarme clignote et l'alarme sonore retentit pour indiquer que la température
interne de l'appareil est trop élevée.
5. Appuyez sur la touche FROSTMATIC pour éteindre l'alarme sonore.
6. Appuyez à nouveau sur la touche FROSTMATIC , le voyant FROSTMATIC s'allume. Le
congélateur se met en fonctionnement.
27
Mise à l'arrêt
1. Pour mettre à l'arrêt l'appareil, tournez le dispositif de réglage de température sur la
position "O". Un signal sonore retentit pendant 2 s seulement.
2. Le voyant s'éteint.
Réglage de la température
La température régnant à l'intérieur de l'appareil est contrôlée par un thermostat situé sur
la partie supérieure de l'appareil
Pour faire fonctionner l'appareil, procédez comme suit :
• Tournez le thermostat sur la position minimum pour obtenir moins de froid.
• Tournez le thermostat sur la position maximum pour obtenir plus de froid.
Une position moyenne est généralement la plus indiquée.
Toutefois, le réglage doit être choisi en tenant compte du fait que la température à l'intérieur de l'appareil dépend de plusieurs facteurs :
• la température ambiante
 Loading...