


LYFE SILVER
USER MANUAL
ENGLISH

Table of Contents
Box Content . . . . . . . . . . . . . . . . . . . . . . . |
. . . . 1 |
Camera Basics . . . . . . . . . . . . . . . . . . . . |
. . . . 3 |
Indicator Light Statuses . . . . . . . . . . . . |
. . . . 4 |
Getting Started |
|
Battery Installation . . . . . . . . . . . . . . . . . . . . |
5 |
microSD Card Insertion .. . . . . . . . . . . . . . . |
. 5 |
Charging the Battery . . . . . . . . . . . . . . . . . |
. . . . 6 |
Power On/Off . . . . . . . . . . . . . . . . . . . . . . . . . |
7 |
Touch Screen Operation |
|
Default View . . . . . . . . . . . . . . . . . . . . . . . . . . |
9 |
Main Menu . . . . . . . . . . . . . . . . . . . . . . . . |
. . . 10 |
Video Mode ....................... |
11-13 |
Photo Mode . . . . . . . . . . . . . . . . . . . . . . . |
. . . 14 |
Setting Mode. . . . . . . . . . . . . . . . . . . . . . . . |
15-17 |
Library . . . . . . . . . . . . . . . . . . . . . . . . . . . |
18-19 |
Data Transfer |
|
Transfering Data to Computer . . . . . . . . . . |
20 |
Viewing Photos and Video on TVs . . . . . . . |
20 |
Connecting to the AEE APP . . . . . . . . . . . . |
21 |
Accessory |
|
Accessory Application . . . . . . . . . . . . . . . . . |
22 |
Specifications .. . . . . . . . . . . . . . . . . . . . . . . |
23 |
Troubleshooting . . . . . . . . . . . . . . . . . . . . . |
24 |
FCC Notification . . . . . . . . . . . . . . . . . . . . . . |
25 |
i

Disclaimer
Please use common sense and caution when operating camera(s)..
1.Keep the camera out of high temperatures and/or direct sunlight..
2.Keep the memory card away from any object with a strong magnetic field (i..e.. TV, loud speaker, magnetic iron) and any place that has static electricity to prevent lost data storage..
3.If the battery overheats or smoke or odd odors emerge when charging, immediately pull the plug from the power outlet to prevent a possible fire hazard..
4.Keep out of the reach of children when charging the battery..
5.Store the camera in a cool, dry, dust free location..
6.Keep the camera away from any object with a strong magnetic field (i..e.. a magnetic iron or motor) or objects that send out strong wireless waves (i..e.. an antenna) because damage might occur..
ii

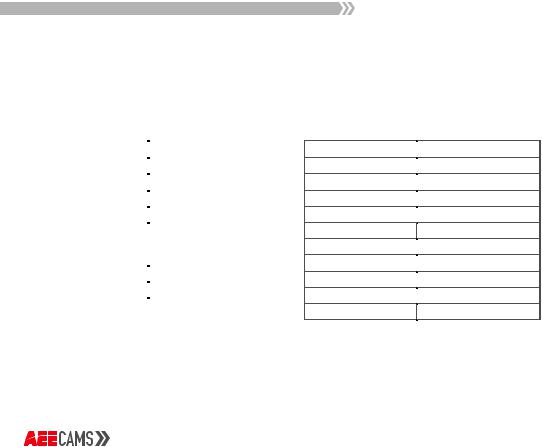
Box Content
LYFE ONYX CAMERA
Lithium Battery |
Waterproof Housing |
Quick Release |
|
|
Frame |
Quick Release Buckle |
Curved Adhesive Mount |
Flat Adhesive Mount |
1
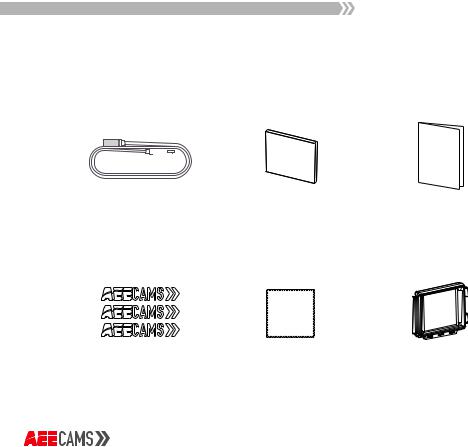
Box Content
|
|
|
|
Anti-Fog Inserts |
Quick Start Guide |
|
|
|
|
||
|
|
|
|
||
|
|
USB Cable |
|||
Stickers |
Lens Cleaning Cloth |
Back Panel Cover |
2

Camera Basics
1. |
Stop Recording |
7. |
Battery Cover |
14. |
Micro HDMI Port |
|
Button |
8. |
Mic |
15. |
microSD Card Slot |
2. |
Shutter Button |
9. |
Wide Angle Lens |
16. |
Micro USB Port |
3. |
Green Indicator Light |
10. |
Green Indicator Light |
|
|
|
[L1] |
|
[L1] |
|
|
4. |
Blue WiFi Indicator |
11. |
Red Indicator Light |
|
|
|
Light [L2] |
|
[L3] |
|
|
5. |
WiFi Button |
12. |
Built-in Touch LCD |
|
|
6. |
Power Button/Record |
|
Screen |
|
|
|
Button |
13. |
Speaker |
|
|
3
Indicator Lights
Camera Status |
Green Light [L1] |
Camera Status |
|
Red Light [L3] |
Recording Video |
Flashing |
Charging Battery |
|
Flashing |
Recording Audio |
Flashing |
Power On |
|
Solid |
Taking Photos |
Single Flash |
Recording Video |
|
Solid |
Card Full |
Solid |
Recording Audio |
|
Solid |
|
|
Taking Photos |
|
Solid |
|
|
Card Full |
|
Solid |
|
|
|
||
|
|
Charged Battery |
|
Solid |
|
|
|
||
Camera Status |
Green Light [L2] |
Low Power Warning |
|
Solid |
WiFi Enabled |
Flashing |
|
||
Data Transmission |
|
Solid |
||
|
||||
|
|
|
||
|
|
WiFi Enabled |
|
Solid |
4
Getting Started
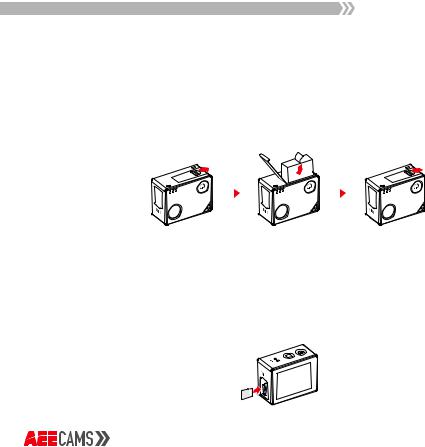
Battery Installation
Slide the battery cover in the direction of the arrow, then place the battery into the battery compartment and close the cover..
microSD Card Insertion
When powered off, slide the microSD card into the microSD card slot with the label facing the front of the camera.. When the microSD card is fully inserted, it will click into place..
*microSD card with UHS Speed Class 3 (U3) transfer rate or higher is required.
5

Getting Started
Charging the Battery
Connect the Micro USB cord to the camera and connect the other end to a computer or
5V/2A AC power adapter or portable power source..
*Please remove the battery when operating the camera for long periods of time while plugged into a power source to prevent damage to the battery.
6
 Loading...