

Page 1

LYFE SILVER
USER MANUAL
ENGLISH
Page 2

Table of Contents
Box Content ..........................1
Camera Basics .......................3
Indicator Light Statuses ...............4
Getting Started
Battery Installation ....................5
microSD Card Insertion ................5
Charging the Battery .................... 6
Power On/O .........................7
Touch Screen Operation
Default View .......................... 9
Main Menu ..........................10
Video Mode .......................11-13
Photo Mode .........................14
Setting Mode .......................15-17
Library ..........................18-19
Data Transfer
Transfering Data to Computer .........20
Viewing Photos and Video on TVs ......20
Connecting to the AEE APP ...........21
Accessory
Accessory Application ................22
Specifications .......................23
Troubleshooting .....................24
FCC Notification .....................25
i
Page 3

Disclaimer
Please use common sense and caution when operating camera(s).
1. Keep the camera out of high temperatures and/or direct sunlight.
2. Keep the memory card away from any object with a strong magnetic field (i.e. TV, loud speaker, magnetic iron) and any
place that has static electricity to prevent lost data storage.
3. If the battery overheats or smoke or odd odors emerge when charging, immediately pull the plug from the power
outlet to prevent a possible fire hazard.
4. Keep out of the reach of children when charging the battery.
5. Store the camera in a cool, dry, dust free location.
6. Keep the camera away from any object with a strong magnetic field (i.e. a magnetic iron or motor) or objects that send
out strong wireless waves (i.e. an antenna) because damage might occur.
ii
Page 4
LYFE ONYX CAMERA
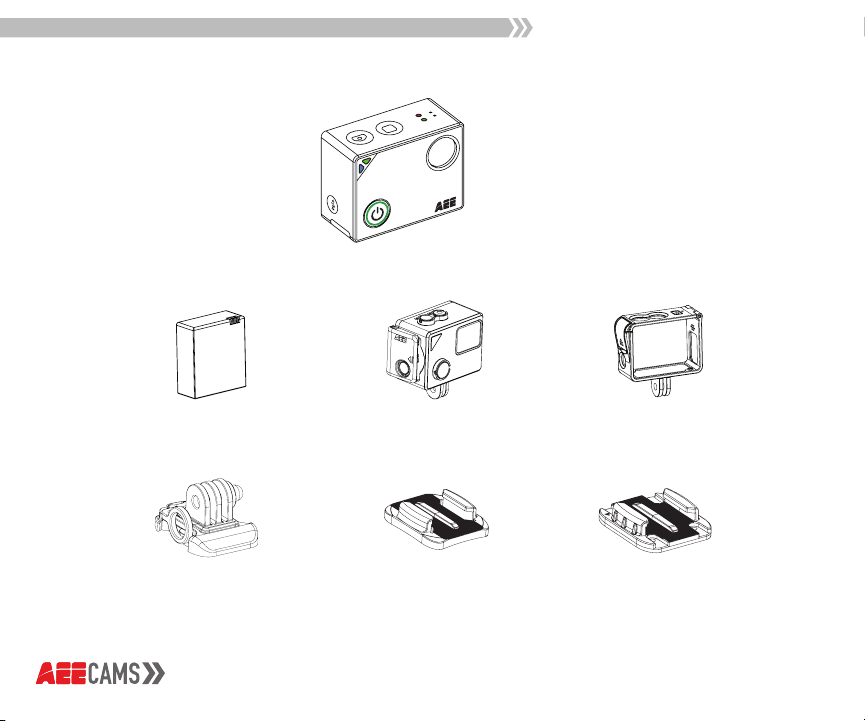
Box Content
Lithium Battery
Quick Release Buckle
Waterproof Housing
Curved Adhesive Mount
Quick Release
Frame
Flat Adhesive Mount
1
Page 5
Box Content
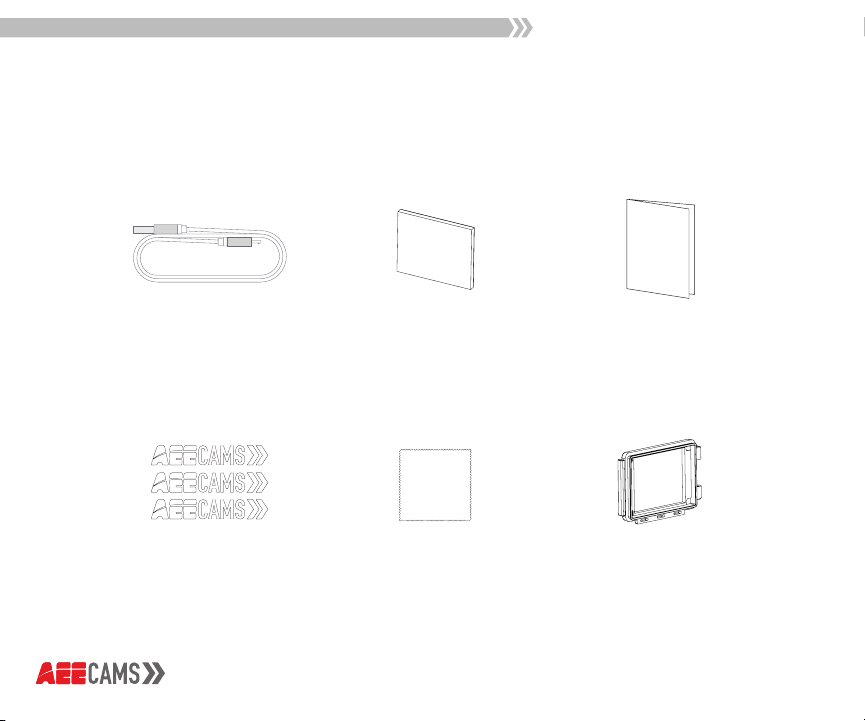
USB Cable
Stickers
Anti-Fog Inserts
Lens Cleaning Cloth
Quick Start Guide
Back Panel Cover
2
Page 6
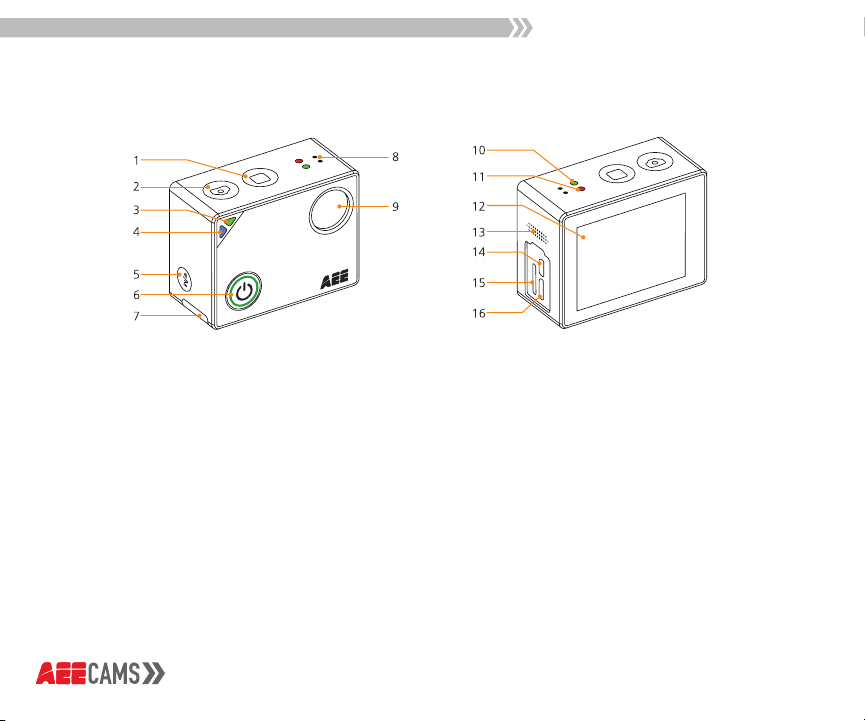
Camera Basics
1. Stop Recording
Button
2. Shutter Button
3. Green Indicator Light
[L1]
4. Blue WiFi Indicator
Light [L2]
5. WiFi Button
6. Power Button/Record
Button
7. Battery Cover
8. Mic
9. Wide Angle Lens
10. Green Indicator Light
[L1]
11. Red Indicator Light
[L3]
12. Built-in Touch LCD
Screen
13. Speaker
14. Micro HDMI Port
15. microSD Card Slot
16. Micro USB Port
3
Page 7
Indicator Lights
Camera Status
Recording Video
Recording Audio
Taking Photos
Card Full
Camera Status
WiFi Enabled
Green Light [L1]
Flashing
Flashing
Single Flash
Solid
Green Light [L2]
Flashing
Camera Status
Charging Battery
Power On
Recording Video
Recording Audio
Taking Photos
Card Full
Charged Battery
Low Power Warning
Data Transmission
WiFi Enabled
Red Light [L3]
Flashing
Solid
Solid
Solid
Solid
Solid
Solid
Solid
Solid
Solid
4
Page 8
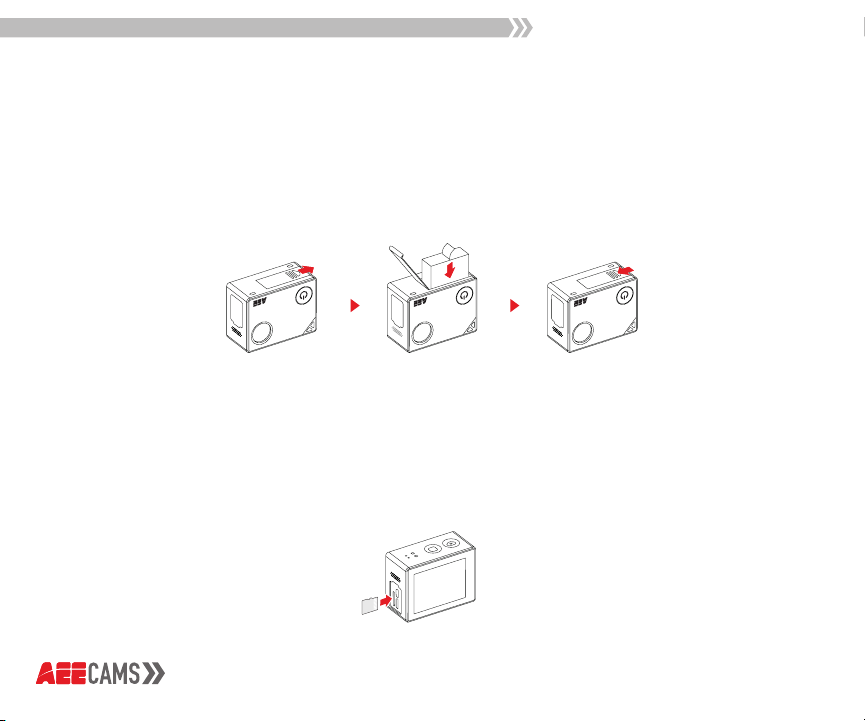
Battery Installation
Slide the battery cover in the direction of the arrow, then place the battery into the
battery compartment and close the cover.
microSD Card Insertion
When powered o, slide the microSD card into the microSD card slot with the label
facing the front of the camera. When the microSD card is fully inserted, it will click
into place.
*microSD card with UHS Speed Class 3 (U3) transfer rate or higher is required.
Getting Started
5
Page 9

Getting Started
Charging the Battery
Connect the Micro USB cord to the camera and connect the other end to a computer or
5V/2A AC power adapter or portable power source.
*Please remove the battery when operating the camera for long periods of time while plugged
into a power source to prevent damage to the battery.
6
Page 10

Power On/Off
Press and hold the Power/Record button for approximately 3 seconds to turn the
camera on or o.
*When powered on, the red indicator light (L3) will turn on and the camera will be in preview mode.
Getting Started
7
Page 11

TOUCH SCREEN OPERATION
Page 12

Default View
1
1. Indicates Modes Selected
2. Record Time
3. Battery Level
4. Video Resolution & Viewing Angle
5. Tap on Menu Button to enter Main Menu
6. Remaining Record Time
2 3
654
9
Page 13

Main Menu
icon
Description
Tap the Video Icon to enter Video Mode
Tap the Camera Icon to enter Photo Mode
Tap the Burst Icon to enter Burst Photo Mode
Tap the Interval Shooting Icon to enter Interval
Shooting Mode
Tap the Library Icon to view photos and videos
Tap the Setting Icon to change settings
*Tap the “x” in the top left-hand corner to exit.
10
Page 14

Video Mode
Function
Video Modes
Description
Record: Select to record video with audio
Video Only: Select to record video only
Audio Only: Select to record audio only
Slow Motion: Select to record a slow motion video
Interval Record: Set time for Interval Record: 1s/2s/5s/10s/30s/60s
To take a sequence of frames at set intervals to record changes that
take place slowly over time. (Time-Lapse)
Auto Record: Set time for Auto Record: 5s/10s/20s
Video + Photo: Set time to take photo(s) during video
recording: Manual/5s/10s/30s/60s
11
Page 15

Video Mode
Function
Resolution
Viewing Angle
Bit Rate
Auto
Overwrite
180º Image Flip
Time Stamp
Description
Select Video Resolution: 4k@10fps, 2.7K@15fps,
1440P@30fps, 1080P@60fps/30fps, 720P@120fps/60fps,
480p@240fps
Select Viewing Angle: Ultra Wide, Wide, Medium
Select Bit Rate: High, Normal
Turn Auto Overwrite: On/O
When Auto Overwrite is turned on, it will record over
existing files when microSD card is full
Turn Auto Image Rotation: On/O
Turn Auto Image Rotation on to have the camera automatically adjust right side up when mounted upside down
Turn Time Stamp: On/O
Turn Time Stamp on to show the current day,
month, year, and time in the recorded file
12
Page 16

Video Resolution Viewing Angle (FOV)*
4K
1440P
1080P
960P
720P
Ultra Wide, Wide,
Medium
Ultra Wide, Wide,
Medium
Ultra Wide, Wide,
Medium
Ultra Wide, Wide,
Medium
Ultra Wide, Wide,
Medium
*FOV: Field of View
Video Mode
13
Page 17

Photo Mode
Function
Photo Modes
Resolution
Time Stamp
Description
Tap Shutter: If turned on, tap screen to take a picture
Burst: Select Burst Mode: 3 photos/1s, 5 photos/1s, 10 photos/1s
Interval Shooting: Sets Frequency for pics to be taken:
1s, 2s, 3s, 5s, 10s, 30s, 60s
Self Timer: Pics will be taken automatically after setting time:
2s, 3s, 5s, 10s
Select Image Resolution: 16MP (4608x3456 4:3),
12MP (4000x3000 4:3), 8MP (3200x2400 4:3)
Turn Time Stamp: On/O
Turn Time Stamp on to show the current day,
month, year, and time in the file
14
Page 18

Settings Mode
Function
Sound
G-Sensor
WiFi Mode
Bluetooth
Mode
Status
Indicator
Screen
Display
Description
Turn Sound on to hear beeping indicators
Turn G-Sensor on to start recording (in video mode) when
camera moves. Camera will stop recording when moving
stops after 3 minutes
Turn WiFi on to connect to APP ZONE on the Lyfe Onyx
network, select Mobile APP for smartphone devices,
select Wi-Fi Remote for remote controls
Select Search Mode to connect with the selfie stick
Turn on to see camera status functions
Turn on to see Camera Mode, Record Time, Power Level,
Resolution, Viewing Angle, Menu Button, and Remaining
Record Time.
15
Page 19

Settings Mode
Function
Sleep Mode
White
Balance
Stabilization
Display
Standby
TV Output
Language
Description
Camera will enter power-saving state when no user activity has been
sensed for a certain time: O, 2min, 5min, 10min
Select the appropriate setting according to the lighting conditions of
the application scenario
Digital image stabilization: on / o
Display will be automatically turned o when no user activity has
been sensed for a certain time: O, 10s, 30s, 60s
Select PAL or NTSC
Select Traditional Chinese , English (default), German, French,
Italian, Spanish, Portuguese, Dutch, Turkish, Russian, Hungarian,
Danish, Finnish, Norwegian, Sweden,Greek, Polish, Czech
16
Page 20

Date/Time
Format SD Card
Function Description
Date/Time
Select Date & Time format:
M/D/Y H:M, D/M/Y H:M, Y/M/D H:M
Settings Mode
Format SD
Card
Restore
Defaults
Version
Confirm to delete all files on microSD card
Confirm to Restore Factory Settings
Displays software version
17
Page 21

Library
Function
Video Files
Photo Files
All Files
Description
Displays all video & audio files
Displays all photo files
Displays all video, audio & photo files
18
Page 22

Tap on thumbnail to open any file
Click on the square on the top left-hand corner
of the thumbnail to select each file
After selecting 1 or more files, three yellow
option squares ( ) appear in the top righthand corner.
Tap on the three yellow option squares
( ) to delete and lock the files selected.
*Exit this screen by touching the “x” exit button in the top left-hand corner
Library
19
Page 23

Data Transfer
Transferring Data to Computer
1. Connect the Micro USB cord to the camera and connect the other end to a computer.
2. Turn the camera on.
3. If using Windows, go to “My Computer” and search for “Removable Disc.” Double click
on “Removable Disc.” Copy and paste the files to the computer.
4. If using Mac OS, the library will pop up immediately. Simply click on “Start Import” to
import your files.
*Files cannot be imported to microSD card via USB cable when the card is inserted in the camera.
Files cannot be deleted from the microSD card directly from computer, it needs to be done through camera.
Viewing Photos and Videos on TVs
Photos and videos can be viewed on TVs or monitors that have an HDMI port. Check to see
that your camera is set to the correct video format.
*Please enter playback mode before using HDMI port to the TVs or montitors
20
Page 24

Connecting to the AEE ZONE
1. On your mobile device, turn the WiFi on and download the AEE ZONE from the Google Play or Apple Store.
2. Press and hold the WiFi Button for 3 seconds to turn on the camera WiFi.
3. Go to WiFi settings on your mobile device, find and select the Lyfe Onyx network,
and enter the password: AEE12345.
4. Launch the AEE ZONE and click on the Camera button in the APP. Use your camera
with the AEE ZONE.
*Make sure that the Wi-Fi mode in the camera setup menu is on “Mobile
APP” before connecting the product.
*After the WiFi is turned on, the G-Sensor feature will turn o automatically.
AEE ZONE
21
Page 25

Accessory Application
Accessory Application
The Lyfe Cams are suitable for handheld use or hands-free use by using appropriate
accessories. The Lyfe Cams come with waterproof housing that is used to record videos and take photos underwater.
Waterproof Case:
Quick Release Buckle + Thumb Screw+ Housing = Complete Unit
Quick Release Frame:
22
Page 26

Specications
Photo Resolution
Lens
Photo Mode
Burst Mode
Self Timer
Interval Shooting
Interface
Operating Temperature
Storage Temperature
Weight
Other Functions
16MP, 12MP, 8MP
Angle: 140°
Aperture: 2.5f
Tap Shutter, Burst, Self
Timer, Interval Shooting
3 photos/1s, 5 photos/1s,
10 photos/1s
2s, 3s, 5s, 10s
1s, 2s, 3s, 5s, 10s, 30s,
60s
Micro USB, Micro HDMI,
microSD
0°C to 60°C
-20°C to 60°C
67g
Built-In WiFi, Built-In Bluetooth, 4x Digital Zoom, Video Loop,
Auto Record, 180º Image Flip, Sleep Mode (2min, 5min, 10min)
Video Resolution (MP4)
Screen
Video Mode
Video + Photo
Interval Record
Auto Record
Memory
Battery
Dimension
4k@24fps, 2.7K@30fps,1440P@30fps,
1080P@60fps/30fps, 720P@120fps/60fps,480p@240fps
1.8“ Touchscreen integrated
Record, Video Only, Audio Only,
Slow Motion, Interval Record, Auto Record,
Video + Photo
5s, 10s, 30s, 60s or Manual
1s, 2s, 5s, 10s, 30s, 60s
5s, 10s, 20s
microSD card (up to 64GB)
1050 mAh
52mm x 26mm x 40mm
23
Page 27

Troubleshooting
1. If you don’t use your camera for a long period of time, please charge it every 6
months to maintain the battery life.
2. Using the digital zoom feature will slightly reduce the image quality. Please be
aware of this and use at your discretion.
3. It is suggested to upload and view large video/photo/audio files on your computer
to ensure quality viewing.
4. If your video files are corrupt, try reformatting the microSD card with the camera.
To do this, go into the settings mode, locate the format SD card option and confirm.
5. During operation, the camera might become noticeably warm. Do not be concerned, as the camera is operating normally. The camera will automatically shut
down if it overheats to prevent damage.
6. Turn o the camera before inserting the microSD card for best performance.
7. While it is possible to use the camera while the battery is charging, you run the
risk of shortening the battery life and damaging it.
24
Page 28

FCC Notication
FCC Compliance Statement
This device complies with part 15 of the FCC Rules. Operation is subject to the following
two conditions:
• This device may not cause harmful interference.
• This device must accept any interference received, including interference that may
cause undesired operation.
This equipment has been tested and found to comply with the limits for a Class B digital
device, pursuant to part 15 of the FCC Rules. These limits are designed to provide reasonable protection against harmful interference in a residential installation. This equipment
generates, uses and can radiate radio frequency energy, and if not installed and used
in accordance with the instructions, may cause harmful interference to radio communications. However, there is no guarantee that interference will not occur in a particular
installation.
If this equipment does cause 25 harmful interferences to radio or television reception,
which can be determined by turning the equipment o and on, the user is encouraged to
try to correct the interference by one or more of the following measures:
• Reorient or relocate the receiving antenna.
• Increase the separation between the equipment and receiver.
• Connect the equipment into an outlet on a circuit dierent from that to which the receiver
is connected.
• Consult the dealer or an experienced radio/TV technician for help.
FCC Caution
Any changes or modifications to the equipment not expressly approved by the party
responsible for compliance could void user’s authority to operate the equipment.
25
Page 29

 Loading...