

Page 1
Page 2
aee.com
]
]
]
]
]
]
[ 12
[ 14
[ 16
[ 18
[ 19
[ 1 ]
PWR
PBC
DC IN
[ 1 ]
[ 4 ]
[ 5 ]
[ 6 ]
[ 7 ]
[ 2 ]
[ 3 ]
AEE AP11 Quick Start Guide
Disclaimer
Please read this disclaimer carefully before using the product of Quadcopter. This product is not suitable for people under the age of 18. By using this product,
you hereby agree to this disclaimer and signify that you have read them fully. You agree that you are responsible for your own conduct and content while using this
product, and for any consequences there of. You agree to use this product only for purposes that are proper and in accordance with the terms and any applicable or
guidelines AEE may make available.
1. Shenzhen AEE Technology Co., Ltd. reserves the right of nal interpretation of this disclaimer.
2. Any par t of this disclaimer is subject to change without prior notice.
3. This disclaimer is available in multiple languages. In case of any discrepancy, the Chinese version shall prevail.
Instructions
[ 1 ]
[ 3 ]
[ 4 ]
[ 7 ]
[ 8 ]
S
D
E
S1 S2 S3 S4
[ 11 ]
]
]
]
]
]
GPS
NRM
Operating Instructions
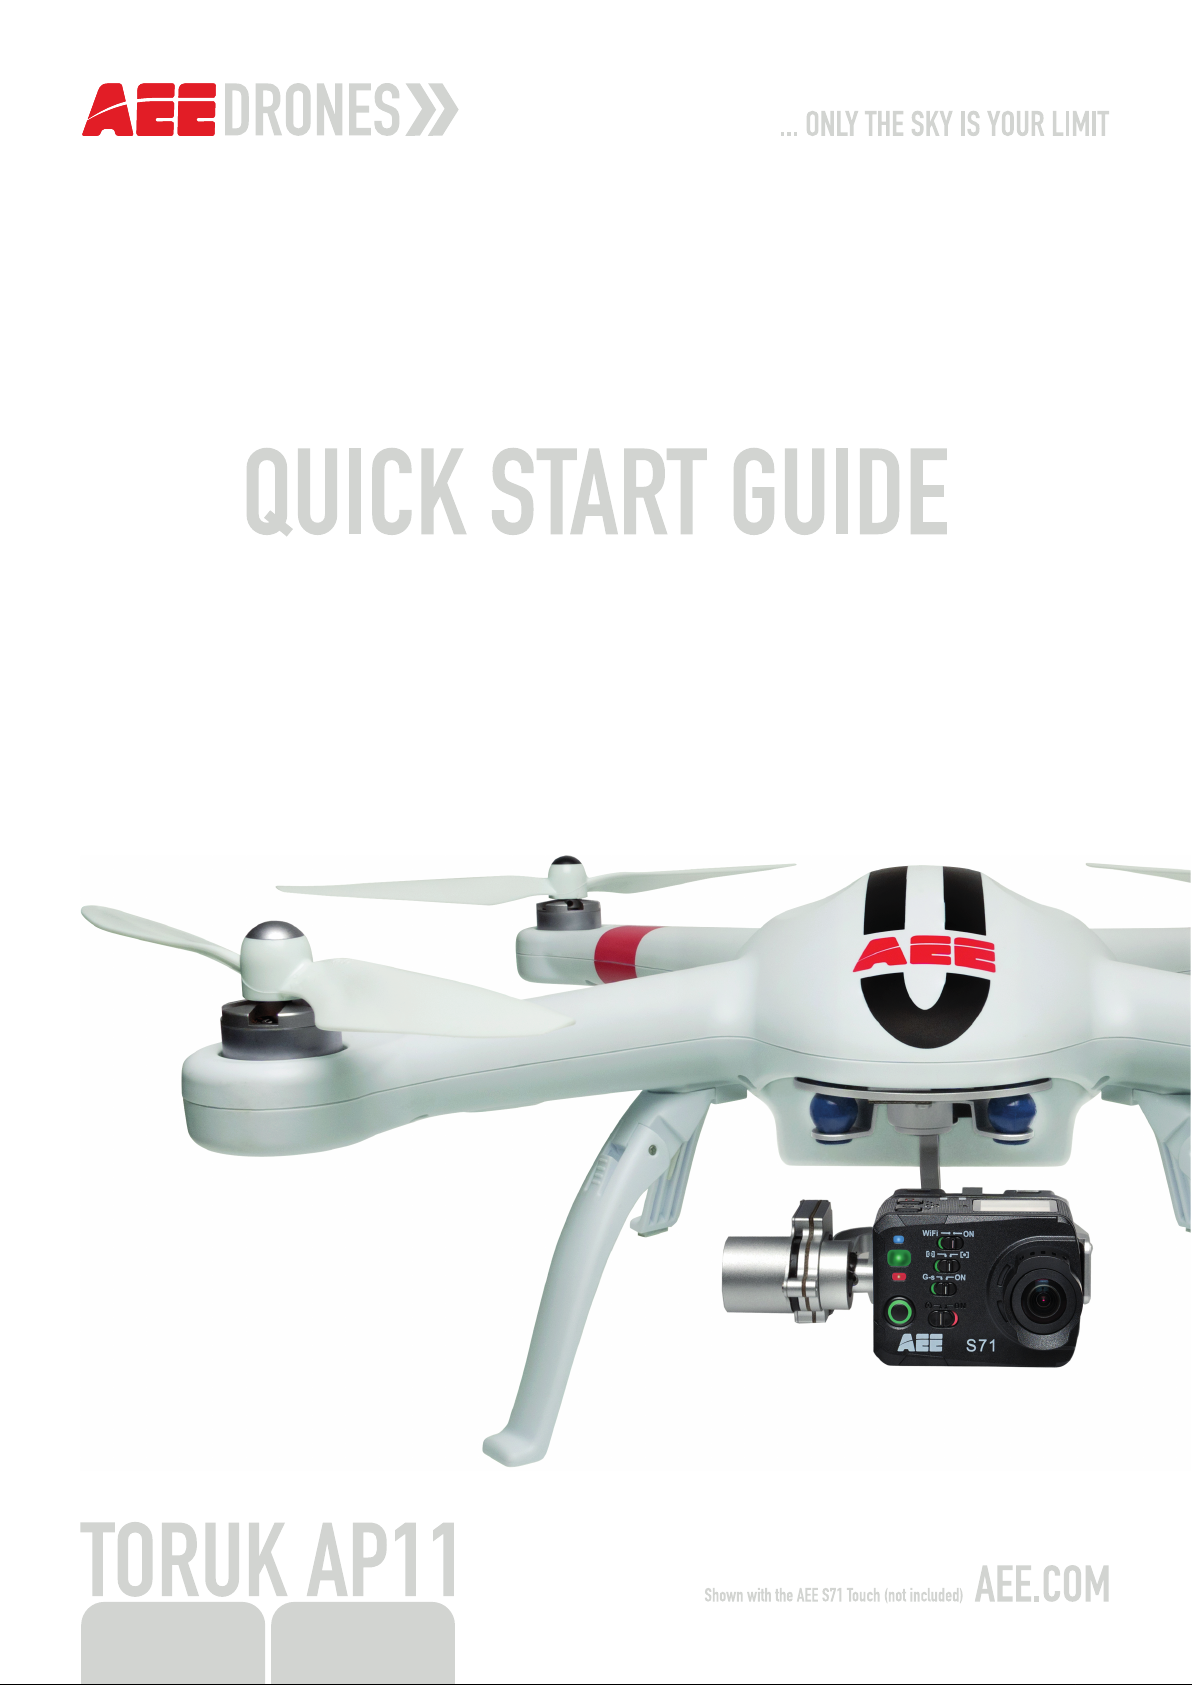
Remote control (U.S.
Mode)
Quadcopter Direction(" " indicates
[ 1 ] Antenna
[ 2 ] Wi-Fi Repeater
[ 3 ] Smartphone Holder
[ 7 ] Quadcopter Battery [ 8 ] Tail Indicator [ 9 ] Power Switch
[ 10 ] Rear Indicator [ 11 ] Battery Level LCD Segment Display
[ 12 ] Battery Level Check Button
[ 4 ] Hook open/close button
[ 5 ] Speed control switch S1
[ 2 ]
[ 6 ] Return button
[ 7 ] Speed control switch S1
[ 8 ] Calibration switch S2
[ 5 ]
[ 6 ]
[ 9 ] Angle control switch S3
[ 9 ]
GPS
NRM
F M
[ 10 ] Flight mode switch S4
[ 10
[ 11 ] Remote Control Power Indicator
[ 13
[ 12 ] Status Indicator
[ 15
[ 13 ] Photo Shooting & Video Recording
[ 17
Indicator
[ 20
[ 14 ] Buzzer hole
[ 21
[ 15 ] Strap Hole
[ 16 ] Left Joystick
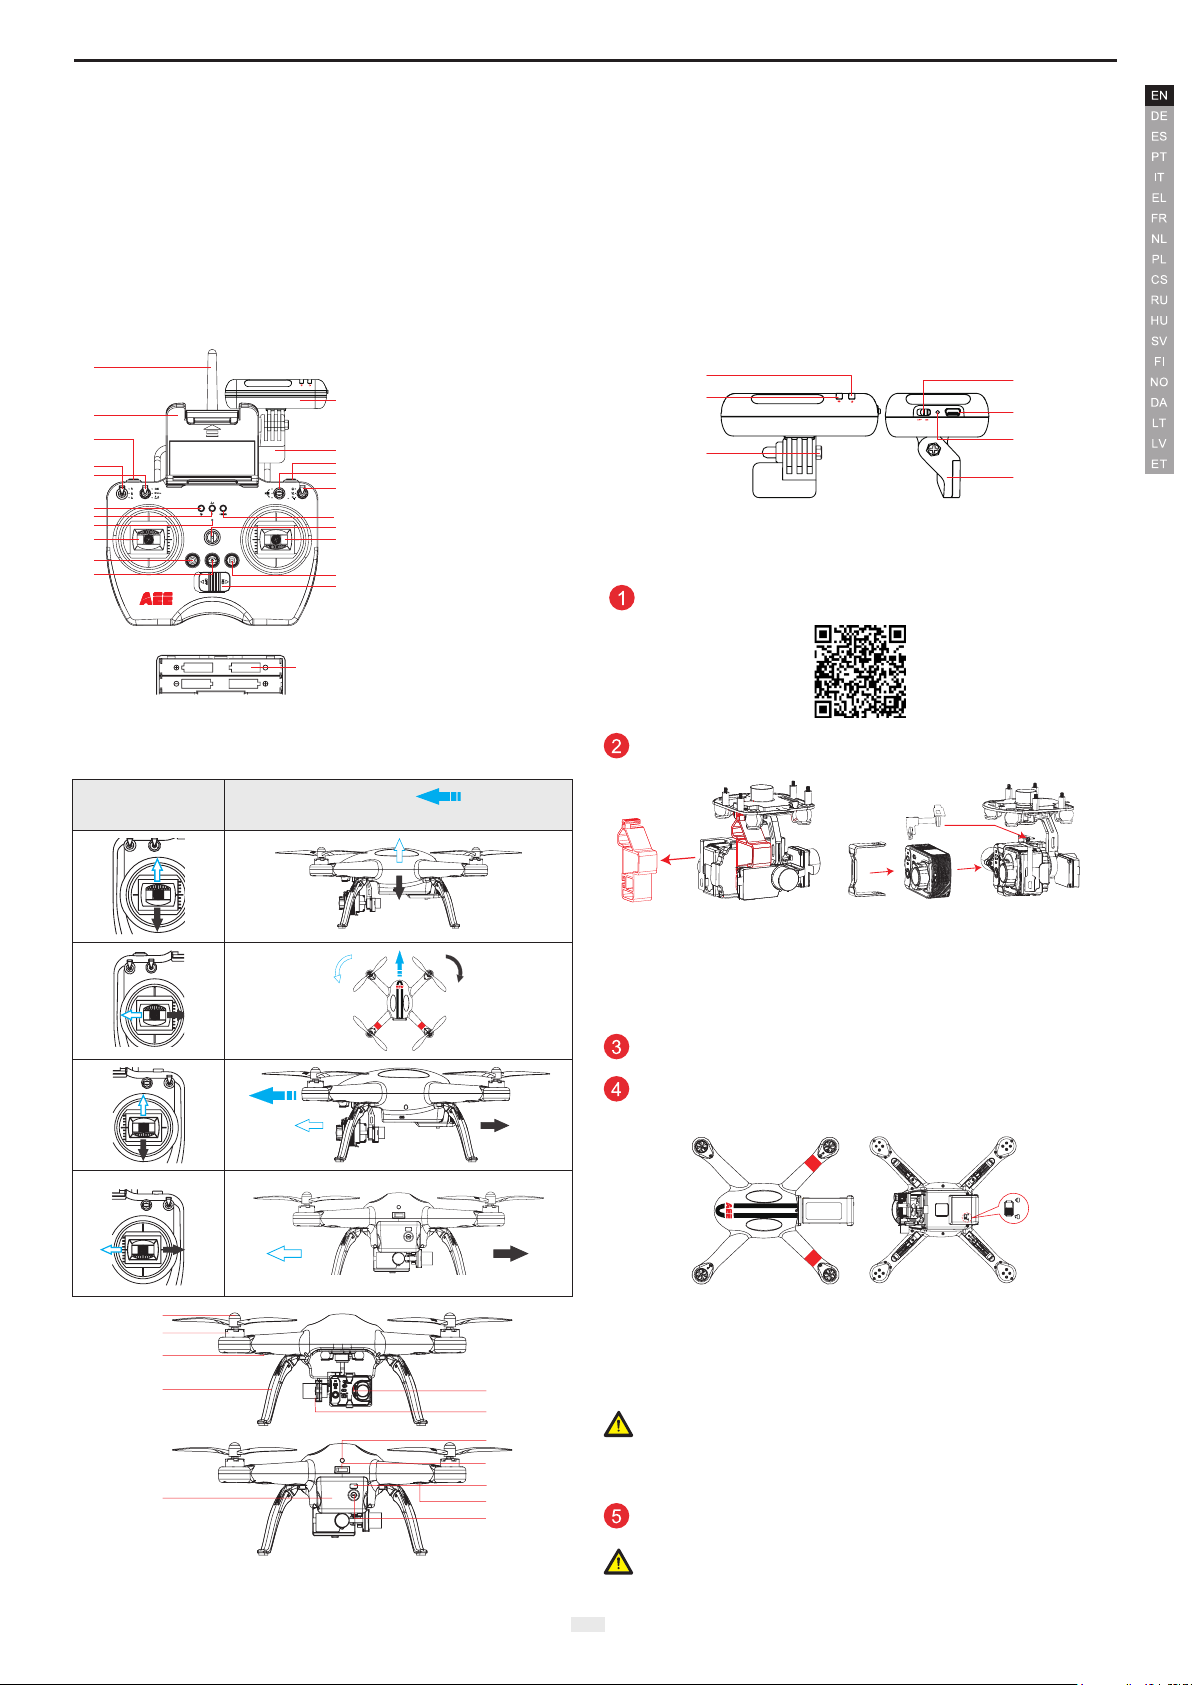
[ 1 ] Power Indicator [ 2 ] WiFi Indicator [ 3 ] Lock Screw
[ 4 ] Power Switch [ 5 ] Charging Port
[ 6 ] Pairing Button [ 7 ] Repeater Base
Download AEE App (iOS / Android)
[ 17 ] Right Joystick
[ 18 ]Airborne Video Recording Button
[ 22 ]
[ 19 ] Airborne Shutter Button
[ 20 ] Video Stop Button
[ 21 ] Remote Control Power Switch
[ 22 ]Battery Compartment
Remove the Buckle and Install the Camera:
nose direction)
Diagram of installation of PTZ USB cable
Fig. A Fig. B
1.Pull out the buckle of the gimbal in the direction shown in Fig. A:
2.Install the camera onto the aircraft and x the clip to the camera reliably as
shown in Fig. B to prevent the camera coming off.
Preparing the Remote control
Assembling Quadcopter Battery
1) Load batter y into battery compar tment in the correct direction.
[ 2 ]
[ 3 ]
[ 4 ]
[ 1 ] Propeller [ 2 ] Motor [ 3 ] Front Indicator
[ 4 ] Landing Gear [ 5 ] Camera [ 6 ] 3-Axials Gimbal
[ 7 ]
[ 5 ]
[ 6 ]
[ 8 ]
[ 9 ]
[11]
[10]
[12]
Push the battery into the bat tery compar tment in the right direction
2) Ensure that the battery has been completely pushed in.
After the battery is completely pushed in, a“click” sound will be heard,
indicating that the battery has been fastened. If the battery lock is not tightly
locked, poor cont act of power supply may be caused, which will affect the ight
safety or result in take-off failure.
Important: Pressing the Bat tery Level Check button to check the batter y
level. Please fully charge the batter y if it is less than two bars showed on the
Segment Display.
Power on Quadcopter
Slide the power switch to "ON " to power on Quadcopter.
Note: The general indicator instructions are showed in the following table.
Please refer to the user manual for more details.
1
Page 3

aee.com
Tai l in d icat o r
Description
Power-on self-test (remaining on), Searching satellites
(blinking slowly), Searching completed (remaining on)
WARNING Front Indicator (green) Rear Indicator (red)
1st Level low
battery alarm
2nd level low
battery alarm
● ● ● ●
Slow Blink(1s ON,1s OFF)
● ● ● ●
Fast blink twice per second
● ● ● ●
Slow Blink(1s ON,1s OFF)
● ● ● ●
Fast blink twice per second
Remote Control Indicators
Functional
status
Power
indicator●Status Indicator
● ● ●
Photo Sho oting &Vid eo
Recording Indicator
●
Startup Remains ON NONE NONE
GPS nor mal Remains ON Green light NONE
GPS searching Remains ON Blue light NONE
Note: The Remote Control will be started fully when the Photo Shooting & Video
Recording Indic ator turns on.
Compass Calibration
Compass calibration is required before rst time use otherwise the system
may not work properly, affecting ight safety. The compass is sensitive to
electromagnetic interference from other electronic devices, which can cause
abnormal compass data leading to poor ight performance or even ight failure.
Regular calibration is required for optimum performance.
● Atte ntion:D o not calibrate the compass in environments with a strong
magnetic eld (such as near power lines or radio towers); Do not carr y
ferromagnetic materials when calibrating the compass,such as keys and cell
phones etc.)
Note: Calibration can begin until the Remote control and Quadcopter star t
up completely(powered on for about 20 seconds).
1 2 3
the password “AEE12345” to join the net work.
3) Run the AEE AP App on your mobile device. The App inter face appears on
the mobile device as shown in the gure below.
Preview Interface
Wi-Fi network
Connect Interface
Touch " " to establish connection between the mobile device and
camera. After c onnecting, the App will navigate to the App Preview inter face.
If you can see real-time camera preview on screen, the mobile device has
successfully connected with the camera.
Taking off and Landing(Outdoors)
Taking off:
1) Place Quadcopter (with full power batter y) on a at and open ground, and
ensure Tail Indicator fac es toward you.
2) Turn on the remote control, repeater and camera and enable the Wi-Fi
function of the camera in sequence; last, turn on the aircraft (Do Not turn on
the aircraft before the Wi-Fi function of the camera is enabled);
General Operating Order List
Unit Duration
Camera 20s
Repeater 22s
Remote
Control
10s
Power on
3) Be sure the Remote control is set exactly as the gure below.
Run the
APP
Take off
GPS
NRM
F M
S4
After the aircraft is normally
powered on, turn the S4
switch between positions
1 and 3 for more than 5
times. The quadcopter will
enter calibraion standby
mode(the tail light blinks
fast).
Toggle the joysticks
to the position as in
the follow gure, Front
indicator (green) starts
blinking, Then release the
joysticks.
Compass calibration
command has been sent
Rotate
Quadcopter 360°
horizontally (2
turns)
successfully.
4 5
Rotate Quadcopter 360°
vertically 2 turns (Nose
down )
Rotate Quadcopter vertically (Nose leftward)
until green lights off, Put Quadcopter on the
ground. Green lights up normally after light
off→ calibration successful; Green lights
blink fast after light off→calibration failed
→Recalibrate
Switching on the Repeater
Important: Wi- Fi Repeater power is running out or is charging when the red
light blinks. If the power is low , please charge it as soon as possible.
Connecting the Camera
1. First, turn on the repeater and camera, and enable the Wi- Fi function of the
camera. (DO NOT turn on the aircraft before the Wi-Fi function of the camera
is enabled).
2. Wait for about 25s until the blue Wi-Fi indicator light on the camera blinks.
When the blue Wi- Fi indicator light on the repeater starts blinking slowly (off
for 3S and on for 0.3S), enable the Wi-Fi function of the mobile device. In
order to ensure signal strength, please place the mobile device as close as
possible to the repeater. Select “AEE_ AP ** ****” in the Wi-Fi list, and enter
S
D
E
S1 S2 S3 S4
GPS
NRM
F M
GPS
NRM
S
D
E
S1
S1: E S2: OK S3: S4: GPS
S3
S2
S4
4) Starting motors: toggle the left joystick to left bot tom cor ner and toggle right
joystick to right bottom corner at the mean time to star t motors. Once the
motors st art please release the joysticks immediately.
5) Push the left joystick slowly, then Quadc opter take off. Please refer AEE
Quadcopter User Manual for more details.
Note: The motors can not be started until GPS signal is ready (Tail
Indicator (green) remains on).
1. Upon star tup, the airborne camera and the repeater will pair with each other.
Please wait for about 30S to ensure that pairing is completed, so that the
airborne camera can record videos nor mally.
2. After the aircraft is powered on, the aircraft and the PTZ will star t self- test. Do
not shake the aircraf t or the PTZ at this moment; otherwise, the aircraf t and the
PTZ will fail the self-test.
(The PT Z can be used only when the camera is installed; otherwise the PTZ
may be damaged)
3. Before installing the camera onto the aircraft, it is suggested that the auto
standby function of the camera should be disabled.
4. When the aircraf t complete searching for GPS satellites, the tail light (green)
will remain on. During ight, please do not turn the joysticks of the remote control
to a lower toe -out pattern, which will stop the motors.
Landing:
1) Slowly pull the left joystick to lower Quadcopter until it touches the
ground(only on at and open ground).
2) After landing, pull the left joystick to the lowest position and hold for more
than 3 seconds until the motors stop.
3) Power off Quadcopter by sliding the switch to OFF.
4) Remove the battery.
5) Power off Remote control and Wi-Fi Repeater.
Important:
1) Control the ight height under your control during your rst ight.
2) Do not stop the motors during ight, or it will cause the Quadcopter to drop
without control.
2
Page 4

 Loading...