

Aea R92 User Manual

• STUDIO RIBBON MICS
Audio Engineering
Associates
1029 N. Allen Ave. Pasadena, CA 91104 www.ribbonmics.com Phone: (626) 798-9128 Fax: (626) 798-2378
• M/S STEREO
• TALL STANDS
• MIC POSITIONERS
© March 2005
AEA R92 Ribbon Microphone
User’s Manual
The R92 LRG™ Series Ribbon Microphone is designed for close micing of amplifiers, instruments and vocals.
The mic is optimized for micing distances of 6-12 inches, and has an extended high frequency response and
reduced bass proximity effect compared to other AEA models.
Your R92 will sound great on guitar amps, acoustic guitar, as a room mic for drums, and in many creative mic
ing applications we haven’t even thought of yet. We want you to make recordings with your R92 as quickly as
possible, but please read through this manual carefully. Below you will find important information which could
help you avoid damage to your new microphone, as well as help you quickly get great sounding recordings with
the R92.
-
A Few Things to Remember...
1) Keep it covered when not in use.
Since the R92 contains powerful magnets, it is possible for tiny pieces of metal to be drawn into the ribbon gap. The microphone’s protective cloth surround protects the transducer from this so-called “tramp
iron”, but it is wise to safeguard your investment by keeping the mic covered with its supplied bag when
not in use. Avoid leaving the microphone sitting out on a table or workbench. In our experience this is a
likely place where tramp iron may be attracted to the microphone.
2) Store the mic upright.
Our ribbon transducers are tensioned very lightly for excellent transient response. To help ensure a long
life and consistent sound, keep the microphone stored upright to prevent “sagging” in the ribbon that
may occur during long term horizontal storage. Because AEA ribbon mics sound great on a variety of
sources, many people like to leave their mics set up vertically on a stand in their studio with the protec
tive bag on.
-
3) Avoid phantom power.
Using a correctly wired cable and a properly working phantom power supply, there is little
danger of damaging the microphone with phantom power. However since using phantom power with
a faulty or miswired cable or a defective supply can cause severe damage to the transducer, we recom
mend avoiding the use of phantom power with your R92 as a general rule.
4) Protect the microphone from wind blasts.
The ribbon element in your R92 is well-protected from the normal wind blasts that may occur when
making amp, instrument and vocal recordings, but it is still possible to damage the ribbon by careless
use and positioning. For example the R92 is NOT suitable for use inside a bass drum. A simple check
is to place your hand where you would like to put the mic. Make sure that you can’t feel any “wind”
against your palm. An inexpensive pop filter can be very helpful to avoid damaging wind blasts and the
associated noise that they will produce in the recording.
-
Getting the Most Out of Your R92
Preamplifiers
Here are a few specs to look for in a mic preamp which will match well with your R92:
- Abundant gain (at least 60dB clean gain)
- Low noise (EIN -127dB or better)
- High input impedance (we suggest at least 1.5 kOhm for good bass performance)
Active ribbon mic designs can help alleviate the gain demands on your preamp, but this approach results in in
creased cost, somewhat limited dynamic range and a slight degradation of sound caused by internal electronics.
Active electronics also remove the variable interaction between the mic element and the preamplifier. Several
excellent preamplifiers are built with variable input impedance, and when coupled with passive designs like the
R92, a significant variety of sounds and colors are available to the sonic experimentalist.
NOTE: The fundamental design tradeoff of a dynamic microphone is bandwidth vs. output. With close micing
applications in mind, the R92 was engineered with as much bandwidth as we could squeeze out of a large ribbon
design. The tradeoff then is that a lot of gain may be required for recording low level sources. You will need a
preamp with 60-65dB of clean gain to get a healthy level on quiet vocal recordings.
-
Using the Figure-8 Pattern
The bidirectional (or “figure-8”) mic pattern of the R92 is a powerful recording tool. The front and rear lobes
of the R92 have slightly different sounds. We call the front the “crisp” side and the back the “smooth” side.
Try recording on the rear side to get a warmer sounding HF response (the phase of the recorded signal will be
inverted as well). Like any bidirectional microphone, the bass response of the R92 is very sensitive to micing
distance, but its excellent horizontal off-axis performance makes it easy to find a “sweet spot” when, for example, close micing an acoustic guitar.
It is possible to use the bidirectional pattern to provide excellent isolation between musicians playing in the
same room. The bidirectional pattern features a ‘null plane’ which provides more sound rejection than any other
microphone pattern! Also the excellent off-axis response of the R92 means that whatever bleed is left over from
nearby instruments will be reproduced with accurate phase information, so it won’t muddy or distort your mix.
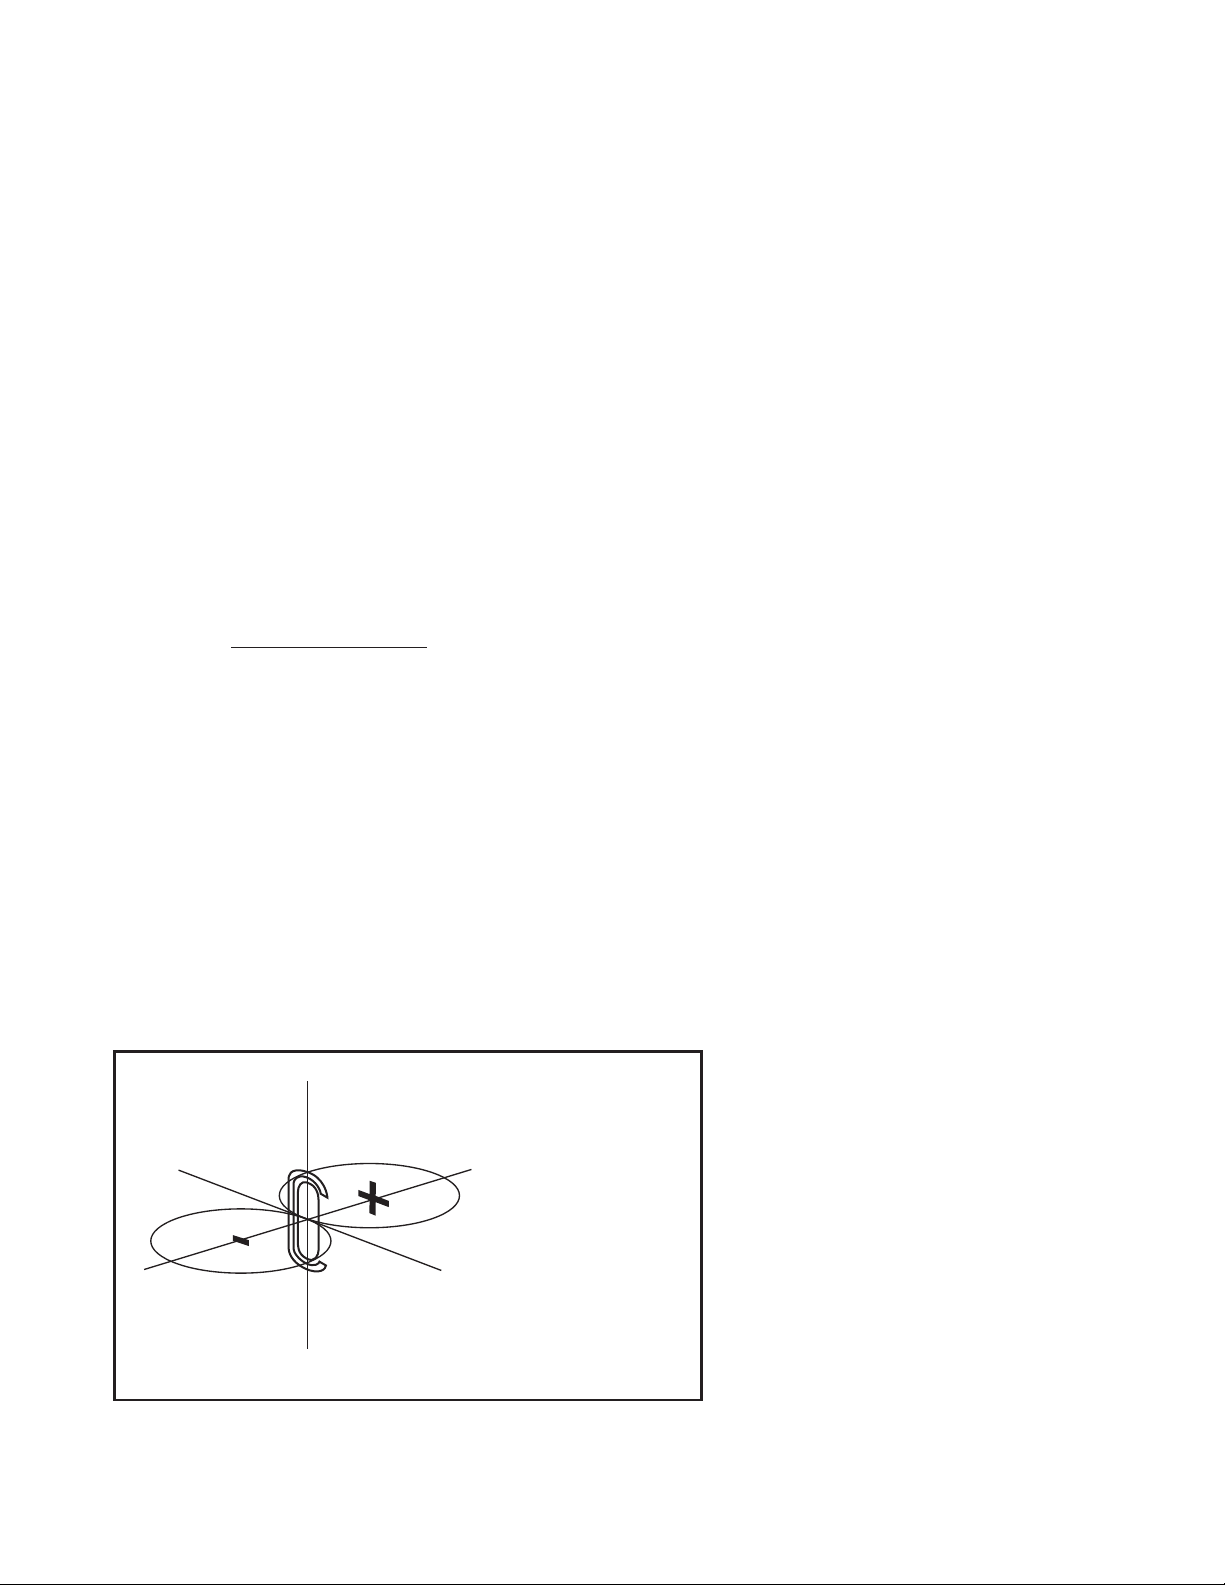
Here’s an illustration of the pickup pattern
of your R92. The AEA logo on the front
of your R92 points directly towards the
‘principal axis’ indicated in the diagram.
The “+” and “-“ in this diagram refer to
the electrical polarity of sounds arriving at
the front and back sides of the microphone
respectively.
 Loading...