

Page 1
TOCLS-OE100
TOCLJ-OE100
Owner’s Manual
Navigation
Page 2

Preface
NavMate navigation software provides turn-by-turn route guidance while traveling to your destination. Before operating, take a few minutes to review the safety
and operating instructions in this manual so you can quickly and safely become
familiar with your NavMate software’s many features.
This User Manual explains the NavMate software’s functions, and provides details on
• Using the control buttons
• Entering destinations
• Understanding the dierent screens available on your NavMate software
• Adjusting user preferences
• Updating software
NOTE: All users should read this manual prior to operating your NavMate software.
Copyright© 2006
All rights reserved.
NavMate Software User Manual Ver. 4.0 (480x272)
This document and the software described in it are furnished under license and
may be used or copied only in accordance with such license. Except as permitted by such license, the contents of this document may not be disclosed to third
parties, copied, or duplicated in any form, in whole or in part, without the prior
written permission of Horizon Navigation, Inc.
The NavMate software, including its operation and use, is covered by one or more
of the following patents:
US Patents No. 5,262,775; 5,283,575; 5,291,412; 5,291,413; 5,291,414; 5,297,028;
5,303,159; 5,311,434; 5,339,246; 5,343,400; 5,345,382; 5,359,529; 5,374,933;
5,377,113; 5,390,123; 5,394,333; 5,402,120; 5,414,630; 5,430,655; 5,440,484;
5,477,220; 5,508,931; 5,515,283; 5,515,284; 5,550,538; 5,608,635; 5,712,788;
5,731,978; 5,862,509; 5,898,390; 5,902,350; 5,904,728; 5,910,177; 5,912,635;
5,922,042; 5,928,307; 5,938,720; 5,987,381; 6,058,390; 6,144,919; 6,147,626;
6,253,154; 6,259,987; 6,282,496; 6,298,305; 6,360,165; 6,456,931; 6,456,935;
6,470,268; 6,542,814; 6,552,656; 6,600,994; 6,622,086; 6,735,516; D364,840;
D397,046; D457,823; EP0987665A3. The sale and/or licensing of the NavMate software and associated materials does not include any licenses (implied or otherwise)
to patents or technology, unless specically stated in writing.
NavMate software may be periodically updated. Please read the “Update Software” section at the back of this user manual.
NavMate® is a trademark of Horizon Navigation, Inc. The NavMate software and
associated materials are protected by copyright in the US and internationally.
2
Page 3

End-User License Agreement
This End-User License Agreement (EULA) is a legal agreement between you (either an individual or a single
entity) and HORIZON NAVIGATION, INC. for the operating software and updates thereof that run the digital
map database and associated hardware (collectively the “Software”). By installing or using the Software,
you agree to be bound by the terms of this Agreement. If you do not agree to the terms of this Agreement,
return the Software, along with all other accompanying items in the form they were purchased, within
thirty (30) days after such purchase to the authorized dealer from where the Software was purchased, for a
full refund of any fees paid. Use of the Software without acceptance of this Agreement is unauthorized and
not permitted.
1. License Grant. HORIZON NAVIGATION, INC. grants you a non-exclusive license to use your purchased
copy of the Software for your own internal purposes of accessing the digital map database and running
the associated hardware and not for service bureau time-sharing, or other similar purposes.
2. Limitations On Use. You are not permitted to copy, modify, decompile, disassemble, or reverse engineer
any portion of the Software without the expressed written permission from HORIZON NAVIGATION, INC.
3. U.S. Government End Users. The Software is provided with Restricted Rights. Use, duplication, or disclosure by the Government is subject to restrictions as set forth in subparagraph (c) (1) (II) of the Rights in
Technical Data and Computer Software clause at DFARS 252.227- 7013 or subparagraphs (c) (1) and (2)
of the Commercial Computer Software-Restricted Rights at 48 CFR 52.227-19, as applicable. HORIZON
NAVIGATION, INC., 4701 Patrick Henry Dr. Suite 1301 Santa Clara, CA 95054 USA.
4. Indemnity. You agree to indemnify, defend and hold free and harmless HORIZON NAVIGATION, INC.,
including its licensors, assignees, subsidiaries, aliated companies, and the respective ocers, directors,
employees, shareholders, agents, authorized dealers or sales agents, and representatives of each of
them from and against any liability, loss, injury, demand, cost, expense, or claim of any kind of character,
including but not limited to attorney’s fees, arising out of (a) any use or possession of the Software, or (b)
any breach of any warranties or representations made by you in this Agreement or of your obligations
under this Agreement.
5. Disclaimer of Warranty. HORIZON NAVIGATION, INC. does not make any warranties or representations,
either express or implied, with respect to the software, without limiting the foregoing, HORIZON NAVIGA-
TION, INC. expressly disclaims any implied warranties of quality, performance, merchantability, tness for
a particular purpose or non-infringement. Some states do not allow the exclusion of implied warranties,
so some portion of the above exclusion may not apply to you.
6. Limitation of Liability. HORIZON NAVIGATION, INC. shall not be held responsible for any actual, anticipated or speculative loss of prot or direct, indirect, incidental, special, or consequential damages,
including, without limitation, loss of revenue, data, or use incurred by you or any third party arising out
of your use or possession of the software, whether in an action in contract or tort or based on a warranty,
even if HORIZON NAVIGATION, INC. has been advised of the possibility of such damages.
7. Warnings.
A. Copies of the digital map database reect conditions as they existed at various points in time
before your receipt of such copies. Accordingly, copies of the digital database map may contain
inaccurate or incomplete data or information due to inaccurate or incomplete source materials, the
passage of time, road construction, changing conditions, and otherwise.
B. Neither the Software nor the digital map database include, analyze, process, consider or reect any
of the following categories of information, i.e., neighborhood quality or safety; population density;
availability or proximity of law enforcement, emergency, rescue, medical or other assistance;
construction work, zones, or hazards; road and lane closures; various legal restrictions (such as
vehicular type, weight, load, height and speed restrictions); road slope or grade; bridge height,
width, weight or other limits; road, trac or trac facilities safety or conditions; weather conditions; pavement characteristics or conditions; special events; trac congestion; or travel time.
8. Transfer. This Agreement, including all rights, obligations and representations may be transferred to
another individual or single entity, provided the same transfer includes the simultaneous transfer of the
associated hardware in which the Software is installed, and further provided that such other individual
or single entity accepts all the terms of this Agreement. In the event such individual or single entity to
which the Software is transferred does not accept the terms of this agreement, then the License herein
automatically terminates. Further use of the Software is unauthorized and not permitted.
9. Governing Law. This Agreement shall be governed by the laws of the State of California, without giving
eect to its conict of laws provisions.
3
Page 4

Contents
PREFACE . . . . . . . . . . . . . . . . . . . . . . . . . . . . . . . . . . . . . . . . . . . . . . . . . . . . . . . . . . . . . . . . . . 2
SAFETY INFORMATION AND PRECAUTIONS . . . . . . . . . . . . . . . . . . . . . . . . . . . . . . . . 6
INTRODUCTION TO YOUR NAVMATE SOFTWARE . . . . . . . . . . . . . . . . . . . . . . . . . . . . 7
VEHICLE POSITION . . . . . . . . . . . . . . . . . . . . . . . . . . . . . . . . . . . . . . . . . . . . . . . . . . . 7
MAP AND INFORMATION DATABASE . . . . . . . . . . . . . . . . . . . . . . . . . . . . . . . . . . 7
QUICK START . . . . . . . . . . . . . . . . . . . . . . . . . . . . . . . . . . . . . . . . . . . . . . . . . . . . . . . . . . . . . 8
USING YOUR NAVMATE SOFTWARE . . . . . . . . . . . . . . . . . . . . . . . . . . . . . . . . . . . . . . . . 10
FUNCTION BUTTONS . . . . . . . . . . . . . . . . . . . . . . . . . . . . . . . . . . . . . . . . . . . . . . . . . 10
NAVIGATION MENUS . . . . . . . . . . . . . . . . . . . . . . . . . . . . . . . . . . . . . . . . . . . . . . . . . 11
SELECTING DESTINATION . . . . . . . . . . . . . . . . . . . . . . . . . . . . . . . . . . . . . . . . . . . . . 12
KEYBOARD SCREEN BUTTONS . . . . . . . . . . . . . . . . . . . . . . . . . . . . . . . . . . . . . . . . .13
MAP MODE SCREEN BUTTONS . . . . . . . . . . . . . . . . . . . . . . . . . . . . . . . . . . . . . . . . 13
DESTINATION SELECTION (GO TO…) . . . . . . . . . . . . . . . . . . . . . . . . . . . . . . . . . . . . . . . 14
DESTINATION SELECTION BUTTONS. . . . . . . . . . . . . . . . . . . . . . . . . . . . . . . . . . . 14
POSTAL / CITY/INTERSECTION . . . . . . . . . . . . . . . . . . . . . . . . . . . . . . . . . . . . . . . . . 15
POINT OF INTEREST (POI) . . . . . . . . . . . . . . . . . . . . . . . . . . . . . . . . . . . . . . . . . . . . . 16
POINT OF INTEREST (POI) SEARCH RESULTS. . . . . . . . . . . . . . . . . . . . . . . . . . . . 17
HOME ADDRESS . . . . . . . . . . . . . . . . . . . . . . . . . . . . . . . . . . . . . . . . . . . . . . . . . . . . . 18
OFFICE ADDRESS . . . . . . . . . . . . . . . . . . . . . . . . . . . . . . . . . . . . . . . . . . . . . . . . . . . . . 18
FAVORITES . . . . . . . . . . . . . . . . . . . . . . . . . . . . . . . . . . . . . . . . . . . . . . . . . . . . . . . . . . . 18
ADDRESS BOOK . . . . . . . . . . . . . . . . . . . . . . . . . . . . . . . . . . . . . . . . . . . . . . . . . . . . . . 18
TRAIL BOOK . . . . . . . . . . . . . . . . . . . . . . . . . . . . . . . . . . . . . . . . . . . . . . . . . . . . . . . . . . 18
TRIP BOOK . . . . . . . . . . . . . . . . . . . . . . . . . . . . . . . . . . . . . . . . . . . . . . . . . . . . . . . . . . . 18
ADDRESS BOOK ENTRIES SCREEN . . . . . . . . . . . . . . . . . . . . . . . . . . . . . . . . . . . . . 19
COORDINATES . . . . . . . . . . . . . . . . . . . . . . . . . . . . . . . . . . . . . . . . . . . . . . . . . . . . . . . 20
HISTORY . . . . . . . . . . . . . . . . . . . . . . . . . . . . . . . . . . . . . . . . . . . . . . . . . . . . . . . . . . . . . 20
BY USING MAP . . . . . . . . . . . . . . . . . . . . . . . . . . . . . . . . . . . . . . . . . . . . . . . . . . . . . . . 21
QUICK POI . . . . . . . . . . . . . . . . . . . . . . . . . . . . . . . . . . . . . . . . . . . . . . . . . . . . . . . . . . . 21
ROUTE CALCULATION AND GUIDANCE . . . . . . . . . . . . . . . . . . . . . . . . . . . . . . . . . . . . . 22
ROUTE GUIDANCE . . . . . . . . . . . . . . . . . . . . . . . . . . . . . . . . . . . . . . . . . . . . . . . . . . . . 22
PLEASE PROCEED . . . . . . . . . . . . . . . . . . . . . . . . . . . . . . . . . . . . . . . . . . . . . . . . . . . . 22
TRUE VIEW (INTERSECTION ZOOM) . . . . . . . . . . . . . . . . . . . . . . . . . . . . . . . . . . . . 23
MAP DISPLAY . . . . . . . . . . . . . . . . . . . . . . . . . . . . . . . . . . . . . . . . . . . . . . . . . . . . . . . . . . . . . 23
CURRENT LOCATION SCREEN . . . . . . . . . . . . . . . . . . . . . . . . . . . . . . . . . . . . . . . . . 24
ARRIVAL SCREEN . . . . . . . . . . . . . . . . . . . . . . . . . . . . . . . . . . . . . . . . . . . . . . . . . . . . . . . . . . 24
OFF-ROUTE AND ROUTE INTERRUPTIONS . . . . . . . . . . . . . . . . . . . . . . . . . . . . . . . . . . 24
EDIT FAVORITES MENU . . . . . . . . . . . . . . . . . . . . . . . . . . . . . . . . . . . . . . . . . . . . . . . . . . . . 25
EDIT ADDRESS BOOK . . . . . . . . . . . . . . . . . . . . . . . . . . . . . . . . . . . . . . . . . . . . . . . . . . . . . . 25
EDIT HOME ADDRESS . . . . . . . . . . . . . . . . . . . . . . . . . . . . . . . . . . . . . . . . . . . . . . . . . . . . . 26
EDIT OFFICE ADDRESS . . . . . . . . . . . . . . . . . . . . . . . . . . . . . . . . . . . . . . . . . . . . . . . . . . . . 26
4
Page 5

Contents
EDIT TRAIL BOOK . . . . . . . . . . . . . . . . . . . . . . . . . . . . . . . . . . . . . . . . . . . . . . . . . . . . . . . . . . 27
ADD TRAIL . . . . . . . . . . . . . . . . . . . . . . . . . . . . . . . . . . . . . . . . . . . . . . . . . . . . . . . . . . . 27
EDIT TRAIL . . . . . . . . . . . . . . . . . . . . . . . . . . . . . . . . . . . . . . . . . . . . . . . . . . . . . . . . . . . 28
SETUP TRAIL DISPLAY. . . . . . . . . . . . . . . . . . . . . . . . . . . . . . . . . . . . . . . . . . . . . . . . . 30
EDIT TRIP BOOK . . . . . . . . . . . . . . . . . . . . . . . . . . . . . . . . . . . . . . . . . . . . . . . . . . . . . . . . . . . 31
ADD . . . . . . . . . . . . . . . . . . . . . . . . . . . . . . . . . . . . . . . . . . . . . . . . . . . . . . . . . . . . . . . . . 31
EDIT . . . . . . . . . . . . . . . . . . . . . . . . . . . . . . . . . . . . . . . . . . . . . . . . . . . . . . . . . . . . . . . . . 32
EDIT MY POI . . . . . . . . . . . . . . . . . . . . . . . . . . . . . . . . . . . . . . . . . . . . . . . . . . . . . . . . . . . . . . 32
ADD CATEGORY . . . . . . . . . . . . . . . . . . . . . . . . . . . . . . . . . . . . . . . . . . . . . . . . . . . . . . 33
SETUP DISPLAY . . . . . . . . . . . . . . . . . . . . . . . . . . . . . . . . . . . . . . . . . . . . . . . . . . . . . . . 34
EDIT CATEGORY . . . . . . . . . . . . . . . . . . . . . . . . . . . . . . . . . . . . . . . . . . . . . . . . . . . . . . 34
ADD TO MY POI . . . . . . . . . . . . . . . . . . . . . . . . . . . . . . . . . . . . . . . . . . . . . . . . . . . . . . 35
EDIT MY POI. . . . . . . . . . . . . . . . . . . . . . . . . . . . . . . . . . . . . . . . . . . . . . . . . . . . . . . . . . 35
SET-UP MENU . . . . . . . . . . . . . . . . . . . . . . . . . . . . . . . . . . . . . . . . . . . . . . . . . . . . . . . . . . . . . 35
SETUP ROUTING CRITERIA . . . . . . . . . . . . . . . . . . . . . . . . . . . . . . . . . . . . . . . . . . . . 36
DISPLAY OPTIONS . . . . . . . . . . . . . . . . . . . . . . . . . . . . . . . . . . . . . . . . . . . . . . . . . . . . 37
USER PREFERENCE SETTINGS . . . . . . . . . . . . . . . . . . . . . . . . . . . . . . . . . . . . . . . . . 38
DAY/NIGHT SETTINGS . . . . . . . . . . . . . . . . . . . . . . . . . . . . . . . . . . . . . . . . . . . . . . . . 39
POINT OF INTEREST . . . . . . . . . . . . . . . . . . . . . . . . . . . . . . . . . . . . . . . . . . . . . . . . . . 39
POINT OF INTEREST ICON TYPE . . . . . . . . . . . . . . . . . . . . . . . . . . . . . . . . . . . . . . . 39
SET DISTANCE UNITS . . . . . . . . . . . . . . . . . . . . . . . . . . . . . . . . . . . . . . . . . . . . . . . . . 39
SYSTEM . . . . . . . . . . . . . . . . . . . . . . . . . . . . . . . . . . . . . . . . . . . . . . . . . . . . . . . . . . . . . . 40
VOLUME . . . . . . . . . . . . . . . . . . . . . . . . . . . . . . . . . . . . . . . . . . . . . . . . . . . . . . . . . . . . . 40
GPS DIAGNOSTIC . . . . . . . . . . . . . . . . . . . . . . . . . . . . . . . . . . . . . . . . . . . . . . . . . . . . . 40
SYSTEM INFORMATION . . . . . . . . . . . . . . . . . . . . . . . . . . . . . . . . . . . . . . . . . . . . . . . 40
TRIP COMPUTER . . . . . . . . . . . . . . . . . . . . . . . . . . . . . . . . . . . . . . . . . . . . . . . . . . . . . . . . . . 41
PLANNED ROUTE . . . . . . . . . . . . . . . . . . . . . . . . . . . . . . . . . . . . . . . . . . . . . . . . . . . . . . . . . 42
DETOUR . . . . . . . . . . . . . . . . . . . . . . . . . . . . . . . . . . . . . . . . . . . . . . . . . . . . . . . . . . . . . . . . . . 42
AVOID SPECIFIC ROAD . . . . . . . . . . . . . . . . . . . . . . . . . . . . . . . . . . . . . . . . . . . . . . . . . . . . 43
CANCEL ROUTE . . . . . . . . . . . . . . . . . . . . . . . . . . . . . . . . . . . . . . . . . . . . . . . . . . . . . . . . . . . 43
FOLLOW TRAIL . . . . . . . . . . . . . . . . . . . . . . . . . . . . . . . . . . . . . . . . . . . . . . . . . . . . . . . . . . . . 44
UPDATE SOFTWARE . . . . . . . . . . . . . . . . . . . . . . . . . . . . . . . . . . . . . . . . . . . . . . . . . . . . . . . 46
5
Page 6

Safety Information and Precautions
WARNING! Please read and follow the following safety precautions.
Failure to follow the instructions below may increase your risk of collision and
personal injury.
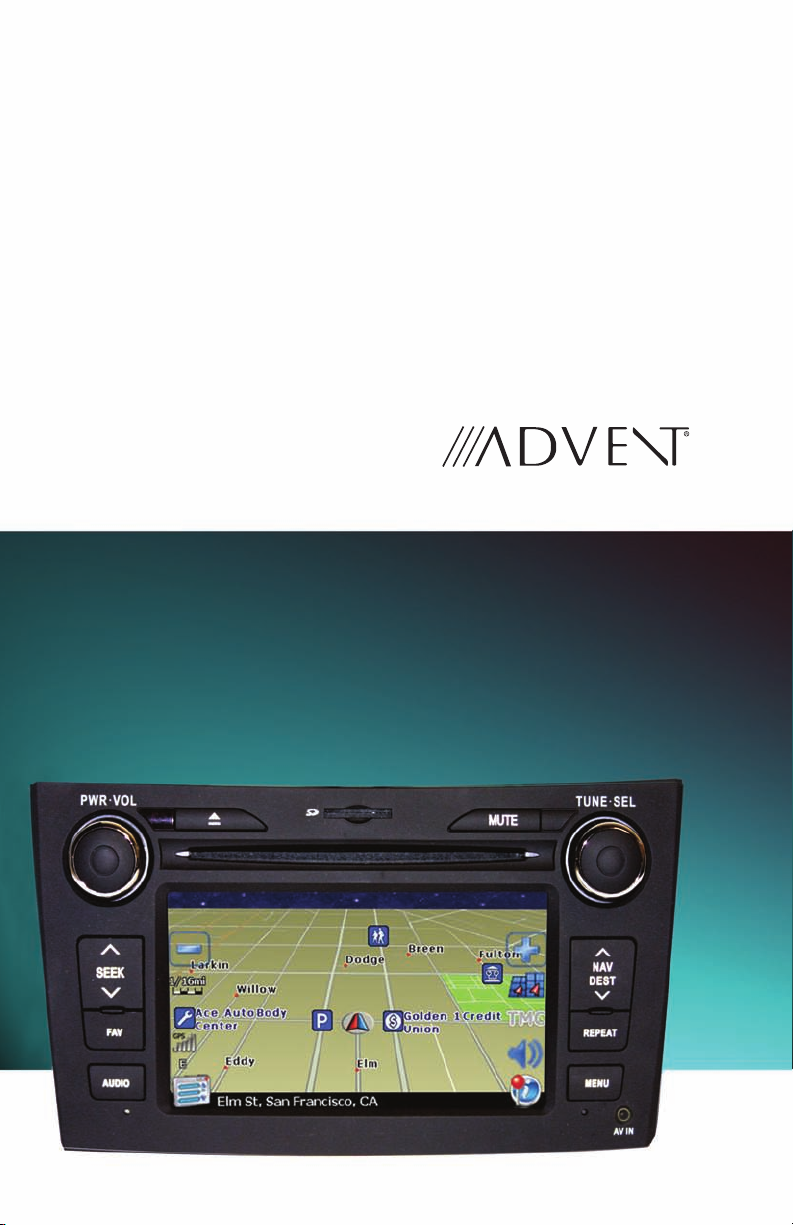
The Please Drive Safely screen is displayed each time the NavMate software is
turned ON as a reminder to make use of the system’s navigational aids in a safe
manner.
Before using the NavMate software, read this entire manual. Make sure that you
are familiar with the system’s features and know how to operate the system.
Proper use of the NavMate software includes the following guidelines:
The NavMate software is not a substitute for your personal judgment. The route
suggestions should never supersede any local trac regulation or your personal
judgment and /or knowledge of safe driving practices. Prior to completing any
maneuvers suggested by your NavMate software (for example, a U-turn or a left
turn), verify that you can legally and safely complete the maneuver. Do not follow
route suggestions if they direct you to perform an unsafe or illegal maneuver,
would place you in an unsafe situation, or would route you into an area that you
consider unsafe.
Glance at the screen only when necessary and safe to do so. Let the computer
voice guide you. If prolonged viewing is necessary, pull o the road to a safe
location.
Do not use the NavMate software to locate emergency services (such as police,
re stations, hospitals, and clinics). The database may not include all emergency
service providers. Use your own best judgment and ask for directions in these
situations.
If the vehicle is in motion, only a passenger should program the NavMate software. The driver should not program the system unless the vehicle is parked in a
safe location.
The NavMate software’s map database provides information on suggested routes
without regard to factors that may aect your driving experience or the time required to arrive at your destination. For example, the system does not reect road
detours, closures or construction, some road characteristics (e.g., road surface,
slope or grade, weight or height restrictions, etc.), temporary trac congestion,
weather conditions, and similar factors.
6
Page 7

Introduction to Your NavMate Software
NavMate software provides turn-by-turn visual and voice assistance to direct you
to your selected destination. The software quickly calculates step-by-step directions to any destination available on the included navigation map.
The NavMate software uses Global Positioning System (GPS) satellites, and a digital roadway map database to calculate and display travel directions. The system’s
GPS antenna receives signals from a constellation of 24 satellites orbiting the earth
and uses the strongest of signals, to determine your position to within meters.
Vehicle Position
The NavMate software’s computer considers vehicle speed and heading changes,
together with longitude and latitude information, to accurately determine vehicle
heading and position on a digital map.
Signals from GPS satellites are used to determine the vehicle location. Three
(good) or four (best) satellites must be received to accurately determine location.
The GPS reception status is indicated by the GPS symbol on the map.
Map and Information Database
The map database used by your NavMate software was created using high-resolution aerial and land based data collection.
Car navigation maps are frequently updated. While the database was judged to
be as accurate as possible at the time of its release, a map database can never be
100% accurate. Road information that is maintained in the map databases, such as
turn restrictions or road names may change over time.
7
Page 8
Quick Start
QUICK START
Follow these four easy steps and you are
on your way.
NOTE: Before operating your NavMate
software, please carefully read and
follow the instructions provided in the
“Safety Information and Precautions”
section of this manual.
Step 1 -- Access the navigation
function:
You can access the navigation function
by pressing the front panel NAV/DEST
button or by pressing the front panel
MENU button.
Step 2 -- Start up/Main Menu :
After the NavMate software starts,
you will see the reminder warning to
use your NavMate software safely
and lawfully.
Step 3 :
Press the icon to access the
navigation main menu screen.
Step 4 -- Select Destination
You have many ways to select a destination. For this example, let’s nd a nearby
Airport.
Select by touching screen:
• Icon
• Start Route Guidance
• Point of Interest
• State/Province
NOTE: The software remembers the
last State/Province, so this step is not
necessary every time.
• By Category
• Airport
• Sort by Distance
• Select one of these functions and the
system will calculate a route to that
destination using the criteria set in
the Setup menu.
to activate main menu.
8
Page 9
Step 5 -- Map/Guide along Route
Proceed to the highlighted route and
drive while the NavMate software
provides audible and visual guidance to
your destination.
Quick Start
Step 6 -- Arrive at Destination
That’s it! You’ve arrived at the selected
destination. Refer to the rest of this
manual to become more familiar with
the many options available on your
NavMate software.
9
Page 10
Using Your Software
The best way to learn about this product is to use it, while observing the safety
precautions discussed earlier.
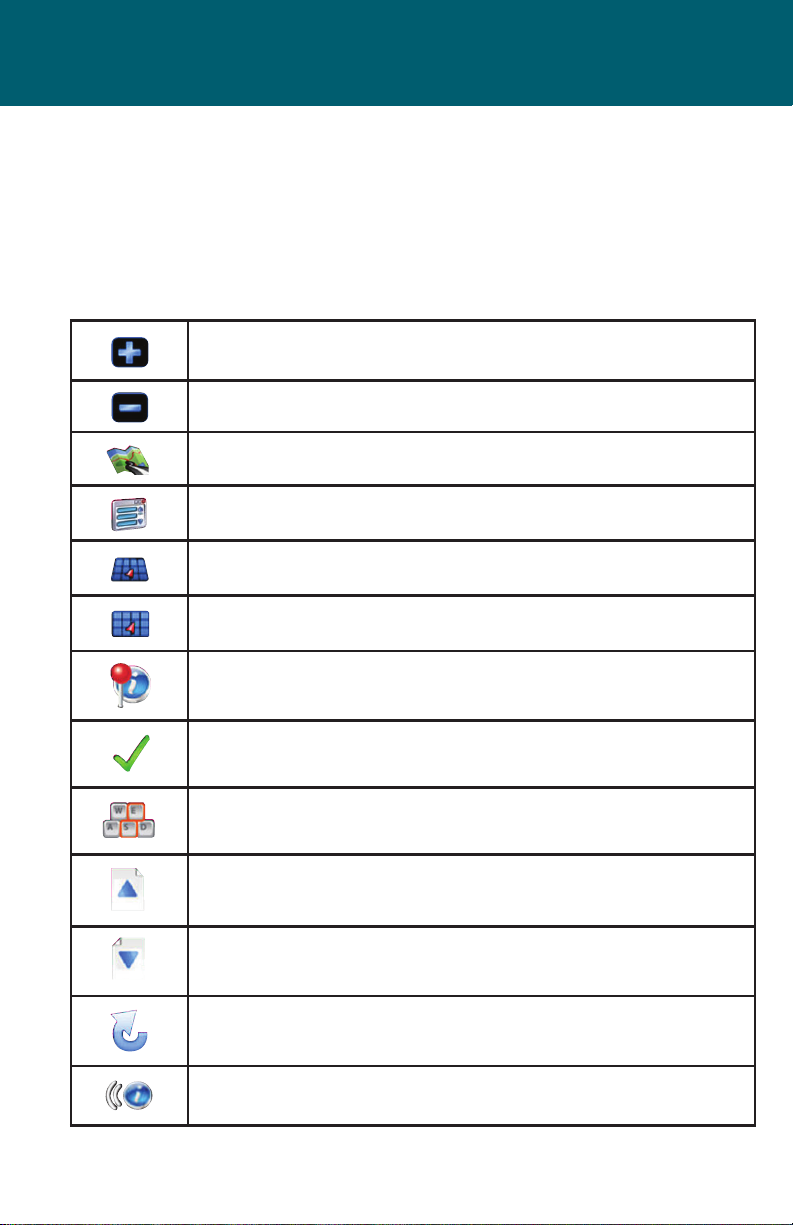
Function Buttons
The buttons on the bottom of the display are called function buttons. These
buttons change labels and function depending on the screen displayed.
The list below provides a brief description of the function buttons.
Zoom in the map to show a smaller area
Zoom out the map to show a larger area
View Map, Return to Map mode
Display menu, jump to main menu
Display map in 3D view
Display map in 2D view
10
After panning map, select current panned position
Select currently highlighted item
Display spell mode
Page up in displayed list
Page down in displayed list
Go back one step
Repeat voice instructions
Page 11
Navigation Menus
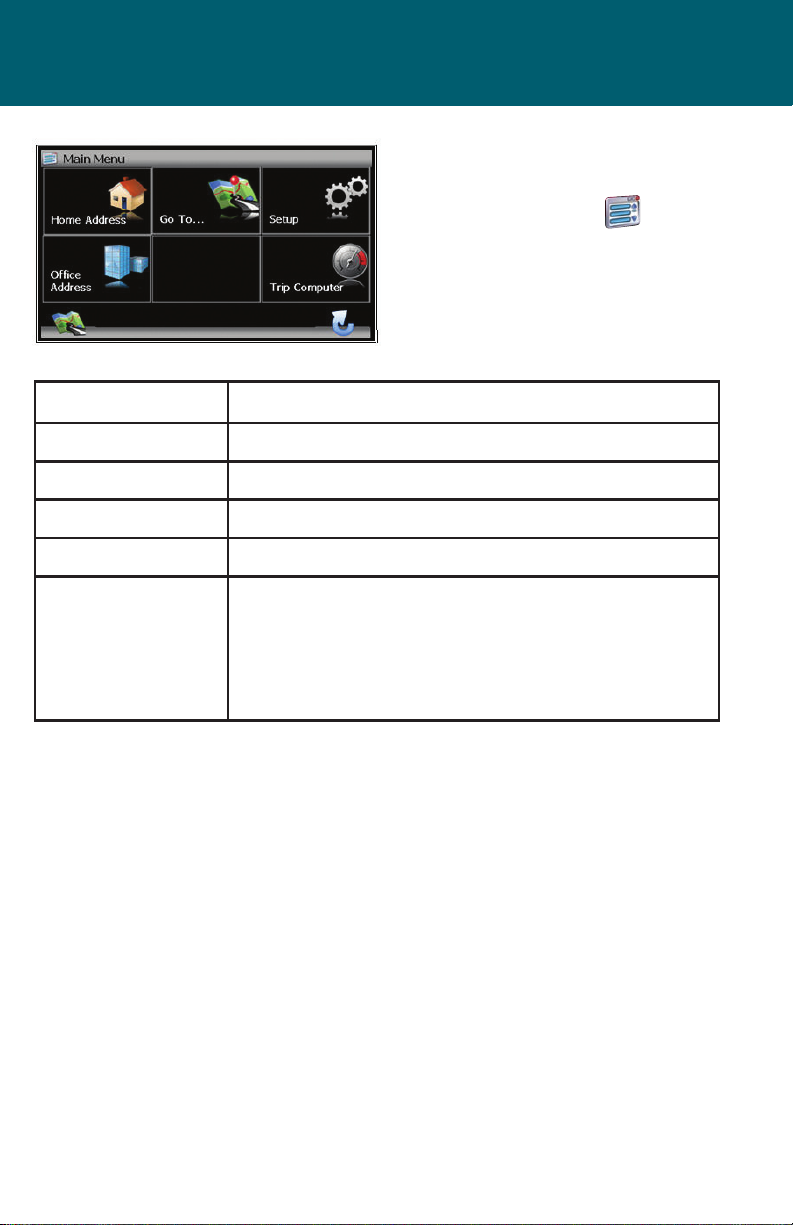
Main Menu Screen
This screen illustrates the
Main Menu options
available when the icon
is pressed.
Main Menu Options Select this Option to...
Home Address Route to home address
Go to... Pick a destination for routing
Setup Set preferences for routing and navigation display
Oce Address Route to oce address
Trip Computer Display Speed, Trip, Odometer and Clock readings
Average Speed, Maxium Speed, Total Trip Time, Stopped Time, Drive
Time, Elevation, Estimated Time of Arrival (ETA), Trip Odometer, Digital
Clock, and Current Speed
11
Page 12
Selecting Destination
There are ve ways to select a
destination:
1. Address and Intersection
2. Point of Interest (POI)
3. Favorites
4. Coordinates
5. History
Several of the methods allow you to
move through a list by scrolling using the page up or down keys or by
searching using an on screen keyboard (Spell Mode):
Many of the lists keep track of the last
ve most recently used selections
(history). This list allow you to quickly
select items that are used frequently.
12
Page 13
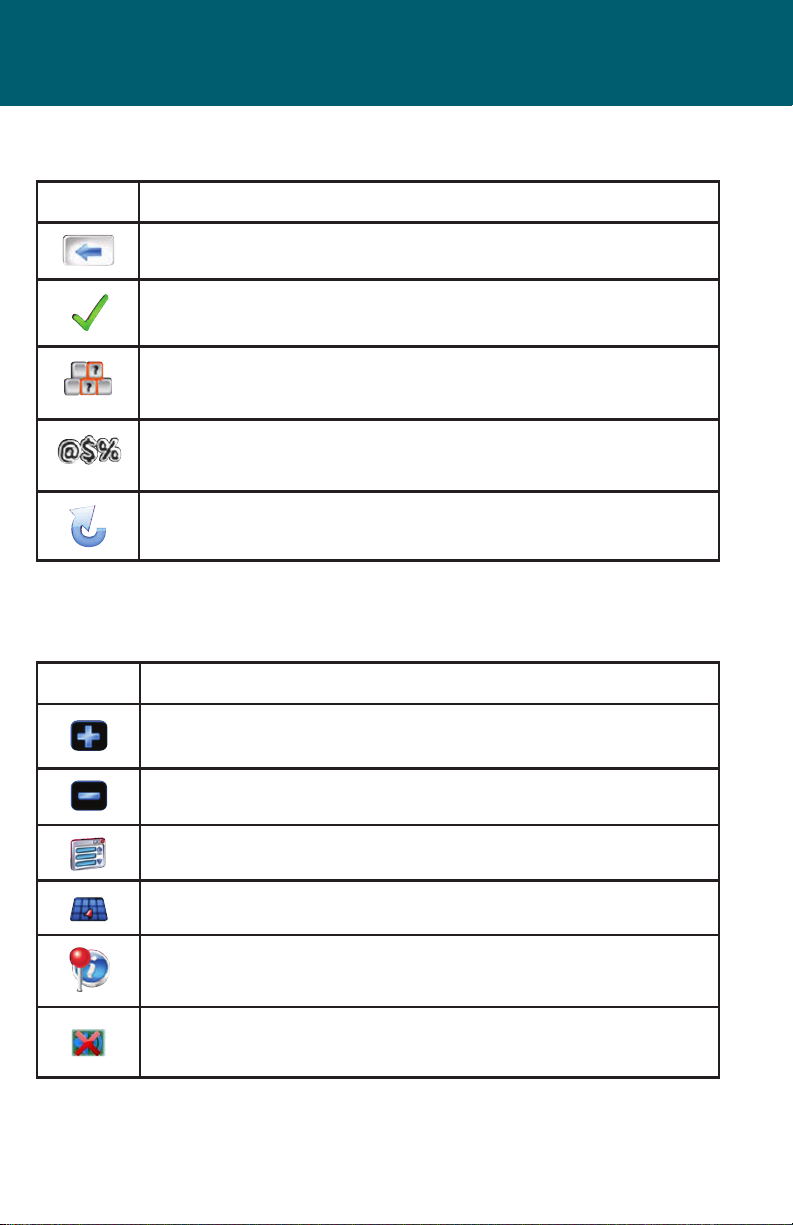
Navigation Menus
Keyboard Screen Buttons
Button Press This Button To...
Delete last entered character
Select currently input characters and show list of matches
Switch keyboard from QWERTY layout to
special character layout
Switch keyboard from special character layout to
QWERTY layout
Quit Spell Mode and return to List Mode
Map Mode Screen Buttons
The table below explains the button functions available on the Map Screen.
Button Press This Button To...
Show smaller map area
Show larger map area
Show main menu
Change type of map view
If no active route, select current location
Mute
13
Page 14
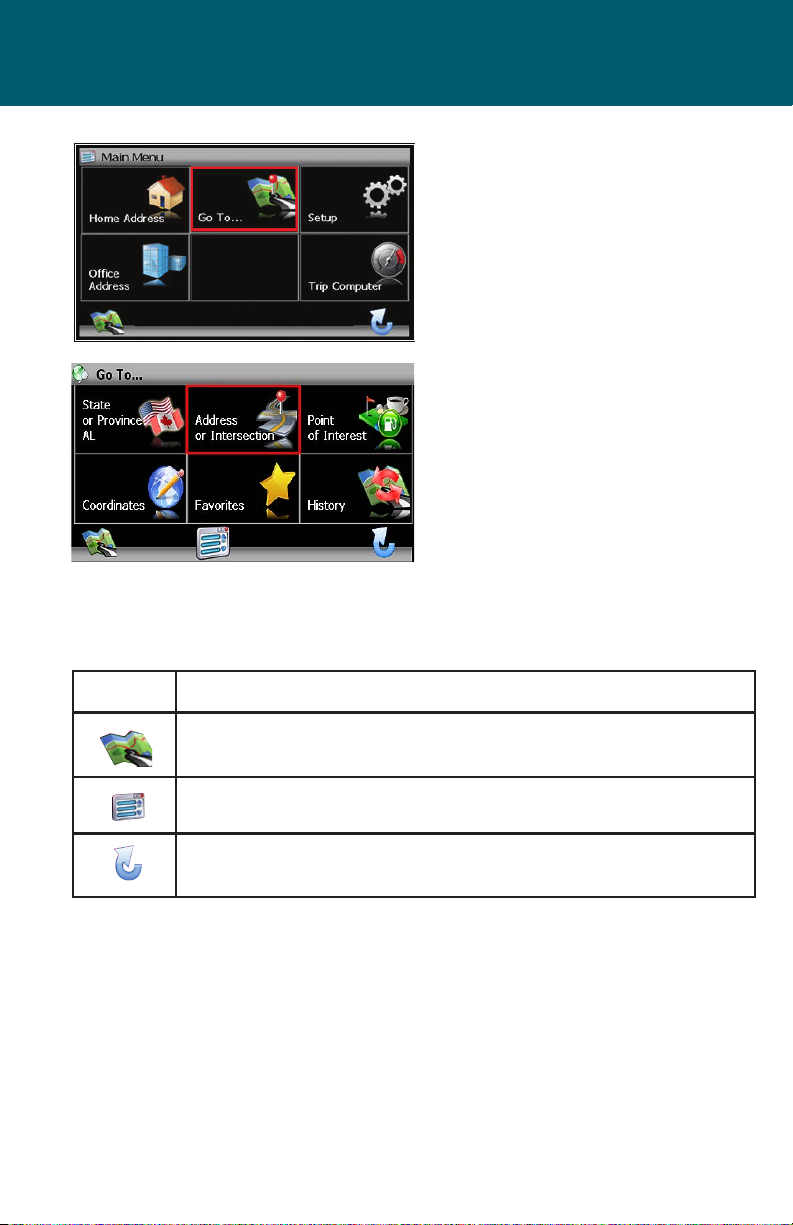
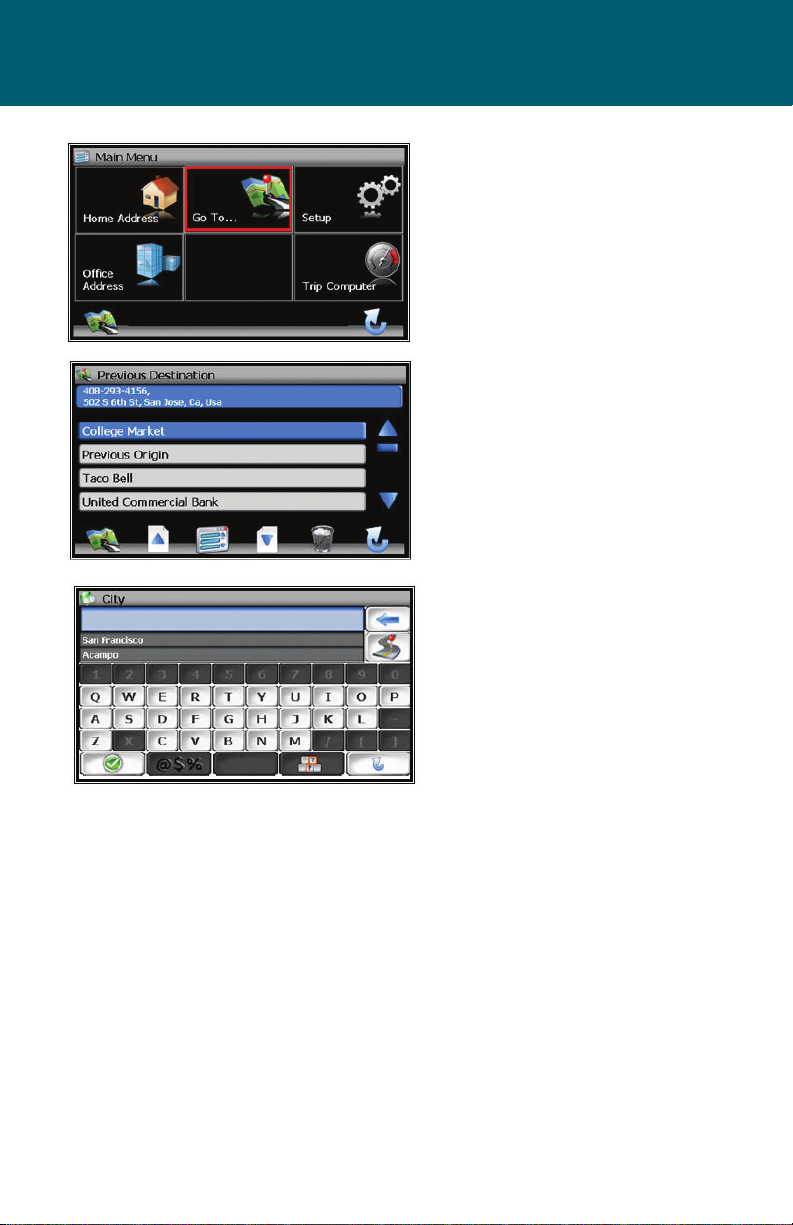
Destination Selection (Go To...)
Destination Selection
(GO TO...)
To select a destination, you
must select “Go To…” from the
Main Menu.
Destination Selection Buttons
The table below explains the button functions available on the Map Screen
Address/Intersection
Button Press This Button To...
Return to map mode
Return to main menu
Go back one step
14
Page 15
Destination Selection (Go To...)
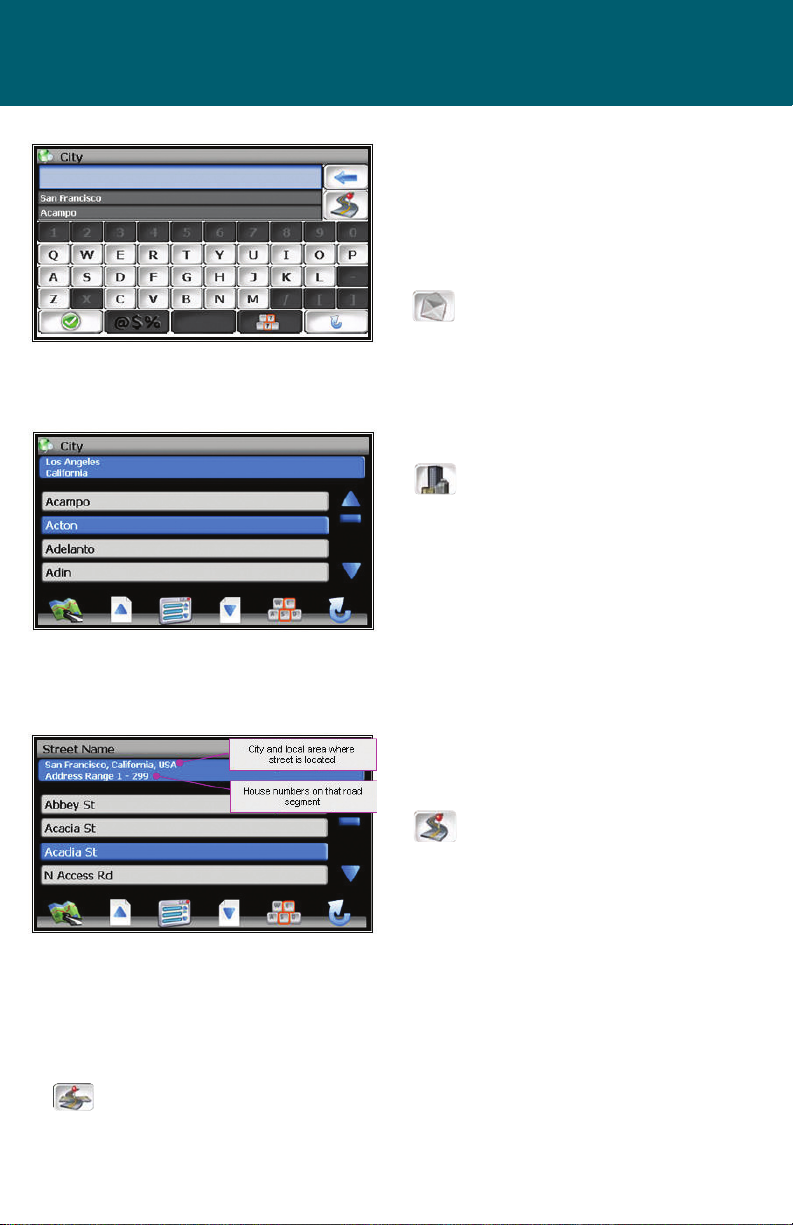
Postal/City/Street/Intersection:
You may select either the Postal code or
City Name or the Street Name rst.
NOTE: When the icon is pressed, the
icon will change to the next category
(Postal, City, or Street)
• Postal Code icon – If you know
the postal code, select this option to
quickly nd the city. NOTE: The postal
code search is limited to the currently
selected State/Province. Postal code
searching may not be available in
all areas.
• City Name icon - If you know
the city and street, select this option.
You could use the “Street Name”
option instead, but it is quicker and
easier to use the “City Name” option when you know both parts of
the address. If you selected the “City
Name” option, continue by following
the prompts on the display screen to
select a city rst, then street, then address number of the intersection.
If you selected the “Street Name” option, follow the prompt to select
a street name, then a city, then a
street address or intersection
• Street Name icon - If you know
the street name but you are not sure
of the city, select this option. You
might use this option, for example, if
you were in a large metropolitan area
and a street continues through
multiple cities and you are not sure of which city is appropriate for the street.
If you know the street address or cross streets of your destination, use the
“Address/Intersection” selection. You must select the State/Province where the
destination is located. NOTE: The system remembers the last State/Province
selected, so this step is not necessary every time.
•
Intersection icon - This icon will appear after the rst street and city is
entered. When the icon appears, press the icon and select the Intersection Cross
Street.
15
Page 16

Point of Interest (POI)
The Point of Interest option is useful
when you are going to a public place
or are looking for some type of facility
such as a gasoline station. Select “Go To”
from the main menu. Then select “Point
of Interest” from the Go To Screen. After
selecting the Point of Interest option,
you must select the State/Province
where the destination is located.
NOTE: The system remembers the last
State/Province selected, so this step is
not necessary every time.
Points of Interest may be searched by
Category, City, State or Name.
By Category – If you are interested
in the closest POI of a certain type for
example nearest gas station, select this
option.
By City or State
By Name - If you know the name of the
Point of Interest for example “COLISEUM”, select this option.
16
Page 17

POI Search Results
Some POI categories may not be
available in some areas and not all
possible POIs may be listed for all
categories. For example, although
the “Restaurant” category is very
extensive, it is only as current as the
map database information. Several
categories restrict the search radius
as well to minimize the search
time.
Since businesses change over time,
so will the accuracy of the points
of interest in your navigation map.
To have the most accurate map
database, annual map database
updating is recommended.
After selecting POI search criteria,
you may select to list the results
sorted by distance or by name.
Destination Selection (Go To...)
17
Page 18

Home Address
The Home Address is a convenient way
to route to your saved home address
directly.
Oce Address
The oce Address is a convenient way
to route to your saved oce address
directly.
Favorites
There are three additional ways to set
your destination under Favorites:
Address Book
The Address Book is a convenient
place to store frequently visited destinations.
To add, delete, or edit address book
entries see “Edit Address Book” section of this manual.
Trail Book
You can route to trails you have created. To add, delete, or edit Trail Book
entries see “Edit Trail Book” section of
this manual.
18
Trip Book
This button will change depending
on Trip Book allows you to navigate a
trip that has multiple destinations. To
add, delete, or edit Trail Book entries
see “Edit Trip Book” section of this
manual.
Page 19

Destination Selection (Go To...)
Address Book Entries Screen
This screen illustrates the address
book screen and the selection
options.
Address Book Selection Buttons
Button Press This Button To...
Exit menu mode and return to map mode
Return back to main menu level
Delete the highlighted displayed list
Go back one step
Page up in displayed list
Page down in displayed list
19
Page 20

Coordinates
You can route to a destination by
directly inputting latitude and
longitude values.
History
Previous destinations entered into your
NavMate software are automatically
saved into the memory of the NavMate
software. This is helpful when you want
to return to a recent destination, such as
a hotel where you may be staying. The
Previous Origin of the last calculated
route is also stored for easy return to
your start point.
Previous Destination Selection Buttons
Button Press This Button To...
20
Exit menu mode and return to map mode
Page up in displayed list
Return to main menu
Page down in displayed list
Delete the selected item
Go back one step
Page 21

By using Map
You may select the destination
by touching the screen. The
system will display the cross
hairs according to the location
you touch.
Press current position icon
to display location information
about the current panned location. Select the highlighted entry
to select the panned location for
the following options.
Quick POI
These points of interest are
located in close proximity to the
area selected on the map screen.
Destination Selection (Go To...)
Select Destination from Map Buttons Buttons
Button Press This Button To...
Return to map mode
Return to main menu
Go back one step
21
Page 22

Route Guidance and Map
Route Calculation and Guidance
After selecting a destination, the system
calculates a route based on the route
criteria set in the Setup Menu. The Status Bar indicates calculation progress.
Please Proceed
When route calculation is complete,
the NavMate software will instruct you
to “Please proceed to the highlighted
route” unless you are already on the
route. The highlighted route is indicated in yellow.
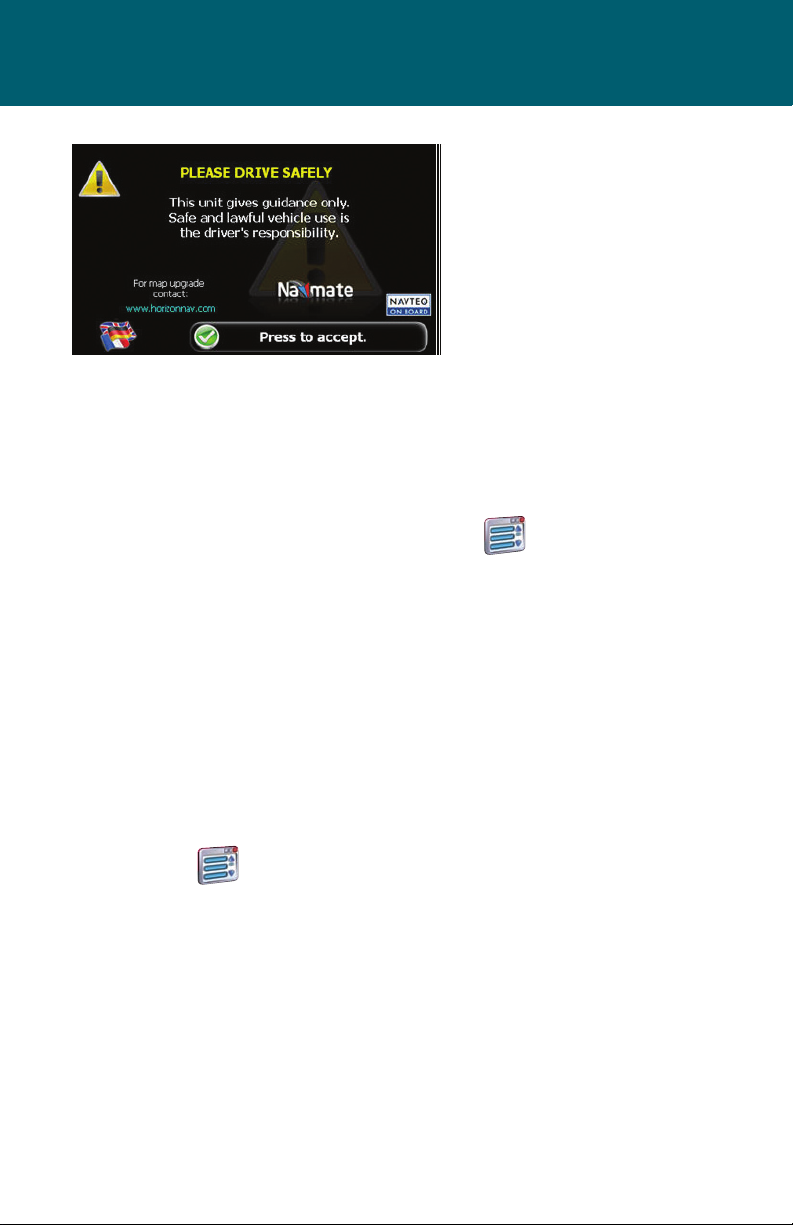
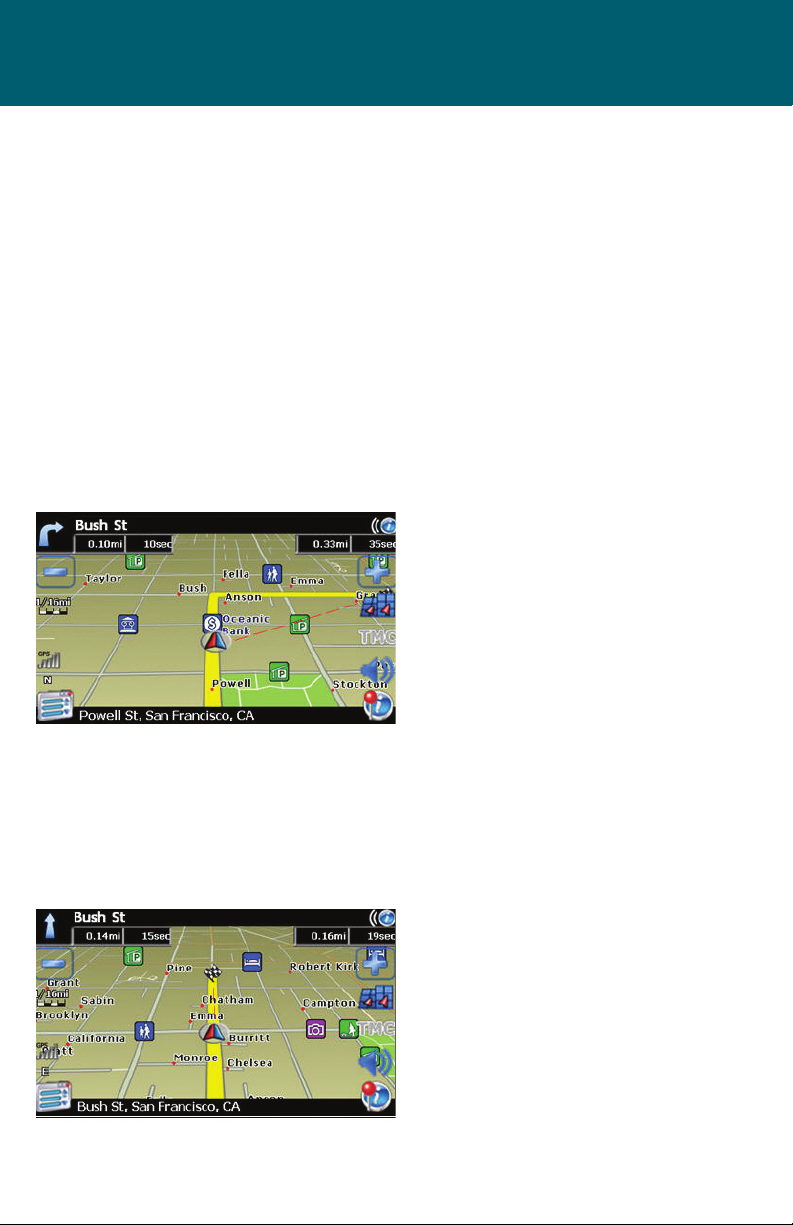
Guidance Display
Route Guidance
Once on the highlighted route, guidance information is provided on the
screen. Glance at the screen only when
necessary and safe to do so.
As you continue on the route, the guidance information is continually updated
to correspond with your progress to the
destination.
22
Page 23

Route Guidance and Map
True View (Intersection Zoom)
Just before a turn point, the
guidance display will show a close-up
or “true view” of the roads around the
turn point.
Map Display
The Map Display shows roads, road names, and cartographic features like lakes
and rivers. You can adjust the map scale, the map orientation, map view, status
information display, and the distance units to your own preferences (See Setup
section of this manual).
The GPS symbol may change colors indicating the strength of the signal. The GPS
symbol colors mean:
• Green - GPS signal is free from obstruction and is being received regularly. At
least four satellites are being received.
• Yellow - GPS signal is partially obstructed. Three satellites are being received.
• Red - GPS signal is unavailable. Two or fewer satellites are being received.
23
Page 24

Current Location
Screen
Press current position icon to display information about the current map
location. Then select the location information box to add it to address book,
use it as a destination, re-set position, or
save location as HOME location.
Arrival Screen
The destination is shown on the Map
Display screen with a circle. A voice
message announces that you are
approaching your destination.
O-Route and Route Interruptions
If you leave the current route, the NavMate software will automatically recalculate
the route. This feature can be disabled “Auto Recalculation O” in the Setup menu,
under Navigation Preference.
If you leave the route, making a stop, the NavMate software remembers your destination.
After you re-start, the NavMate software will ask if you want to continue your route.
24
Page 25

Edit Address/Trail Point
Select “Go To” from the Main Menu.
Then select “Favorites” from the “Go To”
screen.
Edit Favorites Menu
Add or modify destinations in Address
Book, Home Address, Oce Address,
Trail Book and Trip Book.
Edit Address Book
The “Address Book” option allows adding and editing address book entries.
Select “Edit Favorites” from the Main
Menu then select “Address Book”:
Use Edit function to rename address
book entry and to delete.
25
Page 26

Edit Home Address
The “Home Address” option allows adding or replacing of the home address.
Select the home address from the
following menu locations.
Edit Oce Address
The “Oce Address” option allows adding or replacing oce address book.
26
Select oce address from the following
menu locations.
Page 27

Edit Address/Trail Point
Edit Trail Book
The “Trail Book” option allows adding,
editing and Setup display for trail book
entries.
Add Trail
Press current position icon to add
a waypoint.
Press Menu icon and select “Stop Trail” when you complete the trail.
27
Page 28

Edit Trail
The “Trail Book” option allows adding,
editing and Setup display for trail book
entries.
Select the trail name, use to rename
the trail and to delete the trail.
28
Page 29

Edit Address/Trail Point
Select the highlighted trail name to edit
color and waypoints.
Use to rename the waypoints and
to delete the waypoints.
29
Page 30

Setup Trail Display
Select Setup Display and set the map
scale for the trails to be displayed.
30
Page 31

Edit Address/Trail Point
Edit Trip Book
Edit Trip Book allows adding and editing
trips and destinations within a trip.
Add
Add allows adding trips and
destinations within a trip.
Press to add additional destinations to the trip, press to rename the
destinations and press to delete an existing destination in a selected trip.
31
Page 32

Edit
Edit allows modifying destinations
within a trip and or deleting an
existing trip.
Press to rename the highlighted trip
and press to delete the trip.
Edit My POI
The user can create personalized Point
Of Interest categories.
32
Page 33

Edit Address/Trail Point
Add Category
In order for My POI to work properly,
a category needs to be created rst.
POI. Use the keyboard to create a new
POI category name and set icon, sound
and distance of your choice to the
created category. Then add the destination as a POI.
By selecting sound and distance the
system will alert you when you are
approaching the POI destination.
33
Page 34

Setup Display
By selecting the map scale, the user can
hide or display the POI on the selected
map scale view.
Edit Category
The user can modify or delete the
selected POI category.
34
Press to rename the POI category or
press to delete.
Page 35

Edit Address/Trail Point
Add to My POI
By selecting a destination, the user can
add this destination as a POI to the POI
category previously created.
Edit My POI
The user can modify the POI items by
category, by name or by phone number.
The POI names can be edited or deleted
from the list.
Setup Menu
You may customize the NavMate
software to your own preferences.
Select the Setup option to adjust
navigation preferences, display options,
and units (km or mi) settings. The Setup
Menu also allows the user to reset the
vehicle position and do some basic
system diagnostics.
35
Page 36

Preferences
Setup Routing Criteria
Navigation Preferences allows you
to enable the simulation mode,
set the route calculation and
guidance options.
• Simulation On/O – When On, the NavMate software will “drive” the selected
route even though the vehicle is not moving. This can be used to preview a
route, or demonstrate the system to friends.
• Shortest time/distance – Determines if the NavMate software emphasizes nding the fastest or the shortest route.
• Avoid Freeway yes/no – Determines if the NavMate software avoids or uses
freeways in the route calculation.
• Toll Yes/No – Determines if the NavMate software uses toll roads in the calculated route.
• Auto Recalculation On/O – When On, the NavMate software will automatically
recalculate the route if the user deviates from current route.
• Voice Guidance On/O – When On, the system will provide audible guidance.
• Use Ferries – Creates a route using ferries when possible.
• Announcement Tone – Indicates an action such as a turn should be preformed
at the tone.
• Screen Tap Sound – Provides an audible tone when the screen is touched.
36
Page 37

Preferences
Display Options
Display options allow you to set the
map orientation and some of the
information items displayed.
• North Up/Heading Up – Determines if the map is always displayed with
North direction at the top of the screen or if map is always adjusted so that
vehicle symbol points toward the top of the screen.
• Display Clock – Turn the display of the clock on or o.
• ETA – Turn the estimated time of arrival function on or o.
• Status Bar Display On/O – Turn the display of the Status Bar on or o.
• GPS Icon Display On/O – Turn the display of the GPS reception symbol on
or o.
• Scale Icon Display On/O – Determines if the map scale symbol is shown.
• Compass Icon Display On/O – Turn the Compass symbol on or o.
• Next Maneuver On/O – Set the display of the turn symbol.
• Soft Keys Auto-Hide On/O – Turn the function key display on or o.
• Intersection Zoom On/O – Turn the true view on or o.
37
Page 38

User Preference Settings
NOTE: The term”TTS” refers to the text
to speech function.
38
Page 39

Preferences
Day/Night Settings
You can select Auto, Day or Night
color scheme.
Point of Interest
This feature will allow you to select
POI that will be displayed in dierent
scales.
Point of Interest Icon Type
This screen appears after an item is selected from the POI Icon Setup Screen.
Location Reset
You may reset the location of the
vehicle symbol using the Location
Reset option.
39
Page 40

System
The System menu allows you to set
the volume, display the GPS reception
status and provides information on
the current software and map version
numbers.
Volume
Allows the user to set or mute the
volume of the navigation unit.
GPS diagnostic
The GPS diagnostic displays the
number of GPS satellites currently in
view and how many are currently
being used. The GPS satellite time is
displayed Universal Time Coordinated
(UTC) and so is the latitude and longi-
tude determined from GPS.
40
System Information
The version numbers for the system
software and mapping can be found
under System Information.
Page 41

Preferences
Trip Computer
Trip Computer displays speed, trip
related timing, elevation, odometer and
clock.
Press to display detailed reading of
each eld.
Scroll the Up or Down arrow button
to choose the eld then press to
refresh current reading.
41
Page 42

Planned Route
View the planned route on a highlighted route by clicking the top left corner
icon (arrow). The system will display the
entire route list.
Detour
42
Page 43

Avoid Specic Road
Preferences
Cancel Route
Select this function to cancel the
current route.
43
Page 44

Trail Book
Follow Trail
Next time when you go o-road, you
can follow the same trail you created
by selecting “Start Route Guidance”
then select “Trail Book” and nally
select an existing trail.
Select the Trail Book icon.
44
The following screen appears upon
selecting a trail.
Page 45

Trail Book
You can select to go to any points in
this trail as a starting point. Upon your
selection, the system will point you with
a red line to that starting location. You
will follow the red line to the starting
point and start your trail by following
the dotted line.
Press Menu icon and select “Stop
Trail” to cancel route.
45
Page 46

SOFTWARE UPDATE
FUNCTION
The navigation software contained in
the DVD must be transferred to a USB
thumb drive that is at least four gigabytes or more.
To update navigation software, press
the unit’s front panel or front remote
control MENU button and select SETUP.
The following screen will appear:
Accessing Navigation:
Touch the
submenu feature.
Navigation:
Press the Navigation icon and the following screen will appear:
icon to scroll to Navigation
The navigation software upgrade USB
device should connected to the iPOD
Interface USB port. Press the YES icon
and the following screen will appear:
Press YES and the following screen will
appear:
Using the keypad enter the update
password (874723) and press OK. The
following screen will appear:
The navigation software can be up-
dated by pressing the NAVIGATION
UPDATE icon. When the icon is pressed
the following screen will appear:
46
Page 47

When the unit has completed the
search for updated les one the following screens will appear:
If a new version of the navigation soft-
ware is found, pressing the YES icon will
cause the unit to extract the software
from the USB device and update the
navigation software. Press the NO icon
and the unit will return to previous
mode prior to the upgrade.
CAUTION: The navigation software
update can take up to one hour to
complete. During this time the unit
must not be turned o. If the unit is
turned o during the navigation
software update the unit will be
permanetly damaged.
If a new version of the navigation software is not found, pressing the NO or
YES icon will cause the unit to return to
previous mode prior to the upgrade.
Update Software
47
Page 48

C
2009 Audiovox Electronics Corp., Hauppauge, NY 11788
128-8724
 Loading...