

Page 1

TOCLS-OE100
TOCLJ-OE100
Owner’s Manual
Page 2
Introduction
Congratulations on your purchase of the TOCLS-OE100/TOCLJ-OE100 Mobile
Multimedia Receiver. Please read the instruction manual for this product before
using. The documentation provided will allow you to fully enjoy all the features
this unit has to oer. Please save this manual for future reference.
iPod® Control “iPod” is a trademark of Apple Computer, Inc., registered in the
U.S. and other countries. Expanding Systems iPodVTR etc. Expanding audio
features Expanding visual features.
Bluetooth® is a trade mark of Bluetooth Special Interest Group (SIG) Inc.
WARNING!
Never install this unit where
operation and viewing could interfere
with safe driving conditions.
WARNING!
To reduce the risk of a trac accident
(except when using for rear view video
camera) never use the video display
function while driving the vehicle.
This is a violation of federal law.
WARNING!
To prevent injury from shock or
re, never expose this unit to
moisture or water.
2
WARNING!
Never disassemble the unit.
WARNING!
Never use irregular discs.
WARNING!
To prevent damage to the mechanism
inside this unit, avoid impact
to the unit’s monitor.
WARNING!
Using an improper fuse may cause
damage to the unit and result in a re.
Page 3

Contents
WARNINGS . . . . . . . . . . . . . . . . . . . . . . . . . . . . . . . . . . . . . . . . . . . . . . . . . . . . . . . . . . . . . . . . . 2
FEATURES . . . . . . . . . . . . . . . . . . . . . . . . . . . . . . . . . . . . . . . . . . . . . . . . . . . . . . . . . . . . . . . . . . 6
CONTROLS AND INDICATORS . . . . . . . . . . . . . . . . . . . . . . . . . . . . . . . . . . . . . . . . . . . . . . 8
Turning the Unit ON or OFF . . . . . . . . . . . . . . . . . . . . . . . . . . . . . . . . . . . . . . . . . . . .10
Volume Adjustment . . . . . . . . . . . . . . . . . . . . . . . . . . . . . . . . . . . . . . . . . . . . . . . . . . .10
Mute . . . . . . . . . . . . . . . . . . . . . . . . . . . . . . . . . . . . . . . . . . . . . . . . . . . . . . . . . . . . . . . . . .10
Equalizer Control Menu . . . . . . . . . . . . . . . . . . . . . . . . . . . . . . . . . . . . . . . . . . . . . . . .10
Audio Adjustments . . . . . . . . . . . . . . . . . . . . . . . . . . . . . . . . . . . . . . . . . . . . . . . . . . . .11
Main Menu . . . . . . . . . . . . . . . . . . . . . . . . . . . . . . . . . . . . . . . . . . . . . . . . . . . . . . . . . . . .11
System Reset . . . . . . . . . . . . . . . . . . . . . . . . . . . . . . . . . . . . . . . . . . . . . . . . . . . . . . . . . .11
MAIN MENU . . . . . . . . . . . . . . . . . . . . . . . . . . . . . . . . . . . . . . . . . . . . . . . . . . . . . . . . . . . . . . . .12
AM/FM RADIO . . . . . . . . . . . . . . . . . . . . . . . . . . . . . . . . . . . . . . . . . . . . . . . . . . . . . . . . . . . . .13
RADIO MENU . . . . . . . . . . . . . . . . . . . . . . . . . . . . . . . . . . . . . . . . . . . . . . . . . . . . . . . . . .13
PTY Screen . . . . . . . . . . . . . . . . . . . . . . . . . . . . . . . . . . . . . . . . . . . . . . . . . . . . . . . . . . . .15
HD Sub-Channel Screen . . . . . . . . . . . . . . . . . . . . . . . . . . . . . . . . . . . . . . . . . . . . . . .16
Direct Tuning Screen . . . . . . . . . . . . . . . . . . . . . . . . . . . . . . . . . . . . . . . . . . . . . . . . . .16
AUDIO DISC . . . . . . . . . . . . . . . . . . . . . . . . . . . . . . . . . . . . . . . . . . . . . . . . . . . . . . . . . . . . . . . .17
AUDIO DISC MENU . . . . . . . . . . . . . . . . . . . . . . . . . . . . . . . . . . . . . . . . . . . . . . . . . . . . .17
DISC/SD CARD/USB. . . . . . . . . . . . . . . . . . . . . . . . . . . . . . . . . . . . . . . . . . . . . . . . . . . . . . . .19
Audio Mode (MP3, WMA Files) . . . . . . . . . . . . . . . . . . . . . . . . . . . . . . . . . . . . . . . . . .19
Image Mode (JPEG Files) . . . . . . . . . . . . . . . . . . . . . . . . . . . . . . . . . . . . . . . . . . . . . . .20
JPEG Information Screen . . . . . . . . . . . . . . . . . . . . . . . . . . . . . . . . . . . . . . . . . . . . . . .20
Selecting Images or Folders . . . . . . . . . . . . . . . . . . . . . . . . . . . . . . . . . . . . . . . . . . . .20
JPEG Menu Screen . . . . . . . . . . . . . . . . . . . . . . . . . . . . . . . . . . . . . . . . . . . . . . . . . . . . .21
MPEG Menu Screen . . . . . . . . . . . . . . . . . . . . . . . . . . . . . . . . . . . . . . . . . . . . . . . . . . . .22
DVD . . . . . . . . . . . . . . . . . . . . . . . . . . . . . . . . . . . . . . . . . . . . . . . . . . . . . . . . . . . . . . . . . . . . . . . .23
DVD MENU . . . . . . . . . . . . . . . . . . . . . . . . . . . . . . . . . . . . . . . . . . . . . . . . . . . . . . . . . . . .23
DVD Information Screen . . . . . . . . . . . . . . . . . . . . . . . . . . . . . . . . . . . . . . . . . . . . . . .24
DVD Search Screen . . . . . . . . . . . . . . . . . . . . . . . . . . . . . . . . . . . . . . . . . . . . . . . . . . . . .24
Settings and Adjustments . . . . . . . . . . . . . . . . . . . . . . . . . . . . . . . . . . . . . . . . . . . . . .25
Picture (PIC) Button . . . . . . . . . . . . . . . . . . . . . . . . . . . . . . . . . . . . . . . . . . . . . . .25
Screen Mode Select . . . . . . . . . . . . . . . . . . . . . . . . . . . . . . . . . . . . . . . . . . . . . . .25
Audio Language Select . . . . . . . . . . . . . . . . . . . . . . . . . . . . . . . . . . . . . . . . . . . .25
Subtitle Display and Language Select . . . . . . . . . . . . . . . . . . . . . . . . . . . . . .26
Angle Select . . . . . . . . . . . . . . . . . . . . . . . . . . . . . . . . . . . . . . . . . . . . . . . . . . . . . .26
3
Page 4

BLUETOOTH . . . . . . . . . . . . . . . . . . . . . . . . . . . . . . . . . . . . . . . . . . . . . . . . . . . . . . . . . . . . . . .27
BLUETOOTH MENU . . . . . . . . . . . . . . . . . . . . . . . . . . . . . . . . . . . . . . . . . . . . . . . . . . . .27
BLUETOOTH OPERATION . . . . . . . . . . . . . . . . . . . . . . . . . . . . . . . . . . . . . . . . . . . . . . .28
Entering Bluetooth Mode . . . . . . . . . . . . . . . . . . . . . . . . . . . . . . . . . . . . . . . . . . . . . .28
Pairing Your Wireless Phone . . . . . . . . . . . . . . . . . . . . . . . . . . . . . . . . . . . . . . . . . . . .28
Pairing a Wireless Phone and the Unit . . . . . . . . . . . . . . . . . . . . . . . . . . . . . . . . . .28
Pairing the Unit and a Wireless Phone . . . . . . . . . . . . . . . . . . . . . . . . . . . . . . . . . .29
Deleting a Paired Wireless Phone(s) . . . . . . . . . . . . . . . . . . . . . . . . . . . . . . . . . . . . .30
Managing Incoming Calls . . . . . . . . . . . . . . . . . . . . . . . . . . . . . . . . . . . . . . . . . . . . . .31
Answering an Incoming Call . . . . . . . . . . . . . . . . . . . . . . . . . . . . . . . . . . . . . . . . . . .31
Rejecting an Incoming Call . . . . . . . . . . . . . . . . . . . . . . . . . . . . . . . . . . . . . . . . . . . . .31
Volume Control . . . . . . . . . . . . . . . . . . . . . . . . . . . . . . . . . . . . . . . . . . . . . . . . . . . . . . . .31
Audio Mute . . . . . . . . . . . . . . . . . . . . . . . . . . . . . . . . . . . . . . . . . . . . . . . . . . . . . . . . . . . .31
Making an Outgoing Call . . . . . . . . . . . . . . . . . . . . . . . . . . . . . . . . . . . . . . . . . . . . . . .32
Direct Dialing . . . . . . . . . . . . . . . . . . . . . . . . . . . . . . . . . . . . . . . . . . . . . . . . . . . . . . . . . .32
Outgoing Call Using Contact Dialing . . . . . . . . . . . . . . . . . . . . . . . . . . . . . . . . . . .32
Call Transfer . . . . . . . . . . . . . . . . . . . . . . . . . . . . . . . . . . . . . . . . . . . . . . . . . . . . . . . . . . .33
Menu List . . . . . . . . . . . . . . . . . . . . . . . . . . . . . . . . . . . . . . . . . . . . . . . . . . . . . . . . . . . . .33
Contacts List . . . . . . . . . . . . . . . . . . . . . . . . . . . . . . . . . . . . . . . . . . . . . . . . . . . . . . . . . . .33
Call Log . . . . . . . . . . . . . . . . . . . . . . . . . . . . . . . . . . . . . . . . . . . . . . . . . . . . . . . . . . . . . . .33
Dialed Calls . . . . . . . . . . . . . . . . . . . . . . . . . . . . . . . . . . . . . . . . . . . . . . . . . . . . . . . . . . . .33
Received Calls . . . . . . . . . . . . . . . . . . . . . . . . . . . . . . . . . . . . . . . . . . . . . . . . . . . . . . . . .33
Missed Calls List . . . . . . . . . . . . . . . . . . . . . . . . . . . . . . . . . . . . . . . . . . . . . . . . . . . . . . .34
Bluetooth Music Function . . . . . . . . . . . . . . . . . . . . . . . . . . . . . . . . . . . . . . . . . . . . . .34
Devices . . . . . . . . . . . . . . . . . . . . . . . . . . . . . . . . . . . . . . . . . . . . . . . . . . . . . . . . . . . . . . . .35
Settings . . . . . . . . . . . . . . . . . . . . . . . . . . . . . . . . . . . . . . . . . . . . . . . . . . . . . . . . . . . . . . .35
Auto Connect . . . . . . . . . . . . . . . . . . . . . . . . . . . . . . . . . . . . . . . . . . . . . . . . . . . . . . . . . .35
PIN Code . . . . . . . . . . . . . . . . . . . . . . . . . . . . . . . . . . . . . . . . . . . . . . . . . . . . . . . . . . . . . .36
Microphone Function . . . . . . . . . . . . . . . . . . . . . . . . . . . . . . . . . . . . . . . . . . . . . . . . . .36
Mic_Gain . . . . . . . . . . . . . . . . . . . . . . . . . . . . . . . . . . . . . . . . . . . . . . . . . . . . . . . . . . . . . .36
Software Version . . . . . . . . . . . . . . . . . . . . . . . . . . . . . . . . . . . . . . . . . . . . . . . . . . . . . . .36
CAMERA . . . . . . . . . . . . . . . . . . . . . . . . . . . . . . . . . . . . . . . . . . . . . . . . . . . . . . . . . . . . . . . . . . .37
Rear Camera Function . . . . . . . . . . . . . . . . . . . . . . . . . . . . . . . . . . . . . . . . . . . . . . . . .37
REAR DISPLAY FUNCTION . . . . . . . . . . . . . . . . . . . . . . . . . . . . . . . . . . . . . . . . . . . . . . . . .37
SETUP MENU . . . . . . . . . . . . . . . . . . . . . . . . . . . . . . . . . . . . . . . . . . . . . . . . . . . . . . . . . . . . . . .38
Accessing Menu Items . . . . . . . . . . . . . . . . . . . . . . . . . . . . . . . . . . . . . . . . . . . . . . . . .38
General Items . . . . . . . . . . . . . . . . . . . . . . . . . . . . . . . . . . . . . . . . . . . . . . . . . . . . . . . . .38
Key Press Click Sound . . . . . . . . . . . . . . . . . . . . . . . . . . . . . . . . . . . . . . . . . . . . . . . . . .38
Bluetooth Mode . . . . . . . . . . . . . . . . . . . . . . . . . . . . . . . . . . . . . . . . . . . . . . . . . . . . . . .38
Camera Image . . . . . . . . . . . . . . . . . . . . . . . . . . . . . . . . . . . . . . . . . . . . . . . . . . . . . . . . .38
Clock . . . . . . . . . . . . . . . . . . . . . . . . . . . . . . . . . . . . . . . . . . . . . . . . . . . . . . . . . . . . . . . . . .38
4
Page 5

SETUP MENU (continued)
GPS Time . . . . . . . . . . . . . . . . . . . . . . . . . . . . . . . . . . . . . . . . . . . . . . . . . . . . . . . . . . . . . .39
Screen . . . . . . . . . . . . . . . . . . . . . . . . . . . . . . . . . . . . . . . . . . . . . . . . . . . . . . . . . . . . . . . . .39
Brightness . . . . . . . . . . . . . . . . . . . . . . . . . . . . . . . . . . . . . . . . . . . . . . . . . . . . . . . . . . . . .39
Touch Screen Calibration . . . . . . . . . . . . . . . . . . . . . . . . . . . . . . . . . . . . . . . . . . . . . . .40
AUX IN . . . . . . . . . . . . . . . . . . . . . . . . . . . . . . . . . . . . . . . . . . . . . . . . . . . . . . . . . . . . . . . .40
DVD . . . . . . . . . . . . . . . . . . . . . . . . . . . . . . . . . . . . . . . . . . . . . . . . . . . . . . . . . . . . . . . . . .40
Image Aspect Ratio . . . . . . . . . . . . . . . . . . . . . . . . . . . . . . . . . . . . . . . . . . . . . . . . . . . .40
Parental Control . . . . . . . . . . . . . . . . . . . . . . . . . . . . . . . . . . . . . . . . . . . . . . . . . . . . . . .41
Navigation . . . . . . . . . . . . . . . . . . . . . . . . . . . . . . . . . . . . . . . . . . . . . . . . . . . . . . . . . . . .42
ASP (Audio Sound Parameters) . . . . . . . . . . . . . . . . . . . . . . . . . . . . . . . . . . . . . . . . .43
Misc . . . . . . . . . . . . . . . . . . . . . . . . . . . . . . . . . . . . . . . . . . . . . . . . . . . . . . . . . . . . . . . . . . .45
Factory Default . . . . . . . . . . . . . . . . . . . . . . . . . . . . . . . . . . . . . . . . . . . . . . . . . . . . . . . .45
Version . . . . . . . . . . . . . . . . . . . . . . . . . . . . . . . . . . . . . . . . . . . . . . . . . . . . . . . . . . . . . . .45
AV2 MEDIA DEVICE (iPod) . . . . . . . . . . . . . . . . . . . . . . . . . . . . . . . . . . . . . . . . . . . . . . . . .46
AUDIO Menu . . . . . . . . . . . . . . . . . . . . . . . . . . . . . . . . . . . . . . . . . . . . . . . . . . . . . . . . . .46
VIDEO Menu . . . . . . . . . . . . . . . . . . . . . . . . . . . . . . . . . . . . . . . . . . . . . . . . . . . . . . . . . . .47
AV1/AV2 INPUT . . . . . . . . . . . . . . . . . . . . . . . . . . . . . . . . . . . . . . . . . . . . . . . . . . . . . . . . . . . .48
AV1 Auxiliary Audio/Video Input . . . . . . . . . . . . . . . . . . . . . . . . . . . . . . . . . . . . . . .48
AV2 Auxiliary Audio/Video Input . . . . . . . . . . . . . . . . . . . . . . . . . . . . . . . . . . . . . . .48
NAVIGATION . . . . . . . . . . . . . . . . . . . . . . . . . . . . . . . . . . . . . . . . . . . . . . . . . . . . . . . . . . . . . . .49
Navigation Quick Start . . . . . . . . . . . . . . . . . . . . . . . . . . . . . . . . . . . . . . . . . . . . . . . . .49
XM SATELLITE RADIO (Optional) . . . . . . . . . . . . . . . . . . . . . . . . . . . . . . . . . . . . . . . . . . .51
XM Satellite Radio Menu . . . . . . . . . . . . . . . . . . . . . . . . . . . . . . . . . . . . . . . . . . . . . . .51
Direct Tuning Screen . . . . . . . . . . . . . . . . . . . . . . . . . . . . . . . . . . . . . . . . . . . . . . . . . . .52
XM Radio ID . . . . . . . . . . . . . . . . . . . . . . . . . . . . . . . . . . . . . . . . . . . . . . . . . . . . . . . . . . .52
SIRIUS SATELLITE RADIO (Optional) . . . . . . . . . . . . . . . . . . . . . . . . . . . . . . . . . . . . . . .53
SIRIUS Satellite Radio Menu . . . . . . . . . . . . . . . . . . . . . . . . . . . . . . . . . . . . . . . . . . . .53
Direct Tuning Screen . . . . . . . . . . . . . . . . . . . . . . . . . . . . . . . . . . . . . . . . . . . . . . . . . . .54
Settings . . . . . . . . . . . . . . . . . . . . . . . . . . . . . . . . . . . . . . . . . . . . . . . . . . . . . . . . . . . . . . .54
Parental Control . . . . . . . . . . . . . . . . . . . . . . . . . . . . . . . . . . . . . . . . . . . . . . . . . . . . . . .54
Edit Password . . . . . . . . . . . . . . . . . . . . . . . . . . . . . . . . . . . . . . . . . . . . . . . . . . . . . . . . .55
SIRIUS Version . . . . . . . . . . . . . . . . . . . . . . . . . . . . . . . . . . . . . . . . . . . . . . . . . . . . . . . . .55
REMOTE CONTROL . . . . . . . . . . . . . . . . . . . . . . . . . . . . . . . . . . . . . . . . . . . . . . . . . . . . . . . . .56
Remote Control Front . . . . . . . . . . . . . . . . . . . . . . . . . . . . . . . . . . . . . . . . . . . . . . . . . .56
Remote Control Back . . . . . . . . . . . . . . . . . . . . . . . . . . . . . . . . . . . . . . . . . . . . . . . . . .60
Remote Control Battery . . . . . . . . . . . . . . . . . . . . . . . . . . . . . . . . . . . . . . . . . . . . . . .63
Initial Use . . . . . . . . . . . . . . . . . . . . . . . . . . . . . . . . . . . . . . . . . . . . . . . . . . . . . . . . . . . . .63
Battery Replacement . . . . . . . . . . . . . . . . . . . . . . . . . . . . . . . . . . . . . . . . . . . . . . . . . .63
5
Page 6

Features
General
• Bluetooth - Bluetooth hands-free prole for safety / convenience
and A2DP prole for streaming music from a PDA / PMP
• Navigation Ready
• Infrared Remote Control
• Two Composite Video Outputs for Additional Screens
• One Audio /Video Auxiliary Inputs
• Rotary Encoder Audio Control
• Seven-Band EQ with Eleven Preset EQ Curves
• Rear Camera Input
DVD
• Aspect Ratio - 16 : 9 or 4 : 3
• Fast Forward, Fast Reverse - 2X, 4X, 8X and 16X
• Play, Pause, Stop, Next Chapter and Previous Chapter
CD / MP3 / WMA
• Direct Track Access via Remote control
• Audible Forward / Reverse Track Search
• Random, Repeat and Intro
• Play, Pause, Stop, Next Track and Previous Track
AM-FM
• Station Presets (15 FM1, 15 FM2, 15 FM3, 15 AM)
• Auto Stereo/Mono
• Auto Store/Preview Scan
6
Page 7

Sat Radio Ready
• Compatible with XM and Sirius Tuners (Sold Separately)
• Satellite Channel Name, Artist, Song and Categories Displayed
on Monitor
iPod
• Access iPod Playlists, Artists, Albums, Songs, *Photos
and *Video (* Requires Photo or Video iPod)
• Power Management Charges iPod while Connected
• iPod Interface Cable (included)
Media
• USB - Supports Hard Drives and Flash Memory Drives
• 3.5mm Audio Only Input
• RCA Audio /Video Input
Navigation
The TOCLS-OE100/TOCLJ-OE100 provides turn-by-turn guidance with
a large map and points-of-interest data base.
Rear Camera
• The TOCLS-OE100/TOCLJ-OE100 is “camera ready.”
Anti-Theft Feature
The unit is equipped with an anti-theft feature requiring the user to enter a
password upon initial power on.
The default user password is 012345 (6 digits). To change the anti-theft and
RATINGS protection password, perform the following steps: XXXXXXX
7
Page 8
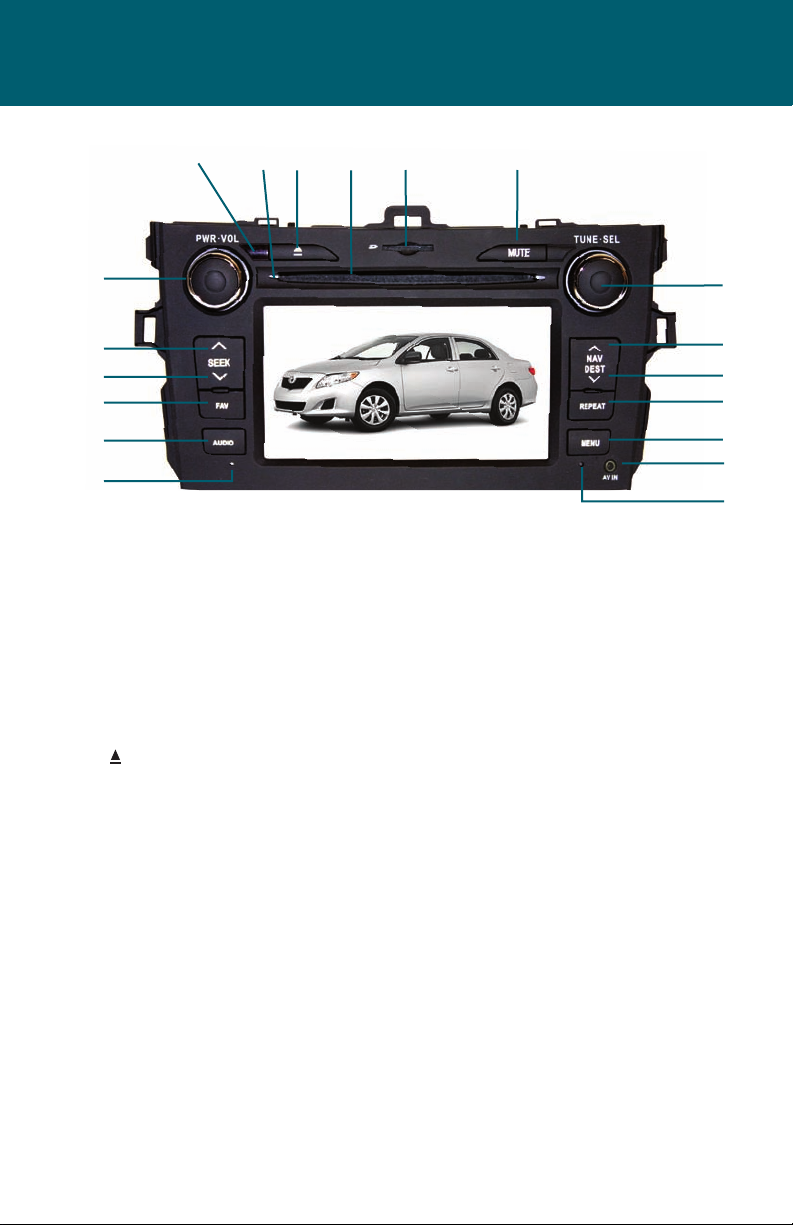
Controls and Indicators
2
3
4 5
6 7
1
19
18
17
16
15
1. Power on/o and volume control knob
Press and hold for 3 seconds to turn the unit o. Press again to turn the unit
on. Increase the volume by rotating the knob clockwise. Decrease the volume
by rotating the knob counter-clockwise.
2. REMOTE CONTROL SIGNAL RECEIVER
Receives the IR signal from the remote control.
3. Disc LED Indicator
LED which lights red when a disc is inserted in the radio and lights amber
when the disc slot is empty.
4. Button
Press this button to eject a DVD/CD/MP3 disc. Disc play is stopped, the disc
is ejected and the unit will change to radio operation. If the disc is not
removed from the unit and the button is pressed again, the disc will be
re-loaded. If the disc is not removed from the disc slot within 10 seconds of
being ejected, it will be automatically re-loaded to prevent it from being
accidentally damaged.
5. Disc Slot
Accepts DVD/CD/MP3 discs.
6. SD Card slot
Insert SD card for playback of audio/video les.
7. MUTE
Press the button to mute the audio. Press again to restore the volume.
8. Scroll Tuning Knob:
When the unit is set to Radio mode pressing this button will acquire the next
or previous available frequency. When the unit is set to iPod/MP3/USB/SD
player mode, this button will select a song in iPod/MP3/USB/SD player mode
or channel in Satellite radio mode.
8
8
9
10
11
12
13
14
Page 9

9. NAV Button
Press this button to access the Navigation mode.
10. DEST Button
Press this button as a shortcut to access the Navigation mode and enter a
desired destination.
11. REPEAT Button
Press to repeat the voice guidance or instructions while in the Navigation
mode.
12. MENU Button
Press this button to access the main menu.
13. AV IN Jack
Jack (3.5mm) which provides an audio or video input jack.
14. Reset Button
Press to reset system to correct a system halt or other illegal operation, use
the tip of a pen to press the reset button.
15. Microphone
The microphone is located on the left side of the unit. For best reception,
speak loudly and clearly.
16. AUDIO Button
Press to switch the various audio sources applied to the unit. Press and hold
for 2 seconds to turn the audio o.
17. FAV Button
Press to access AM, FM and Sat. Radio presets. For example changing the
program mode from Sat. Radio to DVD, and then pressing the FAV button, the
program will return to Sat. Radio and display the presets list at the same time.
Press to access the desired preset list (Group 1 through 6, each containing 5
presets). When the desired group is accessed, press and hold the preset location for 2 seconds to save the channel as a favorite.
18. SEEK Button
When the unit is set to Radio mode pressing this button will acquire the next
available frequency. When the unit is set to iPod/MP3/USB/SD player mode,
this button will select the next song in iPod/MP3/USB/SD player mode or
channel in Satellite radio mode.
19. SEEK Button
When in the Radio mode pressing this button will acquire the next available
frequency. When the unit is set to iPod/MP3/USB/SD player mode, this button will select the next song in iPod/MP3/USB/SD player mode or channel in
Satellite radio mode.
9
Page 10
Turning the Unit ON or OFF:
Press the front panel PWR button to turn the unit on. The unit can also be turned
on buy pressing the front remote control power button. To turn the unit o, press
and hold the front panel PWR button for 2 seconds or press the front remote control power button.
Volume Adjustment:
To increase or decrease the volume level, turn the front panel PWR button or press
the VOL+/ VOL- buttons on the front remote control. The unit’s front panel screen
will display the volume level for 3 seconds. The volume ranges from “0” to “40”.
Mute:
Pressing the PWR VOL button on the front panel or either the front or the rear
remote control will mute the audio from the unit. Press the MUTE button again to
restore the audio volume. “MUTE” ( or ) is displayed on the monitor. Adjusting the volume or using any of the audio setup features cancels the mute function.
Also pressing the front panel PWR button will mute or unmute the audio from the
unit.
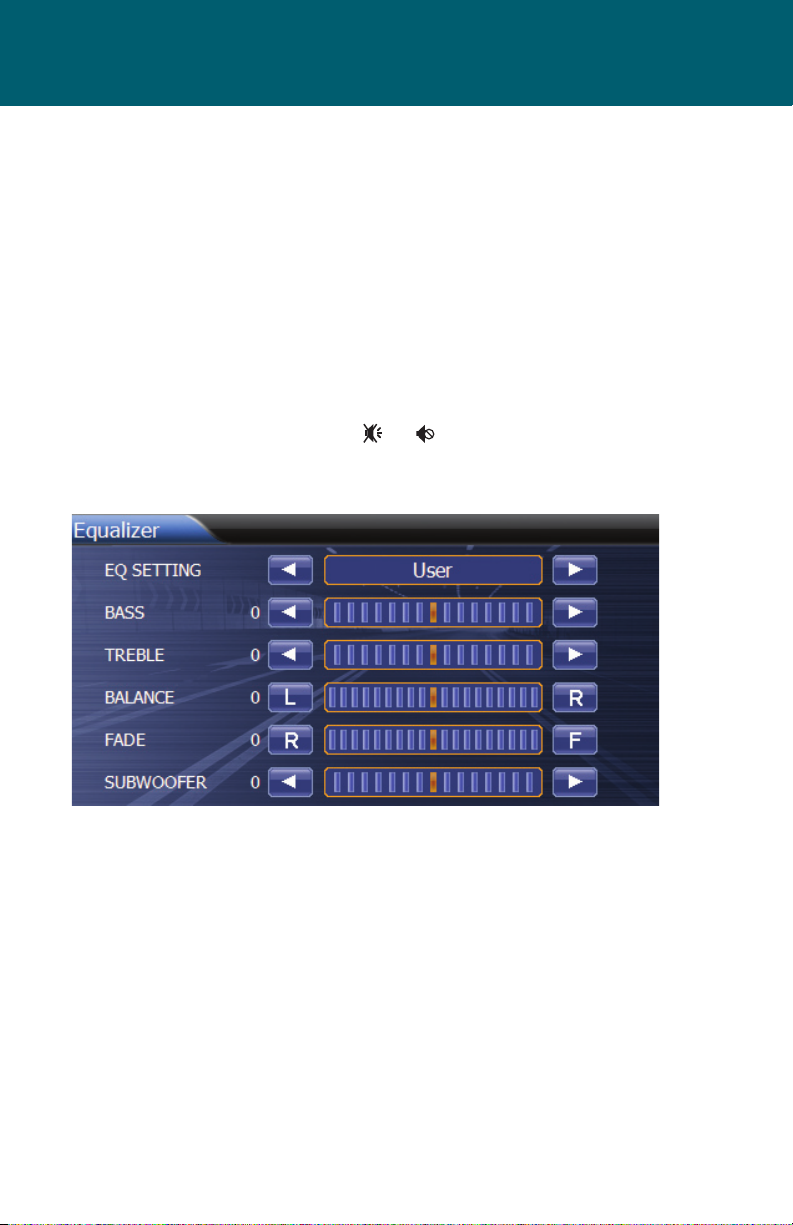
Equalizer Control Menu :
The Equalizer Control menu can be accessed by pressing the front panel TUNE SEL
knob or by pressing SEL on either the front or rear remote control. The Equalizer
Menu features a 6-band graphic equalizer, which allows you to easily adjust your
audio system to meet the acoustical characteristics of your vehicle, which vary depending on the type of vehicle and its measurements. Proper setting of the Fader
and Balance boosts the eects of the cabin equalizer. The Equalizer Control menu
applies preset sound eects to the unit’s audio output signal. The “EQ SETTING”
right or left cursor buttons when pressed, will activate one of eleven operating
modes: User, Flat, Jazz, Pop, Classical, Rock, News, Urban, Rave, Movie, Techno.
When the “EQ SETTING” is set to a preset sound, such as Flat, Jazz, Pop etc.,the bass
and treble levels cannot be changed. Press the TUNE SEL Knob to exit the equalizer menu screen.
NOTE: All the various audio settings can only be adjusted when the “EQ SETTING”
is set to USER.
10
Page 11

Audio Adjustments:
1. Press the unit’s front panel TUNE SEL button or press SEL on either the front or
rear remote control to access the Equalizer Control Menu.
2. Press and hold either the left/right cursor buttons to move the highlight on the
feature to be adjusted to a negative or positive value. To left of the cursor buttons is a numerical value for the feature being adjusted.
The Equalizer Control menu can be accessed by pressing the front panel TUNE SEL
button or by pressing SEL on either the front rear remote control.
Main Menu:
The Main Menu can be accessed by pressing the front panel MENU button or
by pressing MENU on the front panel remote control. The Main Menu allows the
selection of function source for the front and rear zone. The function source can
be selected by pressing the front panel buttons, the function icon on the units
front panel screen or using the front remote control. When using the front remote
control press the MENU button. The Main Menu will be displayed. The various
function sources can be selected using the cursor buttons to highlight the function and then pressing the OK button.
System Reset:
To correct a system halt or other illegal operation, use the tip of a pen to press the
reset button located on the front bottom right corner of the unit.
11
Page 12

Main Menu
MAIN MENU
AM/FM:
Press to access AM/FM TUNER mode.
CD/DVD:
Press to access CD/DVD mode, (CD/DVD
must be inserted).
SD CARD:
Press to access the contents of the SD
Card (SD card must be inserted).
USB:
Press to access the contents of the USB
thumb drive (USB thumb drive must be
connected).
BLUETOOTH:
Press to access the Bluetooth menu.
CAMERA:
Press to access a signal from an
external camera.
REAR:
Press to display DVD video in the
rear of a vehicle equipped with rear
monitors.
SETUP:
Press to access the unit’s setup menu
The setup menu consists of a submenu
which contains General, Video, Audio,
and other unit settings.
AV 2:
Press to access the audio video input
(AV2) mode. The input can be various
media devices such as an iPod etc. When
an iPod is connected to the unit, the AV2
icon will change to iPod.
AV 1:
Press to access the AUX INPUT mode.
NAV:
Press to access the navigation mode.
SAT:
Press to access the satellite radio
function.
NOTE: This button will change depend-
ing on the optional satellite radio subscription service that is chosen (XM or
SIRIUS). The button will display the logo
of the Satellite Service.
12
Page 13
AM/FM Radio
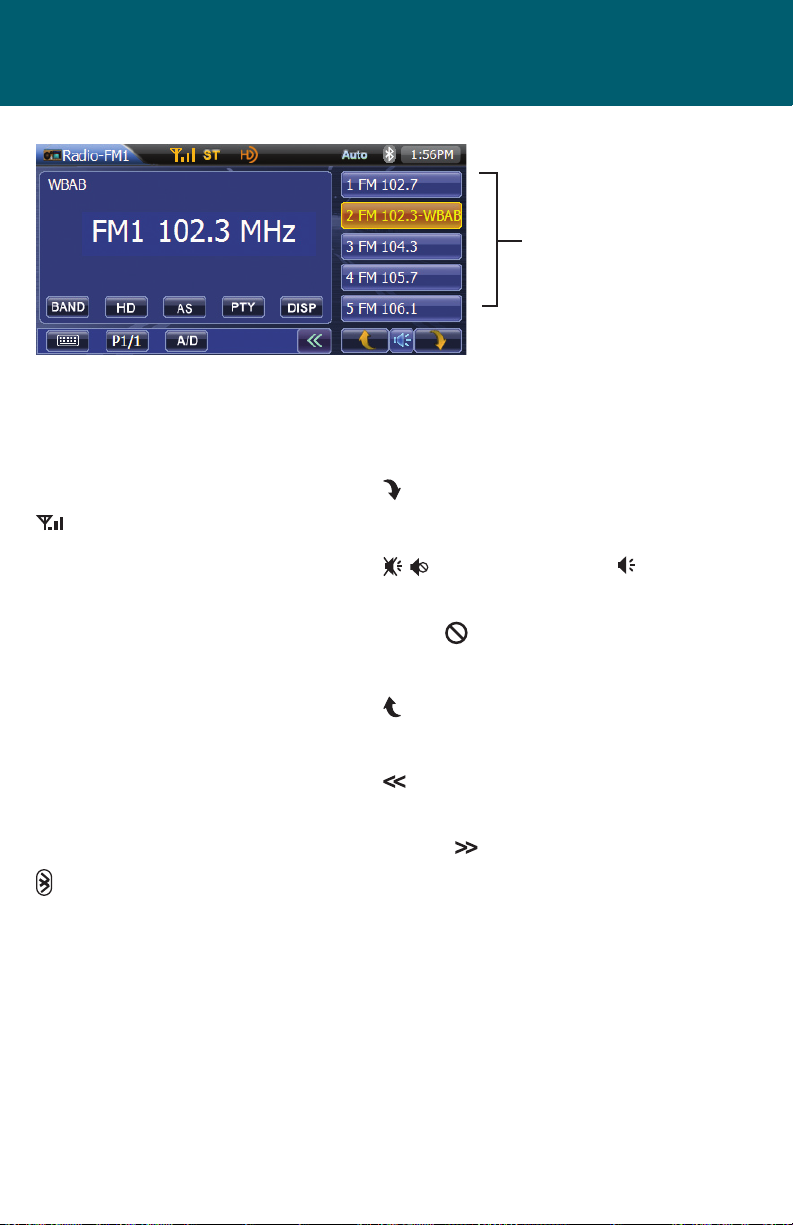
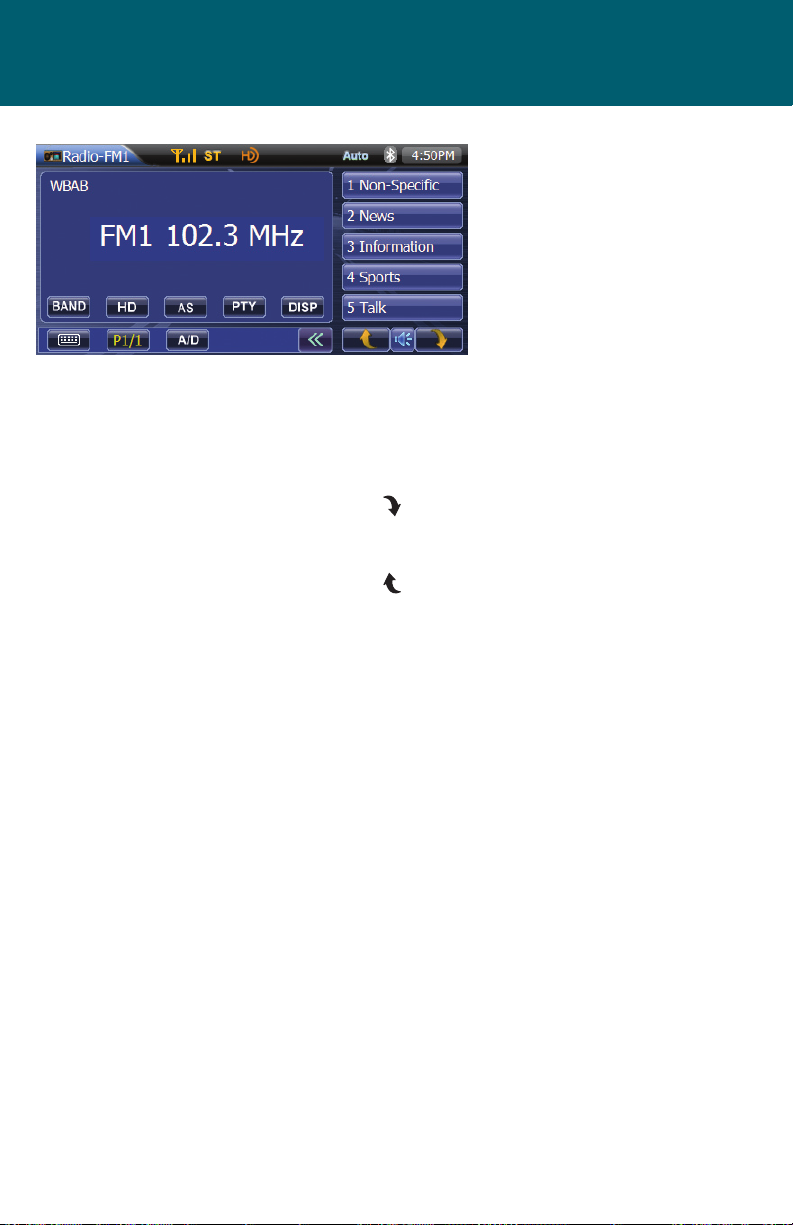
Preset List
RADIO MENU
RADIO-FM Icon:
Indicates the frequency band that is
currently playing. When pressed the
user is returned to the Main Menu.
Antenna Icon:
As the strength of the radio signal
increases, the number of illuminated
segments will increase.
ST Icon:
This icon appears when the radio station
frequency is broadcasted in stereo.
HD Icon:
Indicator appears when the unit is tuned
to a radio station frequency that contains a HD Digital AM or FM radio signal.
Auto Icon:
Indicates the radio frequency signal
reception mode. Refer to the A/D icon
for more details.
Bluetooth Icon:
The icon will be light blue when paired
to a device and gray when not paired.
Time Display:
Displays the time as entered by the user
in the SETUP Menu, clock function.
Preset List:
Provides a display of the preset frequencies. Press to recall preset stations or
press and hold to store a station. When
the station is stored, a conrmation
beep is heard. During radio operation,
pressing the screen will tune to frequency indicated. The radio can store fifteen
FM1, fteen FM2, fteen FM3 and fteen
AM frequency presets.
Preset List Next Icon:
Press to access the next page in the
preset list.
Mute/ Un-mute Icon :
,
This button is used to mute the volume
from the radio. By pressing the button,
a Mute indication will appear on the
speaker icon and the volume will
be muted.
Preset List Previous Icon:
Press to access the previous page in the
preset list.
Icon:
Press the icon and the additional buttons on the lower portion of screen are
hidden. Press the icon again and the
additional buttons are displayed on the
screen.
DISP Icon:
Press to display the radio frequency and
radio station call letters. In addition to
the above information, certain stations
will display banner messages.
PTY Icon:
Press to access the program type related
search function. Refer to the
PTY Screen.
13
Page 14

A/D Icon:
Press to select the radio frequency signal reception mode. The choices consist
of Digital (D), Analog (A) and AUTO.
This icon indicates the radio signal type
that the unit is set to access. When the
unit is set to analog only analog radio
signals will be accessed. When the unit
is set to digital only digital or HD radio
signals will be accessed. When the unit
is set to automatic (AUTO) the unit will
access both analog and digital (HD)
signals. When the content of the analog
and digital channel are the same, the
unit will access the digital signal automatically. Refer to the HD Sub-Channel
Screen.
AS Icon:
Press to access the Auto-Store Tuning
feature which will automatically scan
and enter up to fteen strong stations
into the fteen preset memory loca-
tions. If you have already set the preset
memories to your favorite stations,
activating the Auto-Store feature will
erase those stations and enter the new
strong stations. This feature is most useful when travelling in an area where you
are not familiar with the local stations.
P1/4 Icon:
If current channel is a HD Radio channel with multiple digital sub-channels
this button will be illuminated. Press to
select the sub-channels present. Refer
to HD Sub-Channel Screen.
HD Icon:
Press to access high denition audio
channel list if it is being broadcasted by
the radio station. If the station is broadcasting a HD siginal the button will be
illuminated
Keyboard Icon :
Press to access the direct tuning function. When the icon is pressed a keyboard will appear. The user can enter the
desired radio frequency, press OK and
the unit will tune to the frequency. Refer
to the Direct Tuning Screen.
BAND Icon:
Press to select or change the radio band
(AM or FM1, FM2, or FM3). When the
band is changed the presets associated
with the band will also be displayed.
14
Page 15
PTY SCREEN
PTY Icon:
Press to change the display to the
main radio screen. Press the icon
again and the multi-line display
format returns. When the PTY function
is enabled, pressing a category (news,
sports, talk etc.) will cause the unit to
search for the desired topic.
Call Letters:
Displays the radio station call letters of
the radio station currently playing.
Category List:
The unit contains thirty two categories
that can be searched. These categories
consist of topics such as news, sports,
types of music etc.
Category List Next:
Press to access the next page in the
category list.
Category List Previous:
Press to access the previous page in
the category.
15
Page 16
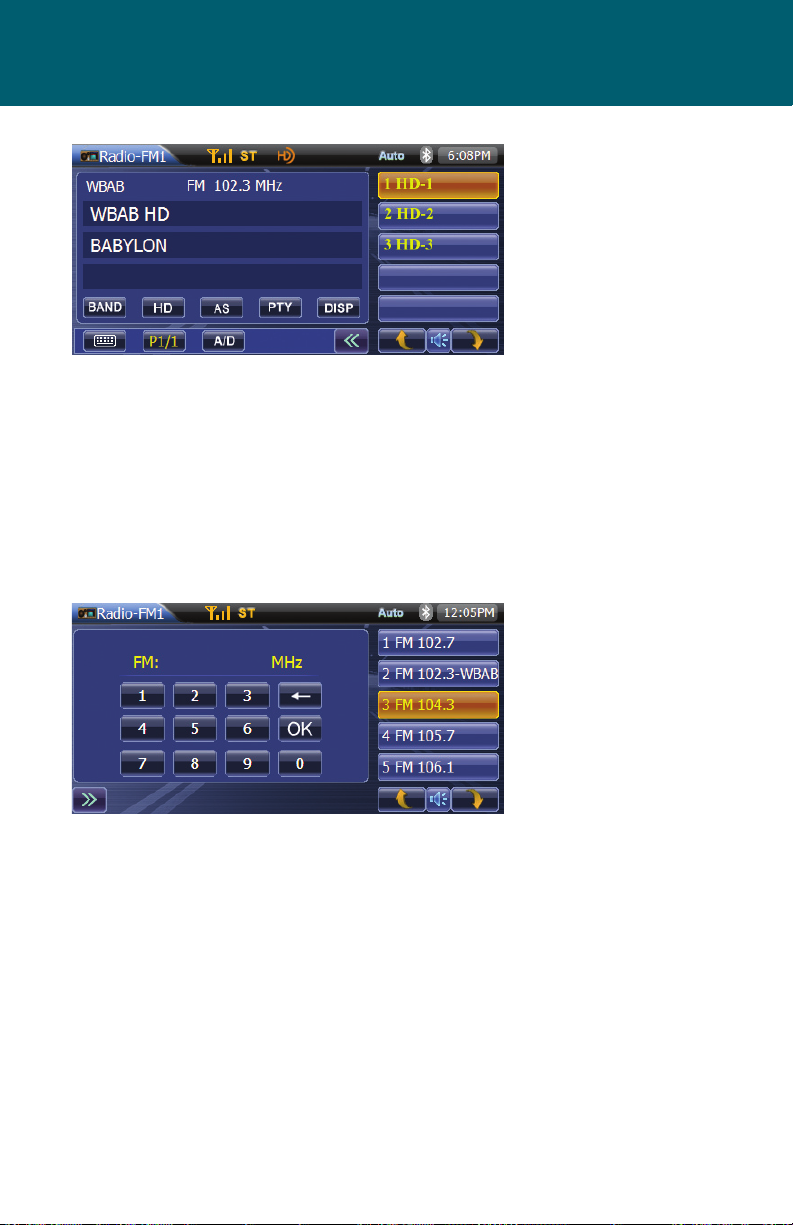
HD SUB-CHANNEL SCREEN
If the currently playing radio channel is
a HD Radio channel with multiple digital
sub-channels pressing the HD Icon button will display all the sub channels. The
radio must be set to DIGITAL or AUTO to
receive the HD signal and sub-channels.
Pressing a HD sub-channel in the list will
cause that channel to be played.
DIRECT TUNING SCREEN
When the Keyboard Icon is pressed in
the Radio Screen a keyboard will appear.
The user can enter the desired radio
frequency using the numeric keypad.
Once the desired frequency is entered
press OK and the unit will tune to
the frequency.
16
Page 17
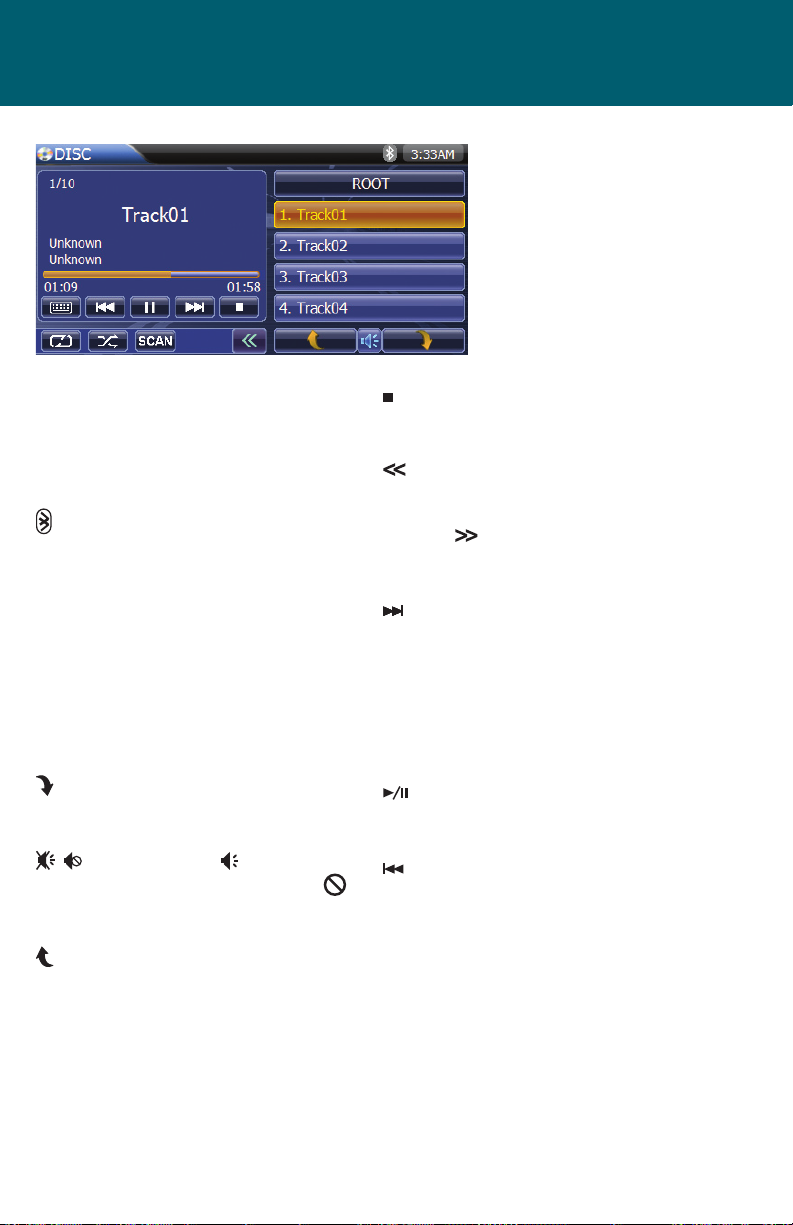
Audio Disc
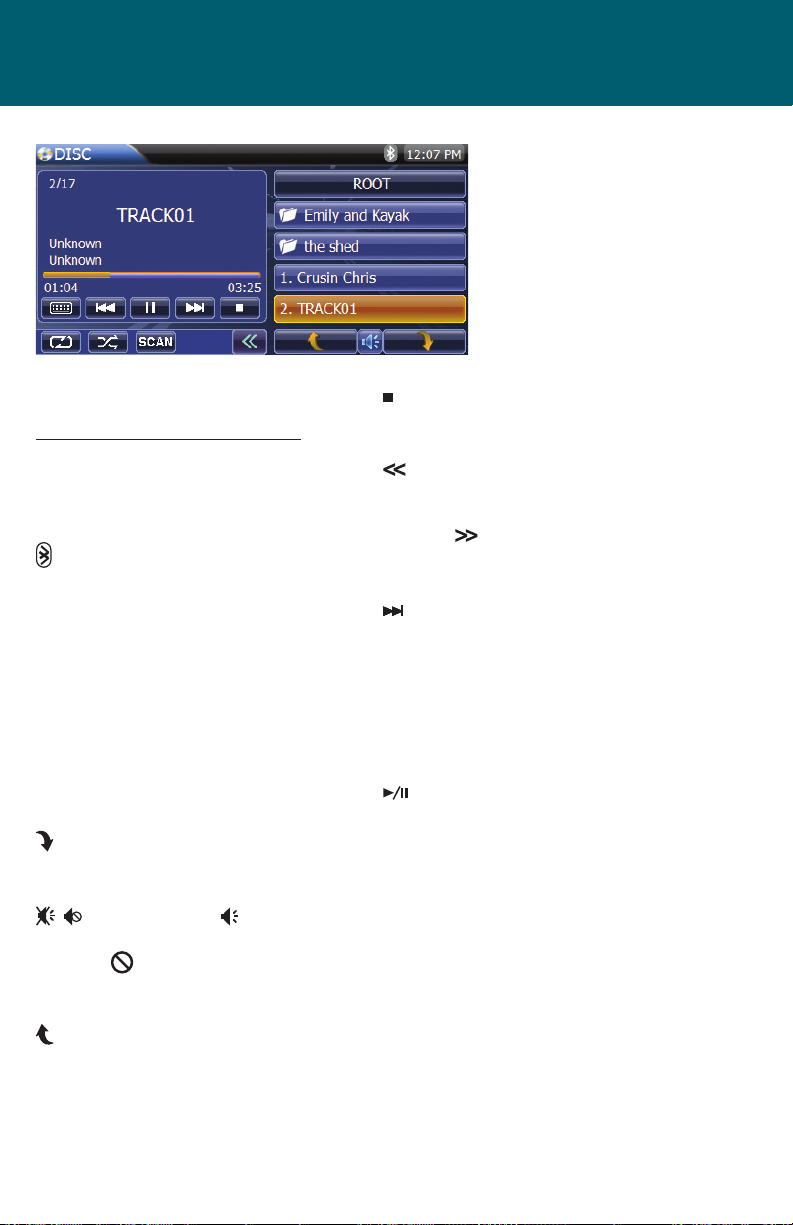
AUDIO DISC MENU
DISC Icon:
Indicates that a disc is in the unit. When
pressed the user is returned to the Main
Menu.
Bluetooth Icon:
The icon will be light blue when paired
to a device and gray when not paired.
Time Display:
Displays the time as entered by the user
in the SETUP Menu, clock function.
Preset List:
Provides a display of the tracks contained on the disc. During disk operation, pressing the track number on the
screen will access and play the track.
Preset List Next Icon:
Press to access the next page in the
preset list.
, Mute/Un-mute Icon:
Press to mute the volume. A mute ( )
indication will appear on the speaker
icon and the volume will be muted.
Preset List Previous Icon:
Press to access the previous page in the
preset list.
Icon:
Press the icon to stop playback of the
track.
Icon:
Press the icon and the additional buttons on the lower portion of screen are
hidden. Press the icon again and the
additional buttons are displayed on the
screen.
Next Icon:
Press the icon to access the next track
on the CD. Each momentary tap of the
icon will proceed to the next higher
track number. Press and hold to fast
forward at 2x, 4x, 8x,16x normal speed.
Release the icon and return to normal
playback speed.
Play/Pause Icon:
Press the icon to begin playback. Press
the icon again pause playback.
Previous Icon:
Press the icon to access the previous
track on the CD. Each momentary tap
of the icon will proceed the next lower
track number. Press and hold to fast
forward at 2x, 4x, 8x,16x normal speed.
Release the icon and return to normal
playback speed.
17
Page 18
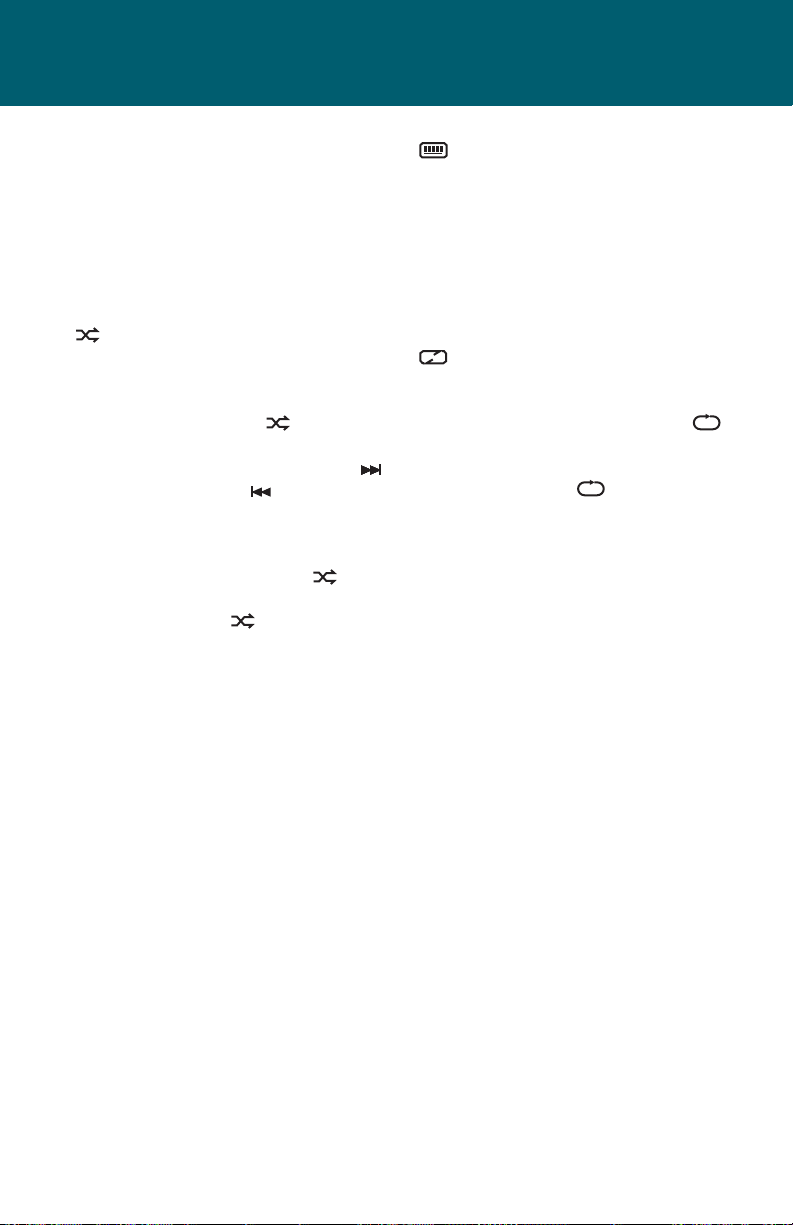
SCAN Icon:
Press to access the scan function
which will play the rst 10 seconds of
each track on the disc. When a desired
track is reached, press the Scan button
again or the highlighted track in the
preset list to cancel the function. Play
of the selected track will continue.
Icon:
Press to access the random play function. This function will play the songs
on the CD in a random, shued order.
The random play icon ( ) will appear on the display panel. In random
play mode, pressing the Next icon ( )
or the Previous icon ( ) will also select tracks in a random order instead
of the normal progression. Additional
presses will select tracks in random
order. Press the random play ( ) icon
to cancel the random play mode. The
random play icon ( ) will disappear
on the display panel.
Keyboard Icon:
Press to access the direct access song
selection function. When the icon is
pressed a keyboard will appear. The user
can enter the desired track number and
press OK. The track will begin to play.
Also pressing the numeric keypad on
the front remote control will also cause
the keyboard to appear.
Icon:
Press the icon during disc playback to
repeat playback of the current song.
The following icon will appear (S ).
Press the icon a second time to repeat
all tracks on the disc. The following
icon will appear (A ). Pressing the
icon once again will turn the repeat
function o.
18
Page 19
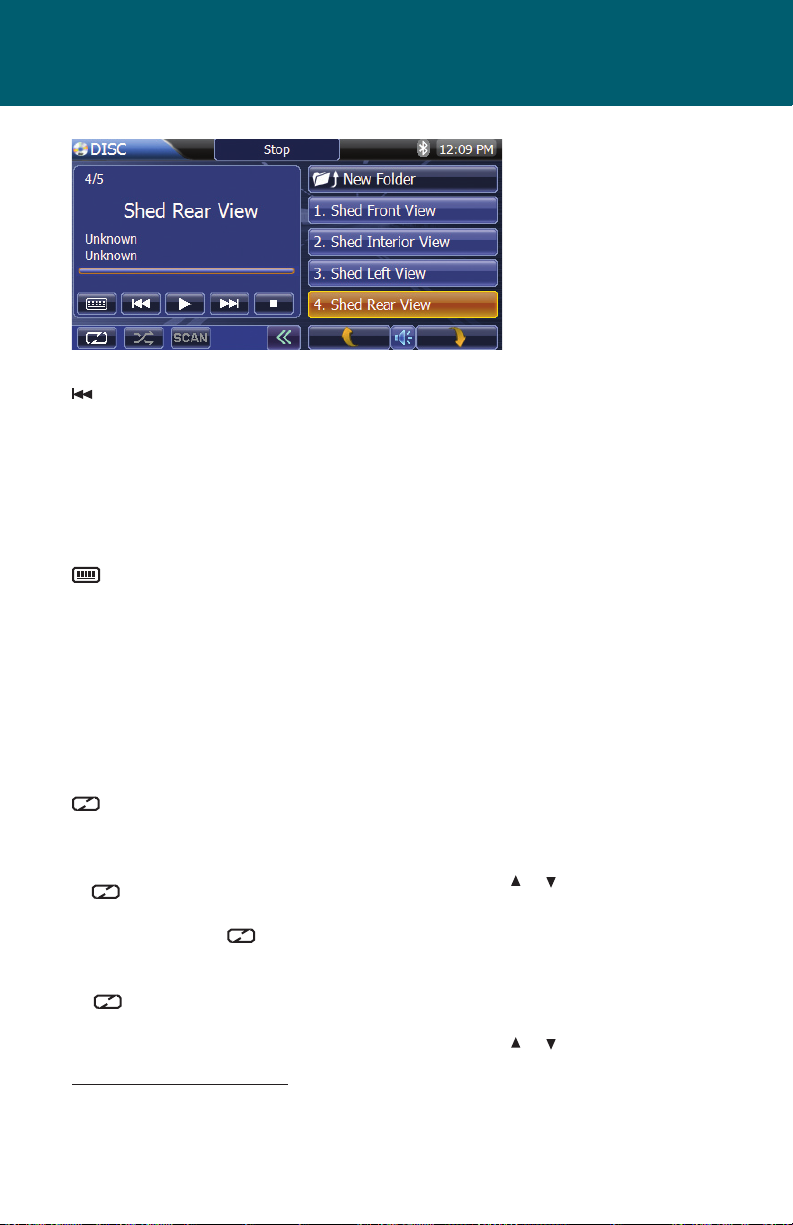
DISC/SD CARD/USB
NOTE: The adjacent screen
is practically the same for
SD Cards and USB devices.
Aside from identifying
the media type in the left
corner, the screen contains
the same features.
DISC/SD CARD/USB MENU
Audio Mode (MP3, WMA Files)
DISC Icon:
Indicates that a disc is in the unit. When
pressed the user is returned to the Main
Menu.
Bluetooth Icon:
The icon will be light blue when paired
to a device and gray when not paired.
Time Display:
Displays the time as entered by the user
in the SETUP Menu, clock function.
Preset List:
Provides a display of the folders, images
and tracks contained on the disc. During
MP3 operation, pressing the screen folders or images will open the item. Music
tracks will play after the disc is read.
Preset List Next Icon:
Press to access the next page in the
preset list.
, Mute/Un-mute Icon:
Press to mute the volume.
A mute ( ) indication will appear
on the speaker icon and the volume
will be muted.
Preset List Previous Icon:
Press to access the previous page in the
preset list.
Icon:
Press the icon to stop playback of
the media.
Icon:
Press the icon and the additional buttons on the lower portion of screen are
hidden. Press the icon again and the
additional buttons are displayed on the
screen.
Next Icon:
Press the icon to access the next track
on the disc. Each momentary tap of the
icon will proceed to the next higher
track number. Press and hold to fast
forward at 2x, 4x, 8x,16x normal speed.
Release the icon and return to normal
playback speed.
Play/Pause Icon:
Press the icon to begin playback. Press
the icon again pause playback.
19
Page 20
Previous Icon:
Press the icon to access the previous
track on the disc. Each momentary
tap of the icon will proceed the next
lower track number. Press and hold
to fast forward at 2x, 4x, 16x normal
speed. Release the icon and return
to normal playback speed.
Keyboard Icon:
Press to access the direct access
song selection function. When the
icon is pressed a keyboard will appear. The user can enter the desired
track number and press OK. The
track will begin to play. Also pressing the numeric keypad on the front
remote control will also cause the
keyboard to appear.
Icon:
Press the icon during disc playback
to repeat playback of the current
song. The following icon will appear
(S ). Press the icon a second time
to repeat the folder. The following
icon will appear (F ). Press the
icon a third time to repeat all. The
following icon will appear
(A ). Pressing the icon once
again will turn the repeat function
o.
Image Mode (JPEG Files)
Provides a display of the folders
and or images contained on the
disc. During JPEG operation, pressing
the screen folders or images will open
the item. Refer to the JPEG Information
Screen.
JPEG Information Screen:
JPEG images can be stored as individual
images or in folders. Refer to the image
above. When a disc is loaded and read
by the unit the root menu will display
the contents of the disc. Pressing the
folder image will access the contents of
the folder. The above image displays the
contents of the folder which consists of
individual images. The images can be
accessed by using the cursor buttons.
Selecting Images or Folders:
When a disc containing JPEG is loaded
in the unit, the Root Menu appears automatically. The Root Menu will display
the contents of the disc.
1 Press image or use the front remote
control or cursor buttons to move
the highlight to the desired folder or
image. Press the desired image or if
using the front remote control press
OK. The contents of the folder will be
displayed on the screen.
2. Press image or use the front remote
control or cursor buttons to move
the highlight to the desired image.
If using the front remote control
press OK.
20
Page 21

JPEG Menu Screen
Arrow Icon:
Press the icon to access the main menu.
Clockwise Rotation Icon:
Press this icon to rotate the image clockwise in 90 degree increments.
Counter Clockwise Rotation Icon:
Press this icon to rotate the image counter clockwise in 90 degree increments.
Next Icon:
Press to advance to the next Image.
Previous Icon:
Press to advance to the previous Image.
Stop Icon:
Press to stop the image slide show
presentation.
INFO Icon:
Press to view information regarding the
image being displayed.
Menu Icon:
Press to create a thumbnail view of
the images contained on disc.
21
Page 22

MPEG Menu Screen
Arrow Icon:
Press the icon to access the main menu.
A-B Icon:
Press to repeat a specic portion from
point A to point B of the disc. During
playback press A-B to set the starting
point A. Press A-B a second time to
set the ending point B. The player will
repeatedly play the part between Point
A and Point B. Press A-B a third time to
cancel A-B repeat and resume playback.
Repeat Icon:
Press the icon during playback to repeat
the current chapter. Press the icon a
second time to repeat the current title.
Press the icon a third time to turn the
repeat function o.
Stop Icon:
Press to stop playback. To resume playback, press the icon again.
Fast Forward Icon:
Press to fast forward at 2x, 4x, 8x, 16x
normal speed. Press again and return
to normal playback speed.
Play/Pause Icon:
Press to begin playback. Press the icon
again to pause playback.
Fast Reverse Icon:
Press to fast reverse at 2x, 4x, 8x, 16x
normal speed. Press again and return
to normal play-back speed.
INFO Icon
Press to view information regarding
the image being displayed.
22
Page 23
DVD
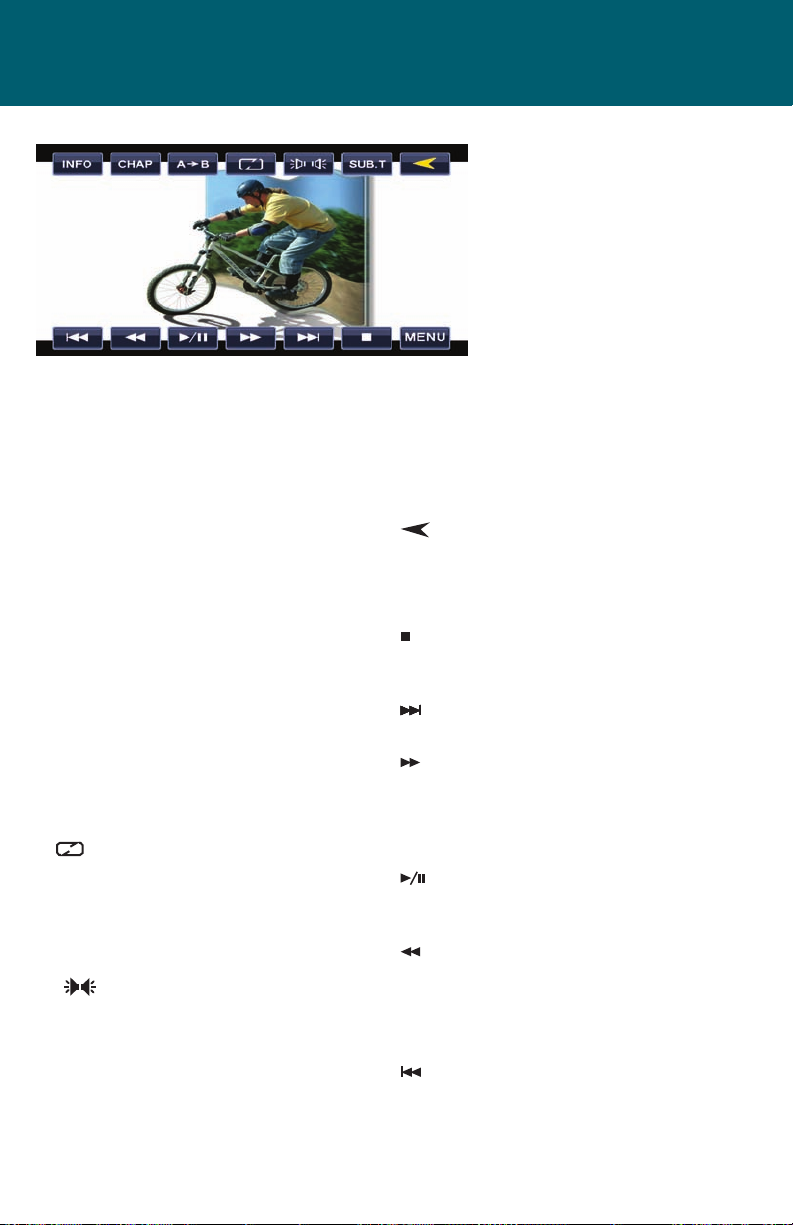
DVD MENU
1. INFO Icon:
Press to access information regarding
the DVD that is playing. Refer to the
DVD Information Screen.
2. CHAP Icon:
Press to search the DVD disc by title,
chapter or by elapsed time. Refer to
the DVD Search Screen.
3. A-B Icon:
Press to repeat a specic portion from
point A to point B of the disc. During
playback press A-B to set the starting point A. Press A-B a second time
to set the ending point B. The player
will repeatedly play the part between
Point A and Point B. Press A-B a third
time to cancel A-B repeat and resume
playback.
4. Repeat Icon:
Press the icon during playback to
repeat the current chapter. Press the
icon a second time to repeat the current title. Press the icon a third time to
turn the repeat function o.
5. Audio Language Icon:
Press the icon during playback to select the audio language. Each time
the icon is pressed a dierent audio
language is selected.
6. SUB.T Icon:
Press the icon during playback to
select the subtitle language if the disc
is recorded in multiple languages. Each
time the icon is pressed a dierent
subtitle language is selected. The
subtitle function can also be turned
on or o.
7. Arrow Icon:
Press the icon to access the main menu.
8. MENU:
Press to display the DVD Root Menu.
9. Stop Icon:
Press to stop disc playback. To resume
playback, press the icon again.
10. Next Icon:
Press to advance to the next chapter.
11. Fast Forward Icon:
Press to fast forward at 2x, 4x, 8x, 16x
normal speed.
Press again and return to normal playback speed.
12. Play/Pause Icon:
Press to begin playback. Press the icon
again to pause playback.
13. Fast Reverse Icon:
Press to fast reverse at 2x, 4x, 8x, 16x
normal speed.
Press again and return to normal playback speed.
14. Previous Icon:
Press to advance to the previous
chapter.
23
Page 24
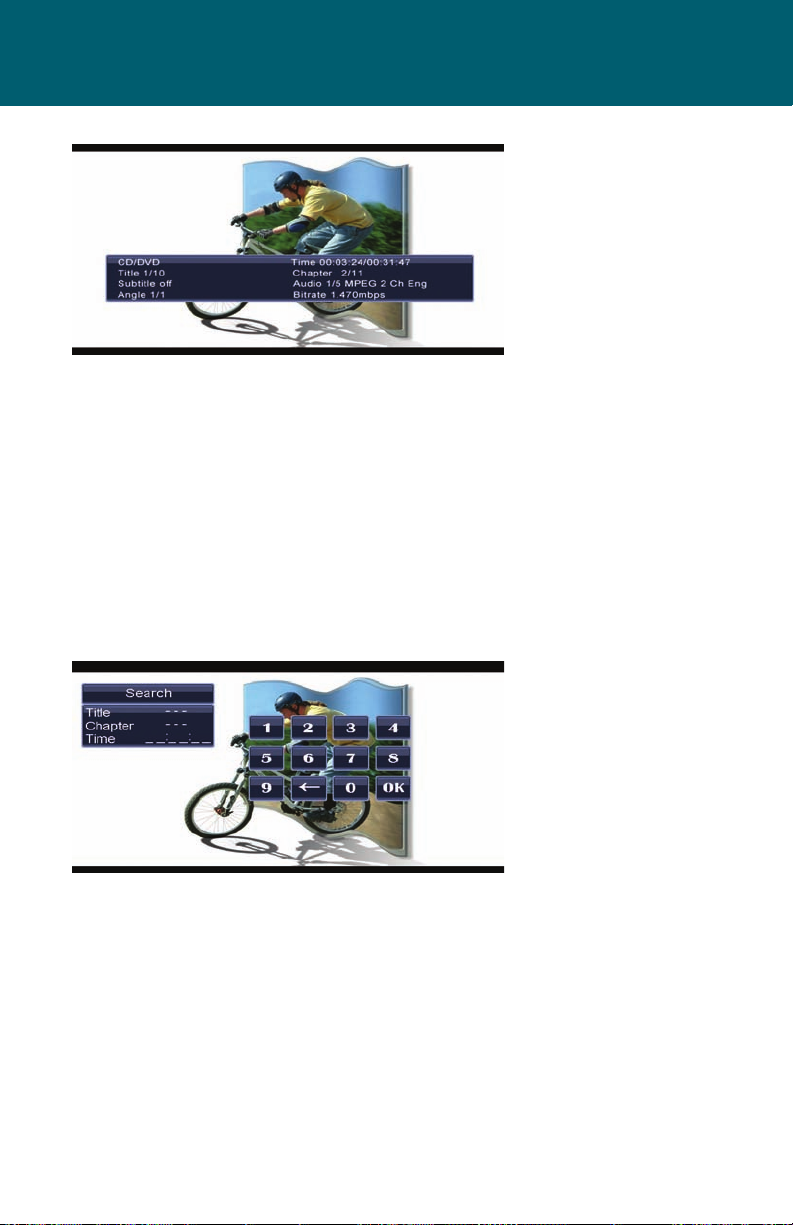
DVD Information Screen
When the DVD information function is activated by pressing the INFO icon, a
screen will appear containing DVD disc information.
The information provided consists of the following:
• Current title number • Total number angles
• Total number of titles • Subtitle On or OFF
• Elapsed playing time for the title • Current audio language and the total
• Current chapter number of languages contained in the disc
• Total number of chapters • Bitrate
• Current angle
DVD Search Screen
When the search function is activated by pressing the CHAP icon, a screen will
appear containing the categories title, chapter or elapsed time. Adjacent to the
screen is a keyboard which allows the user to enter values for the searched parameter such as title 20, chapter 16, time 4 minutes, 30 seconds 10 milliseconds. Press
OK and unit will proceed to that section of the DVD disc.
24
Page 25

Settings and Adjustments
Picture (PIC) Button
When watching a program, the picture quality can be adjusted to suit your preferences.
1. Press the PIC button on the front remote control and the front panel displays
the “adjustment bar” for BRIGHTNESS.
BRIGHTNESS
2. Once the desired adjustment bar is displayed, use the or cursor buttons to
adjust the setting from 0 to 20. The brightness will increase or decrease by one
increment each time a cursor button is pressed.
The display will automatically turn o if no adjustments are made within
6 seconds or is any other button is pressed.
Screen Mode Select:
1. Press the front panel MENU button and then access the
SETUP menu.
2. Select the DVD option.
3. Select the aspect ratio by pressing the IMAGE ASPECT RATIO icon.
4. Select the desired aspect ratio,16:9 or 4:3.
Audio Language Select:
1. Press the AUDIO button on the front remote control or the icon on the
front panel.
2. The current language and the total number of languages will
be displayed.
3. Press the AUDIO button or the icon again and the audio language will change.
4. Press the AUDIO button or the icon consecutively to obtain the desired language.
11
25
Page 26

Subtitle Display and Language Select:
1. Press the SUB.-T button on the front remote control or the SUB.-T icon on the
front panel.
2. The current language and the total number of subtitle languages will be displayed.
3. Press the SUB.-T button or the icon again and the subtitle language will change.
4. Press the SUB.-T button or the icon consecutively to obtain the desired subtitle
language.
5. Pressing the SUB.-T button or the icon consecutively and the subtitle o option
will appear. The user can turn the subtitles on or o.
Angle Select
Some DVDs contain scenes that have been shot simultaneously from dierent
angles. For a DVD disc recorded with multiple angles, press the ANGLE button on
the front remote control to toggle the available angles of the on-screen image.
26
Page 27

Bluetooth
BLUETOOTH MENU
Bluetooth Icon:
Indicates the unit’s Bluetooth menu.
When pressed the user is returned to
the Main Menu.
Antenna Icon:
As the strength of the Bluetooth signal
increases, the number of illuminated
segments will increase.
Bluetooth Icon:
The icon will be light blue when paired
to a device and gray when not paired.
Time Display:
Displays the time as entered by the user
in the SETUP Menu, clock function.
PHONE Icon:
The PHONE feature is enabled only
when paired with a wireless phone.
Press the PHONE icon to open the direct
dial screen.
CONTACTS Icon:
The CONTACTS feature is enabled only
when paired with a wireless phone.
Press the CONTACTS icon and the
contacts from the wireless phone will be
transferred to the unit and displayed on
the front panel if the function is supported by the wireless phone.
CALL LOG Icon:
The CALL LOG feature is enabled only
when paired with a wireless phone.
Press the CALL LOG icon and the call
register will appear on the front panel if
the function is supported by the wireless phone. The call register consists
of dialed numbers, received calls, and
missed calls.
MUSIC Icon:
The MUSIC feature is enabled only when
paired with a wireless phone. Press the
MUSIC icon and four control functions
will appear if the function is supported
by the wireless phone. These are Previous, Next, Play/Pause and Stop.
DEVICES Icon:
Press the DEVICE icon and the devices
that are connected to the unit are listed
on the on the front panel.
SETTINGS Icon:
Press the SETTINGS icon and various
settings associated with Bluetooth are
displayed. These settings include Auto
Connect, PIN Code, Microphone, and
Software Version.
27
Page 28

BLUETOOTH OPERATION
Bluetooth® technology has the capability
to wirelessly synchronize and transfer
data among devices. The Bluetooth audio capabilities can be used for wireless
phones hands free applications. Blue-
tooth has many proles and the unit
is compatible with most Bluetooth enabled wireless phones. Before attempting to use the Bluetooth functions on
the unit, please make sure your wireless
phone supports Bluetooth functions
NOTE: The line-of-sight distance between this unit and your cellular phone
must be 8 feet (2.4 meters) or less for
sending and receiving voice and data
via Bluetooth wireless technology.
Before using Bluetooth functions, you
must pair your wireless phone and the
unit. Pairing is a special process used
when two devices connect for the rst
time. The pairing process is used to generate a link key that is used for authentication purposes for future Bluetooth
connections between devices. Refer to
the procedures for Pairing the Your Wireless Phone and the Unit and Pairing the
Unit and a Wireless Phone.
Entering Bluetooth Mode:
Press the unit’s front panel MENU button or the MENU button on the front
remote control. Then press the SETUP
icon. Press the BLUETOOTH icon in the
GENERAL Submenu and set the Bluetooth to ON.
Pairing Your Wireless Phone:
Your wireless phone can be paired
with the unit in two manners. The unit
can initiate the search for compatible
devices and pair to the wireless phone
or the wireless phone can initiate the
search and pair to the unit. The following paragraphs describe both methods.
NOTE: The following procedures are
28
generic. Procedures for pairing wireless
phones may vary slightly from phone
manufacturer to phone manufacturer.
Pairing a Wireless Phone and the Unit:
1. Select the Bluetooth setup option
on the wireless phone to be paired
(please refer to the wireless phone’s
instruction manual to enter Bluetooth
setup, turn Bluetooth on/o, and
perform pairing). Access the wireless
phone Bluetooth function and set the
Bluetooth function to ON.
2. Set your wireless phone Bluetooth
discover mode to ON.
NOTE: Some discovery modes have a
time limit usually a minute before they
are automatically turned o.
3. Use the wireless phone’s add a new
device feature. A device or devices will
appear on your wireless phone display.
NOTE: Some phones require a “pass
key” or pairing code to connect. If your
phone requires a pass key or pairing
code, you will need to enter this number
in the Pairing Code eld under the Bluetooth SETUP menu. The default pairing
code for many wireless phones is “0000”.
The default code for the unit is “1234”.
4. A prompt to pair or bond should appear on your wireless phone. Accept
the request and initiate the process.
5. A prompt to enter a PIN number or
passkey for the unit should appear.
The default passkey for the unit is
“1234”.
6. At this point a prompt stating pairing
successful should appear. Another
prompt should appear asking connect to the unit, Yes or NO. Press Yes.
The wireless phone and the unit
should pair. Once the Bluetooth
main menu appears on the unit’s
front panel the wireless phone and
the unit have paired.
Page 29

Pairing the Unit and a Wireless Phone:
1. Press the front panel MENU button
and then press the BLUETOOTH icon
to access the Bluetooth main menu.
2. Select the Bluetooth setup option
on the wireless phone to be paired
(please refer to the wireless phone’s
instruction manual to enter Bluetooth setup, turn Bluetooth on/o,
and perform pairing). Access the
wireless phone Bluetooth function
and set the Bluetooth function to ON.
3. Set your wireless phone Bluetooth
discover mode to ON.
NOTE: Some discovery modes have a
time limit usually a minute before they
are automatically turned o.
4. On the Bluetooth main menu press
the DEVICES icon. The following
screen will appear:
5. On the Bluetooth DEVICES screen
press the ADD icon. The following
screen will appear:
7. Using the keypad enter the PIN or
Passkey to your wireless phone and
press OK. The following screen will
appear:
8. At this point the wireless phone will
ask the user to respond to a prompt
similar to “Pairing request from
_______ Accept? Yes or No “. The user
should answer Yes to the request.
Another prompt will appear on the
wireless phone to enter the PIN or
Passkey.
9. Enter the PIN or Passkey for the unit
(1234). Acknowledge the unit’s PIN
or Passkey on the wireless phone by
pressing (ENTER, OK etc.). The following screen should appear.
6. Press the wireless phone name under
DEVICE FOUND and then press the
CONNECT icon. The following screen
will appear:
29
Page 30

10. Once the Bluetooth main menu
appears on the unit’s front panel
the wireless phone and the unit
have paired.
11. In the event the unit and the wireless phone fail to pair or bond the
following screen will appear.
12. Press the RETRY icon. The wireless
phone will receive a prompt similar
to “Pairing request from _______
Accept? Yes or No “. The user should
answer Yes to the request.
13. Enter the PIN or Passkey for the unit
(1234). Acknowledge the unit’s PIN
or Passkey on the wireless phone by
pressing (ENTER, OK etc). Once the
Bluetooth main menu appears on
the unit’s front panel the wireless
phone and the unit have paired.
Deleting a Paired Wireless Phone(s):
1. Press the front panel MENU button
and then press the BLUETOOTH icon
to access the Bluetooth main menu.
2. Press the DEL ALL icon. The following
screen will appear:
3. Press the YES icon. The following
screen will appear:
4. The wireless phone is disconnected
from the unit.
30
Page 31

Managing Incoming Calls:
When connected to a Bluetooth phone,
the unit will mute audio output, pause
CD play, and change to the Bluetooth
screen below when a call is received.
The incoming phone number or assigned name for that number will appear
in the middle of the screen. An audible
tone will sound from the unit and a
graphic display will appear on the front
panel. If the incoming call has no caller
ID, the unit will display “Private Caller”.
Answering an Incoming Call:
To answer the call, press the icon.
For best reception, speak loudly and
clearly. The microphone is located on
the lower left side of the unit. To end
the conversation, press the icon.
Volume Control:
To increase or decrease the volume
level, turn the PWR VOL knob on the
front panel or press the VOL+/ VOLbuttons on the front remote control.
Audio Mute:
To mute the phone call audio from the
unit when a call is received, press the
icon. Press the icon again and
phone call will be restored to the unit.
Rejecting an Incoming Call:
Press the icon to reject an
incoming call. The call will revert to
your wireless phone and be left for
voice mail.
31
Page 32

Making an Outgoing Call:
Outgoing calls can be performed in
two manners. The outgoing call can be
direct dialed using the front panel keypad or the by pressing the CONTACTS
icon, selecting a name and pressing the
phone number.
Direct Dialing:
1. Press the front panel MENU button
and then press the BLUETOOTH icon
to access the Bluetooth main menu.
The following screen will appear:
2. Use the 0-9, */+, and # buttons to
input the phone number. If necessary
press the C icon to clear the last digit
or the entire number and start over.
3. After entering the phone number,
press the
The number dialed will be displayed
on the screen.
icon to dial the call.
Outgoing Call Using Contact Dialing:
1. Press the front panel MENU button
and then press the BLUETOOTH icon
to access the Bluetooth main menu.
The following screen will appear:
2. Press the CONTACTS icon. The follow-
ing screen will appear:
3. Press icon for the number to be di-
aled. The following screen will appear:
4. To end the call, press the button.
32
4. Press the number icon to dial the call.
The number dialed will be displayed
on the screen.
5. To end the call, press the button.
Page 33

Call Transfer:
While talking, to transfer audio from the
unit back to the wireless phone, press
the icon. You can only transfer a call
after it has been answered. Pressing the
icon again will return the audio from
the wireless phone to the unit.
Menu List:
The menu list appears on the right side
of the Bluetooth main menu screen.
NOTE: Not all wireless phones allow
access to missed, received or dialed calls
and some will not allow uploading of
your wireless phone’s address book.
Contacts List:
The Contacts List is a copy of the contact
list on your wireless phone which contains a listing of your important names
and phone numbers. The list is usually
arranged in alphabetical order. In the
center of the Contact List screen are and
up and down arrows which toggles
the key board letters from A to L, M to
X and Y to Z. Above the center up and
down arrows are another set of arrows
and which scrolls through the list
of contacts in groups of ve.
Call Log:
The call log consists of dialed numbers,
received calls and missed calls.
NOTE: Not all wireless phones allow
access to missed, received or dialed calls
and some will not allow uploading of
your wireless phone’s address book.
Dialed Calls:
The Dialed Calls list retrieves the list
of dialed numbers from your wireless
phone. The last dialed number is the
rst number on the list. Press the Dialed
Calls menu option to view the list. To
make a call from the Dialed Calls list,
press the name. A new screen will appear with the name on the top and the
phone number below. Press the phone
number and it will be dialed.
Received Calls:
Use the Received Calls list to view the
received numbers stored on your wireless phone. To access the Received list,
press the Received Calls menu option.
The last received number is the rst
number on the list. To make a call from
the Dialed Calls list, press the name. A
new screen will appear with the name
on the top and the phone number
below. Press the phone number and it
will be dialed.
33
Page 34

Missed Calls List:
The Missed Calls List retrieves the list
of missed numbers from your wireless
phone if your wireless phone allows
the function. The last missed number
is the rst number on the list. Press the
Missed Calls menu option to view the
list. To make a call from the Missed Calls
list, press the call’s name. A new screen
will appear with the name on the top
and the phone number below. Press the
phone number and it will be dialed.
Bluetooth Music Function:
1. Press to begin playback. Press
the icon again to pause playback.
2. Press to go to the previous le.
3. Press to advance to the next le.
4. Press to stop song playback.
Bluetooth provides an Advanced Audio
Distribution Prole (A2DP) prole for
streaming music from a wireless phone
or a portable multimedia player (PMP),
sometimes referred to as a MP3 player.
The unit allows you to play back audio
les from your wireless phone or a PMP
using a Bluetooth connection. Before
using an audio player, it may be necessary to enter the default passkey into
the unit. The default passkey for the unit
is “1234”.
NOTE: Please quit A2DP mode before
attempting to make a phone call, as unexpected results may occur depending
on your wireless phone model.
The unit can control a Bluetooth audio
player via Advanced Audio Distribution
Prole (A2DP) or Audio/Video Remote
Control Prole (AVRCP). Bluetooth audio
players (or Bluetooth adapters) compatible with these proles can be connected to this unit. Functionality varies
depending on the prole used:
•A2DP: Stream audio from your Blue-
tooth compatible audio player and
listen to the music through the unit.
•AVRCP: Play back, pause, select songs,
etc. while streaming audio from your
Bluetooth compatible audio player to
the unit.
NOTE: Song information (e.g. elapsed
playing time, song title, song index, etc.)
cannot be displayed on this unit. Since
there are a number of Bluetooth audio
players available on the market, operations with your Bluetooth audio player
using this unit vary greatly. Please refer
to the instruction manual that came
with your Bluetooth audio player.
When there is an incoming call, the
song will be paused. After the incoming
call is nished, the screen will return to
the music function screen and playback
will continue.
34
Page 35

Devices:
This screen is used to discover, add or
delete paired devices from the unit.
The screen contains two main buttons
(ADD and Del All). Pressing the ADD
button will cause the unit to search for
devices that are within the range of the
Bluetooth signal. Once the devices are
discovered they will be listed on the
screen. Pressing the Del All button will
cause all devices paired with the unit to
be deleted.
Settings:
Auto Connect:
The Auto Connect option will allow the
unit to automatically connect to a previously paired Bluetooth device when
it is in range. When the Auto Connect
option is set to “O”, you must initiate
the pairing process with your wireless
phone. To enable the Auto Connect
option:
1. Press to Auto Connect “O/On icon.
The following screen will appear:
2. Press the “On” button which will become highlighted in orange.
3. Press the “OK” button and the Auto
Connect option is now operational.
This screen allows the user to congure
Bluetooth settings.
35
Page 36
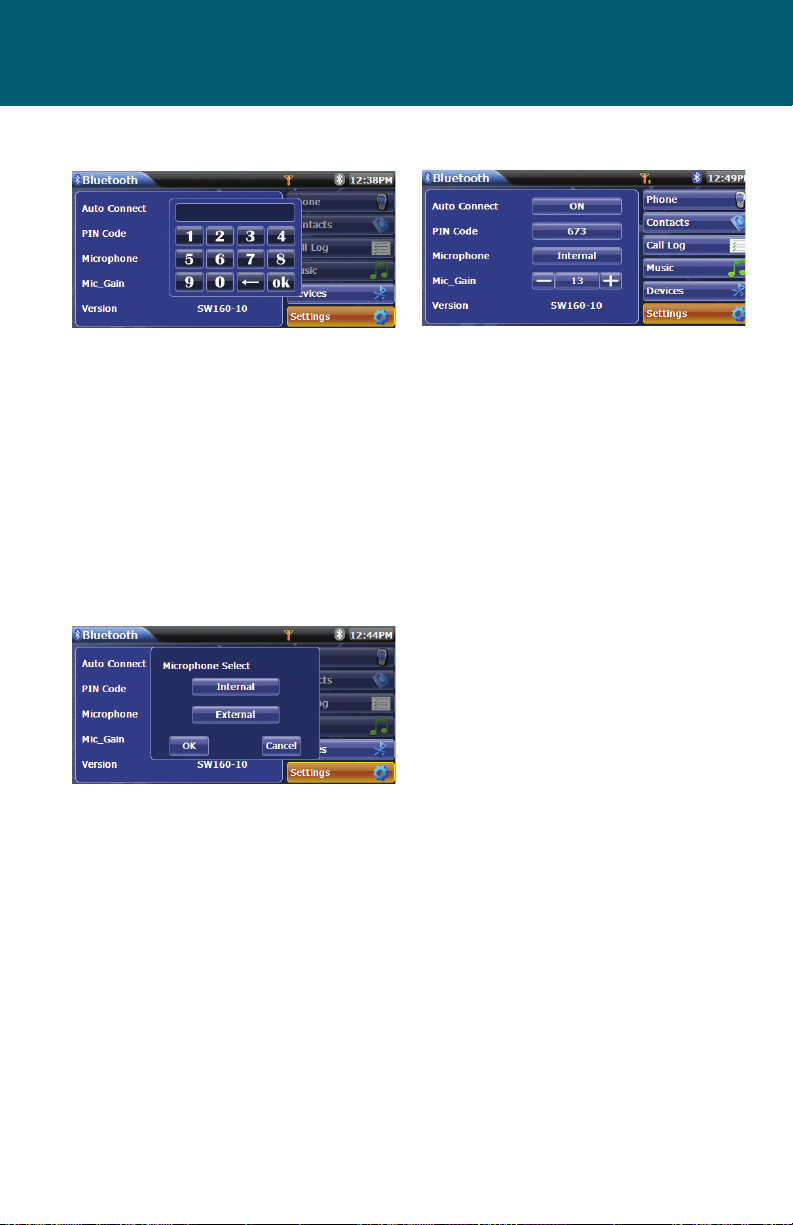
PIN Code:
Mic_Gain:
The PIN or Passkey for the unit is (1234).
Pressing the PIN Code on the Bluetooth
Settings screen will result in the following screen being displayed. When
keyboard screen appears the PIN Code
can be changed with up to any seven
digits. Use the keyboard to select the
digits and press OK. Once the digits are
selected and conrmed the new PIN
Code will appear in the PIN Code on the
Bluetooth Settings screen.
Microphone Function:
When a call is received you can communicate with the caller using the unit’s
internal microphone or an optional
external microphone. An external microphone will in some instances improve
the sound quality during communication. The default setting for the unit is
the internal microphone. Pressing the
MICROPHONE icon on the Bluetooth Settings screen will result in the following
screen being displayed. When the screen
appears, press either INTERNAL or EXTER-
NAL and conrm the setting pressing OK.
Once the setting has been conrmed, it
will appear in the MICROPHONE icon on
the Bluetooth Settings screen.
The microphone gain adjustment allows
the volume of the outgoing call audio
signal to be increased or decreased. This
feature is useful when the called party
cannot hear you loudly enough. This
function is only enabled when the unit is
paired with a wireless device.
Software Version:
This entry provides the software version
that is resident in the unit. This screen
is for information only and cannot be
altered by the user.
36
Page 37
Camera Function/Rear Display/Setup Menu
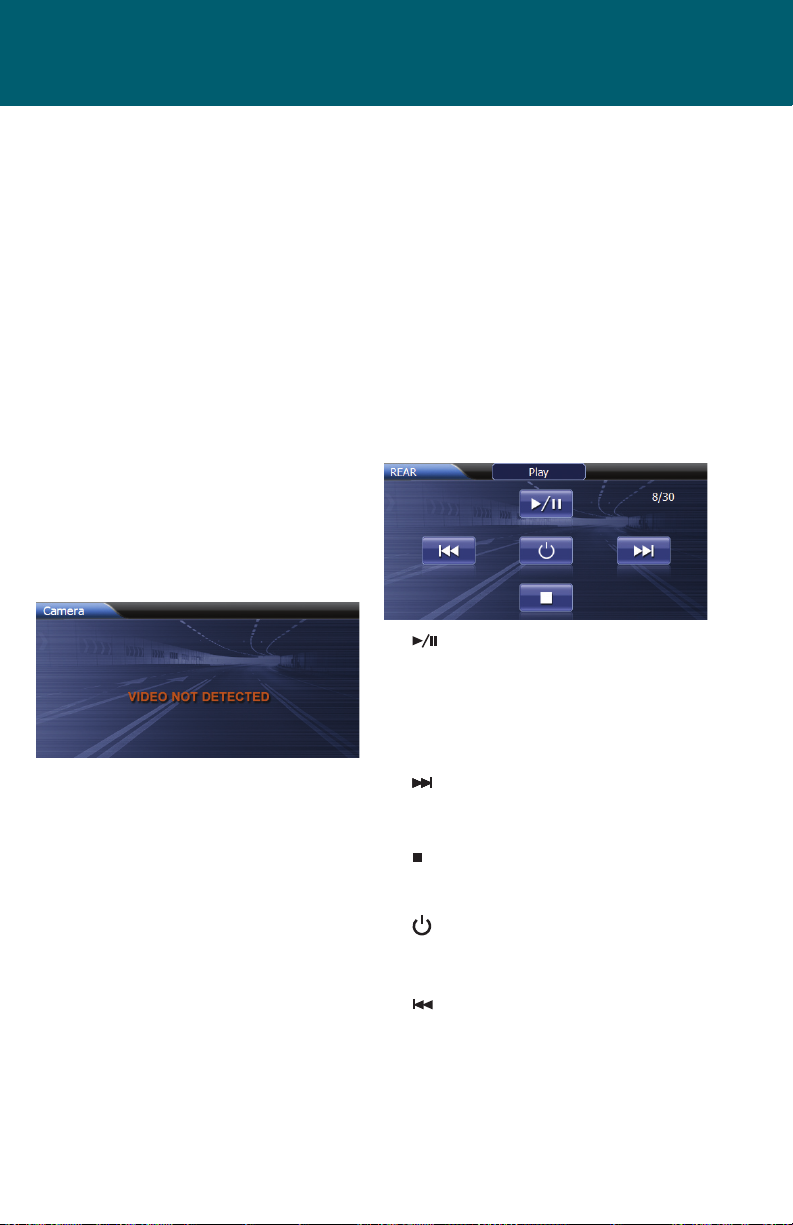
CAMERA FUNCTION
Rear Camera Function:
The unit is “camera ready.” Before accessing any camera features, you must install
a rear video camera. When the camera is
not installed and the function is accessed
by gear selector being placed in reverse
or the unit’s menu, the following screen
will appear indicating the function is not
available. When the camera is installed
the rear view image of what is behind
the vehicle will appear when the vehicles
shift lever is placed in reverse. When lever is removed from the reverse position
the unit will return to the previous screen.
The rear camera image can be adjusted
from the SETUP menu. The image can
be changed from normal to mirrored.
Refer to the SETUP menu, Camera Image
for complete details.
REAR DISPLAY FUNCTION
The unit allows two sources to be played
simultaneously. For example, the unit’s
screen can be set to the radio function
while the rear passengers can watch a
DVD video using an optional rear monitor. The unit provides for connection
of up to two additional monitors (sold
separately) for rear passengers.
Perform the following to access the Rear
Display function:
1. Turn on the rear monitor. Refer to the
monitor’s owner manual for instructions.
2. Insert the media (DVD, CD etc) to be
viewed into the unit.
3. Press the unit’s front panel or front
remote control MENU button and
select REAR.
4. Use the rear remote control to start
playback and various control functions.
The rear remote should be pointed to
the unit’s front panel.
NOTE: You cannot change or control
the front zone source from the rear zone
video screen.
The Rear Display Function allows control
of the disc playback. When a disc is
inserted the unit, pressing the REAR icon
will cause the following screen to appear:
1. Play/Pause Icon:
Press to begin playback. Press the
icon again to pause playback.
NOTE: The playback function (Pause,
Play, Stop and Rear Disc on/o ) is
displayed at the top of the screen.
2. Next Icon:
Press to advance to the next DVD
chapter or CD track.
3. Stop Icon:
Press to stop disc playback. To resume playback, press the icon again.
4. Rear Display Function on/o
Press to turn the Rear Display Function on and o.
5. Previous Icon:
Press to advance to the previous
DVD chapter or CD track.
6. Chapter/Track Number:
Provides the current number that is
playing. The second number is the
total number of chapters/tracks.
37
Page 38
SETUP MENU
To access system settings, press the
unit’s front panel or front remote control
MENU button and select SETUP. The fol-
lowing screen will appear:
Accessing Menu Items:
Press the submenu feature you wish to
adjust (General, Clock etc.). The submenu feature for adjustment will be
highlighted. Pressing the feature will
cause the adjustable parameters to be
displayed.
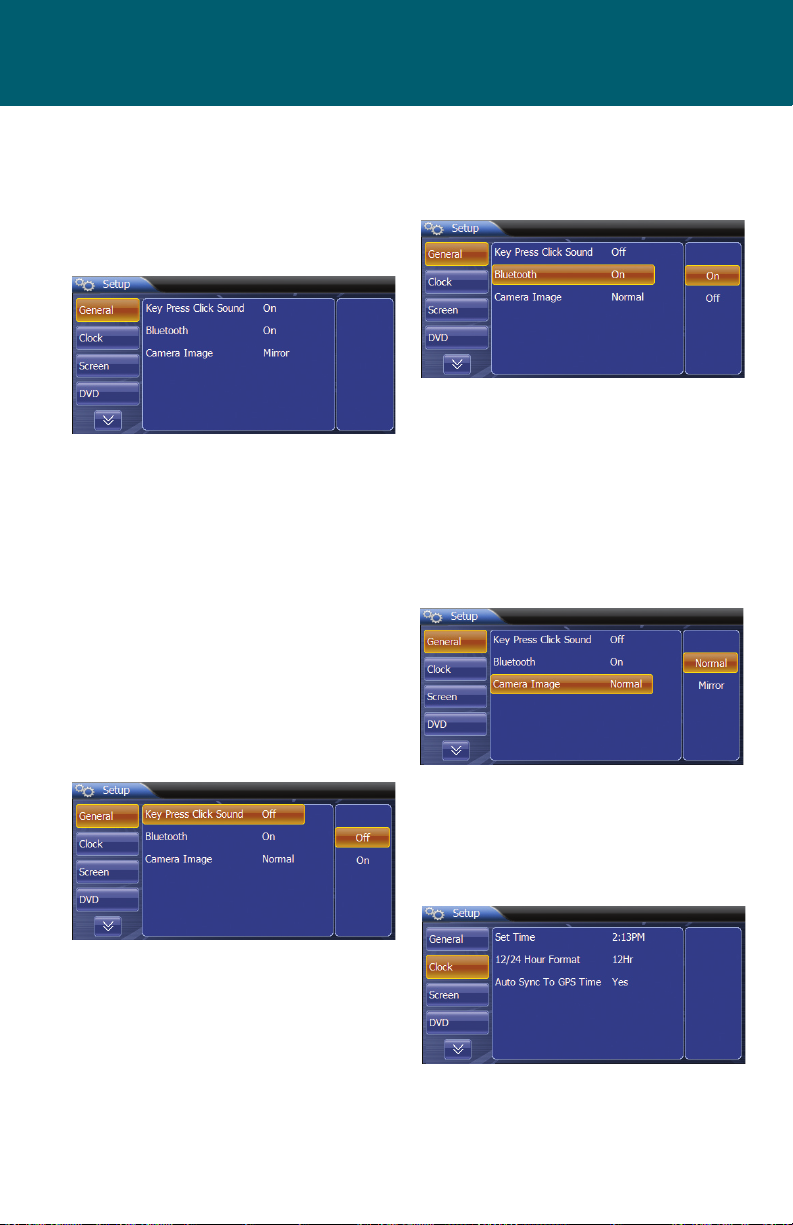
General Items:
The General submenu feature allows
you to congure the above items in the
SETUP screen to your preference.
Key Press Click Sound:
Press the Key Press Click Sound icon and
the following screen will appear:
Bluetooth Mode:
The Bluetooth function can be set to on
or o. Refer to the following screen.
Press the On or the O icon and it will
be selected.
Camera Image:
The Rear Camera input can be displayed
on the unit’s front panel in “Normal
View” or a “Mirrored View”. In the “Mirror
View” the camera image is reversed as
if looking through a rear-view mirror.
Refer to the following screen.
Press the Normal or the Mirror icon and
it will be selected.
Clock:
Press the CLOCK icon and the following
screen will appear:
An audible beep tone occurs when front
panel or remote control buttons are
pressed. The beep tone can be disabled.
Press the On or the O icon and the
function will be enabled or disabled.
38
Press the Set Time icon and the follow-
ing screen will appear:
Page 39

Using the keyboard enter the time in
(HH:MM) format. Then press AM or PM
icon and press OK. The newly entered
time will appear on the screen at the
Set Time icon.
Press the 12/24 Hour Format icon and
the following screen will appear:
The clock then can be set for either the
12 hour or the 24 format. Press the 12Hr
or 24Hr icon and it will be selected.
GPS Time:
Screen:
The Screen tab allows adjustment of
video signals and the unit’s monitor.
Refer to the following screen.
Brightness:
The Brightness allows the screen to be
adjusted to your preference. The screen
can be adjusted for daylight and night
time viewing preferences. Press the
ADJUST BRIGHTNESS –DAY icon. Refer
to the following screen.
To adjust the screen for night time
viewing, press the ADJUST BRIGHTNESS
–NIGHT icon. Refer to the following
screen.
This adjustment is used to synchronize
or ignore time with the Global Positioning System (GPS) time. GPS time is the
atomic time scale implemented by
the atomic clocks in the GPS ground
control stations and the GPS satellites
themselves. Set the time to synchronize
with the GPS time system or to ignore it.
Press the Ignore or Sync icon and it will
be selected.
The day/night picture brightness can
be adjusted from -10 to +10. Use the up
and down scroll buttons to access the
full range of the adjustment. The night
time screen adjustments should be
performed with vehicle’s headlights on
to provide a realistic setting.
39
Page 40

Touch Screen Calibration:
This Touch Screen Calibration adjustment is used to set the parameters of
the touch screen to ensure that when
the screen is pressed that it corresponds
to feature the user is selecting. To cali-
brate the screen, rst select the Touch
Screen Calibration. Press the Yes icon
and it will be selected. The following
screen will appear:
AUX IN:
The Aux In allows the use to congure
the unit to accept an auxiliary signal.
Refer to the following screen.
The unit provides three settings for the
auxiliary input signal. The video input
circuitry detects the video signal from
the auxiliary source. If set to Auto, the
color signal output is switched automatically based on the video input signal
(NTSC or PAL).
DVD:
The DVD screen allows the user to
choose the screen aspect ratio and to
set the Parental Control.
Follow the instructions on the screen
to press and briey hold the stylus. The
stylus will move to each corner of the
screen and nally to the center. The following screen will appear:
If the screen is pressed the new calibration parameters will be accepted. If the
screen is not pressed within the thirty
seconds, the new parameters will be
disregarded.
40
Image Aspect Ratio:
Image Aspect Ratio allows the user to
select and set the desired aspect ratio
for the screen. Refer to the following
screen.
Page 41

The unit provides selection of two
aspect ratios. The conventional display
image has a 4 to 3 ratio of horizontal
to vertical, leaving a blank area on the
right and left sides of the display. In the
aspect ratio of 16:9 the entire screen is
extended horizontally. The extension
ratio is the same at any point.
Parental Control:
Press the Parental Control icon and the
following screen will appear:
NOTE: The CANCEL icon can pressed if
the parental control menu was entered
accidentally.
Press the ENTER PASSWORD icon and
the following screen will appear:
This allows the playback content to be
limited “From Kid Safe” to “Adult”. Use
the scroll bars at the top or the bottom
of the screen to access the dierent
program rating levels.
To change the password, press the EDIT
PASSWORD icon and the following
screen will appear:
Enter the current password or the four
digit default (0000) password and press
OK. Once the correct password is entered, the following screen will appear
requesting the new password entered.
Enter the unit’s password. The default
password is 0000. Once the correct
password is entered the Parental Control function is enabled. The following
screen will appear:
Enter the new password and press OK.
The following screen will appear:
41
Page 42

Re-enter the new password again and
press OK. The following screen will
appear:
The password is changed.
NOTE: Record the password and keep it
in a safe place for future reference.
Navigation:
Press the Navigation icon and the fol-
lowing screen will appear:
The VIEW CURRENT GPS TIME is current
GMT time. GMT is sometimes called
Greenwich Meridian Time because it is
measured from the Greenwich Meridian
Line at the Royal Observatory in Greenwich, England. Greenwich is the place
from where all time zones are measured.
The navigation software can be updated
by pressing the NAVIGATION UPDATE
icon. When the icon is pressed the
following screen will appear:
The navigation software upgrade USB
device should connected to the iPOD
Interface USB port. Press the YES icon
and the following screen will appear:
Press YES and the following screen will
appear:
Using the keypad enter the update
password (874723) and press OK. The
following screen will appear:
When the unit has completed the
search for updated les one the following screens will appear:
42
Page 43

If a new version of the navigation software is found, pressing the YES icon will
cause the unit to extract the software
from the USB device and update the
navigation software. Press the NO icon
and the unit will return to previous
mode prior to the upgrade.
If a new version of the navigation software is not found, pressing the NO or
YES icon will cause the unit to return to
previous mode prior to the upgrade.
ASP:
Press the ASP icon and the following
screen will appear:
frequencies to optimize the audio
output for your vehicle.
Press the TREBLE FREQ icon and the fol-
lowing screen will appear:
The screen allows the Treble Center Frequency to be set to the above frequencies to optimize the audio output for
your vehicle.
Press the SUB FILTER icon and the
following screen will appear:
The ASP (Audio Sound Parameters)
submenu provides for the adjustment
of various audio signals. Press the BASS
FREQ icon and the following screen will
appear:
The screen allows the Bass Center
Frequency to be set to the above
The screen allows the Sub Filter Frequency to be set to the above frequencies to optimize the audio output for
your vehicle.
Press the BASS Q-FACTOR icon and the
following screen will appear:
The screen allows the Bass Q-Factor to
be set to the above frequencies to optimize the audio output for your vehicle.
43
Page 44

Press the iPOD GAIN icon and the
following screen will appear:
Press the SIRIUS GAIN icon and the fol-
lowing screen will appear:
The screen allows the iPOD audio signal
to be amplied or attenuated. The signal
can be adjusted from -7 to +7. Use the
up and down scroll buttons to access
the full range of the adjustment.
Press the AUXIN GAIN icon and the
following screen will appear:
The screen allows the auxiliary in audio
signal to be amplied or attenuated. The
signal can be adjusted from -7 to +7.
Use the up and down scroll buttons to
access the full range of the adjustment.
Press the XM GAIN icon and the follow-
ing screen will appear:
These screens allow the satellite radio
audio signal to be amplied or attenuated. The signal can be adjusted from
-7 to +7. Use the up and down scroll
buttons to access the full range of the
adjustment.
Press the DVD GAIN icon and the follow-
ing screen will appear:
The screen allows the DVD audio signal
to be amplied or attenuated. The signal
can be adjusted from -7 to +7. Use the
up and down scroll buttons to access
the full range of the adjustment.
44
Page 45

Press the TUNER GAIN icon and the
following screen will appear:
The screen allows the tuner audio signal
to be amplied or attenuated. The
signal can be adjusted from -7 to +7.
Use the up and down scroll buttons to
access the full range of the adjustment.
Misc:
The Misc (Miscellaneous) provides tab
allows conguration of various unit settings. Refer to the following screen.
Version:
Pressing the SOFTWARE VERSION icon
will display the following screen.
The screen lists the software version for
the unit.
Factory Default:
This screen allows the user to reset all
options to the factory settings. Press the
Yes icon and original factory settings
will be restored.
45
Page 46

AV2 Media Device
AV2 Media Device (iPod)
iPod Icon:
Indicates the media device that is connected to AV2. When pressed the user is
returned to the Main Menu.The media
devices can consist of an iPod, USB
device, or 3.5mm jack input. The USB
device and the 3.5 mm jack input can
be connected to the unit at the same
time. When the iPod is connected the
other two inputs are excluded.
Bluetooth Icon:
The icon will be light blue when paired
to a device and gray when not paired.
Time Display:
Displays the time as entered by the user
in the SETUP Menu, clock function.
AUDIO Menu
Playlists Icon:
Provides a list of all the Playlists that are
stored in the iPod. Pressing the Playlists
name will provide the song associated
with Playlist. Pressing the title name will
begin playback of the song.
Artists Icon:
Provides a list of the performers that are
stored in the iPod. Pressing the performers name will provide the title associated with the performers.
Pressing the title name will begin
playback of the item.
Albums Icon:
Provides a list of the albums that are
stored in the iPod Pressing the albums
provides the title name. Pressing the title
name will begin playback of the item.
Genres Icon:
Provides a list of the categories that
are contained in the iPod. Pressing the
Genres icon will result in the artist name
comprising the genre to be displayed.
Pressing the artist name will display the
title name. Pressing the title name will
begin playback of the item.
Songs Icon:
Provides a list of the of the songs and
audio items that are stored in the iPod.
Pressing the title name will begin playback of the item.
Composers Icon:
Provides a list of composers of that
are stored in the iPod. Pressing the
composer’s name will display the song’s
title. Pressing the title name will begin
playback of the item.
Audiobooks Icon:
Provides a list of the of the audiobooks
that are stored in the iPod. Pressing the
title name will begin playback of the
audiobook.
Podcasts Icon:
Provides a list of podcasts that are
stored in the iPod. The podcasts usually
consist of series of digital audio les.
Pressing the title name will begin playback of the podcast.
46
Page 47

SCAN Icon:
Pressing this icon will play the rst ten
seconds of each track.
Play/Pause Icon:
Press to begin playback. Press the icon
again to pause playback.
Icon:
Plays tracks in the directory in random
order.
Previous Icon:
Press to advance to the next item contained in the menu.
Repeat Icon:
Press the icon (S ) during playback to
repeat playback of the current song. This
operation plays back the track currently
being played. Press the icon (A ) a
second time to repeat all. This operation
plays back tracks in the directory repeatedly. Pressing the icon once again will
turn the repeat feature o.
VIDEO Menu
Movies Icon:
Provides a list of all the movies that are
stored in the iPod. Pressing the movie’s
name will begin playback of the movie.
Music Videos Icon:
Provides a list of the music videos that
are stored in the iPod. Pressing the
music video name will begin playback
of the music video.
TV Shows Icon:
Provides a list of the TV shows that are
stored in the iPod. Pressing the title
name will begin playback of the item.
Video Podcasts Icon:
Provides a list of podcasts that are
stored in the iPod. The podcasts usually
consist of series of digital video les.
Pressing the title name will begin
playback of the podcast.
Rentals Icon:
Provides a list of rental videos that are
stored in the iPod. Pressing the title
name will begin playback of the rental
video.
Preset List Next Icon:
Press to access the next page in the
menu list.
Mute/Un-mute Icon:
This button is used to mute the volume
from the unit. By pressing the button,
a Mute indication will appear on the
speaker display and the volume will be
muted.
Preset List Previous Icon:
Press to access the previous page in the
menu list.
Icon:
Press the icon and the additional buttons on the lower portion of screen are
hidden. Press the icon again and the
additional buttons are displayed on the
screen.
Stop Icon:
Press to stop playback. To resume playback, press the icon again.
Music icon
Sets the iPod to music mode. Pressing
the music icon will display audio related
topics in the menu such as playlists, artists, albums etc. Press the icon again to
enter the video mode.
Video icon
Sets the iPod to video mode. Pressing
the video icon will display video related
topics in the menu such as movies, music videos, TV shows etc. Press the icon
again to enter the music mode.
Next Icon:
Press to advance to the next item contained in the menu.
47
Page 48

AV1/AV2 Input
Keyboard Icon:
Press to directly access a video or an
audio track. When the icon is pressed a
keyboard will appear. The user can then
enter the desired feature number and
press OK. The item will begin to play.
Direct Tuning Screen:
When the Keyboard Icon is pressed
in the AV2 (Media Device) Screen a
keyboard will appear. The user can enter
the number corresponding to the desired item in the menu listing using the
numeric keypad. Once the desired item
is entered press OK and the unit will access the item in the menu.
AV1/AV2 INPUT
AV1 Auxiliary Audio/Video Input:
The unit contains an auxiliary audio/
video input which can accept signals
from various audio/video devices. The
AVIN jack on the front panel (reference
Item 2, Controls and Indicators) accepts
a 3.5mm jack which has three female
color coded RCA jacks on the opposite
end. The yellow jack is used for video,
the red jack accepts the right channel
audio and the white jack accepts the left
channel audio.
Perform the following to access audio/ video inputs to the to unit’s AVIN
input jack: Turn on the video /audio
source component. Refer to the owner’s
manual for instructions.
1. Connect the device’s output signal
to the unit using the three RCA jacks
(Yellow= Video, Red=Right Audio,
White=Left Audio).
48
2. Press the unit’s front panel or front
remote control MENU button and
select AV1.
3. Use the controls located on the
device to start playback and other
control functions.
AV2 Auxiliary Audio/Video Input:
The unit contains an auxiliary audio/
video input which can accept signals
from various audio/video devices. The
AV2 Interface Module (see below) will
accept a USB device, a 3.5mm jack, or an
iPod. The iPod
is connected
using the iPod
adapter cable.
The iPod adaptor cable plugs
into the USB and
AV2 on the AV2
Interface Module connectors. When the
input signal does not contain a video
signal the following screen will appear:
When a video signal is present, it will be
displayed on the unit’s front panel.
However for the video to be displayed,
the vehicle’s parking brake must be
engaged. If the parking brake is not en-
gaged the following screen will appear:
Page 49
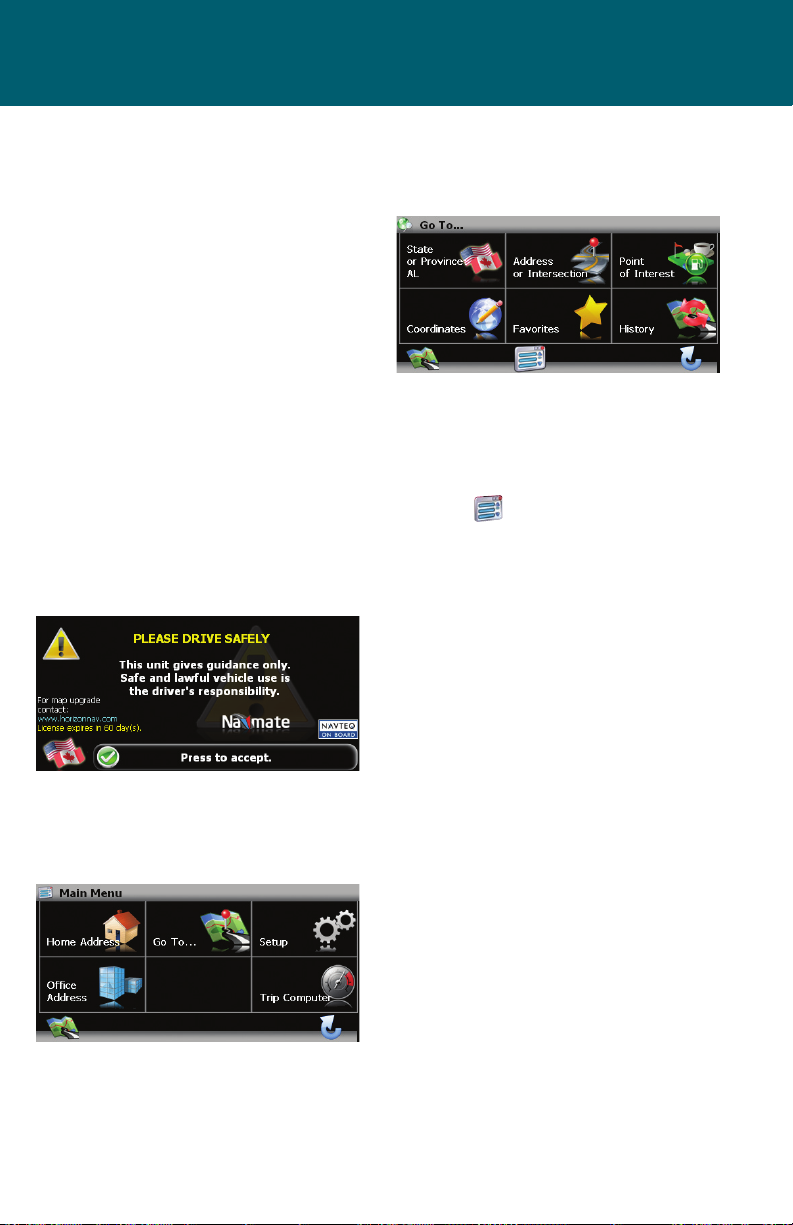
Navigation
NAVIGATION
The Navigation mode can be selected
in a number of ways. The mode can
be accessed from the Main Menu. The
mode can also be selected by pressing
the front panel NAV/DEST button. In
addition the Navigation mode can be
selected using the front remote control
to access the Main Menu and then
using the cursor keys to select the
NAV icon. The following procedure
provides a quick overview of the
Navigation Mode. For a detailed
description of the Navigation mode,
refer to TOCLS-OE100/TOCLJ-OE100
Owner’s Manual Navigation.
Navigation Quick Start:
1. Once the navigation mode is selected the software will load and the
following screen will appear:
2. Acknowledge the drive safely warning and the Navigation main menu
will appear. Refer to following
screen.
3. When the Navigation main menu will
appears press the “Go To…” icon and
the following screen will appear:
4. You can now select a destination.
There are many ways to select a destination. For this example, let’s find
a nearby airport. Select by pressing
screen:
• Icon
• Start Route Guidance
• Point of Interest
• State/Province
NOTE: The software remembers the
last State/Province, so this step is not
necessary every time.
• By Category
• Airport
• Sort by Distance
Select one of these functions and the
system will calculate a route to that
destination using the criteria set in the
Setup menu.
to activate main menu.
49
Page 50

5. Use the Map/Guide along Route
function by proceeding to the
highlighted route and drive while the
software provides audible and visual
guidance to your destination.
6. The software will advise you that you
have arrived at your destination.
50
Page 51
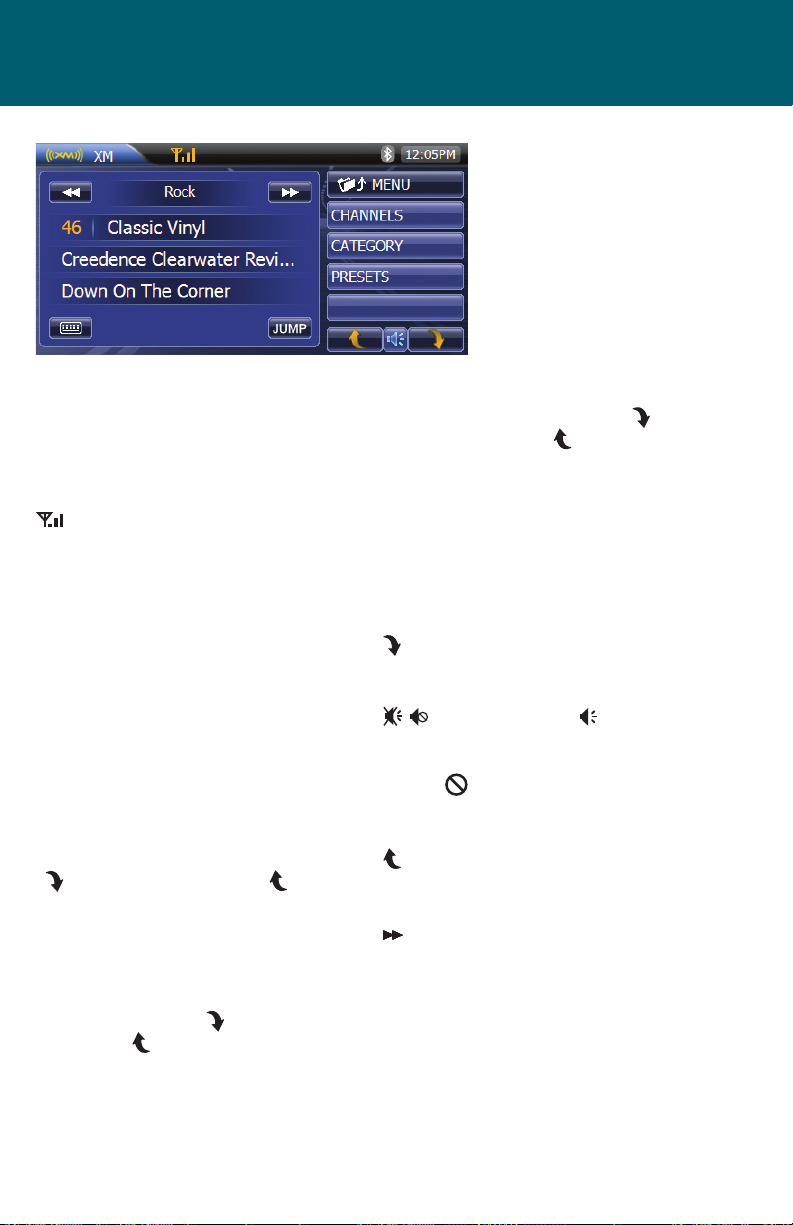
XM Satellite Radio (Optional)
XM SATELLITE RADIO MENU
XM Icon:
Identies the name of the satellite radio
that is currently playing. When pressed
the user is returned to the Main Menu.
Antenna Icon:
As the strength of the satellite radio signal increases, the number of illuminated
segments will increase.
Bluetooth Icon:
The icon will be light blue when paired
to a device and gray when not paired.
Time Display:
Displays the time as entered by the user
in the SETUP Menu, clock function.
Menu
Channels Icon:
When the icon is pressed a channel list
is displayed with the current channel in
play highlighted. Use the next arrow
( ) or the previous arrow ( ) to view
the available XM radio channels.
Category Icon:
When the icon is pressed a category list
is displayed. Categories group music
by type such as jazz, rock, classical etc.
Use the next arrow ( ) or the previous arrow ( ) to view the available XM
categories.
Presets Icon:
When the icon is pressed a list of preset
channels are displayed. Presets consist
of channels that were stored into the
memory. Use the next arrow ( ) or
the previous arrow ( ) to view the
available XM presets. Press and hold
the preset and after approximately 2
seconds, the pre-set number will appear
on the display panel, indicating that the
currently playing channel is now set into
that preset memory position. The channel can now be recalled at any time by
pressing that preset.
Preset List Next Icon:
Press to access the next page in the
menu list.
Mute/ Un-mute Icon:
This button is used to mute the volume
from the radio. By pressing the button,
a Mute indication will appear on the
speaker display and the volume will be
muted.
Preset List Previous Icon:
Press to access the previous page in the
menu list.
Next Icon:
Press to advance to the next available
category.
51
Page 52

Jump Icon:
Press jump to access the previous channel (i.e., switch between the current and
previous channel).
Previous Icon:
Press to advance to the next previously
available category.
Keyboard Icon:
Press to directly tune to a channel. When
the icon is pressed a keyboard will appear. The user can then enter the channel number and press OK. The unit will
tune to the channel and the programming on the channel will play.
Direct Tuning Screen:
When the Keyboard Icon is pressed in
the XM Screen a keyboard will appear.
The user can enter the number corresponding to a desired XM channel using
the numeric keypad. Once the desired
channel number is entered press OK and
the unit will tune to the XM channel..
XM Radio ID:
Using the keyboard press zero and OK.
The XM Radio ID will be displayed. The
XM Radio ID consists of 8 alphanumeric
characters.
52
Page 53
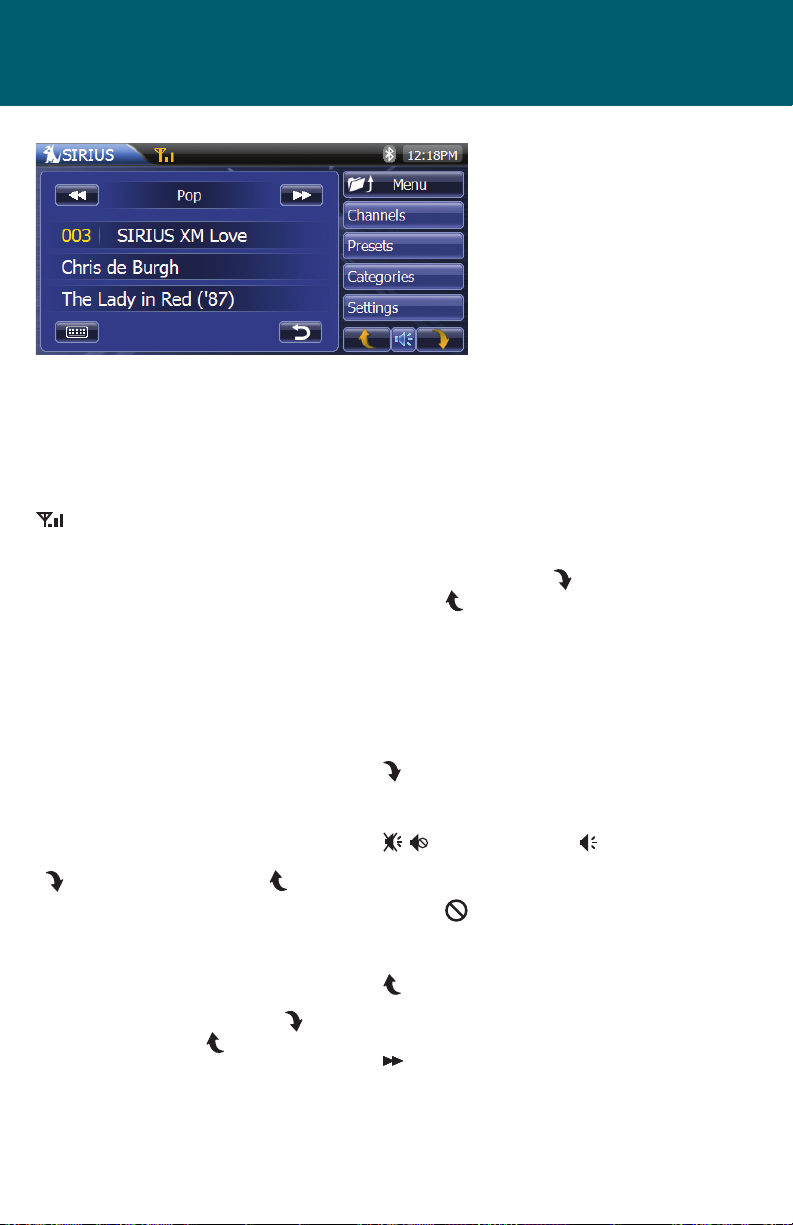
SIRIUS Radio (Optional)
SIRIUS SATELLITE RADIO MENU
SIRIUS Icon:
Identies the name of the satellite radio
that is currently playing. When pressed
the user is returned to the Main Menu.
Antenna Icon:
As the strength of the satellite radio
signal increases, the number of illuminated segments will increase.
Bluetooth Icon:
The icon will be light blue when paired
to a device and gray when not paired.
Time Display:
Displays the time as entered by the user
in the SETUP Menu, clock function.
Menu
Channels Icon:
When the icon is pressed a channel list
is displayed with the current channel in
play highlighted. Use the next arrow
( ) or the previous arrow ( ) to view
the available SIRIUS radio channels.
Presets Icon:
When the icon is pressed a list of preset
channels are displayed. Presets consist
of channels that were stored into the
memory. Use the next arrow ( ) or
the previous arrow ( ) to view the
available SIRIUS presets. Press and hold
the preset and after approximately 2
seconds, the preset number will appear
on the display panel, indicating that the
currently playing channel is now set into
that preset memory position. The channel can now be recalled at any time by
pressing that preset.
Categories Icon:
When the icon is pressed a category list
is displayed. Categories group music
by type such as jazz, rock, classical etc.
Use the next arrow ( ) or the previous
arrow ( ) to view the available SIRIUS
categories.
Setting Icon:
When the icon is pressed the screen displays the SIRIUS radio ID below the Setting icon. The SIRIUS radio ID consists of
12 numeric characters.
Preset List Next Icon:
Press to access the next page in the
menu list.
Mute/ Un-mute Icon:
This button is used to mute the volume
from the radio. By pressing the button,
a Mute indication will appear on the
speaker display and the volume will be
muted.
Preset List Previous Icon:
Press to access the previous page in the
menu list.
Next Icon:
Press to advance to the next available
category.
53
Page 54
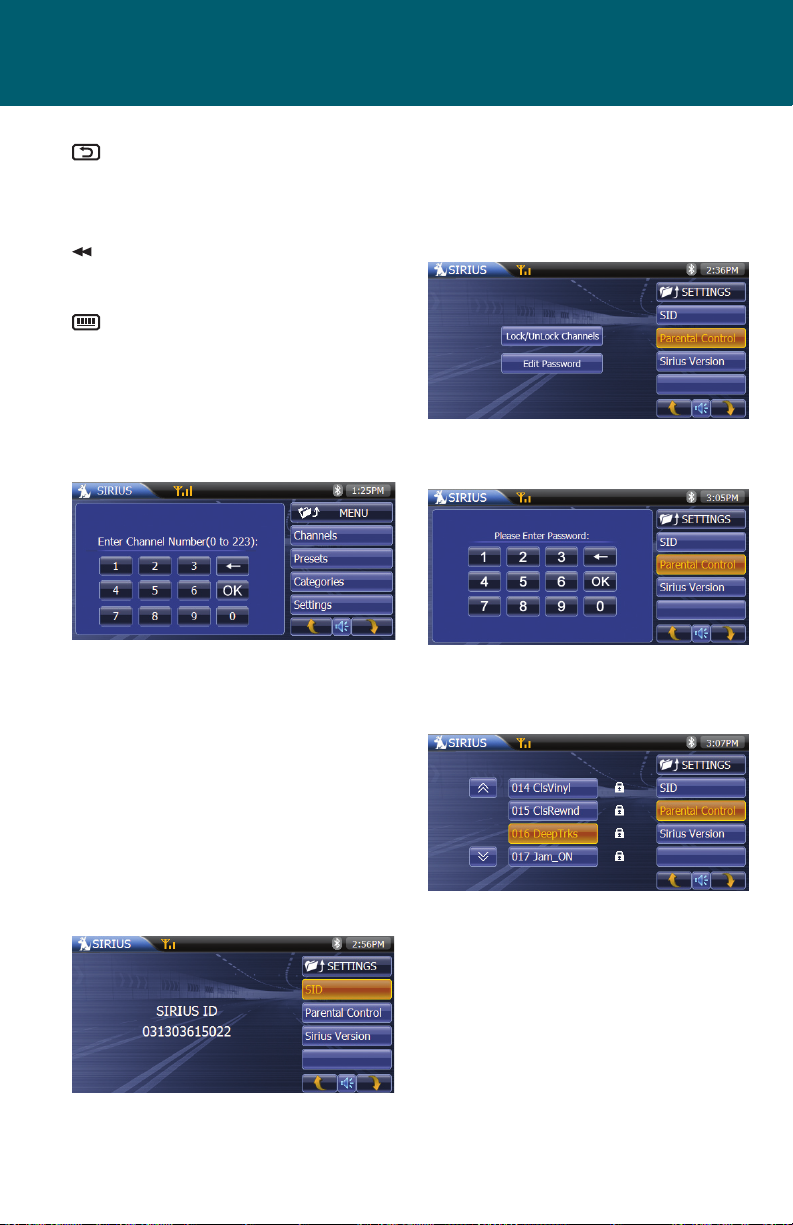
Icon:
Press jump access to the previous channel (i.e., switch between the current and
previous channel).
Previous Icon:
Press to advance to the next previously
available category.
Keyboard Icon:
Press to directly tune to a channel. When
the icon is pressed a keyboard will appear. The user can then enter the channel number and press OK. The unit will
tune to the channel and the programming on the channel will play.
Parental Control:
The PARENTAL CONTROL icon allows the
user to block or unblock certain channels. Press the PARENTAL CONTROL icon
and the following screen will appear:
Press the LOCK UNLOCK CHANNELS icon
and the following screen will appear:
Direct Tuning Screen:
When the Keyboard Icon is pressed
in the SIRIUS Screen a keyboard will
appear. The user can enter the number
corresponding to a desired SIRIUS channel using the numeric keypad. Once
the desired channel number is entered
press OK and the unit will tune to the
SIRIUS channel.
Settings:
Press the SETTINGS icon and the following screen will appear. Press the SID Icon.
This screen displays the SIRIUS identication number.
54
The password is 0000. Enter the password, press OK and the following screen
will appear:
When the lock appears the channel is
not accessible. The channel will not appear in the list of channels.
Page 55

To unlock the channel, press the channel icon and the lock will open. The
following screen will appear:
Enter the four digits you want to replace
the default password. The following
screen will appear:
The channel will appear in the screen
followed by the opened lock. This indicates that the channel is now accessible.
Edit Password:
Press the EDIT PASSWORD icon and the
following screen will appear:
Enter the password (0000) and press OK.
The following screen will appear:
Enter the same four digits again and
press OK. The password is now changed
to the new password.
SIRIUS Version:
Press the SIRIUS Version icon and the
above screen will appear. The screen
displays the software version that is
installed the unit.
55
Page 56

Remote Control
Remote Control Front
56
Page 57

1. POWER
Press this button to turn the unit on and o.
2. VOL+
Press this button to increase the volume.
3. VOL-
Press this button to decrease the volume.
4. INFO
Press this button during DVD and CD playback to display playback information. This information consists of media type and the playback elapsed time.
5. SEL
Press this button to display the Equalizer menu. Pressing the button again the
display will return to the prior screen.
6. /BAND
DVD Mode
Press this button to stop DVD playback.
Radio Mode
Press this button to select various frequency bands (AM and FM etc.).
7. PIC
Press this button to access the on screen picture adjustment displays for
BRIGHTNESS, CONTRAST, COLOR or TINT.
8. MENU
Press this button to access the unit’s main menu screen.
9. A-B
Allows the user to dene and repeat disc playback from a starting point, A, to
an ending point, B. Once the starting and ending points are dened and the
A-B repeat function enabled, the section will play and loop continuously.
Press A-B Button Unit
Once Mark the beginning of the section to repeat (Set point A)
Twice Mark the end of the section to repeat (Set point B)
Three Cancels the A-B repeat function
10. ROOT
Press this button to access the DVD root menu.
11. Press this button to use the repeat function for various playback modes.
DVD Mode: Pressing this button consecutively will repeat the title, repeat the
chapter, and disable the repeat function.
CD Mode: Pressing this button consecutively will repeat the track and disable
the repeat function.
MP3 Mode: Pressing this button consecutively will repeat the track, repeat
the folder and disable the repeat function
57
Page 58

12.
DVD Mode
Press this button ( ) to search in a backward direction. Press this button ( )
to search in a forward direction. Press repeatedly to change the search speed
from 2, 4, 8, and 20 times the normal speed.
13. SUB-T
Press this button to display and select the available subtitle languages. Each
time the button is pressed, the subtitles change.
iPod Video Mode
Press this button to access videos located on the iPod.
14. ANGLE
DVD Mode
Press this button during DVD playback to display the number of angles being
played and then select the desired angle to view the screen.
iPod Music Mode
Press this button to access music located on the iPod.
15. AUDIO
DVD Mode
Press this button during DVD playback to display and select the audio languages available in DVD mode. Each time the audio button is pressed, the
contained language changes.
NOTE: The audio languages available vary from disc to disc.
CD Mode
Press this button during CD playback to choose between Left Channel, Right
Channel, and Stereo.
16. ZOOM
DVD Mode
Press this button during DVD playback to view a scene in a close-up mode.
Each time the button is pressed the picture will enlarge 1X, 2X, 3X normal
size. Press the button again and the zoom function will turn o and the picture will return to normal size.
58
Page 59

17.
DVD Mode
Press this button ( ) to return to the previous chapter or track. Press this
button ( ) to skip to the next chapter or track.
18. TITLE
Press this button to display the title of a DVD. DVD titles are a collection of
video clips or chapters. DVDs generally contain multiple titles.
19. OK
Press this button to conrm and implement a selected setting or menu option. Press this button to resume playback in various modes..
20. CURSOR BUTTONS ( )
Use these buttons to navigate the menu selections on the screen.
21. ESC
Press this button to stop a particular process and return to another task.
22. SRCH
Press this button to display a search screen that allows the user to enter a Title
number, Chapter number or time value for a position on the DVD. A keyboard
screen also appears on the front panel.
23. Numbers 1 Through 0
Press these buttons to enter the numbers 0 to 9 for selection of CD tracks,
DVD chapters, and for various unit functions such as passwords and navigation settings.
24. MODE
Press this button to select the following audio sources: Radio, Disc, AV2, Media SD, Media USB, AV1, and SAT Radio.
25. MUTE
Press this button to mute the audio. Pressing the button again restores the
audio to the previously set volume level.
26. OPEN
Press this button to eject a DVD or CD disc from the unit.
59
Page 60

Remote Control Back
60
Page 61

1. R-SRC
Press this button to display the current operational mode on the front
panel screen.
2. MUTE
Press this button to mute the audio. Pressing the button again restores the
audio to the previously set volume level.
_ _
3. _/
Press this button to display a search screen that allows the user to enter a
Title number, Chapter number or time value for a position on the DVD. A
keyboard screen also appears on the front panel..
4. Numbers 1 Through 0
Press these buttons to enter the numbers 0 to 9 for selection of CD tracks,
DVD chapters, and for various unit functions such as passwords and navigation settings.
5. ROOT
Press this button to access the DVD root menu.
6. CURSOR BUTTONS ( )
Use these buttons to navigate the menu selections on the screen.
Radio Mode
Press this button to select various frequency bands (AM and FM etc.).
7.
DVD Mode
Press this button ( ) to return to the previous chapter or track. Press this
button ( ) to skip to the next chapter or track.
8. ZOOM
DVD Mode
Press this button during DVD playback to view a scene in a close-up mode.
Each time the button is pressed the picture will enlarge 1X, 2X, 3X normal
size. Press the button again and the zoom function will turn o and the picture will return to normal size.
9.
Press this button to playback the DVD in slow motion. Pressing this button
consecutively will reduce the playback speed by one half, one quarter, one
sixth and one eighth normal speed.
61
Page 62

10. Press this button to use the repeat function for various playback modes.
DVD Mode: Pressing this button consecutively will repeat the title, repeat the
chapter, and disable the repeat function.
CD Mode: Pressing this button consecutively will repeat the track and disable
the repeat function.
MP3 Mode: Pressing this button consecutively will repeat the track, repeat the
folder and disable the repeat function.
11. A-B
Allows the user to dene and repeat disc playback from a starting point, A, to
an ending point, B. Once the starting and ending points are dened and the
A-B repeat function enabled, the section will play and loop continuously.
Press A-B Button Unit
Once Mark the beginning of the section to repeat (Set point A)
Twice Mark the end of the section to repeat (Set point B)
Three Cancels the A-B repeat function
12. ANGLE
DVD Mode
Press this button during DVD playback to display the number of angles being
played and then select the desired angle to view the screen.
iPod Music Mode
Press this button to access music located on the iPod.
13. SUB-T
Press this button to display and select the available subtitle languages. Each
time the button is pressed, the subtitles change.
iPod Video Mode
Press this button to access videos located on the iPod.
14. AUDIO
DVD Mode
Press this button during DVD playback to display and select the audio languages available in DVD mode. Each time the audio button is pressed, the
contained language changes.
NOTE: The audio languages available vary from disc to disc.
CD Mode
Press this button during CD playback to choose between Left Channel, Right
Channel, and Stereo.
62
Page 63

15.
DVD Mode
Press this button ( ) to search in a backward direction. Press this button ( )
to search in a forward direction. Press repeatedly to change the search speed
from 2, 4, 8, and 20 times the normal speed.
16. /
Press this button to pause the DVD disk playback. Pressing the button again
will resume normal DVD disc playback.
17.
Press this button to stop DVD playback.
18. OK
Press this button to conrm and implement a selected setting or menu option. Press this button to resume DVD playback play.
19. TITLE
Press this button to display the title of a DVD. Titles are a collection of video
clips or chapters. DVDs generally contain multiple titles within a DVD.
Remote Control Battery
Initial Use
When purchased the remote control has a battery installed with a Pull Tab to
prevent battery discharge. Remove the Pull Tab before attempting to use the
remote control.
Battery Replacement
1. Remove the battery holder.
2. Insert the battery into the battery holder and insert the battery holder
into the remote. Be sure to observe the correct polarity.
3. Align the battery holder with the remote control and push until the
holder clicks.
The remote controls are specic to this unit. They are not universal
remotes and will not operate other equipment.
CR2025
63
Page 64

C
2009 Audiovox Electronics Corp., Hauppauge, NY 11788
128-8563
 Loading...