

Page 1
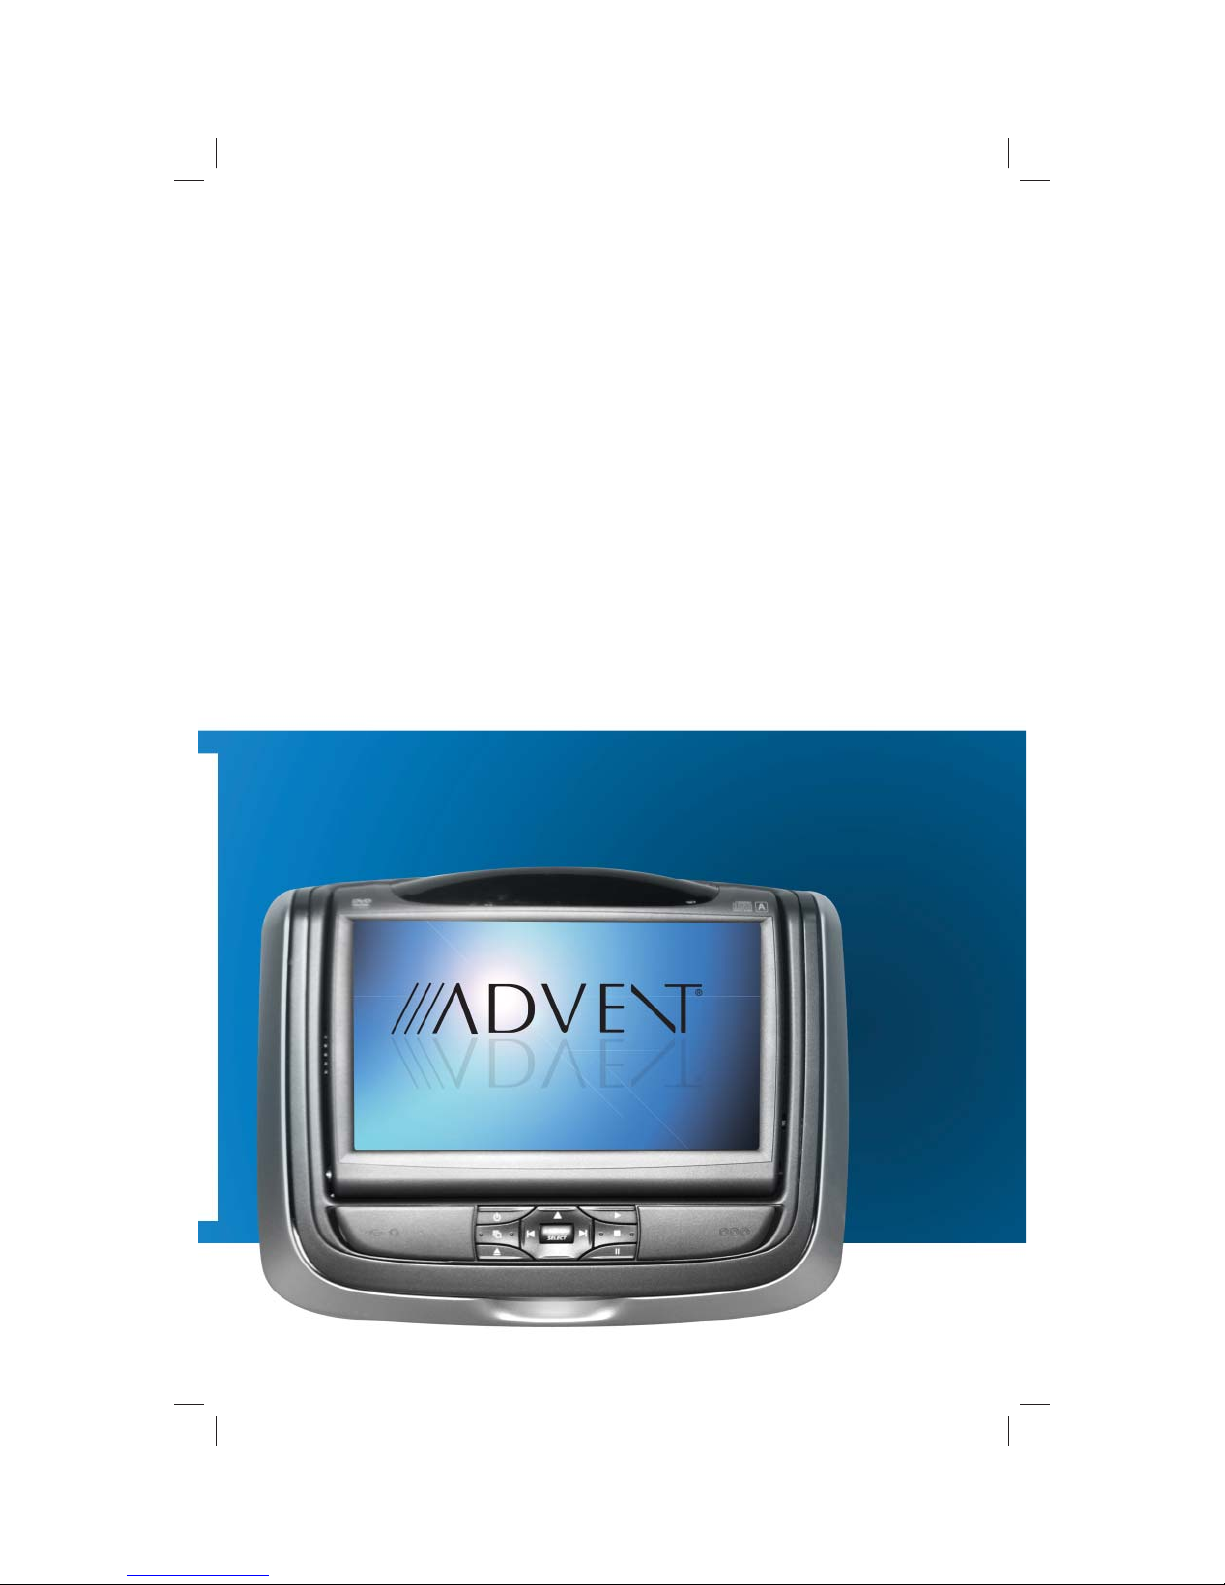
SB7 Active Headrest
Rear Seat Entertainment System
Owner’s Manual
1
Page 2

Page 3

SB7 Active Headrest
Rear Seat Entertainment System
Owner’s Manual
3
Page 4

Page 5

SB7 Active Headrest
Owner’s Manual 7
EN
SB7 Apoyacabeza Activo
Manual del usuario 35
SB7 Appuie-tête Actif
Le manuel du propriétaire 67
ES
FR
5
Page 6

Page 7

SB7 Active Headrest
Owner’s Manual
Contents
Welcome .....................................................................................................................................................................8
Functional Veri cation ........................................................................................................................................10
Front Panel Description......................................................................................................................................11
Remote Control Operations .............................................................................................................................13
Button Function Descriptions ..........................................................................................................................14
General Operating Instructions.......................................................................................................................18
How to Use the DVD OSD Menu ....................................................................................................................20
How to Use the Device OSD Menu ................................................................................................................23
Playing an Audio CD ...........................................................................................................................................24
Playing an MP3 Disc ............................................................................................................................................25
Connecting a USB Device ..................................................................................................................................26
Connecting an iPod Device .............................................................................................................................27
Troubleshooting ...................................................................................................................................................28
Speci cations ........................................................................................................................................................29
Compliance Information ....................................................................................................................................31
Notes ........................................................................................................................................................................32
EN
© 2011 Audiovox. All rights reserved. This
manual, or any portion thereof, may not
be reproduced without the express written
permission of Audiovox.
7
Page 8

Welcome
Thank you for purchasing this SB7 Active
Headrest with built-in DVD player. Before
operating this system, read this manual
thoroughly and retain it for future reference.
Important Notice
It is unlawful in most jurisdictions for a
person to drive a motor vehicle which is
equipped with a television viewer or screen
that is located in the motor vehicle at any
point forward of the back of the driver’s
seat, or that is visible, directly or indirectly,
to the driver while operating the vehicle. In
the interest of safety, the unit should never
be installed where it will be visible, directly
or indirectly, by the operator of the motor
vehicle.
If your vehicle is equipped with a wireless
rear seat audio system or any other wireless
IR device, power system o in order to
operate the DVD headrest system. If system
is powered on, the two systems may
interfere with each other canceling out or
creating undesirable audio through the
wireless headphones.
Safety Precaution
For safety reasons, when changing a video
disc it is recommended that the vehicle
not be in motion, and that you do not
allow children to unfasten safety belts to
change a disc or make any adjustments
to the system. System adjustments can be
accomplished using the remote control unit,
while safety belts remain fastened. Enjoy
your entertainment system but remember
that the safety of all passengers remains the
number one priority.
Product Features
• 7-inch Color TFT-LCD Panel (480x234)
with 16:9 aspect ratio
• Built-in Top-Loading Slot Load DVD Player
• Infrared Transmitters for IR Wireless
Headphones
• Audio/Video Signal Output - 1/8-inch
Headphone Jack
• 1/8-inch Stereo Headphone Jack
• USB Port Compliant with 1.1 Specifcations
• Forward Remote Sensor on the Front
Panel
• Full Function Remote Control
• Control Buttons on the Front Panel POWER/SOURCE, STOP/LEFT, UP, SETUP/
ENTER, PLAY/PAUSE/RIGHT, EJECT, DOWN
• OSD (On Screen Display) Control
• 12V DC Power Input
• FM Transmitter (may be optional)
Caution
• Do not touch the inner pins of the jacks
on the front panel. Electrostatic discharge
may cause permanent damage to the
device.
• Be sure to run the vehicle’s engine while
using the device. Using this device
without running the engine can result
in battery drainage. To avoid the risk of
battery drainage, please remember to
turn o the device when the vehicle is not
in use for long periods of time.
8
Welcome
Page 9

Wireless Headphones
The SB7 Active Headrest includes a built-in
dual channel infrared transmitter for use
with a wireless headphone. The volume
can then be adjusted with the controls on
each headset. The wireless headphone
must be used within a line of sight from the
transmitter as infrared transmission, like
visible light, travels only in a straight line.
Wired Headphones
There is a 1/8-inch headphone jack on the
device that can be used with any standard
stereo headphone. Remove and save the
protective plastic cover to access the jacks.
Remember to replace the cover when the
jacks are not in use.
AV Control Box
The additional audio/video input may
connect other items such as a DVD player,
video game device, or other audio/video
devices. To play the second AV source, turn
the SB7 Active Headrest on and press the
SOURCE button on the remote control until
“AV or AUX” is displayed on the screen. Turn
the source component on with its power
button or remote control. The SB7 Active
Headrest is now ready to play the audio and
video signals from the source connected to
AV or AUX input.
Wireless FM Transmitter
Your video device may be equipped with an
external FM transmitter, which allows you
to listen to the audio signal by tuning your
vehicle’s FM radio to one of six frequencies.
Whenever the FM transmitter is active,
broadcast radio reception will be poor. Turn
the FM transmitter o to allow normal radio
reception.
How to Use the FM Transmitter
Power up your system and place a disc in
monitor “A”. While pointing your remote
at the monitor press the “DVD A” button
directly under the red “POWER” button on
your remote control.
EN
Next press the “Sound Around ON/OFF”
button to turn FM transmission on or o as
desired. Three buttons to right is the “Sound
Around SELECT” button which will cycle
through 6 possible stations (88.3, 88.7, 89.1,
89.5, 89.9, and 90.3 MHz) for broadcasting
audio to your radio.
Once you’ve selected a frequency, you must
then tune your radio to the corresponding
frequency. Try each station frequency until
you achieve a clear audio signal.
Dolby Compatibility
When using this unit with a multi-channel
processor, you can enjoy the atmosphere
and excitement provided by DVD movie and
music software featuring stereo 2-channel
record-ings. Manufactured under license
from Dolby Laboratories. “Dolby” and
double-D symbol are trademarks of Dolby
Laboratories.
Welcome
9
Page 10

Functional Veri cation
Function Checks: Look for:
Turn vehicle ignition to ON, depress power
button on each headrest monitor.
Insert disc into DVD player, press ENTER
button on the remote control or LCD panel.
Listen with wireless headphones (be sure to
set to channel “A” to listen to Monitor A and
channel “B” to listen to Monitor B.
Press SOURCE button on Monitor B until it
reads Monitor A.
Press SOURCE button on Monitor A until it
reads Monitor B.
Depress eject button on the remote control
or LCD panel.
Turn on vehicle radio and set station to
the frequency set on FM transmitter (if
available).
Monitor should power on and start up
screen should appear on screen.
Disc should begin playing.
Audio should be heard through wireless
headphones.
DVD in Monitor A should be displayed on
Monitor B also.
DVD in Monitor B should be displayed on
Monitor A also.
Disc should eject.
Only audio from Monitor A should be heard
through vehicle speakers.
10
Functional Veri cation
Page 11
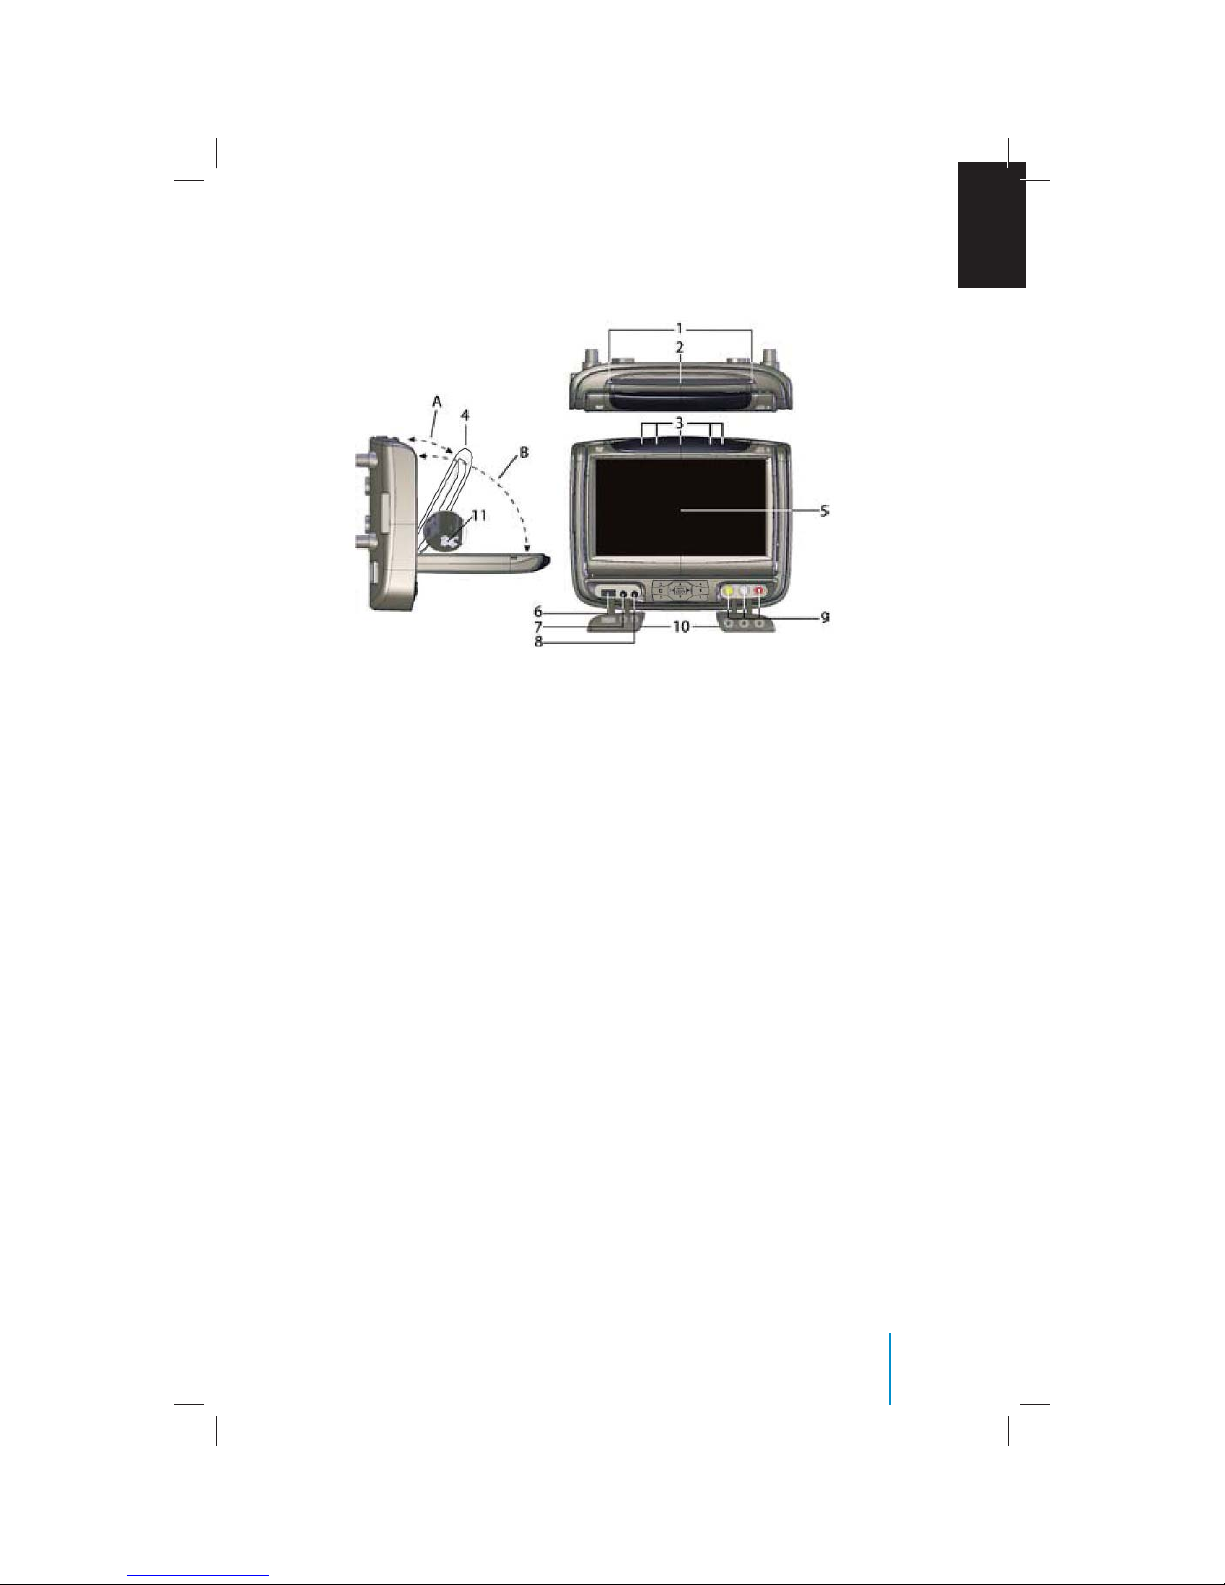
Front Panel Description
EN
1. DVD Player Busy Light
The busy light indicates the activity
state of the DVD player.
2. DVD Compartment Slot
Insert a disc to play.
3. IR Sensor - Forward Sensor Eye
Allow the remote control to navigate
the OSD (On Screen Display) on
the device and to control the other
accessories.
4. Latch Tip
Allow the user to adjust the viewing
angle of the LCD panel. (Range A)
5. 7-inch TFT LCD Panel
(480 x 3 (RGB) x 234) resolution.
Warnings
• Do not use any solvents or cleaning
materials when cleaning the video
device.
• Do not use any abrasive cleaners; that
may scratch the screen. Use only a lightly
dampened lint free cloth to wipe the
screen if it is dirty.
• Lock the LCD screen in the fully closed
position when not in use. Do not put
pressure on the screen.
• Caution children to avoid touching or
scratching the screen, as it may become
dirty or damaged.
6. USB 1.1 Port
You can play videos, music, and images
stored in a USB device such as USBcompatible stick memory or memory
card reader, etc.
7. 1/8-inch AV Output Jack
Allows CVBS signal to be output for
monitoring.
8. 1/8-inch Headphone Jack
Allow plug-in of wired headphones with
1/8-inch stereo connector plug for monitoring the audio from the program.
9. AV Input Jacks (Yellow/White/Red)
Connect using a cable (RCA connectors)
from your infotainment device’s video/
audio output to the device’s AV Input
jacks.
10. Protective Cover
Insert the protection cover into position
when not in use.
11. Level Lock & Release Latch
Limits the LCD panel angle for viewing
(Range A). Latch is intended to be
released for service only (Range B).
Front Panel Description
11
Page 12

12. UP/DOWN/LEFT/RIGHT Buttons
These buttons allow you to navigate the
contents when in the DVD on- screen
display menu. During playback, the LEFT
button will skip backwards on the disc
and the RIGHT button will skip forward
on the disc.
13. POWER Button
Switches device on. The device will turn
o by pressing this button when the
device is on.
14. SOURCE Button
Press to cycle through all of the available
sources.
15. EJECT Button
Press this button to eject the disc from
disc compartment or pull disc into
the compartment.
16. PLAY Button
Press this button to begin playback of
a DVD.
17. STOP Button
Press this button to stop playback of
a DVD.
18. PAUSE Button
Press this button to pause playback of
a DVD.
19. MENU/SELECT Button
This button is used for DVD control
only. Press this button to enter the DVD
OSD setup menu when the DVD is in
the device. This button function will
changed to SELECT when the DVD is
running in the title menu or DVD OSD
setup menu.
20. Adjustable Viewing Lever
Allow the user to adjust the viewing
angle of the LCD panel.
12
Front Panel Description
Page 13
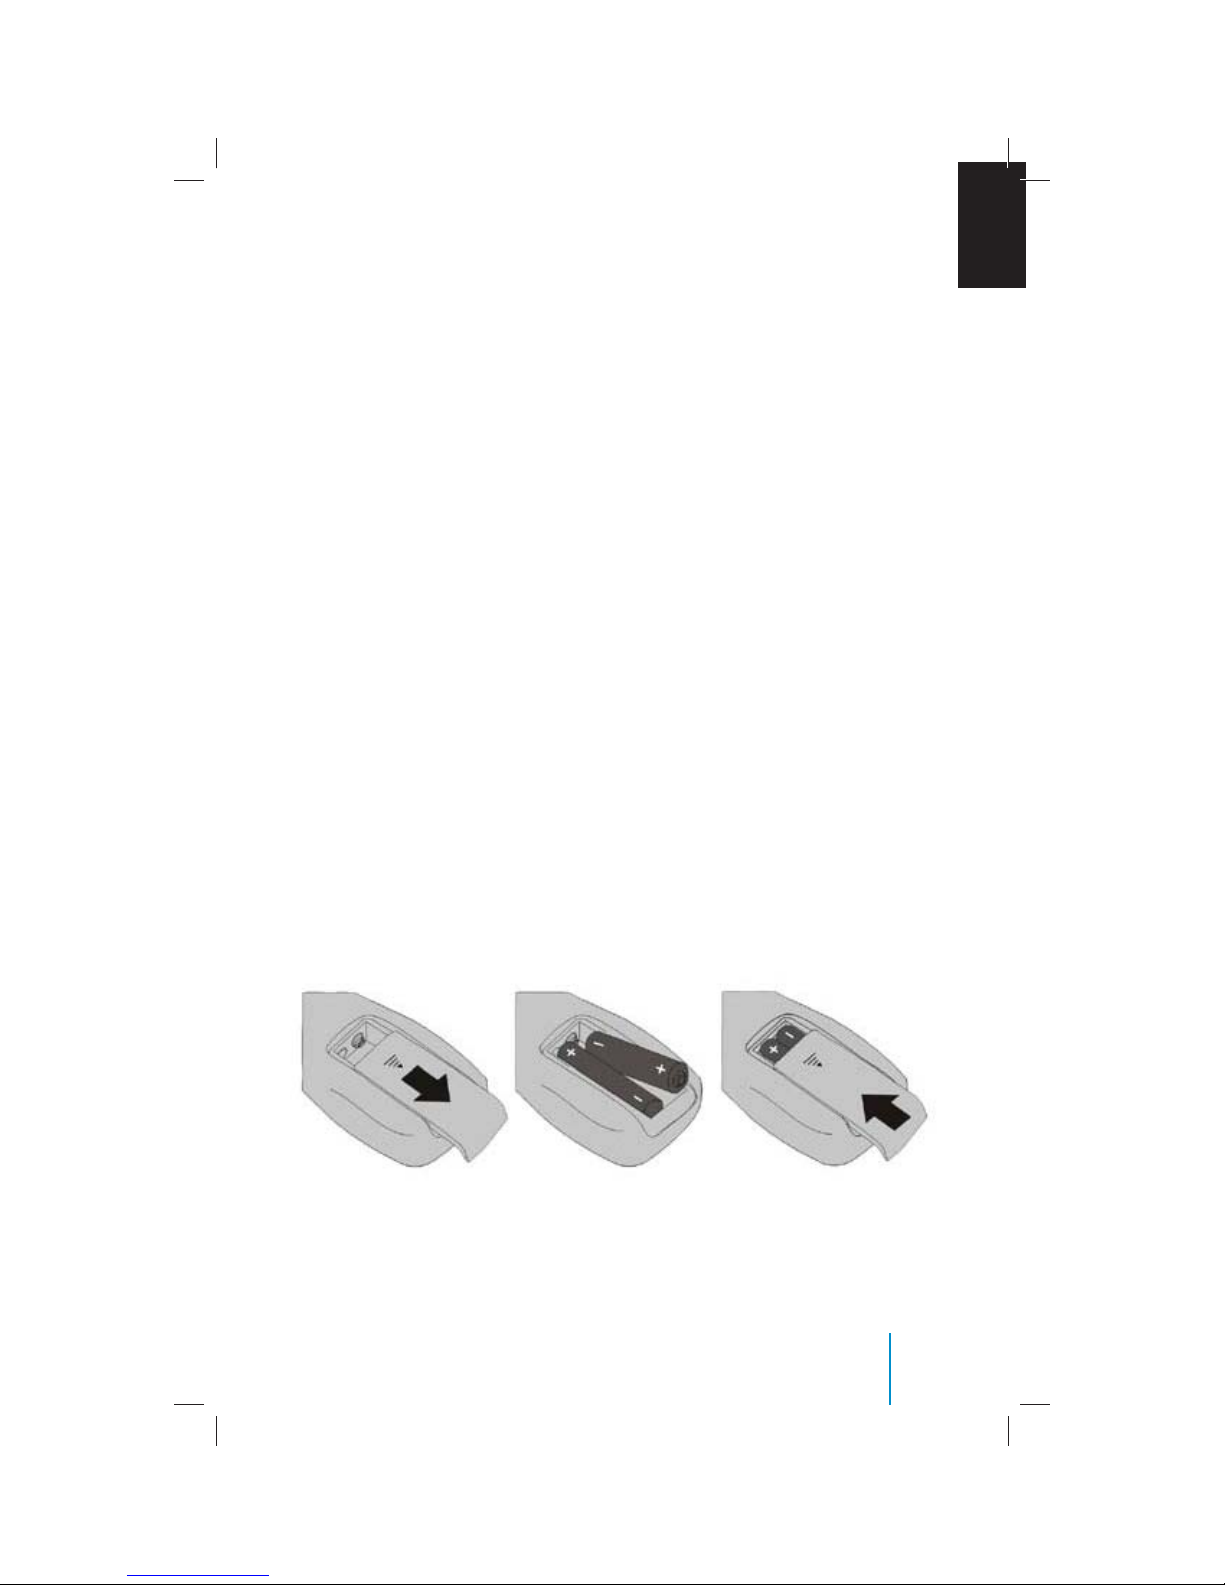
Remote Control Operations
Installing the Battery
Before attempting to operate your remote
control, install the batteries as described
below.
1. Turn the remote control face down.
Press down on the ridged area of the
battery cover and slide it o .
2. Install two “AAA” batteries as shown.
Make sure that proper polarity (+ or -) is
observed.
3. Slide the cover back until it clicks.
The remote control will only operate this
device. It is not a universal remote control
and will not control other equipment.
EN
Warning/Caution on Using Batteries
• Always ensure that the batteries are
inserted with the positive and negative
terminals in the correct direction as
shown in the battery compartment.
• Di erent types of batteries have di erent
characteristics. Do not mix di erent types.
• Do not mix old and new batteries. Mixing
old and new batteries will shorten battery
life and/or cause chemical leaks from the
old batteries.
• When batteries fail to function, replace
them immediately.
• Keep the batteries out of the reach of
children. Should the batteries be swallowed, immediately consult a doctor. Also,
when disposing of used batteries, please
comply with governmental regulations
or environmental public institution rules
that apply in your country/area.
• Remove the batteries if the remote
control is not used for a month or longer.
Remote Control Operations
13
Page 14
Button Function Descriptions
14
Button Function Descriptions
Page 15

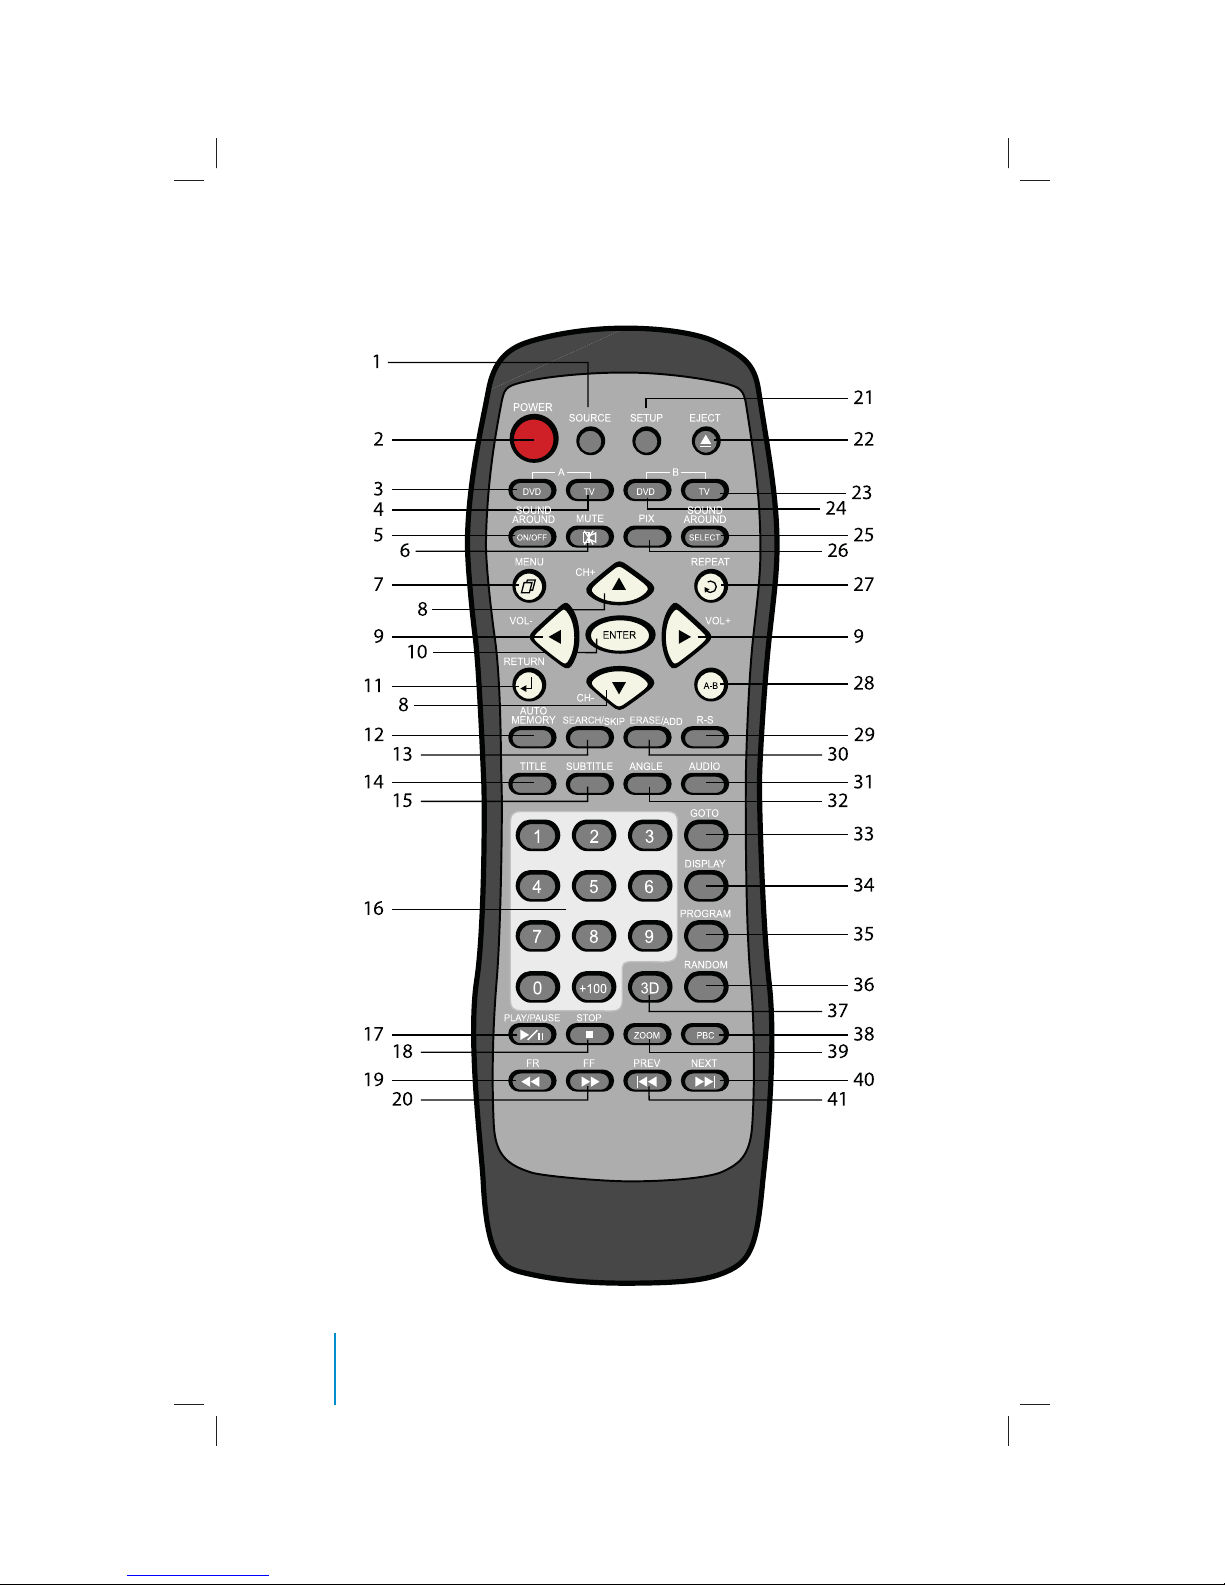
1. SOURCE
Any video equipment connected to the
audio/video inputs can be used with
the monitor by pressing this button.
Each time the button is pressed, the
audio/video source will change in the
following sequence: Monitor A,
Monitor B, AUX, TV.
2. POWER
Press the button to turn the device
on. The current video source will be
displayed on the screen, and the picture
will appear in a few seconds. Press the
button again to turn the device o .
3. DVD-Monitor A
Transmit IR codes for DVD mode of
MONITOR A.
4. TV-Monitor A
Function not available at this time.
5. SOUND AROUND ON/OFF (If available)
Turn the FM transmitter ON/OFF.
6. MUTE (for DVD only)
Press the button to shut o the sound
transmitted to the headphone stations.
The screen will display that the sound
has been turned o . Pressing the button
again restores sound to the previously
set level.
7. MENU
Press the button to go to the Root Menu
included on the disc.
8. UP, DOWN
For DVD: Navigation button, you can
use this button to move the select bar to
items among the menu or le list.
For OSD: Increase or decrease the
setting of selected item.
9. LEFT, RIGHT
EN
Navigation button; you can use this
button to move the select bar to one of
the items in the menu or le list.
10. ENTER
Makes a selection or begins playback of
the disc.
11. RETURN
Returns to the previous menu screen or
resumes disc playback.
12. AUTO MEMORY
Function not available at this time.
13. CH-SEARCH/SKIP
Function not available at this time.
14. TITLE
Navigate the title menu included in
the disc.
15. SUBTITLE
Press this button. If the current disc has
di erent subtitles options, this now
appears on the screen. Press this button
repeatedly until you have reached your
desired subtitles option.
16. Numbers
Decimal number: 0 to 9;
and +100: Add 100.
17. PLAY/PAUSE
While playing, press this button once
to pause the playback. Press the button
again to resume playback.
18. STOP
Stop playing the movie or songs.
STOP PLAY: Resumes disc playback.
STOP STOP PLAY: Resumes from the
beginning of the disc.
Button Function Descriptions
15
Page 16

19. FR (Fast Reverse)
Press this button to search disc
backward continuously. There are 5
speed options to choose: 2X, 4X, 8X, 16X,
and 32X.
20. FF (Fast Forward)
Press this button to search disc forward
continuously. There are 5 speed options
to choose: 2X, 4X, 8X, 16X, and 32X.
21. SETUP
Navigate the Setup Menu. Please refer
to the following pages to con gure
the system: General Setup Page, Audio
Setup Page, Preference Page, and
Password Setup Page.
22. EJECT
Eject the disc from the disc
compartment or load the disc into the
disc compartment.
23. TV-Monitor B
Function not available at this time.
24. DVD-Monitor B
Transmit IR codes for DVD mode of
Monitor B.
25. SOUND AROUND SELECT (If available)
Select a FM transmitter channel. There
are 6 channels: CH1: 88.3MHz; CH2:
88.7MHz; CH3: 89.1MHz; CH4: 89.5MHz;
CH5: 89.9MHz; CH6: 90.3MHz.
26. PIX (Picture Selection)
Each time the button is pressed, the
picture adjustment OSD cycles through
bars for BRIGHTNESS, CONTRAST,
SATURATION, HUE, SHARPNESS, IR
HEADPHONE, and RESET. Once the
desired adjustment bar is displayed,
use the UP/DOWN button to
adjust the setting. The bar display
will automatically disappear, if no
adjustments are made within 6 seconds
or if any button is pressed.
27. REPEAT
Press this button to switch the repeat
mode by ALL, TITLE, CHAPTER and
cancel the repeat mode while playing
DVD-video. Other disc types such as
VCD, CD, and SVCD that only have two
repeat modes that can be selected:
TRACK and ALL
Note: Both repeat functions of VCD and
SVCD need the PBC status set to ON
when available.
28. A-B (Except MP3)
Repeat from point A to point B.
29. R-S (If TV mode is available)
Function not available at this time..
30. ERASE/ADD
Function not available at this time.
31. AUDIO
Press this button if the current disc
has di erent language options. Press
this button repeatedly until you have
reached your desired language option.
32. ANGLE
View with a di erent camera angle (The
button takes e ect only on the DVD that
supports frames with multiple angles).
Press this button repeatedly until you
have reached your desired viewing
angle.
16
Button Function Descriptions
Page 17

33. GOTO
For the DVD, pressing this button will
enter the menu to set the Title/Chapter/
Audio/Subtitle/Angle/Title Time/Chapter
Time/Repeat Mode/Time display mode
while normal playing. For the SVCD and
VCD, pressing this button can enter the
menu to set the Track/Disc Time/Track
Time/Repeat Mode/Time display mode
during normal playback.
34. DISPLAY
Show information on the screen
including title, chapter/track, time
elapsed, and time remaining, or turn o
the display.
35. PROGRAM
Edit a playback program containing
desired titles in the DVD or tracks in
the CD-DA.
36. RANDOM
Play titles randomly.
37. 3D
Press this button to set the audio e ect
for the following audio options:
DVD mode: O , Rock, Pop, Live, Dance,
Techno, Classic, and Soft.
CD mode: O , Concert, Living Room,
Hall, Bathroom, Cave, Arena, and Church
38. PBC (Video CD only)
Turn the PBC (Play Back Control) on
or o .
EN
39. ZOOM
Enlarge the picture in the movie by 2x,
3x, and 4x, or shrink the picture in the
movie by 1/2, 1/3, and 1/4.
40. NEXT
When a disc has more than one Chapter,
Track, or File, you can move to another
Chapter/Track/File. Press the button
brie y during play to select the next
Chapter for DVD-video or Track/File for
VCD, SVCD, MP3, CD, etc.
41. PREV
When a disc has more than one Chapter,
Track, or File, you can move to another
Chapter/Track/File. Press this button
brie y during play to step back to the
previous Chapter for DVD-video or
Track/File for VCD, SVCD, MP3, CD, etc.
Note:
The remote control incorporates an infrared
sensor that relays signals from the remote
control to be controlled simply by pointing
its remote control at the remote sensor eye.
This provides control of auxiliary equipment
such as a video DVD player. The infrared
sensor can-not relay signals from any
other manufacturer’s remote control to its
respective component connected to the
AUX input, such as a DVD player. In this case,
you must use the remote control supplied
with the device.
Button Function Descriptions
17
Page 18

General Operating Instructions
Turning the Device ON or OFF
1. Pivot the screen downward until a
comfortable viewing angle is reached.
2. Pressing the POWER button on the
lower-left corner of the front panel or
the remote control will turn the device
on or o . When in use, the controls will
be lit.
3. After the device has been turned on
and is displaying a picture, adjust the
viewing angle by pivoting the screen to
optimize the picture quality.
4. Remember to turn the device o and
pivot the LCD panel to the locked
position when not in use.
DVD Basics
To get the most use out of each DVD, make
sure you read this section completely.
Regional Coding
Both the DVD player and disc are coded by
region. These regional codes must match
in order for the disc to play. If the codes do
not match, the disc will not play by default.
The system’s code is set to region 1. Other
regions may not be played in this system.
Type of Discs Your DVD Will Play
• DVD-Video: DVD contains video.
• CD-DA: CD contains musical or sound
content only.
• CD-Video: CD contains movie only.
• CD-R/RW: A disc that contains audio les
(for example, a CD-R with downloaded
MP3 les), MPEG, or JPEG les.
Loading and Playing Discs
Before you load a disc, make sure that it is
compatible with the player.
Note that the following discs CANNOT be
used with this player: Optical disc- CD-1, CDROM, and DVD-ROM Mini disc- CDG (audio
only, not graphics).
18
General Operating Instructions
Page 19
To Load and Play a Disc
When you press the POWER button the
system turns on in DVD mode. Put the disc’s
printed-side facing the rear of vehicle into
the disc compartment, about halfway into
the slot. The disc will load automatically and
begin to play. (Some discs may start at the
root menu, where play must be selected to
start movie.) Depending on the disk and
playback location on the disc, the icon may
be displayed in the upper-left corner of the
screen indicating that still playback is not
possible.
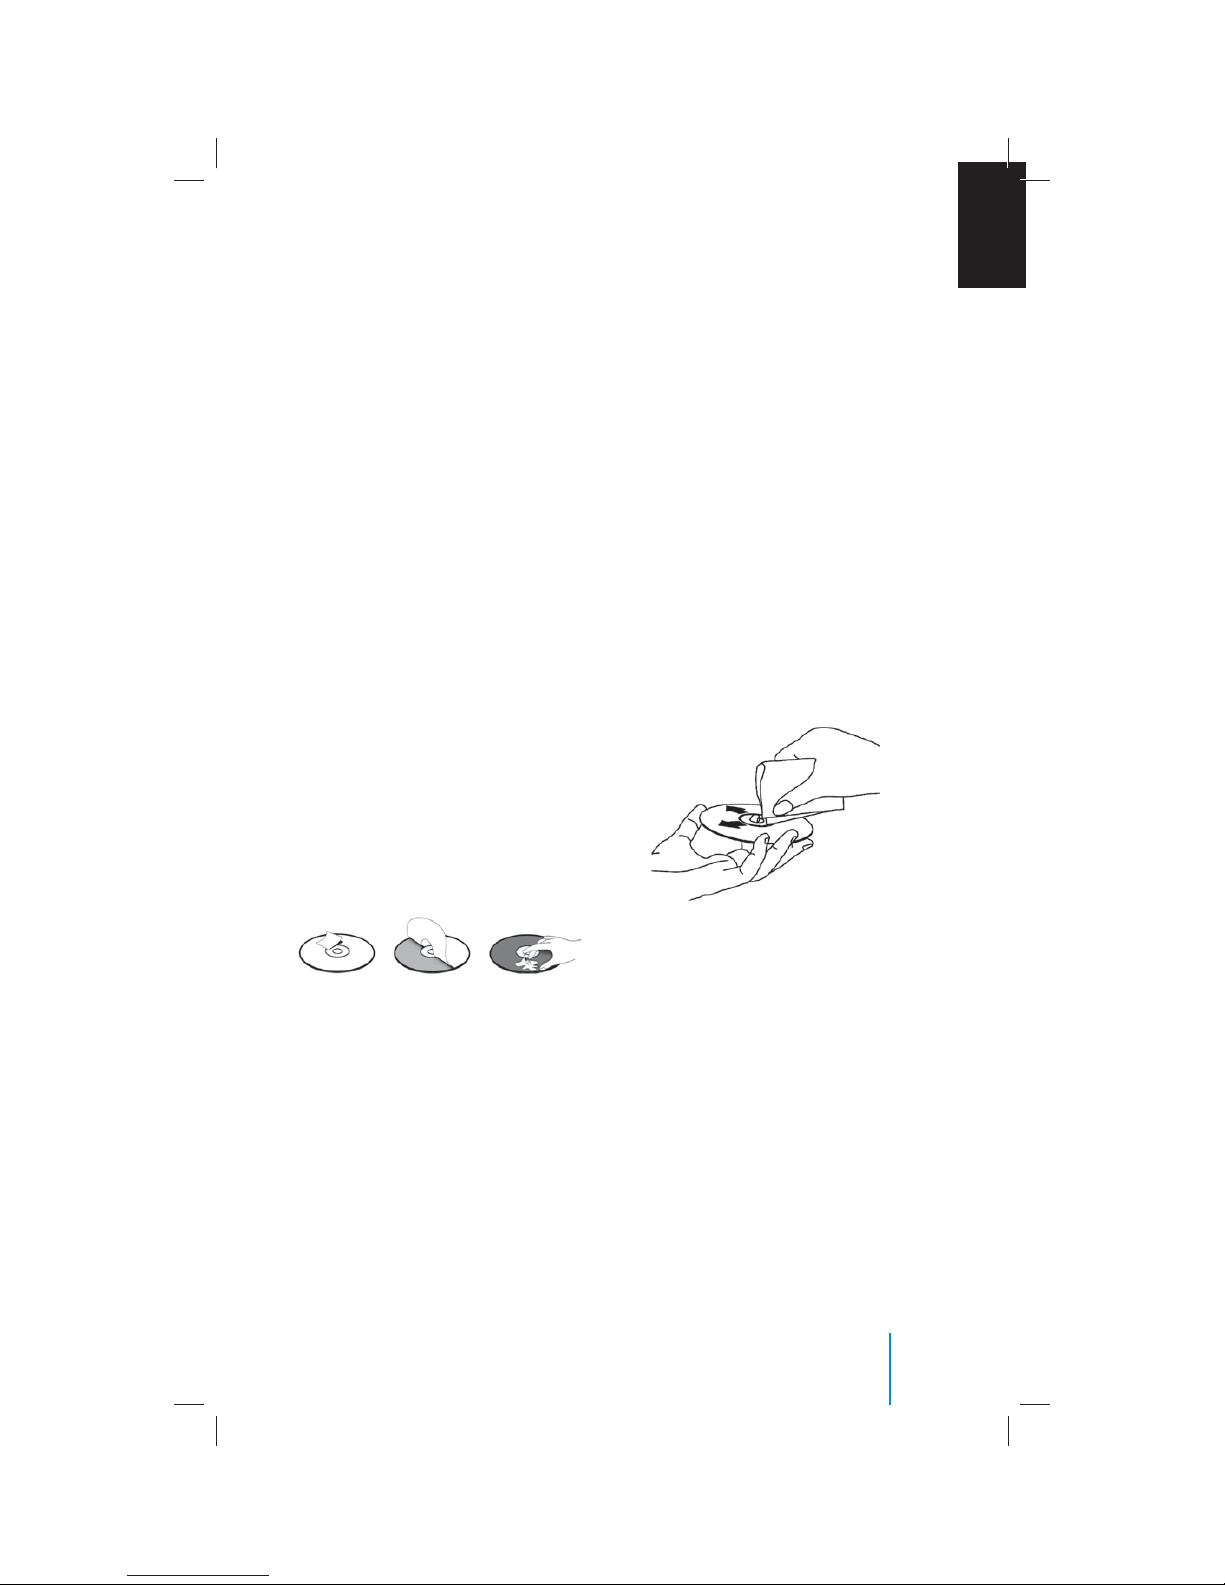
Notes on Discs
• To keep a disc clean, do not touch its
surface. Handle the disc by its edge.
• Keep your discs in their cases or disc
magazines when not in use. Also, do not
subject disc to heat/high temperature.
Avoid leaving them in a parked vehicle or
on a dashboard/rear tray.
• Do not attach labels, or use discs with
sticky ink/residue. Such discs may stop
spinning when used, causing a malfunction, or may ruin the disc.
• Do not use any discs with labels
EN
or stickers attached. The following
malfunctions may result from using such
discs:
• Inability to eject a disc (due to a label
or sticker peeling o and jamming the
eject mechanism).
• Inability to read audio data correctly
(i.e., playback skipping, or no playback)
due to heat shrinking of a sticker or
label causing a disc to warp.
• Before playing, clean the discs with a
commercially available cleaning cloth.
Wipe each disc from the center out. Do
not use solvents such as benzene, thinner,
commercially available cleaners, or
antistatic spray intended for
analogue discs.
• Use only normal, round discs. If you insert
irregular, non-round, shaped discs they
may jam in the DVD player or not play
properly.
General Operating Instructions
19
Page 20
How to Use the DVD OSD Menu
This section describes how to set and adjust
settings using the on-screen setup pages
included in the OSD Menu. You can use the
OSD menu screen to adjust all the settings
on your screen. Follow the steps outlined
below to select the function you desire,
and refer to the pages indicated for more
information.
Using the Setup Menu
Use the Setup Menu to do the initial setup,
adjust the picture quality, and set the
various output. You can also set a language
for the on-screen display, the setup display,
and limit playback by children.
1. Press the SETUP button on the remote
control to bring up the following Setup
Menu on screen.
2. Press the
the desired page on screen, choose
functions or change settings.
To Cancel Using the Setup Display
Press the SETUP button on the remote
control.
or buttons to select
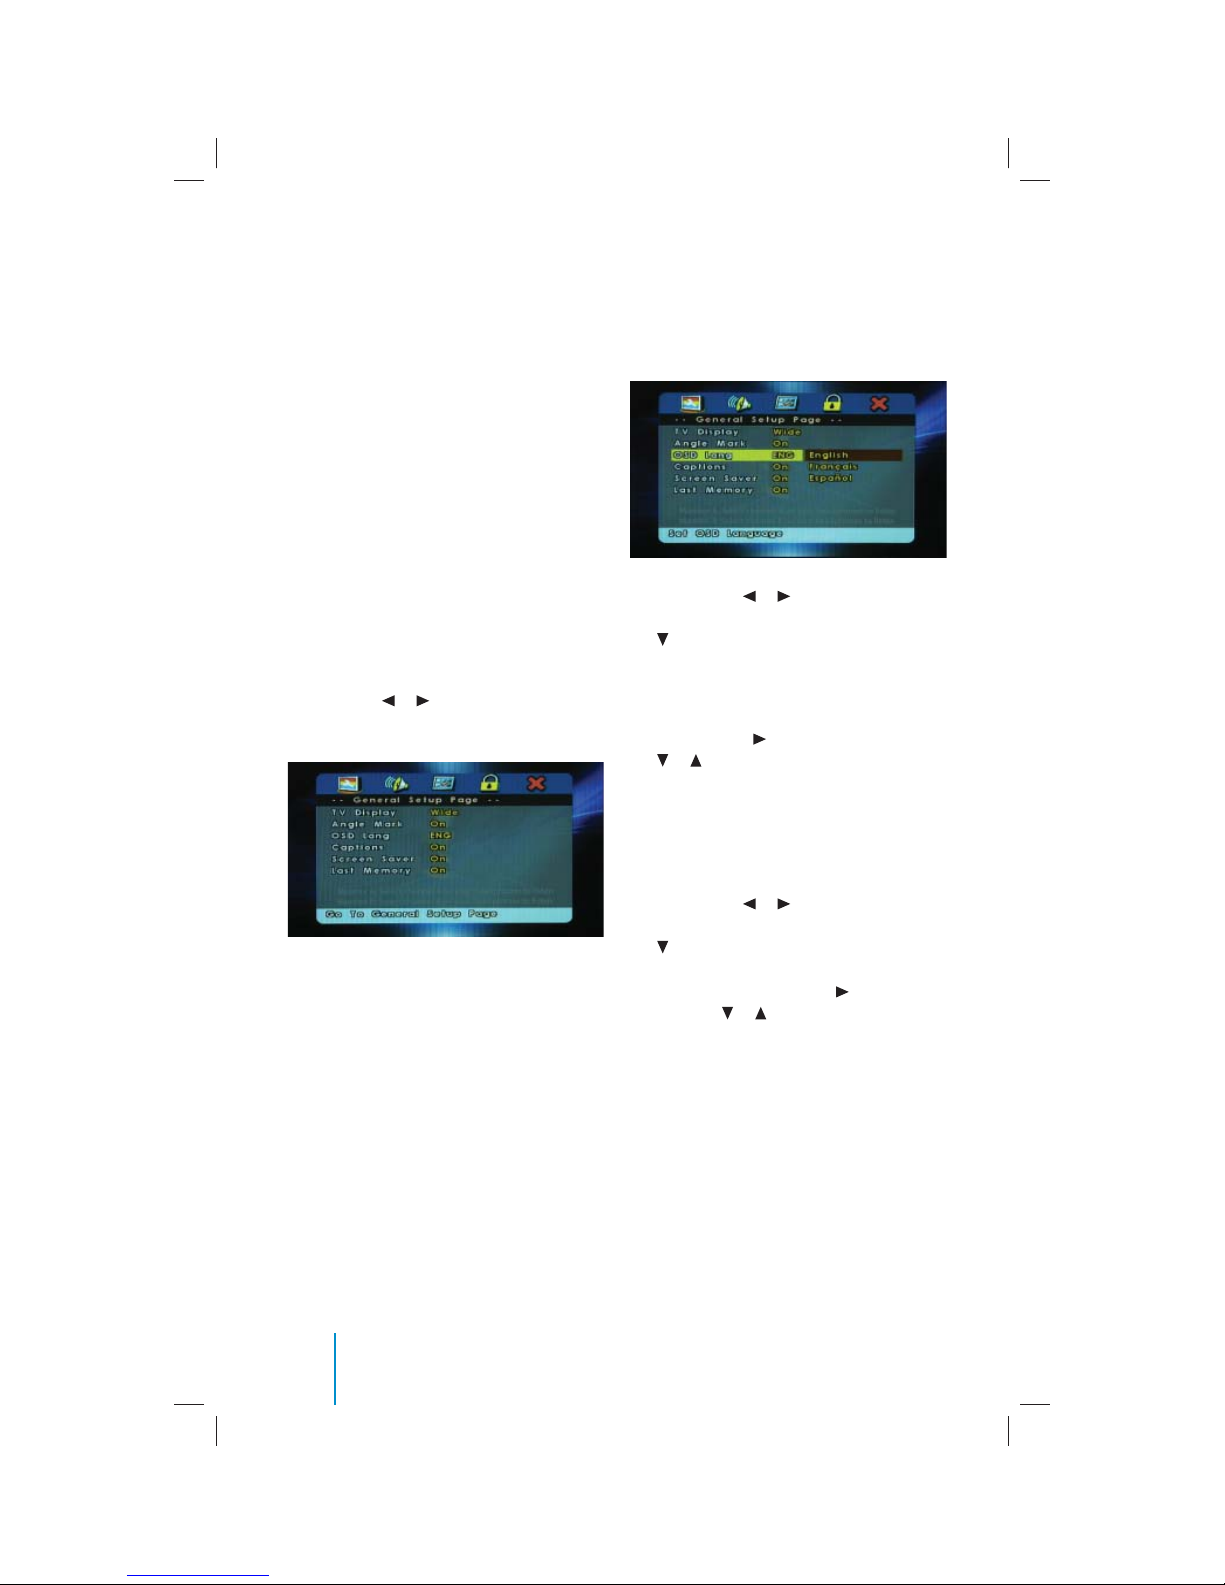
General Setup Page
Setting the Language for On-Screen
Display
Press the SETUP button on the remote
control, use the
to the General Setup Page, and then use
the
button to select OSD Lang sub-menu.
OSD (On Screen Display) Language Menu
The OSD Lang sub-menu allows the user
to select the language for the on-screen
display. Press the
the
or buttons on the remote control to
select the desired language. The user can
select English, French, or Spanish for the
OSD language.
Setting the Display
Press the SETUP button on the remote
control, use the
to the General Setup Page, and then use
the
button to select TV Display submenu. The setup allows you to adjust the
screen aspect ratio. Press the
then use the
appropriate setting.
The options are as follows:
Normal/PS (Pan and Scan)
This displays the wide picture on the screen
with a portion of the left and right sides
removed.
Normal/LB (Letter-Box)
This displays the wide picture with black
bands on the upper and lower portions of
the screen.
or buttons to navigate
button and then use
or buttons to navigate
button and
or buttons to select the
20
How to Use the DVD OSD Menu
Page 21

Wide (16:9)
This option displays the full widescreen
picture if the LCD panel is widescreen.Then
press the ENTER button on the remote
control to con rm the screen.
Preference Page
Default Setting
Press the SETUP button, and use
the
or and buttons on the remote
control to navigate to the default sub-menu
under Preference Page. The default setup
allows you to reset all options to factory
defaults.
Press the
ENTER button to carry out the reset.
Note: This function will not a ect the
parental setting.
button and then press the
Setting for Parental (Parental Control)
(Accessible when no disc is loaded)
This section of the Setup Menu allows user
to control the content of movie playback
from G to ADULT. The parental control
function allows you to limit viewing to your
preference.
1. After navigating to the Parental submenu under the Preference Page, use
the
and or the buttons on the
remote control to select: KID SAF
(Children); G; PG; PG 13; PGR; R; NC 17;
ADULT.
Note: The lower the value, the more
strict the limitation.
2. Press the ENTER button on the remote
control to con rm the selection.
3. Input a password in 4 digits using the
numeric buttons and then press the
ENTER button on the remote control.
Note: The default password is 0000.
Note: If a disc is inserted into the DVD
Compartment Slot and exceeds the Parental
Setting, the following message appears on
the screen:
The Parental Settings of this player
prohibits play. Would you like to allow this
disc to play?
If you select yes, the password must be
entered for the disc to play. If wrong
password is entered, the following message
appears on the screen:
This movie will not play due to the Parental
Settings of the player.
EN
How to Use the DVD OSD Menu
21
Page 22
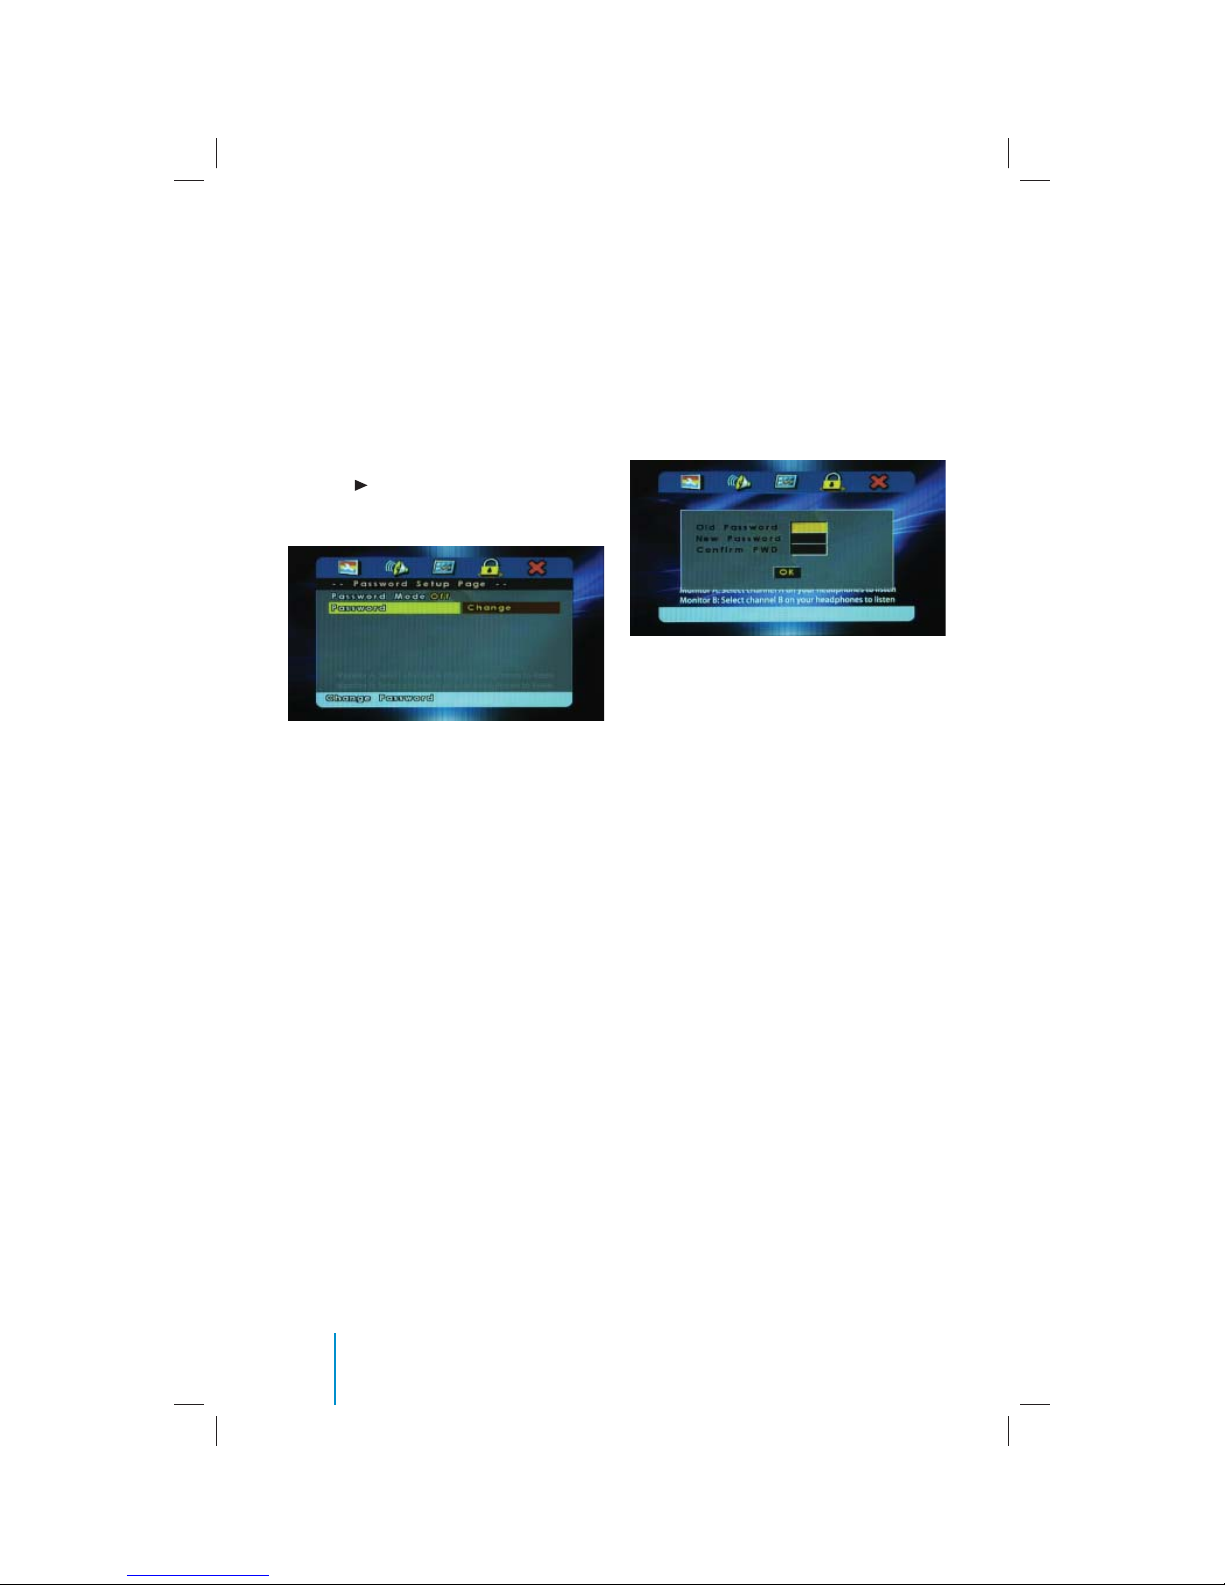
Password Setup Page
Setting the Password (Parental Control
Password)
Press the SETUP button and navigate to the
Password submenu under the Password
Setup Page. The menu appears and
allows you to change the parental control
password.
Press the
ENTER button on the remote control to
enter the sub-menu.
button and then press the
Old Password
Input the old password or the default password (4 digits).
New Password
Input a new password (4 digits) using
numeric buttons.
Con rm PWD
Con rm the new password by entering the
same new password again.
Then scroll to the OK button and press the
ENTER button on the remote control. Your
password has been changed.
(Note: The default password is 0000)
22
How to Use the DVD OSD Menu
Page 23
How to Use the Device OSD Menu
Picture Adjustment
This section describes how to set and adjust
settings using the on-screen display (OSD)
Menu. You can use the device OSD Menu
screen to adjust advanced picture selections
on your screen.
• Press the PIX button on the remote
control to select the BRIGHTNESS,
CONTRAST, SATURATION, HUE, and
SHARPNESS options to adjust value and
setting.
• After selecting the desired option use
the
or buttons to adjust the setting.
Option Description Range Default
BRIGHTNESS Adjust to brighten or darken the picture. 0-100 50
CONTRAST Adjust to increase or decrease picture contrast. 0-100 50
SATURATION Adjust to increase or decrease color intensity. 0-100 50
HUE Adjust to increase or decrease the color hue. 0-100 50
SHARPNESS Adjust to sharpen or soften the picture. 0-100 50
IR Headphone Select on or o to turn the IR headphone
function.
Reset Resets the current settings to default values.
ON or
OFF
ON
EN
How to Use the Device OSD Menu
23
Page 24

Playing an Audio CD
When playing an audio CD, the DISPLAY
banner appears automatically. It displays
the current track and the amount of time
the track has been playing, the total amount
of time on the disc and the current time
running on the disc.
Press the DISPLAY button on the remote
control to display the DISPLAY banner.
The options below show you what happens
when you press the DISPLAY button.
Press DISPLAY (1x)
Single Elapsed appears along with the
current track playing and the time of that
track.
Press DISPLAY (2x)
Single Remain appears along with the
current track playing and the amount of
time left.
Press DISPLAY (3x)
Total Elapsed appears along with the
current track playing and the total time
playing on CD.
Press DISPLAY (4x)
Total Remain appears along with the
current track playing and the amount of
time left on CD.
Using the REPEAT Feature
The default mode for the REPEAT feature is
OFF. Pressing REPEAT button on the remote
control consecutively changes the REPEAT
options as follows:
Track - repeat the track that is playing.
All - repeat the disc that is playing.
As you toggle through the options, the
REPEAT option changes. The track repeats
once that track has ended. The selected
repeat option loops repeatedly until you
turn it o .
24
Playing an Audio CD
Page 25
Playing an MP3 Disc
MP3 is the format for storing digital
audio. An audio CD-quality song can be
compressed into the MP3 format with
very little loss of quality, while talking up
much less space. CD-R discs that have been
encoded in MP3 format can be played on
your DVD player. Press the DISPLAY
button on the remote control to show
DISPLAY Banner. The options below show
you what happens when you press the
DISPLAY button.
• Press DISPLAY (1x) “TIME REMAIN” appears
along with the amount of time left in the
song that is playing. “TIME REMAIN” and
the time that is left will remain on-screen
until you press DISPLAY button again.
• Press DISPLAY (2x) “TIME ELAPSED”
appears along with the amount of time
the song that is played. “TIME ELAPSED”
and the elapsed time will remain onscreen until you press DISPLAY button
again.
• Press DISPLAY (3x) “OFF” appears and
then disappears after a few seconds.
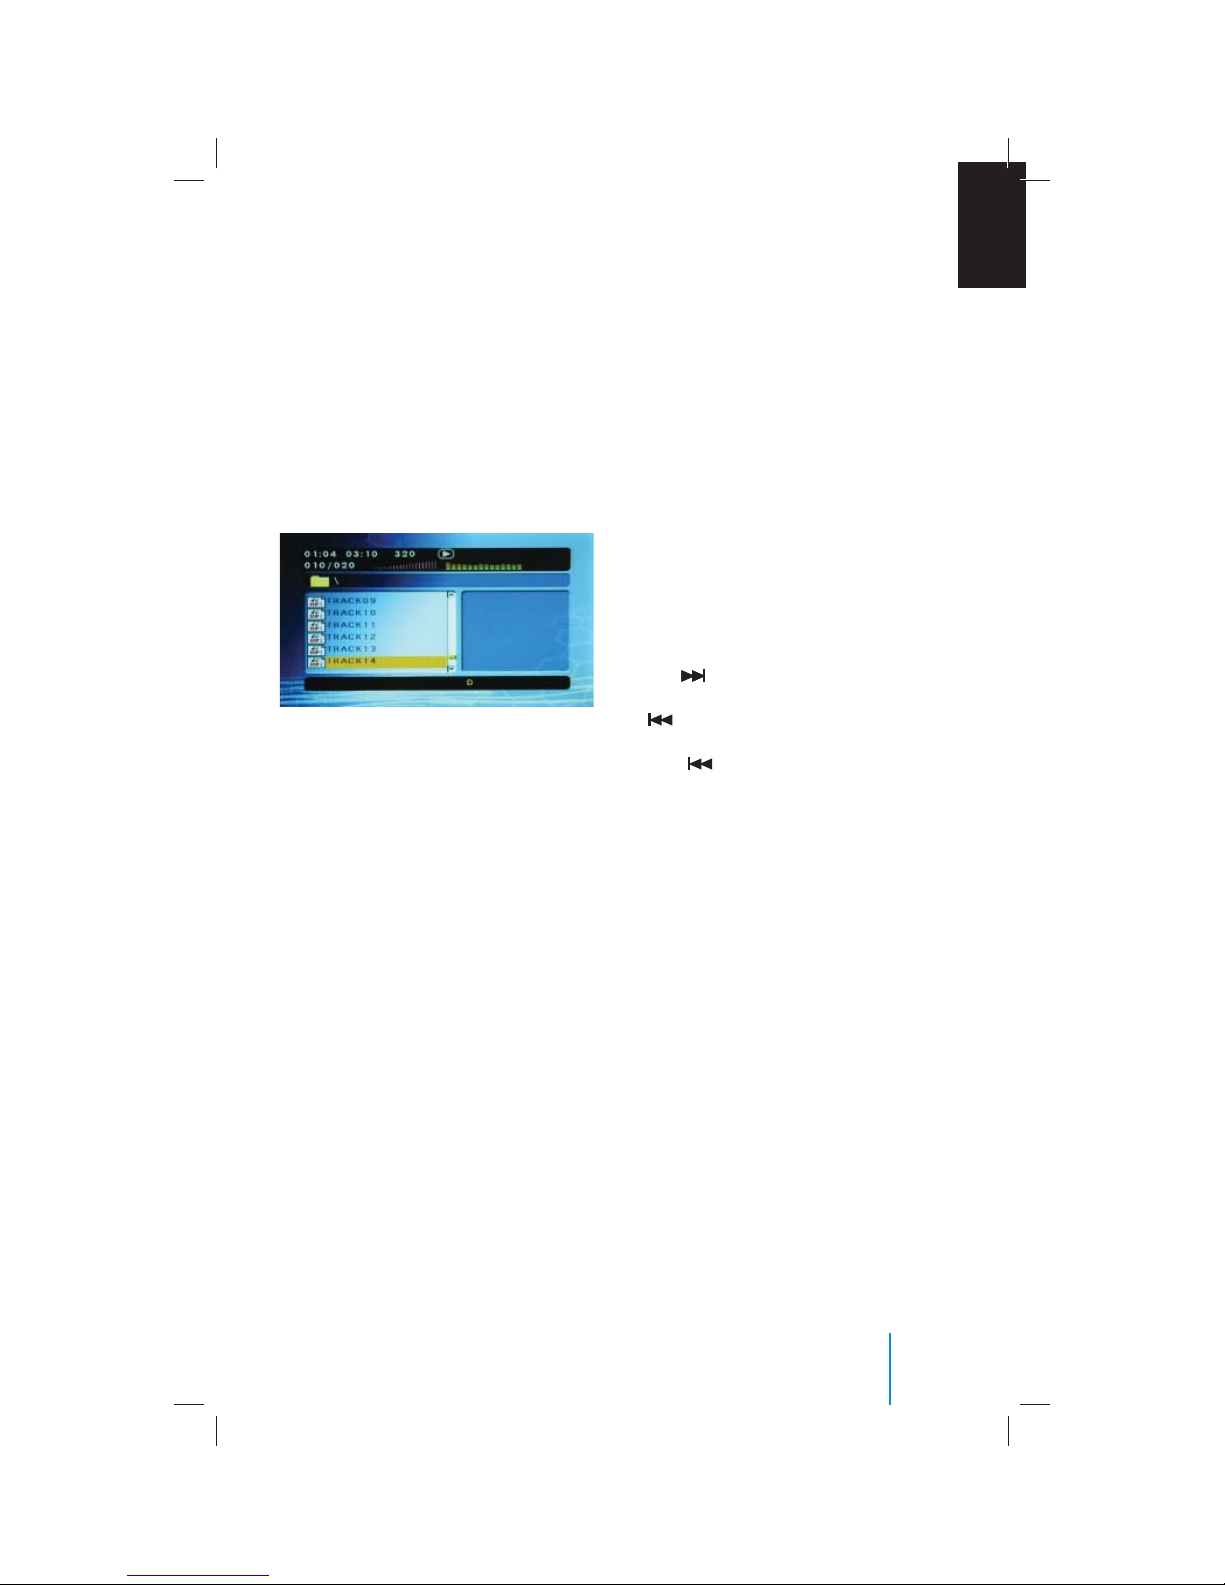
Selecting Folders and Songs
When an MP3 disc is inserted in the
player, the navigation screen appears
automatically. You can change folders and
songs by navigating the le system. The
DVD player plays the songs in the order they
were burned to the disc.
1. If a disc is playing, press the STOP
button on the remote control, and then
press the UP or DOWN arrow buttons to
go through the folder list on the left side
of the navigation screen.
2. Once the folder you want is highlighted,
press the ENTER button on the remote
control (the folder list shifts to left side
of the screen and the songs in the folder
appear on the right).
3. Press the UP or DOWN arrow button on
the remote control to go through the
song list and highlight the song you
want. Press the ENTER button to begin
the playback of the highlighted song.
Skipping Songs
Use the
control to move to the next song. Use
the
beginning of the currently playing song.
Press the
to the previous song.
Selecting a Play Mode
You can choose what order the songs will
play on a disc temporarily. The FOLDER play
mode is the default. To access the play mode
operations, press the REPEAT button on the
remote control. The play mode options are
as follows:
Single: Play a selected song.
Repeat One: Repeat the song that is playing.
Folder: Play the folder in the order the songs
were recorded.
Folder Repeat: Repeat the folder that is
playing.
Disc: Play the entire disc.
Disc Repeat: Repeat the disc that is playing.
Random: Play the songs in the random
order.
Shu e: Play the songs in random order
(within the selected folder).
(NEXT) button on the remote
(PREV) button to move to the
(PREV) button 2 times to move
EN
Playing an MP3 Disc
25
Page 26

Connecting a USB Device
You can connect a USB (v1.1) mass storage
class device such as a USB memory stick,
digital audio player (USB mass storage class
device) etc. to the USB port of the SB7 Active
Headrest.
The SB7 Active Headrest can play MPEG/
MP3/ WMA/JPEG tracks stored in a USB
device. Turn on the SB7 Active Headrest
to watch the playback picture if you play
back a MPEG/JPEG le. You can also control
playback by referring to the SB7 Active
Headrest screen.
Order of Tracks
The SB7 Active Headrest plays the les in the
order that the writing software writes them.
Therefore, the playing order may not be the
same as the order you input. The folder and
le playback order di ers from the folder
number indicated on the display.
26
Connecting a USB Device
Page 27
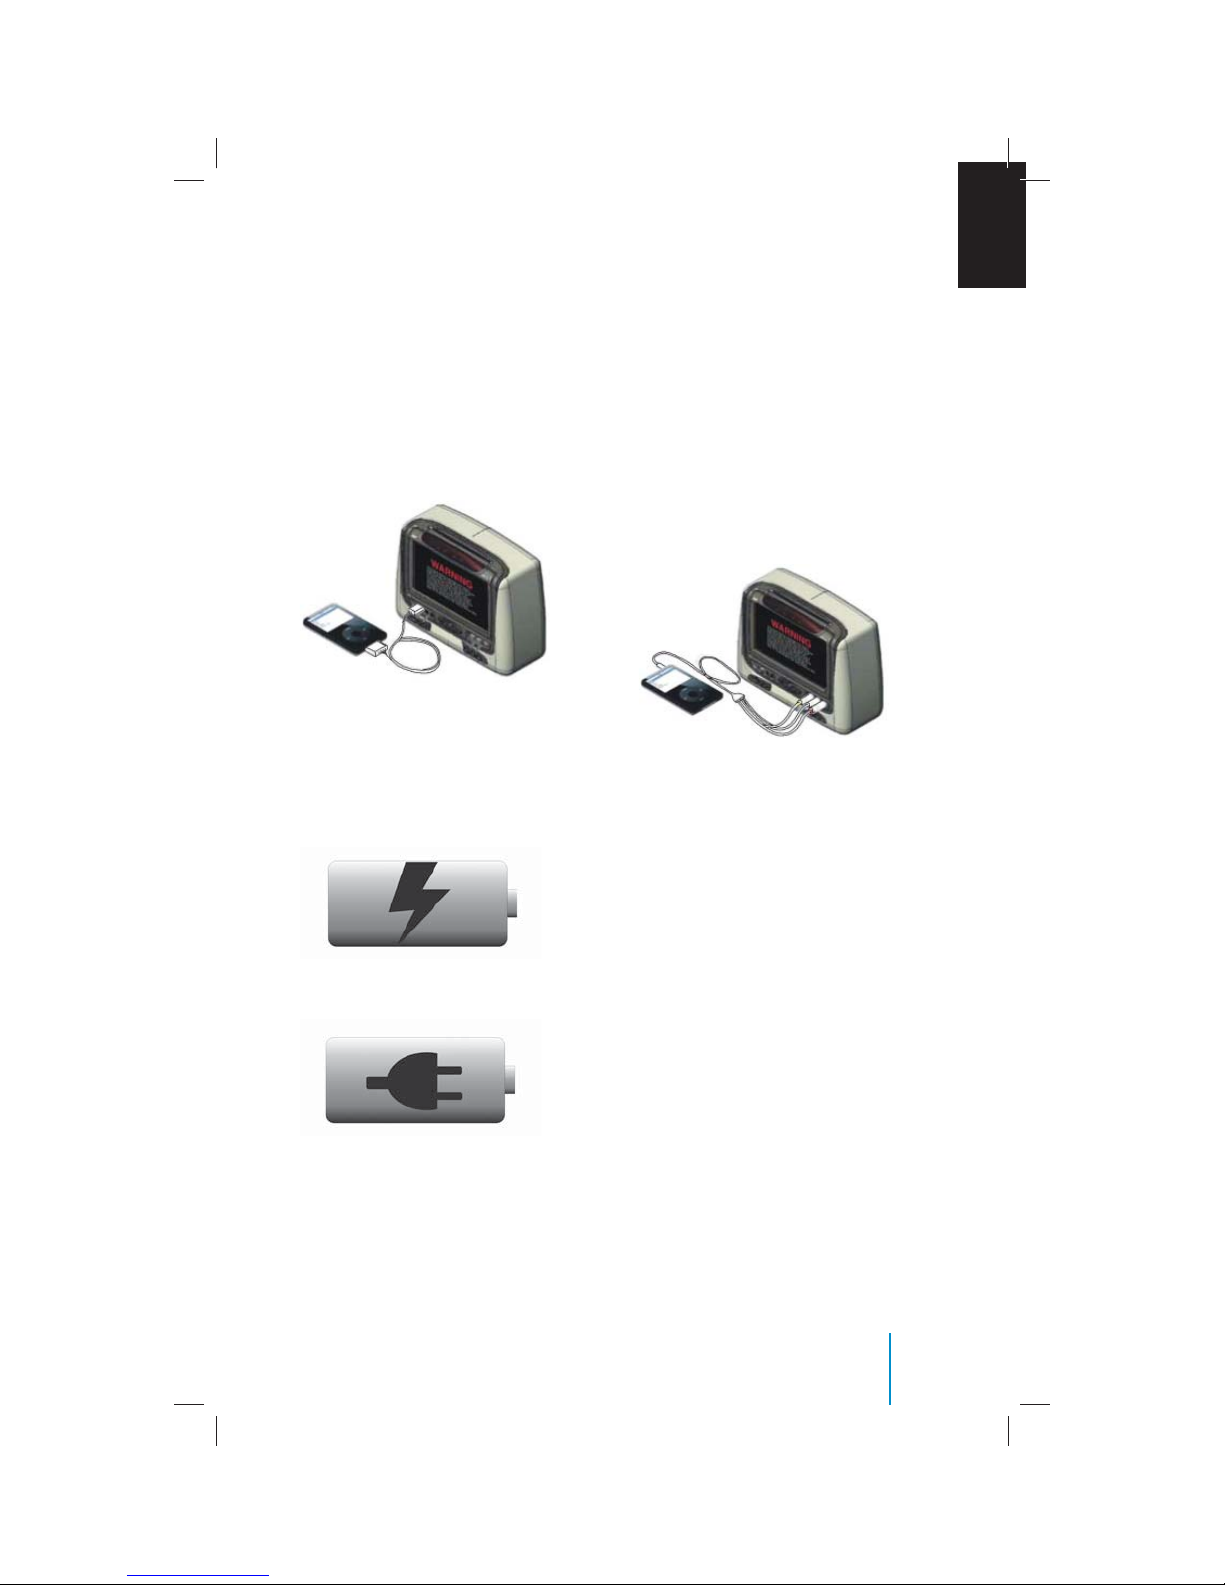
Connecting an iPod Device
Connecting an iPod Device to Your SB7
Active Headrest via USB
Plug the iPod Dock Connector-to-USB cable
into a high-power USB port on your SB7
Active Headrest, and then connect the other
end to the iPod.
See the documentation that came with your
iPod for more information.
Charging the iPod Battery
Connect the iPod to a high-power USB port
on your SB7 Active Headrest. The SB7 Active
Headrest must be turned on.
If the battery icon on the iPod screen shows
a lightning bolt, the battery is charging.
If it shows a plug, the battery is fully
charged.
Connecting an iPod Device to Your SB7
EN
Active Headrest via AV Cable
Connect the optional iPod AV cable to the
headphones port on iPod. Note: Use the
iPod AV cable made speci cally for iPod.
Other similar RCA-type cables might not
work. You can also connect the iPod AV
cable to the LINE-OUT port on the iPod
Universal Dock.
Connect the video and audio connectors to
the AV-IN ports on your SB7 Active Headrest,
as shown.
To View a Video on Your SB7 Active
Headrest
• Connect the iPod to your SB7 Active
Headrest (see above).
• Turn on your SB7 Active Headrest
and set it to display from the input
ports connected to the iPod. See the
documentation that came with your iPod
for more information.
• On your iPod, choose Videos and browse
for video.
If you don’t see the lightning bolt or the
plug, the iPod might not be connected to a
high-power USB port.
The iPod AV cable is sold seperately by Apple.
The iPod Dock Connector-to-USB cable is sold
seperately by Apple.
iPod® is a registered trademark of Apple, Inc.
Connecting an iPod Device
27
Page 28

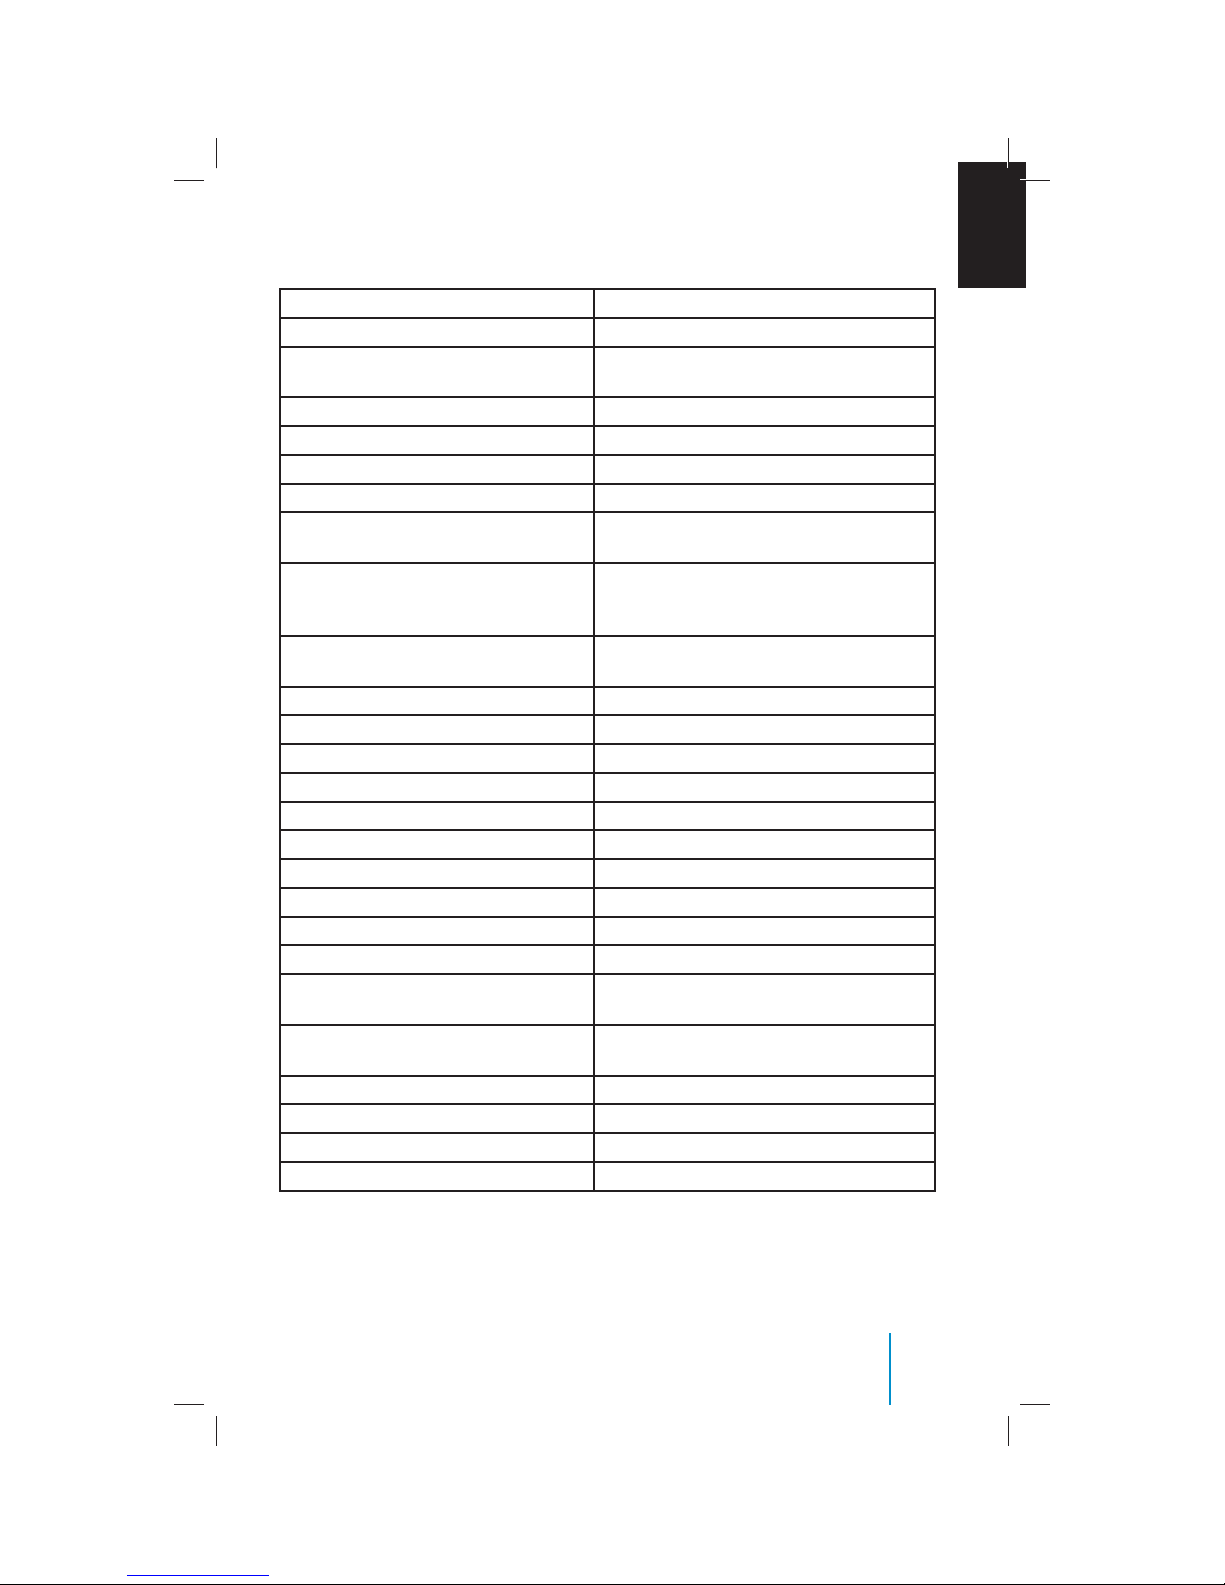
Troubleshooting
Symptom Remedy
Device does not power “ON” • Is the ignition turned “ON”?
• Are batteries installed in remote control?
IR sensor inoperative • Verify that the batteries in the remote control are good.
• Verify that the remote sensor eye is not obstructed.
• Verify that the infrared transmitter is a xed over the
sensor eye of the component to be controlled.
Disc won’t play • Insert a disc with label side facing the rear of the vehicle.
• Check if the disc is defective by trying another disc.
• Check the type of disc you put into DVD compartment
slot. This DVD player only plays DVDs, audio CDs, and
MP3s.
• Both the device and the disc are coded by region. If the
regional codes don’t match, the disc can’t be played. This
DVD player is set to region number 1.
Disc plays, but then stops
immediately
No picture • Check that the signal source is connected.
Distorted picture • Check the disc for ngerprints and clean with a soft cloth,
Cannot advance through a
movie
No sound or distorted
sound
Device feels warm • When the device is in use for a long period of time, the
Player does not respond
to all commands during
playback
• The disc is dirty and needs cleaning.
• Condensation has formed. Allow the player to dry out.•
• The setting may be in the wrong status. Match your
monitor mode with the source correctly.
wiping from center to edge.
• Sometimes a small amount of picture distortion may
appear. This is not a malfunction.
• You cannot advance through the opening credits and
warning information that appears at the beginning of
movies because the disc is programmed to prohibit that
action.
• Make sure that the DVD player is connected properly, and
all cables are securely inserted into the appropriate jacks.
• If you are using the IR headphones, make sure you turn
on the IR power.
• Is volume turned “UP” on headphones?
• Is anything blocking signal between the monitor and the
headphones?
surface will be heated. This is normal.
• Operations are not permitted by the disc.
• Refer to the instructions in the disc inlay.
28
Troubleshooting
Page 29
Speci cations
Dimensions 234.95 (W) x 190.5 (H) x 57.15 (D) mm
Weight 2.49 Kg
Power Consumption Operation <13W
Standby <1W
LCD Backlight LED
Resolution 480 x 3 (RGB) x 234 for 7-inch TFT LCD
Luminance 450cd/m2 (typ.)
DVD Slim Type Slot-In Loader
Supported Disc DVD (Single, Dual Layer), DVD-R/+R, DVD+R
Dual layer, DVD-RW/+RW, CD, CD-R, CD-RW
Supported Format DVD-Video Navigation Ver1.0, VCD Ver1.0/2.0,
SVCD, D-DA, Data (MP3, WMA, JPEG,
MPEG 1/2/4)
Source Internal DVD, CD, USB Flash Memory (USB
play MP3, JPEG only), Analog AV input
Operation Temperature/Humidity -20 °C ~ 70 °C/20 ~ 90% RH
Storage Temperature/Humidity -30 °C ~ 85 °C/5 ~ 95% RH
Expected Backlight Life 20,000 hours
Video Display System NTSC/PAL
Supply Input Voltage 10V ~ 16V DC
Maximum Input Current 1.3A (Vin = 10V DC)
Frequency Response 20Hz ~ 20KHz ± 1dB
Signal/Noise Ratio ≥ 85dB
Audio Distortion + Noise ≤ -80dB (1KHz)
Acoustic Noise 40dB
Control Button on the Front Panel POWER/SOURCE, STOP/LEFT, UP, SETUP/
ENTER, PLAY/PAUSE/RIGHT, EJECT, and DOWN
I/O Ports USB 1.1 Port, 1/8” AV Out Jack, 1/8”
Headphone Jack, AV In RCA Jacks
Audio Out (analog audio) 0.4 (headphone) Output Level: 2V ± 10%
Load Impedance (Audio Out) 10 KΩ
Video Out Output Level 1 Vp-p ± 20%
Load Impedance (Video Out) 75 Ω
EN
Speci cations
29
Page 30

Wireless Audio Dual channel infrared audio transmitter,
Support IR receiver stereo headphone
(reception: 0.9 m; 80°, 1.8 m; 50°)
IR Channels Channels
A: 2.3/2.8 MHZ
B: 3.3/3.8 MHZ
3: Proprietary
4: Proprietary
30
Speci cations
Page 31

Compliance Information
FCC Notice
This device has been tested and found
to com-ply with the limits for a Class B
digital device, pursuant to part 15 of the
FCC Rules. These limits are designed to
provide reasonable protection against
harmful interference in a residential
installation. This device generates, uses,
and can radiate radio frequency energy,
and if not installed and used in accordance
with the instructions, may cause harmful
interference to radio communications.
However, there is no guarantee that
interference will not occur in a particular
installation. If this device does cause
unacceptable interference to radio
or television reception, which can be
determined by turning the device o and
on, the user is encouraged to try to correct
the interference by one or more of the
following measures:
• Reorient or relocate the receiving
antenna.
• Increase the separation between the
device and receiver.
• Connect the device into an outlet on a
circuit di erent from that to which the
receiver is connected.
• Consult your dealer or an experienced
radio/TV technician for help.
FCC Warning:
To assure continued FCC compliance, the
user must use the provided grounded
power supply cord and the shielded
video interface cable with bonded ferrite
cores. Also, any unauthorized change or
modi cations to this device would void the
user’s authority to operate this device.
EN
WEEE Notice
Disposal of Old Electrical & Electronic Equipment (Applicable in the European Union
and other European countries with separate
col-lection systems)
This symbol on the product or on its
packaging indicates that device shall not
be treated as household waste. Instead
it shall be handed over to the applicable
collection point for the recycling of
electrical and electronic equipment. By
ensuring this device is disposed of correctly,
you will help prevent potential negative
consequences for the environment and
human health, which could otherwise be
caused by inappropriate waste handling of
this device. The recycling of materials will
help to conserve natural resources. For more
detailed information about recycling of this
device, please contact your local city o ce,
your household waste disposal service or
the shop where you purchased the device.
Applicable accessory: remote control.
Macrovision Notice
This product incorporates copyright
protection technology that is protected
by U.S. patents and other intellectual
property rights. Use of this copyright
protection technology must be authorized
by Macrovision, and is intended for home
and other limited viewing uses only unless
otherwise authorized by Macrovision.
Reverse engineering or disassembly is
prohibited.
Compliance Information
31
Page 32

Notes
32
Notes
Page 33

EN
Notes
33
Page 34

Page 35

SB7 Apoyacabeza Activo
Manual del usuari
Índice
Bienvenido .............................................................................................................................................................. 36
Veri cación funcional ......................................................................................................................................... 38
Descripción del panel delantero .....................................................................................................................39
Operaciones con control remoto ...................................................................................................................41
Descripciones de las funciones de los botones......................................................................................... 42
Instrucciones generales de uso ....................................................................................................................... 47
Cómo utilizar el menú OSD DVD ....................................................................................................................49
Cómo utilizar el menú OSD del dispositivo ................................................................................................ 52
Reproducción de CD de audio......................................................................................................................... 53
Reproducción de discos de MP3 .....................................................................................................................54
Conexión de dispositivo USB ........................................................................................................................... 56
Conexión de dispositivo iPod .......................................................................................................................... 57
Identi cación de problemas............................................................................................................................. 58
Especi caciones .................................................................................................................................................... 60
Información de la conformidad ......................................................................................................................62
Notas ......................................................................................................................................................................... 64
ES
© 2011 Audiovox. Todos los derechos
reservados. Queda manual la reproducción total
o parcial de este manuals in el expreso permiso
por escrito de Audiovox.
35
Page 36

Bienvenido
Muchas gracias por adquirir este monitor
de video SB7 Apoyacabeza Activo con
reproductor de DVD integrado. Lea
detenidamente este man-ual antes de
utilizar el sistema y consérvelo para
consultarlo en el futuro.
Aviso importante
En la mayoría de las jurisdicciones es
ilegal conducir un automóvil equipado
con un visor o una pantalla de televisión
ubicada dentro del vehículo en algún
punto donde quede por delante de la
parte trasera del asiento del conductor, o
donde el conductor lo pueda ver, directa
o indirectamente, mientras conduce. En
aras de la seguridad, la unidad nunca se
debe instalar donde quede en la línea de
visión, directa o indirecta, del conductor del
vehículo. Si su vehículo está equipado con
un sistema de audio inalámbrico para el
asiento trasero o cualquier otro dispositivo
inalám-brico infrarrojo (IR), apague este
sistema para poner en funcionamiento el
sistema de DVD de apoyacabeza. Si ese
sistema permanece encendido, ambos
sistemas pueden interferir mutuamente,
anulando el audio o creando sonidos
no deseados a través de los audifonos
inalámbricos.
Precaución de seguridad
Por razones de seguridad, se recomienda
detener el vehículo antes de cambiar
los dis-cos de video y no permitir a los
niños que se desajusten los cinturones de
seguridad para cambiar de disco o realizar
ajustes en el sistema. Los ajustes en el
sistema pueden hacerse por medio de la
unidad de control remoto sin desa-justar
los cinturones de seguridad. Disfrute de su
sistema de entretenimiento, pero recuerde
que la seguridad de todos los pasajeros
siempre es la prioridad.
Características del producto
• Pantalla de cristal líquido TFT-LCD de
7 pulgada (480x234) con formato 16:9
proporcion
• Reproductor de DVD incorporado Tipo
cargamento por ranura
• Transmisores infrarrojos para auriculares
inalámbricos IR
• Entrada de fuente de audio/video3
enchufes RCA
• Salida de señal de audio/video: enchufe
de 1/8 de pulgada para auricular
• Enchufe de 1/8 de pulgada para auricular
estéreo
• Sensor remoto delantero del panel frontal
• Control remoto para todas las funciones
• Botones de control del panel frontal:
ENERGÍA/FUENTE (POWER/SOURCE),
DETENER/IZQUIERDA (STOP/LEFT),
ARRIBA (UP), CONFIGURAR/INGRESAR
(SETUP/ENTER), REPRODUCIR/ PAUSA/
DERECHA (PLAY/PAUSE/RIGHT),
EXPULSAR (EJECT), ABAJO (DOWN)•
Control de visualización en pantalla (OSD)
• Entrada de energía de 12V CC
• Transmisor de FM (puede ser opcional)
Precaución:
• No toque las clavijas internas de
los enchufes ubicados en el panel
frontal. Una descarga de electricidad
estática puede dañar el dispositivo
permanentemente.
• Asegúrese de que el vehículo esté
en movimiento cuando utilice este
sistema. Usando este dispositivo sin el
funciona-miento del motor puede dar
lugar a drena-je de la batería. Para evitar
este riesgo, recuerde por favor apagar
el dispositivo cuando el vehículo este
estacionado por periodos largos de
tiempo.
36
Bienvenido
Page 37

Auriculares inalámbricos
La unidad SB7 Apoyacabeza Activo incluye
un transmisor infrarrojo incorporado de
canales duales para usar con un auricular
inalámbrico. Así, el volumen puede ajustarse
con los controles de cada auricular. El
auricular inalámbrico debe utilizarse dentro
de la línea de visión con el transmisor ya
que la transmisión infrarroja, al igual que la
luz visible, viaja solamente en línea recta.
Auriculares con cable
El dispositivo cuenta con un enchufe para
auricular de 1/8 de pulgada en el que se
puede conectar un auricular estereofónico
estándar (no incluido). Retire y guarde la
cubierta protectora plástica para acceder a
los enchufes. Recuerde volver a colocar la
cubierta cuando los enchufes no se utilicen.
Audio visual Control de cuadro
La entrada audio visual (A/V) permite
conectar otros artículos tales como un
reproductor de DVD, un dispositivo de video
juegos, u otros dispositivos audios/video.
Para utilizar la segunda fuente del sistema
auxiliar enciende el SB7 Apoyacabeza Activo
y presione el botón de fuente <<SOURCE>>
en el control remoto hasta que aparezca
“Auxiliar ó AUX” en la pantalla. Encienda el
componente independientemente del SB7
Apoyacabeza Activo con su boton ó con su
control remoto. El SB7 Apoyacabeza Activo
está listo ahora para replicar las señales
audios y video de la fuente conectada con el
auxiliuar << AUX>>.
Transmisor Inalambrico FM
Su equipo de video podria estar equipado
con un transmisor FM externo, el cual
le permite escuchar la senal de audio
sintonisando una de las seis frequencias
FM del radio de suvehiculo , siempre y
cuando el transmisor FM este activado. Si
su recepcion del radio es probre apage el
transmisor FM para obtener un recepcion
normal.
Como utilizar suTransmisor FM
inalambrico
Prenda su systema y ponga un DVD en el
monitor “A”. apuntando el control hacia
el monitor presione el boton marcado
“DVD A” que se encuentra directamente
bajo el boton rojo marcado “POWER”
.Luego presione el boton marcado “Sound
Around On / O ” para prender o apagar el
transmisor inalambrico. Tres botones hacia
la derecha se encuentra el boton marcado
“Sound Around Select” el cual le permitira
rotar las 6 posibles estaciones de radio para
un audio optimo (88.3, 88.7, 89.1, 89.5 y 90.3
MHZ), una vez selecsionada la frequencia
se nesecita selecsionar la estacion del
radio que corresponda a la frecuencia
selecsionada de su transmisor. Trate todas
las 6 frequencias hasta optener el major
resultado de audio.
Compatibilidad Dolby Stereo
Cuando utilice esta unidad con un
procesador multicanal, podrá disfrutar
del ambiente y entusiasmo que ofrece el
software de película y música en DVD que
ofrece grabaciones estereofónicas de dos
canales. Fabricado bajo licencia de Dolby
Laboratories. “Dolby” y el símbolo de la
doble D son marcas registradas de Dolby
Laboratories.
ES
Bienvenido
37
Page 38

Veri cación funcional
Comprobaciones de función: Busque:
Enciende el Vehículo en modo “ON”,
despues presiona el botón de encendido en
cada monitor.
Insertar disco en Reproductor de DVD,
presione el botón ENTER en el control
remoto ó en el panel frontal de la unidad.
Escuchar con auriculares inalámbricos
(asegúrese de establecer al canal “ A ” para
escuchar el monitor A y canal “ B ” para
escuchar el monitor B.
Presione botón SOURCE en el monitor B
hasta que lee el monitor A.
Presione botón SOURCE en el monitor A
hasta que lee el monitor B.
Presionar botón de expulsar en el control
remoto ó en el panel frontal de la unidad.
Activar el radio del vehículo y establecer
que la frequencia de su radio y el transmisor
FM sean igual (si está disponible).
Monitor debe encender y una pantalla de
inicio debe aparecer.
Disco debe iniciar la reproducción.
Audio se debería oír mediante auriculares
inalámbricos.
DVD en el monitor A debe mostrarse en el
monitor B también.
DVD en el monitor B debe mostrarse en el
monitor A también.
Disco debe expulsar.
Solamente el audio del monitor A se debe
oír a través de los altavoces del vehículo.
38
Veri cación funcional
Page 39

Descripción del panel delantero
ES
1. Luz de reproductor de DVD ocupado
La luz de ocupado indica que el
reproductor de DVD está en estado
activo.
2. Ranura de compartimiento de DVD
Inserte un disco para reproducirlo.
3. Sensor IR: ojo sensor delantero
Permite que el control remoto navegue
por el menú OSD (visualización en
pantalla) del dispositivo y controle los
demás accesorios.
4. Pestillo regulador
Permite al usuario ajustar el ángulo de
visión de la pantalla de LCD. (gama A)
5. Panel TFT LCD
Pantalla de cristal líquido TFT LCD de 7
pulgadas (480x3 (RGB) x234).
Advertencias
• No limpie el dispositivo de video con
materiales solventes o de limpieza.
• No utilice limpiadores abrasivos, ya
que estos pueden rayar la pantalla. Si la
pantalla está sucia, utilice solamente un
paño sin pelusa apenas húmedo.
• Cuando no la utilice, asegure la pantalla
LCD en la posición de cerrado completo.
• No aplique presión sobre la pantalla.
Prevenga a los niños de que no toquen ni
rayen la pantalla para que no se dañe ni
se ensucie.
6. Puerto USB 1.1
Se pueden reproducir videos, música e
imágenes en un dispositivo USB tales
como una llave USB o una tarjeta de
memoria compatibles con USB, etc.
7. Enchufe de salida de 1/8 de pulgada
Permite la salida de una señal CVBS para
que sea controlada.
8. Enchufe de 1/8 de pulgada para
auricular
Permite conectar audifonos con cable
con conector estéreo de 1/8 de pulgada
para escuchar el audio del programa.
9. Enchufes de entrada AV (amarillo/
blanco/rojo)
Conecte mediante un cable (con
conectores RCA) desde la salida de
video/audio de su dispositivo de
infoentretenimiento a los enchufes de
entrada de AV del dispositivo.
10. Cubierta protectora
Trabe la cubierta protectora cuando no
utilice estos conectores.
11. Pestillo para asegurar y liberar el nivel
de pantalla
Limita el ángulo de la pantalla LCD para
la visión (gama A). El cierre se utiliza para
servicio solamente (gama B).
Descripción del panel delantero
39
Page 40

12. Botón ARRIBA/ABAJO/IZQUIERDA/
DERECHA
Estos botones le permiten navegar
hacia arriba, abajo, derecha o izquierda
cuando se utiliza el menú de ajustes en
el sytema. Tambien le permiten avanzar
o retrocederel disco o película mientras
toca.
13. Botón PRENDER/APAGAR
Presionar este botón para prender
el aparato o presione para apagar el
aparato cuando este prendido.
14. Botón FUENTE
Presionar este boton para cambiar o
elegir una de las Fuentes disponible.
15. Botón EXPULSAR
Presionar este botón para expulsar el
disco de sú compartimiento o para
introducir el disco a sú compartimiento.
16. Botón TOCAR
Presionar este botón para darle
comienzo al disco o película.
17. Botón PARE
Presionar este botón para detener el
disco o película.
18. Botón PAUSA
Presionar este botón pauser el disco o
película mientras toca.
19. Botón MENU/SELECCION
Este botón es para el uso del DVD
solamente. Presionar este botón
para entrar al menú de ajustes de
DVD OSD cuando el disco esta en su
compartimiento. Este bóton cambiará
su funcion a SELECT cuando el DVD esta
tocando y esta en su menú de titulos o
cuando esta en el menú de ajustes de
DVD OSD.
20. Palanca ajustable de la visión
Permite al usuario ajustar el ángulo de
visión de la pantalla de LCD.
40
Descripción del panel delantero
Page 41

Operaciones con control remoto
Instalación de la batería
Antes de intentar hacer funcionar el control
remoto, coloque las baterías como se
describe a continuación.
1. Coloque el control remoto hacia abajo.
Presione hacia abajo la parte estriada
de la cubierta de las baterías y deslícela
hacia afuera.
2. Coloque dos baterías “AAA” como se ve
en la ilustración. Asegúrese de que la
polaridad (+ o -) sea la correcta.
3. Vuelva a colocar la cubierta deslizándola
hasta que suene.
Con el control remoto podrá manejar
este dispositivo. No es un control remoto
universal por lo tanto no controlará otros
equipos.
Advertencia/Precaución sobre el uso
de baterías
• Siempre asegúrese de insertar las baterías
con sus polos positivos y negativos en
la dirección correcta como se muestra
dentro del compartimiento de las
baterías.
• Los distintos tipos de baterías tienen
distintas características. No mezcle
baterías de diferentes tipos.
• No mezcle baterías viejas y nuevas. Si
mezcla baterías viejas y nuevas reducirá
su vida útil y/o provocará pérdidas en las
baterías viejas.
• Cuando las baterías comiencen a fallar,
reemplácelas de inmediato.
• Mantenga las baterías lejos del alcance
de los niños. En el caso de que alguien
se tragara una batería, consulte a un
médico de inmediato. Además, cuando
deseche las baterías usadas, tenga en
cuenta las normas gubernamentales o las
normas de los organismos públicos de
medioambiente que sean de aplicación
en su país o región
• Quite las baterías si no utilizará el control
durante un mes o más.
ES
Operaciones con control remoto
41
Page 42

Descripciones de las funciones de los botones
42
Descripciones de las funciones de los botones
Page 43

1. FUENTE (SOURCE)
Cualquier equipo de video conectado
a las entradas de audio/video puede
utilizarse con el monitor si presiona este
botón. Cada vez que presione el botón,
la fuente de audio/video cambiará en la
siguiente secuencia: Monitor A,
Monitor B, AUX, TV.
2. ENCENDER (POWER)
Presione el botón para encender el
dispositivo. La pantalla mostrará la
fuente de video en uso y la imagen
aparecerá al cabo de unos segundos.
Presione el botón nuevamente para
apagar el dispositivo.
3. Monitor A de DVD (DVD-Monitor A)
Transmite códigos IR para el modo DVD
del Monitor A.
4. Monitor A de TV (TV-Monitor A)
Función no disponible en este
momento.
5. SONIDO ENVOLVENTE ENCENDIDO/
APAGADO (SOUND AROUND ON/OFF)
(Si está disponible)
Activar el transmisor FM ENCENDIDO/
APAGADO (ON/OFF).
6. MUDO (MUTE) (solo para DVD)
Presione el botón para cancelar el
sonido transmitido a los audiofonos.
La pantalla indicará que el sonido está
apagado. Para restablecer el sonido al
nivel previamente jado, presione el
botón nuevamente.
7. MENÚ (MENU)
Presione el botón para acceder al Menú
raíz incluido en el disco.
8. ARRIBA, ABAJO (UP, DOWN)
Para DVD: botón de navegación. Lo
puede utilizar para desplazar la barra
selectora entre los títulos del menú o de
la lista de archivos. Para TV: utilice estos
botones para avanzar o retroceder al
siguiente canal. Para el OSD: aumenta o
disminuye la con guración del artículo
seleccionado.
9. IZQUIERDA, DERECHA (LEFT, RIGHT)
Botón de navegación. Lo puede utilizar
para desplazar la barra selectora entre
los títulos del menú o de la lista de
archivos.
10. INGRESAR (ENTER)
Hace una selección o inicia la
reproducción del disco.
11. REGRESAR (RETURN)
Regresa a la pantalla de menú previa o
reanuda la reproducción del disco.
12. MEMORIA AUTOMÁTICA (AUTO
MEMORY)
Función no disponible en este
momento.
13. BUSCAR/SALTAR CANAL (CH-SEARCH/
SKIP)
Función no disponible en este
momento.
14. TÍTULO (TITLE)
Navega el menú de títulos incluido en
el disco.
ES
Descripciones de las funciones de los botones
43
Page 44

15. SUBTÍTULO (SUBTITLE)
Presione este botón. Muestra en pantalla
si el disco actual tiene distintas opciones
de subtítulos. Presione este botón
varias veces hasta llegar a la opción de
subtítulos deseada.
16. Números
Número decimal: 0 a 9;
y +100: agrega 100.
17. REPRODUCIR/PAUSA (PLAY/PAUSE)
Mientras esté reproduciendo, presione
este botón una vez para pausar la
reproducción, y presione nuevamente
para reanudar la reproduccion.
18. DETENER (STOP)
Detiene la reproducción de la película o
canción. DETENER-REPRODUCIR (STOP/
PLAY): reanuda la reproducción del
disco. DETENER-DETENER-REPRODUCIR
(STOP/ STOP/PLAY): reanuda la
reproducción desde el comienzo del
disco.
19. FR (Retroceso rápido)
Presione este botón para buscar hacia
atrás en forma continua. Puede elegir
entre 5 velocidades: 2X, 4X, 8X, 16X y
32X.
20. FF (Adelantado rápido)
Presione este botón para buscar hacia
adelante en forma continua. Puede
elegir entre 5 velocidades: 2X, 4X, 8X,
16X y 32X.
21. CONFIGURACIÓN (SETUP)
Navega por el menú de con guración.
En las siguientes cuatro páginas se
describe cómo con gurar el sistema:
Página de con guración general, Página
de con guración de audio, Página de
preferencias y Página de con guración
de contraseña.
22. EXPULSAR (EJECT)
Expulsa el disco del compartimiento
para disco o introduce el disco dentro
del compartimiento.
23. Monitor B de TV (TV-Monitor B)
Función no disponible en este
momento.
24. Monitor B de DVD (DVD-Monitor B)
Transmite códigos IR para el modo DVD
del Monitor B.
25. SELECCIÓN DE SONIDO ENVOLVENTE
(SOUND AROUND SELECT)
(Si está disponible)
Seleccione un canal del transmisor de
FM. Hay 6 canales: CH1: 88.3MHz; CH2:
88.7MHz; CH3: 89.1MHz; CH4: 89.5MHz;
CH5: 89.9MHz; CH6: 90.3MHz.
26. PIX (Selección de imagen)
Cada vez que se presiona este botón
el OSD de ajuste de imagen circula por
las barras de BRILLO (BRIGHTNESS),
CONTRASTE (CONTRAST), SATURACIÓN
(SATURATION), TINTE (HUE), NITIDEZ
(SHARPNESS), AURICULAR INFRARROJO
(IR HEADPHONE) y REINICIAR (RESET)
. Una vez que se muestra la barra de
ajuste deseada, utilice el botón ARRIBA/
ABAJO (UP/DOWN) para lograr el
ajuste buscado. La barra desaparecerá
automáticamente si pasan seis
segundos sin que se hagan ajustes o se
presione algún botón.
27. REPETIR (REPEAT)
Presione este botón para cambiar el
modo de repetición entre TODOS (ALL),
TÍTULO (TITLE), CAPÍTULO (CHAPTER)
y para cancelar el modo de repetición
mientras se esté reproduciendo un
DVD-video. Otros tipos de discos, como
VCD, CD o SVCD solo tienen dos modos
de repetición para seleccionar: PISTA
(TRACK) y TODAS (ALL) Nota: la función
de repetición de VCD y de SVCD necesita
que el control de reproducción (PBC)
esté encendido cuando esté disponible.
28. A-B (Excepto MP3)
Repite desde el punto A hasta el
punto B.
44
Descripciones de las funciones de los botones
Page 45

29. R-S
Función no disponible en este
momento.
30. BORRAR/AGREGAR (ERASE/ADD)
Función no disponible en este
momento.
31. AUDIO
Presione este botón si el disco actual
tiene diferentes opciones de idioma.
Presione este botón varias veces hasta
llegar a la opción de idioma deseada.
32. ÁNGULO (ANGLE)
Visualización desde un ángulo de
cámara diferente (este botón solo
funciona con DVD compatible con
marcos con ángulos múltiples). Presione
este botón varias veces hasta llegar al
ángulo deseado de visión.
33. IR (GOTO)
Para discos de DVD, al presionar este
botón ingresará al menú para con gurar
el modo de visualización de Título/
Capítulo/Audio/ Subtítulo/Ángulo/
Tiempo del título/ Tiempo del capítulo/
Modo de repetición/ Tiempo (Title/
Chapter/Audio/ Subtitle/Angle/ Title
Time/Chapter Time/Repeat Mode/ Time)
durante la reproducción normal. Para
discos de SVCD y VCD, al presionar este
botón puede ingresar al menú para
con gurar el modo de visualización de
Pista/ Tiempo de disco/Tiempo de pista/
Modo de repetición/Tiempo (Track/Disc
Time/ Track Time/Repeat Mode/Time)
durante la reproducción normal.
34. VISUALIZACIÓN (DISPLAY)
Muestra información en pantalla que
incluye el título, el capítulo o la pista, el
tiempo transcurrido, el tiempo restante
o apaga el visor.
35. PROGRAMA (PROGRAM)
Edita un programa de reproducción que
contiene los títulos deseados de un DVD
o las pistas deseadas del CD de audio.
36. ALEATORIO (RANDOM)
Reproduce los títulos en orden aleatorio.
37. 3D
Presione este botón para jar el efecto
de audio para las siguientes opciones
de audio: Modo DVD: apagado (O ),
rock, pop, en vivo (Live), dance, techno,
clásico (Classic) y suave (Soft). Modo CD:
apagado (O ), concierto (Concert), living
room, auditorio (Hall), cuarto de baño
(Bathroom), caverna (Cave), estadio
(Arena) e iglesia (Church).
38. PBC
(Video CD only)
Enciende o apaga el control de
reproducción (PBC).
39. ZOOM
Amplía la imagen de la película en 2x, 3x
y 4x o la reduce en 1/2, 1/3 y 1/4.
40. SIGUIENTE (NEXT)
Cuando un disco tiene más de un
capítulo, pista o archivo, puede
avanzar a otro capítulo/pista/archivo.
Presione brevemente el botón durante
la reproducción para seleccionar el
capítulo siguiente en discos de DVDvideo o la siguiente pista/archivo en
discos VCD, SVCD, MP3, CD, etc.
ES
Descripciones de las funciones de los botones
45
Page 46

41. ANTERIOR (PREV)
Cuando un disco tiene más de un
capítulo, pista o archivo, puede avanzar
a otro capítulo/pista/archivo. Presione
brevemente el botón durante la
reproducción para retroceder al capítulo
anterior en discos de DVD-video o a la
pista/archivo anterior en discos VCD,
SVCD, MP3, CD, etc.
Nota:
El control remoto incorpora un sensor
infrarrojo que repite las señales emitidas
desde el control remoto y se puede
controlar simplemente apuntando el control
remoto hacia el ojo sensor remoto. Esto
proporciona control de equipos auxiliares,
tales como un reproductor de DVD. El sensor
infrarrojo no puede repetir las señales de
un control remoto de otro fabricante a su
componente respectivo conectado a la
entrada AUX, tal como un reproductor de
DVD. En este caso, se debe utilizar el control
remoto provisto con ese dispositivo.
46
Descripciones de las funciones de los botones
Page 47

Instrucciones generales de uso
Encendido o apagado del dispositivo
1. Gire la pantalla hacia abajo hasta
alcanzar un ángulo de visión cómodo.
2. Al presionar el botón POWER ubicado
en el ángulo inferior izquierdo del panel
frontal o el botón ubicado en el control
remoto, el dispositivo se encenderá o
se apagará. Los controles se iluminan
cuando está en funcionamiento.
3. Luego de encender el dispositivo y
cuando este muestre una imagen, ajuste
el ángulo de visión subiendo o bajando
la pantalla para lograr una óptima
calidad de imagen.
4. Recuerde apagar el dispositivo y
asegurar el panel LCD en su posición de
cerrado cuando no lo utilice.
DVD: conceptos básicos
Para que cada DVD rinda al máximo,
asegúrese de leer esta sección
completamente.
Codi cación Regional
El reproductor de DVD y el disco están
codi cados por región. Estos códigos
regionales deben coincidir para poder
reproducir el disco. Si los códigos no
coinciden, el disco no será reproducido. El
código del sistema corresponde a la región
1. Este sistema no reproducirá los discos
codi cados para otras regiones.
Tipos de discos que su DVD puede
reproducir
• DVD-video: el DVD contiene video.
• CD-DA: el CD contiene solamente música
o sonidos.
• CD-video: el CD contiene solamente una
película.
• CD-R/RW: es un tipo de disco que
contiene archivos de audio (por ejemplo,
un CD-R con archivos MP3 descargados),
MPEG, o JPEG.
ES
Instrucciones generales de uso
47
Page 48

Carga y reproducción de discos
Antes de cargar un disco, asegúrese de que
sea compatible con el reproductor. Tenga
en cuenta que los siguientes discos NO SE
PUEDEN utilizar con este reproductor: disco
óptico- CD-1, CD-ROM y DVD-ROM Mini
disc- CDG (solo audio, sin grá cos)
Para cargar y reproducir un disco
Al presionar el botón POWER el sistema
se enciende en el modo DVD. Con el
lado impreso del disco mirando hacia la
parte trasera del vehículo, introdúzcalo
en la ranura hasta la mitad. El disco se
cargará automáticamente y comenzará la
reproducción.
(Algunos discos pueden comenzar con
el menú raíz y debe seleccionar PLAY
-reproducir-para comenzar la película.)
Según el disco y la ubicación de la
reproducción en el disco, el icono puede
mostrarse en el ángulo superior izquierdo
de la pantalla, lo que indica que aún no es
posible la reproducción.
Nota acerca de los discos
• Para mantener los discos limpios, no
toque la super cie. Para manipular el
disco, tómelo por el borde.
• Mantenga sus discos en sus estuches
o cajas. Tampoco exponga los discos
al calor ni a altas temperaturas.
Evite dejarlos dentro de un vehículo
estacionado, sobre el tablero o la bandeja
trasera.
• No les pegue etiquetas ni utilice discos
con residuos pegajosos o de tinta. Estos
discos pueden dejar de girar, lo que
puede provocar un mal funcionamiento o
arruinar el disco.
• No utilice discos con etiquetas o rótulos
pegados. A continuación se enumeran
algunos funcionamientos defectuosos
que pueden ser el resultado de la
utilización de tales discos:
• Imposibilidad de expulsar un disco
(debido a una etiqueta o rótulo que se
esté despegando y esté trabando el
mecanismo de expulsión).
• Imposibilidad de leer correctamente la
información de un disco (es decir, saltos
en la reproducción o sin reproducción)
debido al encogimiento por calor de una
etiqueta o rótulo que hace que el disco
se arquee.
• Antes de la reproducción, limpie
los discos con un paño de limpieza
disponible comercialmente. Limpie los
discos desde el centro hacia afuera.
No utilice solventes como benceno,
disolvente para pinturas, limpiadores
comercialmente disponibles ni aerosoles
• Utilice solamente discos normales,
redondos. Si introduce discos de formas
irregulares no redondos, estos pueden
trabar el reproductor de DVD o no ser
correctamente reproducidos.
48 Instrucciones generales de uso
Page 49

Cómo utilizar el menú OSD DVD
En esta sección se describe cómo con gurar
y regular los ajustes por medio de las
páginas de con guración en pantalla
incluidas en el menú OSD. La pantalla del
menú OSD se puede utilizar para regular
todos los ajustes en la pantalla. Siga los
pasos que se resumen a continuación para
seleccionar la función deseada y consulte
las páginas indicadas para obtener más
información.
Uso del menú de con guración.
Utilice el menú de la disposición para hacer
la disposición inicial, ajuste la calidad de
cuadro, y je la varia salida. Usted puede
también jar una lengua para la exhibición
en pantalla, la exhibición de disposición, y el
aparato de lectura del límite de los niños.
1. Presione el botón SETUP del control
remoto para que el siguiente menú de
con guración aparezca en la pantalla.
2. Presione los botones
seleccionar la página deseada en
la pantalla, seleccionar funciones o
cambiar los ajustes.
Para cancelar utilizando la
visualización de con guración
Presione el botón SETUP del control remoto.
ó para
Página de con guración general
Selección del idioma para la visualización
en pantalla
Presione el botón SETUP del control remoto,
emplee los botones
página de con guración general, y luego
utilice los botones 6 para seleccionar el
submenú de idioma del OSD (OSD Lang).
OSD (Visualización en pantalla)
Menú de idioma
El submenú OSD Lang permite al usuario
seleccionar el idioma de la visualización en
pantalla. Presione el botón
los botones
seleccionar el idioma deseado. El usuario
puede elegir entre inglés, francés y español
como idioma para el OSD.
Con guración para visualización
Presione el botón SETUP del control remoto,
emplee los botones
la página de con guración general, y
luego utilice el botón
el submenú de visualización de TV. La
con guración le permite ajustar la relación
de formato de la pantalla.
Presione el botón
botones
adecuado.
Las opciones son las siguientes:
Normal/PS (Paneo y Escaneo)
Esto muestra una imagen amplia en la pan
talla, eliminando una parte de los extremos
derecho e izquierdo.
ó para seleccionar el ajuste
ó para recorrer la
y luego utilice
ó del control remoto para
ó para recorrer
para seleccionar
y luego utilice los
ES
Cómo utilizar el menú OSD DVD
49
Page 50

Normal/LB (Buzón)
Esto muestra una imagen ancha con franjas
negras en las partes superior e inferior de la
pantalla.
Ancho (Wide) (16:9)
Esta opción muestra la imagen en pantalla
ancha completa si el panel de LCD es de
pantalla ancha. Luego presione el botón
ENTER del control remoto para con rmar la
pantalla.
Página de preferencia
Con guración preestablecida
Presione el botón SETUP y utilice los
botones
recorrer el submenú preestablecido bajo
la página de preferencia. La con guración
preestablecida le permite volver las
opciones de con guración a los valores
establecidos en fábrica.
Para recon gurar, presione el botón
luego presione el botón ENTER.
Nota: esta función no afecta la con guración
del control parental.
Con guración del control parental
(Parental Control)
(Accesible cuando no hay ningún disco
cargado)
Esta sección del menú de con guración
permite al usuario controlar el contenido
a reproducir de una película entre G a
ADULTO (ADULT).
ó y del control remoto para
y
La función de control parental le permite
limitar la visualización según su preferencia.
1. Luego de navegar hasta el submenú
Parental, utilice los botones
del control remoto para seleccionar: KID
SAF (ninos), G, PG, PG 13; PGR, R, NC 17;
ADULT (adultos).
Nota: a menor valor, más estricta es la
limitación.
2. Para con rmar la selección presione el
botón ENTER del control remoto.
3. Ingrese una contraseña de cuatro dígitos
utilizando los botones numéricos y
presione el botón ENTER del control
remoto.
Nota: la contraseña preestablecida es 0000.
Nota: si se inserta un disco en la ranura
del compartimiento de DVD y este excede
el nivel del control parental establecido,
aparecerá el siguiente mensaje en la
pantalla:
La con guración del nivel de control
parental de este reproductor impide
la reproducción. ¿Desea permitir la
reproducción de este disco? (The Parental
Settings of this player prohibits play.
Would you like to allow this disc to play?)
Si selecciona “sí”, deberá ingresar la
contraseña para que el disco pueda ser
reproducido. Si se ingresa la contraseña
equivocada, el siguiente mensaje aparecerá
en pantalla:
Esta película no será reproducida debido
a la con guración del control parental del
reproductor (This movie will not play due
to the Parental Settings of the player).
y ó
50 Cómo utilizar el menú OSD DVD
Page 51

Página de con guración de la
contraseña
Con guración de la contraseña
(Contraseña de control parental)
Presione el botón SETUP y navegue hasta
el submenú de Contraseña, bajo la Página
de Con guración de la contraseña. El
menú aparecerá y le permitirá cambiar la
contraseña del control parental.
Para ingresar al submenú presione el botón
y luego presione el botón ENTER del
control remoto.
Contraseña anterior (Old Password)
Ingrese la contraseña anterior o la
contraseña preestablecida (4 dígitos).
Contraseña nueva (New Password)
Ingrese una nueva contraseña (4 dígitos)
utilizando los botones numéricos.
Con rmar contraseña (Con rm PWD)
Con rme la contraseña ingresando otra vez
la nueva contraseña. Luego baje la pantalla
hasta el botón OK y presione el botón ENTER
del control remoto. Su contraseña ha sido
cambiada.
Nota: la contraseña preestablecida es 0000.
ES
Cómo utilizar el menú OSD DVD
51
Page 52

Cómo utilizar el menú OSD del dispositivo
Ajuste de imagen
Esta sección describe cómo con gurar y
regular los ajustes empleando el menú de
visualización en pantalla (OSD). La pantalla
del menú OSD del dispositivo se puede
utilizar para regular todos los ajustes de
imagen en la pantalla.
• Presione repetidamente el botón PIX
del control remoto para seleccionar
las opciones de BRILLO (BRIGHTNESS),
CONTRASTE (CONTRAST), SATURACIÓN
(SATURATION), TINTE (HUE), NITIDEZ
(SHARPNESS), AUDIFONOS INFRARROJOS,
(IR HEADPHONE), REINICIAR (RESET) y
regular los valores y ajustes.
• Luego de seleccionar la opción deseada,
presione los botones 6 o 5 para ajustar los
valores.
Opción Descripción Rango Pre-
establecido
Brillo Ajuste para iluminar u oscurecer la
imagen.
Contraste Ajuste para aumentar o disminuir el
contraste de la imagen.
Saturación Ajuste para aumentar o disminuir la
intensidad del color.
Tinte Ajuste para aumentar o disminuir los
tonos de verde.
Nitidez Ajuste para lograr una imagen más
nítida o más suave.
AudifonosIR
(infrarrojos)
Restablecer
(Reset)
52
Seleccione para encender o apagar la
función de auricular IR.
Restablece la con guración a los
valores preestablecidos de fábrica.
Cómo utilizar el menú OSD del dispositivo
0-100 50
0-100 50
0-100 50
0-100 50
0-100 50
Encendido o
Apagado (ON
- OFF)
Encendido (ON)
Page 53

Reproducción de CD de audio
Cuando se esté reproduciendo un CD
de audio, el mensaje de VISUALIZACIÓN
(DISPLAY) aparecerá automáticamente.
Allí se muestra la pista en reproducción
y el tiempo que la pista lleva siendo
reproducida, la duración total del disco y el
tiempo transcurrido actualmente.
Para mostrar el mensaje de VISUALIZACIÓN
(DISPLAY) presione el botón DISPLAY del
control remoto.
Las siguientes opciones muestran qué
ocurre cuando se presiona el botón
DISPLAY.
Presione DISPLAY (1x)
El mensaje Transcurrido individual aparecerá
junto con la pista en reproducción y el
tiempo transcurrido de esta.
Presione DISPLAY (2x)
El mensaje Resto individual aparecerá junto
con la pista en reproducción y el tiempo
restante de esta.
Presione DISPLAY (3x)
El mensaje Total transcurrido aparecerá
junto con la pista en reproducción y el
tiempo transcurrido de esta.
Presione DISPLAY (4x)
El mensaje Resto total aparecerá junto con
la pista en reproducción y el tiempo restante
del CD.
Uso de la función REPEAT (Repetir)
El modo preestablecido para la función
REPEAT es OFF (Apagado). Presionar
consecutivamente el botón REPEAT del
control remoto cambia las opciones de la
función REPEAT de la siguiente manera:
Pista: repite la pista en reproducción.
Todo: repite el disco en reproducción.
A medida que pase por las opciones,
cambiará la función REPEAT. La pista
se repite luego de haber terminado. La
opción de repetición escogida se repite
continuamente hasta que se apague.
ES
Reproducción de CD de audio
53
Page 54

Reproducción de discos de MP3
MP3 es el formato para almacenar audio
digital. Una canción de calidad de CD de
audio puede ser comprimida en formato
MP3 casi sin perdercalidad a la vez que se
ahorra mucho más espacio. Los discos CD-R
codi cados en formato MP3 pueden ser
reproducidos en el reproductor de DVD.
Para mostrar el mensaje de VISUALIZACIÓN
(DISPLAY) presione el botón DISPLAY del
control remoto. Las siguientes opciones
muestran qué ocurre cuando se presiona el
botón DISPLAY.
• Al presionar DISPLAY (1x) aparecerá el
mensaje TIME REMAIN (tiempo restante)
junto con la cantidad de tiempo restante
de la canción en reproducción. El mensaje
TIME REMAIN y la cantidad de tiempo
restante permanecerán en pantalla
hasta que presione el botón DISPLAY
nuevamente.
• Al presionar DISPLAY (2x) aparecerá
el mensaje TIME ELAPSED (tiempo
transcurrido) junto con la cantidad de
tiempo transcurrido de la canción en
reproducción. El mensaje TIME ELAPSED
y la cantidad de tiempo transcurrido
permanecerán en pantalla hasta que
presione el botón DISPLAY nuevamente.
• Luego de presionar DISPLAY (3x)
aparecerá la palabra OFF (apagado) y
desaparecerá al cabo de unos segundos.
Selección de carpetas y canciones
Cuando se inserta un disco de MP3 en el
reproductor, la pantalla de navegación
aparece automáticamente. Puede cambiar
de carpetas y canciones navegando por el
sistema de archivos. El reproductor de DVD
reproduce las canciones en el orden en que
fueron grabadas en el disco.
1. Si hay un disco en reproducción,
presione el botón STOP del control
remoto y luego presione los botones
con las echas UP (arriba) o DOWN
(abajo) para recorrer la lista de carpetas,
a la izquierda de la pantalla de
navegación.
2. Una vez iluminada la carpeta deseada,
presione el botón ENTER del control
remoto (la lista de carpetas se cambia
al lado izquierdo de la pantalla y las
canciones dentro de la carpeta aparecen
a la derecha).
3. Presione los botones echa UP o DOWN
del control remoto para recorrer la
lista de canciones e iluminar la canción
deseada. Para comenzar a reproducir
la canción iluminada presione el botón
ENTER.
Saltear canciones
Utilice el botón
del control remoto para moverse hacia la
siguiente canción. Utilice el botón
[anterior]) para moverse al comienzo de
la canción actualmente en reproducción.
Presione el botón
moverse a la canción anterior.
(NEXT [siguiente])
(PREV
(PREV) dos veces para
54
Reproducción de discos de MP3
Page 55

Selección de modo de reproducción
Se puede seleccionar el orden en que se
reproducirán temporalmente las canciones
de un disco. El modo de reproducción por
carpeta (FOLDER) es el preestablecido.
Para acceder a las operaciones de modo de
reproducción, presione el botón REPEAT del
control remoto. Las opciones de modo de
reproducción son las siguientes:
Single: reproduce una canción seleccionada.
Repeat One: repite la canción que se está
reproduciendo.
Folder: reproduce la carpeta en el orden en
que las canciones fueron grabadas.
Folder Repeat: repite la carpeta que se está
reproduciendo.
Disc: reproduce el disco completo.
Disc Repeat: repite el disco que se está
reproduciendo.
Random: reproduce las canciones en orden
aleatorio.
Shu e: reproduce las canciones en
orden aleatorio (dentro de la carpeta
seleccionada).
ES
Reproducción de discos de MP3
55
Page 56

Conexión de dispositivo USB
Se puede conectar un dispositivo de
almacenamiento masivo USB (v1.1), tal
como una llave de memoria USB, un
reproductor de audio digital (del tipo de
dispositivo de almacenamiento masivo
USB), etc., al puerto USB de la unidad SB7
Apoyacabeza Activo.
La unidad SB7 Apoyacabeza Activo puede
reproducir pistas de formato MPEG/MP3/
WMA/JPEG almacenadas en un dispositivo
USB. Encienda la unidad SB7 Apoyacabeza
Activo para observar la imagen reproducida
si está reproduciendo un archivo de formato
MPEG/JPEG. También puede controlar la
reproducción por medio de la pantalla de la
unidad SB7 Apoyacabeza Activo.
Orden de las pistas
La unidad SB7 Apoyacabeza Activo
reproduce los archivos en el orden en que
los graba el programa de grabación. Por
lo tanto, el orden de reproducción puede
diferir del orden que usted cargue. El orden
de reproducción de carpeta y archivo di ere
del número de carpeta indicado en la
pantalla.
56
Conexión de dispositivo USB
Page 57

Conexión de dispositivo iPod
Conexión de un dispositivo iPod a su SB7
Apoyacabeza Activo vía USB
Enchufe el conector de base iPod (que se
incluye con el equipo) al puerto USB de alta
velocidad de su unidad SB7 Apoyacabeza
Activo y luego conecte el otro extremo al
iPod.
Para obtener más información consulte la
documentación que acompaña su iPod.
Carga de la batería del iPod
Conecte el iPod a un puerto USB de alta
velocidad de su unidad SB7 Apoyacabeza
Activo. La unidad SB7 Apoyacabeza Activo
debe estar encendida.
Si el icono de batería de la pantalla del iPod
muestra un rayo, entonces la batería se está
cargando.
Si muestra un enchufe, la batería está
cargada completamente.
Para conectar el iPod a su unidad SB7
Apoyacabeza Activo
• Conecte el cable opcional de iPod AV
al puerto de audifonos del iPod. Nota:
utilice el cable de iPod AV fabricado
especialmente para iPod. Otros cables
similares de tipo RCA pueden no
funcionar. También puede conectar el
cable de iPod AV al puerto LINE-OUT del
puerto universal del iPod.
• Conecte los conectores de video y audio
a los puertos AV-IN de su unidad SB7
Apoyacabeza Activo, como se muestra.
Para ver un video en su unidad SB7
Apoyacabeza Activo
• Conecte el iPod a su unidad SB7
Apoyacabeza Activo (vea las instrucciones
anteriores).
• Encienda su unidad SB7 Apoyacabeza
Activo y con gúrela para que reproduzca
desde los puertos de entrada conectados
al iPod. Para obtener más información
consulte la documentación que
acompaña su iPod.
• Seleccione Videos en el iPod y busque el
video deseado.
ES
Si no ve el rayo ni el enchufe, puede que el
iPod no esté conectado a un puerto USB de
alta velocidad. Pruebe con otro puerto USB
de su unidad SB7 Apoyacabeza Activo .
iPod una infracción de acceso por cable
vendido seperately por Apple.
iPod® es una marca registrada de Apple, Inc.
Conexión de dispositivo iPod
57
Page 58

Identi cación de problemas
Síntoma Solución
El dispositivo no enciende • ¿Está encendido el motor?
• ¿Están colocadas las baterías en el control
remoto?
El sensor IR no funciona • Veri que que las baterías del control
remoto tengan carga.
• Veri que que el ojo del sensor remoto no
tenga ninguna obstrucción.
• Veri que que el transmisor infrarrojo
esté colocado sobre el ojo sensor del
componente a controlar.
El disco no se reproduce • Introduzca un disco con la etiqueta
mirando hacia la parte trasera del vehículo.
• Pruebe con otro disco para comprobar si el
disco tiene algún defecto.
• Compruebe el tipo de disco que introdujo
en la ranura del compartimiento de DVD.
Este reproductor de DVD solamente
reproduce DVD, CD de audio y MP3.
• Tanto el dispositivo como el disco están
codi cados por región. Si los códigos
regionales no coinciden, el disco no podrá
ser reproducido. Este reproductor de DVD
está codi cado para la región 1.
El disco se reproduce pero se detiene
inmediatamente
No hay imagen • Controle que la fuente de señal esté
• El disco está sucio y debe limpiarse.
• Se ha formado condensación. Deje que el
reproductor se seque
conectada.
• La con guración puede estar incorrecta.
Haga coincidir correctamente el modo de
su monitor con la fuente.
Imagen distorsionada • Controle si el disco no tiene huellas
58
Identi cación de problemas
digitales y límpielo con un paño suave,
desde el centro hacia los bordes
• Algunas veces puede haber una pequeña
distorsión de la imagen.
• Esto no es un mal funcionamiento.
Page 59

No puede avanzar en una película • No puede avanzar más allá de los títulos
iniciales y de la información de advertencia
que aparecen al principio de las películas
• porque el disco está programado para
impedir esa acción.
No hay sonido o el sonido está
distorsionado
El dispositivo está caliente • Cuando el dispositivo se utiliza durante
El reproductor no responde a todos los
comandos durante la reproducción.
• Asegúrese de que el reproductor de DVD
esté correctamente conectado y que todos
los cables estén conectados de forma
segura en los enchufes correctos.
• Si está utilizando auriculares infrarrojo,
asegúrese de encender la energía del
dispositivo infrarrojo.
• ¿Tienen los auriculares el volumen alto?
• ¿Hay algo obstruyendo la señal entre el
monitor y los auriculares?
un tiempo prolongado, su super cie se
calienta. Esto es normal.
• El disco no permite ciertas operaciones.
• Vea las instrucciones en la carátula del
disco.
ES
Identi cación de problemas
59
Page 60

Especi caciones
Dimensiones 234.95(ancho) x 190.5(alto) x 57.15(espesor)
mm
Peso 2.49 Kg
Consumo de energía En funcionamiento <13W
En espera (Standby) <1W
Iluminación trasera del LCD LED
Resolución 480x3 (RGB) x234 para el panel TFT LCD
Luminancia 450 cd/m2 (típico)
DVD Tipo delgado con cargador por ranura
Discos compatibles DVD (de una capa, Single, de doble capa,
Dual Layer), DVD-R/+R, DVD+R de doble capa,
DVD-RW/+RW, CD, CD-R, CD-RW
Formatos compatibles Navegación DVD-Video Ver1.0, VCD
Ver1.0/2.0, SVCD, D-DA, Datos (MP3, WMA,
JPEG, MPEG 2/01/04)
Fuente DVD interno, CD, memoria Flash USB (el
dispositivo USB solamente reproduce MP3 y
JPEG), Entrada audio-visual análoga
Temperatura y humedad de
funcionamiento
Temperatura y humedad de
almacenamiento
Vida útil de la iluminación trasera: 20,000 horas
Sistema de video NTSC/PAL
Voltaje de entrada 10V~16V CC
Corriente máxima de entrada 1.3A (V de entrada = 10V CC)
Respuesta de frecuencia 20Hz ~20KHz ± 1dB
Relación señal/ruido ≥ 85dB
Distorsión de audio + ruido ≤ -80dB (1KHz)
Ruido acústico 40dB
Botones de control del panel frontal ENERGÍA/FUENTE (POWER/SOURCE),
-20°C~70°C/20~90% HR
-30°C~85°C/5~95% HR
DETENER/IZQUIERDA (STOP/LEFT),
ARRIBA (UP),
CONFIGURAR/INGRESAR (SETUP/ENTER),
REPRODUCIR/PAUSA/DERECHA (PLAY/PAUSE/
RIGHT),
EXPULSAR (EJECT),
ABAJO (DOWN)
60
Especi caciones
Page 61

Puertos de entrada/salida Puerto USB 1.1, enchufe de salida de AV de
1/8”, enchufe para auricular de 1/8”, enchufes
de entrad a AV RCA
Salida de audio (audio analógico) 0.4
(auricular)
Impedancia de carga
(salida de audio)
Nivel de salida de vídeo 1Vp-p ± 20%
Impedancia de carga
(salida de vídeo)
Audio inalámbrico Transmisor de audio infrarrojo de canales
Canales infrarrojos Canales
Nivel de salida: 2V ± 10%
10KΩ
75Ω
duales, compatible con auricular receptor
estereofónico infrarrojo (recepción: 0,9 m; 80°,
1,8 m; 50°)
A: 2.3/2.8 MHz
B: 3.3/3.8 MHz
3: Propietario
4: Propietario
ES
Especi caciones
61
Page 62

Información de la conformidad
Aviso de la Comisión Federal de
Comunicaciones (FCC)
Este equipo ha sido probado y se ha
demostrado que cumple los límites de un
dispositivo digital de Clase B, de acuerdo
con el Apartado 15 de la normativa
FCC. Estos límites están diseñados para
proporcionar una protección razonable
contra las interferencias perjudiciales en
una instalación residencial. Este equipo
genera, utiliza y puede emitir energía de
radiofrecuencia y, si no se instala y utiliza de
acuerdo con el manual de instrucciones del
fabricante, puede provocar interferencias
en las comunicaciones de radio. Sin
embargo, no existen garantías de que el
equipo no provoque interferencias en una
instalación particular. Si este equipo causa
interferencias inaceptables a la recepción
de radio o televisión, lo que puede
determinarse encendiéndolo y apagándolo,
es recomendable intentar corregir las
interferencias mediante una o varias de las
siguientes medidas:
• Reorientar o reubicar la antena receptora.
• Alejar el dispositivo del receptor.
• Enchufar el sistema en una toma de
corriente de un circuito diferente de
aquel al cual el receptor se encuentre
conectado.
• Para obtener asistencia consulte a su
distribuidor o a un técnico de radio o
televisión con experiencia.
Advertencia de la FCC:
Para asegurar el cumplimiento permanente
de las normas de la FCC, el usuario debe
utilizar el cable de energía con conexión a
tierra provisto y el cable blindado de interfaz
de video con núcleos de ferrita. Además,
cualquier cambio o modi cación no
autorizados que se hagan a este dispositivo
anulará la autorización al usuario para
manejar este dispositivo.
62
Información de la conformidad
Page 63

Aviso de WEEE
Disposición del equipo eléctrico y
electrónico viejo (Aplicable en la unión
europea y otros países europeos con los
sistemas de la colección separada)
Este símbolo en el producto o en su
empaquetado indica que el dispositivo no
será tratado como basura del hogar. En
lugar será entregado al punto aplicable
de la colección para el reciclaje del equipo
eléctrico y electrónico. Asegurando este
dispositivo se dispone correctamente,
usted ayudará a prevenir las consecuencias
negativas potenciales para el ambiente y
la salud humana, que se podrían causar
de otra manera por la gestión de residuos
inadecuada de este dispositivo. El reciclaje
de materiales ayudará a conservar
recursos naturales. Para una información
más detallada sobre el reciclaje de este
dispositivo, entre en contacto con por favor
su o cina de ciudad local, su servicio de
la disposición inútil del hogar o la tienda
en donde usted compró el dispositivo.
Accesorio aplicable: teledirigido.
Aviso de Macrovision
Este producto incorpora la tecnología de la
protección de los derechos reservados que
es protegida por las patentes de los U.S. y el
otro derechos de propiedad intelectual. El
uso de esta tecnología de la protección de
los derechos reservados se debe autorizar
por Macrovision, y se piensa para el hogar
y otras aplicaciones limitadas de la visión
solamente a menos que sea autorizado de
otra manera por Macrovision. Se prohíbe la
ingeniería reversa o el desmontaje.
ES
Información de la conformidad
63
Page 64

Notas
64
Notas
Page 65

ES
Notas
65
Page 66

Page 67

SB7 Appuie-tête Actif
Le manuel du propriétaire
Sommaire
Bienvenue ............................................................................................................................................................... 68
Véri cation Fonctionnelle ................................................................................................................................. 70
Description Du Panneau Frontal ..................................................................................................................... 71
Fonctionnement De La Télécommande ....................................................................................................... 73
Descriptions De Fonction De Touche ............................................................................................................ 74
Instructions Générales De Fonctionnement .............................................................................................. 78
Utilisation Du Menu DVD OSD ........................................................................................................................ 80
Utilisation Du Dispositif OSD ........................................................................................................................... 83
Lecture D’Un CD Audio ...................................................................................................................................... 84
Lecture D’Un Disque MP3 ................................................................................................................................. 85
Connexion D’Une Clé D’USB ............................................................................................................................ 86
Connexion D’Un iPod .......................................................................................................................................... 87
Résolution Des Problèmes ................................................................................................................................ 88
Speci cations ......................................................................................................................................................... 90
L’information De Conformité ............................................................................................................................ 93
Notes ......................................................................................................................................................................... 94
FR
© 2011 Audiovox. Tous droits réservés. Ce
manuel en toute ou partie, ne peut être
reproduit sans autorisation expresse et ecrite de
la part Audiovox.
67
Page 68

Bienvenue
Merci d’avoir acheté cet SB7 Appuie-tête
Actif avec lecteur DVD intégré. Avant la
mise en route du système, veuillez lire ce
manuel entièrement et le conserver pour
d’éventuelles futures utilisations.
Noti cation importante
Dans certains pays, il est illégal de conduire
un véhicule motorisé équipé d’un ou de
plusieurs écrans a l’avant du véhicule. Le
conducteur ne doit pas avoir accès de
manière quelconque a l’écran lorsqu’il
conduit. Si votre véhicule est équipé d’un
système acoustique sans l ou de tout autre
dispositif infrarouge, cela peut nuire à la
qualité du son dans les écouteurs sans l.
Mesure de Sécurité
Lors de tout changement de disque
ou d’ajustement du système, a n de
préserver la sécurité de tous les passagers,
il est recommande que le véhicule soit
arrête. Les enfants ne doivent jamais
détacher leurs ceintures de sécurité, les
ajustements peuvent être faits à partir de
la télécommande sans besoin de détacher
les ceintures de sécurité. Appréciez votre
nouveau système mais n’oubliez jamais que
la sécurité des passagers reste la priorité
numéro un.
Caractéristiques du produit
• Ecran TFT-LCD de 7 pouces avec aspect
16:9
• Chargeur DVD par le haut incorpore
• Emetteurs infrarouges pour écouteurs
sans l
• Source AV (Entrée) - 3 connecteurs
femelles RCA
• Rendement signal audio/vidéo de signal
sortie-1/8-pouce
• 1/8-pouce Prise Ecouteur Stéréo
• Un port USB avec spéci cations 1.1
• Télécommande multifonctions
• Touches de Contrôle sur le Panneau
Frontal:
INTERRUPTEUR (POWER), FUENTE
(SOURCE), LECTURE (PLAY), ARRET (STOP),
EJECTER (EJECT)
• Contrôle OSD (A chage sur écran)
• Entrée alimentation 12V courant continu
• Transmetteur FM (si disponible)
Attention:
• Ne touchez pas l’intérieur des PRISES
JACK sur le panneau frontal. Les
décharges électrostatiques peuvent
endommager durablement le dispositif.
• Utiliser le système DVD lorsque le
véhicule est en marche, sinon la batterie
peut se décharger. De même, a n d’éviter
de décharger la batterie, rappelez-vous
d’éteindre le dispositif lorsque le véhicule
est à l’arrêt pour un long moment
68
Bienvenue
Page 69

Écouteurs sans l
Le système SB7 Appuie-tête Actif inclut un
transmetteur infrarouge intégré pour une
utilisation des écouteurs sans l. Le volume
peut être ajuste sur chaque appuie-tête. Le
casque sans l doit être utilise de façon a ce
que l’émetteur de la transmission infrarouge
soit a portée du casque.
Écouteurs avec l
Il y a une prise jack 1/8 pouce qui peut
être utilisée avec n’importe quel écouteur
stéréo standard. Enlevez et conservez le
lm protecteur pour accède a la prise jack.
N’oubliez pas de remettre en place le lm
protecteur lorsque la prise n’est pas utilisée.
Entrée AV
Cette unité comporte une entrée AV, ou
vous pouvez connecter un jeu vidéo par
exemple. Pour lire cette deuxième source
AV, mettez l’appareil sous tension et
appuyez sur la touché SOURCE, a partie
de la télécommande, jusqu’a ce que
“AV” s’a che sur l’écran. Le système est
maintenant prêt pour lire les signaux audio
et vidéo de la source branchée sur l’entrée
AV/AUX.
Transmetteur FM sans l
Ce dispositif DVD peut être équipé d’un
émetteur externe FM, qui vous permet
d’écouter le signal audio en mettant en
marche et en accordant la radio FM de
votre véhicule sur la fréquence FM choisie.
Toutes les fois que l’émetteur de FM est
sur la réception de radio le son sera faible.
Stoppez ‘SOUND AROUND’ a partir de la
télécommande , l’émetteur de FM permettra
une réception par radio normale.
Comment utiliser le transmetteur FM
Allumez votre système et placez le disque
DVD dans le moniteur A. En pointant la
télécommande vers le moniteur, appuyez
sur la touche DVD A, cette touche se
trouve directement sous la touche rouge
de POWER sur la télécommande. Ensuite
appuyez sur la touche « Sound Around
» ON/OFF, qui fera dé ler 6 stations
radio possibles. Une fois que vous aurez
sélectionné une station vous devez
accorder votre stéréo sur la fréquence
correspondante. Essayez chaque fréquence
jusqu’à ce que vous obteniez un signal
audio clair.
Compatibilité Stéréo Dolby
En employant cette unité avec un
processeur multi canal, vous pouvez
apprécier l’atmosphère fournie par lm de
DVD et le logiciel de musique incluant le
Stéréo Dolby. Construit sous le permis des
Dolby Laboratories. Le symbole “Dolby” et
“double-D” sont des marques déposées des
Dolby Laboratories.
FR
Bienvenue
69
Page 70

Véri cation Fonctionnelle
Controles de Fonctionnement:
Mettre le véhicule en marche. Presser la touche
POWER sur chaque moniteur.
Insérer le disque dans le lecteur, presser la
touche ENTER.
Ecouter avec les écouteurs sans l (soyez sur
d’être sur la chaine A pour écouter le moniteur
A et la chaine B pur écouter le moniteur B).
Presser la touche SOURCE sur le moniteur B
jusqu’a ce qu’il lise la di usion sur le moniteur
A.
Presser la touche SOURCE sur le moniteur A
jusqu’a ce qu’il lise la di usion sur le moniteur
B.
Presser la touche EJECT sur la télécommande
ou sur le panneau frontal.
Mettre en fonction la radio du véhicule et
régler la station a la fréquence sur FM (si
disponible).
Recherche
Les écrans doivent s’allumer.
Le disque doit commencer à tourner.
Le son doit fonctionner a travers les écouteurs
sans l.
Le DVD lu sur le moniteur A devrait être lu aussi
sur le moniteur B.
Le DVD lu sur le moniteur B devrait être lu aussi
sur le moniteur A.
Le disque doit s’éjecter.
Le son du moniteur A doit être entendu
seulement par les haut-parleurs du véhicule.
70
Véri cation Fonctionnelle
Page 71

Description Du Panneau Frontal
FR
1. Indice d’Actvite du Lecteur DVD
Les lumières indiquent que le lecteur
fonctionne.
2. Compartiment Pour DVD
Insérez le disque dans ce compartiment.
3. Émetteurs Infrarouges Et Capteur
Infrarouge
Permet à la télécommande d’accéder à
toutes les fonctions du lecteur DVD.
4. Verrouillage De Niveau Et Verrou De
Déblocage
Autorise l’utilisateur à ajuster l’angle
de visionnement de l’écran LCD ou
verrouille l’écran dans une position
sécurisée. (Niveau A).
5. ÉCRAN LCD
Écran TFT-LCD de 7 pouces (480x234).
Précautions
• Ne pas utiliser de solvants ou autres
matériaux de nettoyage pour nettoyer
votre système vidéo.
• Ne pas utiliser de nettoyants décapants
risquant de rayer l’écran. N’utiliser qu’un
chi on non pelucheux légèrement
humidi é pour essuyer l’écran s’il est sale.
Verrouiller l’écran LCD dans la position
fermée quand il n’est pas utilise.
• Ne pas appliquer de pression sur l’écran.
• Prévenez les enfants de ne pas toucher ni
de gratter l’écran pour ne pas le salir ou
l’endommager.
6. PORT USB 1.1
Vous pouvez utiliser ce système pour
des DVD, de la musique ou des images
stockées sur votre clé USB.
7. AV Output 1/8 Pouce (sortie AV)
Permet de brancher une sortie audio
auxiliaire.
8. Prise Pour Écouteurs 1/8 Pouce
Autorise le branchement d’écouteurs
avec l sur des ches stéréo de 1/8
pouce pour écouter le son provenant
directement du programme.
9. Entrée RCA (Jaune, Blanc, Rouge)
Permet de connecter des connecteurs
RCA
10. Protection Des Ports
Protège les ports lorsque le lecteur n’est
pas utilise.
11. Verrou De Surete
Limite l’écran LCD à un angle de
vue (Niveau A). Le loquet est utilise
uniquement pour le service (Niveau B).
Description Du Panneau Frontal
71
Page 72

12. UP/DOWN/LEFT/RIGHT Touches
Ces touches vous permettent de
naviguerm dans le menu. Pendant
un playback la touche gauche vous
positionnera en arriere et la touche
droite vous fera avancr sur le DVD.
13. Touche POWER
Cette touche vous permet d’allumer ou
eteindre votre systeme.
14. Touche SOURCE
Preseez cette touche et vous obtiendrez
toutes les sources permises.
15. Touche EJECT
Pressez cette touche pour ejecter le disc
du compartiment ou inserer le disc dans
le compartiment.
16. PLAY Button
Appuyez sue cette touche pour
commencer la lecture du DVD
17. Touche STOP
Appuyez sur cette touche pour arrêter la
marche arrière du DVD.
18. Touche PAUSE
Cette touche perment de stopper la
lecture du DVD et de mettre la lecture
en attente.
19. MENU/ Touche SELECTION
Cette touche sert uniquement a
controler le dvd. Appuyez pour aller
dans le ,enu OSD quand le disque
est charge: Cette touche per met de
selectionner ce que ous desirez lorsque
le DVd est en mode lecture dans le
menu OSD.
20. Ajustement De L’ecran
L’écran peut être ajuste par l’utilisateur
pour un meilleur angle de vue.
72
Description Du Panneau Frontal
Page 73

Fonctionnement De La Télécommande
Instructions pour l’installation des
piles
Avant de mettre en marche votre
télécommande, installez les piles selon la
description suivante.
1. Retournez la télécommande . Appuyez
sur la zone cannelée du couvercle des
piles et faites le glisser.
2. Installez 2 piles “AAA”. Véri ez que la
polarité (+ ou -) est bien respectée.
3. Refaites glisser le couvercle jusqu’a
obtention d’un click.
La télécommande commandera le système
DVD uniquement. Ce n’est pas une
télécommande universelle et elle ne peut
contrôler d’autres équipements d’autres
fabricants.
Avertissement/Caution sur l’utilisation
des piles
• Assurez vous toujours que les piles soient
insérées avec les terminaux positifs
et négatifs dans la direction correcte
suivant les indications gurant dans le
compartiment des piles.
• Di érents types de piles ont des
caractéristiques di érentes. Ne pas
mélanger des types de piles di érents.
• Ne pas mélanger d’anciennes et de
nouvelles piles. Le mélange anciennes et
nouvelles piles peut raccourcir la durée de
vie des piles et/ou provoquer des fuites
de produits dans les piles anciennes.
• Lorsque les piles ne fonctionnent pas,
remplacez les immédiatement.
• Conservez les piles hors de la portée des
enfants. Si les piles sont avalées, consulter
immédiatement un médecin. En outre,
lorsque les piles sont usages, veuillez
vous conformer aux règlementations
gouvernementales ou environnementales
en vigueur dans votre pays.
• Enlever les piles de la télécommande si
elle n’est pas utilisée pendant un mois ou
plus.
FR
Fonctionnement De La Télécommande
73
Page 74

Descriptions De Fonction De Touche
74
Descriptions De Fonction De Touche
Page 75

1. SOURCE
Tout équipement vidéo connecte aux
entrées AV peut être utilise avec le
moniteur en appuyant sur cette touche.
A chaque pression sur cette touche, la
source AV changera dans la séquence
suivante: DVD, AV.
2. INTERRUPTEUR (POWER)
Appuyez sur cette touche pour allumer
l’appareil. La source vidéo en cours
s’a chera sur l’écran, l’image apparaitra
après quelques secondes Appuyez de
nouveau sur la touche pour éteindre
l’appareil.
3. DVD –Moniteur A
Transmet les codes IR pour le mode
DVD/AV du moniteur vidéo (ce mode
est utilise pour contrôler toutes les
fonctions, a l’exception du mode TV (si
disponible).
4. TV –Moniteur A
Cette fonction n’est pas disponible en ce
moment.
5. SOUND AROUND ACTIVÉ/DÉSACTIVÉ
(ON/OFF)
(Si l’émetteur FM est disponible)
Allume et éteint l’émetteur FM.
6. MUTE (pour DVD uniquement)
Appuyez sur cette touche pour éteindre
le son dans les écouteurs. L’écran
a chera la mise en sourdine du son. En
appuyant de nouveau sur cette touche
vous restaurez le son a son niveau
précédent
7. MENU
Aller au menu du disque.
8. HAUT, BAS (UP, DOWN)
Pendant la lecture du disque, utilisez
cette touche pour faire dé ler le menu
OSD vers le haut ou bas.
9. GAUCHE, DROIT (LEFT, RIGHT)
Passe du menu OSD gauche au menu
bas. Baisse ou Augmente la valeur de la
barre TEINTE, COULEUR, LUMINOSITE, ou
CONTRASTE.
10. ENTRER (ENTER)
Faire une sélection ou commencer la
lecture du disque.
11. RETOUR (RETURN)
Retourner a l’écran menu précédent ou
point de lecture.
12. MÉMOIRE AUTO (AUTO MEMORY)
Cette fonction n’est pas disponible en ce
moment.
13. SKIP/RECHERCHE (CH-SEARCH/SKIP)
Cette fonction n’est pas disponible en ce
moment.
14. TITRE (TITLE)
Navigue dans le Menu Titre inclus sur le
disque.
15. SOUS-TITRE (SUBTITLE)
Change de langue des sous-titres pour
une autre langue disponible ou enlever
les sous-titres (uniquement si le disque
contient de multiples langues soustitrées).
16. NUMÉROS (Numbers)
Chi re décimal: 0 a 9.
+100: Ajouter 100.
FR
Descriptions De Fonction De Touche
75
Page 76

17. LECTURE/PAUSE (PLAY/PAUSE)
Appuyez sur cette touche pour lire ou
mettre en pause un lm quand le disque
est inséré dans le compartiment disque.
18. ARRÊT (STOP)
Arrête la lecture du lm ou de la
musique.
ARRET : Lire : reprendre la lecture depuis
le point d’arrêt.
ARRET : ARRET : Lecture : Commence la
lecture au début du disque.
19. FR (Retour Rapide)
Appuyer sur cette touche pour faire une
recherche arrière continue sur le disque.
Vous pouvez choisir parmi 5 options de
vitesse : 2X, 4X, 8X, 16X, et 32X.
20. FF (Avance Rapide)
Appuyez sur cette touche pour faire une
recherche avant continue sur le disque.
Vous pouvez choisir parmi 5 options de
vitesse : 2X, 4X, 8X, 16X, et 32X.
21. CONFIGURATION (SETUP)
Navigue dans le
MENU CONFIGURATION ; Il y a 4 pages
pour con gurer votre système.
(1) Page générale de con guration
(2) Page con guration audio
(3) Page Préférences
(4) Page con guration mot de passe.
22. EJECT
Ejecte le disque du lecteur DVD.
23. TV-Monitor B
Cette fonction n’est pas disponible en ce
moment.
24. DVD-Monitor B
Transmet les codes IR pour le mode DVD
sur le moniteur B.
25. SÉLECTION SOUND AROUND (SOUND
AROUND SELECT)
(Si l’émetteur FM est disponible)
Sélectionnez une chaine FM. Il y en a
6 : CH1: 88.3MHz; CH2: 88.7MHz; CH3:
89.1MHz; CH4: 89.5MHz; CH5: 89.9MHz;
CH6: 90.3MHz.
26. PIX (Sélection Image)
A chaque fois que cette touche est
pressée, l’OSD de réglage image passe
en boucle sur les barres de LUMINOSITE,
CONTRASTE, COULEUR, et TEINTE.
Quand la barre de réglage désirée est
a chée, utilisez les boutons DROIT/
GAUCHE pour faire les réglages. La barre
d’a chage disparait automatiquement
si aucun nouveau réglage n’est e ectue
pendant 6 secondes ou si une autre
touche est pressée.
27. RÉPÉTER (REPEAT)
(sauf VCD avec PBC active)
Répète une partie ou la totalité d’un
chapitre, d’un titre, d’une piste ou
l’intégralité du disque.
28. A-B (sauf MP3)
Répète du point A au point B.
29. R-S
Cette fonction n’est pas disponible en ce
moment.
30. EFFACER/AJOUTER (ERASE/ADD)
Cette fonction n’est pas disponible en ce
moment.
76
Descriptions De Fonction De Touche
Page 77

31. AUDIO
Change de langue pour une autre
langue disponible (seulement si le
disque contient de multiples langues
audio).
32. ANGLE
Si mode TV disponible)
Quand une chaine est sélectionnée,
appuyez sur ce bouton pour mémoriser
ou e acer cette chaine de la mémoire.
Les numéros de chaines mémorisées
s’a chent en vert sur l’écran et les
numéros de chaines non mémorisées en
rouge. Quand le mode SKIP est active,
l’appareil n’activera que les chaines
mémorisées avec l’utilisation des
touches HAUT/BAS.
33. GOTO
Navigue dans le menu, permet de se
ren dre sur le titre, chapitre, piste ou
chanson désirés sur le disque.
34. AFFICHAGE (DISPLAY)
A che des informations en haut à
gauche de l’écran incluant le titre, le
chapitre, la piste, le temps écoulé ou
restant et permettant l’extinction de
l’a chage.
35. PROGRAMME (PROGRAM)
Edite un programme de lecture
contenant les titres désirés du DVD ou
des pistes du CD-DA.
36. ALÉATOIRE (RANDOM)
Joue les titres d’une manière aléatoire.
37. 3D
Contrôle l’e et son virtuel 3D. Les
options sont désactivées, Rock, Pop,
Live, Dance, Techno, Classique et
musique douce. CD mode: O , Concert,
Living Room, Hall, Bathroom, Cave,
Arena, and Church.
38. PBC (CD Vidéo uniquement)
Active ou désactive le PBC
(Commande lecture par menu)
39. ZOOM
(1) Agrandit l’image du lm par 2x,3x,4x.
(2) Rétrécit l’image du lm par 1/2x, 1/3x,
et 1/4x.
40. SUIVANT (NEXT)
Lit le chapitre ou la piste suivante.
41. PREC (PREV)
Lit le chapitre ou la piste précédente.
Note:
La télécommande incorpore une sonde
infrarouge qui transmet des signaux de la
télécommande a l’oeil du télédétecteur. La
sonde infrarouge ne peut pas transmettre
des signaux d’autres fabricants ; si une
source est branchée en auxiliaire, un
lecteur DVD par exemple, il vous faudra
la télécommande du lecteur DVD pour
commander ce dernier.
FR
Descriptions De Fonction De Touche
77
Page 78

Instructions Générales De Fonctionnement
Allumage et extinction de l’appareil
1. Faites pivoter l’écran vers le bas jusqu’a
ce que vous soyez satisfait de l’angle de
visionnement.
2. L’appui sur la touche POWER (ARRÊT/
MARCHE) dans le coin inferieur
gauche du panneau avant ou de la
télécommande allumera ou éteindra
l’appareil. En cours d’utilisation, les
touches restent allumes.
3. Une fois que l’appareil est allume et
qu’il a che une image, réglez l’angle de
visionnement en faisant pivoter l’écran
a n d’optimiser la qualité de l’image.
4. N’oubliez pas d’éteindre l’appareil et
de faire pivoter l’écran LCD en position
verrouillée.
Fondamentaux DVD
Pour obtenir le maximum de votre
DVD, veuillez lire cette section dans son
intégralité.
Codage Régional
Le lecteur DVD et le disque sont codes
par région. Ces codes régionaux doivent
correspondre pour pouvoir lire le disque. Si
les codes ne correspondent pas, le disque
ne marchera pas. Le code de cet appareil
est préréglé en usine pour la région 1. Les
autres codes régionaux ne peuvent être
joues sur cette unité.
78
Instructions Générales De Fonctionnement
Page 79

Types de disques que votre lecteur
DVD peut lire
• DVD-Vidéo : Le DVD contient des vidéos
• CD-DA : Le CD contient de la musique ou
un contenu son uniquement
• CD-Vidéo : Le CD contient un lm
uniquement
• CD-R/RW : Un disque qui contient des
chiers audio (par exemple, un CD-R avec
des chiers MP3 téléchargés, des chiers
MPEG ou JPEG).
Chargement et lecture de disques
Avant de charger un disque, assurez-vous
qu’il est compatible avec le lecteur. Notez
que les disques suivants NE PEUVENT PAS
être utilises avec ce lecteur:
Disque optique : CD-1, CD-ROM, DVD-ROM
Minidisque : CDG (audio uniquement, pas
d’images)
Pour charger et lire un disque
Quand vous appuyez sur la touche POWER
l’appareil s’allume et est en mode DVD.
Appuyez sur la porte du DVD pour l’ouvrir.
Chargez le disque en l’insérant avec
l’inscription vers le haut et en le plaçant bien
au milieu. Refermez la porte en appuyant
jusqu’a fermeture du taquet.
(Certains disques DVD commencent au
Menu Racine, a l’endroit ou l’on sélectionné
le démarrage du lm)
Dépendant du DVD et de la place du
Playback sur le disque, l’icône peut
apparaître dans le coin supérieur gauche de
l’écran, indiquant que le playback n’est pas
possible.
Notes sur des Disques
• Pour maintenir un disque propre, ne
touchez pas sa surface. Manipulez le
disque par son bord.
• Laisser vos disques dans leurs boitiers ou
leurs emplacements lorsqu’ils ne sont pas
utilises. En outre, ne soumettez pas vos
disques à la chaleur. Eviter de les laisser
dans un véhicule gare, ou sur le tableau
de bord ou sur la plage arrière.
FR
• Ne mettez pas de liquide ou d’étiquettes
sur les disques car cela pourrait le faire
bloquer. Ne mettez pas de produits
collants sur le disque, cela pourrait
endommager le système ainsi que le
disque:
• Les étiquettes peuvent entrainer une
incapacité du disque à être éjecter.
• La chaleur, un autocollant ou une
étiquette sur le disque peuvent
entrainer une incapacité de lecture
correctes des données audio
présentent sur le disque.
• Avant la lecture, nettoyez les disques
avec un tissu de nettoyage disponible
dans le commerce. Essuyez chaque
disque du centre dehors. N’employez
pas les dissolvants tels que le
benzène, des décapants plus ns et
disponibles dans le commerce, ou le jet
antistatique.
• Employez seulement les disques
normaux et ronds. Si vous insérez un
disque irrégulier, il peut se bloquer.
Instructions Générales De Fonctionnement
79
Page 80

Utilisation Du Menu DVD OSD
Cette section décrit comment régler votre
système en utilisant les pages a l’écran
inclusesdans le menu d’OSD. Vous pouvez
utiliser le menu d’OSD pour faire tous les
réglages sur votre écran. Suivez les étapes
décrites ci-dessous pour choisir la fonction
que vous désirez, et referez-vous aux pages
indiquées pour plus d’information.
Utilisation Du Menu Con guration
En utilisant le menu con guration, vous
pouvez retrouver la con guration initiale,
régler la qualité d’image et con gurer les
di érentes sorties. Vous pouvez aussi dé nir
une langue d’a chage sur l’écran, ainsi que
limiter l’accès aux di érentes fonctions pour
les enfants.
1. Appuyez sur la touche SETUP
(CONFIGURATION) pour a cher les
icones et les pages sur l‘écran.
2. Sélectionnez la page désirée en utilisant
les touches
curseur.
Pour Annuler L’a chage
Con guration
Appuyez sur la touche SETUP
(CONFIGURATION) sur la télécommande.
ou pour déplacer le
Page Générale D’Installation
Dé nir une langue pour l’A chage sur
l’écran
Appuyez sur la touche SETUP
(CONFIGURATION) utilisez les touches
ou pour naviguer vers la page de
Con guration Générale, puis utilisez les
touches pour sélectionner la langue OSD.
Menu Langue OSD (A chage sur écran)
Le sous-menu langue OSD permet à
l’utilisateur de sélectionner la langue de
l’a chage sur l’écran. Appuyez sur
utilisez les touches
la langue désirée. L’utilisateur peut
sélectionner Anglais, Français ou Espagnol
comme langue OSD.
Paramétrages de l’a chage
Appuyez sur la touche SETUP
(CONFIGURATION) utilisez les touche
ou pour naviguer vers la page de
Con guration Générale, puis utilisez les
touches
A chage TV. Ce réglage vous permet de
régler la con guration écran (format de
l’image). Appuyez sur
touches
réglage approprie.
Les options sont les suivantes:
Normal/PS
A che une large image sur l’écran sans
bandes noires sur les cotes droit et gauche.
pour sélectionner le sous-menu
ou pour sélectionner le
ou pour sélectionner
puis utilisez les
puis
80
Utilisation Du Menu DVD OSD
Page 81

Normal/LB
Ceci a che l’image large avec des bandes
noires sur les portions supérieure et
inferieure de l’écran.
Large (16:9)
Cette option est choisie si le panneau LCD
est de type écran large. Appuyez alors sur
ENTER (ENTRER) pour con rmer.
Page De Préférence
Paramètres Par Défaut
Appuyez sur la touche SETUP
(CONFIGURATION), et utilisez les touches
ou et pour naviguer dans le sousmenu Default sous la page Préférence.
La con guration par défaut permet
de réinitialiser toutes les options aux
paramètres initiaux. Appuyez sur
sur ENTER (ENTRÉE) pour e ectuer la
réinitialisation.
Remarque: cette fonction n’a ectera pas le
paramétrage du contrôle parental.
puis
Paramètres Du Contrôle Parental
(Uniquement accessible lorsqu’aucun
disque n’est chargé)
Cette section du MENU SETUP
(CONFIGURATION) permet aux utilisateurs
de contrôler le contenu de la lecture du
lm de G à ADULT. La fonction de contrôle
parental vous permet de limiter la lecture à
vos préférences.
1. Apres avoir navigue dans le sous-menu
Parental (Contrôle parental) sous la page
Préférence, utilisez les boutons
pour sélectionner: KIDSAF (Children);
G; PG; PG 13; PGR; R; NC 17; ADULT.
Remarque : plus la valeur est faible, plus la
limitation est stricte.
2. Appuyez sur le bouton ENTER (ENTRÉE)
pour con rmer la sélection.
3. Entrez un mot de passe a six chi res
a l’aide des touches numériques puis
appuyez sur ENTER (ENTRÉE).
Remarque: Le mot de passe par défaut
est 0000.
Remarque : si un disque est inséré dans
le compartiment et qu’il outrepasse le
paramètre du contrôle parental, le message
suivant apparaitra à l’écran:
Le paramétrage du contrôle parental de
ce lecteur empêche la lecture. Voulezvous
autoriser la lecture du disque?
Si vous sélectionnez Yes (Oui), vous devez
entrer le mot de passe pour que le disque
soit lu. Si le mauvais mot de passe est entre,
le message suivant apparait :
Ce lm ne sera pas lu en raison du
paramètre de contrôle parental du lecteur.
, ou
FR
Utilisation Du Menu DVD OSD
81
Page 82

Page D’Installation Du Mot De Passe
Paramètres du mot de passe du contrôle
parental
Appuyez sur la touche SETUP
(CONFIGURATION) et naviguez dans le
sous-menu Mot de passe sous la Page
Con guration de mot de passe. Le menu
apparait et vous permet de changer le mot
de passe du contrôle parental. Appuyez sur
ENTER (ENTRÉE).
OLD PASSWORD (ANCIEN MOT DE PASSE)
Entrez l’ancien mot de passe ou le mot de
passe par défaut (6 chi res).
NEWPASSWORD (NOUVEAU MOT DE
PASSE)
Appuyez sur le bouton SETUP
(CONFIGURATION) et naviguez dans le
sous-menu Mot de passe sous la Page
Con guration de mot de passe. Le menu
apparait et vous permet de changer le mot
de passe du contrôle parental. Appuyez sur
ENTER (ENTRÉE).
CONFIRM PWD (CONFIRMER MOT DE
PASSE)
Con rmez le nouveau mot de passe en
entrant de nouveau le mot de passe. Puis
faites dé ler jusqu’au bouton OK et appuyez
sur ENTER (ENTRÉE). Votre mot de passe a
été modi e.
(Note : Le mot de passe de défaut est 0000)
82 Utilisation Du Menu DVD OSD
Page 83

Utilisation Du Dispositif OSD
Ajustement D’Image
Cette section décrit comment régler l’écran
en utilisant le menu a l’écran de l’a chage
(OSD). Vous pouvez utiliser l’écran menu
du dispositif OSD pour ajuster des choix
avances d’image sur votre écran.
• Appuyez sur le bouton de PIX sur la
télécommande pour choisir : BRIGHTNESS
(ECLAT), CONTRAST (CONTRASTE),
SATURATION (SATURATION), HUE
(COULEUR), SHARPNESS (DEFINITION
D’IMAGE)
• Apres sélection de l’option désirée,
utilisez les boutons
le réglage.
Option Description Gamme Défaut
BRIGHTNESS
(ECLAT)
CONTRAST
(CONTRASTE)
SATURATION
(SATURATION)
HUE
(COULEUR)
SHARPNESS
(DEFINITION
D’IMAGE)
ou pour ajuster
Eclaire ou obscurcit l’image 0-100 50
Augmente ou diminuer le contraste d’image 0-100 50
Augmente ou diminue l’intensité de la couleur 0-100 50
Augmente ou diminue la tonalite de la couleur 0-100 50
A ne la dé nition de l’image 0-100 50
FR
IR Headphone Sélectionner On ou O pour allumer ou
éteindre les écouteurs sans l
Reset Remet les réglages par défaut
ON ou OFF ON
Utilisation Du Dispositif OSD
83
Page 84

Lecture D’Un CD Audio
Lors de la lecture d’un CD audio, la
bande DISPLAY(AFFICHAGE) apparait
automatiquement. Elle a che la piste
actuelle et le temps de lecture de la piste, la
durée totale du disque et le temps restant
du disque.
Appuyez sur la touche DISPLAY
(AFFICHAGE) de la télécommande pour
a cher la bande DISPLAY (AFFICHAGE).
Les options ci-dessous vous montrent ce qui
se passe quand vous appuyez sur la touche
DISPLAY (AFFICHAGE):
Appuyez sur DISPLAY (AFFICHAGE) (1x)
Single Elapsed (Temps de la piste écoulé)
s’a che pendant la lecture de la piste avec
le temps de la piste écoulé.
Appuyez sur DISPLAY (AFFICHAGE) (2x)
Single Remain (Temps restant de la piste)
s’a che pendant la lecture de la piste avec
le temps restant.
Appuyez sur DISPLAY (AFFICHAGE) (3x)
Total Elapsed (Temps total écoulé) s’a che
pendant la lecture de la piste avec le temps
total écoulé du CD.
Appuyez sur DISPLAY (AFFICHAGE) (4x)
Total Remain (Temps restant total) s’a che
pendant la lecture de la piste avec le temps
restant du CD.
Utilisation de la fonctionnalité REPEAT
(RÉPÉTER)
Le mode par défaut pour la fonctionnalité
REPEAT (RÉPÉTER) est OFF (DÉSACTIVÉ).
Appuyer plusieurs fois de suite sur la touche
REPEAT (RÉPÉTER) change les options de
REPEAT (RÉPÉTER) comme suit :
Track (Piste) - répète la piste actuellement
lue.
All (Tous) - répète le disque actuellement
lu. Lorsque vous basculez d’une option à
l’autre, l’option REPEAT (RÉPÉTER) change.
La piste se répète qu’une fois. L’option de
répétition sélectionnée en boucle répète
la piste sans arrêt jusqu’a ce que vous
l’éteignez.
84
Lecture D’Un CD Audio
Page 85

Lecture D’Un Disque MP3
MP3 est le format de stockage du son
numérique. Une chanson d’une qualité d’un
CD audio peut être compressée en format
MP3 avec très peu de perte de qualité,
tout en prenant beaucoup moins d’espace.
Les disques CD-R/RW qui sont encodes
au format MP3 peuvent être lus sur votre
lecteur DVD.
• Pressez DISPLAY (1x) :“Time Remain”
apparait; c’est le temps restant de la
chanson lue. Cela restera a che jusqu’à
ce que vous appuyiez de nouveau sur le
bouton.
• Pressez DISPLAY (2x) :“Time Elapsed”
apparait ; c’est le temps écoulé de la
chanson lue. Cela restera a che jusqu’à
ce que vous appuyiez de nouveau sur le
bouton.
• Pressez DISPLAY (3x) :“OFF” apparait et
disparaitra quelques secondes plus tard.
Sélection Des Dossiers Et Des Chansons
Lorsqu’un disque MP3 est inséré dans
le lecteur, l’écran de navigation apparait
automatiquement. Vous pouvez changer les
dossiers et les chansons en naviguant dans
les chiers. Le lecteur DVD lit les chansons
dans l’ordre ou elles ont été gravées sur le
disque.
1. Si un disque est lu, appuyez sur STOP
(ARRÊT). Appuyez sur les èches UP
(HAUT) ou DOWN (BAS) pour parcourir
la liste de dossiers a gauche de l’écran de
navigation.
2. Une fois que le dossier que vous
voulez est en surbrillance, appuyez sur
ENTER(ENTRÉE).
3. Appuyez sur les èches UP (HAUT) ou
DOWN (BAS) pour parcourir la liste des
chansons et mettre en surbrillance la
chanson que vous voulez. Appuyez sur
ENTER (ENTRÉE) pour commencer la
lecture d’une chanson en surbrillance.
Ignorer Une Chanson
Utilisez la touche NEXT (SUIVANT) de la
télécommande pour passer à la chanson
suivante. Utilisez la touche PREV (PRÉC)
pour vous déplacer au début de la chanson
actuellement lue. Appuyez deux fois
sur le bouton pour passer à la chanson
précédente.
Sélection D’Un Mode De Lecture
Vous pouvez choisir l’ordre des chansons
que vous voulez lire sur un disque. Le mode
de lecture FOLDER (DOSSIER) est le mode
par défaut. Pour accéder aux options des
modes de lecture, appuyez sur la touche
REPEAT (RÉPÉTER). Les options des modes
de lecture sont les suivantes:
Single (Unique): lit une chanson
sélectionnée.
Repeat One (Répéter une): répète les
chansons qui sont lues.
Folder (Dossier): lit le dossier dans l’ordre ou
les chansons ont été enregistrées.
Repeat Folder (Répéter dossier): Répète le
dossier qui est entrain d’être lu.
Disc: Lit le disque en entier.
Disc Repeat: Répète le disque en entier.
Random (Désordre): lit les chansons en
désordre.
Shu e: lit les chansons en désordre (depuis
le dossier sélectionné).
FR
Lecture D’Un Disque MP3
85
Page 86

Connexion D’Une Clé D’USB
Vous pouvez connecter une clé USB (v1.1) au
port USB de l’appuie-tête DVD SB7 Appuietête Actif.
L’appareil peut lire les formats MPEG/MP3/
WMA/ JPEG compris dans votre clé USB.
Allumez l’appareil SB7 Appuie-tête Actif
pour visionner les images si vous lisez
des formats MPEG ou JPEG. Vous pouvez
aussi contrôler la lecture en suivant les
instructions à l’écran.
Ordre De Lecture
L’appareil SB7 Appuie-tête Actif joue les
chiers dans l’ordre ou ils ont été graves.
L’ordre des dossiers et des chiers peut
di érer du numéro du dossier a ché à
l’écran.
86
Connexion D’Une Clé D’USB
Page 87

Connexion D’Un iPod
Connecter un iPod au SB7 Appuie-tête
Actif grâce au port USB
Vous pouvez connecter un iPod au port USB
de l’appareil grâce au câble fourni avec votre
iPod. Branchez la prise USB sur le port USB
de l’appareil et la prise iPod sur votre iPod.
Pour plus d’informations, referez-vous à la
notice d’utilisation fournie avec votre iPod.
Charger la batterie de l’iPod
Connectez l’iPod au port USB de l’appareil
; cela vous permettra de charger la batterie
de votre iPod. Le SB7 Appuie-tête Actif doit
être allume.
Si vous ne voyez pas de changements dans
les écrans après le branchement, cela peut
signi er que l’iPod n’est pas correctement
branche.
Connecter un iPod grâce aux câbles RCA
• Connectez les câbles RCA aux entrées
RCA de l’appareil SB7 Appuie-tête Actif et
connectez l’autre partie du câble au port
des écouteurs sur l’iPod. Notez que vous
devez utiliser le câble RCA spéci que à
l’iPod. D’autres câbles du type RCA ne
pourraient pas fonctionner.
• Connectez la vidéo et l’audio au ports AV-
IN sur votre SB7 Appuie-tête Actif comme
présenté.
Pour visionner une vidéo sur votre
appareil SB7 Appuie-tête Actif
• Connecter iPod à votre unité de SB7
Appuie-tête Actif (voit au-dessus).
• Allumer votre unité de SB7 Appuie-
tête Actif et l’a réglé pour a cher des
ports d’entrée connectés à l’iPod. Voir la
documentation qui a été fourni avec votre
iPod pour plus d’informations.
• Sur l’iPod, choisir Vidéos et brouter pour
la vidéo.
FR
Si la batterie sur votre iPod est superpose
d’un éclair cela signi e qu’elle est en cours
de chargement.
Si la batterie sur votre iPod est superposée
d’une prise cela signi e qu’elle est
complètement chargée.
Le câble RCA/AV iPod est vendu séparément
par Apple.
iPod® est une marque déposée et contrôlée par
Apple, Inc.
Connexion D’Un iPod
87
Page 88

Résolution Des Problèmes
Problemes Solutions
Le dispositif ne se met
pas sous tension.
Capteur infrarouge
défectueux.
Le disque ne démarre
pas.
Le disque demarre
mais s’arrête aussitôt.
Pas d’image.
L’image est distordue.
Impossible d’avancer la
lecture.
Aucun son ou son
défectueux.
• Le véhicule est-il en mode marche ?
• Les piles sont-elles dans la télécommande?
• Les piles de la télécommande fonctionnent-elles?
• Le capteur infrarouge est-il obstrue?
• Visez le capteur près du haut de l’écran.
• Sélectionnez sur la télécommande l’écran que vous souhaitez
contrôler.
• Insérer un disque dans le bon sens.
• Véri ez si le disque est défectueux en insérant un autre disque.
• Véri ez le type de disque que vous insérez.
• Le dispositif et le disque sont codes par région. Si les codes
régionaux ne s’accordent pas, le disque ne pourra être lu.
• Le disque est sale et a besoin d’être nettoyé.
• De la condensation s’est formée dans le lecteur, attendez un
moment avant de vous servir du lecteur.
• Véri ez que le mode d’entrée vidéo utilise sur le téléviseur est
correct.
• Véri ez que le câble vidéo est branche dans la prise de façon
sécurisée.
• Examinez le disque, s’il y a des empreintes digitales nettoyez le
avec un chi on doux, en essuyant du centre vers le bord.
• Parfois un peu de déformation d’image peut apparaitre. Ce n’est
pas un défaut de fonctionnement.
• Vous ne pouvez pas avancer jusqu’a l’information d’avertissement
qui apparait au début des lms parce que le disque est
programme pour interdire cette action.
• Véri ez que le mode d’entrée audio utilise sur le téléviseur est
correct.
• Si vous utilisez les écouteurs infrarouge, assurez vous que l’IR est
allume.
• Le volume est-il sur la position UP sur les écouteurs.
• Y a t-il un obstacle entre les écouteurs et le capteur infrarouge?
88
Résolution Des Problèmes
Page 89

Le dispositif sent le
chaud.
Le lecteur ne répond
pas à toutes les
commandes pendant
la lecture.
• Si le système fonctionne depuis un certain temps, il est normal
qu’il soit chaud.
• Des opérations ne sont pas autorisées sur le disque.
• Referez-vous aux instructions sur le manuel fournit dans le boitier
du disque.
FR
Résolution Des Problèmes
89
Page 90

Speci cations
Dimensions 234.95(W) x 190.5(H) x 57.15(D)mm
Poids 2.49Kg
Puissance Opération <13W
Standby <1W
Retro éclairage de l’écran LCD LED
Résolution 480x234 TFT LCD Panel
Luminosité 450cd/m2 (typ.)
DVD Emplacement dans le chargeur
Disque pris en charge DVD (Single, Dual Layer), DVD-R/+R, DVD+R
Dual layer, DVD-RW/+RW, CD, CD-R, CD-RW
Format pris en charge DVD-Video Navigation Ver1.0, VCD Ver1.0/2.0,
SVCD, D-DA, Data (MP3, WMA, JPEG,
MPEG 1/2/4)
Source Interne DVD, CD, Source AV analogiques, USB
(USB jeu MP3, JPEG only)
Température Opération/Humidité -20°C~70°C/20~90% RH
Température de Stockage/Humidité -30°C~85°C/5~95% RH
Durée de vie prévue du retro éclairage 20,000 heures
Système d’a chage vidéo NTSC/PAL
Entrée Voltage 10V~16V DC
Maximale en cours de saisie 1.3A (Vin = 10V DC)
Réponse Fréquence 20Hz ~20KHz ± 1dB
Rapport de Signal/Bruit ≥ 85dB
Déformation Audio + Bruit ≤ -80dB (1KHz)
Bruit Acoustique 40dB
Touches de Contrôle sur le Panneau
Frontal
Ports de I/O Rendement signal audio/vidéo de signal
Sortie Audio (audio analogique) 0.4
(Ecouteurs)
Impédance de Charge (Sortie Audio) 10KΩ
Rendement sortie vidéo 1Vp-p ± 20%
INTERRUPTEUR (POWER) SOURCE (SOURCE)/
GAUCHE SETUP/ENTREE LECTURE (PLAY)/
PAUSE/DROITE ARRET (STOP) BAS (DOWN)
EJECTER (EJECT)
sortie-1/8-pouce, 1/8-pouce Prise Ecouteur
Stéréo, Entrée audio/vidéo de signal – 3
connecteurs femelles RCA, Port USB 1.1
Niveau de sortie : 2V + ou – 10%
90
Speci cations
Page 91

Impédance de Charge
(Sortie Vidéo)
Audio sans l Double canal émetteur audio infrarouge,
Canaux infrarouges Canaux
75Ω
Ecouteur infrarouge de stéréo de récepteur
de soutien (réception : 0.9 m ; 80°, 1.8 m ; 50°)
A : 2.3/2.8 MHZ
B : 3.3/3.8 MHZ
3 : Propriétaires
4 : Propriétaires
FR
Speci cations
91
Page 92

92 Speci cations
Page 93

L’information De Conformité
Avertissement FCC
Ce dispositif a été examine et s’avère être
conforme aux exigences pour un dispositif
numérique de la classe B, conformément
a la partie 15 des règles de FCC. Ces limites
sont conçues pour assurer une protection
raisonnable contre l’interférence nocive
dans une installation résidentielle. Ce
dispositif génère des ondes qui peuvent
interférer avec les fréquences radio. Si ce
dispositif n’est pas installe et utilise selon les
instructions, il peut causer des l’interférences
nocives aux communications par radio.
Cependant, il n’y a aucune garantie que
l’interférence ne se produira pas dans une
installation particulière. Si ce dispositif cause
des interférences inacceptables à la radio
ou a la réception des émissions télévisées,
l’utilisateur est encourage à essayer de
corriger ces interférences par une ou
plusieurs mesures suivantes:
• Réorientez ou replacez l’antenne de
réception.
• Augmentez la séparation entre le
dispositif et le récepteur.
• Reliez le dispositif sur un circuit di érent
de celui sur lequel le récepteur est relie
• Consultez votre revendeur ou un
technicien expérimenté de radio/TV pour
l’aide.
Avertissement de FCC:
Pour s’assurer la continuité de la conformité
de FCC, l’utilisateur doit employer le câble
d’alimentation fourni et le câble d’interface
visuel protégé avec des noyaux de ferrite
colles. En outre, tout changement ou
modi cations non autorises à ce dispositif
ne garantie pas à l’utilisateur le bon
fonctionnement de l’appareil.
Avertissement WEEE
Disposition de vieux matériel électrique
et électronique (Applicable dans l’Union
Européenne et d’autres pays européens avec
des systèmes de collecte séparée)
Ce symbole sur le produit ou sur son
empaquetage indique que le dispositif ne
sera pas traite comme déchet ménager.
Au lieu de cela il sera remis au point de
collection pour la réutilisation du matériel
électrique et électronique. En s’assurant
que ce dispositif est jeté correctement, vous
aidez a protéger l’environnement et la sante
des personnes susceptibles de manipuler
ce dispositif. La réutilisation des matériaux
aidera a conserver les ressources naturelles.
Pour plus d’informations détaillées au sujet
de la réutilisation de ce dispositif, entrez en
contact avec l’organisme local, votre service
d’évacuation des déchets de ménage ou le
magasin ou vous avez acheté le dispositif.
Macrovision Avertissement
Ce produit incorpore la technologie de
protection de copyright© qui est protégée
par des brevets des Etats-Unis et d’autres
droits de propriétés intellectuelles.
L’utilisation de cette technologie de
protection de copyright© doit être autorisée
par Macrovision, et est prévue pour l’usage
prive. Les autres usages de visionnement
doivent être autorises par Macrovision. Le
démontage de ce dispositif est strictement
interdit.
FR
L’information De Conformité
93
Page 94

Notes
94
Notes
Page 95

FR
Notes
95
Page 96

© 2011 AUDIOVOX,150 Marcus Blvd. Hauppauge, NY 11788
© 2011 AUDIOVOX,150 Marcus Blvd. Hauppauge, NY 11788
© 2011 AUDIOVOX,150 Marcus Blvd. Hauppauge, NY 11788
www.adventproducts.com
128-9003
128-9003
128-9003
 Loading...