

Page 1
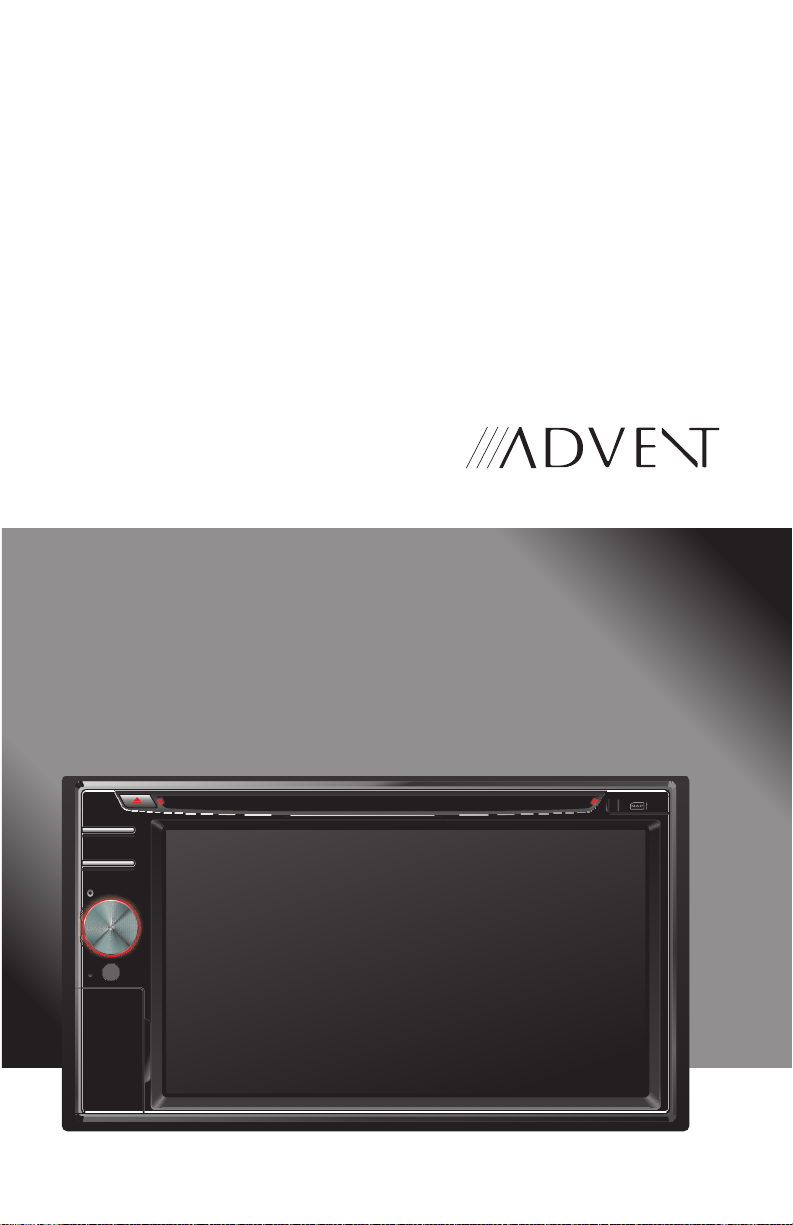
ADVUV630
Owner’s Manual
®
DEST
NAV
PWR-VOL
A/V
INPUT
Page 2

Introduction
Congratulations on your purchase of the ADVUV630 Mobile Multimedia Receiver.
Please read the instruction manual for this product before using. The documentation
provided will allow you to fully enjoy all the features this unit has to offer. Please save
this manual for future reference.
®
iPhone
marks of Apple Inc., registered in the U.S. and other countries.
“Made for iPod” and “Made for iPhone” mean that an electronic accessory has
been designed to connect specifi cally to iPod or iPhone respectively, and has
been certifi ed by the developer to meet Apple performance standards. Apple
is not responsible for the operation of this device or its compliance with safety
and regulatory standards. Please note that the use of this accessory with iPod
or iPhone may affect wireless performance.
Bluetooth
, iPod®, iPod classic, iPod nano, iPod shuffl e, and iPod touch are trade-
®
is a trade mark of Bluetooth Special Interest Group (SIG) Inc.
WARNING!
Never install this unit where operation and viewing could interfere with
safe driving conditions.
WARNING!
To reduce the risk of a traffi c acci-
dent (except when using for rear view
video camera) never use the video
display function while driving the
vehicle. This is a violation of federal
law.
WARNING!
To prevent injury from shock or fi re,
never expose this unit to moisture or
water.
WARNING!
Never disassemble the unit.
WARNING!
Never use irregular discs.
WARNING!
To prevent damage to the mechanism
inside this unit, avoid impact to the
unit’s monitor.
WARNING!
Using an improper fuse may cause
damage to the unit and result in a
fi re.
2
Page 3

Contents
Controls and Indicators ............................................................................................. 4
Main Menu ...................................................................................................................6
Main Menu - Page 1 ..............................................................................................6
Main Menu - Page 2 ..............................................................................................7
Audio Control Menu ................................................................................................... 8
AM/FM Radio ............................................................................................................... 9
Loading Media ...........................................................................................................11
Audio Disc ................................................................................................................. 12
JPEG/MPEG .............................................................................................................. 13
JPEG Image Mode ..............................................................................................13
MPEG Video Mode .............................................................................................. 14
DVD ............................................................................................................................15
JPEG/MPEG .............................................................................................................. 16
Bluetooth ................................................................................................................... 17
Bluetooth Menu ...................................................................................................17
Connecting to a Bluetooth device........................................................................18
Connecting to a Bluetooth device........................................................................19
Bluetooth Setup Menu ......................................................................................... 20
Disconnecting ...................................................................................................... 21
Making Calls ........................................................................................................ 22
Managing Incoming Calls ....................................................................................23
Rear Camera ............................................................................................................24
Camera Function ................................................................................................. 24
Rear Display Function .........................................................................................25
iPod/iPhone (Front USB/Rear USB) ........................................................................26
iPod/iPhone Music Menu..................................................................................... 26
iPod/iPhone Video Menu ..................................................................................... 28
iPod/iPhone Photo Menu.....................................................................................28
AV IN1/AV IN2 Input .................................................................................................. 29
XM Satellite Radio (Optional) ..................................................................................30
SWC (Steering Wheel Control) ................................................................................32
System Settings Menu ............................................................................................. 33
Wallpaper ..................................................................................................................36
Troubleshooting .......................................................................................................37
Error Messages......................................................................................................... 39
Care and Maintenance .............................................................................................40
Specifi cations ........................................................................................................... 41
NOTE: Refer to the separate NavMate 5 Navigation Instructions for operating instructions related to navigation.
3
Page 4
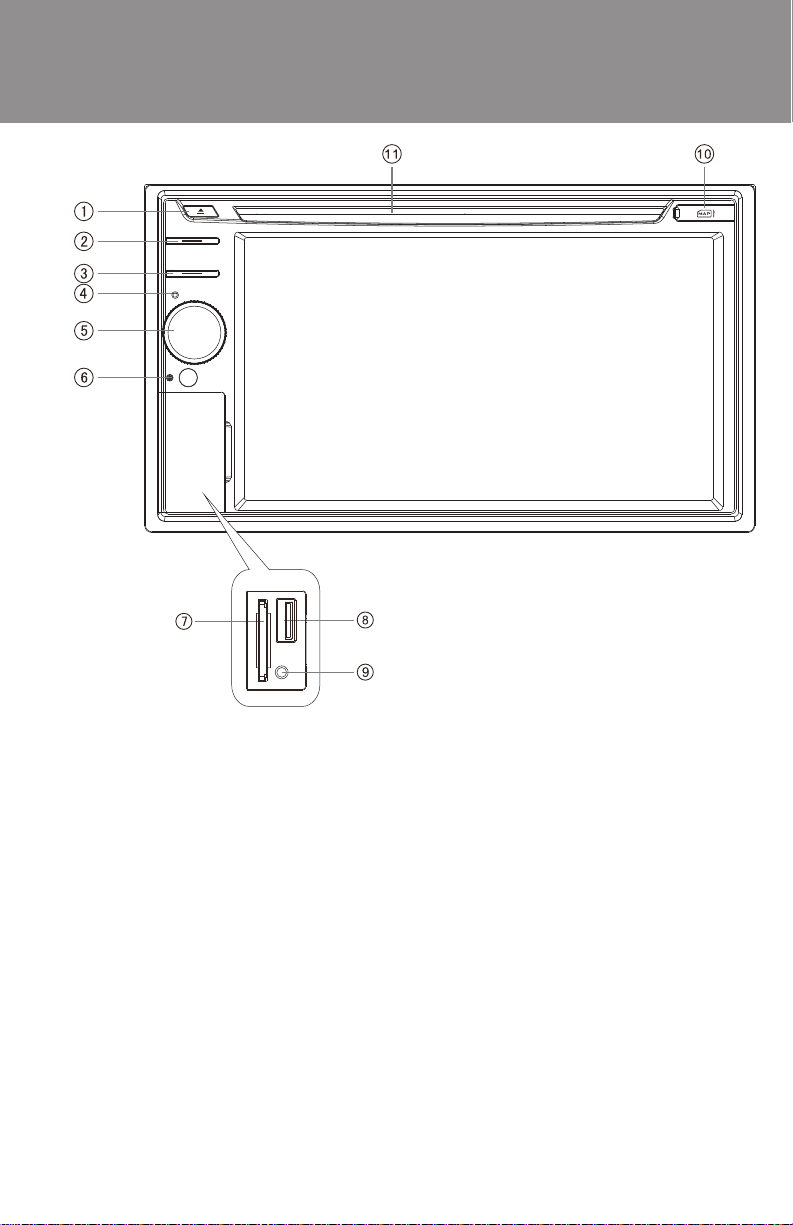
Controls and Indicators
DEST
NAV
PWR-VOL
A/V
INPUT
Getting Started
After pressing the PWR-VOL button to turn the unit on, the “Radio” screen appears.
To adjust equalizer settings, touch the EQ icon on the right side of the screen below
the clock display (see ““Audio Control Menu” on page 8).
To access the “Main Menu”, press the MENU button at the top left corner of the
screen (see “Main Menu” on page 6). From the Main Menu, you can choose the
source for the front and rear zone TFT screens, change the background wallpaper, or
select the “Settings” menu to adjust a variety of system features.
4
Page 5

Controls and Indicators
1. Eject Button
Press this button to eject a DVD/CD/MP3 disc. Disc play is stopped, the disc is
ejected, and the unit will change to radio operation. If the disc is not removed
from the unit and the button is pressed again, the disc will be re-loaded. If the
disc is not removed from the disc slot within 10 seconds of being ejected, it will
be automatically re-loaded to prevent accidental damage.
2. DEST Button
Press this button as a shortcut to access the Navigation mode and enter a desired destination.
3. NAV Button
Press this button to toggle between Navigation source and the current Audio
source.
4. Bluetooth Microphone
The ADVUV630 has an internal microphone as well as an optional external microphone (Included). The internal Bluetooth microphone is located on the left side
of the radio’s faceplate. For best reception, speak loudly and clearly.
5. PWR-VOL Controller (On/Off, Volume Control, Mute)
Press to turn the unit on. Press and hold for 3 seconds to turn the unit off.
Increase the volume by rotating the knob clockwise. Decrease the volume by
rotating the knob counter-clockwise. The unit’s front panel screen will display the
volume level for 3 seconds. The volume ranges from “0” to “50”.
When on, press to mute the audio. Press again to restore the volume.
NOTE: The turn-on volume is preset to “16” to prevent the audio system from
being too loud when powered on. If the volume is set lower than “16”, this will be
your turn-on volume. This setting is not adjustable.
6. Reset
Press to reset system to correct a system halt or other illegal operation, use the
tip of a pen to press the reset button.
7. SD/SDHC Card Slot
Insert card for playback of audio/video files.
8. USB Connector
USB will charge with < 1 Amp charging current while connected.
9. A/V INPUT
10. Map Micro SD Card Slot
11. Disc Slot
Accepts DVD/CD/MP3 discs.
5
Page 6
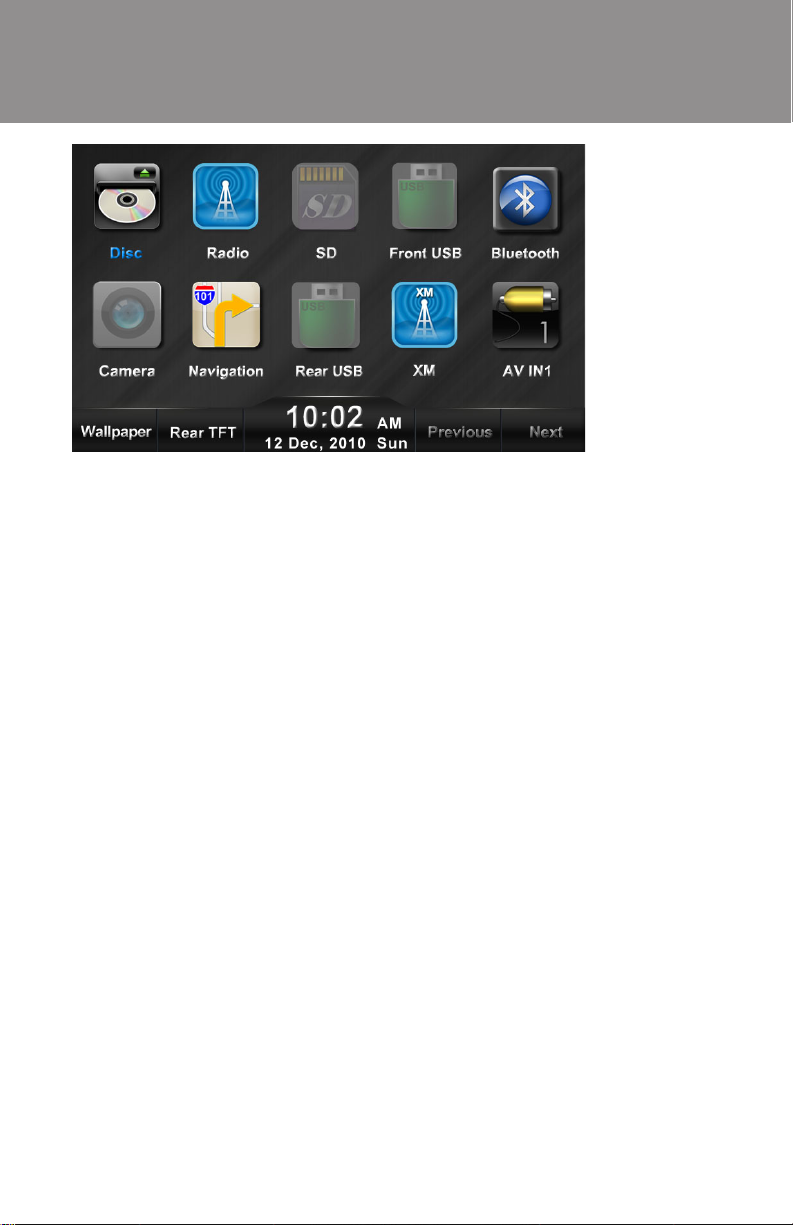
Main Menu
Main Menu - Page 1
Disc:
Select CD/DVD mode, (CD/DVD must
be inserted).
Radio:
Select AM/FM radio mode.
SD:
Access the contents of the SD Card
(SD card must be inserted).
Front USB:
Access a device connected to the front
(A/V Input) USB connector. When an
iPod is connected, this icon is labeled
“Front iPod” and shows an iPod image.
Bluetooth:
View the Bluetooth menu.
Camera:
Access a signal from an external camera (optional accessory).
Navigation:
Select navigation mode.
Rear USB:
Access a device connected to the rear
USB connector. When an iPod is connected, this icon is labeled “Rear iPod”
and shows an iPod image.
XM:
Select XM Radio mode.
AV IN1:
Access the AUX INPUT mode
Wallpaper:
Press to access the “Wallpaper” menu
and choose from available wallpaper
images. See “Wallpaper” on page 36.
Front/Rear TFT:
Independent sources can be played
simultaneously on the ADVUV630. For
example, a music source can be used
on the main TFT screen while DVD
video is available to rear passengers.
Press Rear TFT on the bottom menu
bar to switch between the front and rear
zone source menus.
• Camera, NAV, XM, Radio and BT
sources are only available on the
front TFT.
• When the front TFT source is
DISC, front USB, rear USB or SD
source, and the rear TFT source
is the same, the TFT output is the
same on all screens.
6
Page 7
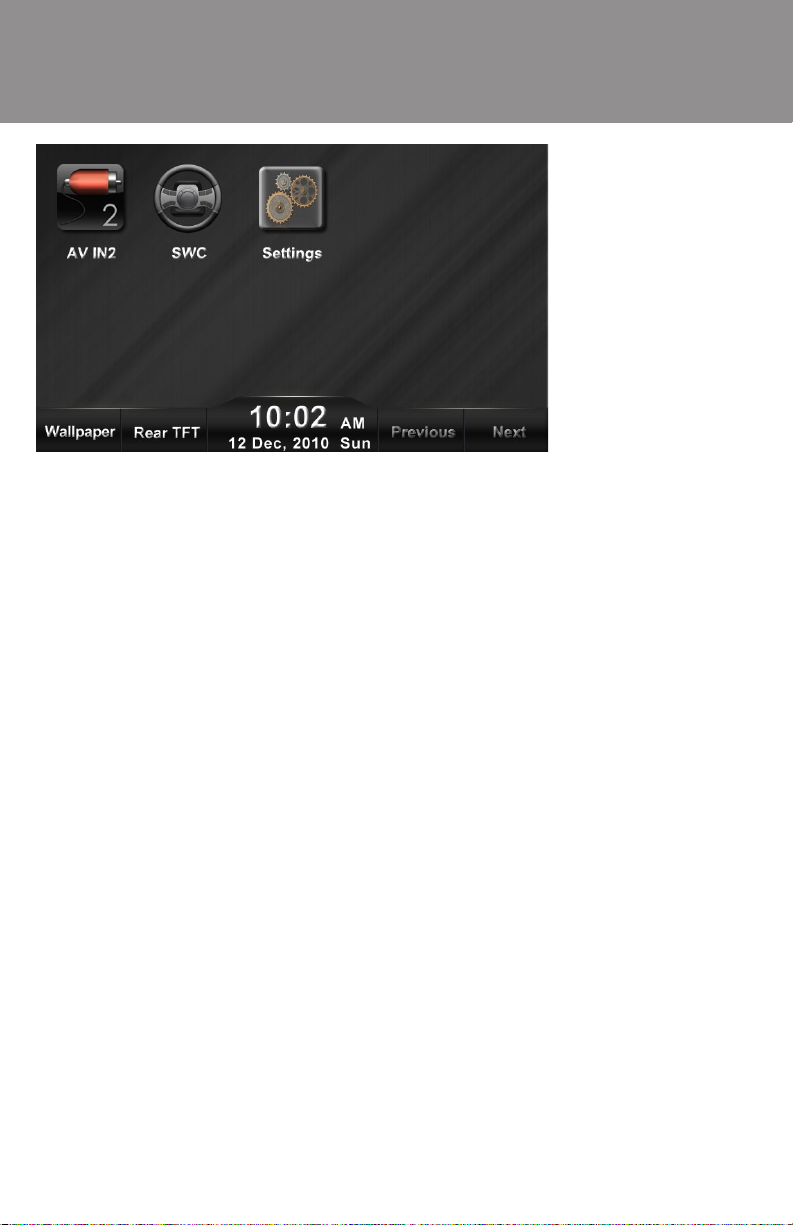
Main Menu - Page 2
Main Menu
• If the rear TFT source is AV IN1
or AV IN2, the front TFT source
must be different since these AV IN
sources cannot be shared between
front and rear.
Next:
View a second page of menu choices.
AV IN2:
Access the audio/video input (AV2)
mode.
SWC:
Access the Steering Wheel Control
menu and assign functions.
Settings:
Access the unit’s setup menu. The
setup menu consists of a submenu
which contains General, Video, Audio,
and other unit settings.
Rear TFT:
Access the Rear TFT source menu
options. Some sources (navigation,
radio, camera, etc.) are not available
for playback on rear TFT screens.
Previous:
Return to the fi rst page of menu
choices.
Rearrange Main Menu Icons:
Press and hold an icon, and then drag
to relocate it to another position on the
screen. The icon in the target destination will move to the vacant position.
7
Page 8
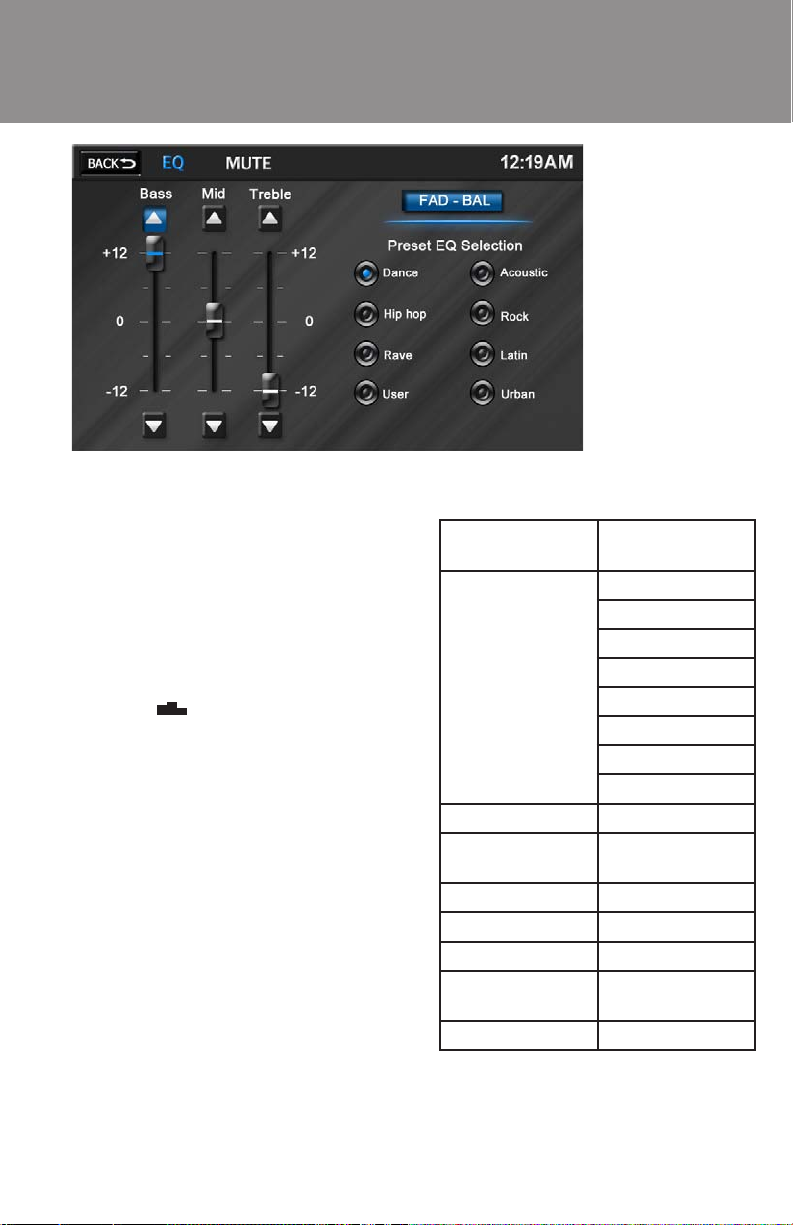
Audio Control Menu
Audio Control Menu
The Audio Control feature allows you
to easily adjust your audio system to
meet the acoustical characteristics of
your vehicle, which vary depending on
the type of vehicle and its measurements. Proper setting of the Fader and
Balance boosts the effects of the cabin
equalizer.
EQ
Touch the
to access the audio control menu. The
“EQ” menu appears by default. Touch
FAD-BAL to view the “Fader” menu
and adjust Loudness, Subwoofer and
Fader settings. To return to the “EQ”
menu, touch EQ.
Use the touch screen to adjust the settings for an audio feature.
The Audio menu will automatically exit
after a few seconds of inactivity. To exit
quickly, touch the BACK button in the
top left corner of the screen.
button on the screen
Audio Function Adjustable
Range
EQ
(NOTE: The
“User” setting
is automatically
selected when
individual Bass,
Mid and Treble
settings are
modifi ed.)
Bass (85Hz) -12 to +12
Mid-Range
(1kHz)
Treble (12.5Hz) -12 to +12
Loudness On/Off
Subwoofer On/Off, 0 to +12
Fader Front to Rear
Balance Left to right (Grid)
Dance
Hip Hop
Rave
User
Acoustic
Rock
Latin
Urban
-12 to +12
(Grid)
8
Page 9
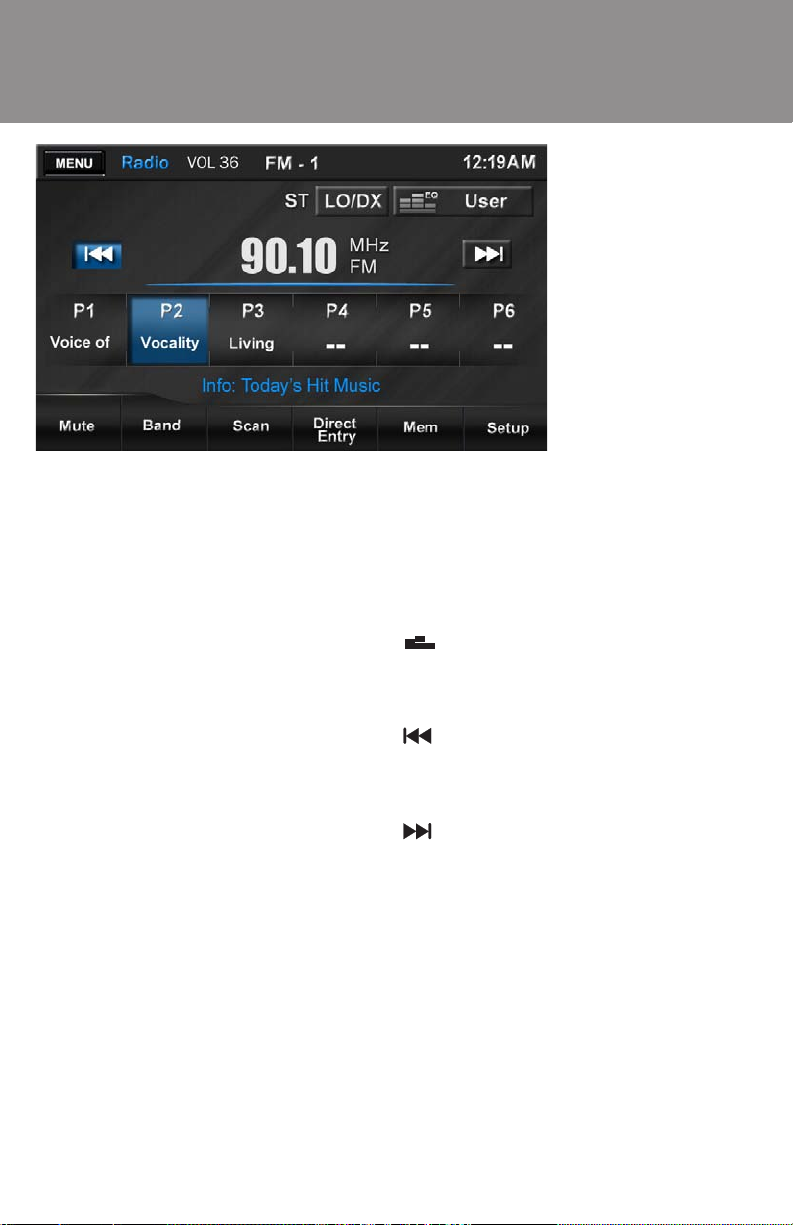
Radio Menu
AM/FM Radio
Accessing Radio Mode:
To access Radio mode from the Main
Menu, select the “Radio” icon.
MENU:
Press to access the “Main Menu” (see
“Main Menu” on page 6). From the Main
Menu, you can choose the source for
the front and rear zone TFT screens,
change the background wallpaper, or
select the “Settings” menu to adjust a
variety of system features.
Volume Level:
Displays the current volume level (VOL
0-50).
Band Indicator:
Indicates the frequency band that is
currently playing (AM-1, AM-2, FM-1,
FM-2, or FM3).
Clock Display:
Displays the time (12:19 AM) as entered by the user in the Settings Menu,
clock function.
ST (Stereo):
This icon appears when the radio station frequency is broadcasted in stereo.
LOC (Local/Distance):
Touch to choose either Local or Distance radio reception. When the icon
turns blue, only stations with suffi cient
signal strength will be detected.
EQ
(Equalizer):
Touch to access the audio control menu
to adjust audio settings (see “Audio
Control Menu” on page 8).
:
Press to seek tune. Press and hold to
tune the station down one step at a
time.
:
Press to seek tune. Press and hold to
tune the station up one step at a time.
P1 - P6:
Provides a display of the preset
frequencies. Press to recall preset stations.
Mute:
This button is used to mute the volumefrom the radio. By pressing the button,
a Mute indication will appear on the
speaker icon and the volume will be
muted.
9
Page 10
AM/FM Radio
Radio Menu
Band:
Press to select or change the radio
band (AM-1, AM-2, FM-1, FM-2, or
FM3). When the band is changed the
presets associated with the band will
also be displayed.
Scan:
Press to access the Auto-Store Tuning
feature which will automatically scan
and enter up to six strong stations into
the six preset memory locations. If you
have already set the preset memories
to your favorite stations, activating the
Auto-Store feature will erase those
stations and enter the new strong stations. This feature is most useful when
travelling in an area where you are not
familiar with the local stations.
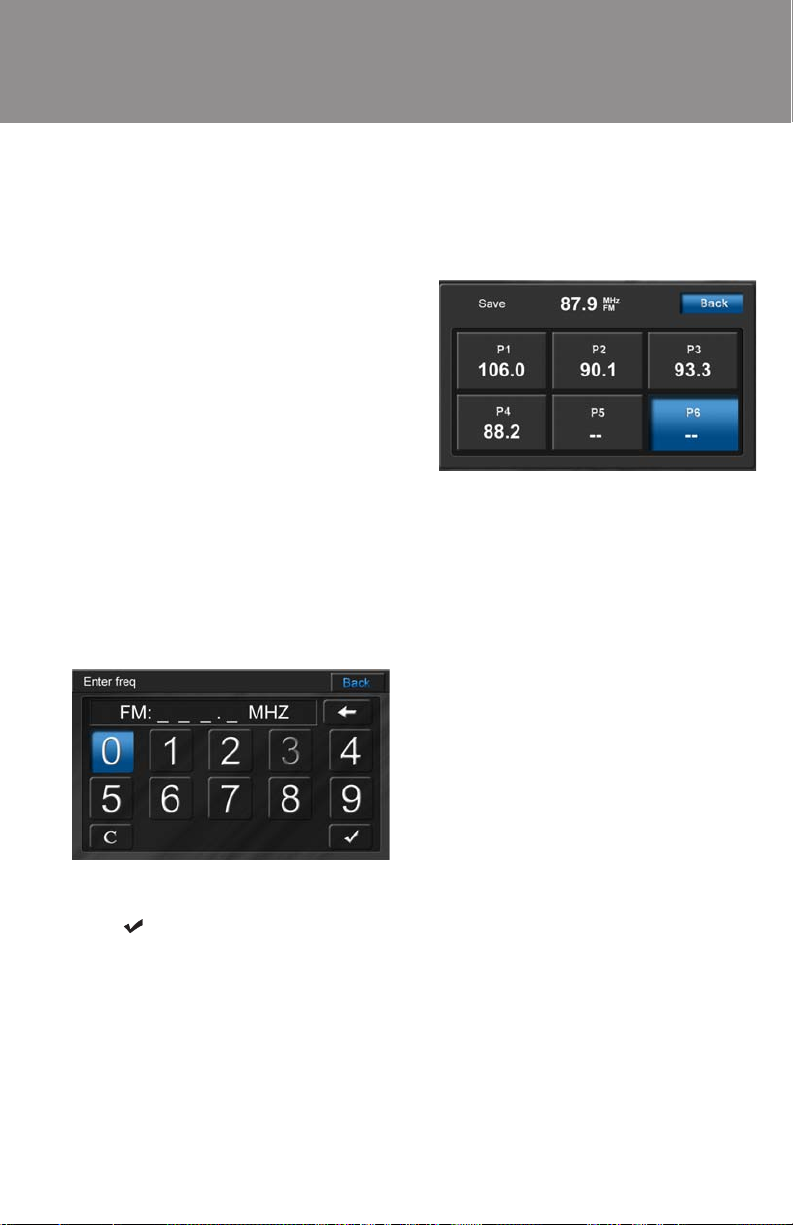
Direct Entry:
Press to access the direct tuning keyboard.
Mem:
Press to view the “Save” screen and
store the current frequency to a preset
memory position.
Touch one of the boxes labeled “P1””P6” to store the current frequency in
that preset memory position. To cancel,
press BACK.
PTY List:
The unit contains thirty two categories
that can be searched. These categories
consist of topics such as news, sports,
types of music, etc.
Use the Next/Previous buttons to
scroll through the list of available PTY
categories.
While a category is highlighted (News,
Sports, Talk etc.), press the Enter button to search for that topic.
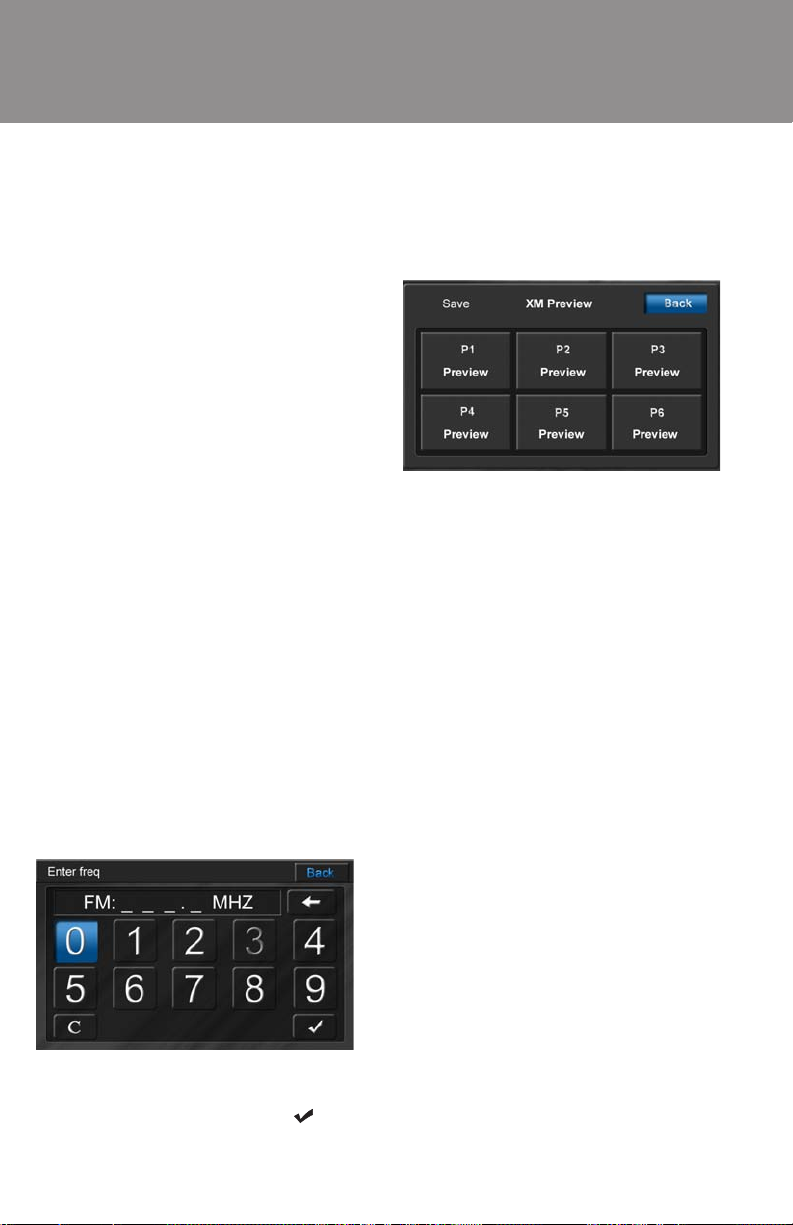
Enter the desired radio frequency using
the keypad, and then press the check
mark ( ) to tune to that frequency.
10
Page 11

Loading Media
Loading Media
Load Disc:
Playback begins automatically when a
disc is inserted.
You can play video, audio or images
stored on the following discs:
• DVD Video, DVD-R, DVD-RW
• VCD
• Audio CD, CD-R, CD-RW
Eject Disc:
Press the
to eject the disc. When the disc is
ejected, the unit switches to the previous source.
Connect USB/iPod Device:
1. Open the AV/INPUT cover (or access the rear iPod connector).
2. Connect your USB/iPod cable to
the front or rear USB input. Connect the other end of the cable to
your USB/iPod device. When an
iPod is attached, the corresponding source menu icon will display
an iPod icon. For viewing iPod
video, connect your jLinkUSB
cable (optional) to the USB and
3.5mm connectors on the front or
rear of the radio.
button on the front panel
NOTE: The rear 3.5mm female connector bundled with the USB connector is
for iPod video only. This is not an audio
input and only works when an iPod is
connected for video playback.
Remove the USB/iPod Device:
1. Select another source from the
main menu.
2. Remove the USB/iPod device.
Insert SD Card:
1. Open the AV/INPUT cover.
2. Insert the SD Card into the SD
card slot. Play starts automatically.
SD card slot supports MP3, WMA,
MPEG 1/2 and XviD formats.
Remove the SD Card:
1. Select another source on the main
menu.
2. Press the card in to release.
3. Remove the SD card.
11
Page 12

Audio Disc
Audio Menu (iPod, USB, Disc, SD)
MENU:
Press to access the “Main Menu” (see
“Main Menu” on page 6). From the Main
Menu, you can choose the source for
the front and rear zone TFT screens,
change the background wallpaper, or
select the “Settings” menu to adjust a
variety of system features.
Clock Display:
Displays the time (12:19 AM) as entered by the user in the Settings Menu,
clock function.
Random:
Press to access the random play function. This function will play the songs on
the CD in a random, shuffl ed order.
In random play mode, pressing Next
or Previous will also select tracks in
a random order instead of the normal
progression. Additional presses will
select tracks in random order. Press the
random play (
random play mode.
Repeat:
Press during disc playback to repeat
playback of the current song. The
icon will appear. Press the icon a
second time to repeat all tracks in the
current folder. Press again to turn the
repeat function off.
EQ
(Equalizer):
Touch to access the audio control menu
to adjust audio settings (see “Audio
Control Menu” on page 8).
Mute:
Press to mute the volume. A mute indication will appear on the speaker icon
and the volume will be muted.
) icon to cancel the
Previous:
Press to play the previous track on the
disc. Press and hold to fast reverse.
Next:
Press to play the next track on the disc.
Press and hold to fast forward.
Direct Entry:
Press to access the direct access song
selection keyboard. Enter the desired
track number and press the check mark
) to play the selected track.
(
Play/Pause:
Press to begin playback. Press again
to pause playback.
List:
Press once to view a list of the tracks
contained on the disc. Press the Up/
Down buttons to navigate the list of
tracks or touch the track title. Once
highlighted, touch the track title again
to play.
Press the List space twice (List and
then Return) to view a list of folders
on the disc. Press the Page Up/Page
Down buttons to navigate the list of
folders or touch the folder name. Once
highlighted, touch the folder name
again to view the track titles in the
selected folder. Repeat above process
to select a track.
12
Page 13
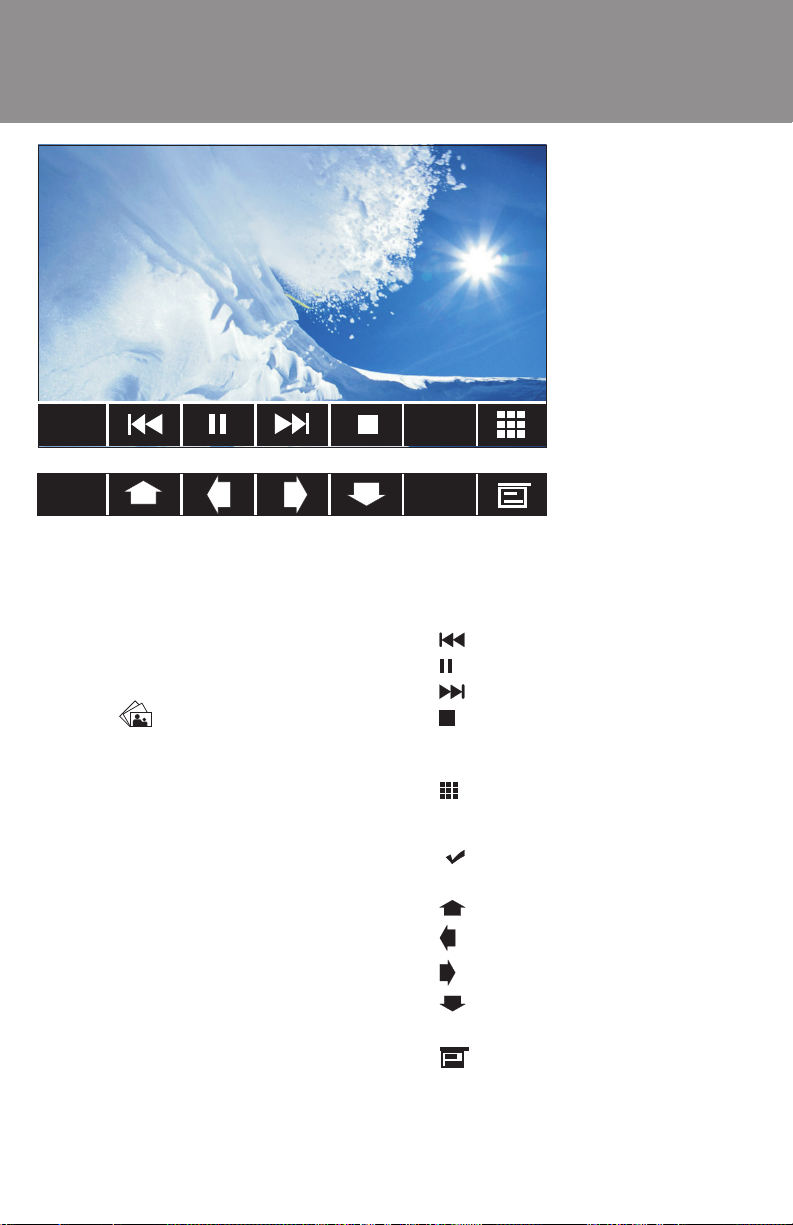
JPEG/MPEG
1/2
2/2
JPEG Image Mode
Navigating Files:
When a disc containing JPEG fi les is
loaded in the unit, the Root Menu appears automatically. The Root Menu
will display the contents of the disc.
Touch the
the screen (under the music note and
fi lm strip) to view a display of the images or image folders contained on the
disc or card/device. JPEG images can
be stored on the disc/card device as
individual images or in folders.
When the fi le/folder list is displayed,
press to select a folder or image name.
Press again to display an image fi le
or show contents of the folder. Repeat
until the desired image is shown.
NOTE: Touch the top of the screen to
view fi le information, including fi le type
and number of fi les.
NOTE: On-screen controls do not work
with iPod/iPhone images. You must
use the iPod controls when displaying
images stored on an iPod.
image on the left side of
Rotate
Zoom
JPEG Menu Screen:
• 1/2: Show 2nd page of controls.
•
• : Pause slideshow.
• : View next photo.
• : Stop and return to previous
• Rotate: Rotate image clockwise.
•
• 2/2: Show 1st page of controls.
•
• : Shift image view left.
•
• : Shift image view downward.
• Zoom: Increase image size.
•
: View previous photo.
screen.
: Press to display the direct
access keyboard. Enter a fi le num-
ber, then press the check mark
( ) to display.
: Shift image view upward.
: Shift image view right.
: Display image fi le information
at the top of the screen.
13
Page 14

JPEG/MPEG
Audio
MPEG Video Mode
Navigating Files:
When loading a disc or device containing multiple MPEG, or a combination of
media fi les, the Root Menu appears au-
tomatically. The Root Menu will display
the contents of the disc, card or device.
If only one MPEG fi le exists, playback
will begin automatically.
Touch the fi lm strip image on the left
side of the screen (under the music
note) to view a display of the MPEG
fi les or folders contained on the disc or
card/device. MPEG fi les can be stored
as individual fi les or in folders.
When the fi le/folder list is displayed,
press to select a folder or fi le name.
Press again to play a fi le or show
contents of the folder. Repeat until the
desired fi le is played.
Sub
Title
MPEG Menu Screen:
•
•
• : View next fi le.
•
• Audio: Direct audio to eft, right or
• SubTitle: Display subtitles, when
•
NOTE: Touch the top of the screen to
view fi le information including fi le type,
elapsed and remaining playing time,
and number of fi les.
: View previous fi le.
/ : Pause playback. Press
again to play.
: Stop and return to previous
screen.
stereo output.
available.
: Press to display the direct
access keyboard. Enter a fi le num-
ber, then press the check mark
( ) to play.
14
Page 15

1/2
DVD
2/2
Audio
Sub
Title
Repeat
DVD Mode
Accessing DVD Mode:
When a DVD disc is loaded in the unit,
playback begins automatically. To access DVD mode from the Main Menu,
select the “Disc” icon.
DVD Touchscreen Areas:
Touch the areas indicated below to access on-screen options:
A
• Touch A to access the main menu.
• Touch B to view disc information,
including fi le type, elapsed and
remaining playing time, title and
chapter number. Press twice consecutively to view audio, subtitle,
angle and bitrate information.
• Touch C to view on-screen con-
trols.
B
C
ANGLEA-B
DVD On-Screen Controls:
• 1/2: Show 2nd page of controls.
: Stop disc playback. Press again
•
to resume playback.
• : Select previous chapter.
• / : Pause playback. Press
again to play.
•
• : Fast reverse at 2x, 4x, 8x and
•
• 2/2: Show 1st page of controls.
• Audio: Select the audio language.
• SubTitle: Select the subtitle
: Advance to next chapter.
20x. Press again to resume normal
playback speed.
: Fast forward at 2x, 4x, 8x and
20x. Press again to resume normal
playback speed.
Each time the icon is pressed a different audio language is selected.
language (if the disc is recorded in
multiple languages). Each time the
icon is pressed a different subtitle
language is selected. This function
can also be turned on or off.
15
Page 16

JPEG/MPEG
DVD Mode
• Repeat: Repeat the current chapter. Press the icon a second time to
repeat the current title. Press the
icon a third time to turn the repeat
function off.
• A-B: Repeat a specifi c portion
from point A to point B of the disc.
During playback press A-B to set
the starting point A. Press A-B a
second time to set the ending point
B. The player will repeatedly play
the part between Point A and Point
B. Press A-B a third time to cancel
A-B repeat and resume playback.
• ANGLE: Some DVDs contain
scenes that have been shot simultaneously from different angles.
For a DVD disc recorded with multiple angles, press the ANGLE button to toggle the available angles
of the on-screen image.
: Display the direct access
•
keyboard.
Chapter:_
2
7
Title
3
8
Goto
0
1
5
6
Clear Menu
Press the button to choose
Chapter or Title entry. Next, enter
a chapter or title number, and then
press the check mark (
You can also choose Menu to access the DVD root menu or Title to
access the DVD title menu.
Press Clear to clear your entry and
start over.
Press Goto to view the DVD
search screen.
16
X
4
9
) to play.
Page 17

Bluetooth Menu
Bluetooth
Entering Bluetooth Mode:
To enable Bluetooth mode, press the
unit’s front panel MENU button. Next,
press the Settings icon on page 2 of
the Setup menu. Select the Bluetooth
submenu and set the “Bluetooth” option
to “On”.
Select the Bluetooth icon from the main
menu to acces the Bluetooth screen.
Previously paired phones (if applicable)
are listed in the center of the screen.
Use the up/down buttons to navigate
the list.
Initial Bluetooth Menu:
• MENU: Press to access the “Main
Menu” (see “Main Menu” on page
6). From the Main Menu, you can
choose the source for the front and
rear zone TFT screens, change the
background wallpaper, or select
the “Settings” menu to adjust a
variety of system features.
• Device Status (no device connected)
• Clock Display: Displays the time
(12:19 AM) as entered by the user
in the Settings Menu, clock function.
• Back: Return to previous screen.
• Up: Move up the menu list.
• Down: Move down the menu list.
• Connect Phone: Initiate pairing or
reconnect highlighted phone.
• Delete: Remove highlighted phone
from list.
• Setup: Open pop-up menu to view
Bluetooth setup options.
17
Page 18

Bluetooth
Connecting to a Bluetooth device
Bluetooth® technology has the capability to wirelessly synchronize and transfer data among devices. The Bluetooth
audio capabilities can be used for
wireless phones hands-free applications. Bluetooth has many profi les
and the unit is compatible with most
Bluetooth enabled wireless phones.
Before attempting to use the Bluetooth
functions on the unit, please make sure
your wireless phone supports Bluetooth
functions.
NOTE: The line-of-sight distance between this unit and your cellular phone
must be 30 feet (10 meters) or less for
sending and receiving voice and data
via Bluetooth wireless technology.
Before using Bluetooth functions, you
must pair your wireless phone and the
unit. Pairing is a special process used
when two devices connect for the fi rst
time. The pairing process is used to
generate a link key that is used for
authentication purposes for future Bluetooth connections between devices.
Refer to the procedures for “Pairing
Your Wireless Phone” and “Pairing a
Wireless Phone and the Unit.”
Pairing Your Wireless Phone:
Your wireless phone can be paired
with the unit in two manners. The unit
can initiate the search for compatible
devices and pair to the wireless phone
or the wireless phone can initiate the
search and pair to the unit. The following paragraphs describe both methods.
NOTE: The following procedures are
generic. Procedures for pairing wireless
phones may vary slightly from phone
manufacturer to phone manufacturer.
Compatibility with all Bluetooth devices
is not guaranteed.
Pairing a Wireless Phone and the
Unit:
1. Select the Bluetooth setup op-
tion on the wireless phone to be
paired (please refer to the wireless
phone’s instruction manual to enter
Bluetooth setup, turn Bluetooth on/
off, and perform pairing). Access
the wireless phone Bluetooth function and set the Bluetooth function
to ON.
2. Set your wireless phone Bluetooth
discover mode to ON.
NOTE: Some discover modes
have a time limit, usually a minute,
before they are automatically
turned off.
3. Use the wireless phone’s add a
new device feature. A device or devices will appear on your wireless
phone display.
NOTE: Some phones require a
“pass key” or pairing code to connect. If your phone requires a pass
key or pairing code, you will need
to enter this number in the Pairing
Code fi eld under the Bluetooth
SETUP menu. The default pairing
code for many wireless phones is
“1234”. The default code for the
unit is “0000”.
4. A prompt to pair or bond should
appear on your wireless phone.
Accept the request and initiate the
process.
5. A prompt to enter a PIN number or
passkey for the unit should appear.
The default pass key for the unit is
“0000”.
6. At this point a prompt stating
pairing successful should appear.
Another prompt should appear
18
Page 19

Connecting to a Bluetooth device
Bluetooth
asking connect to the unit, “Yes”
or “No”. Press Yes. The wireless
phone and the unit should pair
and the wireless device name will
appear at the top of the screen.
Once the Bluetooth main menu appears on the unit’s front panel the
wireless phone and the unit have
paired.
Pairing the Unit and a Wireless
Phone:
1. Press the front panel MENU
button and then press the
“Bluetooth” icon to access
the Bluetooth main menu.
discover mode to ON.
NOTE: Some discover modes
have a time limit, usually a minute,
before they are automatically
turned off.
4. On the Bluetooth main menu press
the Connect Phone button.
5. Follow the prompts on your wireless phone to initiate pairing.
At this point the wireless phone
will ask the user to respond to a
prompt similar to “Pairing request
from ADVUV630 Accept? Yes or
No “. The user should answer Yes
to the request. Another prompt will
appear on the wireless phone to
enter the PIN or pass key.
6. Enter the PIN or pass key for
the unit (0000). Acknowledge
the unit’s PIN or pass key on
the wireless phone by pressing
(ENTER, OK etc.). The following screen should appear.
2. Select the Bluetooth setup option on the wireless phone to be
paired (please refer to the wireless
phone’s instruction manual to enter
Bluetooth setup, turn Bluetooth on/
off, and perform pairing). Access
the wireless phone Bluetooth function and set the Bluetooth function
to ON.
3. Set your wireless phone Bluetooth
Once the Bluetooth main menu appears on the unit’s front panel, the
wireless phone and the unit have
paired.
NOTE: Any obstacle between this unit
and a Bluetooth device can reduce the
operational range.
NOTE: Keep this unit away from any
other electronic devices that may cause
interference.
19
Page 20

Bluetooth
Bluetooth Setup Menu
To access the Bluetooth “Options”
menu, press the Setup button.
Bluetooth:
Choose to turn the Bluetooth feature
“On” or “Off.”
Auto Connect:
The “Auto Connect” option will allow the
unit to automatically connect to a previously paired Bluetooth device when
it is in range. When the Auto Connect
option is set to “Off”, you must initiate
the pairing process with your wireless
phone. To enable the Auto Connect option, set this feature to “On.”
Auto Answer:
When this feature is set to “On,” the
unit will automatically answer calls
coming into the paired device.
Pairing Code:
Choose the “Pairing Code” option to access a keyboard allowing you to enter a
new pairing code to be used when pairing this unit to your bluetooth devices
(the default code is “0000). Enter a new
4-digit pairing code and then press the
check mark (
).
To correct errors made while typing,
you can press the C button to clear the
entire entry or the back arrow (
delete the last digit entered.
Press the Back button to return to the
main Bluetooth menu without changing
the code.
Phone Book Sync:
Before you can use Phone Book list,
you must fi rst initiate the Phone Book
Sync feature. This will also update your
list of Missed Calls, Received Calls,
and Dialed Calls.
After choosing “Phone Book Sync” from
the menu, the unit will display the message “Sync Current Device’s Phonebook?” Press the check mark (
begin syncing or click the X to cancel
and return to the main Bluetooth menu.
Back:
Press the Back button at any time to
return to the main Bluetooth menu
without making changes to the above
options.
NOTE: Not all wireless phones allow
access to missed, received or dialed
calls or address book support.
) to
) to
20
Page 21

Disconnecting
Bluetooth
Deleting a paired wireless device:
1. Press the front panel MENU button and then press the Bluetooth
icon to access the Bluetooth main
menu.
2. Touch to select the phone model
number you want to delete and
then press the Delete button.
Disconnect a Bluetooth device:
To disconnect a device, press the Disconnect Phone button.
The device will also be disconnected
when the device is moved beyond the
operational range (approximately 30
feet). When the “Auto Connect” feature
is set to “On,” you can reconnect the
device to the unit by placing it within the
operational range.
If you do not want to reconnect the device to the unit automatically, set Auto
Connect” feature to “Off.”
21
Page 22
Bluetooth
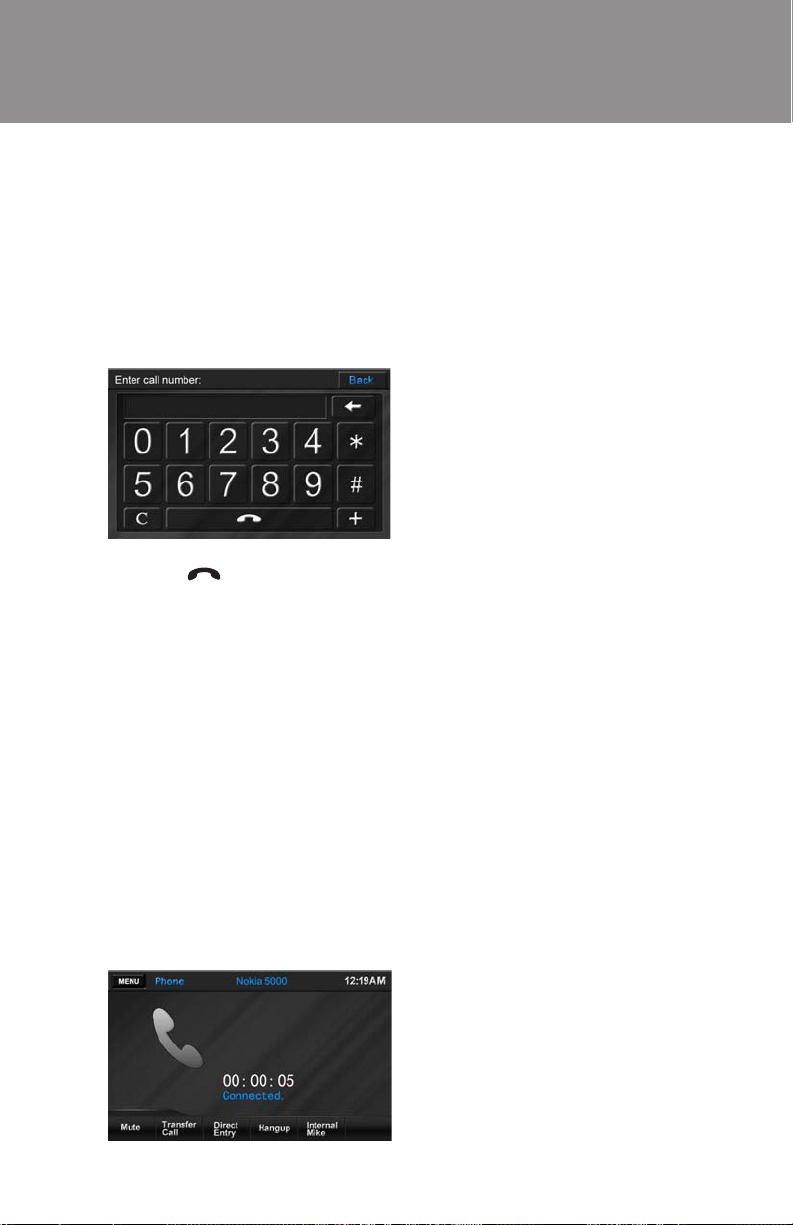
Making Calls
Make a call (keypad direct entry):
1. Press the front panel MENU but-
ton and then press the Bluetooth
icon to access the Bluetooth main
menu.
2. Pair the phone with the unit.
3. Press the Direct Entry but-
ton to view the keypad.
4. Enter a phone number and then
press the button.
Make a call (using lists):
1. Press the front panel MENU but-
ton and then press the Bluetooth
icon to access the Bluetooth main
menu.
2. Pair the phone with the unit.
3. Touch to view one of the following
phone lists: Missed Calls, Received Calls, Dialed Calls or Phone
Book. If you did not yet sync your
phonebook, see “Bluetooth Setup
Menu” on page 20 for syncing instructions.
4. Use the Up/Down buttons to navi-
gate the list.
5. Touch to select a number.
6. Touch the number again to dial.
Cancel call in progress:
To cancel a call in progress, touch the
Hangup button at the bottom of the
screen.
Transfer call in progress:
To transfer a call in progress from the
radio back to the mobile device, press
the Transfer button at the bottom of the
screen.
Mute call:
To mute the phone call audio from the
unit when a call is received, press the
Mute button. Press the Mute button again and the phone call will be
restored to the unit.
External Microphone:
When a call is received, you can communicate with the caller using the unit’s
internal microphone or an optional external microphone. An external microphone (included with the ADVUV630)
will, in some instances, improve the
sound quality during communication.
The default setting for the unit is the
internal microphone. Pressing the
External Mic button will enable audio
output to the optional external microphone (if connected).
22
Page 23

Managing Incoming Calls
Bluetooth
Managing Incoming Calls:
When connected to a Bluetooth phone,
the unit will mute audio output, pause
disc play, and change to the Bluetooth
screen when a call is received.
The incoming phone number and
assigned name for that number will
appear in the middle of the screen. An
audible tone will sound from the unit
and a graphic display will appear on the
front panel. If the incoming call has no
caller ID, the unit will display “Private
Caller”.
Answering an Incoming Call:
To answer the call, press the Call button. For best reception, speak loudly
and clearly toward the external microphone. To end the conversation, press
the Hangup button.
Rejecting an Incoming Call:
Press the Hangup button to reject
an incoming call. The call will revert
to your wireless phone and be left for
voice mail.
Volume Control:
To increase or decrease the volume
level, turn the PWR-VOL knob on the
front panel.
Audio Mute:
To mute the phone call audio from the
unit when a call is received, press the
Mute button. Press the Mute button again and the phone call will be
restored to the unit.
23
Page 24

Rear Camera
Camera Function
Rear Camera Function:
The unit is “camera ready.” Before accessing any camera features, you must
install a rear video camera. When the
camera is not installed and the function
is accessed by the gear selector being
placed in reverse or the unit’s menu,
touching the Camera icon produces
no response. When the camera is
installed, the rear view image of what is
behind the vehicle will appear when the
vehicle’s gear selector lever is placed
in reverse. When the lever is removed
from the reverse position, the unit will
return to the previous screen.
The rear camera image can be adjusted from the “Setup” menu under the
“Video” submenu. The image can be
changed from normal to mirror image.
24
Page 25

Rear Display Function
The unit allows two sources to be
played simultaneously. For example,
the unit’s screen can be set to the radio
function while the rear passengers can
watch a DVD video using an optional
rear monitor.
The unit provides for connection of up
to two additional monitors (sold separately) for rear passengers.
Perform the following to access the
Rear TFT function:
1. Turn on the rear monitor. Refer to
the monitor’s owner’s manual for
instructions.
2. Insert the media (DVD, CD etc.) to
be viewed into the unit.
3. Press the unit’s touch screen
MENU button and select the Rear
TFT icon on the second page of
menu options. The Rear TFT menu
options appear on the screen.
4. Use the MENU icons (Disc, SD,
Front USB, Rear USB, AV IN1, AV
IN2, Rear Off and Front TFT) to
select the playback source for the
Rear TFT.
5. Control the rear zone function
6. Use the Front/Rear TFT button at
the bottom of the screen to switch
between front and rear MENU
options.
NOTE: You cannot change or control
the front zone source from the rear
zone video screen.
Rear Camera
25
Page 26

iPod/iPhone (Front USB/Rear USB)
iPod/iPhone Music Menu
Accessing iPod Mode:
Press to access the “Main Menu” (see
“Main Menu” on page 6). Connect a
supported iPod or iPhone to the Front
or rear USB connector. The iPod icon
appears instead of the USB icon whenever an iPod or iPhone is attached
to the Front or Rear USB connector.
Press the Front iPod or Rear iPod
icon to access iPod mode.
Music playback begins automatically.
Clock Display:
Displays the time (12:19 AM) as entered by the user in the Settings Menu,
clock function.
Random:
This function will randomly reorganize
all fi les on the iPod for playing in the
new random order. You can view the
random song order by pressing the List
button. Press once to play all songs in
random order. The
Press twice to play the current album in
random order. Press the random play
(
) icon a third time to cancel ran-
dom play mode.
icon appears.
In random play mode, pressing Next
or Previous will select songs in the
random order (as indicated on the List
screen) instead of the normal progression.
Repeat:
Press during disc playback to repeat
playback of the current fi le. The
icon will appear. Press the icon a
second time to repeat all music fi les on
the iPod. Press a third time to turn the
repeat function off.
EQ
(Equalizer):
Touch to access the audio control menu
to adjust audio settings (see “Audio
Control Menu” on page 8).
Mute:
Press to mute the volume. A mute indication will appear on the speaker icon
and the volume will be muted.
:
Press to play the previous fi le. Press
and hold to fast reverse.
:
Press to play the next fi le. Press and
hold to fast forward.
26
Page 27
iPod/iPhone (Front USB/Rear USB)
iPod/iPhone Music Menu
Direct Entry:
Press to access the direct access song
selection keyboard. Enter the desired
track number and press the check mark
(
) to play the selected track.
/ :
Press to begin playback. Press again
to pause playback.
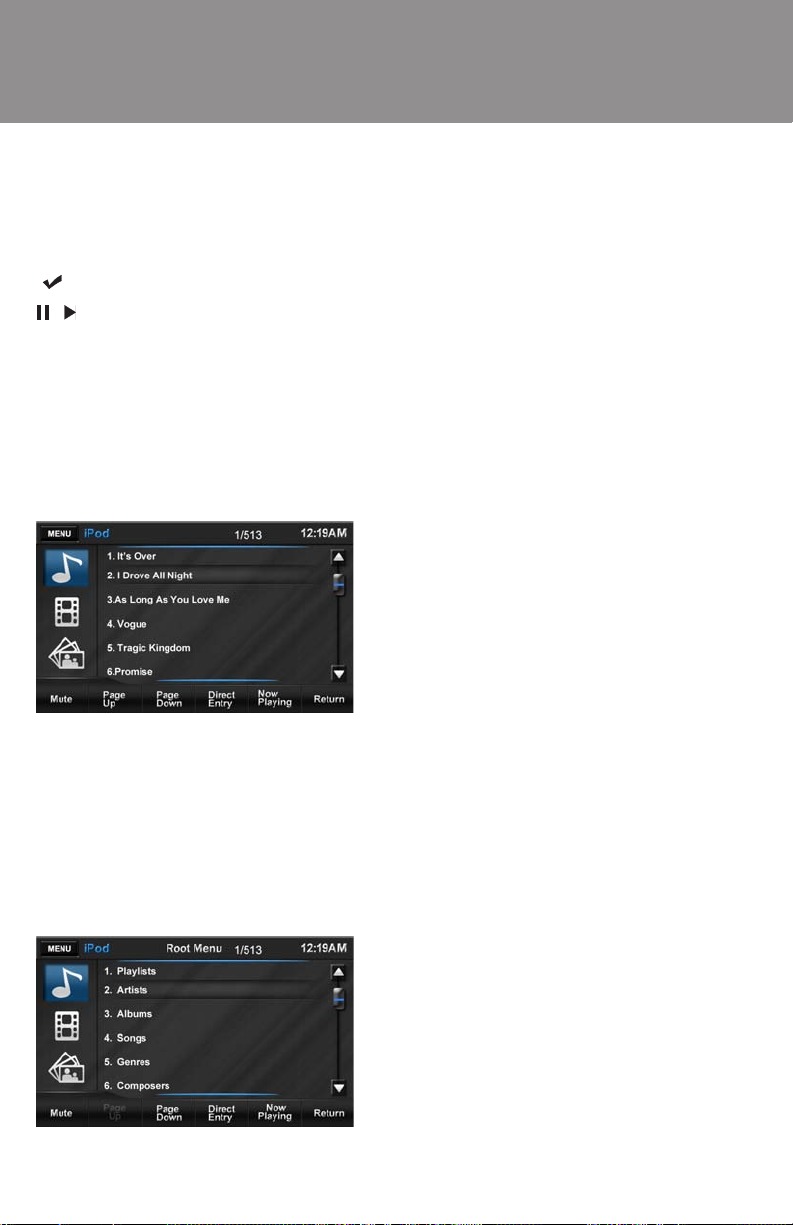
List:
Press once to view a list of the fi les
contained on the iPod. Press the onscreen arrows to navigate the list of
fi les or touch to select. Once highlighted, touch the fi le name again to play.
Press the Page Up/Page Down buttons to navigate screen lists. Once
highlighted, touch to view options inside
a folder. Repeat above process to
select a fi le.
Press the List space twice (List and
then Return) to view the iPod music
menu.
• Playlists: Provides a list of all
the Playlists that are stored in the
iPod. Pressing the Playlist name
will provide the song associated
with Playlist. Pressing the title
name will begin playback of the
song.
• Artists: Provides a list of the performers that are stored in the iPod.
Pressing the performers name will
provide the title associated with the
performers. Pressing the title name
will begin playback of the item.
• Albums: Provides a list of the
albums that are stored in the iPod
Pressing the albums provides the
title name. Pressing the title name
will begin playback of the item.
• Songs: Provides a list of the songs
and audio items that are stored in
the iPod. Pressing the title name
will begin playback of the item.
• Genres: Provides a list of the
categories that are contained in the
iPod. Pressing the Genres icon will
result in the artist names comprising the genre to be displayed.
Pressing the artist’s name will
display the title name. Pressing the
title name will begin playback of
the item.
• Composers: Provides a list of
composers of that are stored in
the iPod. Pressing the composer’s
name will display the song’s title.
Pressing the title name will begin
playback of the item.
• Podcasts: Provides a list of
podcasts that are stored in the
iPod. The podcasts usually consist
of a series of digital audio fi les.
Pressing the title name will begin
playback of the podcast.
27
Page 28

iPod/iPhone (Front USB/Rear USB)
iPod/iPhone Video Menu iPod/iPhone Photo Menu
Press the fi lm strip icon on the left side
of the screen (under the music note) to
view the iPod movie menu.
NOTE: You must use the optional jLink
USB cable to view iPod video on this
unit.
• MOVIE: Provides a list of all the
movies that are stored in the iPod.
Pressing the movie’s name will
begin playback of the movie.
• RENTAL: Provides a list of rental
videos that are stored in the iPod.
Pressing the title name will begin
playback of the rental video.
• TV SHOWS: Provides a list of the
TV shows that are stored in the
iPod. Pressing the title name will
begin playback of the item.
• MUSIC VIDEOS: Provides a list of
the music videos that are stored in
the iPod. Pressing the music video
name will begin playback of the
music video.
• VIDEO PLAYLISTS: Provides a
list of all the Video Playlists that
are stored in the iPod. Pressing
the title name will begin playback
of the video.
• VIDEO PODCASTS: Provides a
list of podcasts that are stored in
the iPod. The podcasts usually
consist of a series of digital video
fi les. Pressing the title name will
begin playback of the podcast.
Touch the
the screen (under the music note and
fi lm strip) to switch to iPod control and
display iPod images on the unit’s TFT
screen.
You cannot directly control iPod image
playback using the on-screen controls.
You must use the iPod menu to control
the images displayed after selecting
iPod photo mode.
image on the left side of
28
Page 29

Auxiliary Audio/Video Input
AV IN1/AV IN2 Input
A V IN1 Auxiliary Audio/Video Input:
The unit contains an auxiliary audio/
video input which can accept signals
from various audio/video devices. The
A/V INPUT on the front panel (reference Item 9, Controls and Indicators)
accepts a 3.5mm connector which has
three female color coded RCA connectors on the opposite end. The yellow is
used for video, the red accepts the right
channel audio and the white accepts
the left channel audio.
Perform the following steps to access
audio/video using the unit’s A/V INPUT:
1. Turn on the video /audio source
component. Refer to the owner’s
manual for instructions.
2. Connect the device’s output signal
to the unit using the three RCA
inputs (Yellow= Video, Red=Right
Audio, White=Left Audio).
3. Press the unit’s on-screen MENU
button and select AV IN1.
4. Use the controls located on the
device to begin playback and other
control functions.
A V IN2 Auxiliary Audio/Video Input:
The unit contains a rear auxiliary audio/
video inputs (AUX IN R, AUX IN L, AUX
IN VIDEO) which can accept signals
from various audio/video devices. The
yellow is used for video, the red accepts the right channel audio and the
white accepts the left channel audio.
Perform the following steps to access
audio/video inputs using the unit’s
REAR AUX IN:
1. Turn on the video /audio source
component. Refer to the owner’s
manual for instructions.
2. Connect the device’s output signal
to the unit using the three RCA
inputs (Yellow= Video, Red=Right
Audio, White=Left Audio).
3. Press the unit’s on-screen MENU
button and select AV IN2.
4. Use the controls located on the
device to begin playback and other
control functions.
29
Page 30

XM Satellite Radio (Optional)
XM Radio Menu
Listeners can subscribe to XM® Radio
on the Web by visiting www.xmradio.
com, or by calling (800) 967-2346.
Customers should have their Radio ID
ready (see “Displaying the Identifi cation
(ID) Code”). Customers can receive a
limited number of free-to-air channels
without activation.
Accessing XM Radio Mode:
To access Radio mode from the Main
Menu, select the “XM” icon.
Viewing the Identifi cation (ID) Code:
Before you listen to satellite radio, you
must subscribe to the service using
your radio’s identifi cation number. To
display the radio ID, use the Channel
) / buttons to tune to channel
“000”. The screen displays the radio
ID where the channel name is usually
displayed.
MENU:
Press to access the “Main Menu” (see
“Main Menu” on page 6). From the Main
Menu, you can choose the source for
the front and rear zone TFT screens,
change the background wallpaper, or
select the “Settings” menu to adjust a
variety of system features.
Band Indicator:
Indicates the frequency band currently
playing (BAND 1, BAND 2 or BAND 3).
Signal Strength Indicator:
As the strength of the satellite radio
signal increases, the number of illuminated segments will increase.
Clock Display:
Displays the time (12:19 AM) as entered by the user in the Settings Menu,
clock function.
EQ
(Equalizer):
Touch to access the audio control menu
to adjust audio settings (see “Audio
Control Menu” on page 8).
Channel:
Use the next arrow (
arrow (
channels.
Category:
Use the next arrow ( ) or previous
arrow ( ) to view the available XM
categories. Categories group music by
type such as jazz, rock, classical etc.
P1 - P6:
Provides a display of the preset
) to tune to available XM
) or previous
30
Page 31
XM Radio Menu
XM Satellite Radio (Optional)
frequencies. Press to recall preset stations.
Mute:
This button is used to mute the volumefrom the radio. By pressing the button,
a Mute indication will appear on the
speaker icon and the volume will be
muted.
Band:
Press to select or change the radio
band (Band 1, Band 2 or Band 3).
When the band is changed the presets
associated with the band will also be
displayed.
Scan:
Press to access the Auto-Store Tuning
feature which will automatically scan
and enter up to six strong stations into
the six preset memory locations. If you
have already set the preset memories
to your favorite stations, activating the
Auto-Store feature will erase those
stations and enter the new strong stations. This feature is most useful when
travelling in an area where you are not
familiar with the local stations.
Direct Entry:
Press to access the direct tuning keyboard.
Mem:
Press to view the “Save” screen and
store the current frequency to a preset
memory position.
Touch one of the boxes labeled “P1””P6” to store the current frequency in
that preset memory position. To cancel,
press BACK. The channel can now be
recalled at any time by pressing that
preset.
Channel Guide:
When pressed, a channel list is displayed with the current channel in play
highlighted. Use the up/down arrows
and scroll bar on the right to view the
available XM radio channels.
Enter the number corresponding to a
desired XM channel using the keypad,
and then press the check mark (
tune to that frequency.
) to
31
Page 32
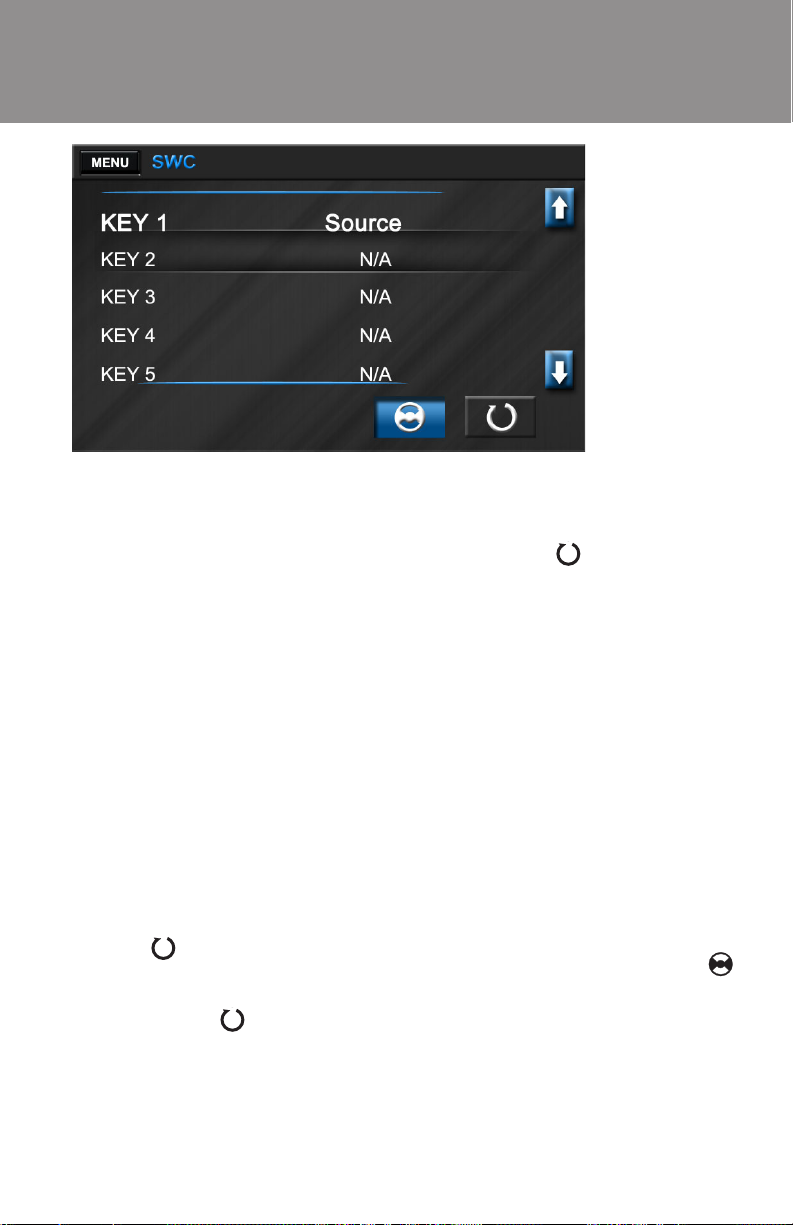
SWC (Steering Wheel Control)
SWC Menu
The ADVUV630 is compatible with the
PAC (Pacifi c Accessory Corporation)
steering wheel control adapter SWI-PS.
A 3.5mm female connector (labeled
“SWC”) on the back of the head unit
allows connectivity to the PAC adapter.
Please refer to the instructions included
with the PAC adapter for detailed installation information. The steering wheel
control option allows you to program
your existing steering wheel controls to
work with the ADVUV630.
Accessing the “SWC” Menu:
To access SWC mode, select the
“SWC” icon on page 2 of the Main
Menu.
NOTE: Before you begin, you MUST
press the
programming options. If a mistake is
made during the programming se-
quence, press the button to clear all
settings and start over. Otherwise, the
steering wheel control function may not
function properly.
button to clear any prior
Programming Keys 1-7:
1. Press the
existing program settings.
2. Touch the option (N/A) next to
each Key number to open a
window with possible programming options (use the up/down
arrow buttons on the right side of
the screen to view additional Key
choices).
3. Use the up/down arrows to navigate the list. Touch to select the
desired function for the selected
Key number.
4. Continue with Key 1 - Key 7 (Keys
+1 through +7 are reserved for
future use).
5. After selecting a desired function
for each Key (1-7), press the
button to begin programming your
choices to the buttons on your
steering wheel control. Follow the
on-screen commands to complete
this process, pressing the left/right
arrow buttons to move between
Key selections.
button to clear any
32
Page 33

Settings Menu
System Settings Menu
Accessing the “Setup” Menu:
Press MENU to access the “Main
Menu.” Press Next to view a second
page of menu options and then select
the Settings icon.
Accessing Menu Items:
Press the submenu feature you wish
to adjust (Video, General, etc.). The
submenu feature for adjustment will
be highlighted. Pressing the feature
will display the adjustable parameters.
Available menu options are as follows:
Video Menu Options:
• Aspect Ratio: Choose Full
• Rear Camera: The Rear Camera input can be displayed on
the unit’s front panel in “Normal
View” or a “Mirrored View”. In the
“Mirror View” the camera image
is reversed as if looking through a
rear-view mirror.
General Menu Options:
• User Interface Color: Choose
White, Red, Blue, Amber or Green
to determine the accent color for
buttons and specifi c text for on-
screen menus.
• Tuner Region: Choose the region
that corresponds with your location
(USA or Europe).
• TFT Standby: Select the length
of time to pass before the TFT
standby feature activates (10 seconds or 20 seconds).
• RGB Light: The RGB light illuminates the front panel buttons
(eject, PWR-VOL, etc.) There are
8 preset colors and 3 custom color
options. Choose the “Scan Color”
option to preview the 8 preset color
options. Press to select a color.
The Edit Color menu allows you to
design a custom color. To begin,
touch the Edit Color option and
then press to highlight Custom 1,
2 or 3. Touch Adjust to open the
“Edit Color” window. To choose a
custom color, drag across the color
bar or input the RGB value using
the +/- arrow buttons on the right
side of the screen.
Touch Initialize to load (factory installed) the original backlight color.
• Beep: An audible beep tone occurs
when front panel or on-screen control buttons are pressed. The beep
tone can be disabled by setting this
33
Page 34

System Settings Menu
Settings Menu
option to “Off.”
• Wallpaper: Choose a preferred
wallpaper image (Black, Shore
Waves, Lotus Flower, Smart Cars,
Dense Flowers, User Defi ned)
to be displayed behind the Main
Menu options. Select the “User
Defi ned” option to load up to 12
user-defi ned wallpaper images us-
ing the Micro-SD slot located at the
top right corner of the front panel
(labeled “MAP”).
• Calibration: This touch screen calibration adjustment is used to set
the parameters of the touch screen
to ensure that when the screen is
pressed that it corresponds to the
feature the user is selecting. To
calibrate the screen, fi rst select the
Touch Screen Calibration. Press
the Yes icon and it will be selected.
Follow the instructions on the
screen to press and briefl y hold the
stylus. The stylus will move to each
corner of the screen and fi nally to
the center. If the screen is pressed
the new calibration parameters will
be accepted. If the screen is not
pressed within the thirty seconds,
the new parameters will be disregarded.
Time Menu Options:
• Date: To adjust the date, press to
select the “Date” option and then
use the on-screen arrows to adjust
the month, day and year fi elds.
• Clock mode: Press to choose the
12 hour or 24 hour clock format.
• Time: To adjust the time, press to
select the “Time” option and then
use the on-screen arrows to adjust
the hour and minute fi elds.
Sound Menu Options:
• Subwoofer fi lter: This option
allows the Sub Filter Frequency
to be set to the following frequencies to optimize the audio output
for your vehicle: 80Hz, 120Hz or
160Hz.
• DRC: Set the Dynamic Range
Control to “On” for better playback
at low volumes.
Language Menu Options:
DVD subtitle and Menu options are
dependent on individual DVD discs. To
choose a default language, touch to
select the option and then use the onscreen arrows to choose from languages available on the current disc. Note
that the selected default language may
not be available on all discs.
• OSD: Select the on-screen language display.
• DVD Audio: Select the DVD audio
language.
• DVD Subtitle: Select the DVD
subtitle language.
• Disc Menu: Select the DVD menu
language.
Bluetooth Menu Options:
• Bluetooth: Turn the Bluetooth
function on/off.
• Auto Connect: When set to “On”,
if a previously paired device is
within range, the unit reconnects
to the device automatically. When
set to “Off” the user must manually
connect to paired devices.
• Auto Answer: Set to “On” to
answer incoming calls to a paired
device automatically. Choose “Off”
to manually answer incoming calls.
• Microphone: Choose to use the
built-in internal microphone or the
external (optional and included)
microphone.
• Pairing Code: Set the password
34
Page 35

Settings Menu
for pairing the unit with Bluetooth
devices.
DVD Rating Menu Options:
• Set Password: Set the password
to restrict playback of disc content
determined by the “Rating Level”
option. The default code is “4321.”
• Rating Level: Choose an appropriate rating level to be playing
without the use of a password.
Kid safe Acceptable for children.
G Acceptable for general
viewers.
PG Parental guidance recom-
mended.
PG-13 Unsuitable for children under
the age of 13.
PG-R Recommended that parents
restrict viewing by children
under 17.
R Parental approval recom-
mended for children under
the age of 17.
NC-17 Unsuitable for children under
the age of 17.
Adult Acceptable for adults only.
• Factory Default: Restore factory
default rating settings.
Volume Menu Options:
The Volume option allows you to adjust
the volume for a source automatically
when switching to that mode. To automatically increase volume for a source,
touch to select that source and then
use the on-screen arrow buttons to
choose an adjustment level from 1-12.
System Settings Menu
35
Page 36

Wallpaper
User-Defi ned Wallpaper
Accessing the “Wallpaper” Screen:
Press MENU to access the “Main
Menu.” Press Wallpaper to access the
“Wallpaper” screen.
You can also access the “Wallpaper”
screen from the “Setup” menu by
choosing the Settings button. Choose
“Wallpaper” from the “General” menu
and select the “User Defi ned” option.
You can store up to 12 JPEG or Bitmap
images in fl ash memory for use as
wallpaper.
Adding User-Defi ned Images:
1. Temporarily remove the Map data
card from the Micro SD slot labeled
“MAP” located at the top right
corner of the unit.
2. Load a micro SD card with pre-
ferred wallpaper images (low resolution offers better performance)
into the Micro SD card. Wait a few
seconds for the images to load.
NOTE: DO NOT load or delete any
data from the MAP SD card.
3. Select the SD card button on the
“Wallpaper” screen to view the directories and the fi les on the card.
Select a directory and then press
the Enter button to view the directory contents. Press the
to the right side of the directory
name to go up a level.
4. Select a JPEG or Bitmap image
and then press the Enter button to
load it into fl ash memory and apply
as wallpaper.
5. Remove the Micro SD card containing the wallpaper images and
replace the map data card.
Reviewing and Selecting Stored
Images:
Press the Back button to view images
stored in fl ash memory. Use the up/
down arrows on the right to navigate
the list. Select an image to see a preview. Press the Enter button to use it
as wallpaper.
Deleting Stored Images:
To delete stored images, select the image and press the Delete button.
button
36
Page 37
Troubleshooting
Problem Cause Corrective Action
GENERAL
Unit will not power on Radio fuse blown Install new fuse with cor-
rect rating
Car battery fuse blown Install new fuse with cor-
rect rating
Illegal operation Press the RESET button
located in the bottom left
corner of the front panel
No/low audio output Improper audio output con-
nection
Volume set too low Increase volume level
Improper “MUTE” connection Review wiring diagram
Speakers damaged Replace speakers
Heavily biased volume bal-
ance
Speaker wiring is in contact
with metal part of car
Poor sound quality or
distortion
Unit resets itself when
engine is off
TFT MONITOR
No image Incorrect connection to park-
Flashing image or
interference appears
on screen
Prolonged image or
improper height/width
ratio display
Pirated disc is in use Use original copy
Speaker power rating not
compatible with unit
Speaker is shorted Check speaker contact
Incorrect connection between
ACC and positive battery wire
ing brake wire
Parking brake is not engaged Stop vehicle in safe place
DVD is not compatible with
current TV system settings
Improper video signal connections
Improper aspect ratio setup Use correct aspect ratio
Check wiring and correct
and check “MUTE” connection
Adjust the channel balance to the center position
Insulate all speaker wiring
connections
Connect proper speakers
Check wiring and correct
Check wiring and correct
and apply parking brake
Change setup to accom-
modate disc
Check wiring and correct
setting
37
Page 38

Troubleshooting
Problem Cause Corrective Action
TUNER
Weak station searching
Cannot insert disc Disc already inside unit Eject current disc and
Image blurred, distorted, or dark
Disc does not play
back
PBC cannot be used
during VCD playback
No repeat or searching while playing VCD
MP3
Interruption occurred
during playback
Vehicle antenna is not fully
extended
Vehicle antenna not properly
connected
LOCAL function is activated Use LO/DX button to turn
Disc is illegally copied Use original disc
Disc is warped or scratched Use disc in good condition
Disc is dirty or wet Clean disc with soft cloth
Laser pickup is dirty Clean laser pickup with
Incompatible disc is used Use compatible disc
Disc rating exceeds Parental
Lock rating limit
Disc region code is not compatible with unit
Disc is inserted upside down Insert disc with label side
PBC is not available on the
disc
PBC is on Turn PBC off
Disc is dirty or scratched Clean disc or replace
File is damaged/bad recording Recreate disc with good
Connect the vehicle
antenna control cable
properly
Connect the vehicle
antenna control cable
properly
LOCAL function off
insert new one
cleaning disc
Change Parental Lock
settings to lower restriction
Use disc with proper
region code
up
fi les
38
Page 39

Error Messages
Message Displayed Cause Corrective Action
Loading Disc is being read
No Disc Disc is dirty Clean disc with soft cloth
Disc is upside down Insert disc with label side up
Disc not present in loading
compartment
Bad Disc Disc is dirty Clean disc with soft cloth
Disc is upside down Insert disc with label side up
Unknown disc Disc format is not compat-
ible with this unit
Region Error DVD is not compatible with
region code of unit
Error Illegal mechanism operation Press the EJECT key for 5
Insert disc
seconds to reset the loading
mechanism
39
Page 40

Care and Maintenance
1. Use only a clean silicone cloth and neutral detergent to clean the front panel or
monitor. A rough cloth and non-neutral detergent (such as alcohol) may result in
scratching or discoloration.
2. Do not get water or cleaning fl uids on the unit.
3. If the temperature inside the player gets too hot, a protective circuit automatically
stops play of the disc. If this occurs, allow the unit to cool before operating the
player again.
4. Never insert anything other than a 5” (12 cm) compact disc into the player as the
mechanism can be damaged by foreign objects.
5. Do not attempt to use a 3” (8 cm) CD-Single disc in this unit, either with or without an adaptor, as damage to the player and/or disc may occur. Such damage is
not covered by the Warranty on this product.
6. The CD player may not operate properly in extreme hot or cold. If such conditions occur, allow the interior of the vehicle to reach a normal temperature before
using player.
7. When the vehicle warms up during cold weather or under damp conditions, condensation may appear on the LCD panel. Should this occur, the screen will not
operate properly until the moisture has evaporated.
8. We suggest you use a cleaning disc in this unit more frequently than in the unit in
your home due to the environmental conditions of the vehicle.
40
Page 41

Specifi cations
DVD/CD Player
Compatible Disc Media: DVD + R / RW (Single and Dual Layer) and CD-R / RW
Compatible Media Formats: CD-DA, MP3, WMA, VCD, SVCD, Xvid, AVI, MPEG1 / 2
Signal to Noise Ratio: > 95dBA
Dynamic Range: > 95dB
Frequency Response: 20Hz to 20 kHz, -3dB
Channel Separation: > 60dB @ 1 kHz
D/A Converter: High performance 24-bit / 192 kHz sample rate, Multi-Bit Sigma-Delta Modulator
Video
Format: NTSC, PAL (auto-detection)
Output: 1Vp-p (75-ohm)
Input: 1Vp-p (75-ohm)
FM Tuner
Tuning Range: 87.5MHz - 107.9MHz
Mono Sensitivity (-30dB): 9dBf
Quieting Sensitivity (-50dB): 15dBf
Alternate Channel Selectivity: 70dB
Signal to Noise Ratio @ 1 kHz: 58dB
Image Rejection: 80dB
Stereo Separation @ 1 kHz: > 30dB
Frequency Response: 30Hz - 15 kHz, -3d
AM Tuner
Tuning Range: 530 kHz - 1720 kHz
Sensitivity (-20dB): 15uV
Signal to Noise Ratio @ 1 kHz: 50dB
Image Rejection: 60dB
Frequency Response: 50Hz - 2 kHz, -3dB
Monitor
Screen Size: 6.2” (Measured diagonally), 16:9 Widescreen
Screen Type: High Defi nition TFT Liquid Crystal Display (LCD)
Resolution: 1,152,000 sub pixels, 800x3 (W) X 480 (H)
General
Auxiliary Input impedance: 10k
Power Supply: 11 to 16VDC, negative ground
Power Antenna (Blue): 500mA max, current limited protection
Amplifi er Remote (Blue/White): 500mA max, current limited protection
Operating Temperature: -20C ~ 65C
Fuse: 15-amp, mini ATM type
DIN chassis dimensions: 7” X 7” X 4” (178mm x 178mm x 50mm)
CEA Power Ratings
Power Output: 13 Watts RMS x 4 channels into 4-Ohms @ < 1% THD+N
Signal to Noise Ratio: 70dBA below reference (Reference: 1 Watt, 4-Ohms)
Frequency Response: 20 Hz - 20 kHz, -3dB. (Aux Input used as reference
input)
Reference Supply Voltage: 14.4VDC
*Specifi cations subject to change without notice.
41
Page 42

Audiovox Electronics Corporation
Hauppauge, NY 11788
T echnical Assistance: 1-800-323-4815
www.audiovox.com
© 2011 Audiovox
Ver. 011911
Printed in China
®
 Loading...