

Page 1

User Manual
TREK-722/723
RISC All-In-One Mobile Data
Terminal
Page 2

Copyright
Part No. Edition 1
Printed in Taiwan January 2013
The documentation and the software included with this product are copyrighted 2012
by Advantech Co., Ltd. All rights are reserved. Advantech Co., Ltd. reserves the right
to make improvements in the products described in this manual at any time without
notice. No part of this manual may be reproduced, copied, translated or transmitted
in any form or by any means without the prior written permission of Advantech Co.,
Ltd. Information provided in this manual is intended to be accurat e and reliable. However, Advantech Co., Ltd. assumes no responsibility for its use, nor for any infringements of the rights of third parties, which may result from its use.
Acknowledgements
TI and AM37x are trademarks of Texas Instruments..
Microsoft Windows is registered trademarks of Microsoft Corp.
All other product names or trademarks are properties of their respective owners.
Product Warranty (2 years)
Advantech warrants to you, the original purchaser, that each of its products will be
free from defects in materials and workmanship for two years from the date of purchase.
This warranty does not apply to any products which have been repaired or altered by
persons other than repair personnel authorized by Advantech, or which have been
subject to misuse, abuse, accident or improper installation. Advantech assumes no
liability under the terms of this warranty as a consequence of such events.
Because of Advantech’s high quality-control standards and rigorous testing, most of
our customers never need to use our repair service. If an Advantech product is defective, it will be repaired or replaced at no charge during the warranty period. For outof-warranty repairs, you will be billed according to the cost of replacement materials,
service time and freight. Please consult your dealer for more details.
If you think you have a defective product, follow these steps:
1. Collect all the information about the problem encountered. (For example, CPU
speed, Advantech products used, other hardware and software used, etc.) Note
anything abnormal and list any onscreen messages you get when the problem
occurs.
2. Call your dealer and describe the problem. Please have your manual, product,
and any helpful information readily available.
3. If your product is diagnosed as defective, obtain an RMA (return merchandize
authorization) number from your dealer. This allows us to process your return
more quickly.
4. Carefully pack the defective product, a fully-completed Repair and Replacement
Order Card and a photocopy proof of purchase date (such as your sales receipt)
in a shippable container. A product returned without proof of the purchase date
is not eligible for warranty service.
5. Write the RMA number visibly on the outside of the package and ship it prepaid
to your dealer.
TREK-722/723 User Manual ii
Page 3

Declaration of Conformity
CE
This product has passed the CE test for environmental specifications. Test conditions
for passing included the equipment being operated within an industrial enclosure. In
order to protect the product from being damaged by ESD (Electrostatic Discharge)
and EMI leakage, we strongly recommend the use of CE-compliant industrial enclosure products.
FCC Class B
Note: This equipment has been tested and found to comply with the limit s for a Class
B digital device, pursuant to part 15 of the FCC Rules. These limits are designed to
provide reasonable protection against harmful interference in a residential installation. This equipment generates, uses and can radiate radio frequency energy and, if
not installed and used in accordance with the instructions, may cause harmful interference to radio communications. However, there is no guarantee that interference
will not occur in a particular installation. If this equipment does cause harmful interference to radio or television reception, which can be determined by turning the equipment off and on, the user is encouraged to try to correct the interference by one or
more of the following measures:
Reorient or relocate the receiving antenna.
Increase the separation between the equipment and receiver.
Connect the equipment into an outlet on a circuit different from that to which the
receiver is connected.
Consult the dealer or an experienced radio/TV technician for help.
This device complies with Part 15 FCC Rules.
Operation is subject to the following two conditions:
(1) this device may not cause harmful interference, and
(2) this device must accept any interference received, including interference may
cause undesired operation.
RF Exposure Information
This device meets the government’s requirements for exposure to radio waves.
This device is designed and manufactured not to exceed the emission limits for expo-
sure to radio frequency (RF) energy set by the Federal Communications Commission
of the U.S. Government.
This device complies with FCC radiation exposure limits set forth for an uncon-
trolled environment. In order to avoid the possibility of exceeding the FCC radio
frequency exposure limits, human proximity to the antenna shall not be less
than 20cm (8 inches) during normal operation.
Changes or modifications not expressly approved by the party responsible for compliance could void the user’s authority to operate the equipment.
iii TREK-722/723 User Manual
Page 4
Technical Support and Assistance
1. Visit the Advantech web site at http://suppo rt.advantech.com where you can find
the latest information about the product.
2. Contact your distributor, sales representative, or Advantech's customer service
center for technical support if you need additional assistance. Please have the
following information ready before you call:
– Product name and serial number
– Description of your peripheral attachments
– Description of your software (operating system, version, application software,
etc.)
– A complete description of the problem
– The exact wording of any error messages
Warnings, Cautions and Notes
Warning! Warnings indicate conditions, which if not observed, can cause personal
injury!
Caution! Cautions are included to help you avoid damaging hardware or losing
data. e.g.
There is a danger of a new battery exploding if it is incorrectly installed.
Do not attempt to recharge, force open, or heat the battery. Replace the
battery only with the same or equivalent type recommended by the manufacturer. Discard used batteries according to the manufacturer's
instructions.
Note! Notes provide optional additional information.
Document Feedback
To assist us in making improvements to this manual, we would welcome comments
and constructive criticism. Please send all such - in writing to: support@advantech.com
Packing List
Before setting up the system, check that the items listed below are included and in
good condition. If any item does not accord with the table, please contact your dealer
immediately.
TREK-722/ TREK-723 Mobile Data Terminal
Warranty Card
"Drivers, utilities, and user manual" CD-ROM
End User License Agreement (WinCE), please download driver and relative
document from http://support.advantech.com
Power Cable
TREK-722/723 User Manual iv
Page 5

Ordering Information
Part Number Description
TREK-722R-A0E TREK-722 barebone
TREK-722R-CBCEA0E TREK-722R-A0E w/ GPS, CDMA, BT, CE
TREK-722R-GBCEA0E TREK-722R-A0E w/ GPS, GPRS, BT, CE
TREK-722R-HBCEA0E TREK-722R-A0E w/ GPS, HSP A, BT, CE
TREK-723R-A0E TREK-723 barebone
TREK-723R-CBCEA0E TREK-723R-A0E w/ GPS, CDMA, BT, CE
TREK-723R-GBCEA0E TREK-723R-A0E w/ GPS, GPRS, BT, CE
TREK-723R-HBCEA0E TREK-723R-A0E w/ GPS, HSP A, BT, CE
Safety Instructions
1. Read these safety instructions carefully.
2. Keep this User Manual for later reference.
3. Disconnect this equipment from any AC outlet before cleaning. Use a damp
cloth. Do not use liquid or spray detergents for cleaning.
4. For plug-in equipment, the power outlet socket must be located near the equip-
ment and must be easily accessible.
5. Keep this equipment away from humidity.
6. Put this equipment on a reliable surface during installation. Dro pping it or letting
it fall may cause damage.
7. Do not leave this equipment in an environment unconditioned where the storage
temperature under -30° C (-22° F) or above 70° C (158° F), it may damage the
equipment.
8. Do not operate this equipment in an environment temperature may over 70° C
(158° F). The surface temperature of metal chassis may be scorch and hot.
9. Make sure the voltage of the power source is correct before connecting the
equipment to the power outlet.
10. Position the power cord so that people cannot step on it. Do not place anything
over the power cord.The voltage and current rating of the cord should be greater
than the voltage and current rating marked on the product.
11. All cautions and warnings on the equipment should be noted.
12. If the equipment is not used for a long time, disconnect it from the power source
to avoid damage by transient overvoltage.
13. Never open the equipment. For safety reasons, the equipment should be
opened only by qualified service personnel.
14. If one of the following situations arises, get the equipment checked by service
personnel:
The power cord or plug is damaged.
Liquid has penetrated into the equipment.
The equipment has been exposed to moisture.
The equipment does not work well, or you cannot get it to work according to
the user's manual.
The equipment has been dropped and damaged.
The equipment has obvious signs of breakage.
v TREK-722/723 User Manual
Page 6

15. This device complies with Part 15 of the FCC rules. Operation is subject to the
following two conditions:
(1) this device may not cause harmful interference, and
(2) this device must accept any interference received, including interference that
may cause undesired operation.
16. CAUTION: Always completely disconnect the power cord from your chassis
whenever you work with the hardware. Do not make connections while the
power is on. Sensitive electronic components can be damaged by sudden
power surges.
17. CAUTION: Always ground yourself to remove any static charge before touching
the motherboard, backplane, or add-on cards. Modern electronic devices are
very sensitive to static electric charges. As a safety precaution, use a gro unding
wrist strap at all times. Place all electronic components on a static-dissipative
surface or in a static-shielded bag when they are not in the chassis.
18. CAUTION: Any unverified component could cause unexpected damage. To
ensure the correct installation, please always use the components (ex. screws)
provided with the accessory box.
Safety Precaution - Static Electricity
Follow these simple precautions to protect yourself from harm and the products from
damage.
To avoid electrical shock, always disconnect the power from your system chas-
sis before you work on it. Don't touch any components on the main board or
other cards while the system is on.
Disconnect power before making any configuration changes. The sudden rush
of power as you connect a jumper or install a card may damage sensitive electronic components.
Warning! 1. Input voltage rated: 6 ~ 36 Vdc (12/24V power).
2. Transport: carry the unit with both hands and handle with care.
3. Maintenance: to properly maintain and clean the surfaces, use only
approved products or clean with a dry applicator.
4. SD/SIM card: Turn off the power before inserting or removing the
storage cards.
TREK-722/723 User Manual vi
Page 7

Contents
Chapter 1 General Information ............................1
1.1 Introduction ............................................................................................... 2
1.2 General Specifications ............................................................. .... ... ... ... ... . 2
1.3 Dimensions ...............................................................................................4
Figure 1.1 TREK-722 dimensions................................................ 4
Figure 1.2 TREK-723 dimensions................................................ 4
Chapter 2 System Setup.......................................5
2.1 A Quick Tour of the TREK-722/723 Mobile Data Terminal .......................5
Figure 2.1 Front view of TREK-722/723...................................... 6
Figure 2.2 Rear view of TREK-722/723.......................................6
Figure 2.3 Bottom view of TREK-722/723................................... 6
2.2 Installation Procedures.............................................................................. 6
2.2.1 Connecting the Power Cord.......................................................... 7
Figure 2.4 Power connector photo............................................... 7
Table 2.1: Pin Definition of Power Cord ...................................... 7
2.3 WinCE Satrtup Procedure......................................................................... 7
Chapter 3 Hardware & Peripheral Installation....9
3.1 Installing the Storage Device and SIM Card ...........................................10
3.2 Installing Optional Accessories ............................................................... 10
Chapter 4 Pin Assignments ...............................11
4.1 Rear Side Connectors............................................................................. 12
4.2 Extended IO............................................................................................12
Table 4.1: Ex tended IO............................... ... .... ... ... ... .... ...........12
Chapter 5 Software Functionality......................13
5.1 Introduction .............................................................................................14
Figure 5.1 Windows® Embedded CE 6.0 on the TREK72x plat-
form .......................................................................... 14
5.2 Windows CE Startup Procedure ............................................................. 14
5.3 Upgrade Procedure.................................................................................15
5.3.1 Prepare SD card for bootloader...... .... ... ... ... ... .... ... ... ... .... ... ... ... .. 15
Figure 5.2 Storage format tool...................................................15
5.3.2 Upgrade image: .......................................................................... 15
Figure 5.3 Boot files...................................................................15
Figure 5.4 Upgrade finish ..........................................................16
Figure 5.5 Format disk............................................................... 16
5.4 Utilities.....................................................................................................17
5.4.1 Test Utility...................................................................................17
5.4.2 Test Procedure ........................................................................... 17
Figure 5.6 Test Utility................................................................. 17
5.4.3 Startup execution........................................................................ 18
5.4.4 Platform Setting .......................................................................... 18
Figure 5.7 General information..................................................19
Figure 5.8 Audio ........................................................................ 19
vii TREK-722/723 User Manual
Page 8

5.5 Network................................................................................................... 20
5.5.1 Setup for HSPA and GPRS........................................................ 20
Figure 5.9 3G via Ethernet ........................................................ 20
Figure 5.10RF module manager................................................. 21
Figure 5.11ISP modern setting................................................... 21
5.5.2 Example for Verizon CDMA Setup ............................................. 22
5.6 Touch Calibration.................................................................................... 24
Figure 5.12Touch panel calibration ............................................ 24
5.7 Application Program Development ......................................................... 24
5.7.1 PC System requirements............................................................ 24
5.7.2 Building Windows CE program................................................... 25
Figure 5.13Flow-chart of Building Windows® Embedded CE 6.0
runtime ..................................................................... 25
5.7.3 How to install SDK...................................................................... 25
5.7.4 Running your application programs............................................ 29
5.7.5 SUSI library for application program........................................... 29
5.8 Windows® Embedded CE 6.0 Component List...................................... 29
TREK-722/723 User Manual viii
Page 9

Chapter 1
1 General Information
This chapter gives background
information on the TREK-722/723
Mobile Data Terminal.
Sections include:
Introduction
General Specifications
Dimensions
Page 10

1.1 Introduction
TREK-722/723 is a RISC platform with 5"/7" display all-in-one Mobile Data Terminal
(MDT). The radio frequency options and programmable function keys make TREK722/723 suitable for local fleet management. It is designed with vehicle power compliant to ISO7637-2 & SAE J1113 ensuring the system is stable in dirty car power
system. With Suspend/Wakeup feature, TREK-722/723 supports 24/7 monitoring
mechanism by periodical, digital input & WWAN wakeup.
1.2 General Specifications
Key features
5" & 7" LCD (800 x 480) with resistive touchscreen
24/7 monitoring & reporting
Cortex-A8 TI AM3703 800 MHz
WinCE6.0 & optional Android 2.3.4
Built-in CAN bus with J1939 protocol
Built-in GPS with AGPS feature, BT, CDMA/GPRS/HSPA+
Operating temperature: -20 ~ 60° C (5") & -30 ~ 70° C (7")
Storage temperature: -30 ~ 80° C
Specifications
Dimensions: 165 x 115 x 43 mm (TREK-722) / 213 x 145 x 43 mm (TREK-723)
Weight: 650 gram (TREK-722) / 850 gram (TREK-723)
Power feature:
– Input Voltage: 6~36Vdc
– Supports power on delay (default 2 seconds)
– Supports power off delay (default 5 seconds)
– Supports hardware power off delay (default 30 seconds)
– Supports WWAN wake up
SoC: TI ARM Cortex-A8 AM3703 800 MHz
OS: WinCE 6.0 R3 core version / Android 2.3.4 Gingerbread
RAM: On board 256MB Mobile LPDDR
Storage:
– On board NAND type 2GB for boot loader, OS & customer's APs
– 1 x push-push type SD slot
LCD: 5" industrial grade wide screen TFT LCD, 800 x 480 resolution (TREK-
722)/ 7" industrial grade wide screen TFT LCD, 800 x 480 resolution (TREK-
723)
Touch Screen: 4-wire resistive with flat panel design
TREK-722/723 User Manual 2
Page 11

IO Function:
– Audio:
1 x built-in 2 W mono speaker
1 x MIC input, 1 x mono line-in, 1 x stereo line-out via high density cable
– Video:
1 x CVBS input via high density cable
1 x Y/C input via high density cable
– USB Client: 1 x USB client I/F via USB mini-B connector with rubber door
protection
– USB Host:
1 x USB host I/F via USB A-type connector (500 mA) with rubber door protection
1 x USB host I/F via high density cable with USB A-type connector (500 mA)
– Serial Port: 2 x 4-wire RS-232 via high density cable
– GPIO:
2 x isolated digital input (DI) which can wake up system via high density
cable
2 x isolated digital output (DO) via high density cable
– CAN bus: 1 x CAN bus 2.0a/b with J1939 protocol via high density cable
– Function Key: 5 x programmable function keys with green LED
RF Function:
– GPS (Optional): Built-in 50 channel u-blox LEA-6S with internal antenna
– Bluetooth (Optional): Built-in Class 2 Bluetooth V2.1+EDR with internal
antenna
– WWAN (Optional)
Built-in Quad-band GPRS module Cinterion TC63i with internal antenna
Built-in UMTS/HSPA+ module Cinterion PH8 with internal antenna
Built-in CDMA/EV-DO module Sierra Wireless MC5728V with internal
Environmental Specifications:
– Operating Temperature: -20° C ~ 60° C & -30 ~ 70° C (7")
– Relative Humidity: 10 ~ 90% @ 40° C (non-condensing)
– Shock/Vibration MIL-STD-810G, SAE J1455, Class 5M3 according DIN EN
60721-3-5
– Certificate CE, FCC, CCC, UL, CUL, CB, E-mark
Chapter 1 General Information
3 TREK-722/723 User Manual
Page 12
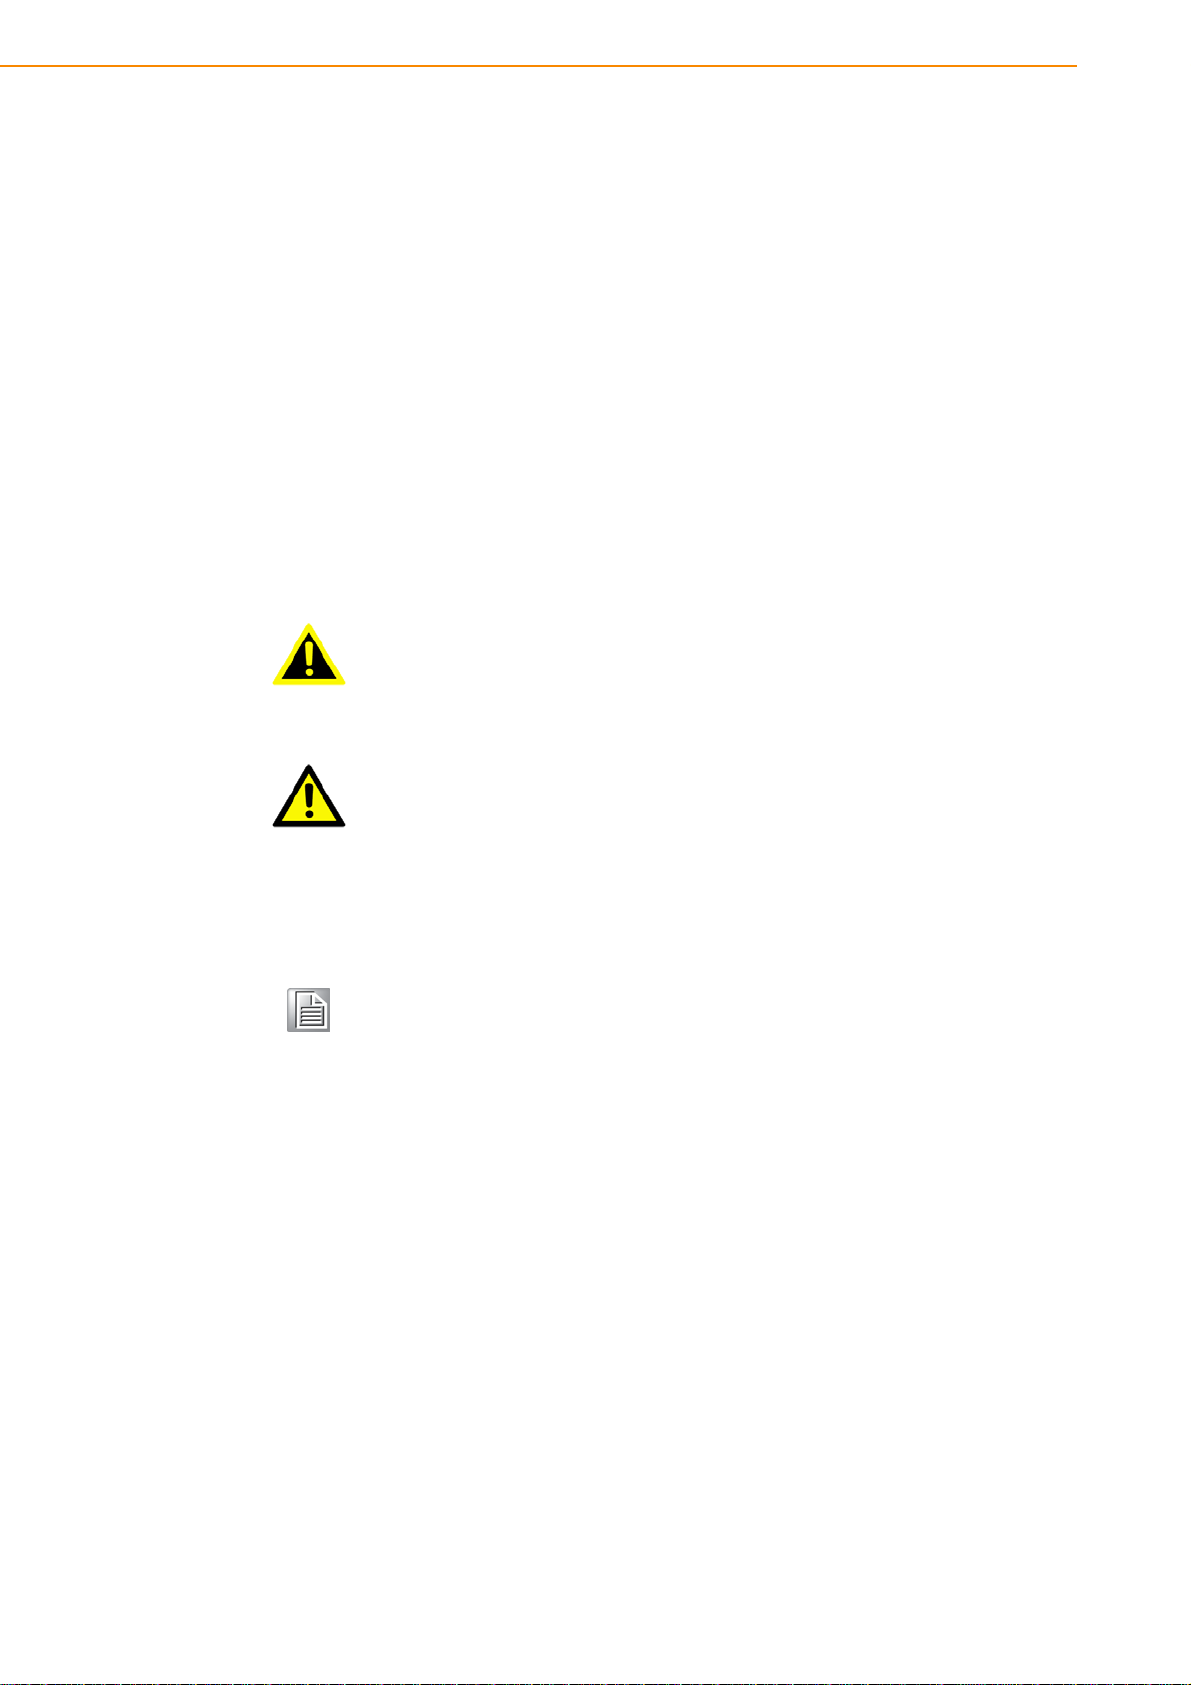
1.3 Dimensions
3- M4
43
40
164.70
114.80
20.40
Unit: mm
14 4 . 8 0
212.70
43
40
20
3- M4
Unit: mm
Figure 1.1 TREK-722 dimensions
Figure 1.2 TREK-723 dimensions
TREK-722/723 User Manual 4
Page 13

Chapter 2
2 System Setup
This chapter details system setup
on TREK-722/723.
Sections include:
A Quick Tour of the Mobile Data
Terminal
Installation Procedures
Running the BIOS Setup Pro-
gram
Installing the Drivers for Win XP
2.1 A Quick Tour of
the TREK-722/723
Page 14
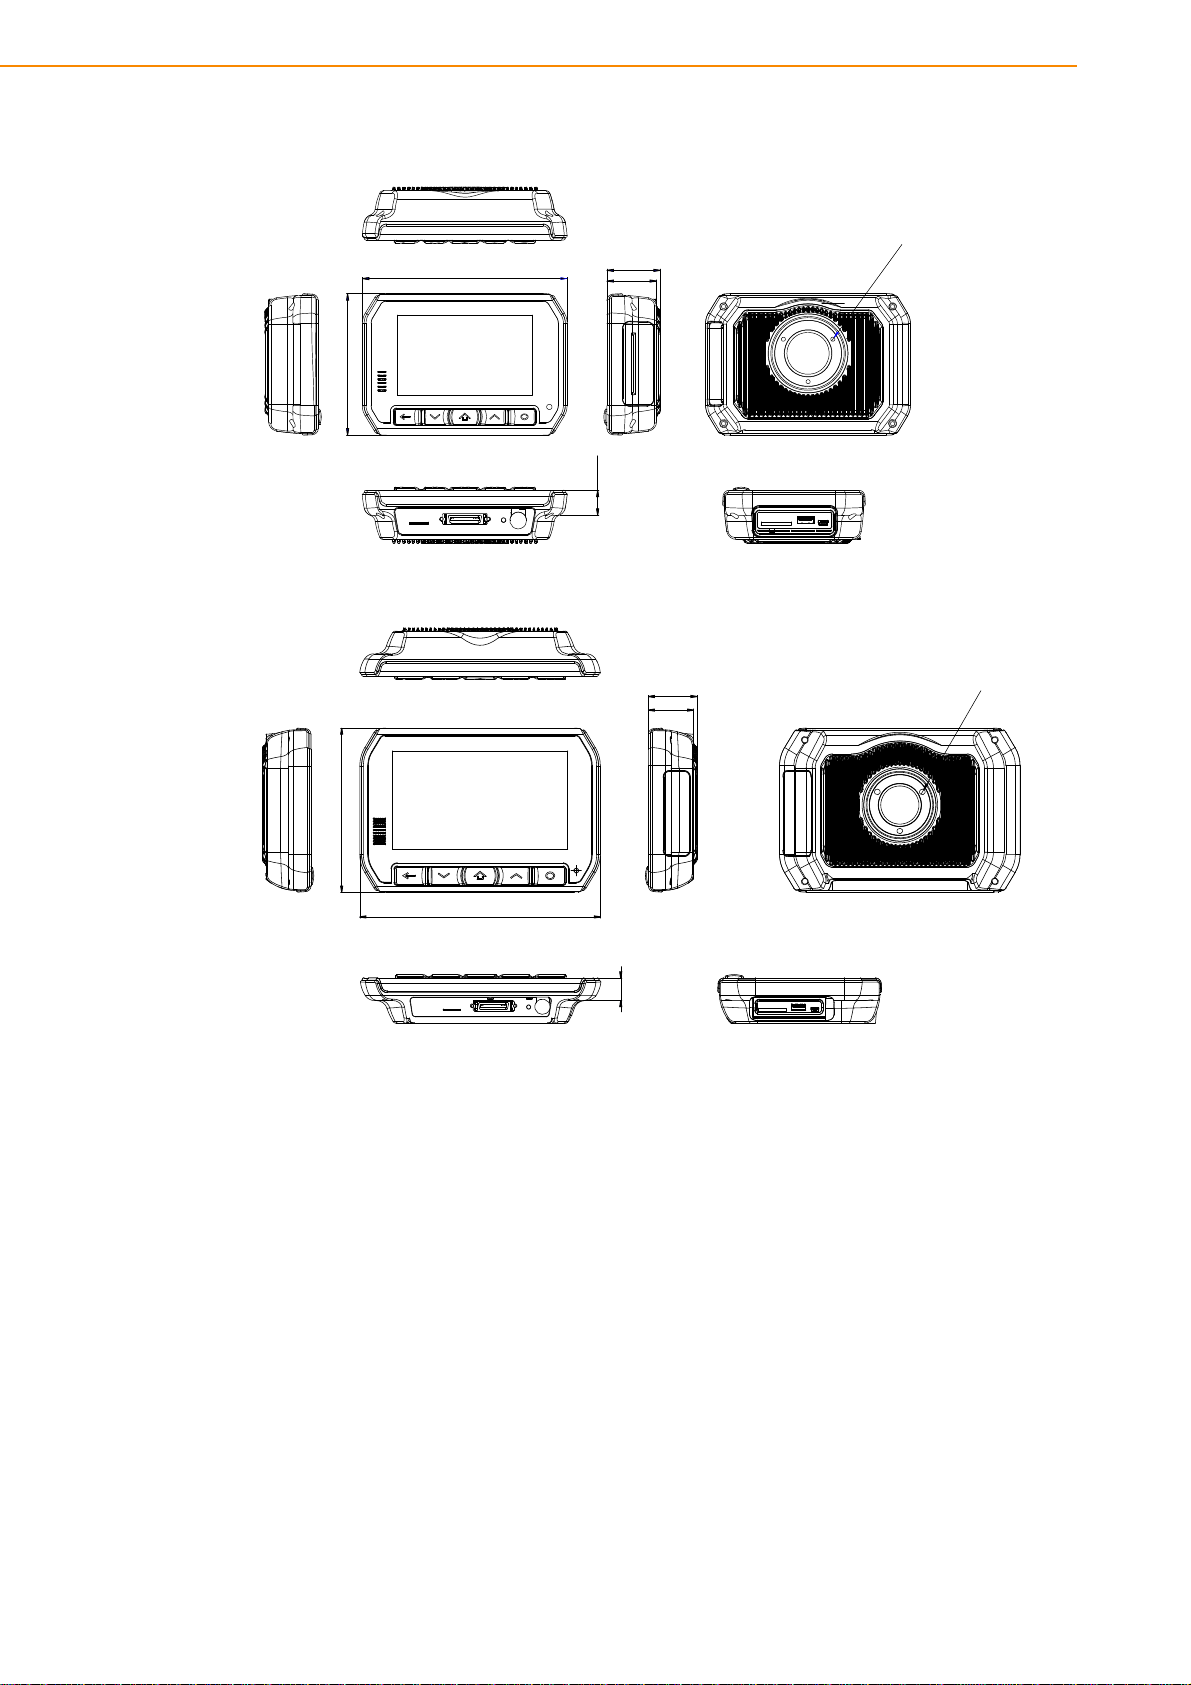
Mobile Data Terminal
Before starting to set up the Mobile Dat a Terminal, take a momen t to be come familiar
with the locations and functions of the controls, drives, connectors and ports, which
are illustrated in the figures below. When the Mobile Data Terminal is placed inside
truck glove cabinet or under the passenger’s seat next to the driver, its front appears
as shown in Figure 2.1.
Figure 2.1 Front view of TREK-722/723
Figure 2.2 Rear view of TREK-722/723
Figure 2.3 Bottom view of TREK-722/723
2.2 Installation Procedures
TREK-722/723 User Manual 6
Page 15
When you installing TREK-722/723, the first step will be connect the power and ignition correctly. TREK-722/723 power cable is designed to connect battery directly.
TREK-722/723 can be switched ON/OFF by the ignition signal or its power button
both.
2.2.1 Connecting the Power Cord
Connect the three pin waterproof power cord to the DC inlet of TREK-722/723. On
the open-wire end, one pin is reserved for positive voltage and is marked "+" which
needs to be connected to the power "+" side; one pin is reserved for ground and is
marked "-"; which needs to be connected to the power "-" side. And, one pin is
reserved for the ignition signal with an “ignition” mark. There's independent "Shield"
pin in power cable, please fixed its O-ring which besides of power connecter of
TREK-722/723.
Chapter 2 System Setup
Figure 2.4 Power connector photo
Table 2.1: Pin Definition of Power Cord
Pin Definition Color
1+Blue
2 Shield Black
3- Black
4 Ignition White
2.3 WinCE Satrtup Procedure
Windows CE image can be loaded by two methods, first way is by SD storage card,
and second way is by system on-board chip. Storage card is higher boot priority than
on-board system flash chip. In BOOTLOADER criteria, it will first read the Windows
CE image from external storage card. After download image done, booloader will
burn image to on-board flash chip automatically. If external storage card is unavailable or no Windows CE image inside, BOOTLOADER will load the Windows CE
image from on-board system flash chip. BOOTLOADER copy Windows CE image to
DRAM and launch WinCE from DRAM, whenever loaded by external storage card or
system on-board flash chip.
7 TREK-722/723 User Manual
Page 16

TREK-722/723 User Manual 8
Page 17

Chapter 3
3 Hardware & Peripheral
Installation
This chapter details the installation of hardware for TREK-722/
723.
Sections include:
Installing the Storage Device
and SIM Card
Installing Optional Accessories
Page 18

3.1 Installing the Storage Device and SIM Card
Users can install SIM card and storages (SD card) easily on TREK-722. SD card is
the main bootable storage which has OS pre-installed from Advantech.
3.2 Installing Optional Accessories
Optional accessories, like RAM mount kits or other functional modules are available
for purchase to complement TREK-722/723. All of standard 75mm type mounting
with M5 type screws only.
TREK-722/723 User Manual 10
Page 19

Chapter 4
4 Pin Assignments
This chapter explains pin assignments on the TREK-722/723.
Page 20

4.1 Rear Side Connectors
Extended IO
SD Card
USB Host Type A
USB Client Mini B
4.2 Extended IO
Table 4.1: Extended IO
Pin Signal Pin Signal
1 USB_G 21 USB_5V
2 USB_G 22 USB_5V
3 TX-A 23 USB_DP
4 RTS-A 24 USB_DM
5 RX-A 25 ISOD_GND
6CTS-A 26DO1
7TX-B 27DO2
8 RTS-B 28 DI-1_N
9RX-B 29DI-1_L
10 CTS-B 30 DI-2_N
11 DGND 31 DI-2_L
12 DGND 32 MIC-LINE_IN
13 J1850_P 33 AUDIO_GND
14 J1850_N 34 LINE-OUT_R
15 CAN-H 35 AUDIO_GND
16 CAN-L 36 LINE-OUT_L
17 ISO-L 37 VIDEO_GND
18 ISO-K 38 VIDEO_GND
19 S-Y 39 VIDEO_GND
20 S-C 40 CVBS
TREK-722/723 User Manual 12
Page 21

Chapter 5
5 Software Functionality
This chapter details the Windows® 6.0 operating system on
the TREK72x platform.
Sections include:
Introduction
Windows® CE Startup Proce-
dure
Upgrade Procedure
Utilities
Network
Application Program Develop-
ment
Windows® Embedded CE 6.0
Require Components
Page 22

5.1 Introduction
The TREK72x platform is one embedded system with Windows® Embedded CE 6.0.
The Windows® Embedded CE 6.0 is a compact OS that occupies less storage space
or system resources compared with other operating systems such as Windows® XP.
By its modular nature, it is possible to choose those functions that are useful for specific application. Not only reducing the system resources required, but also reduces
start-up time. In the field of embedded applications, this is an appealing feature
because the impact of downtime would be minimized.
Furthermore, the small storage space it needs makes OS on solid-state disk possible, which implies higher robustness to harsh environments.
Figure 5.1 Windows® Embedded CE 6.0 on the TREK72x platform
5.2 Windows CE Startup Procedure
Windows CE image can be loaded by two methods, first way is by SD / MMC storage
card, and second way is by system on-board chip. Storage card is high er boot priority
than on-board system flash chip. In BOOTLOADER criteria, it will first read the Windows CE image from external storage card. After download image done.If external
storage card is unavailable or no Windows CE image inside, BOOTLOADER will load
the Windows CE image from on-board system flash chip. BOOTLOADER copy Windows CE image to DRAM and launch WinCE from DRAM, whenever loaded by external storage card or system on-board flash chip.
TREK-722/723 User Manual 14
Page 23

5.3 Upgrade Procedure
Advantech release three files for TREK72x platform. MLO&EBOOT.NB0 is bootloader and NK.BIN is WinCE6.0 image.
5.3.1 Prepare SD card for bootloader
a) Disk format with HPUSBFW.EXE.
Chapter 5 Software Functionality
b) Copy file for upgrade image:
1. Copy MLO to sd card for TI CPU boot code.
2. Copy other file to sd card(refer to Section 5.3.2).
5.3.2 Upgrade image:
a) Auto Upgrade:
1. Copy MLO to sd card first.
2. Copy Figure 5.3 file to sd card for TREK72x.
3. Plug sd card to TREK72x and power on.
Figure 5.2 Storage format tool
Figure 5.3 Boot files
4. The screen will show like next picture. It is will pass through some steps about
format disk and copy file °¦etc. which automatically to finish upgrade except
incorrect conditions.
15 TREK-722/723 User Manual
Page 24

Figure 5.4 Upgrade finish
b) Manual:
If want to upgrade by manual must follow some steps.
1. Format disk with wince tools Storage Manager on the Control panel like Figure
5.4.
2. Copy files to Storage card that include MLO/EbootSD.nb0/NK.bin but MLO must
be copied first. Relation files on the "Image" folder like a) Auto Upgrade.
Figure 5.5 Format disk
TREK-722/723 User Manual 16
Page 25

5.4 Utilities
There are several useful utilities added in the standard Windows® Embedde d CE 6.0
5.4.1 Test Utility
The utility "AdvDiag.exe" is one integrated test tool, which includes the function validation for peripheral. You can use this tool to verify whether the peripheral function
work or not. You just copy this utility to storage card and then launch from WinCE by
double click it.
Main Function :
Item Function Description
COMx (LOOPBACK) Lookback test for COM3 & COM8
COMx <=> COMy Two COM ports RS232 transmission
TOUCH SCREEN Touch Screen function validation
Audio Play Audio play function validation
Audio Record Audio record function validation
USB Keyboard USB Keyboard function validation
USB Mouse USB Mouse function validation
Backlight Test Backlight function validation
DIO Control DIO function validation
PAUSE Pause test process
REPEAT TEST Repeat test process
Etc...
Chapter 5 Software Functionality
5.4.2 Test Procedure
You should see a lot of test items in left zone after launch this utility. You can insert
enough test items you want to right zone by pressing "Add" button. The test items in
right zone will be executed. Also, you can remove test items from right zone by
pressing "Remove" button.
After you add test items done, you can go function test by pressing "EXE ALL" button. To press "View Rpt" button, you will see the test result.
Figure 5.6 Test Utility
17 TREK-722/723 User Manual
Page 26

5.4.3 Startup execution
The TREK72x platform has a useful function call "Startup execution". After the system boot up, the startup execution function would automatically perform. This function is useful for control system to do the initialization processes or some other
procedures. In TREK72x platform, there are two ways to perform "Startup" function.
Method 1:
1. Create "startup" directory in SD/MMC storage card, USB disk.
2. Copy executable files to "startup" directory that is created by Step 1.
Example:
We copy two executable files "softreset.exe" and "Notepad.exe" in "Startup", and
then reboot the system. After the system boot up, the two executable file would automatically execute.
Method 2:
1. Create "startup" directory in SD/MMC storage card, USB disk(Hard Disk).
2. Create a file called "startup.ini" in "startup" directory. Type in the commands you
want to execute after boot up in that file.
Example:
Create "Startup.ini" in "\DiskOnChip\Startup" directory and reboot the system. The
content of startup.ini was listed below:
\windows\tty.exe
\windows\registry.exe
After the system reboot, "\windows\ tty.exe" and "\windows\ registry.exe" would auto-
matically execute. Be sure that the two methods are independent. It means they can
be used simultaneously.
5.4.4 Platform Setting
Platform Setting utility is an outstanding utility designed by Advantech Windows? CE
software team. It is an integrated environment where user can get useful system
information as well as configure favorite system settings and apply system control
function on demand. Double click the icon of Platform Setting on the desktop. Platform Setting is also put on Control Panel. Following sections illustrate the functions of
Platform Setting.
TREK-722/723 User Manual 18
Page 27

5.4.4.1 General
It shows the memory information including DRAM and on board MMC. Platform
name and version control are also put here.
Chapter 5 Software Functionality
Figure 5.7 General information
5.4.4.2 Audio
The Audio page is setting recorder that include "Microphone" and "Line In". The
record function default select is "Line In".
Figure 5.8 Audio
19 TREK-722/723 User Manual
Page 28

5.4.4.3 Miscellaneous
The Misc page provides several functions as described below. The "Registry" block
provides registry save and registry clean function. Pressing "Save" button, the registry settings will be saved to persistent storage as DISKONCHIP. Pressing "Clean"
button, the registry setting will return to default settings. The "A.Sync" button invokes
ActiveSync to the host computer. The Memory Management block will check if memory size needs to be allocated automatically during boot. Once this is checked, program memory will be allocated half size of memory, and storage memory will occupy
the rest.
Miscellaneous settings
5.5 Network
5.5.1 Setup for HSPA and GPRS
TREK72x build in one 3G controller. It appears at "Control Panel/Network and Dialup Connections". User can configure its 3G support as follows:
a) Manual
1. Click "Start/Settings/Control Panel"
2. Double click "Network and Dial-up Connections"
3. If the TREK72x is a node of the LAN with 3G servers, it is now available.
4. Support Module have Tc63i/PH8/SierraWireless
Figure 5.9 3G via Ethernet
TREK-722/723 User Manual 20
Page 29

b) Auto connect
Trek72x provide a "RF Module manager" for easy use 3G via Ethernet. About "auto
dial up" is dial up from system startup. Next select item "auto connect" is dial up
every condition of disconnect automatically.
Chapter 5 Software Functionality
Figure 5.10 RF module manager
Note! In order to fit every area to connect ISP(Internet Service Provider) must
change content of "Extra Settings" like Figure 5.11.
Figure 5.11 ISP modern setting
21 TREK-722/723 User Manual
Page 30

5.5.2 Example for Verizon CDMA Setup
1. On the next screen set the phone number to “#777” and click finish.
2. Double click on the Verizon icon.
3. Tap the dial properties, and use the drop down to select “CAR” and tap OK.
TREK-722/723 User Manual 22
Page 31

4. Tap Connect
5. The next window will say “Dialing #777”
6. If everything is OK, after a short time, you will hear a connect sound, and the
Verizon status window will say “Connected”
Chapter 5 Software Functionality
Note! Fill in the “extra settings” field. Picture below for reference.
23 TREK-722/723 User Manual
Page 32

5.6 Touch Calibration
Want to calibrate touch panel that can be searched on "stylus property". Press recalibrate button and follow guide to finish recalibrate touch. If finish recalibrate suggest
you to save registry with "5.4.4.3 Miscellaneous" keep result of touch panel calibration
Figure 5.12 Touch panel calibration
5.7 Application Program Development
The TREK72x is bundled with built-in Windows® Embedded CE 6.0 operating system. In real applications users need to execute various application programs on it.
However, unlike its other family, the Windows® Embedded CE 6.0 is a hardwaredependent operating system. That is to say, Windows? Embedded CE 6.0 application programs are only portable in the source code level. Users must rebuild the runtime file for a different Windows® Embedded CE 6.0 platform even though the source
code may not be changed at all.
5.7.1 PC System requirements
Intel® Pentium-90 CPU or more advanced
Microsoft® Windows® 2000 Professional or Windows® XP
Microsoft® eMbedded Visual C++ 4.0 or Virtual Studio 2005
Platform SDK for TREK72x
64MB DRAM
CD-ROM drive
Monitor with VGA resolution at least
Mouse
200MB free hard disk space at least
TREK72x platform
Let the host PC and TREK72x connect on the same USB1.1 to do kernel
debugging if necessary
USB cable (bundled in the standard TREK72x)
TREK-722/723 User Manual 24
Page 33

5.7.2 Building Windows CE program
By the platform SDK bundled with the standard TREK72x, users can build the Windows CE runtime application program by the eMbedded Visual Tools.
Chapter 5 Software Functionality
Figure 5.13 Flow-chart of Building Windows® Embedded CE 6.0 runtime
5.7.3 How to install SDK
For example copy Platform SDK file "**.msi" to your PC, and launch it. You can install
SDK by steps.
1. Launch Platform SDK file, and then tap Next button.
25 TREK-722/723 User Manual
Page 34

2. Accept License Agreement and go next.
3. Key in your information and go next.
TREK-722/723 User Manual 26
Page 35

4. Choose setup type.
Chapter 5 Software Functionality
27 TREK-722/723 User Manual
Page 36

5. Tap "Install" button to install SDK.
Install SDK....
6. Finish installing.
TREK-722/723 User Manual 28
Page 37

5.7.4 Running your application programs
After you implement application code, you should choose Advantech SDK to compile.
Chapter 5 Software Functionality
5.7.5 SUSI library for application program
TREK72x is targeted to be the embedded device for system integrator. System integrator usually access platform relative IO, like backlight control, brightness control,
etc. Advantech especially provide one SUSI static library to system integrator. SUSI
library includes some useful APIs. System integrator just adds it to their application
project, and then they can use SUSI library functions.
Note: about SUSI library detail was showed in [SUSIV3.0RISC User Manual.doc]
5.8 Windows® Embedded CE 6.0 Component List
APPLICATIONS AND SERVICES DEVELOPMENT
Active Template Library (ATL) x x x x x x
C Libraries and Runtimes x x x x x x
C++ Runtime Support for Exception Han-
dling and Runtime Type Information
Full C Runtime x x x x x x
Standard I/O (STDIO) x x x x x x
Standard I/O ASCII (STDIOA) x x x x x x
String Safe Utility Functions x x x x x x
Standard S tring Functions - ASCII (cores-
tra)
Component Services (COM and DCOM) x x x x x x
Component Object Model x x x x x x
COM x x x x x x
CoCreateGuid functionality for
OLE32
COM Storage x x x x x x
DCOM x x x x x x
COM Storage x x x x x x
Advantech
Core
Core
xx xx x x
xx xx x x
xx xx x x
Pro.
Advantech
Pro.
Pro.Plus
Advantech
Pro. Plus
29 TREK-722/723 User Manual
Page 38

DCOM Remote Access x x x x x x
Minimal COM (No OLE Support) x x x x x x
CoCreateGuid functionality for
OLE32
COM St orage x x x x x x
Speech Interface x x x
Speech API (SAPI) 5.0 x x x
Microsoft English (US) Windows CE
Speech Recognizer (available in 4.2 only)*
Lightweight Directory Access Protocol
(LDAP) Client
Message Queuing (MSMQ) x x x x x x
SOAP Reliable Messaging Protocol
(SRMP)
MSMQ ActiveX Wrappers x x x x x x
Microsoft Foundation Classes (MFC) x x x x x x
Object Exchange Protocol (OBEX) x x x x x x
OBEX Server x x x x x x
OBEX Inbox x x x x x x
OBEX File Browser x x x x x x
OBEX Client x x x x x x
Pocket Outlook Object Model (POOM) API x x
SOAP Toolkit x x x x x x
Client x x x x x x
Server x x x x x x
Standard SDK for Windows CE x x x x
.NET Compact Framework x x x x x x
OS Dependencies for .NET Compact
Framework 2.0
Smart Device Authentication Utility x x x x x x
.NET Compact Framework 2.0 x x x x x x
SQL Server CE 2.0 .NET Data Pro-
vider
SQL Server 2000 .NET Data Provider x x x x x x
SQL Server CE 2.0 x x x x x x
XML x x x x x x
MSXML 3.0 x x x x x x
XML Core Services and Document
Object Model (DOM)
XML HTTP x x x x x x
XML Query Languages (XQL) x x x x x x
XML Stylesheet Language
Transformations (XSLT)
XML SAX x x x x x x
XML Error St rings x x x x x x
XML Minimal Parser x x x x x x
Exchange Client x x x
APPLICATIONS - END USER
ActiveSync x x
File Sync x x x x x x
Inbox Sync x x
Pocket Outlook Database Sync x x
CAB File Installer/Uninstaller x x x x x x
xx xx x x
xx
xx xx x x
xx xx x x
xx xx x x
xx xx x x
xx xx x x
xx xx x x
TREK-722/723 User Manual 30
Page 39

File Viewers* x x
Microsoft Excel Viewer* x x
Microsoft Image Viewer* x x
Microsoft PDF Viewer* x x
Microsoft PowerPoint Viewer* x x
Microsoft Word Viewer* x x
FLASH Update Sample Application x x x
Games x x x
Freecell x x x
Solitaire x x x
Help* x x x x
Inbox x x
Remote Desktop Connection x x x x
Remote Desktop Protocol (RDP) x x x x
User Interface Dialog Boxes x x x x
Smart Card Redirection x x x x
File Storage Redirection x x x x
Filtered File Storage Redirection x x x x
Cut/Copy/Paste Clipboard Redirection x x x x
Serial and Parallel Port Redirection x x x x
Audio Playback Redirection x x x x
Printer Redirection x x x x
Terminal Emulator x x x x x x
Windows Messenger x x
WordPad x x
CORE OS SERVICES
Battery Driver x x x x x x
Display Support x x x x x x
Serial Port Support x x x x x x
Parallel Port Support x x x x x x
Internet Appliance (IABASE) Support x x x
Notification LED Support x x x
PNP Notifications x x x x x x
USB Host Support x x x x x x
USB Human Input Device (HID) Class
Driver
USB HID Keyboard and Mouse x x x x x x
USB HID Keyboard Only x x x x x x
USB HID Mouse Only x x x x x x
USB Printer Class Driver x x x x x x
USB Storage Class Driver x x x x x x
USB Remote NDIS Class Driver x x x x x x
Debugging Tools x x x
Keyboard Test Application x x x
Touch Driver Test Application x x x
Remote Display Application x x x
Tiny Kernel Test Sample Application x x x
Toolhelp API x x x x x x
LMemDebug Memory Debugging Hooks x x x
Notification (Choose 1) x x x
UI based Notification x x x
Non UI based Notification x x x
xx xx x x
Chapter 5 Software Functionality
31 TREK-722/723 User Manual
Page 40

Power Management (Choose 1) x x x
Power Management (Full) x x x x x x
Power Management (Minimal) x x x
Device Manager x x x x x x
Kernel Features x x x x x x
Target Control Support (Shell.exe) x x x x x x
Fiber API x x x x x x
FormatMessage API x x x x x x
Memory Mapped Files x x x x x x
Message Queue - Point-to-Point x x x x x x
COMMUNICATIONS SERVICES AND NET-
WORKING
Networking Features x x x x x x
Domain Discovery x x x x x x
Extended DNS Querying and Update
(DNSAPI)
Secure DDNS x x x x x x
Extensible Authentication Protocol x x x x x x
Firewall x x x
Internet Connection Sharing (ICS) x x x x x x
Gateway Logging x x x x x x
IPSec v4 x x x x x x
NDIS Packet Capturing DLL x x x
NDIS User-mode I/O Driver x x x x x x
Network Bridging x x x x x x
Network Driver Architecture (NDIS) x x x x x x
Network Utilities (IpConfig, Ping, Route) x x x x x x
Reference Gateway User Interface x x x
Remote Configuration Framework x x x
TCP/IP x x x x x x
IP Helper API x x x x x x
TCP/IPv6 x x x x x x
Universal Plug and Play (UPnP) x x x x x x
Control Point API x x x x x x
Device Host API x x x x x x
Device Host API (Minimal Subset) x x x x x x
Sample UPnP IGD Schema Imple-
mentation
UPnP Tools x x x x x x
UPnP Audio-Video DCP x x x x x
AV Control Point API x x x x x
AV Device API x x x x x
AV Renderer Sample x x
USB Flash Config Tool x x x
Windows Networking API/Redirector
(SMB/CIFS)
Winsock Support x x x x x x
Networking - Local Area Network (LAN) x x x x x x
Native Wi-Fi WLAN Access Point Com-
ponents
Native Wi-Fi WLAN STA x x x x x x
Wired Local Area Network (802.3, 802.5) x x x x x x
xx xx x x
xx xx x x
xx xx x x
xx xx x x
TREK-722/723 User Manual 32
Page 41

Wireless LAN (802.11) STA - Automatic
Configuration and 802.1x
Networking - Personal Area Network (PAN) x x x
Bluetooth x x x
Bluetooth Protocol Stack with Trans-
port Driver Support
Bluetooth Stack with Integrated
CSR Chipset Driver
Bluetooth Stack with Universal
Loadable Driver
Bluetooth Stack with Integrated
SDIO Driver
Bluetooth Stack with Integrated
USB Driver
Bluetooth Stack with Integrated
UART Driver
Bluetooth Profiles Support x x x
Bluetooth HS/HF and Audio Gate-
way Service
Bluetooth LAP and Configuration
Utility
Bluetooth DUN Gateway x x x
Bluetooth PAN x x x
Bluetooth HID Device Support x x x
Bluetooth HID – Keyboard x x x
Bluetooth HID – Mouse x x x
IrDA x x x
Networking - Wide Area Network (WAN) x x x x x x
Dial Up Networking (RAS/PPP) x x x x x x
AutoDial x x x x x x
Standard Modem Support for Dial Up
Networking
Point-to-Point Protocol over Ethernet
(PPPoE)
Telephony API (TAPI 2.0) x x x x x x
Unimodem support x x x x x x
Virtual Private Networking x x x x x x
PPTP x x x x x x
L2TP/IPSec x x x x x x
Servers x x x x x x
Core Server Support x x x x x x
FTP Server x x x
File Server x x x
File Server Customizable UI x x x
Windows Peer-to-Peer Networking x x x
Peer Name Resolution Protocol
(PNRP)
Identity Manager x x x
Print Server x x x
RAS Server/PPTP Server (Incoming) x x
Telnet Server x x x
Web Server (HTTPD) x x x x x x
Active Server Pages (ASP) Support x x x x x x
JScript 5.6 x x x x x x
xx xx x x
xxx
xxx
xxx
xxx
xxx
xxx
xxx
xx
xx xx x x
xx xx x x
xxx
Chapter 5 Software Functionality
33 TREK-722/723 User Manual
Page 42

VBScript 5.6 x x x x x x
Device Management ISAPI Extension x x x x x x
WebDAV Support x x x x x x
Web Server Administration ISAPI x x x x x x
Web Proxy x x x
Parental Controls x x x
Simple Network Time Protocol (SNTP) x x x
SNTP Server x x x
SNTP Client with DST x x x
SNTP Automatic Updates and Server
Synchronization
DEVICE MANAGEMENT
Device Management Client x x x
Simple Network Management Protocol
(SNMP)
FILE SYSTEMS AND DATA STORE
Compression x x x x x x
Database Support x x x x x x
File and Database Replication (Choose 1) x x x
Bit-based x x x x x x
Count-Based x x x
File System - Internal (Choose 1) x x x
RAM and ROM File System x x x x x x
ROM-only File System x x x
Registry Storage (Choose 1) x x x
Hive-based Registry x x x x x x
RAM-based Registry x x x
Storage Manager x x x
Binary Rom Image File System x x x
Storage Manager Control Panel Applet x x x x x x
EDB Database Engine x x x
Partition Driver x x x x x x
CD/UDFS File System x x x x x x
FAT File System x x x x x x
Transaction-Safe F AT File System (TFA T) x x x
System Password x x x x x x
FONTS
Arial x x x
Arial (Subset 1_30) x x x
Arial Black x x x
Arial Bold x x x
Arial Bold Italic x x x
Arial Italic x x x
Comic Sans MS x x x
Comic Sans MS x x x
Comic Sans MS Bold x x x
Courier New x x x
Courier New (Subset 1_30) x x x x x x
Courier New Bold x x x
Courier New Bold Italic x x x
Courier New Italic x x x
Georgia x x x
xxx
xxx
TREK-722/723 User Manual 34
Page 43

Georgia x x x
Georgia Bold x x x
Georgia Bold Italic x x x
Georgia Italic x x x
Impact x x x
Kino x x x
MSLogo x x x
Symbol x x x
Tahoma x x x
Tahoma (Subset 1_07) x x x x x x
Tahoma Bold x x x
Times New Roman x x x
Times New Roman (Subset 1_30) x x x
Times New Roman Bold x x x
Times New Roman Bold Italic x x x
Times New Roman Italic x x x
Trebuchet MS x x x
Trebuchet MS x x x
Trebuchet MS Bold x x x
Trebuchet MS Bold Italic x x x
Trebuchet MS Italic x x x
Verdana x x x
Verdana x x x
Verdana Bold x x x
Verdana Bold Italic x x x
Verdana Italic x x x
Webdings x x x
Wingding x x x x x x
INTERNATIONAL
Input Method Manager (IMM) x x x x x x
Locale Services (Choose 1) x x x
National Language Support (NLS) x x x x x x
English (US) National Language Support
only
Locale Specific Support x x x
Arabic x x x
Fonts x x x
Tahoma (subset 1_08) x x x
Tahoma Bold (subset 1_08) x x x
Arial (subset 1_08) x x x
Arial Bold (subset 1_08) x x x
Courier New (subset 1_08) x x x
Keyboard x x x
Arabic Keyboard (101) x x x
Chinese (Simplified) x x x
Agfa AC3 Font Compression x x x
Fonts x x x
SimSun & NSimSun (Choose 1) x x x
SimSun & NSimSun x x x
SimSun & NSimSun (Subset
2_20)
xxx
xxx
Chapter 5 Software Functionality
35 TREK-722/723 User Manual
Page 44

SimSun & NSimSun (Subset
2_50)
SimSun & NSimSun (Subset
2_60)
SimSun & NSimSun (Subset
2_70)
SimSun & NSimSun (Subset
2_80)
SimSun & NSimSun (Subset
2_90)
SC_Song x x x
GB18030 Data Converter x x x
Input Method Editor (Choose 1) x x x
MSPY 3.0 for Windows CE x x x
MSPY 3.0 for Windows CE Data-
base (Choose 1)
1.1 MB - Minimal Database x x x
1.3 MB - Compact Database x x x
1.7 MB - Standard Database x x x
Double Spelling (Shuang Pin) soft
keyboard – Large
Double Spelling (Shuang Pin) soft
keyboard – Small
Pocket IME x x x
Double Spelling (Shuang Pin) soft
keyboard – Small
Chinese (Traditional) x x x
Agfa AC3 Font Compression x x x
Fonts x x x
MingLiU & PMingLiU (Choose 1) x x x
MingLiU & PMingLiU x x x
MingLiU & PMingLiU (Subset
2_70)
MingLiU & PMingLiU (Subset
2_80)
MingLiU & PMingLiU (Subset
2_90)
MS Ming x x x
Input Method Editor x x x
Pocket IME x x x
Input Methods x x x
Input by Radical (Chang Jei) x x x
Handwriting Recognizer Engine
(HWX)
MboxCHT HWX Sample UI x x
Phonetic Input (Bopomofo) x x x
English (Worldwide) x x x
Input Methods x x x
Handwriting Recognizer Engine
(HWX)
English (U.S.) x x x
Input Methods x x x
Transcriber Handwriting Recogni-
tion Application
French x x x
xxx
xxx
xxx
xxx
xxx
xxx
xxx
xxx
xxx
xxx
xxx
xxx
xx
xx
xx
TREK-722/723 User Manual 36
Page 45

Input Methods x x x
Transcriber Handwriting Recogni-
tion Application
German x x x
Input Methods x x x
Transcriber Handwriting Recogni-
tion Application
Hebrew x x x
Fonts x x x
Tahoma (subset 1_08) x x x
Arial (subset 1_08) x x x
Tahoma Bold (subset 1_08) x x x
Arial Bold (subset 1_08) x x x
Courier New (subset 1_08) x x x
Keyboard x x x
Hebrew Keyboard x x x
Indic x x x
Hindi x x x
Fonts x x x
Mangal x x x
Keyboard x x x
Hindi Traditional Keyboard x x x
Marathi x x x
Fonts x x x
Mangal x x x
Keyboard x x x
Marathi Keyboard x x x
Punjabi x x x
Fonts x x x
Raavi x x x
Keyboard x x x
Punjabi Keyboard x x x
Telugu x x x
Fonts x x x
Gautami x x x
Keyboard x x x
Telugu Keyboard x x x
Gujarati x x x
Fonts x x x
Shruti x x x
Keyboard x x x
Gujarati Keyboard x x x
Kannada x x x
Fonts x x x
Tunga x x x
Keyboard x x x
Kannada Keyboard x x x
Tamil x x x
Fonts x x x
Latha x x x
Keyboard x x x
Tamil Keyboard x x x
xx
xx
Chapter 5 Software Functionality
37 TREK-722/723 User Manual
Page 46

Japanese x x x
Agfa AC3 Font Compression x x x
Fonts x x x
MS Gothic (Choose 1) x x x
MS Gothic & MS PGothic & MS
UI Gothic
MS Gothic & MS PGothic & MS
UI Gothic (Subset 1_50)
MS Gothic & MS PGothic & MS
UI Gothic (Subset 1_60)
MS Gothic & MS PGothic & MS
UI Gothic (Subset 1_80)
MS Gothic & MS PGothic & MS
UI Gothic (Subset 1_90)
MS Gothic & MS PGothic & MS
UI Gothic (Subset 1_70)
MS Gothic & MS PGothic (Sub-
set 30)
MS Gothic & MS PGothic (Sub-
set 30_1_19)
MS Mincho & MS PMincho x x x
Input Method Editor (Choose 1) x x x
IME 3.1 x x x
IME 3.1 Database (Choose 1) x x x
Standard Database x x x
Compact Database x x x
Optional UI Components x x x
Dictionary Tool x x x
Properties Dialog Box x x x
Advanced Settings Dialog
Box (Landscape mode only)
System Tray Icon Manager x x x
Pocket IME (Choose Additional
Databases)
Name/Place Database x x x
Supplemental Database x x x
Test IME x x x
Input Methods x x x
All Characters List x x x
Handwriting Recognizer Engine
(HWX)
Character Auto Com plete -HWX
Sample UI
Multibox HWX Sample UI x x
Kana Soft Keyboard x x x
Romaji/English Soft Keyboard x x x
Search by Radical x x x
Search by Stroke x x x
Korean x x x
Agfa AC3 Font Compression x x x
Fonts x x x
Gulim (GL_CE) x x x
Gulim & GulimChe (Choose 1) x x x
xxx
xxx
xxx
xxx
xxx
xxx
xxx
xxx
xxx
xxx
xx
xx
TREK-722/723 User Manual 38
Page 47

Gulim & GulimChe (Subset
1_30)
Gulim & GulimChe (Subset
1_40)
Gulim & GulimChe (Subset
1_50)
Gulim & GulimChe (Subset
1_60)
Input Method Editor x x x
IME 97 x x x
Input Methods x x x
Handwriting Recognizer Engine
(HWX)
MboxKOR HWX Sample UI x x
Korean Soft Keyboard Sample x x x
Thai x x x
Fonts x x x
Tahoma (subset 1_08) x x x
Keyboard x x x
Thai Kedmanee Keyboard x x x
Multilingual User Interface (MUI) x x x
Unicode Script Processor for Complex
Scripts
Internet Client Services
Browser Application x x x x
Internet Explorer 6.0 for Windows CE -
Standard Components
Internet Explorer 6.0 Sample Browser x x x x
TV-Style Navigation Components x x
Pocket Internet Explorer x x
Internet Explorer 6.0 for Windows CE Com-
ponents
Internet Explorer Browser Control Host x x x x
Internet Explorer HTML/DHTML API x x x x
Internet Explorer HTML Application x x x x
Filter and Translation x x x x
Internet Explorer Plug-in Image
Decoder API
Internet Explorer PNG Image
Decoder
Internet Explorer Theme Library x x x x
Internet Explorer Multiple-Language
Base API
Internet Explorer Multiple-Language
Full API
Optional Charset/Encoding in registry x x x x
Internet Explorer RPC Support x x x x
Internet Explorer TV-Style Navigation x x
Fixed-Width Layout x x
Directional Tabbing x x
Disable Vertical Scroll Bar and Events x x
Customizable Font Range x x
URL Moniker Services x x x x x
Windows Internet Services x x x x x
xxx
xxx
xxx
xxx
xx
xxx
xx x x
xx
xx x x
xx x x
xxxxx
xx x x
Chapter 5 Software Functionality
39 TREK-722/723 User Manual
Page 48

Passport SSI 1.4 Authentication x x x x x
Platform for Privacy Preferences
(P3P)
XML Data Islands x x x x x
XML MIME Viewer x x x x x
Pocket Internet Explorer HTML View (WEB-
VIEW)
Internet Options Control Panel x x x x
Scripting x x x x x x
JScript 5.6 x x x x x x
Script Authoring (Jscript) x x x x x x
Script Encode (Jscript) x x x x x x
VBScript 5.6 x x x x x x
Script Authoring (VBScript) x x x x x x
Script Encode (VBScript) x x x x x x
MsgBox and InputBox support x x x x x x
GRAPHICS AND MULTIMEDIA TECHNOL-
OGIES
Graphics x x x
Raster Fonts Support x x x
V1 Font Compatibility x x x
Alphablend API (GDI version) x x x
Gradient Fill Support x x x x x x
Multiple Monitor Support x x x
Imaging x x x x x x
Still Image Codec Support (Encode
and Decode)
Still Image Decoders x x x x x x
PNG Decoder x x x x x x
BMP Decoder x x x x x x
GIF Decoder x x x x x x
ICO Decoder x x x x x x
JPG Decoder x x x x x x
Still Image Encoders x x x x x x
GIF Encoder x x x x x x
BMP Encoder x x x x x x
JPG Encoder x x x x x x
PNG Encoder x x x x x x
Direct3D Mobile x x x x x x
DirectDraw x x x x x x
Audio x x x x x x
Audio Compression Manager x x x x x x
GSM 6.10 Codec x x x x x x
MSFilter Codec x x x x x x
Waveform Audio x x x x x x
Media x x x
Streaming Media Playback (requires
WMP application)
WMA and MP3 Local Playback x x x
WMA and MP3 Streaming (requires WMP
application)
Digital Rights Management x x x
Digital Rights Management (DRM) x x x
xxxxx
xx
xx xx x x
xx
xx
TREK-722/723 User Manual 40
Page 49

DRM for Portable Devices x x x
DRM License Acquisition OCX x x x
DirectShow x x x x x x
DirectShow Core x x x x x x
DirectShow Display x x x x x x
DirectShow Error Messages x x x x x x
DMO Wrapper Filter x x x x x x
ACM Wrapper Filter x x x x x x
Media Formats x x x x x x
AVI Filter x x x x x x
MPEG-1 Parser/Splitter x x x x x x
Audio Codecs and Renderers x x x
G.711 Audio Codec x x x x x x
GSM 6.10 Audio Codec x x x x x x
IMA ADPCM Audio Codec x x x x x x
MP3 Codec x x x
MPEG-1 Layer 1 and 2 Audio
Codec
MS ADPCM Audio Codec x x x x x x
Waveform Audio Renderer x x x x x x
WMA Codec x x x x x x
WMA Voice Codec x x x x x x
Wave/AIFF/au/snd File Parser x x x x x x
Video Codecs and Renderers x x x x x x
DirectShow Video Renderer x x x x x x
MPEG-1 Video Codec x x x x x x
MS RLE Video Codec x x x x x x
Overlay Mixer x x x x x x
Video/Image Compression Man-
ager
WMV/MPEG-4 Video Codec x x x x x x
DVD-Video x x x
DVD-Video x x x
DVD-Video Samples x x x
Windows Media Player x x x x
Windows Media Player x x x x
Windows Media Player OCX x x x x
Windows Media Technologies x x x x x
ASX v1 and M3U File Support x x x x x
ASX v2 File Support x x x x x
ASX v3 File Support x x x x x
Windows Media Multicast and
Multi-Bit Rate
NSC File Support x x x x x
Windows Media Streaming from
Local Storage
Windows Media Streaming over
HTTP
Windows Media Streaming over
MMS
SECURITY
Authentication Services (SSPI) x x x x x x
NTLM x x x x x x
xx xx x x
xx xx x x
xxxxx
xxxxx
xxxxx
xxxxx
Chapter 5 Software Functionality
41 TREK-722/723 User Manual
Page 50

Kerberos x x x x x x
Schannel (SSL/TLS) x x x x x x
Cryptography Services (CryptoAPI 1.0) with
High Encryption Provider
Certificates (CryptoAPI 2.0) x x x x x x
Cryptographic Messaging (PKCS#7) x x x x x x
Personal Information Exchange Stan-
dard (PKCS #12)
Diffie-Hellman/DSS Provider x x x
Smart Card Encryption Provider x x x
Local Authentication Sub-System x x x
Password Local Authentication Plug-in x x x
Microsoft Certificate Enrollment Tool Sample x x x
Credential Manager x x x x x x
SHELL AND USER INTERFACE
Graphics, Windowing and Events x x x x x x
Minimal GWES Configuration x x x x x x
Minimal GDI Configuration x x x x x x
Minimal Input Configuration x x x x x x
Minimal Window Manager Configuration x x x x x x
Shell x x
Graphical Shell (Choose 1) x x
Standard Shell x x x x x x
Windows Thin Client Shell x x
AYGShell API Set x x x x
Command Shell x x x x x x
Console Window x x x x x x
Command Processor x x x x x x
User Interface x x x x x x
Accessibility x x x x x x
Common Dialog Support x x x x x x
Controls Option B x x x
Control Panel Applets x x x x x x
Customizable UI x x x x x x
Windows XP-like Sample Skin x x x x x x
Menu Tool Tip x x x x x x
Mouse x x x x x x
Network User Interface x x x x x x
Overlapping Menus x x x x x x
Software Input Panel x x x x x x
Software-based Input Panel Driver x x x x x x
Software-based Input Panel (SIP)
(Choose 1 or more)
SIP for Small Screens x x x x x x
SIP for Large Screens x x x x x x
Touch Screen (Stylus) x x x x x x
Quarter VGA Resources - Portrait Mode x x x
Common Controls x x x x x x
Animation Control x x x x x x
Common Control x x x x x x
Windows CE Error Reporting x x x
Error Report Generator x x x
xx xx x x
xx xx x x
xx xx x x
TREK-722/723 User Manual 42
Page 51

Report Upload Client x x x
Report Upload Client User Interface x x x
Error Report Transfer Driver x x x
Error Reporting Control Panel x x x
VOICE OVER IP PHONE SERVICES
Phone IME x x x
PC Authentication x x x
Telephony User Interface x x x
VoIP Application Interface Layer (VAIL) x x x
VAIL Database Store x x x
Phone Provisioner x x x
Reference Media Manager x x x
Real-time Communications (RTC) Client
API
SIREN/G.722.1 Codecs x x x
xxx
Chapter 5 Software Functionality
43 TREK-722/723 User Manual
Page 52

www.advantech.com
Please verify specifications before quoting. This guide is intended for reference
purposes only.
All product specifications are subject to change without notice.
No part of this publication may be reproduced in any form or by any means,
electronic, photocopying, recording or otherwise, without prior written permission of the publisher.
All brand and product names are trademarks or registered trademarks of their
respective companies.
© Advantech Co., Ltd. 2013
Page 53

45
 Loading...