

Page 1
Express 3000
Express 3000
Express 3000 Express 3000
(for Internet Access)
Configuration and Troubleshooting Guide 61203153L2-13D March 2003
Before you begin...
Tools Required (for PC installations)
• DB-25 (25-pin) male to DB-9 (9-pin) female straight-through serial cable.
• USB to DB-25 (25-pin) male serial adapter cable (optional - necessary if a
standard serial interface is not available)
Ordering ISDN
The following ISDN packages are recommended by the industry for most home office/small business applications:
EZ-ISDN 1 (Capability Package U)
EZ-ISDN 1A (Capability Package V)
Generic Data S (if EZ-ISDN is not available)
Use the above information when ordering your ISDN line from the telephone company to ensure the line is set up properly. Refer to the ISDN Feature Table for more details. For more
information regarding ordering ISDN, see the Ordering ISDN Service User Guide (ADTRAN document number 60000.015-8) or contact the telephone company for alternative line
configurations.
Tools Required (for MacIntosh installations)
• USB to serial adapter, such as the Keyspan brand
• DB-25 (25-pin) male to appropriate MacIntosh interface (interfaces vary depending
on model) serial cable
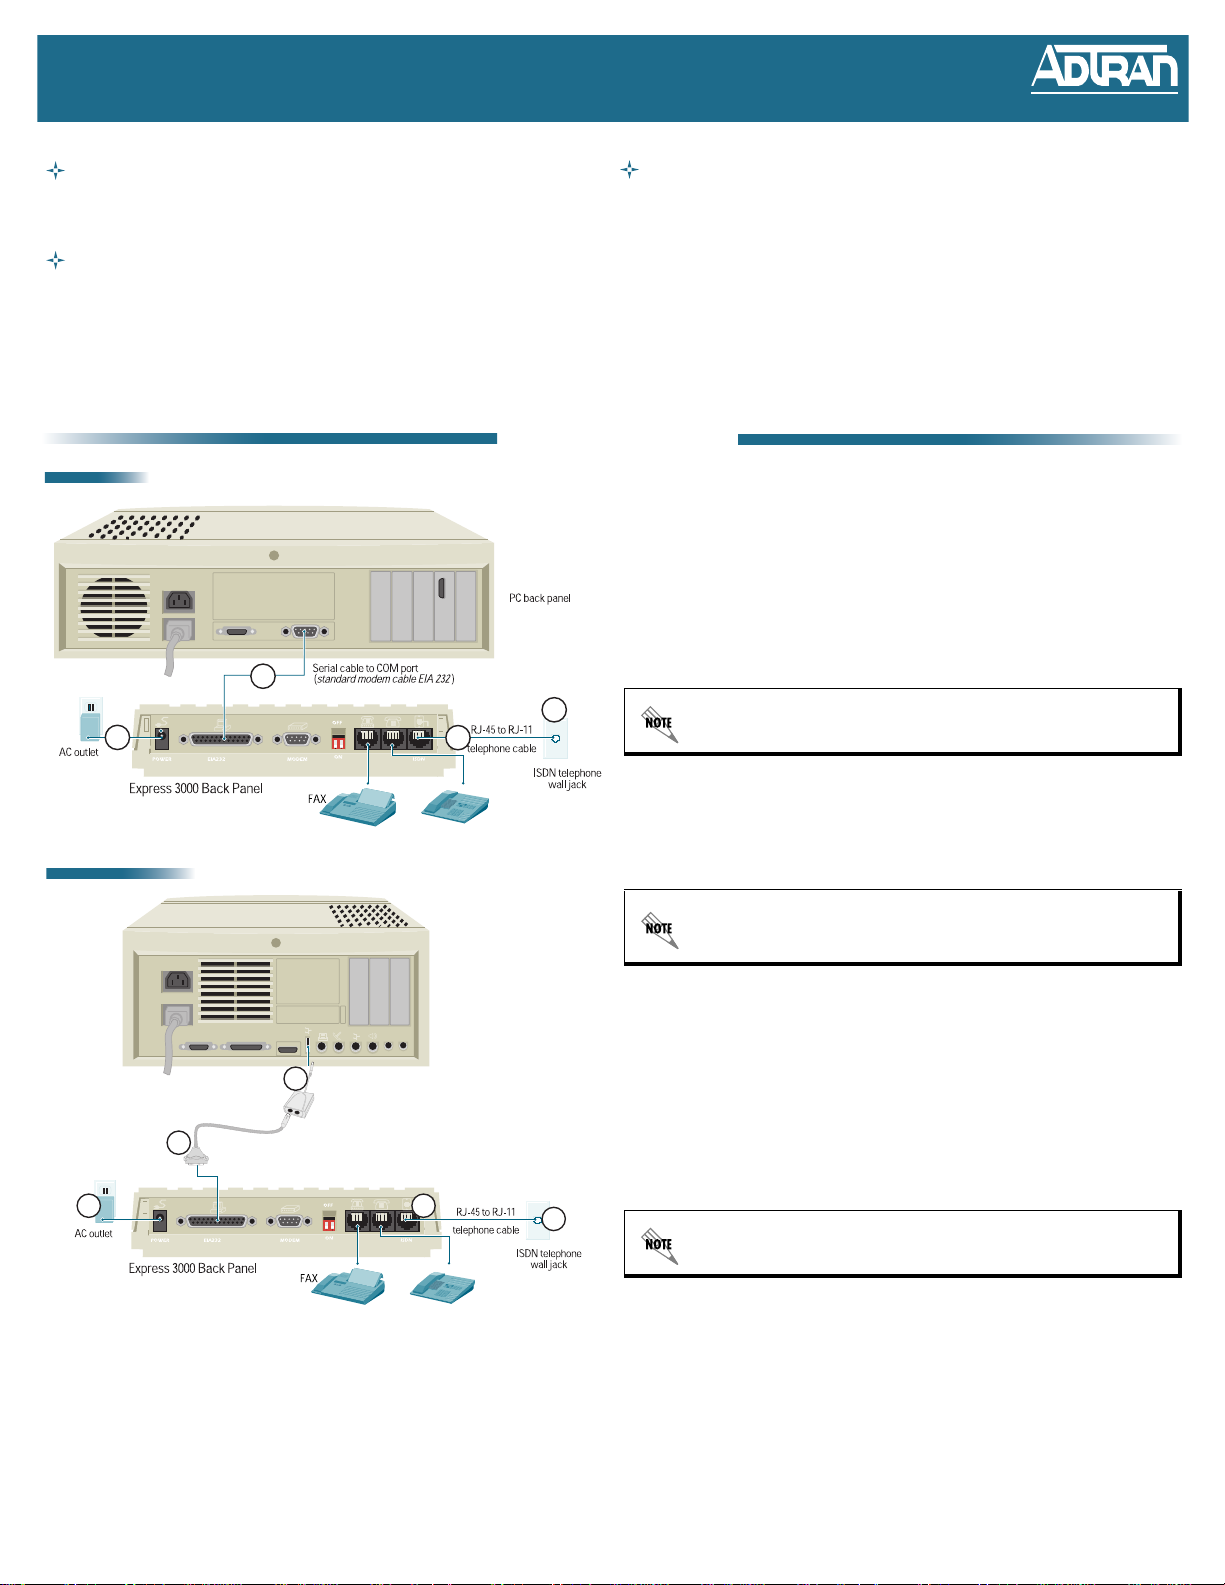
1. Hardware Installation
PC Version
1. With the computer's power off, connect the EIA-232 port on the Express 3000 to an
available serial port on the computer. You will need to provide a DB-25 (25-pin) male
to DB-9 (9-pin) female straight-through serial cable, if one is not shipped by your
supplier.
2. Plug the Express 3000's AC power cord into the port labeled PWR. Plug the other
end into a 120 VAC electrical outlet. The Express 3000 is now powered on.
3. Plug the RJ-45 connector (large end) of the RJ-45 to RJ-11 telephone cable into the
jack labeled ISDN on the rear of the Express 3000.
4. Plug the RJ-11 connector (small end) of the RJ-45 to RJ-11 telephone cable into the
1
4
2
3
ISDN telephone wall jack.
Please consider protecting your equipment from lightning and transient voltage by
using a surge protector on the power line. Damages caused by power surges are
not covered under the ADTRAN Warranty agreement.
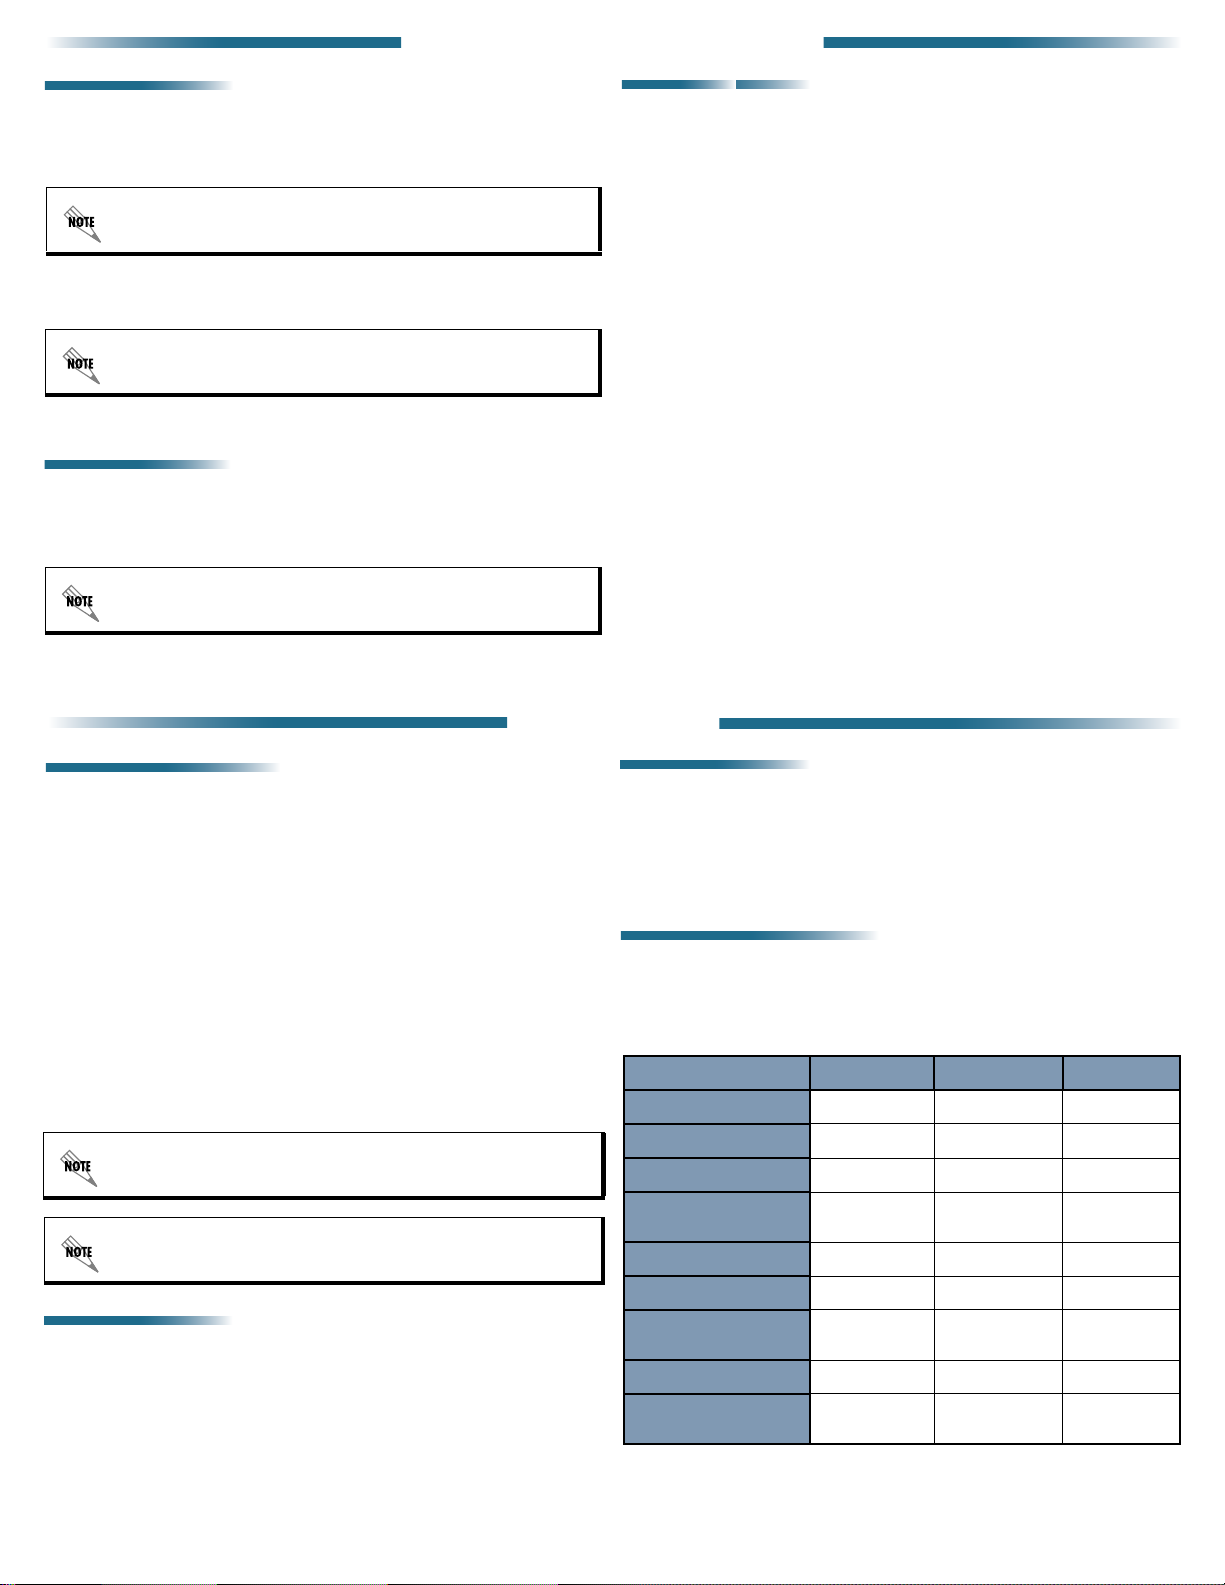
MacIntosh Version
3
1
DB-25 to 8-pin MAC
serial cable
8-pin MAC to USB
2
cable adapter
Macintosh
back panel
4
Phone
Phone
5. Proceed to Express Configuration Software Installation on page 2.
MacIntosh computers no longer come standard with serial ports and require the
use of a USB to serial adapter for operation with the Express 3000. To utilize both
B channels on your ISDN link, purchase an adapter that supports speeds of at least
115.2 kbps. (For example, Keyspan offers a high-speed USB to serial adapter.)
1. With the computer's power off, connect the EIA-232 port on the Express 3000 to an
available serial port on the USB to serial adapter (adapter not provided with
shipment). You will need to provide a DB-25 (25-pin) male to DB-9 (9-pin) female
straight-through serial cable, if one is not shipped by your supplier.
2. Connect the USB end of the USB to serial adapter to an available USB port on the
Mac.
3. Plug the Express 3000's AC power cord into the port labeled PWR. Plug the other
end into a 120 VAC electrical outlet. The Express 3000 is now powered on.
4. Plug the RJ-45 connector (large end) of the RJ-45 to RJ-11 telephone cable into the
jack labeled ISDN on the rear of the Express 3000.
5. Plug the RJ-11 connector (small end) of the RJ-45 to RJ-11 telephone cable into the
ISDN telephone wall jack.
5
6. Proceed to Express Configuration Software Installation on page 2.
Please consider protecting your equipment from lightning and transient voltage by
using a surge protector on the power line. Damages caused by power surges are
not covered under the ADTRAN Warranty agreement.
1
Page 2
2. Express Configuration Software Installation
All Windows Versions
1. Power on the computer.
2. Insert the Express Configuration CD into the CD-ROM drive.
3. After the ADTRAN Installation Helper runs, click the I
on-screen instructions.
If the ADTRAN Installation Helper does not run automatically, double click on the
M
Y COMPUTER icon (on the computer desktop) and double click on the CD-ROM
drive.
4. Start the Express Configuration software (if it does not automatically run after the
TART
installation process) by clicking the S
ADTRAN > ADTRAN E
XPRESS CONFIGURATION
button and selecting P
If the Configuration Wizard opens, click the CANCEL button to close the wizard.
5. Proceed to the steps outlined in ISDN Configuration section below.
MAC OS 9.2 and earlier
1. Power on the computer.
2. Insert the Express Configuration CD into the CD-ROM drive.
3. After the ADTRAN Installation Helper runs, click the I
on-screen instructions.
NSTALL
button and follow the
ROGRAMS
>
.
NSTALL
button and follow the
MAC OS X
The ADTRAN Express Configuration software operates with MAC OS versions 9.2 and earlier. If
your system is currently running MAC OS X, load 9.2 by clicking S
selecting S
MAC OS 9.2 is loaded, follow the steps for installing the software on a MAC OS 9.2 platform. If this
does not work properly, or MAC OS X configuration is preferred, the unit may be manually
TARTUP DISK. Choose MAC OS 9.2 from the options list and click RES TART. Once
configured in OS X using the following steps.
1. Download and install the terminal emulation program Z
www.download.com and open a Z
TERM
session. (Please refer to the Z
instructions for more details on this step.)
2. Under the D
IAL
menu, select D
IRECTORY
and click NEW. Name the service Express
3000 and configure the following settings:
Data Rate: 57600 Hardware Handshake: ON Xon/Xoff: OFF
3. Under the S
ETTINGS
menu, select M
ODEM PREFERENCES
listed corresponds to the correct port on the serial adapter. Enter ate1 in the
NITIALIZATIO N
I
4. Select the Express 3000 and click the D
5. Enter at!v at the Z
field. Click OK.
TERM
prompt to access the Express 3000 Configuration menu.
IAL
button.
6. Proceed to the steps outlined in ISDN Configuration below.
YSTEM PREFERENCES and
TERM
from
TERM
and verify the serial port
If the ADTRAN Installation Helper does not run automatically, double click on the
Express 3000 CD-ROM icon and select ADTRAN > E
I
NSTALL.
XPRESS CONFIGURATION
4. Start the Express Configuration software by double clicking the MacIntosh HD icon
and selecting ADTRAN ISDN > E
XPRESS CONFIGURATION
.
5. Proceed to the steps outlined in ISDN Configuration below.
3. ISDN Configuration
ISDN Configuration Guidelines
Use the following guidelines when entering the ISDN configuration parameters:
ISDN Line Phone Numbers
Enter a single string of 7 digits with no spaces or dashes. The area code is not entered in
the ISDN Line Phone Numbers Field. There are two phone numbers on a BRI (one for
each channel of the ISDN line). The directory numbers are assigned to the BRI by the
ISDN Provider. (Example: Phone 1 = 5552222 and Phone 2 = 5552223)
Switch Type
The switch type is assigned by the ISDN Provider and corresponds to the ISDN switch
protocol used on the D channel. The switch type will not always correspond to the
manufacturer of the Central Office switch. The Express 3000 supports AT&T 5ESS (AT&T
Custom), DMS-100 (DMS Custom), and National ISDN.
SPIDs (Service Profile Identifiers)
Enter a single string of digits with no spaces or dashes. A normal SPID follows this format:
AREA CODE + LINE NUMBER + SUFFIX, where the area code is the local area code, the
line number is the directory number assigned to the BRI by the ISDN Provider, and the
su ffi x is a 4 dig i t ext e nsi o n (s u ch a s 010 1 or 1111) . The r e ar e two S P IDs o n a B R I (o n e for
each channel of the ISDN line). The SPID is defined by the ISDN Provider and assigned to
the BRI by the Central Office switch. (Example: SPID 1 = 25655522220101 and
SPID 2 = 25655522230101)
National ISDN switch type requires 14 digit SPIDs for proper operation.
MAC OS 9.2 or earlier
LOSE
ROFILES
and click the NEW button.
button.
1. Select MLPPP 128K from the list of P
2. Input the ISDN line information (assigned by the ISDN Provider) in the appropriate
fields. Refer to ISDN Configuration Guidelines, for more details.
3. Click the OK button and then the C
4. Proceed to the Remote Access Settings on page 3 for your specific operating
system.
MAC OS X (Manual Configuration)
1. Use the active Z
ISDN Provider) in the appropriate fields. Refer to ISDN Configuration Guidelines for
more details.
2. Proceed to Remote Access Settings on page 3 for your specific operating system.
TERM
session to input the ISDN line information (assigned by the
ISDN Feature Table
Package EZ-ISDN 1 (U) EZ-ISDN 1A (V) Data S
Data B1, B2 B1, B2 B1, B2
Voi ce B1, B2 B1, B2 B1, B2
Calling Party Number B1, B2 B1, B2 B1, B2
When the unit is properly configured, the PWR/Line LED will be solid green (not
blinking). If your LED is not solid after 2 minutes, refer to the Express 3000
Troubleshooting Guide for more help.
All Windows Versions
1. Verify the ISDN S
and click the S
2. Input the ISDN line information (assigned by the ISDN Provider) in the appropriate
fields. Refer to ISDN Configuration Guidelines above for more details.
3. Click the S
the configuration changes. Click the E
4. Proceed to the Remote Access Settings on page 3 for your specific operating
system.
ETUP
link (located at the top of the left-side menu list) is highlighted
ETUP
button (at the bottom of the screen).
AVE
button, then the A
PPLY
button, and finally the C
XIT
link (at the bottom left ) to exit the software.
LOSE
button to register
Flexible Calling
(Additional Call Offering)
B1, B2 B1, B2
Call Waiting B1 B1
Call Forward Variable B1 B1
Visual Message Waiting
Indicator
Call Forward Busy B1
Call Forwarding No
Answer
2
B1
B1
Page 3

Initialization Strings and Dial Up Networking
(
All Windows versions except 2000 and XP)
Initialization Strings
1. Click the S
TART
button and select S
ETTINGS
> C
ONTROL PANEL
4. Remote Access Settings
Dial Up Networking
Click the S
consult with your Internet Service Provider for instructions on creating a new connection
.
(or editing an existing connection).
MAC Settings (MAC OS 9.2 or earlier)
TART
button and select S
ETTINGS
ETWORK AND DIALUP CONNECTIONS
> N
. Please
Windows ME users must click SHOW
2. Double click M
ODEMS
.
3. Select the ADTRAN Express 3000 and click P
4. Select the C
5. Click the A
ONNECTION
DVANCED
tab.
button.
6. Enter one of the following strings in the E
EVERYTHING IN THIS FOLDER..
ROPERTIES
XTRA SETTINGS
.
field. (Consult with your
Internet Service Provider if you are unsure which string to use.)
Multi-link PPP (2 channels):
ats54=12s53=3s27=1s118=8s129=0s6=0s13=1
PPP (1 channel):
ats54=12s53=3s27=0s6=0s13=1
7. Click OK to save the initialization string and close the open windows.
Dial Up Networking
1. Double click the MY C
Windows ME users must click the START button, select SETTINGS
P
ANEL
2. Double click D
Provider for instructions on creating a new connection (or editing an existing
connection).
OMPUTER
icon.
, and then click S
IAL UP NETWORKING
HOW EVERYTHING IN THIS FOLDER..
> C
ONTROL
. Please consult with your Internet Service
Initialization Strings and Dial Up Networking (Windows XP)
Initialization Strings
ARDWARE
TART
button and select C
HONE AND MODEM OPTIONS
> P
1. Click the S
H
2. Select the ADTRAN Express 3000 Plug and Play and click P
3. Select the A
DVANCED
tab.
4. Enter one of the following strings in the Extra Initialization Commands field. (Consult
with your Internet Service Provider if you are unsure which string to use.)
Multi-link PPP (2 channels):
ats54=12s53=3s27=1s118=8s129=0s6=0s13=1
PPP (1 channel):
ats54=12s53=3s27=0s6=0s13=1
5. Click the D
to PPP 128K (for 2 channels) or PPP 64K (for a single channel). Disregard this step
if the D
EFAULT PREFERENCES
ATA PROTOCOL
drop down box is not available for configuring (grayed out).
6. Click OK to save the initialization string; then close the open windows.
ONTROL PANEL
> P
; then click the M
button. Change the D
RINTERS AND OTHER
ODEMS
tab.
ROPERTIES
ATA PROTOCOL
drop down box
.
Dial Up Networking
1. Click the S
C
Service Provider for instructions on creating a new connection (or editing an existing
TART
OMMUNICATIONS
button and select ALL P
ONNECTION WIZARD
> NEW C
connection).
ROGRAMS
CCESSORIES
> A
>
. Please consult with your Internet
Initialization Strings and Dial Up Networking (Windows 2000)
Initialization Strings
1. Click the S
2. Double click P
TART
button and select S
HONE AND MODEM OPTIONS
3. Select the ADTRAN Express 3000 Plug and Play and click P
4. Select the A
5. Enter one of the following strings in the E
(Consult with your Internet Service Provider if you are unsure which string to use.)
DVANCED
tab.
Multi-link PPP (2 channels):
ats54=12s53=3s27=1s118=8s129=0s6=0s13=1
PPP (1 channel):
ats54=12s53=3s27=0s6=0s13=1
6. Click the D
to PPP 128K (for 2 channels) or PPP 64K (for a single channel). Disregard this step if
the D
EFAULT PREFERENCES
ATA PROTOCOL
drop down box is not available for configuring (grayed out).
7. Click OK to save the initialization string; then close the open windows.
ETTINGS
ONTROL PANEL
> C
; and then click the M
XTRA INITIALIZATION COMMANDS
button. Change the D
.
ODEMS
ROPERTIES
ATA PROTOCOL
tab.
.
field.
drop down box
There may be a control panel for the USB to serial adapter to provide information
on the serial port.
1. Click the A
PPLE MENU
and select C
ONTROL PANELS
> M
ODEM
.
2. Select the appropriate serial port and choose one of the following (depending on your
K
application) ADTRAN 57.6
3. Click the A
PPLE MENU
, 115 .2K, or 230.4K.
and select C
ONTROL PANELS
> TCP/IP.
4. Configure the following parameters:
C
ONNECT VIA
ONFIGURE
C
PPP
Using PPP Server
Enter DNS numbers on this page (if necessary). Please consult with your Internet
Service Provider for assistance with these settings.
5. Click the A
phone number, username, and password (provided by your Internet Service
PPLE MENU
and select C
ONTROL PANELS
EMOTE ACCESS
> R
. Enter the
Provider) in the appropriate fields.
6. Click the C
ONNECT
button.
MAC Settings (MAC OS X)
Initialization Strings
1. Copy the scripts (located in the M
CD) and place them in the L
MacIntosh HD).
2. Click the A
3. Choose N
PPLE MENU
ETWORK
and select S
and select S
4. Select the TCP/IP tab and verify that the C
Enter DNS numbers on this page (if necessary). Please consult with your Internet
Service Provider for assistance with these settings.
5. Select the PPP tab and enter the phone number, username, and password (provided
by your Internet Service Provider) in the appropriate fields.
6. Click the M
application) from the M
7. Click the I
ODEM
tab and select the ADTRAN 115.2k or 230.4K (depending on your
ODEMS
NTERNET CONNECT
corner) to connect. Select the appropriate connection from the pull down menu and
ONNECT
click C
.
All necessary CCL scripts are installed automatically during Express
Configuration Software Installation.
ODEM and TCP/IP Control Panels are alternately accessed by selecting them
The M
from the R
EMOTE ACCESS menu. In addition, multiple configurations of each of
program can be accessed by selecting F
ODEM SCRIPTS
IBRARY
> M
YSTEM PREFERENCES
HOW
for the appropriate serial port.
folder on the Express Configuration
ODEM SCRIPTS
folder (located on the
.
ONFIGURE
field is defined as U
SING
PPP.
list.
button (the telephone symbol in the upper right hand
> C
ILE
ONFIGURATIONS.
3
Page 4

5. Completing the Installation
Connecting a Telephone
Port 2 is not available for use when there is an active data call on the
Express 3000. If there is no active data call, Port 2 operates normally. Port 1 may
be used normally at all times.
1. Plug a telephone (or fax machine) in the jack labeled 1 on the back of the ADTRAN
unit.
The phone number assigned to PORT
(see the ISDN Configuration on page 2 section of this guide).
2. Use the telephone or fax machine for normal operation with a standard telephone
line.
1 is the number entered in the P
Additional Telephone Features
To Enable:
Open the Express Configuration Wizard, configure the F
AITING
W
, and click OK.
To U s e :
During a voice call, a beep indicates an incoming call. Flash hook to place the active call
on hold and retrieve the incoming call. Flash hook again to return to the original active call.
Call Waiting Mode
LASH/HOOK DEFAULT
HONE
1 field
to C
ALL
To Enable:
Open the Express Configuration Wizard, configure the F
ENCE/TRANSFER
, and click OK.
Conference/Transfer Mode
LASH/HOOK DEFAULT
to C
ONFER
To U s e :
During a voice call, a beep indicates an incoming call. Flash hook to place the active call
on hold and retrieve the incoming call. Flash hook again to return to the original active call.
If there is an active call and you wish to initiate another call, flash hook to place the first
caller on hold and dial the second number (after hearing dial tone). Flash hook again to put
the second caller on hold and retrieve the first caller. Flash hook once more to conference
the calls together. Hanging up (after conferencing the calls together) will effectively
transfer the call.
To Disable:
Enter *70 from the telephone keypad before placing the call. (This feature is now disabled
until a new configuration is applied to the Express 3000 or the unit is power-cycled.)
To R e d ial :
Enter **5 from the telephone keypad.
-
To flash hook a standard phone, press the flash button (as if you were
disconnecting the call). Most cordless phones have a button labeled F
Alternately, the T
To D i s abl e :
Enter *70 from the telephone keypad before placing the call.
YMPTOM
S
T
: All LEDs are off — No power to the Express 3000.
RY THIS
ALK button may be used if no FLASH button is available.
1. Connect the Express 3000 to a different electrical outlet.
R
O
2. Use a different 12V power supply.
YMPTOM
S
TRY T
T
PWR LED is flashing — No SYNC with the ISDN line.
:
HIS
1. Verify the cable is securely connected to the ISDN jack on the wall and the ISDN
port on the back of the unit.
HEN
1. If the unit is connected properly and the PWR LED is still flashing, start the
ADTRAN Express Configuration software (ships with the unit) by selecting
ROGRAMS
P
D
and the unit status information displays. (The status information changes every
30 to 40 seconds, so click the U
> ADTRAN > ADTRAN E
IAGNOSTIC
s menu (on the left side of the window). Click the U
XPRESS CONFIGURATION
NIT INFO
button a couple times to verify the
. Select the
NIT INFO
displayed information is current.)
ERIFY THE FOLLOWING
V
1. ISDN L
OOP STATUS
one of two actions:
INK DOWN
L
— The contents of the ISDN L
OOP STATUS
field will require
Call your telephone company to report trouble with your ISDN line.
ETTING
G
Disable the SPID download feature and verify the Express 3000 ISDN
TEI OR R
EGISTER
SPID
configuration by completing the following steps:
NIT INFO
1. Close the U
2. Select the ISDN S
3. Click the S
4. Check the D
5. Verify the ISDN settings for your Express 3000 including the switch type,
screen by clicking the C
ETUP
ETUP
ISABLE
menu (on the left side of the window).
button and the ISDN S
SPID D
OWNLOAD
ANCEL
ETUP
menu displays.
check box.
button.
ISDN phone number, and SPIDS. (Refer to ISDN Configuration on page 2
for more help.)
AVE
INALLY
F
6. Click S
7. Click E
PPLY
, A
XIT
, and then C
to close the Express Configuration software.
LOSE
.
Reset the unit and the ISDN connection by completing the following steps:
N
1. Verify that both switches on the back of the unit are in the O
down).
2. Disconnect power from the Express 3000.
position (pointing
3. Unplug the ISDN line from the wall jack and plug it back in, making sure it has a
secure connection (the tab in the middle of the connector should snap in place).
4. Unplug the ISDN line from the back of the Express 3000.
5. Wait 2 minutes; then restore power to the Express 3000.
6. Connect the ISDN line to the ISDN port on the back of the unit, making sure it
has a secure connection (the tab in the middle of the connector should snap in
place).
LASH
.
6. Troubleshooting
YMPTOM
S
unable to locate the Express 3000.
Note: If the Express 3000 has an active data call, the unit will not be available through
TRY T
1. Verify the computer’s COM port is directly connected to the EIA-232 port on the
2. Verify that both switches on the back of the unit are in the O
3. Reboot your computer; then check the unit again.
4. Check the computer COM port and serial cable. (Try a different COM port and/or
5. If there is an icon in the Windows system tray (the icons located on the right side
button
INDOWS TROUBLESHOOTING
W
1. Open the Windows Device Manager and verify the COM port is configured with
2. Check the Windows system tray (the icons located on the right side of the task
3. BIOS settings can be set to disable serial ports on the computer. Have someone
INALLY
F
Factory restore the Express 3000 by completing the following steps:
1. Disconnect power and all connected cables from the Express 3000.
2. Place S
3. Connect power back to the Express 3000.
4. After the Express 3000 powers up, wait at least 30 seconds and place S
5. Reapply the ISDN profile or reconfigure the device.
6. Reconnect all cables.
4
ADTRAN Express Configuration or Windows Device Manager is
:
the ADTRAN Express Configuration software or Windows Device Manager.
HIS
back of the Express 3000.
N
position (pointing
down).
cable if possible.) If you are using a USB to serial converter, verify that the
converter is installed properly as a device on your computer.
of the task bar) that says D
OUBLE CLICK TO EDIT MODEM PROPERTIES
, double click
it to launch the ADTRAN Express Configuration software if you cannot open the
software from the S
APTURE
C
COM
PORT
TART
menu. Select the P
is not checked. Click E
REFERENCES
XIT
to close the software.
menu and verify that
the following settings:
Bits per second: 115200
Data bits: 8
Stop Bits: 1
Parity: None
Flow Control: Hardware
bar) and verify no other programs are currently running that will use the COM
port. Some examples of programs that use the COM port are HotSync, digital
camera software (for non-USB connections), HyperTerminal, Remote Access
Servers, etc.
who is familiar with the BIOS settings on your computer verify the serial ports are
enabled on the computer and are working inside Windows. (Please contact
Technical Support for your computer or Operating System for help with this
step.)
WITCH
2 (on the back of the unit) in the OFF position (switch pointing up).
N
in the O
position (switch pointing down).
WITCH
2
Page 5

YMPTOM
S
T
Data calls only connect with one channel.
:
RY THIS
1. Verify that your ISP (Internet Service Provider) supports 2 channel ISDN (128K).
Some ISPs support ISDN on one 64K channel. Verify you have the correct ISDN
phone number (with the ISP).
2. Verify the Express 3000 configuration (using this guide).
3. Verify the initialization string is correct in your computer for your operating
system (refer to Remote Access Settings on page 3 for more details).
Note: If the Express 3000 has an active data call, the unit will not be available through
the ADTRAN Express Configuration software or Windows Device Manager.
HEN
T
Check the Express 3000 status buffer messages by completing the following steps:
1. Launch the ADTRAN Express Configuration software (ships with the unit) by
selecting P
the D
button (for the Local Unit) and a list of the status buffer displays. Clear this buffer
by clicking the C
C
2. Attempt your outbound call again.
ROGRAMS
IAGNOSTICS
LOSE
button. Exit Express Configuration Software by clicking E
> ADTRAN > ADTRAN E
menu (on the left side of the window). Click the S
LEAR BUFFER
button. Close the buffer window by clicking the
XPRESS CONFIGURATION
. Select
TATUS BUFFER
XIT
.
3. Launch the ADTRAN Express Configuration software and display the status
buffer messages (see Express Configuration Software Installation on page 2).
4. Review the status messages. The entries are in reverse order, with the most
recent entry displayed on line 1. Check the sequence of events for the
IAL
connection for a D
2 error message.
ED_MISMATCH followed by Disconnect 2 indicates that the ISP was unable
to bring both ISDN calls together and disconnected the second call. Try a
different access number or contact your ISP.
NORMAL_CLEARING followed by Disconnect 2 indicates that the ISP
blocked and disconnected the second call. Some ISPs limit ISDN service to
64K during times of high traffic. Try a different access number or contact your
ISP.
Telephone company messages are in upper case and have underscores
between words (for example, NETWORK_BUSY, NO_ROUTE_TO_DEST, and
INCOMPATIBLE_DEST). Refer to the manual provided on the Express 3000
CD for error messages definitions.
YMPTOM
S
NOTE: The P
Unit dials out but is unable to connect a data call.
:
2 LED on the Express 3000 will illuminate orange during an
HONE
outgoing call attempt. These steps assume the P
the data call does not successfully negotiate. If the P
illuminate during an outgoing call attempt, refer to the troubleshooting steps in
S
YMPTOM: ADTRAN Express Configuration or Windows Device Manager is
2 LED is illuminating but
HONE
2 LED does not
HONE
unable to locate the Express 3000 on page 4.
HIS
TRY T
1. Verify the number dialed is an ISDN number.
2. Verify the initialization string is correct in your computer for your operating
system (refer to Remote Access Settings on page 3 for more details).
NOTE: If the initialization string you enter in Windows does not save, the Windows
registry is not working properly. Please contact Technical Support for your
computer or operating system for help with this problem.
HEN
T
Check the Express 3000 status buffer messages by completing the following steps:
1. Launch the ADTRAN Express Configuration software (ships with the unit) by
selecting P
IAGNOSTICS
the D
ROGRAMS
> ADTRAN > ADTRAN E
menu (on the left side of the window). Click the S
XPRESS CONFIGURATION
TATUS BUFFER
. Select
button (for the Local Unit) and a list of the status buffer displays. Clear this buffer
by clicking the C
LOSE
C
button. Exit Express Configuration Software by clicking E
LEAR BUFFER
button. Close the buffer window by clicking the
XIT
.
2. Attempt your outbound call again.
3. Launch the ADTRAN Express Configuration software and display the status
buffer messages (see Step 1 above).
4. Review the status messages. The entries are in reverse order, with the most
recent entry displayed on line 1. Telephone company messages are in upper
case and have underscores between words (for example, NETWORK_BUSY,
NO_ROUTE_TO_DEST, and INCOMPATIBLE_DEST). Refer to the manual
provided on the Express 3000 CD for error message definitions.
NOTE: If there are no entries in the status buffer, the dialer you are using (normally
Windows) is not communicating with the Express 3000. Check the setup of
your dialer and verify that it is configured to use the Express 3000.
YMPTOM
S
TRY T
PWR LED is off and Phone 1 or 2 is on and solid.
:
HIS
1. Disconnect power from the Express 3000.
2. Unplug the ISDN line from the back of the unit.
3. Connect power back to the Express 3000.
4. Connect the ISDN line to the ISDN port on the back of the unit.
HONE
5. If the P
1 and 2 lights are off, wait a minute and verify the PWR LED turns
solid green.
R
O
Factory restore the Express 3000 by completing the following steps:
1. Disconnect power from the Express 3000.
2. Place S
3. Connect power back to the Express 3000.
4. After the Express 3000 powers up, wait at least 30 seconds and place S
5. If the P
WITCH
2 (on the back of the unit) in the OFF position (switch pointing up).
N
position (switch pointing down).
in the O
HONE
illuminate again, contact ADTRAN Technical Support (see Contact Information
1 and 2 lights remain off, reconfigure the unit. If the P
on page 6).
6. Reapply the ISDN profile or reconfigure the device.
7. Reconnect all cables.
YMPTOM
S
Unable to receive/place voice/fax calls.
:
NOTE: If you are able to make a call but there is noise or static on the line, or if you get
a dial tone that continues after you dial the number, contact ADTRAN Technical
Support.
HIS
TRY T
Verify the ISDN settings are correct by completing the following steps:
1. Launch the ADTRAN Express Configuration software (ships with the unit) by
selecting P
the D
button (for the Local Unit) and a list of the AT registers displays.
2. Verify that the assigned phone numbers (7 digits with no spaces or hyphens) for
ROGRAMS
IAGNOSTICS
> ADTRAN > ADTRAN E
XPRESS CONFIGURATION
menu (on the left side of the window). Click the R
the ISDN line are listed in ATS 6 2 and 63. The area code is listed in ATS 67 .
LOSE
3. Click the C
HEN
T
Verify your unit is running the latest firmware by completing the following steps:
1. Click the U
button to exit the register dump.
NIT INFO
button and the firmware version displays (in the second line).
Note the firmware version for later.
2. Go to www.adtran.com
firmware.
(go the Technical Support page) and obtain the latest
3. If your firmware is not the latest firmware, upgrade your unit. (Refer to the manual
provided on the Express 3000 CD for details on upgrading the unit.)
INALLY
F
Contact your ISDN provider to verify that your line is provisioned for voice and data.
YMPTOM
S
NOTE: The P
Unable to receive/place voice/fax calls on devices connected to
:
HONE
the P
HONE
active data call. Any incoming call to P
local phones/fax machines connected to P
the P
HONE
1 port while connected with a data calls.
2 port on the Express 3000 is not available for use while there is an
1 port for a device that needs to be available for use during an active
2 will receive a busy signal, and
HONE
2 will not receive dial tone. Use
HONE
data call.
HIS
TRY T
Verify your unit is running the latest firmware by completing the following steps:
NIT INFO
1. Click the U
Note the firmware version for later.
2. Go to www.adtran.com
firmware.
3. If your firmware is not the latest firmware, upgrade your unit. (Refer to the manual
provided on the Express 3000 CD for details on upgrading the unit.)
HEN
T
button and the firmware version displays (in the second line).
(go the Technical Support page) and obtain the latest
Verify the initialization string is correct in your computer for your operating system (refer
to Remote Access Settings on page 3 for more details).
NOTE: If the initialization string you enter in Windows does not save, the Windows
registry is not working properly. Please contact Technical Support for your
computer or operating system for help with this problem.
WITCH
HONE
LEDs
. Select
EGISTER DUMP
2
5
Page 6

901 Explorer Boulevard
P.O. Box 140000
Huntsville, AL 35814-4000
(256)963-8000
Internet:
www.adtran.com
Pre-Sales Support:
application.engineer@adtran.com
(800) 615-1176
Post-Sales Support:
support@adtran.com
(888) 4ADTRAN
Monday through Friday
7AM to 10 PM CT -- $19.95
Saturday
8AM to 5 PM CT -- $29.95
ACES Help Desk:
(888) 874-ACES (2237)
7. Contact Information
6
 Loading...