

Page 1

FSU
Frame Relay Service Unit
USER MANUAL
1200130L1 FSU base unit
1200130L2 FSU w/built-in DSU
61200.130L1-1A
December 1996
Page 2

This product includes software developed by the University of California, Berkeley,
and its contributors.
901 Explorer Boulevard
P.O. Box 140000
Huntsville, AL 35814-4000
Phone: (205) 963-8000
© 1997 ADTRAN, Inc.
All rights reserved.
Printed in USA.
Page 3

ABOUT THIS MANUAL
This manual is arranged so you can quickly and easily find the
information you need. The following is an overview of the
contents of this manual:
• Chapter 1, Introduction, familiarizes you with frame relay
networks and FSU highlights and gives a brief explanation of
options that may be purchased for use with the FSU.
• Chapter 2, Installation, describes the FSU connectors (pin
assignments are given in Appendix A) and provides an
installation diagram.
• Chapter 3, Operation, explains how to operate your FSU using
either the front panel or a VT 100 terminal interface.
• Chapter 4, Applications, provides examples of some common
FSU applications. This chapter includes network diagrams as
well as configuration tables for each example.
• Chapter 5, Configuration Overview, explains how to access the
FSU configuration menu and provides menu trees for both the
front panel and the VT 100 interface.
• Chapters 6 through 9 provide brief explanations for selections
made in the Configuration menus. These chapters are based
on the first level menu branches of the Configuration menu:
DTE Ports 1 and 2, Network Port, IP Routing, and System
Configuration.
• Chapter 10, Statistics, describes how to access statistical
information from the FSU.
• Chapter 11, Diagnostics, explains how to access the FSU
diagnostic features, including Ping and Loopback Tests.
• Appendix A provides pinouts for the FSU connectors.
• Appendix B contains product specifications.
Page 4

Notes provide additional useful information.
Cautions signify information that could prevent service interruption.
Warnings provide information that could prevent damage to the
equipment or endangerment to human life.
Page 5

FCC regulations require that the following information be provided in this manual:
1. This equipment complies with Part 68 of the FCC rules. On the bottom of the
equipment housing is a label that shows the FCC registration number and Ringer
Equivalence Number (REN) for this equipment. If requested, provide this
information to the telephone company (REN is not required for some types of analog
or digital facilities).
2. If this equipment causes harm to the telephone network, the telephone company may
temporarily discontinue service. If possible, advance notification is given, otherwise,
notification is given as soon as possible. The telephone company will advise the
customer of the right to file a complaint with the FCC.
3. The telephone company may make changes in its facilities, equipment, operations, or
procedures that could affect the proper operation of this equipment; advance
notification and the opportunity to maintain uninterrupted service are given.
4. If experiencing difficulty with this equipment, please contact ADTRAN for repair and
warranty information. The telephone company may require this equipment to be
disconnected from the network until the problem is corrected or it is certain the
equipment is not malfunctioning.
5. This unit contains no user serviceable parts.
6. An FCC compliant telephone cord with a modular plug is provided with this
equipment. In addition, an FCC compliant cable appropriate for the dial backup
option ordered is provided with this equipment. This equipment is designed to be
connected to the telephone network or premises wiring using an FCC compatible
modular jack, which is Part 68 compliant.
7. The following information may be required when applying to the local telephone
company for leased line facilities:
Service Digital Facility Service Order Network
Type Interface Code Code Jacks
56 kbps Digital Interface 04DU5-56 6.0F RJ-48S
64 kbps Digital Interface 04DU5-64 6.0F RJ-48S
8. In the event of equipment malfunction, all repairs should be performed by ADTRAN.
It is the responsibility of users requiring service to report the need for service to their
distributor or ADTRAN. See the inside back cover of this manual for information on
contacting ADTRAN for service.
Page 6

FEDERAL COMMUNICATIONS COMMISSION
RADIO FREQUENCY INTERFERENCE STATEMENT:
This equipment has been tested and found to comply with the limits for a Class A digital device, pursuant to
Part 15 of the FCC Rules. These limits are designed to provide reasonable protection against harmful interference
when the equipment is operated in a commercial environment. This equipment generates, uses, and can radiate
radio frequency energy and, if not installed and used in accordance with the instruction manual, may cause
harmful interference to radio frequencies. Operation of this equipment in a residential area is likely to cause
harmful interference in which case the user will be required to correct the interference at his own expense.
Shielded cables must be used with this unit to ensure compliance with Class A FCC limits.
Change or modifications to this unit not expressly approved by the
party responsible for compliance could void the user's authority to
operate the equipment.
CANADIAN EMISSIONS REQUIREMENTS
This digital apparatus does not exceed the Class A limits for radio noise emissions
from digital apparatus as set out in the interference-causing equipment standard
entitled “Digital Apparatus," ICES-003 of the Department of Communications.
Cet appareil nuerique respecte les limites de bruits radioelectriques applicables aux
appareils numeriques de Class A prescrites dans la norme sur le materiel brouilleur:
“Appareils Numeriques,” NMB-003 edictee par le ministre des Communications.
Page 7

CANADIAN EQUIPMENT LIMITATIONS
Notice: The Canadian Industry and Science Canada label identifies certified
equipment. This certification means that the equipment meets certain telecommunications network protective, operational, and safety requirements. The
Department does not guarantee the equipment will operate to the user's satisfaction.
Before installing this equipment, users should ensure that it is permissible to be
connected to the facilities of the local telecommunications company. The equipment must also be installed using an acceptable method of connection. In some
cases, the company's inside wiring associated with a single line individual
service may be extended by means of a certified connector assembly (telephone
extension cord). The customer should be aware that compliance with the above
conditions may not prevent degradation of service in some situations.
Repairs to certified equipment should be made by an authorized Canadian
maintenance facility designated by the supplier. Any repairs or alterations made
by the user to this equipment, or equipment malfunctions, may give the telecommunications company cause to request the user to disconnect the equipment.
Users should ensure for their own protection that the electrical ground connections of the power utility, telephone lines and internal metallic water pipe
system, if present, are connected together. This precaution may be particularly
important in rural areas.
Users should not attempt to make such connections themselves, but
should contact the appropriate electric inspection authority, or an
electrician, as appropriate.
The Load Number (LN) assigned to each terminal device denotes the percentage
of the total load to be connected to a telephone loop which is used by the device,
to prevent overloading. The termination on a loop may consist of any combination of devices subject only to the requirement that the total of the Load Numbers of all devices does not exceed 100.
Page 8

Page 9

Table of Contents
Chapter 1. Introduction
Understanding Frame Relay.................................................................................................1
Product Overview..................................................................................................................2
DDS Operation........................................................................................................................3
56/64k DDS DSU Option......................................................................................................3
SNMP Management...............................................................................................................3
Warranty and Customer Service...........................................................................................4
Chapter 2. Installation
Unpack, Inspect, Power Up...................................................................................................5
Receiving Inspection.......................................................................................................5
ADTRAN Shipments Include.................................................................................5
Customer Provides...................................................................................................5
Power Up..........................................................................................................................6
Rear Panel................................................................................................................................6
DCE Connector................................................................................................................8
DTE Connectors...............................................................................................................8
Main Telco Connector.....................................................................................................8
Backup Connector...........................................................................................................8
Control Port......................................................................................................................9
Chapter 3. Operation
Front Panel..............................................................................................................................11
LCD Window..........................................................................................................11
Enter.........................................................................................................................11
Numeric Keypad....................................................................................................11
Shift..........................................................................................................................11
Cancel.......................................................................................................................12
Up and Down Arrows...........................................................................................12
Next, Prev, Add, Del..............................................................................................12
LED Descriptions...................................................................................................15
Front Panel Operation..................................................................................................16
VT 100 Terminal Connection and Operation............................................................17
FSU Menu Structure.............................................................................................................19
Main Menu.....................................................................................................................19
Configuration (CONFIG)...............................................................................19
61200.130L1-1 FSU User Manual i
Page 10

Table of Contents
View Statistics (STATS)................................................................................... 19
Diagnostics (DIAG)......................................................................................... 19
Save Configuration (SAVE) ........................................................................... 20
Abort Changes (ABORT) ............................................................................... 20
Logout (VT 100 menu only)........................................................................... 20
Chapter 4. Applications
SNA/SDLC with Local Spoofing ................................................................................ 21
SNA and LAN Application with SNMP/Telnet Management .............................. 24
Bisync Application ........................................................................................................ 27
Transparent Application .............................................................................................. 30
Chapter 5. Configuration Overview
Local and Remote Configuration ....................................................................................... 33
Chapter 6. DTE Port Configuration
Port Disabled Protocol (DISABLED) .......................................................................... 41
Frame Relay Protocol .................................................................................................... 42
SDLC Protocol................................................................................................................ 46
Transparent BOP (TRANS BOP) ................................................................................. 51
Bisync Protocol .............................................................................................................. 53
Transparent Async Protocol (TRANS ASYNC) ........................................................ 57
PPP Synchronous Protocol (PPP SYNC) .................................................................... 59
PPP Async Protocol....................................................................................................... 62
Slip Protocol ...................................................................................................................65
Chapter 7. Configuring the Network Port
Network Port......................................................................................................................... 69
Interface Type (INT TYPE)........................................................................................... 71
Physical Layer Options (PHYS LYR OPT)................................................................. 71
Frame Relay Options (FR OPT) ................................................................................... 72
LLC2 Options (LLC2 OPT)........................................................................................... 74
Local IP Address (LOCAL IP ADDR) ........................................................................ 75
Subnet Mask ................................................................................................................... 75
Transmit RIP Requests (XMIT RIP) ............................................................................ 75
Process Received RIP Packets...................................................................................... 76
Priority Queue Ration (N:1) ......................................................................................... 76
Chapter 8. IP Routing
IP Routing With the FSU ..................................................................................................... 77
IP Route Table ................................................................................................................ 79
ii FSU User Manual 61200.130L1-1
Page 11

Table of Contents
Example Route Table Entry .................................................................................. 80
Gateway IP Address (GW IP ADD)............................................................................ 81
Gateway Port (GW PORT) ........................................................................................... 81
Gateway DLCI (GW DLCI) .......................................................................................... 81
Transmit ARP Requests (TX ARP) .............................................................................. 81
Process Received ARP Packets (RX ARP) .................................................................. 81
ARP Refresh Time (ARP REF) ..................................................................................... 81
Chapter 9. System Configuration
System Config ....................................................................................................................... 83
Change Password .......................................................................................................... 84
Read Community Name (RD COM NAME)............................................................. 84
Write Community Name (WR COM NAME) ........................................................... 84
Trap Manager DLCI (TRAP DLCI) ............................................................................. 85
Trap Manager IP Address (TRAP IP ADDR) ............................................................ 85
Trap Manager Port (TRAP PORT) .............................................................................. 85
Chapter 10. Statistics
Viewing Statistical Information with the VT 100 Interface............................................. 87
DTE and Network Port Statistics ....................................................................................... 88
Current Statistics .................................................................................................... 88
Leads On........................................................................................................... 88
Total................................................................................................................... 89
Errors................................................................................................................. 89
Signal Statistics ................................................................................................ 90
DLCI Statistics................................................................................................................ 93
Protocol Statistics........................................................................................................... 93
Hot Keys ......................................................................................................................... 94
ESC .................................................................................................................... 94
DLCI Stats (D).................................................................................................. 94
Protocol Stats (P) - DTE and Network Port Menus only........................... 95
Current Stats (C).............................................................................................. 95
Freeze Stats (F)................................................................................................. 95
Viewing Statistical Information with the Front Panel Interface ............................. 96
Statistics Available for DTE and Network Ports ............................................... 96
Statistics Available Only for the Network Port ................................................. 98
System Statistics ..................................................................................................... 99
Chapter 11. Diagnostics
Diagnostics .......................................................................................................................... 101
61200.130L1-1 FSU User Manual iii
Page 12

Table of Contents
Ping................................................................................................................................102
Address to Ping (PING ADDRESS)...................................................................102
Start Ping...............................................................................................................103
Loopback All Ports (LOOPBACK ENA)..................................................................104
Disable Loopbacks (LOOPBACK DIS).....................................................................104
Appendix A. Pinouts........................................................................................................105
Appendix B. Specifications Summary..........................................................................109
Acronyms and Abbreviations.........................................................................................113
Glossary...............................................................................................................................117
Index.....................................................................................................................................127
List of Tables
Table 4-A Configuration Settings for SNA/SDLC Application..............................23
Table 4-B Configuration Settings for SNA and LAN Application..........................26
Table 4-C Configuration Settings for Multi-Point Bisync Application...................29
Table 4-D Configuration Settings for Transparent BOP Application......................31
Table 4-E Configuration Settings for Transparent Async Application...................32
Table A-A DTE/DCE Connector Pin Assignments..................................................106
Table A-B Main Connector Pin Assignments...........................................................107
Table A-C Control Connector Pin Assignments.......................................................107
List of Figures
Figure 2-1 FSU Rear View................................................................................................7
Figure 3-1 FSU Front Panel............................................................................................13
Figure 3-2 Example of Basic Menu Travel...................................................................16
Figure 3-3 Terminal Login Menu..................................................................................18
Figure 3-4 Terminal Main Menu...................................................................................18
Figure 4-1 SNA/SDLC with Local Spoofing...............................................................22
Figure 4-2 SNA and LAN Application with SNMP/Telnet Management..............25
Figure 4-3 Bisync Point-to-Point...................................................................................27
Figure 4-4 Bisync Multi-Point........................................................................................28
Figure 4-5 Transparent BOP Application.....................................................................30
Figure 4-6 Transparent Async Application..................................................................31
Figure 5-1 VT 100 Configuration Menu.......................................................................34
Figure 5-2 Front Panel Configuration Menu Tree.......................................................35
iv FSU User Manual 61200.130L1-1
Page 13

Table of Contents
Figure 5-3 VT 100 Configuration Menu Tree............................................................... 37
Figure 6-1 VT 100 Port Configuration Menu............................................................... 39
Figure 6-2 Front Panel Protocol Menu Tree................................................................. 40
Figure 6-3 Port Disabled Menu Tree............................................................................. 41
Figure 6-4 Frame Relay Protocol Menu Tree ............................................................... 43
Figure 6-5 SDLC Protocol Menu Tree........................................................................... 48
Figure 6-6 Transparent BOP Menu Tree....................................................................... 51
Figure 6-7 Bisync Protocol Menu Tree.......................................................................... 53
Figure 6-8 Transparent Async Protocol Menu Tree .................................................... 57
Figure 6-9 PPP Synchronous Protocol Menu Tree...................................................... 60
Figure 6-10 PPP Asynchronous Protocol Menu Tree ................................................... 63
Figure 6-11 Slip Protocol Menu Tree .............................................................................. 66
Figure 7-1 Network Port Configuration Menu ........................................................... 70
Figure 7-2 VT 100 Network Port Configuration Menu.............................................. 71
Figure 7-3 VT 100 Network Port Frame Relay Options Menu ................................. 72
Figure 7-4 VT 100 Network Port LLC2 Options Menu.............................................. 75
Figure 8-1 VT 100 IP Route Menu................................................................................. 78
Figure 8-2 IP Routing Table Menu ................................................................................ 79
Figure 9-1 System Configuration Menu....................................................................... 84
Figure 10-1 View Statistics Menu.................................................................................... 88
Figure 10-2 DTE Port Statistics Menu-Frame Relay Protocol ..................................... 90
Figure 10-3 DTE Port Statistics Menu-Transparent Async Protocol .......................... 91
Figure 10-4 DTE Port Statistics Menu-All Other Protocols ......................................... 91
Figure 10-5 Network Port View Statistics Menu .......................................................... 92
Figure 10-6 View DLCI Statistics Menu-Network Port and
Frame Relay Protocol Only ......................................................................... 92
Figure 10-7 Protocol Statistics Menu .............................................................................. 94
Figure 10-8 Control Signal Status Screen....................................................................... 96
Figure 10-9 Signal State Screen........................................................................................ 98
Figure 10-10 System Statistics Screen ............................................................................... 99
Figure 11-1 Diagnostics .................................................................................................. 101
Figure 11-2 Front Panel Diagnostics Menu ................................................................. 102
Figure 11-3 VT 100 Ping Menu ...................................................................................... 104
61200.130L1-1 FSU User Manual v
Page 14

Table of Contents
vi FSU User Manual 61200.130L1-1
Page 15

UNDERSTANDING FRAME RELAY
Frame relay is a wide area network (WAN) service designed to
minimize physical connections. This is accomplished by using
virtual connections within the frame relay cloud and accessing
these virtual circuits with normally one physical connection at
each location to the frame relay service. Virtual circuits are
addressed using header information at the beginning of each
frame. These frames are formatted by the user's CPE equipment
such as the ADTRAN FSU.
Chapter 1. Introduction
Chapter 1
Introduction
ANSI standards describe how each frame must be constructed to
provide interoperability between CPE equipment and frame
relay switching equipment. Each frame must contain a header,
at least one byte of information data, two bytes of CRC16, and a
trailing flag 0x7E.
This header information contains a virtual circuit address known
as a DLCI (data link connection identifier). The header information also contains bits used for network congestion control.
Frame relay virtual circuits may be defined as permanent (PVC)
or switched (SVC). PVCs have the same DLCI for a given path
each time a user protocol session is established. The network
service provider assigns these DLCIs at subscription time. SVCs,
on the other hand, have DLCIs dynamically assigned each time a
user protocol session is established. The CPE equipment must
request a call and the DLCI is assigned by the network switching
61200.130L1-1 FSU User Manual 1
Page 16

Chapter 1. Introduction
equipment. This DLCI is valid until the call is disconnected and
may be assigned a different value each time a call is requested.
PRODUCT OVERVIEW
The FSU provides a low cost solution for the CPE equipment in a
private or public frame relay network. The FSU connects to the
frame relay network via 56/64k DDS (digital data service) or
T1/FT1 access links. Connections to 56/64k DDS are made
using an integral 56/64k DSU or an external DSU. T1/FT1
connections are made using an external T1 DSU/CSU through a
V.35 interface.
The FSU provides connections to the user equipment through
two independent ports emulating a DCE device. These ports can
be configured for either RS-232 or V.35 signal specifications.
Synchronous protocol speeds up to 512 kbps and asynchronous
protocol speeds up to 38.4 kbps are supported.
The FSU handles each frame of the user data in a three-step
manner. The first step is terminating the user protocol. The
layer at which this termination occurs varies depending on the
user protocol selection for a given port. The next step is examining the user protocol destination address and routing to the
destination port and virtual circuit. The last step involves
encapsulating the information field of each frame and reencapsulating based on the destination port configuration. A
similar process is used for frame relay frames received on the
network port.
The major features of the FSU are as follows:
• Two DTE (data terminal equipment) ports for use on a single
frame relay network interface.
• Support for IP (internet protocol), SDLC (synchronous data
link control), Bisync, SLIP (serial link IP), PPP (point-to-point
protocol) both sync and async, frame relay, BOP (bit-oriented
protocol), and async protocols.
• SNMP (simple network management protocol) management
capability provided inband with support for RFC 1315 (frame
2 FSU User Manual 61200.130L1-1
Page 17

relay DTE MIB), RFC 1213 (MIB II), and ADTRAN Enterprise
MIB.
• DCE port supporting rates of up to 512 kbps.
• Optional integrated 56/64 DDS DSU/CSU.
• Telnet-provided remote terminal management control.
• FLASH code space for easy software upgrades.
DDS OPERATION
DDS is a nationwide service that allows interconnection and
transportation of data at speeds up to 64 kbps. The local exchange carriers provide the local loop service to DDS customers
and may provide data for routing Inter-LATA to an
interexchange carrier. With the optional integrated 56/64 DDS
DSU, the FSU supports the 56/64 kbps DDS service rate yielding
DTE rates of 2.4, 4.8, 9.6, 19.2, 38.4, 56, and 64 kbps.
56/64K DDS DSU OPTION
The FSU is available with an optional integrated 56/64k DSU
(part number 1200130L2). This gives the unit the ability to
directly connect to a frame relay network via a 56 or 64k DDS
circuit.
Chapter 1. Introduction
SNMP MANAGEMENT
SNMP management capability is provided inband with support
for RFC 1315 (frame relay DTE MIB), RFC 1213 (MIB II), and
ADTRAN Enterprise MIB. Telnet capability is also supported.
For non-SNMP environments, VT 100 and front panel operation
is supported.
61200.130L1-1 FSU User Manual 3
Page 18

Chapter 1. Introduction
WARRANTY AND CUSTOMER SERVICE
ADTRAN will replace or repair this product within five years
from the date of shipment if it does not meet its published
specifications or fails while in service. For detailed warranty,
repair, and return information refer to the ADTRAN Equipment
Warranty and Repair and Return Policy Procedure.
Return Material Authorization (RMA) is required prior to
returning equipment to ADTRAN.
For service, RMA requests, or further information, contact one of
the numbers listed on the inside back cover of this manual.
4 FSU User Manual 61200.130L1-1
Page 19

UNPACK, INSPECT, POWER UP
Receiving Inspection
Carefully inspect the FSU for any damage that may have occurred in shipment. If damage is suspected, file a claim immediately with the carrier and contact ADTRAN Customer Service
(see the back cover of this manual). Keep the original shipping
container to use for future shipment or verification of damage
during shipment.
Chapter 2. Installation
Chapter 2
Installation
ADTRAN Shipments Include
The following items are included in ADTRAN shipments of the
FSU:
• FSU unit
• User manual
• An 8-position modular to 8-position modular cable if the
integrated DSU option is installed (part number 1200130L2)
• VT 100 terminal adapter cable (consists of a DB-25 modular
adapter and an 8-position to 8-position modular cable)
Customer Provides
The customer provides an interface cable for each port used.
Each cable should be either an RS-232 with a standard 25-pin
male D-type connector or a V.35 cable. V.35 requires an
ADTRAN adapter cable (part numbers: male 1200193L1; female
1200194L1).
61200.130L1-1 FSU User Manual 5
Page 20

Chapter 2. Installation
Power Up
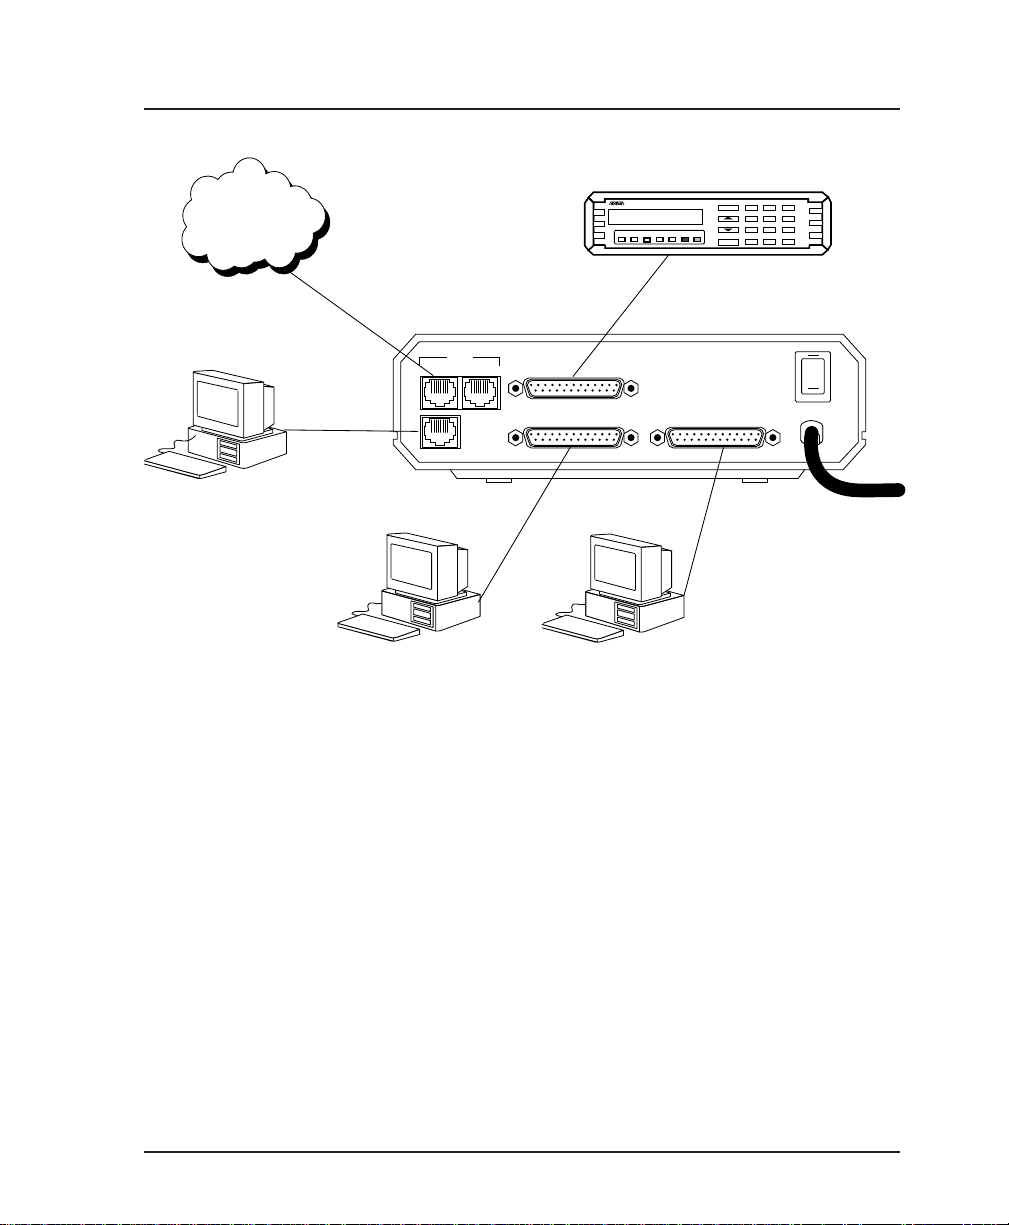
REAR PANEL
Each FSU unit is provided with a captive eight-foot power cord,
terminated by a three-prong plug which connects to a grounded
115 VAC power receptacle.
Power to the FSU must be provided from a grounded 115 VAC, 60 Hz
receptacle.
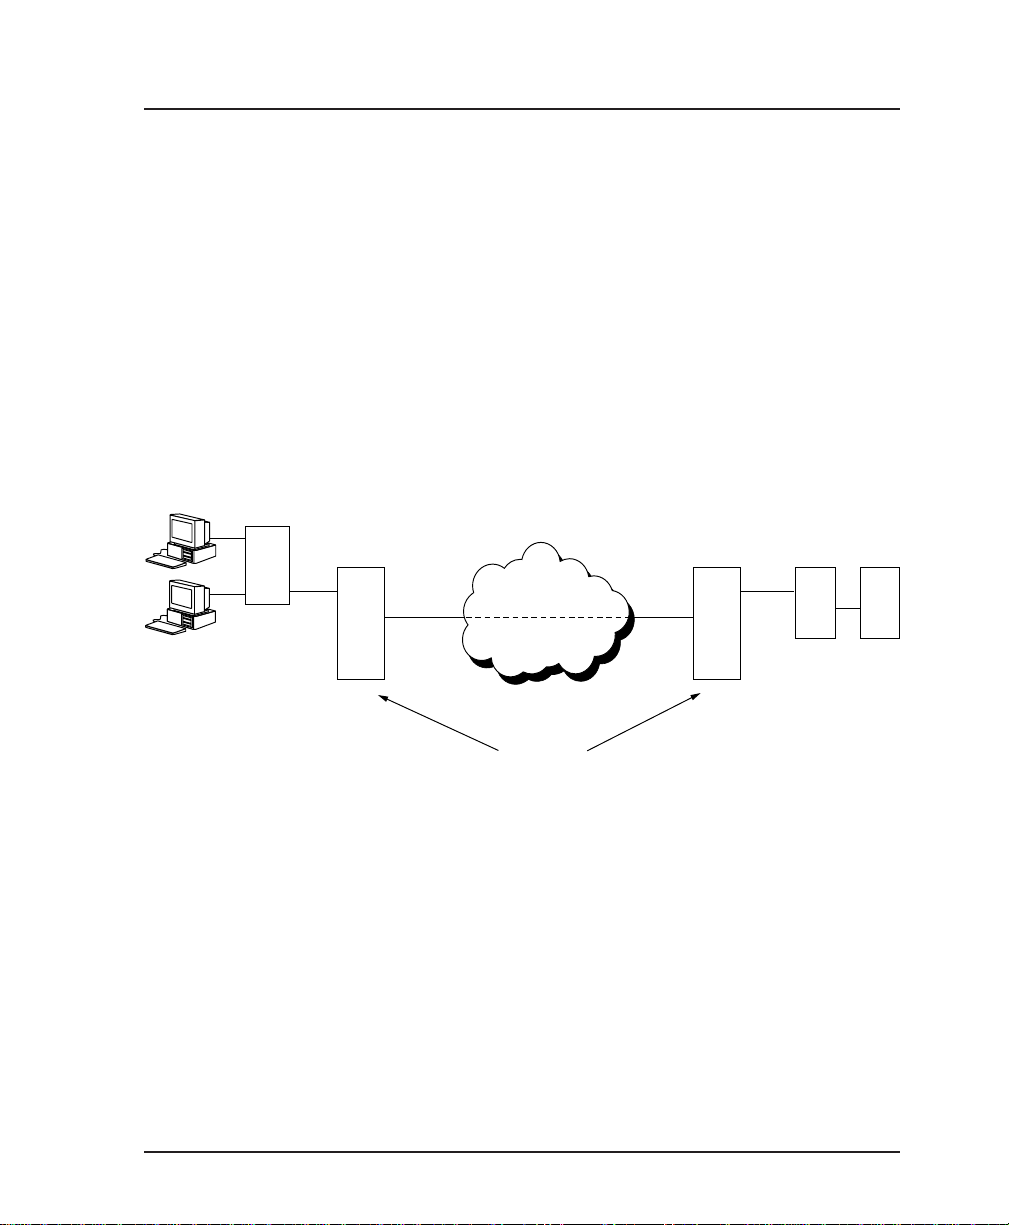
The FSU is equipped with three DB-25 connectors labeled DTE 1,
DTE 2, and DCE. Connections to the dedicated circuit, dial
backup circuit (future enhancement), and VT 100 interface are
provided through the 8-pin telco jacks labeled MAIN, BACKUP,
and CONTROL. Pin assignments for these connectors are given
in the
appendix Pinouts. The FSU rear panel is shown in Figure 2-
1.
The FSU base unit (part number 1200130L1) is not equipped with an
internal DSU. Therefore, the MAIN and BACKUP connectors are not
provided.
The BACKUP connector is provided for future enhancements (FSU dial
backup options).
6 FSU User Manual 61200.130L1-1
Page 21
Chapter 2. Installation
Frame
Relay
VT 100 Terminal
123
DAEBF
456
789
SHIFT QUICK
*
C
#0
115VAC 60Hz
4-wire Telco Cable
RJ45-to-DB25
Cable
DTE Device DTE Device
TELCO
MAIN BACKUP
CONTROL
RS232 or V.35
Cable
RS232 or V.35
Cable
DCE
RS232 or V.35
DSU III AR
RS CS TD RD CD ALM TST
DSU/CSU
Cable
ENTER
CANCEL
DTE 2DTE 1
Item Function
DCE port
Connects to an external DSU/CSU
DTE 1 port Connects to a DTE device
DTE 2 port Connects to a DTE device
Main telco connector Connects to the dedicated circuit
Backup telco connector Connects to the dial backup circuit
(future enhancement)
Control port Connects to the VT 100 interface
On/Off Switch Turns power on and off
115 VAC connection Connects to captive power cord
ON
OFF
Figure 2-1
FSU Rear View
61200.130L1-1 FSU User Manual 7
Page 22

Chapter 2. Installation
DCE Connector
DTE Connectors
The connector labeled DCE provides connection to an external
DSU/CSU. The pinouts for this connector are shown in the
appendix Pinouts.
The connection between the FSU and an external DSU is a direct
connection. When connecting to an external DSU, the FSU emulates
an externally timed DTE interface connected directly to the DCE
interface of the external device.
DTE devices are connected to the DTE connectors using either an
RS-232 DTE cable or a CCITT V.35 DTE adapter cable. The
maximum cable lengths recommended are 50 feet for the RS-232
and 100 feet for the CCITT V.35. The pin assignments are listed
in the appendix Pinouts.
The V.35 adapter cable is recommended for use with data rates
above 19.2 kbps. A low capacitance RS-232 cable works up to 56
kbps. The DTE ports are configured through the front panel or
the VT 100 control port. The DTE ports can operate in asynchronous or synchronous modes.
Main Telco Connector
The Main connector is an eight-position modular jack which
provides connection to the dedicated (DDS) network. See the
appendix Pinouts for the Main connector's pin assignments.
Backup Connector
The eight-position modular jack labeled BACKUP is provided to
allow future enhancements to the FSU (dial backup options).
With the dial backup option installed, this connector will provide connection to the switched telco circuit.
8 FSU User Manual 61200.130L1-1
Page 23

Control Port
Chapter 2. Installation
The eight-position modular jack labeled CONTROL provides
connection to a VT 100 RS-232 compatible interface. This enables
the FSU to be configured through a terminal instead of the front
panel. Use the VT 100 terminal cable (provided) for this connection. See the appendix Pinouts for the connector pin assignments. A description of the operation of this port is covered in
the chapter Operation.
61200.130L1-1 FSU User Manual 9
Page 24

Chapter 2. Installation
10 FSU User Manual 61200.130L1-1
Page 25

FRONT PANEL
LCD Window
Enter
Chapter 3. Operation
Chapter 3
Operation
The FSU faceplate is shown in Figure 3-1. Descriptions of each
part of the front panel follow.
Displays menu items and messages in 2 lines by 16 characters.
Selects active menu items. To activate a menu item scroll to it
using the arrow keys, or press the number of the item. The
flashing cursor indicates which parameter is activated. Press
Enter to select the active menu item.
Numeric Keypad
The numeric keypad contains the numbers 0 through 9 and
alpha characters A through F, which are used to activate menu
items and enter information (such as the IP address).
Shift
Enter alpha characters by pressing Shift before each desired
character . The NEXT, PREV, ADD, and DEL keys are also
activated by first pressing Shift.
61200.130L1-1 FSU User Manual 11
Page 26

Chapter 3. Operation
Cancel
Up and Down Arrows
To activate a menu item designated by an alpha character rather
than a number, place the cursor on the menu item using the Up
and Down Arrows or press Shift and then the letter. The
flashing cursor indicates which parameter is activated. Press
Enter to select the item.
If a key is pressed without using Shift, the numbered item
becomes active instead of the alpha item. If this happens, repeat
the correct procedure.
Pressing the Cancel key stops the current activity and returns to
the previous menu. Repeat until the desired menu level is
reached. When a submenu item is displayed, press Cancel to
exit the current display and return to the previous menu.
Up and Down Arrows scroll through and activate the submenu
items available in the current menu. When the submenu items
are scrolled, the flashing cursor indicates the active parameter.
Next, Prev, Add, Del
To activate these functions, press and release the Shift key, then
press the NEXT, PREV, ADD, or DEL key. Use these keys when
editing routing tables. See the chapters DTE Port Configuration
and Configuring IP Routing for more information.
12 FSU User Manual 61200.130L1-1
Page 27
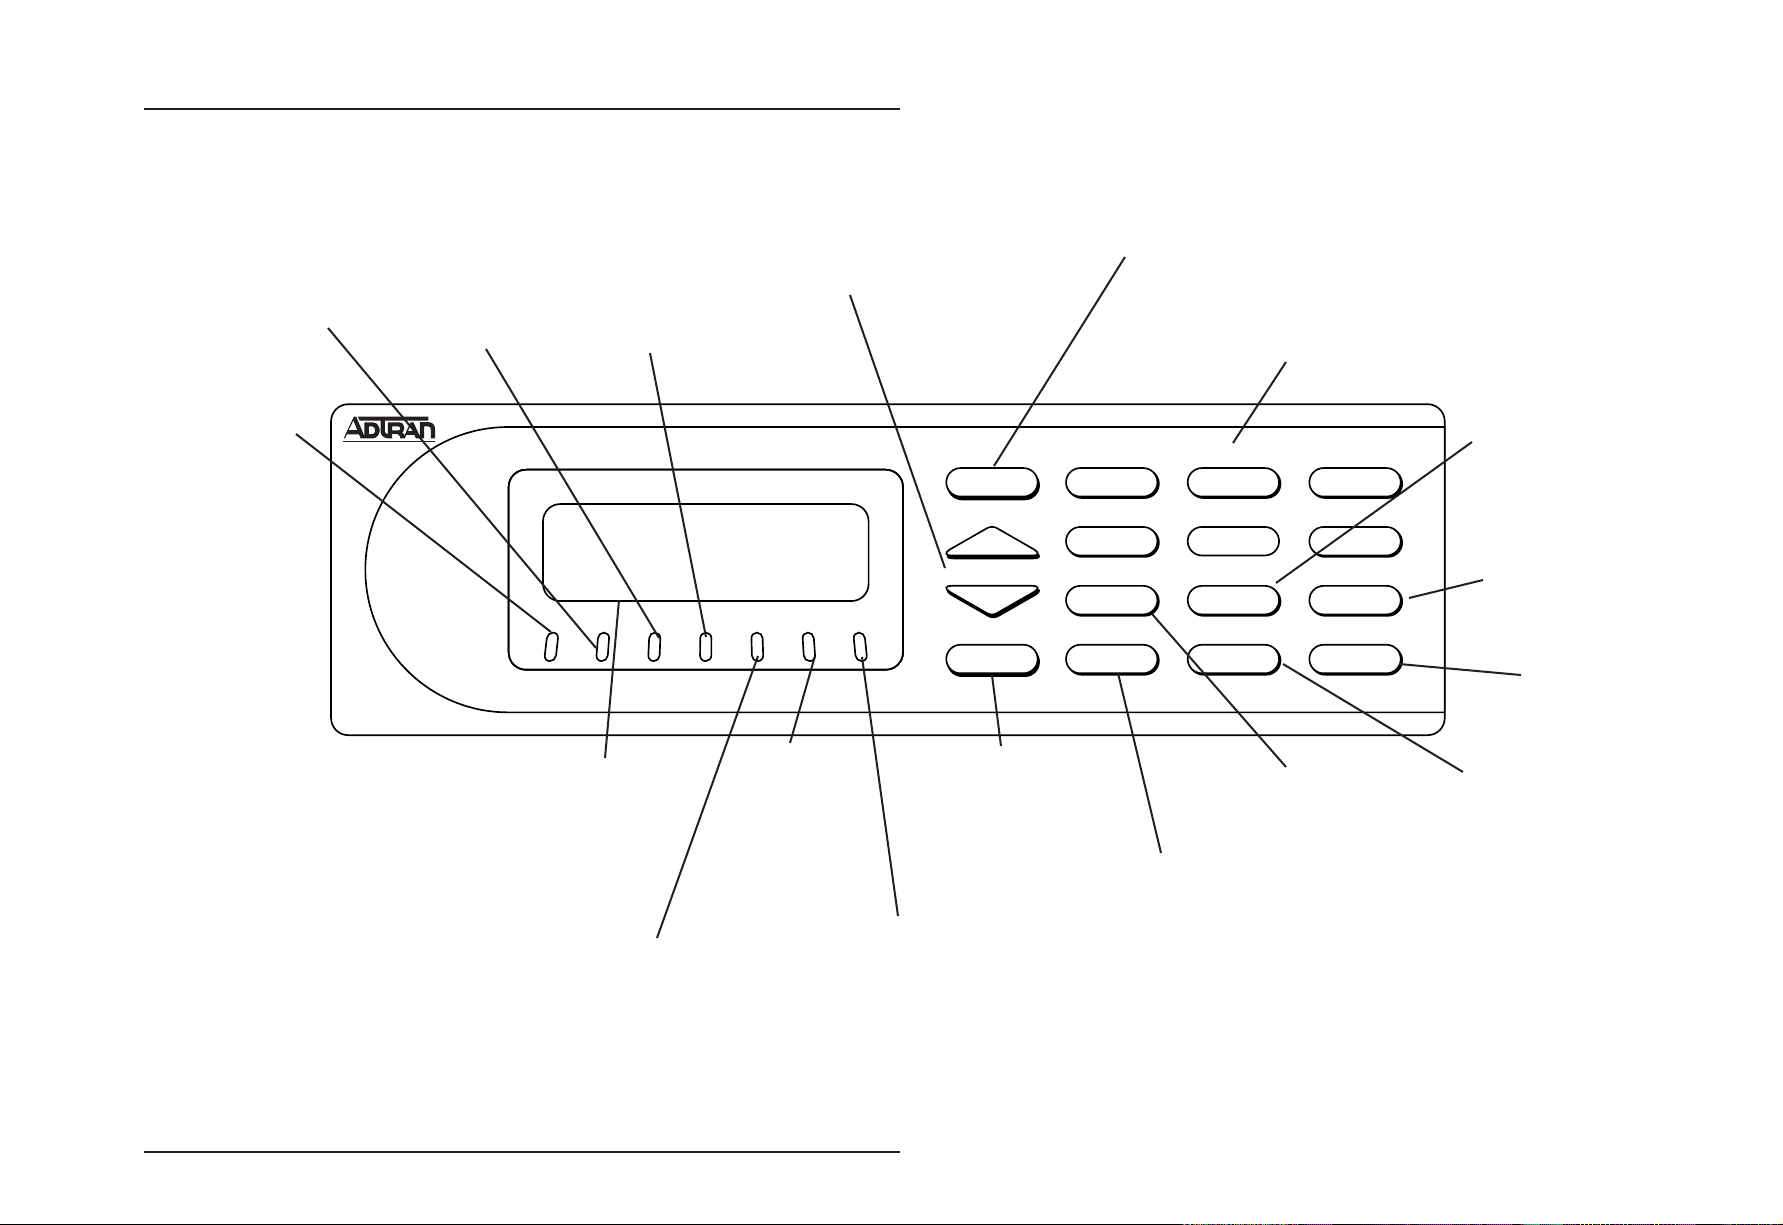
RD1 LED
Active when DTE 1
port receives data.
TD1 LED
Active when DTE
1 port transmits
data.
TD2 LED
Active when DTE
2 port transmits
data.
Chapter 3. Operation
the submenu items available
flashing cursor indicates the
RD2 LED
Active when DTE 2
port receives data.
Up and Down Arrows
Scroll through and activate
in the current menu. The
active parameter.
ENTER
Enter Key
Selects active menu item.
Numeric Keypad
Activates menu items and
enters numeric information.
A
1
Prev Key
FSU
Goes back to the
previous entry when
B
2
C
3
editing routing tables.
TD1 RD1 TD2 RD2 TDN RDN
LCD Window
Displays menu items and
messages in 2 lines by 16
characters.
TDN LED
Active when Network port
transmits data.
RDN LED
Active when
Network port
receives data.
Active when an alarm
condition exists or when the
unit is in test mode.
Figure 3-1
FSU Front Panel
ALM
TST
ALM/TST
CANCEL
Cancel
Stops current
activity and
returns to the
previous menu.
and the NEXT, PREV, ADD,
D
4
NEXT
7
SHIFT
*
E
5
PREV
8
DEL
0
Advances to the next
entry when editing
routing tables.
Shift
Activates alpha selections
and DEL keys.
F
6
ADD
9
QUICK
#
Next Key
Add Key
Adds a new entry to
the routing table.
Quick Key
Reserved for
future use.
Del Key
Deletes the current
entry when editing
routing tables.
61200.130L1-1 FSU User Manual 13
Page 28

Chapter 3. Operation
14 FSU User Manual 61200.130L1-1
Page 29

LED Descriptions
Chapter 3. Operation
The FSU has seven LED indicators: TD1, RD1, TD2, RD2, TDN,
RDN, and ALM/TST. These LEDs are identified as follows:
TD1: Transmit Data (DTE 1)
This LED is active when the FSU DTE 1 port is transmitting data.
RD1: Receive Data (DTE 1)
This LED is active when the FSU DTE 1 port is receiving data.
TD2: Transmit Data (DTE 2)
This LED is active when the FSU DTE 2 port is transmitting data.
RD2: Receive Data (DTE 2)
This LED is active when the FSU DTE 2 port is receiving data.
TDN: Transmit Data (Network)
This LED is active when the FSU Network port is transmitting
data.
RDN: Receive Data (Network)
This LED is active when the FSU Network port is receiving data.
ALM/TST: Alarm/Test
This LED is active when an alarm condition exists or when the
unit is in test mode. Alarm conditions include:
DDS Alarm Conditions
• Open loop on network
• No frame synchronization
Frame Relay Alarm Condition
• Network frame relay signaling state is down.
External DSU/CSU Alarm Condition
• DSR on an external DSU/CSU is false.
61200.130L1-1 FSU User Manual 15
Page 30

Chapter 3. Operation
Front Panel Operation
To choose a menu item, press the corresponding number or
alpha character on the keypad. Press Shift to activate menu
items with alpha selections. Scrolling to the selection by pressing either the Up or Down Arrow also activates the menu items.
The flashing cursor indicates which selection is activated. Press
Enter to select the item. The following steps and Figure 3-2
illustrate how to select FSU options:
1. Activate Configuration (CONFIG) using the arrow keys or
by pressing 1. The cursor will flash on the number next to
the activated selection. Press Enter.
2. Use the arrow keys to view submenu items.
3. Choose an item on the submenu such as DTE PORT 1.
4. Activate DTE PORT 1 using the arrow keys or by pressing 1.
Press Enter.
5. Activate PROTOCOL options using the arrow keys or by
pressing 1. Press Enter.
6. Press the arrow keys until the desired protocol is displayed.
Press Enter.
1 PORT DISABLED
2 FRAME RELAY
3 SDLC <> LLC2
4 TRANSPARENT BOP
1 CONFIG 2 DTE PORT 2 2 PHYS LYR OPT 7 PPP SYNCHRONOUS
1 DTE PORT 1 1 PROTOCOL 6 TRANSPARENT ASYNC
3 NETWORK PORT 3 PROTOCOL OPT 8 PPP ASYNC
4 CONTROL PORT 4 ADDRESS TABLE 9 SLIP
5 IP ROUTING
6 UNIT CONFIG
5 BISYNC
Figure 3-2
Example of Basic Menu Travel
16 FSU User Manual 61200.130L1-1
Page 31

VT 100 Terminal Connection and Operation
To control the FSU using a VT 100 terminal, perform the following procedure:
1. Set the FSU baud rate to match the terminal through the
front panel. Select 1 CONFIG, then 4 CONTROL PORT.
2. Using the provided VT 100 terminal adapter cable, connect
the COM port of a VT 100 compatible terminal or equivalent
to the eight-pin modular jack labeled CONTROL on the rear
of the FSU. This connection is used for both local and
remote configuration.
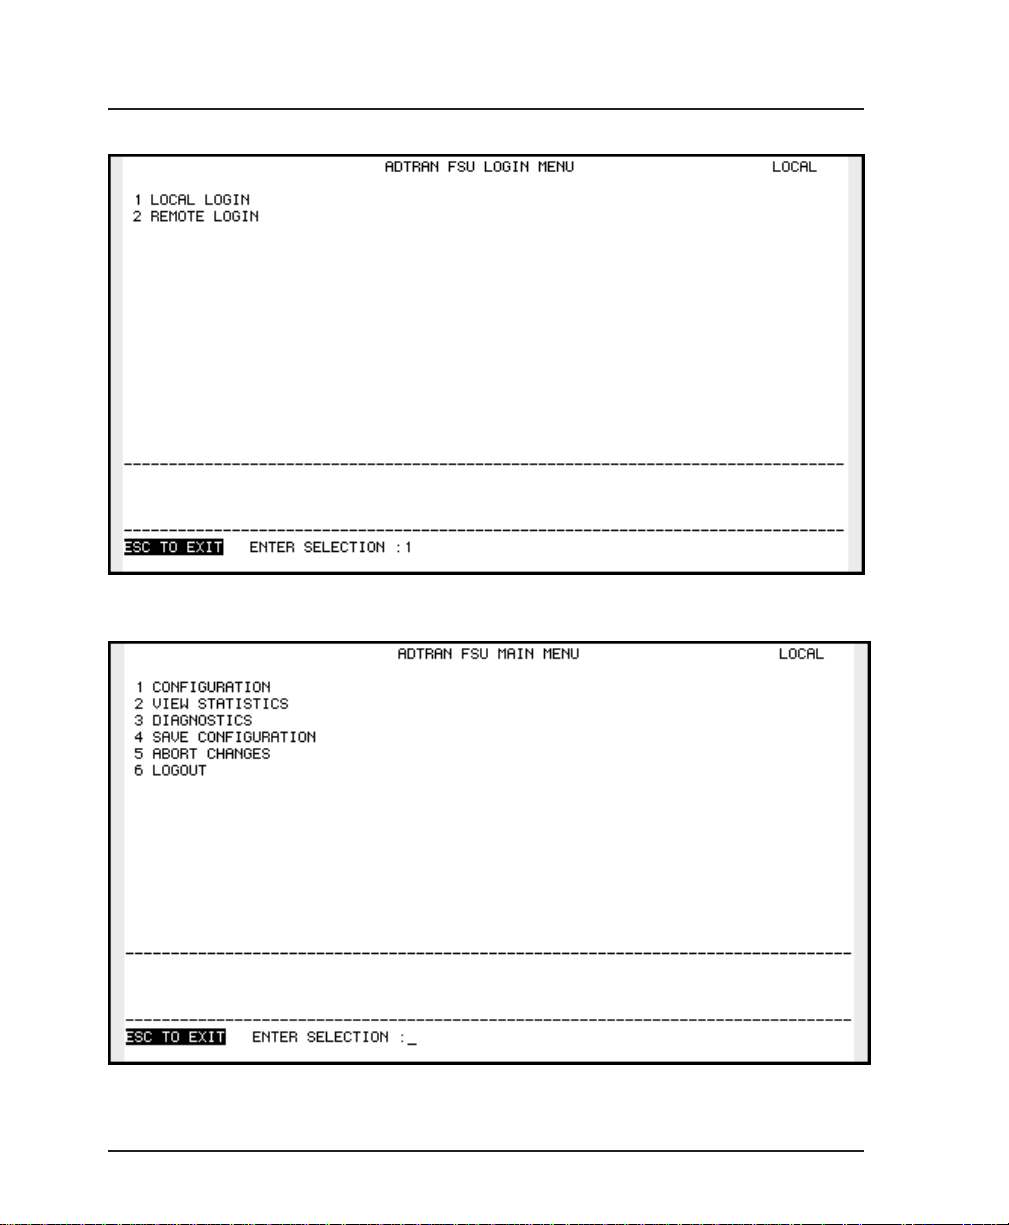
3. Open the connection and press Enter repeatedly until the
Login Menu appears (Figure 3-3).
4. Select Local Login to configure the FSU unit connected to the
terminal. Select Remote Login to configure a remotely
located FSU unit. For remote applications, enter the DLCI
(data link connection identifier) number of the remote unit
by pressing 1, Enter, the DLCI number, and Enter again.
Next select Begin Remote Session by pressing 2 and Enter.
Chapter 3. Operation
5. Enter the password. The factory default password is adtran.
The Main menu will appear (Figure 3-4).
6. Make selections by entering the number corresponding to
the chosen parameter. Press ESC to return to the previous
screen.
In the upper right-hand corner of the VT 100 screen, LOCAL or
REMOTE is displayed, indicating which unit the current screen
represents. See Figure 3-3.
61200.130L1-1 FSU User Manual 17
Page 32
Chapter 3. Operation
Figure 3-3
Terminal Login Menu
Figure 3-4
Terminal Main Menu
18 FSU User Manual 61200.130L1-1
Page 33

FSU MENU STRUCTURE
The opening menu is the access point to all other operations.
The Main menu branches are Configuration, Statistics, Diagnostics, Save, Abort, and Logout. See Figure 3-2. Each Main menu
item has several functions and submenus to identify and access
specific parameters.
The Logout selection is available on the VT 100 interface only.
In this chapter, the VT 100 selections are listed first followed by the
Front Panel selections (if the names differ).
Main Menu
Definitions for the branches of the Main menu follow:
Configuration (CONFIG)
Configuration is used to select network and DTE operating
parameters. For more information on configuration options, see
the following chapters: Configuration Overview, DTE Port Con-
figuration, Configuring the Network Port, Configuring IP Routing,
and System Configuration. When DTE Port 1 or 2 is selected, the
PROTOCOL enabled determines the selections for PHYSICAL
LAYER OPTIONS, PROTOCOL OPTIONS, and PROTOCOL
ADDRESS TABLE.
Chapter 3. Operation
View Statistics (STATS)
This selection displays statistical information for DTE ports, the
network port, the protocol, and the system. See the chapter
Statistics for more information.
Diagnostics (DIAG)
Diagnostic options enable and disable loopback and ping
functions. See the chapter Diagnostics for more information.
61200.130L1-1 FSU User Manual 19
Page 34

Chapter 3. Operation
Save Configuration (SAVE)
This parameter saves the currently selected configuration.
Configuration changes are not implemented until the Save Configuration (SAVE) option is selected.
Abort Changes (ABORT)
This parameter cancels the current selections and reverts to the
last saved configuration.
Logout (VT 100 menu only)
This parameter logs out of the system.
20 FSU User Manual 61200.130L1-1
Page 35

This chapter provides examples of some common FSU applications. The examples include SNA/SDLC with local spoofing,
SNMP/Telnet management, bisync point-to-point and multipoint, and transparent applications. The configuration selections
given in these examples may need modification based on your
network configuration.
SNA/SDLC with Local Spoofing
When used in an SNA/SDLC network, the FSU provides local
spoofing by emulating the primary or secondary SDLC roles (see
Figure 4-1). The FSU performs conversion from SDLC to frame
relay and also terminates SDLC links, providing primary and
secondary emulation between FSUs. Local spoofing improves
performance by reducing traffic across the frame relay network
and allows definite response times on the SDLC links.
Chapter 4. Applications
Chapter 4
Applications
To perform spoofing, the FSU automatically sets itself up to
provide primary or secondary emulation based on the receipt of
SNRM (set normal response mode) from an SDLC device. The
FSU looks for SNRM on all ports and assumes a secondary role
once SNRM is received. The FSU then brings up the LLC2 link
across the frame relay network to another FRAD which assumes
a primary role. This allows the FSU to operate with PU 2.1
devices.
Different roles can be assumed for each SDLC session. Disconnection starts the role determination procedure again.
61200.130L1-1 FSU User Manual 21
Page 36

Chapter 4. Applications
In all cases, the FSU is transparent to the XID (exchange identification) negotiation between any two network devices.
The FSU uses LLC protocol (mode 2) to transport SDLC information frames. This protocol ensures a reliable link across frame
relay, providing protection from frame loss and excessive delays.
The encapsulation method uses the RFC 1490 format. See Table
4-A for an example of how to configure the FSU for this application.
Remote End Host End
PU Address = C0
SDLC
3270 Controller
SDLC
3270 Controller
PU Address = C0
PU Address = C0
PU Address = C1
DLCI=17 DLCI=120
DTE1
NN
DTE2
FSU
UNI
FRAME RELAY
UNI
RFC1490/LLC2
DTE1
DTE2
FSU
SDLC
FEP Host
Figure 4-1
SNA /SDLC with Local Spoofing
22 FSU User Manual 61200.130L1-1
Page 37

Chapter 4. Applications
y
p
p
y
p
Table 4-A
Configuration Settings for SNA/SDLC Application
DTE Port 1
Protocol SDLC SDLC
Ph
sical Layer CONN=RS232 CONN=RS232
Options RATE=19.2K RATE=19.2K
Protocol FORMAT=NRZ FORMAT=NRZ
tions TIMEOUT=3 TIMEOUT=3
O
Protocol ENTRY #1 ENTRY #2 ENTRY #1
Address Table CTRL ADDR=C0 CTRL ADDR=C1 CTRL ADDR=C0
DTE Port 2
Protocol DISABLED SDLC
Physical Layer N/A CONN=RS232
O
tions RATE=19.2K
Protocol N/A FORMAT=NRZ
Options TIMEOUT=3
Protocol N /A ENTRY #1
Address Table CTRL ADDR=C1
Network Port
Interface Type V.35 NET
Ph
sical Layer BIT RATE=64K LOOP RATE=64K
Options CLOCK SOURCE=SLAVE
Frame Relay SIGNAL TYPE=ANNEX D SIGNAL TYPE=ANNEX D
O
tions T391=10 T391=10
IDLE=ONES IDLE=ONES
MIN POLL TIME=0 MIN POLL TIME=0
THRESHOLD=10 THRESHOLD=10
POLL RATIO=1 POLL RATIO=1
TX DELAY=0 TX DELAY=0
GROUP ADDR=0 GROUP ADDR=0 GROUP ADDR=0
LLC2 SSAP=04 LLC2 SSAP=08 LLC2 SSAP=04
LLC2 DSAP=04 LLC2 DSAP=04 LLC2 DSAP=04
OUT DLCI=120 OUT DLCI=120 OUT DLCI=17
N391=6 N391=6
N392=3 N392=3
N393=4 N393=4
HOST FSU REMOTE FSU
IDLE=ONES
MIN POLL TIME=0
THRESHOLD=10
POLL RATIO=1
TX DELAY=0
GROUP ADDR=0
LLC2 SSAP=04
LLC2 DSAP=08
OUT DLCI=17
61200.130L1-1 FSU User Manual 23
Page 38

Chapter 4. Applications
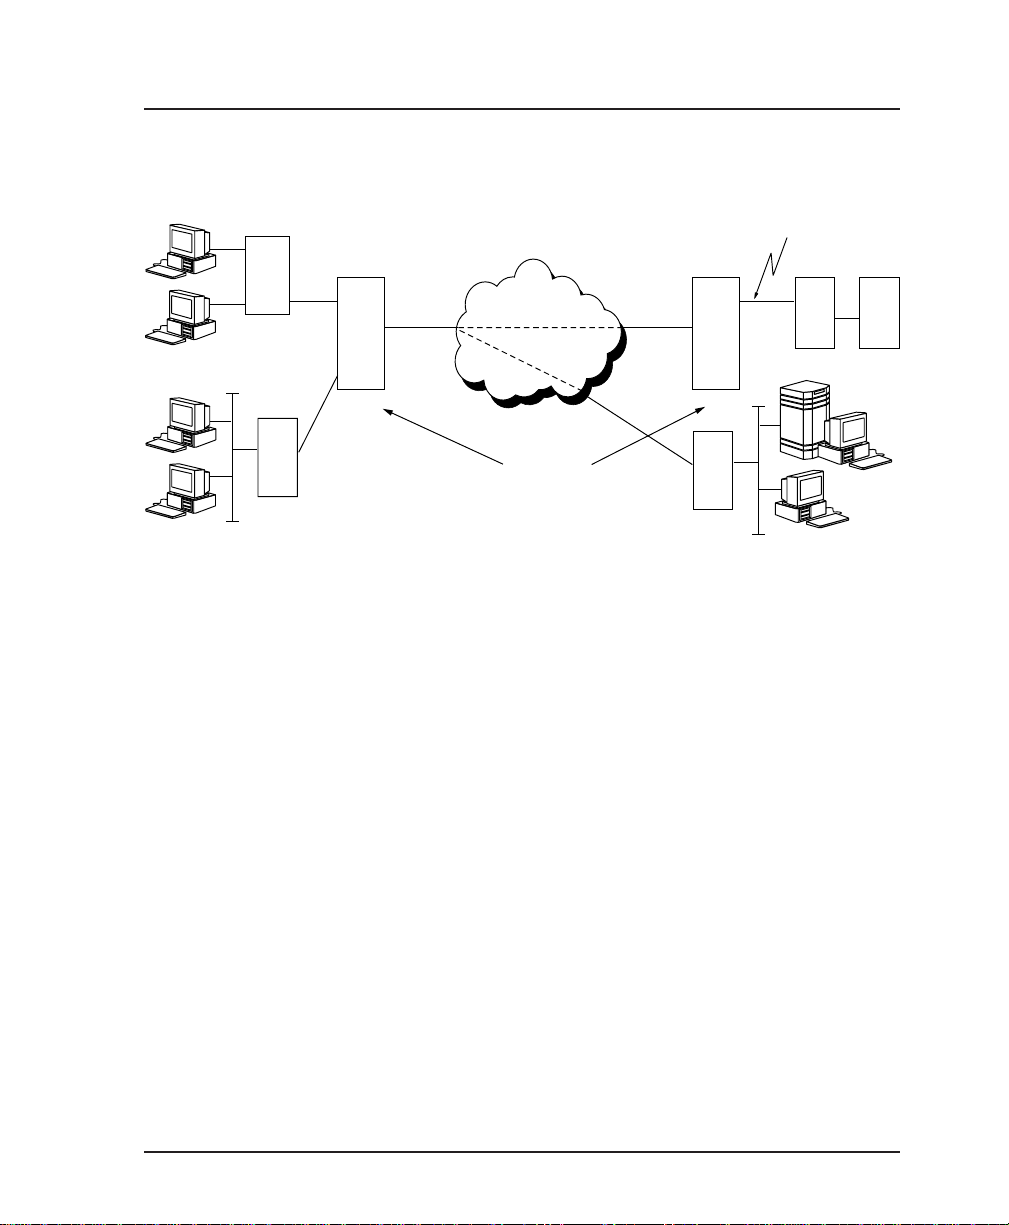
SNA and LAN Application with SNMP/Telnet Management
When used in a mixed environment consisting of both SNA and
LAN networks, the FSU serves as a concentrator, allowing both
networks access to one frame relay link. The example shown in
Figure 4-2 shows DTE 1 configured for SDLC protocol (as in the
previous example). DTE 2 is configured for frame relay protocol, providing the LAN gateway/router with frame relay access.
The FSU routes data at the DLCI level using the DTE 2 frame
relay address table. The FSU emulates the network end of the
UNI signaling protocol for the DTE port while emulating the
CPE end for the network port. PVC status information from the
frame relay network is stored and used for full status requests
from the router attached to the DTE port.
A local DLCI is set up between the router and the FSU. This
Management DLCI carries the SNMP and telnet traffic destined
for the FSU. This DLCI is included in the UNI full status responses to the router. The FSU IP address must be mapped to
the management DLCI in the LAN router's route table (see the
following note). With this path, an SNMP manager located
anywhere in the network can access the FSU's SNMP and telnet
information. See Table 4-B for an example configuration.
RIP and inverse ARP are not used for the FSU DTE frame relay port.
24 FSU User Manual 61200.130L1-1
Page 39
Chapter 4. Applications
Remote End Host End
PU Address = C0
SDLC
3270 Controller
DLCI = 18
MDLCI = 960
Router
UNI
DTE1
DTE2
FSU
PU Address = C0
DLCI=17 DLCI=120
DTE1
N
DTE2
FSU
Router
SDLC
FEP Host
SNMP Manager
N
UNI
DLCI=18
FRAME RELAY
UNI
UNI
RFC1490/LLC2
Figure 4-2
SNA and LAN Application with SNMP/Telnet Management
Server
61200.130L1-1 FSU User Manual 25
Page 40

Chapter 4. Applications
p
Table 4-B
Configuration Settings for SNA and LAN Application
DTE Port 1
Protocol SDLC SDLC
Physical CONN=RS232 CONN=RS232
Options RATE=19.2K RATE=19.2K
Protocol FORMAT=NRZ FORMAT=NRZ
tions TIMEOUT=3 TIMEOUT=3
O
Protocol ENTRY #1 ENTRY #1
Address Table CTRL ADDR=C0 CTRL ADDR=C0
DTE Port 2
Protocol DISABLED FRAME RELAY
Physical N/A CONN=V.35
Options RATE=64K
Protocol N/A SIGNAL=ANSI
Options T392=15
Protocol N/A PORT DLCI=18
Address Table NET DLCI=18
Network Port
Interface Type NET NET
Physical LOOP RATE=64K LOOP RATE=64K
Options CLOCK SOURCE=SLAVE CLOCK SOURCE=SLAVE
Frame Relay SIGNAL TYPE=ANNEX D SIGNAL TYPE=ANNEX D
Options T391=10 T391=10
HOST FSU REMOTE FSU
IDLE=ONES IDLE=ONES
MIN POLL TIME=0 MIN POLL TIME=0
THRESHOLD=10 THRESHOLD=10
POLL RATIO=1 POLL RATIO=1
TX DELAY=0 TX DELAY=0
GROUP ADDR=0 GROUP ADDR=0
LLC2 SSAP=04 LLC2 SSAP=04
LLC2 DSAP=04 LLC2 DSAP=04
OUT DLCI=120 OUT DLCI=17
IDLE=FLAGS
HDW FLOW CTRL=ON
N392=3
N393=4
IP ADDR=200.200.200.2
SUBNET MASK=255.255.255.0
MNG DLCI=960
N391=6 N391=6
N392=3 N392=3
N393=4 N393=4
26 FSU User Manual 61200.130L1-1
Page 41
Bisync Application
The FSU can be used to connect IBM 3780/2780 (see IBM manual
number GA27-3004-2) bisync controllers and a host across a
frame relay network. Point-to-point and multi-point configurations are supported at speeds up to 19200 bps. The LLC protocol
(mode 2) is used to provide a reliable transport layer across the
frame relay network. In a multi-point configuration the FSU
performs local spoofing, minimizing traffic across the frame
relay network. Sample network illustrations for both point-topoint and multi-point are shown in Figures 4-3 and 4-4.
See Table 4-C for an example configuration for the point-to-point
application.
Bisync Bisync
3780 Controller
Chapter 4. Applications
DLCI=17 DLCI=120
DTE1
N
UNI
DTE2
FSU FSU
FRAME RELAY
UNI
DTE1
N
DTE2
FEP Host
RFC1490/LLC2
Figure 4-3
Bisync Point-to-Point
61200.130L1-1 FSU User Manual 27
Page 42

Chapter 4. Applications
Poll Address=AA1
Bisync Bisync
3780 Controller
Bisync
3780 Controller
Poll Address=BB1
DLCI=17 DLCI=120
DTE1
NN
UNI
DTE2
FSU FSU
FRAME RELAY
UNI
RFC1490/LLC2
DTE1
DTE2
FEP Host
Figure 4-4
Bisync Multi-Point
28 FSU User Manual 61200.130L1-1
Page 43

Chapter 4. Applications
y
p
p
y
p
p
y
p
Table 4-C
Configuration Settings for Multi-Point Bisync Application
HOST FSU REMOTE FSU
DTE Port 1
Protocol BISYNC BISYNC
sical CONN=RS232 CONN=RS232
Ph
tions RATE=9600 RATE=9600
O
Protocol LINE=MULTIPOINT LINE=MULTIPOINT
tions TRANS CODE= EBCDIC CRC16 TRANS CODE= EBCDIC CRC16
O
FORMAT=NRZ FORMAT=NRZ
TIMEOUT=3 TIMEOUT=3
THRESHOLD=10 THRESHOLD=10
POLL RATIO=1 POLL RATIO=1
Protocol ENTRY #1 ENTRY #2 ENTRY #1
Address Table UNIT ADDR=AA1 UNIT ADDR=BB1 UNIT ADDR=AA1
LLC2 SSAP=04 LLC2 SSAP=04 LLC2 SSAP=04
LLC2 DSAP=04 LLC2 DSAP=08 LLC2 DSAP=04
OUT DLCI=120 OUT DLCI=12 OUT DLCI=17
DTE Port 2
Protocol BISYNC BISYNC
sical CONN=RS232 CONN=RS232
Ph
tions RATE=9600 RATE=9600
O
Protocol LINE=MULTIPOINT LINE=MULTIPOINT
tions TRANS CODE= EBCDIC CRC16 TRANS CODE= EBCDIC CRC16
O
FORMAT=NRZ FORMAT=NRZ
TIMEOUT=3 TIMEOUT=3
THRESHOLD=10 THRESHOLD=10
POLL RATIO=1 POLL RATIO=1
Protocol ENTRY #1 ENTRY #2 ENTRY #1
Address Table UNIT ADDR=AA1 UNIT ADDR=BB1 UNIT ADDR=BB1
LLC2 SSAP=04 LLC2 SSAP=04 LLC2 SSAP=08
LLC2 DSAP=04 LLC2 DSAP=08 LLC2 DSAP=04
OUT DLCI=120 OUT DLCI=12 OUT DLCI=17
Frame Rela
tions T391=10 T391=10
O
SIGNAL TYPE=ANNEX D SIGNAL TYPE=ANNEX D
N391=6 N391=6
N392=3 N392=3
N393=4 N393=4
61200.130L1-1 FSU User Manual 29
Page 44

Chapter 4. Applications
Transparent Application
In cases when the user protocol is not supported by the FSU, the
transparent mode may be used. Transparent bit-oriented
protocol (BOP) or transparent asynchronous protocol may be
selected. This can be used for point-to-point connections only
because the FSU is transparent to the protocol address formats.
In the transparent BOP protocol, the FSU accepts an HDLC-like
protocol and encapsulates the information field of the HDLC
frames, transporting them across the frame relay network to the
specified virtual circuit and remote FSU port number. The
incoming frames must be spaced with at least one flag byte
(0x7E) and contain two bytes of CRC16 at the end of each frame.
Asynchronous protocols are supported by using the transparent
async mode. The FSU buffers async characters and encapsulates
the data portion of each character for transport across frame
relay using a programmable DLCI and remote FSU port number.
See Figure 4-5 and Table 4-D for an example of a transparent
BOP configuration. See Figure 4-6 and Table 4-E for an example
of a transparent asynchronous application.
REMOTE LOCAL
DTE1 DTE1
N
Router Router
FSU FSU
UNI
FRAME RELAY
UNI
HDLCHDLC
Figure 4-5
Transparent BOP Application
30 FSU User Manual 61200.130L1-1
Page 45

Chapter 4. Applications
p
y
Table 4-D
Configuration Settings for Transparent BOP Application
HOST FSU REMOTE FSU
DTE Port 1
Protocol TRANS BOP TRANS BOP
Physical Layer CONN=V.35 CONN=V.35
Options RATE=64K RATE=64K
Protocol
tions
O
Protocol FAR END PORT=1 FAR END PORT=2
Address Table DLCI=100 DLCI=17
Network Port
Interface Type NET NET
Physical Layer LOOP RATE=64K LOOP RATE=64K
Options CLOCK SOURCE=SLAVE CLOCK SOURCE=SLAVE
Frame Rela
Options T391=10 T391=10
IDLE=FLAGS IDLE=FLAGS
HDW FLOW CTRL=ON HDW FLOW CTRL=ON
N/A N/A
SIGNAL TYPE=ANNEX D SIGNAL TYPE=ANNEX D
N391=6 N391=6
N392=3 N392=3
N393=4 N393=4
REMOTE LOCAL
DLCI=17 DLCI=100
PC
ASYNC
DTE1
N
UNI
FSU FSU
FRAME RELAY
UNI
DTE2
ASYNC
PC
Figure 4-6
Transparent Async Application
61200.130L1-1 FSU User Manual 31
Page 46

Chapter 4. Applications
y
p
p
y
p
y
p
DTE Port 1
Protocol TRANS ASYNC TRANS ASYNC
Ph
sical Layer CONN=RS232 CONN=RS232
O
tions BAUD=38.4K BAUD=38.4K
Protocol
tions
O
Protocol FAR END PORT=1 FAR END PORT=2
Address Table DLCI=100 DLCI=12
Network Port
Interface Type NET NET
Ph
sical Layer LOOP RATE=64K LOOP RATE=64K
O
tions CLOCK SOURCE=SLAVE CLOCK SOURCE=SLAVE
Frame Rela
O
tions T391=10 T391=10
Table 4-E
Configuration Settings for Transparent Async Application
HOST FSU REMOTE FSU
DATA BITS=8 DATA BITS=8
PARITY=NONE PARITY=NONE
STOP BITS=1 STOP BITS=1
HDW FLOW CTRL=ON HDW FLOW CTRL=ON
N/A N/A
SIGNAL TYPE=ANNEX D SIGNAL TYPE=ANNEX D
N391=6 N391=6
N392=3 N392=3
N393=4 N393=4
32 FSU User Manual 61200.130L1-1
Page 47

Configuration Overview
LOCAL AND REMOTE CONFIGURATION
The FSU can be configured locally or, when using the VT 100
interface, communications can be established so a local FSU can
configure a remote FSU. See the chapter Operation for information on selecting Local or Remote operation.
The Configuration menu (Figure 5-1) consists of submenus
relating to specific interfaces or functions of the FSU requiring
setup:
Chapter 5. Configuration Overview
Chapter 5
DTE Port 1
DTE Port 2
Network Port
Control (front panel only)
IP Routing
System Configuration
Configure the Network Port before the DTE Ports. Selections made will
affect the choices available for the DTE ports.
When configuring DTE port 1 or 2, select the Protocol first. This
selection determines which parameters will be available for the Physical
Layer Options, Protocol Options, and Protocol Address Table.
61200.130L1-1 FSU User Manual 33
Page 48

Chapter 5. Configuration Overview
The FSU contains a default set of configuration options stored in
read-only memory (see the appendix Default Configuration
Profile). The unit is shipped from the factory with this profile
loaded into the current (nonvolatile configuration) memory. If
this profile matches requirements for the system, then no
additional configuration is required to put the unit into service.
If the profile does not match system requirements, it can be
modified. When the profile is modified, it is stored in the
current (nonvolatile configuration) memory. The FSU is then
configured with that profile every time power is turned on.
For detailed information on configuration see the chapters DTE
Port Configuration, Network Port Configuration, IP Routing, and
System Configuration.
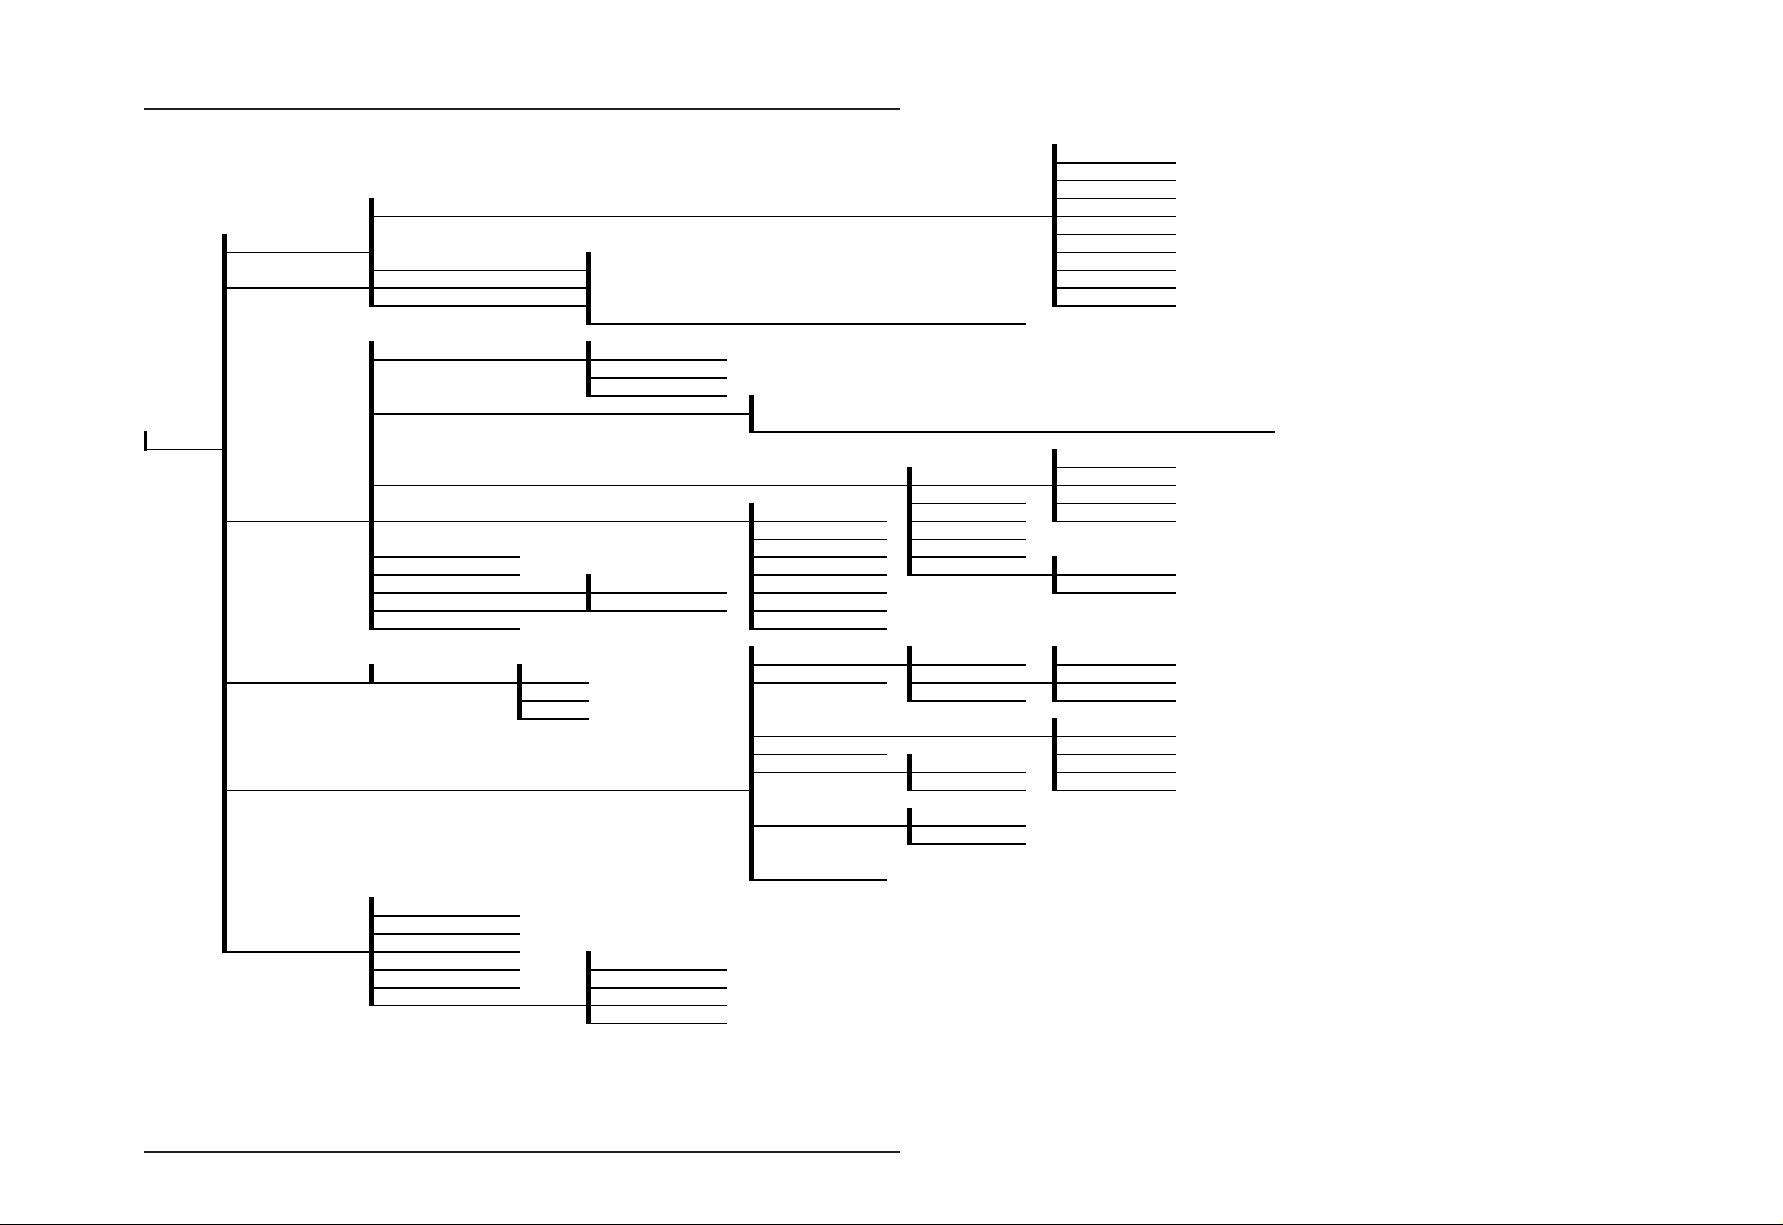
Configuration menus are shown in Figures 5-2 (for the Front
Panel) and 5-3 (for the VT 100 terminal).
Figure 5-1
VT 100 Configuration Menu
34 FSU User Manual 61200.130L1-1
Page 49
Chapter 5. Configuration Overview
p
DTE Port
Configuration
p
Network Port Configuration
DISABLED
FRAME RELAY
1 PROTOCOL TRANS BOP
1 DTE PORT 1 TRANS ASYNC
2 DTE PORT 2 3 PROTOCOL OPT These selections are dependent upon the PROTOCOL selection. PPP ASYNC
2 PHYS LYR OPT PPP SYNC
4 ADDRESS TABLE See the individual
rotocol sections in the chapter
for this portion of the menu tree.
SDLC
BISYNC
SLIP
1 CONFIG
1 INT TYPE 232
2 PHYS LYR OPT These selections are dependent upon the interface type (INT TYPE).
3 FR OPT 1 SIGNAL LMI
3 NETWORK PORT 4 LLC2 OPT 1 ACK TO 3 N391 ITU-T
5 IP ADDR 3 WND SIZE 5 N393
6 SUBNET MASK 4 POLL TO 6 RFECN NO
7 XMIT RIP NO 5 BUSY TO YES
8 RIP PCKTS YES 6 REJECT TO
9 QUEUE RATIO 7 KA TO
4 CONTROL PORT 1 BAUD RATE 9600 2 G W IP ADDRESS 2 DST PORT DTE 2
19.2K 3 DST DLCI NE T
38.4K
5 IP ROUTING YES NET
1 CHANGE PSWRD
2 RD COM NAME
6 SYSTEM CONFIG 3 WR COM NAME
4 TRAP DLCI 1 NONE
5 TRAP IP ADDRESS 2 DTE 1
6 TRAP PORT 3 DTE 2
V.35
NET
4 NET
See the cha
2 N2 RETRY 4 N392
1 IP ROUTE TABLE 1 IP ADDRESS DTE 1
3 GW PORT NONE
4 GW DLCI DTE 1
5 TX ARP NO DTE 2
6 RX ARP NO
7 ARP REF
ter
for this portion of the menu tree.
NONE
2 T391 ANSI
YES
61200.130L1-1 FSU User Manual 35
Figure 5-2
Front Panel Configuration Menu Tree
Page 50

Chapter 5. Configuration Overview
36 FSU User Manual 61200.130L1-1
Page 51

Chapter 5. Configuration Overview
p
Network Port Configuration
1 PORT DISABLED
2 FRAME RELAY
3 SDLC
1 PROTOCOL 5 BISYNC
1 DTE PORT 1 7 PPP SYNCHRONOUS
2 DTE PORT 2
3 NETWORK PORT 1 INTERFACE TYPE 2 V.35
4 IP ROUTING 2 GATEWAY IP ADDRESS 4 LLC2 POLL TIMEOUT 5 N393
1 CONFIG 8 PROCESS RECEIVED RIP PACKETS 2 YES
5 SYSTEM CONFIG 3 WRITE COMMUNITY NAME
2 PHYSICAL LAYER OPTIONS 8 PPP ASYNC
3 PROTOCOL OPTIONS These selections are dependent upon the PROTOCOL selection.
4 PROTOCOL ADDRESS TABLE
1 IP ROUTE TABLE 2 DESTINATION PORT 2 DTE PORT 2 See the cha
3 GATEWAY PORT 1 NONE 7 LLC2 KEEP-ALIVE TIMEOUT
4 GATEWAY DLCI 4 NETWORK PORT
5 TRANSMIT ARP REQUESTS 1 NO 9 PRIORITY QUEUE RATIO (N:1)
6 PROCESS RECEIVED ARP REQUESTS 2 YES
7 ARP REFRESH TIME (SECONDS)
1 CHANGE PASSWORD
2 READ COMMUNITY NAME
4 TRAP MANAGER DLCI 1 NONE
5 TRAP MANAGER IP ADDRESS 2 DTE PORT 1
6 TRAP MANAGER PORT 3 DTE PORT 2
See the individual protocol sections for this portion of the menu tree.
1 IP ADDRESS 1 DTE PORT 1 2 PHYSICAL LAYER OPTIONS These selections are dependent upon the interface type (INT TYPE).
3 DESTINATION DLCI 3 NETWORK PORT
4 EDIT NEXT ENTRY 1 NONE
5 EDIT PREVIOUS ENTRY 3 FRAME RELAY OPTIONS 1 SIGNALING TYPE 2 LMI
6 DELETE THIS ENTRY 3 ANSI T1.617-D
7 ADD NEW ENTRY 4 LLC2 OPTIONS 1 LLC2 ACK TIMEOUT 2 T391 4 ITU-T Q.933-A
2 DTE PORT 1
3 DTE PORT 2 6 SUBNET MASK
4 NETWORK PORT
4 TRANSPARENT BOP
6 TRANSPARENT ASYNC
9 SLIP
1 232
3 NETWORK
5 IP ADDRESS 3 LLC2 k WINDOW SIZE 4 N392
7 TRANSMIT RIP REQUESTS 1 NO
2 LLC2 N2 RETRY COUNTER 3 N391
5 LLC2 BUSY TIMEOUT 6 REMOTE FECN NOTIFICATION 1 DO NOT NOTIFY
6 LLC2 REJECT TIMEOUT 2 NOTIFY REMOTE ON FECN
ter
for this portion of the menu tree.
Figure 5-3
VT 100 Configuration Menu Tree
61200.130L1-1 FSU User Manual 37
Page 52

Chapter 5. Configuration Overview
38 FSU User Manual 61200.130L1-1
Page 53

Chapter 6. DTE Port Configuration
Chapter 6
DTE Port Configuration
Configure the protocol, physical layer options, protocol options,
and protocol address table for the two DTE ports located on the
rear of the FSU by selecting DTE PORT 1 or DTE PORT 2 from
the Configuration menu. Figures 6-1 illustrates the VT 100
configuration menu for DTE Port 1.
Configure the Network Port before the DTE Ports. Selections made will
affect the choices available for the DTE ports.
Figure 6-1
VT 100 Port Configuration Menu
61200.130L1-1 FSU User Manual 39
Page 54

Chapter 6. DTE Port Configuration
When configuring the DTE ports, select the protocol first. This
selection determines which parameters will be available in the
other three categories (Physical Layer Options, Protocol Options,
and Protocol Address Table). See Figure 6-2 for the menu tree
leading to the protocol selection. Definitions for each choice
follow, categorized by the selected protocol.
In this chapter, the VT 100 selections are listed first followed by the
Front Panel selections (if the names differ).
DISABLED
FRAME RELAY
SDLC
TRANS BOP
1 PROTOCOL BISYNC
TRANS ASYNC
1 DTE PORT 1 2 PHYSICAL LAYER OPTIONS PPP SYNC
1 CONFIG PPP ASYNC
2 DTE PORT 2 3 PROTOCOL OPTIONS SLIP
4 ADDRESS TABLE
Figure 6-2
Front Panel Protocol Menu Tree
40 FSU User Manual 61200.130L1-1
Page 55

Port Disabled Protocol (DISABLED)
Follow the menu tree shown in Figure 6-3 to disable the DTE
port protocol. If only one of the DTE ports is in use, select PORT
DISABLED for the unused port.
Chapter 6. DTE Port Configuration
1 PROTOCOL
1 DTE PORT 1 2 PHYSICAL LAYER OPTIONS N/A
1 CONFIG
2 DTE PORT 2 3 PROTOCOL OPTIONS N/A
4 PROTOCOL ADDRESS TABLE N/A
Physical Layer Options
Physical layer options are not available when the port is disabled.
Protocol Options
Protocol options are not available when the port is disabled.
Protocol Address Table (ADDRESS TABLE)
Address table options are not available when the port is disabled.
1 PORT DISABLED
Figure 6-3
Port Disabled Menu Tree
61200.130L1-1 FSU User Manual 41
Page 56

Chapter 6. DTE Port Configuration
Frame Relay Protocol
The frame relay protocol is a synchronous protocol used to
concentrate two different devices into a common frame relay link
to the network. While configured for frame relay protocol, the
FSU accepts frame relay frames from a router or a FRAD and
routes to/from the network port based on the DLCI address.
The address can be modified or preserved from the DTE and
network side based on the frame relay address table. FECN,
BECN, DE, and C/R states are not changed as frames are transferred between the DTE and the network ports. The menu tree
in Figure 6-4 shows the choices available when the frame relay
protocol is selected.
Physical Layer Options
Interface Type (CONN)
Select the connector type for the DTE interface. The choices are
V.35 and RS-232. See the appendix Pinouts for the connector pin
assignments.
Synchronous Bit Rate (RATE)
Select the operating speed of the DTE interface. The selections
are 2400, 4800, and 9600 bps and 19.2, 38.4, 56, 64, 112, 128, 168,
192, 224, 256, 280, 320, 384, 448, and 512 kbps.
Speed selections made for the Network Port affect the choices available
for the DTE ports.
Synchronous Idle Method (IDLE)
Enable the FSU to transmit flags or all ones. When operating the
frame relay protocol, configure this option to transmit flags.
Hardware Flow Control (HDW FLOW CTRL)
When enabled, the FSU varies the transmit clock rate to temporarily limit the transmit data rate to the FSU.
42 FSU User Manual 61200.130L1-1
Page 57

1 CONFIG
Chapter 6. DTE Port Configuration
1 PROTOCOL 2 FRAME RELAY
1 DTE PORT 1 2 PHYSICAL LAYER OPTIONS 1 INTERFACE TYPE 1 RS232
2 DTE PORT 2 2 4800 bps
2 SYNCHRONOUS BIT RATE 7 64 Kbps
3 SYNCHRONOUS IDLE METHOD 1 TRANSMIT FLAGS
4 HARDWARE FLOW CONTROL 1 OFF
3 PROTOCOL OPTIONS 2 T392 3 ANSI T1.617-D
4 PROTOCOL ADDRESS TABLE 1 DTE PORT DLCI
1 SIGNALING TYPE 2 FRF LMI
3 N392 4 ITU-T Q.933-A
4 N393
5 IP ADDRESS
6 SUBNET MASK
7 MANAGEMENT DLCI
2 V.35
1 2400 bps
3 9600 bps
4 19.2 Kbps
5 38.4 Kbps
6 56 Kbps
8 112 Kbps
9 128 Kbps
10 168 Kbps
11 192 Kbps
12 224 Kbps
13 256 Kbps
14 280 Kbps
15 320Kbps
16 384 Kbps
17 448 Kbps
18 512 Kbps
2 TRANSMIT ALL ONES
2 ON
1 NONE
2 NETWORK DLCI
Figure 6-4
Frame Relay Protocol Menu Tree
61200.130L1-1 FSU User Manual 43
Page 58

Chapter 6. DTE Port Configuration
Protocol Options
Signaling Type (SIGNAL)
Set the signaling type for the DTE port to match the signaling
type of the connected DTE device. Choices are none, FRF LMI,
ANSI T1.617-D, and ITU-T Q.933-A. If none is chosen, the
signaling state for the DTE port is always up.
T392
Set the timeout between polling intervals. This parameter needs
to be a few seconds longer than the T391 setting of the attached
frame relay device.
N392 and N393
These parameters define the error threshold for the UNI formed
by the FSU DTE port and the attached frame relay device. If the
error threshold is met, the signaling state status is changed to
down, which indicates a service-affecting condition. This
condition is cleared once N393 consecutive error-free events are
received. N392 defines the number of errors required in a given
event window, while N393 defines the number of polling events
in each window.
For example:
If N392=3 and N393=4, then if three errors occur within any four
events the interface is determined inactive.
The status of the connection can be viewed in the Status menu
under DTE Port Signaling State. The status will return to active
once the threshold is no longer exceeded.
Guidelines for Configuring IP Addr, Subnet Mask, and Mng DLCI
If the attached router or FRAD is used to route SNMP/telnet
frames to the FSU, set the Management DLCI to a unique value
that identifies the virtual circuit between the router/FRAD and
the FSU. The router/FRAD must also be configured to route the
FSU IP address to this DLCI. The IP address and subnet mask
for the DTE port must also be set.
44 FSU User Manual 61200.130L1-1
Page 59

Chapter 6. DTE Port Configuration
Setting the IP address to 0.0.0.0 and setting the Mng DLCI to a
value not used by the attached frame relay device disables this
feature.
IP Address (IP ADDR)
Enter the FSU IP address. Each port capable of carrying IP traffic
has its own unique IP address. See the previous section, Guide-
lines for Configuring IP Addr, Subnet Mask, and Mng DLCI, for
more information.
IP Subnet Mask
Enter the subnet number assigned to the network formed by the
FSU and the other FRAD/routers across the frame relay network. See the section, Guidelines for Configuring IP Addr, IP
Subnet Mask, and Mng DLCI, for more information.
Management DLCI (MNG DLCI)
Enter the management data link connection identifier. The
Management DLCI is a special DLCI used between the attached
DTE device and the FSU to carry SNMP and telnet packets to/
from the FSU on the DTE port. See the section, Guidelines for
Configuring IP Addr, Subnet Mask, and Mng DLCI, for more
information.
Protocol Address Table
DTE Port DLCI (PRT DLCI)
Enter the DTE port DLCI into the Protocol Address Table,
mapping it to the corresponding Network DLCI. If address
translation is not required, set to the value of the corresponding
network DLCI element.
Network DLCI (NET DLCI)
Enter the network port DLCI into the Protocol Address Table,
mapping it to the corresponding DTE Port DLCI. This element
should contain DLCI addresses obtained from the service
provider.
Edit Next Entry (NEXT key on front panel)
Edit the next entry in the address table.
61200.130L1-1 FSU User Manual 45
Page 60

Chapter 6. DTE Port Configuration
Edit Previous Entry (PREV key on front panel)
Edit the previous entry in the address table.
Delete This Entry (DEL key on front panel)
Delete the current entry in the address table.
Add New Entry (ADD key on front panel)
Add a new entry to the address table.
There should be one entry for every virtual circuit on the frame relay
DTE port.
SDLC Protocol
SDLC is a synchronous, bit-oriented, full-duplex, Layer 2
protocol used to connect SDLC devices to a frame relay network.
At Layer 2, SNA networks use SDLC between FEPs (front-end
processors) and cluster controllers. This protocol selection
provides Logical Link Control Type 2 (LLC2). LLC2 defines the
data link frame header and supports the multiplexing of one or
more data links to/from separate service access points (SAPs).
Type 2 provides acknowledged, connection-oriented service. See
Figure 6-5.
The PU (physical unit) address, LLC2 SSAP, LLC2 DSAP, and
outgoing DLCI are used to set up an end-to-end SDLC session
for each PU in the network. The PU address elements should
match the address of each controller address attached to the port.
The DLCI determines the path across the frame relay network
and is given by the service provider. The SSAP/DSAP pairs are
user-defined but should match between two FSUs for each SDLC
session.
All PU addresses for a port must be unique, but it is not necessary that
they match the PU address at the remote end. The SSAP/DSAP/DLCI
is used to make the connection across the frame relay network.
46 FSU User Manual 61200.130L1-1
Page 61

Physical Layer Options
Interface Type (CONN)
Select the connector type for the DTE interface. The choices are
V.35 and RS-232.
Synchronous Bit Rate (RATE)
Select the operating speed of the DTE interface. The selections
are 2400, 4800, and 9600 bps and 19.2, 38.4, 56, 64, 112, 128, 168,
192, 224, 256, 280, 320, 384, 448, and 512 kbps.
Speed selections made for the Network Port affect the choices available
for the DTE ports.
Synchronous Idle Method (IDLE)
Enable the FSU to transmit flags or all ones. When configured
for the SDLC protocol, all ones is the recommended setting.
Hardware Flow Control (HDW FLOW CTRL)
When configured for the SDLC protocol, this parameter is
always enabled. The FSU issues RNR (receive not ready)
commands to the attached PU, temporarily disabling transmit
data to the FSU.
Chapter 6. DTE Port Configuration
61200.130L1-1 FSU User Manual 47
Page 62

Chapter 6. DTE Port Configuration
S
1 CONFIG
1 PROTOCOL
1 DTE PORT 1 1 INTERFACE TYPE 1 RS232
2 DTE PORT 2 2 4800 bps
2 PHYSICAL LAYER OPTIONS 1 2400 bps
3 PROTOCOL OPTIONS 2 POLL/RESPONSE TIMEOUT 2 NRZI
4 PROTOCOL ADDRESS TABLE 4 LLC2 DSAP
3 SDLC
2 V.35
3 9600 bps
4 19.2 Kbps
5 38.4 Kbps
2 SYNCHRONOUS BIT RATE 7 64 Kbps
3 SYNCHRONOUS IDLE METHOD 1 TRANSMIT FLAGS
4 HARDWARE FLOW CONTROL 1 OFF
1 DATA FORMAT 1 NRZ
3 MINIMUM POLL TIMER
4 SLOW POLL RATIO
5 RESPONSE TIMER THRESHOLD
6 TRANSMIT DELAY
6 56 Kbps
8 112 Kbps
9 128 Kbps
10 168 Kbps
11 192 Kbps
12 224 Kbps
13 256 Kbps
14 280 Kbps
15 320Kbps
16 384 Kbps
17 448 Kbps
18 512 Kbps
2 TRANSMIT ALL ONE
2 ON
1 PU ADDRESS
2 GROUP ADDRESS
3 LLC2 SSAP
5 OUTGOING DLCI
Figure 6-5
SDLC Protocol Menu Tree
Protocol Options
Data Format (FORMAT)
Set the data format to match the attached controller or FEP line
coding. The choices are non-return-to zero (NRZ) and nonreturn-to-zero inverted (NRZI).
When using NRZI format, the FSU does not derive timing from the
receive data input.
48 FSU User Manual 61200.130L1-1
Page 63

Chapter 6. DTE Port Configuration
Poll/Response Timeout (TIMEOUT)
Set the amount of time the FSU waits for a poll response before
issuing another poll.
Minimum Poll Timer
This parameter defines the minimum time (ms) between consecutive polls to a given PU assigned to the DTE port.
Slow Poll Ratio (POLL RAT)
Determine how often devices on the Slow Poll list are polled.
This list is automatically managed based on poll timeouts.
Initially, all PUs are on the Normal list. When a PU times out a
fixed number of times, it is moved to the Slow Poll list. A PU
remains on this list until it responds properly to a poll.
The number entered is the number of times PUs on the Normal
list are polled before PUs on the Slow Poll list are polled. Enter 1
to disable this option.
Response Timer Threshold (THRESHOLD)
Set the maximum number of response timeouts allowed before a
session is terminated.
Transmit Delay (DELAY)
Set the minimum time between transmission frames.
Protocol Address Table
PU Address (PU ADDR)
Enter the physical unit address of each SDLC device you wish to
connect to the FSU.
Group Address (GROUP ADDR)
Enter the address used for group polling. With this address the
host can poll the FSU for information on all units connected to
the FSU. This address should match the host's group address.
Set this entry to 0 to disable group polling for the DTE port.
61200.130L1-1 FSU User Manual 49
Page 64

Chapter 6. DTE Port Configuration
LLC2 SSAP (LLC SSAP)
Defines a point-to-point connection on the network. For an
SDLC connection, the SSAP of one FSU should match the DSAP
on the other FSU. The value of this parameter must be in
increments of four beginning with 04.
LLC2 DSAP (LLC DSAP)
Defines a point-to-point connection on the network. For an
SDLC connection, the DSAP of one FSU should match the SSAP
on the other FSU. The value of this parameter must be in
increments of four beginning with 04. See the section SNA/SDLC
with Local Spoofing in the chapter Applications for a configuration
example which demonstrates the SSAP and DSAP arrangement.
Outgoing DLCI (OUT DLCI)
Enter the DLCI address that identifies the virtual circuit used to
make the SDLC connection.
Edit Next Entry (NEXT on front panel)
Edit the next entry in the address table.
Edit Previous Entry (PREV on front panel)
Edit the previous entry in the address table.
Delete This Entry (DEL on front panel)
Delete the current entry in the address table.
Add New Entry (ADD on front panel)
Add a new entry to the address table.
50 FSU User Manual 61200.130L1-1
Page 65

Transparent BOP (TRANS BOP)
Transparent BOP is a synchronous mode which can accept any
HDLC-like protocol as input. This setting allows the FSU to
connect to devices even if the FSU does not understand their
protocol's addressing and controlling techniques. The FSU
becomes transparent to the data link layer protocol and provides
end-to-end connectivity between two HDLC-like devices. See
Figure 6-6 for the Transparent BOP menu tree.
Chapter 6. DTE Port Configuration
1 CONFIG
1 PROTOCOL
1 DTE PORT 1 2 PHYSICAL LAYER OPTIONS 1 INTERFACE TYPE 1 RS232
2 DTE PORT 2 2 4800 bps
3 PROTOCOL OPTIONS N/A
4 PROTOCOL ADDRESS TABLE 1 FAR END PORT NUMBER 1 DTE PORT 1
4 TRANSPARENT BOP
2 V.35
1 2400 bps
3 9600 bps
4 19.2 Kbps
5 38.4 Kbps
2 SYNCHRONOUS BIT RATE 7 64 Kbps
3 SYNCHRONOUS IDLE METHOD 1 TRANSMIT FLAGS
4 HARDWARE FLOW CONTROL 1 OFF
2 OUTGOING DLCI 2 DTE PORT 2
6 56 Kbps
8 112 Kbps
9 128 Kbps
10 168 Kbps
11 192 Kbps
12 224 Kbps
13 256 Kbps
14 280 Kbps
15 320Kbps
16 384 Kbps
17 498 Kbps
18 512 Kbps
2 TRANSMIT ALL ONES
2 ON
Transparent BOP Menu Tree
Figure 6-6
61200.130L1-1 FSU User Manual 51
Page 66

Chapter 6. DTE Port Configuration
Physical Layer Options
Interface Type (CONN)
Select the connector type for the DTE interface. The choices are
V.35 and RS-232.
Synchronous Bit Rate (RATE)
Select the operating speed of the DTE interface. The selections
are 2400, 4800, and 9600 bps and 19.2, 38.4, 56, 64, 112, 128, 168,
192, 224, 256, 280, 320, 384, 448, and 512 kbps.
Speed selections made for the Network Port affect the choices available
for the DTE ports.
Synchronous Idle Method (IDLE)
Enable the FSU to transmit flags or all ones (flags are recommended).
Hardware Flow Control (HDW FLOW CTRL)
When enabled, the FSU varies the transmit clock rate to temporarily limit the transmit data rate to the FSU.
Protocol Options
Protocol options are not available when the Transparent BOP
protocol is enabled.
Protocol Address Table
Far End Port Number (FE PORT)
Enter the remote FSU port number that the remote HDLC device
is connected to.
Outgoing DLCI (OUT DLCI)
Enter the DLCI address that indicates the virtual circuit used to
connect with the remote FSU.
52 FSU User Manual 61200.130L1-1
Page 67
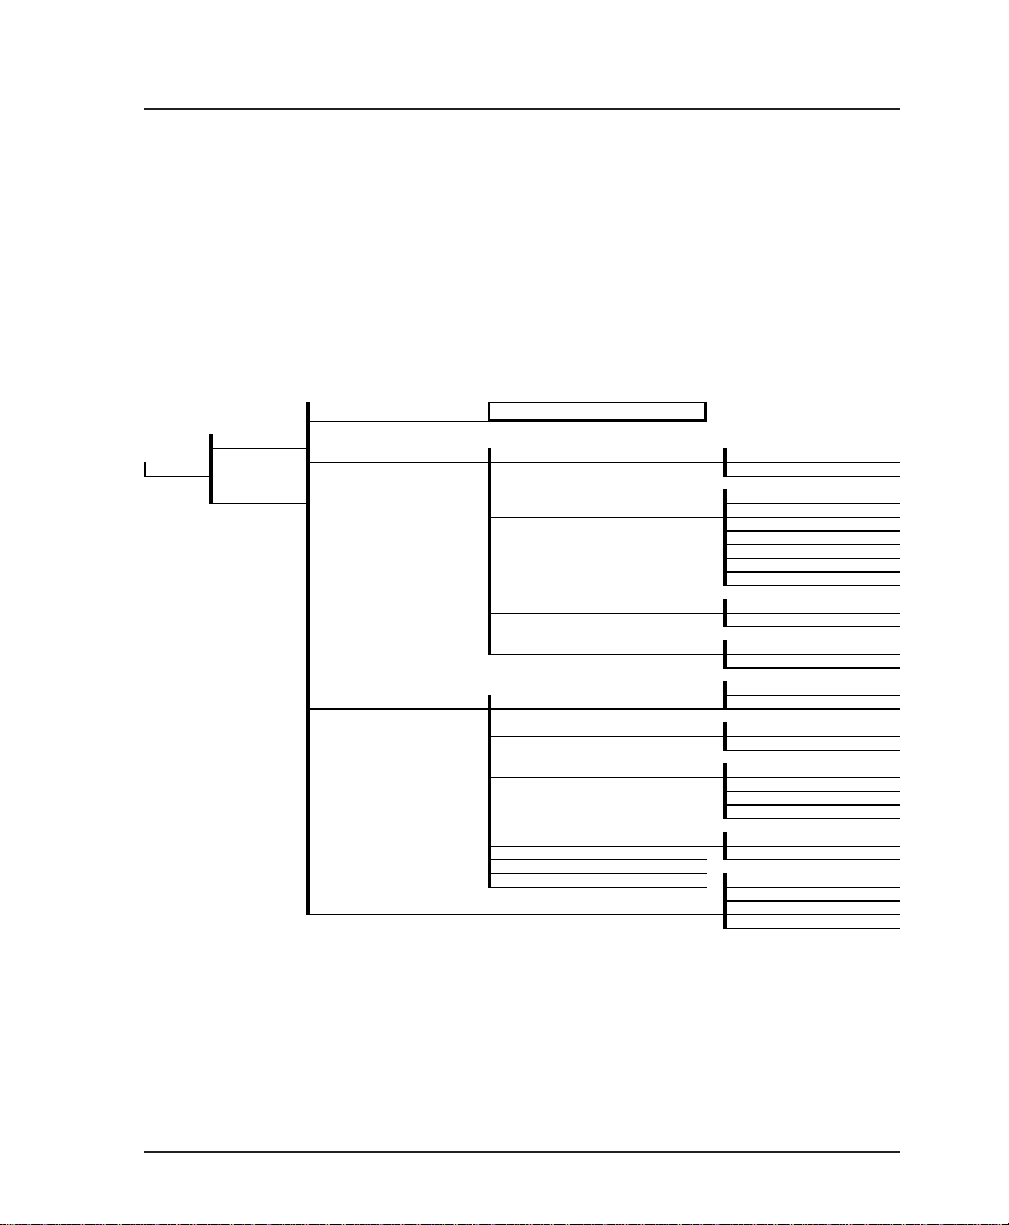
Chapter 6. DTE Port Configuration
Bisync Protocol
The Bisync protocol option enables the FSU to connect IBM
2780/3780 bisync controllers to the host across frame relay. Both
point-to-point and multi-point configurations are supported.
The FSU can decode both ASCII and EBCDIC character sets and
support CRC16, parity, VRC, and LRC error checking methods.
See Figure 6-7 for the Bisync protocol menu tree.
1 PROTOCOL 5 BISYNC
1 DTE PORT 1
1 CONFIG 2 V.35
2 DTE PORT 2 1 2400 bps
2 PHYSICAL LAYER OPTIONS 1 INTERFACE TYPE 1 RS232
2 SYNCHRONOUS BIT RATE 2 4800 bps
3 SYNCHRONOUS IDLE METHOD 1 TRANSMIT FLAGS
4 HARDWARE FLOW CONTROL 1 OFF
3 PROTOCOL OPTIONS 1 EMULATION TYPE 2 SECONDARY
2 LINE TYPE 1 POINT-TO-POINT
3 TRANSLATION CODE 1 EBCDIC CRC 16
4 DATA FORMAT 1 NRZ
5 POLL/RESPONSE TIMEOUT 2 NRZI
6 POLL/RESPONSE TIMER THRESHOLD
7 SLOW POLL RATIO <N:1> 1 UNIT ADDRESS
4 PROTOCOL ADDRESS TABLE 3 LLC2 DSAP
3 9600 bps
4 19.2 Kbps
5 38400 bps
6 56000 bps
7 64000 bps
2 TRANSMIT ALL ONES
2 ON
1 PRIMARY
2 MULTIPOINT
2 ASCII CRC16
2 ASCII ODD PARITY VRC, LRC
3 ASCII EVEN PARITY VRC, LRC
2 LLC2 SSAP
4 OUTGOING DLCI
Figure 6-7
Bisync Protocol Menu Tree
61200.130L1-1 FSU User Manual 53
Page 68

Chapter 6. DTE Port Configuration
Physical Layer Options
Interface Type (CONN)
Select the connector type for the DTE interface. The choices are
V.35 and RS-232.
Synchronous Bit Rate (RATE)
Select the operating speed of the DTE interface. These selections
are dependent upon the Network Port speed.
Speed selections made for the Network Port affect the choices available
for the DTE ports.
Synchronous Idle Method (IDLE)
Enable the FSU to transmit flags or all ones.
Hardware Flow Control (HDW FLOW CTRL)
When configured for the Bisync protocol, this parameter is
always enabled. The FSU uses commands within the bisync
protocol to temporarily disable transmit data to the FSU.
Protocol Options
Emulation Type (EMUL TYPE)
For multi-point configurations, this entry defines primary or
secondary emulation. Set the FSU connected to the host to
secondary and the FSU connected to the 2780/3780 controller to
primary.
Line Type (LINE)
Select a point-to-point or multi-point line type.
Translation Code
Define the character set and error checking algorithm to use.
The choices are EBCDIC CRC16, ASCII CRC16, ASCII odd parity
VRC/LRC, and ASCII even parity VRC/LRC.
Data Format (FORMAT)
Set the data format used by your equipment. The choices are
non-return-to zero (NRZ) and non-return-to-zero inverted
(NRZI).
54 FSU User Manual 61200.130L1-1
Page 69

Poll/Response Timeout (TIMEOUT)
For multi-point configurations, set the amount of time the FSU
waits for a poll response before issuing another poll.
Poll/Response Timer Threshold (THRESHOLD)
For multi-point configurations, set the maximum number of
response timeouts allowed before a session is terminated.
Slow Poll Ratio <N:1> (POLL RAT)
Determine how often devices on the Slow Poll List are polled.
This list is automatically managed based on poll timeouts.
Initially, all controllers are on the Normal list. When a controller
times out a fixed number of times, it is moved to the Slow Poll
list. A controller remains on this list until it responds properly to
a poll.
The number entered is the number of times controllers on the
Normal list are polled before controllers on the Slow Poll list are
polled. Enter 1 to disable this option.
Protocol Address Table
Unit Address (UNIT ADDR)
For a multi-point connection, enter the unit address used for
specific unit identification. The address may consist of a maximum of seven alphanumeric characters. There must be one
alphabetic character for this parameter so the FSU can use the
upper case version for the port address and the lower case
version for the select address.
Chapter 6. DTE Port Configuration
LLC2 SSAP (LLC SSAP)
Defines a point-to-point connection on the network. For each
bisync SDLC connection, the SSAP of one FSU should match the
DSAP on the other FSU.
LLC2 DSAP (LLC DSAP)
Define a point-to-point connection on the network. For each
bisync SDLC connection, the DSAP of one FSU should match the
SSAP on the other FSU. See the section SNA/SDLC with Local
Spoofing in the chapter Applications for a configuration example
which demonstrates the SSAP and DSAP arrangement.
61200.130L1-1 FSU User Manual 55
Page 70

Chapter 6. DTE Port Configuration
Outgoing DLCI (OUT DLCI)
Enter the DLCI address used to connect with the remote device
across the frame relay network.
Edit Next Entry (NEXT key on front panel)
Edit the next entry in the address table.
Edit Previous Entry (PREV key on front panel)
Edit the previous entry in the address table.
Delete This Entry (DEL key on front panel)
Delete the current entry in the address table.
Add New Entry (ADD key on front panel)
Add a new entry to the address table.
56 FSU User Manual 61200.130L1-1
Page 71
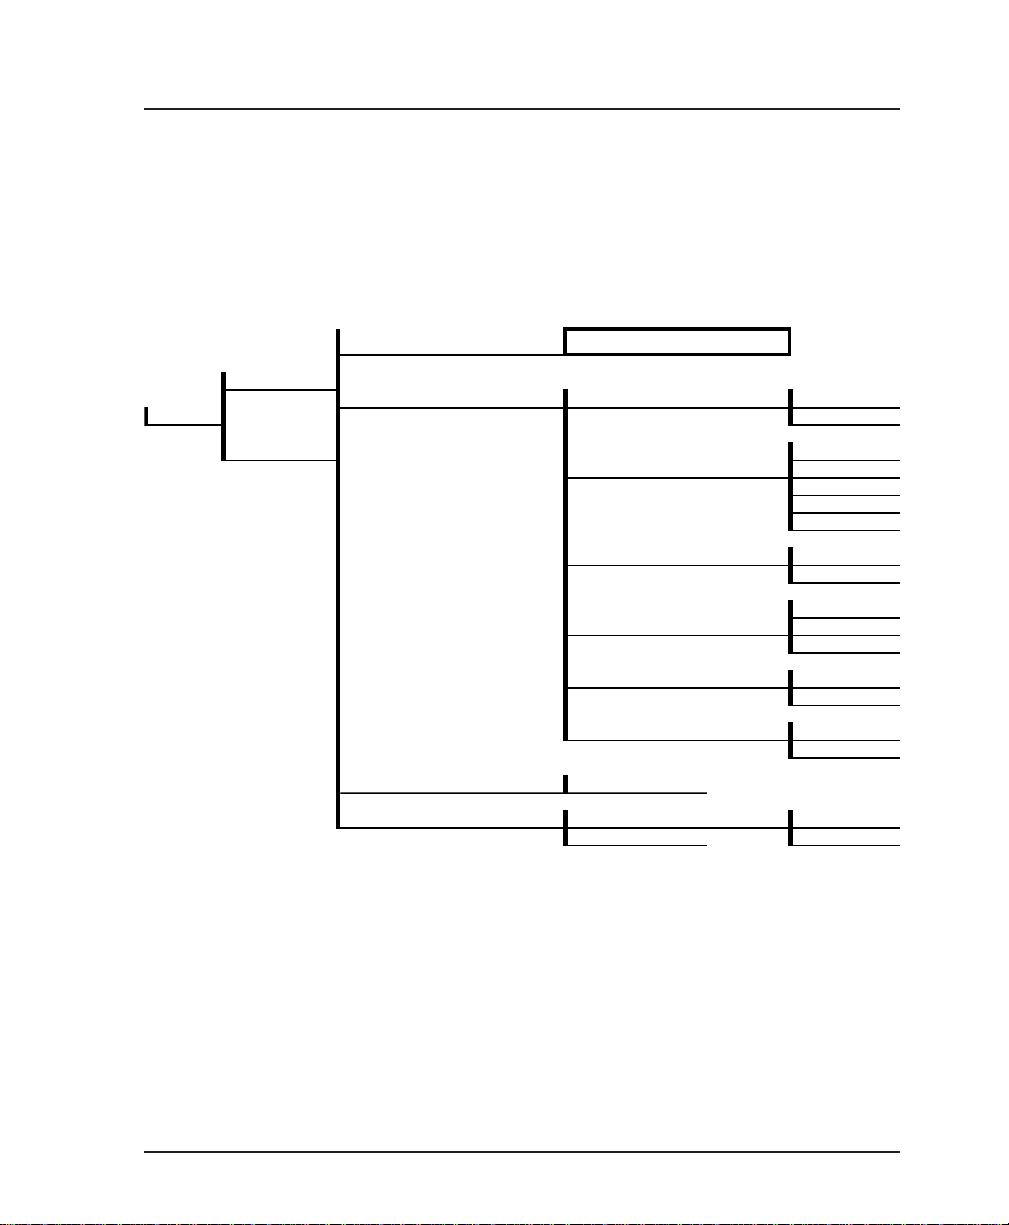
Chapter 6. DTE Port Configuration
Transparent Async Protocol (TRANS ASYNC)
Transparent Async protocol frames up async characters to
transport across a frame relay network. This protocol is used
when the device connected to the FSU is an async device such as
a terminal or PC. See Figure 6-8 for the Transparent Async menu
tree.
1 PROTOCOL
1 DTE PORT 1
2 PHYSICAL LAYER OPTIONS 1 INTERFACE TYPE 1 RS232
1 CONFIG 2 V.35
2 DTE PORT 2 1 2400 bps
3 PROTOCOL OPTIONS N/A
4 PROTOCOL ADDRESS TABLE 1 FAR END PORT NUMBER 1 DTE PORT 1
6 TRANSPARENT ASYNC
2 ASYNCHRONOUS BIT RATE 2 4800 bps
3 9600 bps
4 19.2 Kbps
5 38.4 Kbps
3 DATA BITS 1 7
2 8
1 NONE
4 PARITY 2 EVEN
3 ODD
5 STOP BITS 1 1
2 2
6 HARDWARE FLOW CONTROL 1 OFF
2 ON
2 OUTGOING DLCI 2 DTE PORT 2
Figure 6-8
Transparent Async Protocol Menu Tree
The FSU buffers async characters from the DTE device until two
idle characters or 100 characters are received. A frame relay
synchronous frame is constructed containing the data content of
each character. Frame relay frames received on the network
containing transparent async data are transmitted to the attached
device with the character format set under the DTE port physical
layer options.
61200.130L1-1 FSU User Manual 57
Page 72

Chapter 6. DTE Port Configuration
No control lead status or break characters are transmitted across the
frame relay network.
Physical Layer Options
Interface Type (CONN)
Select the connector type for the DTE interface. The choices are
V.35 and RS-232.
Asynchronous Bit Rate (BIT RATE)
Select the operating speed to match the DTE device connected to
the FSU. The selections are 2400 bps, 4800 bps, 9600 bps, 19.2
kbps, and 38.4 kbps.
Data Bits
Select the byte length to match the DTE device connected to the
FSU. The choices are 7 and 8.
Parity
Select even, odd, or no parity information. Set to match the DTE
device connected to the FSU.
Stop Bits
Select one or two stop bits. Set to match the DTE device connected to the FSU.
Hardware Flow Control (HDW FLOW CTRL)
When enabled, the FSU uses CTS to temporarily disable transmit
data to the FSU.
Protocol Options
Protocol options are not available when the Transparent Async
protocol is selected.
Protocol Address Table
Far End Port Number (FE PORT)
Enter the remote FSU port number that the remote device is
connected to.
58 FSU User Manual 61200.130L1-1
Page 73

Outgoing DLCI (OUT DLCI)
Enter the DLCI address that identifies the virtual circuit used to
connect with the remote FSU.
PPP Synchronous Protocol (PPP SYNC)
PPP Synchronous protocol provides a PPP device access to the
frame relay network and also routes IP traffic from the network
to the PPP device. See Figure 6-9 for the PPP synchronous menu
tree.
Routing
Routing tables are formed through a combination of RIP and
static route entries. If RIP is used, routing tables are generated
dynamically. With static routing, the user is able to force relationships. Static route tables are configured through the IP
Routing selection in the CONFIG menu.
Static routing requires additional configuration (see the chapter IP
Routing for more information).
Chapter 6. DTE Port Configuration
The port set for PPP Synchronous protocol routes and supports IP
traffic only.
61200.130L1-1 FSU User Manual 59
Page 74

Chapter 6. DTE Port Configuration
1 PROTOCOL
1 DTE PORT 1 2 PHYSICAL LAYER OPTIONS 1 INTERFACE TYPE 1 RS232
2 DTE PORT 2 2 4800 bps
3 PROTOCOL OPTIONS N/A
4 PROTOCOL ADDRESS TABLE 2 SUBNET MASK
7 PPP SYNCHRONOUS
2 V.35
1 2400 bps
3 9600 bps
2 SYNCHRONOUS BIT RATE 4 19.2 Kbps
5 38.4 Kbps
6 56 Kbps
7 64 Kbps
8 112 Kbps
9 128 Kbps
10 168 Kbps
11 192 Kbps
12 224 Kbps
13 256 Kbps
14 280 Kbps
15 320Kbps
16 384 Kbps
17 448 Kbps
18 512 Kbps
3 SYNCHRONOUS IDLE METHOD 1 TRANSMIT FLAGS
2 TRANSMIT ALL ONES
4 HARDWARE FLOW CONTROL 1 OFF
2 ON
1 IP ADDRESS
3 PEER IP ADDRESS
4 TRANSMIT RIP REQUESTS 1 NO
5 REPLY TO RIP REQUESTS 2 YES
Figure 6-9
PPP Synchronous Protocol Menu Tree
Physical Layer Options
Interface Type (CONN)
Select the connector type for the DTE interface. The choices are
V.35 and RS-232.
60 FSU User Manual 61200.130L1-1
Page 75

Synchronous Bit Rate (RATE)
Select the operating speed of the DTE interface. The selections
are 2400, 4800, and 9600 bps and 19.2, 38.4, 56, 64, 112, 128, 168,
192, 224, 256, 280, 320, 384, 448, and 512 kbps.
Speed selections made for the Network Port affect the choices available
for the DTE ports.
Synchronous Idle Method (IDLE)
Enable the FSU to transmit flags or all ones.
Hardware Flow Control (HDW FLOW CTRL)
When enabled, the FSU varies the transmit clock rate to temporarily limit the transmit data rate to the FSU.
Protocol Options
Protocol options are not available when the PPP Synchronous
protocol is enabled.
Protocol Address Table
IP Address (IP ADDR)
Enter the internet protocol (IP) address assigned to the FSU for
the DTE port.
Chapter 6. DTE Port Configuration
Subnet Mask
Enter the subnet number assigned to the network formed by the
FSU and the Peer PPP station.
Peer IP Address (PEER IP)
Enter the IP address of the attached PPP device.
Transmit RIP Requests (TX RIP)
Enable or disable the FSU's transmission of routing information
protocol (RIP) messages. RIP broadcasts occur in 60 second
intervals, advertising network addresses to the Peer PPP device.
Routing tables are generated from these broadcasts.
Reply to RIP Requests (RIP REPLY)
Enable or disable the FSU's reply to the request from the Peer
PPP device to issue RIP messages.
61200.130L1-1 FSU User Manual 61
Page 76

Chapter 6. DTE Port Configuration
PPP Async Protocol
The PPP Async Protocol functions the same as the PPP Synchronous Protocol except for the port is in async format, connected to
an async device. Special control characters are used to determine frame boundaries for the async channel. See Figure 6-10
for the PPP Asynchronous menu tree.
Routing
Routing tables are formed through a combination of RIP and
static route entries. If RIP is used, all routing tables are generated dynamically. With static routing, the user is able to force
relationships. Static route tables are configured through the IP
Routing selection in the CONFIG menu.
Static routing requires additional configuration (see the chapter IP
Routing for more information).
Physical Layer Options
Interface Type (CONN)
Select the connector type for the DTE interface. The choices are
V.35 and RS-232.
Asynchronous Bit Rate (BIT RATE)
Select the operating speed of the DTE interface to match the
connected device. The selections are 2400 bps, 4800 bps, 9600
bps, 19.2 kbps, and 38.3 kbps.
Data Bits
Select the byte length to match the connected asynchronous
device. The choices are 7 and 8.
Parity
Select even, odd, or no parity information. Set to match the
connected asynchronous device.
Stop Bits
Select one or two stop bits. Set to match the connected asynchronous device.
62 FSU User Manual 61200.130L1-1
Page 77

Chapter 6. DTE Port Configuration
Hardware Flow Control (HDW FLOW CTRL)
When enabled, the FSU uses CTS to temporarily disable transmit
data to the FSU.
1 PROTOCOL 8 PPP ASYNC
1 CONFIG
1 DTE PORT 1 2 PHYSICAL LAYER OPTIONS 1 INTERFACE TYPE 1 RS232
2 V.35
1 2400 bps
2 DTE PORT 2 2 ASYNCHRONOUS BIT RATE 2 4800 bps
3 9600 bps
4 19.2 Kbps
5 38.4 Kbps
3 DATA BITS 1 7
2 8
4 PARITY 1 NONE
2 EVEN
3 ODD
5 STOP BITS 1 1
2 2
6 HARDWARE FLOW CONTROL 1 OFF
2 ON
3 PROTOCOL OPTIONS N/A
1 IP ADDRESS
4 PROTOCOL ADDRESS TABLE 2 SUBNET MASK
3 PEER IP ADDRESS
4 TRANSMIT RIP REQUESTS 1 NO
5 REPLY TO RIP REQUESTS 2 YES
Figure 6-10
PPP Asynchronous Protocol Menu Tree
Protocol Options
Protocol options are not available when the PPP Asynchronous
protocol is enabled.
61200.130L1-1 FSU User Manual 63
Page 78

Chapter 6. DTE Port Configuration
Protocol Address Table
IP Address (IP ADDR)
Enter the internet protocol (IP) address of the FSU DTE port.
Subnet Mask
Enter the subnet number of the network formed by the FSU and
the Peer PPP station.
Peer IP Address (PEER IP)
Enter the IP address of the attached PPP device.
Transmit RIP Requests (TX RIP)
Enable or disable the FSU's transmission of routing information
protocol (RIP) messages. RIP broadcasts occur in 60 second
intervals, advertising network addresses to the Peer PPP device.
Routing tables are generated from these broadcasts.
Reply to RIP Requests (RIP REPLY)
Enable or disable the FSU's reply to the request from the Peer
PPP device to issue RIP messages.
64 FSU User Manual 61200.130L1-1
Page 79

Slip Protocol
Routing
Physical Layer Options
Chapter 6. DTE Port Configuration
The Slip Protocol is an asynchronous protocol which encapsulates and routes IP traffic to and from a SLIP device. Special
control characters are used to define frame boundaries. See
Figure 6-11 for the Slip menu tree.
Routing tables are formed through a combination of RIP and
static route entries. If RIP is used, all routing tables are generated dynamically. With static routing, the user is able to force
relationships. Static route tables are configured through the IP
Routing selection in the CONFIG menu.
Static routing requires additional configuration (see the chapter IP
Routing for more information).
Interface Type (CONN)
Select the connector type for the DTE interface. The choices are
V.35 and RS-232.
Asynchronous Bit Rate (BIT RATE)
Set the operating speed of the DTE interface to match the
connected device. The selections are 2400 bps, 4800 bps, 9600
bps, 19.2 kbps, and 38.4 kbps.
Data Bits
Set the byte length to match the connected asynchronous device.
The choices are 7 and 8.
Parity
Select even, odd, or no parity information. Set to match the
connected asynchronous device.
Stop Bits
Select one or two stop bits. Set to match the connected asynchronous device.
61200.130L1-1 FSU User Manual 65
Page 80
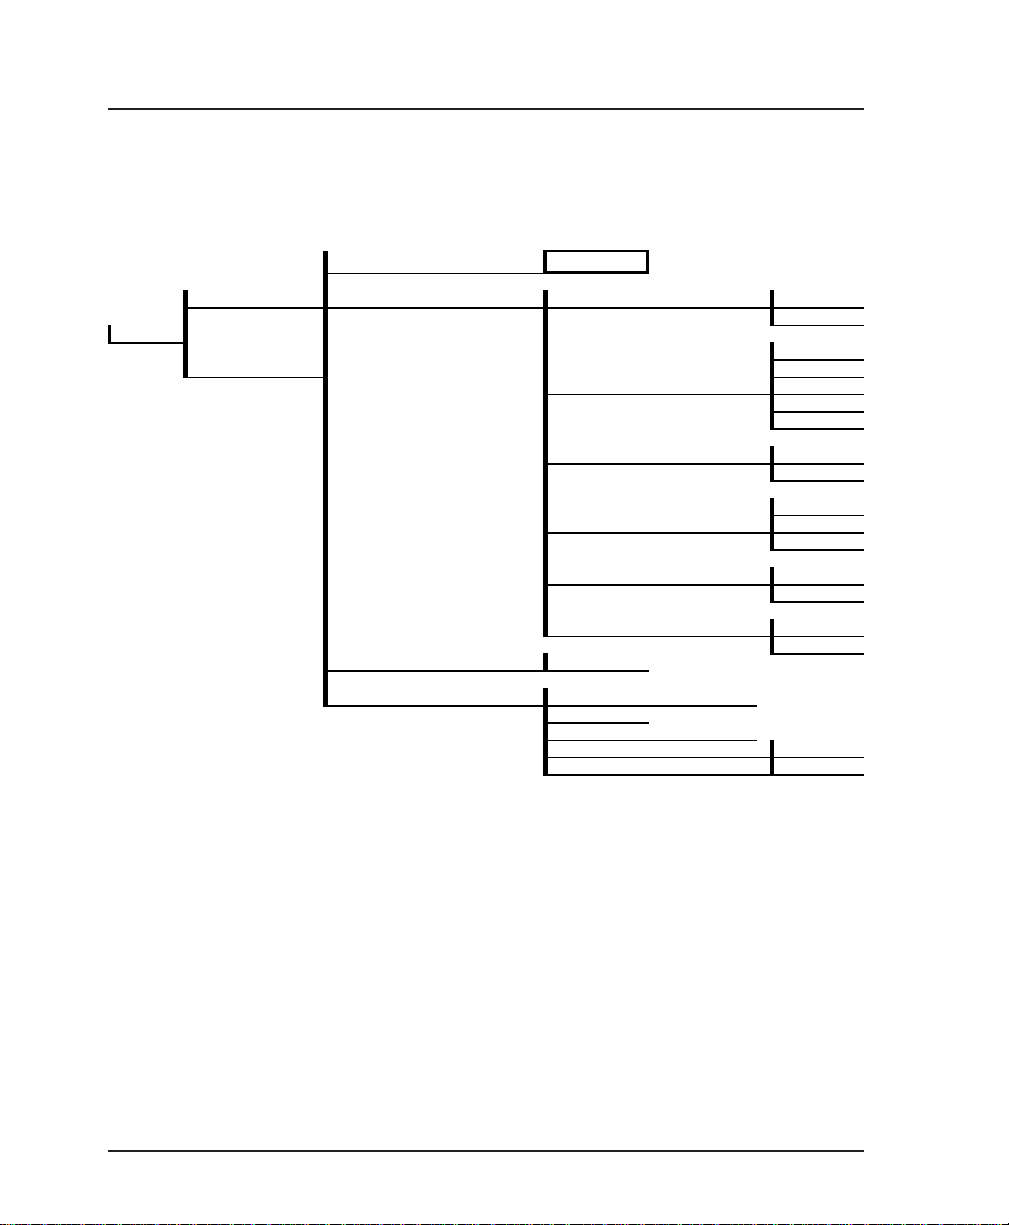
Chapter 6. DTE Port Configuration
Hardware Flow Control (HDW FLOW CTRL)
When enabled, the FSU uses CTS to temporarily disable transmit
data to the FSU.
1 CONFIG
1 PROTOCOL
1 DTE PORT 1 2 PHYSICAL LAYER OPTIONS 1 INTERFACE TYPE 1 RS232
2 DTE PORT 2 2 4800 bps
3 PROTOCOL OPTIONS N/A
4 PROTOCOL ADDRESS TABLE 1 IP ADDRESS
9 SLIP
2 V.35
1 2400 bps
2 ASYNCHRONOUS BIT RATE 3 9600 bps
4 19.2 Kbps
5 38.4 Kbps
3 DATA BITS 1 7
2 8
1 NONE
4 PARITY 2 EVEN
3 ODD
5 STOP BITS 1 1
2 2
6 HARDWARE FLOW CONTROL 1 OFF
2 ON
2 SUBNET MASK
3 PEER IP ADDRESS
4 TRANSMIT RIP REQUESTS 1 NO
5 REPLY TO RIP REQUESTS 2 YES
Figure 6-11
Slip Protocol Menu Tree
Protocol Options
Protocol options are not available when the SLIP protocol is
enabled.
66 FSU User Manual 61200.130L1-1
Page 81

Protocol Address Table
IP Address (IP ADDR)
Enter the internet protocol (IP) address of the FSU DTE port.
Subnet Mask
Enter the subnet number of the network formed by the FSU and
the Peer SLIP station.
Peer IP Address (PEER IP)
Enter the IP address of the attached SLIP device.
Transmit RIP Requests (TX RIP)
Enable or disable the FSU's transmission of routing information
protocol (RIP) messages. RIP broadcasts occur in 60 second
intervals, advertising network addresses to the Peer SLIP device.
Routing tables are generated from these broadcasts.
Reply to RIP Requests (RIP REPLY)
Enable or disable the FSU's reply to the request from the Peer
SLIP device to issue RIP messages.
Chapter 6. DTE Port Configuration
61200.130L1-1 FSU User Manual 67
Page 82

Chapter 6. DTE Port Configuration
68 FSU User Manual 61200.130L1-1
Page 83

NETWORK PORT
Chapter 7. Configuring the Network Port
Chapter 7
Configuring the Network Port
Access the Network Port menus by selecting Network Port from
the Configuration menu. See the menu tree in Figure 7-1. The
network port is always used in frame relay protocol configurations. The network port terminates the user end of the frame
relay UNI interface. The FSU supports three standard PVC
signaling formats: LMI, ANSI T1.617-D, and ITU Q.933-A. The
selected signaling format is used to poll the network end of the
UNI interface and retrieve virtual circuit information. Optionally the polling process can be disabled.
User data is encapsulated into standard frame relay formatted
frames using two methods. FRF 3.1 IA procedures are used for
IP and LLC2 protocols while a proprietary method is used for
transparent protocol mode. Virtual circuit sharing is allowed for
both methods.
Configure the Network Port before the DTE Ports. Selections made will
affect the choices available for the DTE ports.
Connection
Connection is made through the internal DDS 56/64 DSU (if
installed). If this option is not installed, use an external DDS or
fractional T1 (up to 512 kbps) DSU.
61200.130L1-1 FSU User Manual 69
Page 84

Chapter 7. Configuring the Network Port
)
)
W
)
When connecting to an external DSU, the FSU emulates an externally
timed DTE interface connected directly to the DCE interface of the
external device. Therefore, the connection between the FSU and the
DSU is a direct connection.
1 INTERFACE TYPE 2 V.35
1 DTE PORT 1 2 PHYSICAL LAYER OPTIONS
2 DTE PORT 2 2 64K
1 CONFIG 3 NETWORK PORT 2 FROM NETWORK
4 IP ROUTING
5 SYSTEM CONFIG
3 FRAME RELAY OPTIONS 2 T391 3 ANSI T1.617-D
4 LLC2 OPTIONS 1 LLC2 ACK TIMEOUT
5 IP ADDRESS 3 LLC2 k WINDOW SIZE
6 SUBNET MASK 6 LLC2 REJECT TIMEOUT
7 TRANSMIT RIP REQUESTS 1 NO
8 PROCESS RECEIVED RIP PACKETS 2 YES
9 PRIORITY QUEUE RATIO (N:1)
1 RS232
3 NETWORK
1 LOOP RATE (available when
NETWORK interface type is
selected
2 CLOCK SOURCE (available when
NETWORK interface type is
selected
ORK BIT RATE (available
1 NET
when RS232 or V.35 interface type
is selected
1 SIGNALING TYPE 1 NONE
3 N391 4 ITU-T Q.933-A
4 N392
5 N393
6 REMOTE FECN NOTIFICATION 1 DO NOT NOTIFY
2 LLC2 N2 RETRY COUNTER
4 LLC2 POLL TIMEOUT
5 LLC2 BUSY TIMEOUT
7 LLC2 KEEP-ALIVE TIMEOUT
1 56K
1 MASTER
56K and 64K
available for RS232
and V.35 interfaces.
Additional rates of
112K through 512K
available for V.35
interface.
2 LMI
2 NOTIFY REMOTE ON FECN
Figure 7-1
Network Port Configuration Menu Tree
When configuring from a VT 100 terminal, the screen in Figure
7-2 will appear when Network Port is selected.
In this chapter, the VT 100 selections are listed first followed by the
Front Panel selections (if the names differ).
70 FSU User Manual 61200.130L1-1
Page 85
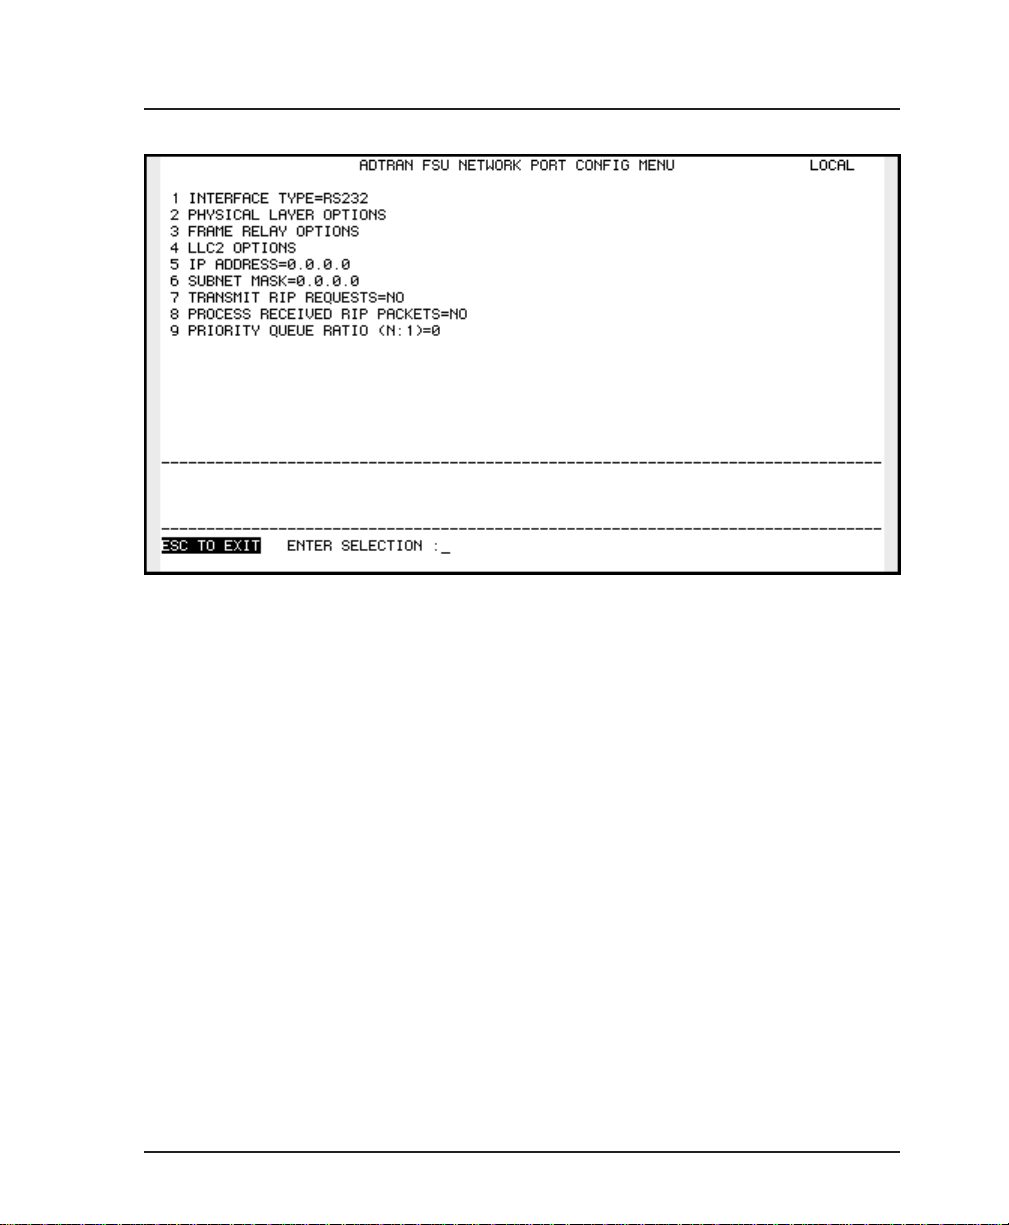
Chapter 7. Configuring the Network Port
Figure 7-2
VT 100 Network Port Configuration Menu
Interface Type (INT TYPE)
Select the connector type for the network interface. The choices
are V.35 and RS232. If the internal DSU is installed, the NET
selection will appear. Select NET to operate the internal DSU.
Physical Layer Options (PHYS LYR OPT)
The following physical layer options are available when the
internal DSU is selected as the interface type:
Loop Rate
Select a loop rate of either 56k or 64k.
61200.130L1-1 FSU User Manual 71
Page 86
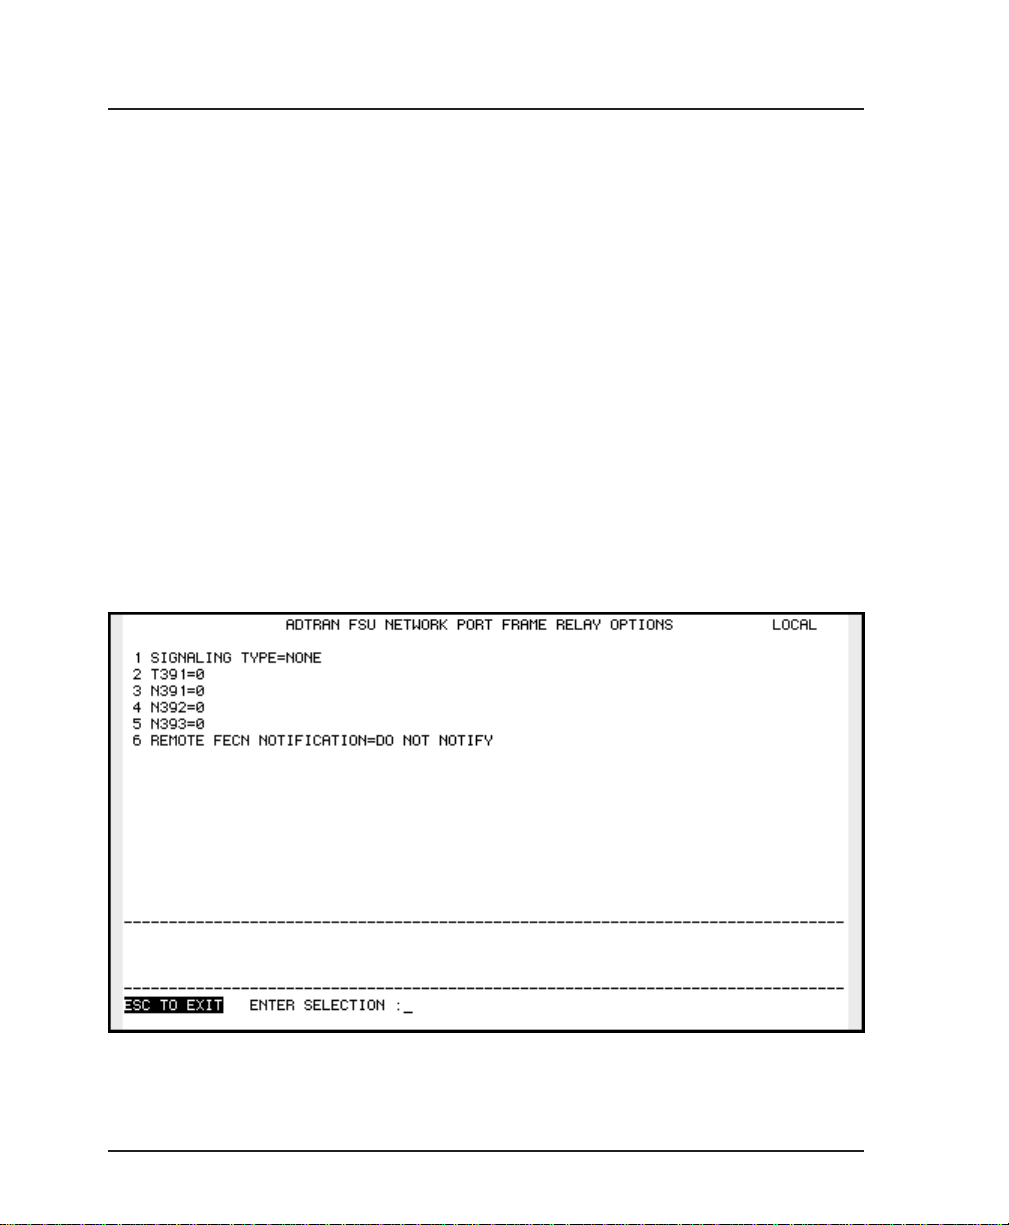
Chapter 7. Configuring the Network Port
Clock Source
Configure the FSU clocking source as either the master or slave
(usually slave).
The following physical layer option is available when the
selected interface type is V.35 or RS232:
Bit Rate
Select the bit rate that closely matches the clock rate supplied by
the external DSU. The choices are 56k and 64k when RS232
interface type is selected. Additional choices of 112k, 128k, 168k,
192k, 224k, 256k, 280k, 320k, 384k, 448k, and 512k are available
when the V.35 interface is selected.
Frame Relay Options (FR OPT)
The VT 100 screen in Figure 7-3 appears when Frame Relay
Options is selected from the Network Port Configuration Menu.
Figure 7-3
VT 100 Network Port Frame Relay Options Menu
72 FSU User Manual 61200.130L1-1
Page 87

Chapter 7. Configuring the Network Port
Signaling Type (SIGNAL)
Set the signaling type option to match the network signaling
type.
T391
Set the time between polls to the frame relay network.
N391
Determine how many link integrity polls occur in between full
status polls.
N392 and N393
These parameters define the error threshold for the UNI formed
by the FSU network port and the frame relay switch. If the error
threshold is met, the signaling state status is changed to down,
which indicates a service-affecting condition. This condition is
cleared once N393 consecutive error-free events are received.
N392 defines the number of errors required in a given event
window, while N393 defines the number of polling events in
each window.
For example:
If N392=3 and N393= 4, then if three errors occur within any four
events the interface is determined inactive.
The status of the connection can be viewed in the Status menu
under Network Port Signaling State. The status will return to
active again once the threshold is no longer exceeded.
Remote FECN Notification (RFECN)
Enable/disable the FSU to issue remote FECN (forward explicit
congestion notification). This feature ensures that a frame will
be generated in the reverse direction upon receiving a frame
with the FECN bit enabled. This is a proprietary feature with
ADTRAN FSUs and can only be used with an ADTRAN FSU on
both ends of the virtual circuit.
The network service provider should recommend the values entered into
the T391, N391, N392, and N393 fields.
61200.130L1-1 FSU User Manual 73
Page 88

Chapter 7. Configuring the Network Port
LLC2 Options (LLC2 OPT)
The VT 100 screen in Figure 7-4 appears when LLC2 (Logical
Link Control Type 2) Options is selected from the Network Port
Configuration menu.
LLC2 ACK Timeout (ACK TO)
Timeout value used by the LLC2 protocol to establish the
maximum time to wait for a positive acknowledgment from a
remote device.
LLC2 N2 Retry Counter (N2 RETRY)
Maximum retries for actions timed by the ACK poll, busy or
reflect timers. When N2 is exceeded, a reset condition occurs.
LLC2 k Window Size (WND SIZE)
Maximum number of outstanding unacknowledged data frames
that the LLC2 protocol will allow.
LLC2 Poll Timeout (POLL TO)
Maximum time to wait for a response to a command having the
poll bit set.
LLC2 Busy Timeout (BUSY TO)
Length of time the LLC2 protocol will wait for a remote device to
clear a busy state before querying it with an RR (receiver ready)
command.
LLC2 Reject Timeout (REJECT TO)
Maximum time the LLC2 protocol will wait for a reject response
after issuing a reject command.
LLC2 Keep-Alive Timeout (KA TO)
Optional tool for detecting the status of an LLC2 connection.
74 FSU User Manual 61200.130L1-1
Page 89

Chapter 7. Configuring the Network Port
Figure 7-4
VT 100 Network Port LLC2 Options Menu
Local IP Address (LOCAL IP ADDR)
Enter the internet protocol (IP) address of the FSU Network port.
Subnet Mask
Enter the subnet number of the network formed by the FSU and
the other FRADs/routers across the frame relay network.
Transmit RIP Requests (XMIT RIP)
Enable or disable the FSU's transmission of routing information
protocol (RIP) messages. RIP broadcasts occur in 60 second
intervals, advertising network addresses to the peer routers or
FRADs. Routing tables are generated from these broadcasts.
61200.130L1-1 FSU User Manual 75
Page 90

Chapter 7. Configuring the Network Port
Process Received RIP Packets
Enable or disable the FSU's reply to the request from the peer
routers or FRADs to issue RIP messages.
Priority Queue Ration (N:1)
Define the ratio that SDLC frames have over other protocols.
SDLC protocols are processed each time the network port
transmitter is serviced. Other protocols are processed every N
times the SDLC protocol is processed. Set to 1 to enable equal
priority.
76 FSU User Manual 61200.130L1-1
Page 91

IP ROUTING WITH THE FSU
The FSU contains an IP router function to resolve paths for IP
packets received. This function is used regardless of encapsulation protocol and port received from.
The heart of the routing system is a routing table which can be
generated manually, automatically, or a combination of the two.
Manual entry is preferred in cases where there are few routes.
This minimizes traffic created by routing protocols used in the
automatic method. The automatic method cuts down on manual
entry for large route tables and allows for routes to be changed
without service interruption.
Chapter 8. IP Routing
Chapter 8
IP Routing
Another important element in routing is the default gateway
route. This is used while routes are being formed automatically
and is a convenient way to direct all IP packets in cases where
only one route is needed.
Routing internet protocol (RIP) can be enabled for each port
configured for IP encapsulation. The Tx RIP parameter enables
the FSU to share the internal routing table with other routers and
FRADs attached to the port. The Rx RIP parameter enables the
FSU to process routing table information from other routers and
FRADs attached to the port.
In addition to RIP, the network port uses inverse ARP (RFC 1490)
to associate peer router/FRAD IP addresses to PVC addresses.
61200.130L1-1 FSU User Manual 77
Page 92

Chapter 8. IP Routing
The FSU can also respond to requests from peer routers/FRADs
seeking an association for their tables. The transmit and receive
inverse ARP section can be independently enabled.
Access IP Routing selections by first choosing 1 CONFIGURATION from the Main menu. Then choose IP ROUTING from the
Configuration Menu. When using the VT 100 terminal interface,
the screen in Figure 8-1 will appear. Full menu trees for these
selections are shown in Figures 5-2 (Front Panel Configuration
Menu Tree) and 5-3 (VT 100 Configuration Menu Tree).
Figure 8-1
VT 100 IP Route Menu
78 FSU User Manual 61200.130L1-1
Page 93

IP Route Table
Chapter 8. IP Routing
Use these menu options to build a table of addresses for routing
data packets based on their IP address. When a packet with the
specified IP address is received, it is sent out through the selected port on the specified DLCI. See Figure 8-2.
The IP route table can be used in conjunction with RIP protocol
to provide routing paths for the entire IP network. If an IP
packet is received with a destination IP not located in the internal routing table (static or RIP), then the gateway route is used.
Figure 8-2
IP Routing Table Menu
61200.130L1-1 FSU User Manual 79
Page 94

Chapter 8. IP Routing
Example Route Table Entry
IP Address=192.239.232.0
Destination Port=Network Port
Destination DLCI=16
This example provides a route for IP address range 192.239.232.1
through 192.239.232.254 using the network port and virtual
circuit 16. See the following parameter descriptions.
IP Address (IP ADDR)
Enter the IP address to be routed. This entry identifies an
individual host or an entire subnet. To address an entire subnet,
enter a value with the host portion equal to 0.
Destination Port (DST PORT)
Select the port on the FSU used to transmit the packets with the
specified IP address.
Destination DLCI (DST DLCI)
Enter the virtual circuit to be used when the network port is part
of the destination IP path. This selection is only applicable if the
corresponding destination port element is set for Network port.
Edit Next Entry (NEXT Key on Front Panel)
Edit the next entry in the address table.
Edit Previous Entry (PREV Key on Front Panel)
Edit the previous entry in the address table.
Delete This Entry (DEL Key on Front Panel)
Delete the current entry in the address table.
Add New Entry (ADD Key on Front Panel)
Add a new entry to the address table.
80 FSU User Manual 61200.130L1-1
Page 95

Gateway IP Address (GW IP ADD)
Enter the Gateway IP address. If an IP packet with an unknown
IP address is received, the FSU sends it to the Gateway (which is
a router or another FRAD).
Gateway Port (GW PORT)
Enter the port from which the gateway can be reached.
Gateway DLCI (GW DLCI)
If the gateway port is set to Network, this parameter identifies
the virtual circuit used to reach the gateway.
Transmit ARP Requests (TX ARP)
This parameter enables the transmit portion of the network port
inverse ARP protocol. If enabled, inverse ARP messages will be
sent to every DLCI assigned to the network port each ARP
refresh time period and inverse ARP responses will be generated.
Chapter 8. IP Routing
Process Received ARP Packets (RX ARP)
This parameter enables the receive portion of the network port
inverse ARP protocol. If enabled, all inverse ARP messages
received are used to associate peer IP addresses with DLCI
values.
ARP Refresh Time (ARP REF)
Determine how often an inverse ARP request is sent to every
DLCI assigned to the network port.
ARP is used in conjunction with RIP to dynamically resolve IP routes
and should be enabled if RIP is enabled.
61200.130L1-1 FSU User Manual 81
Page 96

Chapter 8. IP Routing
82 FSU User Manual 61200.130L1-1
Page 97

SYSTEM CONFIG
Chapter 9. System Configuration
Chapter 9
System Configuration
Access System Configuration selections by first choosing 1
CONFIGURATION from the Main menu. Then choose SYSTEM
CONFIGURATION from the Configuration Menu. Full menu
trees for the System Configuration selections are shown in
Figures 5-2 (Front Panel Configuration Menu Tree) and 5-3 (VT 100
Configuration Menu Tree). The VT 100 System Configuration
menu is shown in Figure 9-1.
61200.130L1-1 FSU User Manual 83
Page 98
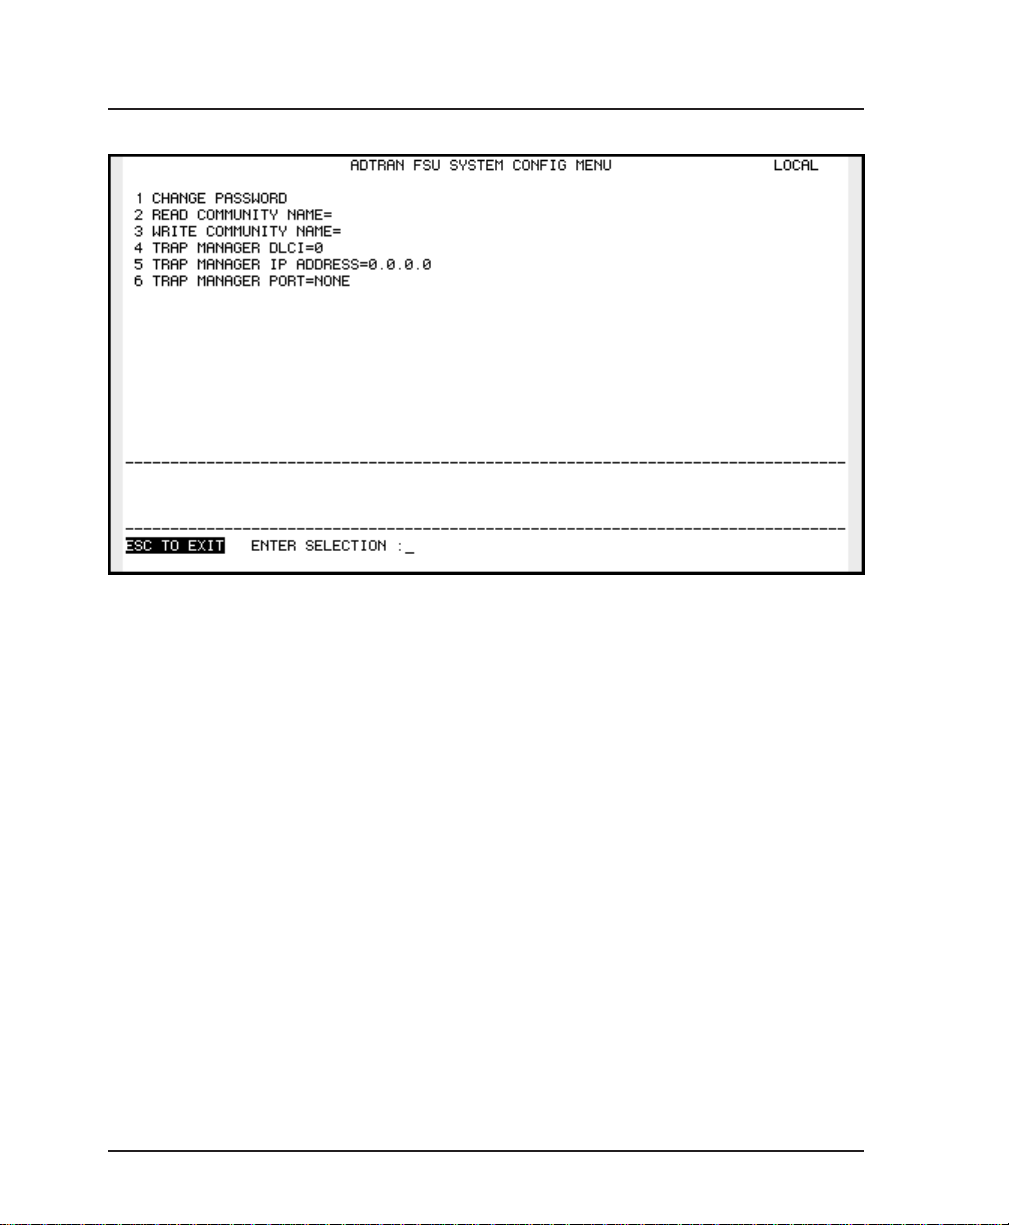
Chapter 9. System Configuration
Change Password
Figure 9-1
System Configuration Menu
Enter a new password of nine digits or less. The default password is adtran.
Read Community Name (RD COM NAME)
Enter the authentication strings used for SNMP management.
Match the FSU to the SNMP manager for read privileges.
Write Community Name (WR COM NAME)
Enter the authentication strings used for SNMP management.
Match the FSU to the SNMP manager for write privileges.
84 FSU User Manual 61200.130L1-1
Page 99

Trap Manager DLCI (TRAP DLCI)
If the trap manager port is set for Network, this parameter
identifies the virtual circuit used for all traps generated by the
FSU.
Trap Manager IP Address (TRAP IP ADDR)
Enter the IP address of the SNMP manager to which the FSU
sends traps.
Trap Manager Port (TRAP PORT)
Enter the FSU port number used to transmit traps to the SNMP
manager.
Chapter 9. System Configuration
61200.130L1-1 FSU User Manual 85
Page 100

Chapter 9. System Configuration
86 FSU User Manual 61200.130L1-1
 Loading...