

Page 1

TM
TM
Inside:
- Introduction
- Getting Started
- Using adManage
- Using autoDialer
ad
Manage
Traff i c & M e dia M ana g e men t App l i cat i o n
Operations Manual
purely digital
cr ea te . mo ve . pl ay . save.
Page 2

Intentionally Left Blank
Page 3

© 2004-2006 Adtec Digital All rights reserved.
This document may not, in whole or in part, be copied, photocopied,
reproduced and translated, or reduced to any electronic medium or
machine-readable form without prior consent in writing from Adtec
Digital.
All examples with names, company names, or companies that appear
in this manual are imaginary and do not refer to, or portray, in name or
substance, any actual names, companies, entities, or institutions. Any
resemblance to any real person, company, entity, or institution is purely
coincidental.
Every effort has been made to ensure the accuracy of this manual.
However, Adtec Digital makes no warranties with respect to this
documentation and disclaims any implied warranties of merchantability
and fitness for a particular purpose. Adtec Digital shall not be liable for
any errors or for incidental or consequential damages in connection
with the furnishing, performance, or use of this manual or the examples
herein. The information in this document is subject to change without
notice.
Trademarks
adManage™ is a trademark of Adtec Digital. Other product and company
names may be trademarks or registered trademarks of their respective
companies.
Document Name: admanage_1106
Page 4

Table of Contents
Chapter 1 - Introduction ............................................ 4
Overview ..............................................................
Applications ...........................................................4
Benefits ................................................................
Feature Highlights ..................................................
Availability ...........................................................
Options .................................................................5
Client Requirements ...............................................
Chapter 2 - Getting Started ........................................ 6
Logging Into adManage ...........................................6
User Accounts ........................................................6
Headend Setup ......................................................8
Channel Setup .......................................................9
System Configuration ...........................................
FCMP .................................................................. 12
Chapter 3 - Using adManage ..................................... 14
TBGS Server and adManage Services .....................
Alarm Service: ............................................... 14
File Backup Service: ....................................... 14
Content Service: ............................................. 14
Merger Service: .............................................. 14
MVL Service: .................................................. 14
RDY Service: .................................................
Scheduling .......................................................... 14
Ad Copy: .......................................................
Local Schedules: ............................................14
Interconnect Schedules: .................................15
Merging Schedules: ........................................ 15
Verifications: .................................................
Ready Files
MVL Files: ...................................................... 15
Content Management ........................................... 15
Missing: ........................................................ 15
Drive Status: ..................................................
: ................................................... 15
10
14
14
14
15
16
Purge: ........................................................... 16
4
4
4
5
5
Chapter 4 - Using autoDialer .................................... 24
Appendix .................................................................. 28
Evergreen: .....................................................
System MVL: ..................................................
Alarm Management .............................................. 18
Alarm Status: ................................................18
Suggested Use for Alarm Rules .............................. 18
Alarm Rules: ..................................................
User Rule Assignment: .................................... 22
Client PC Installation ............................................24
Initial Setup ........................................................ 24
TBGS ............................................................25
Client PC ........................................................ 25
Configuration .......................................................
Automated Functions: .....................................
Using AutoDialer ..................................................
Manual Functions: .......................................... 27
Manual Function Variables: ...............................
A - Contacting Customer Support ....................29
B - Ad Insertion Enterprise Solution .................. 32
B1 - Traffic & Billing Central ............................... 34
B2 - Connected Headend ...................................35
B3 - Satellite Serviced Headend .........................36
B4 - Disconnected Headend ............................... 37
C - CCMS Schedule Format .............................. 38
D - Verification Status Codes ............................39
E - Upgrading adManage ................................. 40
F - adVantage System Troubleshooting ............. 42
G - FAQ .........................................................44
H - Standard Operating Procedures ................... 47
17
17
21
25
26
26
27
Page 5
Page 6

Chapter 1 - Introduction
Overview
The Traffic & Billing Gateway Server and adManage Control
application is at the core of the Adtec adVantage Enterprise Ad Insertion
Solution. adManage coordinates the complex flow of media and data
across the enterprise and streamlines the process of getting the
right ads, schedules and verifications to the right places at the right
times, resulting in high customer satisfaction levels and increased
revenues. Cable and Broadcast operators looking for a turnkey content
management solution will find unmatched value in the powerful server
architecture, SQL database and full complement of user definable
alarms providing notification via e-mail, text messaging, paging as well
as visual alarming via the browser.
Applications
• Cable Digital Ad Insertion: In a cable ad insertion enterprise,
there are likely to be several different types of headends with varying
levels of connectivity available. From networked LAN/WAN to satellite
to disconnected remote, the TBGS with adManage can bring them all
together seamlessly. Compatibility with other ad insertion systems is
standard innovation at Adtec.
• Broadcast Digital Ad Insertion: The TBGS and adMantage
supports the broadcaster, whether the channel is analog, serial
digital or all digital. Ad insertion is performed by Adtec’s scalable
single-channel Duet or Duet-SDI. Since each Duet is a single-channel
modular unit that is totally self-contained, the system is fault tolerant
by design.
• Digital Program Insertion into Transport Streams: For the
all-digital headend, adManage transparently delivers media and
schedules and retrieves verifications and status monitoring in the DPI
environment just as in any other type of headend. Adtec is compliant
with the Cable Labs VOD and SCTE encoding standards, ensuring
that your investment is future proof.
Benefits
• Centralized control and system monitoring for your whole
enterprise.
• Prioritized content management distribution to get commercials
where they are needed next.
• Alarm Status via email, text messaging or paging so you are
always informed of what is going on.
• Real time system status of insertion verifications.
• Support hundreds of channels at multiple headends so the system
grows with your needs.
Feature Highlights
• Media Management with missing content monitoring.
• Interconnect commercial ad insertion with media management,
schedule merging and verification splitting between interconnect and
local T&B.
• Schedule management
• Verification management
• Log File and Ready File management
• SQL Database interface for eyeMonitor
• Alarm management of email, pager and text messaging with user
defined rules based on time, date and system conditions.
• Browser interface gives access to adManage from any computer
on the network.
• Evergreen content to each headend for material that is always
available.
• autoDialer back channel redundancy for schedule distribution,
verification and log file retrieval from the headends and central
office. It can also be used with disconnected headends over dialup to
manage schedules and verifications.
• Purge content from a headend or from the whole system.
• Archive content / system management for future use.
• Premerge services import schedules from different sources and
update file names.
• Easily identify missing content from each ad inserter.
4
Chap t e r 1 - Int r o d ucti o n
Page 7

Availability
adManage is available as part of the Traffic Billing and Gateway
Server (TBGS).
Model Description
TBGS - 1RU
TBGS - 2RU
• 400 Watt power supply
• Two Hot Swap SATA hard drives
• Software RAID 1 (Mirroring)
> 160 GB storage capacity
• Dual Gigabit Ethernet NICs
• Pentium 4 Intel Server mother board
• Intel remote Server management
• Windows 2000 Server
• ServeU FTP Server
• mySQL Database
• Adtec adManage application
• Adtec autoDialer application
• Physical 19” x 1.7” x 25.7” 30 lbs.
• Dual 550 Watt Hot Swap power
supplies
• Four Hot Swap SATA hard drives
• Hardware RAID 5
> 400 GB storage capacity (1.5 TB
max)
• Dual Gigabit Ethernet NICs
• Pentium 4 Intel Server mother board
with 1GB RAM.
• Intel remote Server management
• Windows 2000 Server
• ServeU
• mySQL Database
• Adtec adManage application
• Adtec autoDialer application
• Physical 19” x 3.4” x 25.7” 35 Lbs.
Server
Option Description
FCMP
Adtec’s FCMP (File and Command
Multicast Protocol) software is an IP
address satellite delivery system to
distribute files to multiple headends.
Client Requirements
• Web Browser with JavaScript Enabled: Web Browsers Supported:
Microsoft Internet Explorer v5.0 or later; Firefox 1.0 or later;
• Javascript 2.0 or later.
• LAN/WAN connectivity to the TBGS.
This documentation reflects functionality of adManage version 2.5.4.
Options
Option Description
eyeMonitor
autoDialer
Adtec’s eyeMonitor software provides
an enterprise level view of all zones
and channels in real time on a single
screen. It provides a graphical status of
all headends and channels with detailed
analysis a click away.
The autoDialer application provides
redundancy for LAN or WAN schedule
distribution, verification and log file
retrieval from the headends and
central office. It can also be used with
disconnected headends to manage
schedules and verifications.
5Chap t e r 1 - Int r o d ucti o n
Page 8

Chapter 2 - Getting Started
Logging Into adManage
Once your Traffic and Billing Gateway Server is properly installed
you can log in and setup adManage.
Note: If you are using autoDialer or FCMP as part of the Adtec
adVantage solution, you will need to setup/configure those before
configuring adManage.
On the TBGS, browse to http://localhost for the adManage login
page. The default user name and password is.
User name: adtec
Password: none
Note: If using any other computer on the same network as the TBGS,
you will need to browser to http://hostname where the hostname is the
network host name or equal the IP address of the TBGS server.
To get started, you will need to setup user accounts, headends and
channels. It is also necessary to confirm your system configuration. If
you are using an FCMP server as part of your system, you will also need
to complete the FCMP setup panel. All of these settings are part of the
Configuration tab located in the navigation bar.
User Accounts
Within adManage you have the ability to create multiple users with
varying access and control within adManage. Users can additionally be
emailed and paged alarms as they are detected according to the rules
configured in adManage. Setting alarm rules and assigning those rules
to users is covered in Chapter 3 - Section - Alarm Management.
To add users, browse to Configuration > Users > Add a User. (Fig.
2.1)
Figure 2.1
The following fields are available for each user.
User Name: Login name for the user. 20 character limit.
User Password/Verify: Password for the user. 20 character limit.
User Level: Each user must be assigned a level of access. The options are:
Administrator - Administrators have full access to all functions within
adManage.
Standard - Standard users can use adMange but cannot make
configuration changes.
Guest - Guest users have read-only access.
Note: If using eyeMonitor or autoDialer software as part of you system,
note that the usernames, passwords and user levels assigned in
adManage are the same usernames, passwords and user levels to be
used with all software in the adVantage system.
6
Chap t e r 2 - Gett i n g Sta r t e d
Page 9

Email Host: The SMTP outgoing email host that should be used by adManage
to send emails to this user. Note that typically the same SMTP host can be
used for all users on the system.
Email Address: Email address for the user. This email address will be used
by the Alarm Service.
Requires Authentication: Indicates whether the SMTP server requires user
name and password authentication for sending emails using that host.
User Name: The SMTP server user name to use for authentication when
adManage sends emails.
Password: The SMTP server password to use for authentication when
adManage sends emails.
The following fields are available for any pager device available to that user.
Pager ID: Phone number for the paging terminal service used. Please check
with your pager provider for the terminal service telephone number which
should be used.
Pager Phone Number: Pager phone number for the user’s paging device.
Baud: Select the rate of data transmission specific to the pager. (Bits per
second. 300, 1200, 2400, 4800, 9600, 19200, 38400, 57600, 115200,
172800, 345600, 518400, 1036800)
Once you have added a user it is possible to edit or delete that
user by browsing to Configuration > Users and selecting either Edit or
Delete to proceed.
Parity: Select the error checking bit specific to the pager. (None, Odd, Even,
Mark, Space)
Type: Designate whether the pager is an alphanumeric or numeric pager.
Length: The maximum number of characters which can be received by a text
pager. (80, 120 characters).
Stop Bits: A stop bit signals the end of the data message to a paging
terminal. Select the stop bits specific to the pager. (1 , 2)
Data Bits: Data bits are the number of bits that hold the data to be
transferred over a modem connection to a pager terminal. Select the data bits
specific to the paging terminal. (7 , 8)
Delay: The paging terminal service delay in seconds.
Modem Comport: The serial communication port of the server which is used
to connect with the telephone modem. (Typically COM1).
7Chap t e r 2 - Gett i n g Sta r t e d
Page 10
Headend Setup
To add a headend, browse the navigation menu to Configuration >
Headend > Add a Headend. (Fig. 2.2)
Figure 2.2
Headend Password: The password for FTP and Telnet access for the
headend. The default is the word “none”.
Auto Merge: Auto Merge is the process for automatic schedule merging and
verification unmerging. The default setting is No. If you wish to begin adding
a headend that is not fully functional and want to avoid alarm activity, we
suggest setting the Auto Merge to no until the headend is up and running.
File Name Length: The length of the ad copy file name. As part of the auto
merge feature, schedule files are parsed in three formats.
20/20: 6 characters, right-justified, leading zeros
Ex. 00000123456 = 123456
Novar: 8 characters, right-justified, leading zeros
Ex. Novar typically comes in as 11 characters which has leading zeros
(00012345678 = 12345678)
Non-zero: variable length (max = 8), left-justified, trailing spaces
Ex. “01234 “ = 01234
Full Name: The full 11 character file name specified in the CCMS
schedule is used. (DPI applications only.)
The following fields are required for Headend Setup.
Headend ID: A three digit identifier for the headend. This number is
identified in the schedule file name from your traffic and billing system and
will be a value from 001-999. To locate this value, you should refer to the
file name structure of your schedules using MDDCCHHH.SCH. The number
represented by HHH is your Headend ID.
Headend Description: Description of the headend. You are limited to 255
characters. For management purposes, a short and concise description will
serve best.
Phone Number: The phone number of the modem used by autoDialer at the
headend. Format (000-000-0000) or if dialing for an outside line with a prefix
(9,1-000-0000)
Headend IP Address: The WAN Internet Protocol Address of the gateway
router at the headend.
Headend User Name: The user name for FTP and Telnet access for the
headend. The default is “adtec”.
8
Once you have added a headend it is possible to edit or delete that
headend by browsing to Configuration > Headend and selecting either
Edit or Delete to proceed.
Note: If you delete a headend, all channels assigned to that headend
will be deleted as well.
With a headend in place, you may begin adding channels.
Chap t e r 2 - Gett i n g Sta r t e d
Page 11
Channel Setup
To add a channel, browse the navigation menu to Configuration
> Channel > Add a Channel. (Fig. 2.3) You must select a headend
to add channels to. Single click on the desired headend. You will see
the Headend ID number appear at the top of the page. Complete the
following fields to add a channel to that headend.
Figure 2.3
The following fields are required for Channel Setup.
channel. It is identified in the file name structure of the Interconnect
schedules using MDDCCHHH.SCH. The number represented by CC is your
Interconnect channel ID.
Interconnect Channel Description: A description for the Interconnect
channel. ( ex. ESPN )
Note: When editing or entering a path as part of the channel setup, you
must use a trailing backslash “ \”
Channel Local Schedule Path: The source folder for local unmerged
schedules. The default location on the TBGS is: C:\TBGS\LocalSchedules\.
Channel Interconnect Schedule Path: The source folder for Interconnect
unmerged schedules. The default location on the TBGS is:
C:\TBGS\InterconnectSchedules\.
Local Verification Path: The location where the unmerge service places the
local verification files pulled from the ad inserters. These files are sent back to
your traffic and billing system. The default location on the TBGS is:
C:\TBGS\Verifications\Local\.
Interconnect Verification Path: The location where the unmerge service
places the Interconnect verification files pulled from the ad inserters. These
files are sent back to your Interconnect provider. The default location is:
C:\TBGS\Verifications\Interconnect\.
Channel ID: A two digit identifier. This number is identified in the schedule
file name from your traffic and billing system. It will be a value from 01-99.
To locate this value, you can refer to the file name structure of your schedules
using MDDCCHHH.SCH. The number represented by CC is your Channel ID.
Channel Description: Description of the channel. You are limited to 255
characters. The channel description should match the Duet unit name which
is limited to 4 characters.
Interconnect Headend ID: The three digit identifier that is logically
associated to the Interconnect schedules for a given provider. It is identified in
the file name structure of the Interconnect schedules using MDDCCHHH.SCH.
The number represented by HHH is your Interconnect headend ID.
Interconnect Headend Description: A description for the Interconnect
provider. ( ex. Headend 3 )
Interconnect Channel ID: The two digit indentifier of the Interconnect
IP Address: The IP address of the channel. Each channel has a unique IPA.
Interconnect - Enable/Disable: Select enable if using Interconnect
schedules and verifications. Select disable if ONLY using local schedules and
verifications.
Note: Disabling the Interconnect prior to applying changes will remove
any values you have entered for Interconnect Headend ID, Interconnect
Headend Description, Interconnect Channel ID, Interconnect Description
ID, Channel Interconnect Schedule Path and Interconnect Verification
Path.
Once you have added a channel it is possible to edit or delete that
channel by browsing to Configuration > Channel and selecting either
Edit or Delete to proceed. As channels are added, they are listed under
the specified headend. Each channel screen provides a headend tree
view on the left side of the screen.
9Chap t e r 2 - Gett i n g Sta r t e d
Page 12
System Configuration
To modify the default system configuration of adManange, you
will need to be an Administrator. Login and browse to Configuration >
System. (Fig. 2.4)
Content Archiving Variables
Content archiving is an automated process which moves old local
schedules, merged schedules and verifications to an archive folder on the
TBGS. This saves the files in case they are needed and also removes the
files from the active folder to prevent conflicts during the next calendar
year. These setting will be used for this automated process.
Archive Path: The location of media that has been user-defined as
archived media. To designate media as archived, you must be an
Administrator or Standard User.
The default is: C:\tbgs\Archive\
Archive Type: This setting defines the number of days that will pass prior
to archiving. The recommended setting is ‘60 Days’. This removes
schedules and verifications older than 60 days from the active folder to the
archive folder.
Archive Run Time: The daily run time for archiving. This is written in 24
hour format (ex. 13:32) The recommended setting is ‘03:00’ which
will run at 3:00am each morning.
Figure 2.4
Server Name: The TBGS server name. You can locate this by right-clicking
on the My Computer icon of the TBGS and selecting Properties. Select the
“Computer Name” tab and look for the “Full Computer Name” field. This value
is the server name.
Expiration Variables
These variables assist in maximizing the use of available disk space on
each ad inserter.
Expire Run Time: The daily run time for the Content Service. This is
written in 24 hour format (ex. 13:32) The recommended setting is
‘04:00’ which will run at 4:00am each morning.
Expire Type: This field defines which criteria to use when moving content
to the expired list. You can select one of the given variables (Unused in
30,60,90 or 180 days) or you can select to only use the content expire
time. The recommended setting is ’Unused in 60 days’. This setting
places commercials not used in the last 60 days or expiration dates which
have been exceeded and are not in the Evergreen section into the Expired
List. The Expired List is provided on the on the Content Management >
Purge or the Content Management > System MVL pages.
10
Pre Merge Variables
Pre Merge is an optional service of adManage that allows for local and
Interconnect schedules to be loaded prior to running the Merger Service.
The process creates schedule templates in the form of Interconnect
schedules to be used by the merging service. These fields configure this
service.
Pre Merge: The On/Off selection for the Pre Merge Service. The
recommended setting is ‘Off’.
Copy Local: Allows you to turn on/off copying of local schedules even if
the Interconnect schedules are missing. The recommended setting is
‘On’.
Copy Interconnect: Allows you to turn on/off copying of Interconnect
schedules even if the local schedules are missing. The recommended
setting is ‘On’.
Import Content Path: The location of the source media or ad copy for
the Pre-Merge Service. The default location on the TBGS is C:\TBGS\
ITContent\. The recommended setting is to leave this blank unless
interconnect is being used.
Import Local Schedule Path: The location of source local schedules for
the Pre-Merge Service. The recommended setting is to leave it blank.
Chap t e r 2 - Gett i n g Sta r t e d
Page 13

Over-write Local: This feature handles any scheduling conflicts that may
occur when merging local and Interconnect schedules. Enabling this feature
gives Interconnect scheduled content priority while disabling it gives local
scheduled content priority. The recommended setting is OFF unless
interconnect is being used.
Spot ID Prefix Key: This is used by the Pre Merge service to rename
ad files names to match the eight character naming scheme used in the
CCMS schedule. (See Appendix D for details on the CCMS Schedule) The
recommended setting is to leave this blank unless interconnect is
being used.
Export Schedule Template Path: The location of the pre merge
templates. The recommended setting is to leave this blank unless
interconnect is being used.
Default Paths
These paths are the default locations for the files used by adManage.
Note: When editing or entering a path as part of the system
configuration, you must use a trailing backslash “ \”
Local Schedules: The location of the raw unmerged local schedules. This
location is used by the Merger Service as the source for all local schedules.
The default is: C:\tbgs\LocalSchedules\
Verifications: The location of the verification files received from the ad
inserters after they have been processed by the Unmerge Service. They
are used for verifying inserted content and are retrieved by your traffic and
billing service.
The default is: C:\tbgs\Verifications\
Import Local Schedule Path: The source path to obtain local schedules
for the TBGS. The recommended setting is to leave this field
blank and to place your local schedules directly into the C:\tbgs\
LocalSchedules\ folder.
Export Local Verification Path: The destination path to an independent
server where local verifications are placed for further processing. It is used
by ITVerificationPreparationService. The recommended setting is to
leave this blank and retrieve the Local verifications directly from
c:\TBGS\Verifications\Local\.
Transaction Logs: The location of the RDY and LOG files received from
the ad inserters.
The default is: C:\tbgs\TransactionLogs\
Mirror List File: A mirror list file is a .MVL file created by adMange that
specifies the exact media contents to be held in each ad inserter within
a headend. These files are used by the solicitor unit at each headend for
scheduling, verification and media delivery.
The default is: C:\tbgs\MirrorListFiles\
MVL - 1 : The location of the local MPEG files to be deployed to the ad
inserters. It is used to store content for current and future distribution.
The default is: C:\TBGS\MasterVideoLibrary\
MVL - 2 : The location of the Interconnect MPEG files to be deployed
to the ad inserters. It is used to store content for current and future
distribution. This can be used for DPI ready encoded files as well.
The default is: C:\TBGS\MasterVideoLibrary2\
Verification Key Count: This is the total number of days to
allow eyeMonitor to view verifications. (Includes current day.) The
recommended setting is ‘7’.
Interconnect Schedules: The location of the raw unmerged Interconnect
schedules. This location is used by the Merger Service to merge local and
Interconnect schedules.
The default is: C:\tbgs\InterconnectSchedules\
Merged Schedules: The location for the merged schedules ready for
deployment to the ad inserters. These files are placed in this directory
by the Merger Service. They are merged schedules that include local and
Interconnect schedules.
The default is: C:\tbgs\MergedSchedules\
11Cha p t er 2 - Get t i n g Sta r t ed
Page 14
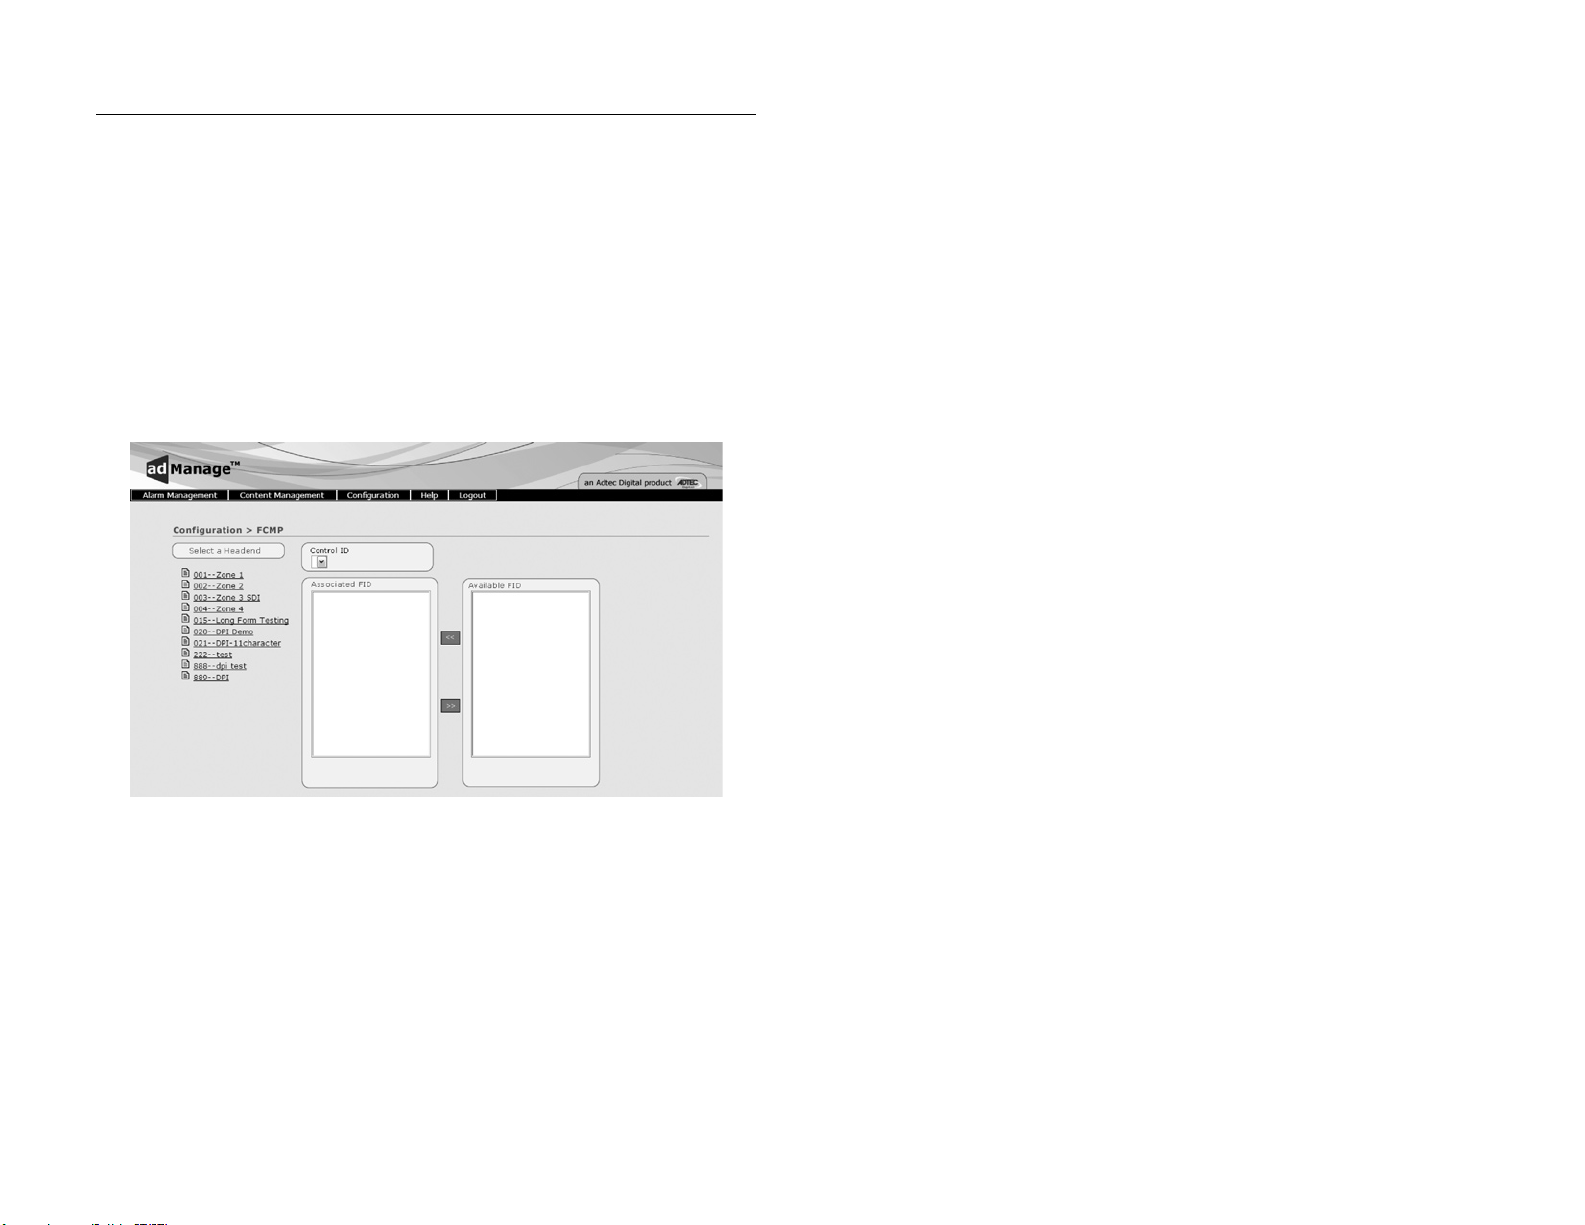
FCMP
FCMP
The configuration of FCMP is used when a FCMP server exists as a part of
the TBGS system. FCMP is an IP address satellite delivery system. It is used
to distribute the media, MVLs, and schedules to each headend. Current and
future schedules are used as a reference for a basic delivery list. Comparing
the basic delivery list to the RDY retreived by autoDialer, the Delivery service
creates a true delivery list of required files for each site. Once the delivery
list is created, the FCMP server will deliver this content directly to each edjeL.
The edjeL in turn EMTs the media and pass-throughs the MVL and schedules
to the duets at the headend.
To modify the FCMP configuration of a headend, browse to Configuration >
FCMP . (Figure 2.5)
The following fields are available for FCMP.
Select Headend: You must select a headend to assign a FID (FCMP ID) to.
Single click on the desired headend. Complete the following fields to configure
the FCMP setup for that headend.
Control ID: Select from the available options to specify the FCMP structure
you are configuring. (FCMP structures are defined and created by the FCMP
setup wizard)
Associated FID: The FCMP IDs already associated with that headend.
Available FID: The FCMP IDs available to the system.
12
Chap t e r 2 - Gett i n g Sta r t e d
Page 15
13Cha p t er 2 - Get t i n g Sta r t ed
Page 16

Chapter 3 - Using adManage
TBGS Server and adManage Services
Alarm Service:
The Alarm Service notifies the adManage users of system status,
critical problems and errors. Users are emailed or paged with alarms as
they are detected according to the rules configured in adManage. Refer
to the Alarm Management portion of this manual for a complete list of
alarms and troubleshooting assistance.
File Backup Service:
The file backup service will archive content as configured in
adManage.
Content Service:
The optional Content Expirations Service helps maximize the use
of available disk space on each ad inserter. This service runs once a
day, at a user defined time, to update the database concerning content
expiration. At the time the service runs, any spot that is 1 – 3 days old,
and is not used in today’s schedule or any loaded future schedule, is
listed as expired in the database. This information is used by the MVL
Service to update the content expiration list in the MVL file.
Merger Service:
The Merger Service automates the handling of schedules in a
local and/or interconnect environment. Schedules from each traffic
and billing program are placed in the appropriate directory on the
TBGS (C:\TBGS\LocalSchedules\ for local schedules and C:\TBGS\
InterconnectSchedules\ for Interconnect schedules.) The Merger
Service is constantly searching for new shedules throughout the day.
New schedules are located by comparing the Time/Date Stamps of
each file. When new schedules are found, they are merged and placed
in the merged schedules directory C:\TBGS\MergedSchedules\. Each
ad inserter periodically checks the merged schedules directory for new
files, and loads or re-loads the file as needed. If the Merger Service
finds a schedule break conflict while merging, the Alarm Service is
notified. adManage users will then be notified according to the rules
setup in the Alarm Management section of adManage. If either the
Local or Interconnect schedule is missing, the Merger Service will move
the existing file into the merged schedules directory for loading. If the
missing file appears later, it will be merged and moved to the merged
schedules directory based on the date/time stamp of the file.
MVL Service:
The MVL Service automates the distribution of ad copy and
schedules. The MVL file, or Mirror List File, is created by the adManage
MVL Service. This file contains a list of all required ad copy for the
current day and up to seven days forward for all networks in each
headend. This file also stores the content expiration list. Only the
Solicitor of each headend uses the MVL file to pull content from the
TBGS. After retrieving ad copy from the TBGS, each Solicitor uses
Adtec’s Ethernet Multicast Transfer protocol to quickly transmit all spots
to all units in that headend, making them available to all channels.
Each time an inserter receives an updated MVL file, it will delete all
spots listed as expired. The spots remain on the TBGS in case they are
needed in the future.
RDY Service:
The RDY Service processes the .RDY Ready File created and
returned by each ad inserter.
The RDY file reports all loaded schedules, missing ad copy,
additional “unmanaged” ad copy and storage status of each ad inserter.
From Ready files, the RDY Service is able to report accurately the
content at each headend compared to the original .MVL file.
UnMerger Service:
The UnMerger Service automates the verification process in
an environment where Interconnect and local schedules exist. As
verification files are received by TBGS from the ad inserters, the
UnMerger Service separates the Interconnect and Local verification
records and writes them to the appropriate file and directory (C:\TBGS\
Verifications\Local\ for local verifications and C:\TBGS\Verifications\
Interconnect\ for Interconnect verifications.)
Scheduling
Ad Copy:
Local ads are encoded and copied into the MVL directory on the
TBGS (C:\TBGS\MasterVideoLibrary\). Interconnect ads are copied
to the MVL2 folder. (C:\TBGS\MasterVdeoLibrary2\). Ads which are
certified as DPI ready should be copied into the MVL2 folder.
Local Schedules:
Local Schedules are CCMS compatible .SCH files that are created
and stored locally. They contain a daily (24 hour) list of ad copy
scheduled to run on a specific headend channel. See Appendix D for
the CCMSS Schedule Format. As these files are loaded into the local
schedule directory (The default directory is C:\TBGS\LocalSchedules\ )
the TBGS creates a list of required ad copy for each site using the MVL
14
Chap t e r 3 - U s ing a d M anag e
Page 17

and Merger Services.
Interconnect Schedules:
Interconnect Schedules are CCMS compatible .SCH files provided
by an Interconnect provider. They contain a daily (24 hour) list of ad
copy scheduled to run on a specific headend channel. As these files are
loaded into the Interconnect schedule directory (The default directory is
C:\TBGS\InterconnectSchedules\ ) the TBGS creates a list of required ad
copy for each site using the MVL and Merger Services.
Merging Schedules:
Schedule merging is an automated service which handles the
schedules from a local or Interconnect environment. The Merger Service
runs behind the scenes once enabled. To enable merging, you will need
to set the Auto Merge setting to enable on the Configuration > System
page of adManage.
Verifications:
Verification files (.VER) are mirror images of schedule files and
include the results of that day’s inserts. As each break airs, fails, or
expires, the appropriate code for each spot is updated and written to the
verification file in the ad inserter. After each avail, the ad inserter will
send back the verification file to the TBGS so that it can be processed by
the UnMerger Service before being placed in the appropriate directory.
(See Appendix E for explanation of Verification Status Codes)
Ready Files:
Ready files (.RDY) files are created by the ad inserter which
specifies any missing content requested by a specific .MVL file. It also
reports any file located on the ad inserter that is unmanaged. These files
are used by the Alarm Service of adManage to monitor and distribute
alarms.
MVL Files:
The MVL file, or Mirror List File, is created by the adManage MVL
Service. This file contains a list of all required ad copy for the current
day and up to seven days forward for all networks in each headend. This
file also stores the content expiration list.
Content Management
The Content Management functionality of adManage allows
centralized control of your commercial insertion system. This includes
the TBGS server, adManage, eyeMonitor, and any ad inserter. A
complete illustration of Adtec’s adVantage Ad Insertion Solution is found
in Appendix B.
Missing:
Once you have logged into adManage, you will see that the initial
screen is the Missing Content page. You can also navigate to it through
Content Management > Missing (Figure 3.1)
Figure 3.1
The Missing Content section lists any media or schedule file
marked as missing by the ad inserter RDY file. RDY files are created
by the ad inserters and reported back to adManage typically every 10
minutes. You can sort through missing content by limiting the missing
content to a specific headend and a specific file.
Single click on one of the headends listed in the Headend Selection
list. Doing so will populate the Missing Content list box with all of the
missing content specific to that headend.
Once you highlight a specific file in the missing content list box,
the right panel grid will populate with the data specific to that file.
Above the grid, you will be given the headend information, a short
description of the missing content, the status of the content and the
location that it is missing from. The Missing From grid will display: the
headend and channel of the missing content, the file name of the RDY
file that reported it missing as well as the date/time stamp of that RDY
file. It also reports whether or not the file is physically located on the
TGBS and what the scheduling specifics are for the missing file.
15Cha p t er 3 - U sing a d Manag e
Page 18

Drive Status:
Drive Status is located at Content Management > Drive Status (Fig
3.2)
Figure 3.2
The Drive Status section provides drive status information on each
ad inserter that is part of the system. By selecting a headend from
the left panel of this screen, you can view the status of all inserters at
that headend. Each inserter is listed separately and you are given the
following stats on each;
The most recent .MVL file date/time stamp
Status
Channel ID
The most recent .RDY file date/time stamp
The most recent .VER file date/time stamp
The percentage of the drive filled
The number of files in use
Having access to this data allows you to monitor disk usage
information and help identify storage management issues. This data is
also available via the Run Rate Report Alarm.
Purge:
Purge is located at Content Management > Purge (Fig 3.3)
Figure 3.3
The process provided by the Purge section allows further content
management by marking files for deletion at the selected headend. Files
which can be purged are either unscheduled or expired. Unscheduled
files are commercials which are not on any schedule for the headend.
Exercise caution in purging unscheduled content because it could be
needed in the future.
adManage will suggest content which has either expired by date
or has not been used in a while for deletion. Note that purging files is
intentionally not automatic, you must review the expired list and select
which content you want to be purged. Unscheduled files are not in the
schedule list yet remain in the headend .MVL file.
Moving files from one of these lists to the purge list marks that file
“to be deleted” at that headend. To move these files, highlight them and
single-click on the double right arrow next to the corresponding box.
You will notice that the file is not immediately removed. Once the .MVL
file is compiled again for this headend the file will be removed. Checks
are performed contstantly throughout the day to see if a new MVL file
needs to be created.
If you find that you have mistakenly marked a file for purge, you
can remove it from the purge list by clicking on any left double arrow
button.
16
If you do not mange the content of the ad inserters, they will hold
excessive unmanaged content which will slow all reporting functions
down.
Chap t e r 3 - U s ing a d M anag e
Page 19

Evergreen:
Evergreen is located at Content Management > Evergreen (Fig
3.4)
System MVL:
System MVL is located at Content Management > System MVL (Fig
3.5)
Figure 3.4
adMange enables you to specify files as evergreen per headend.
These files become a permanent part of the MVL file for the headend
until it is removed by the user. This feature is useful with content that is
frequently used.
To designate material as evergreen, single-click on the headend
you wish to evergreen material for. You will see the headend name
appear at the top of the page. The types of files on this headend are
separated into three categories; Scheduled, UnScheduled and MVL.
Scheduled files include all files scheduled for today through 14 days.
Unscheduled files are not in the schedule list yet remain in the headend
MVL. MVL files are all files listed in the MVL. To view the MVL files, you
will need to load the MVL by clicking on the “Load MVL” button to the
left of the MVL list box. It may take some time to load in all the file
names depending on the number of files in that folder.
To designate any of these files as evergreen, highlight them in
the list box and single-click on the corresponding right double arrow to
move them to the evergeen list.
If you find that you have mistakenly marked a file for evergreen,
you can remove it from the evergreen list by clicking on any left double
arrow button.
Note: You must remove an item from the evergreen list before it can be
purged.
Figure 3.5
The System MVL section of the application assists you in managing
the System Master Video Library. This library is typically held on the
TBGS. To view the files in the library, you will need to load the MVL
by clicking on the “Load MVL” button. The secondary box, labeled
‘Expired’, contains all of content which has exceeded the expiration date
(or optionally has been unused for a configured period of time - 30,
60, 90, 180 days). This interface allows you to complete three types of
processes regarding Expired content and the MVL.
You can Purge & Archive a file which will mark the file for removal
from all headends and place it in the archive folder on your TBGS.
You can Purge & Delete a file which will mark the file for removal
from all headends and delete it from the TBGS.
Finally, you can Evergreeen the file for all Headends. This will add
the file name to the MVL for all headends that are part of the system.
Evergreen material becomes permanent for the headend until it is
removed from the evergreen list.
For each of these actions, you will need to confirm by clicking on
the “confirm” button. Each action must be completed separately.
17Cha p t er 3 - U sing a d Manag e
Page 20

Alarm Management
Alarm Status:
To view the current alarms, browse to Alarm Management >
Alarm Status (Fig. 3.6)
or updated, please move to troubleshooting procedures. This Alarm
would be useful for any traffic personnel wanting confirmation of the
movement of new/updated schedules, which is a necessity for the Duets
to retrieve them.
Merge Conflict
Description: Merge conflict occurred - Local and interconnect
spots are scheduled for the same avail time.
Suggested use: This alarm is used only in an interconnect
environment, to notify of a conflict when merging the two schedules
together. This alarm will be sent out in situations where scheduled
breaks exists n both schedules. If this alarm is received, reference the
schedule name in the alarm to troubleshoot your conflict. This Alarm
would be useful for any traffic personnel.
UnMerge
Description: UnMerge occurred - Status Only
Figu r e 3.6
To view all alarms that have registered in the past hour, click on
the “Current Alarms” button located at the top of the alarm grid. Alarm
Status gives you the ability to narrow the results for alarms using the
following criteria; Type, Date/Time, Headend ID, Channel ID, File
Name, and Notification Status.
There are 19 types of alarms. Refer to the following chart for
status and troubleshooting assistance.
Suggested Use for Alarm Rules
Merge
Description: Merge occurred - Status Only
Suggested use: This alarm is used to notify that the Local
schedules have been placed into the Merged Schedules folder via the
Merger Service. Use this for confirmation that new/updated schedules
have been moved to the merged schedule folder. This process must
happen in order for the Duets to see your new/updated schedules. After
you assign this alarm to a user, it will take 5 – 10 minutes after loading
the schedules from your traffic software to receive an alarm. If you
do not receive this status alarm and new schedules have been made
18
Suggested use: This alarm will notify that verifications have been
unmerged and are ready for billing. This Alarm would be useful for any
traffic personnel ready to bill the previous day.
Not Checked-In (*Highly Recommended Alarm*)
Description: Channel has not checked-in - The ad inserter has
not reported back an RDY file in the past hour, most likely caused by a
communication problem/interuption.
Suggested use: This alarm is used to notify that a Duet has not
logged into the TBGS in the past hour. Communication to the Duet must
be investigated and re-established if need be. The Duet must be able
to login to retrieve schedules and place verifications. This alarm should
be used and monitored to ensure constant/consistent communication to
the TBGS. This alarm would be useful for anyone managing Duets at the
headend and any IT specialist.
Chap t e r 3 - U s ing a d M anag e
Page 21

Check-In
Description: Channel checked-in - Status Only
Suggested use: This status alarm is used to notify that a Duet
has logged into the TBGS in the past hour. This can be used to confirm
a Duet(s) network health in the field. You can use this alarm for a
particular channel for troubleshooting. This alarm would be useful for
anyone managing Duets at the headend and any IT specialist . Because
under normal operation a lot of traffic will be generated by this alarm, it
is better to use the Not Check In alarm for exception management.
Missing Content (*Highly Recommended Alarm*)
Description: Channel missing content - The ad inserter is missing
commercials which are scheduled to play. Missing content is caused by
communication problems or the spots have not been ingested yet.
Suggested use: This alarm is used to notify of missing content
on the ad inserters. This alarm is specific to content that is currently
scheduled. This alarm would be useful for traffic personnel and
production personnel. Please use the Server Missing Content alarm
along with this alarm.
Obtained Schedule
Description: Channel obtained schedule - Status Only
Suggested use: This status alarm is used to notify that a Duet
has obtained a schedule from the TBGS. This can be used to confirm a
Duet(s) has retrieved a new or updated schedule. This alarm could be
used to ensure transfer of schedules from the Merged Schedules folder
to the Duets in the field. Because under normal operation a lot of traffic
will be generated by this alarm, it is better to use the Missing Schedule
alarm for exception management.
Missing Schedule (*Highly Recommended Alarm*)
Description: Channel missing schedule - The ad inserter is
missing a schedule.
Suggested use: This alarm is used to notify that a Duet(s) is
missing a schedule for today or the future. This alarm can be used to
confirm all future schedules are on the inserters. This Alarm would be
useful for any traffic personnel.
Obtained Content
Description: Channel obtained content - Status Only
Suggested use: This status alarm is used to notify of all or
particular content being retrieved by the inserters. This alarm is helpful
in confirming the transferring of new content to the inserters. This
status alarm would be useful for any traffic personnel.
No Netset Cue (*Highly Recommended Alarm*)
Description: Channel had no netset cue - The ad inserter did
not receive a cue to insert the commercial during the scheduled avail.
Typical causes could be DTMF tone a mismatch, schedule problems or
cue issues with the broadcast network.
Suggested use: This alarm is used to notify of channels missing
an insertion by no cue/tone. This alarm can be used to monitor for
consistent missed by no cue occurrences. This alarm would be useful
for all traffic personnel and anyone who manages Duets at the headend
level.
Missed By No Break
Description: Channel had a missed by no break - The unit is
missing a schedule.
Suggested use: This alarm is used to notify of channels missing
an insertion by no scheduled content for that break. This could be a
scheduling error or a missing schedule all together. This would be an
alarm which would require immediate investigation into the scheduling
of the inserter or Duet itself. This alarm would be useful for all traffic
personnel.
Missed by NO SPOT
Description: Channel had a missed by no spot - Ad is missing
from the commercial inserter. Refer to Missing Schedule Alarm and
Missing Content Alarm.
Suggested use: This alarm is used to notify of channels missing
an insertion by no spot/missing content. This alarm can be used to
determine if missing content is at the headend or inserter level. This
alarm would be useful for all traffic personnel.
19Cha p t er 3 - U sing a d Manag e
Page 22

Server Missing Content (*Highly Recommended Alarm*)
Description: TBGS is missing content - Scheduled ads have not
been ingested yet or placed in the Master Video Library on the MVL.
Suggested use: This alarm is used to notify of missing content
from the Master Video Library. This specifically is related to currently
scheduled content only. This alarm can be used for notification of
encoding needs or file transfer duties. This alarm would be useful for all
production personnel. If you are using the Adtec adCode media ingest
station as part of your system setup, any missing content from the
TBGS will automatically be listed within the adCode application.
Server Missing Local Schedules
Description: Gateway is missing local schedules
- Local schedules have not been copied into the folder.
- Schedule file names have the wrong format.
Suggested use: This alarm is used to notify of missing schedules
from the Local Schedules folder. The Local Schedules folder is where
your traffic and billing software transfers to upon completion of new/
updated schedules. This alarm can be used to notify that there is an
inserter that hasn’t been scheduled. This alarm would be useful for all
traffic personnel.
Suggested use: This status alarm will produce a report with
percentages for every channel at every headend. The report will
also note missing verifications as well. This report can be used by
all departments for a snapshot of the run rates of your ad-insertion
system. This status alarm would be useful for all personnel.
Service Status (*Highly Recommended Alarm*)
Description: Service Status
Suggested Use: This alarm will be issued is there this a Gateway
Service stop on the TBGS. All of the TBGS services are required to
maintain consistent and correct data for other alarms, adManage,
eyeMonitor, verification and schedule management processes. This
alarm would be useful for any and all personnel who use the adVantage
System.
Server Missing Interconnect Schedules
Gateway is missing Interconnect schedule
- Interconnect schedules have not been copied into the folder.
- Schedule file names have the wrong format.
Suggested use: This alarm is used only in an interconnect
environment to notify of missing schedules from the Interconnect
Schedules folder. The Interconnect Schedules folder is where your
traffic and billing software transfers to upon completion of new/updated
schedules. This alarm can be used to notify that there is an inserter
that hasn’t been scheduled. This alarm would be useful for all traffic
personnel.
Run Rate Report (*Highly Recommended Alarm*)
Description: Run Rates of you headend - Produces a report for all
current run rates at all currently configured headends
20
Chap t e r 3 - U s ing a d M anag e
Page 23

Alarm Rules:
To create alarm rules that can later be paired with users, you will
need browse to Alarm Management > Rules > Add a Rule. (Fig. 3.7)
Figu r e 3.7
The following fields are available for each rule.
Description: Description for the Rule. You are limited to 255 characters
Type: Select the type of Alarm that applies to this rule. For a complete list of
possible alarms and their meanings, refer to the previous pages.
Time On: Designate the time of day you want the rule active Format is 24
hour.
Time Off: Designate the time of day you do not want the rule active. Format
is 24 hour. To specify 24 hour coverage for a rule, select 00:00 as the Time On
and 00:00 as the Time Off.
Day Selection: Designate the number of days out to receive the alarm. For
example, if the Missing Schedules Rule is set to 0, the alarm would only notify
if the current day’s schedule was missing, If it were set to 6, it would notify
you of missing schedules for the current day through 6 days out.
Once you have added a rule it is possible to edit or delete that rule
by browsing to Alarm Management > Rules and selecting either Edit or
Delete to proceed.
Alarm Occurrences: Enter the number of times you want the alarm to occur
before you are notified of this alarm.
Active: Activates or deactivates the rule.
Days Active: Select the days you want to the rule to be active.
Headend: Select the Headends that this rule applies to. You can select all
headends or a specific headend.
Network: Select the Network/Channel that this rule applies to. You can
select all networks/channels or a specific network/channel.
File Name: You can select a specific file per rule.
Expires: Indicates whether or not the rule expires on a certain date.
Expiration Date: The date that the rule expires ( Format YYYY-MM-DD)
21Cha p t er 3 - U sing a d Manag e
Page 24

User Rule Assignment:
To assign alarm rules to system users, you will need browse to
Alarm Management > User Rule (Fig. 3.8)
Alarm Configuration:
To configure alarms, you will need browse to Alarm Management
> Configuration. (Fig. 3.9)
Figu r e 3.9
Figu r e 3.8
Select a Contact: You will need to select a contact or user to assign a rule to.
You will see the user’s name appear at the top of the screen.
Assigned Rules: The assigned rules panel will display all rules that have
been assigned to this user.
Available Rules: The available rules panel will display a list of all rules
available to the user.
To assign a rule to a user, highlight the user’s name. Select the
rule you wish to apply from the Available Rules list box and single-click
on the double left arrow to place it in the Assigned Rules list box. To
remove a rule, highlight the rule and single-click on the double right
arrow to place it in the available rule box.
Mapped Drive Time-out: The frequency to check for mapped drive failures.
Marked in minutes. The recommended setting is ‘10’.
Mapped Drive Retry: If a mapped drive failure is found, this designates how
often to recheck for failure. Marked in minutes. The recommended setting
is ‘10’.
Verification Time-out: The frequency to check for current verifications
failures. Marked in hours. The recommended setting is ‘1’.
Verification Retry: If a verification failure is found, this designates how often
to recheck to see if failure still exists. Marked in hours. The recommended
setting is ‘1’.
Ready Time-out: The frequency to check for current RDY file failures. Marked
in hours. The recommended setting is ‘1’.
Ready Retry Time-out: If a RDY file failure is found, this designates
how often to recheck to see if failure still exists. Marked in hours. The
recommended setting is ‘1’.
Schedule Check Time: The time to check for schedules to exist for next day.
Format is 24 hour (ex. 16:00) The recommended setting is ‘16:00’.
Schedule Retry: If a schedule failure is found, this designates how often to
22
Chap t e r 3 - U s ing a d M anag e
Page 25

recheck to see if failure still exists. Marked in hours. The recommended
setting is ‘1’.
No NetSet Check Time: The frequency to check for no netset cues. Marked
in hours. The recommended setting is ‘1’.
No NetSet Retry: If a no netset failure is found, this designates how often to
recheck to see if failure still exists. The recommended setting is ‘1’.
Ad Copy Time-out: The frequency to check for missing ad-copy. The
recommended setting is ‘1’.
Ad Copy Retry Interval: If an ad copy failure is found, this designates how
often to recheck to see if failure still exists. The recommended setting is
‘1’.
Email Host: The default email SMTP host to send alarm emails through as
configured in each user profile.
Example:mail.adtec.com
From Email Address: The email address from which emails will be sent.
Example: NashvilleTBGS@adtecinc.com
23Cha p t er 3 - U sing a d Manag e
Page 26

Chapter 4 - Using autoDialer
No Questions Asked Installation - This option will install autoDialer using
default settings.(Recommended method of installation)
autoDialer provides redundancy for adManage schedule
distribution, verification and log file retrieval from the headends
and central office. It can also be used with disconnected headends
to manage schedules and verifications. It communicates with each
headend and the adManage application via LAN/WAN or over a standard
dial up connection.
Client PC Installation
To install autoDialer on a client Windows PC (not the TBGS) you
will need to be on the same LAN/WAN as the TBGS and will need
to mapa network drive to the TBGS data folder before installing the
software.
To map a network drive:
1. Right click Start > Explore.
2. Enter \\IPA in the address field where IPA is the IP address of the TBGS
server. (Use the format XXX.XXX.XXX.XXX.)
3. Right click on the shared TBGS folder on the server and select
“Map Network Drive” from the drop down menu.
4. Enter a Drive letter. Use one that is available (typically Z:\) and
select “Reconnect at logon”.
You may now run the autoDialer software installer. The instructions
for Installing the software on a Client PC or the TBGS are the same.
To install autoDialer either insert the software CD on your
computer or double-click the install file if you have been provided one.
You will need to select one of the following four options for installation.
More Information - Provides you with release notes for the current version
and the ability to print them.
Select Components and Install - You may select which components of the
product you wish to install. You can run this option after an installation has
completed to add or remove components.
Advanced Options Installation - Allows you to designate specific folders for
the Program Files, Common Files and Start Menu items.
Do Not Install - Closes the install application.
Once you have completed the installation process, you will need
launch autoDialer and set several configuration values.
Initial Setup
Launch autoDialer by double-clicking the icon on the desktop or
browse to Start > All Programs > Adtec > autoDialer. Additionally,
you have the ability to launch autoDialer from within the eyeMonitor
application by going to Tools > Launch autoDialer. You will be
prompted to complete the Initial Setup. See Figure 4.2.
24
Figure 4.2
Figure 4.1
Chap t e r 4 - U s ing a u t oDia l e r
Page 27

TBGS
If you installed autoDialer on the TBGS, you will need to check the
box at the top of the initial screen “Installing on Server”. This will fill
the input boxes with the default Computer Name and Default Path.
Click on the Save button to save these settings.
Client PC
If you installed autoDialer on a Client PC, you will need to make
sure that the checkbox is not checked and then enter the correct
information for the IPA/Computer Name and the Data Path. Click on
the Save button to save these settings.
Configuration
To modify the autoDialer Program Configuration, browse to File >
Configuration. (Figure 4.3)
Note: All configured paths must end in a trailing backward slash.
TBGS Path: This is the drive letter of
the mapped drive from the TBGS on
the remote machine. If installed on
the Gateway Server, the path will just
be C:\tbgs\.
Notes: Use the format XXX.XXX.XXX.XXX when entering the IP Address.
If completing initial setup on a Client PC, the Data Path is the network
drive which you mapped prior to installation.
You will receive a message stating that you need to restart autoDialer
to verify your host settings. Click “OK” and then the “Close” button
on the Initial Setup screen. You will need to restart autoDialer.
Verification File: This is the
location of the verification
files. Recommended setting:
Verifications\
Log / RDY File DIR
Listing Content Expiration:
This is the location of the folder
containing the transactionlog
files. Recommended setting:
TransactionLogs\
Send Schedule: This folder
contains the merged schedules
Recommended setting:
MergedSchedules\
MVL File: The location of mirror
list files Recommended setting:
MirrorListFiles\
Figure 4.3
System Mode: The system mode defines what type of system the autoDialer
is used with. For standard enterprise commercial ad insertion, the system
mode is CCMS. When autoDialer is used as part of a Satellite Serviced
System, FCMP is used. You can also set/reset this value by browsing to File >
CCMS / FCMP. Recommended Setting: CCMS mode
25Cha p t er 4 - U sing a u toDi a l e r
Page 28

Automated Functions:
There are several processes that are set up to function automatically
without user initiation when the autoDialer application is running.. You will
need to set some configuration variable for these processes.
Send Schedule: This is an automated function that will send schedules to
all units at every headend connected to the system at a scheduled interval.
The default setting is Disabled or turned off but can be set to run at many
different times to better suit your needs. Recommended Setting: Disabled.
autoDialer should only be used on an exception basis to send schedules .
Retrieve Verifications: This is an automated function that will allow the
scheduled retrieval of verifications for all units at every headend connected to
the system. The default setting is Disabled but can be configured to run at
varying intervals. Recommended Setting: Disabled. autoDialer should only
be used on an exception basis to retrieve verifications.
Tries: This is the number of times the program will attempt to perform a
scheduled task before progressing on the next channel / headend. (max is 8)
Get Directory Listing: Setting only applies to FCPM System Mode
Configurations. This is an automated function that will retrieve a directory
listing from all units at every headend connected to the system. The default
setting is 4 times a day but can be configured to run at different times to
better suit your needs.
Using AutoDialer
The main autoDialer screen (figure 4.4) allows you to view and control the
connection process between the application and each headend. autoDialer will
first use the LAN connection as configured for that channel in adManage. If
the LAN does not connect, autoDailer will use the configured dialup connection
to the headend.
26
Figure 4.4
Chap t e r 4 - U s ing a u t oDia l e r
Page 29

Manual Functions:
Manual Function Variables:
Get Verification: This function will retrieve the verification file from a
channel, headend, or all channels and headends connected to the system
within specified date range and place it in the verifications folder on the TBGS.
Get LFR: To use this you have to have the LFR function enabled. This
function will retrieve the LFR file from a channel, headend, or all channels and
headends connected to the system within specified date range
Get Log: Used in conjunction with the TRACE function of the inserters. This
function will retrieve the LOG file for a channel, headend, or all channels and
headends connected to the system within specified date range and place it in
the configured log folder on the TBGS
Get RDY: This function will retrieve the RDY file from a channel, headend,
or all channels and headends connected to the system within specified date
range and place it in the configured log folder on the TBGS
Get CCMS: This function will retrieve the RDY and the verification files from
a channel, headend, or all channels and headends connected to the system
within specified date range and place it in the appropriate folders on the
TBGS.
Send Schedule: This function will send schedules to a channel, headend, or
all channels and headends connected to the system within a specified date
range
Send CCMS: This function will send the MVL file and schedules for five days
to a channel, headend, or all channels and headends connected to the system.
Start Date: The beginning date in which to perform the manual function
selected.
End Date: The end date in which to perform the manual function selected.
Headend Selection: The headend in which to perform the manual function
selected.
Use the Headend button to the right of this field to perform the selected
function to the entire headend and all of its channels.
Use the All Headends button to perform the selected manual function to
all headends and channels connected to the system.
Channel Selection: The channel from the headend selection above in which
to perform the manual function selected.
Help > About: To determine the autodialer Program version, browse to Help
> About.
27Cha p t er 4 - U sing a u toDi a l e r
Page 30

Appendix
A - Contacting Customer Support..................................................pg.29
B - adVantage - The Adtec Ad Insertion Enterprise Solutions.............pg.32
B1 - Traffic & Billing Central............................................................pg.34
B2 - Connected Headend................................................................pg.35
B3 - Satellite Serviced Headend.......................................................pg.36
B4 - Disconnected Headend............................................................pg.37
C - CCMS Schedule Format...........................................................pg.38
D - Verification Status Codes........................................................pg.39
E - Upgrading adManage..............................................................pg.40
F - adVantage System Troubleshooting ..........................................pg.42
G - FAQ......................................................................................pg.44
H - Standard Operating Procedures (adVantage)..............................pg.47
28
Appe n d ix
Page 31

A - Contacting Customer Support
Technical Support and Customer Service includes troubleshooting
product/system functional operations concerning Adtec equipment
,embedded systems and single device issues; Service Order generation,
processing and tracking; Warranty claim processing; and on-site
system evaluation and maintenance. Technical Support plans do not
include customer training programs. Programs incorporating customer
training are defined in the Training Services Policy. Customer Services
technicians provide limited instruction during a support call/email/fax in
order to facilitate checking for proper equipment operation.
Telephone and Email Support
Telephone: 615.256.6619
Email: support@adtecinc.com
Internet: www.adtecinc.com/supportrequest/
Adtec Digital offers telephone, email and fax support, warranty
and service related inquiries during normal business hours (9:00 AM
to 5:00PM Central Standard Time CST, Monday thru Friday, except
holidays. Support Requests can also be submitted on-line.
All inquiries will be processed in the order in which they are
received and by the criteria outlined in the Call Response Order.
Inquiries and inquiry responses made after 5:00 PM (CST) weekdays,
Saturday, Sunday or on an Adtec recognized holiday will be processed
the next business day in the order received.
Callers on hold and returned calls will be prioritized by the
following criteria:
• Priority-24 Subscription Customers
• Standard-Priority Subscription Customers
• All customers that have purchased Installation & Training, within 90 days of
the installation
• Adtec Certified Operators (ACO)
• Limited Level Support, Warranty & Service Requests
• Multi-device system installations that have purchased Installation & Training
from Adtec
• Distributors
• System Integrators
• Multi-device systems
• Single device users
Information needed for Support
To help expedite the troubleshooting process, please be prepared
to provide the following information to the support representative.
Product(s) affected: Please provide a list of the Adtec Products
involved including the Revision Number for each affected product.
Description of the Problem: Please include a detailed description
of the problem. Include the approximate time and day the problem
occurred, the spot ID of the material being inserted and what the
operator reported about the incident. It is also helpful to note any
recent changes to the system. More information is always better than
too little information.
Your Contact Data: Please include contact information so we
can reach you to discuss how to fix the problem, additional
troubleshooting steps that are required or to gather more complete
information regarding the problem. Please include your facility name
(or call letters), your name, title, email address, telephone number,
hours of work, and other contact persons if you are not available.
Advanced Support Plans
In addition to our basic Inquiry Response Policy, Adtec offers
two advanced levels of priority inquiry support: Standard-Priority
and Priority-24. The Standard-Priority & Priority-24 plans provide
guaranteed* response times with the Priority-24 plan offering after
hours and holiday support. Standard-Priority support is included with
the Adtec Certified Operator (ACO) training. Contact Adtec Sales to
upgrade your current support plan.
SUPPORT PLAN PRIORITY –24 STANDARD-
Hours 24 Hours/Day
Call Response
Time: Guaranty*
Discounted Site
Visits
Discounted Training
Repair Service:
Guaranty*
7 Days/Week
Same Day: 2
Hours (1st in
order of call list)
25% 10% None
25% 10% None
1 Day Turnaround 3 Day Turnaround
PRIORITY
“9 AM – 5 PM
(CST), Excluding
Weekends &
Holidays”
Same Day: 4
Hours (2nd in
order of call list)
LIMITED
9 AM – 5 PM
(CST) Excluding
Weekends &
Holidays
48 Hours
None
One month free service extension will be awarded if Adtec fails to
meet its service guarantee.
29App e n dix
Page 32

Standard-Priority Support Plan
Customers can improve upon our normal call processing times
and can expedite inquiry support responses through our subscription
Standard-Priority service plan. Under this plan all telephone inquiries
are guarantied** a telephone response of no more than 4 hours after
they are received (within the designated hours of operation). Telephone
inquiries received by 4:00 PM (CST) on weekdays, excluding Adtec
holidays are guarantied a same-day telephone response. However,
inquiry responses may be made after hours until 8:00 pm (CST).
Email and fax inquiries are limited in scope to normal business hours,
excluding holidays. Standard-Priority customers are entitled to a 10%
discount on site visit and training charges after the initial system/
product installation and training. Standard-Priority customers also
receive a 3-day turnaround time guaranty* on warranty and nonwarranty repairs on Adtec manufactured equipment, excluding Studio
Encoders.
Priority - 24 Support Plan (24 Hour)
In addition to our Standard-Support plan, after hours, weekend
and holiday support is available with the Priority-24 support plan. This
plan is a subscription only service available for service inquiries 24
hours a day, 7 days a week. All telephone inquiries are guarantied* a
telephone response of no more than 2 hours. Email and fax inquiries
are limited in scope to normal business hours, excluding holidays. Calls
after 5:00 PM will be forwarded to a Customer Services representative
on call. Priority-24 customers are entitled to a 25% discount on site
visit and training charges after the initial system/product installation
and training. Priority-24 customers also receive a 1- day turnaround
time guaranty* on warranty and non-warranty repairs on Adtec
manufactured equipment, excluding Studio Encoders.
30
Appe n d ix
Page 33

31App e n dix
Page 34

B - Ad Insertion Enterprise Solution
1 - adManage/TBGS
At the core of the adVantage solution is the TBGS traffic and billing gateway
server and the adManage software application. This is the gateway that invisibly
coordinates the complex flow of media and data across the enterprise. adManage
streamlines the process of getting the right ads, schedules and verifications
to the right places at the right times, resulting in high customer satisfaction
levels and increased revenues. The powerful server architecture and SQL
database offers rapid access to current data via the browser interface supporting
customized alarms with notification via paging, email or text messaging.
2 - Traffic and Billing
adManage merges local and interconnect schedules to create a master insertion
schedule for each channel at each headend. After commercials are played,
adManage creates and sends separate verification files to local and interconnect
traffic and billing systems facilitating seamless media and data management
across your enterprise.
3 - eyeMonitor
The eyeMonitor interface graphically displays the status of all headends and
channels in the enterprise on a single screen. It provides visibly better real time
status and highlights exceptions so that corrections can be easily made.
4 - autoDialer
The autoDialer application provides a back channel for schedule distribution
and verification retrieval over a simple phone line. This feature is essential for
disconnected remote headends and adds redundancy in networked headends, all
for the price of a phone call.
5 - adCode
New media is ingested and prepared by adCode and sent to adManage for
storage and distribution to the headends. Sources can be tapes, DVDs or over
FireWireTM from nonlinear editors. The architecture of adCode supports Cable
Labs VOD and SCTE encoding standards, an important aspect that future proofs
your investment. Use adCode to seamlessly bridge the transition from analog
and SDI digital insertion to DPI. adCode prepares the highest quality DPI ready
media in the industry. Compatibility with other ad insertion systems is standard
innovation at Adtec.
6 - Networked Headend
A networked headend has an existing broadband LAN/WAN connection, such
as a T1 line or cable modem. adManage uses this connection to send ads
and schedules and receive verifications and status monitoring. Ad insertion is
performed by Adtec’s scalable single-channel Duet or Duet-SDI. Since each Duet
is a single-channel modular unit that is totally self-contained, the system is fault
tolerant by design. Media distribution within the headend is invisibly performed
via multicast techniques making it available to all inserters all the time.
7 - Disconnected Remote Headend
What can you do when a headend is so small or remote that it has no economical
network connection and satellite is not an option? Media can be ingested by
adCode and burned onto a CD or DVD and sent to the headend where the disk is
simply placed into a Duet-DVD unit. The Duet-DVD automatically makes all the
ads available to every unit at the headend. At the remote headend, adManage
performs schedule distribution, status monitoring and verification retrieval over
standard phone lines (PTSN) via dial-up modem through autoDialer.
8 - Optional Satellite Serviced Headend
In headends without a network connection, media and data distribution can
easily be achieved via satellite. Here’s how it works. At the central office,
adManage sends the media and schedules to Adtec’s FCMP server which prepares
the data by adding forward error correction then multicasting it to the Adtec DTA3050 multiplexer for encapsulation and encrypting prior to the multicast uplink.
At each satellite headend, an Adtec edje-1123 with built-in satellite data receiver
unscrambles and distributes the media to the Duet, Duet-SDI or DPI-1200
units. At the satellite headend, adManage performs schedule distribution, status
monitoring and verification retrieval over a simple phone line with a dial-up
modem through autoDialer.
9 - Digital Program Insertion Option
Adtec’s DPI-1200 digital-into-transport (DIT) ad server takes the place of up
to twelve Duets. Designed for the all-digital headend, the DPI-1200 will deliver
seamless splicing effortlessly in concert with Duets in your analog systems.
The DPI-1200 can deliver up to twelve programs to the ad splicer. adManage
transparently delivers media and schedules and retrieves verifications and status
monitoring in the DPI environment just as in any other type of headend.
Headends
In an ad insertion enterprise, there are likely to be several different types of
headends with varying levels of connectivity available. From networked LAN/WAN
to satellite to disconnected remote, adManage can work with them all. Flexibly
better by design.
32
Appe n d ix
Page 35

33App e n dix
Page 36

B1 - Traffic & Billing Central
Page 37

B2 - Connected Headend
Page 38

B3 - Satellite Serviced Headend
Page 39

B4 - Disconnected Headend
Page 40

C - CCMS Schedule Format
Field # Field Name Bytes Description
A schedule file exists for each channel of insertion. The file name
will always be eight characters in length plus the three character
extension of SCH.
MDDCCHHH.SCH
M -
Represents month of intended airing.
Range 1 - C Ex. 1 = January, C = December
Hexadecimal format
DD -
Represents day of month of intended airing
Range 01-31 Ex. 05
CC -
Numeric identifier or Channel ID
Range 01-99
HHH -
Numeric identifier or Headend ID
Range 001- 099
The records within the SCH file follow the following format. Each
record is terminated by a carriage return and line feed. Each record
will all be at least 77 bytes in length. The fields of each record are
determined by its byte position. Each field is separated by a space
character. All times are formatted in military time.
The record format is as follows :
Field # Field Name Bytes Description
1
Event Type
1-3 Type of event defined by record
(LOI, REM,END, NUL)
4 Window Start Time 17-20 Time of day to begin window of
5 Window Duration
Time
6 Break Number Within
Window
7 Position Number
Within Break
8 Scheduled Length 35-40 Scheduled event length (formatted
9 Actual Aired Time 42-47 Actual aired time of day used in VER
10 Actual Aired Length 49-56 Actual aired length used in VER file
11 Actual Aired Position
Within Break
12 Spot Identification 62-72 T&Bs spot identification code used
13 Status Code 74-77 Completion status Code used in VER
14 Advertiser Name 79-110 Advertiser’s name as identified in T&B.
15 Advertiser Spot Name 112-131 Advertiser’s Spot Name as identified
16 Scheduled/Fill 133-136 Identifies the spot as either being
17 Traffic System
Reserved
18 User Defined 145-NNN For use in tracking other data.
22-25 Length of window of opportunity for
27-29 Break sequence number within
30-33 Position sequence number for event
58-60 Actual sequential position number that
138-143 Reserved for use by the Traffic System
opportunity for event to occur
(formatted - HHMM)
event to occur (formatted - HHMM)
window of opportunity for event to
occur
within break
- HHMMSS)
file. (Formatted HHMMSS)
(formatted - HHMMSSCC)
event occurred in. Used in VER file
by adManage as the commercial
file name. See Headend>File Name
Length configuration on how this spot
ID is converted into a file name.
file.(See Appendix E for definition of
Status Codes)
in T&B
scheduled contractually or used
as filler in order to complete a
commercial break.
adManage uses this field in Merged
schedules to identify the event line as
a local or interconnect event.
2 Scheduled Date 5-8 T&Bs approximation of the date
3 Scheduled Time 10-15 T&Bs approximation of the time of day
when the event will occur (formatted
- MMDD)
when the event will occur (formatted
- HHMMSS)
38
Appe n d ix
Page 41

D - Verification Status Codes
Status Code Definition Possible Cause
0001 Aired Successfully
0002 Generic Failed to Air The scheduled event was
0004 Failed, Bypass On
0006 Failed, Bad Video The video stalled during
0008 Failed, User Abort The active insert was aborted
0010 Failed, Device Not Ready Possible hard drive issue.
0012 Failed, Unknown Error If any stall conditions occur
0013 Failed, Time Out The break was closed before
0015 Failed, System Error Possible hardware failure.
0020 Failed, No Ad Copy in
Inserter
not run by the Duet. All
events are marked with a
0002 at the beginning of the
broadcast day. As the event
is run by the Duet, the status
code is changed to an actual
error code.
playback. The actual air time
will be updated.
1. File read errors occur
during playback from a bad
file or hard drive problem.
Try replacing the video file.
2. The VERIFYERRORLMT
threshold of decode errors
was exceeded. Try to reencode the file. See the Duet
manual for details.
by operator intervention.
The hard drive may not be
partitioned.
during playback, the spot will
not be verified, even if the
system was able to continue
after the stall condition. The
actual played length will be
updated in the VER file for
partial verifications.
all spots could be aired.
The commercial inserter did
not have the scheduled ad
copy to play. Causes include:
- Material not copied
into adManage
MasterVideoLibrary.
- The material is not in
the inserter because of a
communication error.
- The material is on the
headend PURGE list (see
Content Management Purge).
Status Code Definition Possible Cause
0023 Failed, No Cue in Window No cue was received in the
scheduled window. See
the Duet manual chapter
on Cue Methods for more
information.
39App e n dix
Page 42

E - Upgrading adManage
Notice: The instructions to upgrade adManage are intended for technical personnel only.
adManage is made up of several components including a SQL database, application services, and components in the Apache web server.
Application Services:
Service Name: Description: FileName: Notes:
AdtecAlarmVer1Service
AdtecFileBackupVer1Service Adtec File Backup Service AdtecFileBackupVer1Service.exe
AdtecContentVer2Service Adtec Content Ver1 Service AdtecGatewayContentVer2Service.exe
AdtecMergerVer1Service Adtec Merger Ver1 Service AdtecGatewayMergerVer1Service.exe
AdtecMVLVer2Service Adtec MVL Ver1 Service AdtecGatewayMVLVer2Service.exe
AdtecRDYVer2Service Adtec RDY Ver1 Service AdtecGatewayRDYVer2Service.exe
AdtecUnMergeVer2Service Adtec UnMerge Ver1 Service AdtecGatewayUnMergeVer2Service.exe
Uninstall the Old Services:
1. Log into the TBGS server as an administrator or Adtec User
2. Open the Windows Service Manager
(Windows 2000: Start>Settings>Control Panel>Administrative Tools>
Services)
(Windows 2003: Start> Control Panel> Administrative Tools> Services)
3. Right click on each of the above services and select Stop.
4. Open the adManage service installer application from
C:\Program Files\Adtec\Gateway\ServiceInstaller.exe
5. Enter the Service Name for each of the adManage services or select the
service name from the list on the left and click Uninstall.
NOTE: The name must exactly match the Service Name in the table above.
6. Close and re-open the Windows Services Manager to verify that all the
services are no longer installed.
7. Delete the adManage Service files from
C:\Program Files\Adtec\Gateway\
Adtec Alarm Service AdtecGatewayAlarmVer1Service.exe
Install the New Services:
1. Log into the TBGS server as an administrator or Adtec User.
2. Open the Windows Service Manager
(Windows 2000: Start>Settings>Control Panel>Administrative Tools>
Services)
(Windows 2003: Start> Control Panel> Administrative Tools> Services)
3. Make sure that the service(s) you are installing are not currently installed.
4. Copy the new adManage Service files to the folder
C:\Program Files\Adtec\Gateway\
5. Open the adManage service installer application from
C:\Program Files\Adtec\Gateway\ServiceInstaller.exe
6. Enter the Service Name and Description for each of the adManage services
and select the corresponding Service Path to each of the files or select the
service name from the list on the left and verify paths, then click Install.
NOTE: The name must exactly match the Service Name in the table above.
7. Close and re-open the Windows Services Manager.
8. Right click on each newly installed service and select Properties to make
the following changes:
General Tab > Startup Type = Automatic
Logon Tab > This Account: Browse and select Adtec with a password of
408adtec2231.
40
NOTE: If the service does not start correctly after restarting the server,
remove the service and restart the system before installing the service.
Appe n d ix
Page 43

adManage Database
Before you install a new database, make sure to back up your
current database. Steps to backup and/or restore your database are
below.
adManage Browser Files
The adManage browser is the actual pages and graphics that
display in the browser window. The browser page files are served up by
the Apache web server on the TBGS.
Backup Database
1. Log into the TBGS server as an administrator or Adtec User.
2. Open the Windows Service Manager
(Windows 2000: Start>Settings>Control Panel>Administrative Tools>
Services)
(Windows 2003: Start> Control Panel> Administrative Tools> Services)
3. Select the Adtec services, select Stop and verify that they have stopped.
4. - Open a MS DOS command prompt
- Type: cd\
- Type: mysqldump > C:\\backup.sql -u gatewayadmin -p
(you will be prompted for a password, the password is adtec)
Note: systemname.sql is the file name that will be created. This can
renamed, but spaces are not allowed and it must end in the .sql
extension. This file will be located on the local disc (C:) drive. Copy this
file to a backup location.
Restore Database
1. Log into the TBGS server as an administrator or Adtec User.
2. Open the Windows Service Manager
(Windows 2000: Start>Settings>Control Panel>Administrative Tools>
Services)
(Windows 2003: Start> Control Panel> Administrative Tools> Services)
3. Select the Adtec services, select Stop and verify that they have stopped.
4. - Open a MS DOS command prompt
- Type: cd\
- Type: mysql -u root -p
(you will be prompted for a password. It is 1root!)
- Locate the database backup.sql file
- Open the file and press ctrl + A to select all. Press ctrl + C to copy to
clipboard.
- Type: usegateway; then rightclick into the DOS window to past copied
text and press enter
5. Restart the server.
Install New Browser Files:
1. Log into the TBGS server as an administrator or Adtec User.
2. Open the Windows Service Manager
(Windows 2000: Start>Settings>Control Panel>Administrative Tools>
Services)
(Windows 2003: Start> Control Panel> Administrative Tools> Services)
3. Select the Apache service and select Stop.
4. Navigate to the C:\Program Files\Apache Group\Apache\modules\ folder
and delete the following:
- Delete the files folder
- Delete the mod_ScheduleMonitorApacheModule.so file
- Delete the Cache folder if it exists.
5. Navigate to the C:\Program Files\Apache Group\Apache\modules\ folder
and copy in the following:
- New the Apache\modules\files folder
- New Apache\modules\mod_ScheduleMonitorApacheModule.so file
6. Restart the server.
41App e n dix
Page 44

F - adVantage System Troubleshooting
The Advantage System is heavily dependent on network
communications between the central office where the TBGS server is
located and the remote headends. An understanding of networking
communications is required to effectively troubleshoot the networking
aspects of your adVantage system. Schedule delivery, verification
delivery, and MPEG delivery are all heavily dependent on your network.
You must maintain networking communication to each device for the
system to operate.
The system consist of eyeMonitor(for alarms and monitoring),
the TBGS(for distribution), adManage (for alarms and monitoring)
Symphony-Pro and autoDialer (as back up tools) and the Duets( for
insertion). After network integrity is confirmed, move to additional
troubleshooting steps as listed below.
Testing the communication between the TBGS and a unit should
be well understood. Any time a Network/Duet exhibits a problem, is
replaced, or is upgraded, communication must be confirmed. Each time
a Duet does not have a schedule or content, communications must be
confirmed. After communications, configurations must also be checked.
Configuration of networking routers, switches, Duets, and adManage
must also be confirmed.
General troubleshooting concepts:
1. Has anything changed?
- Check with your headend tech, traffic and your IT personnel.
2. Is adManage configured correctly?
- See Chapter 2 for correct configuration
3. Is the unit configured correctly?
- See Duet Manual Chapter 3, Chapter 6 and Appendix F
4. Is the unit cabled correctly?
- See Duet Manual Chapter 1, pg 9
5. Can you communicate with the unit over the network to and
from the TBGS?
- Ping the unit from the TBGS and then dial in to the unit and ping
the TBGS from the unit.
Network Troubleshooting
Networking communication problems can originate at the TBGS
Level, Head End Level or at the Duet Level.
Step 1 - TBGS Level
Is your TBGS running?
You should be able to log in and move from program to program.
Has anything in your network changed?
Suggestion: From the TBGS, confirm that the eyeMonitor
application matches the one you may have at your workstation. If
OK, then you have a networking problem between the TBGS and your
workstation PC. Check networking communications between central
office and cabling, router and switches using ping or trace route
commands.
Consider: Has anyone worked on your network? Check with your
system administrator. If the whole system is not reporting, reset the
server. If this does not remedy the problem, go to Step 2.
Step 2 - Head End Level
From the TBGS, can you PING the head end router or any of the
units at the head end in question? If so, then restart your eyeMonitor.
If that does not help, then physically check and reset your network
components at the headend such as cabling, switches, routers and
hubs.
Consider: Has anyone worked on your network or at the headend?
Check with your system administrator and headend tech. At the
Duet rack, check the network cabling and configuration and ability to
communicate to other units at the head end by ping. Also try to ping the
TBGS from the unit in question and other duets at the headend. If this
does not remedy the problem, go to Step 3.
Step 3 - Duet Level
From the TBGS, can you PING the Duet in question? If PING fails,
you may have a Windows problem and you must reboot the server. If
not, check your network components such as cabling, switches, routers
and hubs at the central office.
42
Consider: Has anyone worked on your network? Check with your
system administrator and headend tech.
If you can’t connect to your Duet over a network connection, use
your back up tool, Symphony-Pro, to dial into the unit to check for
operation, configuration and ability to communicate to other units at the
head end (via ping). Also try to ping the TBGS from the ad inserter in
question and other duets at the headend.
Appe n d ix
Page 45

If you can’t connect over modem, have your tech check the
network cabling and configuration and ability to communicate to other
units at the headend. (via ping) Also try to ping the TBGS from the
unit in question, the Gateway router and other duets at the headend.
Finally verify all of the network settings on the ad inserter including the
IP Address, the Gateway IP address and the Host IP Address. If you
unable to communicate, replace the Duet.
Scheduling, Verification and Insertion Troubleshooting
When a network is not working correctly, and discovered via
deficient run rates or monitoring tool, it can be one or a combination of
the following:
- Configuration
- Scheduling
- Cueing
Additional checks, especially if headend hardware has changed:
- Check headend and unit configuration in adManage.
- Check the corresponding configuration in the Duet.
- Check cue tone history in the Duet log or from front panel.
- Check the receiver to make sure you are getting tones.
- Check the cabling for cueing.
After everything is checked you should replace the Duet to see if
that resolves the issue.
Verification Troubleshooting
Is the time stamp of the RDY file in the RDY folder for that unit
relatively new? This indicates that the ad inserter is reporting back to
the TBGS, and that the verification portion of the system is working.
The RDY file updates itself every ad insertion Host Timer (usually
configured for every 20 minutes or 1200 seconds)
Only start the following checks and troubleshooting steps if you
have verified communication with the process as listed above.
Note: Verifications will always be deficient if communication is lost!
Scheduling Troubleshooting
- Has the needed schedule been put in the local schedules folder?
Has it merged into the merged schedules folder?
- Is the time stamp of the merged schedule for any given unit
newer then its corresponding scheduling in the local schedule folder? It
should be newer.
- Is the time stamp of the MVL file in the MVL folder for that head
end relatively new? The MVL file should be newer than the last schedule
placed in the Local or Interconnect folders which indicates that the
Scheduling portion of the adManage is working. The MVL file is updated
each time a new schedule is placed on the TBGS.
- Check the schedule on the ad inserter (Duet or DPI-1200). Is
the current schedule there? Is the schedule correct? You can check
the actual schedule loaded on the ad inserted by using the Symphony
Pro/ Conductor applet or by using an FTP program. If it is not current
or correct, immediately use the autoDialer back up tool to send the
schedule.
Is the timestamp of the VER file in the VER folder for that unit or
all units relatively new? This indicates that the ad inserter is reporting
back to the TBGS. The Ver file will update itself two minutes after each
insert. If you do not see a newer (timestamp) file then you may have a
networking communication issue.
43App e n dix
Page 46

G - FAQ
Why is my eyeMonitor black for a single network?
Verifications are automatically sent back to the TBGS server 2
minutes after each insert and at two minutes after midnight for each
network.
Possible Cause:
1. Verification not in verification folder or un-merged .VER folder
2. Hard drive is bad in Duet
3. Duet is not configured correctly (IP address, Host IP, Gateway IP etc.)
4. Cabling is not correct
5. No schedule is currently loaded for that network.
Solution Steps: Try these solution steps to resolve the issue.
- Close and restart eyeMonitor.
- Confirm that there is a schedule in local and merged folder.
- Confirm that the hard drive of the Duet is working by checking the Content
Management > Drive Status within adManage. Also do a UNITS command
from our terminal applet. Is should respond with each partition’s information.
If it does not, reset the Duet or reset the drive and restart the unit.
- Confirm that the Duet configured correctly? Check networking configuration
and channel ID.
Why is my eyeMonitor black for all networks?
Possible Cause:
1. Loss of network communication to the head end.
How do I test communications between a Duet in the field
and the TBGS?
From the TBGS server you must ping the IP Address of the Duet. If you
cannot PING it, then configurations and wiring must be checked. Try pinging
another unit in that head end for confirmation of a good connection to the
head end. If you cannot ping other units at the head end then networking
hardware may be the cause.
How do I check configurations in a Duet remotely?
Connect to the Duet using Symphony Pro. Use the terminal applet and
compare the configuration to either that of another duet in the same head
end of a master CMDAUTO file your team should have. If you can’t connect
remotely you must go to the head end and check from the front keypad or
by using a laptop. Configurations allow the Duets at the headends to work
with the central server or TBGS. Duets must have a CCHHH number and the
CMDAUTO file (Head End Specific) must be pushed to each unit. Once the
CMDAUTO file resides on the unit, the unit must be reset. This configures the
unit with settings that all of the units must have. (See Duet manual for more
configuration detail). The IP address, the GIP, the HIP, the CCHHH number,
the EMT setting, and making the avail times 00:00 must be done manually on
each unit.
How do I check configurations in AdManage?
After connecting to the AdManage HTML interface simply go to the
Configuration Tab to check both the Head end setup and the channel setup.
See your Advantage manual for further explanation.
Solution Steps:
- Close and restart eyeMonitor.
- Check the timestamp of the .VER in the TBGS? This will give you an
indication when the networking was still working.
- Reset the router or switch at the headend and the Main office.
- Confirm that the Duet is configured correctly, check networking configuration
settings?
- Confirm that the IP or other network-related setting have not been recently
changed for the TBGS?
44
How can I check to see if a spot aired using the TBGS?
To search for a spot airing, it is advised to use eyeMonitor for verification of
playback. One may also open the VER file for a given network in notepad and
use the Find tool, by spot name, to determine when a spot played. Symphony
can be used for some monitoring, but the Console and Verification applets are
not recommended.
Appe n d ix
Page 47

When are schedule, verification and other log files deleted
from the Duets?
The CCMS files for verifications (.VER), verification backup (.VBK), and log
filter (.LFR) will be automatically deleted by the same process that cleans
out old trace log files (.LOG). The TRACEFILESMAX option (TFM) sets the
maximum number of files to keep for each file type.
The schedule (.SCH) for the previous day is always deleted.
The ready report (.RDY), and the mirror list file
(.MVL) files are updated daily, and will only reside as one file on the drive.
How do I verify communications to a Duet in an adVantage
or TBGS system?
Ping the unit from the TBGS, if you can’t then reset the router in your
office and try again or dial into the head end and check the Duet for proper
configuration and functionality. If unable to, try pinging another Duet from
the TBGS to prove networking function to the head end.
The Duet does not have any MPEG files on it?
Are MPEG files or spots missing from the Duet? Check to see if it is configured
correctly, specifically for the CCHHH setting and the EMT setting.
Check to see if files for this unit are in the MVL, they need to be in the MVL for
at least 20 minutes** before it gets distributed to the head end and another
20 minutes** before it gets distributed to the other Duets at the head end.
Check connectivity to the Duet. See, How do I check connectivity to a Duet.
I added a unit at a headend - what do I do now?
You must modify the CCHHH number on the units. Also, when installing a new
head end or units, the CMDAUTO file must be pushed to each unit. Once the
CMDAUTO file resides on the unit, the unit must be reset. This configures the
unit with settings that all of the units must have. (See Duet manual for more
configuration detail. The IP address, the GIP, the CCHHH number, the EMT
setting, and making the avail times 00:00 must be done manually on each
unit.
Also try to ping the TBGS from the Duet in question and finally try to ping
the TBGS from another unit trying to prove two-way networking is OK. If it is
concentrate your efforts on the setup in adManage or the Duet hardware itself.
My Alarms are not set up: How do I do that?
See the Alarm Management section of this manual.
Why does an MPEG show up in my missing content section
of adManage?
Click on it. If it shows at least one Duet at a Headend is missing an MPEG
that is scheduled in the next 14 days, the spot is missing from the Duet.
Check to see if it is in the MVL. It will need to be in the MVL for at least 20
minutes** before it gets distributed to the headend and another 20 minutes**
before it gets distributed to the other Dusts at the headend .
** Dependent on network speed, latency and EMT speed
When does the Auto Backup service run?
Adtec Gateway database backup service should run every night at 3am.
When does the Auto Expiration service run?
This service should not be used. In adManage we provide a method to select
expired material and purge it from the duet manually.
Why do I see an Expiration date of 1899?
This is normal and indicates to the system that the content should never
expire.
How do files get loaded to my Duets from the MVL?
The MasterVideoLibrary on the TBGS is the master repository for
thousands of media files. The only way that these files are transferred
to the Duets is under the following conditions:
1. Scheduled: If the spots are placed on a schedule up to 14 days in the
future, adManage will update the .MVL file content management directive to
send the files to the Duet.
2. Evergreen: The new adManage and Duet 5/23/05 firmware or later
supports evergreen of material to the Duet. This will allow you to send media
to the duets even if it is not scheduled.
45App e n dix
Page 48

When do I need a Firmware/Software Upgrade?
As a general rule, if it isn’t broke don’t fix it. However if you have a problem
with your system please contact Adtec to see if a fix is available. Adtec does
add new features from time to time and if requested a firmware upgrade can
be provided for additional upgrade and training fees.
My Duets are missing their Schedules and MPEG content?
Make sure IP address, Host IP Address, Gateway IP address, Host Mode
CCMS, CCHHH #, and ClientUserPassword are correct. Each Duet in a location
must have the following:
ClientUserPassword: adtec,408adtec2231
(You can check this setting in terminal by typing cpw)
How do I set up/configure a new Duet for a TBGS System?
For the Duet:
1. Install Firmware. Firmware must be 3-18-04 or later. (BANNER command
or Select/Up arrow)
2. Check that the CCMS & AudioLevelControl feature keys are enabled (FEA
terminal command, FEA 13 and FEA 12).
Note: If ALC is being used, all wiring for audio must be using both channels.
Use a jumper if needed.
3. Set the CBD Network. Up arrow from there to NetSets Preset and hit Select
& Enter to setup the NetSets automatically. (Front Panel)
4. Make sure all Avail times in the Netsets are 00:00:00. CCMS mode uses
dynamic avails.
5. Give each inserter an IP Address, GIP Address (if any), and Host IP
Address. (Front Panel or Software)
6. Configure EMT Settings. (Front Panel or Software)
7. Send CMDAUTO.DVC file to each inserter. (Software only) or configure from
front key pad
8. Change the CCHHH setting to the Novar Channel # and Head end #. (Front
Panel or Software)
9. BE SURE TO SAVE CONFIGURATION. CFG SAVE in the Terminal Window.
10. Reset the Duet.
My MVL is not current and is not correct
Reason: You may have old Local Schedules and Merged Schedules, on the
TBGS for the previous year. Since old schedules have been processed, this
means that the MVL file includes old scheduled MPG’s. When the Duet goes
though the Mirroring process, it will look for these files and then report them
missing. The DUET may be searching for files that are no longer on the hard
drive or it is requesting more MPG’s that are not needed. It has to finish its
Mirroring process in order for it to look for a new MVL which can take a while.
Solution: Create a new folder for old schedules and by year and Archive
them Delete the .MVL file off the TBGS Verify your most recent schedules
are present. Delete the .MVL file in every unit at the headends. Allow it to
retrieve its new MVL.
Maintenance: Keep your old schedules archived so you don’t overlap years.
The MVL process looks forward 14 days for schedules. The MVL file is created
based on these schedules. The MVL service looks at the schedule file name
first then the time stamp to see if an updated schedule has been sent. Old
schedules have confused your units. It is imperative that you keep your old
schedules archived so you don’t overlap years.
TBGS Changes:
11. Add user, if needed, in ServU program: Give permissions by assign each
user a permissions group.
12. Don’t forget to make the changes in your Locations Applet in Symphony
Pro. Do this in both networking and dial-up locations.
13. Add Channel and/or headend in AdManage software.
46
Appe n d ix
Page 49

H - Standard Operating Procedures
Daily (Before T&B Verification)
1. Use eyeMonitor’s Verification Report to to confirm that all verifications
have been returned since the last billing cycle (marked Complete). determine
if there are any missing or partial verifications that will need to be retrieved
since the last time you verified. If verifications are missing or partial, correct
the issue or use autoDialer to get the final verification from the ad inserter.
2. Review Alarms assigned to you for corrective action.
Daily (All Day)
3. Use eyeMonitor’s Discrepancy Report to determine if there are any
outstanding error or cue issues that indicate insertion failures. Implement
corrective action for discrepancies.
4. Use eyeMonitor’s Headend Monitoring Zones to get a real time status of
all channels in each headend. To evaluate a run rate for a particular headend,
select any cell with in that headend and right click to navigate to Headend
Analysis.
5. Use the eyeMonitor Encode List Report (or the adCode encode list) and
encode all missing ad content.
Daily (After Schedules Are Created)
6. Use EyeMonitor’s Schedule Report to to confirm that all new schedules
are loaded in the ad inserters. Verify the time/date stamp of the schedule for
modified schedules.
7. Use the eyeMonitor Missing Content Report (or the adManage Content
Management > Missing) to determine if there are any spots missing or not
encoded for the schedules that are created. Correct any missing content
problems.
Monthly
1. Use adManage’s Content Management > Drive Status and Purge
Functions to maintain inserter drive health and efficiency.
2. Use adManage’s Content Management > System MVL to maintain the
Gateway Server’s drives and file maintenance.
3. Use adManage to setup Alarms for your users. You can assign any
alarm created to any user that has been setup.
Weekly
1. Use eyeMonitor’s Discrepancy Report to determine if there are any
outstanding error or cue issues for the system as well as any patters on
missed insertions
2. Use the eyeMonitor’s and adManage’s Run Rate percentage Alarms and
Reports to determine if any maintenance or adjustments need to be made to
improve overall performance.
3. Use adManage’s Content Management>Evergreen section to protect any
spots that you do not want to be deleted. This will protect the spot from any
type of deletion in adManage.
4. Verify that schedules and content are loaded for the weekend.
47App e n dix
Page 50

Corporate Headquarters & Domestic Sales USA
408 Russell Street
Nashville, TN 37206 USA
Tel.615.256.6619 Fax.615.256.6593
sales@adtecinc.com
International Sales
2231-3 Corporate Square Blvd.
Jacksonville, FL 32216-1921 USA
Tel. 904.394.0389 Fax. 904.421.0684
intlsales@adtecinc.com
Technical Support
Tel.615.256.6619 Fax.615.256.6593
www.adtecinc.com/support
support@adtecinc.com
www.adtecinc.com
 Loading...