

Page 1
QUICK CONSUMER BUSINESS
REFERENCE GUIDE
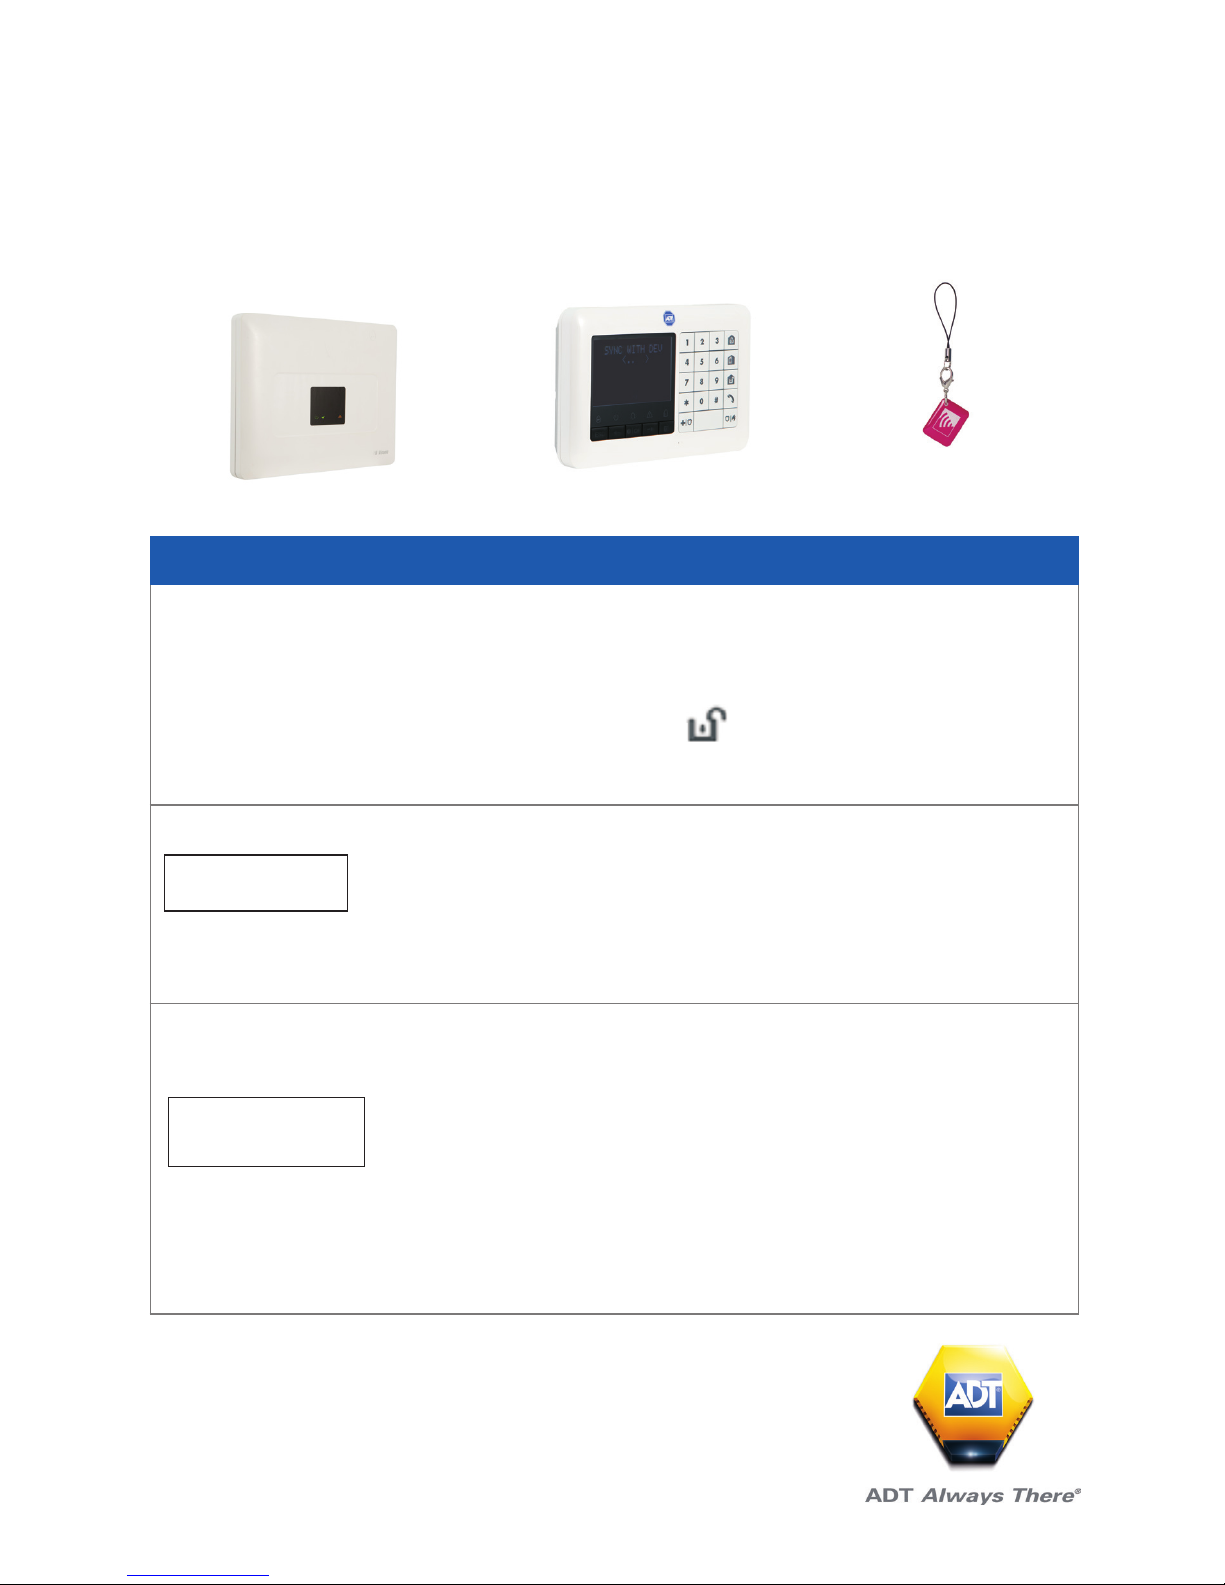
YOUR SYSTEM: ADT PM33 Commercial System
Starting to use the Alarm Panel and Keypad
1
Setting Your System
Step 1
When leaving your premises ensure that all protected doors/windows, including your
front door, are closed before setting your System.
As a security feature, the status of your System is hidden from view
To start using your System, push the “unset” key on your Keypad.
The Alarm Keypad is now lit and you are ready to start using your System, make sure
that READY is displayed on the Keypad.
Step 2
This indicates that all zones are secured and you may arm the System as desired.
Step 3
If at least one zone is open (disturbed) the display will read:
This indicates that the System is not ready for arming and in most cases that one or
more zones are not secured. However, it can also mean that an unresolved condition
exists such as certain trouble conditions, in this case call the customer service team
01–6205990.
PM33 Control Panel
Keyfob
KP-250 PG2 Keypad
HH:MM READY
HH:MM
NOT READY
Page 2
2
Setting Your System
To review the open zones click on the Keypad. The details and location
of the rst open zone detector (usually an open door or window sensor) will be
displayed. To x the open zone, locate the sensor and secure it (close the door or
window) – see “device locator” below. Each click of on the Keypad will
display another open zone or trouble indication. It is highly recommended to x the
open zone(s), thus restoring the System to the state of “ready to arm”. If you do not
know how to do this, consult your installer.
Note: To quit at any stage and to revert to the “READY” display, click on
the Keypad.
Device Locator: The PowerMaster System has a powerful device locator that helps
you to identify open or troubled devices indicated on the LCD display. While the LCD
displays an open or faulty device, the LED on the respective device ashes indicating
“it’s me”. The “it’s me” indication will appear on the device within max. 16 seconds
and will last for as long as the LCD displays the device.
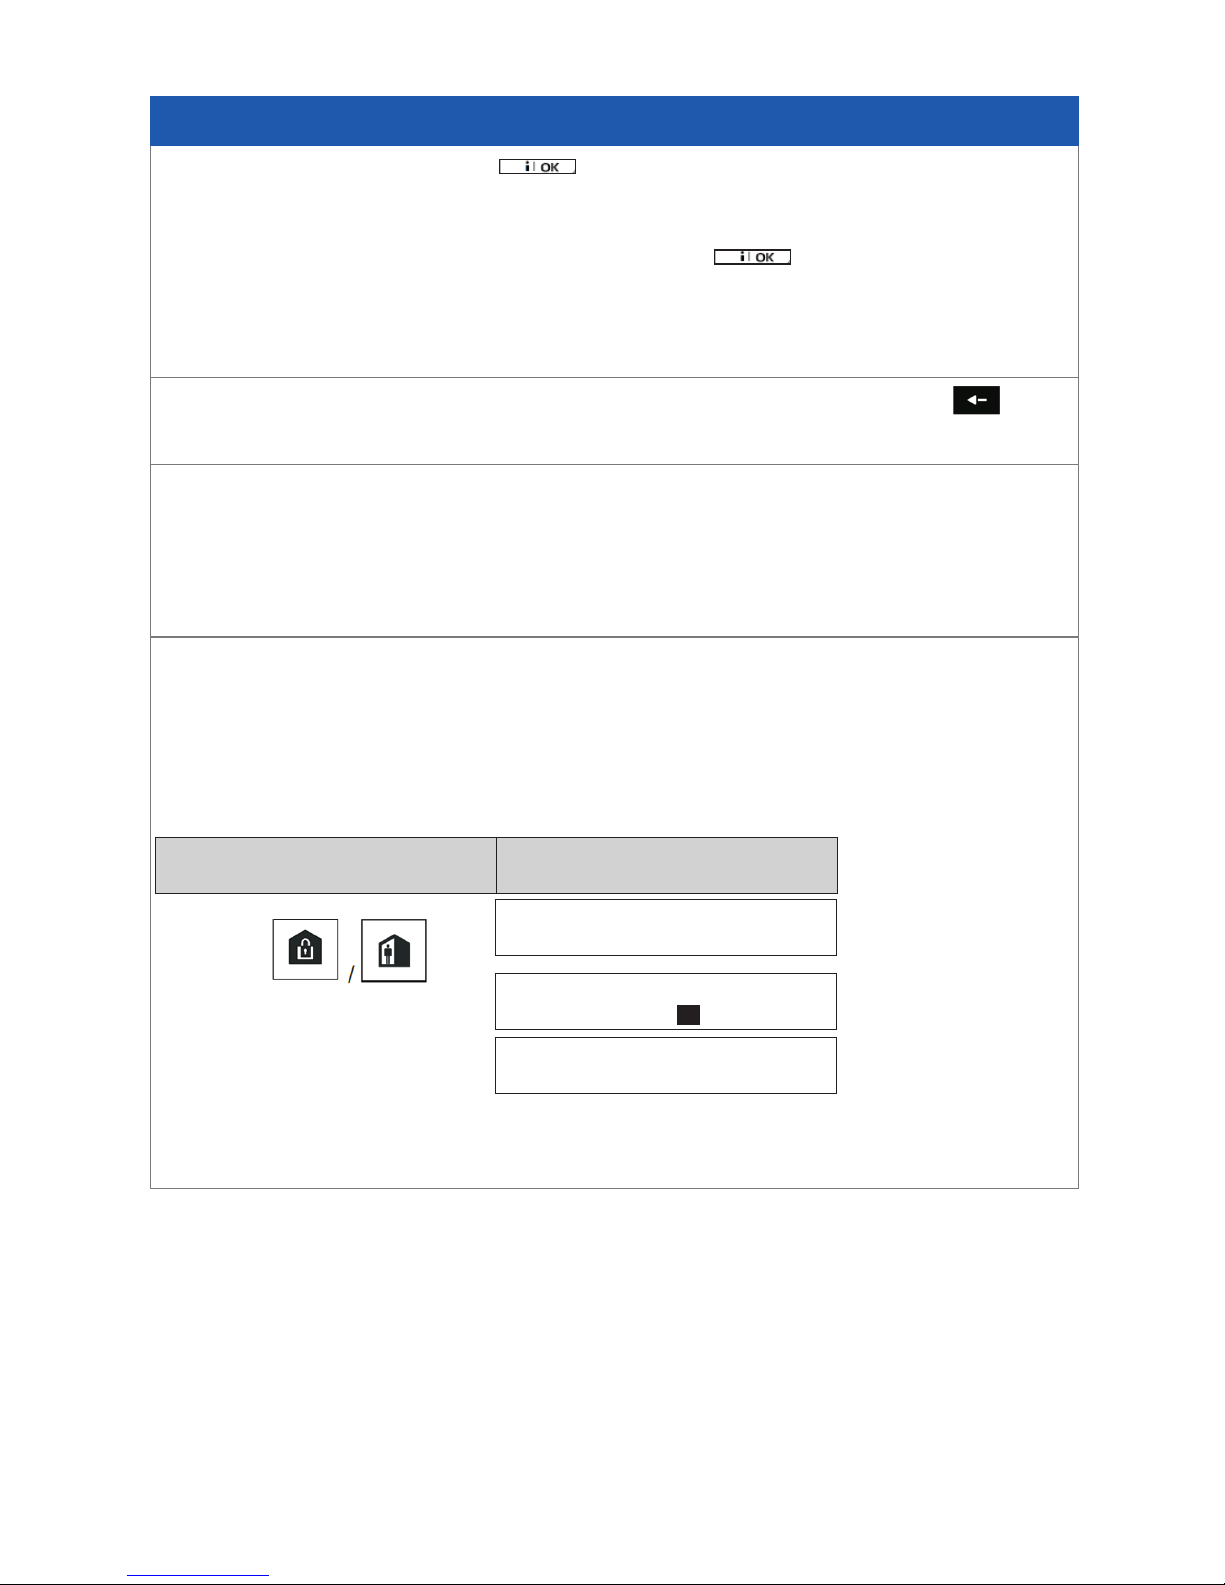
If the System is READY proceed as shown below.
If the System is NOT READY review any open zone detectors to locate and secure
them.
If you want to arm using partitions, see “Partition Selection Process” and then
proceed as shown below.
If Quick Arm is disabled
Vacate the premises (ARM AWAY) or ↓ (Exit delay) ↓
RESULTING DISPLAY PRESS
ARMING AWAY
PRESENT TAG OR
ENTER CODE: -----
PLEASE EXIT NOW
Page 3
Setting Your System
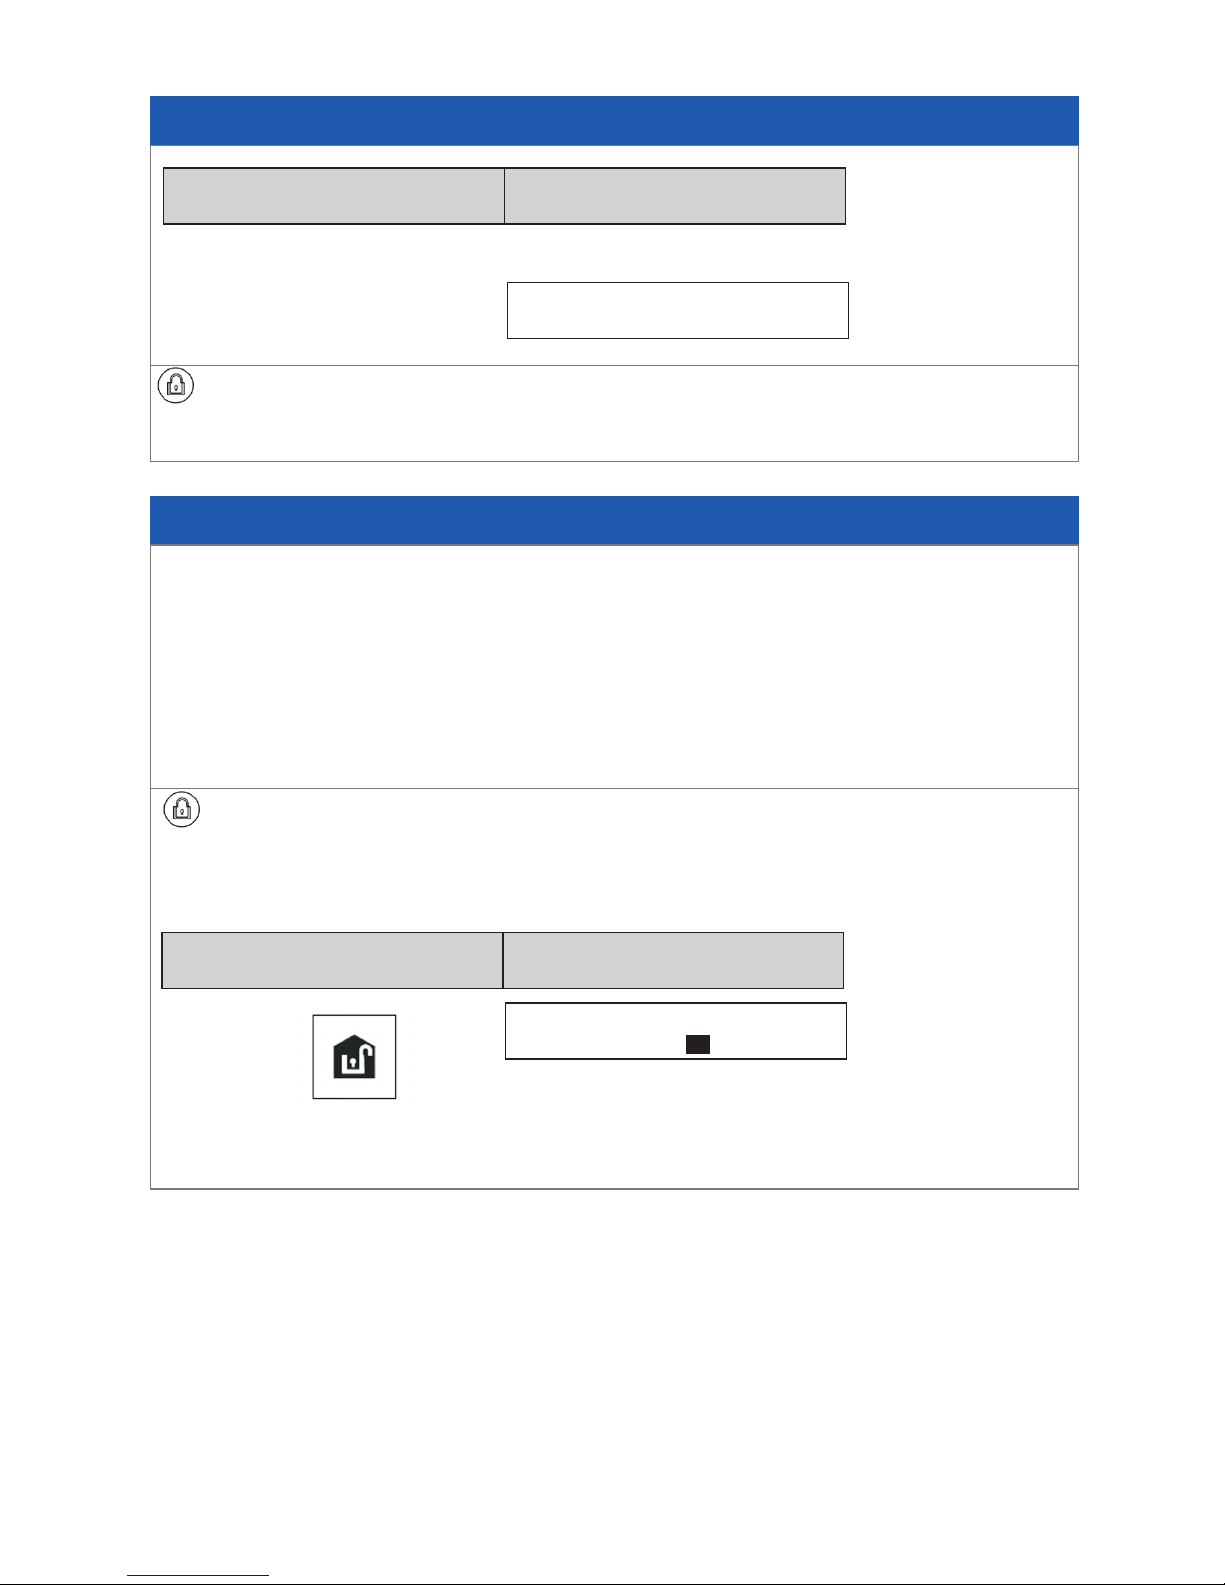
Move to interior zone (ARM HOME)
ARM indicator on both the Keypad and PowerMaster panel lights steadily during
the armed state.
RESULTING DISPLAY PRESS
ARMING AWAY
3
Disarming Your System
Enter the protected premises via a delayed zone. Upon detecting your entrance, the
System will start sounding the entry delay beeps alerting you to disarm the System
before the entry delay ends.
After disarming, different displays may appear indicating that the System is in a state
of alarm MEMORY. The MEMORY message will disappear only upon rearming the
System. To disarm the System, proceed as shown:
ARM indicator on both the Keypad and PowerMaster panel extinguishes during
the disarmed state. Disarming the System also stops the siren alarm, irrespective of
whether the alarm was initiated during the armed or the disarmed state.
Enter code / present tag Code / present tag
RESULTING DISPLAY PRESS
PRESENT TAG OR
ENTER CODE: -----
Page 4

Setting Partitions
Partition Selection Process
Access to any desired partition is achieved through the use of an individual code
or proximity tag. It is not possible to access the INSTALLER MENU if one or more
partitions are in the AWAY modes.
Before attempting to perform any operation on any given partition(s), it is necessary
to perform the operations below which enable you to select the desired/allowed
partition(s) using the individual code or proximity tag:
Notes:
1. The “Sad Tune” will be heard when selecting a partition to which no sensors
/ peripherals were enrolled.
2. If a partition is enabled and no zones are assigned to the partition, the
icon will appear on the Keypad display.
RESULTING DISPLAY PRESS
SELECT PARTITION
PARTITION 1
#
Enter partition # (1 - 3)
4
Page 5

5
To Program A User Code
or
Return to step 3
Enter the [USER SETTINGS] menu, select the
[USER CODES] option and press
1
The rst user code “User 01: 1111” is displayed.
2
To recall the last used bypass scheme press .
At the blinking cursor position, key in the User
Code you wish to program , for example, [06] for
user code 6, or alternatively click the or
button until the display reads, [User 06: 0000].
When the user code you wish to program appears
on the display, press
To program or edit the code, at the blinking cursor
position enter the 4 digit code, for example, “1234”,
using the numerical Keypad.
3, 4
When done, press
Step 1. RECALL BYPASS
Step 2. User 01: 1111
Step 3. User 06: 0000
Step 4. User 06: 0000
Step 5. User 06: 1234
A “Happy Tune” ☺sounds. The display conrms
the saved code.
5, 6
1 For detailed instructions on how to select the setting options – Please refer to the manual on the website
2 The display shows the 1st User Code (Master User) in the list of (PowerMaster-33 G2) User Codes. If you have not yet
changed the default code 1111, we recommend that you change it now.
3 a. The display shows the user code currently programmed in this location (e.g. 5327).
b. The cursor blinks on the rst digit of the code.
c. If the location is free the display will be (0000).
4 You can move the cursor to the next or previous digit by pressing or . Pressing erases the digit of the cursor + all
digits to the right of the cursor.
5 a. The new code is momentarily displayed without the cursor before reverting to step 3.
b. If Partition is enabled, continue to step 6.
6 You can now repeat steps 3 - 5 to program or edit another user code. To end this session and to select other menu options or
to quit programming.
Page 6

6
To Set Partitions Authorization*
Return to step 3
The display will now enable you to set the
partitions.
7
Press the button and use the Keypad keys
to change the status of the partitions 1, 2
& 3, respectively.
8
When you are satised with the setting, for
example, User 6 is authorized with Partition 1 and 3
only, press to conrm.
Step 6. User 06: 1234
1 2 3
Step 7. User 06: 1234
1 2 3
#
#
2
1
3
A “Happy Tune” ☺sounds. The display conrms
the saved code.
9
Adding /Deleting Proximity Tags
Users of the alarm System may be provided with a proximity tag/s that can be used
instead of the user codes to perform a variety of functions, for example, arming,
disarming, reading the event log, etc.
Whenever a user code is required you can simply present a valid proximity tag
instead of entering the user code.
♦ Here you can add (enroll) new proximity tags or delete tags as required.
Enter the [USER SETTINGS] menu, select the
[TAGS (Proximity)] option and press .
1
The display will read [ADD NEW TAG].
3
To begin the process of enrolling a new proximity
tag press
Step 1. TAGS (Proximity)
Step 2. ADD NEW TAG
7 This setting can be performed only after completing steps 1 - 5 of page 5
8 At this stage, pressing the button continuously switches between the rst and second rows.
9 You can now repeat steps 3 - 7 to program or edit another user code.
#
Page 7

7
Return to step 5
Step 5. or
Return to step 2
Return to step 3
Present the proximity tag to the Keypad within the
timeout period.
If enrollment was successfully completed, a “Happy
Tune” ☺ sounds and the display reads [DEVICE
ENROLLED] for a short duration and then changes
to read the tag’s details.
4
The display shows the allocated tag serial No (user
No.), which is always the rst free number, for
example: [T01:Tag (Prox)].
To assign the tag to another user, for example,
“User No. 5”, key in [05] or alternatively click the
or or button until the display reads
[T05:Tag (Prox)] and then press to conrm.
To delete the tag press the button.
Step 3. ENROLL NOW or
ENTR ID:xxx-xxxx
Step 4. DEVICE ENROLLED
T01:Tag (Prox)
DEVICE ENROLLED
T05:Tag (Prox)
The display reads [DEVICE ENROLLED] a “Happy
Tune” ☺ sounds and the display will then change
to [T01:Tag (Prox)].
5 6
Step 6. DELETE TAG
A “Happy Tune” ☺ sounds and the display reads
[DELETE TAG] and returns to step 3.
11
1 For detailed instructions on how to select User Settings – refer to section A.1 and section A.2.
2 The display shows the rst enrolled Tag (Tag No.1) of the 8 PowerMaster-33 G2) tags.
3 To abort enrollment, press the button.
4 If the tag was previously enrolled in the System, the KP-250 PG2 display indicates this together with the tag’s ID number, for
example, “ALREADY ENROLLED T01:Tag (Prox)”.
5 If Partition is enabled, continue to step 6.
6 You can now enroll another proximity tag. You can also select another option in the User Settings menu, or quit programming
7 If no proximity tag is enrolled in the System, the display reads [NO EXISTING DEV.].
8 To abort the procedure, press the button.
11 You can now add or delete another proximity tag. You can also select another option in the User Settings menu, or quit
programming
Page 8

8
Bypass Zone
Enter the [USER SETTINGS] menu1, select the [SET ZONE BYPASS] 2 option and
press .
The rst zone, Z01, is displayed.
3
Step 2. or
4
Step 1. SET ZONE BYPASS
Z01: READY
Ofce 1
Z01: P1 P2 P3
Click the or button until the display reads
the zone you wish to bypass (or clear bypass), for
example, “Z04” for Zone 04. After several seconds
the LEDs on the respective device starts ashing
indicating “it’s me”.
Z04: NOT READY
Z04: P1 P2 P3
Step 3. Ofce 2
When the display reads the zone you wish to bypass
press
Step 4. <OK> TO BYPASS
Z04:BYPASSED
The display now reads [<OK> TO BYPASS].
5
To bypass the selected zone press
A “Happy Tune” ☺sounds and the updated zone
status is now displayed i.e. [Z04: BYPASSED].
8
To Set Partitions Authorization*
Return to step 2
Use the Keypad keys to change the
status of the partitions 1, 2 & 3, respectively.
9
When you are satised with the setting, for
example, User 5 is authorized with Partition 1 and 3
only, press to conrm.
Step 1. T05:PARTITIONS
1 2 3
Step 2. T05:PARTITIONS
1 2 3
2
1
3
A “Happy Tune” ☺ sounds. The display conrms
the Partition setting.
10
9 This setting can be performed only after completing steps 1 - 5 of section on page 7
10 You can now repeat steps 2 - 7 to program or edit another Proximity tag.
8
Page 9

9
Clearing Bypass Zone
Review Bypass
Here you can quickly review the Bypass Scheme i.e. the zones that are set to be
bypassed during the next arming session.
or
Repeat steps 1 to 2 above.
4
When the zone you wish to clear bypass appears
on the display (for example, “Z04”), press
to conrm. You can also identify the device by
looking for the “it’s me” LED indication on the
displayed device.
The display now reads [<OFF> TO CLEAR].
5
To clear the bypassed zone press the
button
A “Happy Tune” ☺ sounds and the updated
zone status is now displayed, i.e. [Z04: READY]
or [Z04: NOT READY].
9
Step 5. Z04: BYPASSED
Z04: P1 P2 P3
Step 6. Ofce 2
<OFF> TO CLEAR
Step 7. Z04:READY
Enter the [USER SETTINGS] menu and select the
[REVIEW BYPASS]1 option and press
.
2
The display reads [BYPASS LIST]
Click the or buttons repeatedly to
review all bypassed zones in ascending numerical
order. When done, click to exit.
9
3. Z04: BYPASSED
Z04: P1 P2 P3
1. REVIEW BYPASS
Ofce 2
2. BYPASS LIST
Page 10

Recalling Bypass
Use this option to repeat (recall) the most recent Bypassed Scheme for use during
the next arming session.
Return to step 1
Enter the [USER SETTINGS] menu, select the
[RECALL BYPASS] 1 option and press .
2, 6
The display now reads [<OK> TO RECALL].
7
To recall the last used bypass scheme press .
A “Happy Tune” ☺ sounds. The display reads
[Bypass RECALLED] and then returns to “USER
SETTINGS” step 1.
9
1. RECALL BYPASS
2. <OK> TO RECALL
BYPASS RECALLED
Useful Phone Numbers
Customer Service Centre
Call 01–6205990* to request
a routine inspection, report
a fault, request a remote
reset or if you have a query
with the monitoring of your
System.
Customer Sales Centre
Call 1850 270 270 to
upgrade your System or
Service Plan.
Moving Home?
Call 01-6205862 to let us
know you are moving and
for details of our moving
offers.
* Calls charged at the standard rate of a regular local or national landline number.
Costs from mobiles may vary.
ADT800IE PM33-PDF / Issue 1 / October 17
1 For detailed instructions on how to select User Settings
2 This menu is displayed only if “BYPASS” was previously enabled by the installer.
3 The STATUS to the right of the zone number indicates whether the zone is READY, NOT-READY or BYPASSED.
4 This display will appear only if PARTITIONING was previously enabled.
5 a. If the zone you selected is “not bypassed”, the display prompts you to press [<OK> TO BYPASS]. However, if the zone you
selected is already “bypassed”, the display prompts you to press [<OFF> TO CLEAR].
b. To abort and return to the previous step press or
6 This menu is not displayed if Partition is enabled.
7 The display now prompts you to press [<OK> TO RECALL] i.e. to repeat the last used bypass scheme. To abort and return to the
User Settings menu, press .
8 You can now repeat steps 2 - 4 to bypass or clear another zone. To end this session and to select other menu options or to quit
programming
9 You can now select another option in the User Settings menu, or quit programming.
 Loading...