

Page 1
LL&
&
H
H
Q
QWW
H
H
U
U
$$GGYYDDQQFFHHGG88VVHHUU,,QQWWHHUUIIDDFFHH
$$''77
8VHU*XLGH
K5763-1 1/01
Page 2

Page 3

Table of Contents
3
ABOUT ICENTER .................................................................................................................... 9
Introduction to iCenter........................................................................................................................................9
The iCenter Interface.........................................................................................................................................9
Navigating through iCenter..............................................................................................................................10
About Your Home Screen................................................................................................................................10
iCenter "Arming" Screen..................................................................................................................................11
SYSTEM OVERVIEW ............................................................................................................ 13
Introduction to Your System.............................................................................................................................13
Burglary Protection ..........................................................................................................................................13
Partitions...................................................................................................................................................................13
Zones .........................................................................................................................................................................13
Entry/Exit Delays.......................................................................................................................................................13
Alarms........................................................................................................................................................................14
Memory of Alarm.......................................................................................................................................................14
Fire Protection..................................................................................................................................................14
User Codes......................................................................................................................................................14
Internet Features..............................................................................................................................................14
TeleSMART Messaging Features....................................................................................................................15
System Basics.............................................................................................................................................................15
Playback Upon Disarm .............................................................................................................................................15
Messages and Memos................................................................................................................................................15
Privacy Feature.........................................................................................................................................................15
Extended Functionality.....................................................................................................................................16
Speed Key (Macros)...................................................................................................................................................16
Using Schedules.........................................................................................................................................................16
Device Timers............................................................................................................................................................16
SECURITY SYSTEM OPERATION ....................................................................................... 17
Introduction to Security System Operation ......................................................................................................17
How to Arm the System...................................................................................................................................17
How to Arm Multiple Partitions.........................................................................................................................18
Keyswitch Operation........................................................................................................................................19
How to Arm Using a Keyswitch........................................................................................................................19
How to Bypass Zones......................................................................................................................................20
How to Remove Bypassed Zones....................................................................................................................22
How to Disarm the System ..............................................................................................................................23
How to Disarm Multiple Partitions....................................................................................................................24
How to Disarm Using a Keyswitch...................................................................................................................26
Page 4

Table of Contents (Cont'd)
How to Check the Status of Other Partitions ...................................................................................................26
How to Send Emergency Messages................................................................................................................27
How to View the Event Log..............................................................................................................................28
FIRE ALARM SYSTEM OPERATION....................................................................................31
Introduction to Fire Alarm System Operation...................................................................................................31
In Case of Fire Alarm.......................................................................................................................................31
Silencing a Fire Alarm......................................................................................................................................31
Fire Display Lock .............................................................................................................................................31
Recommendations for Proper Protection.........................................................................................................32
Recommendations For Smoke And Heat Detectors........................................................................................32
Recommendations For Proper Intrusion Protection.........................................................................................33
Recommendations for Evacuation...................................................................................................................33
USER CODE SETUP.............................................................................................................35
Introduction to User Code Setup......................................................................................................................35
How to Access User Setup..............................................................................................................................35
How to Add a User...........................................................................................................................................36
How to Delete a User.......................................................................................................................................40
How to Edit a User...........................................................................................................................................41
How to Set Up a User Code for TeleSMART Use Only...................................................................................42
INTERNET FEATURES ......................................................................................................... 45
Introduction to Internet Features......................................................................................................................45
Modifying Your WEB Page...............................................................................................................................45
Content ......................................................................................................................................................................47
My Email ...................................................................................................................................................................48
Horoscopes................................................................................................................................................................49
Weather......................................................................................................................................................................49
Reminders..................................................................................................................................................................50
Manage Users............................................................................................................................................................51
Edit Profile ................................................................................................................................................................52
Remote Control..........................................................................................................................................................53
Logout........................................................................................................................................................................54
TELESMART MESSAGING FEATURES...............................................................................55
Introduction to TeleSMART Messaging Features............................................................................................55
System Basics.............................................................................................................................................................55
Playback Upon Disarm .............................................................................................................................................55
Messages and Memos................................................................................................................................................55
Privacy Feature.........................................................................................................................................................55
TeleSMART Operational Structure..................................................................................................................56
4
Page 5

Table of Contents (Cont'd)
TeleSMART Operation Using iCenter..............................................................................................................56
How to Record a Memo Using iCenter......................................................................................................................56
How to Listen to Memos and Messages.....................................................................................................................57
How to Record Outgoing Greetings ..........................................................................................................................59
TeleSMART Operation Using a TeleSMART Touchpad..................................................................................61
Accessing the System .................................................................................................................................................61
List of Options ...........................................................................................................................................................62
Listening to Your Messages (Option 01) ..................................................................................................................63
About Messages.........................................................................................................................................................63
New and Saved Messages..........................................................................................................................................63
Listening to Your Messages Using the TeleSMART Touchpad..................................................................................64
Recording a Memo Using the TeleSMART Touchpad (Option 2) .............................................................................65
How to Record a Memo.............................................................................................................................................65
Caller ID Log Using the TeleSMART Touchpad (Option 03) ...................................................................................66
About the Caller ID Log ............................................................................................................................................66
How to View the Caller ID Log .................................................................................................................................66
Privacy Feature Using the TeleSMART Touchpad (Option 04)................................................................................67
About the Privacy Feature.........................................................................................................................................67
How to Turn the Privacy Feature On/Off..................................................................................................................67
How to Override Privacy Mode.................................................................................................................................67
Recording Greetings Using the TeleSMART Touchpad (Option 05).........................................................................68
About Greetings (outgoing messages) .......................................................................................................................68
How to Record Greetings ..........................................................................................................................................68
Setting the System Time Using the TeleSMART Touchpad (Option 07) ....................................................................69
About the System Time...............................................................................................................................................69
How to Set the System Time.......................................................................................................................................69
Caller ID Display/Announcements Using the TeleSMART Touchpad (Option 08)...................................................70
About Caller ID Displays and Announcements.........................................................................................................70
How to Turn Caller ID Display at the Touchpad On/Off ..........................................................................................70
How to Turn Caller ID Announcements On/Off and How to Set the Volume............................................................70
Toll Saver / Message Beeps Using the TeleSMART Touchpad (Options 12 & 13)....................................................71
About the Toll Saver Feature.....................................................................................................................................71
How to Turn Toll Saver On/Off .................................................................................................................................71
How to Check for Messages while Toll Saver is On..................................................................................................71
About Message Beeps................................................................................................................................................71
How to Turn Message Beeps On/Off .........................................................................................................................71
Call Screening Using the TeleSMART Touchpad (Options 14, 15, 16).....................................................................72
5
Page 6

Table of Contents (Cont'd)
About Call Screening.................................................................................................................................................72
How to Connect to a Call when Telephone Call Screening is On .............................................................................72
How to Turn Call Screening On/Off..........................................................................................................................72
Ring Answer Count Using the TeleSMART Touchpad (Option 17)...........................................................................73
About the Ring Answer Count ...................................................................................................................................73
How to Set the Ring Answer Count............................................................................................................................73
Quick Access Key Using the TeleSMART Touchpad (Option 18)..............................................................................74
About the Quick Access Key ......................................................................................................................................74
How to Assign the Quick Access Key.........................................................................................................................74
Caller ID Options Using the TeleSMART Touchpad (Option 19).............................................................................75
About Caller ID.........................................................................................................................................................75
How to Program Caller ID Options ..........................................................................................................................75
Memory Dial Numbers Using the TeleSMART Touchpad (Option 20) .....................................................................78
About Memory Dial Numbers....................................................................................................................................78
How to Program Memory Dial Numbers...................................................................................................................78
Memory Dial Numbers ..............................................................................................................................................80
Zone Voice Tags Using the TeleSMART Touchpad (Option 22) ...............................................................................81
About Zone Voice Tags..............................................................................................................................................81
How to Record Zone Voice Tags...............................................................................................................................81
TeleSMART Operation Using a Telephone .....................................................................................................82
To Use TeleSMART From a Telephone .....................................................................................................................82
Telephone Access Menu Map ....................................................................................................................................83
Security System Menu from a Phone .........................................................................................................................84
Making Telephone Calls............................................................................................................................................85
ADVANCED SYSTEM FEATURES........................................................................................87
Introduction to Advanced System Features.....................................................................................................87
Touchpad (Console) Emulation Mode .............................................................................................................87
How to Enter Console Emulation Mode...........................................................................................................87
Speed Key (Macro) Programming ...................................................................................................................88
Defining a Macro ......................................................................................................................................................88
Executing a Macro Using a Speed Key .....................................................................................................................89
Using Relay Mode (#70)..................................................................................................................................90
Temporary Schedules......................................................................................................................................90
Delaying the Closing Time Using Schedules.............................................................................................................90
Temporary Open/Close Schedules.............................................................................................................................91
Programming Temporary Schedules.........................................................................................................................92
Programming Device Timers ...........................................................................................................................95
Using Instant Activation Mode (#77)................................................................................................................98
6
Page 7

Table of Contents (Cont'd)
Relay Commands.......................................................................................................................................................98
Arm/Disarm Commands ............................................................................................................................................99
Bypass Commands.....................................................................................................................................................99
Open/Close Windows.................................................................................................................................................99
VistaKey Module Access Control Commands............................................................................................................99
Additional Commands .............................................................................................................................................100
How to Use Instant Activation Mode..............................................................................................................100
TESTING THE SYSTEM......................................................................................................103
Introduction to Testing the System ................................................................................................................103
Using the TEST Key ......................................................................................................................................103
Testing Your System......................................................................................................................................103
TROUBLE CONDITIONS.....................................................................................................105
Introduction to Trouble Conditions.................................................................................................................105
Typical Trouble Displays................................................................................................................................105
Power Failure.................................................................................................................................................106
SUMMARY OF AUDIO NOTIFICATION...............................................................................107
QUICK GUIDE TO ALARM SYSTEM FUNCTIONS.............................................................109
QUICK GUIDE TO TELESMART MESSAGING FUNCTIONS.............................................111
ICENTER SETUP.................................................................................................................113
How to Access iCenter Setup Options...........................................................................................................113
How to Access Setup.....................................................................................................................................113
How to Adjust the Touch Screen Contrast.....................................................................................................114
How to Adjust the Volume..............................................................................................................................115
How to Select Screen Saver Activation Time ................................................................................................115
How to Set the Time and Date.......................................................................................................................116
Time Zones...............................................................................................................................................................118
How to Calibrate the Touch Screen...............................................................................................................119
Introduction to Maintaining Your System.......................................................................................................123
Replacing Batteries In Wireless Sensors.......................................................................................................123
Silencing Low Battery Warning Tones at the Touchpad................................................................................123
How to Clean your iCenter.............................................................................................................................123
Routine Care..................................................................................................................................................124
GLOSSARY..........................................................................................................................127
7
Page 8

Table of Contents (Cont'd)
8
Page 9
Introduction to iCenter
Congratulations on your ownership of an ADT Security System. You've made a wise
decision in choosing it, for it represents the latest in security protection technology
today.
This security system offers you three forms of protection: burglary, fire and
emergency. To realize the full potential of the system, it is important that you feel
comfortable operating it. Your system may consist of:
iCenter Advanced User Interface
•
One or more touchpads for system control
•
Various sensors for perimeter and interior burglary protection, plus a selected
•
number of strategically placed smoke or combustion detectors
TeleSMART Telephone Module
•
Home automation devices.
•
The system uses microcomputer technology to monitor all zones, and provides
appropriate information for display on the iCenter and/or touchpads used with the
system. Your system may also have been programmed to automatically transmit
alarm or status messages over the phone lines to a central alarm monitoring
station.
About iCenter
The iCenter Interface
iCenter is an intuitive, graphical interface that combines security and home control
with interactive Internet features. With clear, simple controls on a touch-screen
interface, the entire family will find iCenter both easy to learn and easy to use.
As a security and home-automation control, iCenter can be used for:
Quick and easy security system operation
•
Retrieval and recording of voice messages, and
•
Control of the home environment, including the heating and air-conditioning
•
system, lights, garage door, etc., and
As a household Internet appliance, iCenter provides access to a wealth of
information, including:
News
•
Sports
•
Weather
•
e-mail, and
•
Live updates of user-selectable content such as your horoscope.
•
9
Page 10
About iCenter (cont'd)
"Home" screen Allows you to retrieve Messages via the
TeleSMART module.
K
eeping pace with advances in technology, iCenter will continue to provide
additional Internet functionality, as it becomes available.
Navigating through iCenter
Navigation through iCenter typically begins from the "Home" screen. This is
iCenter’s main default screen (starting screen) and is the first screen you will see
when iCenter is powered up and initialized. It is from this screen that you will
select from the main menu. Once you have made your selection, you will navigate
through various sub-menus by touching buttons or icons to perform the function you
desire.
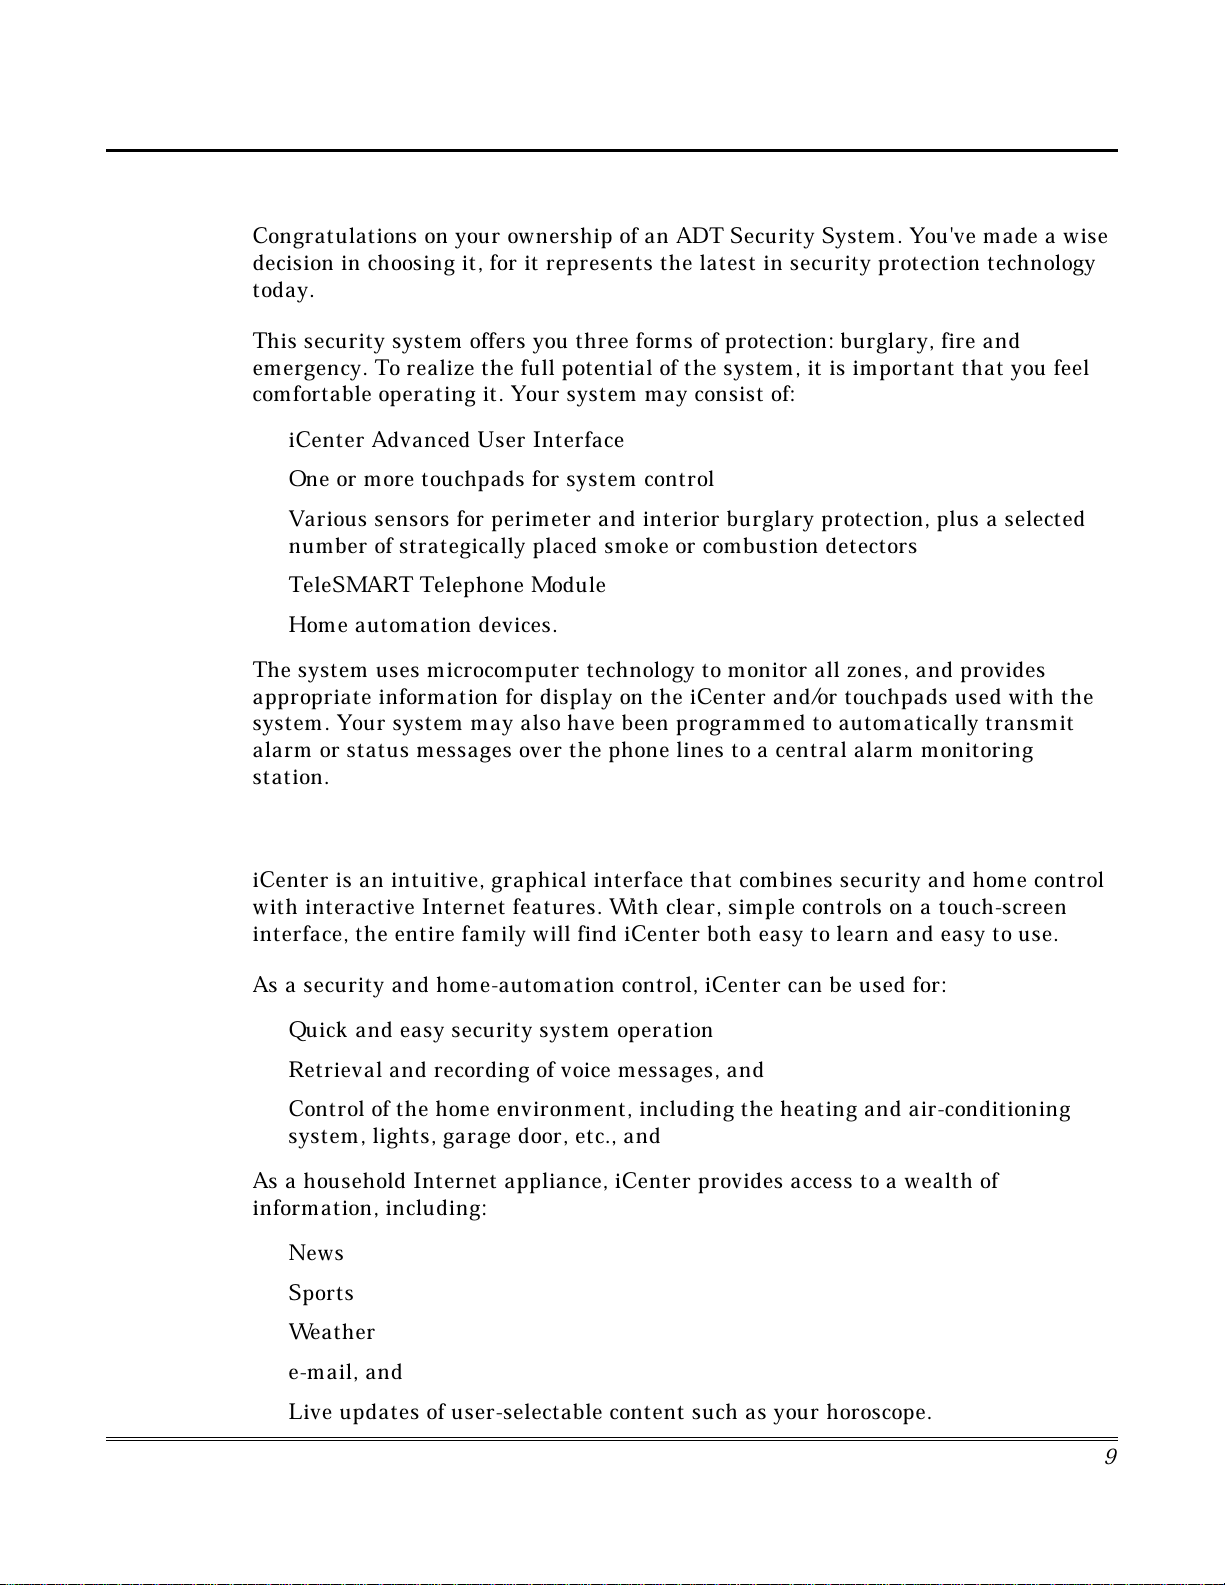
About Your Home Screen
Your "Home" screen is your gateway to your iCenter Advanced User Interface. From
this screen you can:
access telephone and e-mail messages
•
control the premises lighting, and most importantly,
•
control your security system.
•
Besides using your personal "Home" screen for E-mail and telephone messages, you
may also receive news/display and retrieve additional information of your choosing.
Your "Home" screen is displayed at all times, except when the system is armed or
you select another screen option.
iCenter Icon/Button Descriptions
To aid in the navigation of iCenter, a set of user-friendly icons has been provided.
The appearance, function, and location of these icons is described below:
10
ICON/BUTTON LOCATION FUNCTION
Page 11
About iCenter (Cont'd)
11
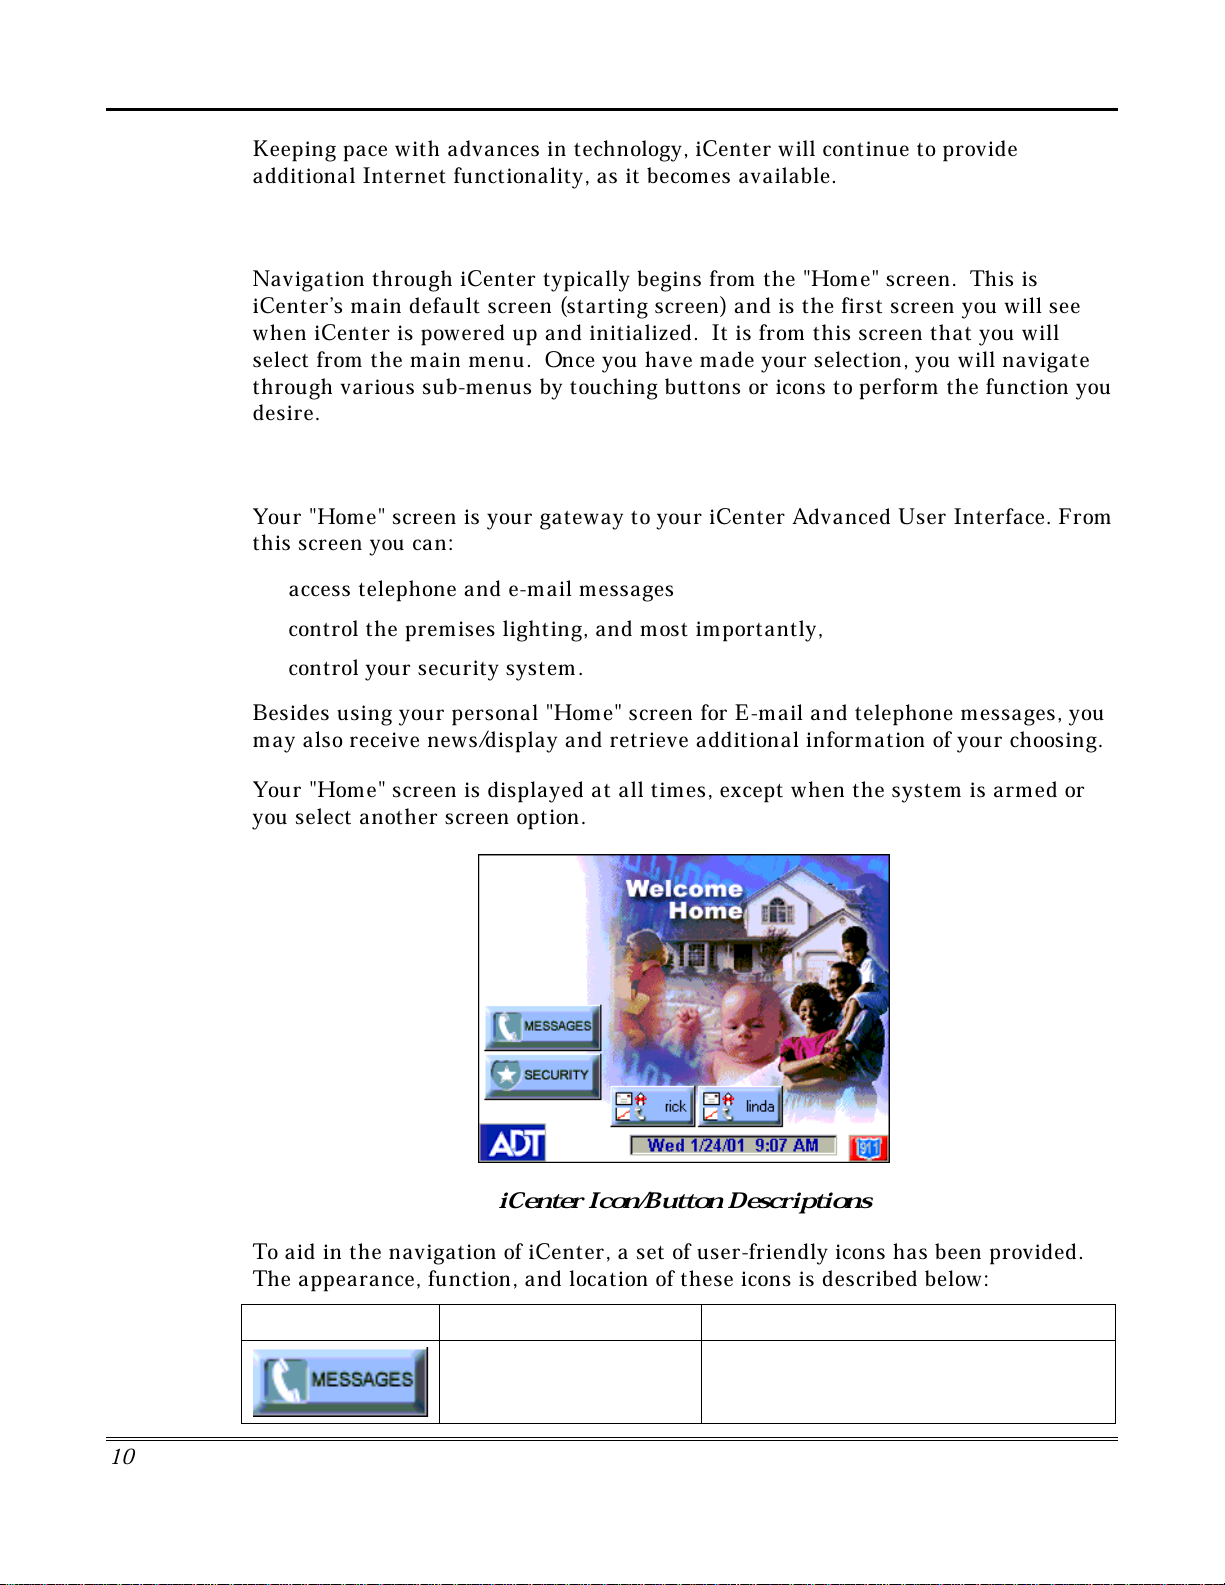
ICON/BUTTON LOCATION FUNCTION
"Home" screen Allows you to set/change Lighting settings (if
installed and programmed by your installer.)
"Home" screen Accesses "Arming" screen.
Upper left corner of most
screens
Returns you to the iCenter "Home" screen.
Upper right corner of most
screens
Reverts to the last screen viewed.
Lower right corner of most
screens
Displays Emergency functions (as
programmed by your installer.
Lower left corner of most
screens
Used for Remote Security Access features.
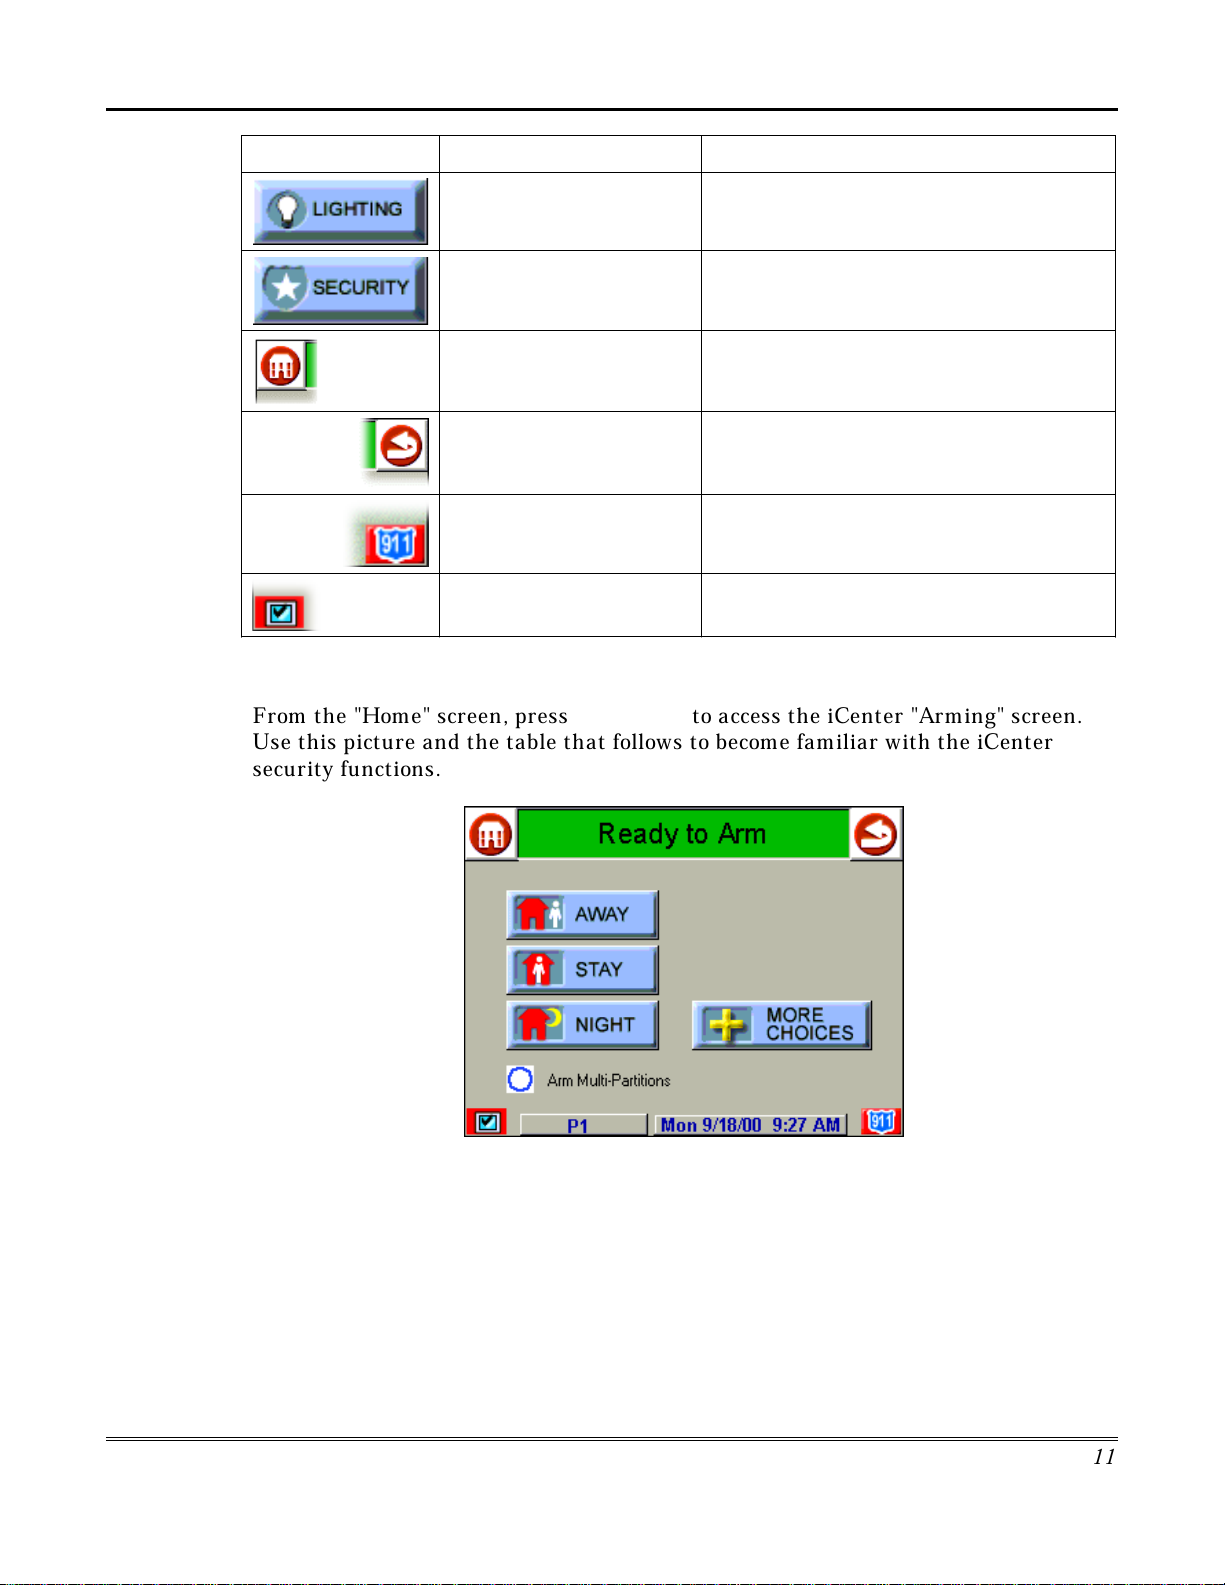
iCenter "Arming" Screen
From the "Home" screen, press
SECURITY
to access the iCenter "Arming" screen.
Use this picture and the table that follows to become familiar with the iCenter
security functions.
Page 12

About iCenter (cont'd)
12
ITEM FUNCTION
AWAY
Press this button to arm when no one will be staying on the premises. When
armed in
AWAY
, the system will sound an alarm if a protected door or window
is opened, or if any movement is detected inside the premises. You may leave
through the entrance door during the exit delay period without causing an
alarm. You may also reenter through the entrance door, but must disarm the
system with you User Code within the entry delay period or an alarm will occur.
STAY
Press this button to arm when you are staying home, but might expect
someone to use the entrance door later.
When armed in STAY, the system will sound an alarm if a protected door or
window is opened, but you may otherwise move freely throughout the
premises. Late arrivals can enter through the entrance door without causing an
alarm, but they must disarm the system within the entry delay period or an
alarm will occur.
NIGHT
Press this button to arm when you are staying home and do not expect anyone
to use the entrance door.
Your installer may have configured NIGHT Mode
differently; have him/her describe the actual settings of this mode.
Arm MultiPartitions
Check this box when you want to arm more than one partition. When
Arm
Multi-Partitions
is checked, all partitions within the system can be armed at
one time (if the user is so authorized). When the
Arm Multi-Partitions
circle
does not contain a check mark, each partition must be armed individually.
MORE
CHOICES
Press this button for more Security, Lighting, telephony, and iCenter setup
features.
Page 13
Introduction to Your System
This system offers you three forms of protection: burglary, fire and emergency.
Monitoring is accomplished with various contact and motion sensors for perimeter
and interior burglary protection, plus strategically placed smoke, heat, or
combustion detectors.
Burglary Protection
The burglary protection portion of your system must be turned on or "armed" before
it will sense burglary alarm conditions. Your system provides three modes of
burglary protection: Away, Stay, and Night, and even allows you to “bypass”
selected zones of protection while leaving the rest of the system armed (e.g. this
enables you to arm the system but leave upper-story windows open.)
The system also provides a Chime mode, for alerting users to the opening and
closing of doors and windows even while the system is disarmed.
Partitions
This system provides the ability to arm and disarm up to eight different areas, each
as if it had its own control. These areas are called partitions. Partitions are used
when the user wants to disarm certain areas while leaving other areas armed, or to
limit access to certain areas to specific individuals. Each user of the system can be
authorized to operate all or only some partitions, and can be given different
privileges in each. Information about Partitions is presented later in this document.
System Overview
Zones
Your system's sensing devices have been assigned to various "zones." For example,
the sensing device on your Entry/Exit door may have been assigned to zone 001,
sensing devices on windows in the master bedroom to zone 002, and so on. These
numbers will appear on the display, along with a Custom English descriptor for that
zone (if programmed), when an alarm or trouble condition occurs.
Entry/Exit Delays
Your system has preset time delays, referred to as exit delay and entry delay.
Whenever you arm your system, exit delay gives you time to leave through the
designated exit door without setting off an alarm. Exit delay begins immediately
after entering any arming command, and applies to all modes of arming protection.
If programmed, a slow beeping will sound throughout the exit delay period.
Entry delay gives you time to disarm the system when you reenter through the
designated entrance door. But the system must be disarmed before the entry delay
period ends, or an alarm will occur. The touchpad will beep during the entry delay
period, reminding you to disarm the system. Ask your installer about the delay
times programmed into your system.
1
3
Page 14
System Overview (cont'd)
A
larms
When an alarm occurs, iCenter (and any other touchpads) and external sounders
will sound, and the zone(s) causing the alarm are displayed. If your system is
connected to a central monitoring station, an alarm message will also be sent. To
stop the alarm sounding, simply disarm the system.
Memory of Alarm
When an alarm condition occurs, the number(s) of the zone(s) that caused the
problem are displayed, along with the type of alarm (e. g. FIRE, ALARM). These
remains displayed until cleared by disarming the system.
Fire Protection
The fire protection portion of your security system (if used) is always on and will
sound an alarm if a fire condition is detected.
User Codes
Each user must be assigned a name with a corresponding 4-digit user code in order
to gain access to various features and functions. Through iCenter, you may program
users to access any and all of the following systems:
Fire/Burglary
•
TeleSMART
•
Internet
•
Users for the systems are programmed in a central user setup location that provides
the specific questions for the user pertaining to each system. You may want these
users to be the same, but there are situations in which you may want a user to have
access to one system (e.g., TeleSMART) without having access to another (e.g., the
Fire/Burglary system).
Internet Features
As a household Internet appliance, iCenter provides access to a wealth of
information, including:
News
•
Sports
•
Weather
•
E-mail, and
•
Updates of user-selectable content such as your horoscope.
•
Additionally, you may control all of iCenter’s functions from any personal computer
or laptop that has Internet capabilities, including security system functions
(arming, disarming, etc.) and to check to see if you have a voice message.
1
4
Page 15

TeleSMART Messaging Features
TeleSMART is an option available with iCenter, which provides you and your family
with the conveniences of a full-featured digital answering machine. In addition to
all the features of a digital answering system, TeleSMART offers much more,
including caller ID (if service is available), multiple mailboxes, a memo feature, and
a unique Privacy feature that enables you to divert ALL calls to the TeleSMART
mailbox for a duration you select – such as during mealtime, baby’s nap time, etc.
S
ystem Basics
Mailboxes -
•
and users can be assigned access to any combination of mailboxes. This lets each
user listen to his/her own messages without having to listen to messages
intended for the other users
The system has four mailboxes for storing messages and memos,
System Overview (Cont'd)
Greetings -
•
caller to leave a message. If multiple mailboxes are in use, the message can
instruct the caller to press a key (1-4) corresponding to the desired user’s
mailbox, and then leave a message. The system then announces the greeting for
that user and automatically stores the caller's message in that mailbox.
S
ecurity System -
•
be used in your system – these provide a two-line LCD display, standard control
keys, plus a speaker/microphone to record and retrieve voice messages. The
system can also be set so that a user's messages are automatically played
whenever that user disarms the security system from a TeleSMART touchpad.
Playback Upon Disarm
Depending on how iCenter and TeleSMART are set up, messages can be played back
when the system is disarmed. If multiple users and mailboxes are set up, the
messages for a user can be played back when that user disarms the system
Messages and Memos
Like any digital answering system, TeleSMART records incoming telephone
messages. TeleSMART also enables users to record “Memos” for themselves or for
other users. For example, you may record a memo for your child – then when your
child returns from school and disarms the system, your memo is played back ahead
of any telephone messages.
When TeleSMART answers a call a recorded greeting instructs the
In addition to iCenter, special TeleSMART touchpads may
.
Privacy Feature
The Privacy feature turns off all telephone ringers and lets TeleSMART answer
your calls. This can be useful if you do not wish to be disturbed at certain times.
A simple pull-down menu lets you select the Privacy duration (from 30 minutes to 8
hours). When Privacy is selected (via a check box), TeleSMART will take all calls
for that duration, or until you turn it off.
Use the Message Menu to check for any messages that may have been left while
Privacy was turned on.
1
5
Page 16
System Overview (cont'd)
Extended Functionality
Extended functions are advanced functions that can be accessed through a standard
Custom English Touchpad or through emulation mode on your iCenter touch screen.
S
peed Key (Macros)
The system can store a string of up to 32 keystrokes, which can be activated
anytime by simply pressing the “A, B, C, or D” keys on your touchpad. This feature
can be used to make it easy to perform a complicated procedure (such as going to
another partition to bypass a zone), or it can be used to simplify an everyday,
repeated procedure. Refer to the
procedures for using this feature.
Using Schedules
Your system may have been programmed with schedules for automatically arming,
disarming and activating various devices and/or performing other system functions
at predetermined times. Users can modify some of these schedules by manually
delaying a closing time, using temporary schedules, or by programming special user
schedules. Refer to the
procedures.
How to Use the Speed Key
How to Use Schedules
paragraph for
paragraph for scheduling related
Device Timers
The system provides up to 20 "timers" that can be used to control various devices,
such as lights or appliances. These timers are similar in concept to the individual
appliance timers that might be purchased at a department store. The devices that
can be controlled are programmed into the system by the installer. Up to 32 of these
devices can be programmed. Refer to the
for procedures.
How to Program Device Timers
paragraph
1
6
Page 17
Introduction to Security System Operation
You can arm your system in one of three arming modes: Away, Stay, and Night.
The following table lists the three different arming modes and the results of each
FEATURES FOR EACH ARMING MODE
Arming Mode Exit Delay Entry Delay Perimeter Armed Interior Armed
Away Yes Yes Yes Yes
Stay Yes Yes Yes No
Night* Yes Yes (set for
*Your installer may have configured Night Mode differently; have your installer
write the actual mode settings above.
How to Arm the System
Security System Operation
Yes Yes (set for
Away or Stay
Mode)
No (set for
Instant or
Maximum Mode)
Away Mode)
No (set for Stay,
Instant or
Maximum Mode)
.
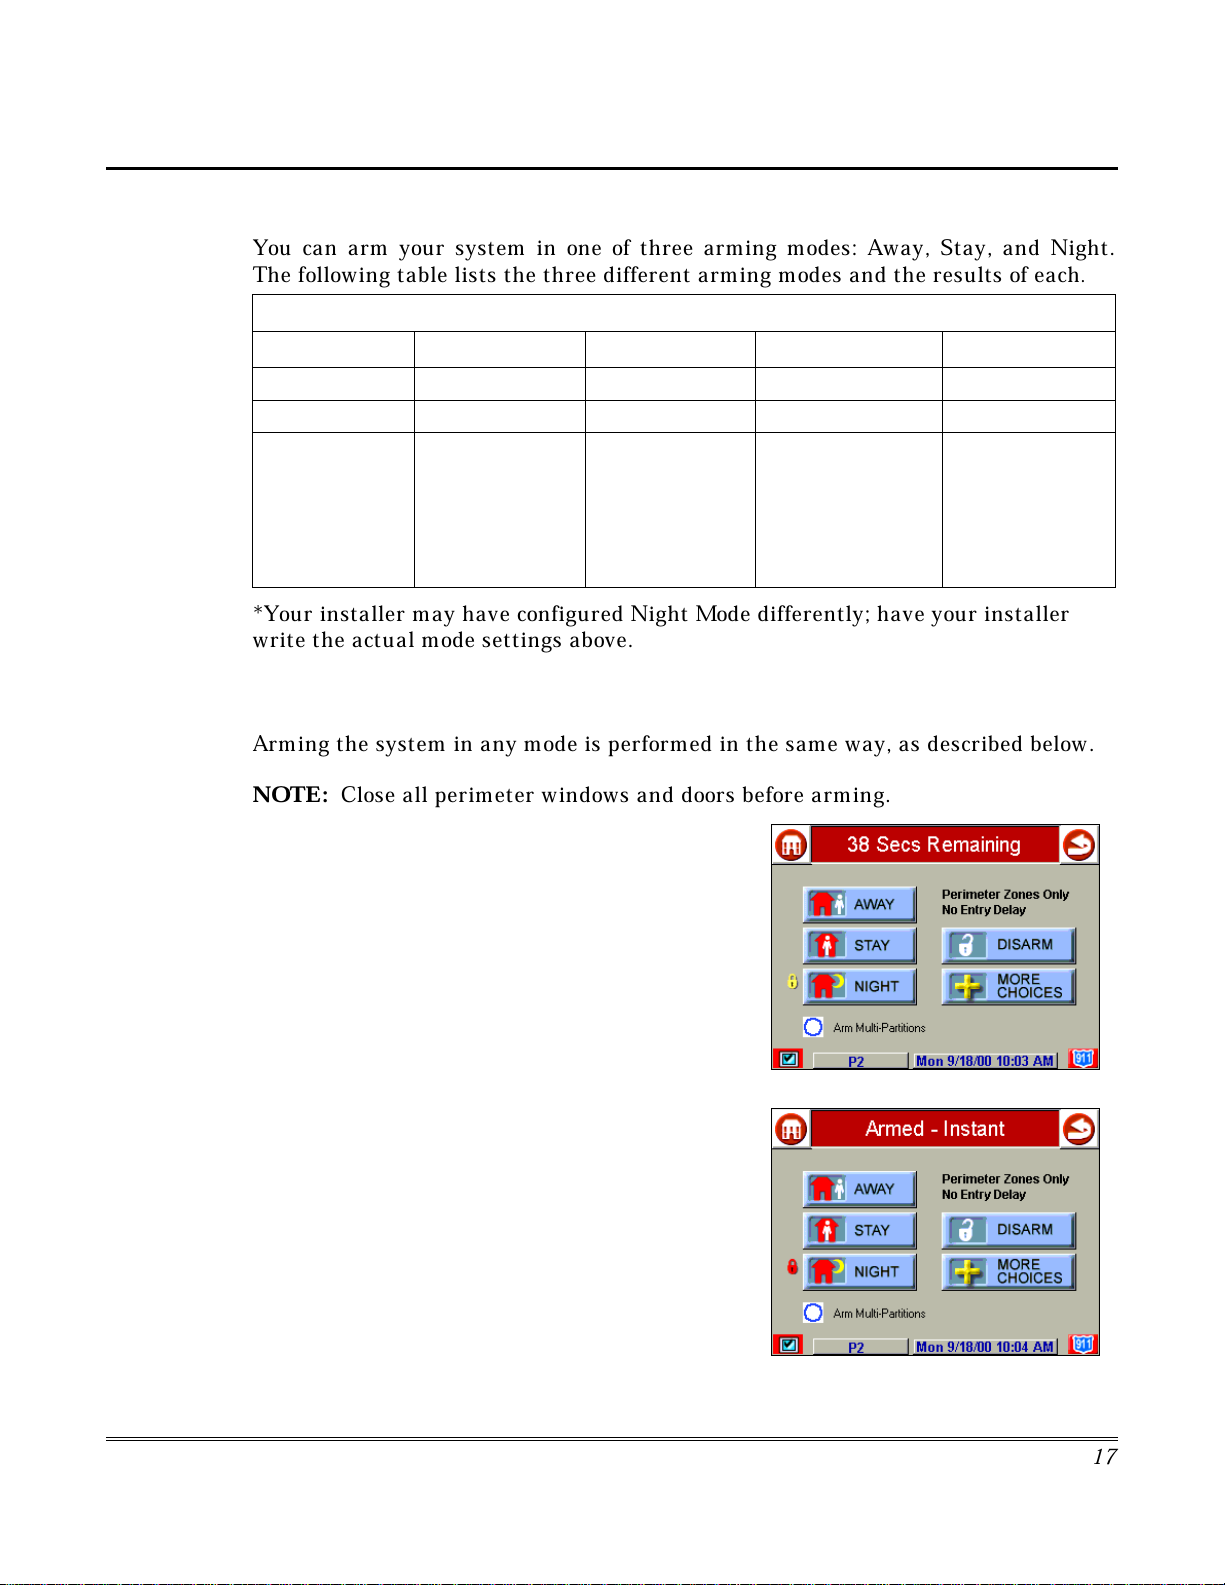
Arming the system in any mode is performed in the same way, as described below.
NO
1. From the "Home" screen, press the
button. The "Arming" screen is displayed.
2. On the "Arming" screen, press the selected arming
button.
•
•
•
•
•
•
When this time indicates zero, the screen automatically
changes to indicate the system is "
"lock" next to the pressed button changes to red. The
system is now armed in the selected mode.
Close all perimeter windows and doors before arming.
TE:
SECURITY
iCenter beeps twice (Away and Night Maximum
Modes) or 3 times (Stay and Night Instant Modes)
DISARM
a
a text message appears stating which zones are
arming and whether or not there is an entry delay
the screen changes to display the remaining exit
delay time, and
a yellow "lock" appears next to the pressed button
to indicate the system is arming.
The exit delay time continues to decrement to zero.
button appears
Armed"
and the
Arming (typical)
Armed (typical)
1
7
Page 18
Security System Operation (cont'd)
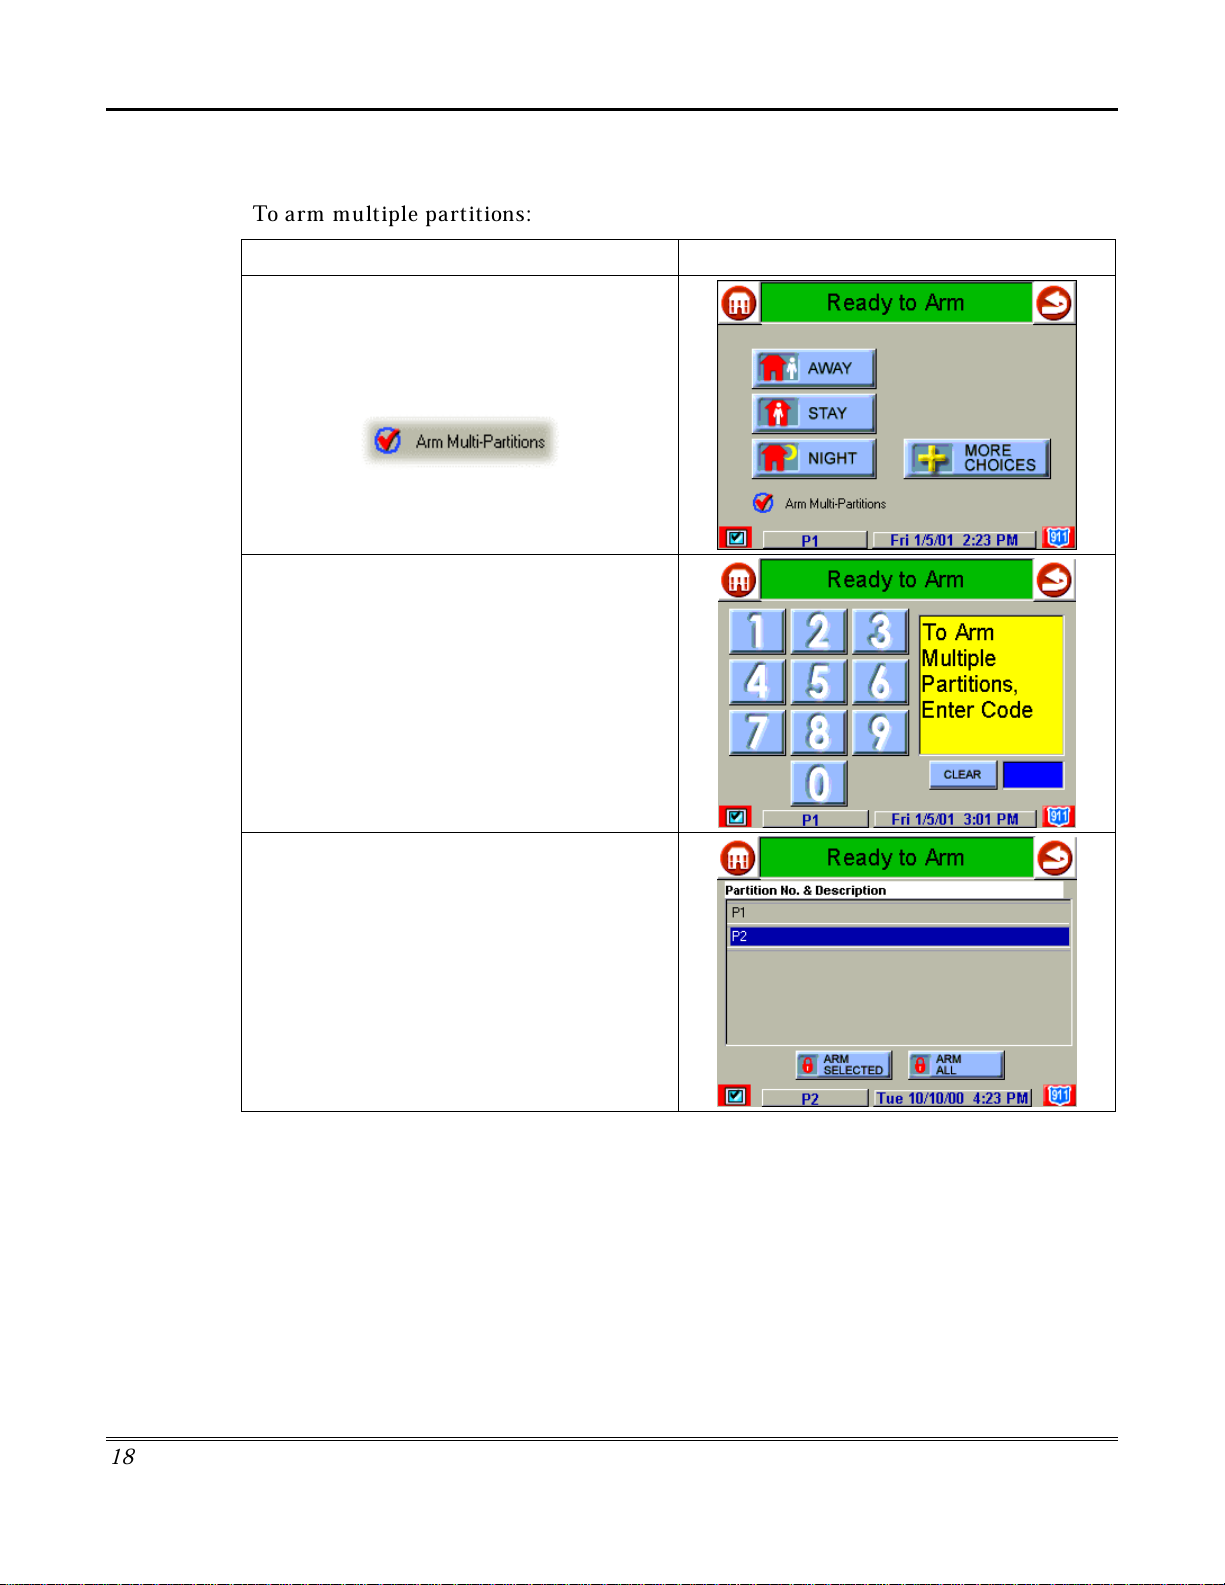
How to Arm Multiple Partitions
To arm multiple partitions:
ACTION SCREEN
1. From the "Home" screen press the
SECURITY
screen.
NOTE:
button is checked.
2. Press the appropriate arming mode button,
and, when prompted, enter the user code
authorized to access other partition(s).
If the user code is accepted, the system
displays the partitions that the user has access
to.
NOTE
not all) of the available partitions!
button to display the "Arming"
Be sure the
: A user may have access to some (but
Arm Multi-Partitions
You have two arming options:
•
To arm one or more partitions, highlight the
partition(s) to be armed by touching it on
the screen, then press
•
ARM ALL
Press
partitions.
ARM SELECTED
to arm all available
.
1
8
Page 19
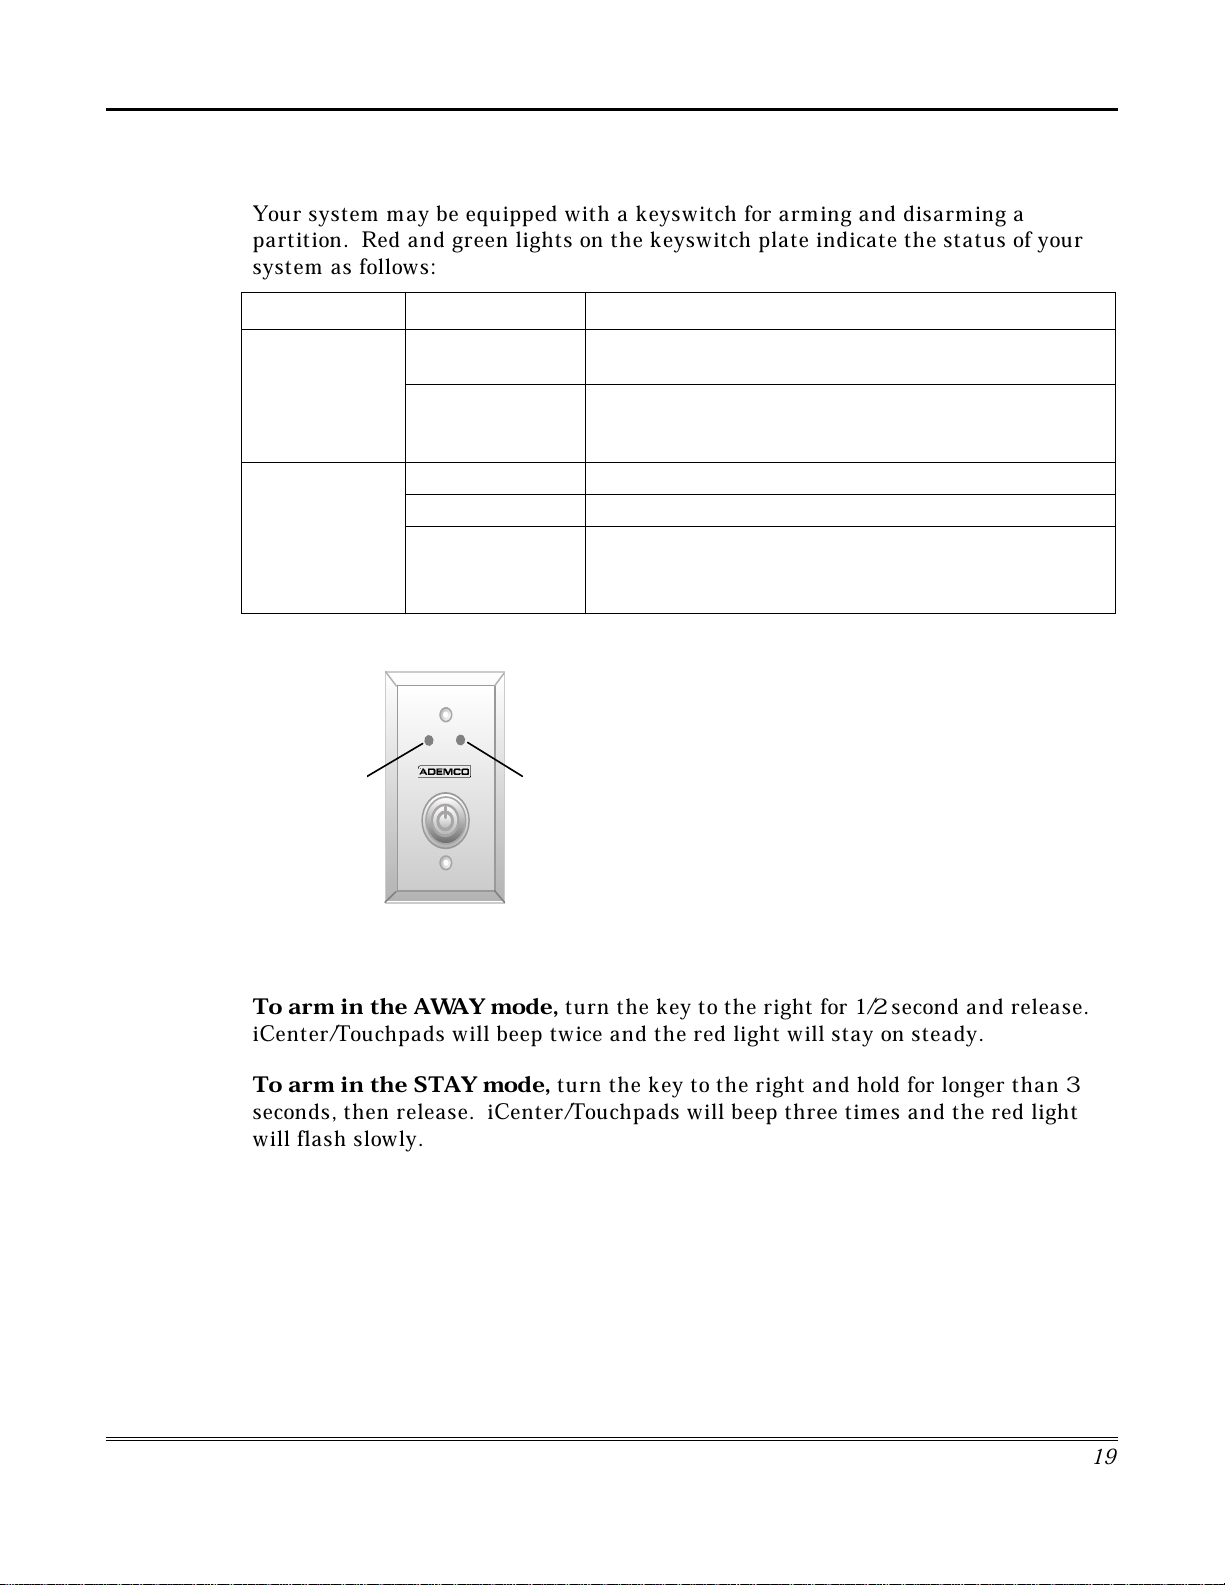
Keyswitch Operation
GREEN
RED
How to Arm Using a Keyswitch
To arm in the
AWAY
mode,
turn the key to the right for 1/2 second and release.
iCenter/Touchpads will beep twice and the red light will stay on steady.
To arm in the STAY mode,
turn the key to the right and hold for longer than 3
seconds, then release. iCenter/Touchpads will beep three times and the red light
will flash slowly.
Your system may be equipped with a keyswitch for arming and disarming a
partition. Red and green lights on the keyswitch plate indicate the status of your
system as follows:
INDICATOR STATUS FUNCTION
Security System Operation (Cont'd)
Green Light
Red Light
Lit The system is disarmed and ready to be armed (no open
zones).
Out If the system is disarmed and the green light is off, it
indicates the system is not ready (one or more zones are
open).
Lit Steady System is armed or memory of alarm exists.
Slow Flashing Partition is armed in Away mode.
Rapid Flashing Partition is armed in Stay mode. Memory of alarm,
indicating an alarm has occurred.
1
9
Page 20
Security System Operation (cont'd)
20
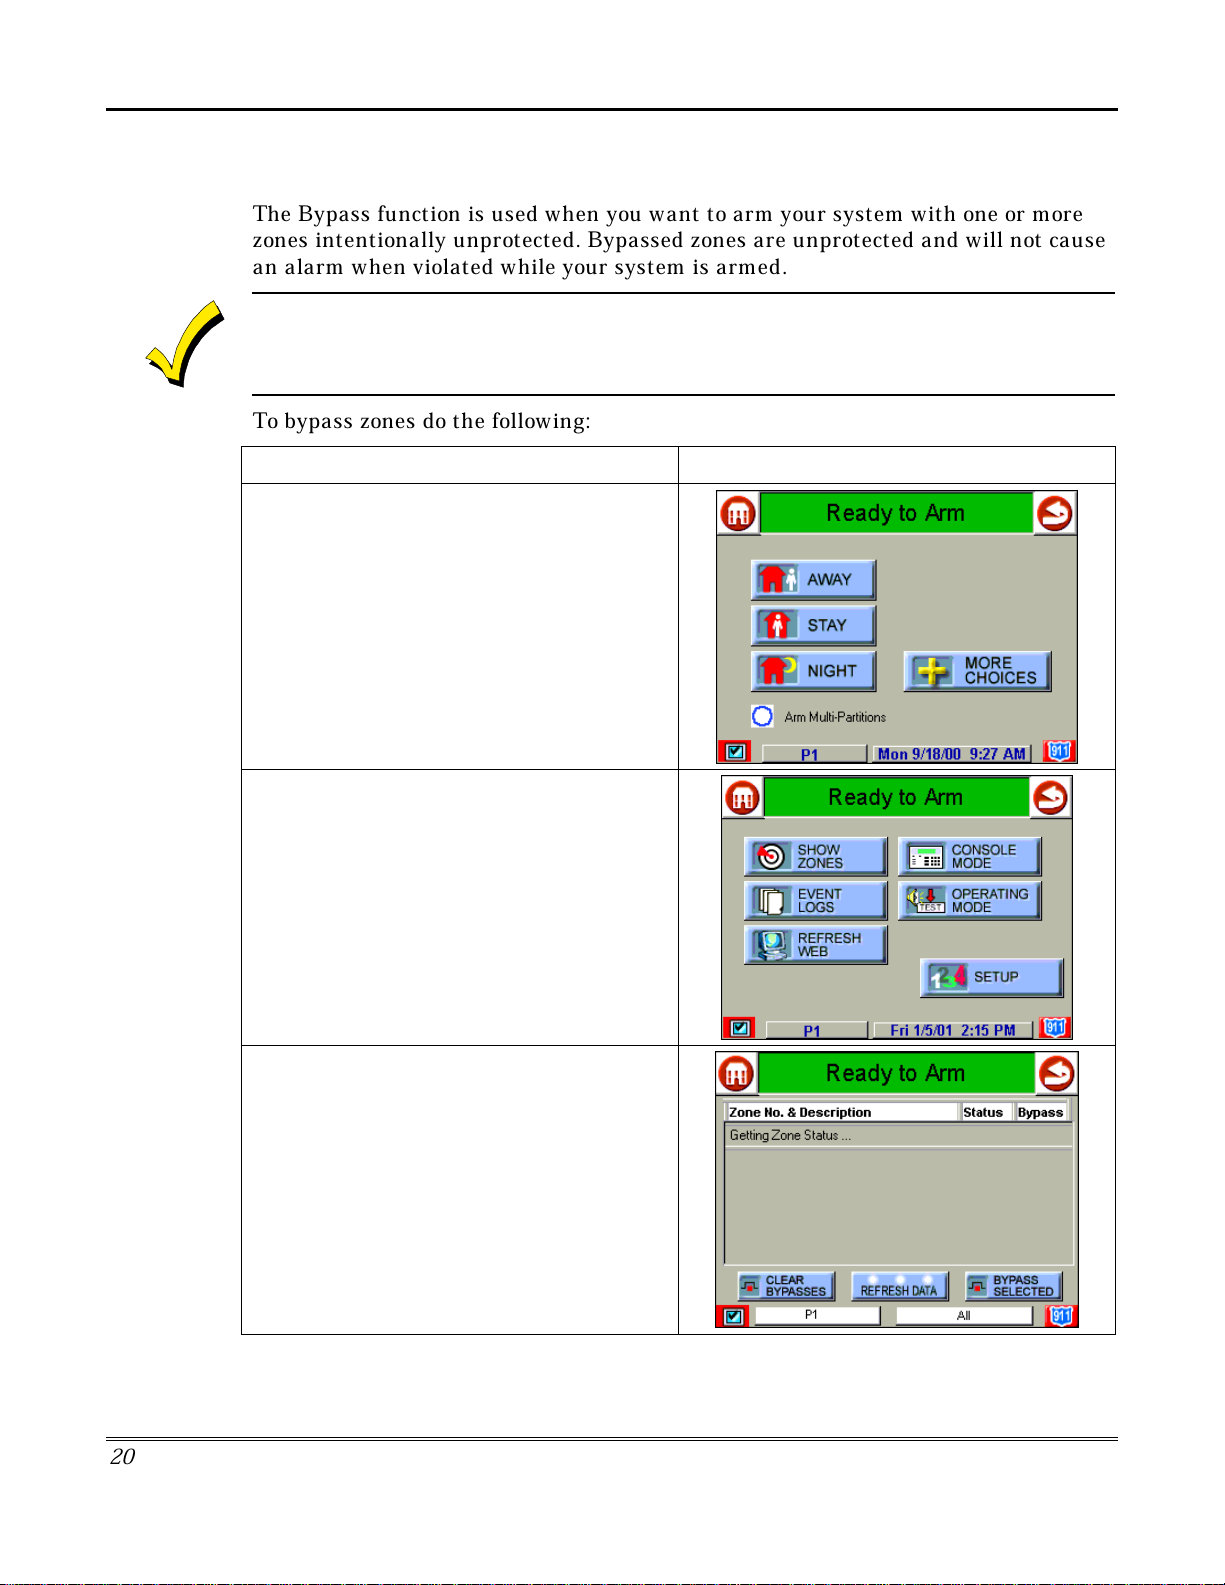
How to Bypass Zones
The Bypass function is used when you want to arm your system with one or more
zones intentionally unprotected. Bypassed zones are unprotected and will not cause
an alarm when violated while your system is armed.
1. The system will not allow you to bypass fire or emergency zones.
2. To bypass zones, the system must be disarmed first.
To bypass zones do the following:
ACTION SCREEN
1. From the "Home" screen, press the
SECURITY
button. The "Arming" screen is
displayed.
2. From the "Arming" screen, press the
MORE
CHOICES
button. The "More Choices" screen
is displayed.
3. Press the
SHOW ZONES
button on the
"More Choices" screen. The "Zones" screen is
displayed.
NOTE:
While iCenter is requesting and
receiving the zone data from the control panel,
the "Zones" screen displays "
Getting Zone
Status…
".
Page 21
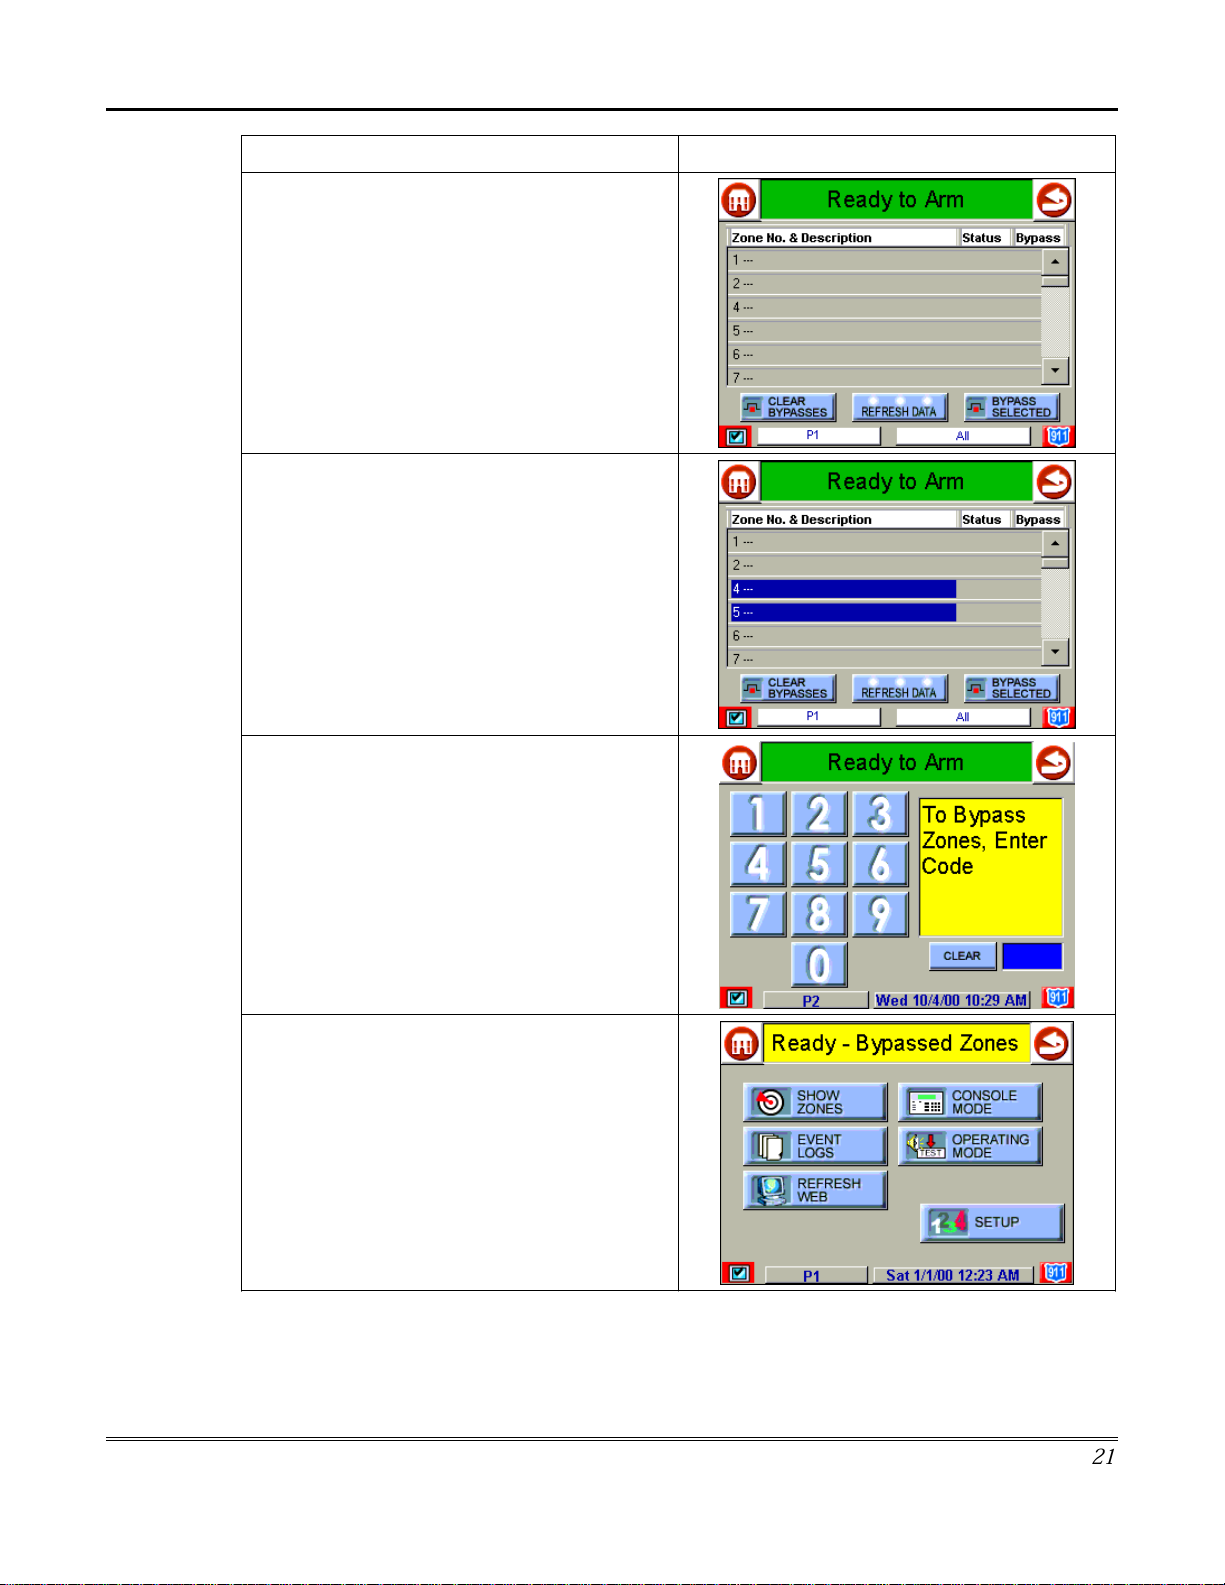
ACTION SCREEN
4. Highlight the zone(s) to be bypassed by
touching it on the screen when the zones are
displayed.
Security System Operation (Cont'd)
5. Press the
The "User Authorization" screen is displayed
with the instructions "
Code
".
6. Enter your 4-digit user code. The "More
Choices" screen is displayed showing the
system as
BYPASS SELECTED
To Bypass Zones, Enter
Ready-Bypassed Zones
button.
.
21
Page 22

Security System Operation (cont'd)
How to Remove Bypassed Zones
A bypassed zone will automatically be unbypassed when you disarm the system. If the
system is disarmed and a zone is bypassed, you can remove the bypass as follows:
ACTION SCREEN
1. View bypassed zones by pressing the
SHOW ZONES
displayed.
NOTE:
receiving the zone data from the control panel,
the "Zones" screen displays "
Status.
While iCenter is requesting and
..".
button. The "Zones" screen is
Getting Zone
2. Remove zone bypasses by pressing the
CLEAR BYPASSES
Authorization" screen is displayed with the
instructions
NOTE:
the system is armed.
3. Enter your 4-digit user code. The "More
Choices" screen is displayed showing the
system as
NOTE:
open (not ready).
To Clear Bypasses, Enter Code
A zone cannot be unbypassed while
Ready to Arm
This will not occur if any zone(s) is
button. The "User
.
.
22
Page 23
How to Disarm the System
Security System Operation (Cont'd)
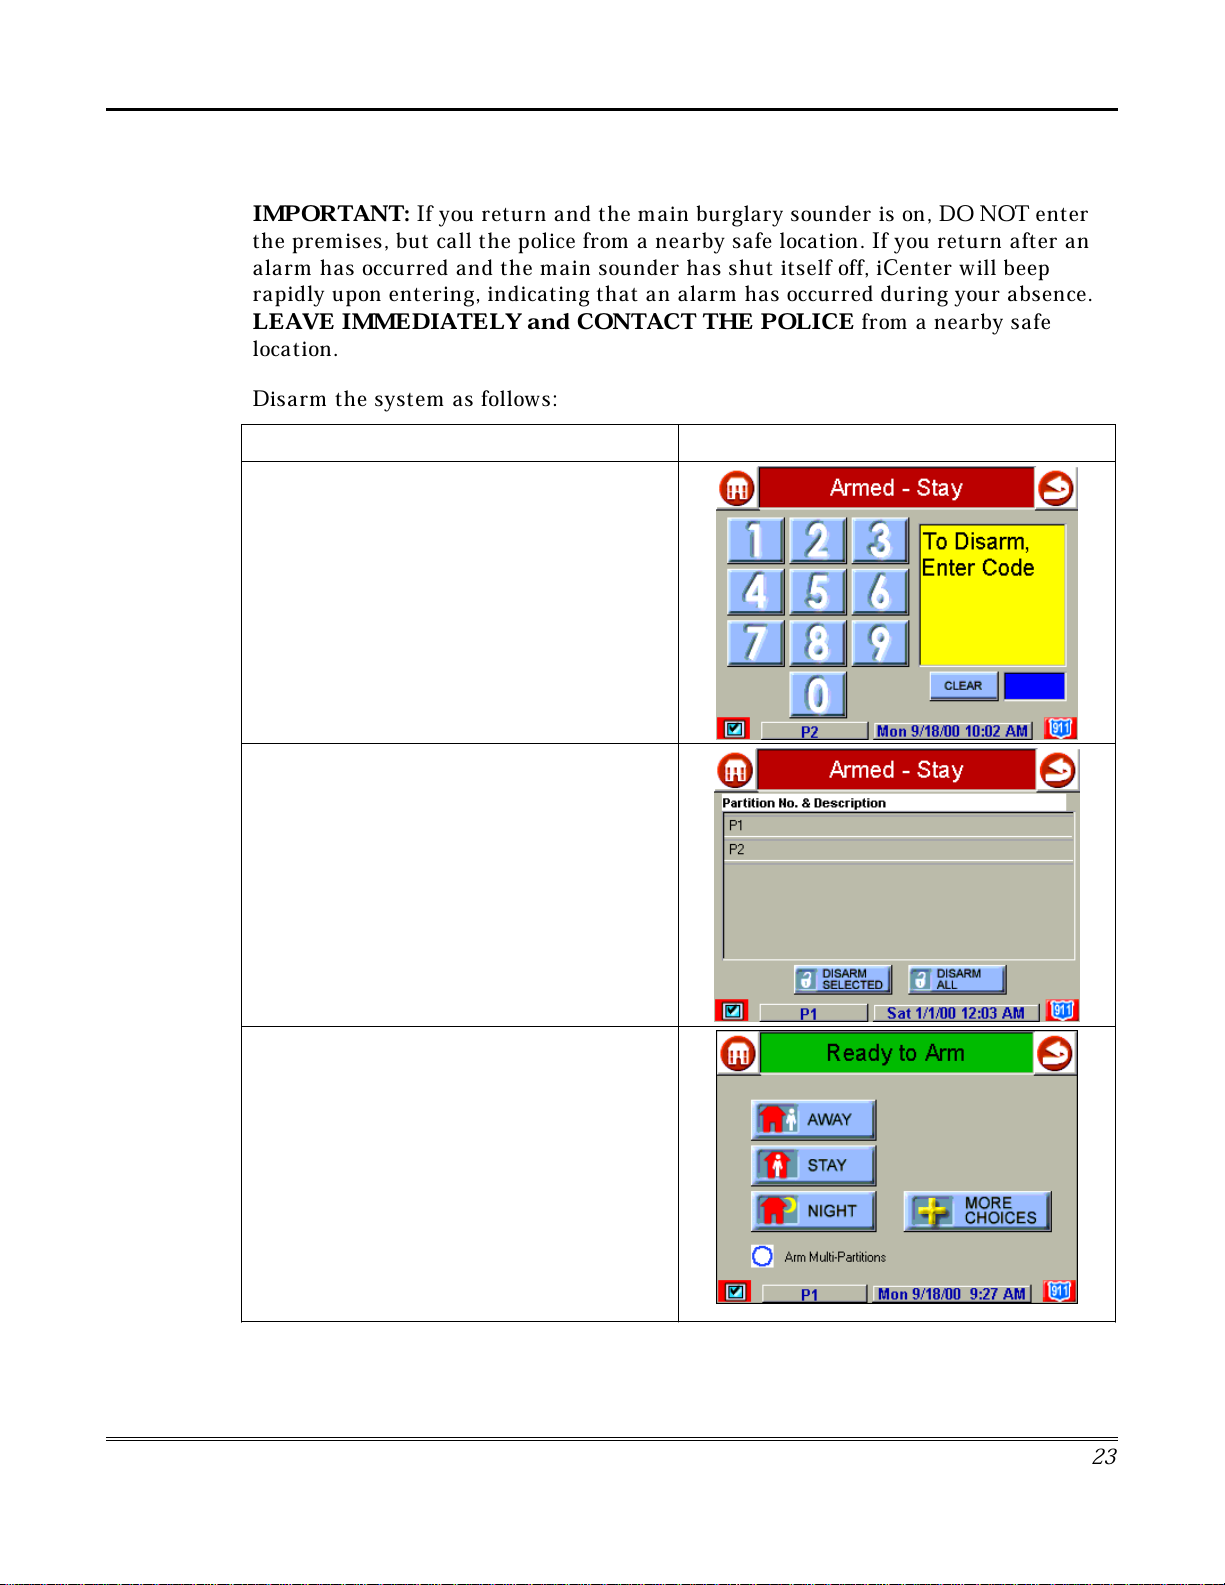
IMPORTANT:
If you return and the main burglary sounder is on, DO NOT enter
the premises, but call the police from a nearby safe location. If you return after an
alarm has occurred and the main sounder has shut itself off, iCenter will beep
rapidly upon entering, indicating that an alarm has occurred during your absence.
LEAVE IMMEDIA
TELY and CONTACT THE POLICE
from a nearby safe
location.
Disarm the system as follows:
ACTION SCREEN
1. Press the
screen. The "User Authorization" screen is
displayed with the instructions
Enter Code
2. Enter your 4-digit user code. The
No. & Description
DISARM
.
button on any "
To Disarm,
screen is displayed.
Armed"
Partition
3. Press the
to disarm the system. iCenter beeps once and
the "Arming" screen is displayed showing the
system as Ready to Arm or not ready if any
zone is faulted (open).
NOTE:
partitions, you must first highlight the
partition(s) to be disarmed, then press the
DISARM SELECTED
once and the "Arming" screen is displayed
showing the system as Ready to Arm or not
ready if any zone is faulted (open).
DISARM ALL
If you wish to disarm only selected
button if you wish
button. iCenter beeps
2
3
Page 24
Security System Operation (cont'd)
ACTION SCREEN
NOTE:
screen approximately 1 minute after the
system is disarmed.
iCenter will return to the "Home"
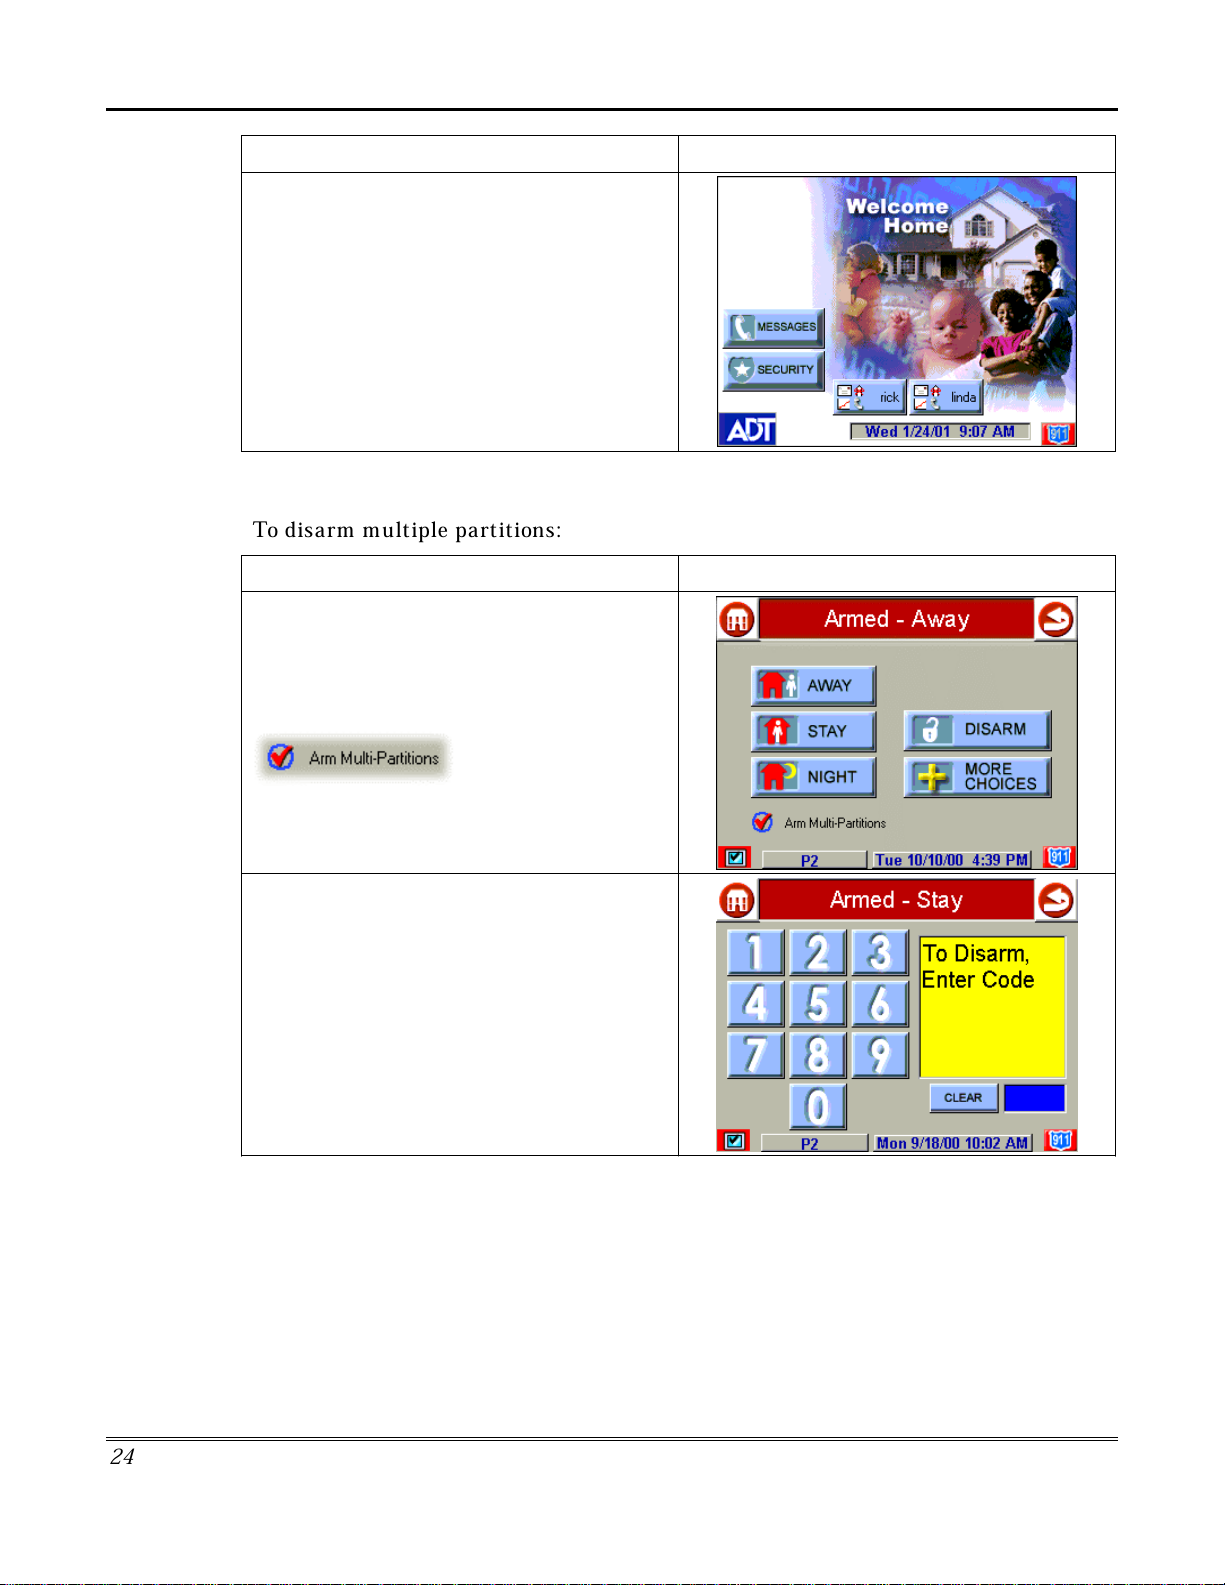
How to Disarm Multiple Partitions
To disarm multiple partitions:
ACTION SCREEN
1. From the "Home" screen press the
SECURITY
screen.
Be sure the
checked.
button to display the "Arming"
Arm Multi-Partitions
button is
2. Press the
screen. The "User Authorization" screen is
displayed with the instructions “
Enter Code”
2
4
DISARM
.
button on the "
Armed"
To Disarm,
Page 25

Security System Operation (Cont'd)
ACTION SCREEN
3. Enter your 4-digit user code. The
No. & Description
4. Press the
to disarm the system. iCenter beeps once and
the "Arming" screen is displayed showing the
system as Ready to Arm or not ready if any
zone is faulted (open).
NOTE:
partitions, you must first highlight the
partition(s) to be disarmed, then press the
DISARM SELECTED
once and the "Arming" screen is displayed
showing the system as Ready to Arm or not
ready if any zone is faulted (open).
If you wish to disarm only selected
screen is displayed.
DISARM ALL
button. iCenter beeps
button if you wish
Partition
NOTE:
screen approximately 1 minute after the
system is disarmed.
iCenter will return to the "Home"
2
5
Page 26
Security System Operation (cont'd)
How to Disarm Using a Keyswitch
To disarm the partition, turn the key to the right and release. If an alarm has
occurred, the red light will be flashing rapidly (memory of alarm).
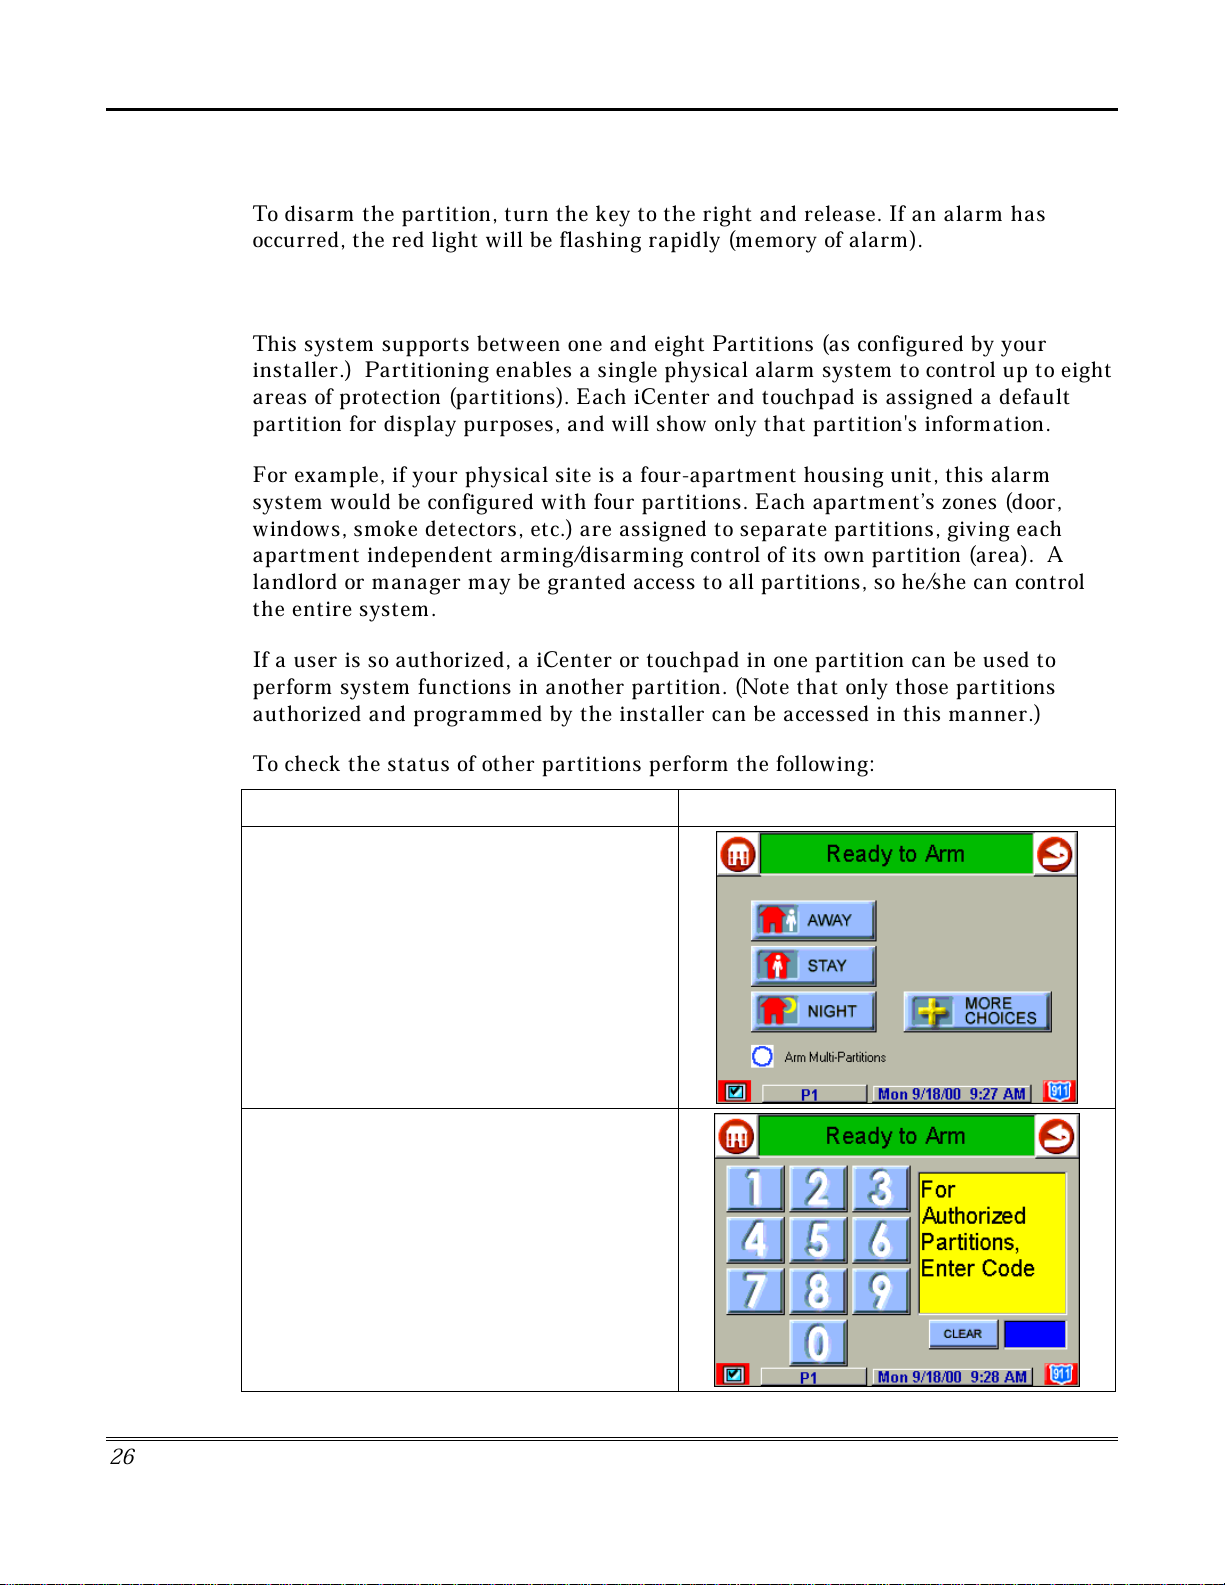
How to Check the Status of Other Partitions
This system supports between one and eight Partitions (as configured by your
installer.) Partitioning enables a single physical alarm system to control up to eight
areas of protection (partitions). Each iCenter and touchpad is assigned a default
partition for display purposes, and will show only that partition's information.
For example, if your physical site is a four-apartment housing unit, this alarm
system would be configured with four partitions. Each apartment’s zones (door,
windows, smoke detectors, etc.) are assigned to separate partitions, giving each
apartment independent arming/disarming control of its own partition (area). A
landlord or manager may be granted access to all partitions, so he/she can control
the entire system.
If a user is so authorized, a iCenter or touchpad in one partition can be used to
perform system functions in another partition. (Note that only those partitions
authorized and programmed by the installer can be accessed in this manner.)
To check the status of other partitions perform the following:
ACTION SCREEN
1. From the "Home" screen press the
SECURITY
screen.
2. Press the "Current Partition" tab (lower edge
of the screen; in this case it displays P1). The
"User Authorization" screen is displayed with
the instructions “
Enter Code”
button to display the "Arming"
For Authorized Partitions,
.
2
6
Page 27
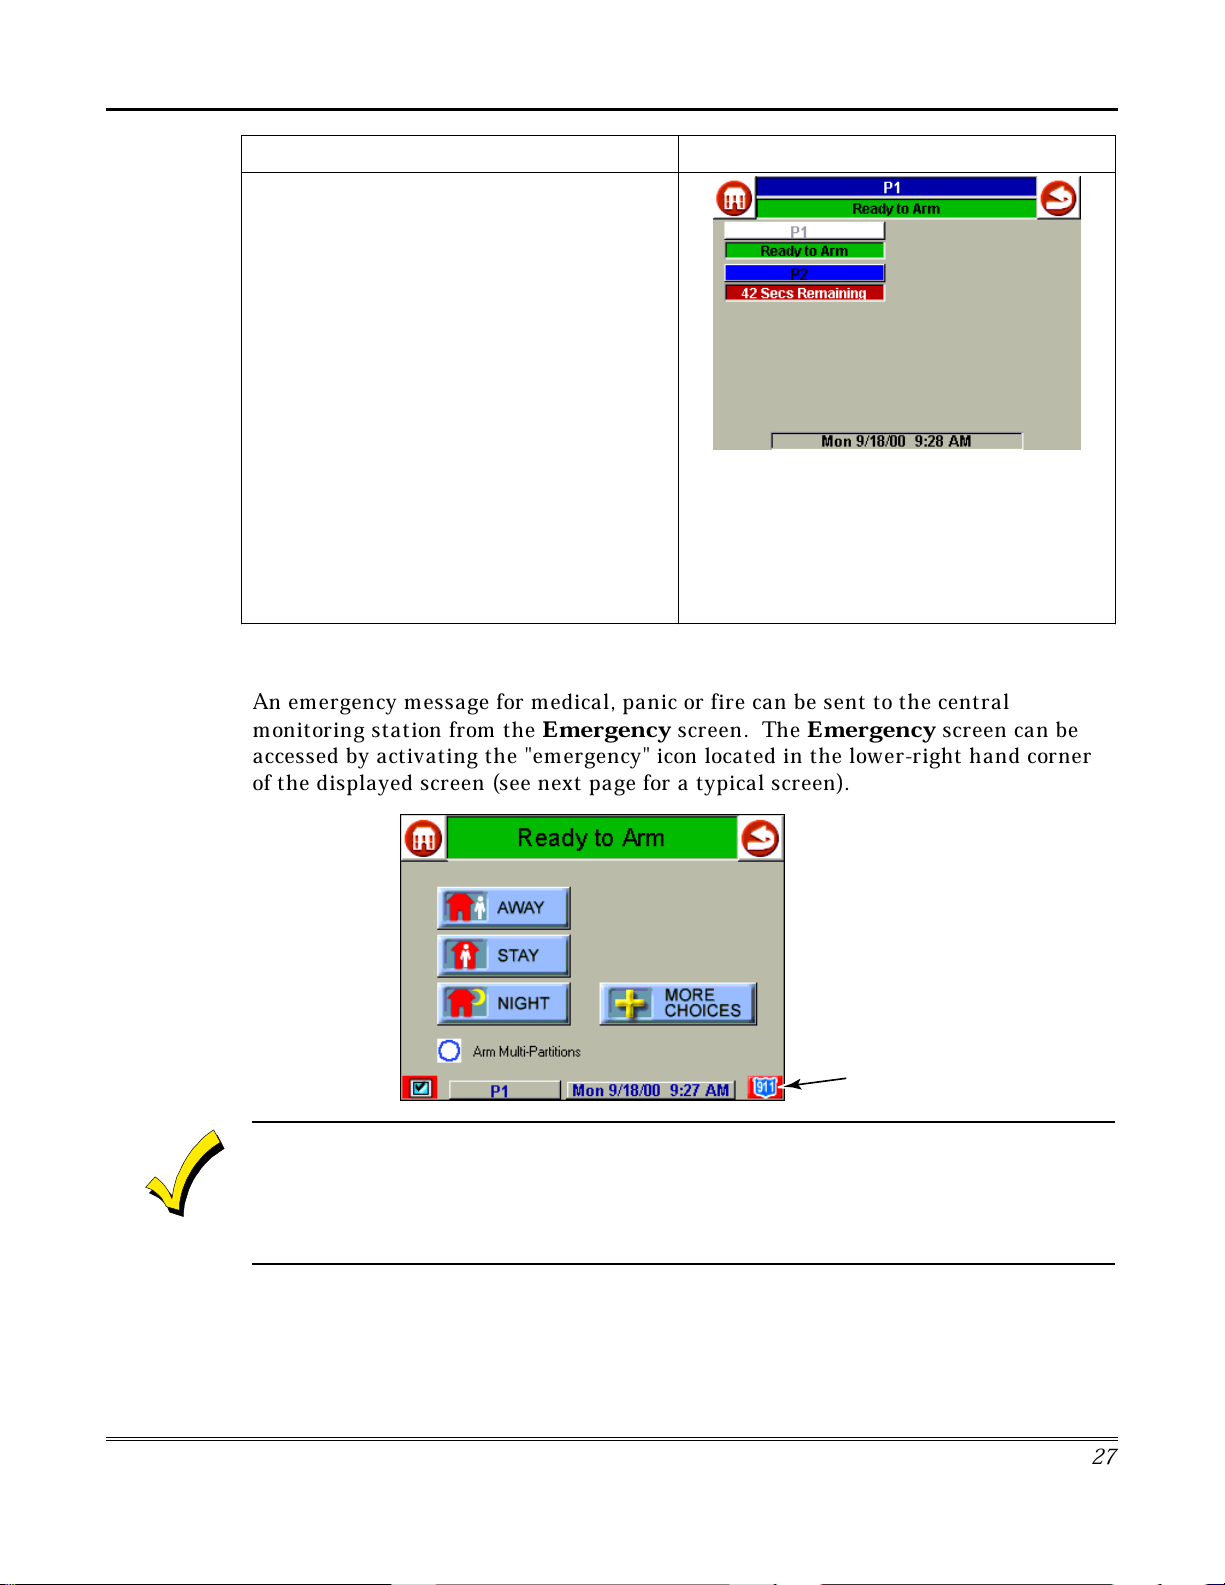
ACTION SCREEN
3. Enter the code authorized to access other
partition(s).
If the code is accepted, the system displays
the partitions that user has access to.
NOTE:
not all) of the available partitions.
This screen displays the available partitions (in
this case, Partitions 1 and 2), and their current
status.
The current partition is shown at the top of the
display (in this example, the device is attached
to Partition 1 (P1)). To change this
assignment, select the appropriate button (e.g.
press P2 to switch control to Partition 2).
A code may have access to some (but
How to Send Emergency Messages
Security System Operation (Cont'd)
An emergency message for medical, panic or fire can be sent to the central
monitoring station from the
Emergency
screen. The
Emergency
screen can be
accessed by activating the "emergency" icon located in the lower-right hand corner
of the displayed screen (see next page for a typical screen).
"EMERGENCY"
ICON
AUI-006
1. The
2. In some instances a pop-up window may be partially covering the "emergency" icon. If this is
Emergency
screen calibration.
the case, you should first close the pop-up window by pressing either the
button, whichever may be appropriate, on the pop-up screen.
screen cannot be accessed while running a diagnostic test or the touch
DONE
CANCEL
or
2
7
Page 28
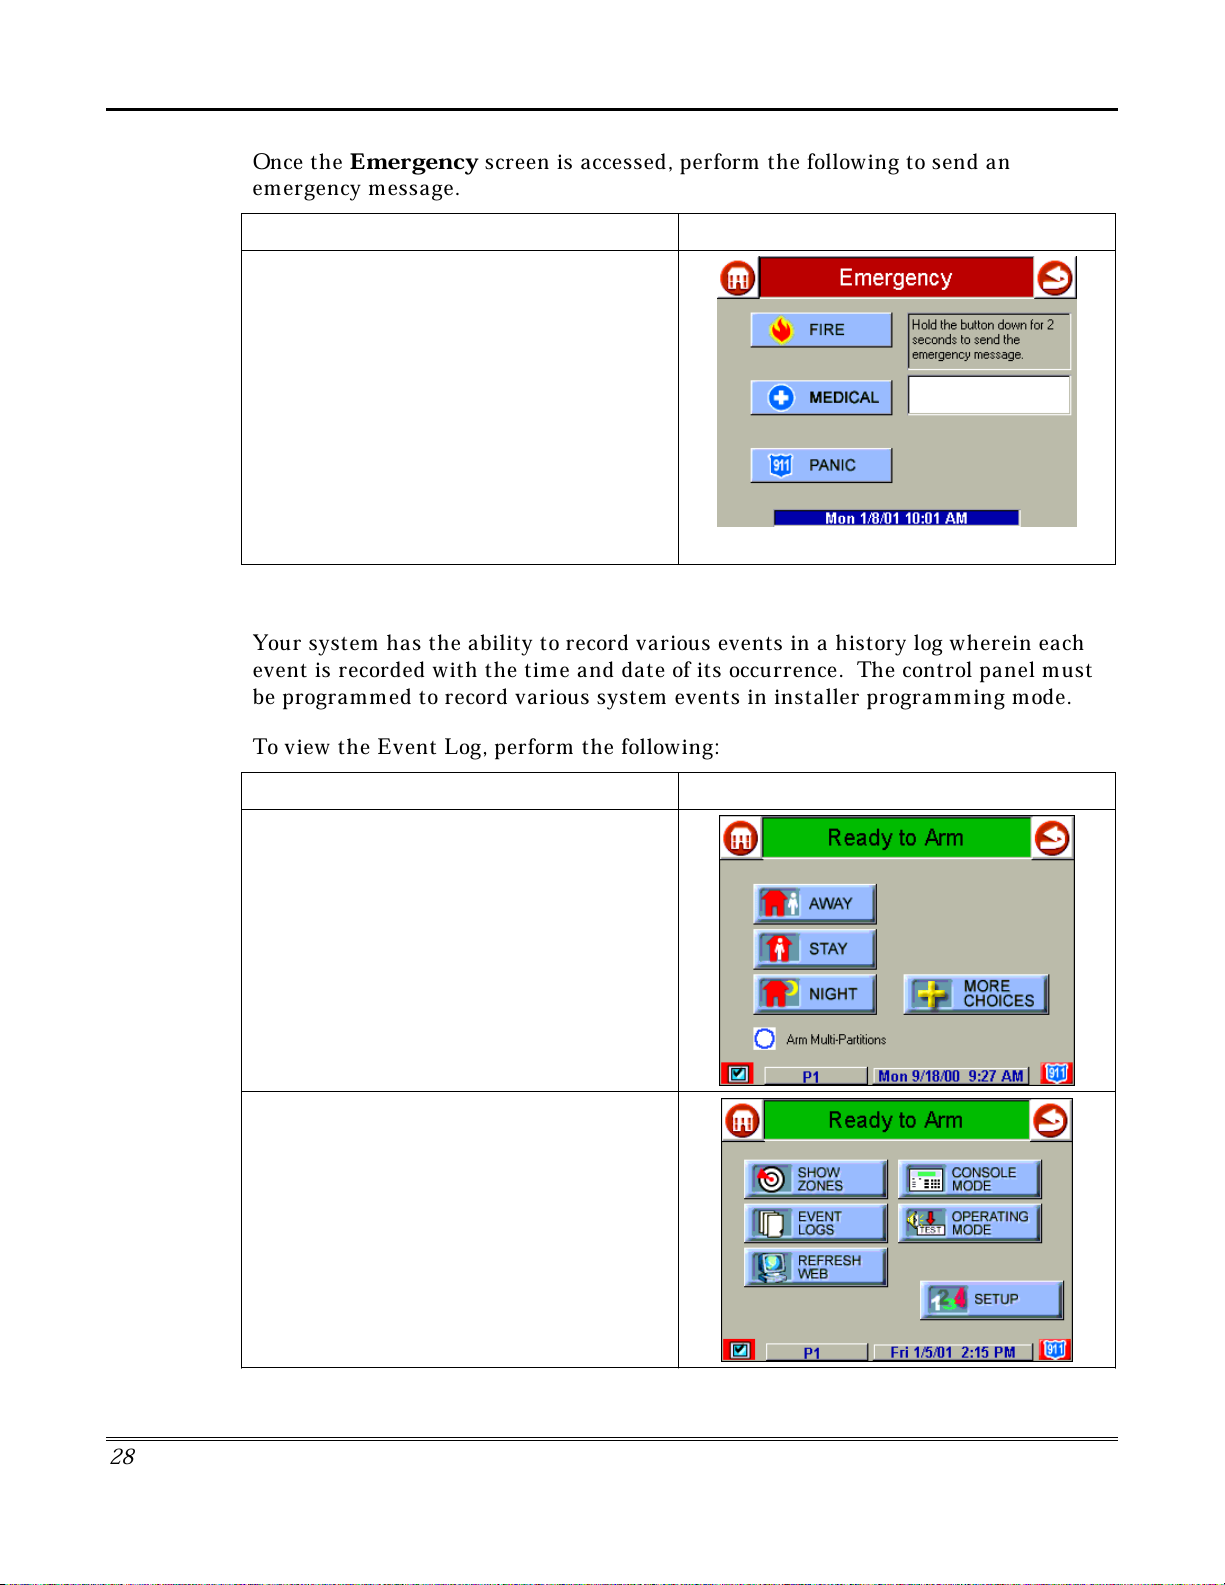
Security System Operation (cont'd)
Once the
Emergency
emergency message.
On the
at least 2 seconds) the associated alarm
button for the type of emergency message you
want to send (
When the message is sent, the associated
"Message Sent" statement is displayed in the
text box to the right of the buttons. You are
immediately returned to the screen from which
you pressed the “Emergency” icon.
Emergency
MEDICAL,PANIC
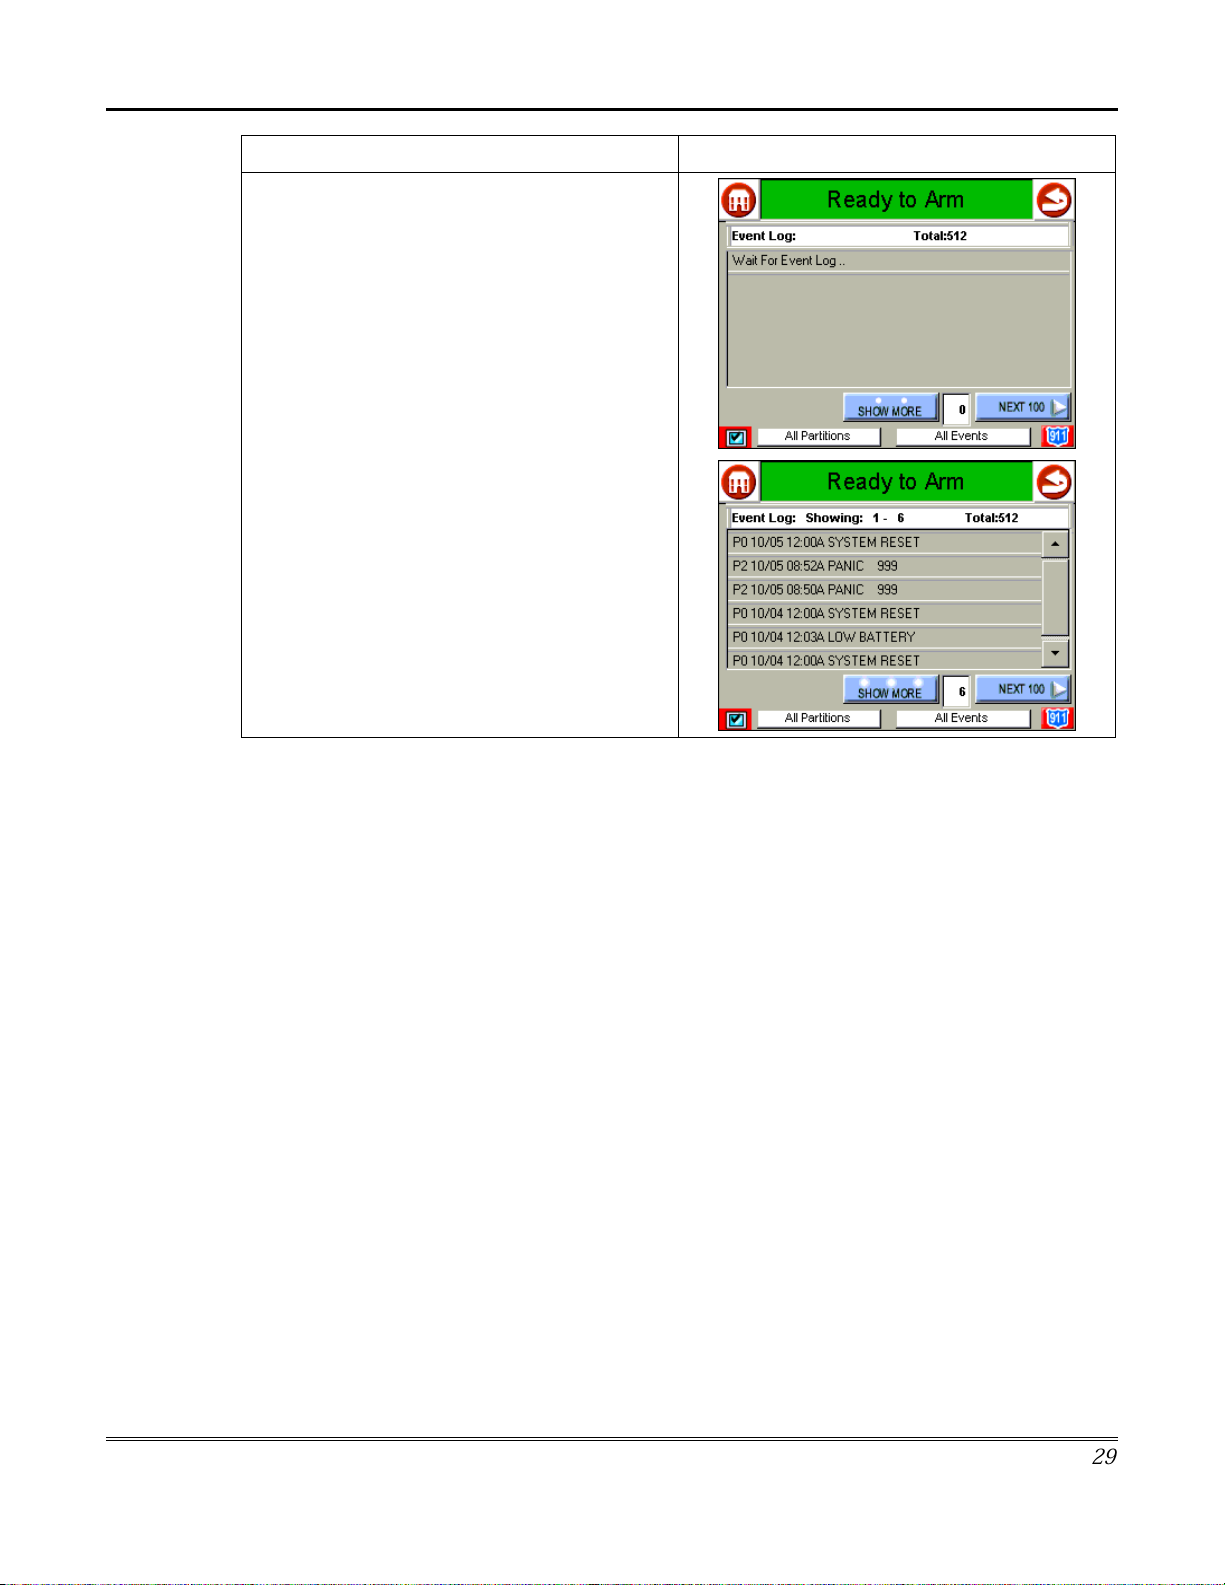
How to View the Event Log
Your system has the ability to record various events in a history log wherein each
event is recorded with the time and date of its occurrence. The control panel must
be programmed to record various system events in installer programming mode.
screen is accessed, perform the following to send an
ACTION SCREEN
screen press and hold (for
FIRE
, or
).
To view the Event Log, perform the following:
ACTION SCREEN
1. From the "Home" screen, press the
SECURITY
displayed.
2. From the "Arming" screen press the
CHOICES
is displayed.
button. The "Arming" screen is
MORE
button. The "More Choices" screen
2
8
Page 29
Security System Operation (Cont'd)
ACTION SCREEN
3. Press the
"More Choices" screen. The "Event Log"
screen is displayed.
NOTE:
receiving the event log data from the control
panel, the "Event Log" screen displays "
For Event Log.
To view additional events, press the up/down
arrows to scroll through the event log. To view
the next 100 items, press the
button.
EVENT LOGS
While iCenter is requesting and
.".
button on the
NEXT 100
Wait
2
9
Page 30

Security System Operation (cont'd)
3
0
Page 31

Introduction to Fire Alarm System Operation
Your fire alarm system (if installed) is on 24 hours a day, providing continuous
protection. In the event of an emergency, the installed smoke and heat detectors
will automatically send signals to your Control/Communicator, triggering a loud
interrupting sound from the touchpad. An interrupted sound will also be produced
by optional exterior sounders. A FIRE message will appear at your touchpad and
remain on until you silence the alarm.
In Case of Fire Alarm
1. Should you become aware of a fire emergency before your detectors sense the
problem, go to your nearest touchpad and manually initiate an alarm by
pressing the panic key assigned as FIRE emergency (if programmed by the
installer) and hold down for at least 2 seconds.
2. Evacuate all occupants from the premises.
3. If flames and/or smoke are present, leave the premises and notify your local Fire
Department immediately.
Fire Alarm System Operation
If no flames or smoke are apparent, investigate the cause of the alarm. The zone
descriptor of the zone(s) in an alarm condition will appear at the touchpad.
Silencing a Fire Alarm
1. Silence the alarm by entering your code and pressing the OFF key. To clear the
display, enter your code and press the OFF key again
2. If the touchpad does not indicate a READY condition after the second OFF
sequence, press the READY key to display the zone(s) that are faulted. Be sure
to check that smoke detectors are not responding to smoke or heat producing
objects in their vicinity. In this case, eliminate the source of heat or smoke.
3. If this does not remedy the problem, there may still be smoke in the detector.
Clear it by fanning the detector for about 30 seconds.
4. When the problem has been corrected, clear the display by entering your code
and pressing the OFF key.
Fire Display Lock
If several zones produce an alarm before any are silenced, the system can be
programmed to lock the touchpad display with the first zone that produced an
alarm. Ask your installer if your system has been activated with this feature. To
display the other zone(s), press the [✴] key for each zone. Also the “A”, “B”, or “C”
keys can be programmed to scroll the touchpad display to view the previous or
subsequent fire alarms.
3
1
Page 32

Fire Alarm System Operation (cont'd)
Recommendations for Proper Protection
THE FOLLOWING RECOMMENDATIONS FOR THE LOCATION OF FIRE AND
BURGLARY DETECTION DEVICES HELP PROVIDE PROPER COVERAGE FOR
THE PROTECTED PREMISES.
Recommendations For Smoke And Heat Detectors
With regard to the number and placement of smoke/heat detectors, we subscribe to
the recommendations contained in the National Fire Protection Association's
(NFPA) Standard #72 noted below.
E
arly warning fire detection is best achieved by the installation of fire detection
equipment in all rooms and areas of the household as follows: For minimum
protection a smoke detector should be installed outside of each separate sleeping
area, and on each additional floor of a multi-floor family living unit, including
basements. The installation of smoke detectors
unfinished), or in garages is not normally recommended.
in kitchens, attics (finished or
For additional protection the NFPA recommends that you install heat
or smoke
detectors in the living room, dining room, bedroom(s), kitchen, hallway(s), attic,
furnace room, utility and storage rooms, basements and attached garages.
DINING
LIVING ROOM
BEDROOM
LVNG RM
BASEMENT
KITCHEN
BEDROOM
TO
BR
BEDROOM
BEDROOM
BEDROOM
KTCHN
BEDROOM
CLOSED
.
DOOR
KITCHEN
TV ROOM
LIVING ROOM
BEDROOM
Smoke Detectors for Minimum Protection
Smoke Detectors for Additional Protection
Heat-Activated Detectors
GARAGE
DINING
BDRM
BDRM
In addition, we recommend the following:
Install a smoke detector inside every bedroom where a smoker sleeps.
•
Install a smoke detector inside every bedroom where someone sleeps with the
•
door partly or completely closed. Smoke could be blocked by the closed door.
Also, an alarm in the hallway outside may not wake up the sleeper if the door is
closed.
Install a smoke detector inside bedrooms where electrical appliances (such as
•
portable heaters, air conditioners or humidifiers) are used.
3
2
Page 33

Fire Alarm System Operation (Cont'd)
Install a smoke detector at both ends of a hallway if the hallway is more than 40
•
feet (12 meters) long.
Install smoke detectors in any room where an alarm control is located, or in any
•
room where alarm control connections to an AC source or phone lines are made.
If detectors are not so located, a fire within the room could prevent the control
from reporting a fire or an intrusion.
Recommendations For Proper Intrusion Protection
For proper intrusion coverage, sensors should be located at every possible point of
entry to a home or commercial premises. This would include any skylights that may
be present, and the upper windows in a multi-level building.
In addition, we recommend that radio backup be used in a security system so that
alarm signals can still be sent to the alarm monitoring station in the event that the
telephone lines are out of order (alarm signals are normally sent over the phone
lines, if connected to an alarm monitoring station).
Recommendations for Evacuation
Establish and regularly practice a plan of escape in the event of fire. The following
steps are recommended by the National Fire Protection Association:
1. Position your detector or your interior and/or exterior sounders so that they can
be heard by all occupants.
2. Determine two means of escape from each room. One path of escape should lead
to the door that permits normal exit from the building. The other may be a window,
should your path be impassable. Station an escape ladder at such windows if there
is a long drop to the ground.
3. Sketch a floor plan of the building. Show windows, doors, stairs and rooftops that
can be used to escape. Indicate escape routes for each room. Keep these routes free
from obstruction and post copies of the escape routes in every room.
4. Assure that all bedroom doors are shut while you are asleep. This will prevent
deadly smoke from entering while you escape.
5. Try the door. If the door is hot, check your alternate escape route. If the door is
cool, open it cautiously. Be prepared to slam the door if smoke or heat rushes in.
6. Where smoke is present, crawl on the ground; do not walk upright. Smoke rises
and may overcome you. Clearer air is near the floor.
33
Page 34

Fire Alarm System Operation (cont'd)
7. Escape quickly; don't panic.
8. Establish a common meeting place outdoors, away from your house, where
everyone can meet and then take steps to contact the authorities and account for
those missing. Choose someone to assure that nobody returns to the house — many
die going back.
3
4
Page 35

Introduction to User Code Setup
Each user must be assigned a name with a corresponding 4-digit user code in order
to gain access to various features and functions. Through iCenter, you may program
users to access any and all of the following systems:
Fire/Burglary
•
TeleSMART
•
Internet
•
Users for the systems are programmed in a central user setup location that provides
the specific questions for the user pertaining to each system. You may want these
users to be the same, but there are situations in which you may want a user to have
access to one system (e.g., TeleSMART) without having access to another (e.g., the
Fire/Burglary system).
How to Access User Setup
Access User Setup as follows:
User Code Setup
ACTION SCREEN
1. From the "Home" screen, press the
SECURITY
displayed.
2. Press the
"More Choices" screen is displayed.
button. The "Arming" screen is
MORE CHOICES
button. The
3
5
Page 36

User Code Setup (cont'd)
ACTION SCREEN
3. Press the
Choices" screen. The "Setup" screen is
displayed.
4. Press the USER SETUP button on the
“Setup” screen. The User Setup screen is
displayed.
How to Add a User
SETUP
button on the "More
Add a user as follows:
ACTION SCREEN
Three selections are available: add a user, edit
a user, or delete a user.
3
6
Page 37

User Code Setup (Cont'd)
ACTION SCREEN
1. To add a use, press the
The "User Authorization" screen is displayed
with the instructions "
2. Enter your “Master” code. The “User
Options” screen is displayed.
3. Press the box next to
Enter Data
The
keyboard screen is displayed.
ADD USER
Enter Authorized Code
Enter User Name
button.
.
".
3
7
Page 38
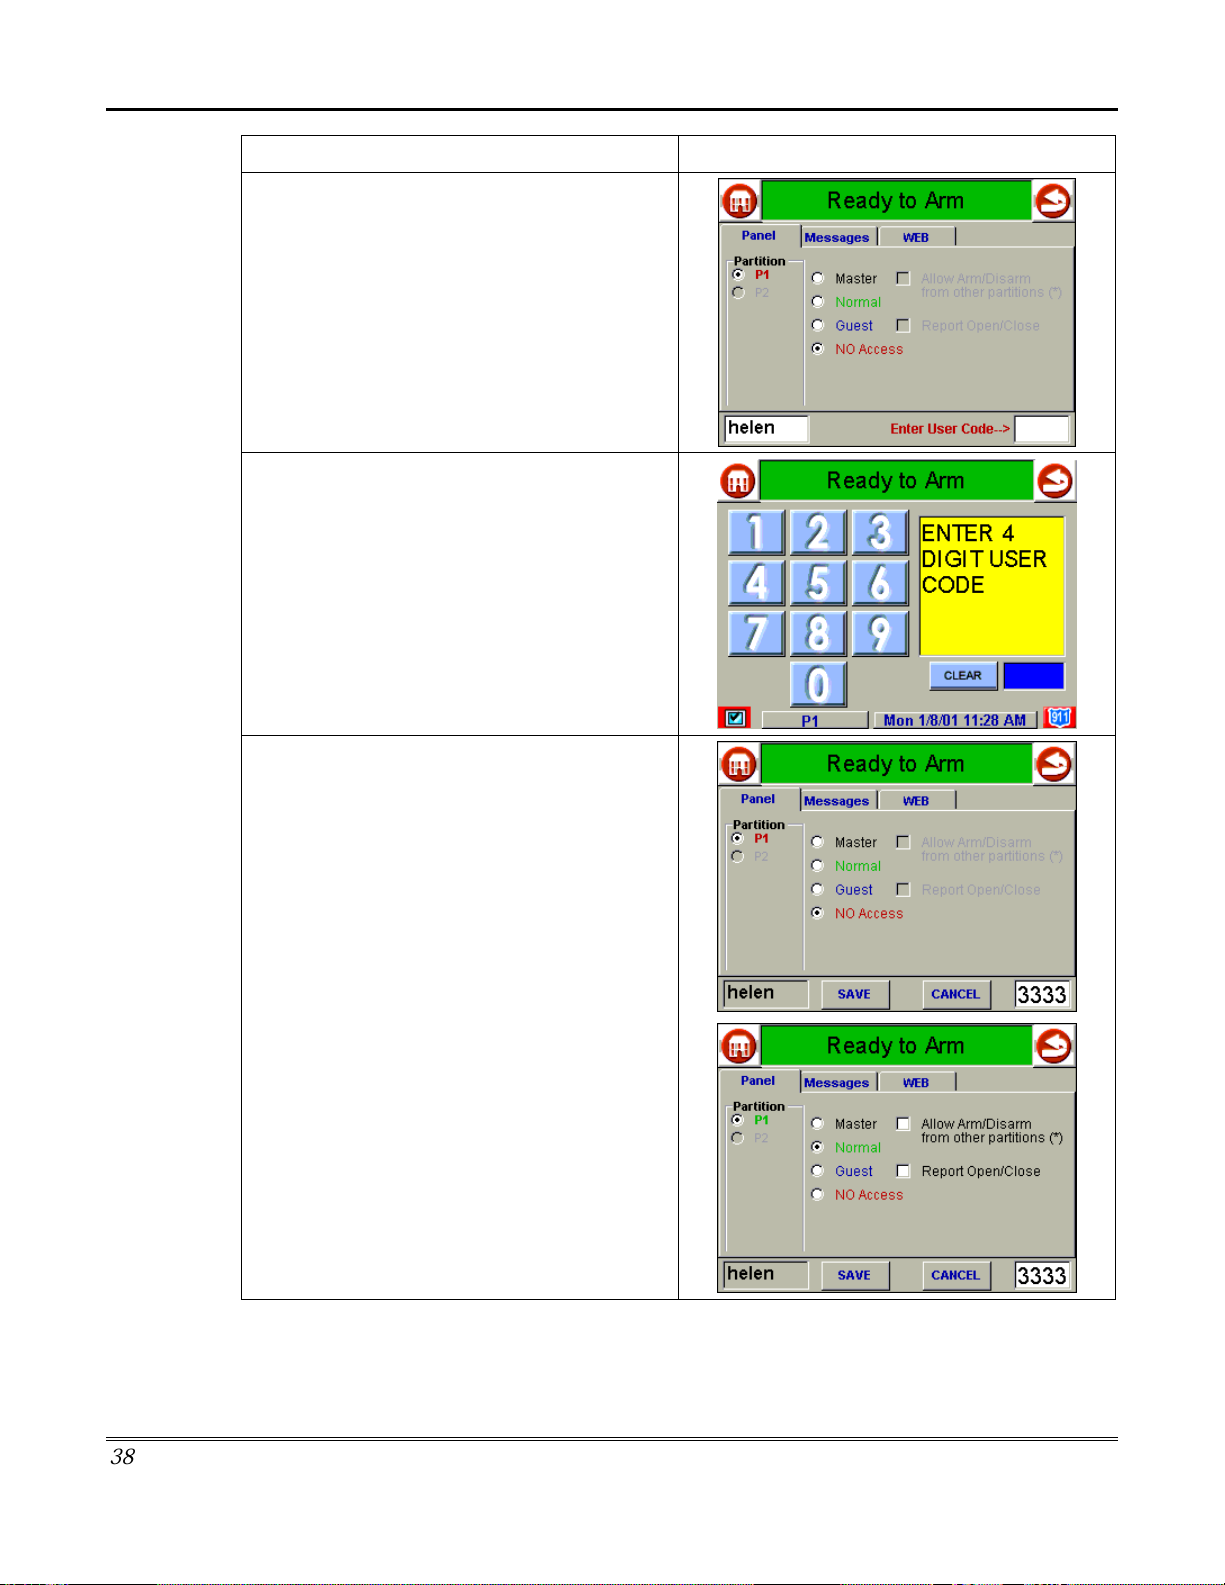
User Code Setup (cont'd)
ACTION SCREEN
4. Type in the user name and press the
button. The “User Options” screen is
displayed with
5. Touch the box next to with
Code…
displayed with the instructions "
DIGIT USER CODE
6. Enter the 4-digit code for this user. The
“User Options” screen is displayed with the
user’s name and code displayed.
Enter User Code…
Enter User
The "User Authorization" screen is
ENTER 4
".
OK
displayed.
Select the partitions and access level for this
user.
NOTE: If this user is to have Internet or
TeleSMART access, continue to step 7. If this
user is to have security access only, press the
SAVE
button at this time.
3
8
Page 39

ACTION SCREEN
7. Press the Messages tab on the “User
Options” screen. The “Messages access”
screen is displayed.
Select the Mailbox Order options for this user
and select
on Disarm, AutoPlay Messages on Disarm,
and/or
options for this user.
NOTE:
and TeleSMART access only, press the
button at this time. If the user will also have
Internet access, go to step 8.
8. Pres the WEB tab on the “User Options”
screen. The “WEB access” screen is
displayed.
To provide this user with Internet access press
the box next to
until a check appears. You may also select the
Auto Switch to WEB on Disarm
time.
Check for Voice Mail Messages
Enable Remote/Telephone Access
If this user is to have security access
SAVE
Enable User for Web Access
option at this
User Code Setup (Cont'd)
9. Press the
save the configuration. When the save is
complete, the
with the new user’s name shown.
Save
button. The system will
User Setup
screen is displayed
3
9
Page 40

User Code Setup (cont'd)
How to Delete a User
Delete a User as follows:
ACTION SCREEN
1. Three selections are available From the
User Setup screen: add a user, edit a user, or
delete a user.
1. To delete a user, touch the circle next to the
user to be deleted and press the
USER
is displayed with the instructions "
Authorized Code
button. The "User Authorization" screen
".
DELETE
Enter
2. Enter your “Master” code. The
Delete
3. Press the appropriate button. The
Setup
screen is displayed.
screen is displayed.
Confirm
User
4
0
Page 41

How to Edit a User
Edit a user as follows:
User Code Setup (Cont'd)
ACTION SCREEN
NOTE:
selections are available; add a user, edit a
user, or delete a user.
1. To edit a user, touch the circle next to the
user to be edited and press the
button. The "User Authorization" screen is
displayed with the instructions "
Authorized Code
2. Enter your “Master” code. The “User
Options” screen is displayed.
From the User Setup screen three
EDIT USER
Enter
".
3. Select whatever options you wish to select
for this user and press the
configuration changes are saved and you are
returned to the
User Setup
Save
button. The
screen.
4
1
Page 42
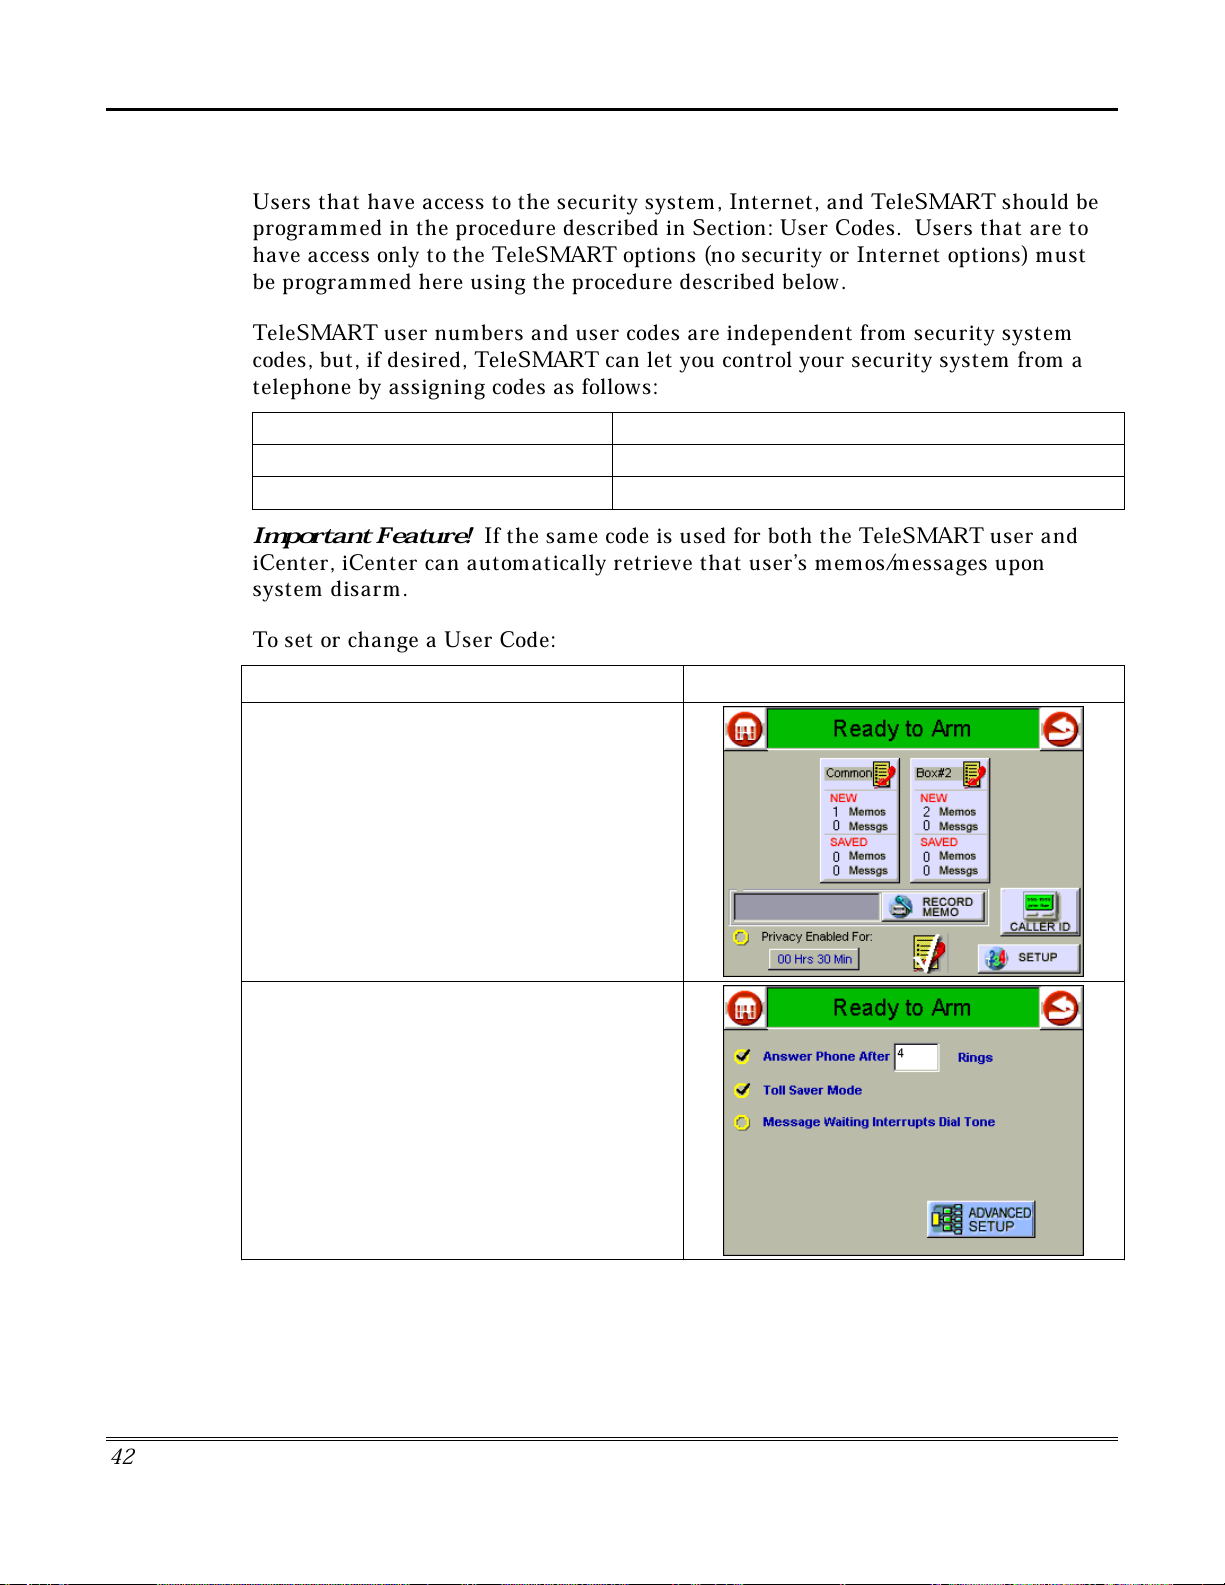
User Code Setup (cont'd)
How to Set Up a User Code for TeleSMART Use Only
Users that have access to the security system, Internet, and TeleSMART should be
programmed in the procedure described in Section: User Codes. Users that are to
have access only to the TeleSMART options (no security or Internet options) must
be programmed here using the procedure described below.
TeleSMART user numbers and user codes are independent from security system
codes, but, if desired, TeleSMART can let you control your security system from a
telephone by assigning codes as follows:
If TeleSMART user code is... That user can access...
Unique to TeleSMART system, TeleSMART system only.
Same as a security system user code, Both TeleSMART and security systems.
Important Feature!
If the same code is used for both the TeleSMART user and
iCenter, iCenter can automatically retrieve that user’s memos/messages upon
system disarm.
To set or change a User Code:
ACTION SCREEN
1. From the "Home" screen, press the
MESSAGES
"TeleSMART" main screen.
2. Press the
enters the "TeleSMART Setup" screen.
button to display the
SETUP
button. The system
4
2
Page 43

User Code Setup (Cont'd)
ACTION SCREEN
3. Press the
“Advanced Setup” screen is displayed.
4. Press the
Authorization" screen is displayed with the
instructions "
Change User Settings
5. Enter your 4-digit Master Code. The “User
Settings” screen is displayed.
Advanced Setup
User Setup
Please Login with Code To
".
button. The
button. The "User
5. Select options and press the
button. The code is saved and The “Advanced
Setup” screen is displayed.
Save Settings
4
3
Page 44

User Code Setup (cont'd)
44
Page 45
Introduction to Internet Features
As a household Internet appliance, iCenter provides access to a wealth of
information, including:
News
•
Sports
•
Weather
•
E-mail, and
•
Live updates of user-selectable content such as your horoscope.
•
Additionally, you may control all of iCenter’s function from any personal computer
or laptop that has Internet capabilities including security system functions (arming,
disarming, etc.) and to check to see if you have a voice message.
Whenever a user is added or edited through the User Setup procedure, and if that
user is authorized to have WEB access, upon saving of the user setup information a
button is automatically generated on the “Home” screen with that user’s name.
Internet Features
Modifying Your WEB Page
You may access and customize your WEB page through your personal computer or
laptop.
To access your existing WEB page go to the ADT iCenter/Alarmnet web site at
http://icenter.alarmnet.com.
The screen will prompt,
“To access your existing iCenter Account, Click here
.
4
5
Page 46
Internet Features (cont'd)
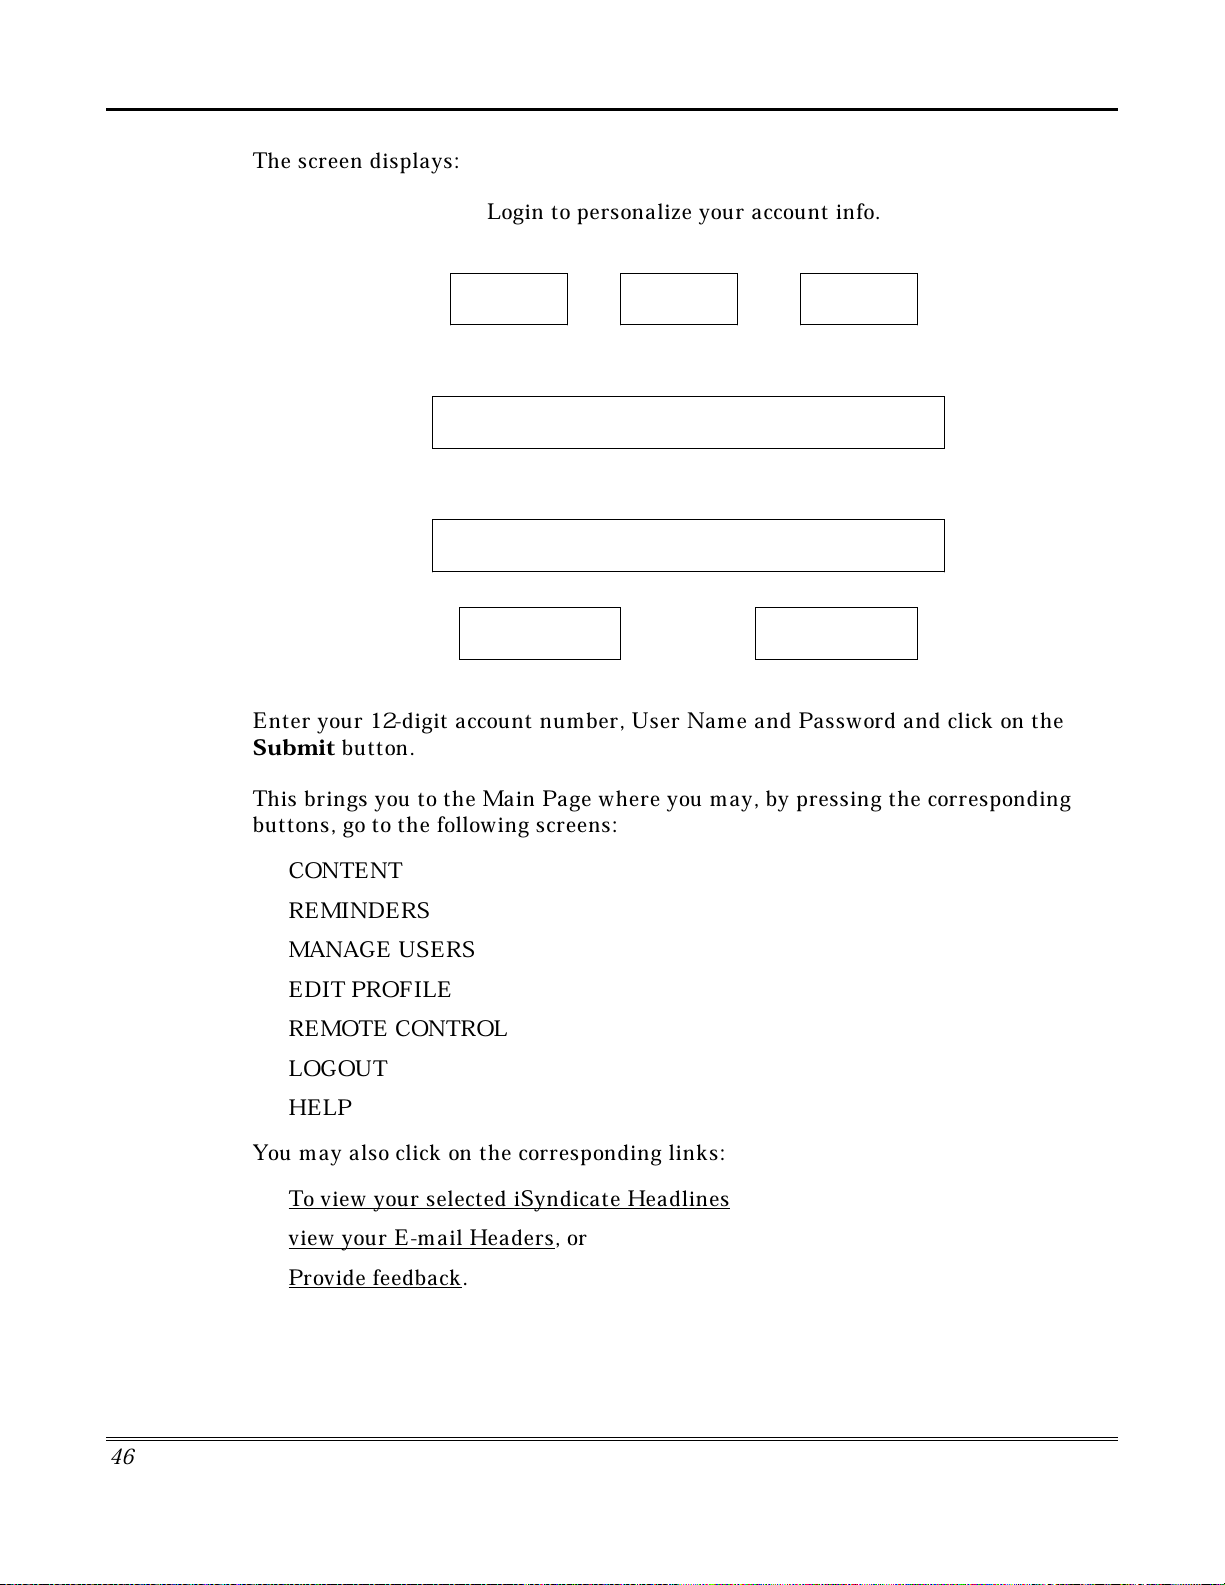
The screen displays:
Login to personalize your account info.
Account Number
User Name
Password
Submit Reset
Enter your 12-digit account number, User Name and Password and click on the
S
ubmit
button.
This brings you to the Main Page where you may, by pressing the corresponding
buttons, go to the following screens:
CONTENT
•
REMINDERS
•
MANAGE USERS
•
EDIT PROFILE
•
REMOTE CONTROL
•
LOGOUT
•
HELP
•
You may also click on the corresponding links:
To view your selected iSyndicate Headlines
•
view your E-mail Headers
•
Provide feedback
•
.
, or
4
6
Page 47
Internet Features (Cont'd)
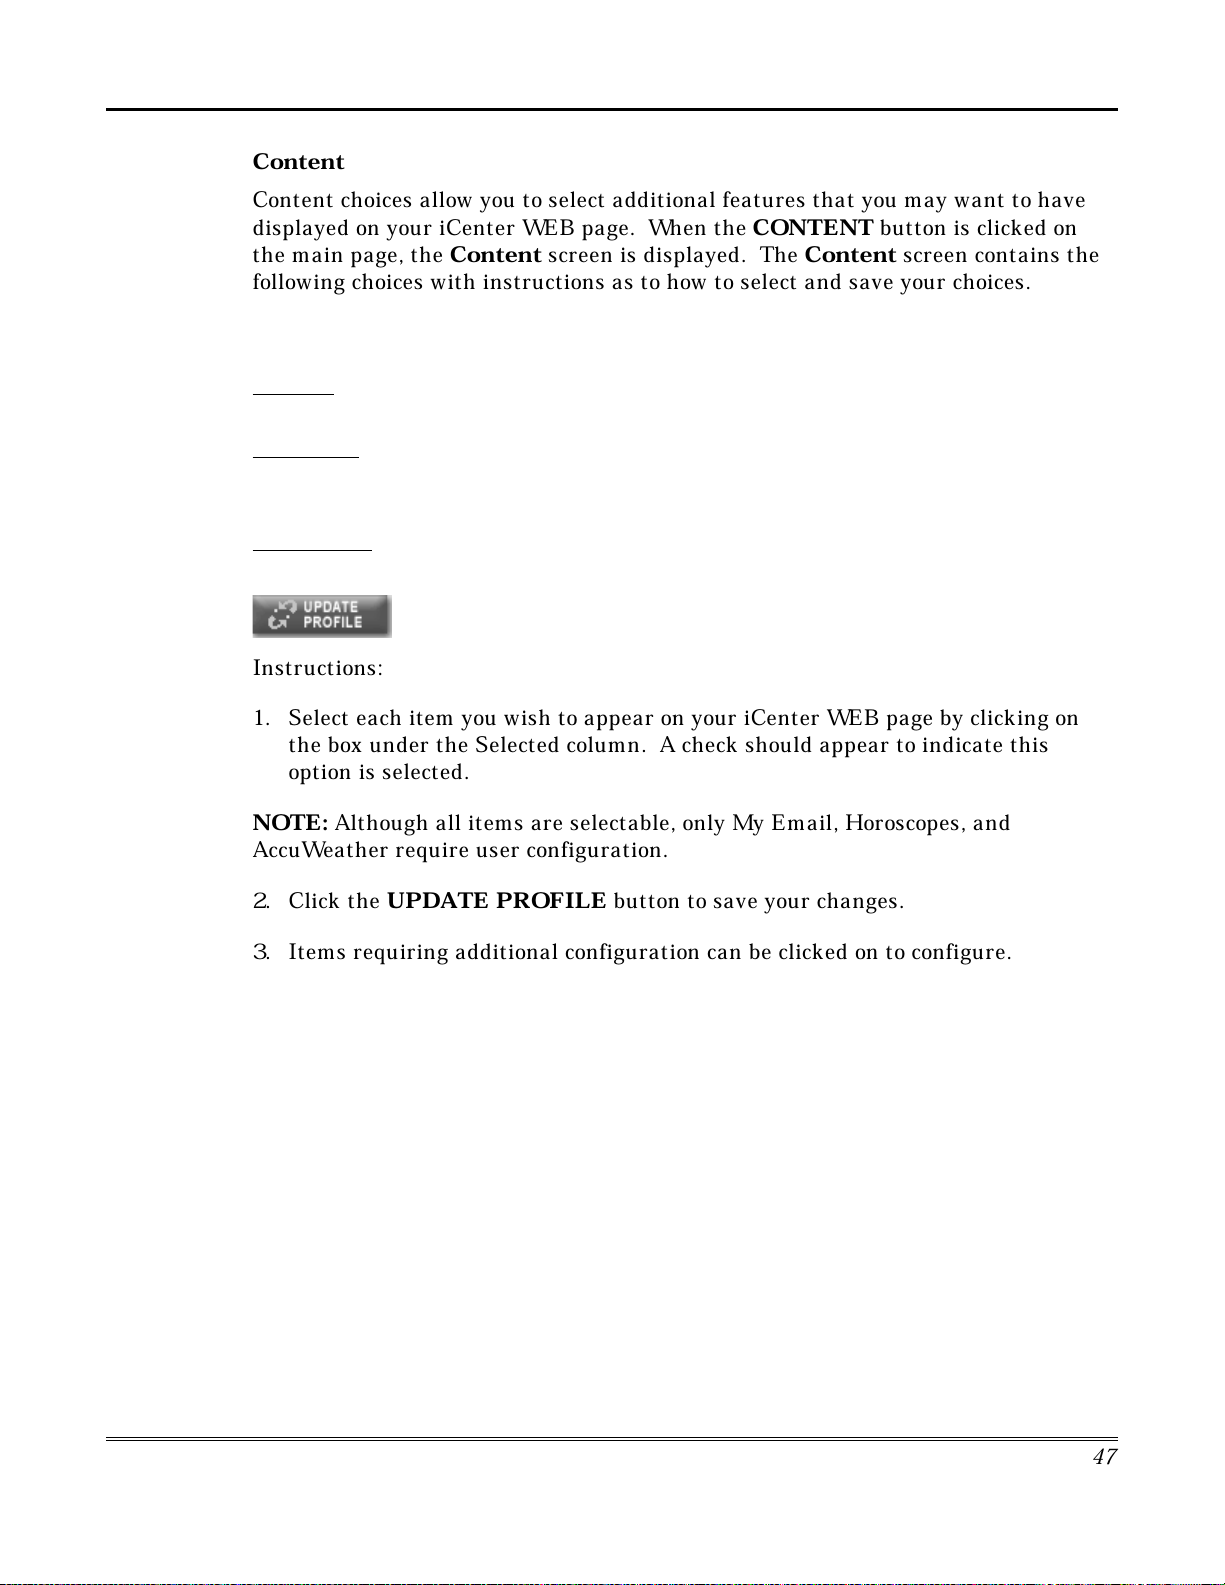
Instructions:
1. Select each item you wish to appear on your iCenter WEB page by clicking on
the box under the Selected column. A check should appear to indicate this
option is selected.
NO
TE:
Although all items are selectable, only My Email, Horoscopes, and
AccuWeather require user configuration.
2. Click the
UPDATE PROFILE
button to save your changes.
3. Items requiring additional configuration can be clicked on to configure.
Content
Content choices allow you to select additional features that you may want to have
displayed on your iCenter WEB page. When the
the main page, the
Content
screen is displayed. The
CONTENT
Content
following choices with instructions as to how to select and save your choices.
CONTENT CHOICES SELECTED
CNBC Business News
My Email
Rolling Stone
Horoscopes
UPI Spot News
The Sports Network
AccuWeather
❑
❑
❑
❑
❑
❑
❑
button is clicked on
screen contains the
4
7
Page 48

Internet Features (cont'd)
4
8
My Email
To configure your Email option, click on the
My Email
link. This displays the
“Configure My Email” screen. Simply follow the instructions at the bottom of the
screen.
Email Username Email Password
Confirm Password
POP3 Server Name
Instructions:
1. Enter your Email Username. For example, if your email address was
jsmith@Yahoo.com
, you would enter jsmith.
2. Enter your Email Password and Confirmation.
3. Enter your email POP3 server information. This entry can be found by
contacting your Internet Service Provider. Example for Yahoo is
pop.mail.yahoo.com
.
NOTE: Due to their proprietary nature, these email servers are not supported:
AOL
®
, MSN/Hotmail®, and Juno®.
4. Click the
S
UBMIT
button to save your changes. You are automatically
returned to the
Content
screen.
Page 49

Internet Features (Cont'd)
4
9
Horoscopes
To configure your Horoscope option, click on the
Horoscope
link. This displays the
“Choose My Horoscopes” screen. Simply follow the instructions at the bottom of the
screen.
Aries
❍
Libra
❍
Taurus
❍
Scorpio
❍
Gemini
❍
Sagittarius
❍
Cancer
❍
Capricorn
❍
Leo
❍
Aquarius
❍
Virgo
❍
Pisces
❍
Instructions:
1. Select the single Horoscope sign you wish to see on your iCenter WEB page.
2. Click the
S
UBMIT
button to save your changes. You are automatically
returned to the
Contents
screen.
Weather
To configure your Weather option, click on the
A
ccuWeather
link. This displays
the “Weather Selections” screen. Simply follow the instructions at the bottom of the
screen
Edit Clear
Edit Clear
Edit Clear
Instructions:
1. Select up to three city/state choices for weather by clicking the
Edit
button to
make your select.
2. Click the
Clear
button to remove a choice.
NO
TE:
Your selections will appear on your iCenter WEB page in the order in
which they were selected.
Page 50

Internet Features (cont'd)
5
0
R
eminders
The Reminders function allows you to leave memos on your iCenter WEB page so
that you won’t forget important events or meetings. When the
REMINDERS
button is clicked on the main page, the “Reminder Management” screen is
displayed. The “Reminder Management” screen displays all existing messages as
follows:
Existing Messages
Posted Date Message To User Recurring Priority Select
December 1 Xxxxxx xxx xx xxxxxx rick Yes Urgent
❏
Add a new reminder
Clicking on the Add a new reminder
link displays:
Occasion To Month Day Year*
Notify Recurring Priority
❍
Normal ❍ Important ❍ Urgent
Message/Reminder
* Year notations are ignored on recurring reminders.
View current reminders
1. By clicking on the boxes for Occasion, To, Month, Day, Year, Notify, and
Recurring, pull down menus are displayed and you may select the option of your
choice. As an example, the Notify pull down menu will allow you to select the Day
of, 1 Day before, 1 Week before, or 2 Weeks before for when you want your message
displayed on your iCenter WEB page.
NO
TE:
No matter what year is selected it is not displayed in current message view.
2. Click on the adjacent circle to select your reminder priority.
IMPORTANT:
Your reminder message is limited to 40 characters.
3. Click on the
A
DD REMINDER
button to add this reminder to your
Existing
Messages
.
Page 51
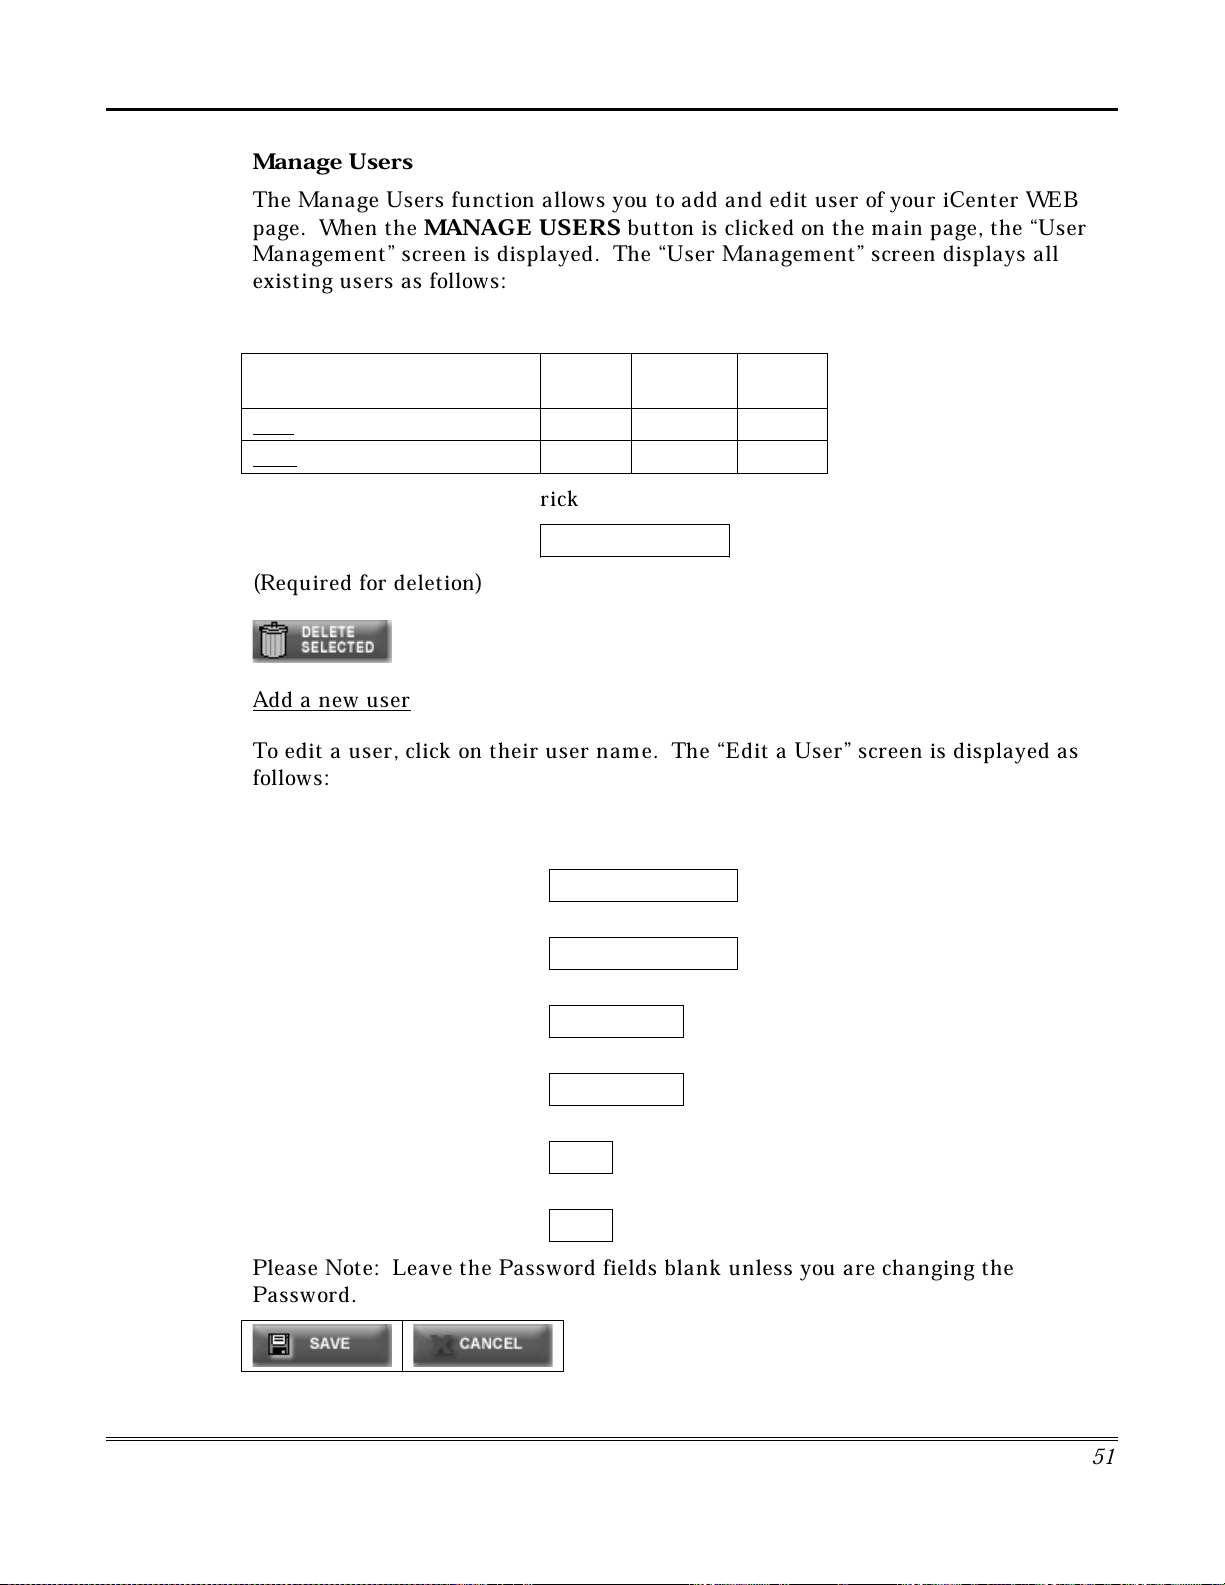
Internet Features (Cont'd)
5
1
Manage Users
The Manage Users function allows you to add and edit user of your iCenter WEB
page. When the
MANAGE USERS
button is clicked on the main page, the “User
Management” screen is displayed. The “User Management” screen displays all
existing users as follows:
Existing Users
User (click to edit the user) Remote
Control
Enabled Select
linda No Yes
❏
ringo No Yes
❏
Primary User Name
rick
Primary User Password
(Required for deletion)
Add a new user
To edit a user, click on their user name. The “Edit a User” screen is displayed as
follows:
Primary User Name rick
Primary User Password
New User Name
New Password
Confirm Password
Remote Control Permission No
User Enabled Yes
Please Note: Leave the Password fields blank unless you are changing the
Password.
Page 52

Internet Features (cont'd)
5
2
To add a new user, click on the
A
dd a New User
link. The “Add New User” screen
is displayed as follows:
Primary User Name rick
Primary User Password
New User Name
New Password
Confirm Password
Remote Control Permission No
View current users.
Edit Profile
The Edit Profile function allows you (the Master User only) to edit the profile
(password or email address) of a user of your iCenter WEB page.. When the
EDIT
PROFILE
button is clicked on the main page, the “Edit Profile” screen is displayed
as follows:
Edit User Profile
New User Name rick
New Password *******
Confirm Password *******
Email xxxxxx@xxx.com
Edit the user profile as follows:
1. Enter the user name.
2. Enter the new password.
Page 53
Internet Features (Cont'd)
5
3
3. Re-enter (confirm) the new password.
4. Enter the email address.
5. Click on the
SAVE
button.
R
emote Control
The Remote Control function allows you to view and operate your iCenter from a
remote PC or laptop computer. In remote control mode you can arm and disarm
your system, view zone event log information, bypass zones, and see if you have
voice messages. For accounts that have more than one iCenter AUI, you can select
which AUI is to be accessed by using a radio-button set. When you click on the
REMO
TE CONTROL
button on the main page, the “Remote Control” screen is
displayed as follows:
Connect via….
For your protection enter the password for user: [rick]
Password
Start session
Start the Remote Control session as follows:
1 Enter the user name password.
2 Click on the
START SESSI
ON
button.
NOTE: If no password is entered or an incorrect password is entered, the screen
will display:
“Failed to Validate User”
Click Try Again To attempt to log in again.
If the password is accepted, the “Remote Control of your Console” screen is shown
with the “Home” screen of your iCenter displayed.
Page 54
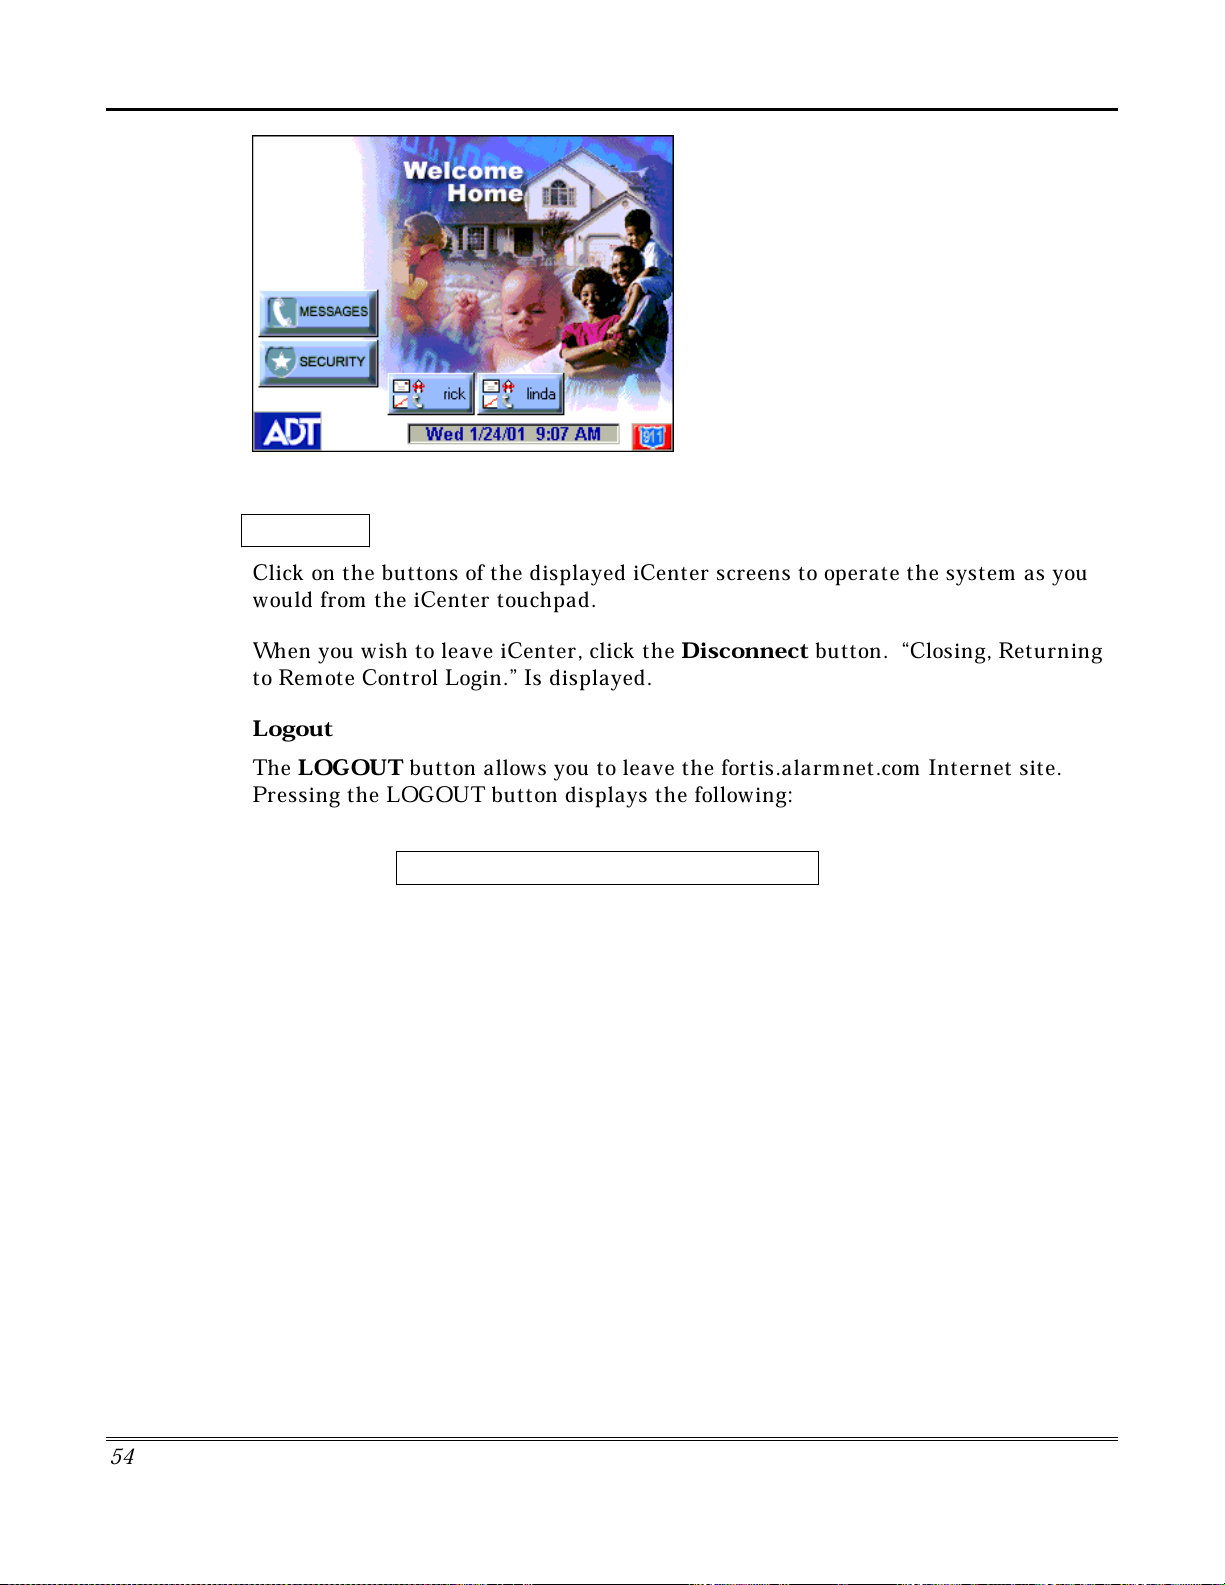
Internet Features (cont'd)
Disconnect
Click on the buttons of the displayed iCenter screens to operate the system as you
would from the iCenter touchpad.
When you wish to leave iCenter, click the
to Remote Control Login.” Is displayed.
Logout
The
LOGOUT
Pressing the LOGOUT button displays the following:
button allows you to leave the fortis.alarmnet.com Internet site.
You have been logged out.
Click Here to Close Your Browser
Disconnect
button. “Closing, Returning
5
4
Page 55

TeleSMART Messaging Features
Introduction to TeleSMART Messaging Features
TeleSMART is an option available with iCenter, which provides you and your family
with the conveniences of a full-featured digital answering machine. In addition to
all the features of a digital answering system, TeleSMART offers much more,
including caller ID (if service is available), multiple mailboxes, a memo feature, and
a unique Privacy feature that enables you to divert ALL calls to the TeleSMART
mailbox for a duration you select – such as during mealtime, baby’s nap time, etc.
S
ystem Basics
Mailboxes -
•
memos, and users can be assigned access to any combination of mailboxes. This
lets each user listen to his/her own messages without having to listen to
messages intended for the other users
The system has up to four mailboxes for storing messages and
Greetings -
•
caller to leave a message. If multiple mailboxes are in use, the message can
instruct the caller to press a key (1-4) corresponding to the desired user’s
mailbox, and then leave a message. The system then announces the greeting for
that user and automatically stores the caller's message in that mailbox.
User Codes -
•
user code. (In addition to the five user codes, the system has one Master Code
and one Installer Code.)
S
ecurity System -
•
be used in your system – these provide a two-line LCD display, standard control
keys, plus a speaker/microphone to record and retrieve voice messages. The
system can also be set so that a user's messages are automatically played
whenever that user disarms the security system from a TeleSMART touchpad.
Playback Upon Disarm
Depending on how iCenter and TeleSMART are set up, messages can be played back
when the system is disarmed. If multiple users and mailboxes are set up, the
messages for a user can be played back when that user disarms the system
Messages and Memos
Like any digital answering system, TeleSMART records incoming telephone
messages. TeleSMART also enables users to record “Memos” for themselves or for
other users. For example, you may record a memo for your child – then when your
child returns from school and disarms the system, your memo is played back ahead
of any telephone messages.
When TeleSMART answers a call a recorded greeting instructs the
TeleSMART supports up to five users. Each user needs a 4-digit
In addition to iCenter, special TeleSMART touchpads may
.
Privacy Feature
The Privacy feature turns off all telephone ringers and lets TeleSMART answer
your calls. This can be useful if you do not wish to be disturbed at certain times.
55
Page 56

TeleSMART Messaging Features (cont'd)
A simple pull-down menu lets you select the Privacy duration (from 30 minutes to 5
hours if enabled at the iCenter). When Privacy is selected (via a check box),
TeleSMART will take all calls for that duration, or until you turn it off.
Use the Message Menu to check for any messages that may have been left while
Privacy was turned on.
TeleSMART Operational Structure
TeleSMART features can be accessed through iCenter, a TeleSMART touchpad, and
through a telephone. Not all features are accessible through iCenter and some
features are only accessible through a telephone.
TeleSMART operation is presented first using iCenter, then using a TeleSMART
touchpad and finally those features that can only be performed through a telephone
provided.
TeleSMART Operation Using iCenter
How to Record a Memo Using iCenter
A memo is a message you can record for other users of the system to hear. For
example, you might want to let them know you went to the store. These users would
then use the Message Menu to listen to your memo.
To record a new memo:
ACTION SCREEN
1. From the "Home" screen, press the
MESSAGES
"TeleSMART" main screen.
2. Press the
multi-user system, you are prompted to select
a mailbox.
Select the desired mailbox, then proceed.
button to display the
RECORD MEMO
button. In a
5
6
Page 57
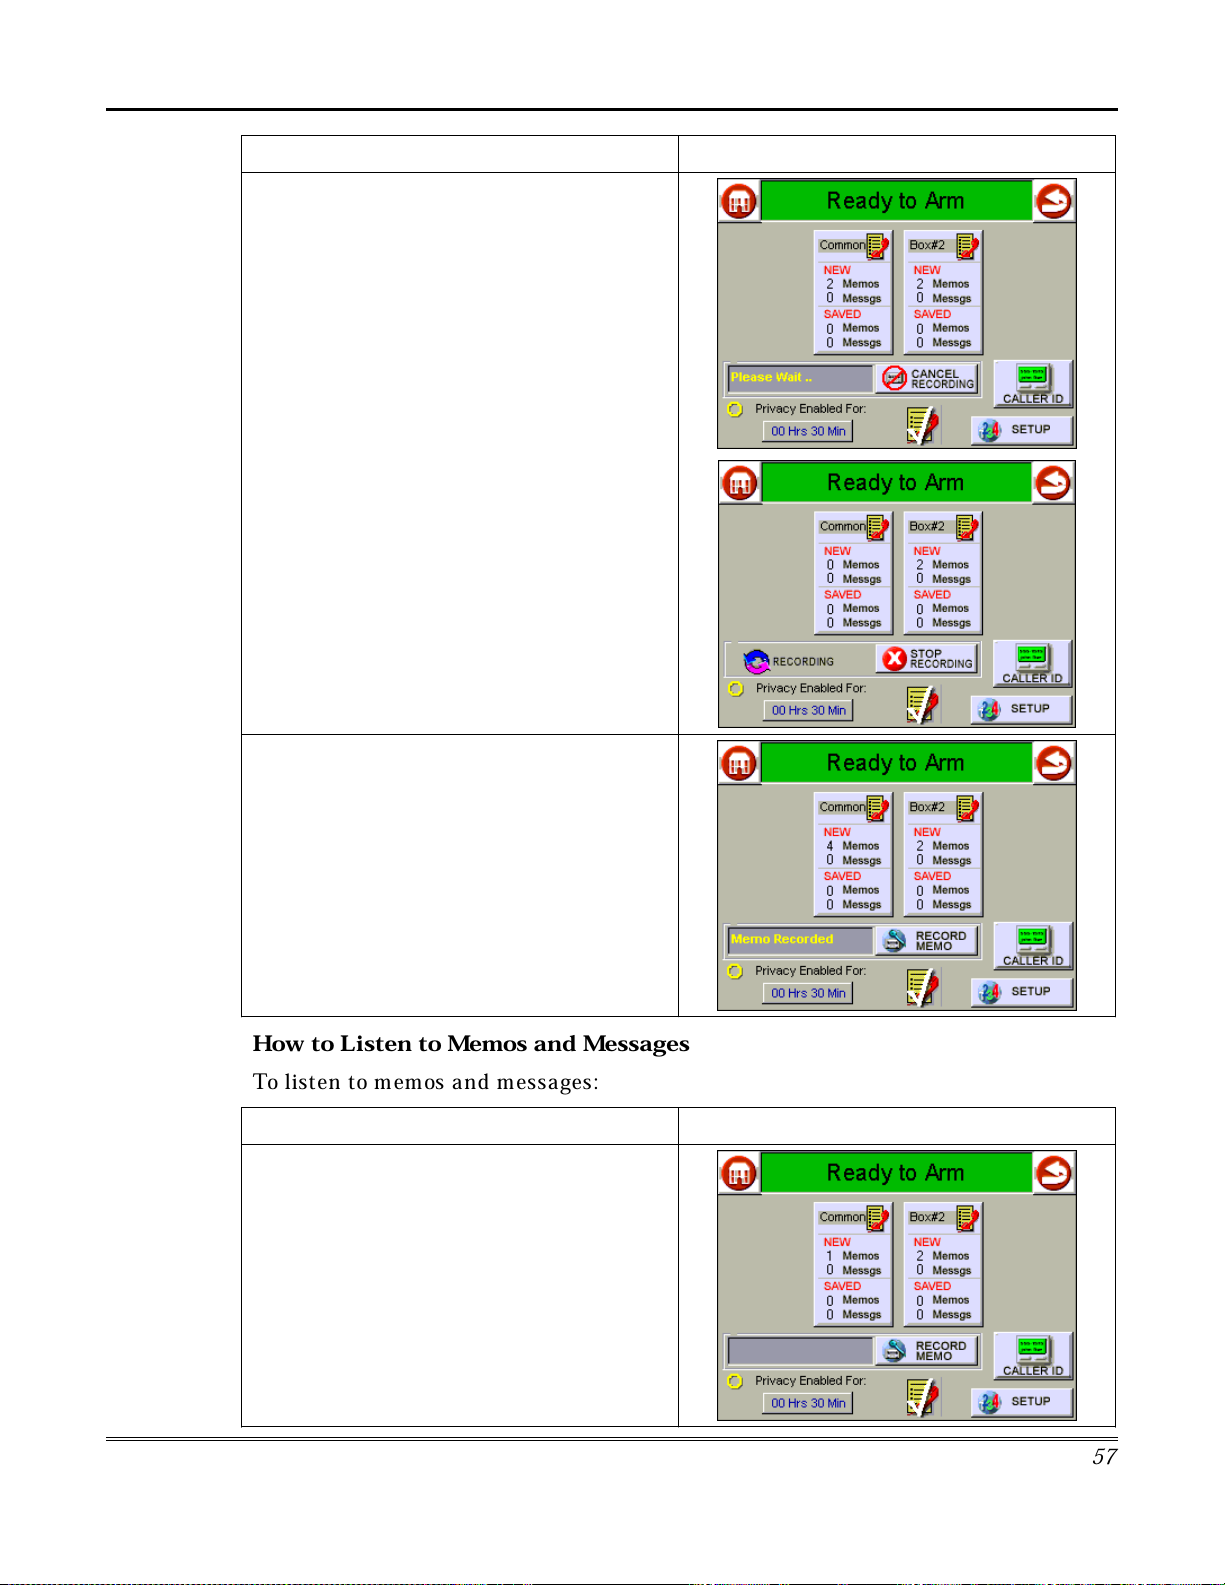
TeleSMART Messaging Features (Cont'd)
ACTION SCREEN
3. Wait for the system to log you in (
Wait…
Record at the Tone
RECORDING
4. Press
completed. The
a text message that reads
replace the
RECORDING
message disappears, the number of memos
under the
increases by one.
is displayed, then you are prompted to
). The screen shows a
” display.
STOP RECORDING
RECORD MEMO
Memo Recorded
RECORDING
buttons. When the text
NEW
column of the selected mailbox
and
Please
button when
button and
STOP
How to Listen to Memos and Messages
To listen to memos and messages:
ACTION SCREEN
1. From the "Home" screen, press the
MESSAGES
"TeleSMART" main screen.
button to display the
5
7
Page 58

TeleSMART Messaging Features (cont'd)
ACTION SCREEN
2. Select the desired Mailbox by touching it.
Then, use the control buttons to navigate
through your memos and messages.
Adjust the speaker volume as needed using
the Volume + and – buttons.
TeleSMART plays back messages in this
order:
•
New Memos
•
New Incoming Messages
•
Saved Memos
•
Saved Messages
After each memo or message is retrieved, you
SAVE
may
buttons. You may also erase memos/
messages by selecting the
button.
NOTE: SAVE
during actual message/memo playback. They
cannot be used during the playback of a time
stamp.
3. When finished, press the "Back" icon to
return to the "TeleSMART" main screen, or the
"Home" icon to return to the iCenter "Home"
screen. Regardless of which button is
pressed, the "TeleSMART" main screen is first
displayed with the text message
Mailbox…
DELETE
or
or
in the text box.
it using the control
DELETE
DELETE ALL
can only be used
Exiting
5
8
Page 59

TeleSMART Messaging Features (Cont'd)
How to Record Outgoing Greetings
When TeleSMART answers a call, the caller hears a recorded greeting (known as
the outgoing message or OGM). The system includes a pre-recorded greeting, but if
desired, you can record your own greetings.
The greeting can instruct a caller to press a key 1-4 (corresponding to user
mailboxes), that lets the caller record a message in a particular user's mailbox.
When recording a greeting:
1. Be sure to include instructions for callers to press the appropriate key (1-4) corresponding
to the desired mailbox. For example: "To leave a message for Kimberly, press 2; to leave a
message for Kaitlyn, press 3."
2. Leave a few seconds of silence at the end of your greeting to give callers time to make their
selection. This is necessary because callers must make a mailbox selection before the "record
now" beep.
To record an outgoing message:
ACTION SCREEN
1. From the "Home" screen, press the
MESSAGES button
"TeleSMART" main screen.
to display the
2. Select the Mailbox into which you wish to
record a greeting by touching it.
5
9
Page 60
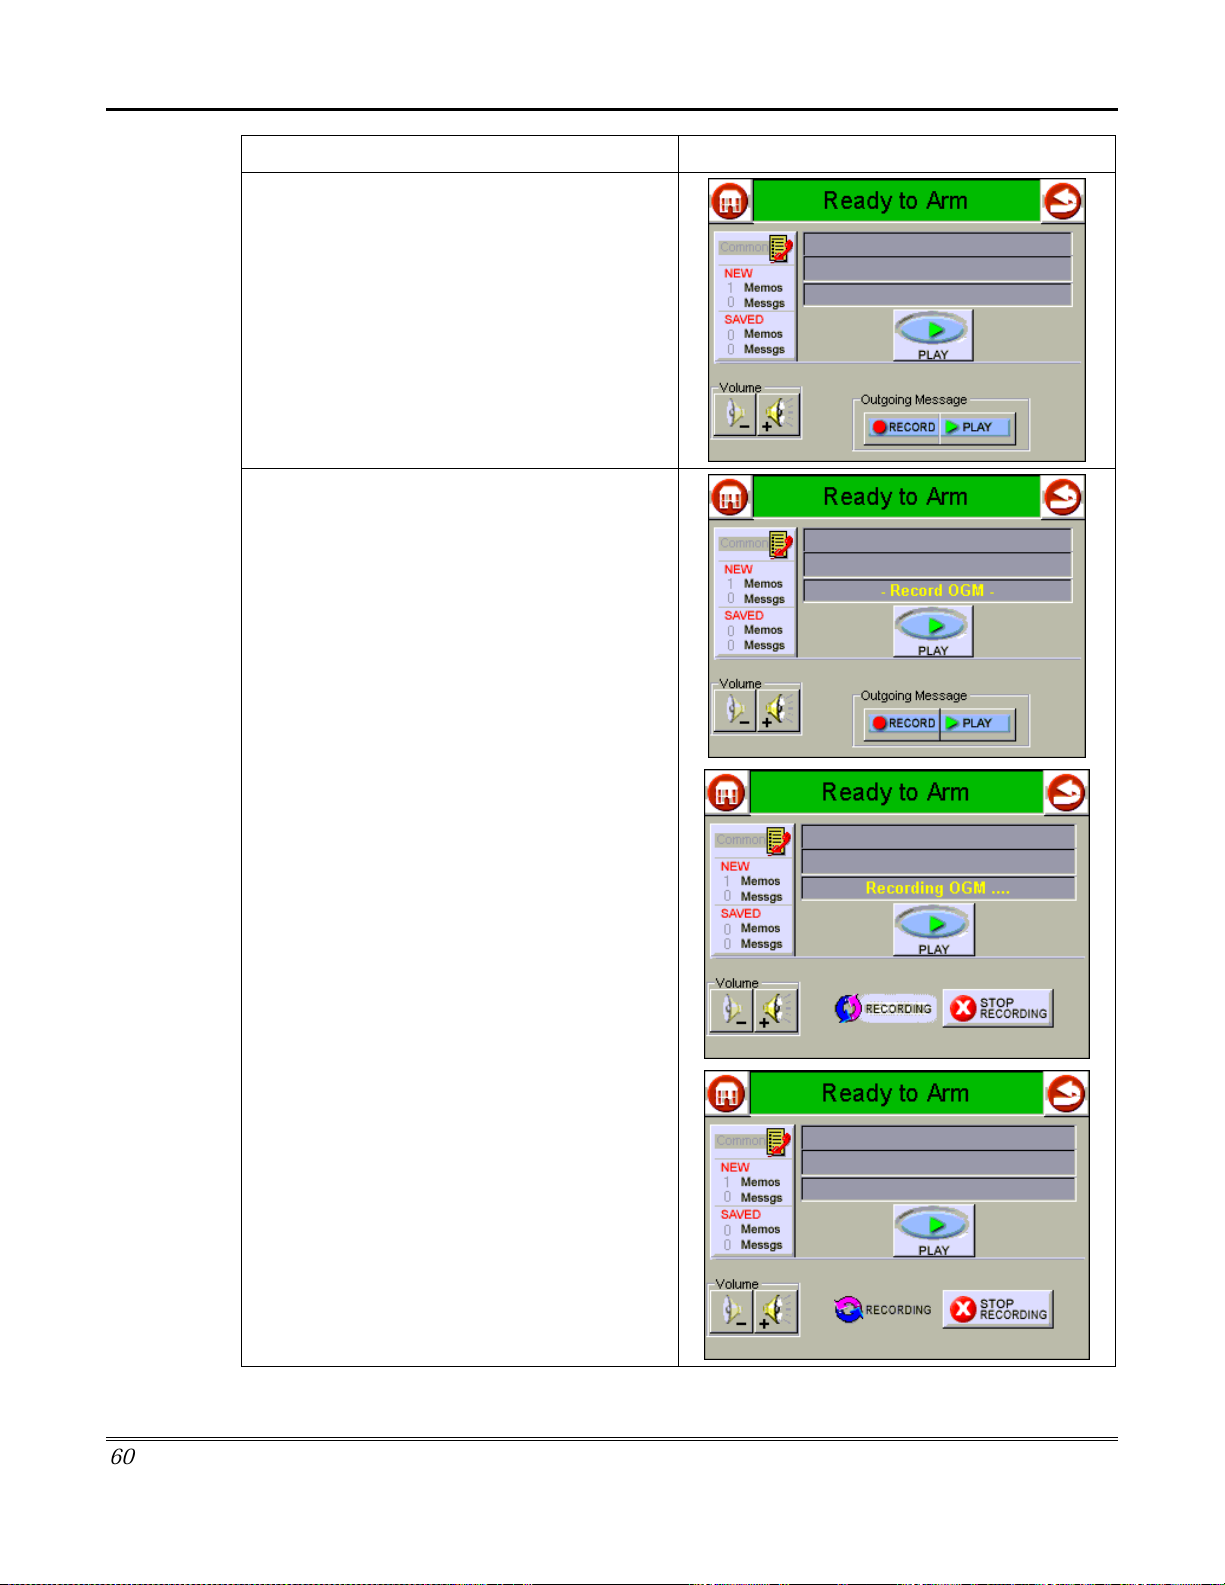
TeleSMART Messaging Features (cont'd)
ACTION SCREEN
3. Touch the
button. The text box displays
After the tone sounds, there is a short delay,
then the text box indicates
And the
RECORDING
few seconds, the text box clears. Record your
outgoing message at this time.
Outgoing Message RECORD
_Record OGM_.
Recording OGM….
RECORDING
button are displayed. After a
icon and
STOP
6
0
Page 61
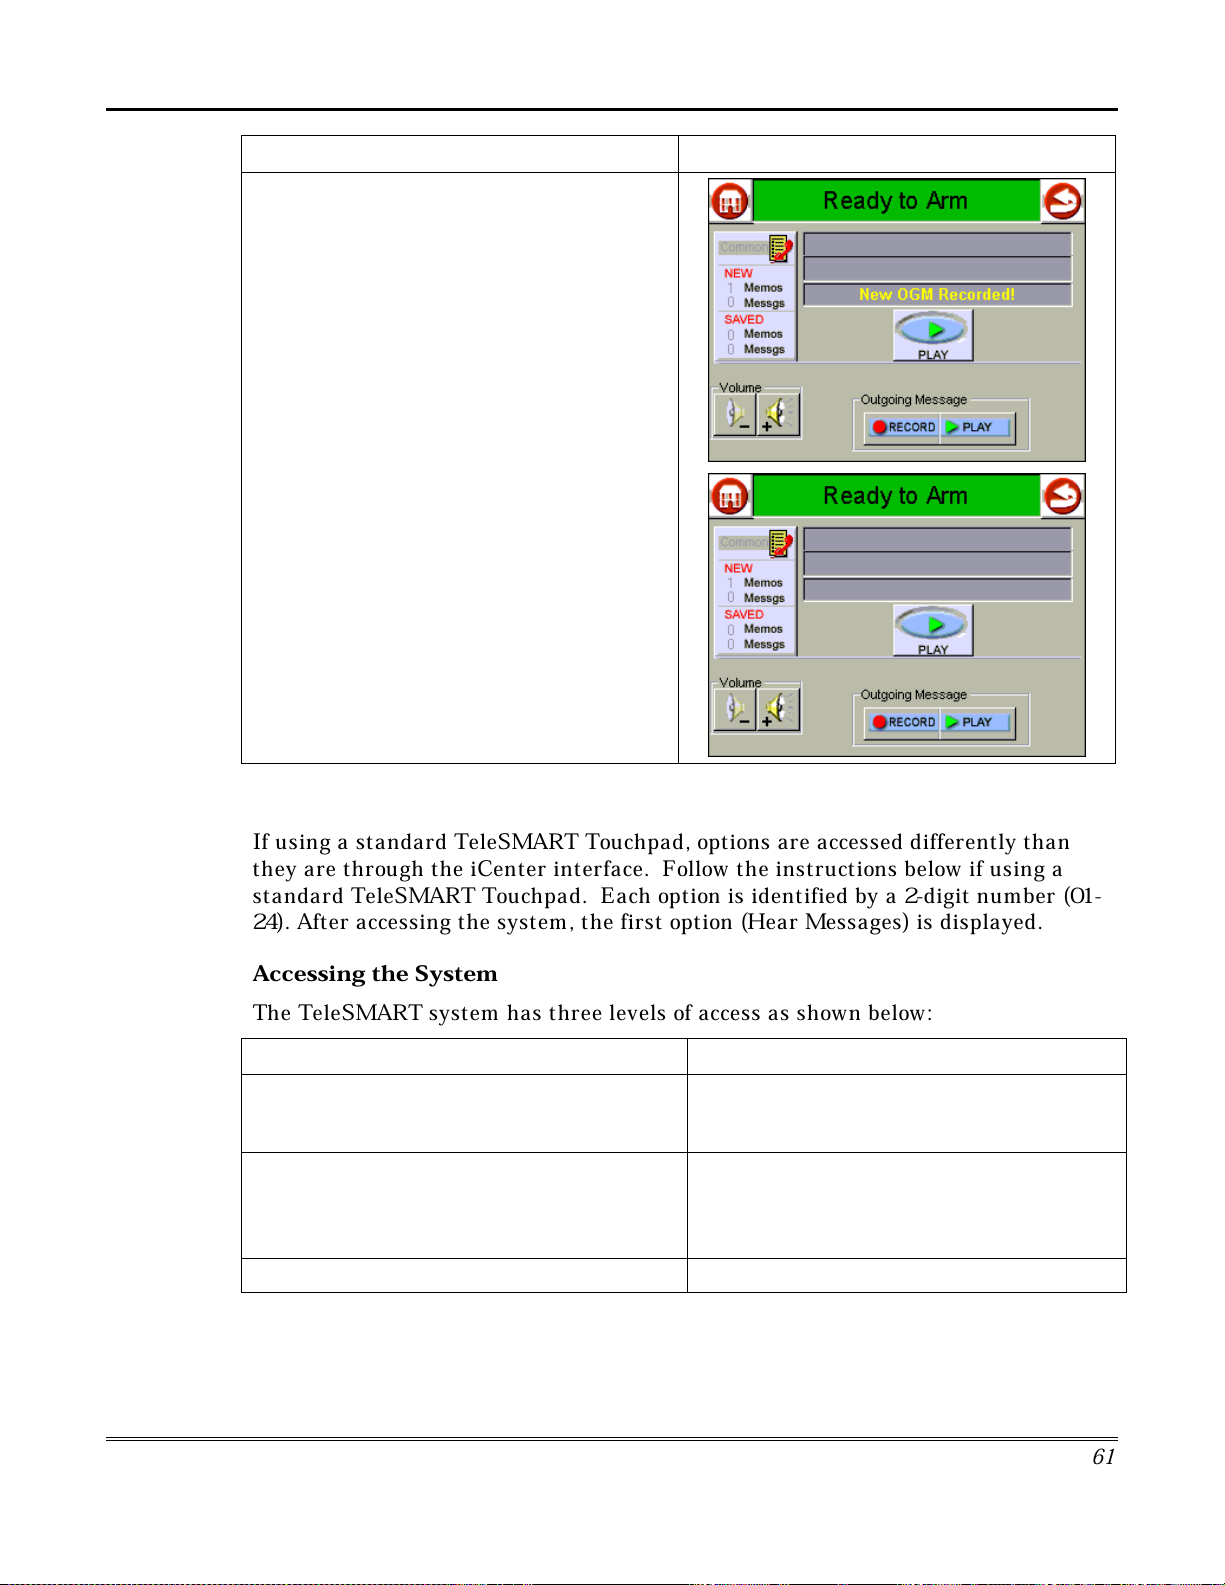
TeleSMART Messaging Features (Cont'd)
ACTION SCREEN
4. When finished, press the
RECORDING
New OGM Recorded!
After a short time the text box clears and you
may record another outgoing message or
leave the mailbox.
button. The text box displays
STOP
TeleSMART Operation Using a TeleSMART Touchpad
If using a standard TeleSMART Touchpad, options are accessed differently than
they are through the iCenter interface. Follow the instructions below if using a
standard TeleSMART Touchpad. Each option is identified by a 2-digit number (01-
24). After accessing the system, the first option (Hear Messages) is displayed.
A
ccessing the System
The TeleSMART system has three levels of access as shown below:
ENTERING… LETS YOU…
the programmed Quick Access key hear messages in the common mailbox only,
and use menu options 01 - 07, listed on the
next page
your user code + [∗]
If calling in from a remote phone, dial your
NOTE:
home number, then press [#] followed by your user
code + [∗] during the greeting message.
the Master code + [∗]
hear messages in all mailboxes to which you
have access, and use menu options 01 - 07,
listed on the next page
use all menu options
6
1
Page 62

TeleSMART Messaging Features (cont'd)
Use the following keys to navigate and select options:
TO… PRESS…
Display the next option
Display the previous option [#]
Go to a particular option [7] then enter the 2-digit option number
Select the displayed option [0]
Exit the system [9]
List of Options
The following table lists the options available, the option numbers used to access
them, and who is allowed to access those options. Options Available to
NO. MENU OPTION USED TO…
01 Hear Messages listen to messages and memos
02 Record Memo record memos for other users of the system
03 Caller ID Log view the log of callers
04 Privacy On/Off turn privacy mode on or off
05 Record OGM record greeting for each mailbox
06 System On/Off turn answer mode on or off. The system must be ON before
07 System Time set the system’s time
[∗]
TeleSMART can record messages from incoming callers.
A
LL
Users
Options Available to
NO. MENU OPTION USED TO…
08 CID Display On/Off
09 Touchpad CID On/Off
10 Aux CID On/Off
11 Aux Volume
12 Toll Saver On/Off
13 Message Beeps On/Off
14 HF Touchpad On/Off
15 HF Aux On/Off
16 Handset On/Off
17 Ring Answer
18 Access Key
19 Caller ID Settings
20 Memory Dial Settings
22 Zone Voice Tags
MASTER/INSTA
turn the CID display at touchpads on or off
turn CID announcement at touchpads on or off
turn CID announcement at speakers on or off
set the auxiliary speaker volume
turn the toll saver feature on or off
turn dial tone message beeps feature on or off
turn touchpad call screening (hands-free) on or off
turn auxiliary speaker hands-free on or off
turn handset hands-free on or off
set the ring answer count (2-8)
assign the Quick Access key (1-4)
program distinctive ring, mailbox, voice tag for incoming calls
program memory dial phone numbers
record zone voice tags that are announced when activity on a
zone occurs
LLE
Only
R
6
2
Page 63

TeleSMART Messaging Features (Cont'd)
Listening to Your Messages (Option 01)
01
Hear Messages02Record Memo03Caller ID Log 04Privacy On/Off
NAVIGATION: [∗] = Next Option; [#] = Previous Option; [7] = GOTO prompt; [9] = Exit System.
05
Record OGM
06
System On/Off07System Time08CID Display
About Messages
Callers and users can leave messages in a particular user’s mailbox by pressing the
appropriate key before recording. This section describes how to listen to these
messages.
NO
The key (1-4) corresponds to the user’s mailbox number and can be
TE:
identified in the greeting. See Recording Greetings paragraph for instructions on
how to record a greeting.
The Message option is available only if there are new or saved messages in the system. Refer to
the
New and Saved Messages
chart below for information on how the system responds
depending on whether there are new or saved messages.
New and Saved Messages
IF THERE ARE… THE SYSTEM…
new messages or memos
Indicated By:
Touchpad: blinking yellow
light
Phone: rapid beeps (if
option on*)
saved messages or memos starts the Main Menu. You can select the Message option to listen
no messages or memos starts the Main Menu.
automatically goes to the Message Menu and begins playing the
oldest message in the user’s mailbox. You can then save or erase
the message, and/or play the next message in that mailbox.
* The message-beeps is option 13.
to saved messages.
6
3
Page 64

TeleSMART Messaging Features (cont'd)
Listening to Your Messages Using the TeleSMART Touchpad
PROGRAM MODE
01 HEAR MESSAGE
MEMO WED 01:23PM
MESSAGE MENU
1 REPEAT
1. Go to the “Hear Messages” prompt (option 01) and press [0]. If
there are new messages or memos in your mailbox, the system
automatically plays the oldest message and displays the day and
time the message was received.
The system automatically advances to the next prompt.
2. Select from options described below.
(Pressing [∗] or [#] displays the choices on the bottom line.)
Message Menu
1 – Repeat Plays back the current message.
2 – Save Saves the current message, then plays the next
message. If you do not save the message, the
system treats it as a new message.
3 – Erase Erases the current message, then plays the next
message. After the last message is played, this
option becomes “erase all” messages.
4 – Next Stops the current message and begins the next
message in the order in which received.
5 – Previous Stops the current message and begins the
previous message.
6 – Sel. Mailbx Lets you select another mailbox by entering the
desired mailbox number (1-4). The system then
displays the number of messages in that mailbox
followed by the messages themselves. See
“Enter Mailbox” prompt at below.
8 – Menu Returns to the Main options
ENTER MAILBOX:
(1 – 4) #-END
MAILBOX C -NEW
MEMO: 1 MSG: 2
3. To hear messages in another mailbox, press [6] from the
“Message” Menu, then:
Enter the desired mailbox number, 1-4.
Remember, you can access only those mailboxes to which you are
authorized.
The system displays the number of new messages in the selected
mailbox and plays back the oldest message, then returns to the
“Message Menu” prompt described above.
When finished, press [8] to return to the Main Menu, or press [9] to exit the system.
6
4
Page 65
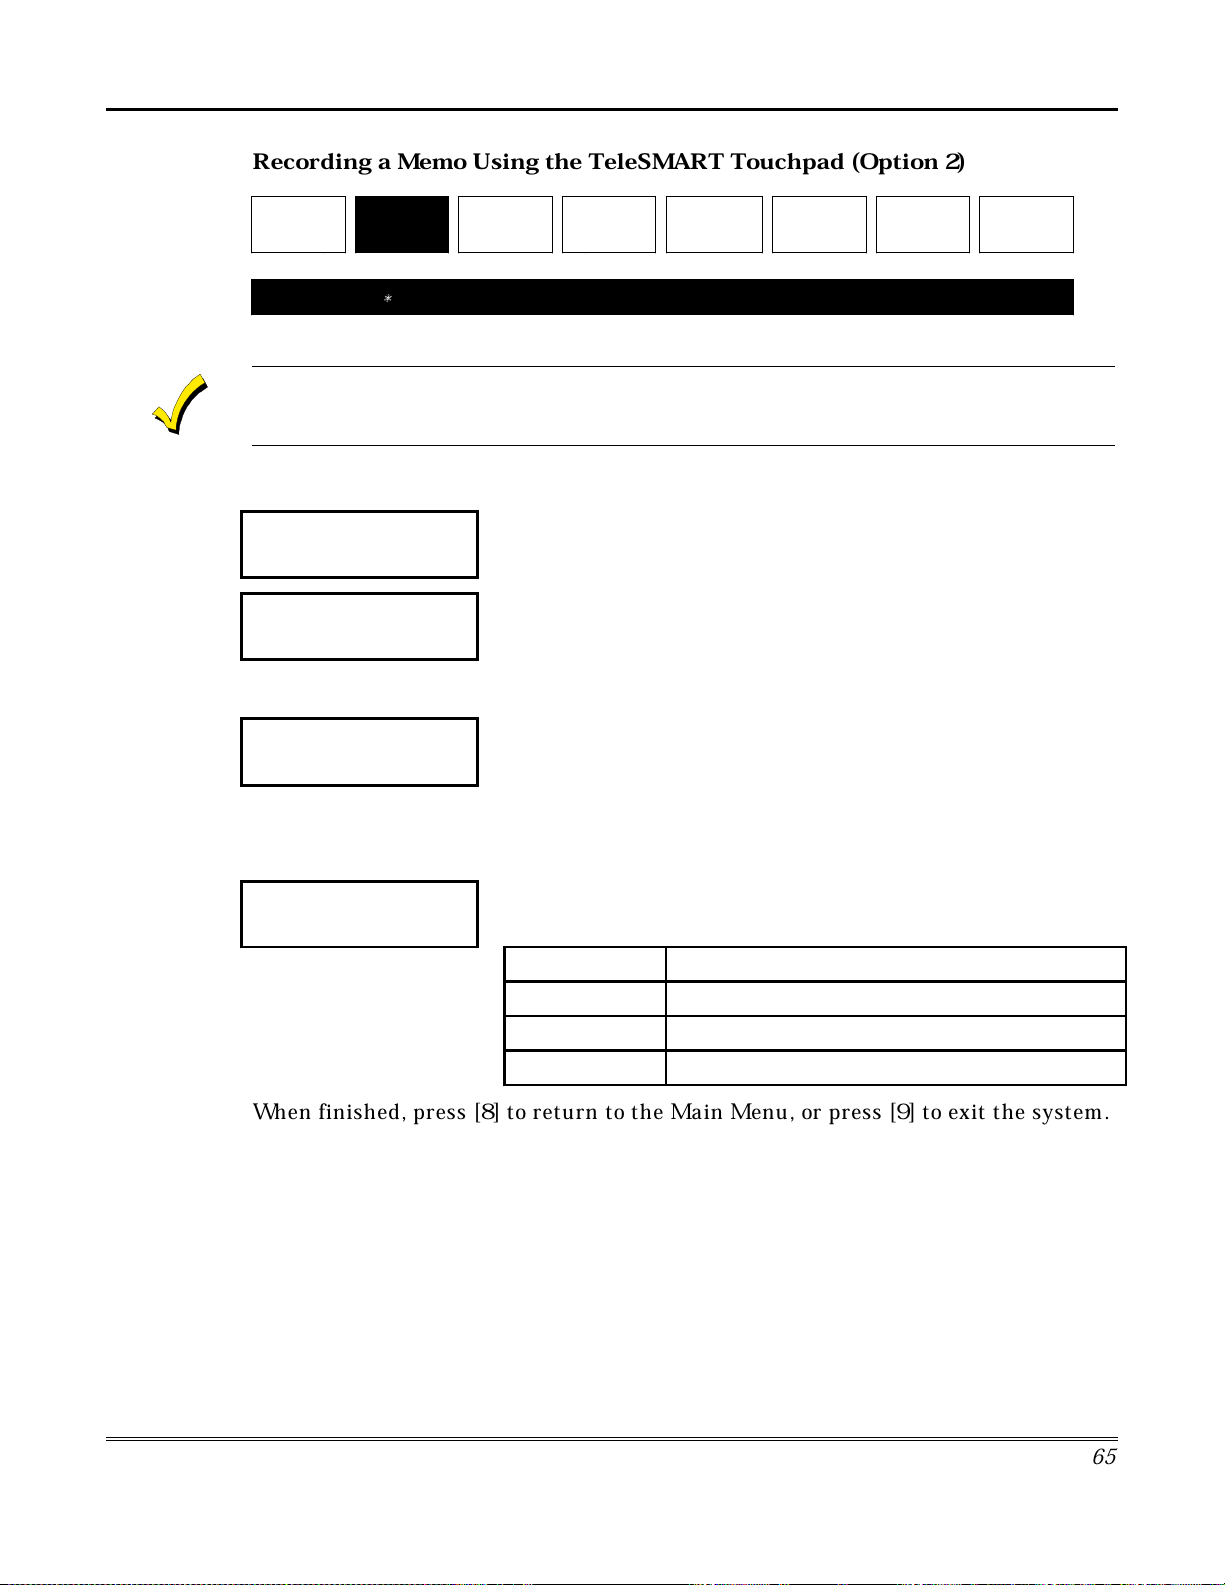
TeleSMART Messaging Features (Cont'd)
R
ecording a Memo Using the TeleSMAR
T Touchpad (Option 2)
01
Hear Messages
NAVIGATION: [∗] = Next Option; [#] = Previous Option; [7] = GOTO prompt; [9] = Exit System.
02
Record Memo
03
Caller ID Log 04Privacy On/Off
05
Record OGM
06
System On/Off
07
System Time
08
CID Display
When you record a memo, you can play it back and/or erase it using this menu. However, once
you exit this menu, the memo can only be erased by using the Message Menu previously
described.
How to Record a Memo
PROGRAM MODE
02 RECORD MEMO
ENTER MAILBOX:
(1 – 4) #-END
MAILBOX: COMMON
RECORD AT TONE!
1. Go to the “Record Memo” prompt (option 2) and press [0].
2. Enter the mailbox number for the intended user.
To cancel this prompt, press the [#] key, then see the “Memo Menu”
prompt described below.
3. The display shows the selected mailbox.
Begin recording your memo after the tone.
Press any key to end the recording.
The memo is automatically saved and the system displays the next
prompt.
MBC: 1-REP 6-REC
3-ERASE 8-MENU
4. Select from the options described below.
Message Menu
1 – Repeat Plays back the recorded memo.
3 – Erase Erases the recorded memo.
6 – Record Returns to the “Enter Mailbox” prompt.
8 – Menu Returns to the Main Menu.
When finished, press [8] to return to the Main Menu, or press [9] to exit the system.
6
5
Page 66

TeleSMART Messaging Features (cont'd)
Caller ID Log Using the TeleSMAR
01
Hear Messages02Record Memo
NAVIGATION: [∗] = Next Option; [#] = Previous Option; [7] = GOTO prompt; [9] = Exit System.
03
Caller ID Log
Privacy On/Off
T Touchpad (Option 03)
04
05
Record OGM
06
System On/Off07System Time08CID Display
About the Caller ID Log
The Caller ID Log is a record of the phone number and/or name of callers
(depending on the type of Caller ID service you subscribe to). Use this menu to
display this log. Refer to the
Caller ID Options
paragraph for other TeleSMART
Caller ID features available if you subscribe to Caller ID service.
You must subscribe to Caller ID service from your telephone service provider to use the Caller ID
Log.
How to View the Caller ID Log
PROGRAM MODE
03 CALLER ID LOG
1. Go to the “Caller ID Log” prompt (option 3) and press [0].
MSG: DAY, TIME
PHONE NUMBER
CALLER ID LOG
1-DISP 3-ERASE
2. The system displays the day, time, and phone number of the
most recent caller, then automatically advances to the “Caller ID
Log” Menu prompt.
3. Select from the options described below.
(Pressing [∗] or [#] displays the choices on the bottom line.)
Caller ID Log Menu
1 – Display The name for the call is displayed on the bottom
line for 3 seconds (only if you have the “name”
Caller ID service).
3 – Erase
4
– Next
Erases
NOTE:
(
Displays the next call. Pressing [4] repeatedly
all
entries in the Caller ID log.
Any user can erase the Caller ID log.)
scrolls through the Caller ID log.
5 – Previous Displays the previous call. Pressing [5] repeatedly
scrolls through the Caller ID log.
8 – Menu Returns to the Main Menu.
When finished, press [8] to return to the Main Menu, or press [9] to exit the system.
66
Page 67

TeleSMART Messaging Features (Cont'd)
y
turns off after 8 hours.
•
Use the Message Menu to check for any messages that may have been left while Privacy was
turned on (message light will be on at the touchpad).
How to Turn the Privacy Feature On/Off
PROGRAM MODE
04 PRIVACY: OFF
1. Go to the “Privacy” prompt (option 04).
PROGRAM MODE
04 PRIVACY: ON
2. To turn the Privacy feature on press [0].
To turn Privacy off, press [0] again.
How to Override Privacy Mode
When you call in to the system, you can manually override Privacy mode if it is on:
1. Dial in to the system. When TeleSMART answers the call, the system announces
“privacy on” before the greeting to let you know it is turned on.
2. Press [0] during the greeting. You are then connected to the system and your
voice can be heard at the TeleSMART touchpads and auxiliary speaker.
3. Simply speak into the telephone mouthpiece and say “pick up the phone” or
something similar to get the attention of those at the premises. Remember, the
phone does not ring at the premises, so your voice is the only alert they have to
your call.
4.
You can also set the system to automatically override Privacy mode for calls
from a specific phone number. See the
Caller ID Options
paragraph for details.
Privacy Feature Using the TeleSMAR
01
Hear Messages
NAVIGATION: [∗] = Next Option; [#] = Previous Option; [7] = GOTO prompt; [9] = Exit System.
02
Record Memo03Caller ID Log
04
Privacy On/Off
T Touchpad (Option 04)
05
Record OGM
06
System On/Off07System Time08CID Display
About the Privacy Feature
The Privacy feature turns off all telephone ringers and lets TeleSMART answer
your calls. This can be useful if you do not wish to be disturbed at certain times. For
example, you may wish to turn Privacy on during dinner to avoid being interrupted
by phone calls.
•
When the Privacy feature is on, it remains on for 8 hours, or until you turn it off. It automaticall
6
7
Page 68

TeleSMART Messaging Features (cont'd)
6
8
R
ecording Greetings Using the TeleSMAR
T Touchpad (Option 05)
01
Hear Messages
02
Record Memo03Caller ID Log 04Privacy On/Off
05
Record OGM
06
System On/Off07System Time08CID Display
NAVIGATION: [∗] = Next Option; [#] = Previous Option; [7] = GOTO prompt; [9] = Exit System.
About Greetings (outgoing messages)
When TeleSMART answers a call, the caller hears a recorded greeting (known as
the outgoing message or OGM). The system includes a pre-recorded greeting, but if
desired, you can record your own greetings. The greeting can instruct a caller to
press a key 1-4 (corresponding to user mailboxes) which lets the caller record a
message in a particular user’s mailbox. Use this menu to record a greeting or to
listen to an existing greeting.
How to Record Greetings
PROGRAM MODE
05 RECORD MEMO
1. Go to the “Record OGM” prompt (option 05) and press [0].
ENTER MAILBOX:
(1 – 4) #-END
2. Enter the mailbox number (1-4) for which the greeting is to be
recorded or reviewed. You can record a greeting only in a mailbox
to which you have access.
To cancel the entry, press [#]. The system displays the “Greetings
Menu” prompt, described below.
MAILBOX: COMMON
RECORD AT TONE!
3. Begin recording your greeting after the tone.
Press any key to end the recording. The greeting is automatically
played back once and saved.
WHEN MAKING A GREETING MESSAGE:
1. Include instructions for callers to press the appropriate key (1-4)
corresponding to the desired mailbox. E.g., “To leave a message for
Tom, press 2; to leave a message for Melissa, press 3.”
2. Leave a few seconds of silence at the end of your greeting to
give callers time to make their selection. This is because callers
must make a mailbox selection before the “record now” beep.
MBC: 1-REPEAT
6-RECORD 8-MENU
4. Select from the options described below.
Greetings Menu
1 – Repeat The recorded memo is played.
6 – Record The system returns to the “Enter Mailbox”
prompt.
8 – Menu The system returns to the Main Menu.
When finished, press [8] to return to the Main Menu, or press [9] to exit the system.
Page 69

TeleSMART Messaging Features (Cont'd)
S
etting the System Time Using the TeleSMAR
T Touchpad (Option 07)
01
Hear Messages
NAVIGATION: [∗] = Next Option; [#] = Previous Option; [7] = GOTO prompt; [9] = Exit System.
02
Record Memo03Caller ID Log 04Privacy On/Off
05
Record OGM
06
System On/Off
07
System Time
08
CID Display
About the System Time
The internal clock is used to time-stamp all messages. Although TeleSMART will
indicate this as an option, iCenter will always provide system time to the
TeleSMART. This menu should only be used with a 6139T TeleSMART Touchpad to
set or view the system’s time setting.
How to Set the System Time
PROGRAM MODE
07 SYSTEM TIME
SYSTEM TIME
SUN 12:00AM
SET TIME?
1-YES 8-MENU
1. Go to the “System Time” prompt (option 07) and press [0].
2. The current time setting is displayed for five seconds.
The system automatically advances to the next prompt.
3. Press [1] (yes) to begin setting the day and time.
To cancel and return to the Main Menu, press [8].
DAY? – WEDNESDAY
* - NEXT 0-SELECT
4. Press [∗] until the correct day of the week appears, then press [0]
to select it.
The system automatically advances to the next prompt.
ENTER HOUR
-- (01=12)
ENTER MINUTES
-- (00-59)
ENTER AM/PM
- 1AM 2PM
5. Enter the current hour (use 2-digit entries; e.g., 09 for 9 o’clock).
The system automatically advances to the next prompt.
6. Enter the current minute (use 2-digit entries).
The system automatically advances to the next prompt.
7. Enter the “AM” or “PM” setting by pressing “1” for AM or “2” for
PM.
The system automatically advances to the next prompt.
SYSTEM TIME
SUN 12:00AM
8. The system displays the day and time, then automatically returns
to the “Set Time” prompt described above.
When finished, press [8] to return to the Main Menu, or press [9] to exit the system
.
6
9
Page 70

TeleSMART Messaging Features (cont'd)
Caller ID Display/Announcements Using the TeleSMAR
T Touchpad (Option
08)
01
Hear Messages02Record Memo03Caller ID Log 04Privacy On/Off
09
Keypad CID
10
Aux CID
11
Aux Volume
12
Toll Saver
05
Record OGM
13
Message Beeps
NAVIGATION: [∗] = Next Option; [#] = Previous Option; [7] = GOTO prompt; [9] = Exit System.
06
System On/Off07System Time
14
HF Keypad
15
HF Aux
08
CID Display
16
Handset On/Off
About Caller ID Displays and Announcements
TeleSMART can provide Caller ID information if you subscribe to Caller ID service
from your telephone provider.
Caller ID Display and Announcement options let you:
display Caller ID information at TeleSMART touchpads
•
announce Caller ID information at the touchpad and/or auxiliary speaker
•
set the auxiliary speaker volume.
•
How to Turn Caller ID Display at the Touchpad On/Off
PROGRAM MODE
08 CID DISP:ON
Caller ID Touchpad Display:
1. Go to the “CID Display” prompt. (option 08)
2. To turn the Caller ID touchpad display on press [0].
To turn the display off, press [0] again.
How to Turn Caller ID Announcements On/Off and How to Set the Volume
PROGRAM MODE
09 KEYPD CID:ON
PROGRAM MODE
10 AUX CID:ON
PROGRAM MODE
11 AUX VOL: MED
ENTER VOLUME:
1-LOW 2-MED 3-HI
Caller ID announcements at the touchpad:
1. Go to the “Touchpad CID” prompt.
2. To turn the CID announcement on, press [0].
To turn the announcement off, press [0] again.
Caller ID announcements at the auxiliary speaker:
1. Go to the “Aux CID” prompt.
2. To turn the announcement on, press [0].
To turn the announcement off, press [0] again.
Speaker Volume:
1. Go to the “Aux Volume” prompt and press [0].
2. Press [1] for low, [2] for medium, or [3] for high volume.
The system automatically returns to the Main Menu with the new
volume setting in effect.
7
0
Page 71

TeleSMART Messaging Features (Cont'd)
Toll Saver / Message Beeps Using the TeleSMAR
T Touchpad (Options 12 &
13)
09
Touchpad CID
NAVIGATION: [∗] = Next Option; [#] = Previous Option; [7] = GOTO prompt; [9] = Exit System.
10
Aux CID
11
Aux Volume
12
Toll Saver13Message Beeps
14
HF Touchpad
15
HF Aux
16
Handset On/Off
About the Toll Saver Feature
The Toll Saver feature lets you call in to the system to check if there are new
messages (determined by the number of rings). This lets you hang up before
incurring toll charges.
The Toll Saver feature works in combination with the security system. First, you
must turn Toll Saver on (shown below), but it becomes active only when the security
system is armed in the AWAY or MAXIMUM mode. The Toll Saver feature is
inactive when the security system is disarmed or when armed STAY or INSTANT.
When Toll Saver is active (option is on and system is armed AWAY or MAXIMUM), the
“distinctive ring” feature is automatically disabled.
How to Turn Toll Saver On/Off
PROGRAM MODE
12 TOLL SAVE:ON
Toll Saver:
1. Go to the “Toll Saver” prompt (option 012).
2. To turn the Toll Saver feature on, press [0].
To turn Toll Saver off, press [0] again.
How to Check for Messages while Toll Saver is On
1. Call in to the system and listen for the number of rings:
2 rings = There are new messages/memos in one or more of the mailboxes
4 rings = There are no new messages/memos in any of the mailboxes
2. To save toll charges if there are no new messages, hang up after the third ring.
About Message Beeps
The system can alert you to new messages whenever you pick up the telephone
receiver, if desired. If the message beeps feature is turned on and you have new
messages, the system beeps over the dial tone when you pick up the receiver.
How to Turn Message Beeps On/Off
PROGRAM MODE
13 MSG BEEP:ON
Message Beeps
1. Go to the “Message Beeps” prompt.
2. To turn Message Beeps on, press [0].
To turn Message Beeps off, press [0] again.
7
1
Page 72

TeleSMART Messaging Features (cont'd)
Call Screening Using the TeleSMAR
09
Touchpad CID
NAVIGATION: [∗] = Next Option; [#] = Previous Option; [7] = GOTO prompt; [9] = Exit System.
10
Aux CID
11
Aux Volume
12
Toll Saver
T Touchpad (Options 14, 15, 16)
13
Message Beeps
14
HF Touchpad15HF Aux16Handset On/Off
About Call Screening
Call Screening lets TeleSMART answer your calls while you listen in from any
phone and/or touchpad or auxiliary speaker (depending on programming) without
the caller hearing you.
CALL SCREENING
FROM…
Telephone (handset) listen to a caller’s incoming message from the telephone without the
caller hearing you. You can then connect to the call or let TeleSMART
continue recording the caller’s message. This is known as Handset
Call Screening. See how to connect in paragraph below.
Touchpad and/or
Speaker
hear a caller’s incoming message at the touchpad and/or auxiliary
speaker without the caller hearing you. You can then pick up a
telephone receiver to connect to the call or let TeleSMART continue
recording the caller’s message. This is known as Hands Free
(abbreviated “HF”) call screening.
LETS YOU…
How to Connect to a Call when Telephone Call Screening is On
1. Pick up the telephone receiver.
2. As you hear the caller leaving a message, click the “off-hook” button once, in the
same way you would when switching between callers if you had Call Waiting
service. Alternatively, you can press the “flash” key if your telephone has one.
You are automatically connected to the call and you can begin your conversation.
How to Turn Call Screening On/Off
PROGRAM MODE
14 HF KEYPD:OFF
PROGRAM MODE
15 HF AUX:OFF
PROGRAM MODE
16 HANDSET
Call Screening at the Touchpad:
1. Go to the “HF Touchpad” prompt (option 14).
2. To turn touchpad Call Screening on, press [0].
To turn touchpad Call Screening off, press [0] again.
Call Screening at the Auxiliary Speaker:
1. Go to the “HF Aux” prompt. (option 15).
2. To turn speaker Call Screening on, press [0].
To turn speaker Call Screening off, press [0] again.
Call Screening at the telephone:
1. Go to the “Handset” prompt (option 16).
2. To turn telephone Call Screening on, press [0].
To turn telephone Call Screening off, press [0] again.
7
2
Page 73
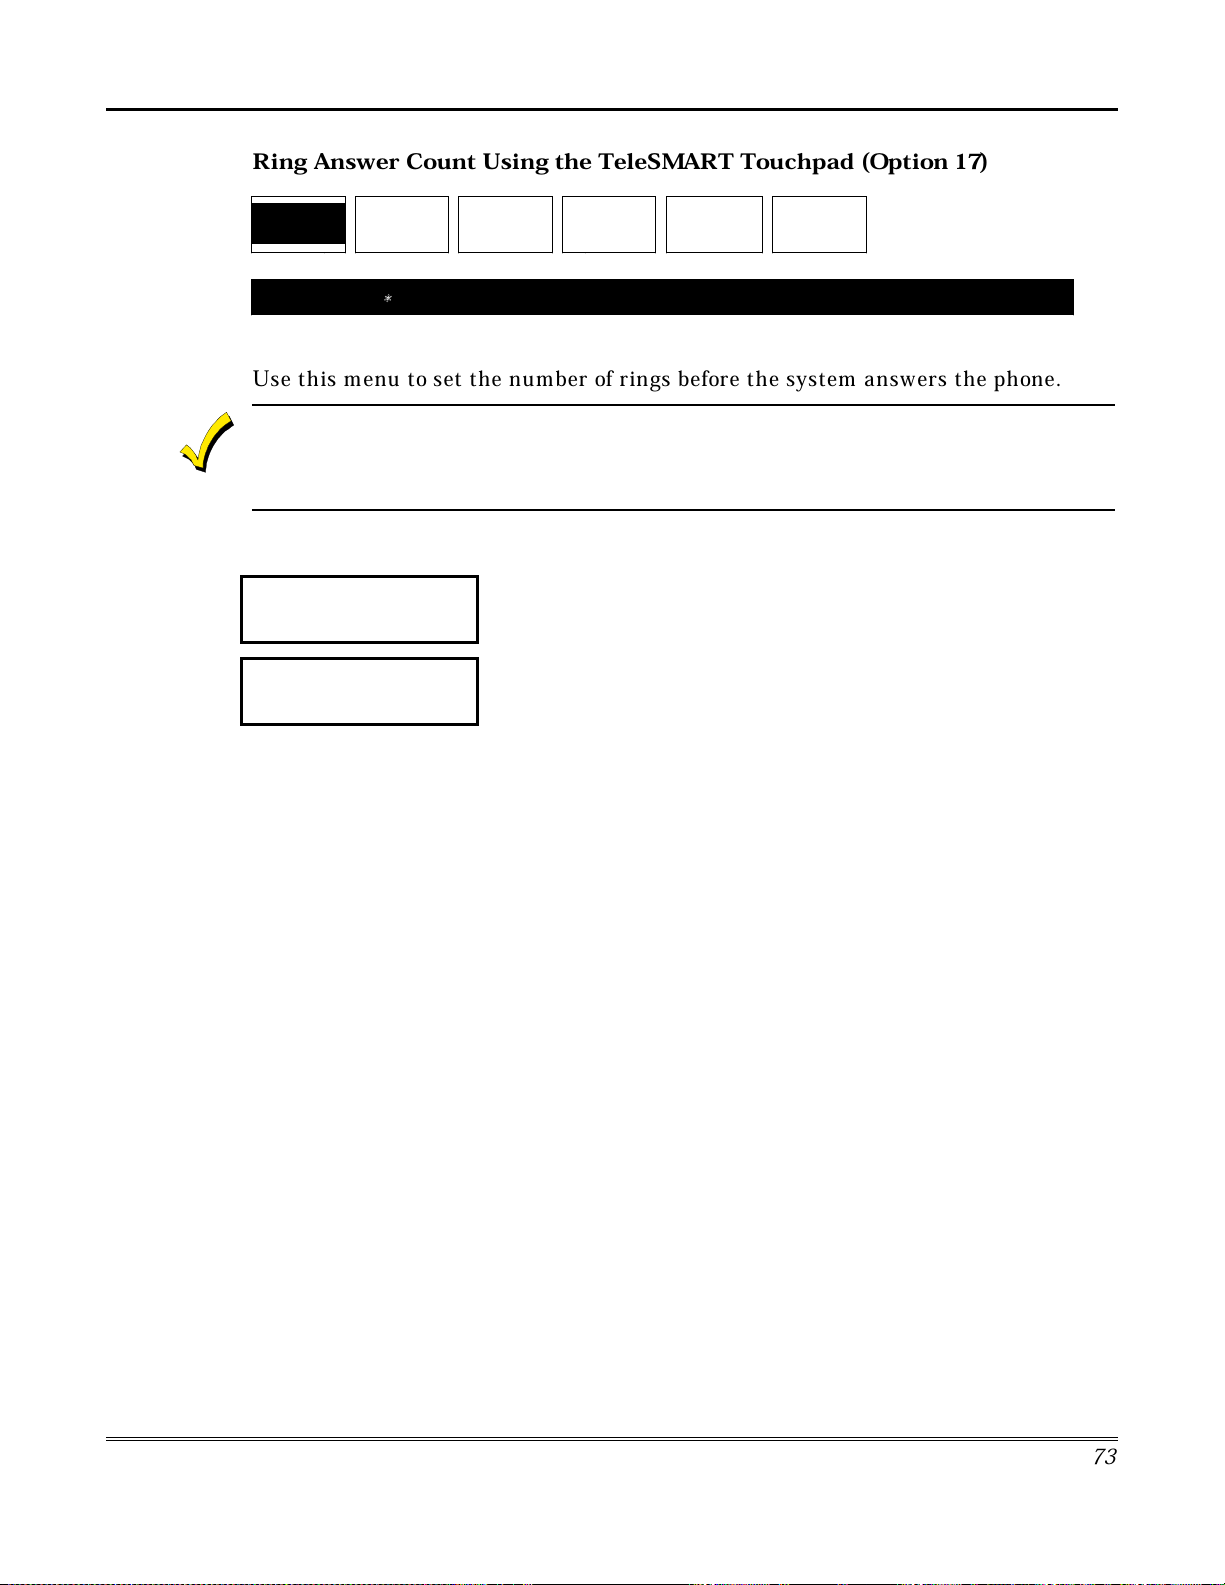
TeleSMART Messaging Features (Cont'd)
R
ing Answer Count Using the TeleSMAR
T Touchpad (Option 17)
17
Ring Answer18Access Key19Caller ID Prog
NAVIGATION: [∗] = Next Option; [#] = Previous Option; [7] = GOTO prompt; [9] = Exit System.
20
Memory Dial
21
User Code
22
Zone Voice Tag
About the Ring Answer Count
Use this menu to set the number of rings before the system answers the phone.
The Ring Answer Count applies except when Toll Saver is active (option is on and system is
armed AWAY or MAXIMUM). When Toll Saver is active, the ring count is automatically set to 4
rings if there are no new messages and 2 rings if there are new messages.
How to Set the Ring Answer Count
PROGRAM MODE
17 RING ANSWER:4
ENTER RINGS
(2-8) #-END
1. Go to the “Ring Answer” prompt (option 17) and press [0].
2. Enter the desired number of rings (2-8) you want to occur before
the system answers a call.
To cancel and return to Main Menu, press [#].
3. The system automatically returns to the Main Menu.
7
3
Page 74

TeleSMART Messaging Features (cont'd)
Q
uick Access Key Using the TeleSMAR
T Touchpad (Option 18)
17
Ring Answer18Access Key
19
Caller ID Prog
20
Memory Dial
21
User Code
22
Zone Voice Tag
NAVIGATION: [∗] = Next Option; [#] = Previous Option; [7] = GOTO prompt; [9] = Exit System.
About the Quick Access Key
You can assign a Quick Access key that lets users access the TeleSMART system by
simply pressing and holding that key down for 2 seconds (no user code needed). This
makes the system easy to use, since a user does not need to remember an access
code.
Make sure the Quick Access key IS NOT programmed for any other security system
function.
How to Assign the Quick Access Key
PROGRAM MODE
18 ACCESS KEY
ENTER ACCSSS
KEY (1-4, 0+OFF)
1. Go to the “Access Key” prompt (option 18) and press [0].
2. Enter the number corresponding to the desired access key (see
figure below.
3. The system automatically returns to the Main Menu, and the
selected Access key is active.
READY
ARMED
1
STAY
OFF
AWAY
2
3
4
IMPORTANT:
available for message playback, and the top line of the prompts reads, “User Mode”
rather than “Program Mode.”
7
4
When using the Quick Access key, only the common mailbox is
321
BYPASS
TEST
654
CHECK
INSTANT
CODE
987
READY
#0
*
6139ADT-003-V0
Page 75

TeleSMART Messaging Features (Cont'd)
Caller ID Options Using the TeleSMAR
17
Ring Answer
NAVIGATION: [∗] = Next Option; [#] = Previous Option; [7] = GOTO prompt; [9] = Exit System.
A
bout Caller ID
18
Access Key
19
Caller ID Prog
20
Memory Dial
T Touchpad (Option 19)
21
User Code
22
Zone Voice Tag
Caller ID can only be accessed by Custom English Touchpad 6139T or by the
Compass Downloader (if Caller ID service is available and you subscribed for it
through your telephone provider.)
TeleSMART allows you program the way the system responds to incoming calls
from up to 25 different phone numbers.
Caller ID Option Programming lets you:
set a distinctive ring for certain phone numbers
•
assign a mailbox where messages from a number are automatically recorded
•
record a voice tag for certain phone numbers.
•
How to Program Caller ID Options
PROGRAM MODE
1. Go to the “Caller ID Tbl” prompt (option 19) and press [0].
19 CALLER ID TBL
CID LOCATION: 01
1-SELECT
2. Select from the options described below.
(Pressing [∗] or [#] displays the choices on the bottom line.)
Caller ID Menu
1 – Select Location Lets you enter a Caller ID location (01-25) to
store the settings (see “Enter Location”
prompt below).
2 – Review Displays the selected location’s settings.
3 – Erase Erases the settings for the selected location.
4 – Next Shows the CID settings in the next location.
5 – Previous Shows the CID settings in the previous
location.
6 – Program Starts the Caller ID Program Menu.
8 – Menu Returns to the beginning of the Program
Menu.
7
5
Page 76
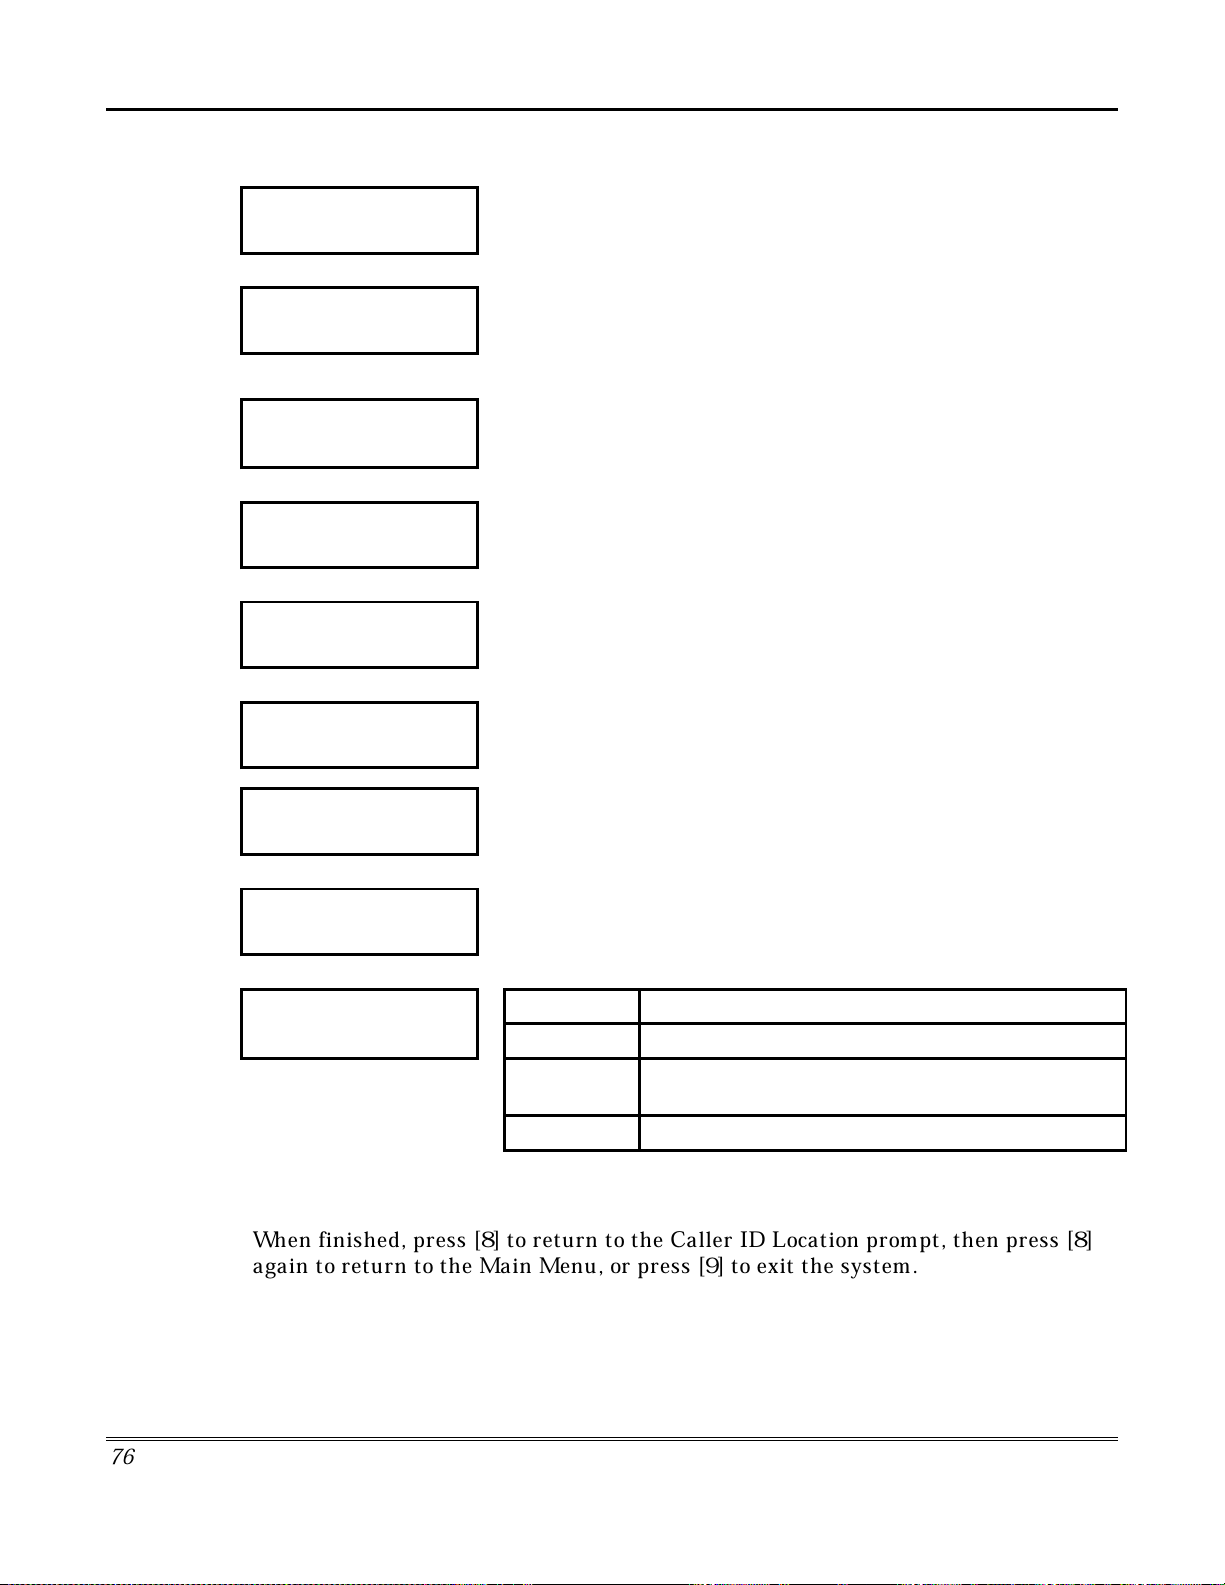
TeleSMART Messaging Features (cont'd)
ENTER LOCATION
-- (01-25) # - END
LOC XX MB XX RN XX
(XXX) XXX-XXXX
(Caller ID Review Prompt)
DISTINCT RING?
1-YES 2-NO 8-MNU
ENTER DIST. RNG:
-(0, 2-5) #-END
MAILBOX?
1-YES 2-NO 8-MNU
ENTER MAILBOX:
-(1-4) #-END
3. Press [1] from the previous prompt, then enter the 2-digit location
number for storing Caller ID settings for a particular phone number.
The system displays the current settings for this location, where:
LOC = location no. (01-25); MB = mailbox (1-4)
RN = distinct ring count (2-5); “x” = phone number
The system automatically advances to the next prompt.
4. Press [1] (yes), then enter the distinctive ring count (2-5) for calls
from this phone number.
The distinctive ring lets you identify a caller by the number of short
rings the system makes when calls are received from that caller.
The system automatically advances to the next prompt.
To skip the “Distinct Ring” prompt, press [2] (no).
5. Press [1] (yes), then enter the mailbox number where you want
messages received from this phone number to be stored.
The system automatically advances to the next prompt.
To skip the “Mailbox” prompt, press [2] (no).
VOICE TAG?
1-YES 2-NO 8-MNU
VOICE TAG:
1-REPEAT
RECORD AT TONE!
6. Press [1] (yes) if you want to record a voice tag for this phone
number. If a voice tag is recorded, it is announced when calls from
this number are received.
Select from the options described below:
(Pressing [∗] or [#] displays the choices on the bottom line.)
Voice Tag Menu
1 – Repeat Press to play back voice tag. VOICE TAG:
3 – Erase Press to erase the voice tag.
6 – Record Press to begin recording voice tag (see display at
left). Press any key to stop the recording.
8 – Menu Advances to the “Override Privacy” prompt.
After voice tag is recorded, press [8] to continue.
To skip the “Voice Tag” prompt, press [2] (no).
When finished, press [8] to return to the Caller ID Location prompt, then press [8]
again to return to the Main Menu, or press [9] to exit the system.
7
6
Page 77

TeleSMART Messaging Features (Cont'd)
Use the following table to record the programmed Caller ID options.
PHONE
NUMBER
01
02
03
04
05
06
07
08
09
10
11
12
13
14
15
16
17
18
19
20
21
22
23
24
25
DISTINCT
RING
DEFAULT
MAILBOX
PRIVACY
OVERRIDE
VOICE TAG (WHO)
77
Page 78

TeleSMART Messaging Features (cont'd)
g
; [#] [1] pauses before new dial tone)
Memory Dial Numbers Using the TeleSMAR
17
Ring Answer
NAVIGATION: [∗] = Next Option; [#] = Previous Option; [7] = GOTO prompt; [9] = Exit System.
18
Access Key19Caller ID Prog
20
Memory Dial
User Code
T Touchpad (Option 20)
21
22
Zone Voice Tag
About Memory Dial Numbers
You can store up to 15 phone numbers in TeleSMART’s memory for easy dialing.
Memory Dial Programming lets you:
enter a phone number in memory for quick dialing
•
record a voice tag for a memory dial number.
•
How to Program Memory Dial Numbers
PROGRAM MODE
20 MEMORY DIAL
SELECT MEM. LOC:
--(01-15) #-END
LOCATION: 1
AVAILABLE
1. Go to the “Memory Dial” prompt (option 20) and press [0].
2. Enter the 2-digit location number for storing this Memory Dial
number.
The system displays the phone number currently entered for this
location or displays “Location Available” if no number is currently
programmed.
The system automatically advances to the next prompt.
PHONE NUMBER?
1-YES 2-NO-8-MNU
3. Press [1], then enter the phone number for this Memory Dial
location.
Phone numbers may be up to 16 digits.
To enter special digits, enter the following:
ENTER PHONE NO:
(XXX) XXX-XXXX
•
For dialing pause, press [#] [1].
•
For “#,” press [#] [#].
•
For “∗,” press [#] [∗].
Press [#] [0] to complete the telephone number entry.
Example: To store a phone number and turn off Call Waiting, press:
[1] then [#] [∗] [7] [0] then [#] [1] then [phone number] then [#] [0].
([#∗70] turns off Call Waitin
7
8
Page 79

TeleSMART Messaging Features (Cont'd)
7
9
VOICE TAG?
1-YES 2-NO 8-MNU
VOICE TAG:
1-REPEAT
4. Press [1] (yes) if you want to record a voice tag for this location.
5. Select from the options described below:
(Pressing [∗] or [#] displays the choices on the bottom line.)
Voice Tag Menu
1 – Playback Plays back the voice tag for this phone number. VOICE TAG:
RECORD AT TONE!
3 – Erase Erase the voice tag for this phone number.
6 – Record Lets you begin recording voice tag (see display at
left). Press any key to stop the recording.
8 – Menu Goes to the Location Select prompt.
LOCATION1
1-SELECT
6. Select from the options described below.
(Pressing [∗] or [#] displays the choices on the bottom line.)
Caller ID Menu
1 – Select Location Lets you enter a 2-digit memory location (01-
15).
2 – Review Displays the selected location’s phone
number.
3 – Erase Erases the phone number from memory.
4 – Next Shows the phone number in the next location.
5 – Previous Shows the phone number in the previous
location.
6 – Program Goes to the “Phone Number” prompt (see
previous page).
8 – Menu Returns to the Main Menu.
When finished, press [8] to return to the Main Menu, or press [9] to exit the system.
Page 80

TeleSMART Messaging Features (cont'd)
Memory Dial Numbers
Use the following table to record phone numbers stored in TeleSMART memory.
PHONE NUMBER VOICE TAG (WHO)
01
02
03
04
05
06
07
08
09
10
11
12
13
14
15
8
0
Page 81

TeleSMART Messaging Features (Cont'd)
Zone Voice Tags Using the TeleSMAR
17
Ring Answer
NAVIGATION: [∗] = Next Option; [#] = Previous Option; [7] = GOTO prompt; [9] = Exit System.
18
Access Key19Caller ID Prog
20
Memory Dial
T Touchpad (Option 22)
21
User Code
22
Zone Voice Tag
About Zone Voice Tags
You can use this menu to record voice tags for up to 22 security system zones using
a TeleSMART touchpad (this option is not available using iCenter).
How to Record Zone Voice Tags
PROGRAM MODE
22 ZNE VOICE TAG
SELECT ZONE #:--(01-
22) #-END
VOICE TAG:
1-REPEAT
1. Go to the “Zone Voice Tag” prompt (option 22) and press [0].
The system displays the next prompt.
2. Enter the security system zone number for which you want a
voice tag. You can press [#] to abort the entry. The system
announces the existing voice tag for the selected zone, then
displays the next prompt.
3. Select from the options described below:
(Pressing [∗] or [#] displays the choices on the bottom line.)
Voice Tag Menu
1 – Repeat Plays back the existing voice tag for this zone.
3 – Erase Erases the existing voice tag for this zone.
6 – Record Lets you begin recording voice tag for this zone.
Press any key to stop the recording.
8 – Menu Goes to the Zone Tag prompt (see below).
VOICE TAG:
RECORD AT TONE!
4. Press [6] (record), begin the voice tag recording after the tone.
Press any key to end the recording.
The system automatically advances to the next prompt.
ZONE 01 TAG
1-SELECT
5.Select from the options described below:
(Pressing [∗] or [#] displays the choices on the bottom line.)
Zone Tag Menu
1 – Select Lets you enter the zone for which you want another
voice tag (01-22).
2 – Review Announces the selected zone’s voice tag.
3 – Erase Erases the voice tag for the selected zone.
4 – Next Announces the voice tag for the next zone.
5 – Previous Announces the voice tag for the previous zone.
6 – Program Starts the Voice Tag Menu (see above).
8 – Menu Returns to the Main Menu.
When finished, press [8] to return to the Main Menu, or press [9] to exit the system.
8
1
Page 82

TeleSMART Messaging Features (cont'd)
TeleSMART Operation Using a Telephone
TeleSMART lets you use a telephone to access some of the system’s functions and
control the security system. TeleSMART also offers several telephone calling
options, including memory dialing (quick dialing of a pre-programmed number), last
number redial, and repeat dialing (automatically redial busy numbers). See
Telephone Calls
later in this section for procedures on using these calling features.
M
aking
To Use TeleSMAR
T From a Telephone
You can control TeleSMART’s typical operating functions from a telephone, but you
cannot perform most system programming functions, (which can be done only from
a TeleSMART keypad). In addition to these restricted telephone functions, the menu
structure for accessing these functions is different from that used with a
TeleSMART keypad. Refer to the Telephone Access Menu Map on the next page to
help navigate the menu system.
1. Pick up any telephone handset (if calling from a remote phone, dial your home
number and do step 2 during the greeting message).
2. Press #
For example, if the access code is “5678”: press #
, then enter your access code, then press ∗.
[5-6-7-8] ∗.
3. The Main Menu options are announced in numerical order (see the table below).
Select the desired menu option by pressing the corresponding option number on the
telephone keypad at any time.
NO
While using TeleSMART from a telephone, the system is unable to receive
TE:
calls.
The following table lists the functions that you can perform from a telephone.
From a Telephone, You Can… By Pressing…
Control the security system [1] then desired arming command
Listen to your messages [2]
Record a memo [4] then follow the prompts
Record a greeting [7] [2] then follow the prompts
Turn privacy on/off [7] [1] [3]
Turn toll saver on/off [7] [1] [4]
Turn the CID display on/off [7] [1] [6]
Turn keypad CID announcement on/off [7] [1] [1] [1]
Turn aux CID announcement on/off [7] [1] [1] [2]
Set the aux speaker volume [7] [1] [1] [4]
Turn message beeps on/off [7] [1] [2] [4]
Turn call screening on/off [7] [1] [2] then follow the prompts
8
2
Page 83

TeleSMART Messaging Features (Cont'd)
Telephone Access Menu Map
MAIN MENU
1 - Security System
2 - Hear Messages
4 - Record Memo
6 - Select Mailbox
Security Menu
Disarm: code+[1]
Check Status: [ ]
Arm Away: code+[2]
Arm Stay: code+[3]
Arm Inst: code+[7]
Arm max: code+[4]
Bypass Zone(s):
code [6]+2 digit zone
number to be bypassed
Message Menu
1 - Repeat
2 - Save
3 - Erase
4 - Next
5 - Previous
6 - Select mailbox
6 - Select Mailbox
8 - Previous Menu
9 - Exit
Enter Mailbox No.
Enter Mailbox No.
or press [#]
to cancel
Enter Mailbox No.
Enter Mailbox No.
Enter Mailbox No.
Record at Tone
Memo Menu
1 - Repeat
3 - Erase
4 - Record Memo
4 - Record Memo
8 - Previous Menu
9 - Exit
Goes to
Message Menu
Program Menu
1 - System
2 - Mailbox
8 - Previous Menu
9 - Exit
System Menu
1 - Speaker
2 - Call Screen
3 - Privacy On/Off
4 - Toll Svr On/Off
6 - CID Disp. On/Off
8 - Previous Menu
9 - Exit
Mailbox Prgm Menu
1 - Select Mailbox
2 - Record OGM
3 - Play OGM
8 - Previous Menu
9 - Exit
Speaker Menu
1 - Keypad CID On/Off
2 - Aux CID On/Off
3 - Phone CID On/Off
4 - Aux Volume #
8 - Previous Menu
9 - Exit
Call Screen Menu
1 - Handset On/Off
2 - HF Aux On/Off
3 - HF Kypd On/Off
4 - Msg Bp On/Off
8 - Previous Menu
9 - Exit
First select a mailbox for
the greeting before using
the other mailbox options.
7 - Programming
9 - Exit
Access_Menu_Map.eps
8
3
Page 84

TeleSMART Messaging Features (cont'd)
S
ecurity System Menu from a Phone
You can control your security system from a telephone by using TeleSMART.
Action
Enter your access code:
∗
From phone: [#]
Press [1] to activate the security system mode.
Refer to the table shown below for some of the typical security system commands.
Once you enter the Security System Menu from the telephone, you cannot return to the Main Menu
by pressing a key. Instead, TeleSMART automatically returns to the Main Menu after 10 seconds
of no key presses.
[ _ _ _ _ ] [
Typical Security System Commands May Include:
COMMAND PRESS
]
CHECK STATUS
DISARM SYSTEM
ARM MAXIMUM**
ARM INSTANT
ARM AWAY
ARM STAY
BYPASS A ZONE(S)
CHIME MODE
∗
Code* +
Code* +
Code* +
Code* +
Code* +
Code* +
Code* +
1
4
7
2
3
6
+ 3-digit zone no. to be bypassed
9
* You must use a security system user code to perform a security system function.
** Not all control panels support “Maximum” arming mode.
Zones greater than 63 are not announced. They can be bypassed, however their status cannot be
announced due to speech limitations..
Refer to your security system’s User Guide for specific commands and procedures.
8
4
Page 85
Making Telephone Calls
TYPE OF CALL PRESS
Normal Dialing
Memory Dialing
phone number Pick up any telephone handset in your home and listen for
[XX]
then
∗
then
TeleSMART Messaging Features (Cont'd)
ACTION/WHAT HAPPENS
a dial tone. Rapid beeps (if enabled) mean that there are
new messages waiting.
To place a call, simply dial as usual after the beeps end.
First pick up any telephone in your home and listen for a
dial tone.
xx = 2-digit memory location number (01-15)
The system announces a voice tag (if recorded) or phone
number for that location after you press [∗].
Last Number
Redial
Repeat Dialing
1
∗
9
9
∗
6
6
The system begins dialing after you press [1].
To program memory/speed dial numbers and optional voice
tags, see “Memory Dial Numbers” on page 78.
First pick up any telephone in your home and listen for a
dial tone.
TeleSMART automatically redials the last number called
from any phone in the house.
After dialing a number, hang up the telephone handset,
then pick it up again and listen for a dial tone.
Press [6] [6] [∗], then hang up the handset again.
TeleSMART will automatically redial the number once per
minute for up to 30 minutes. The system then stops dialing
that number.
When the number is available, your TeleSMART touchpad
will beep; pick up the telephone handset and continue with
your call.
8
5
Page 86

TeleSMART Messaging Features (cont'd)
8
6
Page 87

Introduction to Advanced System Features
While most of the commonly used security functions are available from
iCenter’s advanced user interface, there are some less used, advanced
features that can either be accessed through Touchpad Emulation mode on
the iCenter or a standard Custom English Touchpad.
Touchpad (Console) Emulation Mode
Console Mode allows you to use an iCenter interface just as you would a
regular system touchpad. In this mode, you can use either iCenter’s touch
screen "touchpad,” or the touchpad keys (if available on your model). All
commands shown in Console Emulation mode can also be executed from a
standard Custom English Touchpad.
How to Enter Console Emulation Mode
To access the touch screen "touchpad," do the following:
ACTION SCREEN
Advanced System Features
1. From the "Home" screen, press the
SECURITY
displayed.
2. Press the
"More Choices" screen is displayed.
button. The "Arming" screen is
MORE CHOICES
button. The
8
7
Page 88

Advanced System Features (Cont'd)
ACTION SCREEN
3. Press the
"More Choices" screen. The "Touchpad"
screen is displayed.
CONSOLE MODE
Speed Key (Macro) Programming
The “A”, “B”, “C”, and/or “D” keys can be used to activate a string of
commands up to 32 keystrokes each. This sequence of commands is known
as a macro and is stored in the system’s memory. Typical Speed Key
functions include:
Sequences that involve first bypassing certain zones before arming.
•
Seldom used but repeatable sequences.
•
Relay activation sequences.
•
button on the
Defining a Macro
To program a macro do the following once in Console Emulation Mode, or
from a Custom English Touchpad:
ACTION SCREEN
1. Enter your 4-digit security code, then press
[#][D]. The screen displays the
SpeedKey #
NOTE:
the "Touchpad" screen after approximately 1
minute.
prompt.
The system automatically returns to
Enter
88
Page 89

ACTION SCREEN
2. Enter the 2-digit Speed Key number (01-32)
being defined and press [✴]. Enter up to 32
keystrokes. A Speed Key sequence can
include different commands. Press the "D" key
to separate different commands. For example,
you may want to perform the following
sequence.
and
2
011
away
byps
],
] key
1
GOTO partition 2 - Enter [✴]
Bypass zones 10 and 11 - Press 6 [
then zone numbers
Arm in Away Mode - Press 3 [
Return to partition 1 - Enter [✴]
"D" is pressed after each command; press "D"
twice to exit.
NOTE:
do not use the [#] key to represent Quick
Arming. The system uses the code entered in
response to the prompt to initiate commands in
a Speed Key sequence, so the quick arm key
is unnecessary. The system interprets the use
of the [#] key in a Speed Key sequence as its
designated function only.
When defining Speed Key sequences,
010
Advanced System Features (Cont'd)
Executing a Macro Using a Speed Key
To execute a macro sequence, do the following:
If a lettered key, A-B-C, has been assigned as a Speed Key, press and hold
down the appropriate key on a Standard Custom English Touchpad or the
associated physical key on the iCenter interface (about 2 seconds). If a user
code is required for any part of the Speed Key sequence, the following prompt
appears. Otherwise, the Speed Key sequence automatically begins.
ENTER USER CODE
✴✴✴✴
Enter your user code. The defined Speed Key sequence will begin
automatically.
To activate a macro not assigned to the A-B-C keys, press and hold down the
[D] key for 2 seconds until the following prompt appears:
ENTER SPEED KEY #
01-32 00=QUIT
Enter the desired Speed Key number.
8
9
Page 90

Advanced System Features (Cont'd)
If a user code is required for any part of the Speed Key sequence, the
following prompt appears. Otherwise, the Speed Key sequence automatically
begins.
ENTER USER CODE
✴✴✴✴
Enter your user code. The programmed Speed Key sequence will begin
automatically.
Using Relay Mode (#70)
Your system may be set up so that certain lights or other devices can be
turned on or off by using the #70 command from a touchpad. Ask your
installer if this has been done in your system.
To activate relays from Console Emulation Mode or a Custom English
touchpad, enter 4-digit security code + [#] +70. Follow the touchpad prompts
described below.
ENTER DEVICE NO.
00=QUIT 01
NN DEVICE IS OFF
HIT 0=OFF , 1=ON
NN DEVICE IS OFF
HIT THE "T" KEY
V
Enter the 2-digit number of the device to be activated.
Note that if an invalid number is entered, the system will simply ask
you to reenter the number.
V
descriptor
"ENTER DEVICE CODE NOW"
oice:
oice:
"
voice descriptor
DEVICE nn ON/OFF. FOR
ON ENTER 1, FOR
voice descriptor
voice
OFF ENTER
0"
Press 0 or 1 to turn the device off or on respectively.
"nn" represents the 2-digit device number and
relay voice descriptor programmed by the installer.
V
oice:
"
voice descriptor
DEVICE nn ON/OFF. TO EXIT
voice descriptor
is the
ENTER 00 NOW"
From a touchpad,
prompt will appear.
From a telephone touchpad,
number to be programmed. The current on/off state of that relay will be
annunciated as described above. Alternatively, if 6 seconds elapses
with no key depression, the 4285 or 4286 VIP module will annunciate
the "ENTER DEVICE CODE NOW" message.
press ✴ to continue. The ENTER DEVICE NO.
enter 00 to exit, or enter the next relay
Temporary Schedules
Delaying the Closing Time Using Schedules
Your system's programmed schedules may automatically arm the system at
a predetermined time. In the event a user must stay on the premises later
9
0
Page 91

Advanced System Features (Cont'd)
than usual, users with master or manager authority levels can manually
delay the automatic arming (closing) time up to 2 hours.
To delay the closing time perform the following from Console Emulation
mode or through a Custom English Touchpad:
ACTION SCREEN
1. Enter your 4-digit security code (Master or
Manager authority levels only), then press [ #]
[8] [ 2] keys. A menu prompt is displayed,
asking for the number of hours of delay.
NOTE:
the "Touchpad" screen after approximately 1
minute if no entry is made.
5. Enter the desired number of hours of delay,
1 or 2. The system automatically exits this
mode after entry and returns to the "Touchpad"
screen.
NOTE:
closing time, not from the time the command is
entered.
IMPORTANT:
reduced once it is set. A 1-hour delay can be
increased to 2 hours, though.
The system will automatically send a message
to the central station informing them that the
programmed schedule has been changed.
The system automatically returns to
The delay is from the scheduled
The selected delay cannot be
Temporary Open/Close Schedules
Temporary schedules allow you to override the normal schedules
programmed by the installer. Temporary schedules can be in effect for up to
1 week, and take effect as soon as they are programmed.
Schedules are comprised of an arming (closing) time window and a disarming
(opening) time window. A time window is simply a defined period of time, at
the end of which arming or disarming will occur.
9
1
Page 92
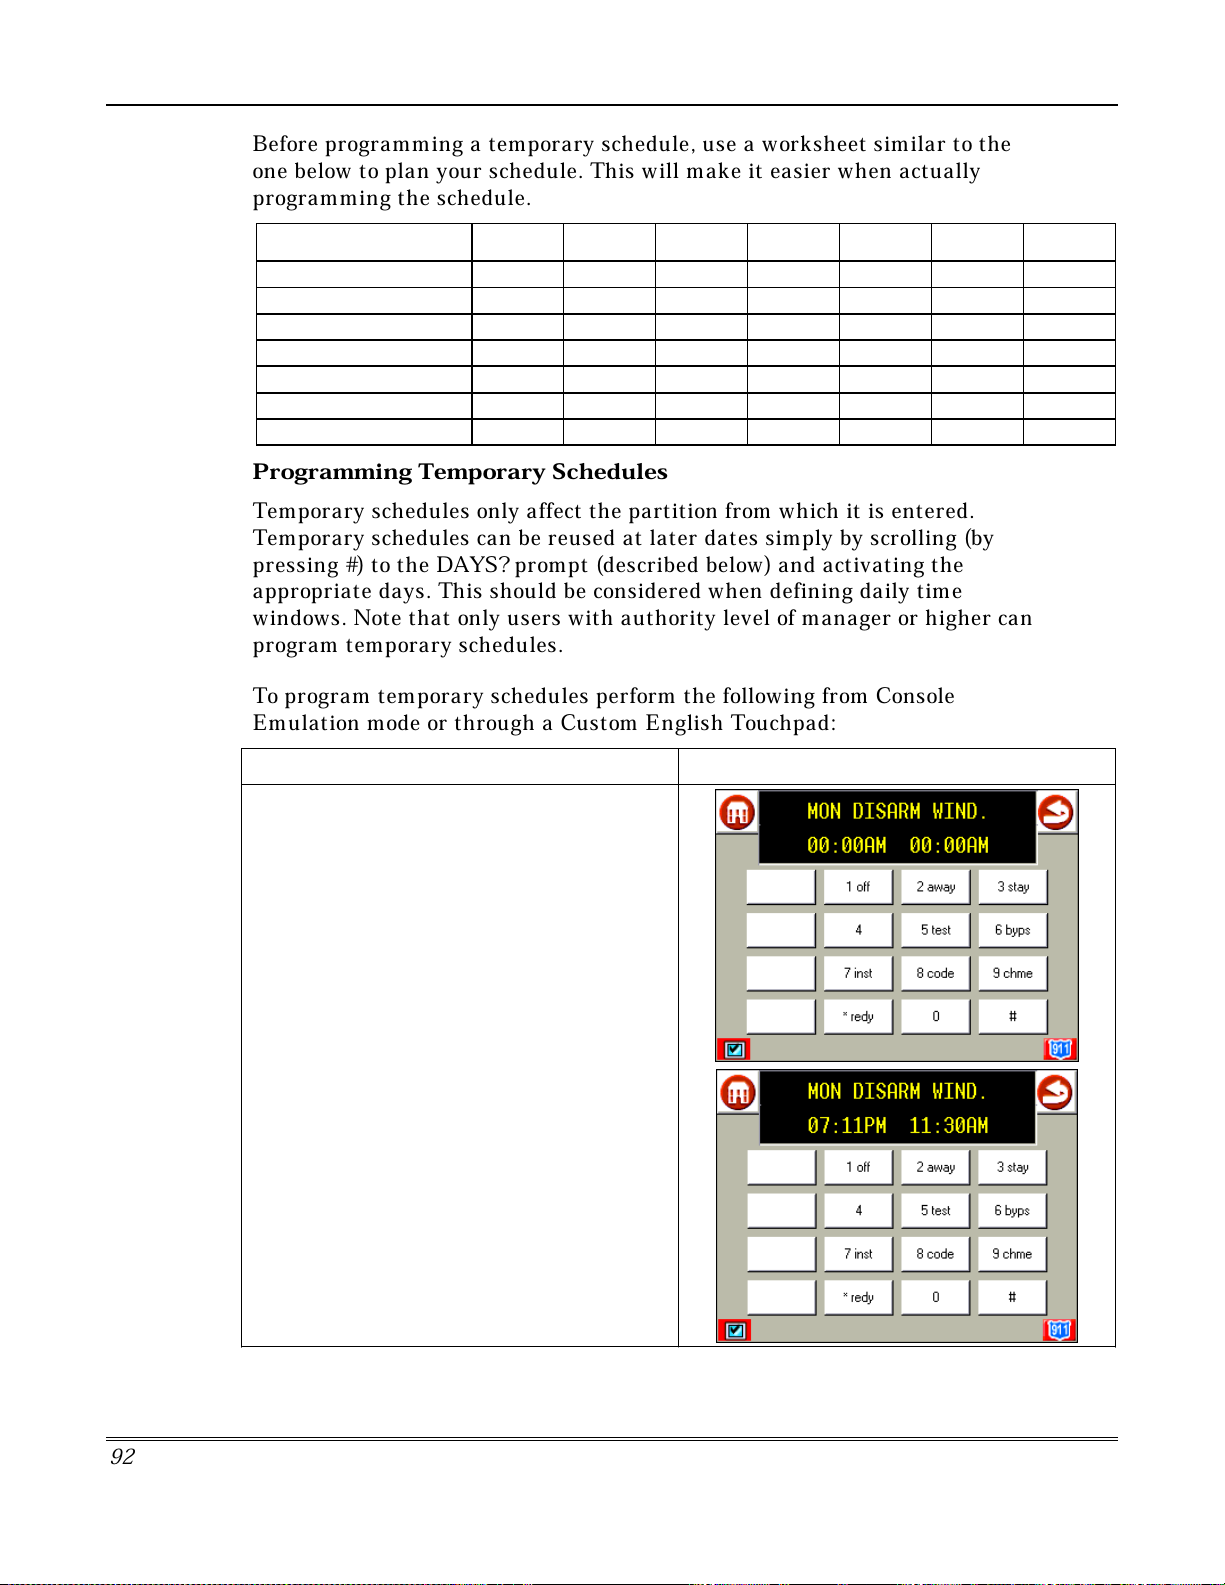
Advanced System Features (Cont'd)
Before programming a temporary schedule, use a worksheet similar to the
one below to plan your schedule. This will make it easier when actually
programming the schedule.
ARM/DISARM MON TUE WED THU FRI SAT SUN
Windows
Disarm Window
Start Time HH:MM
Stop Time HH:MM
Arm Window
Start Time HH:MM
Stop Time HH:MM
Programming Temporary Schedules
Temporary schedules only affect the partition from which it is entered.
Temporary schedules can be reused at later dates simply by scrolling (by
pressing #) to the DAYS? prompt (described below) and activating the
appropriate days. This should be considered when defining daily time
windows. Note that only users with authority level of manager or higher can
program temporary schedules.
To program temporary schedules perform the following from Console
Emulation mode or through a Custom English Touchpad:
ACTION SCREEN
1. Enter your 4-digit security code, then press
[#] [ 8] [ 1] keys. A menu prompt
DISARM WIND.
The cursor is positioned on the tens of hours
digit of the start time for Monday's disarm
window. Enter the desired hour. Press [✴] to
move to the minutes field. The minutes are
entered in the same manner. The AM/PM
indication is changed by hitting any key, 0-9,
while the cursor is under the letter A/P position.
Repeat for the stop time entry.
Press [ #] to move to the next screen display
without making changes.
is displayed.
MON
9
2
Page 93

ACTION SCREEN
2. Press the [✴] key to move to the arming
window for Monday. A menu prompt
ARM WINDOW
The cursor is positioned on the tens of hours
digit of the start time for Monday's arm window.
Enter the desired hour. Press [✴] to move to
the minutes field. The minutes are entered in
the same manner. The AM/PM indication is
changed by hitting any key, 0-9, while the
cursor is under the letter A/P position. Repeat
for the stop time entry.
Press [ #] to move to the next screen display
without making changes.
is displayed.
MON
Advanced System Features (Cont'd)
3. Press the [✴] key to move to the disarm
window for Tuesday. A menu prompt
DISARM WIND.
Repeat the process explained in step 4 for the
Tuesday disarm window.
Press [ #] to move to the next screen display
without making changes.
NOTE:
screen displayed will be the Wednesday
disarm screen, not the Tuesday arm screen.
If the [ #] key is pressed the next
is displayed.
TUE
9
3
Page 94

Advanced System Features (Cont'd)
ACTION SCREEN
4. Press the [✴] key to move to the arm
window for Tuesday. A menu prompt
ARM WINDOW
Repeat the process explained in step 5 for the
Tuesday arm window.
Press [ #] to move to the next screen display
without making changes.
Continue this procedure through the remaining
days of the week.
is displayed.
TUE
When all of the days have been completed, the
system will ask which days are to be activated.
This is the prompt that actually activates the
temporary schedule, and allows the temporary
schedule to be customized to a particular
week's needs. To select the days that are to be
activated, enter the desired number 1-7
(Monday = 1). An X will appear under that day,
indicating the previously entered schedule for
that day is active. Entering a day's number
again will deactivate that day. Pressing 0 will
turn all days on/off.
The temporary schedule will only be in effect
for the days that have the letter X underneath
them. As the week progresses, the days are
reset to the non-active state.
When completed, press [✴] to exit the
temporary schedule entry mode.
9
4
Page 95

Programming Device Timers
Device timers consist of an ON time and an OFF time, and selected days of
the week in which they are active. There are up to 20 timers that can be used
to control various devices, such as lights or appliances. Your installer will
have programmed the appropriate devices into the system (up to 96 devices
can be programmed).
Each timer controls a single device (designated as an output number) that
you select. For example, timer 1 might be set to turn the porch lights on at
7:00pm and turn them off at 11:00pm. Timer 2 might turn on the air
conditioner Monday through Friday at 4:30pm to cool the premises before
you arrive at 5:00pm, and turn it off at 10:00pm when you are retiring for
the night. If desired, different timers can control the same device. For
example, timer 2 could be used Monday through Friday as in the previous
example, and timer 3 could be set to turn the air conditioner on and off at
different times Saturday and Sunday.
To enter the device timer menu mode from Console Emulation mode or
through a Custom English Touchpad perform the following:
Advanced System Features (Cont'd)
ACTION SCREEN
1. Enter your security code, then press the [#]
key followed by the [
OUTPUT TIMER # ?
2. Enter the desired timer number to be
programmed (1-20). Press [✴] to accept entry.
NOTE:
Each timer is identified by a number (1-20).
Up to 20 timers can be programmed.
8] [3] keys
prompt is displayed.
. The
Add
9
5
Page 96

Advanced System Features (Cont'd)
ACTION SCREEN
3. Press [✴] to continue.
NOTE:
programmed, a summary screen will appear. In
this example:
04
00
none
00:00A
00:00A
4. Enter the desired output device number
(01-16). As the number is entered, the
device's description will appear.
To delete a previously programmed timer,
enter 00 as the output number.
Press [✴] to continue.
NOTE:
If that timer number has already been
= Timer #
= Output Device # affected by this timer
= Output Descriptor for Device 4
= Start Time;
= Stop Time
See your installer for device numbers.
5. Enter the time you want the device turned
on using 00:01 - 11:59 format. When the
display shows the desired time, press [✴] to
move to the AM/PM field. Press any key (0-9)
to change the AM/PM indication.
NOTE:
used to turn something on for the days
selected below. (e.g. using one timer to turn
lights on one day and using another timer to
turn them off on another day.)
9
6
Enter 00:00 if this timer is not being
Page 97
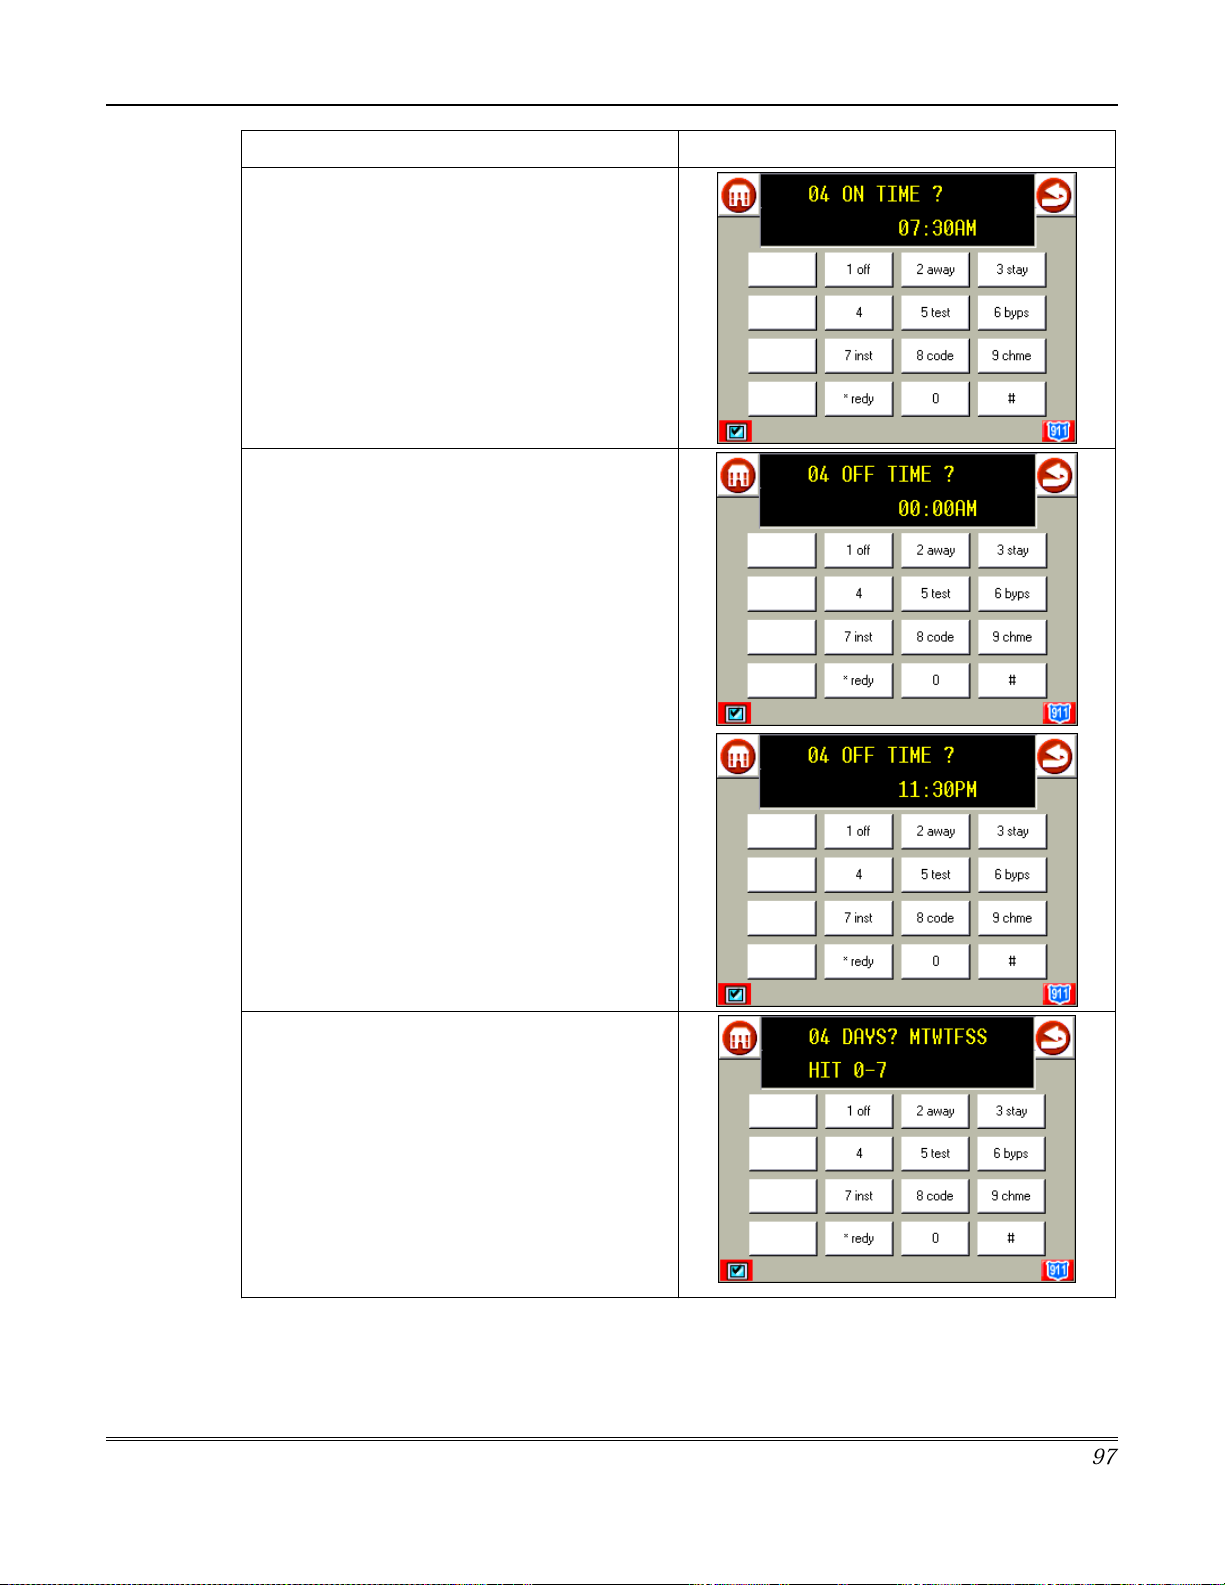
ACTION SCREEN
6. Enter the time you want the device turned
off using 00:01 - 11:59 format. When the
display shows the desired time, press [✴] to
move to the AM/PM field. Press any key (0-9)
to change the AM/PM indication.
NOTE:
used to turn something off for the days
selected below. (e.g. using one timer to turn
lights on one day and using another timer to
turn them off on another day.)
Enter
00:00
if this timer is not being
Advanced System Features (Cont'd)
7. Select the days on which the device is to be
activated by entering 1-7 (Monday = 1). An "X"
will appear under that day, indicating the
output for that day is active. Entering a day's
number again will deactivate that day. Pressing
0 will turn all days on/off. The outputs will only
be in effect for the days that have the letter x
underneath them. As the week progresses, the
selected days are reset to the inactive state,
unless the permanent option is selected (next
screen prompt). When completed, press [✴] to
continue.
9
7
Page 98

Advanced System Features (Cont'd)
ACTION SCREEN
8. Press 1 (
this timer on a continuous basis or press
(NO) to execute each day's output only once.
YES
) to have the system execute
Using Instant Activation Mode (#77)
The #77 Instant Activation Mode is used to activate outputs, bypass zones,
etc. The actions that may be activated are relay commands, arm/disarm
commands, zone bypassing commands, and open/close access conditions.
R
elay Commands
CODE ACTION SPECIFIER
01 Relay On Relay #
02 Relay Off Relay #
03 Relay Close for 2 seconds Relay #
04 Relay Close XX minutes * Relay #
05 Relay Close YY seconds * Relay #
06 Relay Group On Relay Group #
07 Relay Group Off Relay Group #
08 Relay Group Close for 2 seconds Relay Group #
09 Relay Group Close XX minutes * Relay Group #
10 Relay Group Close YY seconds * Relay Group #
0
* Check with your installer for the amount of time.
9
8
Page 99
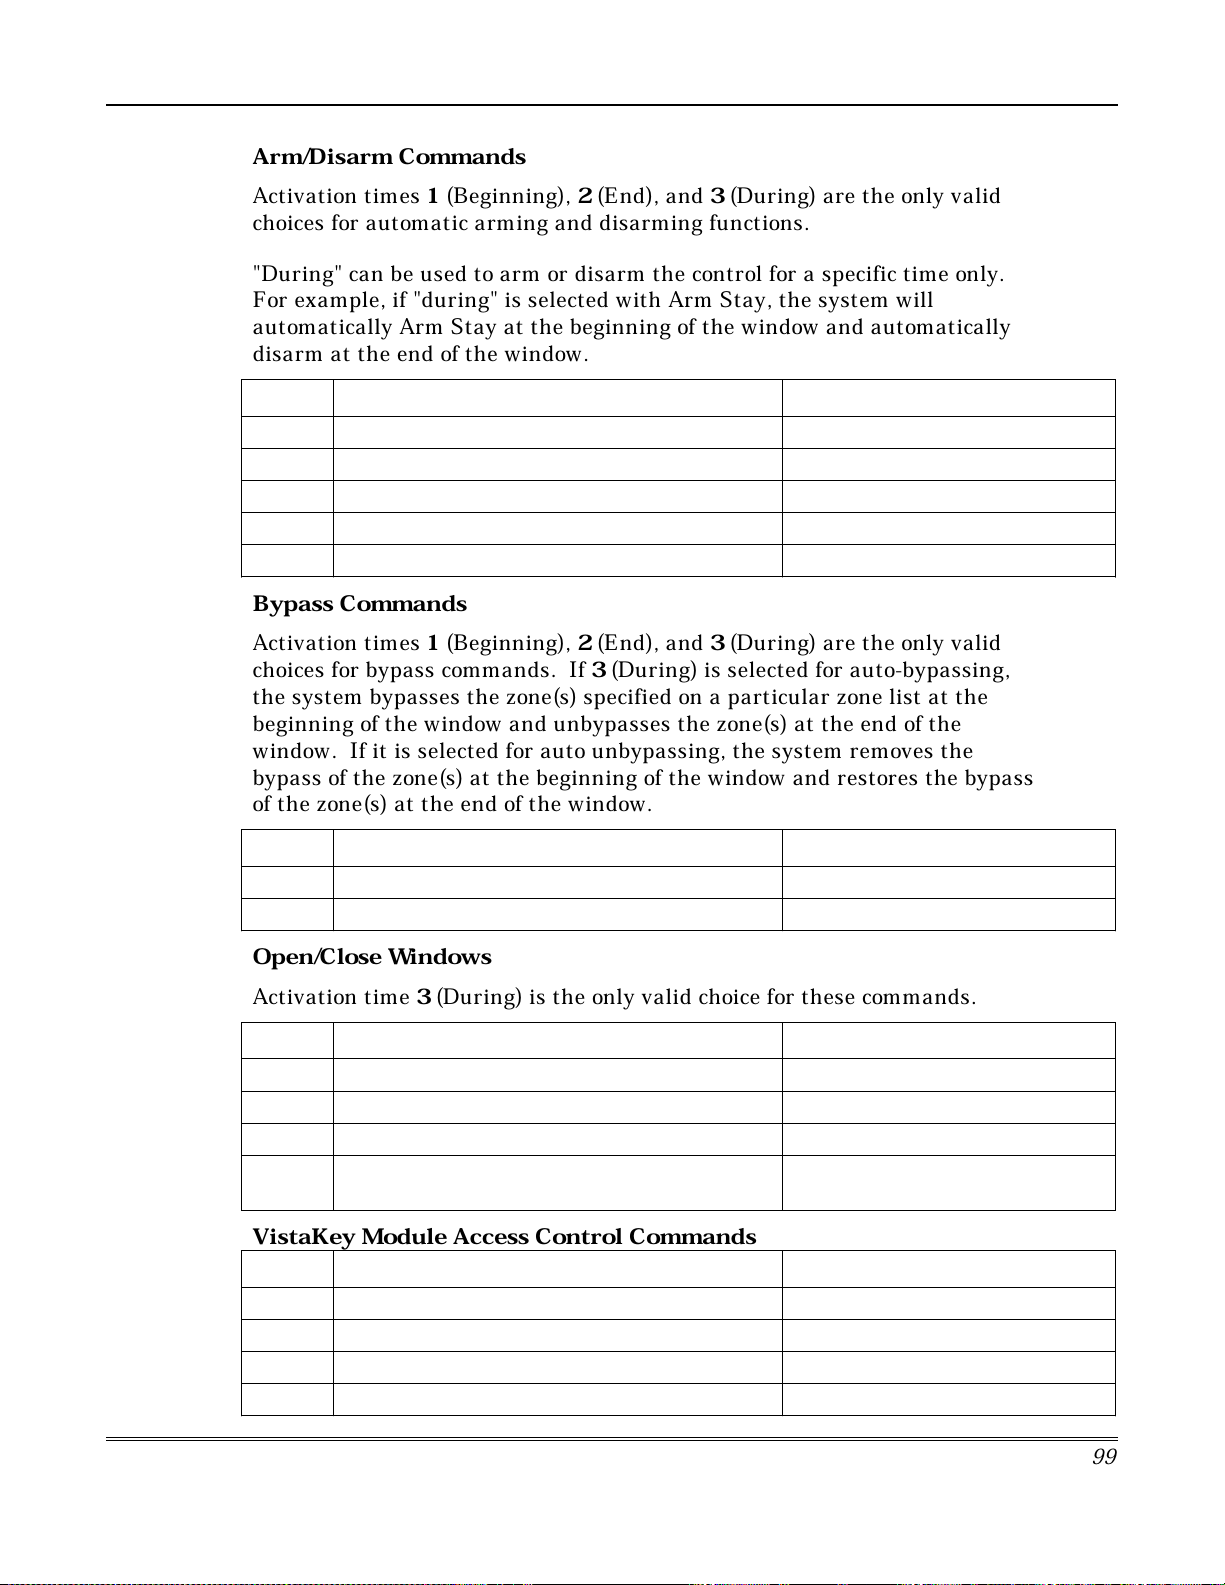
Advanced System Features (Cont'd)
Arm/Disarm Commands
Activation times 1 (Beginning), 2 (End), and 3(During) are the only valid
choices for automatic arming and disarming functions.
"During" can be used to arm or disarm the control for a specific time only.
For example, if "during" is selected with Arm Stay, the system will
automatically Arm Stay at the beginning of the window and automatically
disarm at the end of the window.
CODE ACTION SPECIFIER
20 Arm-Stay Partition(s)
21 Arm Away Partition(s)
22 Disarm Partition(s)
23 Force Arm Stay (Auto-bypass faulted zones) Partition(s)
24 Force Arm Away (Auto-bypass faulted zones) Partition(s)
Bypass Commands
Activation times 1 (Beginning), 2 (End), and 3 (During) are the only valid
choices for bypass commands. If 3 (During) is selected for auto-bypassing,
the system bypasses the zone(s) specified on a particular zone list at the
beginning of the window and unbypasses the zone(s) at the end of the
window. If it is selected for auto unbypassing, the system removes the
bypass of the zone(s) at the beginning of the window and restores the bypass
of the zone(s) at the end of the window.
CODE ACTION SPECIFIER
30 Auto bypass - Zone list Zone list #
31 Auto unbypass - Zone list Zone list #
Open/Close Windows
Activation time 3 (During) is the only valid choice for these commands.
CODE ACTION SPECIFIER
40 Enable Opening Window by partition Partition(s)
41 Enable Closing Window by partition Partition(s)
42 Enable Access Window for access group Access Group
50 Off-Normal Reminder (Starts local touchpad
beeping if fire off-normal condition exists)
None
VistaKey Module Access Control Commands
CODE ACTION SPECIFIER
55 Access Point Grant Access Point #
56 Access Point Grant with Override Access Point #
57 Access Point Protect Access Point #
58 Access Point Bypass Access Point #
99
Page 100

Advanced System Features (Cont'd)
CODE ACTION SPECIFIER
59 Access Point Lock Access Point #
60 Access Point Exit Access Point #
61 Access Point Group Grant Group #
62 Access Point Group Grant with Override Group #
63 Access Point Group Protect Group #
64 Access Point Group Bypass Group #
65 Access Point Group Lock Group #
66 Access Point Group Exit Group #
67 Access Point Partition Grant Partition #
68 Access Point Partition Grant with Override Partition #
69 Access Point Protect by Partition Partition #
70 Access Point Bypass by Partition Partition #
71 Access Point Lock by Partition Partition #
72 Access Point Exit by Partition Partition #
73 Access Point Trigger On Trigger #
74 Access Point Trigger Off Trigger #
Additional Commands
CODE ACTION SPECIFIER
75 Run Macro Macro #
76 Run Script Script #
77 Access Point Group Enable Group #
78 Access Point Group Disable Group #
How to Use Instant Activation Mode
O
nce in Console Emulation mode or from a Custom English Touchpad, do the
following:
ACTION SCREEN
1. Enter your security code, then press the [#]
key followed by the [7] [7] . The
prompt is displayed.
ACTION ?
100
 Loading...