

Page 1

ADOBE® TECHNICAL COMMUNICATION SUITE 4
Page 2

Legal notices
Legal notices
For legal notices, see http://help.adobe.com/en_US/legalnotices/index.html.
Last updated 12/23/2013
Page 3

Contents
Chapter 1: Getting started
Resources . . . . . . . . . . . . . . . . . . . . . . . . . . . . . . . . . . . . . . . . . . . . . . . . . . . . . . . . . . . . . . . . . . . . . . . . . . . . . . . . . . . . . . . . . . . . . . . . . . . . . . . . . . . . . 1
Activation and registration . . . . . . . . . . . . . . . . . . . . . . . . . . . . . . . . . . . . . . . . . . . . . . . . . . . . . . . . . . . . . . . . . . . . . . . . . . . . . . . . . . . . . . . . . . . . 1
Adobe Product Improvement Program . . . . . . . . . . . . . . . . . . . . . . . . . . . . . . . . . . . . . . . . . . . . . . . . . . . . . . . . . . . . . . . . . . . . . . . . . . . . . . . . . 1
Services, downloads, and extras . . . . . . . . . . . . . . . . . . . . . . . . . . . . . . . . . . . . . . . . . . . . . . . . . . . . . . . . . . . . . . . . . . . . . . . . . . . . . . . . . . . . . . . . 2
Adobe Technical Communication Suite 4 overview . . . . . . . . . . . . . . . . . . . . . . . . . . . . . . . . . . . . . . . . . . . . . . . . . . . . . . . . . . . . . . . . . . . . . 3
Chapter 2: Rich media
Adding rich media . . . . . . . . . . . . . . . . . . . . . . . . . . . . . . . . . . . . . . . . . . . . . . . . . . . . . . . . . . . . . . . . . . . . . . . . . . . . . . . . . . . . . . . . . . . . . . . . . . . . . 6
Insert Photoshop images . . . . . . . . . . . . . . . . . . . . . . . . . . . . . . . . . . . . . . . . . . . . . . . . . . . . . . . . . . . . . . . . . . . . . . . . . . . . . . . . . . . . . . . . . . . . . 11
Insert Adobe Captivate demo . . . . . . . . . . . . . . . . . . . . . . . . . . . . . . . . . . . . . . . . . . . . . . . . . . . . . . . . . . . . . . . . . . . . . . . . . . . . . . . . . . . . . . . . . 11
Using PDF Portfolios . . . . . . . . . . . . . . . . . . . . . . . . . . . . . . . . . . . . . . . . . . . . . . . . . . . . . . . . . . . . . . . . . . . . . . . . . . . . . . . . . . . . . . . . . . . . . . . . . . 12
Chapter 3: Using FrameMaker with RoboHelp
Authoring and publishing workflow using FrameMaker and RoboHelp . . . . . . . . . . . . . . . . . . . . . . . . . . . . . . . . . . . . . . . . . . . . . . . . . 13
Synchronizing linked FrameMaker documents with RoboHelp projects . . . . . . . . . . . . . . . . . . . . . . . . . . . . . . . . . . . . . . . . . . . . . . . . 19
FrameMaker document components converted to RoboHelp . . . . . . . . . . . . . . . . . . . . . . . . . . . . . . . . . . . . . . . . . . . . . . . . . . . . . . . . . . 22
Conversion basics . . . . . . . . . . . . . . . . . . . . . . . . . . . . . . . . . . . . . . . . . . . . . . . . . . . . . . . . . . . . . . . . . . . . . . . . . . . . . . . . . . . . . . . . . . . . . . . . . . . . 25
Automap . . . . . . . . . . . . . . . . . . . . . . . . . . . . . . . . . . . . . . . . . . . . . . . . . . . . . . . . . . . . . . . . . . . . . . . . . . . . . . . . . . . . . . . . . . . . . . . . . . . . . . . . . . . . . 27
Pagination, topic naming, and context-sensitive Help . . . . . . . . . . . . . . . . . . . . . . . . . . . . . . . . . . . . . . . . . . . . . . . . . . . . . . . . . . . . . . . . . 29
Converting FrameMaker content . . . . . . . . . . . . . . . . . . . . . . . . . . . . . . . . . . . . . . . . . . . . . . . . . . . . . . . . . . . . . . . . . . . . . . . . . . . . . . . . . . . . . . 33
RoboHelp options within FrameMaker . . . . . . . . . . . . . . . . . . . . . . . . . . . . . . . . . . . . . . . . . . . . . . . . . . . . . . . . . . . . . . . . . . . . . . . . . . . . . . . . 38
HTML publishing workflow using Technical Communication Suite and standalone products . . . . . . . . . . . . . . . . . . . . . . . . . . . . 40
Publishing the current document . . . . . . . . . . . . . . . . . . . . . . . . . . . . . . . . . . . . . . . . . . . . . . . . . . . . . . . . . . . . . . . . . . . . . . . . . . . . . . . . . . . . . 44
iii
Chapter 4: Review and collaboration
Reviews . . . . . . . . . . . . . . . . . . . . . . . . . . . . . . . . . . . . . . . . . . . . . . . . . . . . . . . . . . . . . . . . . . . . . . . . . . . . . . . . . . . . . . . . . . . . . . . . . . . . . . . . . . . . . . 47
Send documents for review . . . . . . . . . . . . . . . . . . . . . . . . . . . . . . . . . . . . . . . . . . . . . . . . . . . . . . . . . . . . . . . . . . . . . . . . . . . . . . . . . . . . . . . . . . . 47
Incorporating review comments . . . . . . . . . . . . . . . . . . . . . . . . . . . . . . . . . . . . . . . . . . . . . . . . . . . . . . . . . . . . . . . . . . . . . . . . . . . . . . . . . . . . . . 48
Collaboration . . . . . . . . . . . . . . . . . . . . . . . . . . . . . . . . . . . . . . . . . . . . . . . . . . . . . . . . . . . . . . . . . . . . . . . . . . . . . . . . . . . . . . . . . . . . . . . . . . . . . . . . 48
Chapter 5: Working with ExtendScript
ExtendScript toolkit . . . . . . . . . . . . . . . . . . . . . . . . . . . . . . . . . . . . . . . . . . . . . . . . . . . . . . . . . . . . . . . . . . . . . . . . . . . . . . . . . . . . . . . . . . . . . . . . . . 49
Preparing scripts . . . . . . . . . . . . . . . . . . . . . . . . . . . . . . . . . . . . . . . . . . . . . . . . . . . . . . . . . . . . . . . . . . . . . . . . . . . . . . . . . . . . . . . . . . . . . . . . . . . . . 51
Last updated 12/23/2013
Page 4

Chapter 1: Getting started
Resources
Before you begin working with your software, take a few moments to read an overview of activation and the many
resources available to you. You have access to instructional videos, plug-ins, templates, user communities, seminars,
tutorials, RSS feeds, and much more.
Activation and registration
Help with installation
For more information on installation issues, see the Technical Communication Suite Help and Support page at
www.adobe.com/go/learn_tcs_en.
1
Activate the software
During the installation process, your Adobe software contacts Adobe to complete the license activation process. No
personal data is transmitted. For more information on product activation, visit the Adobe website at
www.adobe.com/go/activation.
A single-user retail license activation supports two computers. For example, you can install the product on a desktop
computer at work and on a laptop computer at home. If you want to install the software on a third computer, first
deactivate it on one of the other two computers. Choose Help > Deactivate.
Register
Register your suite to receive complimentary installation support, notifications of updates, and other services. Register
only once for Adobe Technical Communication Suite.
❖ To register, enter your Adobe ID when prompted when you install or launch the software.
If you choose to skip entering your Adobe ID during installation or launch, you can register within next 30 days by
choosing Help > Product Registration. You can also set a reminder to register after a few days of software installation.
Adobe Product Improvement Program
You can participate in the Adobe Product Improvement Program. After you have used your Adobe software a few
times, a dialog box appears, asking whether you want to participate in the program.
If you choose to participate, data about your use of Adobe software is sent to Adobe. No personal information is
recorded or sent. The Adobe Product Improvement Program only collects information about the features and tools
that you use in the software and how often you use them.
You can opt in to or opt out of the program at any time:
• To participate, choose Help > Product Improvement Program and click Yes, Participate.
Last updated 12/23/2013
Page 5

TECHNICAL COMMUNICATION SUITE 4
Getting started
• To stop participating, choose Help > Product Improvement Program and click No, Thank You.
Adobe provides more information about the Product Improvement Program in a frequently asked questions (FAQ)
list on the
Adobe website.
Services, downloads, and extras
You can enhance your product by integrating various services, plug-ins, and extensions in your product. You can also
download samples and other assets to complete your work.
Adobe Exchange
Visit the Adobe Exchange at www.adobe.com/go/exchange to download samples as well as plug-ins and extensions
from Adobe and third-party developers. Use these plug-ins and extensions to automate tasks, customize workflows,
create specialized professional effects, and apply more creativity in work.
Adobe downloads
Visit www.adobe.com/go/downloads to find free updates, trials, and other useful software.
2
Adobe TV
Visit Adobe TV at http://tv.adobe.com/channel/technical-communication/to view instructional and inspirational
videos on Technical Communication Suite.
Last updated 12/23/2013
Page 6
TECHNICAL COMMUNICATION SUITE 4
Getting started
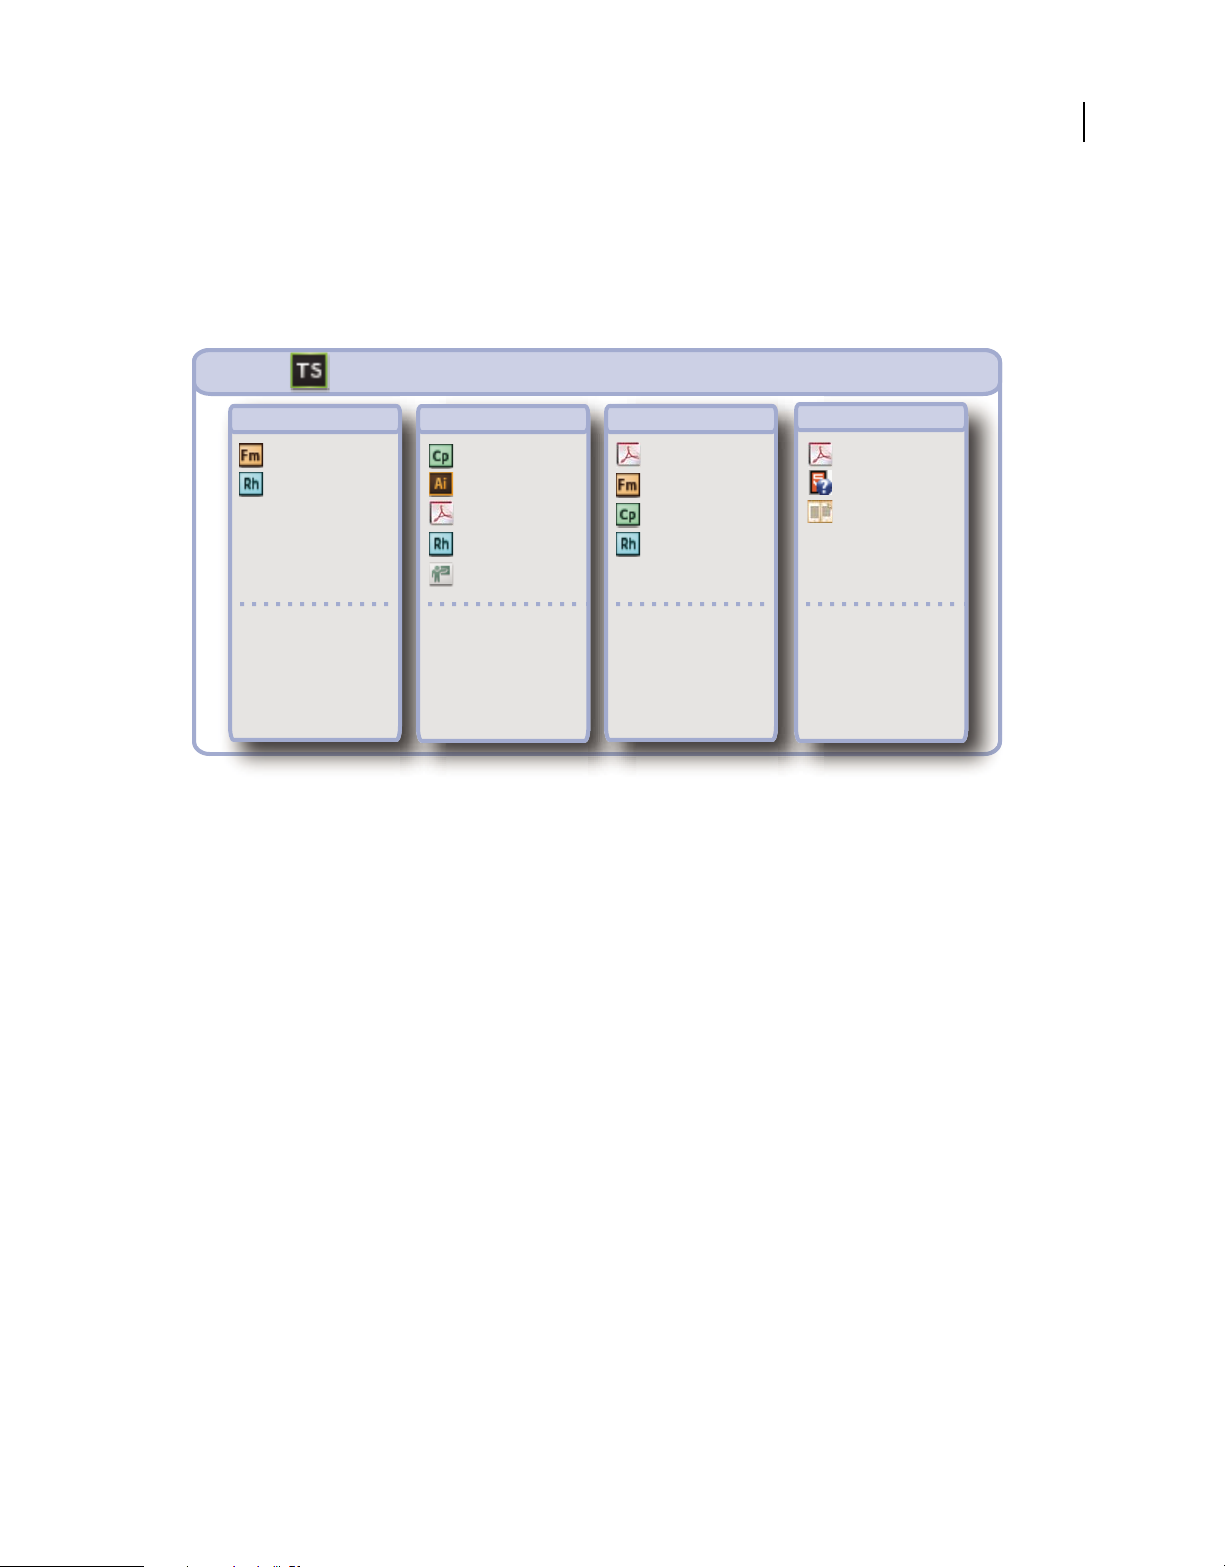
Adobe Technical Communication Suite 4 overview
Adobe Technical Communication Suite software is an end-to-end solution for authoring, reviewing, managing, and
publishing technical information and training content. You can use it to create and maintain technical documentation,
user assistance systems, knowledgebases, simulations, software demonstrations, and other support information.
ADOBE TECHNICAL COMMUNICATION SUITE 4 WORKFLOW
3
Author
FrameMaker 11
RoboHelp 10
ComponentsUse cases
Create, import, and update
content, taking advantage
of an HTML- or XML-based
single-source workflow.
Enrich/Engage
Adobe Captivate 6
Illustrator CS6
Acrobat XI Pro Captivate Reviewer
RoboScreen Capture
Adobe Presenter 8
Integrate rich media and
interactive assets, including
Adobe Captivate videos.
Create PDF portfolios.
Review/Collaborate
Acrobat XI Pro
FrameMaker 11
RoboSource Control
Set up shared reviews in the
cloud and import comments.
Gather feedback from users
by publishing content as AIR
Help output from RoboHelp.
Publish
PDF
Multiscreen HTML5
EPUB
17 Output Formats
Produce media-rich content
in multiple formats,
including PDF, Multiscreeen
HTML5, XML, and EPUB.
Distribute content to mobile
devices, eBook readers, and
tablets.
The tight integration of component products in the suite enables true single-source authoring. You can author content
once and publish it in multiple formats and languages. For example, you can author content in Adobe FrameMaker
and output it in multiple formats using Adobe RoboHelp.
You can also enrich content through interactive 3D models, rich media, multilayered images, demonstrations, and
embedded SWF movies. Using the cross-platform Adobe AIR Help format, you can push updates to your Help content
even after you have delivered it.
This latest release of Adobe Technical Communication Suite includes the following components:
• Adobe® FrameMaker® 11: Author and publish technical content, with XML, DITA standards support, and excellent
PDF publishing capabilities. Includes content management support such as EMC Documentum 6.5 SP1 and
Microsoft SharePoint Server 2007 SP 2.
• Adobe® RoboHelp® 10: Author and publish procedural- or process-based online Help and knowledgebases. Also
includes RoboScreenCapture for still image capturing, and RoboSource Control for managing project source files.
• Adobe® Captivate® 6: Rapidly create powerful and engaging simulations and interactive content. Author rich
eLearning content that includes branching scenarios, Table of content, quizzes, and SCORM- and AICC-compliant
multimedia content.
• Adobe® Acrobat® XI Pro: Reliably create, combine, and control Adobe PDF documents for easy, secure distribution,
collaboration, and forms data collection. Create stunning portfolios that combine several file types, such as image
formats, FLV file, PDF, SWF file, and interactive 3D.
• Adobe® Presenter®: Create engaging presentations and courses rapidly and easily.
• Adobe® RoboScreen Capture®: Capture your screen and edit it to create illustrations.
• Adobe® RoboSource Control®: Configuration and workflow management for your content.
Last updated 12/23/2013
Page 7

TECHNICAL COMMUNICATION SUITE 4
Getting started
• Adobe® Bridge® CS6: Digital asset management with centralized access to your photo and design files with ease.
• Adobe® Illustrator® CS6: Edit and enhance images and screenshots before using them in your projects.
Top features of Adobe Technical Communication Suite
Seamless content creation Create, review, manage, and publish technical information seamlessly. You can publish
your content in XML, DITA, PDF or as printed manuals.
Create Rich PDF FrameMaker excels at creating richly formatted PDF output. Using FrameMaker, you can add 3D,
graphics, audio, video, multimedia, and interactive content. Embed Adobe Captivate demos and simulations in online
Help projects and PDF documents. For more information, see
Single-sourcing (tighter FrameMaker and RoboHelp integration) You can create content once in FrameMaker and
publish it for print/DVD world as XML, DITA, PDF file, or printed guides. You can single source the same content in
RoboHelp and create online content as .chm, webhelp, AIR, or EPUB files. Further, you can directly generate online
Help from FrameMaker. Single-sourcing reduces content creation time as duplication is prevented. Single-sourcing
also reduces errors as reviews are singular, and saves localization costs as same content is being leveraged across
mediums. For more information, see
Multi-device output Devices are in. Users now demand content to be displayed through smartphones or Internet-
“Using FrameMaker with RoboHelp” on page 13.
enabled devices, such as Kindle. With RoboHelp 10, you can now create EPUB-content that appears well across various
devices.
“Rich media” on page 6.
4
DITA Support and multi-channel publishing Author your DITA projects in FrameMaker and then leverage the power
of RoboHelp to create online Help. You can create MultiScreen HTML5, WebHelp, .chm, EPUB 3.0, EPUB 2.0.1,
Kindle Book, Air, Flashhelp, Javahelp, Oraclehelp, or Eclipsehelp files. With FrameMaker 11, there is no need to
convert DITA documents into books only for linking-purpose. You can directly link to DITA documents. For more
information, see
Review and Collaboration Technical Communication Suite includes Acrobat that lets you collaborate on documents.
“Authoring and publishing workflow using FrameMaker and RoboHelp” on page 13.
Use Acrobat.com to share PDF files, set up and manage reviews through e-mails, and collaborate on PDF documents.
Initiate reviews from within FrameMaker, RoboHelp, and Adobe Captivate, without having to exit authoring
applications for setting up reviews. Generate PDFs that can be commented with Adobe Acrobat Reader. Document
reviewers do not need to have Acrobat or Technical Communication Suite installed on their systems to comment
documents using Acrobat Reader. For more information, see
Create Cross-platform output Deliver your Help projects in the cross-platform Adobe AIR format. You can push
“Review and collaboration” on page 47.
updates to your Adobe AIR Help projects even after you have delivered them.
Easy multimedia recording You can also record a new Adobe Captivate demonstration from within FrameMaker or
RoboHelp. You can publish captivate output as SWF file, Zipped package, PDF, or Autorun movie on CD. For more
information, see
Publishing Projects. You can use Adobe Captivate Reviewer application to efficiently review and
comment on Adobe Captivate projects.
Create secure PDFs and PDF Portfolios Reliably create, combine, and control Adobe PDF documents for easy, secure
distribution, collaboration, and forms data collection. Create quality portfolios. For more information, see
“Rich
media” on page 6.
Effective copy-editing Use AuthorAssistant with FrameMaker to improve content consistency and translatability. For
more information, see
Style and linguistic checks using SDL AuthorAssistant 2010 SP1.
Automate manual tasks Use ExtendScript to automate daily mechanical tasks that require manipulation of simple or
complex objects. You can use ExtensScript with FrameMaker, Photoshop, and RoboHelp. It allows robust automation
of tasks across products. For more information, see
“Working with ExtendScript” on page 49.
Last updated 12/23/2013
Page 8

TECHNICAL COMMUNICATION SUITE 4
Getting started
SCORM, AICC, and PENS support through Adobe Captivate 5 Adobe Captivate 5 supports most e-learning content
creation standards for single-click publishing to learning management systems (LMS). SCORM (Shareable Content
Object Reference Model) is a set of specifications used to produce reusable e-learning objects. It defines
communication between a client (such as Adobe Captivate) and a host (usually an LMS). For more details, see
Learning management system (LMS).
Enhanced image-editing Capture images and screenshots for your Help projects using RoboScreenCapture and use
the powerful features in Adobe Illustrator CS6 to edit and enhance them. You can also animate the different layers of
a Photoshop image in Adobe Captivate.
5
Last updated 12/23/2013
Page 9
Chapter 2: Rich media
Adding rich media
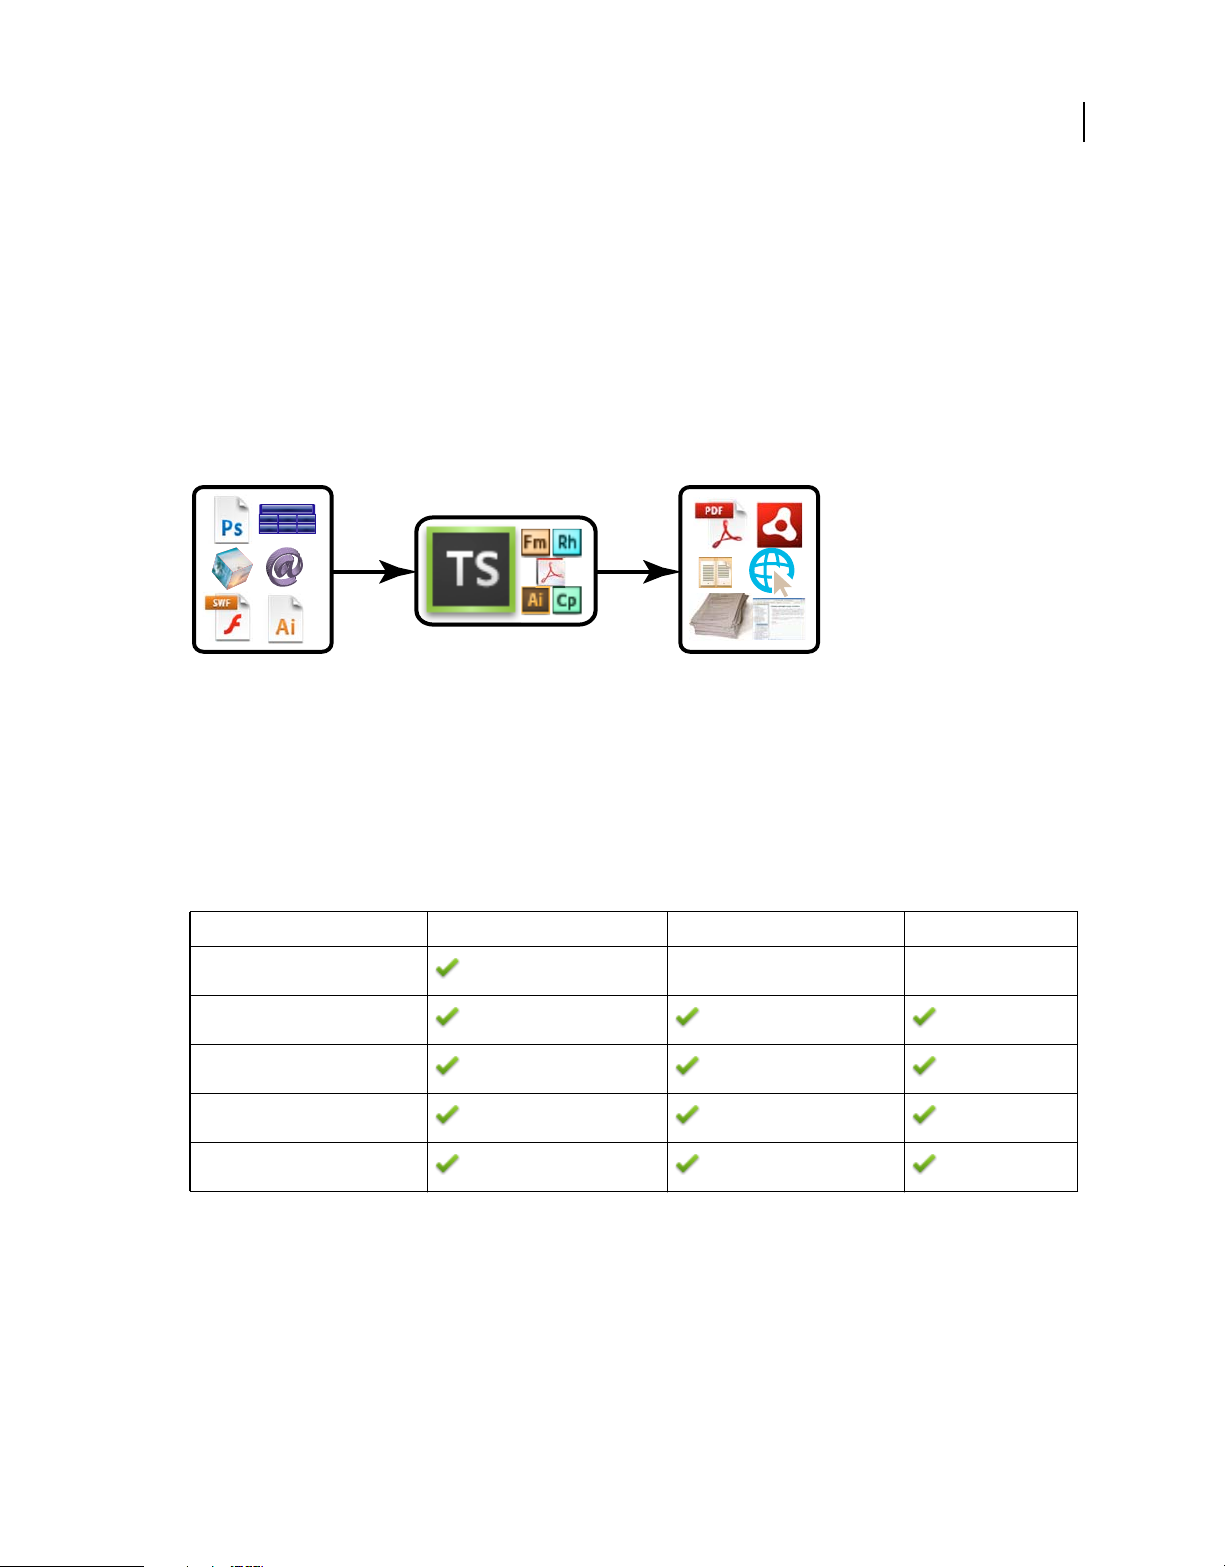
You can create an engaging experience for your customers using the rich media capabilities of the Adobe Technical
Communication Suite. The simplicity of authoring your content once, and publishing it for multiple channels and
devices opens the floodgates to a multitude of possibilities. Never before, was it so simple to integrate 3D, graphics,
audio, video, multimedia, and interactive content in your publishing workflows.
Table
3D
HTML
XML
6
IMAGES FLASH
ILLUSTRATIONS
TABULAR DATA
HTML 3D VIDEO
PDF XML PRINT
AIR EPUB
ONLINE HELP
Rich media opens opportunities to provide various types of content within your documentation. You can even
combine various media types to create documentation that users don’t only just read, but watch, listen to, and interact
with as well. For example, you could use a camcorder to record a narration and add the video to accompany a demo
that you’ve added.
The following table lists the media you can add to your documents while authoring in the various TCS applications.
FrameMaker RoboHelp Adobe Captivate
3D
Graphic/Image
Audio
Video
Interactive/SWF
Rich media and FrameMaker
Adding rich media to FrameMaker documents
1 In FrameMaker, place the cursor at the place you want to insert the file.
2 Choose File > Import > File. The Import dialog box opens.
3 In the Import dialog box, do one of the following:
• Navigate to the file and click Import.
Last updated 12/23/2013
Page 10

TECHNICAL COMMUNICATION SUITE 4
Rich media
• Click Browse URL to navigate to a file
• Click Browse CMS, and navigate to the file on your configured shared repository.
4 If the file type is not recognized, an Unknown File Type dialog box displays, select the closest content type and click
Convert.
5 In the Imported Graphic Scaling dialog box, select an option to fit the rich media object and click Set.
The rich media object is placed in your document, inside an anchored frame.
• Graphic and 3D objects are rendered and a representation is displayed.
• Audio and video objects display an icon.
• Interactive content displays the default poster image. If the SWF does not have a default poster image, a Play button
is displayed instead.
Specify poster images for audio, videos, 3D, and SWF content
The poster image is the default image that displays unless the movie is played. By default, either standard icons or the
first frame of the movie is used as it’s poster image. The set poster command lets you specify an image to be displayed
as a poster for the movie.
Right-click the movie or SWF content, and choose Set Poster, and browse to the image file to use as the poster.You can
also play a video and select any frame as a poster.
7
Working with 3D models
You can add 3D models to your FrameMaker documents. When you publish the document to PDF or generate
WebHelp outputs using RoboHelp, these models are interactive and users can move the objects around.
Note: 3D models work well in the WebHelp outputs of RoboHelp only when the 3D view and all objects linking to it are
placed in an anchored frame.
A 3D model inside a PDF.
Last updated 12/23/2013
Page 11

TECHNICAL COMMUNICATION SUITE 4
Rich media
3D models are supported inside PDFs. You can view the PDF using Adobe Acrobat or Adobe Reader. For more
information on using 3D and Acrobat, see Interacting with 3D models.
When you publish the FrameMaker files to HTML or other formats, the default view of the 3D model is rendered as an
image. However, in RoboHelp you can specify the Preserve 3D Images option (Project Settings > FrameMaker
Document > Edit > Image), 3D models are published as embedded PDF files that open when users navigate to that page.
You can also specify the basic 3D settings right inside FrameMaker. Access to the original 3D application is not
required. Use the 3D options to change the background color, lighting, and render modes for the 3D model. Rightclick and choose 3D to access these controls.
Setting multimedia preferences
In FrameMaker Preferences, specify if you want to embed multimedia objects in PDF.
1 Choose File > Preferences > General.
2 Check the following as required:
• Embed Adobe Flash files in PDF
• Embed 3D objects in PDF
• Embed multimedia objects in PDF
8
Rich media and RoboHelp
Inserting graphics
1 In RoboHelp, place your cursor at the location to insert the file.
2 Choose Insert > Image. The Image dialog box opens.
3 In the Image Name field, specify the file to import or use the browse button and navigate to the file.
4 Optionally, specify the Size, Margins, and Borders.
5 Click OK to add the graphic.
Adding multimedia content
You can add multimedia content to your documents you author in RoboHelp.
1 In RoboHelp, place your cursor at the location to insert the file.
2 Choose Insert > Multimedia/Demo. The Multimedia dialog box opens.
3 In the Multimedia Name field specify the file to import or use the browse button and navigate to the file.
4 Optionally, specify the Size, Margins, and Borders.
5 Click OK to add the content.
The selected file is added to the RoboHelp topic.
Adobe Captivate integration (TCS only)
If you have Microsoft® Word® and Adobe Captivate installed on the same computer, you can publish Adobe Captivate
projects in various layouts in Microsoft Word. These layouts are handout, lesson, step-by-step, and storyboard.
With RoboHelp 10 installed as part of Technical Communication Suite 4, you can add topics with handout and stepby-step output generated from an Adobe Captivate 6 project.
Last updated 12/23/2013
Page 12

TECHNICAL COMMUNICATION SUITE 4
Rich media
Create demo, step-by-step, and handout topics from an Adobe Captivate project
1 In RoboHelp, choose File >New >Adobe Captivate Topic.
2 Specify the Adobe Captivate project name.
3 Select the type of topic that you want to add and specify a topic title and filename:
a Demo Topic: Contains slides from the Adobe Captivate project with the demo.
Note: Previous versions of RoboHelp allowed you to launch Adobe Captivate from within RoboHelp and add topics
with the demo output of an Adobe Captivate project.
b Step-By-Step Topic: Contains the list of steps recorded in the Adobe Captivate project. The topic does not
include the background image of the slides but does include images of interactive objects (buttons, links, and so
on) in the steps.
c Handout Topic: Contains all the slides as they appear with the layout options you choose.
4 Click OK.
Note: A new project with the specified name is opened in Adobe Captivate. RoboHelp is minimized. You cannot access
RoboHelp while Adobe Captivate is open.
5 Record the slides and edit them as required. Save the project and close Adobe Captivate.
Adobe Captivate publishes the recording as a SWF file, a step-by-step document, and a handout document
depending on the options you selected. In the open RoboHelp project, you'll find new topics) added with the
output.
9
The topics containing the Adobe Captivate output store the absolute path of Adobe Captivate project in topic
properties. Therefore, moving the Adobe Captivate project is not recommended. RoboHelp project keeps the
absolute path of the captivate project. Later, you can edit the Adobe Captivate generated topics or SWF file using
the same project.
These topics should be edited with Captivate only. Any changes made within the Design editor are lost if you update
the topics again with captivate.
Edit, rename, or delete step-by-step and handout topics
Edit a step-by-step or handout topic
• Select the topic in Project Manager, right-click, and select Edit.
If the RoboHelp project contains topics created from the same project, RoboHelp checks whether you want those
topics to be updated along with the selected topic. You can specify the topics) you want RoboHelp to update.
You can edit a step-by-step or handout topic in Design Editor. However, these changes are overwritten if you
update the topic later using the Edit option from the context-sensitive menu. You can update a demo from within
RoboHelp in versions earlier than Adobe Captivate 6. However, Adobe Captivate 6 is required to create or update
topics in RoboHelp.
Delete a step-by-step or handout topic
❖ Select the topic in Project Manager, right-click, and select Delete.
Import step-by-step and handout topics
You can import step-by-step and handout output from existing Adobe Captivate projects. RoboHelp adds a topic for
each type of output you select.
Last updated 12/23/2013
Page 13

TECHNICAL COMMUNICATION SUITE 4
Rich media
Import Adobe Captivate project in RoboHelp (TCS only)
Create demo, step-by-step, and handout topics from an Adobe Captivate project
1 In RoboHelp, choose File >Import >Adobe Captivate Project.
2 Navigate to a .cp or .cptx file and select it.
3 In the import Adobe Captivate Topic dialog, select the type of topics you want to create from the Adobe Captivate
project and specify the filenames and titles.
a Demo Topic: Contains slides from the Adobe Captivate project with the demo. To generate HTML 5 output,
select HTML 5.
Note: Previous versions of RoboHelp allowed you to launch Adobe Captivate from within RoboHelp and add topics
with the demo output of an Adobe Captivate project.
b Step-By-Step Topic: Contains the list of steps recorded in the Adobe Captivate project. The topic does not
include the background image of the slides but does include images of interactive objects (buttons, links, and so
on) in the steps.
c Handout Topic: Contains all the slides as they appear with the layout options you choose.
4 Click OK.
TCS launches Adobe Captivate and generates the specified outputs. Once the outputs are created, Adobe Captivate
is closed and the outputs are imported to RoboHelp.
10
Adobe Captivate publishes the recording as a SWF (and HTML 5 if you selected it) file, a step-by-step document,
and a handout document depending on the options you selected. In the open RoboHelp project, you'll find new
topics added with the output.
The topics containing the Adobe Captivate output store the absolute path of Adobe Captivate project in topic
properties. Therefore, moving the Adobe Captivate project is not recommended. RoboHelp project keeps the
absolute path of the Adobe Captivate project. Later, you can edit the Adobe Captivate generated topics or SWF file
using the same project.
These topics should be edited with Adobe Captivate only. Any changes made within the Design editor are lost if
you update the topics again with Adobe Captivate.
Edit, rename, or delete step-by-step and handout topics
Edit a step-by-step or handout topic
• Select the topic in Project Manager, right-click, and select Edit.
If the RoboHelp project contains topics created from the same project, RoboHelp checks whether you want those
topics to be updated along with the selected topic. You can specify the topics) you want RoboHelp to update.
You can edit a step-by-step or handout topic in Design Editor. However, these changes are overwritten if you
update the topic later using the Edit option from the context-sensitive menu. You can update a demo from within
RoboHelp in versions earlier than Adobe Captivate 6. However, Adobe Captivate 6 is required to create or update
topics in RoboHelp.
Delete a step-by-step or handout topic
❖ Select the topic in Project Manager, right-click, and select Delete.
Last updated 12/23/2013
Page 14

TECHNICAL COMMUNICATION SUITE 4
Rich media
Import step-by-step and handout topics
You can import step-by-step and handout output from existing Adobe Captivate projects. RoboHelp adds a topic for
each type of output you select.
Insert Photoshop images
You can insert native Adobe Photoshop images to your projects. On publishing, the PSD files are rasterized and
attributes such as Photoshop filters, layer visibility are maintained. To insert a Photoshop file:
FrameMaker Choose File > Import, and then browse to the PSD file.
Adobe Captivate Choose File > Import > Photoshop File.
Adobe Captivate lets you select individual layers to import, or flatten the layers to import. If you import individual
layers, each layer is treated as a separate image in Adobe Captivate.
Editing Photoshop and Illustrator graphics
You can import native Adobe Photoshop (PSD) and Adobe Illustrator (AI) files into your FrameMaker documents.
And you can open these graphics for editing from within FrameMaker. FrameMaker supports layers, and you can
import graphics with multiple layers into your document.
11
To edit the graphic:
1 Click the imported graphic to select it.
2 Right-click and choose one of the following:
• Edit with Illustrator
• Edit with Photoshop
3 The graphic opens in the selected application. Edit the graphic and save it.
The graphic is updated in your document.
Insert Adobe Captivate demo
You can include Adobe Captivate demos into your documents to create truly rich and engaging content. You can insert
Adobe Captivate demos in FrameMaker and RoboHelp. Publish an existing Adobe Captivate project as a SWF file, and
then import the SWF file into your document. You can also specify poster images for the multimedia demos.
FrameMaker Choose File > Adobe Captivate > Insert Adobe Captivate Demo, and then browse to the location where
you want to save the SWF file. Enter a SWF filename and click Save. Adobe Captivate is launched and a new Adobe
Captivate project is created and the SWF content is placed in your document.
RoboHelp Choose Insert > Adobe Captivate Demo, and then browse to the SWF file.
Last updated 12/23/2013
Page 15
TECHNICAL COMMUNICATION SUITE 4
Rich media
12
SWF file within the documentation.
More Help topics
“Specify poster images for audio, videos, 3D, and SWF content” on page 7
Using PDF Portfolios
PDF Portfolios let you package several documents into a single PDF file. Portfolios provide unified navigation, search,
and seamless transition between documents. You can also add a cover page to introduce your users to the portfolio
and reinforce your brand by adding images, logos, and other messaging information.
Portfolios provide you a mechanism to package disparate media, into a single PDF package. Your customers can view
the portfolio using the free Adobe Reader: no special software is required.
You can collect PDF files, native MS Office documents, images, videos, SWFs, and even online videos, such as
YouTube videos, in your portfolio.
Collect your files and then use Acrobat to create your portfolio.
Last updated 12/23/2013
Page 16

Chapter 3: Using FrameMaker with RoboHelp
Authoring and publishing workflow using FrameMaker and RoboHelp
If your authoring and publishing environment includes these two tools, you have multiple options of incorporating
their strengths into your workflow.
You can map FrameMaker formats directly to RoboHelp styles in a standard CSS that ensures consistency in
appearance and behavior across the entire project. In addition, within FrameMaker, you can use markers to denote
context-sensitive topics, which you can directly reuse in RoboHelp to create a context-sensitive Help system.
FrameMaker and RoboHelp as independent products If you have FrameMaker and RoboHelp as independent
products, you can retain your authoring workflow. In this workflow, you author content in FrameMaker for print and
PDF output. Then you use RoboHelp to generate richly formatted online Help. Both FrameMaker and RoboHelp
provide enhanced features for importing FrameMaker content into RoboHelp projects. You can also use them
together to create online Help formats such as WebHelp and Help based on Adobe AIR.
13
Adobe Technical Communication Suite Adobe® Technical Communications Suite provides technical communicators
a streamlined workflow to author content once and deliver in multiple formats. You can author in FrameMaker and
publish richly formatted PDF for print and online viewing. Technical Communication Suite provides more features
than the component applications that make the suite. You can integrate FrameMaker and RoboHelp authoring and
publishing and dynamically link FrameMaker and RoboHelp content.
Adobe Technical Communication Suite includes Adobe Captivate and Adobe Photoshop—tools that you can use to
include rich multimedia capabilities in your output formats. In addition, you can use Adobe Acrobat to set up shared
reviews and consolidate review comments and edits. You can later import these comments and edits into your
FrameMaker documents.
Authoring considerations for optimizing for online output
If your authoring process in FrameMaker is optimized for print output, consider the following before linking or
importing FrameMaker documents into RoboHelp projects.
Heading formats Determine the best mapping of FrameMaker heading formats to RoboHelp styles. FrameMaker
documents define various heading formats specifically for print documentation. Among these formats are side heads
and heading styles that start on a new page. These formats don’t apply to online formats. You generally map these
heading styles to a few standard styles in the RoboHelp project.
Page layout settings Often FrameMaker chapter templates specify an even number of pages so that new chapters
begin on a recto (right) page. For online Help, ignore these pagination considerations.
Headers and footers RoboHelp ignores headers and footers during conversion, including legal text such as
“Confidential” and copyright lines. Include such text in the headers and footers in a separate step, after conversion.
Similarly, in RoboHelp, re-create watermark text or images that you used in the printed documentation.
Navigation In print, cross-references specify page numbers which are irrelevant in Help. Converting to online Help
removes chapter and section titles in headers and footers. You can enhance navigability by using breadcrumbs, and
back and next buttons instead.
Last updated 12/23/2013
Page 17

TECHNICAL COMMUNICATION SUITE 4
Using FrameMaker with RoboHelp
Redundant content To provide context in different sections of a printed document, writers generally add redundant
information such as brief summaries of concepts covered previously. Because online Help is a random-access,
nonlinear medium, it requires less redundant content. Use cross-references and conditional text options to minimize
redundant content in your outputs.
Chapter versus topic In printed documentation, chapters signal stand-alone logical units, which readers use to grasp
the scope of content. Online Help segregates content at topic level, accessed one topic at a time. You can group the
content into chapter-like folders that expand when a user navigates the table of contents. Even so, only one topic
appears at a time. In this case, try to provide comprehensive information without adding redundancy by grouping
related topics together.
Context sensitivity Although you can assign map IDs to topics in RoboHelp, you can also assign context-sensitive
Help markers in FrameMaker documents. RoboHelp reads these markers and assigns the map IDs to the generated
topics. Ensure that the topics created in FrameMaker contain sufficient information.
For example, a short procedure as a stand-alone topic does not provide conceptual context for the reader. To avoid
creating topics with incomplete information, assign context-sensitive Help markers to topics at a higher level. In this
way, the generated Help topic contains the concept, procedure, and any relevant graphics.
Prepare FrameMaker documents for conversion to Help
If the FrameMaker document that you are importing is an unstructured FrameMaker book, you can define a single
FrameMaker template for the conversion. You can then specify this template as the project template that overrides the
formats of individual documents at the RoboHelp project level. You can also reuse the conversion settings across other
projects by exporting the conversion settings.
14
Carefully examine the FrameMaker templates before importing the documents into RoboHelp, such as when you use
a general-purpose FrameMaker template. If this template contains formats that aren’t used in the book, omit those
formats in the template you use for the conversion.
1 Create a FrameMaker template that contains the formats you need in Help. Alternatively, customize the
FrameMaker template. You don’t have to apply the template manually. You can set RoboHelp to apply a selected
template to FrameMaker files before they are linked or imported to RoboHelp.
In Structured FrameMaker, the element definition document (EDD) or the DTD used in the structured
FrameMaker template automatically controls formatting. Because structured FrameMaker enforces a valid
structure and format, structured documents do not contain format overrides.
2 Create the required DHTML effects such as expanding text and drop-down text using the RoboHelp menus in
FrameMaker.
3 Apply context-sensitive Help markers to the required topics.
4 Enclose graphics, callouts, and graphic or text frames you created with FrameMaker graphic tools in anchored
frames. RoboHelp imports only those FrameMaker graphics that are enclosed in anchored frames.
By default, graphics and multimedia files imported into a FrameMaker document are placed in anchored frames.
If your FrameMaker document contains graphics in graphic frames, place them in anchored frames before linking
or importing the FrameMaker files into RoboHelp.
5 To maintain the original quality of images, insert them in FrameMaker documents by reference. RoboHelp copies
the referenced images directly from the source if the complete image is visible inside the anchored frame. Similarly,
if the images are large, insert them in the source document by reference.
6 Fix any issues in the document such as unresolved cross-references, missing fonts, and irregular numbering issues.
7 Set up alternative text or captions for the images and graphics to create accessible online content.
Last updated 12/23/2013
Page 18

TECHNICAL COMMUNICATION SUITE 4
Using FrameMaker with RoboHelp
8 Apply conditional text settings in FrameMaker documents.
9 Edit the FrameMaker TOC reference pages to have indented hierarchical headings with different styles.
More Help topics
“Pagination, topic naming, and context-sensitive Help” on page 29
“Create alternative text for images” on page 38
Linking options for documents
When you link a document to a RoboHelp project, you have two options. To specify the linking options, in RoboHelp
choose File > Project Settings. Click the Import tab and select one of the following:
Create a Reference You create a reference to an external document. In this case, the source document is not copied
into the RoboHelp project folder and remains outside the project. However, the document is visible in the Project
Manager pod. You can edit and update the source document independently. Later, in RoboHelp, you can update the
topics generated from the linked document.
Use the linking by reference option to bring in content that is shared across multiple projects. Because only a single
copy of the document exists, any change in the source document is reflected in all projects to which this document is
linked.
15
Create a Copy and Link You create a copy of the source document and link to the RoboHelp project. In this case, a copy
of the source document is copied into the RoboHelp project and is visible in the Project Manager pod. You can edit
and update the copy without affecting the source document. You update the topics generated from the copied
document whenever you edit the document.
Use the Create a Copy and Link option to maintain the document in RoboHelp and restrict access to the source
document. This option allows editing only in the copy available in the RoboHelp project. For example, if you want to
bring in content from a static FrameMaker document, link the document by copying it to the RoboHelp project.
Note: FrameMaker books are always linked by reference, irrespective of the linking option you choose.
Trade-offs between linking and importing
• Link FrameMaker and Word documents when your entire authoring is in one or both of these tools. You can make
full use of RoboHelp’s advanced integration features, such as converting TOC, index, and glossaries, and creating
context-sensitive Help. Whenever the source content changes, you can quickly update the topics generated in
RoboHelp from the linked documents. In such cases, RoboHelp converts your FrameMaker or Word documents
to multiple Help outputs with a few clicks, with little, or no native authoring in RoboHelp.
• Import FrameMaker and Word documents when you have multiple independent documents and carefully use
RoboHelp’s integration features. In addition, ensure that the documents you import are stable and don’t require
updates independently until you have finished publishing the online Help.
• Avoid editing the generated topics in RoboHelp so that you don’t lose your edits if you have to update the generated
topics or overwrite them. Topics generated from linked documents can be preserved with their edits, but topics
generated from imported documents are overwritten.
• If you are making minimal changes to a large RoboHelp project, do not link or import documents into RoboHelp.
Doing so can disturb the natively created TOC, index, and glossary, pagination, and context-sensitive Help settings.
Last updated 12/23/2013
Page 19

TECHNICAL COMMUNICATION SUITE 4
Using FrameMaker with RoboHelp
Linking and importing FrameMaker documents
The RoboHelp workflow for linking or importing FrameMaker documents allows you to do the following:
• Create a RoboHelp project by importing a FrameMaker book or DITAMAP.
• Link or import FrameMaker book or DITAMAP into a RoboHelp project.
• Link or import FrameMaker documents into a RoboHelp project. You can import FM, MIF, DITA, and XML files.
When you link a FrameMaker book or DITAMAP, HTML files are not created until you define the project settings
and generate the Help topics. At the same time, you can see the added files in their hierarchical order. Importing the
FrameMaker documents and editing the HTML files generated from them in RoboHelp does not affect the source
FrameMaker documents.
Before you import FrameMaker documents, check them in FrameMaker for errors such as unresolved cross-references
and format overrides.
Create a RoboHelp project by linking or importing FrameMaker books or documents
You can create a RoboHelp project by importing FrameMaker books or documents.
1 On the RoboHelp Starter page, click More under Import, or select File > New > Project.
2 On the Import tab of the New Project dialog box, select FrameMaker Document and click OK.
16
Importing a FrameMaker book or ditamap to create RoboHelp project
3 Select the FrameMaker book or document from the Files Of Type pop-up menu. Then browse to select the
FrameMaker book, and click Open.
Import a FrameMaker book or DITAMAP into RoboHelp project
1 Create a project or open an existing project in RoboHelp.
2 Select File > Import > FrameMaker Document.
Last updated 12/23/2013
Page 20

TECHNICAL COMMUNICATION SUITE 4
Using FrameMaker with RoboHelp
Importing a FrameMaker book or ditamap into a RoboHelp project
3 Select FrameMaker Book or FrameMaker DITAMAP from the Files Of Type pop-up menu.
4 Browse to select the FrameMaker book or DITAMAP file and click Open.
5 Optionally, select a DITAVAL file and click Open. Click Cancel to proceed without a DITAVAL file.
If you are importing a FrameMaker document, you can select the components that you want to import from the
Content Settings wizard that appears. You can select the TOC, index, and glossary, and specify the conversion settings.
Note: FrameMaker documents created in versions earlier than 6.0 (FRM files) can be imported but not linked.
17
Link a FrameMaker book or DITAMAP into RoboHelp project
1 Create a project or open an existing project in RoboHelp.
2 Select File > Link > FrameMaker Document.
Linking a FrameMaker book or ditamap into a RoboHelp project
3 Select FrameMaker Book or FrameMaker DITAMAP from the Files Of Type pop-up menu.
4 Browse to select the FrameMaker book or DITAMAP file and click Open.
Note: FrameMaker documents created in versions earlier than 6.0 (FRM files) can be imported but not linked.
Generate HTML topics from linked FrameMaker documents
Linking FrameMaker documents does not automatically create the topics. You generate the topics after you set the
project and conversion settings.
❖ Do one of the following:
• Right-click the linked FrameMaker document from the Project Manager pod and then select Update >
Generate.
• Select File > Update > Generate.
Last updated 12/23/2013
Page 21

TECHNICAL COMMUNICATION SUITE 4
Using FrameMaker with RoboHelp
However, if you are importing a FrameMaker document, topics are generated immediately according to the
conversion settings you specify. In addition, you can select the components that you want to import from the Import
wizard that appears. You can select the TOC, index, and glossary, and specify the conversion settings.
Convert a FrameMaker TOC
When you import a FrameMaker book to a RoboHelp project, you can also import the table of contents (TOC). Import
the TOC into the RoboHelp project to retain the navigation structure you defined in the FrameMaker book.
1 Select File > Import > FrameMaker Document.
2 In the Content Settings dialog box, select Convert FrameMaker Table Of Contents, and browse to select the
FrameMaker TOC file.
3 Select one of the following options:
Add To Existing TOC Appends the TOC entries to any existing RoboHelp TOC in the project. Select an existing
RoboHelp TOC from the list.
Create New Associated TOC Enter a name for a new associated TOC that is added to the RoboHelp project.
18
Styles in the FrameMaker TOC determine which TOC items become books, sub-books, or pages. The most important
element in determining the level is the left-most indent, followed by the font size and font weight. TOC entries that
have indented items under them become books in the RoboHelp TOC. If all the TOC entries have the same indention,
font size, and weight, the TOC in RoboHelp appears flat.
• To make a heading a main book, include indented heading levels beneath that heading, or use smaller fonts or no
bold for the subsumed headings.
• To make a heading a sub-book, place the heading under a main heading. Then include indented heading levels
beneath the sub-book heading, or use smaller fonts or no bold for the subsumed headings.
• To make a heading a page, don’t include any heading levels beneath that heading. Indent the page heading, or use
smaller fonts or no bold.
Differences between FrameMaker and RoboHelp TOCs
You can either import the FrameMaker TOC or automatically create a TOC in RoboHelp from generated topics.
• In FrameMaker, the TOC is generated according to the heading styles that you include in the TOC. In RoboHelp,
the TOC is generated according to the topic titles. If you use topic name markers in FrameMaker to name the topics
when you import FrameMaker documents, filenames in RoboHelp differ from the topic titles.
• Autocreating a TOC for a FrameMaker 9 book can create multiple layers of content because of the folder structure
in a FrameMaker 9 book.
Last updated 12/23/2013
Page 22

TECHNICAL COMMUNICATION SUITE 4
Using FrameMaker with RoboHelp
• In RoboHelp, you can place a TOC placeholder in another TOC, thus allowing you to create nested TOCs.
More Help topics
“Hierarchical structure in a FrameMaker book” on page 26
Tips on generating TOCs
Import FrameMaker index entries
RoboHelp creates an index based on the index markers in the document you are importing. However, the index file
generated in the FrameMaker book is not imported into the RoboHelp project.
1 Select File > Import > FrameMaker Document and select the FrameMaker book or document.
2 Select Convert Index in the Content Settings dialog box, and select one of the following options:
Add To Existing Index Add the FrameMaker index entries to the existing RoboHelp index of the project.
Create New Associated Index Enter a name for a new associated index that is added to the RoboHelp project.
Add To Topic Add the FrameMaker index entries to individual topics in which they appear.
19
Import glossary definitions
RoboHelp creates a glossary based on glossary markers in the document you are importing. The text inside the glossary
marker is the glossary term, and the paragraph text that contains the marker is the definition.
1 Select File > Import > FrameMaker Document and select the FrameMaker book or document.
2 Select Convert Glossary in the Content Settings dialog box, and select one of the following options:
Add To Existing Glossary Add the FrameMaker glossary to the RoboHelp glossary of the project. You can select the
glossary from the list.
Create New Associated Glossary Enter a name for a new associated glossary that is associated with the existing
glossary in the RoboHelp project.
Synchronizing linked FrameMaker documents with RoboHelp projects
You can update a linked FrameMaker document if the source FrameMaker document has changed or conversion
settings in the RoboHelp project have changed.
Note: Linking eliminates the need to reimport the FrameMaker document and overwrite the topics when you update.
Update the topics generated from linked FrameMaker documents in the following scenarios:
• Source FrameMaker documents changed after you added or linked them to the RoboHelp project.
• You changed the pagination settings in the RoboHelp project.
• You changed the style mapping in the RoboHelp project.
• You updated the CSS in the RoboHelp project.
• You edited the topics generated from the linked documents.
Last updated 12/23/2013
Page 23

TECHNICAL COMMUNICATION SUITE 4
Using FrameMaker with RoboHelp
Icons of the project files in the Project Manager pod indicate whether the documents are in sync with the RoboHelp
topics.
On the other hand, if the documents were imported into the project, the Project Manager pod does not indicate the
synchronization status. If either the FrameMaker documents or the conversion settings change, reimport the
FrameMaker documents and overwrite the RoboHelp topics already generated. When you update the documents,
RoboHelp updates the converted HTML topics, TOC, index, and glossary.
FrameMaker book synchronization status indicators
Icon Description
FrameMaker book missing. The source FrameMaker book that you have linked to the RoboHelp project is either moved to
another folder or deleted. Locate the source book and link them to the new location.
FrameMaker book out of sync because of changes in the source document. Update the RoboHelp topics.
Topics generated from the linked FrameMaker book are out of sync because of changes in the RoboHelp Project Import
Settings. Update the RoboHelp topics generated from the FrameMaker book.
Topics generated are in sync with the linked FrameMaker book.
20
FrameMaker document synchronization status indicators
Icon Description
Linked FrameMaker document missing. The source FrameMaker book that you have linked to the RoboHelp project is either
moved to another folder or deleted. Locate the source book and link them to the new location.
FrameMaker document out of sync because of changes in the source document. Update the RoboHelp topics.
Topics generated from the linked FrameMaker document are out of sync because of changes in the RoboHelp Project Import
Settings. Update the RoboHelp topics generated from the FrameMaker document.
Topics generated are in sync with the linked FrameMaker document.
Update FrameMaker documents
❖ From the Project Manager pod, right-click a FrameMaker book and select Update, then choose one of the
following:
Generate Generates HTML topics from the linked FrameMaker document for the first time. After generating the
topics, the option changes to Update.
Update Updates topics generated from the selected book or document alone.
Update All Updates all topics generated from all linked FrameMaker documents.
Force Update Overwrites the current set of topics generated from the selected FrameMaker book or document. Use
this option to force update the topics generated from the linked FrameMaker book or document.
Force Update All Updates all linked documents and overwrites all generated topics.
Alternatively, you can select the linked FrameMaker book or document and update the RoboHelp topics generated
from the linked FrameMaker book or document.
Last updated 12/23/2013
Page 24

TECHNICAL COMMUNICATION SUITE 4
Using FrameMaker with RoboHelp
Preserve changes to a topic during an update
Normally, when you update a linked document, all topics generated from it are updated, overwriting any other
changes you made in the generated topics. However, you can selectively preserve changes in generated topics and
retain your edits.
1 Right-click the linked document in the Project Manager pod and select Properties.
2 In the FrameMaker Document Settings dialog box, select the File Update Settings tab.
3 On the left column, select the edited files you want to preserve changes during update and click OK.
Any files that you had selected earlier for preserving changes are displayed in the right column.
Set alert when editing generated topics
You can set RoboHelp to alert you when you edit topics generated from linked documents. When you save the changes
to such topics, RoboHelp alerts you that the changes would be lost when the linked documents are updated.
1 Select Tools > Options.
2 In the General tab, select Show Alert On Modification Of Auto Generated Topics From Linked Documents and
click OK.
Mark topic edits for preservation
If you enabled alerts when saving changes to generated topics, you can mark the topic edits for preservation during an
update. Topics marked for preservation during updates are automatically added to the list of preserved topics in the
File Update Settings dialog box.
21
1 Edit a generated topic and save the changes.
2 In the alert message that appears, select Preserve Modifications To This File and click OK.
Delete a generated topic
When you delete a generated topic, you have two options. You can regenerate the deleted topic when you update the
linked FrameMaker document or completely remove the deleted topic from your project. By default, RoboHelp
regenerates the deleted topic when you update the FrameMaker document.
1 In the Project Manager pod, expand the linked FrameMaker document to display the topics generated from it.
2 Right-click the topic that you want to delete, and select Delete.
3 Do one of the following:
• Click OK to delete the topic from the project permanently. The deleted topic is not regenerated when you update
the FrameMaker document.
• Select Generate This File On Next Update and click OK to delete the topic. When you update the FrameMaker
document, the deleted topic is generated again.
Regenerate a deleted topic
If you delete a topic generated from a linked FrameMaker document, the topic is removed from the project. However,
you can regenerate topics deleted from a linked document.
1 Right-click the linked FrameMaker document in the Project Manager pod and select Properties.
2 In the FrameMaker Document Settings dialog box, select File Update Settings tab.
3 On the right column, select the deleted files that you want to retrieve and click OK.
Last updated 12/23/2013
Page 25

TECHNICAL COMMUNICATION SUITE 4
Using FrameMaker with RoboHelp
4 Update the FrameMaker document.
Edit a linked FrameMaker document
You can edit linked FrameMaker documents directly in FrameMaker.
1 Right-click a document and select Edit.
2 Edit the FrameMaker document.
3 Click Save. The modified FrameMaker document now appears in the Project Manager pod with a different icon.
This icon indicates that the source content is now out of sync with the topics generated from the linked
FrameMaker document.
Note: Force an update of the document after you edit the source in FrameMaker.
Delete a linked document
You can directly delete documents linked by copy from the Project Files folder, and you can delete the references of
the documents linked by reference.
❖ Right-click a document and select Delete.
When you delete a linked file, all its associated documents, such as CSS, images, baggage files, and multimedia files,
are also deleted.
22
Notes:
• If a referenced file is moved to a different location, its icon changes. You can restore the link to the document by
pointing to its new location.
• Do not rename files generated after linking a document.
• You cannot drag the generated topics outside the source document folder to some other location in the Project
Manager pod.
Restore a link to a missing or renamed document
If any of the linked documents are moved or renamed, RoboHelp displays a missing link icon for the linked document
in the Project Manager pod. You can restore the link to a moved or renamed file and have all the topics already
generated from the document retained in the project.
1 In the Project Manager pod, right-click the document that has the missing link icon.
2 Select Restore Link To FrameMaker File, and browse to select the new location of the missing file.
FrameMaker document components converted to RoboHelp
RoboHelp converts most of the FrameMaker components when you link or import FrameMaker documents. The
following tables list the major FrameMaker document components and show how they are converted in RoboHelp.
Last updated 12/23/2013
Page 26

TECHNICAL COMMUNICATION SUITE 4
Using FrameMaker with RoboHelp
FrameMaker files
23
Book files Documents contained within the book are converted (FM, XML, MIF, HTM, and HTML files). XHTML files that
TOC Converted, if selected. See “Convert a FrameMaker TOC” on page 18.
Text insets Text insets in the FrameMaker documents are considered part of the FrameMaker document itself and are
Index and glossary Index and glossary files generated in the FrameMaker book are not converted. Instead, the index markers
Variables and conditional text
Variables Converted. User-defined variables in FrameMaker are converted as such in RoboHelp and can be redefined.
Conditional tags Converted as RoboHelp conditional build tags.
Equations Convert equations to images and insert them in the RoboHelp topics after conversion.
Markers
Cross-references, hypertext,
URLs
are included in the FrameMaker book must be valid XHTML. Validate the XHTML in FrameMaker itself. All
other files in the FrameMaker book are ignored. Child books, folders, and groups in FrameMaker 9 books are
converted and appear as folders in the RoboHelp projects. See
on page 26.
flattened in the RoboHelp topic.
and glossary markers in the imported FrameMaker documents are converted if selected. See
FrameMaker index entries” on page 19 and “Import glossary definitions” on page 19..
Apply relevant conditional text tags to suppress variables that shouldn’t appear in online format. For
example, you can suppress the Table Continuation variable in table headers for tables that break across
pages in the FrameMaker documents.
Converted to hypertext links. You can map the cross-reference formats in RoboHelp so that you can remove
the volume, chapter, and page references that are not relevant in online format. Unresolved cross-references
and hypertext entries appear as text in online Help. URLs become live hypertext links in the online Help
output. See
“Convert FrameMaker cross-reference formats to RoboHelp styles” on page 26.
“Hierarchical structure in a FrameMaker book”
“Import
Index and glossary markers Converted to an index and glossary when creating project. See “Import FrameMaker index entries” on
Topic name markers Converted if you select this option in the project conversion settings. Use topic name markers to create topic
Context-sensitive Help markers Converted if you select this option in the project conversion settings. Use Context Sensitive Help Makers in
Custom markers Converted. You can use these markers for delineating topics from FrameMaker source, or to pass processing
Formats
Paragraph formats Converted. You can map FrameMaker paragraph formats to RoboHelp styles or import the source
Character formats Converted. You can map FrameMaker character formats to RoboHelp styles or import the source formatting.
Table formats Converted. You can map FrameMaker table formats to RoboHelp styles or import the source formatting. See
Footnote properties and table
footnotes
Lists Converted according to the settings you define. See “List-mapping scenarios” on page 35.
page 19 and “Import glossary definitions” on page 19.
titles and topic filenames from the marker text. See
on page 29.
FrameMaker to specify text in FrameMaker document for generating Context Sensitive Help. See
“Pagination, topic naming, and context-sensitive Help” on page 29.
instructions to RoboHelp for images and tables.
formatting. See
“Convert FrameMaker character formats to RoboHelp styles” on page 33.
See
“Convert FrameMaker table formats to RoboHelp table styles” on page 36.
Converted. Because table title and table footnotes are paragraph formats in FrameMaker, you specify
conversion settings for these paragraph formats separately.
“Convert FrameMaker paragraph formats to RoboHelp styles” on page 33
“Pagination, topic naming, and context-sensitive Help”
Last updated 12/23/2013
Page 27

TECHNICAL COMMUNICATION SUITE 4
Using FrameMaker with RoboHelp
Page layouts
24
Master pages FrameMaker master pages are ignored. Master pages are used for layout, borders, and page numbers in
Reference pages Ignored. However, you can use the advanced scripting support in RoboHelp to convert images and graphics
Page layout, size, and
pagination
Headers/footers Ignored. Headers and footers in FrameMaker usually contain chapter names, chapter numbers, and page
Rotated text Converted to text, such as in table cells. (Rotated text is not supported in HTML).
Images and anchored frames
Images Only converted if they are inside anchored frames. If the images are not in anchored frames, reinsert them
Drawings Drawings created within anchored frames are converted to images. You can define the image conversion
Anchored frames Converted to images. See “Image conversion settings” on page 37.
ALT text on images and
anchored frames
FrameMaker, so they are not applicable to online Help. RoboHelp provides master page support for
breadcrumbs, mini-TOCs, and headers and footers that can be selected when you publish a single source
layout.
placed in the reference pages that are associated with paragraph formats.
Ignored. These elements are not applicable to online Help. See “Pagination, topic naming, and context-
sensitive Help” on page 29.
numbers, which are not applicable in online formats. After you generate topics, you can create headers and
footers in RoboHelp.
after you have imported the FrameMaker files. By default, FrameMaker places the imported and linked
images in anchored frames, so they are converted. However, images placed in graphic frames are not
converted. If images contained in anchored frames are missing, RoboHelp creates blank images with the
filename in a sequential manner. See
settings. See
Converted. If no ALT text is provided in the FrameMaker document for images RoboHelp applies the
filename of the converted images as the ALT text. See
“Image conversion settings” on page 37.
“Image conversion settings” on page 37.
“Create alternative text for images” on page 38.
Text frames, graphic frames,
and images inside anchored
frames
Equations Enclose equations in anchored frames so that they are converted to images when RoboHelp converts them.
Structured FrameMaker components
DITAMAP files Converted like FrameMaker books
DITA documents Converted like FrameMaker documents
XML files in book Converted like FrameMaker documents
XHTML files in book Converted like FrameMaker documents
Content references Text or files inserted into FrameMaker documents as content references appear as part of the topics where
Anchored frames and their content convert to images. All content within an anchored frame, including text
frames, multiple images, and callouts convert to a single image. RoboHelp inserts the filename of the created
image as the ALT text if no ALT text is defined for the anchored frame.
they appear. They do not appear as references in the online Help outputs. See
page 27.
“Content reference” on
Last updated 12/23/2013
Page 28

TECHNICAL COMMUNICATION SUITE 4
Using FrameMaker with RoboHelp
Conversion basics
Converting FrameMaker formats to RoboHelp styles
You can define how the FrameMaker formats are converted to RoboHelp styles on the project level. All FrameMaker
format definitions in the FrameMaker document appear in the Conversion Settings dialog box, even if they aren’t used.
For structured documents, FrameMaker formats that are mapped to elements in the structured template are listed.
You specify the following:
• FrameMaker template used for conversion. This step is optional.
• RoboHelp style sheet for style mapping.
Select a FrameMaker template for conversion
If the FrameMaker document that you are importing is an unstructured FrameMaker book, you can define a single
FrameMaker template for conversion. For example, suppose the documentation set contains a Getting Started Guide,
Installation Guide, User Guide, and an Administration Guide. These documents can have different page layouts and
formats in print, none of which are relevant for online output. In such cases, you can define one template that contains
format definitions for all documents you want to convert.
25
You can then specify this template as the project template, which overrides the formats of individual documents at the
RoboHelp project level. You can also reuse the conversion settings across other projects by exporting the conversion
settings.
1 Select File > Project Settings.
2 Click the Import tab of the Project Settings dialog box. Select Apply FrameMaker Template Before Import.
3 Click Browse to select the FrameMaker template you want to use for the project.
Select the CSS for style mapping
You can select the cascading style sheet (CSS) that RoboHelp uses to map the FrameMaker formats to RoboHelp styles.
By default, RoboHelp uses the RHStyleMapping.css file for the project. You can also use a custom CSS. You can later
edit the styles either in RoboHelp or in an external CSS editing application such as Adobe® Dreamweaver®.
1 Select File > Project Settings.
2 Click the Import tab of the Project Settings dialog box. Do one of the following:
• Select the CSS file from the CSS For Style Mapping menu.
• Click Add next to the CSS for Style Mapping pop-up menu, and select a CSS file.
Use this option to specify a custom CSS for the project. When you select this option, RoboHelp copies the
selected CSS file into the root folder of the project, and uses the selected CSS for style mapping.
Upgrading from RoboHelp 7 to RoboHelp 10
RoboHelp 7 allowed document-level conversion settings for the FrameMaker documents that you added to a
RoboHelp project. With RoboHelp 10, the conversion settings are applied project-wide, allowing you to have a
consistent set of conversion parameters. If you are opening a RoboHelp 7 project that had FrameMaker documents
added by reference or by copy, you can retain the document-specific settings defined in RoboHelp 7 project.
Last updated 12/23/2013
Page 29

TECHNICAL COMMUNICATION SUITE 4
Using FrameMaker with RoboHelp
26
When you upgrade a RoboHelp 7 project, you can either retain the earlier document-level settings or convert to the
project-level settings supported in RoboHelp 10. After you upgrade your project, you cannot open the project in
RoboHelp 7.
If you choose to retain the RoboHelp 7 settings, you can add or remove documents to an upgraded project with the
document-level conversion settings. You can define document-level conversion settings for the newly added
FrameMaker documents also. This option allows you to retain the RoboHelp 7 behavior for your upgraded project.
However, to take advantage of the enhanced features of RoboHelp 10 and its integration with FrameMaker, you should
upgrade the project completely. For example, RoboHelp 7 provided limited mapping options for autonumbering and
list styles. On the other hand, RoboHelp 10 allows you to map complex autonumber formats and multilevel list styles
to RoboHelp styles or HTML lists.
Note: You can discard the document-level settings any time, even if you choose to retain them at the time of upgrading.
However, discarding the document-level settings is irreversible.
Hierarchical structure in a FrameMaker book
You can enforce a hierarchical structure and grouping within the book. You can also include child books within a
book, and create folders and groups within a book.
When you link or import a FrameMaker book, the Project Manager pod in RoboHelp shows the FrameMaker book’s
hierarchy. When linked or imported into RoboHelp, child books inherit the TOC, index, and glossary from the parent book.
Hierarchy of FrameMaker book reflected in the Project Manager pod when you link a FrameMaker book into RoboHelp
Convert FrameMaker cross-reference formats to RoboHelp styles
By default, all cross-reference styles in the source document are used in the generated topics without mapping. Define
the mapping of these formats because FrameMaker documents can contain page and volume references in crossreferences that are not relevant to Help formats.
1 Select File > Project Settings.
2 In the Import tab of the Project Settings dialog box, click Edit under FrameMaker Document.
3 Select a cross-reference format from the Cross Reference group in the Conversion Settings dialog box.
4 Select a RoboHelp style to map to it, or type the RoboHelp style field to redefine the cross-references in the
FrameMaker document.
Last updated 12/23/2013
Page 30

TECHNICAL COMMUNICATION SUITE 4
Using FrameMaker with RoboHelp
5 Double-click a building block to append it to the RoboHelp cross-reference definition.
Content reference
Text or files that you have inserted into the FrameMaker documents as content references appear as part of the topics
where they are referenced. They do not appear as references in the online Help outputs.
Conversion settings
You can create a standard set of conversion settings for importing FrameMaker content into RoboHelp projects and
then use these settings consistently across multiple projects.
You define these settings once. For subsequent projects, import these settings to the project. In this way, you can
quickly set up the project environment and publish FrameMaker content in several online formats.
These settings include:
• Specified FrameMaker template
• Cascading style sheets (CSS) for RoboHelp projects
• Style mapping between FrameMaker formats and RoboHelp styles
• Format conversion settings, image conversion settings, and other settings
27
More Help topics
Demystifying Mapping Files
Export conversion settings
1 Select File > Project Settings.
2 On the Import tab, click Export.
3 Specify a name for the RoboHelp Import Settings file (ISF file) and click Save.
Import conversion settings to a project
1 Select File > Project Settings.
2 On the Import tab, click Browse.
3 Select a RoboHelp Import Settings File (ISF file) and click Open.
Automap
Automap picks up RoboHelp style names and maps them to the imported FrameMaker document’s styles. Instead of
having to map each FrameMaker format with a corresponding RoboHelp style, use Automap to automatically map
similar style names from the selected CSS in RoboHelp.
Automap compares FrameMaker format names with the style names present in RoboHelp’s mapping CSS (by default,
the mapping CSS is RHStyleMapping.css).
For example, when you choose Automap at a paragraph level, the following could be mapped:
Last updated 12/23/2013
Page 31

TECHNICAL COMMUNICATION SUITE 4
Using FrameMaker with RoboHelp
FrameMaker format name Similar RoboHelp Style
Heading1 h1
Title Title
Indented Indented
CellBody CellBody
my Numbered+ myNumbered
(Space and special characters are removed during
automapping)
Body Body
Unlike FrameMaker format names, CSS style names cannot have spaces and special characters. While mapping,
RoboHelp ignores spaces and special characters in the FrameMaker format names.
A special case is that RoboHelp automaps FrameMaker’s Heading1 to Heading6 (or Heading 1 to Heading 6)
paragraph styles to h1 to h6.
Automap works for Paragraph, Character, and Table formats. Table styles require handling for appearance as well as
caption styles. You can also set Automap for an individual format.
28
When you select Automap for all paragraph, character, or table styles and style-mapping is already defined for some
of the styles, RoboHelp give you the option to automap the previously mapped styles. You can select the styles you want
to overwrite.
In the project settings dialog, you can also click Export to export the conversion settings as a .isf file.
Automap Paragraph, Character, and Table formats at project level
1 Select File > Project Settings.
2 Click the Import tab of the Project Settings dialog and do the following.
a Select Apply FrameMaker Template.
b Specify the name\location of the relevant FrameMaker template.
c Click Edit (FrameMaker Document).
3 In the Conversion Settings dialog, do the following as required:
a Select Paragraph and then select Automap Paragraph Styles
b Select Character and then select Automap Character Styles.
c Select Table and then select Automap Table Styles.
When you select Automap for all Paragraph, Character, or Table styles, and one or more of the relevant formats
are already mapped, RoboHelp displays Automap Options dialog. In the Automap Options dialog, choose to
retain or override the individual formats’ mapping.
Automap paragraph styles at style level
1 In the conversion settings dialog, expand Paragraph and select a style.
If the style is mapped, the dialog displays a preview of the mapped FrameMaker and RoboHelp styles. If the
Automap has failed, the RoboHelp Style field displays the message: [Automap failed. Add stylename to the CSS.]
Last updated 12/23/2013
Page 32

TECHNICAL COMMUNICATION SUITE 4
Using FrameMaker with RoboHelp
2 If the Automap has failed, do one of the following in the RoboHelp Style drop-down list:
• Add the stylename to the mapping CSS.
• Select the RoboHelp style name to map to the selected FrameMaker format.
• Select [Source]. RoboHelp retains the appearance of the FrameMaker text in the online Help format.
Note: RoboHelp automatically maps to [Source] if an automap fails.
Automap character styles at style level
1 In the conversion settings dialog, expand Character and select a style.
If the style is mapped, the dialog displays a preview of the mapped FrameMaker and RoboHelp styles. If the
Automap has failed, the RoboHelp Style field displays the message: [Automap failed. Add stylename to the CSS.]
2 If the Automap has failed, do one of the following in the RoboHelp Style drop-down list:
• Add the stylename to the mapping CSS.
• Select the RoboHelp style name to map to the selected FrameMakercharacter format. Optionally, click Edit Style
to edit the selected RoboHelp character style.
• Select [Source]. RoboHelp retains the appearance of the FrameMaker text in the online Help format.
29
Automap table styles at style level
1 In the conversion settings dialog, expand Table and select a style.
If the style is mapped, the dialog displays a preview of the mapped RoboHelp styles. If the Automap has failed, the
RoboHelp Style field displays the message: [Automap failed. Add stylename to the CSS.]
2 If the Automap has failed, do one of the following in the RoboHelp Style drop-down list:
• Add the stylename to the mapping CSS.
• Select the RoboHelp style name to map to the selected FrameMaker table format. Optionally, click Edit Style to
edit the selected RoboHelp table style.
• Select [Source]. RoboHelp retains the appearance of the FrameMaker table in the online Help format.
3 Specify the Caption Style and other table properties for the style:
• Select the RoboHelp caption style name to map to the selected table format’s caption. Or select [Source].
RoboHelp retains the appearance of the table caption in the online Help format. You can also select Automap
for an individual table’s caption style.
Pagination, topic naming, and context-sensitive Help
When you link or import a FrameMaker document, you define how FrameMaker content is presented as topics in
RoboHelp. With Technical Communication Suite, you can set how the content is paginated, topics named, and map
context-sensitive Help topics for integration with a product.
Last updated 12/23/2013
Page 33

TECHNICAL COMMUNICATION SUITE 4
Using FrameMaker with RoboHelp
Considerations for pagination and topic titles
Determine the pagination option suited to your environment based on the following factors:
Completeness of content in the topic Ensure that the topic generated contains relevant and complete information for
the reader. For example, if you set pagination for Heading 3 level paragraph, it is possible that the topic contains only
the task information, without the required contextual information that is covered in another Heading 3 level topic. To
avoid such disconnected topics, set the pagination at a higher level so that complete information is available in a single
Help topic.
Drop-down text Ensure that the paragraph format for the drop-down text body is not set for pagination. The
paragraphs applied with this format must accompany the drop-down text caption paragraph format.
Even though it is easy to define pagination and topic title generation based on FrameMaker paragraph formats, this
approach has the following limitations:
Lack of topic-level controls Because the pagination settings are set at the project level, you cannot exercise discrete
control over topics that are not in the defined heading levels. For example, suppose you want to make an H3 level topic
a separate Help topic. If you set pagination at H2 for your project, you can’t do so. The H3 topic is included under the
topic immediately above it.
Uniform topic naming convention Help topics use the same file-naming conventions that you define in the conversion
settings, especially if your authoring environment is Structured FrameMaker. You can’t deviate from these
conventions.
30
Lack of flexibility in topic titles You cannot selectively alter the titles or filenames of the topics without changing the
source content. When you search for content in RoboHelp, topic titles are displayed in search. An intuitively titled
topic helps the reader quickly identify the most relevant information from search results.
Possibility of inconsistency in documents from multiple books Linked and imported FrameMaker documents from
multiple books can lead to inconsistent heading styles for generated topics.
For example, suppose you link to or import FrameMaker documents from a user guide and reference guide. In this
case, topic titles can reflect differences in style for instructional content and reference content. If topic titles are derived
from the paragraph text at which pagination is set, the Help topics generated can have inconsistent titles.
Advantages of setting pagination from within FrameMaker
Using custom markers in FrameMaker, you can overcome these drawbacks for smaller projects and do the following:
Create workflow-based content With the intelligent use of custom markers in FrameMaker, you can create RoboHelp
topics that present users information about the workflow. You can create Help topics irrespective of the heading styles
applied in the FrameMaker document.
Optionally, define the titles of the topic This option becomes useful when you want to combine many topics and
assign a relevant title to the combined topic, rather than derive the topic title text from one of the heading styles.
Optimize topic length Because you define from FrameMaker how Help topics are created in RoboHelp, you can
precisely control the topic length suited for topic-based authoring. However, if you use the mini-TOC feature for your
Help topics, limit the number of headings included in a topic. A long mini-TOC can make the topic contents accessible
only through scrolling.
After you define these markers in your FrameMaker documents, you can set the conversion settings in RoboHelp to
create and name topics according to your preferences.
Last updated 12/23/2013
Page 34

TECHNICAL COMMUNICATION SUITE 4
Using FrameMaker with RoboHelp
Pagination options
You can define how FrameMaker content is segregated as different Help topics in RoboHelp.
Create separate HTML topics based on FrameMaker paragraph formats You specify the heading styles in FrameMaker
that should be used as the page break. For example, if the FrameMaker file contains ten topics, each with subtopics,
tasks, and tables, you can have each topic convert into a separate HTML file. If each of these topic headings is at
Heading 1 format, you can set each Heading 1 topic to be created as a separate HTML topic. On the other hand, if you
set the pagination at Heading 2, separate HTML files are created for each Heading 2 topic,
Define Page Break markers in FrameMaker content You can insert Page Break markers at the beginning of the
paragraph in FrameMaker documents. Typically, you create page breaks at the heading levels that you choose. If you
use this option, avoid defining pagination setting based on paragraph formats.
Use custom markers defined in FrameMaker If you are converting legacy content in FrameMaker that used custom
markers to define pagination using other tools, you can use this option. Avoid using the Page Break markers in such
documents.
Topic name options
You can define how topics that are generated from FrameMaker content will be named within RoboHelp. By default,
you can define the text of the paragraph set for pagination as the topic name. In addition, you can define other naming
conventions. If the filenames use sequential numbering, such as helptopic001.html and helptopic002.html, you can
define the pattern for such conventions.
31
Based on paragraph text When you set heading styles for pagination, the heading text becomes the default filename
for the topic file created in RoboHelp. For example, suppose you define Heading 2 for pagination, and the FrameMaker
document has two Heading 2 topics, “Introduction” and “Beyond basics.” In this case, RoboHelp creates the topics
introduction.htm and beyond_basics.htm. Thus, you get intuitively named HTML files that indicate the topic title.
Topic Name Pattern Topics are named according to the selected pattern. You can select one of the following or create
a topic name pattern using the Topic Name Pattern building blocks provided by RoboHelp. In addition, you can add
standard static text, such as “HelpTopic,” followed by sequential number as the topic name pattern.
Building block Converted topic name pattern
default HTML topic generated has the filename consisting of the paragraph text.
<$filename_no_ext>-<$paratext> HTML topic generated has the filename consisting of the filename of the FrameMaker
<$filename_no_ext>-<n> HTML topic generated has the filename consisting of the filename of the FrameMaker
<$paratext_no_num> HTML topic generated has the filename consisting of the paragraph text of the paragraph
<$paratext> HTML topic generated has the filename consisting of the paragraph text of the paragraph
document without the .fm extension and the topic title, separated by a hyphen. For example,
the FrameMaker document named “Chapter.fm” with "1-Introduction" as paragraph text is
converted to an HTML topic with the filename "Chapter-1-Introduction.htm”
document without the .fm extension and the paragraph number separated by a hyphen. For
example, the FrameMaker document "Chapter.fm" is converted to an HTML topic with the
filename "Chapter-1.htm"
format at which pagination is set, without the paragraph number. For example, a heading 1
paragraph "1. Introduction" is converted to an HTML topic with the filename
"Introduction.htm"
format on which pagination is set. For example, a heading 1 paragraph "Introduction" is
converted to an HTML topic with the filename "Introduction.htm"
Last updated 12/23/2013
Page 35

TECHNICAL COMMUNICATION SUITE 4
Using FrameMaker with RoboHelp
Topic Name Marker You can use topic name markers in the FrameMaker document to create topic titles and
filenames from the marker text. If you select this option, the pagination settings applied on the Paragraph Styles pane
are ignored. Use this option to precisely control the creation of separate Help topics from the FrameMaker documents.
Page Break Marker If you are creating new content in FrameMaker, and do not want to use custom markers to define
pagination, you can use the Page Break marker. When you define the topic title, FrameMaker automatically creates the
topic name based on the topic title.
Avoid using this option when your FrameMaker document already contains custom markers for pagination, or when
you want to define pagination based on FrameMaker paragraph formats.
Define topic name settings
1 Select File > Project Settings.
2 In the Import tab of the Project Settings dialog box, click Edit under FrameMaker document.
3 In the Other Settings tab, select the required option:
Context-sensitive Help markers in FrameMaker documents
If you are using Technical Communications Suite, you can define the context-sensitive Help map IDs within
FrameMaker itself, in addition to using other markers.
32
You can convert the context-sensitive Help markers that you insert in your FrameMaker documents and reuse them
as map IDs. You specify the context-sensitive Help marker in the Project Settings dialog box before linking
FrameMaker documents. You can also specify this setting when you import FrameMaker documents. You can work
with context-sensitive Help markers in FrameMaker documents in two ways:
Automatic conversion of map IDs from FrameMaker documents You apply context-sensitive Help markers in your
FrameMaker documents, and specify the marker type in the conversion settings. RoboHelp imports the markers from
FrameMaker documents and adds the map IDs from the strings contained in the context-sensitive Help markers.
Manually adding map IDs You can use the map IDs you received from your development team in two ways:
• From within FrameMaker, use the CSH marker option to enter the map IDs for the topics that you want generated.
This option is available only if you are using the Technical Communications Suite.
• From within FrameMaker, use the map ID as the text for the marker that you want to use the context-sensitive Help
marker. When you link or import the FrameMaker documents, you specify the context-sensitive Help marker in
the conversion settings.
If you are using the first option, avoid specifying the context-sensitive Help marker in the conversion settings.
Specify the context-sensitive Help marker
1 Select File > Project Settings.
2 In the Import tab of the Project Settings dialog box, click Edit under FrameMaker Document.
3 In the Other Settings group of the Conversion Settings dialog box, select Context-Sensitive Help Marker.
Last updated 12/23/2013
Page 36

TECHNICAL COMMUNICATION SUITE 4
Using FrameMaker with RoboHelp
Converting FrameMaker content
Convert FrameMaker paragraph formats to RoboHelp styles
By default, RoboHelp converts all paragraph formats from FrameMaker to RoboHelp CSS styles. It retains the
appearance and behavior of the FrameMaker formats in the RoboHelp project. To ensure consistency of the online
Help projects, map the FrameMaker formats to RoboHelp styles and edit them.
1 Select File > Project Settings.
2 In the Import tab of the Project Settings dialog box, click Edit under FrameMaker Document.
3 On the Conversion Settings panel, select the FrameMaker format from the Paragraph group.
4 From the RoboHelp Style menu, select the RoboHelp style that you want to map to the FrameMaker format. To
retain the appearance of FrameMaker text in the online Help format, select [Source].
To edit the selected RoboHelp style, click Edit Style.
5 Select the properties for the mapped RoboHelp style:
Exclude From Output Select to discard the content in FrameMaker document that is applied with the selected
FrameMaker paragraph format.
33
Pagination Select to create a Help topic at each occurrence for the selected FrameMaker paragraph format.
User Defined HTML Tag Select or enter a user-defined HTML tag for the selected paragraph format.
If the selected FrameMaker format has auto numbering properties defined, specify how auto numbering is
converted.
More Help topics
“Custom HTML tags” on page 34
“Autonumber style mapping” on page 34
Mapping FrameMaker Styles to RoboHelp
Convert FrameMaker character formats to RoboHelp styles
You can map the FrameMaker character formats to character styles in RoboHelp.
You can also edit the styles in RoboHelp.
1 Select File > Project Settings.
2 In the Import tab of the Project Settings dialog box, click Edit under FrameMaker Document.
3 Select the FrameMaker character format from the left pane of the Conversion Settings dialog box.
4 Select the RoboHelp character style from the pop-up menu. Optionally, you can do the following:
• To import the FrameMaker character format, select [Source] from the pop-up menu.;
• To edit the selected RoboHelp style, click Edit Style.
• To exclude the text in the FrameMaker document applied with the selected character format, select Exclude
From Output.
Last updated 12/23/2013
Page 37

TECHNICAL COMMUNICATION SUITE 4
Using FrameMaker with RoboHelp
• To apply a user-defined HTML tag to the imported text in HTML output, select User Defined HTML Tag, and
select the tag from the pop-up menu. You can also enter a new HTML tag. The custom HTML tag for the
character format replaces the <span> tag in the generated HTML file.
Exclude a FrameMaker paragraph format from Help topics
You can exclude the content in FrameMaker documents that has a specified paragraph format from the converted
output. Use this option to remove content such as special notices that are not required in online output.
1 Select File > Project Settings.
2 In the Import tab of the Project Settings dialog box, click Edit under FrameMaker Document.
3 In the project settings, select a FrameMaker paragraph format in the left pane.
4 Click Exclude From Output.
Custom HTML tags
You can define or apply a custom HTML tag instead of the standard <p> tag for paragraph styles and <span> tag for
character styles in the HTML output for the formats that you import from FrameMaker. You can define separate
HTML tags for each format in the FrameMaker document.
34
1 Select File > Project Settings.
2 In the Import tab of the Project Settings dialog box, click Edit under FrameMaker Document.
3 In the Conversion Settings dialog box, select the user-defined HTML tag option.
4 Type the name of the custom HTML tag or select an existing tag to use instead of the default HTML tag.
Apply FrameMaker conditional text build expressions
You can apply the Show/Hide settings of the conditional text build expressions to the content in your FrameMaker
documents imported into RoboHelp projects. RoboHelp imports the content after applying the Show/Hide settings to
the FrameMaker content. Any text that is hidden is not brought into RoboHelp project.
1 Select File > Project Settings.
2 In the Import tab of the Project Settings dialog box, click Edit under FrameMaker Document.
3 In the Other Settings group of the Conversion Settings dialog box, select Apply FrameMaker Conditional Text
Build Expression.
Autonumber style mapping
Choose the conversion setting for converting autonumber formats in the FrameMaker document to the Help format.
If the FrameMaker document contains hierarchical numbered lists, you can choose one of the following:
Ignore Autonumber Choose this option if the autonumber text is relevant only in print format. The converted
paragraph does not contain autonumbering. For example, suppose you ignore autonumbering for the FrameMaker
paragraph format “Section2 Level.” In this case, “Section 1.1: System Requirements” in the source appears as “System
Requirements” in the RoboHelp topic generated.
Convert Autonumber To Text Choose this option to retain the appearance of the FrameMaker numbered lists. The
autonumber part loses its sequencing properties and appears as part of the paragraph text in RoboHelp topic.
Convert Autonumber To HTML List Choose this option to convert the autonumber to HTML lists using HTML tags
such as <ol>, <ul>, and <li>.
Last updated 12/23/2013
Page 38

TECHNICAL COMMUNICATION SUITE 4
Using FrameMaker with RoboHelp
Convert Autonumber To RoboHelp List Choose this option if you want to edit the generated HTML topics in
RoboHelp or use the RoboHelp styles to control the numbering properties.
List-mapping scenarios
RoboHelp allows you to convert list properties of FrameMaker paragraph formats in several ways. Consider the
following scenarios:
More Help topics
Best practices in mapping list styles
FrameMaker numbered list mapped to [Source]
The FrameMaker paragraph format autonumber property converts to a list according the autonumber conversion
settings you define for that FrameMaker paragraph format.
Ignore Autonumber The autonumber part of the FrameMaker paragraph format is ignored. The converted paragraph
style in the RoboHelp topic doesn't contain the list part.
Convert Autonumber To Text The autonumber part of the FrameMaker paragraph converts to text and appears as
paragraph text in the RoboHelp topic.
35
Convert Autonumber To HTML List Autonumber format converts to list items using HTML tags such as <ol>, <ul>,
and <li>.
Converted Autonumber To RoboHelp List Autonumber properties of the paragraph style convert to a RoboHelp list.
Example:
• Create a paragraph style “FM_Para1” in FrameMaker with autonumbering defined as <a+> and apply it to
paragraphs. The resulting paragraphs are ordered as “a, b, c, ...."
• Map the FrameMaker paragraph format “FM_Para1” to [Source].
Generated paragraphs in RoboHelp topics have the list style applied to them, where the list has properties similar to
those in the source document.
FrameMaker numbered list mapped to RoboHelp unnumbered style
You can map a FrameMaker paragraph format with autonumbering properties to a RoboHelp paragraph style that is
not linked to any list style. In this case, the autonumber is converted to a list according to the autonumber conversion
settings you define for the paragraph format.
Ignore Autonumber The FrameMaker paragraph autonumber is ignored and doesn't appear in the RoboHelp topic.
However, the paragraph style is mapped.
Convert Autonumber To Text The FrameMaker autonumber part is converted to text and appears as a part of
paragraph text in RoboHelp topic. The paragraph style is mapped.
Convert Autonumber To HTML List The FrameMaker paragraph format is converted to HTML list items using HTML
tags such as <ol>, <ul>, and <li>.
Convert Autonumber To RoboHelp List The autonumber properties of the FrameMaker paragraph format are
ignored. The paragraph style is mapped.
Last updated 12/23/2013
Page 39

TECHNICAL COMMUNICATION SUITE 4
Using FrameMaker with RoboHelp
FrameMaker unnumbered format mapped to RoboHelp numbered style
In this case, the converted paragraph has the RoboHelp paragraph style and inherits the RoboHelp list style. The
Autonumber conversion options do not affect the paragraph behavior in the RoboHelp topic.
For example:
• In the FrameMaker document, create a paragraph format "FM_Para 1" without autonumber properties.
• Define a RoboHelp list style “RH_List1” in the RH style mapping CSS.
• Create a paragraph style “RH_Para1” and link the first level of list style “RH_List1” to the paragraph style
“RH_Para1”.
• Map the FrameMaker paragraph style “FM_Para1” to RoboHelp paragraph style “RH_Para1”.
The generated paragraph in the RoboHelp topic inherits the properties of the list style “RH_List1”.
FrameMaker numbered list mapped to RoboHelp numbered list
The converted paragraph style has the RoboHelp paragraph style and inherits the RoboHelp list style. The
Autonumber conversion options do not affect the paragraph behavior in the RoboHelp topic.
For example:
• In FrameMaker, create a paragraph format “FM_Para1” with autonumbering defined as <a+> and apply it to a
paragraph so that the paragraph has an ordered list such as “a, b, c, ….”
• Define a numeric list style “RH_List1” in the RoboHelp style mapping CSS with the first level definition as <x>.
• In RoboHelp, define a paragraph style “RH_Para1” and link the first level of list style “RH_List1” to the paragraph
style “RH_Para1”.
• Map the FrameMaker paragraph format “FM_Para1” to the RoboHelp paragraph style “RH_Para1”.
The generated paragraph in the RoboHelp topic inherits the properties of list style “RH_List1” and displays a list of
type “1, 2, 3, ...."
36
Convert FrameMaker table formats to RoboHelp table styles
You can map FrameMaker table formats to RoboHelp table styles. Alternatively, you can import the table formats from
the FrameMaker document. You can also edit the table formats in RoboHelp. Cells in the FrameMaker document that
are merged (straddled) cannot be unmerged (unstraddled); however, the straddled cells appear merged in the
RoboHelp topic.
If the FrameMaker table formats contained table titles and table footnotes, convert these paragraph formats in
FrameMaker to RoboHelp paragraph styles separately. Decide whether you want to retain automatic numbering in the
table title styles and specify the autonumbering properties for the mapped RoboHelp paragraph style. For example, if
the table title formats in the FrameMaker documents included the chapter number, such as “Table 2-3: Quarterly
Results”, you can choose to ignore the autonumbering part and have only “Quarterly Results” appear as the table title.
1 Select File > Project Settings.
2 In the Import tab of the Project Settings dialog box, click Edit under FrameMaker Document.
3 Select the FrameMaker table format from the left pane of the Conversion Settings dialog box.
4 Select the RoboHelp table style from the pop-up menu and click OK. Optionally, to edit the table style in RoboHelp,
click Edit Style.
Last updated 12/23/2013
Page 40

TECHNICAL COMMUNICATION SUITE 4
Using FrameMaker with RoboHelp
More Help topics
“List-mapping scenarios” on page 35
Image conversion settings
Some FrameMaker documents, especially those optimized for high-quality printing through PDF, contain images in
EPS format. You can let RoboHelp use Adobe Distiller to convert such images to online formats.
You specify the following image conversion settings in the Conversion Settings dialog box:
Use PDF To Generate Images Select this option to generate web-friendly images formats from graphics linked and
inserted in FrameMaker documents. You should use this option especially if you have vector graphics formats such as
EPS or AI, or graphics with text content in them.
Preserve 3D Images Select this option to convert the 3D graphics as a PDF file, with the 3D rendering intact within the
PDF file. To ensure that the 3D image retains its rendering, enable embedding in FrameMaker.
Preferred Dimensions Specify the dimensions for the images. Select one of the following:
• Scale Scale images as a percentage of the existing size. The aspect ratio of the images is maintained.
• Width and Height Specify the absolute image size as Height and Width, in points. Select Maintain Aspect Ratio to
ensure that the images are not skewed.
37
Note: To convert the images in FrameMaker documents to the actual dimensions of the images, specify the height and
width as 0 pt. The <img> tag for such images in the generated HTML does not have the height and width values. This
conversion is irrespective of the dimensions of the anchored frames that contained the images.
• Maximum Dimensions Set the maximum dimensions for images in online format. Images that exceed the
maximum dimensions you specify are automatically scaled down to fit the maximum size you specify. If you scale the
images and specify an aspect ratio, RoboHelp scales the images within the maximum dimensions specified and
maintains the aspect ratio.
Use this option to avoid large images causing the browser window to scroll horizontally or vertically. For example, if
you specify the window size to be 800 x 600 pixels, you can specify the maximum dimensions to be 640 x 480, so that
the images do not exceed the window size.
Margins Set the margins for the images:
• Set equal margins on all sides by setting the margin in All Sides.
• To set margins on individual sides, set the margins on each side.
Borders Set a border for the images:
• To set a uniform border on all sides, select All from the Border pop-up menu. Alternatively, you can specify the side
on which you want the border to appear from the pop-up menu.
• To set the border style, select the style from the Style pop-up menu.
• To set the border color, select the color from the Color pop-up menu.
• To set the border width, select it in, in points, from the Width menu.
Format Define the image format, color depth, and quality settings for the web-supported images that are converted
from the images in the FrameMaker document:
• As Is Select this option for retaining the images in the current web-supported format.
• JPG Select this option for multicolor images such as screenshots or photographs. JPG format with a high color
depth provides the best online quality, but increases the file size.
Last updated 12/23/2013
Page 41

TECHNICAL COMMUNICATION SUITE 4
Using FrameMaker with RoboHelp
• GIF Select this option if the FrameMaker document contains only line art, such as schematic diagrams.
• BMP Select this option for screenshots and other images. BMP files provide good quality at an increased file size.
• PNG Select this option for screenshots and photographs.
JPEG Quality Set the quality percentage for JPG images.
Color Bit Depth Set the color bit depth for bitmap images. JPG and PNG formats can have either 8- or 24-bit color
depth, while BMP images can be have color bit depths of 1, 4, 8, 16, 24, or 32. GIF images can have only 8-bit color
depth.
Grayscale Select this option if you want monochrome images.
More Help topics
Preparing Anchored Frames for Conversion
Preserve converted images
RoboHelp converts the images and anchored frames in the FrameMaker documents each time the topics are updated
or generated. You can skip updating the images if the corresponding images or SWF files from the corresponding
anchored frames are already present in the RoboHelp project. Use this option in the following cases:
38
• You want to avoid regenerating the images each time the FrameMaker document is updated
• You have edited the images in the RoboHelp project using another image-editing tool, and want to prevent
overwriting of the edited images
• You want to preserve the earlier generated image in the RoboHelp project even though the image in the
FrameMaker document has changed
If the order in which the images appear in the document or the image name has changed, you should clear this option
and allow RoboHelp to update the images.
❖ In the Image tab of the Conversion Settings dialog box, select Do Not Re-Generate Images.
Create alternative text for images
To create accessible content, create alternative text for images so that visually impaired users can access the content
through screen readers. If you link or import completed FrameMaker books into RoboHelp for publication, add
alternative text to graphics used in the FrameMaker documents. These entries are not visible in PDF files, but they
appear in online content when the mouse hovers over the images.
RoboHelp options within FrameMaker
When you use FrameMaker as part of Adobe Technical Communications Suite, you get several options that enable
you to streamline online Help publishing with RoboHelp.
Pagination with Page Break marker
If you are creating a new document within FrameMaker that you want to published from RoboHelp, you can avoid the
traditional ways of having to define custom markers for pagination and topic naming. You can add Page Break
markers to denote the topics that should be converted as separate Help topics, and define their topic names.
Last updated 12/23/2013
Page 42

TECHNICAL COMMUNICATION SUITE 4
Using FrameMaker with RoboHelp
Note: If you define page break markers within FrameMaker documents, RoboHelp silently paginates based on these
markers in addition to any other pagination settings that you defined in conversion settings.
Add Page Break marker
1 Within FrameMaker, click the heading text, and select Adobe RoboHelp > Apply Page Break Marker.
2 In the Page Break Marker dialog box, enter the topic title. The topic name is automatically populated based on the
title text that you enter.
For example, if you enter the topic title as “RoboHelp Conversion Settings”, the topic is named
“RoboHelp_Conversion_Settings.htm”.
Remove all Page Break markers
❖ Select Adobe RoboHelp > Remove All Page Break Markers.
Context-sensitive Help marker
You can add the context-sensitive Help map IDs that you received from your product development team to paragraphs
within FrameMaker content. For best results, ensure that you are applying the map IDs to heading styles that you
identified for pagination.
39
Apply a context-sensitive Help marker
1 Click on the paragraph text that you want to insert the context-sensitive Help marker.
2 Select Adobe RoboHelp > Apply CSH Marker.
3 Enter the map ID and click OK.
Apply index markers
1 Click on the paragraph text that you want to insert the index marker.
2 Select Adobe RoboHelp > Apply Index Marker.
3 Enter the index entry and click OK.
Create Dynamic HTML effects
You can create dynamic HTML effects such as drop-down text and expanding text in your FrameMaker documents if
you want to have the published online Help formats to have these options.
Use the drop-down text effect to provide alternative task options and basic conceptual topics, summarize the questions
on an FAQ, and shorten nested procedures. Text that you mark as drop-down body is displayed in your PDF output.
But the text appears online only when the user clicks the drop-down text caption on the Help page.
Similarly, you can use expanding text DHTML effect to display expanded definitions, key terms, or links to overview
topics embedded in a paragraph. Expanding text requires an expanding text caption that contains the link and
expanding text body that is displayed when a user clicks the expanding text link. Expanding text body is not displayed
in PDF. It appears only in the Help page when a user clicks the text that contains the expanding text link.
Last updated 12/23/2013
Page 43

TECHNICAL COMMUNICATION SUITE 4
Using FrameMaker with RoboHelp
These DHTML effects require two components: a caption and body. You apply the drop-down text effects to
paragraphs and the expanding text effect to characters. When the drop-down text effect is created, two paragraph
formats, DropDownCaption and DropDownBody, are added to the FrameMaker document. When the expanding text
effect is created, two character formats—ExpandingTextCaption and ExpandingTextBody—are added. These formats
are imported to the RoboHelp project when you import the FrameMaker documents. The effects are visible in the
created HTML topics.
If the HTML topic generated contains only the captions without the accompanying body formats, links are generated
and visible in the HTML topic. If the HTML topic generated contains a text body without the corresponding captions,
no links are generated. In addition, if a paragraph to which the drop-down text body format is applied is also specified
for conversion to an autonumbered list, the list conversion is ignored.
Create drop-down text in a FrameMaker document
1 Select the text or paragraph on which you want to place the drop-down text caption.
2 Select Adobe RoboHelp > Dynamic HTML Effects > Drop Down Caption.
3 Select the text that should appear as drop-down text in your online Help page.
4 Select Adobe RoboHelp > Dynamic HTML Effects > Drop Down Body.
Create expanding text in a FrameMaker document
1 Select the term or phrase on which you want to place the expanding text caption.
2 Select Adobe RoboHelp > Dynamic HTML Effects > Expanding Text Caption.
3 Select the text that should appear as expanding text in your online Help page.
4 Select Adobe RoboHelp > Dynamic HTML Effects > Expanding Text Body.
40
HTML publishing workflow using Technical Communication Suite and standalone products
Adobe Technical Communications Suite provides technical communicators a streamlined workflow for authoring
content once and delivering it in multiple formats. You can author in FrameMaker and import FrameMaker
documents into RoboHelp to publish Help in several formats, including Adobe AIR Help and WebHelp.
The suite provides more features than the individual suite applications used as standalone products. The following
table lists some differences in the workflow for importing FrameMaker documents when you use the suite and when
you use the standalone products.
Last updated 12/23/2013
Page 44

TECHNICAL COMMUNICATION SUITE 4
Using FrameMaker with RoboHelp
41
Task in the workflow Technical Communication Suite FrameMaker and RoboHelp as stand-alone
Importing FrameMaker documents into
RoboHelp project
Synchronizing FrameMaker source files and
RoboHelp topics
Updating the topic structure when pagination
settings are changed
Link to or import the FrameMaker source
documents into the RoboHelp project.
The Project Manager pod in RoboHelp
indicates whether the linked documents are
out of sync. You can update the linked
documents to have the changes reflected in
RoboHelp projects. You can choose to
preserve the changes in the generated topics.
Update the FrameMaker document in
RoboHelp.
applications
Import FrameMaker documents.
Reimport the FrameMaker documents and
overwrite the topics generated earlier.
Reimport the FrameMaker documents and
overwrite the topics generated earlier.
Mixed sources of documents
Typically, you use the suite workflow to convert your existing FrameMaker books to online Help format; that is, you
link the entire book into RoboHelp. If you have well-shaped FrameMaker documents, you can optimize the workflow
with minimal changes to the FrameMaker source or generated topics in RoboHelp. Use this method when your author
primarily in FrameMaker and want to use RoboHelp as the publishing tool.
However, sometimes it’s necessary to reuse content from diverse sources in RoboHelp projects. An example is
updating a small online Help project by including conceptual information from a reference guide and troubleshooting
information from a maintenance guide. Perhaps these documents are authored in different tools and templates, and
perhaps they follow different writing guidelines.
Documents can have these sources, among others:
• Documents authored in earlier versions of FrameMaker
• Documents authored in structured and in unstructured FrameMaker
• Documents authored in FrameMaker and in Microsoft Word
Project-wide conversion settings
RoboHelp allows you to define project-wide settings for each source type. For all FrameMaker documents, you define
the conversion settings only once, whether they are linked to or imported into RoboHelp. Similarly, the conversion
settings of Microsoft Word documents remain the same for linked as well as imported documents.
Project-wide conversion settings promote consistency not just in your project but across multiple projects. You can
quickly set up a RoboHelp project without having to define individual conversion settings for paragraphs, tables,
images, and so on.
Project-wide conversion settings work best when you author the entire document either in FrameMaker or in Word
and use RoboHelp as the publishing tool. In this case, you simply optimize the source content for publishing to online
Help formats and do little or no content modification in RoboHelp. However, if you have a mixed authoring
environment or content from multiple sources, complex scenarios arise. Differences in the following can add
complexity:
FrameMaker templates RoboHelp allows you to select a template to be applied to the FrameMaker documents that
you link or import. Different document types could have different templates with different paragraph and other
formats defined.
Topic naming patterns This complicating factor arises when you base the topic names on the paragraph text.
Depending on how you have written the headings, the RoboHelp topics could have inconsistent names. For
Last updated 12/23/2013
Page 45

TECHNICAL COMMUNICATION SUITE 4
Using FrameMaker with RoboHelp
FrameMaker documents, you can define topic naming based on custom markers. You can’t define topic naming based
on custom markers in Word.
Context-sensitive Help marker text Defining context-sensitive Help in the source documents itself gives you
complete control over how the online Help is created. However, defining context sensitivity in the source can
introduce significant complexity. If you have multiple types of source documents, you usually have several types of
markers that differ in syntax.
More Help topics
Compare style mapping approaches: FrameMaker and RoboHelp
Tips for creating context-sensitive Help
To overcome the challenges, keep the following tips in mind when you plan your project:
Determine the workflow If you’re working on a large RoboHelp project created natively, it makes more sense to
continue authoring in RoboHelp if the content inputs are minimal. Linking and importing external documents can
increase the complexity of the project, especially if you defined TOCs, indexes, glossaries, and context-sensitive Help
settings in RoboHelp. If, however, you are creating a project from scratch or significantly revising an existing project,
link to and import external documents to avoid updating content manually in RoboHelp.
42
Identify the source documents Before you define the project settings in RoboHelp, identify the sources of content that
you intend to use in your project. If all your source documents are well-shaped FrameMaker documents, link the
documents. If your source documents are of several types, import the documents.
Explore your linking and importing options Even though you can choose to convert the TOC, index, and glossary
from the source documents, explore your options carefully. For example, importing a TOC works best when you want
to retain the TOC structure in your source documents. Similarly, if you are importing a set of FrameMaker and Word
documents in different versions, consider carefully before using context-sensitive Help markers or index markers.
Their use is advantageous only if you are making significant revisions. If the update is minimal, sometimes the best
option is to import the content and add the map IDs or index entries natively in RoboHelp.
Last updated 12/23/2013
Page 46

TECHNICAL COMMUNICATION SUITE 4
Using FrameMaker with RoboHelp
Scenarios for creating a project
Source documents Method to use Options available
43
Single unstructured or Structured
FrameMaker book
Multiple unstructured or Structured
FrameMaker books
Single or multiple FrameMaker books in
versions earlier than 7
Link FrameMaker book Use RoboHelp as the publishing tool, with
little or no content authoring in RoboHelp
• Define pagination based on either
FrameMaker paragraph formats or custom
markers
• Create context-sensitive Help using custom
markers in FrameMaker
• Convert TOC, index, and glossary
Link FrameMaker books Use RoboHelp as the publishing tool, with
little or no content authoring in RoboHelp
• Define pagination based on either
FrameMaker paragraph formats or custom
markers
• Create context-sensitive Help using custom
markers in FrameMaker
• Convert TOC, index, and glossary
Import FrameMaker books
• Define pagination based on either
FrameMaker paragraph formats or custom
markers
• Create context-sensitive Help using custom
markers in FrameMaker
• Convert TOC, index, and glossary
Independent FrameMaker documents Import FrameMaker documents
Single Word document with a well-shaped
TOC and index
Link Word document
• Define pagination based on either
FrameMaker paragraph formats or custom
markers
• Convert TOC, index, and glossary
• Define pagination based on Word
paragraph styles
• Define context-sensitive Help marker using
the custom footnote option in Word and
use the marker text for context-sensitive
Help
• Convert TOC, index, and glossary
• Use RoboHelp as the publishing tool, with
little or no content authoring in RoboHelp
Last updated 12/23/2013
Page 47

TECHNICAL COMMUNICATION SUITE 4
Using FrameMaker with RoboHelp
Source documents Method to use Options available
44
Multiple Word documents Import the documents
• Define pagination based on Word
paragraph styles
• Define context-sensitive Help marker using
the custom footnote option in Word and
use the marker text for context-sensitive
Help
Mix of FrameMaker books and Word
documents
Link FrameMaker and Word documents
• Define pagination based on FrameMaker
and Word paragraph styles, separately
• Use context-sensitive Help marker in source
documents
Mix of independent FrameMaker and Word
documents
Import the documents
• Define pagination based on FrameMaker
and Word paragraph styles, separately
• Use context-sensitive Help marker in source
documents
Scenarios for updating a RoboHelp project
Source documents Method to use Options available
Single unstructured or Structured
FrameMaker book
Link FrameMaker book
• Define pagination based on either
FrameMaker paragraph formats or custom
markers
• Create context-sensitive Help using custom
markers in FrameMaker
Multiple unstructured or Structured
FrameMaker books
Multiple FrameMaker books or independent
FrameMaker documents
Single Word document with a well-shaped
TOC and index
Multiple Word documents Import the documents
Mix of independent FrameMaker and Word
documents
Link FrameMaker books
Import FrameMaker books and documents
Link Word document
Import the documents
• Define pagination based on either
FrameMaker paragraph formats or custom
markers
• Define pagination based on either
FrameMaker paragraph formats or custom
markers
• Define pagination based on Word
paragraph styles
• Define pagination based on Word
paragraph styles
• Define pagination based on FrameMaker
and Word paragraph styles, separately
More Help topics
“Trade-offs between linking and importing” on page 15
Publishing the current document
Note: This feature is available only if FrameMaker is part of the Adobe Technical Communications Suite.
Last updated 12/23/2013
Page 48

TECHNICAL COMMUNICATION SUITE 4
Using FrameMaker with RoboHelp
You can quickly publish the current document, book, DITA file, or DITAMAP using the Publish option in
FrameMaker. You can select from a set of several online output formats, and then specify the publishing options that
you defined for the FrameMaker- RoboHelp workflow.
If you want to quickly publish the entire book or DITAMAP from FrameMaker, ensure that you have defined the
publishing workflows such as the FrameMaker to RoboHelp style mapping, pagination, and other conversion settings.
In a production environment, create separate RoboHelp projects and Import Settings Files (ISF) for each output
format.
Optionally, you can also specify the DITAVAL file to create output based on conditions specified in the DITAVAL file.
Publish current document
1 Select File > Publish.
2 In the Publish Settings dialog box, select the output format.
3 Select the folder where the published output will be saved. By default, FrameMaker chooses the same location as
the source file.
4 Specify the RoboHelp settings that will be used for the conversion and click Publish.
Note: Even though these settings are not mandatory, to get optimum output, you should specify the relevant settings.
FrameMaker does not alert you to specify these settings when you initiate the Publish action.
45
RoboHelp Project Specify the RoboHelp Project file (XPJ) that you have created.
ISF File Specify the Import Settings File (ISF) that contains the required conversion settings.
Generate a native mobile app
To create a native mobile app, you need to have the following on your computer:
1 PhoneGap SDK
2 Android™ SDK
3 Oracle Java™ SDK
4 Apache Ant
Complete the following steps to publish your content to a native mobile app:
1 Select File > Publish.
2 In the Publish Settings dialog box, select Native Mobile App.
3 Select the folder where the published output will be saved. By default, FrameMaker chooses the same location as
the source file.
4 Specify the RoboHelp settings that will be used for the conversion.
Note: Even though these settings are not mandatory, to get optimum output, you should specify the relevant settings.
FrameMaker does not alert you to specify these settings when you initiate the Publish action.
RoboHelp Project Specify the RoboHelp Project file (XPJ) that you have created.
ISF File Specify the Import Settings File (ISF) that contains the required conversion settings.
5 Locate the settings.xml file at Installdir\fminit\RH_DEFAULT_PROJECT and specify the following options:
Last updated 12/23/2013
Page 49

TECHNICAL COMMUNICATION SUITE 4
Using FrameMaker with RoboHelp
Tag Value
46
PhoneGapFolder Folder on your computer where you’ve downloaded and
LDPIIcon A png file for application icon for LDPI (low) android mobile
MDPIIcon A png file for application icon for MDPI (medium) android
HDPIIcon A png file for application icon for HDPI (high) android mobile
PackageName A unique identifier of the application in addition to the
AppName The name of the application
AppVersionString A version string for the application
JDKPath Folder on your computer where the Oracle Java™ software
AntPath Folder on your computer where you’ve downloaded and
AndroidPath Folder on your computer where the Android™ software
SSLName Name of the SSL of the multiscreen HTML 5 in the RoboHelp
unzipped the PhoneGap software development kit
screen density
mobile screen density
screen density
application’s name, for example com.example.myapp
development kit is installed
unzipped Apache Ant
development kit is installed
project, which you are using for publishing
If you are using the default project shipped with TCS, the SSL
name is Multiscreen_HTML5.
6 Click Publish.
After processing, TCS displays the native mobile application (.apk) file that you circulate among the users for
installing on their mobile devices.
Last updated 12/23/2013
Page 50

Chapter 4: Review and collaboration
Technical Communication Suite includes Acrobat that lets you collaborate on documents. Using Acrobat you can
share PDF files, set up and manage reviews, and collaborate on PDF documents. FrameMaker, RoboHelp, and Adobe
Captivate also let you initiate reviews, so that you can send content for review without exiting the authoring
application.
Reviews
Your reviewers do not require Acrobat to participate in reviews. Create a PDF and use Acrobat to set up a review.
Reviewers can add annotations on the review PDF. Reviewers can use the free Adobe Reader to post annotations on a PDF.
Review types
47
Invite reviewers Annotation Tools Track
Simple PDF Manual
• Adobe Reader: Sticky Note &
Highlight
reviews
No Manual No
Collect Comments Concurrent view of
comments
• Acrobat: All commenting
tools
Reader Extended
PDF
E-mail Review Automatic e-mail All commenting tools Yes Automatic No
Shared Review
using Acrobat.com
Shared review using
internal server
(WebDAV,
Sharepoint, or
shared folder)
Manual All commenting tools No Manual No
Automatic e-mail All commenting tools Yes Automatic Yes
Automatic e-mail All commenting tools
Reviewers need read/write
access to shared location
Yes Automatic Yes
Send documents for review
You can send content for review from within the authoring environments provided by Technical Communication
Suite. RoboHelp, FrameMaker, and Adobe Captivate all provide integrated review functionality so that you can set up
and send content for review without having to leave the applications.
FrameMaker Choose File > Save As Review PDF.
RoboHelp Choose Review > Create PDF for Review.
Adobe Captivate Choose File > Collaborate > Send for Shared Review.
Last updated 12/23/2013
Page 51

TECHNICAL COMMUNICATION SUITE 4
Review and collaboration
Incorporating review comments
Using Technical Communication Suite, you can set up a review from within the authoring environments.
FrameMaker and RoboHelp provide built-in mechanisms to track changes and edits. You can also import the
comments made on a review PDF and import them into source files. To import comments from the review PDF:
FrameMaker Choose File > Import > PDF Comments.
RoboHelp Choose Review > Import Comments from PDF.
Collaboration
Use Collaborate Live to review a PDF with one or more remote users in an online session. In a Collaborate Live session,
the participants view a document with a live chat window. When a participant shares a document, the page number
and magnification are also shared, so that everyone sees the same part of a document.
To start a Collaborate Live session, you must have Acrobat XI installed. Participants in a Collaborate Live session must
have Acrobat XI or Adobe Reader® XI.
48
Last updated 12/23/2013
Page 52

Chapter 5: Working with ExtendScript
In Adobe Technical Communication Suite, you can use scripts to automate many of the features and thus save so much
of time and effort. A script is a set of commands that instructs an application to do a specific task that you perform
manually. These tasks can be simple and affect only one object. For example, setting the table properties in a
FrameMaker body page. These tasks can also be complex and affect many objects in different applications. For
example, setting the dpi properties of images to a predefined value in FrameMaker, import the images to Photoshop,
and do some editing.
In short, scripts automate repetitive tasks and streamline tasks that can be too time consuming to do manually. Adobe
Technical Communication Suite provides ExtendScript ToolKit to develop and debug scripts in many of the
applications in the suite.
ExtendScript toolkit
ExtendScript is based on JavaScript. Use ExtendScript ToolKit (ESTK) to develop and debug ExtendScript. ESTK
provides the following features that make scripting easy:
49
• A built-in syntax checker that verifies whether the syntax is correct and provides possible suggestions
• Support for Object Model Viewer that provides the information on different classes and methods
• Ability to run the script without saving the file
Adobe Technical Communication Suite provides ESTK support for the following components:
• FrameMaker 11
• Media Encoder
• Bridge CS6
• PhotoShop CS6
• RoboHelp 10
Accessing ESTK
Do the following to access ESTK:
1 Click Start > All Programs > Adobe Technical Communication Suite 4> Adobe Extended Toolkit CS 6.
2 In the ESTK window’s top-left drop down-list, select the application for which you prepare the script.
3 Prepare the script using the editor.
4 Run the script using the Play button displayed at the top-right corner.
Last updated 12/23/2013
Page 53

TECHNICAL COMMUNICATION SUITE 4
Working with ExtendScript
ESTK Window
Note: You can also access ESTK from a supported Technical Communication Suite component. Refer to the User's Guide
of the component for more details.
Using object model viewer
Object Model Viewer in ESTK helps you to get the information on different classes and the methods in ExtendScript.
Press F5 or click Help > Object Model Viewer to open Object Model Viewer.
50
Under Browser, select the object model for which you want the information. It displays all the classes in the selected
object model and the details such as type, properties and method, and a short description of the class. It also provides
a search functionality. You can search for a class or a method for which you want the information.
Object Model Viewer
Last updated 12/23/2013
Page 54

TECHNICAL COMMUNICATION SUITE 4
Working with ExtendScript
Preparing scripts
ExtendScript is similar to JavaScript. You can easily develop ExtendScript for any of the applications in Adobe
Technical Communication Suite if you are familiar with JavaScript.
The following sections provide examples for scripts that automates a specific activity in FrameMaker 11 and RoboHelp 10.
Adding text to a FrameMaker document and enabling change bar
The following script adds a sample text to a FrameMaker document and then enables the change bar. Open a
FrameMaker document before running the script.
Copy and paste the script to ESTK and select FrameMaker 11 as the target application. Click the Play button to run the
script.
var doc = app.ActiveDoc
var tl = new TextLoc()
var firstPgf = doc.MainFlowInDoc.FirstTextFrameInFlow.FirstPgf
tl.obj = firstPgf
doc.AddText (tl, "Hello")
doc.AutoChangeBars =1;
51
The script creates a text location using the new TextLoc()method. Assign the first page of the document as the text
location. Using the
AddText() method, add a sample text. Set the AutoChangeBars property to 1 to enable the change bar.
Changing the table properties in a FrameMaker document
The following script changes the left indentation of all the tables in a FrameMaker body page by 1 inch. It also changes
the width of the columns to 2 inches. Open a FrameMaker document that has tables with two columns before running
the script.
var doc =app.ActiveDoc
var flow = doc.MainFlowInDoc
var tbl = 0;
var textItems = flow.GetText(FTI_TblAnchor)
for (var i = 0; i < textItems.len; i += 1)
{
tbl = textItems[i].obj;
tbl.TblLeftIndent = (2*72 * 65536);
var tblColWidths = new Metrics (2 * 72 * 65536, 2 * 72 * 65536);
tbl.TblColWidths = tblColWidths;
}
The script creates the document’s main flow using the MainFlowInDoc method. Use the GetText(FTI_TblAnchor)
method to list all tables in the main flow. Using a for loop, for each table, use the
the left indentation.
Use the TblColWidths() method to change the width of the column. This method accepts the argument in a metric
form. So, create the arguments as a metric object using the
new Metrics()method.
TblLeftIndent()method to change
Note: By convention, there are 72 points per inch. Multiply the inch value with 65536 to get the correct value. 1 inch is
equal to 1 * 72 * 65536 points.
Last updated 12/23/2013
Page 55

TECHNICAL COMMUNICATION SUITE 4
Working with ExtendScript
Importing a FrameMaker document to a RoboHelp project
The following script, while executing, imports a FrameMaker document to a RoboHelp project. Open a FrameMaker
document before executing the script. The script automatically launches RoboHelp.
doc=app.ActiveDoc
var path=doc.Name;
createScript(path)
function createScript(path)
{
script="doc.importFrameMakerDoc (\""+path+"\",\"\",\"\", \"\", false, \"\", \"\");";
sendRoboHelp(script);
}
function sendRoboHelp(script)
{
var bt = new BridgeTalk();
bt.target = "RoboHelp";
bt.body = script;
bt.send();
}
Using the doc variable, create a reference to the active FrameMaker window. Use the Doc.Name property to get the
path of the active FrameMaker window. Call the user-defined
In the function, create the following string:
\"\", false, \"\", \"\");";
script="doc.importFrameMakerDoc (\""+path+"\",\"\",\"\",
createScrip() function by passing the path variable.
52
doc.importFrameMakerDoc is a RoboHelp function that takes the following parameters to import a FrameMaker
document to RoboHelp:
• File path
• Folder name
• FrameMaker TOC file path
• TOC name
• Add index to topics
• Index name
• Glossary name
The example uses default settings to import the document to RoboHelp. Provide document’s path. Provide false for
the Add Index to Topics parameter. As a general JavaScript rule, the quotes in a string are provided inside the escape
character “
is used to connect to a different application in Technical Communication Suite. Using the
the name of the application on which you want to run the script. Use the
want to run. The
\”. The user-defined sendRoboHelp() function invokes RoboHelp. Create a new BridgeTalk object which
target property, provide
body property to provide the script that you
send()method sends the script to the target application and executes the script.
Last updated 12/23/2013
 Loading...