

Page 1

NuDAQ / NuIPC
PCI-7200 / cPCI-7200 / LPCI-7200S
12MB/S High Speed Digital I/ O Card
User’s Manual
Manual Rev. 2.00
Revision Date: March 31, 2006
Part No: 50-11102-1030
Advance Technologies; Automate the World.
Page 2

Copyright 2006 ADLINK TECHNOLOGY INC.
All Rights Reserved.
The information in this document is subject to change without prior
notice in order to improve reliability, design, and function and does
not represent a commitment on the part of the manufacturer.
In no event will the manufacturer be liable for direct, indirect, special, incidental, or consequential damages arising out of the use or
inability to use the product or documentation, even if advised of
the possibility of such damages.
This document contains proprietary information protected by copyright. All rights are reserved. No part of this manual may be reproduced by any mechanical, electronic, or other means in any form
without prior written permission of the manufacturer.
Trademarks
NuDAQ, NuIPC, DAQBench are registered trademarks of ADLINK
TECHNOLOGY INC.
Product names mentioned herein are used for identification purposes only and may be trademarks and/or registered trademarks
of their respective companies.
Page 3
Getting Service from ADLINK
Customer Satisfaction is top priority for ADLINK Technology Inc.
Please contact us should you require any service or assistance.
ADLINK TECHNOLOGY INC.
Web Site: http://www.adlinktech.com
Sales & Service: Service@adlinktech.com
TEL: +886-2-82265877
FAX: +886-2-82265717
Address: 9F, No. 166, Jian Yi Road, Chungho City,
Taipei, 235 Taiwan
Please email or FAX this completed service form for prompt and
satisfactory service.
Company Information
Company/Organization
Contact Person
E-mail Address
Address
Country
TEL FAX:
Web Site
Product Information
Product Model
OS:
Environment
M/B: CPU:
Chipset: BIOS:
Please give a detailed description of the problem(s):
Page 4

Page 5

Table of Contents
Table of Contents..................................................................... i
List of Tables.......................................................................... vi
List of Figures ....................................................................... vii
1 Introduction ........................................................................ 1
1.1 Applications ......................................................................... 1
1.2 Features............................................................................... 2
1.3 Specifications....................................................................... 3
1.4 Supporting Software ............................................................ 5
Programming Library ...................................................... 5
DAQ-LVIEW PnP: LabVIEW® Driver ............................. 6
PCIS-VEE: HP-VEE Driver ............................................. 6
PCIS-OCX: ActiveX Controls .......................................... 6
DASYLabTM PRO .......................................................... 6
PCIS-DDE: DDE Server and InTouchTM ...................... 6
PCIS-ISG: ISaGRAFTM driver ....................................... 7
PCIS-ICL: InControlTM Driver ........................................ 7
PCIS-OPC: OPC Server ................................................. 7
2 Installation .......................................................................... 9
2.1 Contents .............................................................................. 9
2.2 Unpacking.......................................................................... 10
2.3 Device Installation for Windows Systems .......................... 10
2.4 PCI-7200/cPCI-7200/LPCI-7200S Layout ......................... 11
2.5 Hardware Installation Outline............................................. 15
2.6 Connector Pin Assignments .............................................. 16
PCI-7200 Pin Assignments ........................................... 16
cPCI-7200 Pin Assignments ......................................... 18
LPCI-7200S Pin Assignments ...................................... 19
2.7 8254 for Timer Pacer Generation ...................................... 21
2.8 LPCI-7200S PCI Bus Signaling ......................................... 22
2.9 Onboard Pull-ups and Terminations in digital input ........... 22
3 Register Format................................................................ 25
3.1 I/O Registers Format ......................................................... 25
3.2 Digital Input Register (BASE + 10) .................................... 25
Table of Contents i
Page 6

3.3 Digital Output Register (BASE + 14).................................. 26
3.4 DIO Status & Control Register (BASE + 18)...................... 26
3.5 Interrupt Status & Control Register (BASE + 1C) .............. 29
3.6 8254 Timer Registers (BASE + 0) ..................................... 32
4 Operation Theory .............................................................. 33
4.1 Direct Program Control ...................................................... 33
4.2 Timer Pacer Mode ............................................................. 34
4.3 External Clock Mode.......................................................... 35
4.4 Handshaking ...................................................................... 36
4.5 Timing Characteristic ......................................................... 38
5 C/C++ Libraries ................................................................. 41
5.1 Libraries Installation ........................................................... 42
5.2 Programming Guide........................................................... 43
Naming Convention ...................................................... 43
Data Types ................................................................... 43
5.3 _7200_Initial ...................................................................... 44
@ Description ............................................................... 44
@ Syntax ...................................................................... 44
@ Argument .................................................................. 44
@ Return Code ............................................................. 44
5.4 _7200_Switch_Card_No .................................................... 46
@ Description ............................................................... 46
@ Syntax ...................................................................... 46
@ Argument .................................................................. 46
@ Return Code ............................................................. 46
5.5 _7200_AUX_DI .................................................................. 47
@ Description ............................................................... 47
@ Syntax ...................................................................... 47
@ Argument .................................................................. 47
@ Return Code ............................................................. 47
5.6 _7200_AUX_DI_Channel................................................... 48
@ Description ............................................................... 48
@ Syntax ...................................................................... 48
@ Argument .................................................................. 48
@ Return Code ............................................................. 48
5.7 _7200_AUX_DO ................................................................ 49
@ Description ............................................................... 49
@ Syntax ...................................................................... 49
ii Table of Contents
Page 7

@ Argument ................................................................. 49
@ Return Code ............................................................. 49
5.8 _7200_AUX_DO_Channel................................................. 50
@ Description ............................................................... 50
@ Syntax ...................................................................... 50
@ Argument ................................................................. 50
@ Return Code ............................................................. 50
5.9 _7200_DI ........................................................................... 51
@ Description ............................................................... 51
@ Syntax ...................................................................... 51
@ Argument ................................................................. 51
@ Return Code ............................................................. 51
5.10 _7200_DI_Channel............................................................ 52
@ Description ............................................................... 52
@ Syntax ...................................................................... 52
@ Argument ................................................................. 52
@ Return Code ............................................................. 52
5.11 _7200_DO ......................................................................... 53
@ Description ............................................................... 53
@ Syntax ...................................................................... 53
@ Argument ................................................................. 53
@ Return Code ............................................................. 53
5.12 _7200_DO_Channel .......................................................... 54
@ Description ............................................................... 54
@ Syntax ...................................................................... 54
@ Argument ................................................................. 54
@ Return Code ............................................................. 54
5.13 _7200_Alloc_DMA_Mem ................................................... 55
@ Description ............................................................... 55
@ Syntax ...................................................................... 55
@ Argument ................................................................. 55
@ Return Code ............................................................. 56
5.14 _7200_Free_DMA_Mem ................................................... 57
@ Description ............................................................... 57
@ Syntax ...................................................................... 57
@ Argument ................................................................. 57
@ Return Code ............................................................. 57
5.15 _7200_Alloc_DBDMA_Mem .............................................. 58
@ Description ............................................................... 58
@ Syntax ...................................................................... 58
Table of Contents iii
Page 8

@ Argument .................................................................. 58
@ Return Code ............................................................. 58
5.16 _7200_Free_DBDMA_Mem............................................... 59
@ Description ............................................................... 59
@ Syntax ...................................................................... 59
@ Argument .................................................................. 59
@ Return Code ............................................................. 59
5.17 _7200_DI_DMA_Start........................................................ 60
@ Description ............................................................... 60
@ Syntax ...................................................................... 61
@ Argument .................................................................. 62
@ Return Code ............................................................. 63
5.18 _7200_DI_DMA_Status ..................................................... 64
@ Description ............................................................... 64
@ Syntax ...................................................................... 64
@ Argument .................................................................. 64
@ Return Code ............................................................. 64
5.19 _7200_DI_DMA_Stop ........................................................ 65
@ Description ............................................................... 65
@ Syntax ...................................................................... 65
@ Argument .................................................................. 65
@ Return Code ............................................................. 65
5.20 _7200_DblBufferMode ....................................................... 66
@ Description ............................................................... 66
@ Syntax ...................................................................... 66
@ Argument .................................................................. 66
@ Return Code ............................................................. 66
5.21 _7200_CheckHalfReady .................................................... 67
@ Description ............................................................... 67
@ Syntax ...................................................................... 67
@ Argument .................................................................. 67
@ Return Code ............................................................. 67
5.22 _7200_DblBufferTransfer................................................... 68
@ Description ............................................................... 68
@ Syntax ...................................................................... 68
@ Argument .................................................................. 68
@ Return Code ............................................................. 68
5.23 _7200_GetOverrunStatus .................................................. 69
@ Description ............................................................... 69
@ Syntax ...................................................................... 69
iv Table of Contents
Page 9

@ Argument ................................................................. 69
@ Return Code ............................................................. 69
5.24 _7200_DO_DMA_Start...................................................... 70
@ Description ............................................................... 70
@ Syntax ...................................................................... 70
@ Argument ................................................................. 70
@ Return Code ............................................................. 71
5.25 _7200_DO_DMA_Status ................................................... 72
@ Description ............................................................... 72
@ Syntax ...................................................................... 72
@ Argument ................................................................. 72
@ Return Code ............................................................. 72
5.26 _7200_DO_DMA_Stop ...................................................... 73
@ Description ............................................................... 73
@ Syntax ...................................................................... 73
@ Argument ................................................................. 73
@ Return Code ............................................................. 73
5.27 _7200_DI_Timer ................................................................ 74
@ Description ............................................................... 74
@ Syntax ...................................................................... 74
@ Argument ................................................................. 75
@ Return Code ............................................................. 75
5.28 _7200_DO_Timer .............................................................. 76
@ Description ............................................................... 76
@ Syntax ...................................................................... 76
@ Argument ................................................................. 77
@ Return Code ............................................................. 77
6 Double Buffer Mode Principle......................................... 79
7 Limitations ........................................................................ 81
Warranty Policy..................................................................... 83
Table of Contents v
Page 10

List of Tables
Table 2-1: CN1A Pin Assignments .......................................... 19
Table 2-2: CN1B Pin Assignments .......................................... 20
Table 2-3: Pull-ups and termination of PCI/cPCI-7200 and LPCI-
7200S. .................................................................... 22
Table 5-1: Data Types ............................................................. 43
vi List of Tables
Page 11

List of Figures
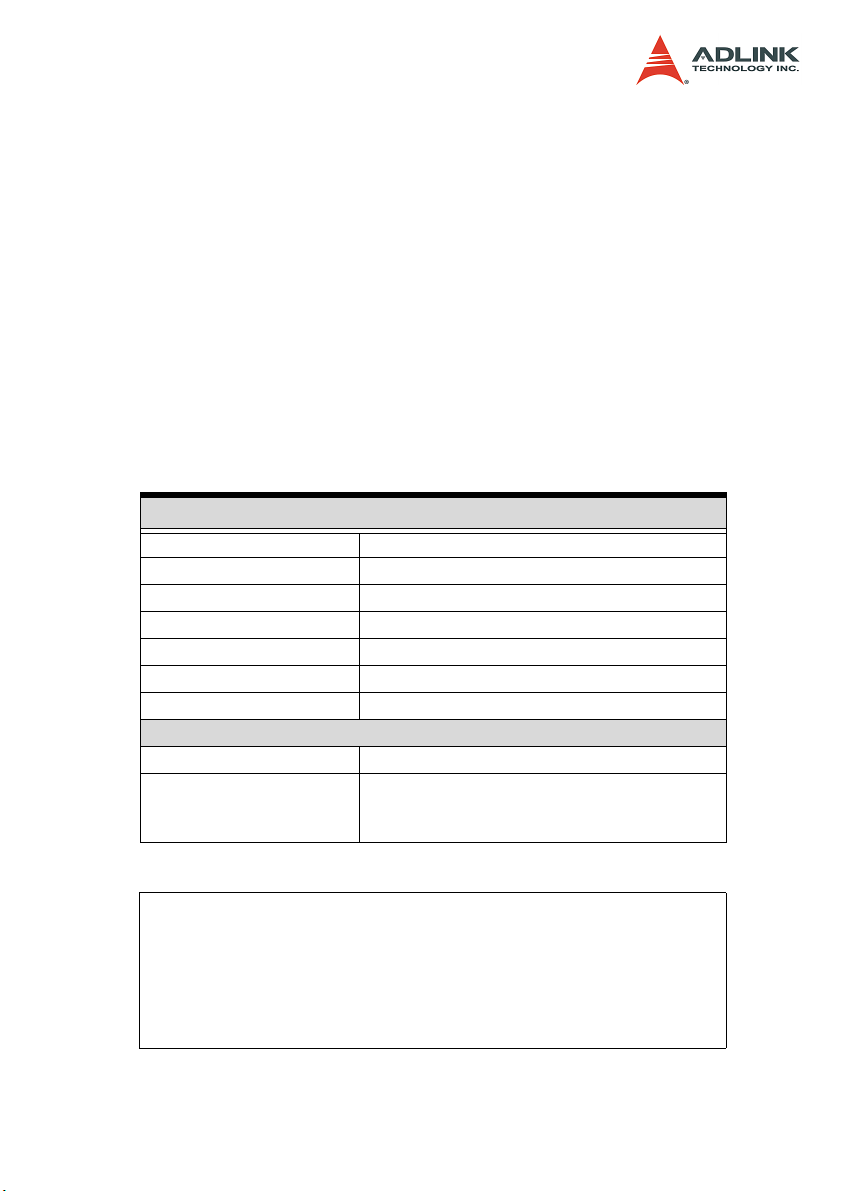
Figure 2-1: PCI-7200 Layout Diagram ....................................... 11
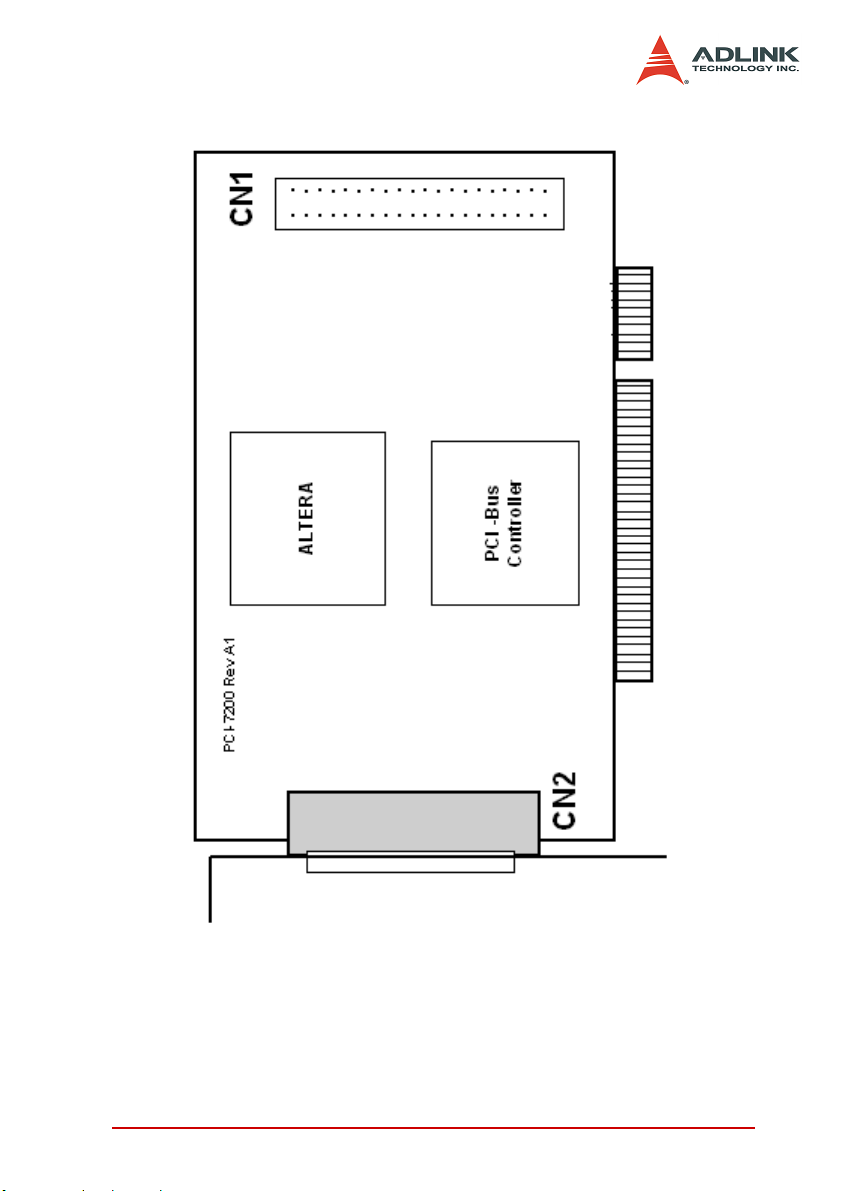
Figure 2-2: cPCI-7200 Layout Diagram ..................................... 12
Figure 2-3: LPCI-7200S Layout Diagram................................... 13
Figure 2-4: LPCI-7200S with standard PCI bracket ................... 14
Figure 2-5: CN1 Pin Assignments.............................................. 17
Figure 2-6: CN2 Pin Assignments.............................................. 17
Figure 2-7: CN Pin Assignments................................................ 18
Figure 2-8: 8254 configuration ................................................... 21
Figure 2-9: Digital input pull-up resistor and termination circuit dia-
gram. ....................................................................... 23
Figure 6-1: Double Buffer Mode................................................. 79
List of Figures vii
Page 12

Page 13

1 Introduction
The PCI-7200, cPCI-7200, and LPCI-7200S are PCI/CompactPCI/
Low profile PCI form factor high-speed digital I/O cards, consisting
of 32 digital input channels, and 32 digital output channels. High
performance design and state-of-the-art technology make this
card suitable for high-speed digital input and output applications.
The PCI-7200 performs high-speed data transfers using bus-mastering DMA via the 32-bit PCI bus architecture. The maximum data
transfer rates can be up to 12MB per second - very suitable for
interfacing high-speed peripherals with your computer system.
Several different digital I/O operation modes are supported:
1. Direct Program Control: the digital inputs and outputs
can be accessed and controlled by its corresponding I/O
ports directly.
2. Timer Pacer Mode: the digital input and output opera-
tions are handled by internal timer pacer clock and transferred by bus mastering DMA.
3. External Clock Mode: the digital input operations are
handled by an external input strobe signal (I_REQ) and
transferred by bus mastering DMA.
4. Handshaking: through the REQ and ACK signals, digi-
tal I/O data can utilize simple handshaking data transfer.
1.1 Applications
X Interface to high-speed peripherals
X High-speed data transfers from other computers
X Digital I/O control
X Interface to external high-speed A/D and D/A converter
X Digital pattern generator
X Waveform and pulse generation
X BCD interface driver
Introduction 1
Page 14

1.2 Features
The PCI-7200 high-speed DIO Card provides the following
advanced features:
X 32 TTL digital input channels
X 32 TTL digital output channels
X Transfer up to 12M Bytes per second
X High output driving and low input loading
X 32-bit PCI bus, Plug and Play
X Onboard internal timer pacer clock
X Internal timer controls input sampling rate
X Internal timer controls digital output rate
X ACK and REQ for handshaking
X Onboard 32-byte FIFO for both digital input and output
X Extra 2k double word digital input FIFO for cPCI-7200
X Four auxiliary digital input and output channels (cPCI-7200
only)
X Diode terminators for 32 input channels and control sig-
nals(cPCI-7200/LPCI-7200S)
X Multiple interrupt sources are selectable by software
2Introduction
Page 15

1.3 Specifications
Digital I/O (DIO)
X Number of DI Channels: 32 TTL compatible
X Number of DO Channels: 32 TTL compatible
X Data Transfer Mode
Z Program I/O
Z Internal timer pacer transfer
Z External I_REG strobe input
Z Handshake data transfer
X Maximum Transfer Speed:
Z 3MHz (12MB/sec) by external clock, handshake or
external strobe
Z 2MHz (8MB/sec) by internal timer pacer transfer
X FIFO:
Z Eight words (32-bit) (for PCI-7200/LPCI-7200S)
Z 2k + 8 words (32-bit) (for cPCI-7200 Digital input chan-
nels)
X Input Voltage:
Z Low: Min. 0V; Max. 0.8V
Z High: Min. +2.0V
X Input Load:
Z Low: +0.5V @ -0.6mA max.
Z High: +2.7V @ +20µA max.
X Output Voltage:
Z Low: Min. 0V; Max. 0.5V
Z High: Min. +2.7V
X Driving Capacity:
Z Low: Max. +0.5V at 24mA (Sink)
Z High: Min. 2.4V at -3.0mA (Source)
Introduction 3
Page 16

Programmable Counter
X Device: 82C54-10, with a 4MHz time base
X Timer 0: DI clock source
X Timer 1: DO clock source
X Timer2: Base clock of Timer #0 and Timer #1
X Pacer Output: 0.00046Hz to 2MHz
General Specifications
X Operating Temperature: 0ºC to 60ºC
X Storage Temperature: -20ºC to 80ºC
X Humidity: 5 to 95%, non-condensing
X Connector:
Z PCI-7200:one 37-pin D-type and one 40-pin ribbon con-
nector
Z cPCI-7200:one 100-pin SCSI-type connector
Z LPCI-7200S: two 68-pin SCSI-type connectors
X Dimension:
Z PCI-7200:Compact size, only 148mm (L) X 102mm (H)
Z cPCI-7200:Standard 3U CompactPCI form factor
Z LPCI-7200S: Low Profile PCI, 167.64mm (L) X 64.41mm
(H)
X Power Consumption:
Z PCI-7200: +5V @ 720 mA typical
Z cPCI-7200: +5V @ 820 mA typical
Z LPCI-7200S: +5V @ 500 mA typical
X PCI signaling environment:
Z PCI-7200: 5V board supports a 5V PCI BUS
Z cPCI-7200: 3U Eurocard form factor, CompactPCI com-
pliant (PICMG 2.0 R2.1)
Z LPCI-7200S: Universal board, supports a 3.3V or 5V PCI
BUS
4Introduction
Page 17

1.4 Supporting Software
ADLINK provides versatile software drivers and packages for
users’ different approach to building a system. We not only provide
programming library for many Windows systems, but also provide
drivers for many software packages including LabVIEW®, HP
TM
VEE
All software options are included in the ADLINK CD. Commercial
software drivers require licenses. Without the software license,
users can still install them and run the demo version for two hours
for demonstration purpose. Please contact an ADLINK dealer to
purchase licenses.
Programming Library
For customers writing customized programs, we provide function
libraries for many different operating systems, including:
, DASYLabTM, InTouchTM, InControlTM, ISaGRAFTM, etc.
X DOS Library: Borland C/C++ and Microsoft C++ (function
descriptions are included in this user’s guide).
X Windows 95 DLL: For VB, VC++, Delphi, BC5 (functions
descriptions are included in this user’s guide).
X PCIS-DASK: Includes device drivers and DLL for Windows
98/NT/2000/XP. The DLL is binary compatible across Windows 98/NT/2000/XP. The developing environment can be
VB, VC++, Delphi, BC5, or any Windows programming language that allows calls to a DLL. The PCIS-DASK user’s
guide and function reference manual are on the CD. Please
refer the PDF manual files under the following directory:
\Manual_PDF\Software\PCIS-DASK
X PCIS-DASK/X: Includes device drivers and a shared library
for Linux. The developing environment can be Gnu C/C++
or any programming language that allows linking to a
shared library. The PCIS-DASK/X user's guide and function
reference manual are on the CD (\Manual_PDF\Software\PCIS-DASK-X).
The above software drivers are shipped with the board. Please
refer to the “Software Installation Guide” to install these drivers.
Introduction 5
Page 18

DAQ-LVIEW PnP: LabVIEW® Driver
DAQ-LVIEW PnP contains the VIs, which are used to interface
with NI’s LabVIEW® software package. The DAQ-LVIEW PnPW
supports Windows 98/NT/2000/XP. The LabVIEW® drivers are
shipped free of charge with the board. These can be installed and
used without license. For further detailed information about DAQLVIEW PnP, please refer to the user’s guide in the CD.
(\\Manual\Software Package\DAQ-LVIEW PnP)
PCIS-VEE: HP-VEE Driver
PCIS-VEE includes the user objects, which are used to interface
with the HP VEE software package. PCIS-VEE supports Windows
95/98/NT. The HP-VEE drivers are shipped free with the board.
Users can install and use them without a license. For detailed
information about PCIS-VEE, please refer to the user’s guide on
the CD.
(\Manual_PDF\Software\PCIS-VEE)
PCIS-OCX: ActiveX Controls
It is recommended that customers who are familiar with ActiveX
controls and VB/VC++ programming to use the PCIS-OCX
ActiveX Control components library for developing applications.
The PCIS-OCX is designed under Windows 98/NT/2000/XP. For
further information on PCIS-OCX, please refer to the user’s guide
in the CD.
(\\Manual\Software Package\PCIS-OCX)
DASYLabTM PRO
DASYLab is an easy-to-use software package that provides easysetup instrument functions such as FFT analysis. Please contact
ADLINK to get DASYLab PRO, which include DASYLab and
ADLINK hardware drivers.
PCIS-DDE: DDE Server and InTouchTM
DDE stands for Dynamic Data Exchange specifications. The
PCIS-DDE includes the PCI cards’ DDE server. The PCIS-DDE
6Introduction
Page 19

server is included on the ADLINK CD. It requires a license. The
DDE server can be used in conjunction with any DDE client under
Windows NT.
PCIS-ISG: ISaGRAFTM driver
The ISaGRAF WorkBench is an IEC1131-3 SoftPLC control program development environment. The PCIS-ISG includes ADLINK
products’ target drivers for ISaGRAF under the Windows NT environment. The PCIS-ISG is included on the ADLINK CD. It requires
a license.
PCIS-ICL: InControlTM Driver
PCIS-ICL is the InControl driver, which support the Windows NT.
The PCIS-ICL is included on the ADLINK CD. It requires a license.
PCIS-OPC: OPC Server
PCIS-OPC is an OPC Server that can link with OPC clients. Many
software packages on the market provide OPC clients. PCIS-OPC
supports Windows NT. It requires a license.
Introduction 7
Page 20

8Introduction
Page 21

2 Installation
This chapter describes how to install the PCI-7200. Package contents and unpacking information are described. Because the PCI7200 is a Plug and Play device, there are no jumper or DIP switch
settings for configuration. The interrupt number and I/O port
address are assigned by the system BIOS during system boot up.
2.1 Contents
In addition to this User's Manual, the package includes the following items:
X PCI-7200 Digital I/O & Counter Card
X ACL-10437: 40-pin to 37-pin D-Sub cable
or
X cPCI-7200 Digital I/O & Counter Module for 3U
X 100-pin SCSI connector assembly
or
X LPCI-7200S Low profile Digital I/O & Cunter Card
X ADLINK CD
X Software Installation Guide
If any of these items is missing or damaged, contact the ADLINK
dealer. Save the shipping materials and carton to ship or store the
product in the future.
Installation 9
Page 22

2.2 Unpacking
The PCI-7200 card contains sensitive electronic components that
can be easily damaged by static electricity.
The work area should have a grounded anti-static mat. The operator should be wearing an anti-static wristband, grounded at the
same point as the anti-static mat.
Inspect the card module carton for obvious damage. Shipping and
handling may cause damage to the module. Ensure there is no
shipping and handling damage on the module before proceeding.
After opening the card module carton, remove the system module
and place it only on a grounded anti-static surface component side
up.
Again inspect the module for damage. Press down on all the socketed IC's to ensure that they are properly seated. Do this only with
the module place on a firm flat surface.
Note: DO NOT APPLY POWER TO THE CARD IF IT HAS BEEN
DAMAGED.
You are now ready to install your PCI-7200.
2.3 Device Installation for Windows Systems
Once Windows 95/98/2000 has started, the Plug and Play function
of Windows system will find the new NuDAQ/NuIPC cards. If this
is the first time to installing NuDAQ/NuIPC cards in this system,
Windows will require device information source. Please refer to
the “Software Installation Guide” for instructions on installing the
device.
10 Installation
Page 23
2.4 PCI-7200/cPCI-7200/LPCI-7200S Layout
Figure 2-1: PCI-7200 Layout Diagram
Installation 11
Page 24
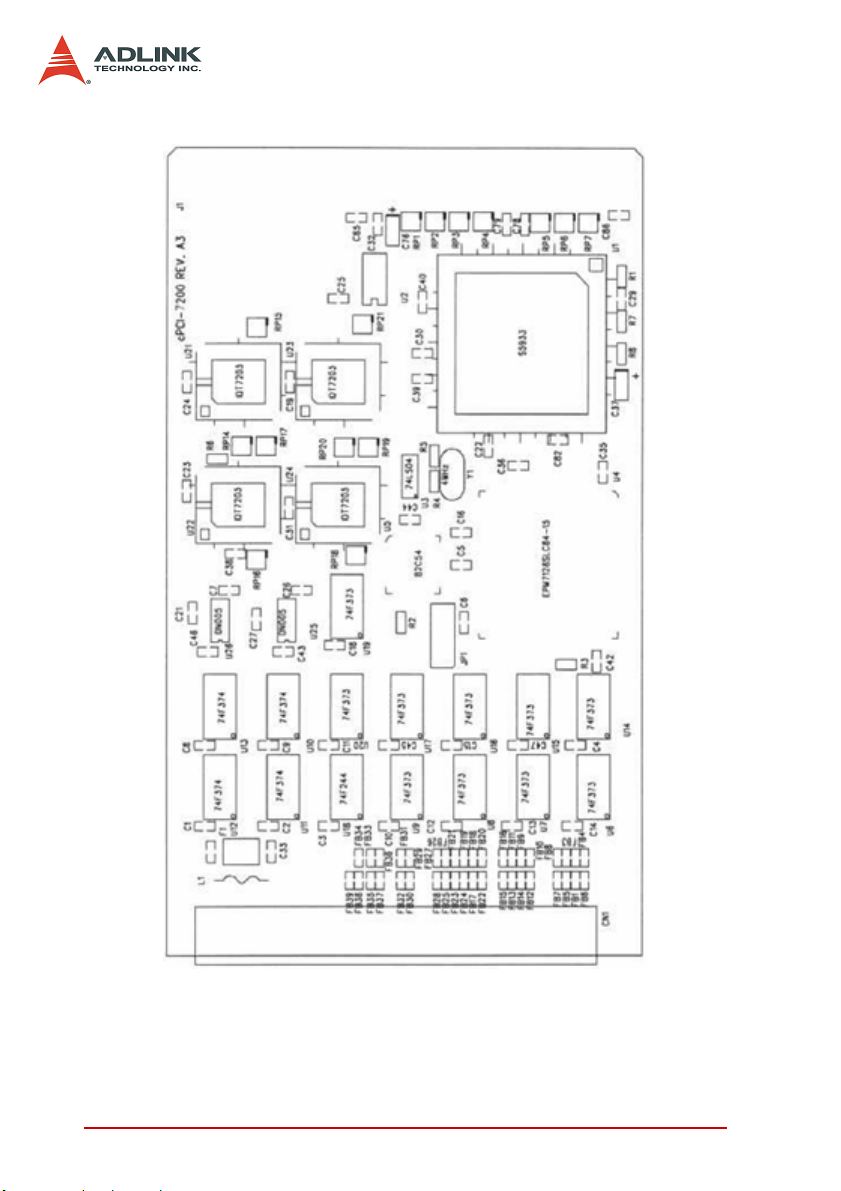
Figure 2-2: cPCI-7200 Layout Diagram
12 Installation
Page 25
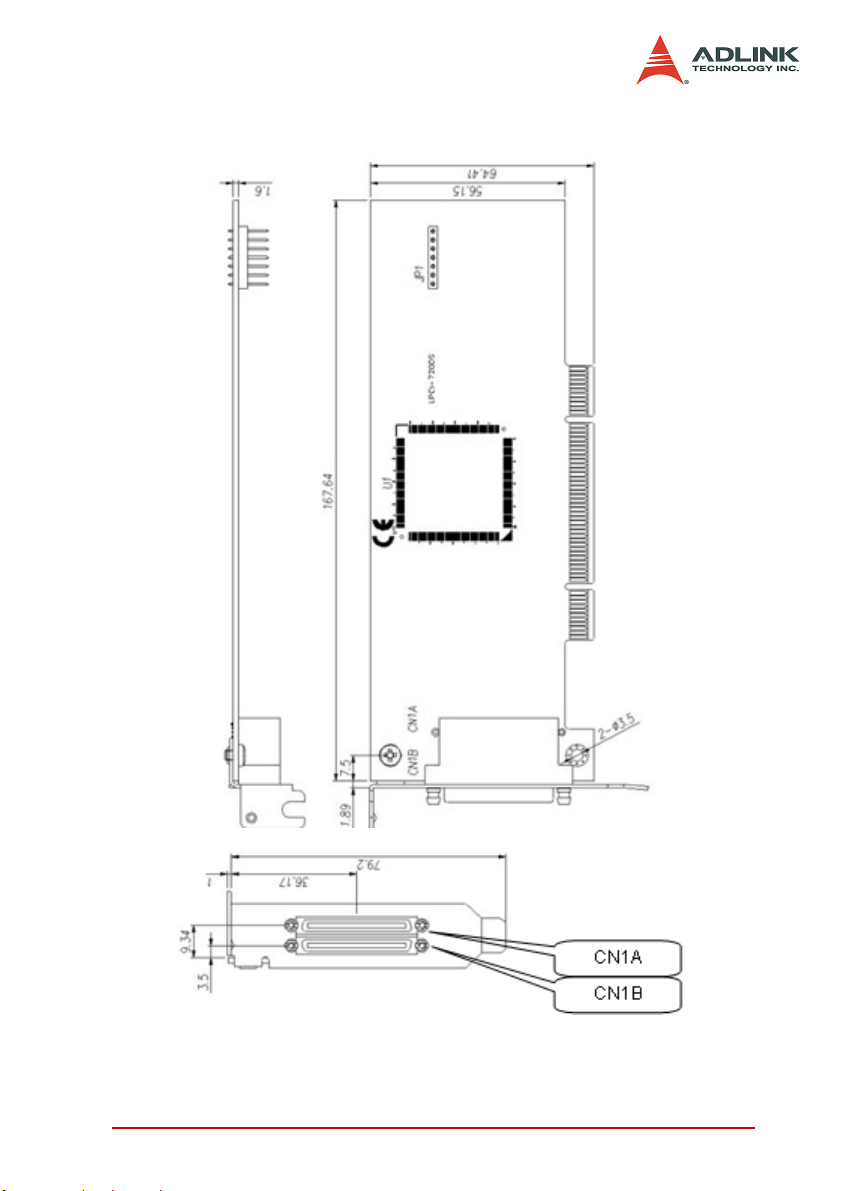
Figure 2-3: LPCI-7200S Layout Diagram
Installation 13
Page 26
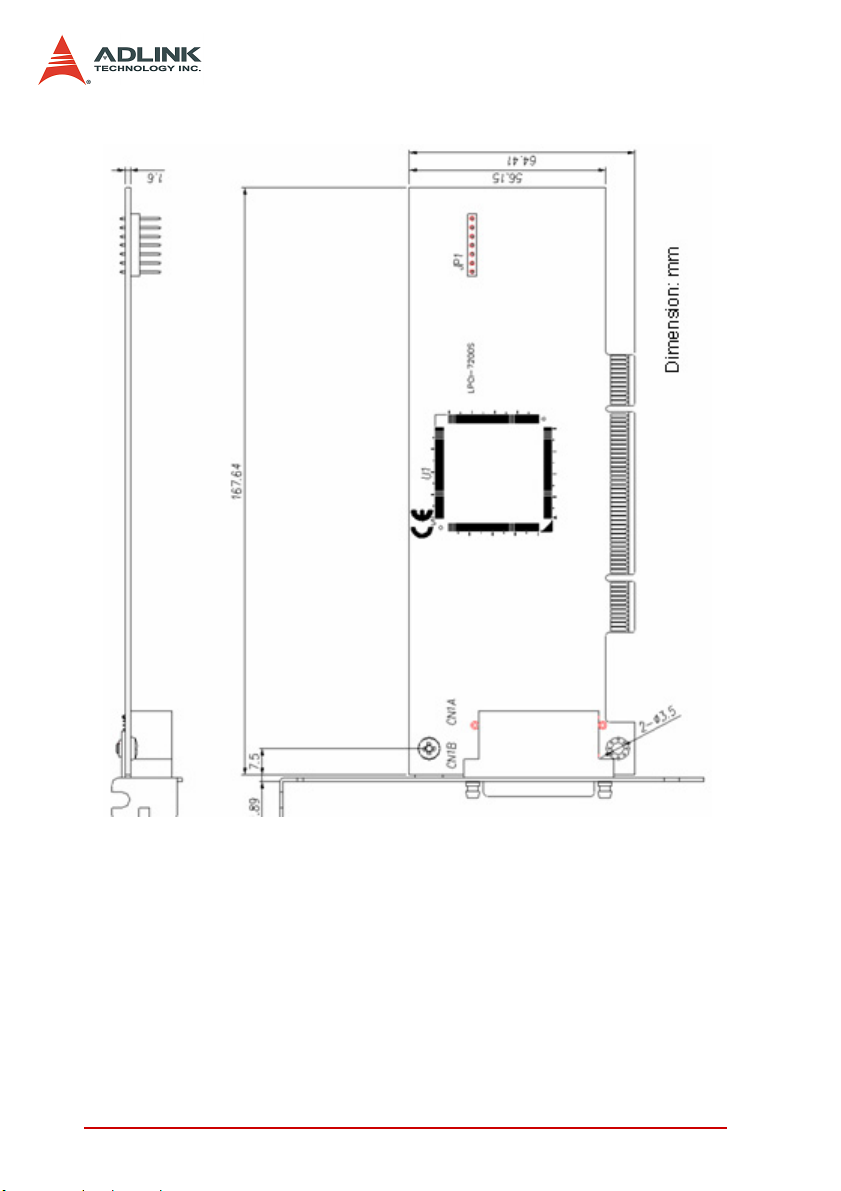
Figure 2-4: LPCI-7200S with standard PCI bracket
14 Installation
Page 27

2.5 Hardware Installation Outline
Hardware configuration
These PCI cards (or CompactPCI, Low Profile PCI cards) are
equipped with a Plug and Play PCI controller that requests
base addresses and interrupts according to PCI standard. The
system BIOS will install the system resource based on the PCI
cards’ configuration registers and system parameters (which
are set by system BIOS). Interrupt assignment and memory
usage (I/O port locations) of the PCI cards can be assigned by
system BIOS only. These system resource assignments are
done on a board-by-board basis. It is not recommended to
assign the system resource by any other methods.
PCI slot selection
The PCI and Low-Profile PCI cards can be inserted to any PCI
slot without any configuration for system resource. CompactPCI peripheral slots are marked with a circle on the backplane.
Please note that the PCI, CompactPCI, and Low-Profile PCI
system board must provide bus-mastering capability to operate
this board well.
Installation Procedure
1. Turn off the computer
2. Turn off all accessories (printer, modem, monitor, etc.)
connected to the computer
3. Remove the cover from your computer
4. Select a 32-bit PCI slot. PCI slots are shorter than the
ISA or EISA slots, and are usually white or ivory in
colour.
5. Before handling the PCI cards, discharge any static
buildup on your body by touching the metal case of the
computer. Hold the edge of the card and do not touch
the components.
6. Position the board into the PCI selected slot.
7. Secure the card in place at the rear panel of the system.
Installation 15
Page 28
2.6 Connector Pin Assignments
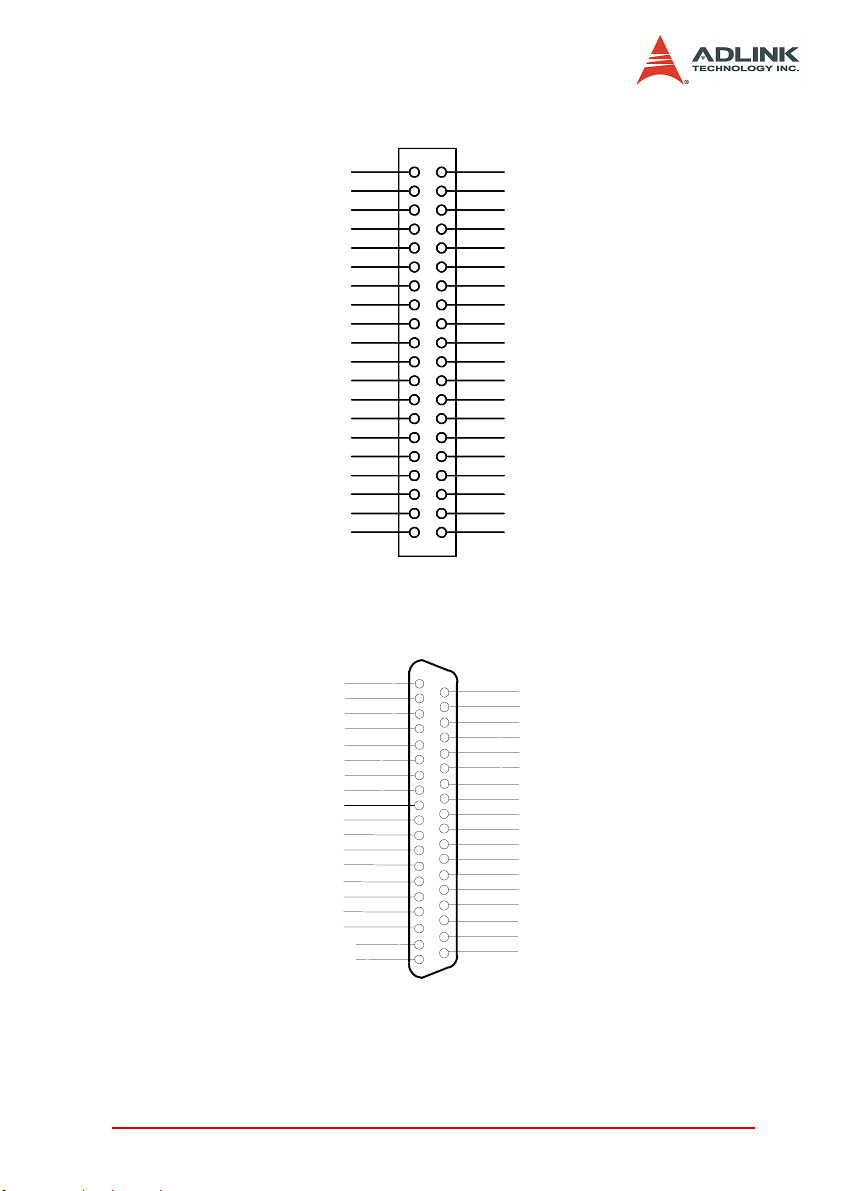
PCI-7200 Pin Assignments
The PCI-7200 comes equipped with one 37-pin D-Sub connector
(CN2) located on the rear mounting plate and one 40-pin female
flat cable header connector (CN1). The CN2 is located on the rear
mounting plate; the CN1 is on front of the board. Refer section 2.4
PCI-7200‘s layout.
CN2 is used for digital inputs (DI 0 to DI 15) and digital outputs
(DO 0 to DO 15) The reminding digital I/O channels DI 16 to DI 31
and DO 16 to DO 31 are on CN1. The pin assignment of CN1 and
CN2 is illustrated in the Figures 2-5 and 2.3.
Legend:
DO n Digital Output CH n
DI n Digital Input CH n
GND Ground
ACK ACK handshaking signal
REQ REQ handshaking signal
I_TRG Input signal to start DI data sampling
O_TRG Output signal can be controlled by software
16 Installation
Page 29
O_ACK
O_ACK
O_REQ
O_REQ
DI16
DI16
DI17
DI17
DI18
DI18
DI19
DI19
DI20
DI20
DI21
DI21
DI22
DI22
DI23
DI23
DI24
DI24
DI25
DI25
DI26
DI26
DI27
DI27
DI28
DI28
DI29
DI29
DI30
DI30
DI31
DI31
+5V
+5V
1
1
1
34
34
3
56
56
56
78
78
78
910
910
910
11 12
11 12
11 12
13 14
13 14
13 14
15 16
15 16
15 16
17
17
17
19
19
19
21
21
21
23 24
23 24
23 24
25 26
25 26
25 26
27 28
27 28
27 28
29
29
29
31
31
31
35
35
35
37
37
37
39 40
39 40
39
N/C
N/C
2
2
DO16
DO16
DO17
DO17
DO18
DO18
DO19
DO19
DO20
DO20
DO21
DO21
DO22
DO22
DO23
DO23
18
18
18
DO24
DO24
20
20
20
DO25
DO25
22
22
22
DO26
DO26
DO27
DO27
DO28
DO28
DO29
DO29
30
30
30
DO30
DO30
32
32
32
DO31
DO31
3433
3433
3433
GND
GND
36
36
36
O_TR1
O_TR1
38
38
38
N/C
N/C
N/C
N/C
Figure 2-5: CN1 Pin Assignments
DI 0
DI 1
DI 2
DI 3
DI 4
DI 5
DI 6
DI 7
DI 8
DI 9
DI10
DI11
DI12
DI13
DI14
DI15
+5V
I_ACK
I_REQ
1
2
3
4
5
6
7
8
9
10
11
12
13
14
15
16
17
18
19
20
DO0
21
DO1
22
DO2
23
DO3
24
DO4
25
DO5
26
DO6
27
DO7
28
DO8
29
DO9
30
DO10
31
DO11
32
DO12
33
DO13
34
DO14
35
DO15
36
GND
37
I_TRG
Figure 2-6: CN2 Pin Assignments
Installation 17
Page 30

cPCI-7200 Pin Assignments
Figure 2-7: CN Pin Assignments
18 Installation
Page 31

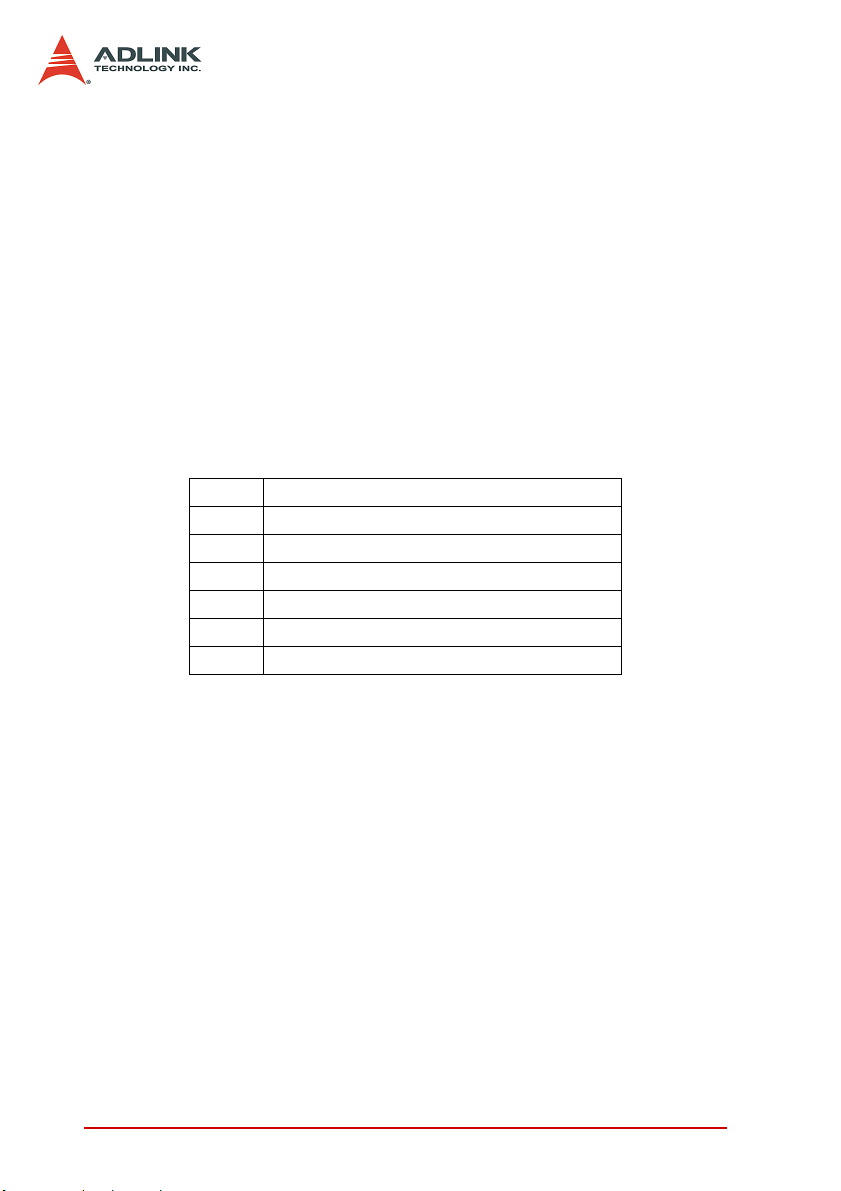
LPCI-7200S Pin Assignments
DIN0 A1 A35 GND
DIN1 A2 A36 GND
DIN2 A3 A37 GND
DIN3 A4 A38 GND
DIN4 A5 A39 GND
DIN5 A6 A40 GND
DIN6 A7 A41 GND
DIN7 A8 A42 GND
DIN8 A9 A43 GND
DIN9 A10 A44 GND
DIN10 A11 A45 GND
DIN11 A12 A46 GND
DIN12 A13 A47 GND
DIN13 A14 A48 GND
DIN14 A15 A49 GND
DIN15 A16 A50 GND
DIN16 A17 A51 GND
DIN17 A18 A52 GND
DIN18 A19 A53 GND
DIN19 A20 A54 GND
DIN20 A21 A55 GND
DIN21 A22 A56 GND
DIN22 A23 A57 GND
DIN23 A24 A58 GND
DIN24 A25 A59 GND
DIN25 A26 A60 GND
DIN26 A27 A61 GND
DIN27 A28 A62 GND
DIN28 A29 A63 GND
DIN29 A30 A64 GND
DIN30 A31 A65 GND
DIN31 A32 A66 GND
I_REQ A33 A67 I_ACK
I_TRG A34 A68 5Vout
Table 2-1: CN1A Pin Assignments
Installation 19
Page 32

DOUT0 B1 B35 GND
DOUT1 B2 B36 GND
DOUT2 B3 B37 GND
DOUT3 B4 B38 GND
DOUT4 B5 B39 GND
DOUT5 B6 B40 GND
DOUT6 B7 B41 GND
DOUT7 B8 B42 GND
DOUT8 B9 B43 GND
DOUT9 B10 B44 GND
DOUT10 B11 B45 GND
DOUT11 B12 B46 GND
DOUT12 B13 B47 GND
DOUT13 B14 B48 GND
DOUT14 B15 B49 GND
DOUT15 B16 B50 GND
DOUT16 B17 B51 GND
DOUT17 B18 B52 GND
DOUT18 B19 B53 GND
DOUT19 B20 B54 GND
DOUT20 B21 B55 GND
DOUT21 B22 B56 GND
DOUT22 B23 B57 GND
DOUT23 B24 B58 GND
DOUT24 B25 B59 GND
DOUT25 B26 B60 GND
DOUT26 B27 B61 GND
DOUT27 B28 B62 GND
DOUT28 B29 B63 GND
DOUT29 B30 B64 GND
DOUT30 B31 B65 GND
DOUT31 B32 B66 GND
O_REQ B33 B67 O_ACK
O_TRG B34 B68 5Vout
Table 2-2: CN1B Pin Assignments
20 Installation
Page 33

2.7 8254 for Timer Pacer Generation
8254 Timer/Counter
4MHz Clock
The internal timer/counter 8254 on the PCI-7200 is configured as
the above diagram (Figure 2.7). Users can use it to generate the
timer pacer for both digital input and digital output triggers.
The digital input timer pacer is from OUT0 (Timer 0), and the digital output timer pacer is from OUT1 (Timer 1). Besides, Timer 0
and Timer 2 can be cascaded together to generate more timer
pacer frequencies for digital input. Also, Timer 2 can be cascaded
with Timer 1 for digital output.
pacer rate = 4MHz / ( C0 * C2)
pacer rate = 4MHz / C0
The maximum pacer signal rate of input and output are 4MHz/2 =
2MHz. The minimum signal rate is 4MHz/65535/65535.
Timer 0
OUT0
Timer 1
OUT1
“H”
“H”
CLK0
GATE0
CLK1
GATE1
Timer 2
CLK2
“H”
GATE2
Figure 2-8: 8254 configuration
if Timer 0 & Timer 2 are cascaded
if timer 0 & Timer 2 are not cascaded
OUT2
Digital Input Timer Pacer
Digital Output Timer Pacer
For example, to get a pacer rate of 2.5kHz, set C0 = 40 and C2 =
40. That is 2.5kHz = 4MHz / (40 x 40)
Installation 21
Page 34

2.8 LPCI-7200S PCI Bus Signaling
Low-Profile PCI is a new PCI card standard for space-constrained
system designs. The new form factor has the same electrical protocols, PCI signals, and software drivers as standard PCI v2.2
expansion cards. However, the Low-Profile PCI bus interface only
supports 3.3V signaling. To support both 5V and 3.3V signaling,
LPCI-7200S implements 5V I/O tolerant bus switches to achieve
the I/O voltage transition. This allows LPCI-7200S to be used in
both 5V and 3.3V systems.
2.9 Onboard Pull-ups and Terminations in digital input
The PCI-7200, cPCI-7200 and LPCI-7200S have 32 digital input
channels. Onboard pull-ups and terminations for digital input circuits may be needed for some applications. The pull-ups guarantee a fixed input state when external connections are floating.
Schottky terminations can minimize undershoot/overshoot disturbances caused by reflection noise on high-speed bus lines. Table
2.1 lists the pull-ups and termination status of PCI-7200, cPCI7200 and LPCI-7200S. Figure 2.8 is the illustration of the pull-up
resistor and terminations on-board.
Pull-up resistor Terminations
PCI-7200 None None
cPCI-7200 None Schottky diode clamped to ground & power
LPCI-7200S
10kΩ
Schottky diode clamped to ground & power
Table 2-3: Pull-ups and termination of PCI/cPCI-7200 and LPCI-7200S.
22 Installation
Page 35

Figure 2-9: Digital input pull-up resistor and termination circuit diagram.
Installation 23
Page 36

24 Installation
Page 37

3 Register Format
3.1 I/O Registers Format
The PCI-7200 occupies eight consecutive 32-bit I/O addresses in
the PC I/O address space. The cPCI-7200 occupies nine consecutive 32-bit I/O addresses. Table 4-1 shows the I/O Map.
Address Read Write
Base + 0 Counter 0 Counter 0
Base + 4 Counter 1 Counter 1
Base + 8 Counter 2 Counter 2
Base + C --- CLK Control CW0
Base + 10 Digital Input Reg. ---
Base + 14 Digital Output (Read-back) Digital Output Reg.
Base + 18 DIO Status & Control DIO Status &Control
Base + 1C INT Status & Control INT Status & Control
Base + 20 (cPCI-7200 only) AUXDIO Reg. AUXDO Reg.
Note: (1) I/O port is 32-bits wide
(2) 8-bit or 16-bit I/O access is not allowed
3.2 Digital Input Register (BASE + 10)
32 digital input channels can be read from this register
Address: BASE + 10
Attribute: READ Only
Data Format:
Byte 7 6 5 4 3 2 1 0
Base +10 DI7 DI6 DI5 DI4 DI3 DI2 DI1 DI0
Base +11 DI15 DI14 DI13 DI12 DI11 DI10 DI9 DI8
Base +12 DI23 DI22 DI21 DI20 DI19 DI18 DI17 DI16
Base +13 DI31 DI30 DI29 DI28 DI27 DI26 DI25 DI24
Register Format 25
Page 38

3.3 Digital Output Register (BASE + 14)
32 digital output channels can be written and read to/from this register
Address: BASE + 14
Attribute: READ/WRITE
Data Format:
Byte 7 6 5 4 3 2 1 0
Base +14 DO7 DO6 DO5 DO4 DO3 DO2 DO1 DO0
Base +15 DO15 DO14 DO13 DO12 DO11 DO10 DO9 DO8
Base +16 DO23 DO22 DO21 DO20 DO19 DO18 DO17 DO16
Base +17 DO31 DO30 DO29 DO28 DO27 DO26 DO25 DO24
The digital output status can be read back through the same location (BASE + 14)
3.4 DIO Status & Control Register (BASE + 18)
The data transfer mode of digital input is controlled and status is
checked through this register.
Address: BASE + 18
Attribute: READ/WRITE
Data Format:
Byte 7 6 5 4 3 2 1 0
Base +18 O_ACK DIN_EN I_TRG TRGPL I_FIFO I_TIME0 I_REQ I_ACK
Base +19 ---- I_OVER ---- ---- O_TRG O_FIFO O_TIME1 O_REQ
Base +20 ---- ---- ---- ---- ---- ---- ---- O_UND
Base +21 ---- ---- ---- ---- ---- ---- ---- ----
X Digital Input Mode Setting:
I_ACK: Input ACK Enable
1: Input ACK is enabled (input ACK will be asserted after input data is read by CPU or written to input FIFO)
0: Input ACK is disabled
26 Register Format
Page 39

I_REQ: Input REQ Strobe Enabled
1: Use I_REQ edge to latch input data
0: I_REQ is disabled
I_TIME0: Input Timer 0 Enable
1: Input is sampled by falling edge of Counter 0 output
(COUT0)
0: Input Timer 0 is disabled
I_FIFO: Input FIFO Enable Mode
1: Input FIFO is enabled (input data is saved to input FIFO)
0: Input FIFO is disabled
TRGPOL: Input Trigger Polarity
1: I_TRG is Rising Edge Active
0: I_TRG is Falling Edge Active
I_TRG: External Trigger Enable
1: Wait until I_TRG signal is active, digital input sampling will
begin after a rising or falling edge of I_TRG
0: Start input sampling immediately (if input control register
is set)
DIN_EN: Digital Input Enable
1: Digital Input Enable
0: Digital Input Disabled, when this bit is set as 0, all digital
input operation will be stopped
X Digital Output Mode Setting:
O_ACK: Output ACK Enable
1: Output ACK is enabled; the output circuit will wait for
O_ACK after O_REQ strobe is asserted
0: Output ACK is disabled
O_REQ: Output REQ Enable
1: Output REQ is enabled; an O_REQ strobe will be generated after output data is ready
0: Output REQ is disabled
O_TIME1: Output Timer 1 Enable
1: Output Timer 1 is enabled; output data is moved from out-
Register Format 27
Page 40

put FIFO to DO registers when output of Counter1 goes low
0: Output Counter 1 is disabled
O_FIFO: Output FIFO Enable
1: Output FIFO is enabled (output data is moved from output
FIFO)
0: Output FIFO is disabled
O_TRG: Digital Output Trigger Signal
This bit is used to control the O_TRG output of PCI-7200; the
signal is on CN1 pin 36 of PCI-7200, CN1 pin 26 of cPCI7200, CN2 pin 34 of LPCI 7200S when
1: O_TRG 1 goes High (1)
0: O_TRG 1 goes Low (0)
X Digital I/O FIFO Status:
I_OVR: Input data overrun
1: Digital Input FIFO is full (overrun) during input data transfer
0: No input data overrun occurred
Input data overrun occurred, the I_OVR bit is set when input
FIFO is full and there is new input data coming in. This bit
can be cleared by writing “1” to it.
O_UND: Output data FIFO is underrun
1: Output FIFO is empty during output data transfer
0: No output data underrun occurred
Output data underrun, the O_UND bit is set when output
FIFO is empty and the output request for new data, this bit
can be cleared by writing “1” to it.
28 Register Format
Page 41

3.5 Interrupt Status & Control Register (BASE + 1C)
The interrupt mode/status is set/checked through this register.
Address: BASE + 1C
Attribute: READ/WRITE
Data Format:
Byte 7 6 5 4 3 2 1 0
Base +1C SI_TO SI_REQ SO_ACK T2_EN T1_EN T0_EN II_REQ IO_ACK
Base +1D FIFOFF FIFOEF FIFORST REQ_NEG T1_T2 T0_T2 SI_T2 SI_T1
Base +1E ---- ---- ---- ---- ---- ---- ---- ----
Base +1F ---- ---- ---- ---- ---- ---- ---- ----
X Interrupt Control:
With the PCI-7200, interrupts can be triggered by many signal sources such as O_ACK, I_REQ, timer 0, timer 1, and
timer 2. The following bits control the interrupt source:
IO_ACK: Interrupt is triggered by O_ACK signal.
1: O_ACK interrupt is enabled
0: O_ACK interrupt is disabled
II_REQ: Interrupt is triggered by I_REQ signal.
1: I_REQ interrupt is enabled
0: I_REQ interrupt is disabled
T0_EN: Interrupt is triggered by timer 0 output.
1: Timer 0 interrupt is enabled
0: Timer 0 interrupt is disabled
T1_EN: Interrupt is triggered by timer 1 output.
1: Timer 1 interrupt is enabled
0: Timer 1 interrupt is disabled
T2_EN: Interrupt is triggered by timer 2 output.
1: Timer 2 interrupt is enabled
0: Timer 2 interrupt is disabled
X Interrupt Status:
Register Format 29
Page 42

The following bits are used to check interrupt status:
SO_ACK: Status of O_ACK interrupt
1: O_ACK Interrupt occurred
0: No O_ACK interrupt
SI_REQ: Status of I_REQ interrupt
1: I_REQ Interrupt occurred
0: No I_REQ Interrupt
SI_T0: Status of timer 0 interrupt
1: OUT0 (output of timer 0) Interrupt occurred
0: No timer 0 Interrupt
SI_T1: Status of timer 1 interrupt
1: OUT1 (output of timer 1) Interrupt occurred
0: No timer 1 Interrupt
SI_T2: Status of timer 2 interrupt
1: OUT2 (output of timer 2) interrupt occurred
0: No timer 2 Interrupt
Note: Writing “1” to the corresponding bit of the register can clear
all interrupt statuses. In order to make the interrupt work
properly, the interrupt service routine has to clear all the interrupt status before end of the ISR.
X Timer Configuration Control:
The 8254 timer on the PCI-7200 can be configured as either
timer 0 cascaded with timer 2 or timer 1 cascaded with timer
2. These configurations are controlled by the following bits:
T0_T2: Timer 0 is cascaded with timer 2
1: Timer 0 and timer 2 are cascaded together; output of timer
2 connects to the clock input of timer 0.
0: Not cascaded, the 4MHz clock is connected to the timer 0
clock input.
T1_T2: Timer 1 is cascaded with timer 2
1: Timer 1 and timer 2 are cascaded together; output of timer
2 connects to the clock input of timer 1.
0: Not cascaded, the 4MHz clock is connected to the timer 1
30 Register Format
Page 43

clock input.
X I_REQ Polarity Selection:
When the input sampling is controlled by the I_REQ signal
only, the I_REQ can be programmed to be rising edge active
or falling edge active.
REQ_NEG: I_REQ trigger polarity
1: latch input data on falling edge of I_REQ
0: latch input data on rising edge of I_REQ
X FIFO Control and Status (cPCI-7200 only):
The cPCI-7200 has an extra 2k samples digital input FIFO.
The FIFO can be cleared and monitored by the following bits:
FIFORST (Write only): Clear the on-board DI FIFO
1: Write 1 to clear the data of the FIFO.
0: No operation.
FIFOEF (Read only): Empty flag of the DI FIFO
1: DI FIFO is empty.
0: DI FIFO is not empty.
FIFOFF (Read only): Full flag of the DI FIFO
1: DI FIFO is full.
0: DI FIFO is not full.
Note: The cPCI-7200 has two cascaded DI FIFOs. One is located
in the PCI controller chip, the other one is on the PCI-7200
board. The above bits only control the onboard FIFO. In order to control the on-chip FIFO, please refer to the AMCC5933 data book.
Register Format 31
Page 44

3.6 8254 Timer Registers (BASE + 0)
The 8254 timer/counter IC occupies four I/O address. Users can
refer to Tundra's or Intel's data sheet for a full description of the
8254 features. Download the 8254 data sheet from the following
web site:
http://support.intel.com/support/controllers/peripheral/231164.htm
or
http://www.tundra.com (for Tundra’s 82C54 datasheet).
Address Read Write
Base + 0 Counter 0 Counter 0
Base + 4 Counter 1 Counter 1
Base + 8 Counter 2 Counter 2
Base + C --- CLK Control CW0
32 Register Format
Page 45

4 Operation Theory
In PCI-7200, there are four data transfer modes can be used for
digital I/O access and control, these modes are:
1. Direct Program Control: the digital inputs and outputs
can be read/written and controlled by its corresponding I/
O port address directly.
2. Internal Timer Pacer Mode: the digital input and output
operations are paced by an internal timer pacer and are
transferred by bus mastering DMA.
3. External Clock Mode: the digital input operation is
clocked by external I_REQ strobe and transferred by bus
mastering DMA.
4. Handshaking: through REQ and ACK signals, the digital
I/O can have simple handshaking data transfers.
4.1 Direct Program Control
Digital I/O operations can be controlled by I/O port BASE+10 for
digital input and BASE+14 for digital output.
The I/O port address BASE is assigned by system BIOS, please
refer to Section 5 for a more detailed description.
The digital OUT operation is:
outport (BASE+14, 0xAAAAAAAA) // (A : 0 to F)
The digital IN operation is:
value = inport (BASE+10) // The input status
is save in the // value variable
Operation Theory 33
Page 46

4.2 Timer Pacer Mode
The digital I/O access control is clocked by timer pacer, which is
generated by an interval programming timer/counter chip (8254).
There are three timers on the 8254. Timer 0 is used to generate
timer pacer for digital input and timer 1 is used for digital output.
The configuration is illustrated as below.
“H”
8254 Timer/Counter
CLK0
GATE0
CLK1
GATE1
“H”
Timer 0
Timer 1
OUT0
OUT1
Digital Input Timer Pacer
Digital Output Timer Pacer
4MHz Clock
“H”
CLK2
GATE2
Timer 2
OUT2
The operation sequences are:
1. Define the frequency (timer pacer rate)
2. The digital input data are saved in FIFO after a timer
pacer pulse is generated. The sampling is controlled by
timer pacer.
3. The data saved in FIFO will be transferred to main memory of the computer system directly and automatically.
This is controlled by bus mastering DMA control, this
function is supported by PCI controller chip.
The operation flow is show as following:
34 Operation Theory
Page 47

4.3 External Clock Mode
The digital input is clocked by external strobe, which is from Pin 19
(I_REQ) of CN2 (PCI-7200), Pin 24 of CN1 (cPCI-7200), or PIN 33
of CN1A (LPCI-7200S). The operation sequence is very similar to
the Timer Pacer Trigger. The only difference is the clock source.
1. The external input strobe is generated from outside
device, and goes through the Pin 19 (I_REQ) of CN2 to
latch the digital input.
2. The digital input data is saved in FIFO after an I/O strobe
signal is coming in.
3. The data saved in input FIFO will be transferred to main
memory on your computer system directly. This is controlled by bus mastering DMA control, this function is
supported by PCI.
1
Pin 19 of CN2
To Digital Input Trigger
Latch Digital
Input Data
2
3
PC's Main Memory
Bus mastering
DMA data Transfer
Operation Theory 35
Digital Input FIFO
Page 48

4.4 Handshaking
The PCI-7200 also supports a handshaking digital I/O transfer
mode. That is, after input data is ready, an I_REQ is sent from an
external device, and I_ACK will go high to acknowledge the data
already accessed.
I_REQ & I_ACK for Digital Input
1. Digital Input Data is ready.
2. An I_REQ signal is generated for digital input operation.
3. Digital input data is saved to FIFO.
4. An I_ACK signal is generated and sent to an outside
device.
5. If the FIFO is not empty and PCI bus is not occupied, the
data will be transferred to main memory.
IN_REQ
IN_ACK
PC's Main Memory
2
DMA data Transfer
5
Digital Input DATA
1
Latch Digital Input
or Digital Output
4
Digital Input FIFO Bus mastering
3
36 Operation Theory
Page 49

O_REQ & O_ACK for Digital Output
1. Digital Output Data is moved from PC memory to FIFO
of PCI-7200 by using DMA data mastering data transfer.
2. Move output data from FIFO to digital output circuit.
3. Output data is ready.
4. An O_REQ signal is generated and sent to outside
device.
5. After an O_ACK is captured, steps 2-5 will be repeated.
** If the FIFO is not full, the output data is moved form PC‘s
main memory to FIFO automatically.
O_REQ
O_ACK
PC's Main
Memory
4
5
Bus mastering
DMA data Transfer
1
Digital Output DATA
Move Data to
Digital Output
Digital Output FIFO
3
2
Operation Theory 37
Page 50

4.5 Timing Characteristic
1. I_REQ as input data strobe (Rising Edge Active)
h
t
IN_ I_REQ
l
t
cyc
t
s
t
valid data
t
n
D10~DI31
th ≥ 60ns tI ≥ 60ns tCYC ≥ 5 PCI CLK Cycle
ts ≥ 2ns tn ≥ 30ns
2. I_REQ as input data strobe (Falling Edge Active)
h
IN_R I_REQ
D10~DI31
t
t
valid data
s
t
t
n
th
≥ 60ns tI ≥ 60ns tCYC ≥ 5 PCI CLK Cycle
ts ≥ 2ns tn ≥ 30ns
cyc
l
t
valid data
valid data
38 Operation Theory
Page 51

3. I_REQ & I_ACK Handshaking
IN I_REQ
IN I_ACK
D10~DI31
t4t3
valid data
t1
t2
t1 ≥ 0ns t5 ≥ 60ns t3 ≥ 2 PCI CLK Cycle
t2 ≥ 0ns t4 ≥ 1 PCI CLK Cycle
t5
valid data
Note: I_REQ must be asserted until I_ACK asserts, I_ACK will be
asserted until I_REQ de-asserts.
4. O_REQ as output data strobe
ts
≥ 19ns th ≥ 2 PCI CLK Cycles Tcyc ≥ 500ns
5. O_REQ & O_ACK Handshaking
Note: O_ACK must be de-asserted before O_REQ asserts,
O_ACK can be asserted any time after O_REQ asserts,
O_REQ will be reasserted after O_ACK is asserted.
Operation Theory 39
Page 52

40 Operation Theory
Page 53

5 C/C++ Libraries
This chapter describes the software library for operating the card.
Only the functions in DOS library and Windows 95 DLL are
described. Please refer to the PCIS-DASK function reference
manual, included on the ADLINK CD, for descriptions of the Windows 98/NT/2000 DLL functions.
The function prototypes and some useful constants are defined in
the header files LIB directory (DOS) and INCLUDE directory (Windows 95). For the Windows 95 DLL, the developing environment
can be Visual Basic 4.0 or above, Visual C/C++ 4.0 or above, Borland C++ 5.0 or above, Borland Delphi 2.x (32-bit) or above, or
any Windows programming language that allows calls to a DLL. C/
C++, VB, and Delphi files are included.
C/C++ Libraries 41
Page 54

5.1 Libraries Installation
Please refer to the “Software Installation Guide” for the detailed
information about how to install the software libraries for DOS, or
Windows 95 DLL, or PCIS-DASK for Windows 98/NT/2000.
Device drivers and DLL functions of Windows 98/NT/2000 are
included in the PCIS-DASK. Please refer to the PCIS-DASK
user’s guide and function reference, which included on the
ADLINK CD, for detailed programming information.
42 C/C++ Libraries
Page 55

5.2 Programming Guide
Naming Convention
The functions of the NuDAQ PCI cards or NuIPC CompactPCI
cards’ software drivers use full-names to represent the functions'
real meaning. The naming convention rules are:
In DOS:
_{hardware_model}_{action_name}. e.g. _7200_Initial().
All functions in the PCI-7200 driver are named with 7200 as
{hardware_model}. But they can be used by PCI-7200, cPCI-7200
and LPCI-7200S.
In order to recognize the difference between DOS library and Windows 95 library, a capital "W" is put on the head of each function
name of the Windows 95 DLL driver (e.g. W_7200_Initial()).
Data Types
Some data types are defined in Pci_7200.h (DOS) and Acl_pci.h
(Windows 95). These data types are used by NuDAQ Cards’
library. We suggest using these data types. The following table
shows the data type names and their range.
Typ e N ame Description Range
U8 8-bit ASCII character 0 to 255
I16 16-bit signed integer -32768 to 32767
U16 16-bit unsigned integer 0 to 65535
I32 32-bit signed integer -2147483648 to 2147483647
U32 32-bit single-precision floating-point 0 to 4294967295
F32 32-bit single-precision floating-point -3.402823E38 to 3.402823E38
F64 64-bit double-precision floating-point
Boolean Boolean logic value TRUE, FALSE
Table 5-1: Data Types
-1.797683134862315E308 to
1.797683134862315E309
C/C++ Libraries 43
Page 56

5.3 _7200_Initial
@ Description
A PCI-7200 card is initialized according to the card number.
Because the PCI-7200 is PCI bus architecture and meets the Plug
and Play design, the IRQ and base_address (pass-through
address) are assigned by system BIOS directly. Every PCI-7200
card has to be initialized by this function before calling other functions.
Note: Because the configuration of PCI-7200 is handled by the
system, there are no jumpers or DMA selection on the PCI
boards that need to be set up by the users.
@ Syntax
Visual C++ (Windows 95)
int W_7200_Initial (U8 card_number, U16
*base_addresss, U8 *irq_no)
Visual Basic (Windows 95)
W_7200_Initial (ByVal card_number As Byte,
base_addresss As Integer, irq_no As Byte) As
Long
C/C++ (DOS)
int _7200_Initial (U8 card_number, U16
*base_addresss, U8 *irq_no)
@ Argument
card_number: the card number to be initialized, only four cards
can be initialized, the card number must be CARD_1, CARD_2,
CARD_3 or CARD_4.
base_address: the I/O port base address of the card, it is
assigned by the system BIOS.
irq_no: the system will give an available interrupt number to this
card automatically.
@ Return Code
ERR_NoError
ERR_InvalidBoardNumber
44 C/C++ Libraries
Page 57

ERR_PCIBiosNotExist
ERR_PCICardNotExist
ERR_PCIIrqNotExist
ERR_BaseAddressError
C/C++ Libraries 45
Page 58

5.4 _7200_Switch_Card_No
@ Description
After initializing more than one PCI-7200 card, this function is
used to select which card is currently used.
@ Syntax
Visual C++ (Windows 95)
int W_7200_Switch_Card_No (U8 card_number)
Visual Basic (Windows 95)
W_7200_Switch_Card_No (ByVal card_number As Byte)
As Long
C/C++ (DOS)
int _7200_Switch_Card_No (U8 card_number)
@ Argument
card_number: The card number to be initialized, four cards can
be initialized, the card number must be CARD_1, CARD_2,
CARD_3, or CARD_4, but only one card is active.
@ Return Code
ERR_NoError
ERR_InvalidBoardNoInit
46 C/C++ Libraries
Page 59

5.5 _7200_AUX_DI
@ Description
Read data from auxiliary digital input port of cPCI-7200 card. All
four bits input data can be found by using this function.
@ Syntax
Visual C++ (Windows 95)
int W_7200_AUX_DI (U32 *aux_di)
Visual Basic (Windows 95)
W_7200_DI (aux_di As Long) As Long
C/C++ (DOS)
int _7200_DI (U32 *aux_di)
@ Argument
aux_di: returns 4-bit value from auxiliary digital input port.
@ Return Code
ERR_NoError
ERR_FunctionNotAvailable
C/C++ Libraries 47
Page 60

5.6 _7200_AUX_DI_Channel
@ Description
Read data from the auxiliary digital input channel of cPCI-7200
card. There are four digital input channels on the cPCI-7200 auxiliary digital input port. When performing this function, the auxiliary
digital input port is read and the value of the corresponding channel is returned.
* channel means each bit of digital input port.
@ Syntax
Visual C++( Windows 95)
int W_7200_AUX_DI_Channel (U8 di_ch_no, Boolean
*aux_data)
Visual Basic (Windows 95)
W_7200_AUX_DI_Channel (ByVal di_ch_no As Byte,
aux_data As Byte) As Long
C/C++ ( DOS)
int _7200_AUX_DI_Channel (U8 di_ch_no, Boolean
*aux_data)
@ Argument
di_ch_no: the DI channel number, the value is between 0 and 3.
aux_data: return value, either 0 or 1.
@ Return Code
ERR_NoError, ERR_InvalidDIChannel,
ERR_FunctionNotAvailable
48 C/C++ Libraries
Page 61

5.7 _7200_AUX_DO
@ Description
Write data to auxiliary digital output port. There are four auxiliary
digital outputs on the cPCI-7200.
@ Syntax
Visual C++ (Windows 95)
int W_7200_AUX_DO (U32 aux_do)
Visual Basic (Windows 95)
W_7200_AUX_DO (ByVal aux_do As Long) As Long
C/C++ (DOS)
int _7200_AUX_DO (U32 aux_do)
@ Argument
aux_do: value will be written to auxiliary digital output port.
@ Return Code
ERR_NoError
ERR_FunctionNotAvailable
C/C++ Libraries 49
Page 62

5.8 _7200_AUX_DO_Channel
@ Description
Write data to auxiliary digital output channel (bit). There are four
auxiliary digital output channels on the cPCI-7200. When performing this function, the digital output data is written to the corresponding channel.
* channel means each bit of digital input port
@ Syntax
Visual C++ (Windows 95)
int W_7200_AUX_DO_Channel (U8 do_ch_no, Boolean
aux_data)
Visual Basic (Windows 95)
W_7200_AUX_DO_Channel (ByVal do_ch_no As Byte,
ByVal aux_data As Byte) As Long
C/C++ (DOS)
int _7200_AUX_DO_Channel (U8 do_ch_no, Boolean
aux_data)
@ Argument
do_ch_no: the auxiliary DO channel number, the value is
between 0 and 3.
aux_data: either 0 (OFF) or 1 (ON).
@ Return Code
ERR_NoError
ERR_InvalidDOChannel
ERR_FunctionNotAvailable
50 C/C++ Libraries
Page 63

5.9 _7200_DI
@ Description
This function is used to read data from digital input port. There are
32-bit digital inputs on the PCI-7200. Use this function to get all 32
inputs data from _7200_DI.
@ Syntax
Visual C++ (Windows 95)
int W_7200_DI (U32 *di_data)
Visual Basic (Windows 95)
W_7200_DI (di_data As Long) As Long
C/C++ (DOS)
int _7200_DI (U32 *di_data)
@ Argument
di_data: returns all 32-bit value from digital port.
@ Return Code
ERR_NoError
C/C++ Libraries 51
Page 64

5.10 _7200_DI_Channel
@ Description
This function is used to read data from digital input channels (bit).
There are 32 digital input channels on the PCI-7200. When this
function is performed, the digital input port is read and the value of
the corresponding channel is returned.
* channel means each bit of digital input port.
@ Syntax
Visual C++ (Windows 95)
int W_7200_DI_Channel (U8 di_ch_no, Boolean
*di_data)
Visual Basic (Windows 95)
W_7200_DI_Channel (ByVal di_ch_no As Byte,
di_data As Byte) As Long
C/C++ (DOS)
int _7200_DI_Channel (U8 di_ch_no, Boolean
*di_data)
@ Argument
di_ch_no: the DI channel number, the value has to be set
between 0 and 31.
di_data: return value, either 0 or 1.
@ Return Code
ERR_NoError
ERR_InvalidDIChannel
52 C/C++ Libraries
Page 65

5.11 _7200_DO
@ Description
This function is used to write data to the digital output port. There
are 32 digital outputs on the PCI-7200.
@ Syntax
Visual C++ (Windows 95)
int W_7200_DO (U32 do_data)
Visual Basic (Windows 95)
W_7200_DO (ByVal do_data As Long) As Long
C/C++ (DOS)
int _7200_DO (U32 do_data)
@ Argument
do_data: value will be written to digital output port
@ Return Code
ERR_NoError
C/C++ Libraries 53
Page 66

5.12 _7200_DO_Channel
@ Description
This function is used to write data to digital output channels (bit).
There are 32 digital output channels on the PCI-7200. When performing this function, the digital output data is written to the corresponding channel.
* channel means each bit of digital input port
@ Syntax
Visual C++ (Windows 95)
int W_7200_DO_Channel (U8 do_ch_no, Boolean
do_data)
Visual Basic (Windows 95)
W_7200_DO_Channel (ByVal do_ch_no As Byte, ByVal
do_data As Byte) As Long
C/C++ (DOS)
int _7200_DO_Channel (U8 do_ch_no, Boolean
do_data)
@ Argument
do_ch_no: the DO channel number, the value has to be set
between 0 and 31.
do_data: either 0 (OFF) or 1 (ON).
@ Return Code
ERR_NoError
ERR_InvalidDOChannel
54 C/C++ Libraries
Page 67

5.13 _7200_Alloc_DMA_Mem
@ Description
Contact the Windows 95/98 system to allocate a block of contiguous memory for single-buffered DMA transfer. This function is only
available in Windows 95/98.
@ Syntax
Visual C++ (Windows 95)
int W_7200_Alloc_DMA_Mem (U32 *buff, U32 *handle,
U32 buf_size, U32 *actual_size)
Visual Basic (Windows 95)
W_7200_Alloc_DMA_Mem (buff As Long, handle As
Long, ByVal buf_size As Long, actual_size As
Long ) As Long
@ Argument
buff: The start address of the user buffer for DMA data transfer.
This buffer will be attached to the DMA memory allocated by this
function. When using this DMA memory handle as an argument of
the W_7200_DI_DMA_Start function, DI data will be copied to this
buffer. When using this DMA memory handle as an argument of
the W_7200_DO_DMA_Start function, the data stored in this
buffer will be the DO data.
handle: The handle of system DMA memory returned from sys-
tem. Use this handle in _7200_DI_DMA_Start or
_7200_DO_DMA_Start.
buf_size: Bytes to allocate. Please be careful, the unit of this
parameter is BYTE, not SAMPLE.
actual_size:The actual size system allocate for DMA memory.
The unit is BYTE. If system is not able to get a block of contiguous
memory of specified buf_size, it will allocate a block of memory as
large as it can. In this case, this function returns
ERR_SmallerDMAMemAllocated, and actual_size denotes the
actual size of allocated memory.
C/C++ Libraries 55
Page 68

@ Return Code
ERR_NoError
ERR_SmallerDMAMemAllocated
56 C/C++ Libraries
Page 69

5.14 _7200_Free_DMA_Mem
@ Description
Releases system DMA memory. This function is only available in
Windows 95/98.
@ Syntax
Visual C++ (Windows 95)
int W_7200_Free_DMA_Mem (U32 handle)
Visual Basic (Windows 95)
W_7200_Free_DMA_Mem (ByVal handle As Long ) As
Long
@ Argument
handle: The handle of system DMA memory to release.
@ Return Code
ERR_NoError
C/C++ Libraries 57
Page 70

5.15 _7200_Alloc_DBDMA_Mem
@ Description
Contact Windows 95/98 system to allocate a block of contiguous
memory as circular buffer for double-buffered DMA DI transfer.
This function is only available in Windows 95/98 version. For double-buffered transfering, please refer to Section 6 “Double Buffered Mode Principle”.
@ Syntax
Visual C++ (Windows 95)
int W_7200_Alloc_DBDMA_Mem (U32 *buff,U32
*handle, U32 buf_size, U32 *actual_size)
Visual Basic (Windows 95)
W_7200_Alloc_DBDMA_Mem (buff As Long, handle As
Long, ByVal buf_size As Long, actual_size As
Long) As Long
@ Argument
buff: There is a dummy buffer attached to the DMA memory this
function will allocate. But this buffer needs to have size equal to or
more than buf_size bytes.
handle: The handle of system DMA memory returned from sys-
tem. Use this handle in _7200_DI_DMA_Start.
buf_size: Bytes to allocate. This is the half size of circular buffer
in byte. That is, this is the size of each half buffer in byte.
actual_size: The actual DMA memory size system allocate for
each half buffer. If system is not able to get a block of contiguous
memory of specified buf_size, it will allocate the largest block of
memory possible. In this case, this function returns
ERR_SmallerDMAMemAllocated, and actual_size denotes the
actual size of allocated memory for each half of circular buffer.
@ Return Code
ERR_NoError
ERR_SmallerDMAMemAllocated
58 C/C++ Libraries
Page 71

5.16 _7200_Free_DBDMA_Mem
@ Description
Releases a system’s circular buffer DMA memory. This function is
only available in Windows 95/98. For double-buffered transfer
principle, please refer to Section 6 “Double Buffered Mode Principle”.
@ Syntax
Visual C++ (Windows 95)
int W_7200_Free_DBDMA_Mem (U32 handle)
Visual Basic (Windows 95)
W_7200_Free_DBDMA_Mem (ByVal handle As Long ) As
Long
@ Argument
handle: The handle of system DMA memory to release.
@ Return Code
ERR_NoError
C/C++ Libraries 59
Page 72

5.17 _7200_DI_DMA_Start
@ Description
The function will perform digital input N times with DMA data transfer by using one of the following four sampling modes:
1. pacer trigger (internal timer trigger)
2. external rising edge I_REQ
3. external falling edge I_REQ
4. I_REQ & I_ACK handshaking
It will take place in the background which will not stop until the Nth
input data is transferred or your program execute
_7200_DI_DMA_Stop function to stop the process.
After executing this function, it is necessary to check the status of
the operation by using the function _7200_DI_DMA_Status. The
PCI-7200 Bus mastering DMA is different from traditional PC style
DMA. Its description is as follows:
Bus Mastering DMA mode of the PCI-7200:
PCI bus mastering offers the highest possible speed available on
the PCI-7200. When the function _7200_DI_DMA_Start is executed, it will enable PCI bus master operation. This is conceptually
similar to DMA (Direct Memory Access) transfers in a PC but it is
really PCI bus mastering. It does not use an 8237-style DMA controller in the host computer and therefore isn't blocked in 64k max
groups. PCI-7200 bus mastering works as follows:
1. To set up bus mastering, first do all normal PCI-7200 initialization necessary to control the board in status mode.
This includes testing for the presence of the PCI BIOS,
determining the base addresses, slot number, vendor
and device ID's, I/O, or memory, space allocation, etc.
Please make sure the PCI-7200 is plugged in a bus
master slot, otherwise this function will not be workable.
2. Load the PCI controller with the count and 32-bit physical address of the start of previously allocated destination memory, which will accept data. This count is the
number of bytes (not long words) transferred during the
60 C/C++ Libraries
Page 73

bus master operation and can be a large number up to
64 million (2^26) bytes. Since PCI-7200 transfers are
always long words, this equals to 16 million long words
(2^24).
3. After the input sampling is started, the input data is
stored in the FIFO of PCI controller. Each bus mastering
data transfer continually tests if any data in the FIFO and
then blocks transfer, the system will continuously loop
until the conditions are satisfied again but will not exit the
block transfer cycle if the block count is not complete. If
there is momentarily no input data, the PCI-7200 will
relinquish the bus temporarily but returns immediately
when more input data appears. This operation continues
until the whole block is done.
4. This operation proceeds transparently until the PCI con-
troller transfer byte count is reached. All normal PCI bus
operations applied here, such as a receiver that cannot
accept the transfers, higher priority devices requesting
the PCI bus, etc. Remember that only one PCI initiator
can have bus mastering at any one time. However,
review the PCI priority and "fairness" rules. Also study
the effects of the Latency Timer. Additionaly, be aware
that the PCI priority strategy (round robin rotated, fixed
priority, custom, etc.) is unique to each host PC and is
explicitly not defined by the PCI standard. You must
determine this priority scheme for your own PC (or
replace it).
The interrupt request from the PCI controller can be optionally set
up to indicate that this loanword count is complete although this
can also be determined by polling the PCI controller.
@ Syntax
Visual C++ (Windows 95)
int W_7200_DI_DMA_Start (U8 mode, U32 count, U32
handle, Boolean wait_trg, U8 trg_pol,
Boolean clear_fifo, Boolean disable_di)
C/C++ Libraries 61
Page 74

Visual Basic (Windows 95)
W_7200_DI_DMA_Start (ByVal mode As Byte, ByVal
count As Long, ByVal handle As Long, ByVal
wait_trg as Byte, ByVal trg_pol As Byte,
ByVal clear_fifo As Byte, ByVal disable_di
As Byte) As Long
C/C++ (DOS)
int _7200_DI_DMA_Start (U8 mode, U32 count, U32
*di_buffer, Boolean wait_trig, U8 trig_pol,
Boolean clear_fifo, Boolean disable_di)
@ Argument
mode:Digital Input trigger modes
DI_MODE0: Internal timer pacer (TIME 0)
DI_MODE1: External signal I_REQ rising edge
DI_MODE2: External signal I_REQ falling edge
DI_MODE3: I_REQ & I_ACK handshaking
count: For non-double-buffered DI, this parameter denotes the
number of digital input samples to read. For double-buffered DI, it
is the size of circular buffer (in samples, not in bytes).
handle (Win95): The handle of system DMA memory. In Win-
dows 95, before calling _7200_DI_DMA_Start, depending on
using double-buffer mode or not, either _7200_Alloc_DMA_Mem
or _7200_Alloc_DBDMA_Mem must be called to allocate a contiguous DMA memory and get the handle.
di_buffer (DOS): If double buffer mode is disabled, this is the
start address of the memory buffer to store the DI data. If double
buffer mode is enabled, this memory buffer is actually of no use.
But the buffer size still must be larger than the number of count
(count*4 bytes). Use this buffer as transfer buffer in
_7200_DblBufferTransfer to make use of this buffer.
**This memory should be double-word alignment.
wait_trig: The waiting status of trigger
DI_NONWAITING: the input sampling will start immediately
62 C/C++ Libraries
Page 75

DI_WAITING: the input samples waiting rising or falling edge trig-
ger to start DI
trig_pol: trigger polarity
DI_RISING: rising edge trigger
DI_FALLING: falling edge trigger
clear_fifo:
0: retain the FIFO data
1: clear FIFO data before perform digital input
disable_di:
0: digital input operation still active after DMA transfer complete
1: disable digital input operation immediately when DMA
transfer complete
@ Return Code
ERR_NoError
ERR_BoardNoInit
ERR_InvalidDIOMode
ERR_InvalidDIOCnt
ERR_NotDWordAlign
ERR_DMATransferNotAllowed
C/C++ Libraries 63
Page 76

5.18 _7200_DI_DMA_Status
@ Description
Since the _7200_DI_DMA_Start function is executed in background, users can issue this function to check its operation status.
This function only works when double-buffer mode is set as disable.
@ Syntax
Visual C++ (Windows 95)
int W_7200_DI_DMA_Status (U8 *status, U32 *count)
Visual Basic (Windows 95)
W_7200_AD_Status (status As Byte, count As Long )
As Long
C/C++ (DOS)
int _7200_AD_DMA_Status (U8 *status, U32 *count)
@ Argument
status:status of the DMA data transfer
0: DI_DMA_STOP: DMA is completed
1: DI_DMA_RUN: DMA is not completed
count: the numbers of DI data which has been transferred.
@ Return Code
ERR_NoError
64 C/C++ Libraries
Page 77

5.19 _7200_DI_DMA_Stop
@ Description
This function is used to stop the DMA data transferring. After executing this function, the _7200_DI_DMA_Start function is stopped.
The function returns the number of the data which has been transferred, regardless if the digital input DMA data transfer is stopped
by this function or by the DMA terminal count, ISR.
@ Syntax
Visual C++ (Windows 95)
int W_7200_DI_DMA_Stop (U32 * count)
Visual Basic (Windows 95)
W_7200_DI_DMA_Stop ( count As Long ) As Long
C/C++ (DOS)
int _7200_DI_DMA_Stop (U32 *count)
@ Argument
count: the number of DI data which has been transferred.
@ Return Code
ERR_NoError
ERR_BoardNoInit
C/C++ Libraries 65
Page 78

5.20 _7200_DblBufferMode
@ Description
This function is used to enable or disable double buffer mode for
DMA DI operation.
@ Syntax
Visual C++ (Windows 95)
int W_7200_DblBufferMode (Boolean db_flag)
Visual Basic (Windows 95)
W_7200_DblBufferMode (ByVal db_flag As Byte) As
Long
C/C++ (DOS)
int _7200_CheckHalfReady (Boolean db_flag)
@ Argument
db_flag:
1: double buffer mode enabled
0: double buffer mode disabled
@ Return Code
ERR_NoError
66 C/C++ Libraries
Page 79

5.21 _7200_CheckHalfReady
@ Description
When you use _7200_DI_DMA_Start to sample digital input data
and double buffer mode is set as enable. Users must use
_7200_CheckHalfReady to check data ready (data half full) or not
in the circular buffer, and using _7200_DblBufferTransfer to get
data.
@ Syntax
Visual C++ (Windows 95)
int W_7200_CheckHalfReady (Boolean * halfReady)
Visual Basic (Windows 95)
W_7200_CheckHalfReady (halfReady As Byte) As Long
C/C++ (DOS)
int _7200_CheckHalfReady (Booelan *halfReady)
@ Argument
halfReady: 1 (TRUE) or 0 (FALSE)
@ Return Code
ERR_NoError
C/C++ Libraries 67
Page 80

5.22 _7200_DblBufferTransfer
@ Description
Use this function to copy the input data in the circular buffer to the
transfer buffer. It copies half of the circular buffer, either first half or
second half, to the transfer buffer.
@ Syntax
Visual C++ (Windows 95)
int W_7200_DblBufferTransfer (U32 *userBuffer)
Visual Basic (Windows 95)
W_7200_DblBufferTransfer (userBuffer As Long) As
Long
C/C++ (DOS)
int _7200_DblBufferTransfer (U32 *userBuffer)
@ Argument
userBuffer: the start address of the transfer buffer. The
W_7200_DblBufferTransfer function copies half of the circular
buffer to userBuffer.
@ Return Code
ERR_NoError, ERR_NotHalfReady
68 C/C++ Libraries
Page 81

5.23 _7200_GetOverrunStatus
@ Description
When using _7200_DI_DMA_Start to convert Digital I/O data with
double buffer mode enabled, and not using
_7200_DblBufferTransfer to move converted data then double
buffer overrun will occur. Use this function to check overrun count.
@ Syntax
Visual C++ (Windows 95)
int W_7200_GetOverrunStatus (U32 * overrunCount)
Visual Basic (Windows 95)
int W_7200_GetOverrunStatus (overrunCount As
Long) As Long
C/C++ (DOS)
int _7200_GetOverrunStatus (U32 *overrunCount )
@ Argument
overrunCount: number of overruns.
@ Return Code
ERR_NoError
C/C++ Libraries 69
Page 82

5.24 _7200_DO_DMA_Start
@ Description
The function will perform digital output N times with DMA data
transfer by using the following four sampling modes:
1. Pacer trigger (internal timer trigger, TIME 1)
2. Internal timer pacer with O_REQ enabled
3. O_REQ & O_ACK handshaking
It takes place in the background which will not be stopped until the
Nth conversion has been completed or the program executes the
_7200_DO_DMA_Stop function to stop the process. After executing this function, it is necessary to check the status of the operation by using the function _7200_DO_DMA_Status.
@ Syntax
Visual C++ (Windows 95)
int W_7200_DO_DMA_Start (U8 mode, U32 count, U32
handle, Boolean repeat)
Visual Basic (Windows 95)
W_7200_DO_DMA_Start (ByVal mode As Byte, ByVal
count As Long, ByVal handle As Long, ByVal
repeat as Byte) As Long
C/C++ (DOS)
int _7200_DO_DMA_Start (U8 mode, U32 count, U32
*do_buffer, Boolean repeat)
@ Argument
mode: Digital output trigger modes
DO_MODE_0: Internal timer pacer (TIME 1)
DO_MODE_1: Internal timer pacer with O_REQ enable
DO_MODE_2: O_REQ & I_REQ handshaking
count:the sample number of digital output data (in samples, not in
bytes)
handle (Win 95): the handle of system DMA memory. In Windows
95, before calling W_7200_DO_DMA_Start,
70 C/C++ Libraries
Page 83

W_7200_Alloc_DMA_Mem must be called to allocate a contiguous DMA memory and get the handle of it. Also
W_7200_Alloc_DMA_Mem will attach a buffer to DMA memory.
The DO data is stored in the buffer attached to this handle.
do_buffer (DOS): the start address of the memory buffer to
store the DO data.
** This memory should be double-word alignment
repeat: The digital output will be continuous or only one shot.
CONTINUOUS: digital output will be continuous until
_7200_DO_DMA_STOP is called.
ONE_SHOT: digital output only one-shot.
@ Return Code
ERR_NoError
ERR_InvalidDIMode
ERR_InvalidBoardNumber
ERR_BoardNoInit
ERR_InvalidDIOCnt
ERR_NotDWordAlign
ERR_DMATransferNotAllowed
C/C++ Libraries 71
Page 84

5.25 _7200_DO_DMA_Status
@ Description
Since the _7200_DO_DMA_Start function is executed in background, users can issue the function _7200_DO_DMA_Status to
check its operation status.
@ Syntax
Visual C++ (Windows 95)
int W_7200_DO_DMA_Status (U8 *status, U32 *
count)
Visual Basic (Windows 95)
W_7200_DO_Status ( status As Byte, count As Long
) As Long
C/C++ (DOS)
int _7200_DO_DMA_Status (U8 *status , U32 *count)
@ Argument
status: status of the DMA data transfer.
0: DO_DMA_STOP: DMA is completed
1: DO_DMA_RUN: DMA is not completed
count: the amount of DO data which has been transferred.
@ Return Code
ERR_NoError
72 C/C++ Libraries
Page 85

5.26 _7200_DO_DMA_Stop
@ Description
This function is used to stop the DMA DO operation. After executing this function, the _7200_DO_DMA_Start function is stopped.
The function returns the number of the data which has been transferred, regardless if the digital output DMA data transfer is stopped
by this function or by the DMA terminal count ISR.
@ Syntax
Visual C++ (Windows 95)
int W_7200_DO_DMA_Stop (U32 *count)
Visual Basic (Windows 95)
W_7200_DO_DMA_Stop (count As Long) As Long
C/C++ (DOS)
int _7200_DO_DMA_Stop (U32 *count)
@ Argument
count: the number of digital output data which has been trans-
ferred.
@ Return Code
ERR_NoError
ERR_BoardNoInit
C/C++ Libraries 73
Page 86

5.27 _7200_DI_Timer
@ Description
This function is used to set the internal timer pacer for digital input.
There are two configurations for the internal timer pacer:
1. Non-cascaded (One COUNTER 0 only)
4MHz Input
Counter 0
CLK0
GATE0
OUT0
Timer pacer frequency = 4Mhz / C0
2. Cascaded (TIME2 cascaded with COUNTER0)
8254 Timer/Counter
8254 Timer/Counter
Counter 0
CLK0
4MHz Input
GATE0
CLK1
GATE1
CLK2
GATE2
Counter 1
Counter 2
OUT0
OUT1
OUT2
Timer pacer frequency = 4Mhz / (C0 * C2)
@ Syntax
Visual C++ (Windows 95)
int W_7200_DI_Timer (U16 c0, U16 c2, Boolean
mode)
Visual Basic (Windows 95)
W_7200_DI_Timer ( ByVal c0 As Integer, ByVal c2
As Integer, ByVal mode As Byte ) As Long
C/C++ (DOS)
int _7200_DI_Timer (U16 c0, U16 c2, Boolean mode)
Digital Input Trigger
Digital Input Trigger
74 C/C++ Libraries
Page 87

@ Argument
c0: frequency divider of Counter #0. Valid value ranges from 2 to
65535.
c2: frequency divider of Counter #2. Valid value ranges from 2 to
65535.
Note: Since the Integer type in Visual Basic is a signed integer. Its
range is within -32768 and 32767. In Visual Basic, to set c0
or c2 to a value larger than 32767, set it as the intended value minus 65536. For example, to set c0 as 40000, set c0 as
40000-65536=-25536.
mode:TIMER_NONCASCADE or TIMER_CASCADE
@ Return Code
ERR_NoError
ERR_InvalidBoardNumber
ERR_InvalidTimerMode
ERR_BoardNoInit
C/C++ Libraries 75
Page 88

5.28 _7200_DO_Timer
@ Description
This function is used to set the internal timer pacer for digital output. There are two configurations for the internal timer pacer:
1. Non-cascaded (One COUNTER 0 only)
4MHz Input
Counter 1
CLK0
GATE0
OUT0
Timer pacer frequency = 4Mhz / C1
2. Cascaded (TIME2 cascaded with COUNTER0)
8254 Timer/Counter
8254 Timer/Counter
Counter 0
CLK0
4MHz Input
GATE0
CLK1
GATE1
CLK2
GATE2
Counter 1
Counter 2
OUT0
OUT1
OUT2
Timer pacer frequency = 4Mhz / (C1 * C2)
@ Syntax
Visual C++ (Windows 95)
int W_7200_DO_Timer (U16 c1, U16 c2, Booelan
mode)
Visual Basic (Windows 95)
W_7200_DO_Timer (ByVal c1 As Integer, ByVal c2 As
Integer, ByVal mode As Byte) As Long
C/C++ (DOS)
int _7200_DO_Timer (U16 c1, U16 c2, Boolean mode)
Digital Output Trigger
Digital Input Trigger
76 C/C++ Libraries
Page 89

@ Argument
c1 : frequency divider of Counter #1
c2 : frequency divider of Counter #2
Note : Since the Integer type in Visual Basic is a signed integer. Its
range is within -32768 and 32767. In Visual Basic, to set c1
or c2 to a value larger than 32767, set it as the intended value minus 65536. For example, to set c0 as 40000, set c0 as
40000-65536=-25536.
mode:TIMER_NONCASCADE or TIMER_CASCADE
@ Return Code
ERR_NoError
ERR_InvalidBoardNumber
ERR_InvalidTimerMode
ERR_BoardNoInit
C/C++ Libraries 77
Page 90

78 C/C++ Libraries
Page 91

6 Double Buffer Mode Principle
The data buffer for a double-buffered DMA DI operation is logically
a circular buffer divided into two equal halves. The double buffered
DI begins when the device starts writing data into the first half of
the circular buffer (Figure 6-1a). After device begins writing to the
second half of the circular buffer, users can copy the data from the
first half into the transfer buffer (Figure 6-1b). Users can now process the data in the transfer buffer according to application needs.
After the board has filled the second half of the circular buffer, the
board returns to the first half buffer and overwrites the old data.
Users can now copy the second half of the circular buffer to the
transfer buffer (Figure 6-1c). The data in the transfer buffer is
again available for process. The process can be repeated endlessly to provide a continuous stream of data to applications (Figure 6-1d).
a
Incoming DMA
input data
Circular Buffer
Transfer Buffer
b
> > >
c
> >
Empty Buffer Untransferred Data Transferred Data
d
> > >> >
Figure 6-1: Double Buffer Mode
The PCI-7200 double buffer mode functions were designed
according to the principle described above. If using
_7200_DblBufferMode() to enable double buffer mode,
_7200_DI_DMA_Start() will perform double-buffered DMA DI. Call
_7200_CheckHalfReady() to check if data in the circular buffer is
Double Buffer Mode Principle 79
Page 92

half-full and ready for copying to the transfer buffer. Then call
_7200_DblBufferTransfer() to copy data from the ready half buffer
to the transfer buffer.
In Windows 95, W_7200_Alloc_DBDMA_Mem() is needed to allocate a contiguous DMA memory for the circular buffer. The
buf_size argument of W_7200_Alloc_DBDMA_Mem() is the half
size of circular buffer in byte, that is, the size of each half buffer in
byte. The DMA memory is referenced by the return parameter
handle. This memory is system memory; users are not allowed to
access it directly.
80 Double Buffer Mode Principle
Page 93

7 Limitations
The 12MB/sec data transfer rate can only be possibly achieved in
systems where the PCI-7200 card is the only device using the bus,
but the speed cannot be guaranteed due to the limited FIFO
depth.
The PCI-7200 supports three input clock modes, internal clock,
external clock, and handshaking modes. The first two modes cannot guarantee the input data integrity in high-speed data rate
because of the limited FIFO depth and PCI-bus latency variation.
The handshaking mode is the only mode that data integrity can be
guaranteed. During handshaking, expect 12 MB/sec data rate on
average, but the speed is not guaranteed.
The guaranteed data rate with internal clock or external clock
mode is 1MB/sec on systems where PCI-7200 card is the only
device using the bus.
The largest transfer size (in bytes) PCI-7200 can perform is 64MB.
Limitations 81
Page 94

82 Limitations
Page 95

Warranty Policy
Thank you for choosing ADLINK. To understand your rights and
enjoy all the after-sales services we offer, please read the following carefully.
1. Before using ADLINK’s products please read the user man-
ual and follow the instructions exactly. When sending in
damaged products for repair, please attach an RMA application form which can be downloaded from: http://
rma.adlinktech.com/policy/.
2. All ADLINK products come with a limited two-year war-
ranty, one year for products bought in China:
X The warranty period starts on the day the product is
shipped from ADLINK’s factory.
X Peripherals and third-party products not manufactured
by ADLINK will be covered by the original manufacturers' warranty.
X For products containing storage devices (hard drives,
flash cards, etc.), please back up your data before sending them for repair. ADLINK is not responsible for any
loss of data.
X Please ensure the use of properly licensed software with
our systems. ADLINK does not condone the use of
pirated software and will not service systems using such
software. ADLINK will not be held legally responsible for
products shipped with unlicensed software installed by
the user.
X For general repairs, please do not include peripheral
accessories. If peripherals need to be included, be certain to specify which items you sent on the RMA Request
& Confirmation Form. ADLINK is not responsible for
items not listed on the RMA Request & Confirmation
Form.
Warranty Policy 83
Page 96

3. Our repair service is not covered by ADLINK's guarantee
in the following situations:
X Damage caused by not following instructions in the
User's Manual.
X Damage caused by carelessness on the user's part dur-
ing product transportation.
X Damage caused by fire, earthquakes, floods, lightening,
pollution, other acts of God, and/or incorrect usage of
voltage transformers.
X Damage caused by unsuitable storage environments
(i.e. high temperatures, high humidity, or volatile chemicals).
X Damage caused by leakage of battery fluid during or
after change of batteries by customer/user.
X Damage from improper repair by unauthorized ADLINK
technicians.
X Products with altered and/or damaged serial numbers
are not entitled to our service.
X This warranty is not transferable or extendible.
X Other categories not protected under our warranty.
4. Customers are responsible for shipping costs to transport
damaged products to our company or sales office.
5. To ensure the speed and quality of product repair, please
download an RMA application form from our company website: http://rma.adlinktech.com/policy. Damaged products
with attached RMA forms receive priority.
If you have any further questions, please email our FAE staff:
service@adlinktech.com.
84 Warranty Policy
 Loading...