

Page 1
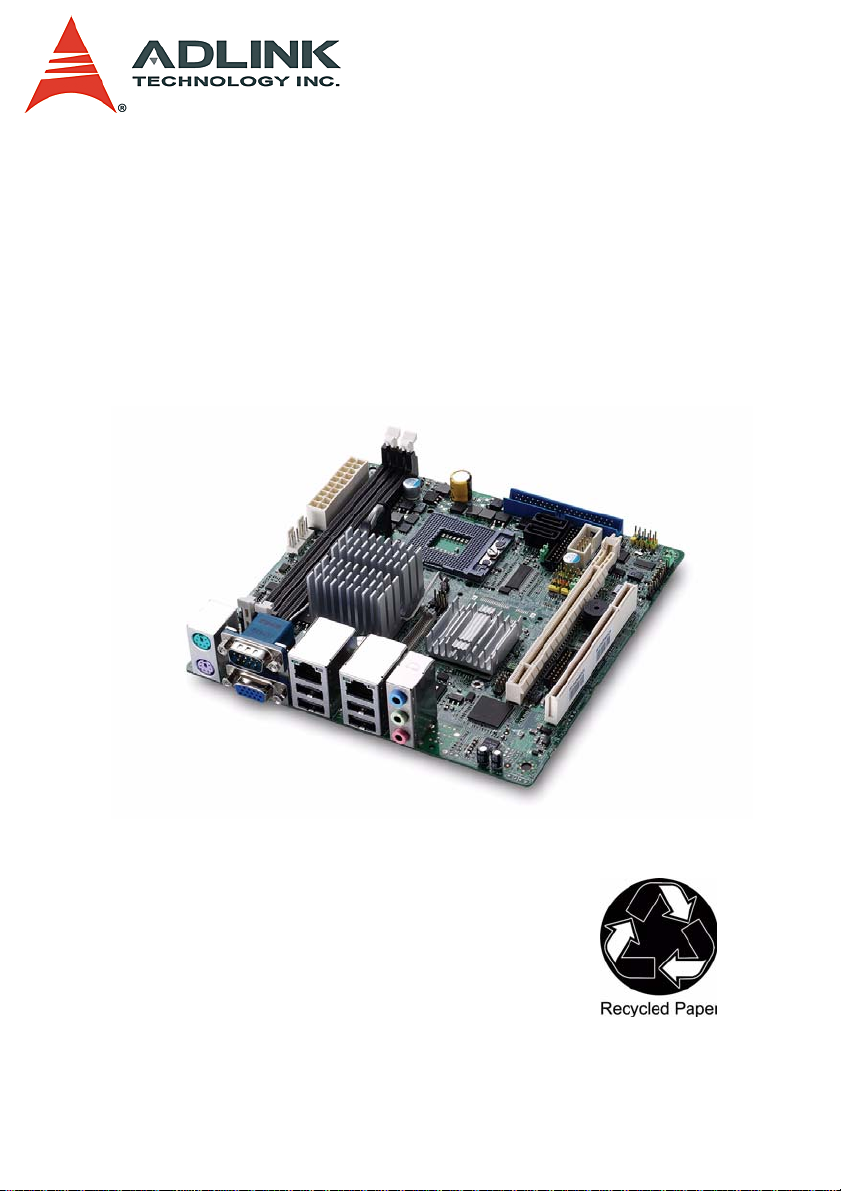
MI-965
Mini-ITX Industrial Motherboard with
Intel® GME965 Chipset
User’s Manual
Manual Rev.: 2.01
Revision Date: December 12, 2008
Part No: 50-1X002-1000
Advance Technologies; Automate the World.
Page 2
Revision History
Revision Release Date Description of Change(s)
2.00 2008/10/02 Initial Release
2.01 2008/12/12 Correct IO Shield Drawing
ii
Page 3

MI-965
Preface
Copyright 2008 ADLINK Technology Inc.
This document contains proprietary infor mation protected by copyright. All rights are reserved. No part of this manual may be reproduced by any mechanical, electronic, or other means in any form
without prior written permission of the manufacturer.
Disclaimer
The information in this document is subject to change without prior
notice in order to improve reliability, design, and function and does
not represent a commitment on the part of the manufa cturer.
In no event will the manufacturer be liable for direct, indirect, special, incidental, or consequential damages arising out of the use or
inability to use the product or documentation, even if advised of
the possibility of such damages.
Environmental Responsibility
ADLINK is committed to fulfill its social responsibility to global
environmental preservation through compliance with the European Union's Restriction of Hazardous Substances (RoHS) directive and Waste Electrical and Electronic Equipment (WEEE)
directive. Environmental protection is a top priority for ADLINK.
We have enforced measures to ensure that our products, manufacturing processes, components, and raw materials have as little
impact on the environment as possible. When products are at their
end of life, our customers are encouraged to dispose of them in
accordance with the product disposal and/or recovery programs
prescribed by their nation or company.
Trademarks
Product names mentioned herein are used for identification purposes only and may be trademarks and/or registered trademarks
of their respective companies.
Preface iii
Page 4

Using this Manual
Audience and Scope
The MI-965 User’s Manual is intended for hardware technicians
and systems operators with knowledge of installing, configuring
and operating industrial grade single board computers.
Manual Organization
This manual is organized as follows:
Preface: Presents important copyright notifications, disclaimers,
trademarks, and associated information on the proper under st anding and usage of this document and its associated product(s).
Chapter 1, Introduction: Introduces the MI-965, its features,
applications, and specifications, including functional descriptions
and board layout.
Chapter 2, Connectors & Jumpers: Provides technical information on connectors and jumpers as well as pin assignments for
configuring the MI-965 and any attached external devices.
Chapter 3, Getting Started: Illustrates how to install components
on the MI-965, specifically, CPU, memory modules, operating systems and drivers.
Chapter 4, BIOS Setup: Presents information and illustrations to
help understand and configure the system BIOS.
Chapter 5, POST Codes: Presents POST information and
detailed descriptions for users.
Appendix A, Watchdog Timer: Presents information on understanding and configuring the embedded Watchdog timer.
Appendix B, System Resources: Presents information on I/O
mapping, IRQ routing, and resource allocation.
Important Safety Instructions: Presents safety instructions all
users must follow for the proper setup, installation and usage of
equipment and/or software.
Getting Service: Contact information for ADLINK’s worldwide
offices.
iv Preface
Page 5
MI-965
Conventions
Take note of the following conventions used throughout this
manual to make sure that users perform certain tasks and
instructions properly.
Additional information, aids, and tips that help users perform tasks.
NOTE:
NOTE:
Information to prevent minor physical injury, component
damage, data loss, and/or program corruption when try-
CAUTION:
ing to complete a task.
Information to prevent serious physical injury, component damage, data loss, and/or program corruption
WARNING:
when trying to complete a specific task.
Preface v
Page 6

This page intentionally left blank.
vi Preface
Page 7

MI-965
Table of Contents
MI-965.........................................................................................i
Revision History...................................................................... ii
Preface.................................................................................... iii
Table of Contents.................................................................. vii
List of Figures........................................................................ ix
List of Tables.......................................................................... xi
1 Introduction ........................................................................ 1
1.1 Package Contents ............................................................... 1
1.2 Overview.............................................................................. 2
1.3 Features............................................................................... 2
1.4 Specifications....................................................................... 3
1.5 Block Diagram ..................................................................... 6
1.6 Functional Description ......................................................... 7
1.7 Board Layout ..................................................................... 10
1.8 Mechanical Drawings......................................................... 11
2 Connectors & Jumpers.................................................... 13
2.1 Rear I/O Connectors.......................................................... 13
2.2 Onboard Connectors ......................................................... 16
2.3 Jumpers............................................................................. 23
3 Getting Started ................................................................. 25
3.1 Installing the CPU.............................................................. 25
3.2 Memory Module Installation............................................... 27
3.3 Driver Installation.................................... ... ... ... .... ... ... ... .... . 28
Table of Contents vii
Page 8

4 BIOS Setup........................................................................ 29
4.1 Starting the BIOS............................................................... 29
4.2 Main Setup......................................................................... 33
4.3 Advanced BIOS Setup....................................................... 34
4.4 Boot Setup......................................................................... 43
4.5 Security Setup.................................................................... 47
4.6 Chipset Setup .................................................................... 49
4.7 Exit Menu........................................................................... 53
5 POST Codes...................................................................... 57
5.1 Post Code Checkpoints ..................................................... 57
A Appendix: Watchdog Timer..............................................61
A.1 Sample Code..................................................................... 61
B Appendix: System Resources..........................................63
B.1 Generic I/O Ports ............................................................... 63
B.2 IO Map............................................................................... 66
B.3 PCI Devices ....................................................................... 67
Important Safety Instructions............................................... 71
Getting Service...................................................................... 73
viii Table of Contents
Page 9

MI-965
List of Figures
Figure 1-1: MI-965 Block Diagram .....................................................6
Figure 1-2: MI-965 Board Layout.....................................................10
Figure 1-3: MI-965 Board Dimensions (top view).............................11
Figure 1-4: MI-965 Rear I/O Dimensions .........................................12
List of Figures ix
Page 10

This page intentionally left blank.
xList of Figures
Page 11

MI-965
List of Tables
Table 1-1: MI-965 General Specifications.........................................4
Table 1-2: MI-965 Power Consumption............................................ 5
Table 5-1: POST Code Checkpoints............................................... 60
Table B-1: ICH8M GPIO Resources ...............................................64
Table B-2: SIO GPIO Resources ....................................................65
Table B-3: IO Map...........................................................................66
Table B-4: PCI Device Resources...................................................67
Table B-5: PCI Interrupt Request Routing.......................................67
Table B-6: SMBus Resource Allocation..........................................68
Table B-7: ISA Interrupt Allocation.................................................. 68
Table B-8: ISA DMA Channel Allocation......................................... 69
List of Tables xi
Page 12

This page intentionally left blank.
xii List of Tables
Page 13

1 Introduction
This chapter will introduce the MI-965, its features, specifications
and applications. This chapter also provides detailed information
about the mechanics of the product and technical information to
assist users.
1.1 Package Contents
Please check that your package contains the items below. If
you discover damaged or missing items, please contact your
vendor.
X MI-965 Industrial Mini-ITX Motherboard
X I/O shield x1
X SATA cable x2
X SATA power cable x2
X IDE cable x1
X COM + Printer cable with bracket x1
X Driver CD
X User’s Manual
MI-965
DO NOT install or apply power to equipme nt that is damaged or if there is missing/incomplete equipment. Ret ain
WARNING:
the shipping carton and packing materials for inspection.
Please contact your ADLINK dealer/vendor immediately
for assistance. Obtain authorization from your dealer
before returning any product to ADLINK.
Introduction 1
Page 14

1.2 Overview
The ADLINK MI-965 is a Mini-ITX industrial motherboard supporting the next-generation Intel® Core 2 Duo/Intel® Celeron® processors in the Micro-FCPGA package to deliver a high
performance and space-saving platform for a wide array of
embedded computing applications. With a compact footprint, the
MI-965 supports processing speeds up to 2.2 GHz and hi gh-ba ndwidth network connectivity with PCI Express®-based gigabit LAN.
These advanced features, coupled with a dual-channel DDR2 system memory architecture, diverse I/O, storage, and audio interfaces make the MI-965 suitable for multimedia, automation
control, and gaming applications requiring a compact, easy-todeploy, and cost-effective mainboard.
1.3 Features
X Mini-ITX form factor
X Support Intel® mobile Core™ 2 Duo, Celeron® M proces-
sors in 478-pin micro-FCPGA package
X Integrated graphics controller, supports dual independent
display
X Supports PCIe® x16, PCI™
X Onboard CompactFlash® socket
X RoHS compliant
2Introduction
Page 15

MI-965
1.4 Specifications
System
CPU/Cache • Intel® Core™2 Duo Mobile Processor T7 500,
2.2GHz, 4MB L2 cache, 800MHz FSB
• Mobile Intel® Celeron® Processor 550,
2.0GHz, 1MB L2 cache, 533MHz FSB
• Socket P 478-pin micro-FCPGA package
FSB • 533/800MHz
Chipset • North Bridge: Intel® GME965 chipset
• South Bridge: Intel® ICH8M chipset
Memory • DDR2 533/667 SDRAM (4GB Ma x)
• 2 DDR2 DIMM slots (240pin / 1.8V)
BIOS • AMI BIOS with 8 Mb Flash ROM
Audio • HDA Codec by Realte k ALC888
• supports line-in, line-out and mic-in
Watch Dog Time r • 1-255 second or 1-255 minute programmable and
can generate system reset.
Hardware Monitor • CPU/System temperature, fan speed and onboard
DC voltage
Trusted Platform • Supports TPM 1.2 via Infineon SLB 9635
I/O Interfaces
IDE • 1 IDE port by ICH8M
• Supports Ultra DMA 66/100 mode
• Supports PIO, Bus Master operation mode
CompactFlash • One CompactFlash type II socket
Serial ATA • Two serial ATA ports with 300 MB/s data transfer
Onboard I/O • 2 USB 2.0 pin headers (4 ports)
• 1 parallel port connector
• 1 SPDIF connector
• 1 LVDS connector
• 1 TV-out connector
• 1 digital I/O connector (16GPIO)
• 1 serial port connector
• 1 front panel connector
Introduction 3
Page 16
I/O Interfaces (cont’d)
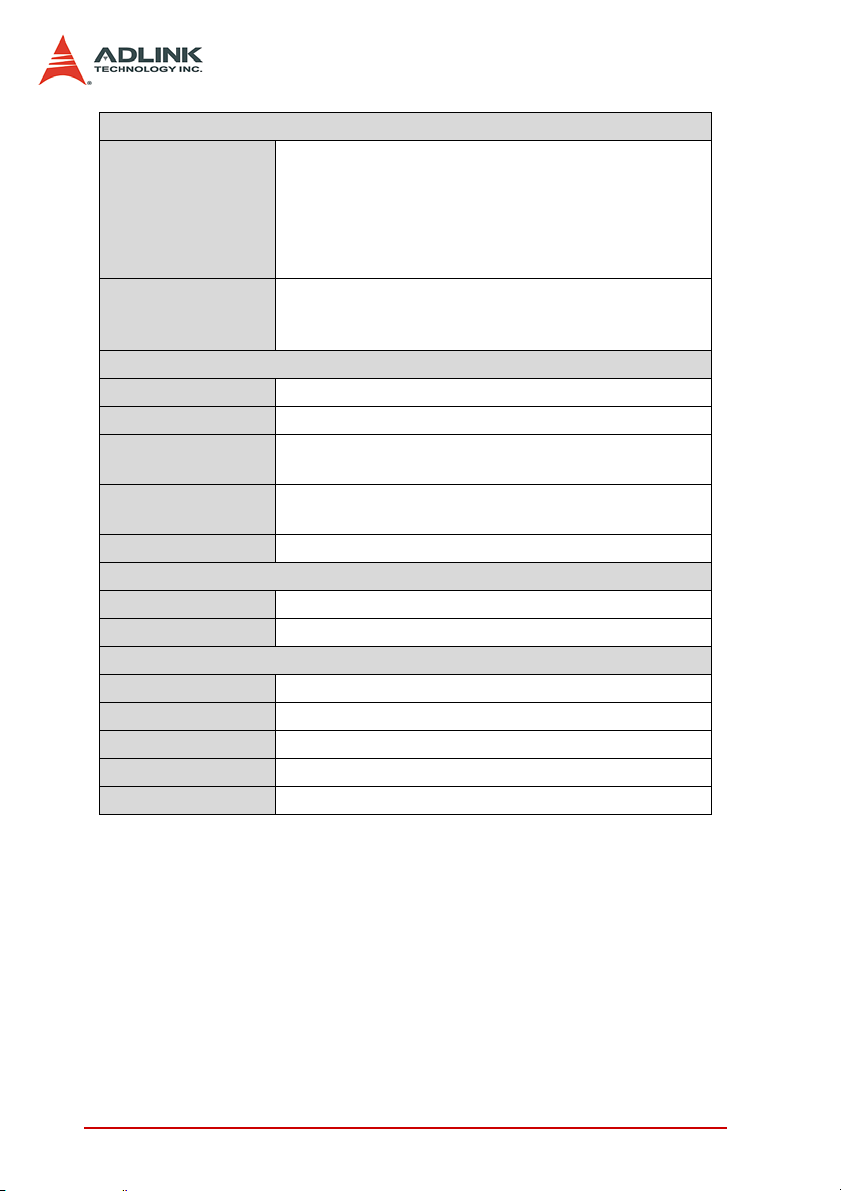
Rear I/O • 2 RJ-45 LAN
• 4 USB 2.0 ports
• 1 D-Sub VGA connector
• 1 serial port
• 2 PS2 keyboard/mouse ports
• 3 audio jacks
Expansion Slots • 1 PCI Express x16 slot
• 1 32-bit/33MHz PCI slot
• 1 CF socket
Display
VGA • GMA X3100 integrated in GME965 GMCH
VRAM • Shared system memory up to 384 MB
CRT • External Dsub-15 connector, resolution up to 2048
x 1536 @ 60 Hz
LVDS • Internal 24-bit header, supports dual independent
display
TV-Out • Supported by optional TV-Out cable
Ethernet
Controller • Intel® 82573L & 82566DC
Ports • Two RJ-45 Ethernet ports
Mechanical and Environment
Form Factor • Mini-ITX Industrial Motherboard
Dimensions • 170 mm x 170 mm (L x W)
Operating Temp. • 0°C to 55°C
Storage Temp. • -20ºC to 80ºC
Safety • CE, FCC Class A
T able 1-1: MI-965 General Specifications
4Introduction
Page 17
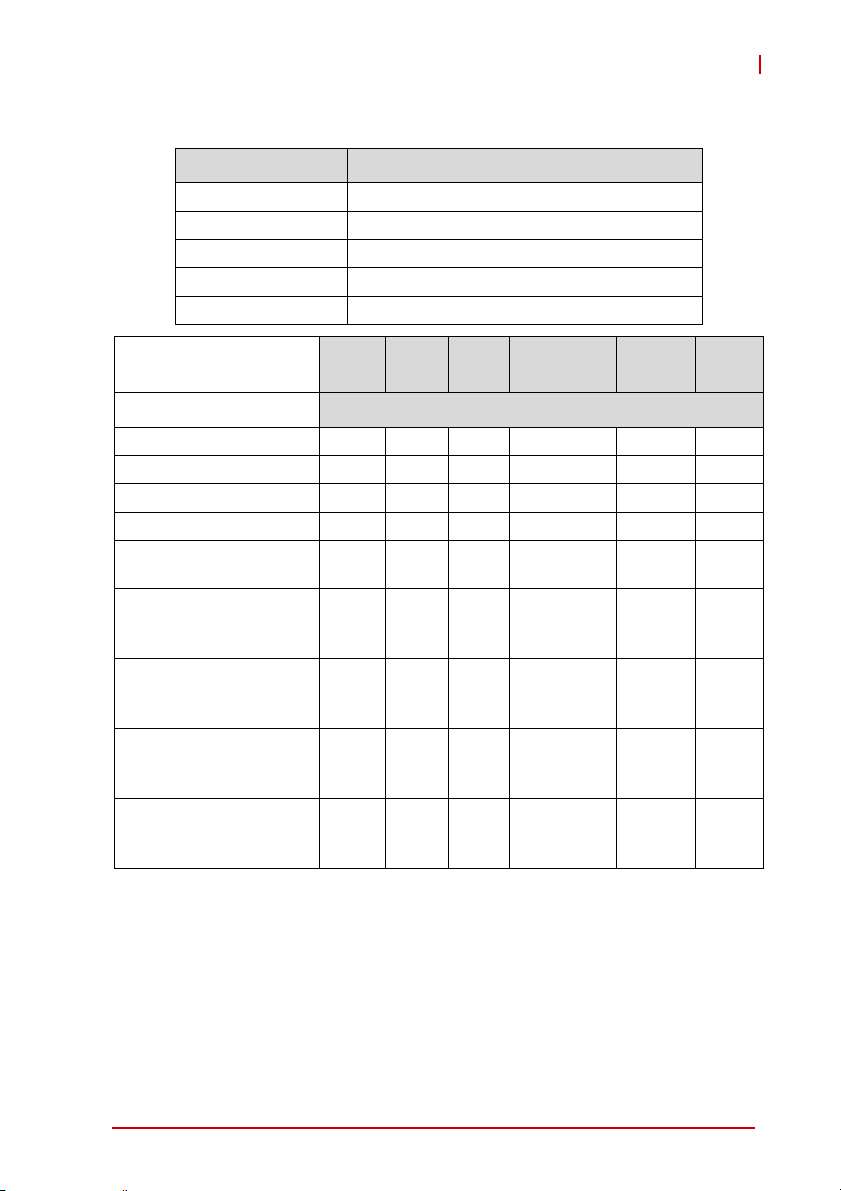
Power Consumption
MI-965
Component Descript
CPU Intel Core 2 Duo T7100 processor
Memory Kingston 2G DDR2-667 x2
Add-On VGA Nvidia FX1400 PCI-Express VGA Card x1
Hard Disk Seagate 500G SATA2 7200rpm HDD x1
Operating system Microsoft® Windows XP® Professional SP2
MI-965
Enter DOS(Stable) 2.45 2.75 2.97 0 0.05 0.02
Enter BIOS(Stable) 2.42 2.74 2.97 0 0.05 0.02
Idle 1.64 2.37 1.92 0 0.05 0.01
CPU Stress 100% 1.66 2.7 3.5 0 0.05 0.02
Windows stress
(3dMARK2006)
Windows Desktop
Standby S1 w/wo two
LANs connected (stable)
Windows Desktop
Standby S3 w/wo two
LANs connected (stable)
Windows Desktop
Hibernate S4 w/wo two
LANs connected (stable)
Windows Desktop Soft
Off S5 w/wo two LANs
connected (stable)
3.3V 5V 12V
1.66 3.22 4.5 0 0.05 0.02
1.08/
1.07
1.78/
000 0
000 0
000 0
1.76
1.58/
1.56
ion
12V Main
Connector
Current(A)
0
5V
Standby
0.08/
0.08
0.45/
0.44
0.25/
0.24
0.25/
0.24
(-)12V
0.02
0
0
0
Table 1-2: MI-965 Power Consumption
Introduction 5
Page 18
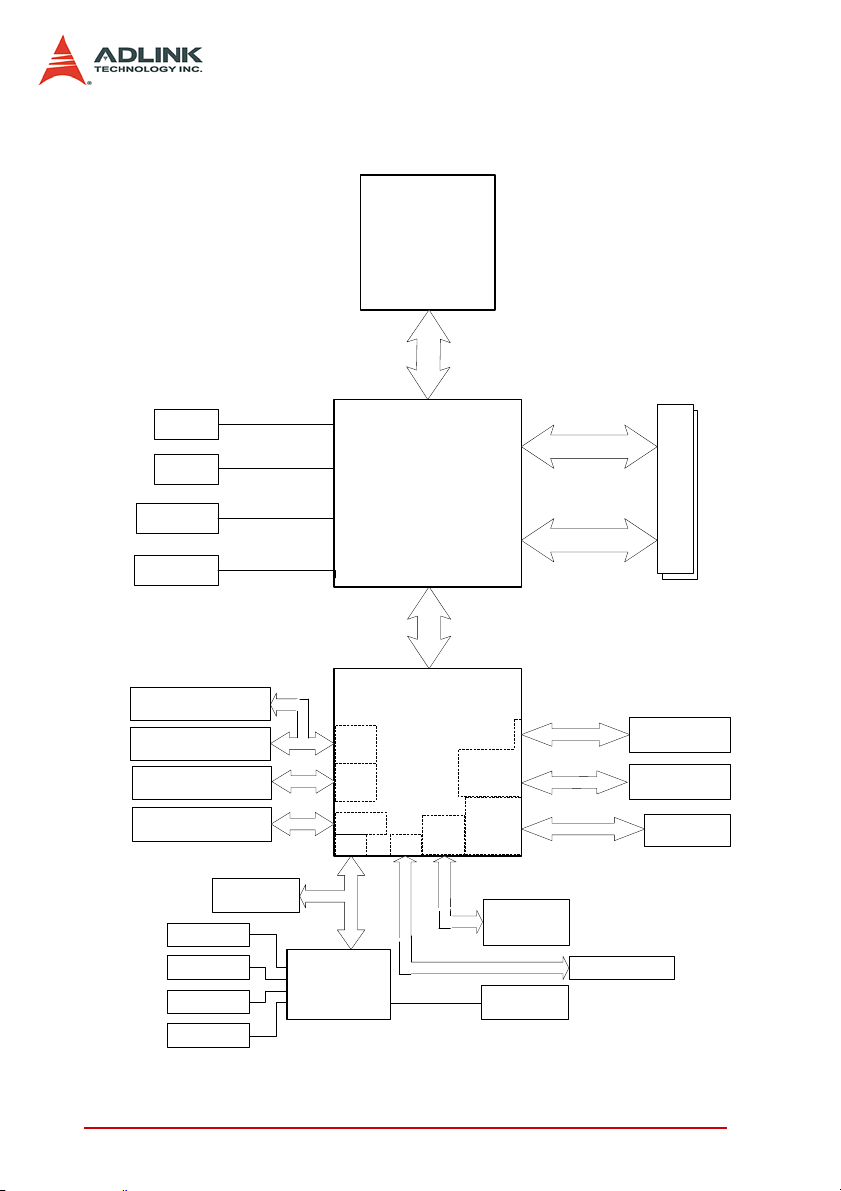
1.5 Block Diagram
TV-Out
6-pin header
CRT
DB-15
24-bit LVDS
40-pin
PCIe x16 slot
CPU
Intel® Mobile
Core™2 Duo
533/800MHz FSB
Northbridge
Intel®GME965 GMCH
Celeron
Socket P
®
533/800 MHz FSB
DMI
Interface
2 GB/s
DDR Channel A
DDRII 533/667 MHz
DDR Channel B
DIMM x2
CF Socket
IDE 40-pin header
SATA ports x2
USB 2.0
(Rear x4, Internal x4)
KB/Mouse
LPT
RS-232
TPM
Southbridge
Intel® ICH8-M
IDE
SATA
USB 2.0
LPC
W83627DHG
LPC Super I/O
SPI
Audio
PCIe
Controller
PCI
Controller
Audio Codec
Hardware
Realtek
ALC888
Monitor
PCIe x1
x
1
e
I
C
P
PCI Bus
8Mb SPI BIOS
Intel 82566DC
RJ-45
Intel 82573L
RJ-45
PCI 32-bit/
33MHz bus
RS-232
Figure 1-1: MI-965 Block Diagram
6Introduction
Page 19

MI-965
1.6 Functional Description
Processor Support
The MI-965 motherboard features the Socket P interface designed
for Intel processors in the Micro-FCPGA package. The motherboard features a powerful 533/800 MHz Front Side Bus (FSB).
Providing high-performance computing and energy-efficiency, the
MI-965 is designed for the next-generation Intel® Core 2 Duo and
Celeron® processors based on 65nm process technology. The MI965 supports dual-core processing when deployed with a CPU
containing two physical cores and dedicated L2 caches to meet
the ever-increasing demands of industrial computing.
Intel® GME965 Express chipset
The Intel® GME965 Express chipset, featuring the Intel® GME965
graphics memory controller hub (GMCH) and the Intel® ICH8M
I/O controller hub, provides the vital interfaces for the motherboard. The Intel® GME965 comes with the Intel® Graphics Media
Accelerator X3100, an integrated graphics engine with enhanced
3D/2D graphics rendering and video capabilities. The GMCH also
provides the interface for the processor and system memory.
The Intel® ICH8-M Southbridge is the eighth generation of Intel
I/O controller hub that provides key interfaces such as PCI
Express®, USB 2.0, and SATA II.
Dual-channel DDR2 memory
To meet the requirements of memory-intensive applications, the
MI-965 has a dual-channel memory architecture supporting DDR2
533/667 MHz DIMMs. The high-bandwidth memory specification,
meets the requirements of the latest 3D graphics, multimedia, and
network application, and boosts system performance by eliminating bottlenecks.
Intel® Graphics Media Accelerator X3100
The Intel® Graphics Media Accelerator (GMA) X3100 revolutionizes integrated graphics with new capabilities that provide significant increase in graphics performance. With support for DirectX 9
Introduction 7
Page 20

hardware acceleration, 333 MHz display clock, and up to 384 MB
of video memory, the Intel GMA X3100 provides a cost-effective
and high-performance graphics solution. The MI-965 comes with
the dual-independent display technology, enabling different contents to be displayed on two separate display terminals or a single
content stretched across two displa y devices for expanded workspace.
Gigabit Ethernet
The motherboard is equipped with the Intel® 82573L and
82566DC. 82566DC is a single port Gigabit Ethernet Physical
Layer Transceiver (PHY) that connects to its MAC through a dedicated interconnects. Both 82573L and 82566DC are based on
Intel's Gigabit PHY technology, and supports operation at data
rates of 10/100/1000 Mbps. Utilizing its wide bandwidth, the gigabit LAN controller allows up to 1 Gbps of data transfer rate for
superior network communications.
PCI Express®
The MI-965 fully supports the PCI Express® technology with one
PCI Express® x16 slot. The PCI Express x16 graphics interface
offers increased bandwidth and scalability over AGP 8X. PCI
Express x16 allows up to 4 GB/s of peak bandwidth per direction,
and up to 8 GB/s concurrent bandwidth.
Serial ATA II technology
Storage is efficient and secure with the Serial ATA II interface. Utilizing the Intel® ICH8M, the MI-965 supports up to two Serial ATA
II devices capable of reading/writing data at up to 3 Gbps. The
SATA specification improves chassis airflow via thinner and more
flexible cables with lower pin count.
Universal Serial Bus (USB) 2.0
The MI-965 incorporates the Universal Serial Bus (USB) 2.0 specification that increases peripheral connection speed from 12 Mbps
(USB 1.1) to 480 Mbps. USB 2.0 is backward compatible with USB
1.1.
8Introduction
Page 21

MI-965
Hardware monitoring
A built-in, proactive hardware monitoring system in the ASIC monitors the CPU temperature, system fan rotations, and voltage levels to prevent overheating and/or component damage, effect
timely failure detection, and ensure stable supply of current for
critical motherboard components.
Watchdog Timer
The watchdog timer (WDT) monitors system operations based on
user-defined configurations. The WDT can be programmed for different time-out periods, such as from 1 to 255 seconds or from 1 to
255 minutes. The WDT generates a reset signal, then a reset
request, after failure to strobe it within the programmed time
period. A register bit may be enabled to indicate if the watchdog
timer caused the reset event. The WDT register is cleared during
the power-on sequence to enable the operating system to take
appropriate action when the watchdog generates a reboot.
Software
The MI-965 is compatible with all major operating systems.
ADLINK provides additional drivers for ADLINK peripherals. Hardware and software drivers may be found on the Driver CD.
Introduction 9
Page 22
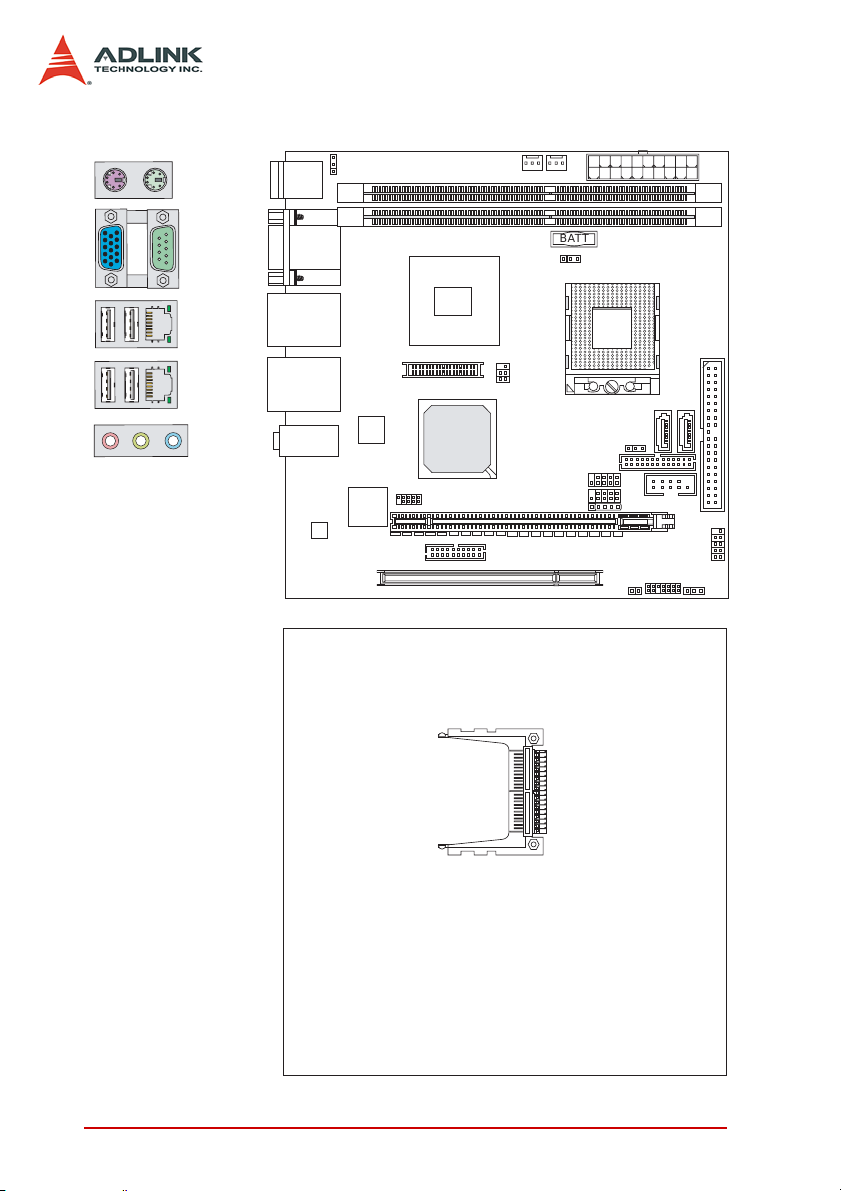
1.7 Board Layout
Top : mouse
Bottom: keyboard
Top:COM Port
Bottom: VGA Port
Top:LAN Jack
Bottom: USB ports
Top:LAN Jack
Bottom: USB ports
T:Line-In
M:Line- Out
B:MIC-Int
ALC888
J5
82566DC
82573L
Intel
Intel
JLVDS1
JSPI2
DIMM1
DIMM2
GM965
PCI1
Intel
Intel
ICH8M
CPUFAN1
JTV2
PCI-E1
J4
SYSFAN1
BATT
JBAT1
F_USB2
F_USB1
+
JCF_SEL1
JLPT1
J7
JCASE1
SATA2
COM2
JLPC1
ATX1
IDE1
SATA1
JFP1
J6
CF1
Figure 1-2: MI-965 Board Layout
10 Introduction
Page 23
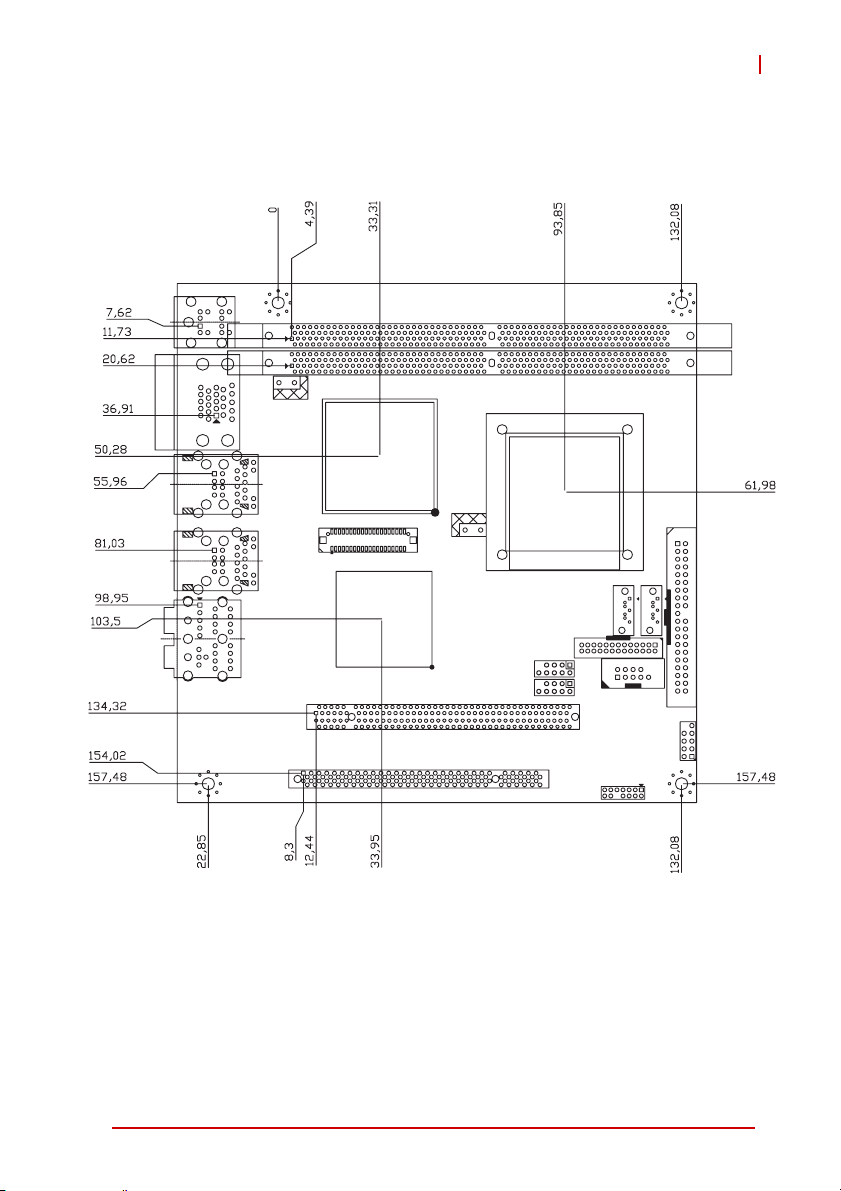
1.8 Mechanical Drawings
MI-965
Dimensions in mm
Figure 1-3: MI-965 Board Dimensions (top view)
Introduction 11
Page 24
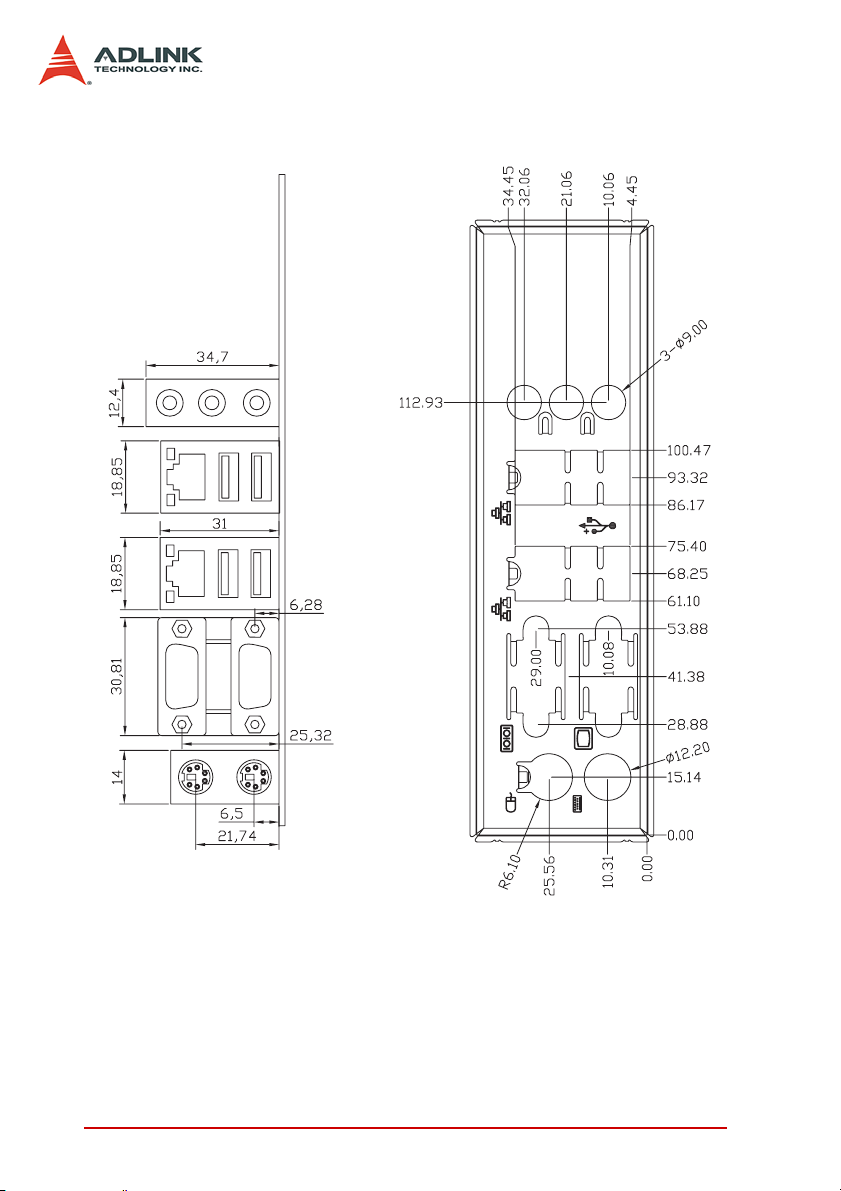
Dimensions in mm
Figure 1-4: MI-965 Rear I/O Dimensions
12 Introduction
Page 25
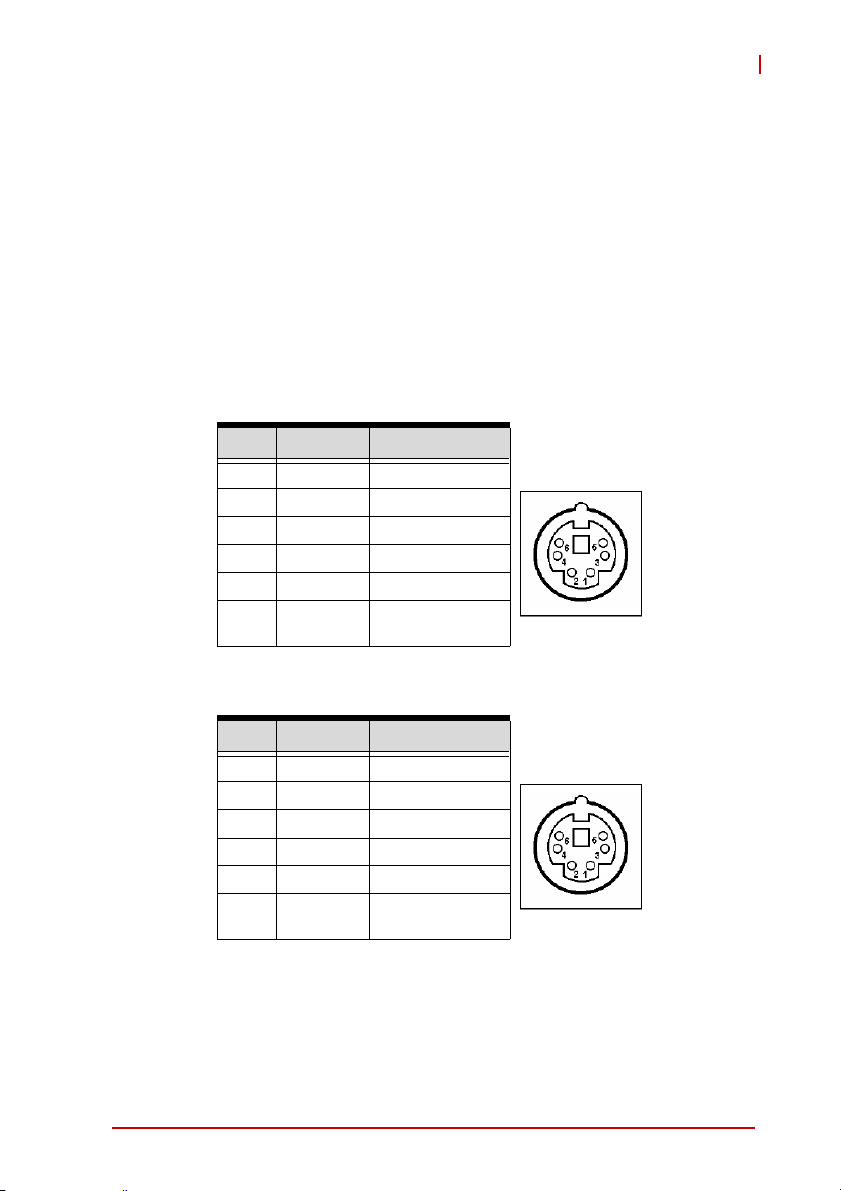
2 Connectors & Jumpers
The connectors and jumpers on the MI-965 allow you to connect
and configure external devices such as keyboard, floppy disk
drives, hard disk drives, printers, etc. The following subsections
specify the pin assignments for connectors and jumper blocks on
the MI-965. Refer to Figure 1-2: MI-965 Board Layout for connector and jumper locations.
2.1 Rear I/O Connectors
PS/2 Mouse Port (green)
Pin # Signal Function
1MSDATAMouse Data
2 NC not connected
3 GND Ground
4+5V Power
5 CLK Clock
6 NC not connected
MI-965
PS/2 Keyboard Port (purple)
Pin # Signal Function
1 KBDATA Keyboard Data
2 NC not connected
3 GND Ground
4+5V Power
5 CLK Clock
6 NC not connected
Connectors & Jumpers 13
Page 26
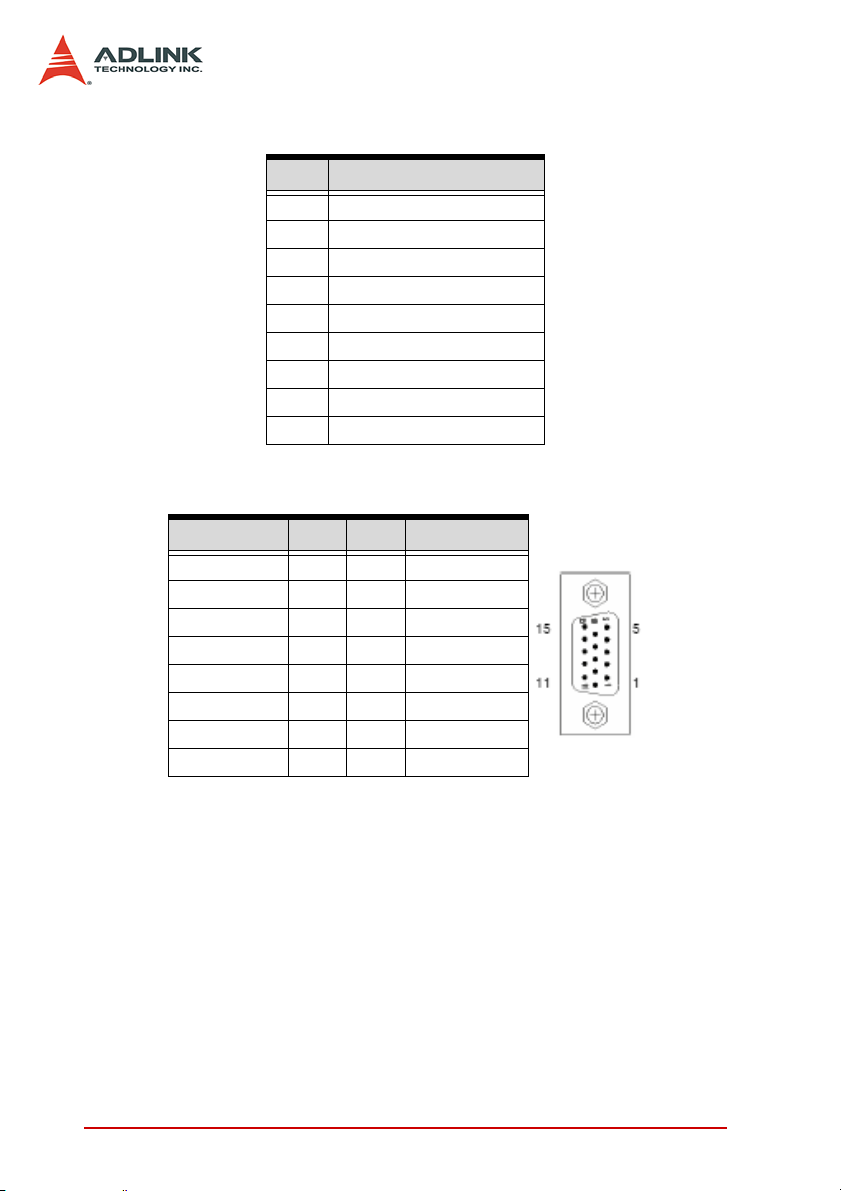
Serial Port Connector (COM1)
Pin # RS-232
1 DCD, Data carrier detect
2 RXD, Receive data
3TXD, Transmit data
4 DTR, Data terminal ready
5 IsoGND, Isolated ground
6 DSR, Data set ready
7 RTS, Request to send
8 CTS, Clear to send
9 RI, Ring indicator
VGA Connector.
Signal Name Pin # Pin # Signal Name
Red 1 2 Green
Blue 3 4 N.C.
GND 5 6 GND
GND 7 8 GND
+5V. 9 10 GND
N.C. 11 12 CRTDATA
HSYNC 13 14 VSYNC
CRTCLK 15
Audio I/O port
The three-jack audio I/O supports Line-In, Line-Out, and Mic-In
functions. The Line-In jack (blue) connects to an audio source
such as tape recorders, etc. The green Line-Out port connects a
speaker or headphone, while the pink Mic-In jack connects a
microphone.
14 Connectors & Jumpers
Page 27
MI-965
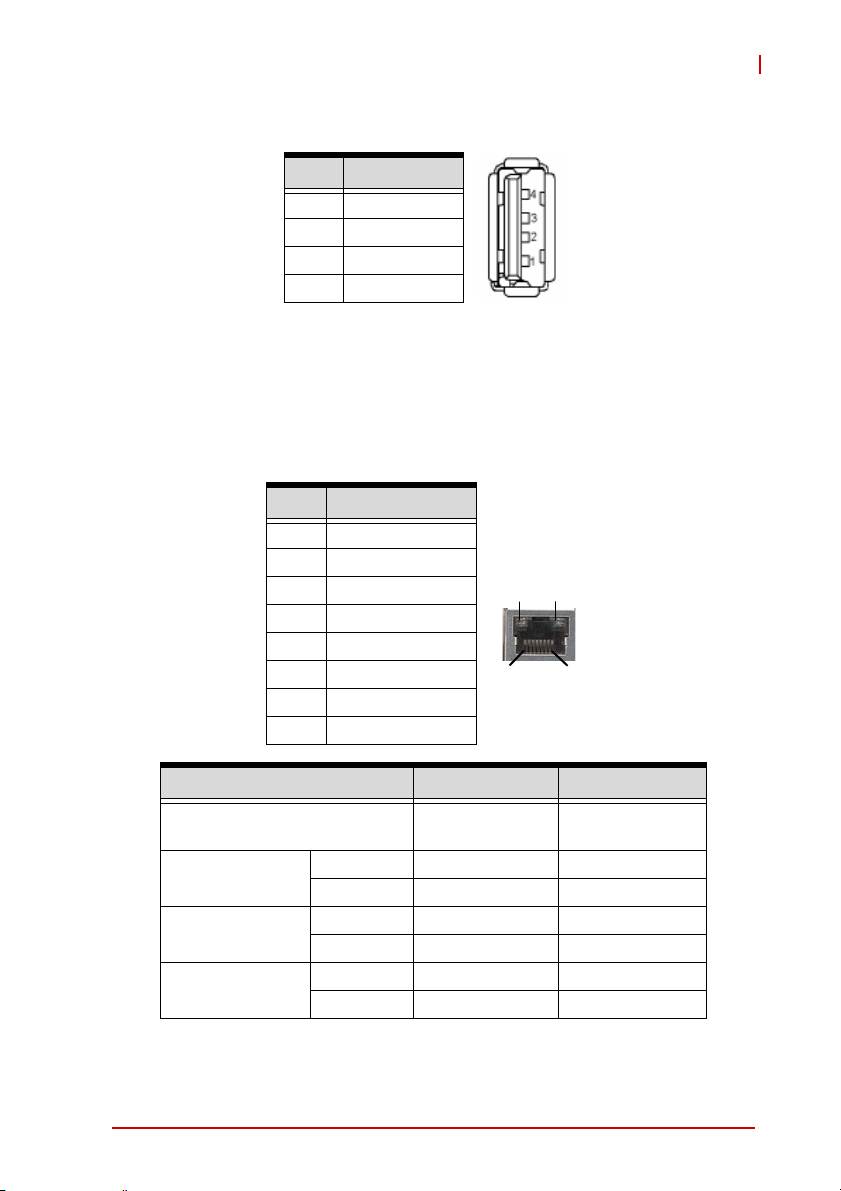
USB Connectors
Pin # Signal Name
1Vcc
2 USB2/33 USB2/3+
4GND
LAN Port (RJ-45)
This port allows gigabit connection to a Local Area Network (LAN)
using a network hub. The LAN port comes with an activity/link and
speed LED. Refer to the tables below for the LAN port pin defini-
tions and LED indications.
Pin # Signal Name
1 GBE0_MDI0+
2 GBE0_MDI03 GBE0_MDI1+
4 GBE0_MDI2+
5 GBE0_MDI26 GBE0_MDI17 GBE0_MDI3+
8 GBE0_MDI3-
ACT/LINK
LED
RJ45
SPEED
LED
18
Status LED1 LED2
Network link is not established
or system powered off
10 Mbps
100 Mbps
1000 Mbps
Link OFF ON
Active OFF Blinking
Link ON OFF
Active Blinking OFF
Link Blinking ON
Active Blinking Blinking
OFF OFF
Connectors & Jumpers 15
Page 28
2.2 Onboard Connectors
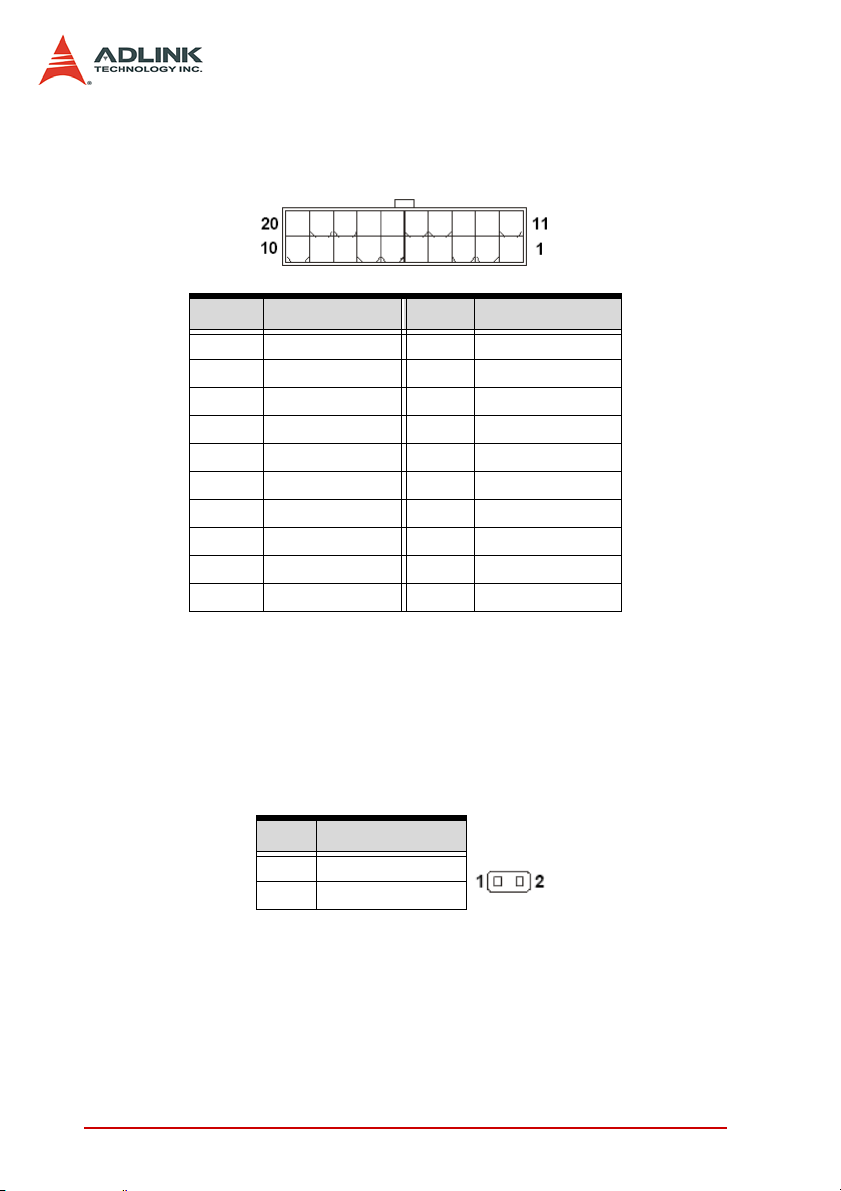
ATX Power Connector (ATX1)
Pin # Signal Pin # Signal
1 3.3V 13 3.3V
2 3.3V 14 - 12V
3 GND 15 GND
4 5V 16 PS On
5 GND 17 GND
6 5V 18 GND
7 GND 19 GND
8 Power Good 20 - 5V
9 5VSB 21 5V
10 12V 22 5V
Chassis Intrusion Connector (JCASE1)
This connector connects to the chassis intrusion switch cable. If
the chassis is opened, the chassis intrusion mechanism will be
activated. The system will record this status and show a warning
message on the screen. To clear the warning, you must enter the
BIOS utility and clear the record.
Pin # Signal Name
1CINTRU
2GND
16 Connectors & Jumpers
Page 29
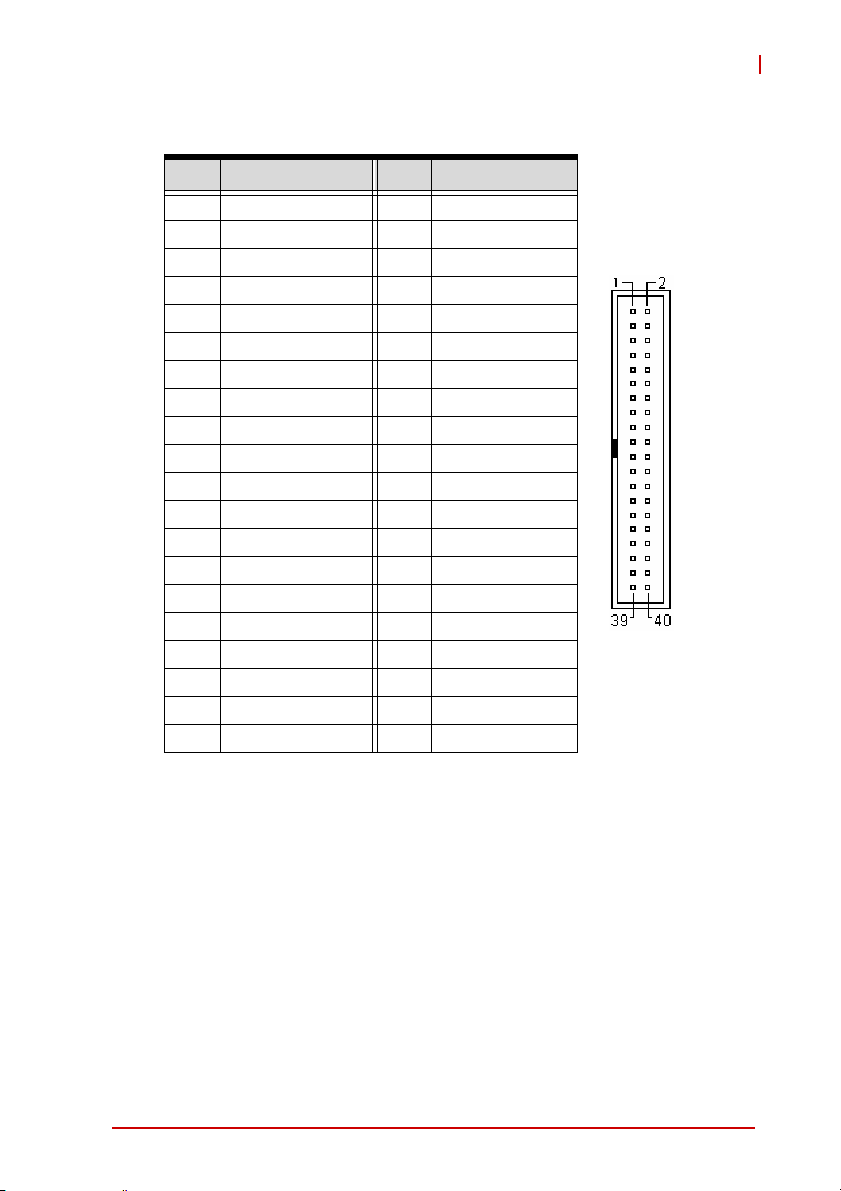
IDE Connector (IDE1)
Pin # Signal Pin # Signal
1 Reset IDE 2 Ground
3 Host data 7 4 Host data 8
5 Host data 6 6 Host data 9
7 Host data 5 8 Host data 10
9 Host data 4 10 Host data 11
11 Host data 3 12 Host data 12
13 Host data 2 14 Host data 13
15 Host data 1 16 Host data 14
17 Host data 0 18 Host data 15
19 Ground 20 NC
21 DRQ0 / DRQ1 22 Ground
23 Host IOW 24 Ground
25 Host IOR 26 Ground
27 IOCHRDY 28 Host ALE
29 DACK0 / DACK1 30 Ground
31 IRQ14 / IRQ 15 32 No conn ect
33 Address 1 34 No connect
35 Address 0 36 Address 2
37 Chip select 0 38 Chip select 1
39 Activity 40 Ground
MI-965
Connectors & Jumpers 17
Page 30
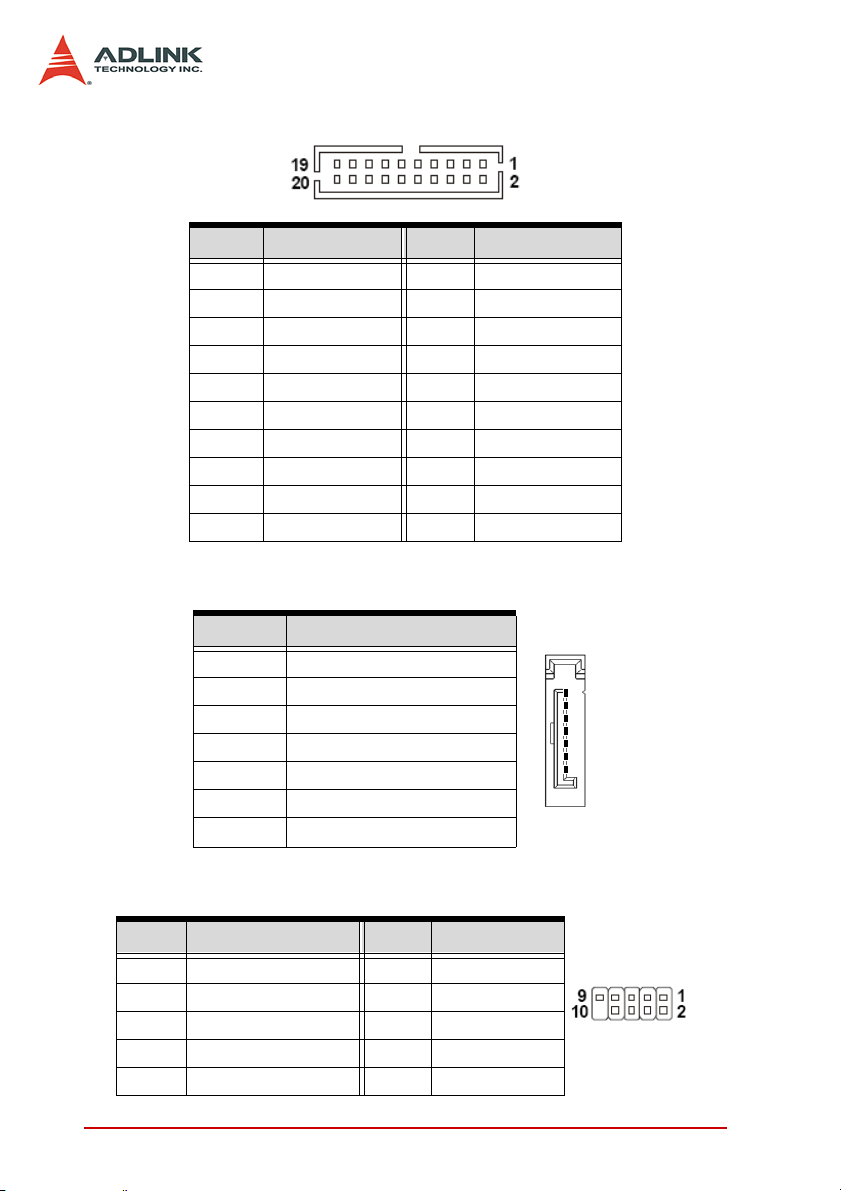
Digital IO Connector (J4)
Pin # Signal Pin # Signal
1 VCC3 13 VCC5
2 N_GPIO10 14 N_GPIO20
3 N_GPIO11 15 N_GPIO21
4 N_GPIO12 16 N_GPIO22
5 N_GPIO13 17 N_GPIO23
6 N_GPIO14 18 N_GPIO24
7 N_GPIO15 19 N_GPIO25
8 N_GPIO16 20 N_GPIO26
9 N_GPIO17 21 N_GPIO27
10 GND 22 NC
Serial ATA Connectors (SATA1-2))
Pin # Signal
1 GND
2 TXP (A +)
3 TXN (A -)
4 GND
5 RXN (B -)
6 RXP (B +)
7 GND
1
7
SPI Flash ROM Connector (JSPI2)
Pin # Signal Pin # Signal
1 VCC3_SB 2 VCC3_SB
3 SPI_MISO_F 4 SPI_MOSI_F
5 SPI_CS0_F# 6 SPI_CLK_F
7 GND 8 GND
9 SPI_HOLD# 10 NC
18 Connectors & Jumpers
Page 31

Fan Power Connectors (CPUFAN1, SYSFAN1)
Front Panel Connector (JFP1)
Pin # Signal Description
1 HD_LED + Hard disk LED pull-up
2 FP PWR/SLP MSG LED pull-up
3 HD_LED - Hard disk active LED
4 FP PWR/SLP MSG LED pull-up
5 RST_SW -
6 PWR_SW +
7 RST_SW +
8 PWR_SW 9 RSVD_DNU Reserved. Do not use.
10 NC NC
Reset Switch low reference
pull-down to GND
Power Switch high reference
pull-up
Reset Switch high reference
pull-up
Power Switch low reference
pull-down to GND
MI-965
Connectors & Jumpers 19
Page 32
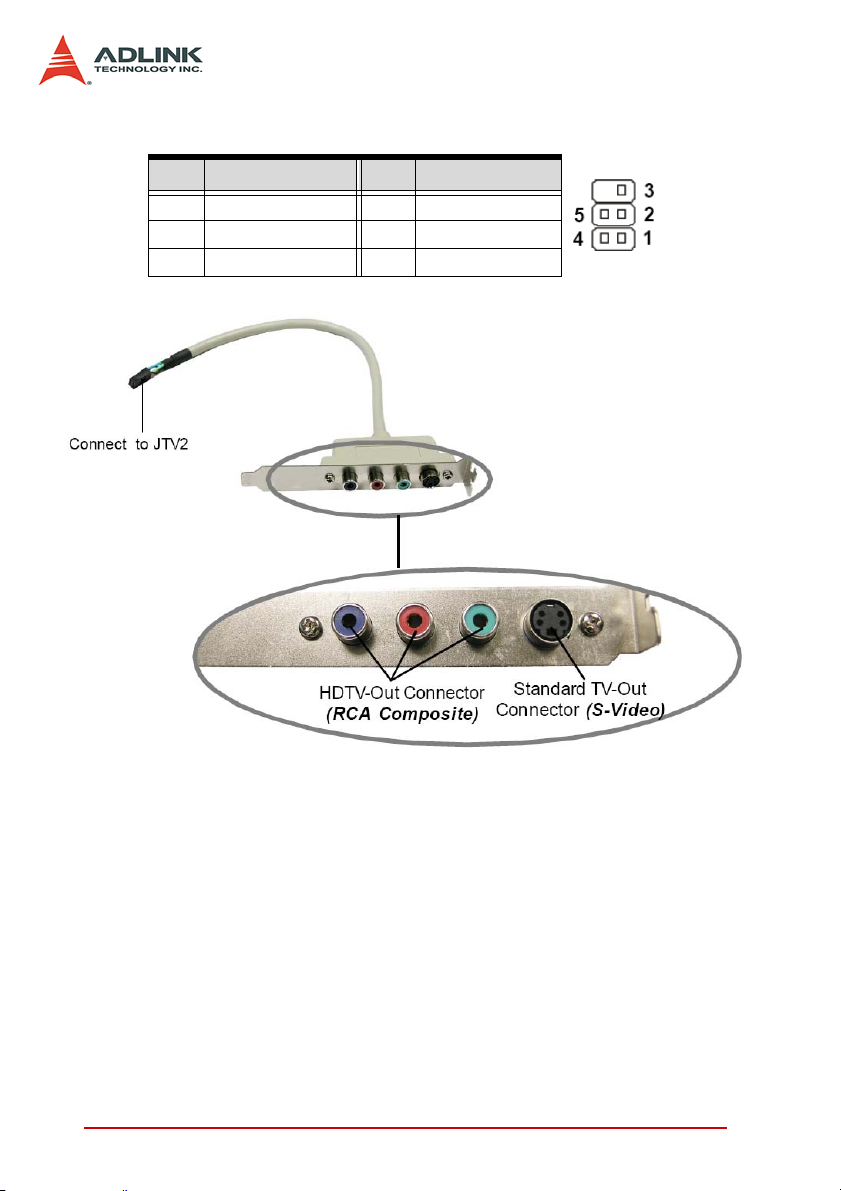
TV-Out Connector (JTV2)
Pin # Signal Pin # Signal
1 GND 4 GND
2 LCVBS 5 LC
3 LY 6 NC
TV-Ou t Bracket (optional)
20 Connectors & Jumpers
Page 33
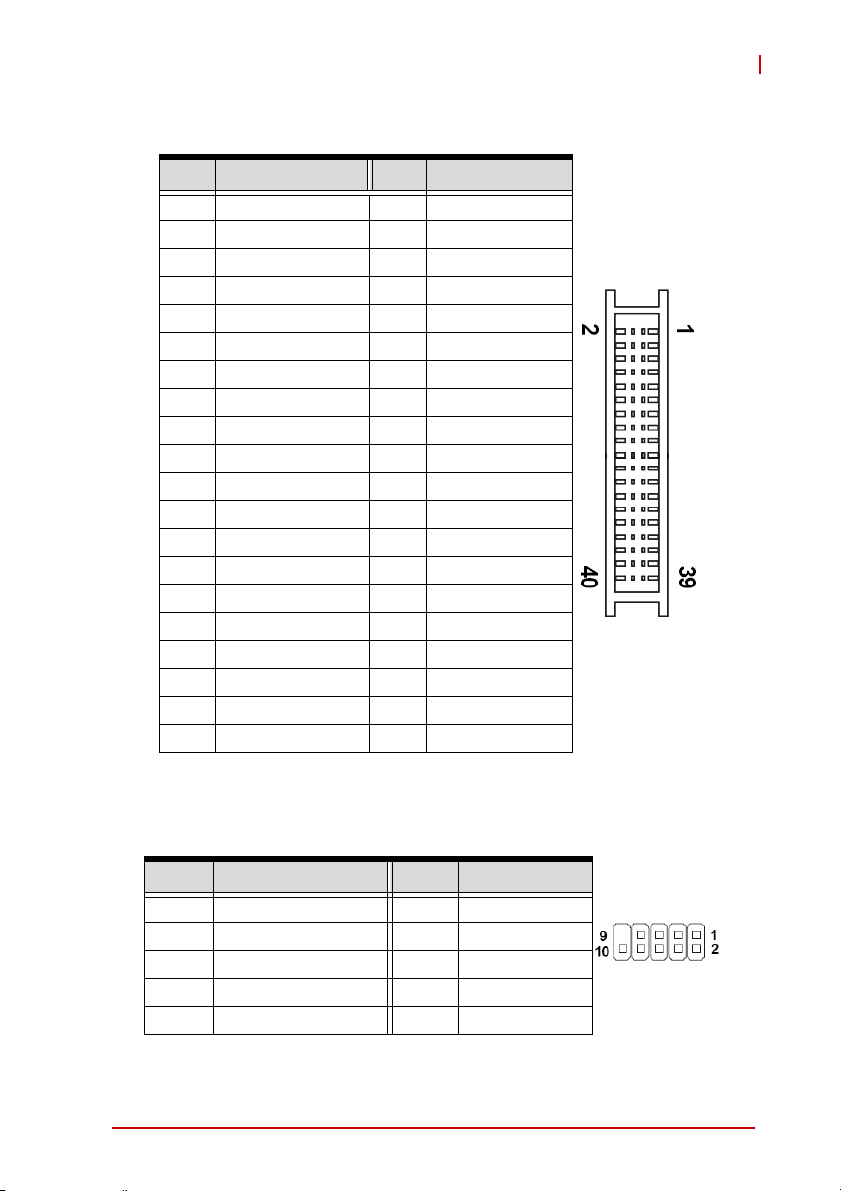
LVDS Flat Panel Connector (JLVDS1)
Pin # Signal Pin # Signal
1 +12V 2 +12V
3 +12V 4 +12V
5 +12V 6 GND
7 VCC3/VCC5 8 GND
9 LCD_VDD 10 LCD_VDD
11 LDDC_CLK 12 LDDC_DATA
13 L_BKLTCTL 14 LVDS_VDDEN
15 L_BKLTEN 16 GND
17 LA_DATA0# 18 LA_DATA0
19 LA_DATA1# 20 LA_DATA1
21 LA_DATA2# 22 LA_DATA2
23 LA_CLK# 24 LA_CLK
25 LA_DATA3# 26 LA_DATA3
27 GND 28 GND
29 LB_DATA0# 30 LB_DATA0
31 LB_DATA1# 32 LB_DATA1
33 LB_DATA2# 34 LB_DATA2
35 LB_CLK# 36 LB_CLK
37 LB_DATA3# 38 LB_DATA3
39 GND 40 GND
MI-965
Note: Refer to LVDS Power Selection Jumper (J7).
USB Connector (F_USB1, F_USB2)
Pin # Signal Pin # Signal
1 VCC 2 VCC
3 USB0- 4 USB15 USB0+ 6 USB1+
7 GND 8 GND
9 Key 10 NC
Connectors & Jumpers 21
Page 34
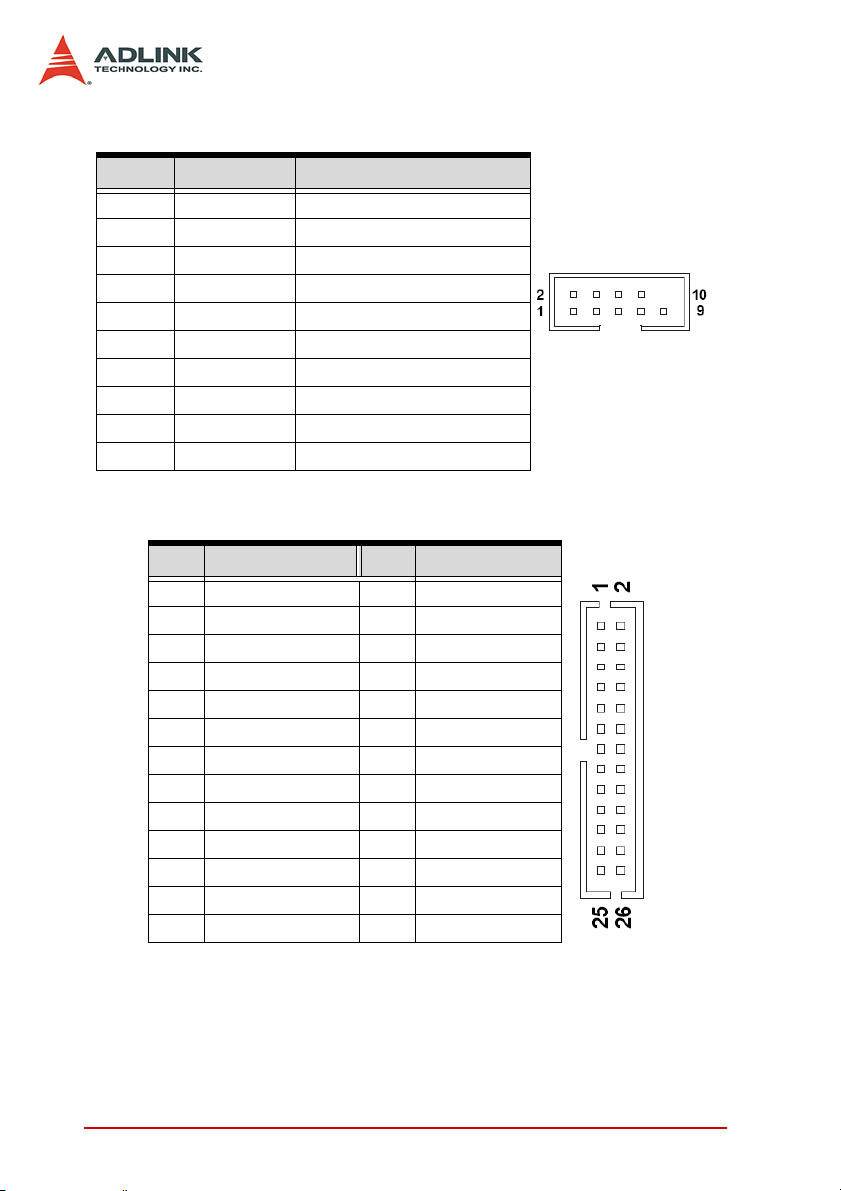
Serial Port Connector (COM2))
Pin # Signal Functions
1 DCD Data Carry Detect
2 SIN Serial In or Receive Data
3 SOUT Serial Out or Transmit Data
4 DTR Data Terminal Ready
5 GND Ground
6 DSR Data Set Ready
7 RTS Request To Send
8 CTS Clear To Send
9 VCC_COM3 Power Source
10 NC NC
Parallel Port Connector (JLPT1)
Pin # Signal Pin # Signal
1 RSTB# 2 AFD#
3 PRND0 4 ERR#
5 PRND1 6 PINIT#
7 PRND2 8 LPT_SLIN#
9 PRND3 10 GND
11 PRND4 12 GND
13 PRND5 14 GND
15 PRND6 16 GND
17 PRND7 18 GND
19 ACK# 20 GND
21 BUSY 22 GND
23 PE 24 GND
25 SLCT 26 GND
22 Connectors & Jumpers
Page 35
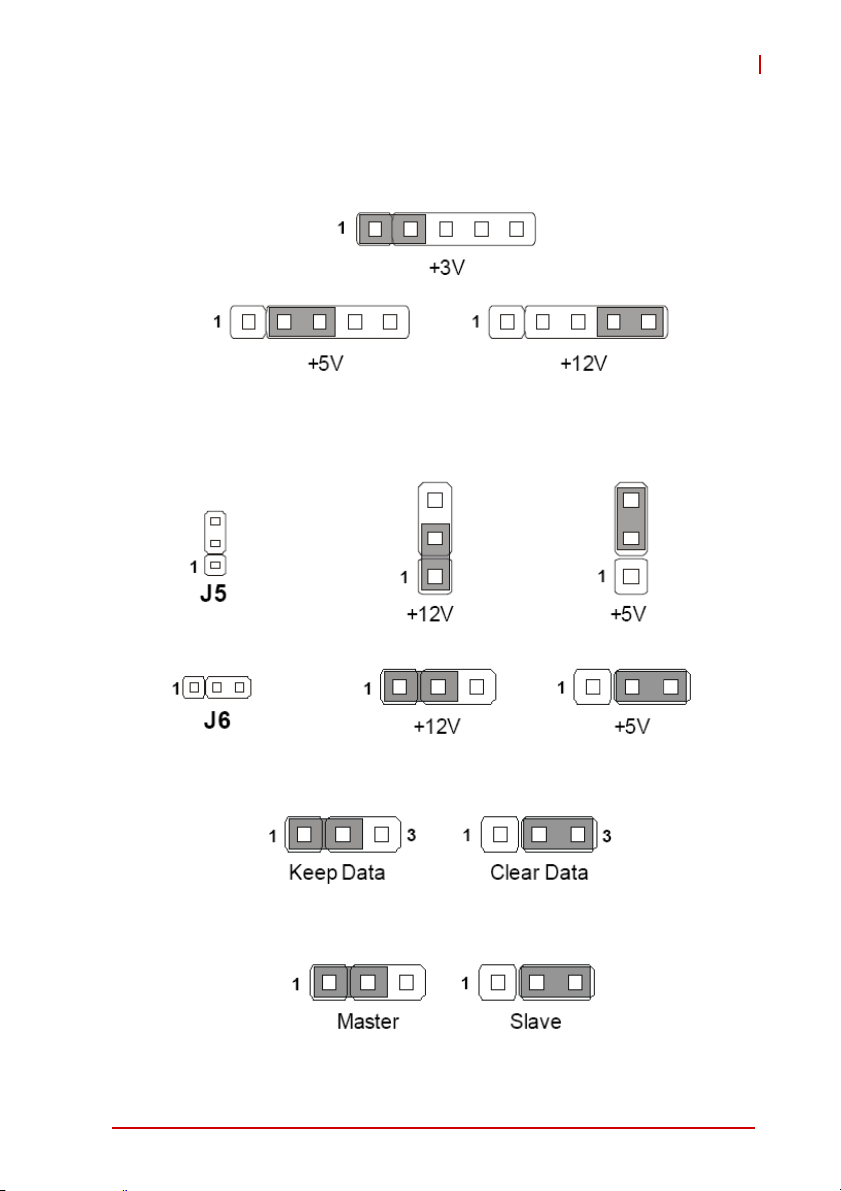
2.3 Jumpers
LVDS Power Selection Jumper (J7)
COM Port Power Jumpers (J5, J6)
J5 corresponds to COM1, J6 corresponds to COM2.
MI-965
Clear CMOS Jumper (JBAT1)
CF Mode Selecting Jumper (JCF_SEL1)
Connectors & Jumpers 23
Page 36

This page intentionally left blank.
24 Connectors & Jumpers
Page 37
3 Getting Started
This chapter provides information on how to install components to
the MI-965 SBC. Specifically, the installation of CPU, memory
modules, and operating system are explained.
3.1 Installing the CPU
The MI-965 Supports the Intel® Core™ 2 Duo, Celeron® M
processors in the Micro-FCPGA package using the Socket P
interface. To install the CPU on the main board, follow the
instructions below.
Overheating will seriously damage the CPU and system.
Always make sure the cooling fan is functioning properly to
CAUTION:
protect the CPU from overheating.
Make sure that you apply an even layer of thermal paste (or
thermal tape) between the CPU and the heatsink to allow heat
dissipation.
Before replacing the CPU, always turn off the power supply or
unplug the power supply’s power cord from the grounded outlet
to ensure the safety of CPU.
MI-965
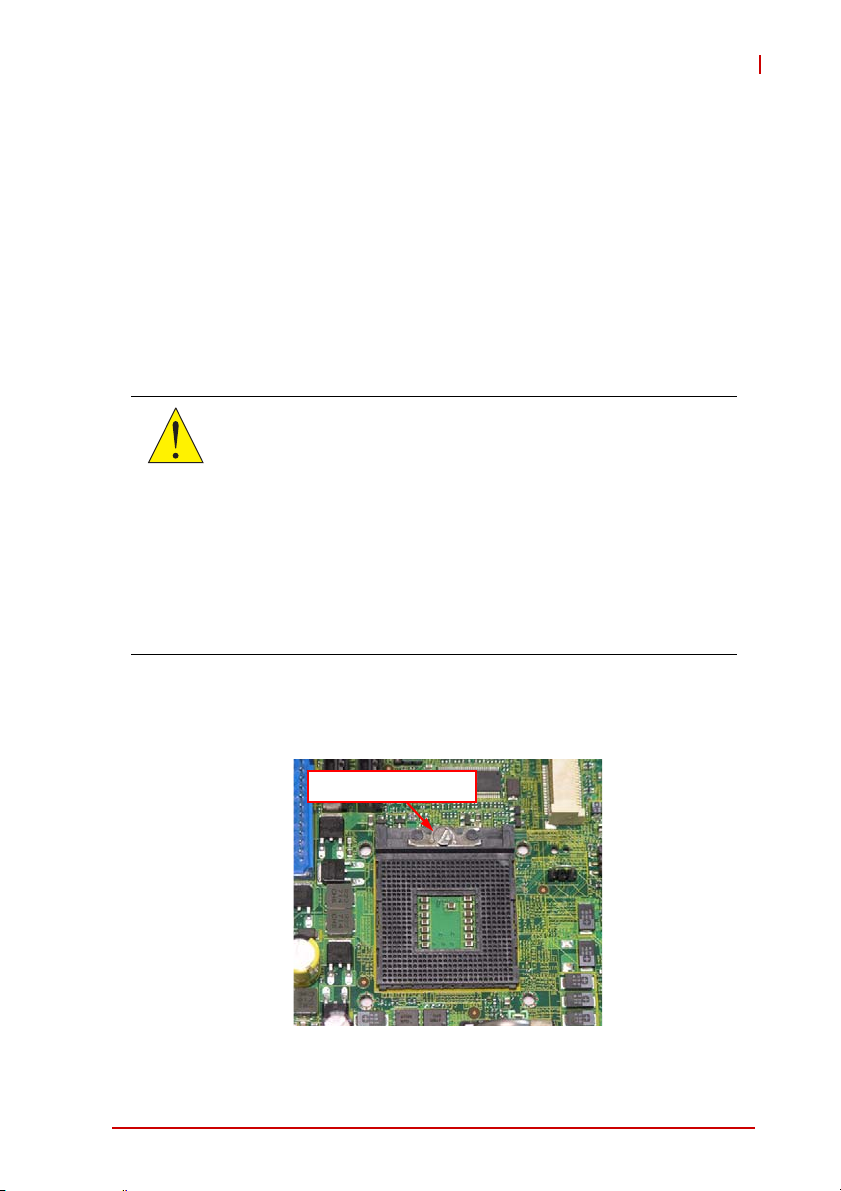
1. Locate the CPU socket on the MI-965. Fully turn the
CPU locking screw counter-clockwise as far as it will go.
locking screw
Getting Started 25
Page 38
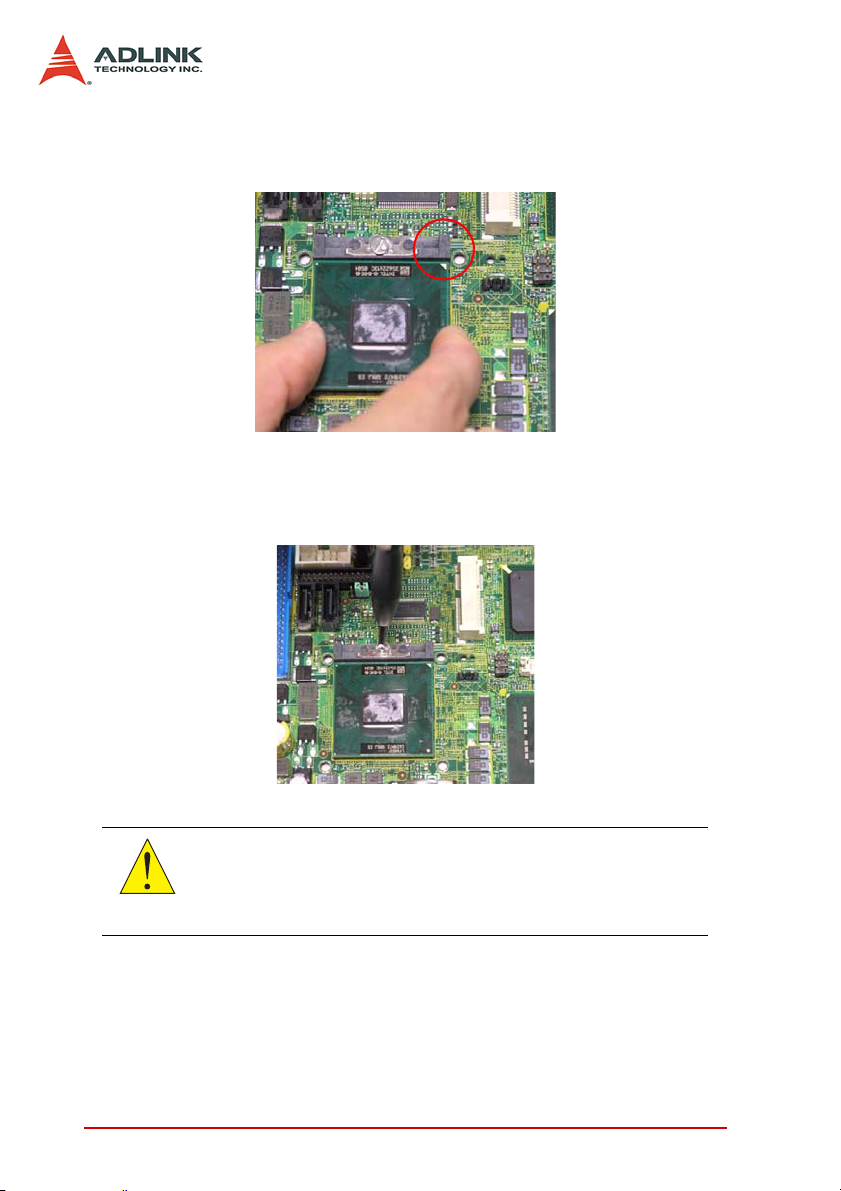
2. Carefully place the CPU into the CPU socket. Be sure to
align the gold triangle on the corner of the chip with the
triangular marking in the corner of the socket.
3. Press down gently on the chip to ensure that it is
securely in place, and then fully turn the CPU locking
screw clockwise as far as it will go to lock the CPU into
position.
.
A CPU heatsink and fan are not included with the MI-965.
Obtain a suitable CPU cooler and follow the installation instruc-
CAUTION:
26 Getting Started
tions provided with your unit. Connect the fan power cable to
the CPUFAN1 socket.
Page 39
MI-965
3.2 Memory Module Installation
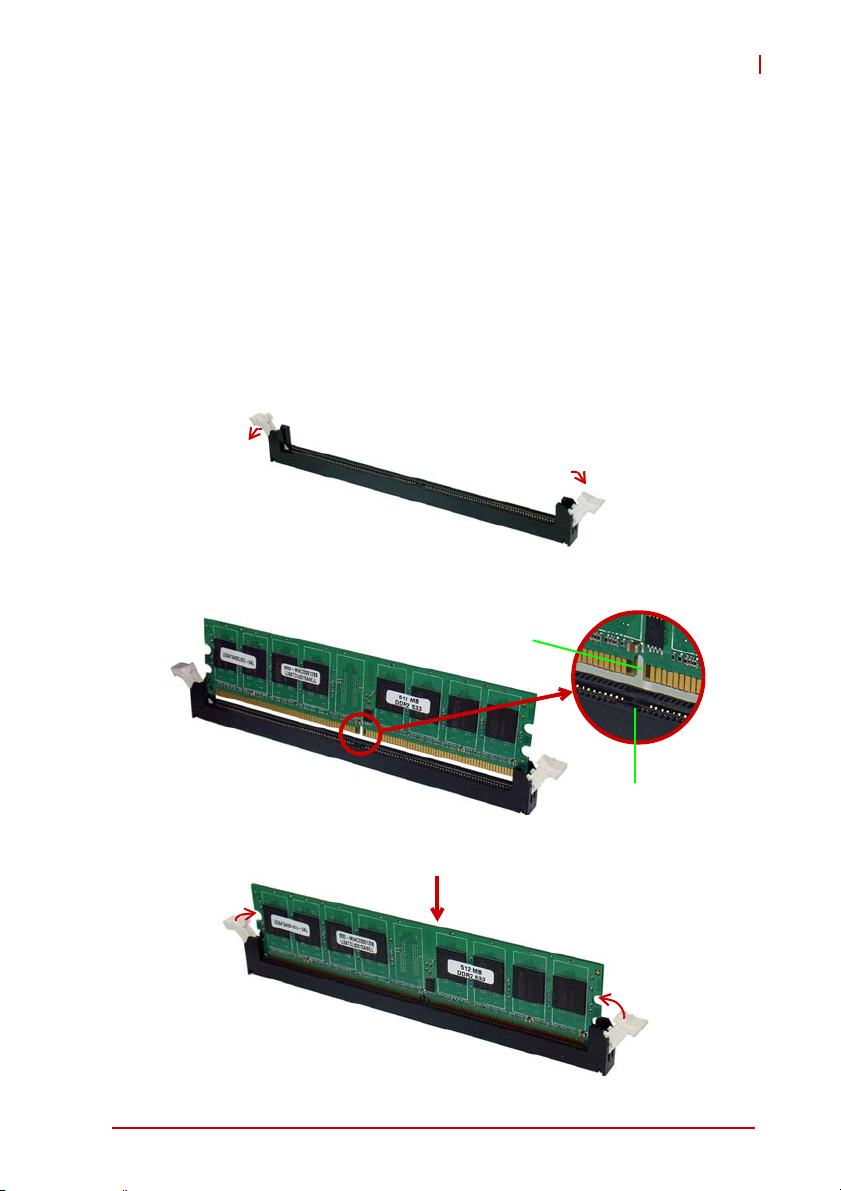
The MI-965 supports up to 4 GB of DDR2 533/667 SDRAM in two
240-pin DIMM sockets. The DDR2 memory modules are notched
to facilitate correct installation in the DIMM sockets.
X It is recommended that you install DIMMs with the same
CAS latency. For maximum compatibility, install memory
modules with the same brand, model, and/or rating.
To install a memory module:
1. Locate the DIMM slots on the motherboard.
2. Press the socket’s retaining clips outward to unlock.
3. Align the memory module on the socket making sure
that the notch matches the break on the socket.
Notch
Break
4. Insert the module firmly into the slot until the retaining clips
snap back inwards and the module is securely seated.
Getting Started 27
Page 40
3.3 Driver Installation
The MI-965 drivers are located in the following directories on the
Driver CD, or can be downloaded from the ADLINK website
(http://www.adlinktech.com):
Chipset driver \CHIPSET\Intel\INF8.3.0.1013\
Display driver \SVGA\Intel\GM965\Winxp32\
LAN driver \NETWORK\Intel\
TPM driver \TPM\Win32\
Audio driver \SOUND\REALTEK\ALC888\windows\R187\
Follow the instructions below to install the required MI-965 drivers:
1. Install the Windows operating system before installing
any driver. Most standard I/O device drivers are installed
during Windows installation.
2. Install the chipset driver by running the program
X:\CHIPSET\Intel\INF8.3.0.1013\infinst_autol.exe.
Follow the instructions given and reboot when
instructed.
3. Install the VGA driver and utilities by running the program X:\SVGA\Intel\GM965\Winxp32\setup.exe. Follow the instructions given and reboot when instructed.
4. Install the LAN driver by running the program
X:\NETWORK\Intel\autorun.exe. Follow the instructions given and reboot if required.
5. Install the Audio driver by running the program
X:\SOUND\REAL TEK\ALC888\windows\R187\setup.exe.
Follow the instructions given and reboot if required.
6. Install the TPM driver by running the program
X:\TPM\Win32\setup.exe. Follow the instructions given
and reboot if required.
28 Getting Started
Page 41

4 BIOS Setup
The following chapter describes basic navigation for the
AMIBIOS®8 BIOS setup utility.
4.1 Starting the BIOS
To enter the setup screen, follow these steps:
1. Power on the motherboard
2. Press the < Delete > key on your keyboard when you
see the following text prompt:
< Press DEL to run Setup >
3. After you press the < Delete > key, the main BIOS setup
menu displays. You can access the other setup screens
from the main BIOS setup menu , such as Chipset and
Power menus.
MI-965
Note: In most cases, the < Delete > key is used to invoke the setup
screen. There are several cases that use other keys, such as
< F1 >, < F2 >, and so on.
BIOS Setup 29
Page 42
Setup Menu
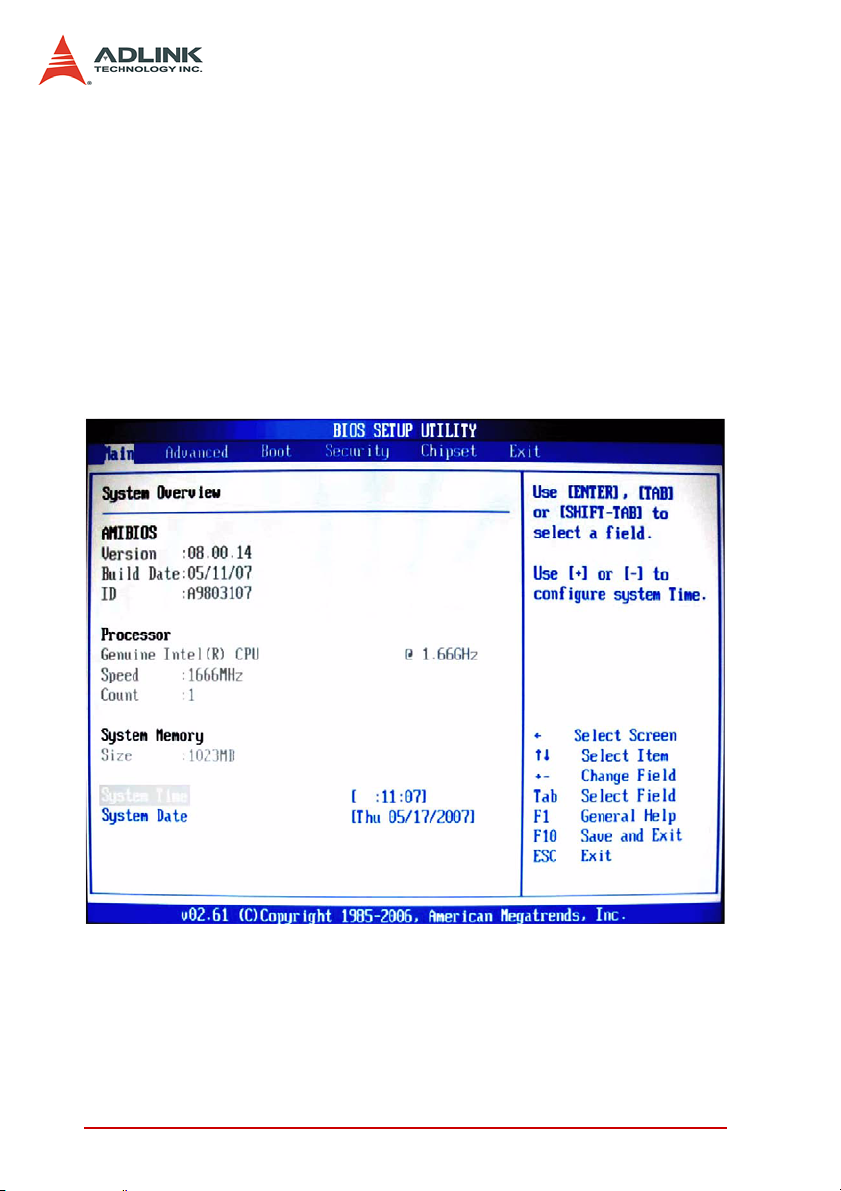
The main BIOS setup menu is the first screen that you can navigate. Each main BIOS setup menu option is described in this
user’s guide.
The Main BIOS setup menu screen has two main frames. The left
frame displays all the options that can be configured. “Grayed”
options cannot be configured, “Blue” options can be.
The right frame displays the key legend. Above the key legend is
an area reserved for a text message. When an option is selected
in the left frame, it is highlighted in white. Often a text message will
accompany it.
Navigation
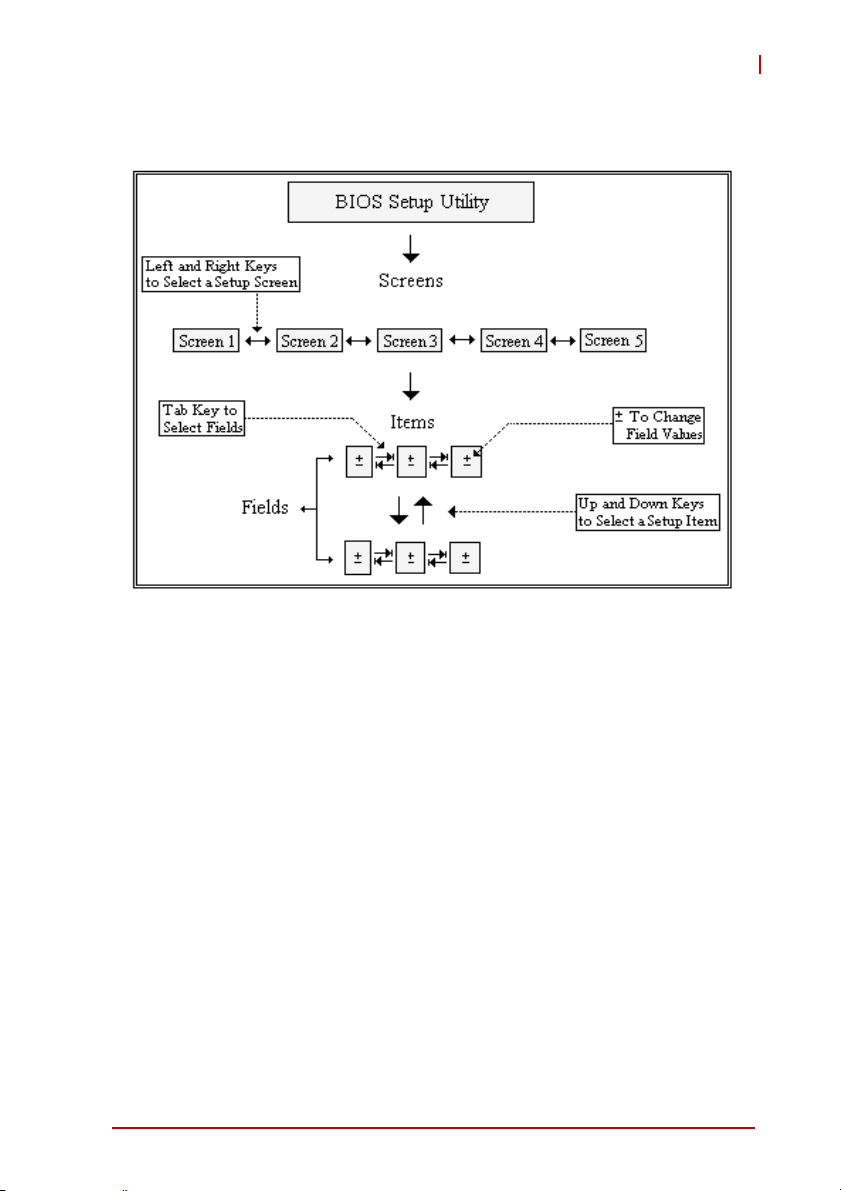
The BIOS setup/utility uses a key-based navigation system called
hot keys. Most of the BIOS setup utility hot keys can be used at
any time during the setup navigation process.
30 BIOS Setup
Page 43
MI-965
These keys include < F1 >, < F10 >, < Enter >, < ESC >, < Arrow >
keys, and so on. .
Note: There is a hot key legend located in the r ight frame on most
setup screens.
The < F8 > key on your keyboard is the Fail-Safe key. It is not displayed on the key legend by default. To set the Fail-Safe settings
of the BIOS, press the < F8 > key on your keyboard. It is located
on the upper row of a standard 101 keyboard. The Fail-Safe settings allow the motherboard to boot up with the least amount of
options set. This can lessen the probability of conflicting settings.
BIOS Setup 31
Page 44
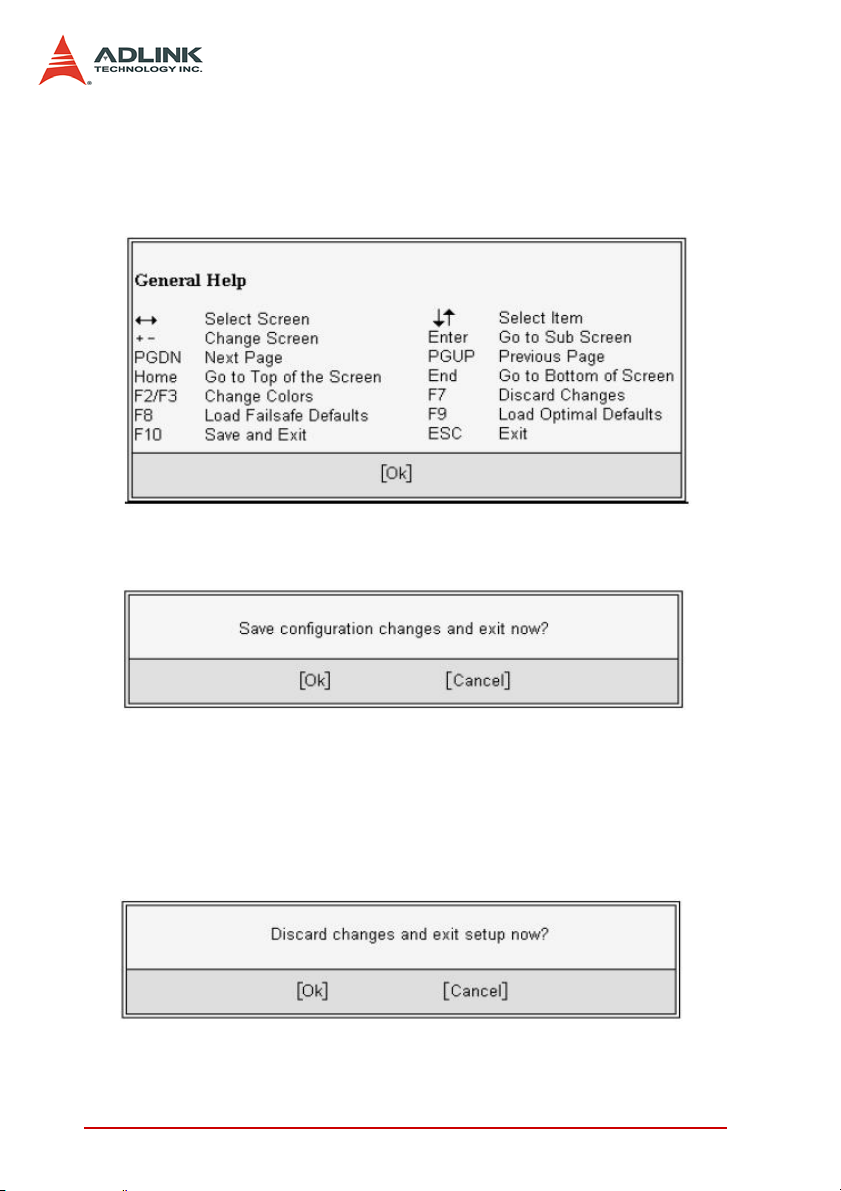
Hotkey Descriptions
F1 The < F1 > key allows you to display the General Help
F10 The < F10 > key allows you to save any changes you have
ESC The < Esc > key allows you to discard any changes you have
screen.
Press the < F1 > key to open the General Help screen.
made and exit Setup. Press the < F10 > key to save your
changes. The following screen will appear:
Press the < Enter > key to save the configuration and exit.
You can also use the < Arrow > key to select Cancel and
then press the < Enter > key to abort this functio n and return
to the previous screen.
made and exit the Setup. Press the < Esc > key to exit the
setup without saving your changes. The following screen will
appear:
Press the < Enter > key to discard changes and exit. You can
also use the < Arrow > key to select Cancel and then press
32 BIOS Setup
Page 45
MI-965
the < Enter > key to abort this function and retu rn to the previous screen.
Enter The < Enter > key allows you to display or change the setup
option listed for a particular setup item. The < Enter > key
can also allow you to display the setup sub-screens.
4.2 Main Setup
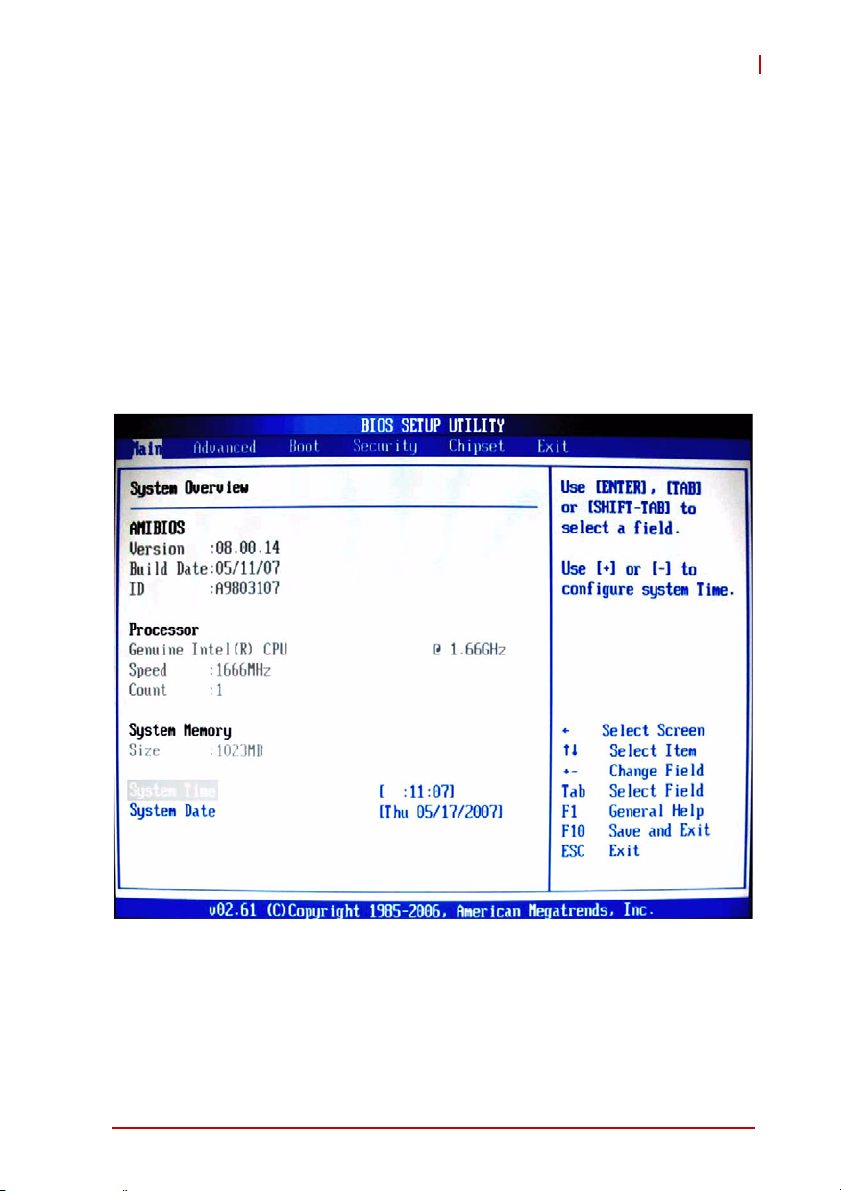
When you first enter the Setup Utility , you will enter the Main setup
screen. You can always return to the Main setup screen by selecting the Main tab. There are two Main Setup options. They are
described in this section. The Main BIOS Setup screen is shown
below.
System Time/System Date
Use this option to change the system time and date. Highlight System Time or System Date using the < Arrow > keys. Enter new values using the keyboard. Press the < Tab > key or the < Arrow >
BIOS Setup 33
Page 46
keys to move between fields. The date must be entered in MM/
DD/YY format. The time is entered in HH:MM:SS format.
Note: The time is in 24-hour format. For example, 5:30 A.M. ap-
pears as 05:30:00, and 5:30 P.M. as 17:30:00.
4.3 Advanced BIOS Setup
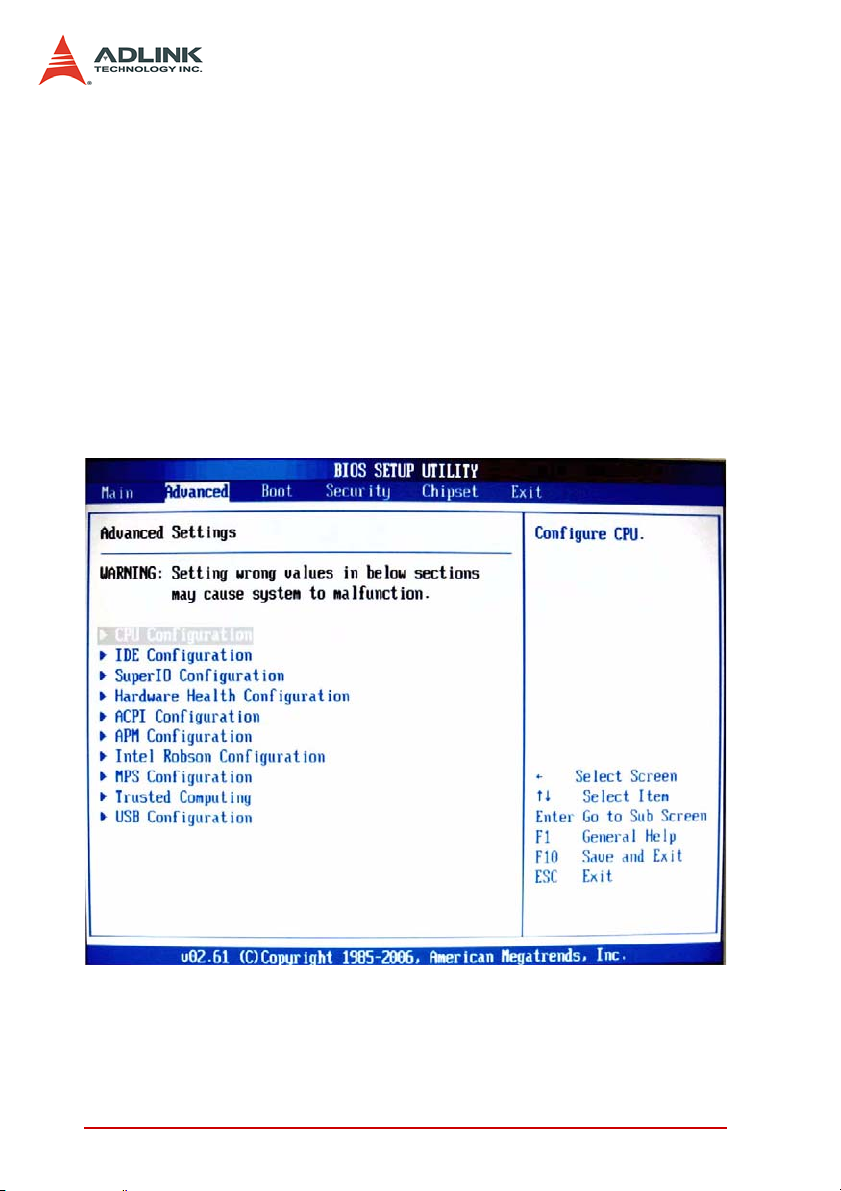
Select the Advanced tab from the setup screen to enter the
Advanced BIOS Setup screen. You can select any of the items in
the left frame of the screen, such as SuperIO Configuration, to go
to the sub menu for that item. You can display an Advanced BIOS
Setup option by highlighting it using the < Arrow > keys. The
Advanced BIOS Setup screen is shown below.
The sub menus are described on the following pages.
34 BIOS Setup
Page 47
MI-965
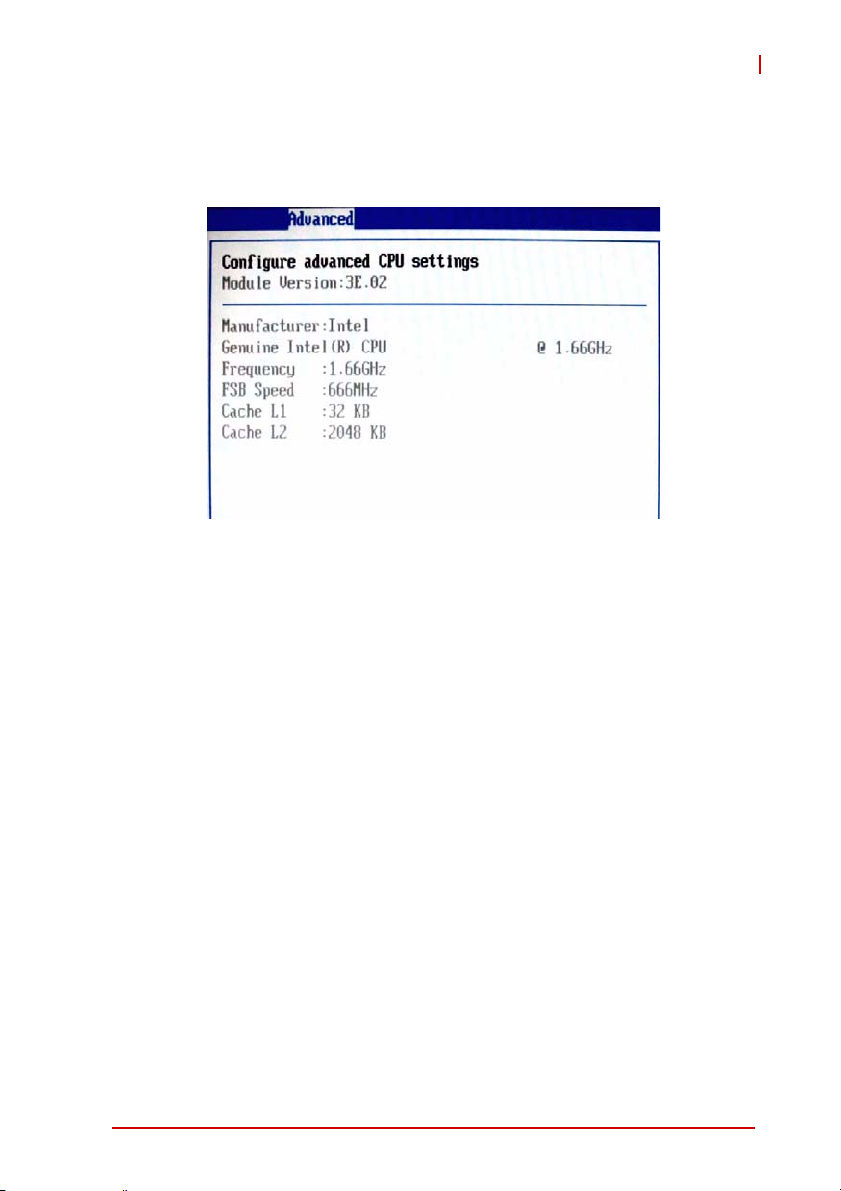
CPU Configuration
This screen displays the advanced configurations of your CPU
(non-configurable).
IDE Configuration
You can use this screen to select options for the IDE Configuration
Settings. Use the up and down < Arrow > keys to select an item.
Use the < + > and < - > keys to change the value of the selected
option. A description of the selected item appears on the right side
of the screen. The settings are described on the following pages.
An example of the IDE Configuration screen is shown below.
BIOS Setup 35
Page 48
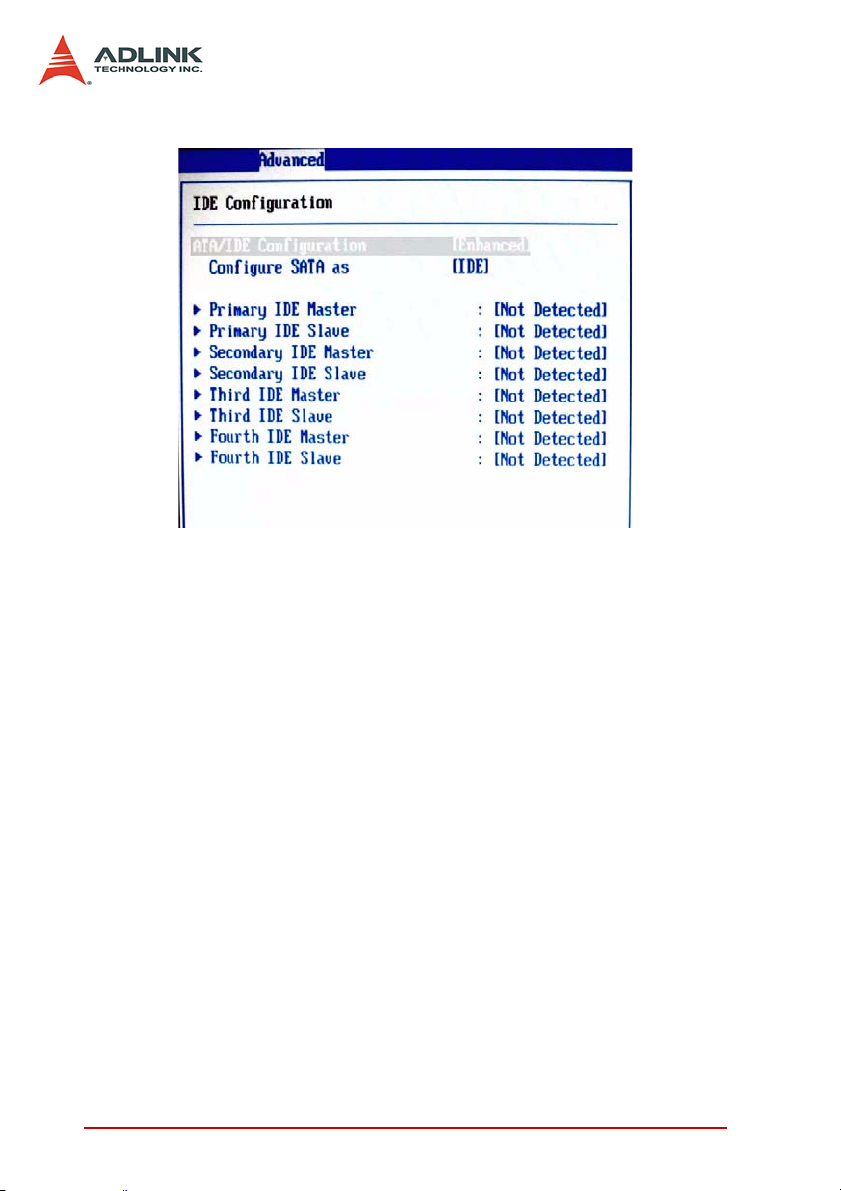
ATA/IDE Configuration
This item specifies whether the IDE channels should be initialized in Compatible or Enhanced mode of operation. The settings are Disabled, Compatible and Enhanced.
Configure SATA as
This item specifies function of the SATA channels. The settings
are IDE mode and AHCI mode.
Primary IDE Master/Slave, Secondary IDE Master/Slave, Third IDE Master/Slave, Fourth IDE Master/Slave
Select one of the hard disk drives to configure it. Press
< Enter > to access its sub menu.
36 BIOS Setup
Page 49
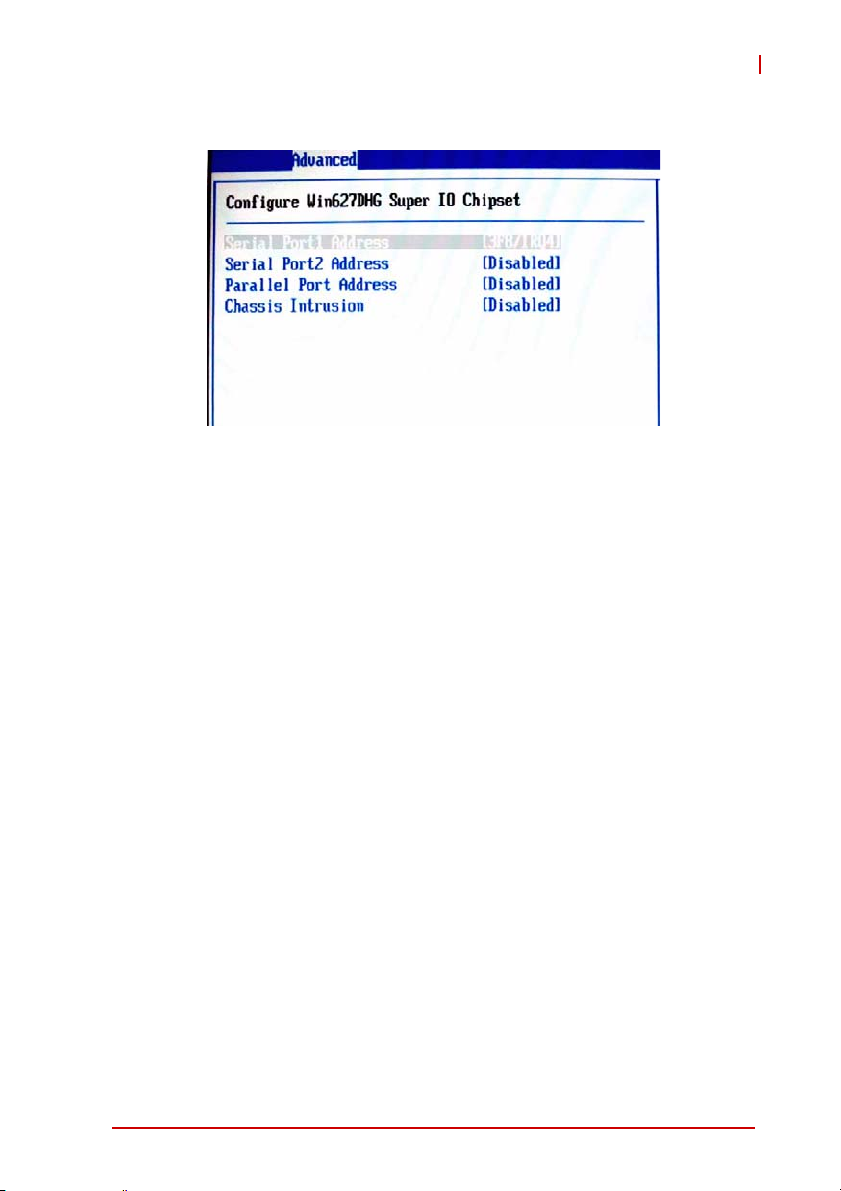
Super IO Configuration
Serial Port 1 / 2 Address
Select an address and a corresponding interrupt for Serial Port
1/2.
Parallel Port Address
This setting specifies the I/O port address and IRQ of the
onboard parallel port.
Chassis Intrusion
MI-965
The field enables or disables recording the chassis intrusion
status and issuing a warning message if the chassis is opened.
To clear the warning message, set the fie ld to [Reset]. The setting of the field will automatically be returned to [Enabled].
BIOS Setup 37
Page 50
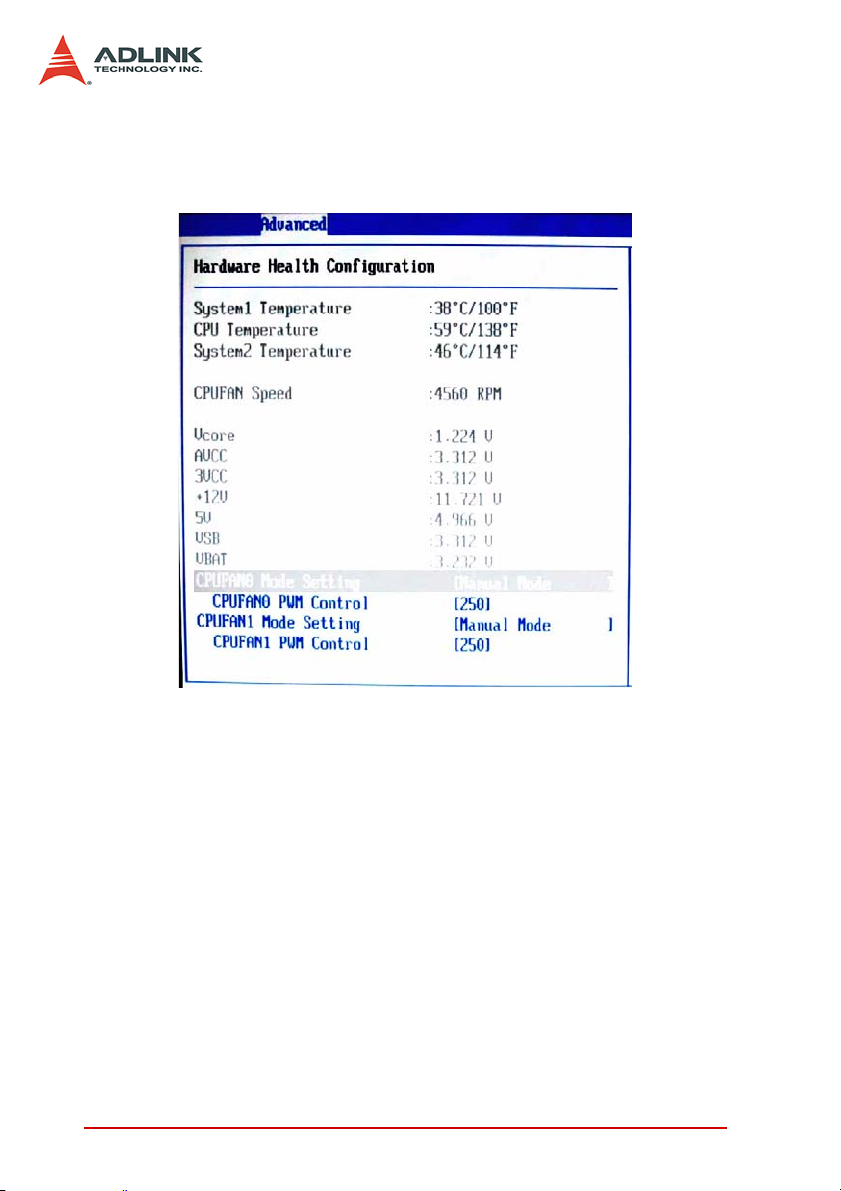
Hardware Health Configuration
This option displays the current status of all of the monitored hardware devices / components such as voltages and temperatures.
CPUFAN0 / CPUFAN1 Mode Setting
These settings specify the operation mode of the CPU fans.
CPUFAN0 / CPUFAN1 PWM Control
These settings control the PWM duty cycle of the CPU fans.
38 BIOS Setup
Page 51
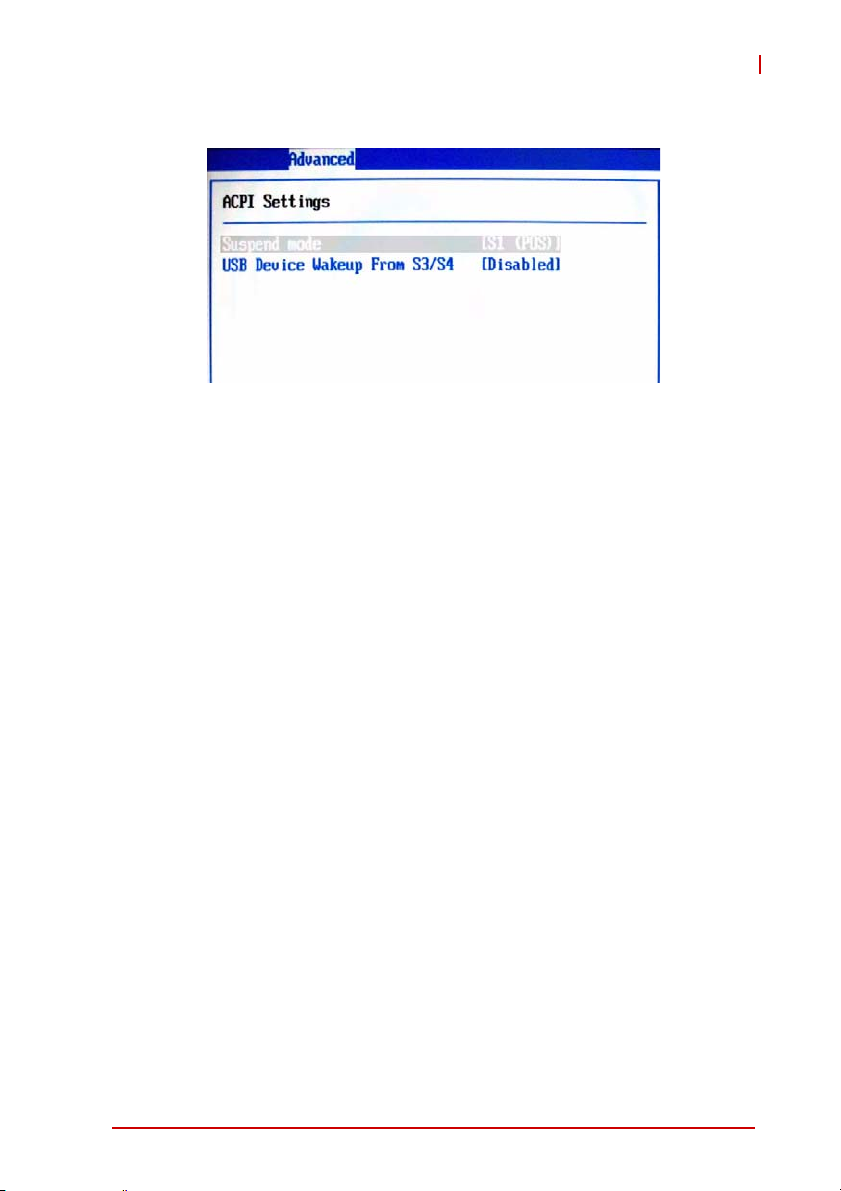
ACPI Settings
Suspend Mode
This item specifies the power saving modes for ACPI function.
If your operating system supports ACPI, you can choose to
enter the Standby mode in S1 (POS) or S3 (STR) fashion
through the setting of this field. Options are:
[S1 (POS)]: The S1 sleep mode is a low power state. In this
state, no system context is lost (CPU or chipset) and hardware
maintains all system context.
[S3 (STR)]: The S3 sleep mode is a lower power state where
the information of system configuration and open applications/
files is saved to main memory that remains powered while most
other hardware components turn off to save energy. The information stored in memory will be used to restore the system
when a “wake up” event occurs.
USB Device Wakeup from S3/S4
This setting allows the activity of the USB device to wake up
the system from S3/S4 sleep state.
MI-965
BIOS Setup 39
Page 52
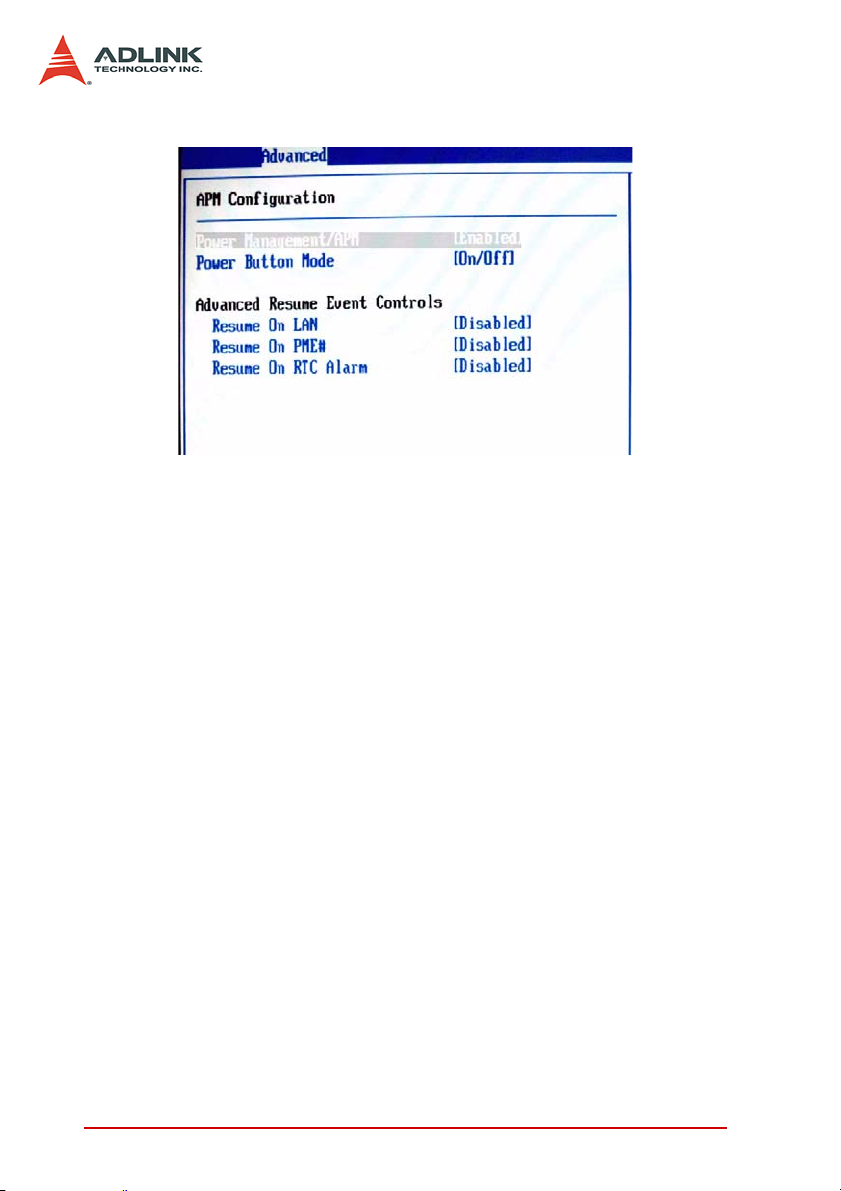
APM Configuration
Power Management/APM
Setting to [Enabled] will activate an Advanced Power Management (APM) device to enhance Max Saving mode and stop
CPU internal clock.
Power Button Mode
This setting controls the operation of the power button.
Resume On LAN
This field specifies whether the system will be awakened from
power saving modes when activity or input signal of onboard
LAN is detected.
Resume On PME#
When setting to [Enabled], this setting allows your system to be
awakened from the power saving modes thro ugh any even t on
PME (Power Management Event).
Resume On RTC Alarm
When [Enabled], your can set the date and time at which the
RTC (real-time clock) alarm awakens the system from suspend
mode.
40 BIOS Setup
Page 53
MI-965
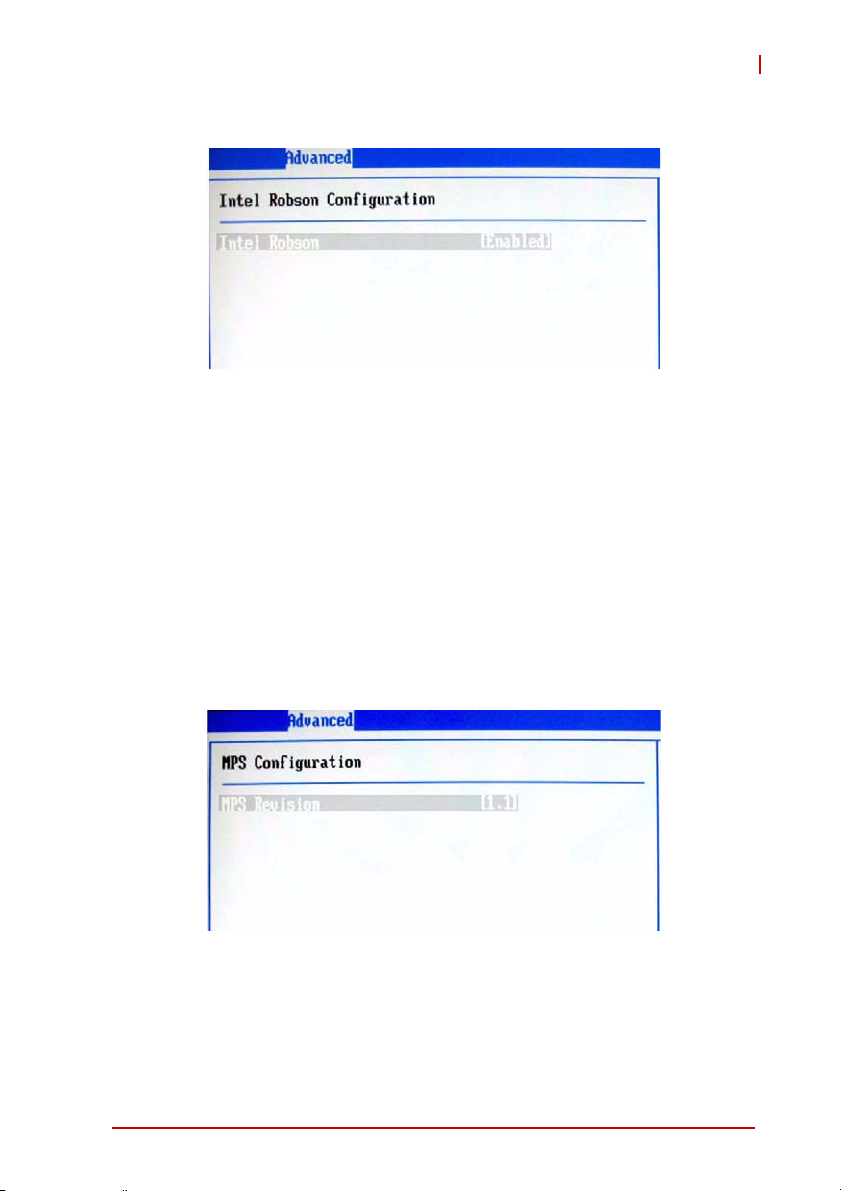
Intel Robson Configuration
Robson is the code name for a new Intel platform technology that
uses non-volatile memory (Flash memory) to increase system
responsiveness, make multi-tasking faster, and extend battery life.
Intel Robson technology is poised to eliminate many of the bottlenecks associated with HDD latency. By enabling the majority of
application workload to be written and read from a system cache
instead of the HDD, Robson will offer users of mobile computers
built on the Santa Rosa platform significantly increased performance -- particularly in application load and run time, the speed in
which systems resume operation after hibernation or boot, and in
system-level power usage.
MPS Configuration
This field allows you to select which MPS (Multi-Processor Specification) version to be used for the operating system. You need to
select the MPS version supported by your operating system. To
find out which version to use, consult the vendor of your operating
system.
BIOS Setup 41
Page 54
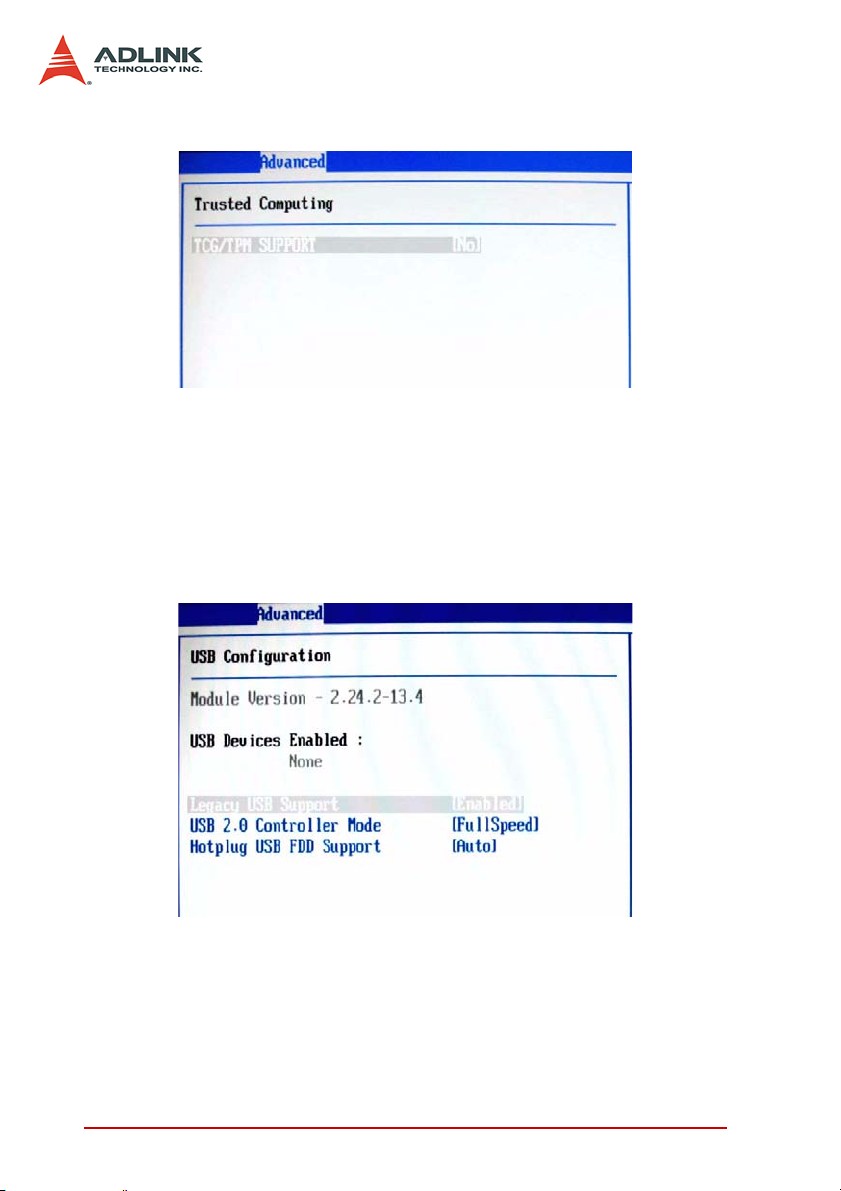
Trusted Computing
This setting controls the Trusted Platform Module (TPM) designed
by the Trusted Computing Group (TCG). TPMs are special-purpose integrated circuits (ICs) built into a variety of platforms to
enable strong user authentication and machine attestation—
essential to prevent inappropriate access to confidential and sensitive information and to protect against compromised networks.
USB Configuration
Legacy USB Support
Set to [Enabled] if you need to use any USB 1.1/2.0 device in
the operating system that does not support or have any USB
1.1/2.0 driver installed, such as DOS and SCO Unix.
42 BIOS Setup
Page 55
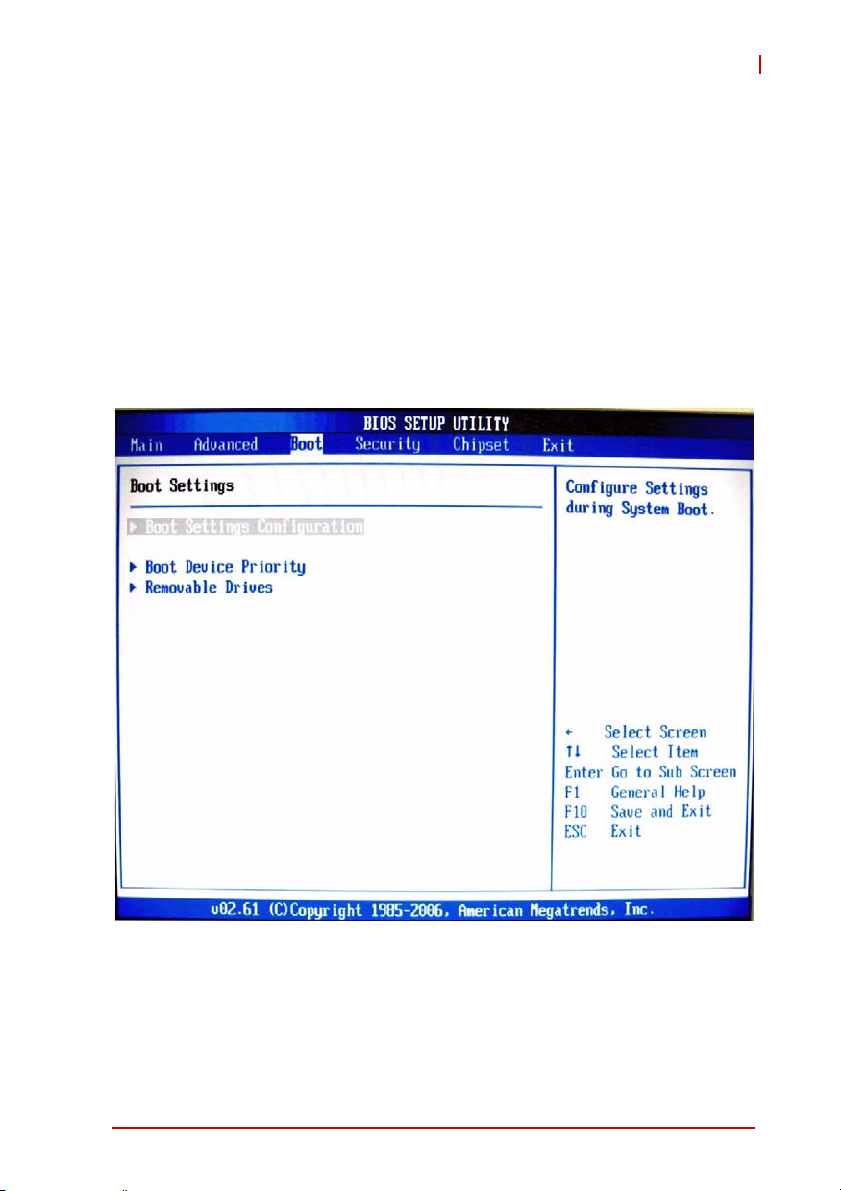
USB 2.0 Controller Mode
This setting specifies the operation mode of the onboard USB
2.0 controller.
Hotplug USB FDD Support
Set to [Enabled] if your need to use a hotplug USB-interfaced
FDD in the operating system that does not support or have any
USB driver installed, such as DOS and SCO Unix.
4.4 Boot Setup
MI-965
BIOS Setup 43
Page 56
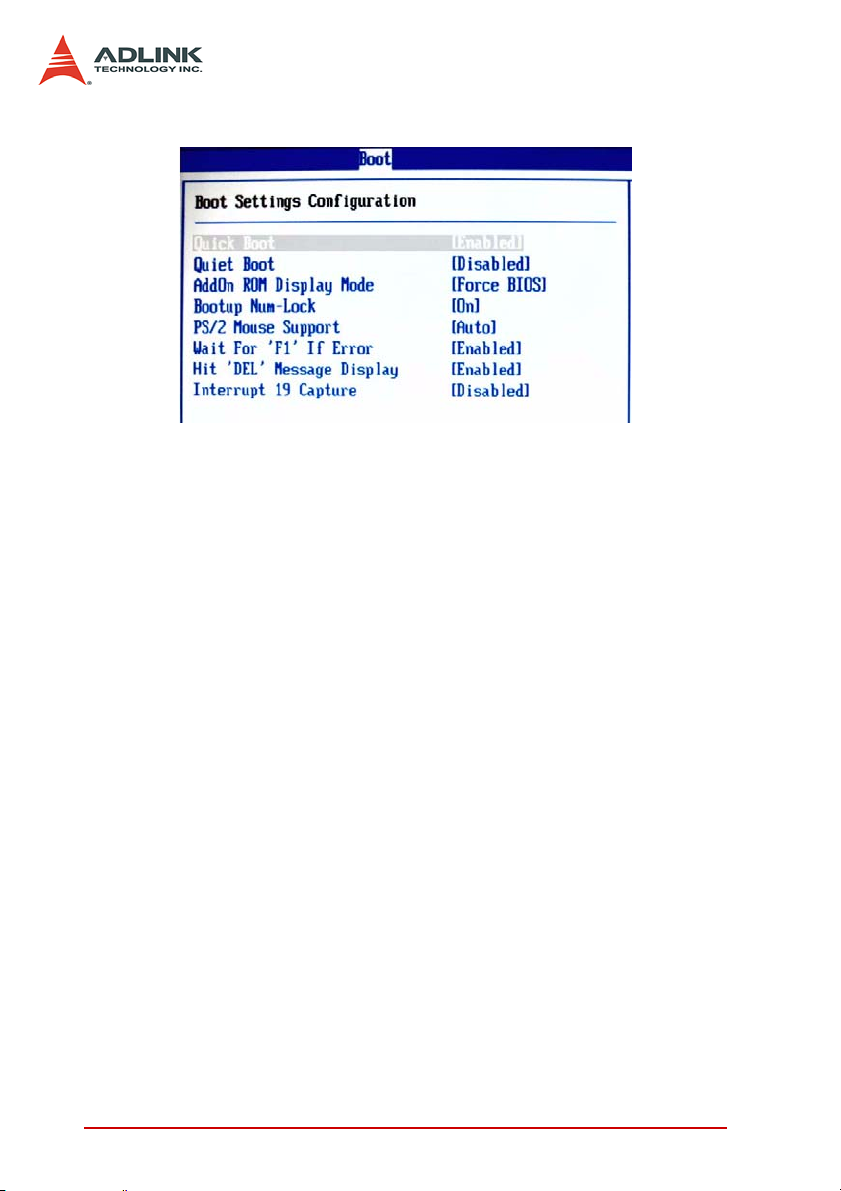
Boot Setting Configuration
Quick Boot
Enabling this setting will cause the BIOS power-on self test
routine to skip some of its tests during bootup fo r fa st er s yst em
boot.
Quiet Boot
This BIOS feature determines if the BIOS should hide the normal POST messages with the motherboard or system manufacturer's fullscreen logo.
When it is enabled, the BIOS will display the full-screen logo
during the boot-up sequence, hiding normal POST messages.
When it is disabled, the BIOS will display the normal POST
messages, instead of the full-screen logo.
Please note that enabling this BIOS feature of te n adds 2-3 seconds of delay to the booting sequence. This delay ensures that
the logo is displayed for a sufficient amount of time. Therefore,
it is recommended that you disable this BIOS feature for a
faster boot-up time.
AddOn ROM Display Mode
This item is used to determine the display mode when an
optional ROM is initialized during POST. When set to [Force
BIOS], the display mode used by AM I BIOS is used. Select
[Keep Current] if you want to use the display mode of optional
ROM.
44 BIOS Setup
Page 57

MI-965
Bootup Num-Lock
This setting is to set the Num Lock status when the system is
powered on. Setting to [On] will turn on the Num Lock key
when the system is powered on. Setting to [Off] will allow users
to use the arrow keys on the numeric keypad.
PS/2 Mouse Support
Select [Enabled] if you need to use a PS/2-interfaced mouse in
the operating system.
Wait For ‘F1’ If Error
When this setting is set to [Enabled] and the boot sequence
encounters an error, it asks you to press F1. If disabled, the
system continues to boot without waiting for you to press any
keys.
Hit ‘DEL’ Message Display
Set this option to [Disabled] to prevent the message as follows:
Hit Del if you want to run setup
It will prevent the message from appearing on the first BIOS
screen when the computer boots. Set it to [E nabled] whe n you
want to run the BIOS Setup Utility.
Interrupt 19 Capture
Interrupt 19 is the software interrupt that handles the boot disk
function. When enabled, this BIOS feature allows the ROM
BIOS of these host adaptors to "capture" Interrupt 19 during
the boot process so that drives attached to these adaptors can
function as bootable disks. In addition, it allows you to gain
access to the host adaptor's ROM setup utility, if one is available.
When disabled, the ROM BIOS of these host adaptors will not
be able to "capture" Interrupt 19. Therefore, you will not be able
to boot operating systems from any bootable disks attached to
these host adaptors. Nor will you be able to gain access to their
ROM setup utilities.
BIOS Setup 45
Page 58
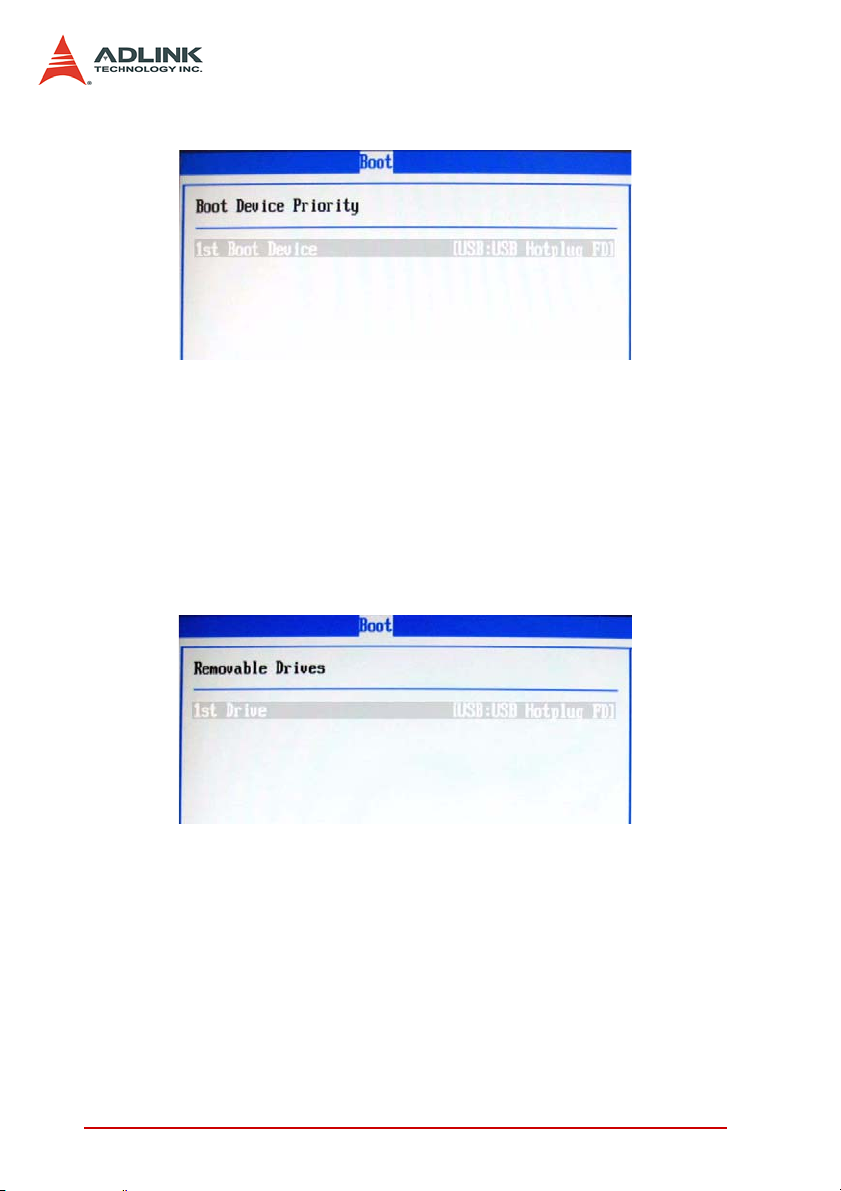
Boot Device Priority
1st Boot Device
The items allow you to set the sequence of boot devices where
BIOS attempts to load the disk operating system. First press
<Enter> to enter the sub-menu. Then you may use the arrow
keys to select the desired device, then press <+>, <-> or
<PageUp>, <PageDown> key to move it up/down in the priority
list.
Removable Drives
1st Drive
This setting allows users to set the priority of the removable
devices. First press <Enter> to enter the sub-menu. Then you
may use the arrow keys ( -¯ ) to select the desired device, then
press <+>, <-> or <PageUp>, <PageDown> key to move it up/
down in the priority list.
46 BIOS Setup
Page 59
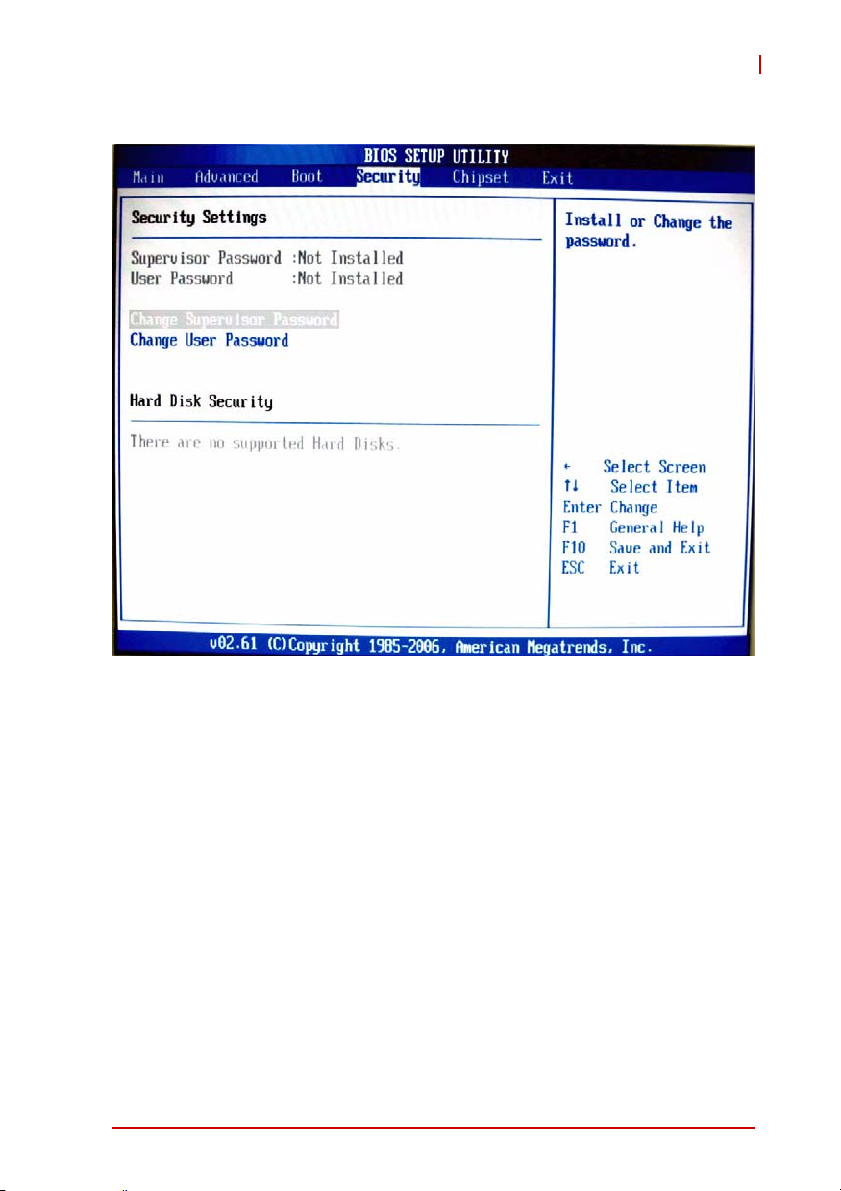
4.5 Security Setup
MI-965
Password Support
Two Levels of Password Protection
Provides both a Supervisor and a User password. If you use
both passwords, the Supervisor password must be set first.
The system can be configured so that all users must enter a
password every time the system boots or when Setup is executed, using either or either the Supervisor password or User
password.
The Supervisor and User passwords activate two different levels of password security. If you select password support, you
are prompted for a one to six character password. Type the
password on the keyboard. The password does not appear on
the screen when typed. Make sure you write it down. If you forget it, you must drain NVRAM and re-configure.
BIOS Setup 47
Page 60

Remember the Password
Keep a record of the new password when the password is
changed. If you forget the password, you must erase the system configuration information in NVRAM.
To access the s ub menu for the following items , select the it em
and press < Enter >:
X Change Supervisor Password
X Change User Password
X Clear User Password
Supervisor Password
Indicates whether a supervisor password has been set.
User Password
Indicates whether a user password has been set.
Change Supervisor Password
Select this option and press < Enter > to access the sub menu.
You can use the sub menu to change the supervisor password.
Change User Password
Select this option and press < Enter > to access the sub menu.
You can use the sub menu to change the user password.
Clear User Password
Select this option and press < Enter > to access the sub menu.
You can use the sub menu to clear the user password.
Change Supervisor Password
Select Change Supervisor Password from the Security Setup
menu and press < Enter >.
Enter New Password:
Type the password and press < Enter >. The screen does not dis play the characters entered. Retype the password as prompted
48 BIOS Setup
Page 61
MI-965
and press < Enter >. If the password confirmation is incorrect, an
error message appears. The password is stored in NVRAM after
completes.
Change User Password
Select Change User Password from the Security Setup menu and
press < Enter >.
Enter New Password:
Type the password and press < Enter >. The screen does not display the characters entered. Retype the password as prompted
and press < Enter >. If the password confirmation is incorrect, an
error message appears. The password is stored in NVRAM after
completes.
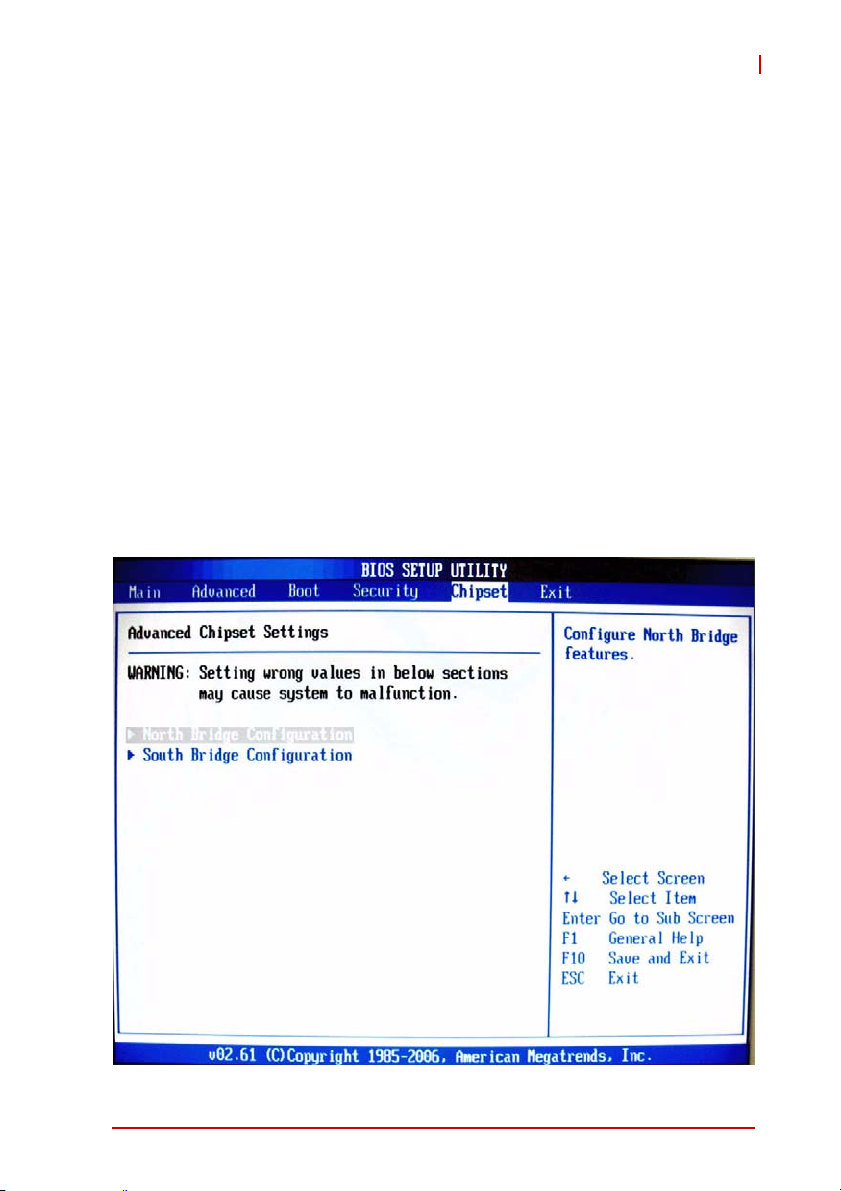
4.6 Chipset Setup
BIOS Setup 49
Page 62
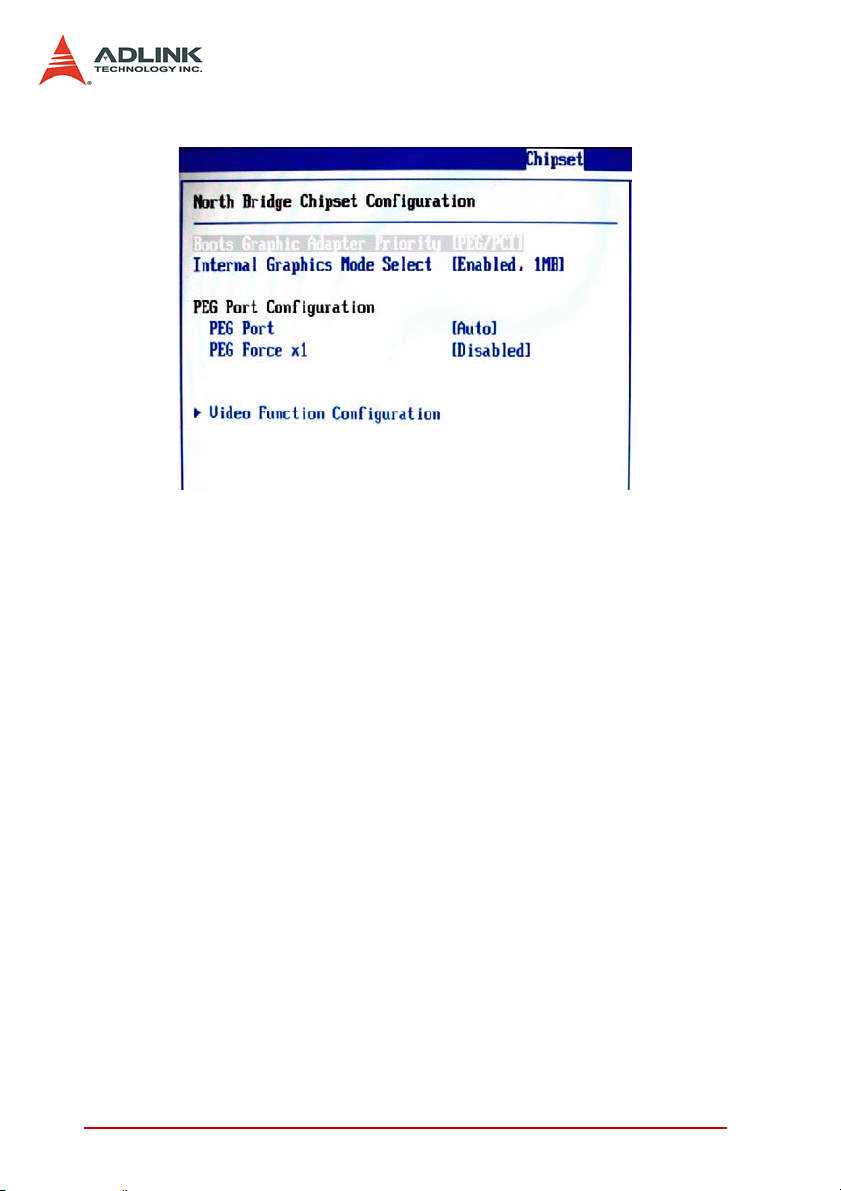
North Bridge Configuration
Boot Graphics Adapter Priority
This item specifies which VGA card is your primary graphics
adapter.
Internal Graphics Mode Select
The field specifies the size of system memory allocated for
video memory.
PEG Port
This setting allows you to select whether to use the onchip
graphics processor or the PCI Express card. When set to
[Auto], the BIOS checks to see if a PCI Express graphics card
is installed. If it detects that a PCI Express graphics card is
present, the motherboard boots up using that card. Otherwise,
it defaults to the onboard graphics processor.
PEG Force X1
This BIOS feature allows you to convert a PCI Express X16
slot into a PCI Express X1 slot. When [Enabled], the PCI
Express X16 slot will be forced to run in the PCI Express X1
mode. When [Disabled], the PCI Express X16 slot will be
allowed to run in its normal PCI Express X16 mode.
50 BIOS Setup
Page 63
MI-965
If you have a PCI Express X16 graphics card installed in y our
system, you should disable this BIOS fe ature. This allows for
optimal performance of the card by ensuring maximum transfer
rates between the graphics card and the motherboard.
But if you need to install a PCI Express X1 card into the PCI
Express X16 slot, you should enable this BIOS feature to
ensure maximum compatibility.
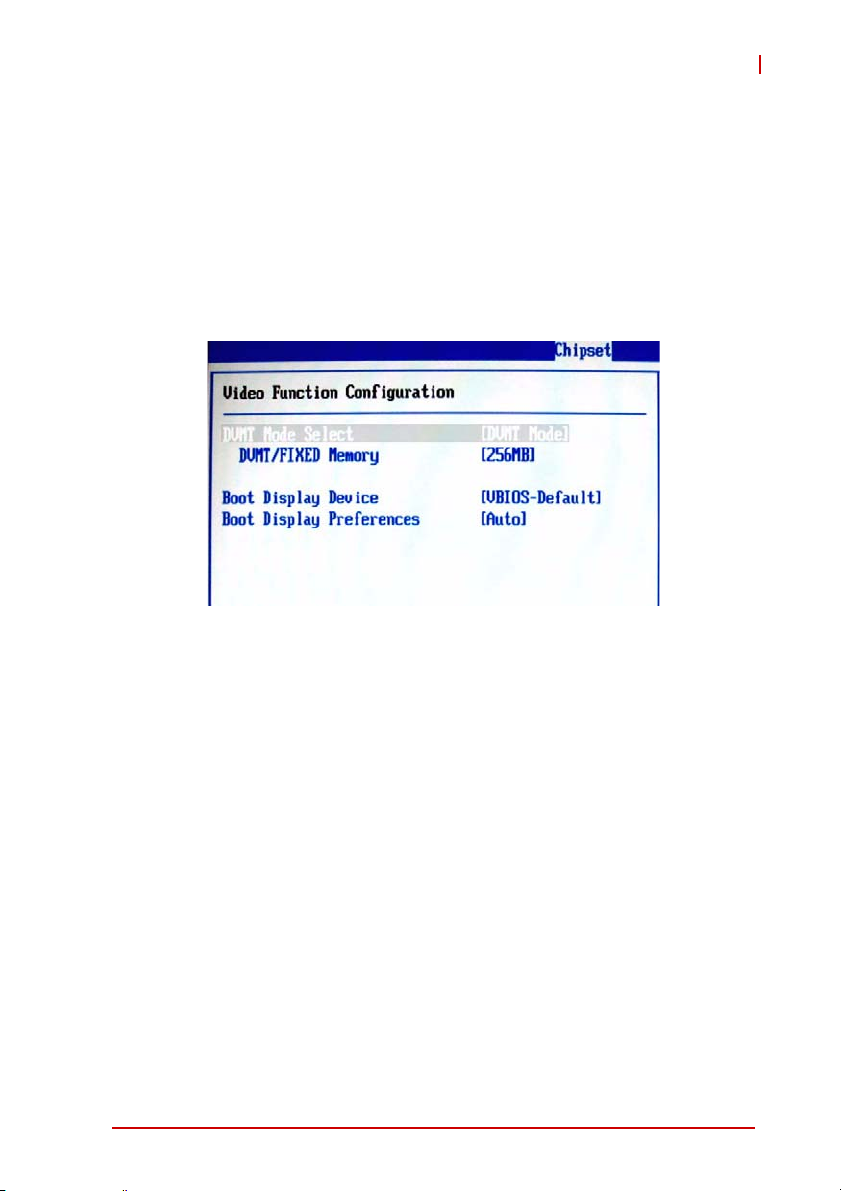
Video Function Configuration
DVMT Mode Select
Intel's Dynamic Video Memory Technology (DVMT) allows the
system to dynamically allocate memory resources according to
the demands of the system at any point in time. The key idea in
DVMT is to improve the efficiency of the memory allocated to
either system or graphics processor.
It is recommended that you set this BIOS feature to DVMT
Mode for maximum performance. Setting it to DVMT Mode
ensures that system memory is dynamically allocated for optimal balance between graphics and system performance.
DVMT/FIXED Memory
When set to DVMT/FIXED Mode, the graphics driver will allocate a fixed amount of memory as dedicated graphics memory,
as well as allow more system memory to be dynamically allocated between the graphics processor and the operating system.
BIOS Setup 51
Page 64

Boot Display Device
Use the field to select the type of device you want to use as the
display(s) of the system.
Boot Display Preferences
This setting allows you to set your preferences for the boot display device.
South Bridge Configuration
USB Functions
This setting specifies the function of the onboard USB controller.
USB 2.0 Controller
Set to [Enabled] if you need to use any USB 2.0 device in the
operating system that does not support or have any USB 2.0
driver installed, such as DOS and SCO Unix.
GbE Controller
This setting disables/enables the onboard Gigabit Ethernet
controller.
GbE LAN Boot
When [Enabled], the BIOS attempts to boot from a LAN boot
image before it attempts to boot from a local storage device.
52 BIOS Setup
Page 65
MI-965
GbE Wake Up From S5
This field specifies whether the system will be awakened from
the S5 power saving mode when activity or input signal of
onboard LAN is detected.
HDA Controller
This setting controls the High Definition Audio interface integrated in the Southbridge.
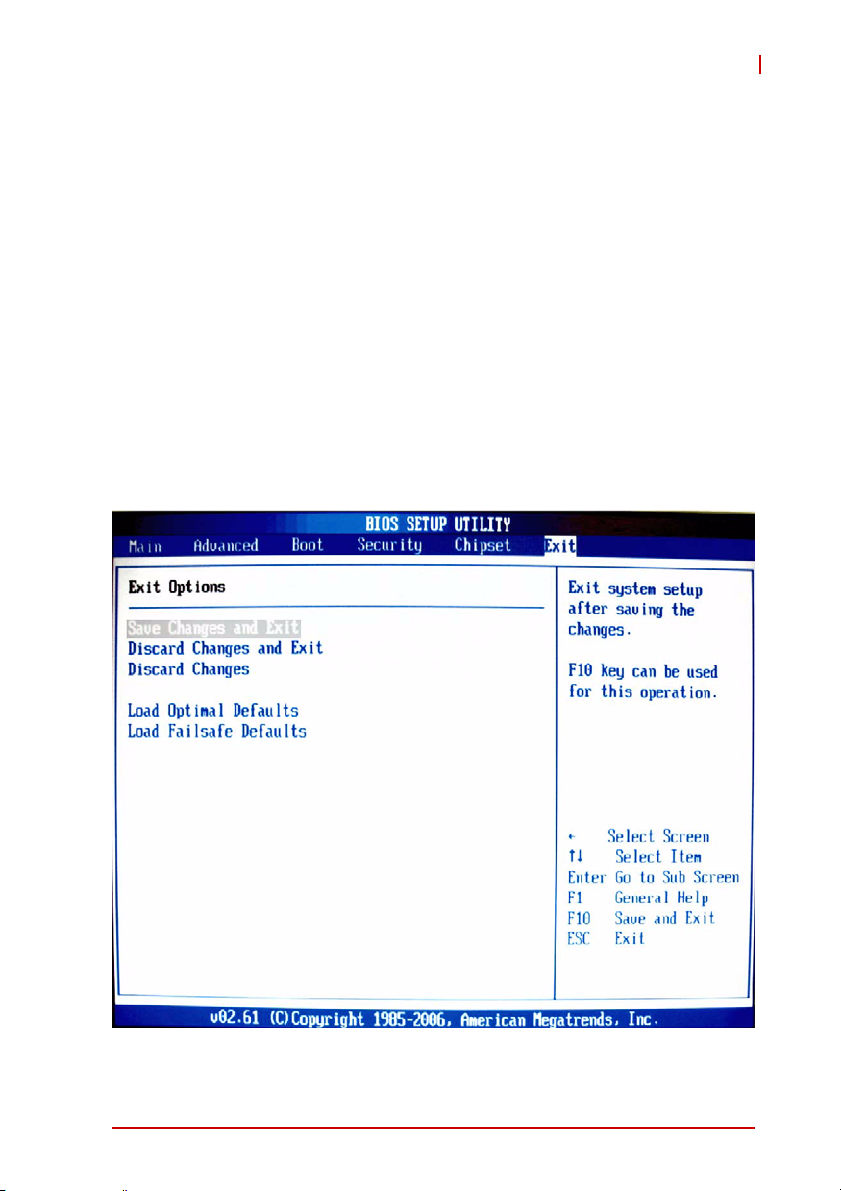
4.7 Exit Menu
Select the Exit tab from the setup screen to enter the Exit BIOS
Setup screen. You can display an Exit BIOS Setup option by highlighting it using the < Arrow > keys. The Exit BIOS Setup screen is
shown below.
BIOS Setup 53
Page 66

Save Changes and Exit
When you have completed the system configuration changes,
select this option to leave Setup and reboot the computer so the
new system configuration parameters can take effect.
Save Configuration Changes and Exit Now?
[Ok] [Cancel]
appears in the window. Select Ok to save changes and exit.
Discard Changes and Exit
Select this option to quit Setup without making any permanent
changes to the system configuration.
Discard Changes and Exit Setup Now?
[Ok] [Cancel]
appears in the window. Select Ok to discard changes and exit.
Discard Changes
Select Discard Changes from the Exit menu and press < Enter >.
Select Ok to discard changes.
Load Optimal Defaults
Automatically sets all Setup options to a complete set of default
settings when you select this option. The Optimal settings are
designed for maximum system performance, but may not work
best for all computer applications. In particular, do not use the
Optimal Setup options if your computer is experiencing system
configuration problems.
Select Load Optimal Defaults from the Exit menu and press
< Enter >.
Select Ok to load optimal defaults.
Load Failsafe Defaults
Automatically sets all Setup options to a complete set of default
settings when you select this option. The Failsafe settings are
54 BIOS Setup
Page 67

MI-965
designed for maximum system stability, but not maximum performance. Select the FailSafe Setup options if your computer is
experiencing system configuration problems.
Select Load Fail-Safe Defaults from the Exit menu and press
< Enter >.
Load FailSafe Defaults?
[Ok] [Cancel]
appears in the window. Select Ok to load FailSafe defaults.
BIOS Setup 55
Page 68

This page intentionally left blank.
56 BIOS Setup
Page 69

5 POST Codes
The POST code checkpoints are the largest set of checkpoints
during the BIOS pre-boot process. The following table describes
the type of checkpoints that may occur during the POST portion of
the BIOS.
Note that checkpoints may differ between different platforms
based on system configuration. Checkpoints may change due to
vendor requirements, system chipset or option ROMs from add-in
PCI devices.
5.1 Post Code Checkpoints
Checkpoint Description
Disable NMI, Parity, video for EGA, and DMA controllers. Initialize
03
04
05
06
07 Fixes CPU POST interface calling pointer.
08
C0 Early CPU Init Start -- Disable Cache – Init Local APIC
C1 Set up boot strap processor Information
C2 Set up boot strap processor for POST
C5 Enumerate and set up application processors
BIOS, POST , Runtime data area. Also initialize BIOS modules on
POST entry and GPNV area. Initialized CMOS as mentioned in
the Kernel Variable "wCMOSFlags."
Check CMOS diagnostic byte to determine if battery power is OK
and CMOS checksum is OK. Verify CMOS checksum manually by
reading storage area. If the CMOS checksum is bad, update
CMOS with power-on default values and clear passwords.
Initialize status register A. Initializes data variables that are based
on CMOS setup questions. Initializes both the 8259 compatible
PICs in the system
Initializes the interrupt controlling hardware (generally PIC) and
interrupt vector table.
Do R/W test to CH-2 count reg. Initialize CH-0 as system
timer.Install the POSTINT1Ch handler. Enable IRQ-0 in PIC for
system timer interrupt. Traps INT1Ch vector to
"POSTINT1ChHandlerBlock."
Initializes the CPU. The BAT test is being done on KBC.Program
the keyboard controller command byte is being done after Auto
detection of KB/MS using AMI KB-5.
MI-965
POST Codes 57
Page 70

Checkpoint Description
C6 Re-enable cache for boot strap processor
C7 Early CPU Init Exit
0A Initializes the 8042 compatible Key Board Controller.
0B Detects the presence of PS/2 mouse.
0C Detects the presence of Keyboard in KBC port.
Testing and initialization of different Input Devices. Also, update
0E
13 Early POST initialization of chipset registers.
20
24
2A
2C
2E Initializes all the output devices.
31
33
37
38
39 Initializes DMAC-1 & DMAC-2.
3A Initialize RTC date/time.
3B
3C Mid POST initialization of chipset registers.
the Kernel Variables. Traps the INT09h vector, so that the POST
INT09h handler gets control for IRQ1. Uncompress all available
language, BIOS logo, and Silent logo modules.
Relocate System Management Interrupt vector for all CPU in the
system.
Uncompress and initialize any platform specific BIOS modules.
GPNV is initialized at this checkpoint.
Initializes different devices through DIM. See DIM Code
Checkpoints section of document for more information.
Initializes different devices. Detects and initializes the video
adapter installed in the system that have optional ROMs.
Allocate memory for ADM module and uncompress it. Give
control to ADM module for initialization. Initialize language and
font modules for ADM. Activate ADM module.
Initializes the silent boot module. Set the window for displaying
text information.
Displaying sign-on message, CPU information, setup key
message, and any OEM specific information.
Initializes different devices through DIM. See DIM Code
Checkpoints section of document for more information. USB
controllers are initialized at this point.
Test for total memory installed in the system. Also, Check for DEL
or ESC keys to limit memory test. Display total memory in the
system.
58 POST Codes
Page 71

Checkpoint Description
Detect different devices (Parallel ports, serial ports, and
40
52
60
75 Initialize Int-13 and prepare for IPL detection.
78 Initializes IPL devices controlled by BIOS and option ROMs.
7C Generate and write contents of ESCD in NVRam.
84 Log errors encountered during POST.
85 Display errors to the user and gets the user response for error.
87
8C Late POST initialization of chipset registers.
8D Build ACPI tables (if ACPI is supported)
8E
90
A1 Clean-up work needed before booting to OS.
A2
A4
A7
A9 Wait for user input at config display if needed.
AA Uninstall POST INT1Ch vector and INT09h vector.
coprocessor in CPU, … etc.) successfully installed in the system
and update the BDA, EBDA…etc.
Updates CMOS memory size from memory found in memory test.
Allocates memory for Extended BIOS Data Area from base
memory. Programming the memory hole or any kind of
implementation that needs an adjustment in system RAM size if
needed.
Initializes NUM-LOCK status and programs the KBD typematic
rate.
Execute BIOS setup if needed / requested. Check boot password
if installed.
Program the peripheral parameters. Enable/Disable NMI as
selected
Initialization of system management interrupt by invoking all
handlers. Please note this checkpoint comes right after
checkpoint 20h
Takes care of runtime image preparation for different BIOS
modules. Fill the free area in F000h segment with 0FFh. Initializes
the Microsoft IRQ Routing Table. Prepares the runtime language
module. Disables the system configuration display if needed.
Initialize runtime language module. Display boot option popup
menu.
Displays the system configuration screen if enabled. Initialize the
CPU’s before boot, which includes the programming of the
MTRR’s.
MI-965
POST Codes 59
Page 72

Checkpoint Description
AB Prepare BBS for Int 19 boot. Init MP tables.
AC
B1
00 Passes control to OS Loader (typically INT19h).
End of POST initialization of chipset registers. De-initializes the
ADM module.
Save system context for ACPI. Prepare CPU for OS boot
including final MTRR values.
Table 5-1: POST Code Checkpoints
60 POST Codes
Page 73

Appendix A - Watchdog Timer
The following is a sample program for configuring the MI-965’s
watchdog timer.
A.1 Sample Code
SIO_IDX equ 2EH
SIO_DTA equ 2FH
Timer equ 10; reset after 10 seconds
; Enter configuration mode
mov dx,SIO_IDX
mov al,87h
out dx,al
out dx,al
; Set to LDN 08
mov dx,SIO_IDX
mov al,07h
out dx,al
mov dx,SIO_DTA
mov al,08h
out dx,al
MI-965
; Set WatchDog Timer
mov dx,SIO_IDX
mov al,0f6h
out dx,al
mov dx,SIO_DTA
mov al,Timer
out dx,al
; Exit configuration mode
mov dx,SIO_IDX
mov al,0AAh
out dx,al
Watchdog Timer 61
Page 74

This page intentionally left blank.
62 Watchdog Timer
Page 75

MI-965
Appendix B - System Resources
B.1 Generic I/O Ports
ICH8M GPIO
Pin GPIO Typ Multi Power Connection.
AG12 0 I/O BMBUSY# 3.3v PM_BMBUSY#
AG22 11 I/O SMBALERT# 3.3v SMB_ALERT#
AE20 15 I/OD STP_PCI# 3.3v PM_STP_PCI#
AG18 3 I/OD STP_CPU# 5v PM_STP_CPU#
AH11 32 I/OD CLKRUN# 3.3v P_CLKRUN#
AJ8 1 I/OD TACH1 3.3v NC
AJ9 6 I/O TACH2 3.3v NC
AH9 7 I/O TACH3 3.3v NC
AE16 8 I/O GPIO8 3.3v SIO_PME#
AC19 12 I/O GPIO12 3.3v SPI_HOLD_GPO#
AG8 17 I/O TACH0 3.3v SPI_WP#
AH12 18 I/O GPIO18 3.3v SLPBTIN#
AE11 20 I/O GPIO20 3.3v ATADET0
AG10 22 I/O SCLOCK 3.3v NC
AH25 27 I/O QRT_STATE0 3.3v EL_STATE0
AD16 28 I/O QRT_STATE1 3.3v EL_STATE1
AG13 35 I/O SATACLKREQ# 3.3v CLK_SATA_OE#
AF9 38 I/O SLOAD 3.3v NC
AJ11 39 I/O SDATAOUT0 3.3v NC
AD10 48 I/O SDATAOUT1 3.3v NC
AJ12 21 I/O SATA0GP 3.3v RESISTOR
AJ10 19 I/O SATA1GP 3.3v RESISTOR
AF11 36 I/O SATA2GP 3.3v RESISTOR
AG11 37 I/O SATA3GP 3.3v RESISTOR
AH27 26 I/O S4_STATE# 3.3v NC
AJ27 24 I/O NCMEM_LED 3.3v LAN_EN
AJ24 10 I/O ME_EC_ALERT 3.3v PHY_DIS#
System Resources 63
Page 76
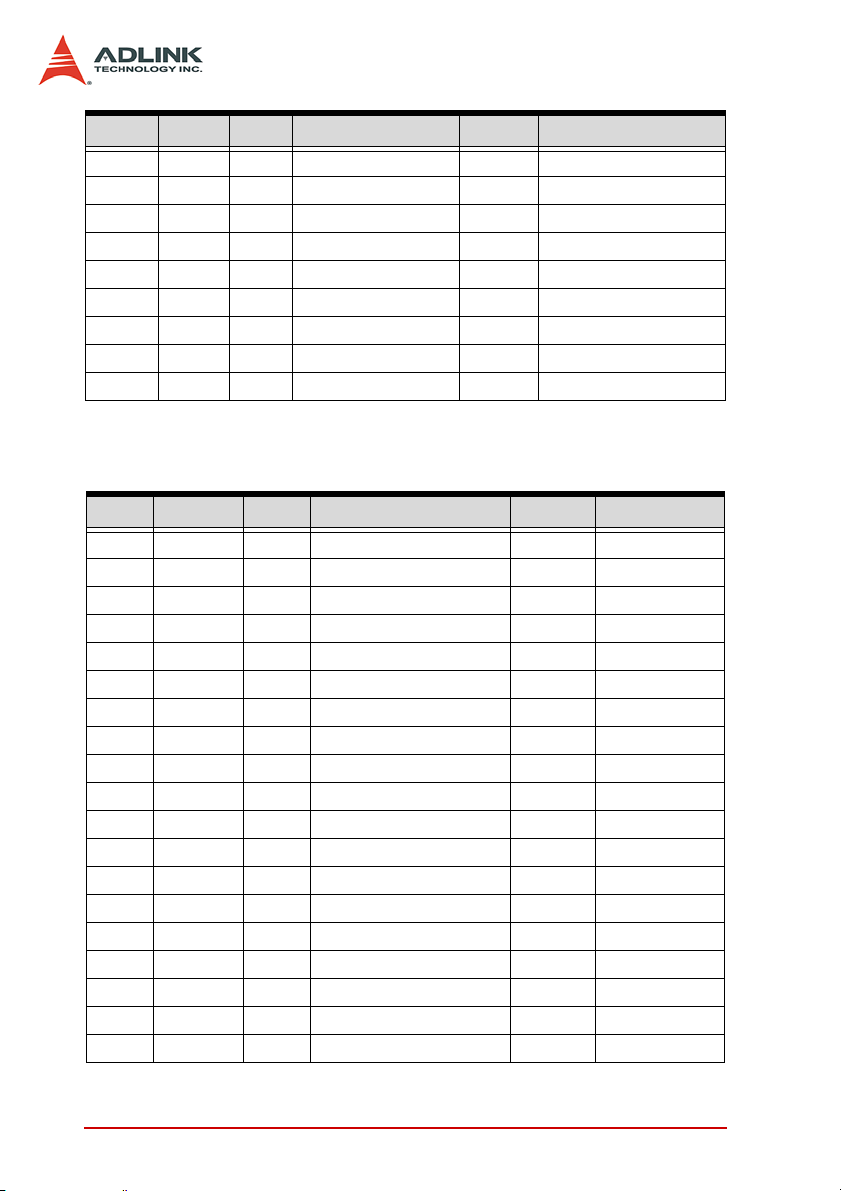
Pin GPIO Typ Multi Power Connection.
AF22 14 I/O EC_ME_ALERT 3.3v NC
AG19 9 I/O WOL_EN 3.3v NC
AG16 40 I/O OC1# 3.3v OC0#
AG15 41 I/O OC2# 3.3v OC0#
AE15 42 I/O OC3# 3.3v OC0#
AF15 43 I/O OC4# 3.3v OC1#
AG17 29 I/O OC5# 3.3v OC1#
AD12 30 I/O OC6# 3.3v OC1#
AJ18 31 I/O OC7# 3.3v OC1#
Table B-1: ICH8M GPIO Resources
SIO GPIO
Pin GPIO Typ Multi Power Connection.
121 17 I/O VID7 VCC5 NC
122 16 I/O VID6 VCC5 NC
123 15 I/O VID5 VCC5 NC
124 14 I/O VID4 VCC5 NC
125 13 I/O VID3 VCC5 NC
126 12 I/O VID2 VCC5 NC
127 11 I/O VID1 VCC5 NC
128 10 I/O VID0 VCC5 NC
120 20 O CPUFANOUT1/GP20 VCC CFAN_PWM
119 21 I/O CPUFANN1/GP21 VCC CPU_FAN
89 33 I/O RST OUT3#/GP33/SDA VSB NC
90 32 I/O RSTOUT2#/GP32/SCL VSB NC
91 31 I/O GP31 VSB NC
92 30 I/O GP30 VSB NC
67 57 O GP57/PSOUT# VSB PWRBTN#
68 56 I GP56/PSIN# VSB IO_PWRBTN#
64 37 I/O GP37 VSB NC
72 53 I/O GP53/PSON# VSB PS_ON#
73 52 I GP52/SUSB# VSB SLP_S3#
64 System Resources
Page 77

MI-965
Pin GPIO Typ Multi Power Connection.
77 50 I/O WDTO#GP50 VSB GP50
2 23 I/O SCK/GP23 VCC NC
88 34 O RSTOUT4#GP34 VSB NC
69 36 I/O GP36 VSB NC
87 35 I/O GP35 VSB NC
75 51 O RSMRST# VSB VCC3
56 61 I DCDA# VCC DCDA#
50 66 I DDSRA# VCC DDSRA#
53 63 I SINA VCC SINA
51 65 I/O RTSA# VCC RTSA#
54 62 O SOUTA VCC SOUT A
49 67 I CTSA# VCC CTSA#
52 64 O DTRA# VCC DTRA#
57 60 I RIA# VSB RIA#
84 41 I DCDB# VSB DCDB#
79 46 I DSRB# VSB DSRB#
82 43 I SINB VSB SINB
80 45 O RTSB# VSB RTSB#
83 42 O SOUTB VSB SOUTB
78 47 I CTSB# VSB CTSB#
81 44 O DTRB# VSB DTRB#
85 40 I RIB# VSB RIB#
63 26 I/O KBDAT# VSB KBDAT#
62 27 I/O KBCLK# VSB KBCLK#
66 24 I/O MSDAT# VSB MSDAT#
65 25 I/O MSCLK# VSB MSCLK#
70 55 I/O SUSLED VSB GND
71 54 I/O PWROK VSB NC
Table B-2: SIO GPIO Resources
System Resources 65
Page 78

B.2 IO Map
I/O Port Description
0000-000F DMA Controller 1
0020-0021 Interrupt Controller 1
002E-002F SIO Port
0040-0043 System Timer
004E-004F TPM Port
0060, 0064 Keyboard Controller
0070-0073 RTC and CMOS
0080-0090 DMA Controller Page Registers
0092 Port 92h
00A0-00A1 Interrupt Controller 2
00B2-00B3 APM Register
00C0-00DF DMA Controller 2
00F0-00FF Numeric Data Processor
01F0-01F7 Primary IDE Controller
02F8-02FF COM2
0376 Secondary IDE Controller
0378-037F LPT1
03F6 Primary IDE Controller
03F8-03FF COM1
0400-045F ACPI I/O Space
0500-050F SMBus I/O Space
0CF8-0CFF PCI Configuration Port
Table B-3: IO Map
66 System Resources
Page 79

MI-965
B.3 PCI Devices
PCI Device Ven. ID Dev. ID Bus# Dev# Func#
Host Bridge 8086 2A00 00 00 00
VGA-compatible
Controller
Other Display Controller 8086 2A03 00 02 01
Ethernet Controller 8086 104B 00 19 00
UHCI USB Controller 8086 2834 00 1A 00
UHCI USB Controller 8086 2835 00 1A 01
Unknown Device 8086 283A 00 1A 07
Unknown Device 8086 284B 00 1B 00
PCI-to-PCI Bridge 8086 283F 00 1C 00
UHCI USB Controller 8086 2830 00 1D 00
UHCI USB Controller 8086 2831 00 1D 01
UHCI USB Controller 8086 2832 00 1D 02
Unknown Device 8086 2836 00 1D 07
Subtractive Decode P2P
Bridge
ISA Bridge 8086 2815 00 1F 00
IDE Controller 8086 2850 00 1F 01
IDE Controller 8086 2828 00 1F 02
Smbus 8086 283E 00 1F 03
80862A02000200
8086 2448 00 1E 00
T able B-4: PCI Device Resources
PCI Interrupt Request Routing
Device INT Pin IDSEL Clock REQ# / GNT#
32-bit PCI Slot PIRQA AD17 PCICLK 0 REQ#0 / GNT#0
32-bit PCI Riser PIRQC AD18 PCICLK 1 REQ#1 / GNT#1
32-bit PCI Riser PIRQD AD19 PCICLK 2 REQ#2 / GNT#2
Table B-5: PCI Interrupt Request Routing
System Resources 67
Page 80
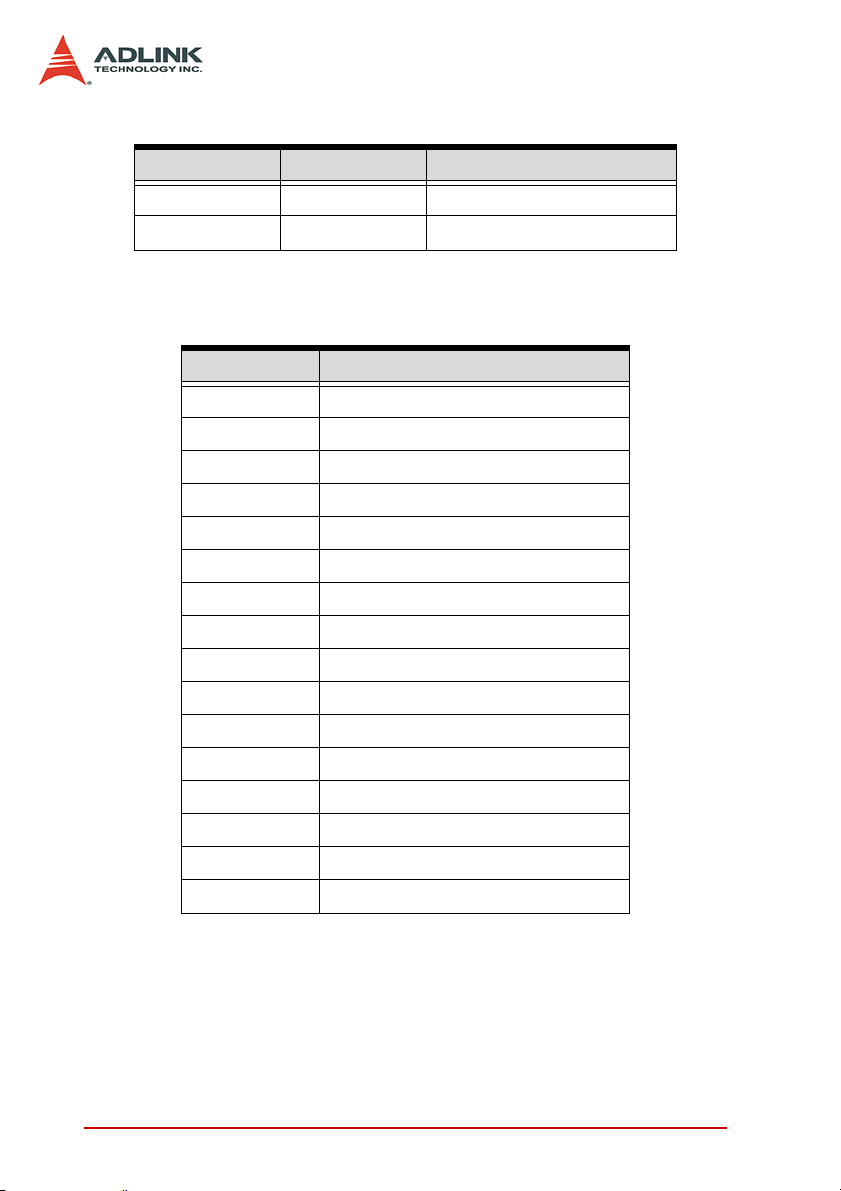
SMBus Resource Allocation
Device Address Description
MS-7 0101 111X MSI ACPI Controller
DIMM Slot 1010 0000 SPD
T able B-6: SMBus Resource Allocation
ISA Interrupt Allocation
IRQ Description
IRQ0 System Timer
IRQ1 Keyboard Controller
IRQ2 Cascade Interrupt
IRQ3 COM2
IRQ4 COM1
IRQ5 PCI Device
IRQ6 PCI Device
IRQ7 LPT1
IRQ8 RTC
IRQ9 ACPI Controller Interrupt
IRQ10 PCI Device
IRQ11 PCI Device
IRQ12 PS/2 Mouse
IRQ13 Numeric Data Processor
IRQ14 Primary IDE Controller
IRQ15 Secondary IDE Controller
Table B-7: ISA Interrupt Allocation
68 System Resources
Page 81

ISA DMA Channel Allocation
IRQ Description
CHANNEL0 Unassigned 8-bit channel
CHANNEL1 Unassigned 8-bit channel
CHANNEL2 Unassigned 8-bit channel
CHANNEL3 Unassigned 8-bit channel
CHANNEL4 Cascade channel
CHANNEL5 Unassigned 16-bit channel
CHANNEL6 Unassigned 16-bit channel
CHANNEL7 Unassigned 16-bit channel
Table B-8: ISA DMA Channel Allocation
MI-965
System Resources 69
Page 82

This page intentionally left blank.
70 System Resources
Page 83

MI-965
Important Safety Instructions
For user safety, please read and follow all instructions,
WARNINGS, CAUTIONS, and NOTES marked in this manual
and on the associated equipment before handling/operating the
equipment.
X Read these safety instructions carefully.
X Keep this user’s manual for future reference.
X Read the specifications section of this manual for detailed
information on the operating environment of this equipment.
X When installing/mounting or uninstalling/removing
equipment:
Z Turn off power and u nplug any power cords/cables.
X To avoid electrical shock and/or damage to equipment:
Z Keep equipment away from water or liquid sources;
Z Keep equipment away from high heat or high humidity;
Z Keep equipment properly ventilated (do not block or
cover ventilation openings);
Z Make sure to use recommended voltage and powe r
source settings;
Z Always install and operate equipment near an easily
accessible electrical socket-outlet;
Z Secure the power cord (do not place any obje ct on /ove r
the power cord);
Z Only install/attach and operate equipment on stable
surfaces and/or recommended mountings; and,
Z If the equipment will not be used for long periods of time,
turn off and unplug the equipment from its power source.
Important Safety Instructions 71
Page 84

X Never attempt to fix the equipment. Equipmen t sho u ld on ly
be serviced by qualified personnel.
A Lithium-type battery may be provided for uninterrupted, backup
or emergency power.
Risk of explosion if battery is replaced with one of an incorrect
WARNING:
type. Dispose of used batteries appropriately.
X Equipment must be serviced by authorized technicians
when:
Z The power cord or plug is damaged;
Z Liquid has penetrated the equipment;
Z It has been exposed to high humidity/moisture;
Z It is not functioning or does not function according to the
user’s manual;
Z It has been dropped and/or damaged; and/or,
Z It has an obvious sign of breakage.
72 Important Safety Instructions
Page 85

Getting Service
Contact us should you require any service or assistance.
ADLINK Technology Inc. (Headquarters)
Web Site: htt p: //w ww.adlinktech.com
Sales & Service: [email protected]
Telephone No.: +886-2-8226-5877
Fax No.: +886-2-8226-5717
Mailing Address: 9F No. 166 Jian Yi Road, Chungho City,
Taipei 235, Taiwan
Ampro ADLINK Technology Inc.
Sales & Service: [email protected]
Telephone No.: +1-408-260-0200
Fax No.: +1-408-360-0222
Toll-Free: 1-800-966-5200 (USA only)
Mailing Address: 5215 Hellyer Avenue, #110,
San Jose, CA 95138, USA
ADLINK Technology Co. Ltd. (Beijing)
Sales & Service: [email protected]
Telephone No.: +86-10-5885-8666
Fax No.: +86-10-5885-8625
Mailing Address: Rm. 801, Power Creative E, No. 1, B/D
Shang Di East Rd.
Beijing, 100085 China
ADLINK Technology Co. Ltd. (Shanghai)
Sales & Service: [email protected]
Telephone No.: +86-21-6495-5210
Fax No.: +86-21-5450-0414
Mailing Address: 4F, Bldg. 39, No.333 Qinjiang Road,
Cao He Jing High-Tech Park
Shanghai, 200233 China
ADLINK Technology Co. Ltd. (Shenzhen)
Sales & Service: [email protected]
Telephone No.: +86-755-2643-4858
Fax No.: +86-755-2664-6353
Mailing Address: 2F, C Block, Bld. A1,
Cyber-Tech Zone, Gao Xin Ave. Sec 7,
High-Tech Industrial Park S.,
Shenzhen, 518054 China
MI-965
Getting Service 73
Page 86

ADLINK Technology Inc. (European Liaison Office)
Sales & Service: [email protected]
Telephone No.: +49-211-495-5552
Fax No.: +49-211-495-5557
Mailing Address: Nord Carree 3, 40477
Düsseldorf, Germany
ADLINK Technology Japan Corp.
Sales & Service: [email protected]
Telephone No.: +81-3-4455-3722
Fax No.: +81-3-5333-6040
Mailing Address: Asahiseimei Hatagaya Bld. 8Fl. 1-1-2
Hatagaya Shibuya-ku, Tokyo, Japan
ADLINK Technology Inc. (South Korea Liaison Office)
Sales & Service: [email protected]
Telephone No.: +82-2-2057-0565
Fax No.: +82-2-2057-0563
Mailing Address: #402, Dongsung B/D, 60-12,
Nonhyeon-dong Gangnam-gu,
Seoul, 135-010, South Korea
ADLINK Technology Singapore Pte. Ltd.
Sales & Service: [email protected]
Telephone No.: +65-6844-2261
Fax No.: +65-6844-2263
Mailing Address: 84 Genting Lane #07-02A,
Cityneon Design Center,
Singapore 349584
ADLINK Technology Singapore Pte. Ltd. (India Liaison Office)
Sales & Service: [email protected]
Telephone No.: +91-80-6560-5817
Fax No.: +91-80-2244-3548
Mailing Address: No. 1357, Ground Floor, "Anupama",
Aurobindo Marg JP Nagar (Ph-1)
Bangalor, Karnataka 560078, India
74 Getting Service
 Loading...