

Page 1

Addonics
T E C H N O L O G I E S
NAS Adapter
Model: NASU2
User Manual
FCC Warning Statement
This equipment has been tested and found to comply with the limits for a class B digital
device pursuant to Part 15 of the FCC rules. These limits are designed to provide
reasonable protection against harmful interference in a residential installation. This
equipment generates, uses and can radiate radio frequency energy. If not installed and
used in accordance with the instructions, it may cause harmful interference to radio
communications. However, there is no guarantee that interference will not occur in a
particular installation. If the equipment does cause harmful interference to radio or
television reception, which can be determined by turning the equipment on and off, the user
is encouraged to try and correct the interference by one or more of the following
suggestions.
Reorient or relocate the receiving antenna
Increase the distance between the equipment and the receiver
Connect the equipment to a different power outlet other than the one where receiver is
connected
Consult a certified television or radio technician
1.0 Key Features
• Convert any USB 2.0 / 1.1 mass storage device into a Network Attached
Storage device
• Great for adding Addonics Storage Tower, Storage Rack or any
Addonics USB storage device onto the network
• USB port can be use to power most 2.5" USB hard drive or any low
power USB devices
• Connect a USB printer to share it over the network
• One Fast Ethernet 10/100Mbps port
• Can be set as a DHCP server or client depending on whether a DHCP
server is present
• Support Samba server, by which the server hosts 64 clients on line
• Support FTP server allowing up to 8 FTP users at the same time
• Built-in Bit torrent client to download files directly off the internet onto
the attached USB storage device
• UPnP AV server can be used to share photo/music files stored on the
file server with XBOX 360 video game consoles connected to the LAN
• Supports USB 2.0 / 1.1 specification.
• User Management capability to allow read only or read/write access to
folders
• Administrative management access via web browser with password
security.
• Compatible with Windows 2000/XP/Vista, Mac 10.5.4 and above, and
Linux 2.6.x and above
The NAS adapter is a flexible, economical and powerful unit for your Network.
Follow the instructions to help you connect, setup, and configure it.
Note: Any external USB storage device that you connect to the NAS
adapter must be first initialized and formatted. This means that if
you are connecting an external USB drive with data on it, you will
need to make a backup of this data and transfer them back to the
USB drive after the drive finishes the formatting by the NAS
adapter.
Page 2
Network Environment
There are 3 different setup conditions you can choose:
A. Setup NAS Adapter as a DHCP Client:
If your NAS adapter is connected to a LAN network with an active DHCP server,
it will obtain an IP address from DHCP server automatically.
B. Setup NAS Adapter as DHCP Server:
If your LAN network does not have an active DHCP server, NAS adapter will
immediately act as DHCP server and assign itself an IP address for installation.
C. Setup NAS Adapter in Static IP environment:
You need first configure the IP address for NAS adapter to operate in the static
IP environment. For Configuring details, please refer to “IP Config” setup page.
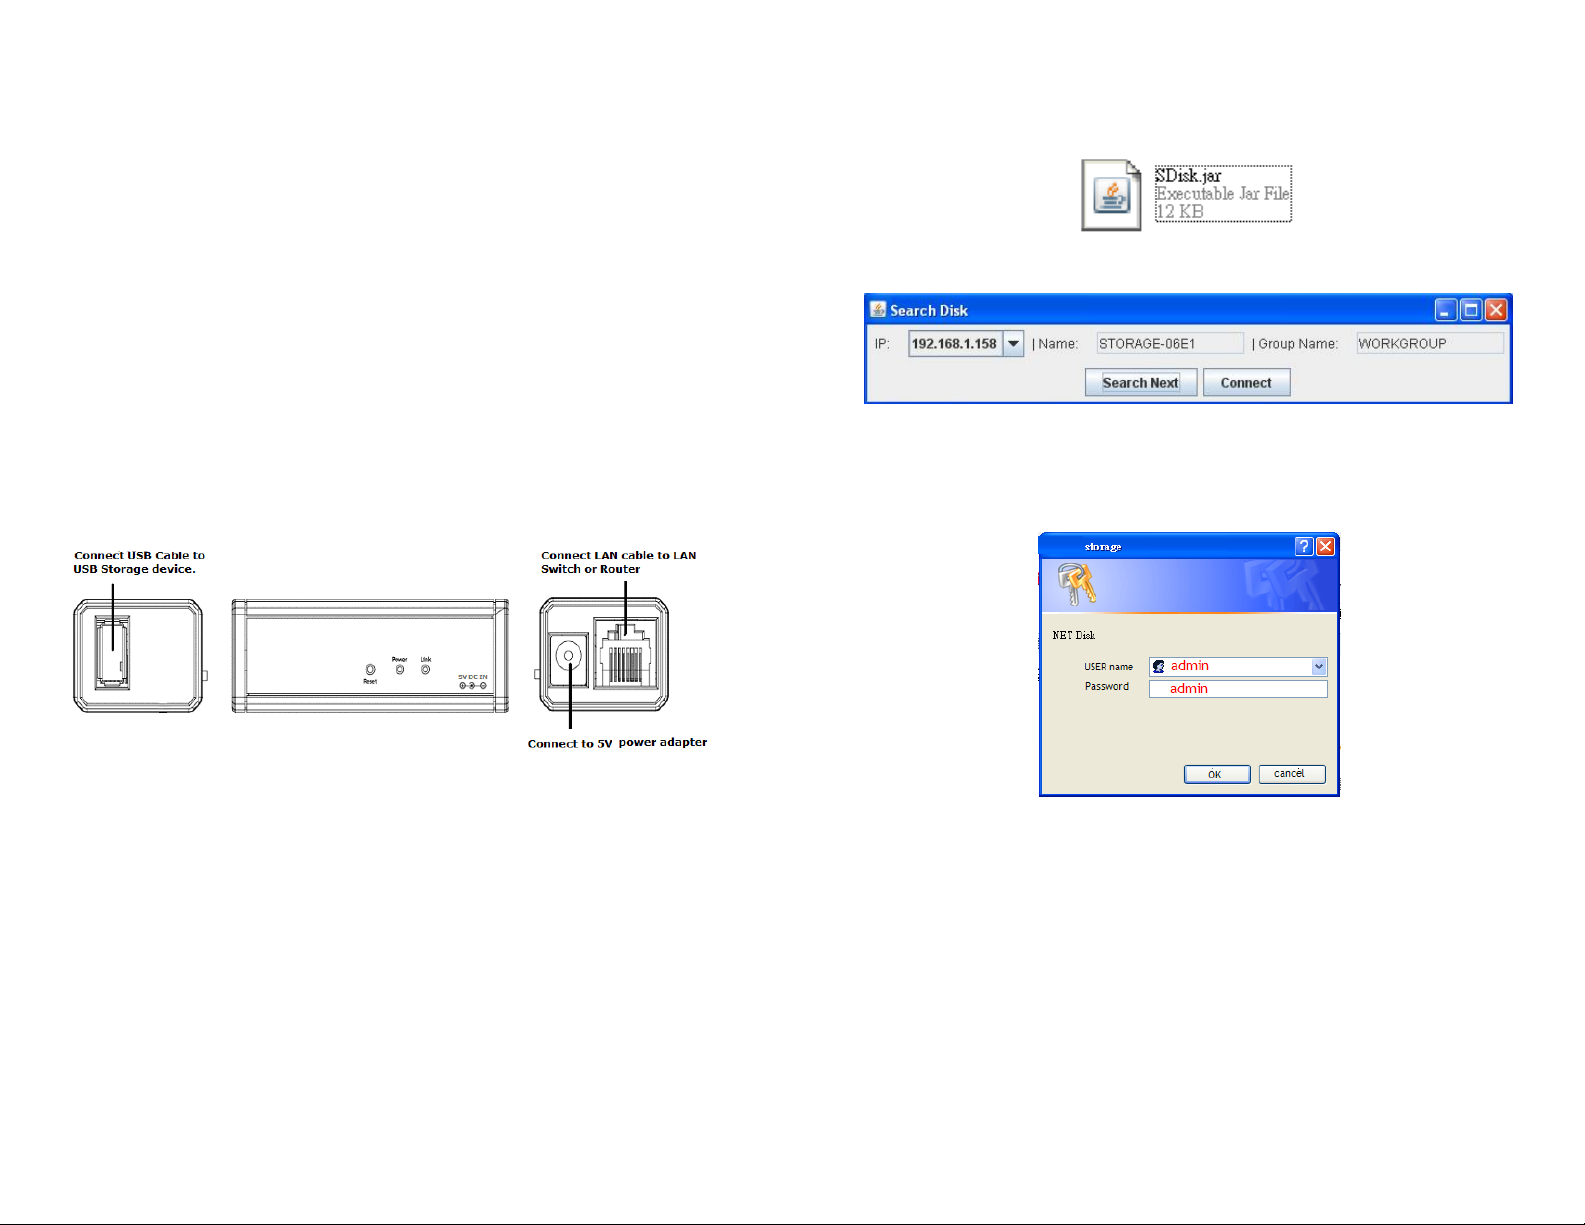
2.0 NAS Adapter Hardware Installation
Connections:
1. Connect external USB Storage device into USB port of the NAS
Adapter. Power on the USB Storage device.
2. Connect LAN cable via LAN switch and Router.
3. Connect 5V power adapter to power up the NAS adapter
Note: “SDisk utility” was written with JAVA script, please make sure your
computer has installed JAVA before, if not please install the JAVA script
form the CD drive.
2. When NAS Adapter has been found, click “Connect” to enter configurations.
Open NAS Adapter web GUI by using web browser.
1. Open web browser and type default host name “storage” in the
search bar.
2. Default login is “admin” for both User name and password. Click
“OK” to enter configurations.
NAS Adapter connected directly to a computer’s NIC card
If you connect the NAS adapter to a computer directly, the adapter will act as a
DHCP server, assigning itself an IP address automatically and also will assign an
IP address to the computer’s network card.
NAS Adapter connected to a Router or Switch
If your NAS adapter is connected to a LAN network with an active DHCP server,
it will obtain an IP address from DHCP server automatically. Or if your LAN
network does not have an active DHCP server, NAS adapter will immediately act
as DHCP server and assign itself an IP address for installation
3.0 Search NAS Adapter by SDisk Utility
1. Browse the CD enclosed in the product package. Copy and paste “ SDisk
Utility” in to your computer then double click the icon to start search.
Page 3
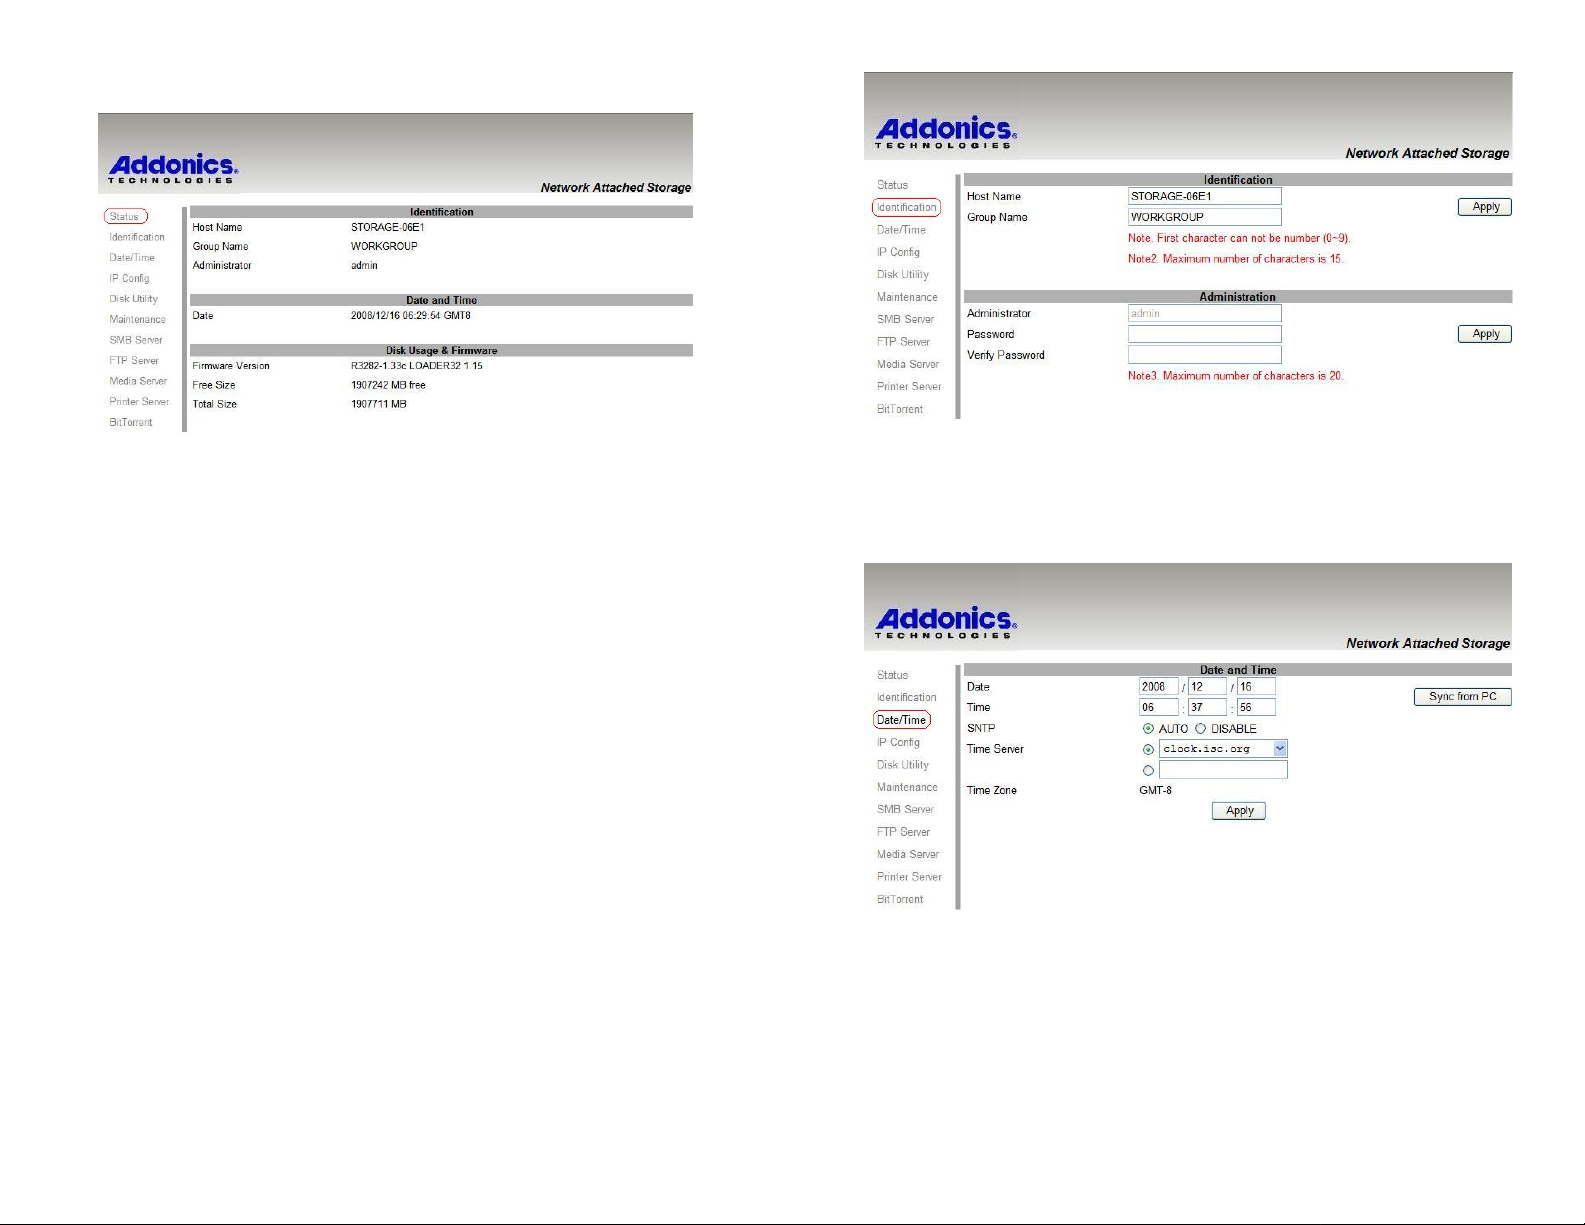
Status
Provide the basic information for NAS Adapter.
Identification
You can change and modify your host, group name and password from this
page. Click “Apply” to save the setting.
Host name: This is used to identify your device on the network. If you prefer
a different name, type in the new name and click “Apply” to save setting.
Group Name: This should be the same as your workgroup. In general, the
default “WORKGROUP” will be OK. But if your workstation belongs to
different workgroup, type in the correct group name to modify.
For Window OS, right click on “My computer” and choose “Properties”, go to
the computer name tab to see your current workgroup.
If using a Mac OS system, to join a Windows workgroup, open the directory
access utility (under Applications-> utilities). Select SMB and click configure to
modify the settings (administrator access required to access this option.)
Note: We strongly suggest you to change the password as soon as you logged
in, to prevent unauthorized access.
Date/ Time Setting
You can change time setting from this page. Clicks “Apply” to save the setting.
By default SNTP is set to Network Time Service otherwise select synchronize to
PC. If internet access is available, we recommended setting SNTP to Network
Time Service instead.
Page 4

IP Configuration
By default, “IP Config” is set to “Automatic IP”. This will allow the NAS adapter to
obtain its IP address automatically. If you prefer setting it manually, select the
static IP option, enter your own value and click “Apply” to confirm the new
setting.
Disk Utility
In this page, you can manage hard disk settings of the USB storage device.
Format: For first time installation, you need to format hard disk into FAT32
file system. Formatting the drive will erase all data on the hard drive.
Warning: For hard drives with data on it, be fore you have a backup
before proceeding to format the hard drive!
Tip: You can transfer back the backup data to the NAS Public folder for
sharing via the network or USB connection of the USB Storage device.
Sleep Time: This is to select hard disk sleeping mode.
Scan Disk: After the scan, it will show file content information and health
status for the hard disk.
Maintenance
This page allows you to update the NAS adapter firmware, to go back to factory
default settings or reboot NAS system.
Firmware update: Follow the steps below to update the loader and firmware
for NAS adapter.
1. Download the latest firmware.
2. Store the firmware file on your computer and decompress them if
necessary.
3. Browse your system and locate the firmware (BIN file).
4. Click on “Upload”.
5. Confirm the pop-up massage to start the update.
6. Wait and DO NOT click anywhere else or turn off the power. The
upgrade might take a few minutes.
7. Once the update is done, it will prompt you to reboot the device.
8. Click on ”reboot” to restart the device.
9. Wait for about one minute and then go to the status page to confirm the
update was successful.
Factory defaults: If you experience problems after a firmware update, it is
recommended to reset all settings.
Note: Resetting the device will remove all folder from the sharing list, erase
the FTP accounts, and reset all other settings! Please do not power off or
disconnect NAS adapter connection during the firmware update process.
System reboot: This can be used to restart the network drive after a
firmware update.
Page 5

Click “Modify” to share a folder.
SMB Server
SMB server allows you to share data or files through the network LAN. When a
USB storage device is connected, a default Public folder is available to be shared
among Guest users. A default Guest user is also created.
Note: Only use English alphabet for folder names and no special characters
when creating new folders.
How to create a user
Click on the “Add” button and type new account name and password. Click
“OK”. The NAS adapter will also create a SAMBA folder named “User1”.
Select “User1” from Folder List and click the “à” to add user on “Sharing
List”.
To Access the folder
From the Windows start button, type “Run”, and type \\ follow by the IP
address.
Eg:\\192.168.1.121 and click OK to continue.
Page 6

Type “User1” and password to login.
Enter new password then click “Apply” to save setting.
Now you have set up the folder that you wish to share on your NAS adapter. This
folder can be access from other computer on your local network.
How to modify account password
Select “User1” and then click “Modify”.
How to delete a SAMBA account
Select an account you wish to delete. Click “Delete” to proceed. Please
note that all the data inside the folder will be lost after the delete.
Page 7

FTP Server
Remember to “Enable” the FTP service on the status page, when you plan on
using the FTP server.
FTP server Configuration: The standard port for FTP service is 21. If
required, you can change it from any port between 1025-65500. But in
general, we recommended using the default port of 21.
File language support: By default, the encoding is set to English. If you
want to store or transfer files with a different encoding (different language),
choose the corresponding language for the drop down list. In order to
transfer and view the files correctly, it is important that you select the correct
language!
Anonymous: By default an anonymous user name has been created, it
allows FTP users to login without username and password. For security
reasons, it is best to add a password!
Note: To be able share FTP resource you need a router to assign the IP address.
How to create FTP account
FTP allows you to share your data through the internet. An internet
connection is required before setting up FTP server.
Select FTP server and click the “Add” button.
Enter a name and password for the new FTP account and click “Next” to
continue. In the account list, you can see an overview of the existing
accounts and status. Click “Apply”.
For FTP file transfers, we recommend to use other dedicated FTP client
software e.g.: SyncQuick FTP, Cute FTP etc.
Note: When creating FTP accounts, please use only English alphabet and
no special character or space for FTP account name.
How to delete FTP account
In the “Account List”, you can see an overview of the existing account and
status. You can change them at any time by selecting the account and
modifying, disabling or deleting it.
Note: Deleting a folder will erase all the files on the hard drive that are stored
inside that folder.
Page 8

XBOX 360 Media Server
The Media server can be used to share your photo and music files stored on the
NAS adapter with an X-BOX360 video game console from Microsoft.
Before you start, make sure both devices are connected to the same local
network and turned on.
Go to the X-BOX360 Media Server page, select the folder where your photo files
is located using the drop down menu. Once you have selected the folder, click on
the “Set” button. This will enable this folder as the shared folder. In the example
below “PUBLIC” is Share directory.
Same procedure applies for the Music and Video folders.
On your Xbox 360, go to “Media” tab, select either Music or Pictures and press A
button of the Xbox console to continue.
Press X button of the Xbox console to change the source and select your
network drive. It should show up as storagexxx and display the folder that you
have set up earlier on your NAS adapter.
Page 9

Printer Server
Inside the share folder, you can access your picture or music files, depending on
which mode you are currently using. Select the files you would like to see or to
listen, and start playback.
1. Install printer driver, (for example. if Epson PL-6200L Printer is connected to
the NAS adapter, you must install PL-6200L driver into the computer first.)
After driver installation, click “Start” • “Setting” • “Printer and Faxes” •
“Add a printer”• “Next”.
Page 10

2. Connect USB printer to NAS adapter. Your network environment should be
similar with diagram below:
3. Select “Local printer” and click “Next” to continue.
4. Select “Create a new port type of port:” then choose “Standard TCP/IP Port”
then click “Next” to continue.
5. Enter the NAS adapter IP address then click “Next” to continue.
6. Select “Custom” and go to “Setting”.
Page 11

7. Select “LPR” under protocol, and give a queue name eg:LRxxx; select LPR
Byte Counting Enabled then click “OK” to finish the port setting.
8. Click “Finish” to complete TCP/IP printer setup.
Note: The NAS adapter printer server does not support GDI/Host-based
printers. For some Multi Function Printers (MFP); scanning functions might
not be functional probably. Please contact Printer Manufacture for detail
Specifications.
Bit Torrent server
The NAS adapter supports Bit Torrent download without using PC resource.
A maximum of 4 bit torrent downloads can be running at the same time.
Page 12

1. Select “Bit Torrent” and select the “Download Path” you wish to use.
Then click “Apply” to save setting. (DO NOT change path setting while
performing BT download, otherwise downloading jobs will disappear)
2. Server Port range can be from 6881 to 65535. (6881 is default setting)
3. Type an upload speed limit: 0= unlimited upload speed, and 4 KB is
minimum speed. Then click “Set” to save setting.
Mail Notification
After a download is successful, an email will be sent to the designated email
address. Click “Mail setup” and input SMTP server, recipient email, SMTP
A/C, Password, than click “Apply” to save setting.
4. Click “Browse” and select torrent file then click “Upload” The file will
show up to the download queue.
Note: Jobs listed in the Download Queue will be removed when NAS
adapter is turned off or USB storage is removed.
Page 13

Mac installations (Mac 10.5.4 or above)
Open the Mac browser “Safari” and key-in the host name of the NAS adapter (for
example, “Storage-0000”). It will detect the NAS adapter automatically.
How to setup SAMBA in Mac OS X 10.5.4
1. Click “Go” on the toolbar, and select ”Network” as the screenshot
shown below.
3. Click on the Storage-xxxx (or the correct name of the NAS adapter).
2. Double Click “WORKGROUP” (or the correct group name of the NAS
adapter), you will find the NAS adapter “STORAGE-xxxx” (or the
correct name of the NAS adapter) in following window.
4. Select the folder you wish to share, and click “OK” to share the folder.
5. Click “OK” to show the folder in the Desktop.
Page 14

How to Map your NAS Adapter to your system.
Showing NAS Disk Drive in network
1. Press “Start” button on Windows desktop
2. Press “Search”
3. Select Folders
4. Select Computer or people
5. Select a computer on the network and a new window will appear.
6. Key in the host name, (For example “storage-xxxx”) in the “Computer
name” column and then press “Search” button. You will see the
following window.
Map Network Window appears
7. Point to the “Storage-xxxx”, double click the mouse. Choose the folder
you wish to map, click mouse on its right button and click “Map Network
Drive”.
Note: For faster connection and usability, we recommend that you map a drive.
This creates a direct access to the shared drive from My Computer (for more
information about drive mapping, refer to your Windows manual).
Access SMB folder of NAS Adapter in Ubuntu 8.04
First, using the console get the prerequisites for the samba file system:
$ sudo aptitude install samba smbfs
$ mkdir /mnt/NAS
$ sudo mount.cifs //NAS_adapter_IP_address/Public /mnt/NAS -o
username=Guest
Search NAS Adapter by SDisk Utility in Ubuntu 8.04
You are going to be installing the JRE and the web browser plug-in. Use the
following command from a terminal
$ sudo apt-get install sun-java6-jre sun-java6-plugin sun-java6-fonts
Check that the JRE is properly installed by running the following command from
a terminal.
$ java -version
You should get similar output
java version “1.6.0•
Java(TM) SE Runtime Environment (build 1.6.0-b105)
Java HotSpot(TM) Client VM (build 1.6.0-b105, mixed mode, sharing)
Navigate to the folder where the jar file is located
$ java –jar Sdisk.jar
Page 15

Technical Support
If you need assistance to get your unit functioning properly, please call Addonics
Technical Support. Our technical staff will be happy to assist you, but they will
need your help to do so. Calling the technical support staff without all the proper
information can be both time consuming and frustrating. Here are some tips to
help you out:
MODEL NUMBER – Please have this number on hand.
SYSTEM INFORMATION – Type of computer, peripherals, etc.
OPERATING SYSTEM – What version of Windows
WHAT’S THE TROUBLE? – Give enough information
about your problem so that we can recreate and diagnose it.
FREE Software Drivers for all Addonics Technologies
Products are available 24 hours per day at the
World Wide Web Site: www.addonics.com
Contact Information
Phone: 408-573-8580
Fax: 408-573-8588
Email: http://www.addonics.com/sales/query/
Internet: http://www.addonics.com
TECHNICAL SUPPORT
Phone: 408-453-6212
Hours: 8:30 am - 6:00 pm PST
Email: http://www.addonics.com/support/query/
 Loading...