


T E C H N O L O G I E S
User Guide
NAS 4.0 Adapter
(NAS40ESU)
www.addonics.com
Technical Support
If you need any assistance to get your unit functioning properly, please have your product information ready and contact Addonics Technical Support at:
Hours: 8:30 am - 6:00 pm PST
Phone: 408-453-6212
Email: http://www.addonics.com/support/query/
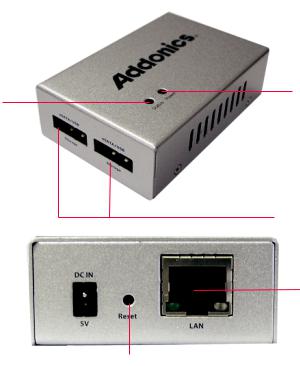
Overview
Power LED
Status LED
Storage Ports
Network port
Reset button
Storage Ports: eSATA (1.5Gbps) or USB (2.0). Each port supports one eSATA device and one or more USB based devices, up to 16 physical drives.
Network Port: Supports 10/100/1000.
Power LED: glows when unit is on.
Status LED: glows steady when unit is idle, other states are dark or dim to indicate a problem, slow or fast blinking between dark and bright or dim and bright to indicate the unit is busy.
www.addonics.com |
Technical Support (M-F 8:30am - 6:00pm PST) |
Phone: 408-453-6212 |
Email: www.addonics.com/support/query/ |
|
|
|
|
Quick Install
In order to start sharing storage as soon as possible, follow these steps:
1.Attach the NAS 4.0 unit to a network with a DHCP server present (most home routers provide this by default).
2.Follow the steps described in the Initial Setup section below.
3.Attach one hard disk. The Status LED should begin to blink after a few moments, then settle back to a steady glow. Confirm at least one partition was detected using the View Drive Information feature in the
Configuration Menu. If not, the drive may be formatted with ext3 or XFS using the Format Drive feature in the Configuration Menu.
4.Define at least one share, granting either read-only or full access rights to “Everyone.”
Installation
Network Connection
The NAS 4.0 unit is factory configured for dynamic IP addressing (DHCP client). Connect the unit to a network (router or switch) where DHCP is supported. Static IP may be assigned later after initial setup.
Storage
The NAS 4.0 unit has two EUHP (eSATA USB Hybrid Port) connectors, supporting eSATA 1.5Gbps or USB 2.0 devices. The eSATA connections do not support FIS switching for port multipliers, only one physical unit may be connected to each port using eSATA. Through the use of USB hubs up to a total of 16 physical units including eSATA and USB can be connected. One SATA port multiplier may be connected using USB; however, with more than one such port multiplier connected only one will function – others will not be recognized at all.
Each physical unit may be formatted with up to 4 individual partitions using a Master Boot Record (MBR), or up to 15 individual partitions using a GUID Partition Table (GPT). Supported file systems are: FAT32, ext2, ext3, ext4, XFS, and NTFS. The NAS 4.0 unit will by far provide the best performance when using an external drive connected using eSATA and formatted with the XFS file system.
Note: Initializing a drive with MBR is limited to drives less than 2TB in capacity with up to 4 partitions total. For drives greater than 2TB in capacity or if more than 4 partitions are desired, the drive must be initialized using a GPT boot record.
www.addonics.com |
Technical Support (M-F 8:30am - 6:00pm PST) |
Phone: 408-453-6212 |
Email: www.addonics.com/support/query/ |
|
|
|
|
The NAS 4.0 Unit Boot Process
Upon powering up the unit, the status LED will blink at first between bright and dim, then remain dark for a few moments, then begin to blink between bright and dark for a while and finally settle down to glowing steadily. Once this pattern is complete the unit is ready to communicate.
This process normally takes about a minute or less, but may take longer depending on the complexity of the configuration, storage and LAN connections. With the 240 possible file systems, booting may take several minutes or longer.
Resetting the NAS unit
Should a problem arise with the NAS 4.0 unit or its configuration, the unit may be reset simply by disconnecting power and reconnecting after a few moments. If this doesn't clear the problem, the unit may be returned to its factory configuration by gently pressing and holding the reset button between the power and LAN connectors until the Status LED blinks slowly, then rapidly. After releasing the Reset button while blinking slowly there will be no changes. After releasing the button once the Status LED blinks rapidly, the Status LED will continue to blink for a while, and may possibly glow steadily for a while as well. Eventually it will begin the boot process, beginning with blinking between bright and dim. Once the boot process is complete and the LED is glowing steadily again, all settings will have been cleared and the unit is ready to communicate with all settings reset to the factory default – including the network and device name settings.
If the process appears to become stuck or takes too long to complete, you can try disconnecting power, then reconnect and after the Status LED blinks bright and dark a few times, try the Reset button again.
Initial Setup
Windows: All of the NAS 4.0 unit's functions and features are configured using a Web Interface. Once the hardware is installed, access the Web Interface with a web browser on a computer attached to the same network by typing in “http://addnas” - this will work on most Windows systems. Be sure the computer accessing the NAS has the Workgroup name set to WORKGROUP.
MAC: Mac users may need to determine the NAS 4.0 unit's IP address by opening a Terminal window and typing the following command:
smbutil lookup addnas
This utility should return the NAS 4.0 unit's IP address. Typing this address into the web browser should open the NAS 4.0 unit's Web Interface.
Linux: Linux users may need to determine the NAS 4.0 unit's IP address if Windows name resolution support is not fully installed and configured, by examining the DHCP server's clients table and attempting to connect to each unidentified IP address using a browser until the NAS 4.0 unit's Web Interface appears.
www.addonics.com |
Technical Support (M-F 8:30am - 6:00pm PST) |
Phone: 408-453-6212 |
Email: www.addonics.com/support/query/ |
|
|
|
|

Once you have connected to the Web Interface, the Initial Setup page will appear:
Click Next, then set a custom password for the admin account. The admin account name may also be changed.
Next, set up the Date and Time. Choose a city nearest you in the same Time Zone and be sure the Date and Time are correct.
www.addonics.com |
Technical Support (M-F 8:30am - 6:00pm PST) |
Phone: 408-453-6212 |
Email: www.addonics.com/support/query/ |
|
|
|
|
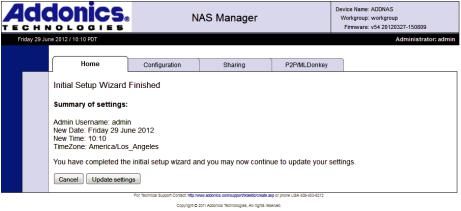
Finally, review and confirm the settings:
After clicking on the Update settings button, Initial Setup is complete.
Sharing Files Using the NAS 4.0
SMB (Windows Sharing)
Connecting to the NAS for direct file access through Windows Explorer is very similar to sharing files between Windows systems. Typing “\\ADDNAS” (or the NAS 4.0 unit's hostname if changed from the default) or the double-backslash followed by the NAS 4.0 unit's IP address is the easiest way to gain direct access quickly. After pressing Enter, the Explorer Window should show a list of the shares available. Opening any of the shares is like opening any other folder, except when accessing a share for the first time, Windows may request a username and password for access to the share (unless “Everyone” permissions have been changed from the default setting of NONE). Entering a valid username and password will open the folder with appropriate access rights to that user. If “NONE” permissions are set for that user on that share, Another username and password prompt will appear. After connecting to a share, Windows will use the same username and password for all connections until the Windows user logs off of Windows.
On Mac systems, on the Finder's Go menu choose “Connect to Server...” then in the server address box type “smb://” followed by the NAS 4.0 unit's IP address.
On Linux systems, use the “Connect to share...” dialog found on the Nautilus or “File Manager” menu bar, then select Windows Share for the type and complete the remaining fields for share name, username and password. Information required to complete the connection and the system's response vary from one version of Linux to another, and should be expected to work about the same way as connecting to a share on an actual Windows PC.
www.addonics.com |
Technical Support (M-F 8:30am - 6:00pm PST) |
Phone: 408-453-6212 |
Email: www.addonics.com/support/query/ |
|
|
|
|
 Loading...