

Page 1
T E C H N O L O G I E S
ENT
ESC
CONTACT US
www.addonics.com
Phone: 408-573-8580
Fax: 408-573-8588
Email: http://www.addonics.com/sales/query/
User Guide
1:3 Blu-Ray / DVD Duplicator
(DDU3SAS)
www.addonics.com
v3.1.11
Technical Support
If you need any assistance to get your unit functioning properly, please have your
product information ready and contact Addonics Technical Support at:
Hours: 8:30 am - 6:00 pm PST
Phone: 408-453-6212
Email: http://www.addonics.com/support/query/
Page 2
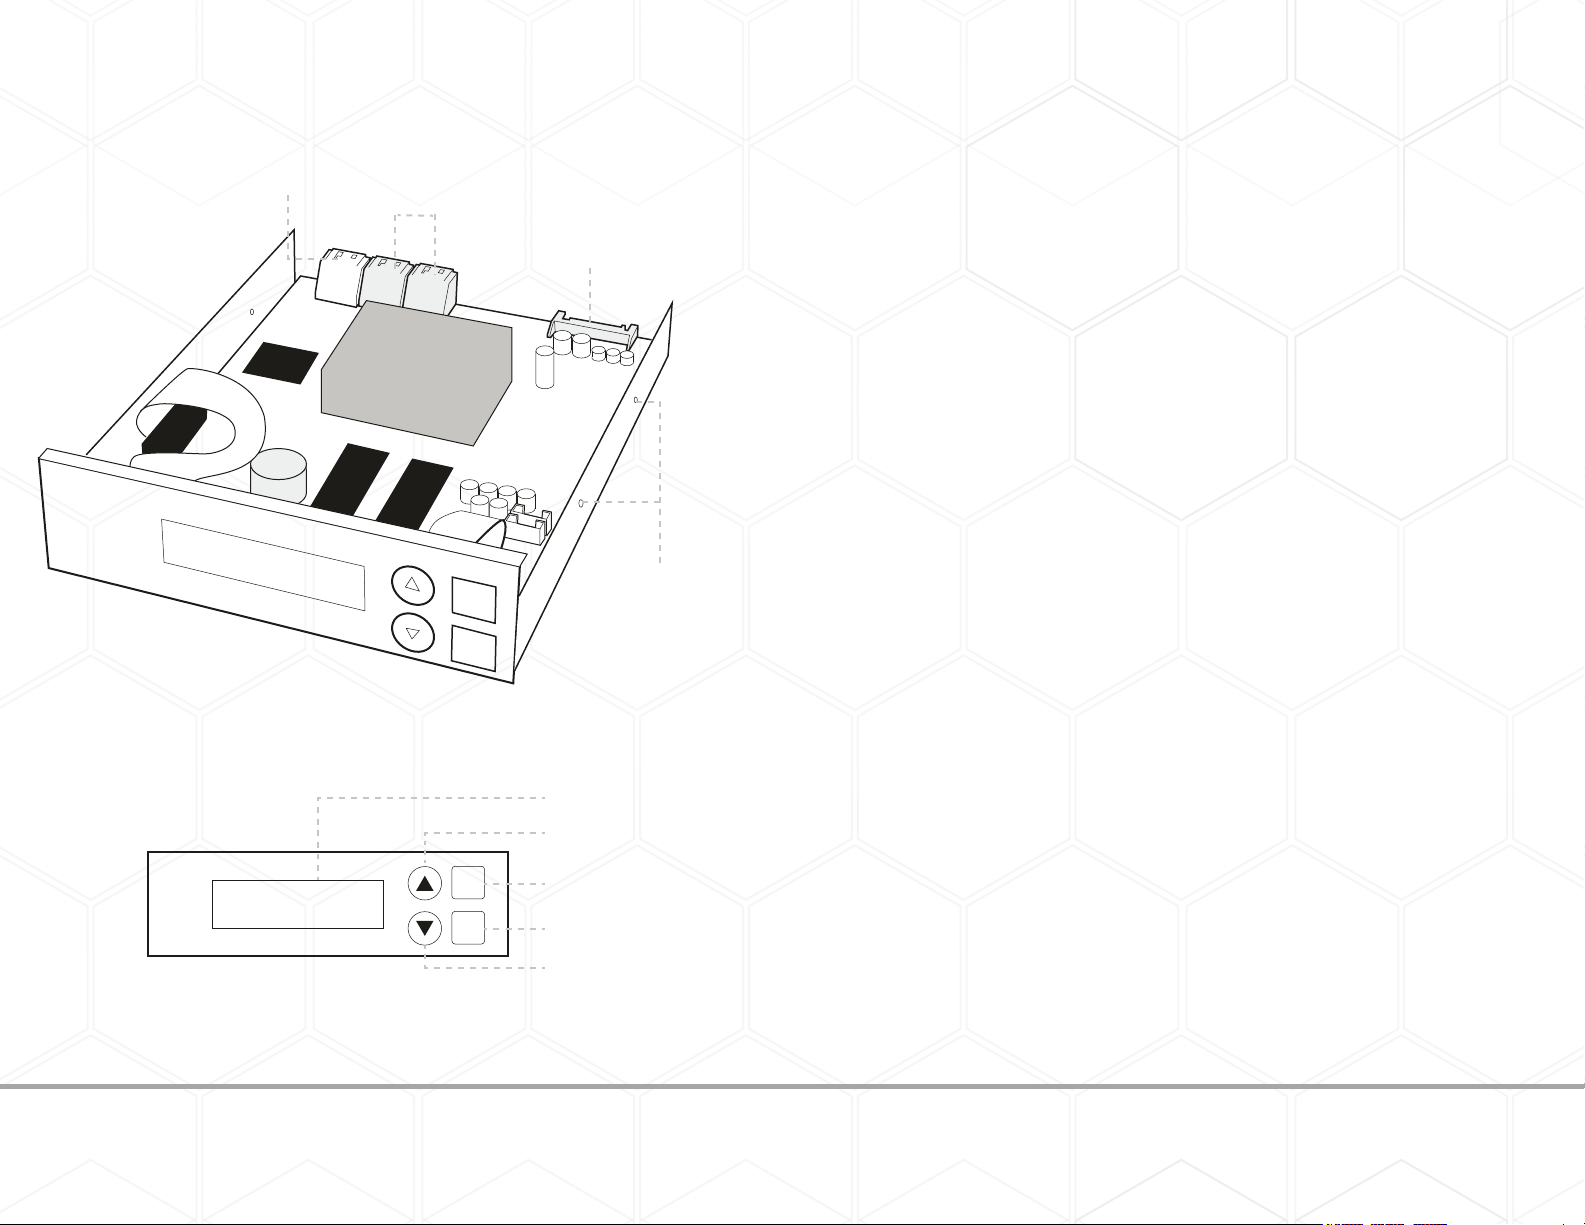
Diagram
Source
SATA Port
(top port)
3 Destination
SATA Ports
15-pin SATA
Power Connector
ENT
Mounting Holes
(2 on each side)
ESC
LCD
Duplicator Panel
ENT
ESC
Scroll Up
Executes Function
Cancels Function
Scroll Down
1 10
Technical Support:
Hours: 8:30 am - 6:00 pm PST
Phone: 408-453-6212
Email: http://www.addonics.com/support/query/
Page 3

12.19 Quick Compare
Quick Compare is related to function#5 Compare. Once compare error byte reach to the setting
figures, compare process will stop.
12.20 Link Mode Select (Select Models)
Now press ESC and ▼ to enter the following screen. Press ENT to enter the “Link Mode Select”
screen. Use ▲ ▼ to choose between the Stand Alone, Middle Tower or Last Tower modes as
appropriate.
Quick Guide
Installing the 1:3 optical duplicator
Step 1
Insert the 1:3 Blu-Ray / DVD Duplicator into standard 5.25” drive bay.
Attention: Once a tower has been set as Middle Tower or Last Tower and the J14 jumper is also set
to Target mode, the LCD will show that it is in Target mode.
12.21 Re-Scan (Select Models)
Now press ESC and ▼ to enter the following screen. Press ENT to enter the “Re-Scan” screen. By
default this is set to No. Use ▲ ▼ to choose Yes then press ENT to scan the chosen connected
tower.
12.22 Tray-In/Out
Lets you control the drive tray ejecting. The default is All Once and there have Divide 2 Times for
selection. The default is 5 second, more option is up to 99 seconds.
12.23 BootTime Delay
To set the device scanning time during the system booting.
12.24 Start Tray Eject
To set if do eject all tray after system boot up. The default is On. Press ▼ to select Off.
12.25 Disc Redetect
The function is designed specially for bad quality disc, the system will detect the disc one more
time if disc recognition error occurred. The default is Off. Press ▼ to select On.
12.26 Show Burn Speed
Now press ESC and ▼ to enter the following figure. This function lets LCD shows the burning
speed of CD/DVD/BD writers. The default is On. Press ▼ to select Off.
Step 2
Connect the power cable from you system to the 4-pin floppy power connector.
Step 3
Connect the source drive to the source SATA port via SATA cable and the target
drives to the destination SATA port via SATA cable.
Step 4
Screw the duplicator into the drive bay with 4 screws (2 on each side).
Duplicating drive(s)
Make sure the source and target drives are connected to the proper ports.
When the duplicator is on, it will go through the steps below.
Step 1
Duplicator LED will light up and the device will beep.
Step 2
LCD will display initial steps:
1. Duplicator Ver: - Displays duplicator version
2. Initializing SDRAM
3. Detect Source/Target - Will detect the type of source/targets
4. Copy - Defaults to the first function which is to copy
Step 3
Once the duplicator gets to the copy menu, press ENT to begin copying. The
duplicator will auto-detect the drive and display its information on the LCD. Make
sure that the power LEDs of the flash reader are blinking, the blinking indicates
drive activity.
9
Technical Support:
Hours: 8:30 am - 6:00 pm PST
Phone: 408-453-6212
Email: http://www.addonics.com/support/query/
You can find the complete user manual of the 1:3 Blu-Ray / DVD Duplicator panel
on the driver disk under user guides. You can also download it from our website at
www.addonics.com/support/user_guides/
2
Page 4

Panel Functions
Duplicator Panel
ENT
LCD
Scroll Up
Executes Function
To select any function from #1 to # 13 as the first item appears on the screen whenever system is
turned on.
12.6 Auto Verify
To set if auto verify target disc's readability after copy function. The default is Off. Press ▼ to select On.
12.7 Auto Compare
To set if auto do comparison after copy function to check if source and target disc are identical.
The default is Off. Press ▼ to select On.
ESC
The Duplicator has 6 functions to choose from:
1. Copy
2. Test
3. Test & Copy
4. Verify
5. Compare
6. Prescan
7. Disc Info
7.1 Source
7.2 Target
9.1 Load
9.2 Delete Image
9.3 Image Info
9.4 Compare Image
9.5 Select Image
9.6 Image Src Drvie
9.7 ImageFormat Info
9.8 Edit
8. Select Source
9. Image
9.9 Format HDD
9.10 LoadImage Method
10. Edit Track
11. Lightscribe
12. Setup
11.1 Print
11.2 Load LSI to HDD
11.3 Select LSI File
11.4 Delete LSI File
11.5 Load LSI Drive
11.6 Coypright Info
12.1 Language
12.2 Burn Speed
12.3 Read Speed
12.4 Auto Start Drive
12.5 Startup Menu
12.6 Auto Verify
12.7 Auto Compare
12.8 Auto Prescan
12.9 Eject Disc
12.10 Burn On The Fly
12.11 Burn Mode
12.12 Display Time
12.13 Button Sound
12.14 Device Info
12.15 System Info
12.16 Quick Erase
12.17 Full Erase
12.18 Auto Close Tray
Cancels Function
Scroll Down
10.1 CD to CD Edit
10.2 CD to HDD Edit
10.3 Close Session
12.19 Quick Compare
12.20 Link Mode Select
12.21 Re-Scan
12.22 Tray-In/Out
12.23 BootTime Delay
12.24 Start Tray Eject
12.25 Disc Redetect
12.26 Show Burn Speed
12.8 Auto Prescan
To set if auto scan source disc before copy function. The default is Off. Press ▼ to select On.
12.9 Eject Disc
There are 3 kinds of tray behavior when copy process is completed.
Eject Good Only: Only good disc will be ejected after burning.
Eject All Disc : All discs will be ejected after burning.
Do Not Eject : All discs stay in after burning.
The default is Eject Good Only.
12.10 Burn On The Fly
Burn On The Fly means data will be copied directly from the source disc to the target disc. When
the setting is Off, the data will be loaded into temporary partition of HDD first, then copy from HDD
to disc. The default is On. Press ▼ to select Off.
12.11 Burn Mode
There are two modes: DAO (Disc At Once) and TAO (Track At Once). The default is DAO. Press ▼ to
select TAO.
12.12 Display Time
To set if display a timer while copying. The default is On. Press ▼ to select Off.
12.13 Button Sound
To enable or disable beep sound while press a key.
12.14 Device Info
To show the writer information.
12.15 System Info
To show system Information.
12.16 Quick Erase
To erase data on the DVD rewriteable discs quickly.
12.17 Full Erase
To erase data on the DVD rewriteable discs completely. Compared with Quick Erase, Full Erase
takes longer time to do the job.
12.18 Auto Close Tray
All tray will be closed in selected time and if disc is ready, system will auto start copy, test or both
functions, depends on which function is stay on the LCD screen.
3 8
The default is Off, press ▼ to select 1 Byte, 1 KB, 10 KB, 100KB, 1 MB, 10MB, 100MB etc.
Technical Support:
Hours: 8:30 am - 6:00 pm PST
Phone: 408-453-6212
Email: http://www.addonics.com/support/query/
Page 5

10.3 Close Session
Single session format is used for Audio CD, and commercial audio player is not able to play open
session audio CD, therefor session must be closed to max. playback compatibility. However, no
more tracks can be added once session is closed.
11 LightScribe (Optional Function)
LightScribe is an optical disc recording technology that uses specially coated recordable CD and
DVD media to produce laser-etched labels with text or graphics, as opposed to stick-on labels and
printable discs. This function includes 6 sub-functions: Print, Load LSI to HDD, Select LSI File,
Delete LSI File, Load LSI Drive and Coypright Info.
11.1 Print
Use optical drive's laser to print loaded LSI file. Disc should placed up side down.
1. Copy
Function#1 Copy, instant copy source (disc/image) to the target drives (optical writes). Use Function#8
to select source drive before copying. Select function#1. place a source disc into source drive and blank
disc into the target drives. A rewriteable disc can be used as target media, however all data will be
erased before copying.
Press ENT to start copy function when all discs are ready. After complete, system will show spent time
and the amount of OK disc on the screen, the OK disc will be ejected.
2. Test
Function#2, copy simulation, no data will be written to the write once media (DVD+R is not supported
for this function).
11.2 Load LSI to HDD
Load LSI to hard disk.
11.3 Select LSI File
Select LSI file from hard disk for laser printing.
11.4 Delete LSI File
Delete a LSI File stored in a particular partition. Use ▲ ▼ to confirm Yes or No.
11.5 Load LSI Drive
This function is to select source drive in order to load LSI File into a particular partition.
11.6 Coypright Info
This function is to see the LightScribe copyright information.
12 Setup
To change the default setting. However, it is suggested to use the default for the optimal operation.
There are 24 sub-functions: Language, Burn Speed, Read Speed, Auto Start Drive, Startup Menu,
Auto Verify, Auto Compare, Auto Prescan, Eject Disc, Burn On The Fly, Burn Mode, Display Time,
Button Sound, Device Info, System Info, Quick Erase, Full Erase, Auto Close Tray, Quick
Compare, Tray-In/Out, BootTime Delay, Start Tray Eject, Disc Redetect and Show Burn Speed.
12.1 Lanuage
Now press ENT, and you will enter the following figure. The function Language lets you select a
language in which messages can be shown on LCD.
12.2 Burn Speed
Now press ESC and ▼ to enter the following figure. This function lets you control the burning
speed of CD writers. DVD Burn Speed is defaulted to 16X, BD Burn Speed default is 4X, CD Burn
Speed default is 32X and Audio Burn Speed is is defaulted to 16X.
12.3 Read Speed
To change default reading speed of source disc. The default is Off. Press ▼ to select 1 or 2 (blank
disc).
Press ENT to start simulation. If rewriteable disc is used, all contained data will be erased before
simulation.
3. Test & Copy
Function#3, will do copy simulation before copy function. Press ENT to start simulation and copy.
Note, only passed test disc will do the copy.
4. Verify
Function#4, check readability of the burned disc.
5. Compare
Function#5, to check if target disc is identical to source disc.
Compare result :
OK: Source and target disc are identical
Fail: TOC not match, compare skipped due to contains do not match.
Diff: Shows how many bytes are different.
6. Prescan
Function#6, to check if source disc is readable and without read error.
7. Disc Info
Function#7, to report disc information, disc type and capacity.
8. Select Source
Function#8, to set which drive as source device. The drive on CH01 will be chosen as source device.
Press ENT, and then press ▲ ▼ to select the source.
Assume that HDD is selected as the source device and selected partition contains no data, an error
message “Source Drive Not Ready” will show on LCD while trying copy function. In that case, go to
Function#9 Image to load the data into the chosen partition first.
12.4 Auto Start Drive
System will auto start to copy or test once blank disc is ready.
12.5 Start Up Menu
7 4
Technical Support:
Hours: 8:30 am - 6:00 pm PST
Phone: 408-453-6212
Email: http://www.addonics.com/support/query/
Page 6

9. Image
Function#9 Image is valid only when a hard disk is installed. Disc is loaded to hard disk as an
image file.
9.1 Load
Load function loads whole disc data from any writers into the current partition of the hard disk.
“P:A” means current partition is A.
9.2 Delete Image
If you want to delete an image file stored in a particular partition, you can use this function to
delete image. Press ENT , the system will confirm with you for the action, use ▲ ▼ to select Yes or
No, then press ENT for confirmation.
9.3 Image Info
To check selected image information. First, enter into the function and press ▼ for more
information.
9.4 Compare Image
This function is used to check if created image is identical to source disc.
When result shows on LCD, press ENT for more detail information.
Compare result :
OK: Source and target disc are identical
Fail: TOC not match, compare skipped due to contains not match.
Diff: shows how many bytes are different.
9.5 Select Image
This function is to select a partition as source image from the hard disk. Pressing ▲ ▼ to select a
partition, LCD will show image name and capacity.
9.6 Image Src Drive
This function is used to set the image source drive for loading disc data into a particular partition.
Enter into the function and use ▲ ▼ to select image source drive.
9.9 Format HDD
Hard disk must be formatted by the system for the very first time. Hard disk will be partitioned into
the chosen partition format. If no hard disk is installed, LCD will show the message as No Valid HDD!
All data on the hard drive will be erased after the hard disk format. After the hard drive is formatted
correctly, LCD will show “ Format HDD ok!.”, Press ENT to verify HDD or press ▼ and choose No return
back to menu.
9.10 LoadImage Method
This function is to change the way to save Image. There are 2 formats for choice: Auto and Manual.
Auto means system auto assign partition for loaded image. Manual let you to choose which partition to
load image to.
10 Edit Track (for Audio CD only)
Function#10 Edit Track is exclusively designed for editing a collection of favorite songs from CDs. In
other words, you can collect songs on a number of CDs and merge them into a single CD. There are 3
sub-functions: CD to CD, CD to HDD and Close Session.
10.1 CD to CD Edit
To select songs from source CD, and then burn into a blank CD-R/RWs.
You can press ▼ to see the rest of tracks. If you want to select the track, press ENT then a “+” will
shows up, press ENT again will cancel the selection. After selection, use ▲▼ move to the “End” which
is between 1st track and last track. Press ENT to end of selection, and use ▲ ▼ to confirm Yes or No.
Press ENT after burning, system will ask if you want to continue edit, use ▲ ▼ to confirm Yes or No. If
you want to continue edit, the current source CD will be ejected and ask you to insert next disc. Repeat
the above process for editing.
After editing, system will show ''Close all disc's session ? Yes”, use ▲ ▼ to confirm Yes or No.
Once session is closed, no more tracks can be added.
Attention:
Commercial audio player might not able to play open session disc, close session is suggested for
max. compatibility.
10.2 CD to HDD Edit
To select tracks from single or multi-audio CD and create image to specific partition of HDD
9.7 ImageFormat Info
This function shows which format is used for current hard disk. It is related to function#12.4 Format
HDD.
9.8 Edit
This function is to edit selected image's title, sub1 title and sub2 title. Only valid when the current
partition contains an image file can title. A title should be composed of 1 to 13 characters. The
character can be alphabet, number or the combination of both. Use ▲ ▼ to select the number or
alphabet. After selecting a desired one, press ENT for next character, the end of key in, press and
hold ENT for 2 sec and release for next title.
5 6
The basic operation method is same as CD to CD Edit, system still ask you to insert empty disc
even the target drive is HDD. If burning successful, system will show ''Image load OK'', which
means the selected tracks are written to temporary partition.
Press ENT after burning, system will ask if you want to continue edit, use ▲ ▼ to confirm Yes or No.
If you want to continue edit, the current source CD will be ejected and ask you to insert next disc.
Repeat the above process for editing. If ''No'' is selected, system will show ''Burn or Move to partition
?'', use ▲ ▼ to confirm Burn or Move.
Burn : Burn the selected tracks to CD
Move to partition : Create an image for selected tracks.
Technical Support:
Hours: 8:30 am - 6:00 pm PST
Phone: 408-453-6212
Email: http://www.addonics.com/support/query/
 Loading...