

Adcraft UB-286 Installation Manual
UB-286, UB-289
Coffee Brewer
This manual contains important information regarding your Admiral Craft
unit. Please read this manual thoroughly prior to equipment set-up,
operation and maintenance. Failure to comply with regular maintenance
guidelines outlined in this manual may void the warranty.
MUST READ!!!

2
Warnings:
• Do not touch any hot surfaces
• Do not plug or unplug unit with wet hands
• Do not immerse unit, cord or plug in liquid at any time
• Unplug cord from outlet when not in use and before cleaning
• Do not operate unattended
• Do not use this unit for anything other than intended use
• Never pour Hot Water, Coffee, or Coffee Powder into the Water Reservoir.
• Never pour more than 2.2 liter of water into the Water Reservoir
• Do not use outdoors
• Always use on a firm, dry and level surface at least 12” from walls or any other obstruction
• Do not use if unit has a damaged cord or plug, in the event the appliance malfunctions, or has been
damaged in any manner
• Keep children and animals away from unit
• Any incorrect installation, alterations, adjustments and/or improper maintenance can lead to property
loss and injury. All repairs should be done by authorized professionals only
• Ensure that the designated power supply is adequate for continual usage and the voltage is correct
Installation:
*Note - Please check that your Brew Cone is assembled correctly, with the spring wedged firmly at the bottom
of the Filter Basket.
1. Place the Machine on a firm and horizontal surface with plenty of room above to allow easy and safe filling of
the water tank.
2. Plume UB series to water connection. A quality water filter is recommended.
Water line must have water pressure of between 20 and 90PSI.
3. Plug machine into power.
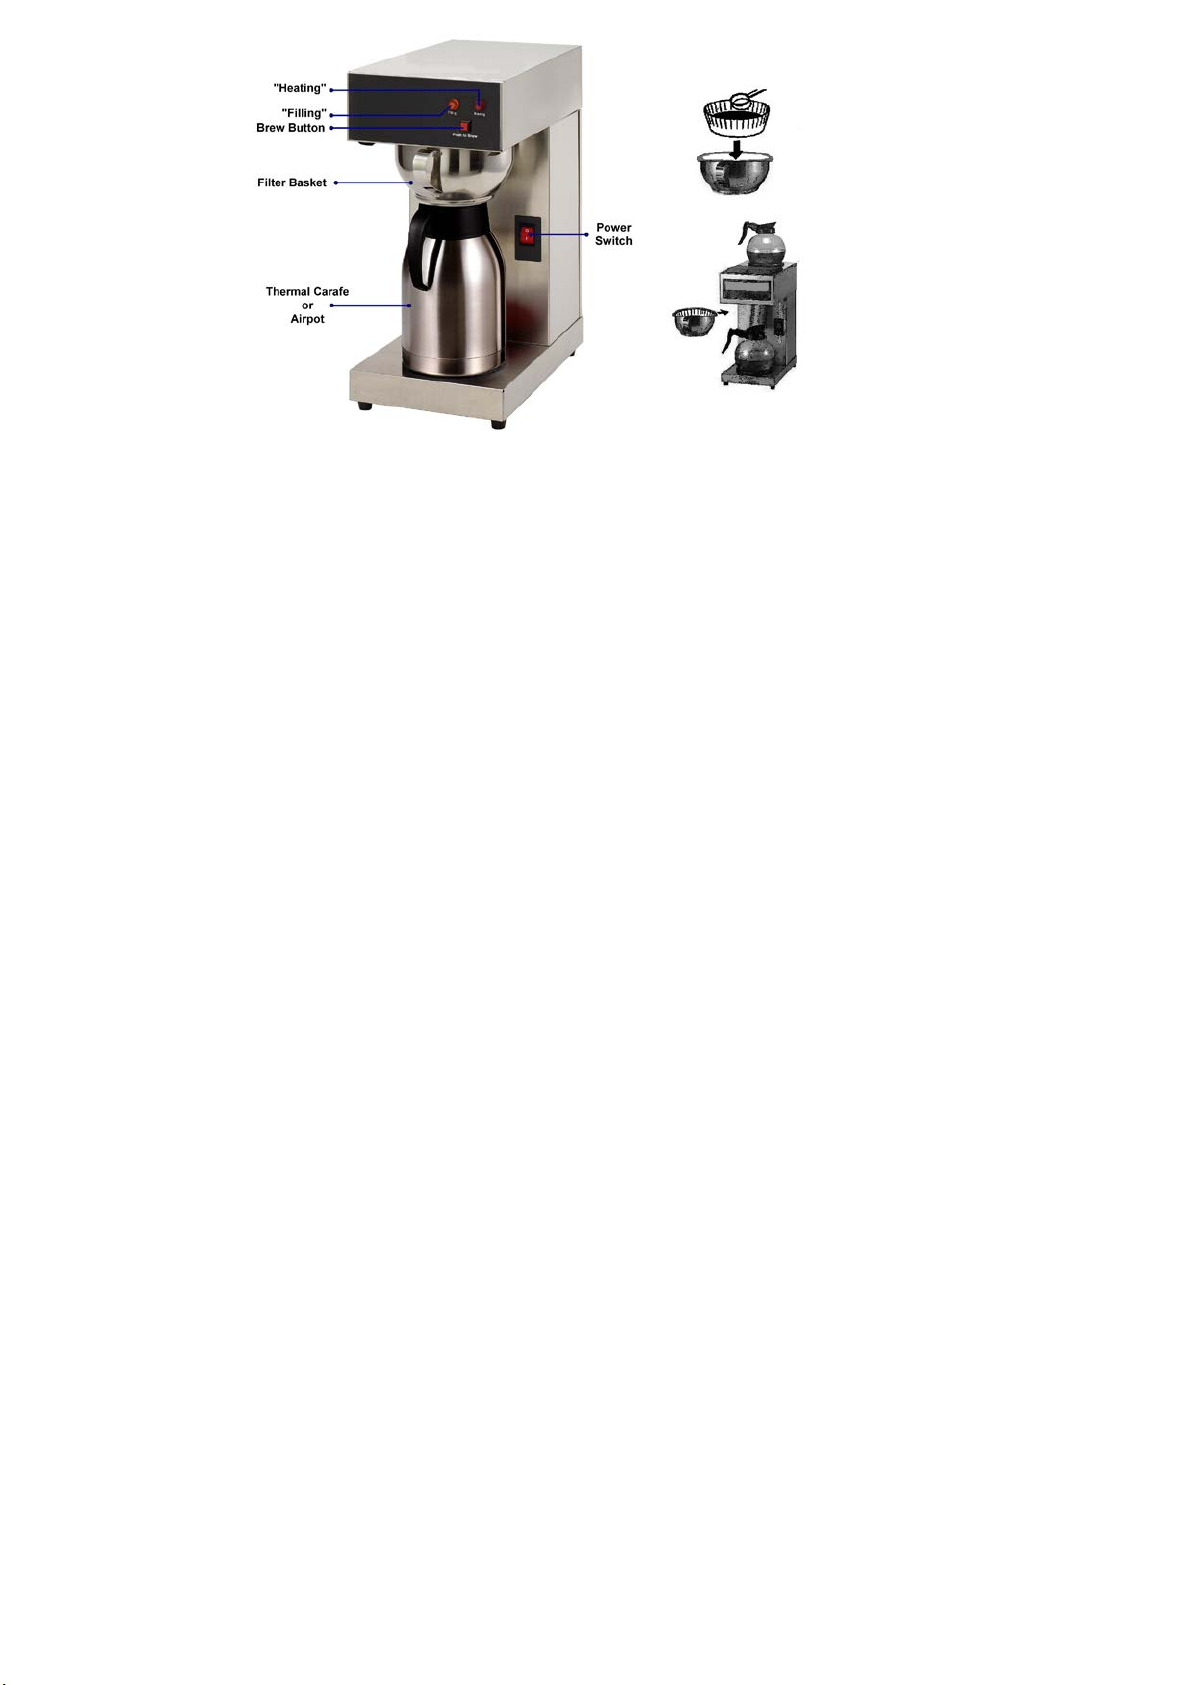
4. Place an empty pot at correct position under the Filter Basket.
5. Turn the power switch ON. Press the brew button and the “Filling” indicator will light up and off when
reservoir is full. The “Heating” indicator will light up continued.
6. HOT W AT ER should start to flow into pot in approximately 90 seconds.
7. About 4~5 minutes later, the "Heating" Indicator will off indicating the brewing process has ended. Do not
remove vessel or Brew Cone until water stops flowing.
8. You should repeat the above process twice to clean the internal parts of the machine before brewing coffee
for first time.
9. During above operation, it is normal to hear some brewing and pumping sounds and to see some water
vapor coming out of the machine.
*NOTE - If operated incorrectly or water over flows, please TURN-OFF
the brewing procedure.
the power switch immediately to STOP
3
Operation
*Note -
CLEANING – NOTE: To maintain cleanliness and increase service life, the brewer should be cleaned daily. Do
not immerse the unit in water or any other liquid. If liquid enters the electrical compartment it may cause a
short circuit or electrical shock.
1. Remove the Filter Basket, and place a Filter Paper into the Filter Basket. Put appropriate amount of
coffee in the Filter Paper (your coffee supplier should be able to provide you with information about
correct yields).
2. Slide the Filter Basket into position.
3. Place the empty decanter (Pot or Airpot) at the correct position under Filter Basket.
4. Turn the power switch ON. Press the Brew button; the “Filling” & “Heating” indicator will light.
5. Coffee will start to flow into the pot in approximately 90 seconds.
6. When the "Heating" indicator light turns off, the brewing cycle has completed. Do not remove vessel
or Filter Basket away until coffee stops flowing.
7. Brew cycle is completed.
8. Dispose of used grounds coffee and filter paper; rinse Filter Basket in clean water.
- The tank must be full of water before connecting the brewer to electrical power.
- Water will always remain in the hoses and boiler of the unit. If the brewer should be
moved or removed for service, be sure to pour out the remaining water. Failure to comply can cause
serious burns.
- To avoid splashing or overflowing hot liquids, always place an empty airpot or server under the
filter pan before starting the brew cycle. Failure to comply can cause serious burns
1. Allow unit to completely cool before cleaning.
2. Disconnect the cord from the outlet.
3. The Coffee Maker must not be cleaned by a water jet.
4. Wipe the outside of the unit with a damp cloth, then wipe dry.
5. To avoid damage, do not use abrasive cleaners or scouring pads.
6. If soap or chemical cleaners are used, be sure they are completely rinsed away with clear water
immediately after cleaning. Chemical residue could damage or corrode the surfaces of the unit.
 Loading...