

Page 1
INSTRUCTION MANUAL
SL250ES-10
10” MEAT SLICER
1/4 HP, 120V
This manual contains important information regarding your Adcraft unit. Please read this manual
thoroughly prior to equipment set-up, operation and maintenance. Failure to comply with regular
maintenance guidelines outlined in this manual may void the warranty.
Page 2

WARNINGS
• Keep hands away from blade and moving parts
• Do not use the meat slicer for boned meat, fish or anything other than food
• Do not use machine with wet hands or bare feet
• Do not use extension cables
• Do not immerse unit, cord or plug in liquid at any time
• Unplug cord from outlet when not in use and before cleaning. Make sure the graduated knob is
in “0” position.
• Plug only into a 3-hole grounded electrical outlet
• Do not operate unattended
• Do not use this unit for anything other than intended use
• Do not use outdoors
• Keep children and animals away from unit
• Always operate on a firm, dry and level surface at least 12” from walls or any other obstruction
• Do not use unit with a damaged cord or plug, in the event the appliance malfunctions, or has
been damaged in any manner
• Any incorrect installation, alterations, adjustments and/or improper maintenance can lead to
property loss and injury. All repairs should be done by authorized professionals only
• Ensure that the power supply you are using is adequate for continual usage and the voltage is
correct
• Do not use device when, after it has been sharpened numerous times or the diameter of the
blade has become 10mm thinner
*In the case of prolonged use of the food slicer or a motor block, the thermic safeguard in the motor is activated. The motor stops automatically; at this point the machine must be turned off. Check
that the warning light is turned off. Give the motor time to cool down before using again.
TO USE
1. Unwrap and place machine with the On/Off switch so that it is in front of the operator.
2. Regulate the thickness of the slice desired by turning the graduated knob.
3. Switch on to activate the blade.
4. Place the food to be sliced on the sliding carriage (pushing against the food holder arm) facing
the blade, making sure that the food is resting against the gauge plate.
5. After use, turn the graduated knob back to position “0”. The food grip should not be removed
unless the shape and size of the food does not allow its use.
Note: For best results, thaw out frozen meat for several hours before slicing.
*If the sharpener is not mounted, proceed as follows:
• Place the sharpener in its support
• Tighten the safety screw
• Block the knob
CLEANING
To maintain cleanliness and increase service life, the machine should be cleaned daily.
• Before cleaning or attempting to move food slicer, unplug from outlet
• Wipe the entire machine and all parts with a clean soft cloth using ordinary neutral detergents.
Use soft cloths for drying.
• When the sliding food tray moves with difficulty, lift the food slicer and place on its side.
• Carefully clean the cylindrical sliding bar and lubricate with Vaseline oil.
• Remove knife guard periodically, unscrewing the screw (in the center of the knife guard) then
clean both the blade and the inside of the knife guard with alcohol
April 2015
Page 3
NOTE - If the blade transmission belt slips, the correct tension can be achieved (This can be seen
when the rotation of the cutting blade can be stopped while cutting). Please see the following:
1. Approach the regulating components on the bottom.
2. Loosen the bolt on the tension belt screws then turn the screws in a clockwise direction to
achieve correct tension of the belt.
3. Tighten the bolt on the screws.
BLADE SHARPENING
Note - The blade is highly resistant, normally needing to be sharpened about once a year when used
regularly. Should the blade become blunt or dull, please see the following:
1. Unplug the unit.
2. Check that the gauge plate is closed (graduated knob in position “0”).
3. Carefully clean the part of the blade sharpened.
4. Reinsert the plug.
5. Loosen the locking knob on the sharpener group.
6. Raise the sharpener, turning it by 140 degrees so that both grinding wheels are in working
position.
7. Lower the sharpener group until it locks. During this procedure, press button to bring the
sharpening wheel into contact with the cutting edge of the blade.
8. Secure the group by turning the locking knob.
9. Set the gauge plate by turning the graduated knob to no. 2.
10. Switch on, letting the blade turn for 1-2 minutes. When the blade is still, check to see if any burr
has formed on the edge.
11. After having verified the presence of burr, switch on and gently press button for about 3 seconds to remove the burr produced during sharpening in (in this last phase both grinding wheels
should be working).
12. Turn the graduated knob back to position “0”.
13. After sharpening, move the sharpener back to its original position, clean the edge of the blade
and the grinding wheels with alcohol.
14. After several sharpening operations, the grinding wheels should be cleaned with a brush to
remove traces of alcohol.
April 2015
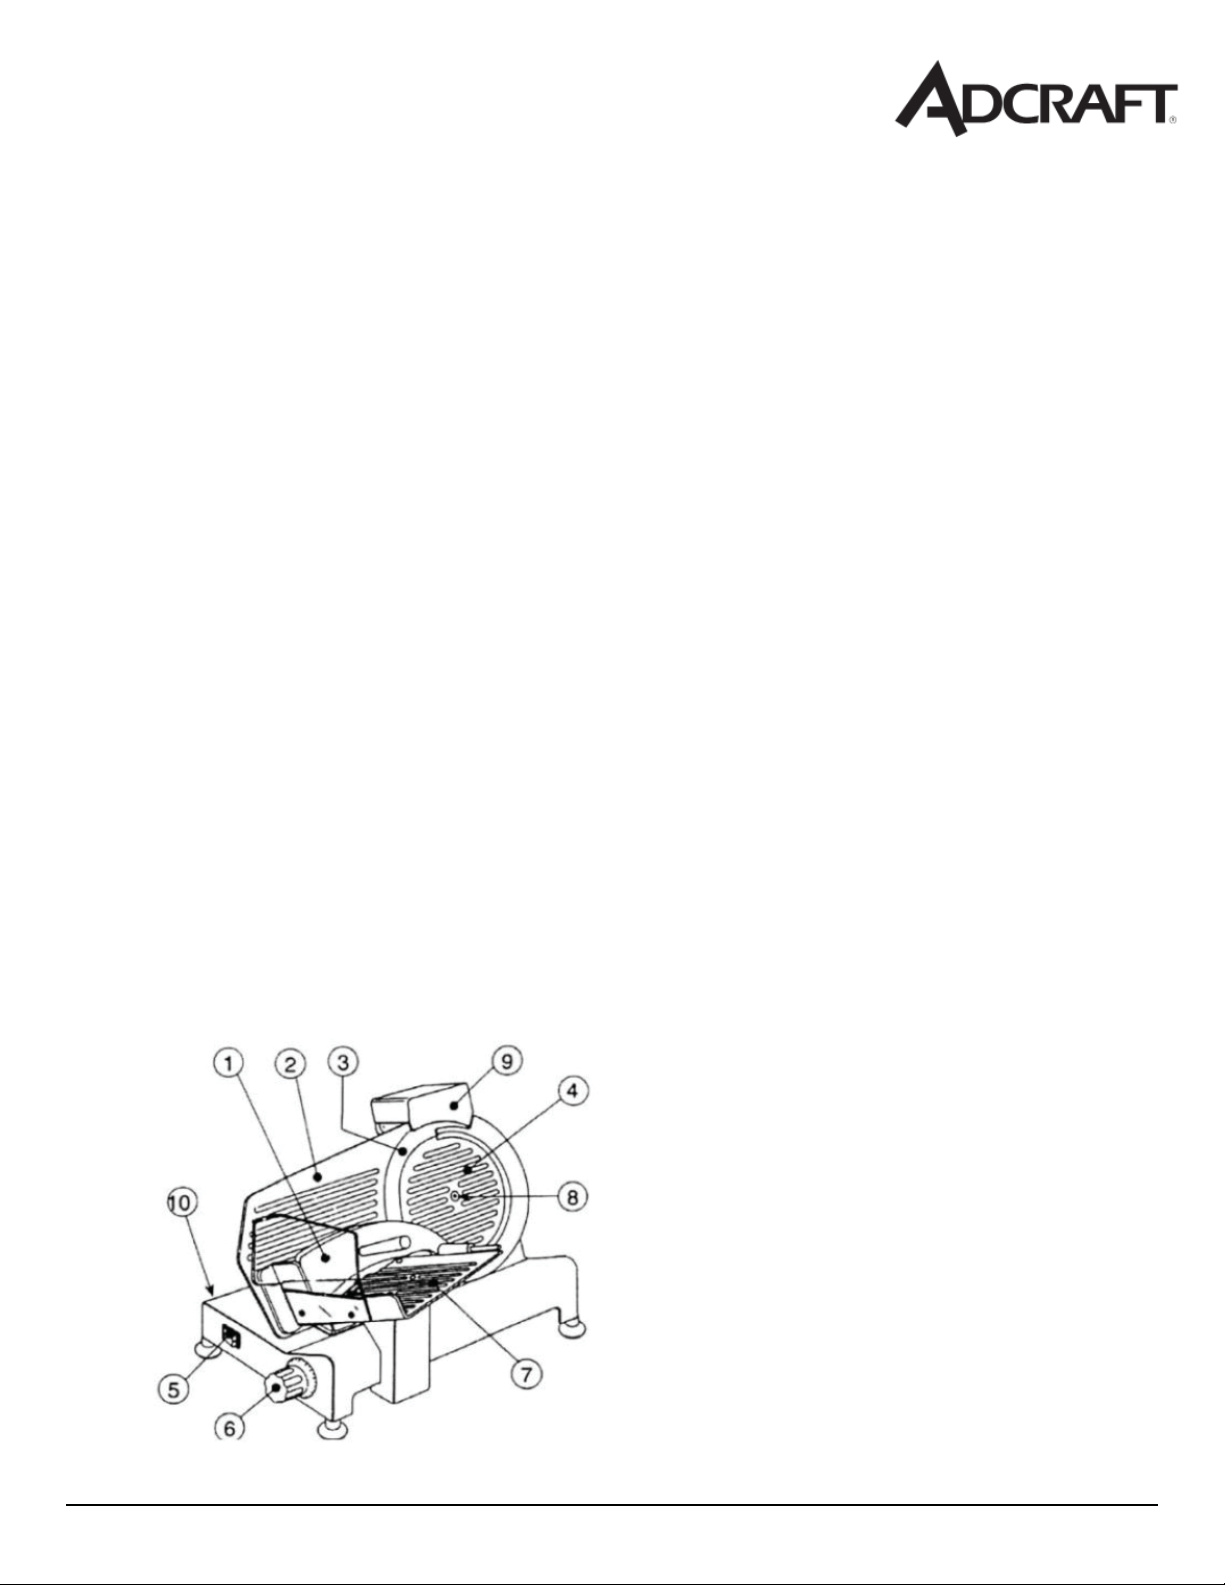
1. Food holder
2. Gauge Plate
3. Blade
4. Blade Guard
5. On/Off Switch
6. Graduated Knob
7. Carriage
8. Blade Guard Bolt
9. Sharpener
10. Body
Page 4

Page 5

SL250ES-10
Parts Diagram and Replacement Parts for the Meat Slicer
April 2015
Page 6

Replacement Parts for the Meat Slicer
Diagram # Description
1 Encloser
2 Active Clapboard
3 Food Salver
4 Blade Guard Disc
5 Blade
6 Blade Guarding Ring
7 Tray Bracket
8 Food and Fixed Arm
9 Fixed Arm Bushing
10 Fixed Arm Handle
11 Plastic Granule
12 Motor
13 Motor Briquetting
14 Fixed-Arm Pin 12x185
15 Blade Guard Bolts
16 Ball Bearing 6202
17 Blade Belt Wheel 66
18 Pin of Belt Wheel
19 BeltSV.330
20 Slide Mulch
21 Power Line
22 Slide Axel
23 Knob with Scale
24 Spring Gasket
25 Cam
26 Cam Osculant Staff
27 Slider
28 Slide Axle Briquetting
29 Spring of Towing Bracket Slide Axle
30 Towing Bracket Axle
31 Quadrate Axis
32 Towing Bracket
33 M8x35 Hexcagonal Screw
34 Ball Bearing 607
35 Towing Bracket Cover Knob
36 Relay
37 Capacitor
38 Capacitor Retainer
39 Button Mulch
40 Button Switch
Diagram # Description
41 Motherboard
42 Meat scraper
43 Sharpener Mulch
44 Sharpener Base of Subassembly
45 Sharpener Base of Assembled
46 Button of Sharpener
47 Fine Grinding Wheel 45
48 Crude Grinding Wheel 45
49 Pin of Rubbingstone
50 Spring
51 Pin of Sharpener Bracket
52 Sharpener Tighten Knob
53 Active Clapboard Mandril
54 Rubber Foot
55 Pin of Blade Guarding Ring
56 Tray Finger Plate Guard
57 Slide Axle Bracket
58 Small Belt of Wheel Motor
59 Slide Driver
60 Belt Wheel Module
61 Sharpener Module
62 Spring Gasket for Bearing 15
63 Spring Gasket for Hole 35
64 Blade Guard Disc Square-Head Nut
65 Fixed-Arm Handle Bolt
66 Finger Baffl e Bolt
67 Finger Baffl e Nut
68 Bracket Knob Bolt
69 Under Spring Gasket
70 Motor Impacted Bolt
71 Meat Scraping Shim
72 Meat Scraper Bolt
73 Capacitor Fixation Clamp Bolt
74 Tray Bearing Cover A
75 Meat Board Basket
76 Tray Bearing Cover B
77 Cross Recessed countersunk head M6x12
78 Slide Axle Briquetting Bolt
79 Quadrate Axis Locking Screw
80 Slider Adjust Bolt
April 2015
Page 7

ACE
Equipment
One Year Limited
Warranty
Admiral Craft Equipment Corp. (ACE) warrants its equipment against defects in materials and workmanship, subject
to the following conditions:
ACE Equipment is warranted for one year, effective from the date of purchase by the original owner. A copy of the
original receipt or other proof of purchase is required to obtain warranty coverage. This warranty applies to the original
owner only, and is not assignable.
Should any product fail to function in its intended manner under normal use within the limits defined in this
warranty, at ACE’s discretion, such product will be repaired, replaced with a refurbished unit, or replaced with a new
unit by ACE, after defective unit has been inspected and defect has been confirmed. ACE does not assume any liability
for extended delays in replacing any item beyond its control. This warranty does not apply to rubber and non-metallic
synthetic parts that may need to be replaced due to normal usage, wear or lack of preventative maintenance.
This warranty covers products shipped into the 48 contiguous United States, Hawaii, and metropolitan areas of Alaska
and Canada. Warranty coverage on products used outside the 48 contiguous United States, Hawaii and metropolitan
areas
of Alaska and Canada may vary. Contact ACE for details at 1-800-223-7750
The following conditions are not covered by warranty:
•
Equipment failure relating to improper installation, improper utility connection or supply and problems due to
improper ventilation.
•
Equipment that has not properly been maintained, damage from improper cleaning, and water damage
to controls.
•
Equipment that has not been used in an appropriate manner, or has been subject to misuse, neglect, abuse,
accident, alteration, negligence, damage during transit, delivery or installation, fire, flood, riot, or act of God.
•
Equipment that has the model number or serial number removed or altered.
•
Equipment on which the security seal has been broken.
If the equipment has been changed, altered, modified, or repaired without express written permission from ACE, then the
manufacturer shall not be liable for any damages to any person or to any property, which may result from the use of this
equipment thereafter.
This equipment is intended for commercial use only and this warranty is void if equipment is used in other than a
commercial application.
For warranty and non-warranty related issues, technical support, purchase replacement parts and warranty registration
visit
www.admiralcraft.com
. Please have your model number, serial number and proof of purchase ready. It is not
necessary to contact the place where you originally purchased your product from.
“THE FOREGOING WARRANTY IS IN LIEU OF ANY AND ALL WARRANTIES EXPRESSED OR IMPLIED
INCLUDING ANY IMPLIED WARRANTY OF MERCHANTABILTY OR FITNESS FOR PARTICULAR
PURPOSES AND CONSTITUES THE ENTIRE LIABILITY OF ACE. IN NO EVENT DOES THE LIMITED
WARRANTY EXTEND BEYOND THE TERMS STATED HEREIN.”
VER1212
April 2015
 Loading...