

Page 1
ADCP-77-086 • Issue 2 • 04/2009 • Chapter 5 - microBTS Initial Configuration
5.5 Assigning OML Link IP Address and a Static IP Address to the microBTS
Depending upon your networks requirements, a network IP address will need to be assigned to
the microBTS and each TRX. IP addresses should be obtained from your network administrator. Use the following step-by-step procedure to assign a new IP address to the microBTS.
1 Find the IP address of the microBTS corresponding to the micro controller.
The last MAC address listed on the exterior label will be the micro controller as shown in
Figure 5-7.
Match this MAC address with the DHCP assigned IP address as shown in Figure 5-12. Open a
Web browser such as Explorer, Mozilla, etc. and using the familiar browser command:
http:// xxx.xxx.xxx.xxx where xxx.xxx.xxx.xxx is the IP address assigned to the micro
controller.
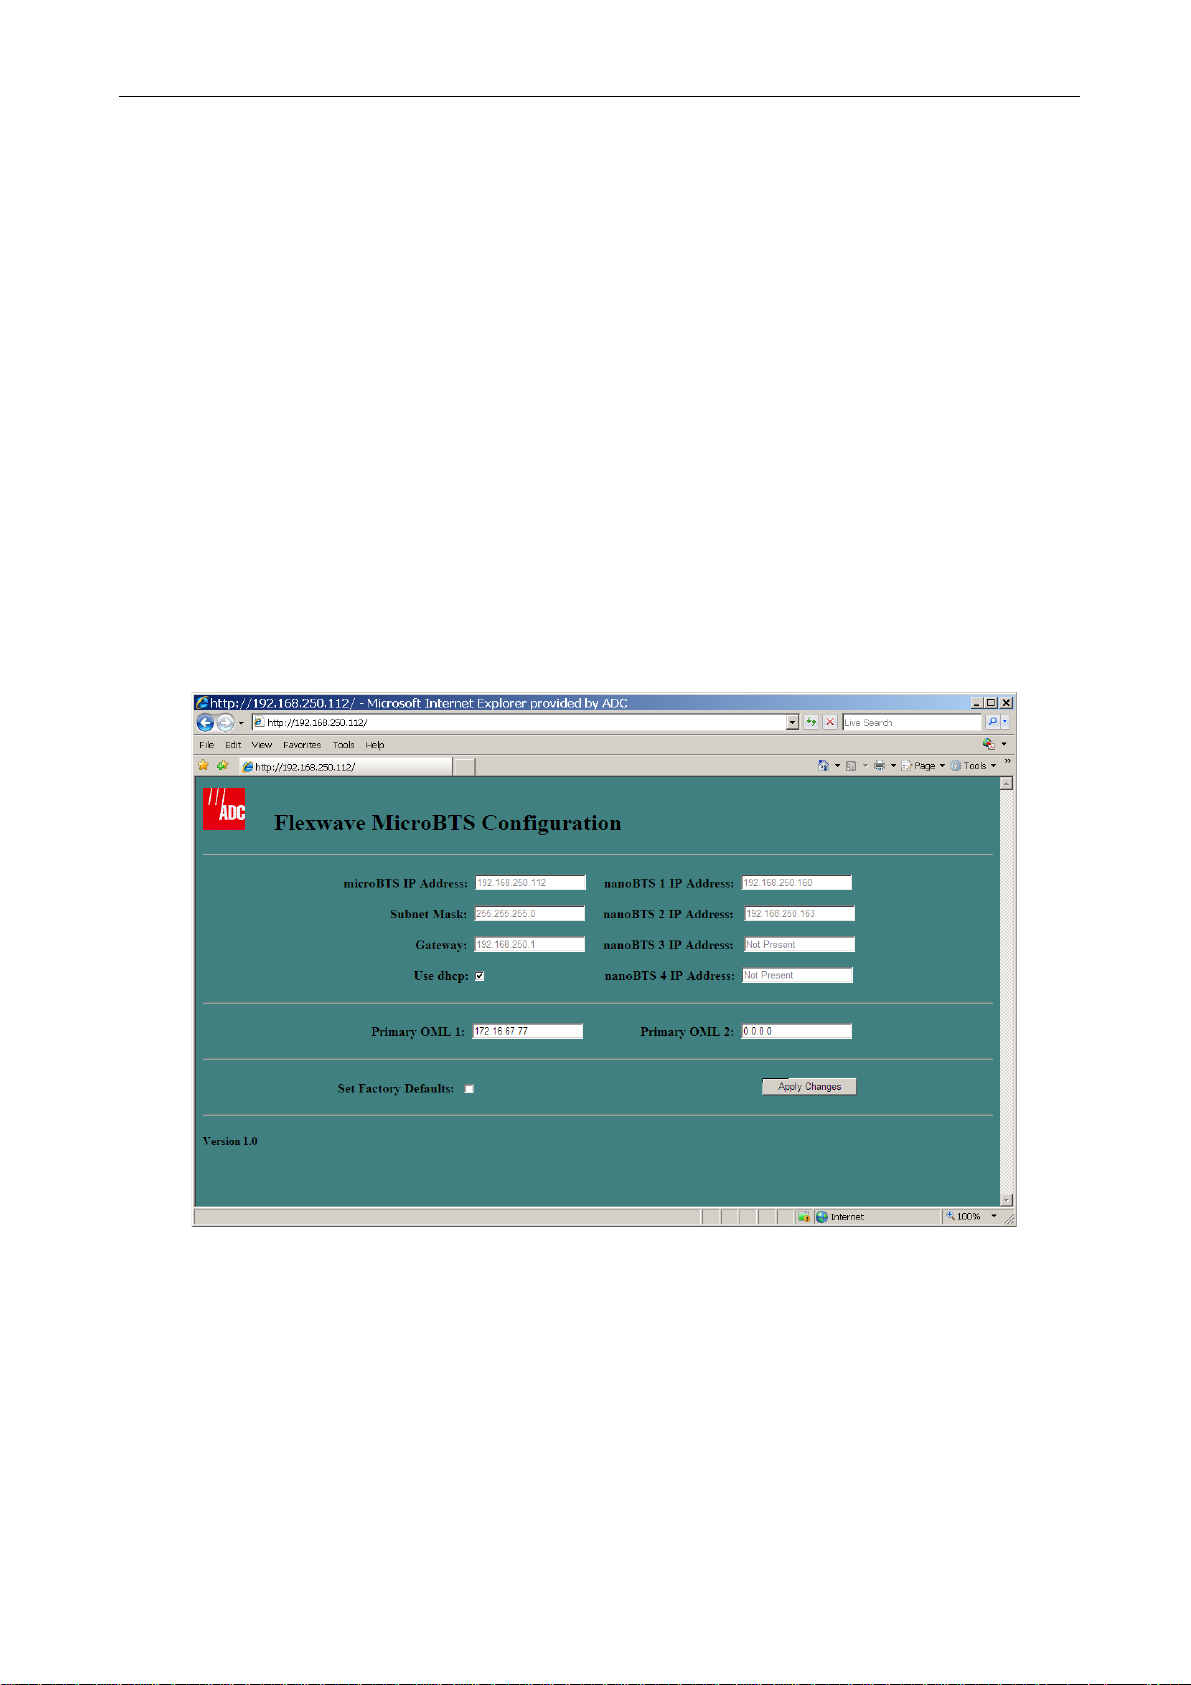
The following screen will appear. Refer to Figure 5-15.
AD030908
Figure 5-15: FlexWave microBTS Configuration Screen
FlexWave microBTS Installation and Commissioning Guide Page 55
© 2009, ADC Telecommunications, Inc.
Page 2

ADCP-77-086 • Issue 2 • 04/2009 • Chapter 5 - microBTS Initial Configuration
2 Using the configuration screen, type in the following information as shown in Table 5-1
Table 5-1: Configuration Parameters
Parameter Variable
E
microBTS Address
Subnet Mask
Gateway
nanoBTS 1
nanoBTS 2
Primary OML (operations and maintenance link) 1
Primary OML (operations and maintenance link) 2
Use DHCP
Use an IP address assigned by your system
administrator
Use an IP address assigned by your system
administrator
Use an IP address assigned by your system
administrator
Use an IP address assigned by your system
administrator
Use an IP address assigned by your system
administrator
Use the IP address assigned to the Abis link on which
your BSC is operating
Use the IP address assigned to the Abis link on which
your BSC is operating a secondary link
This is selected when a DHCP address needs to be
assigned to the microBTS.
Make sure that this is not selected
if you are assigning
static IP addresses
Page 56 FlexWave microBTS Installation and Commissioning Guide
© 2009, ADC Telecommunications, Inc.
Page 3
ADCP-77-086 • Issue 2 • 04/2009 • Chapter 5 - microBTS Initial Configuration
AD069909
Launch the
BSC configuration
Manager
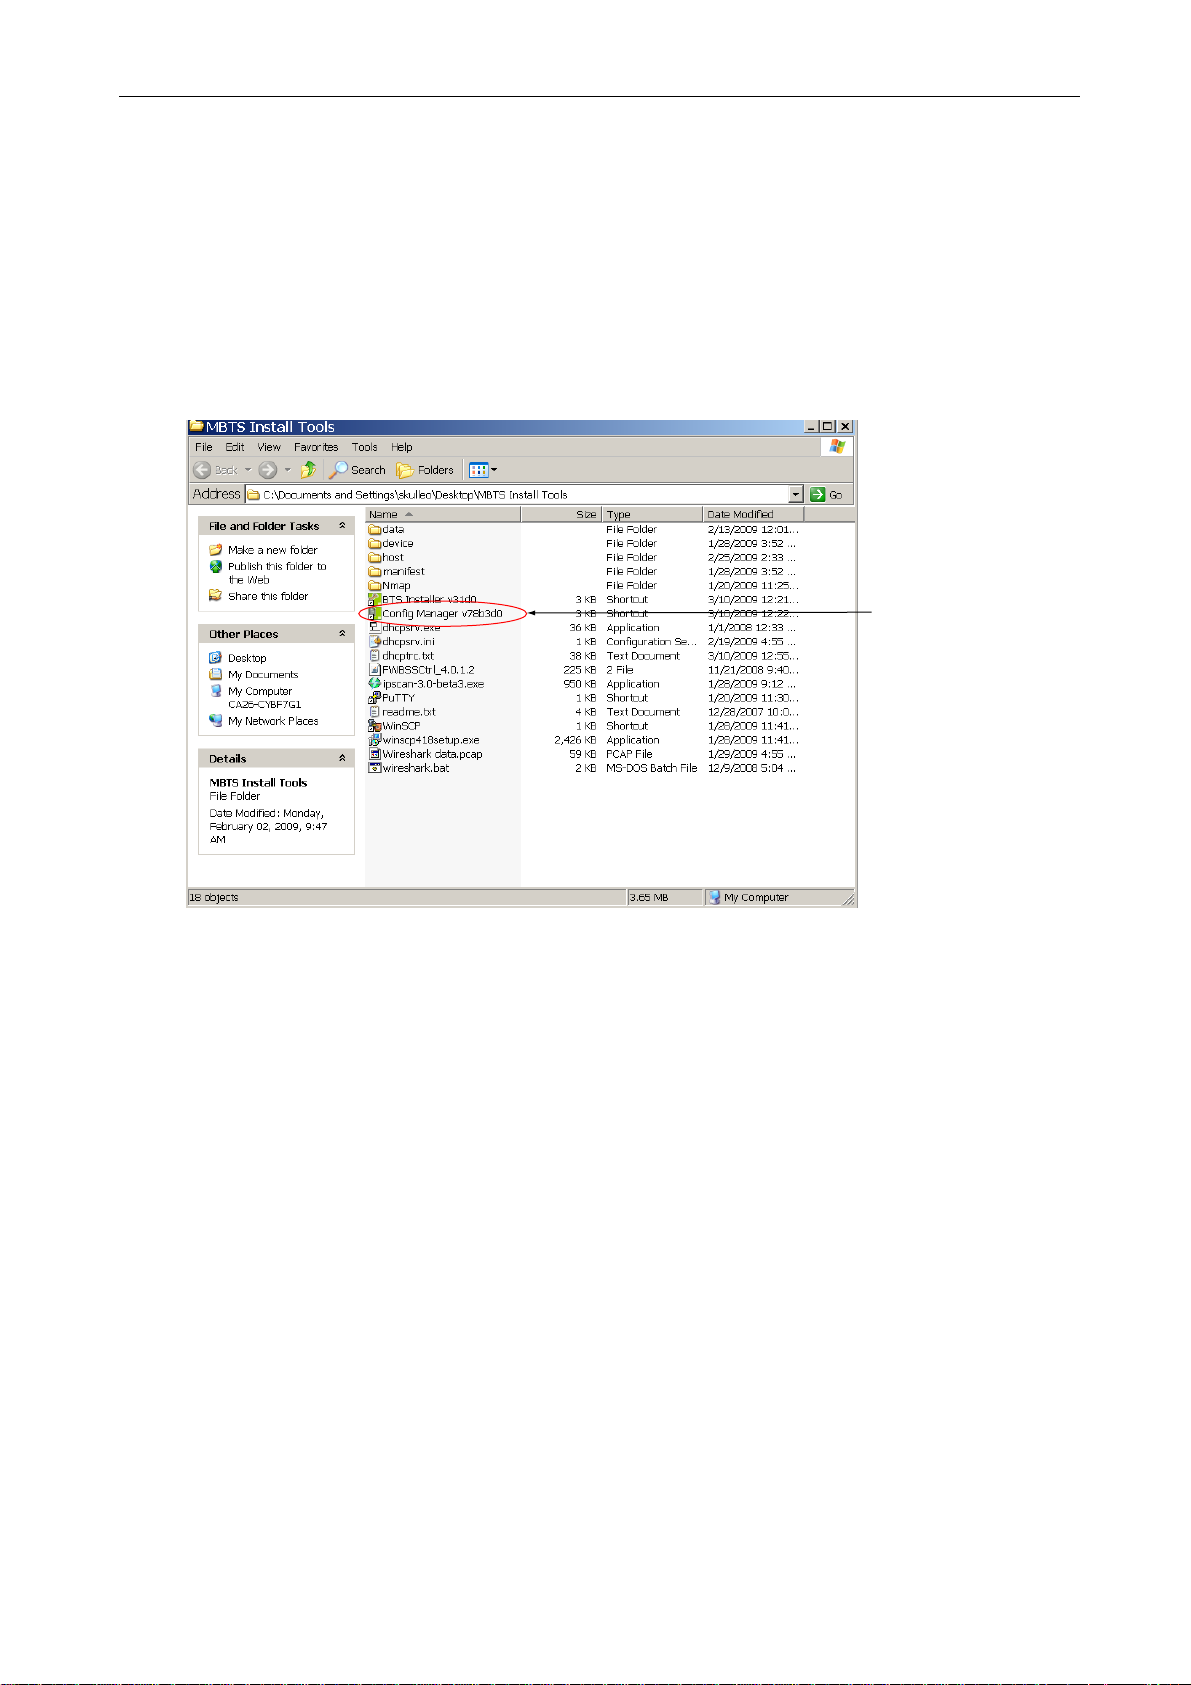
5.6 Configuring a New Site Using the BSC Configuration Manager Utility
Once the microBTS is configured with IP addresses, use the following procedure to launch,
configure and verify that the microBTS is connected and functioning.
1 Launch the BSC Configuration Manager from the PC’s desktop or file folder as shown in
Figure 5-16.
Figure 5-16: Launching the BSC Configuration Manager from a PC Desktop
FlexWave microBTS Installation and Commissioning Guide Page 57
© 2009, ADC Telecommunications, Inc.
Page 4
ADCP-77-086 • Issue 2 • 04/2009 • Chapter 5 - microBTS Initial Configuration
AD069902
AD069903
Click on the
Sites “+”Symbol
To Reveal the
BTS Sites on
the Network
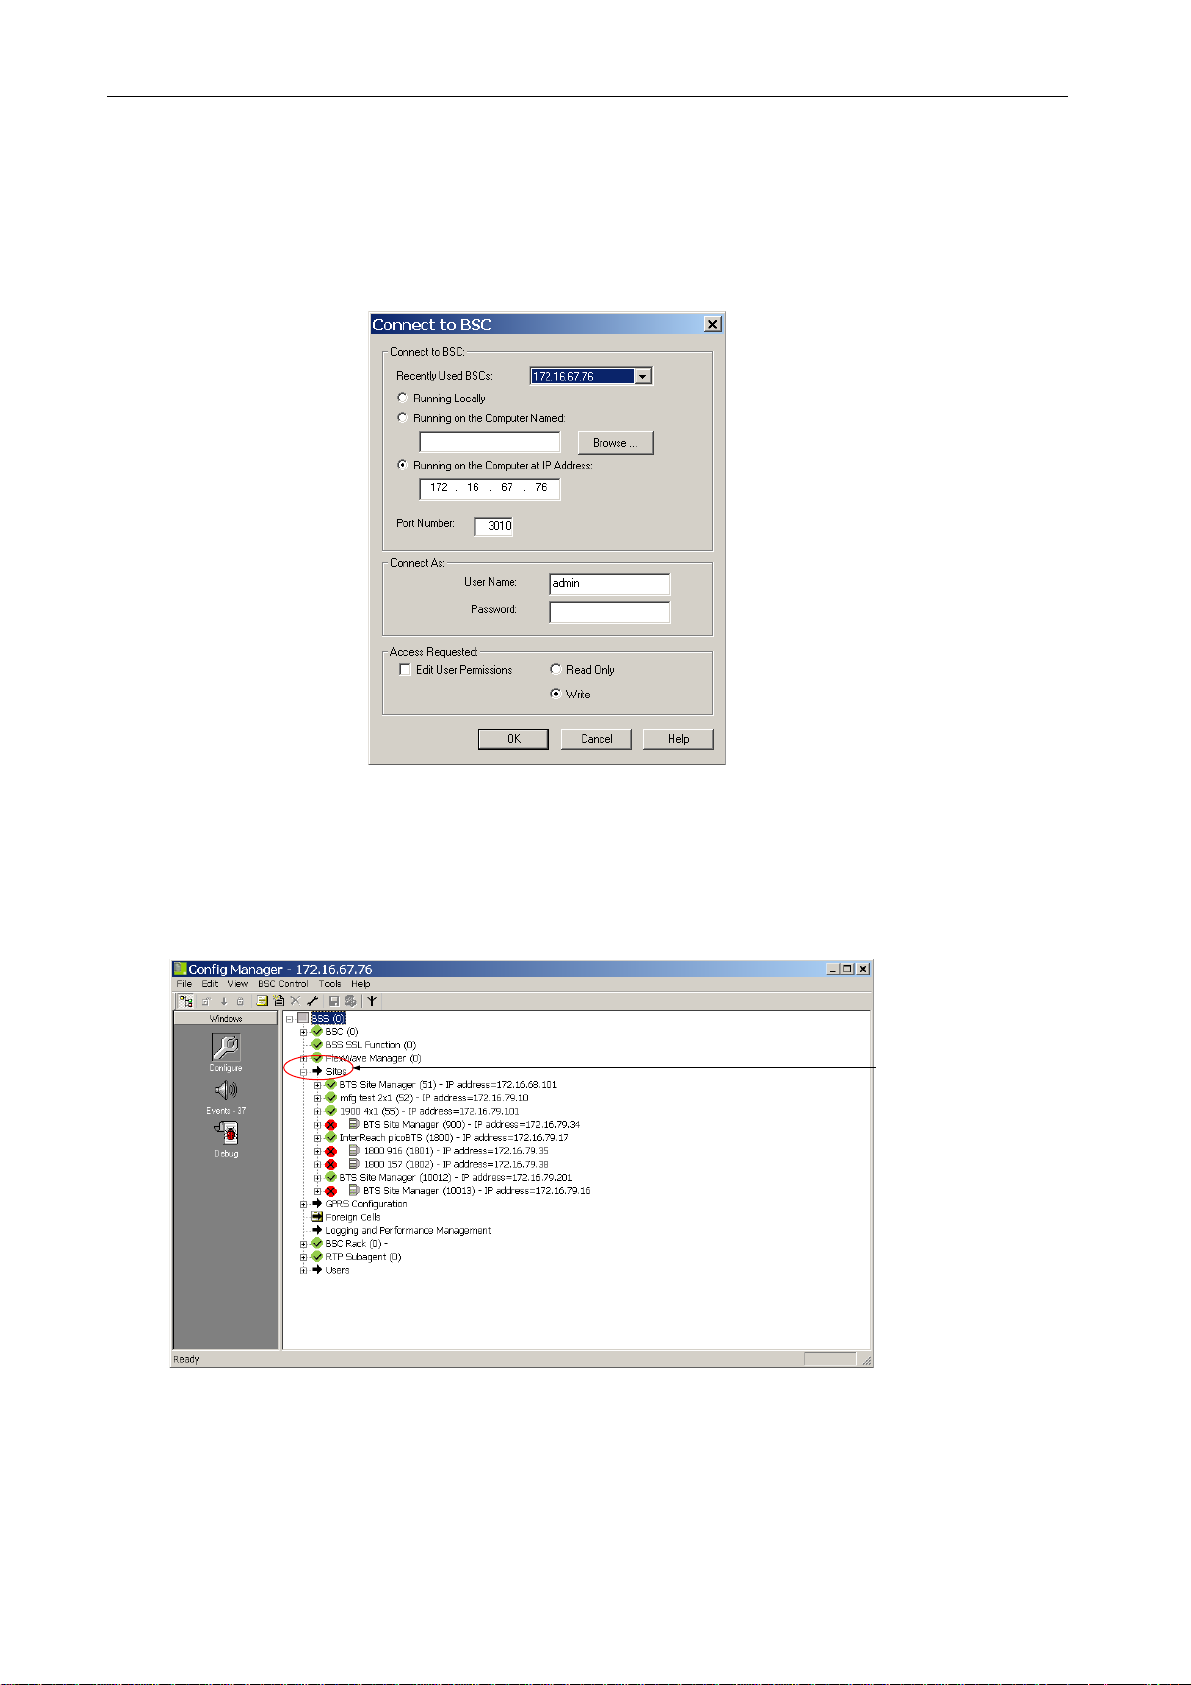
2 After the BSC Configuration Manager is launched, a connection screen will appear as
shown in Figure 5-17. Type in the IP address of the BSC you wish to communicate with.
Enter the password and click OK.
Figure 5-17: Connecting to the BSC screen
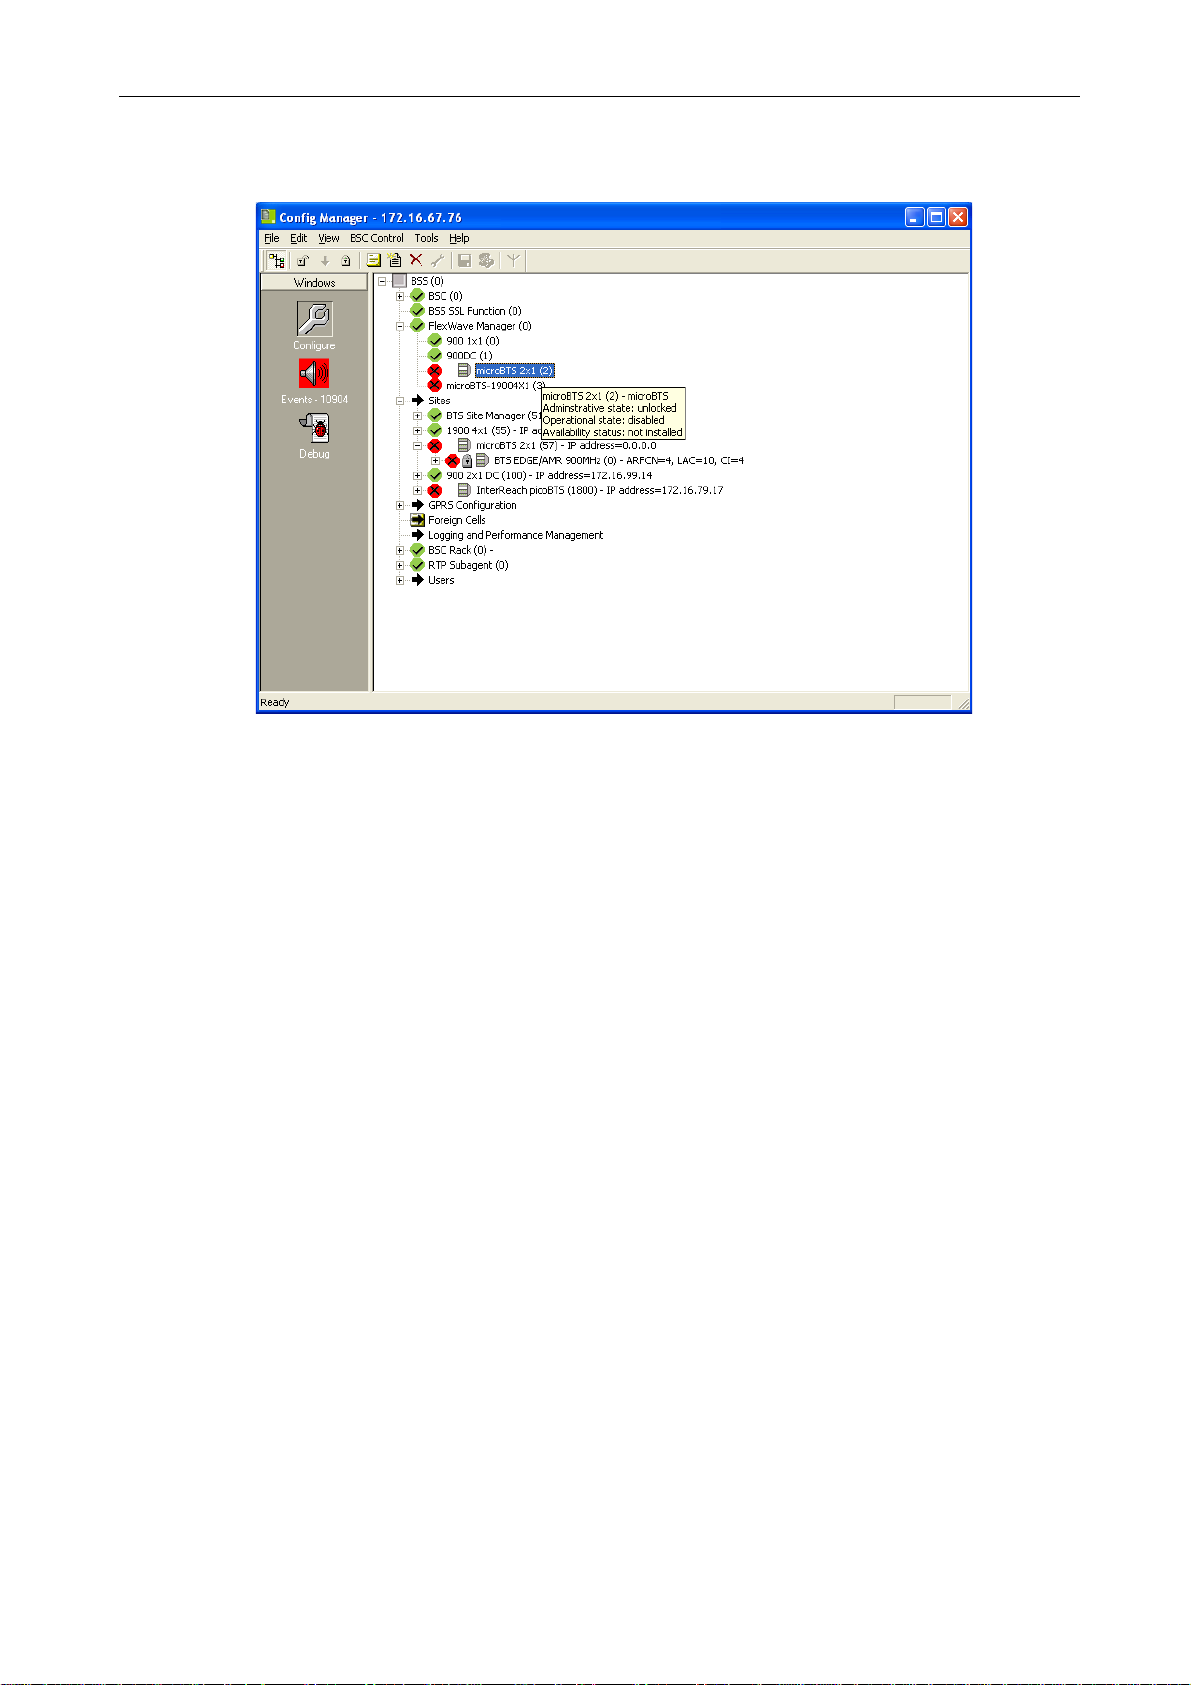
3 A “tree” representation of your network will appear as shown in Figure 5-18. Click on the
sites + symbol. This will show each BTS site on your network.
Figure 5-18: Reviewing the BTS Sites on the Network
Page 58 FlexWave microBTS Installation and Commissioning Guide
© 2009, ADC Telecommunications, Inc.
Page 5
ADCP-77-086 • Issue 2 • 04/2009 • Chapter 5 - microBTS Initial Configuration
AD069905
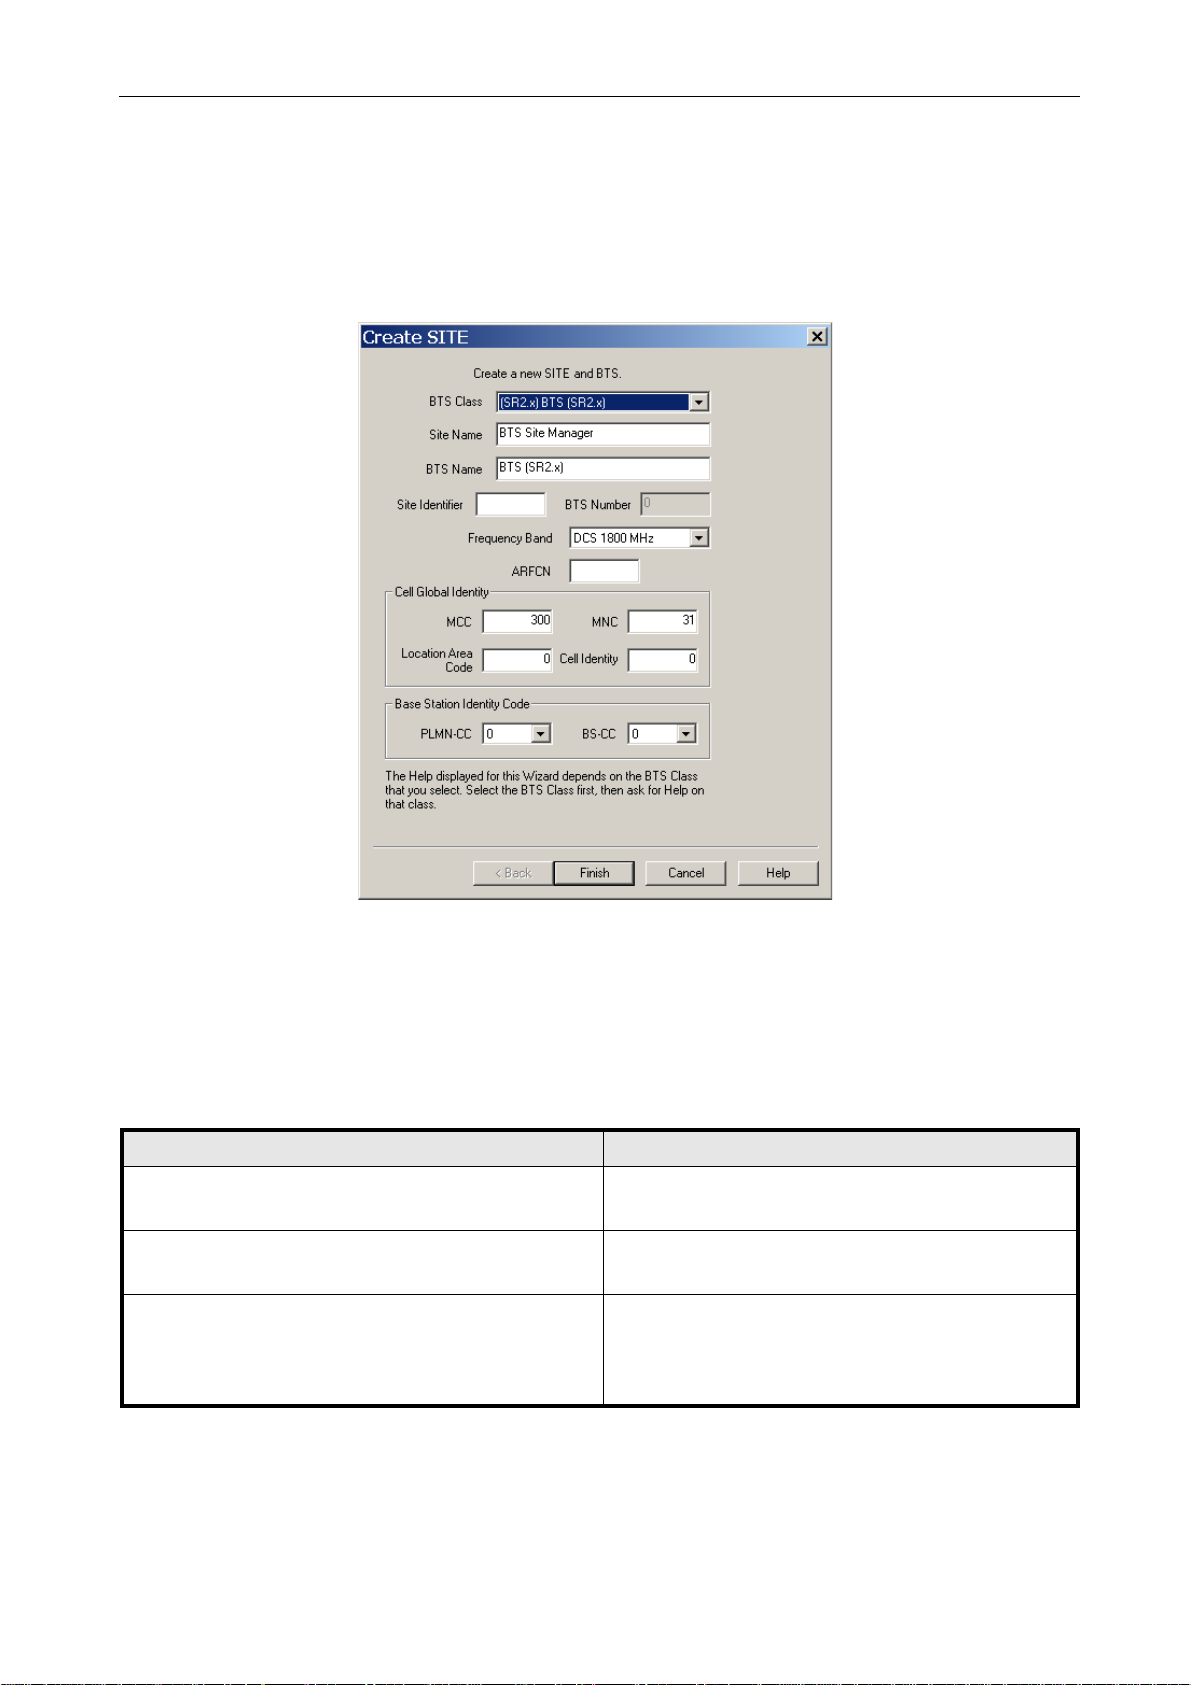
4 A new site must be created for the microBTS configured in the previous sections. Right
click on Sites and select
Create. A Create SITE dialog box will appear as shown in
Figure 5-19.
Figure 5-19: Creating a New Site
5 A number of parameters will need to be input in the Create SITE dialog box as shown in
Table 5-2:
E
Table 5-2: Configuration Parameters
Parameter Variable
BTS Class
Site Name
Site Indentifier
FlexWave microBTS Installation and Commissioning Guide Page 59
From this pull-down menu, select the type of TRX(s)
installed in the microBTS
Select a site name according to the needs of your
network
This number is normally assigned by a network administrator depending upon the needs of the network. The
number must be unique to each site and can not be
duplicated within a network.
© 2009, ADC Telecommunications, Inc.
Page 6
ADCP-77-086 • Issue 2 • 04/2009 • Chapter 5 - microBTS Initial Configuration
AD079901
Table 5-2: Configuration Parameters
Parameter Variable
BTS Name
Frequency Band
MCC
Select a BTS name that is associated to the site name in
your network
Select the appropriate frequency band from the
pull-down menu
Select an AFRCN channel number according to the
needs of the network
MNC Per network requirement
Location Area Code (LAC) Per network requirement
Cell Identity Per network requirement
PLMN-CC Per network requirement
BS-CC Per network requirement
6 Once all of the above items are configured, click Finish and a new BTS site will be
created.
7 A new site will appear in the configuration “tree.”
Note: For 2 x 1 configured microBTS a “slave TRX” must be added.
8 Right click on the site object and select Create from the pull-down menu.
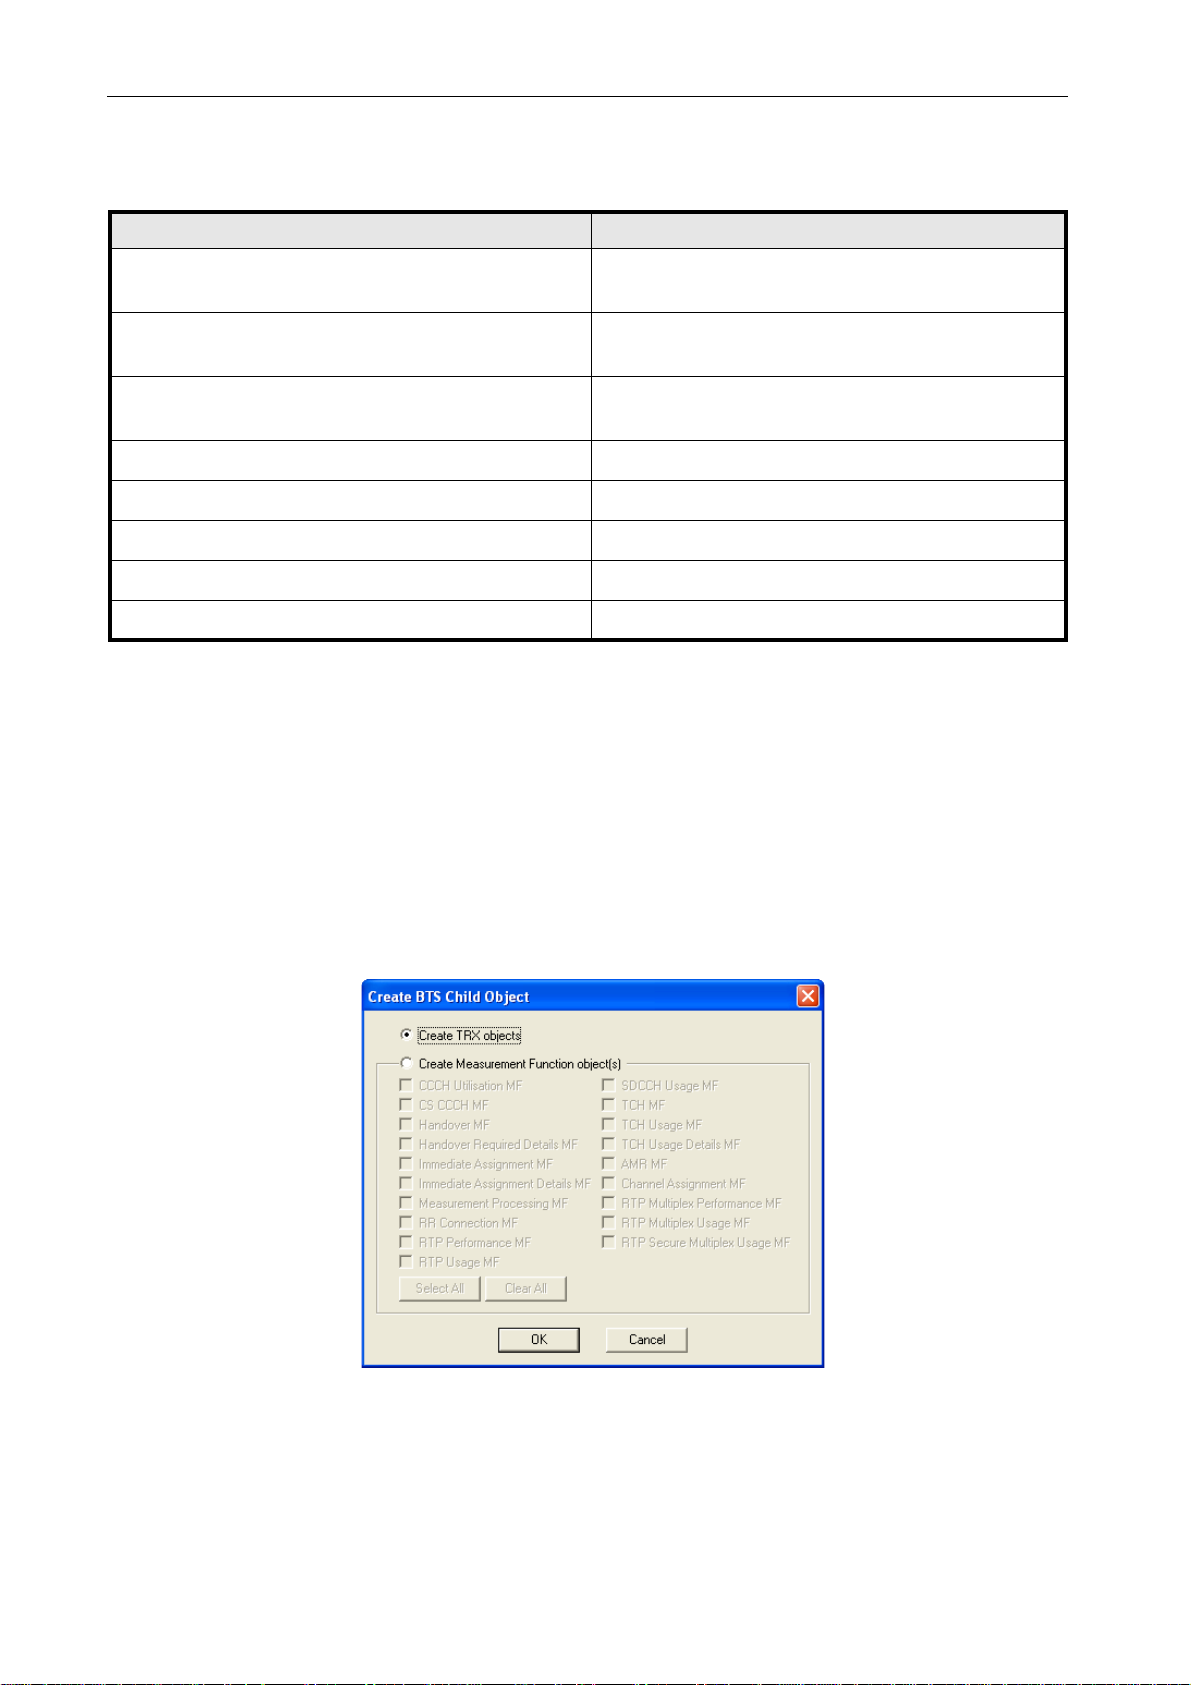
9A Create BTS Child Object screen will appear. Select Create TRX objects and click on
OK. Refer to Figure 5-20.
Figure 5-20: Create BTS Child Object Screen
Page 60 FlexWave microBTS Installation and Commissioning Guide
© 2009, ADC Telecommunications, Inc.
Page 7
ADCP-77-086 • Issue 2 • 04/2009 • Chapter 5 - microBTS Initial Configuration
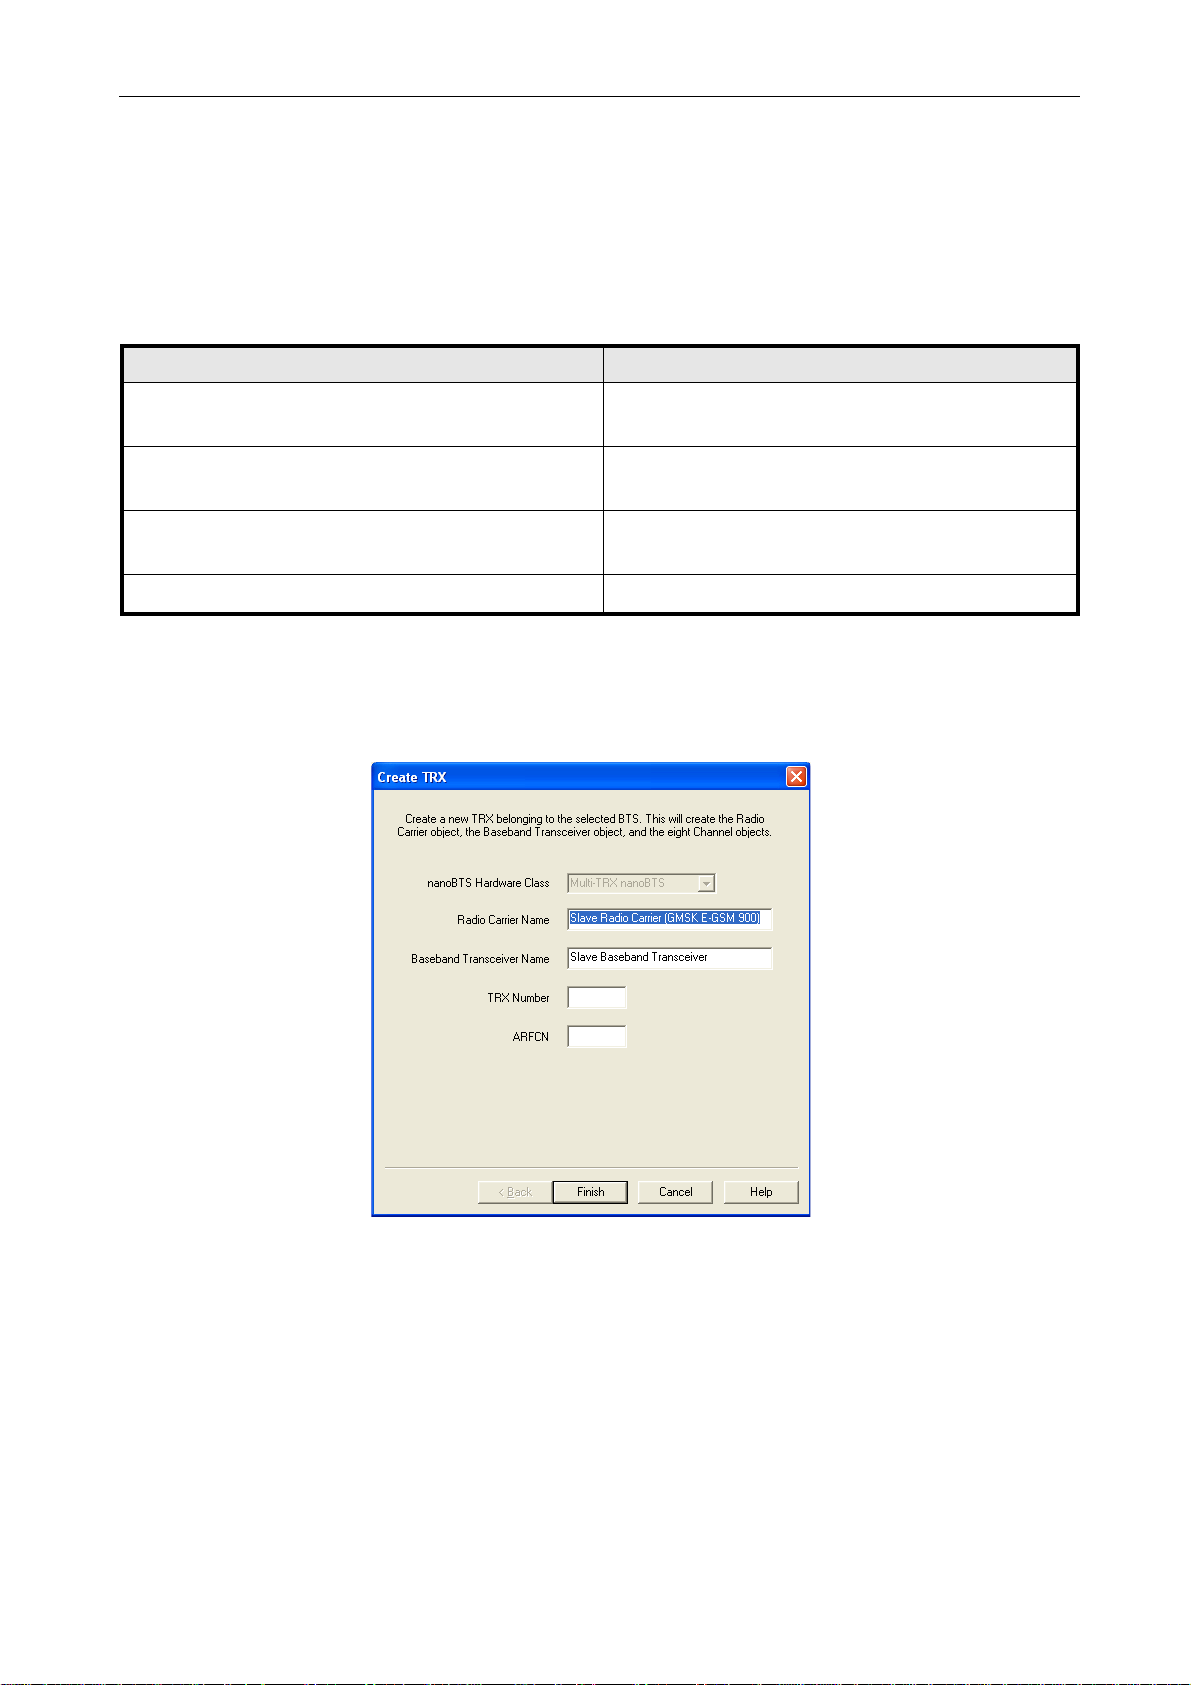
10 A Create TRX screen will appear. Refer to Figure 5-21.
11 Fill in the dialog boxes with the information appropriate to your system. Refer to
Table 5-2.
E
Table 5-3: Configuration Parameters
Parameter Variable
nanoBTS Hardware Class
Radio Carrier Name
Baseband Transceiver Name
From this pull-down menu, select the type of TRX(s)
installed in the microBTS
Select a Radio Carrier Name according to the needs of
your network
Select a Baseband Transceiver Name according to the
needs of your network
TRX Number In a 2 TRX system the Master = 0, the Slave = 1.
12 Once this information is added.
13 Click Finish to complete the process of adding a slave TRX.
AD079902
Figure 5-21: Create TRX Screen
FlexWave microBTS Installation and Commissioning Guide Page 61
© 2009, ADC Telecommunications, Inc.
Page 8

ADCP-77-086 • Issue 2 • 04/2009 • Chapter 5 - microBTS Initial Configuration
AD079903
5.7 Creating the FlexWave Manager
1 Right click on the FlexWave Manager object on the “tree” screen as shown in Figure 5-22.
Select Create from the pull-down menu.
Figure 5-22: Using the FlexWave Manager Object to Launch the Create TRX Screen
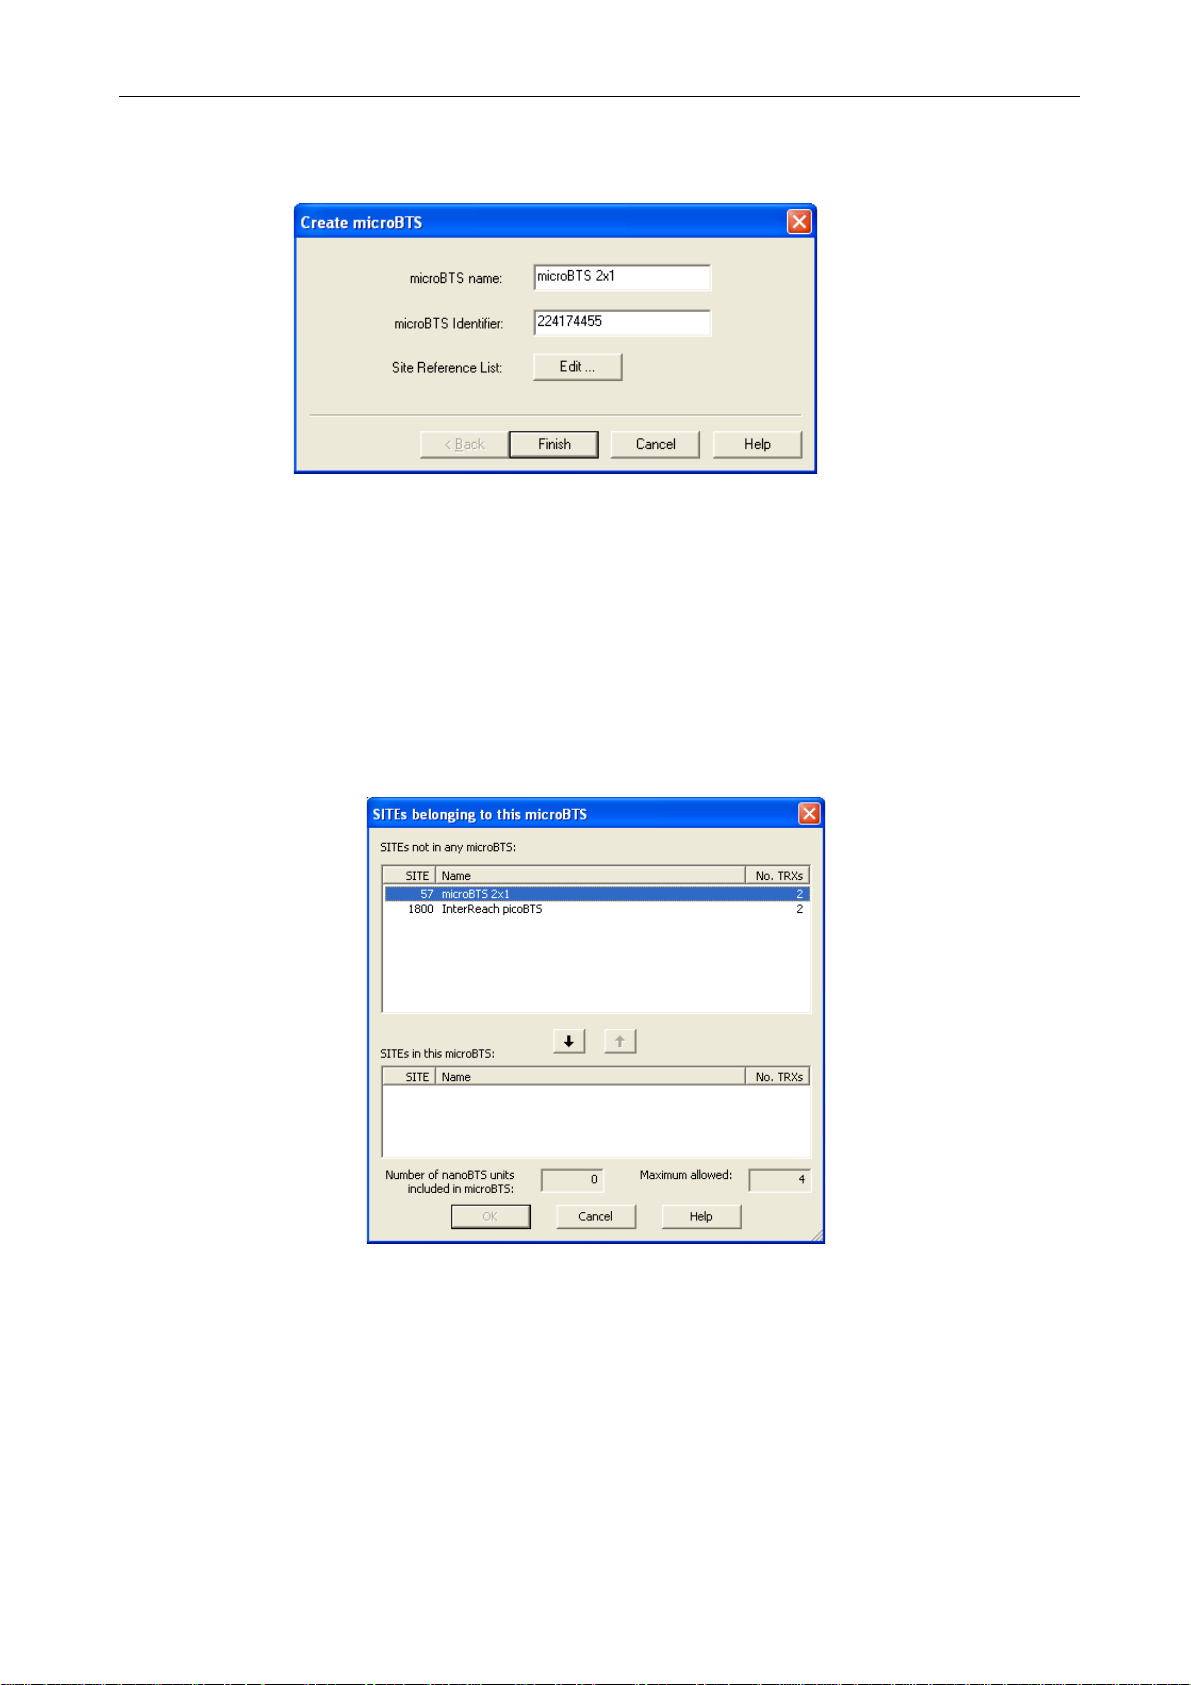
2A Create microBTS screen will appear.
3 Enter the name (the name will be choosen according to the needs of your network)and site
identifier (the serial number located on the exterior label of the microBTS) in the dialog
boxes indicated. Click Edit once the information is input. Refer to Figure 5-23.
Page 62 FlexWave microBTS Installation and Commissioning Guide
© 2009, ADC Telecommunications, Inc.
Page 9
ADCP-77-086 • Issue 2 • 04/2009 • Chapter 5 - microBTS Initial Configuration
AD079904
AD079906
Figure 5-23: Create TRX Screen
4A Sites belonging to this microBTS dialog screen will appear. The site name entered in
the previous steps will appear in the top portion of the screen.
5 Click on the new site to highlight it.
6 Click on the down arrow to move this site into the SITEs in this microBTS: shown on the
lower portion of the screen and click OK. Refer to Figure 5-24.
Figure 5-24: Sites Belonging to this microBTS Screen
FlexWave microBTS Installation and Commissioning Guide Page 63
© 2009, ADC Telecommunications, Inc.
Page 10
ADCP-77-086 • Issue 2 • 04/2009 • Chapter 5 - microBTS Initial Configuration
AD079907
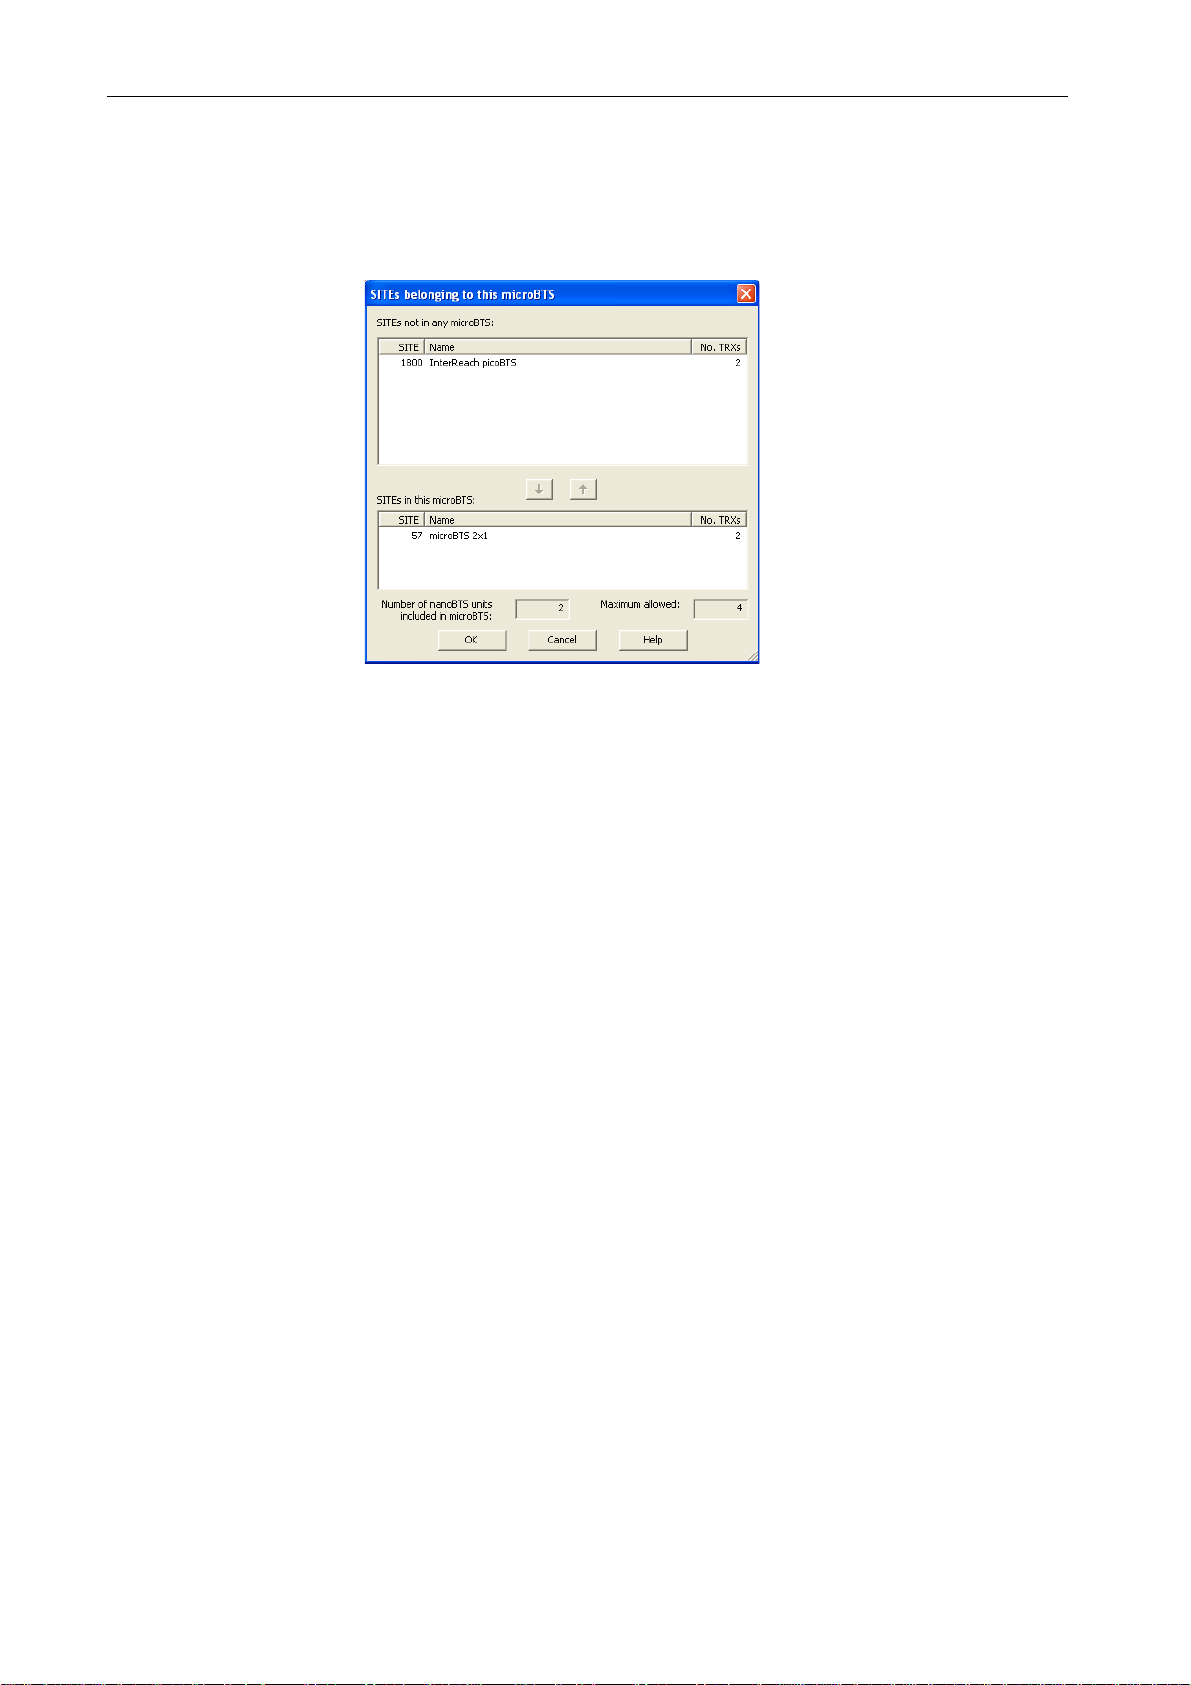
7 A confirmation screen will appear that indicates the created site has been moved into the
FlexWave Manager register. Refer to Figure 5-25.
Figure 5-25: Conformation SITEs Belonging to this Screen
8 Return to the Create microBTS screen as shown in Figure 5-23 and click Finish.
9 Return to the main screen and the new FlexWave Manager site object will appear as
shown in Figure 5-26.
Page 64 FlexWave microBTS Installation and Commissioning Guide
© 2009, ADC Telecommunications, Inc.
Page 11
ADCP-77-086 • Issue 2 • 04/2009 • Chapter 5 - microBTS Initial Configuration
AD079909
Figure 5-26: New Site Object Appears on Configuration Manager “Tree”
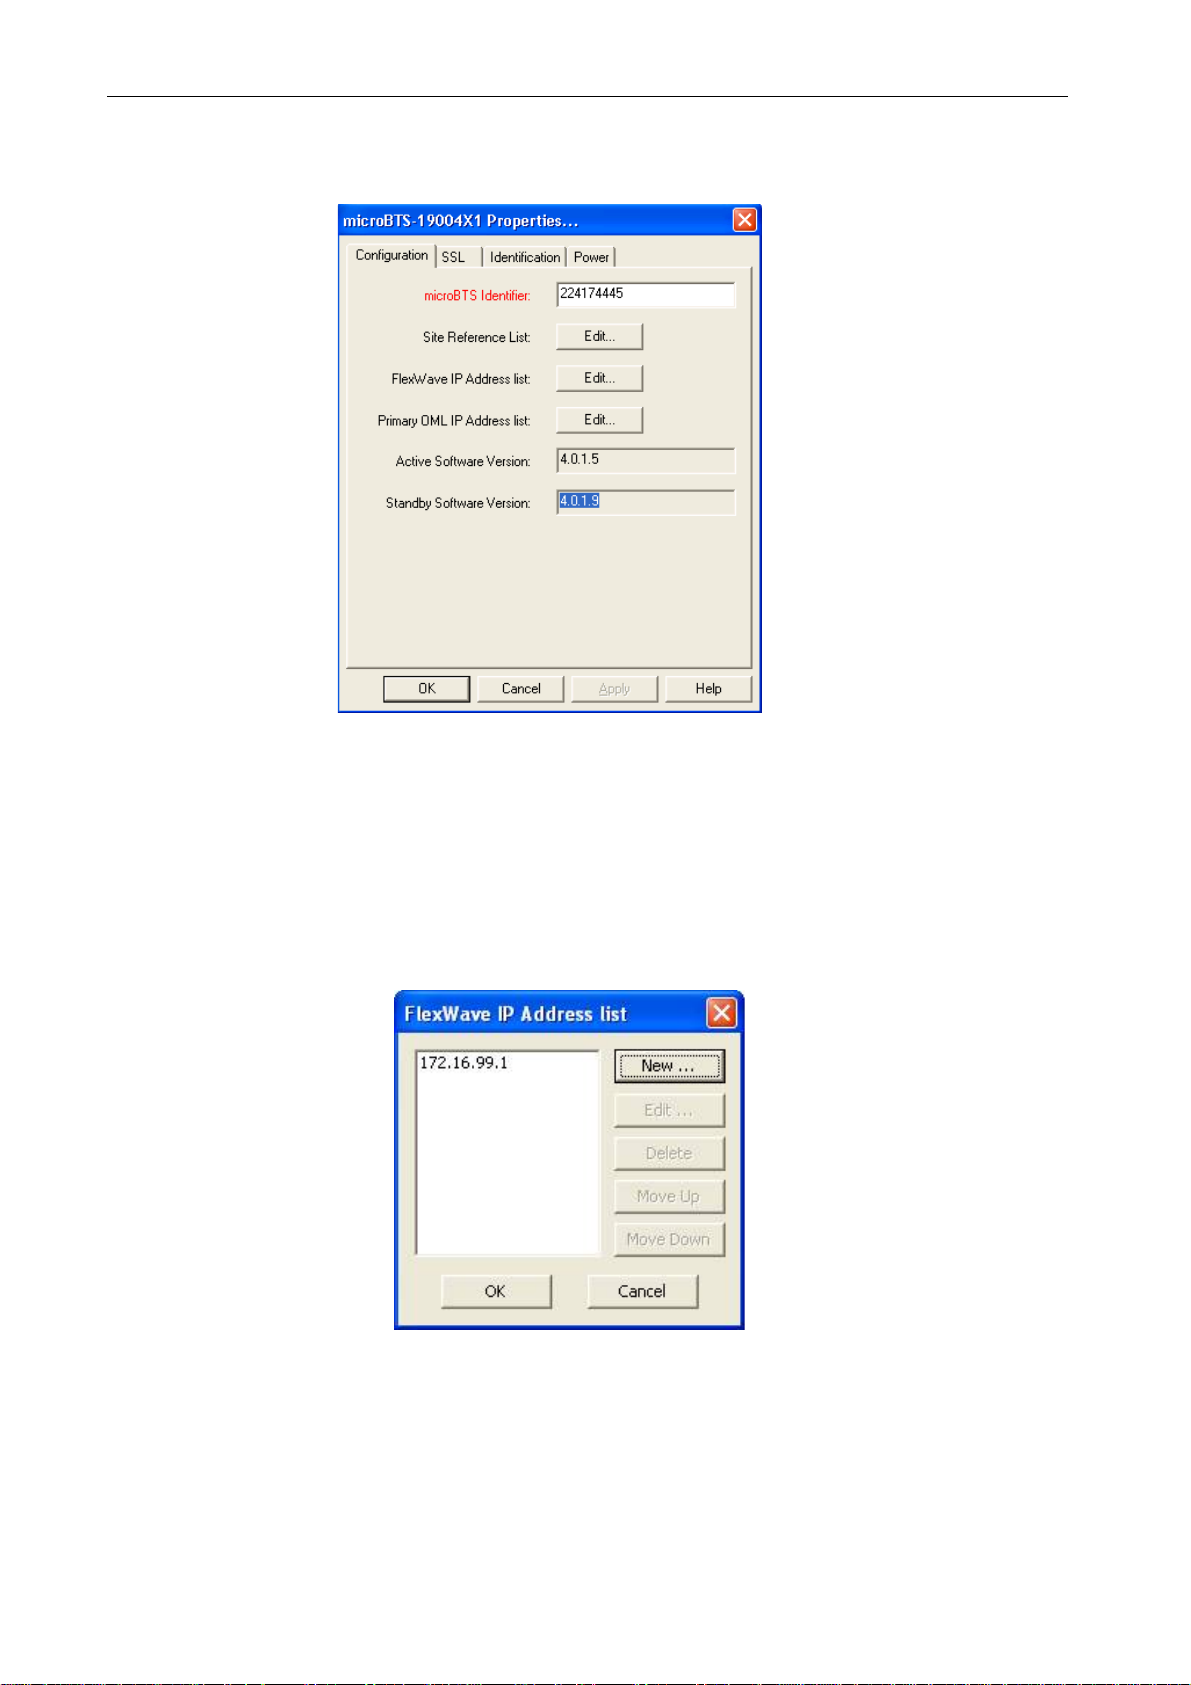
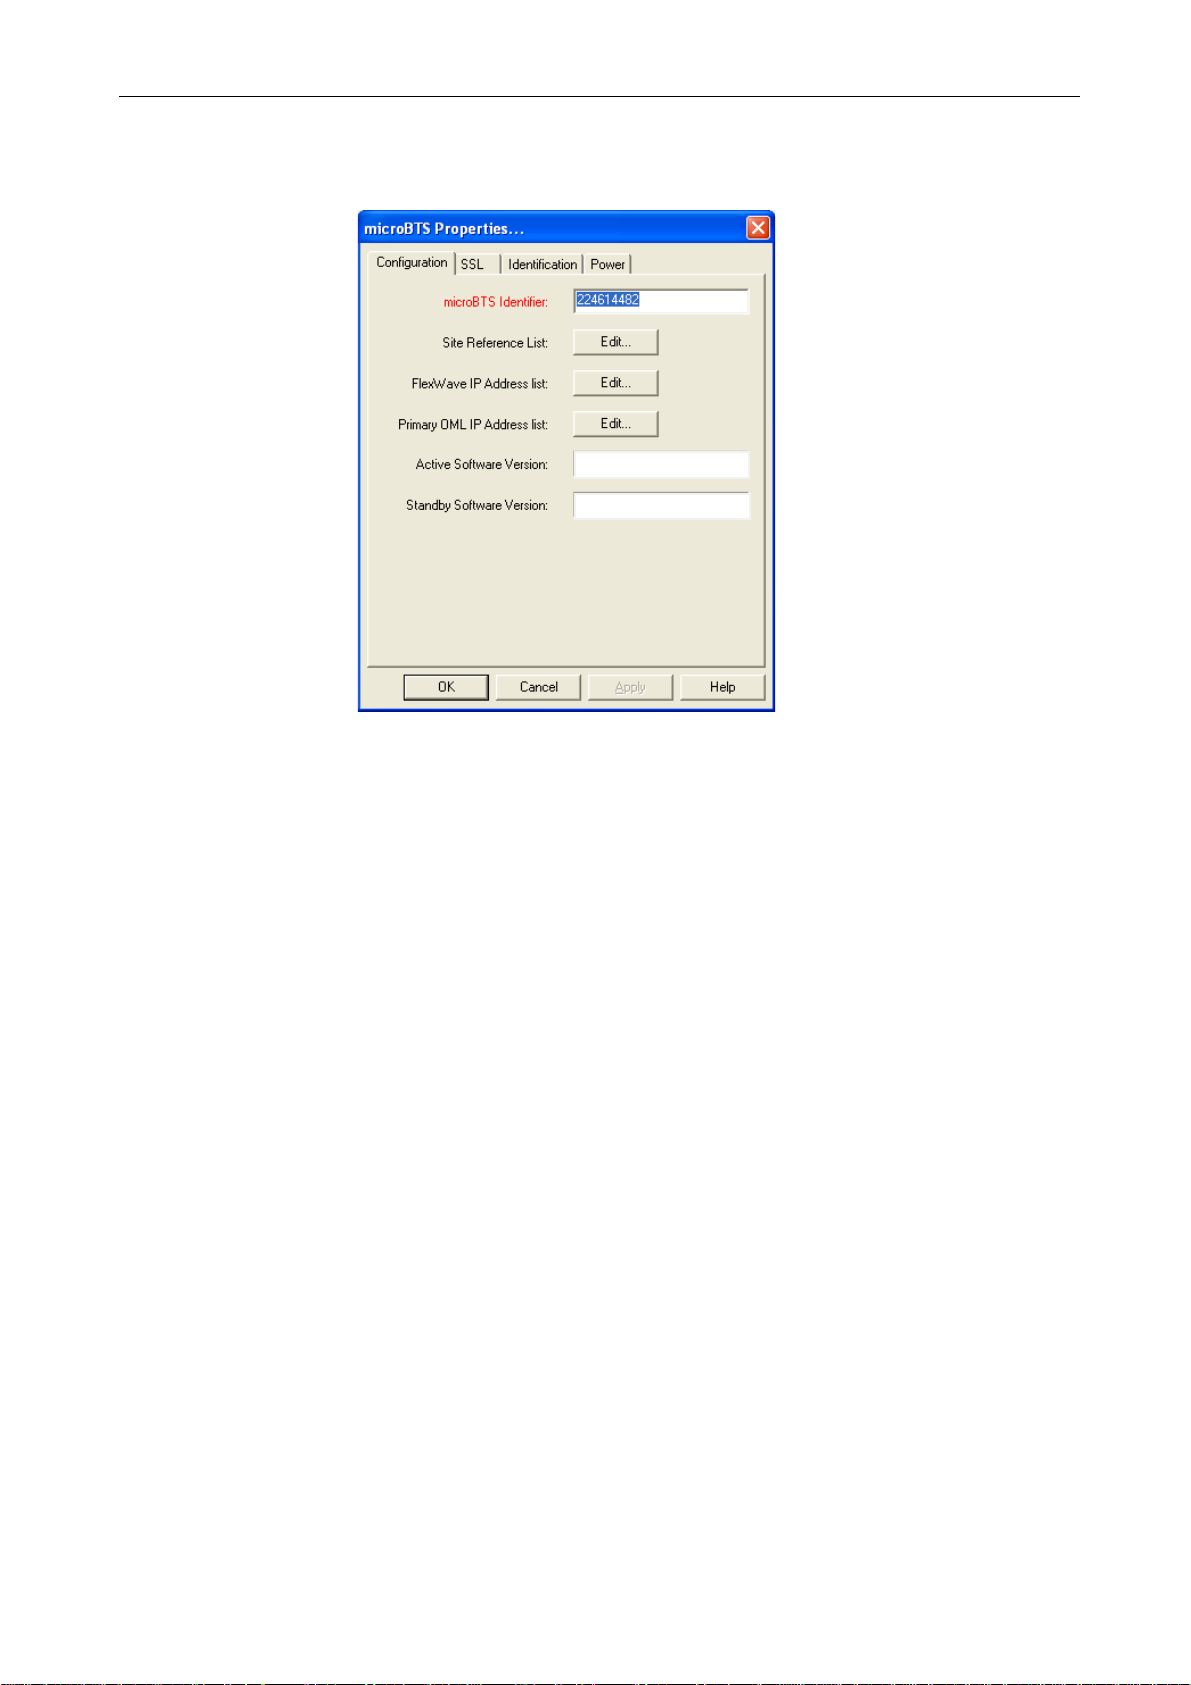
10 Right click on the new site and select Properties. A configuration screen titled
microBTS- (name of model) Properties... will appear.
Select the Configuration tab. Refer to Figure 5-27.
FlexWave microBTS Installation and Commissioning Guide Page 65
© 2009, ADC Telecommunications, Inc.
Page 12
ADCP-77-086 • Issue 2 • 04/2009 • Chapter 5 - microBTS Initial Configuration
AD075904
Figure 5-27: Configuration Tab of the Site Properties Screen
11 Verify the serial/ identification number from the exterior model label of the microBTS
matches the one obtained in Step 2.
12 Click on the FlexWave IP Address List Edit button and enter the OML Link IP address for
your network. Click OK. Refer to Figure 5-28.
AD078902
Figure 5-28: Verifying the FlexWave IP Address List
Page 66 FlexWave microBTS Installation and Commissioning Guide
© 2009, ADC Telecommunications, Inc.
Page 13
ADCP-77-086 • Issue 2 • 04/2009 • Chapter 5 - microBTS Initial Configuration
AD078903
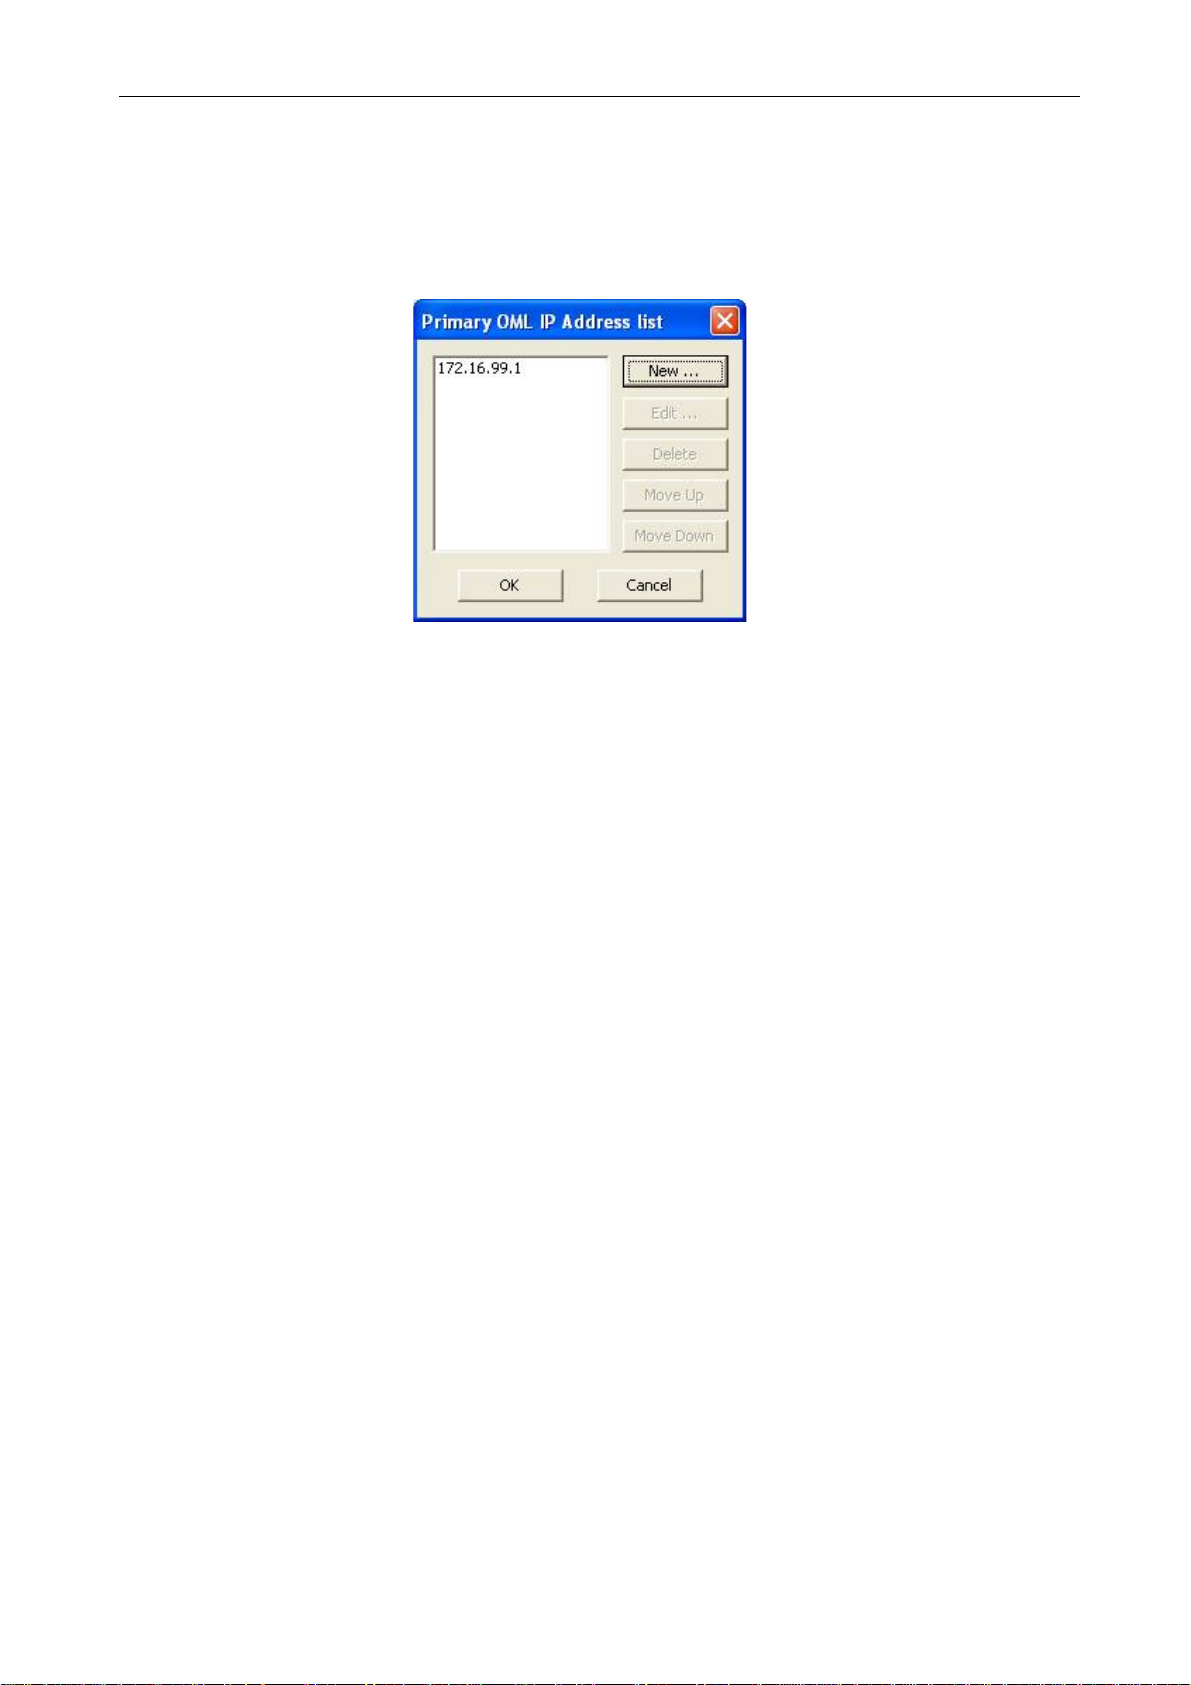
13 Click on the Primary OML Address List Edit button and enter the OML Link IP address
for your network. Click OK. Refer to Figure 5-29.
Figure 5-29: Verifying the Primary OML Address List
FlexWave microBTS Installation and Commissioning Guide Page 67
© 2009, ADC Telecommunications, Inc.
Page 14

ADCP-77-086 • Issue 2 • 04/2009 • Chapter 5 - microBTS Initial Configuration
5.8 Verifying BTS Functionality Using the BSC Configuration Manager
To verify the installed BTS is functioning, use the following procedure:
1 Right click on the new site shown on the BSC Configuration Manager “tree” and a dialog
box will appear. Select Unlock.
The BTS will now begin transmitting on the AFRCN number selected in the previous
steps. This can be verified at the site by means of an external power meter and frequency
counter or a spectrum analyzer if available.
Make a phone call by working in conjunction with the system administrator.
Note: Further information regarding the configuration of the microBTS TRX units can be
found in the instructions set forth in ADC publication ADCP-75-310
Page 68 FlexWave microBTS Installation and Commissioning Guide
© 2009, ADC Telecommunications, Inc.
Page 15

Appendix A - Software Upgrade Procedure
Content Page
A.1 Introduction . . . . . . . . . . . . . . . . . . . . . . . . . . . . . . . . . . . . . . . . . . . . . . . . . . . . . . . . . . . . . . . . . . . . . . . . . 70
A.2 Upgrading Micro Controller Software from 4.0.x.x . . . . . . . . . . . . . . . . . . . . . . . . . . . . . . . . . . . . . . . . . . . . . . 71
A.2.1 Automatic Upgrading of the microBTS Controller . . . . . . . . . . . . . . . . . . . . . . . . . . . . . . . . . . . . . . . 71
A.2.2 Manual Upgrade Procedure . . . . . . . . . . . . . . . . . . . . . . . . . . . . . . . . . . . . . . . . . . . . . . . . . . . . . . 78
A.3 Upgrade Procedure for Micro Controller Software 3.2.x to Version 4.0.1.x. . . . . . . . . . . . . . . . . . . . . . . . . . . . . . 86
ADCP-77-086 • Issue 2 • 04/2009 • Appendix A - Software Upgrade Procedure
FlexWave microBTS Installation and Commissioning Guide Page 69
© 2009, ADC Telecommunications, Inc.
Page 16

ADCP-77-086 • Issue 2 • 04/2009 • Appendix A - Software Upgrade Procedure
A.1 Introduction
From time-to-time ADC may issue software upgrades in the interest of product improvement.
The following upgrade procedure should be performed by an experienced field service technician who is familiar with linux operating systems.
Caution: Failure to execute the procedure(s) exactly as given may render the microBTS
inoperative.
Page 70 FlexWave microBTS Installation and Commissioning Guide
© 2009, ADC Telecommunications, Inc.
Page 17

ADCP-77-086 • Issue 2 • 04/2009 • Appendix A - Software Upgrade Procedure
AD091911
A.2 Upgrading Micro Controller Software from 4.0.x.x
The micro controller unit within the microBTS contains upgradable software, which from
time-to-time may be upgraded.
Note: The following procedure will require that the microBTS being upgraded be taken out
of service for the duration of the upgrade process
This procedure provides two methods for upgrading the micro controller software. An “automatic” upgrade (preferred method) is accomplished through the use of a GUI type interface.
The “manual” procedure relies on linux commands to accomplish the upgrade task. The
“manual” upgrade method should only be used when circumstances preclude the use of the
“automatic” upgrade and should be performed by an experienced linux operator.
A.2.1 Automatic Upgrading of the microBTS Controller
.
1 Launch a WinSCP session from the PC desktop and the WinSCP Login screen will
appear. Refer to Figure A-1.
2Enter the Host name which is the IP address assigned to the micro controller unit of the
microBTS being upgraded.
3Enter root in the User name dialog box, and your password in the Password dialog box.
4 Click on Login when complete.
Figure A-1: WinSCP Login Screen
FlexWave microBTS Installation and Commissioning Guide Page 71
© 2009, ADC Telecommunications, Inc.
Page 18

ADCP-77-086 • Issue 2 • 04/2009 • Appendix A - Software Upgrade Procedure
AD091912
5A Warning screen will appear (if this is your first login). Select Yes. Refer to Figure A-2.
Figure A-2: WinSCP Warning Screen
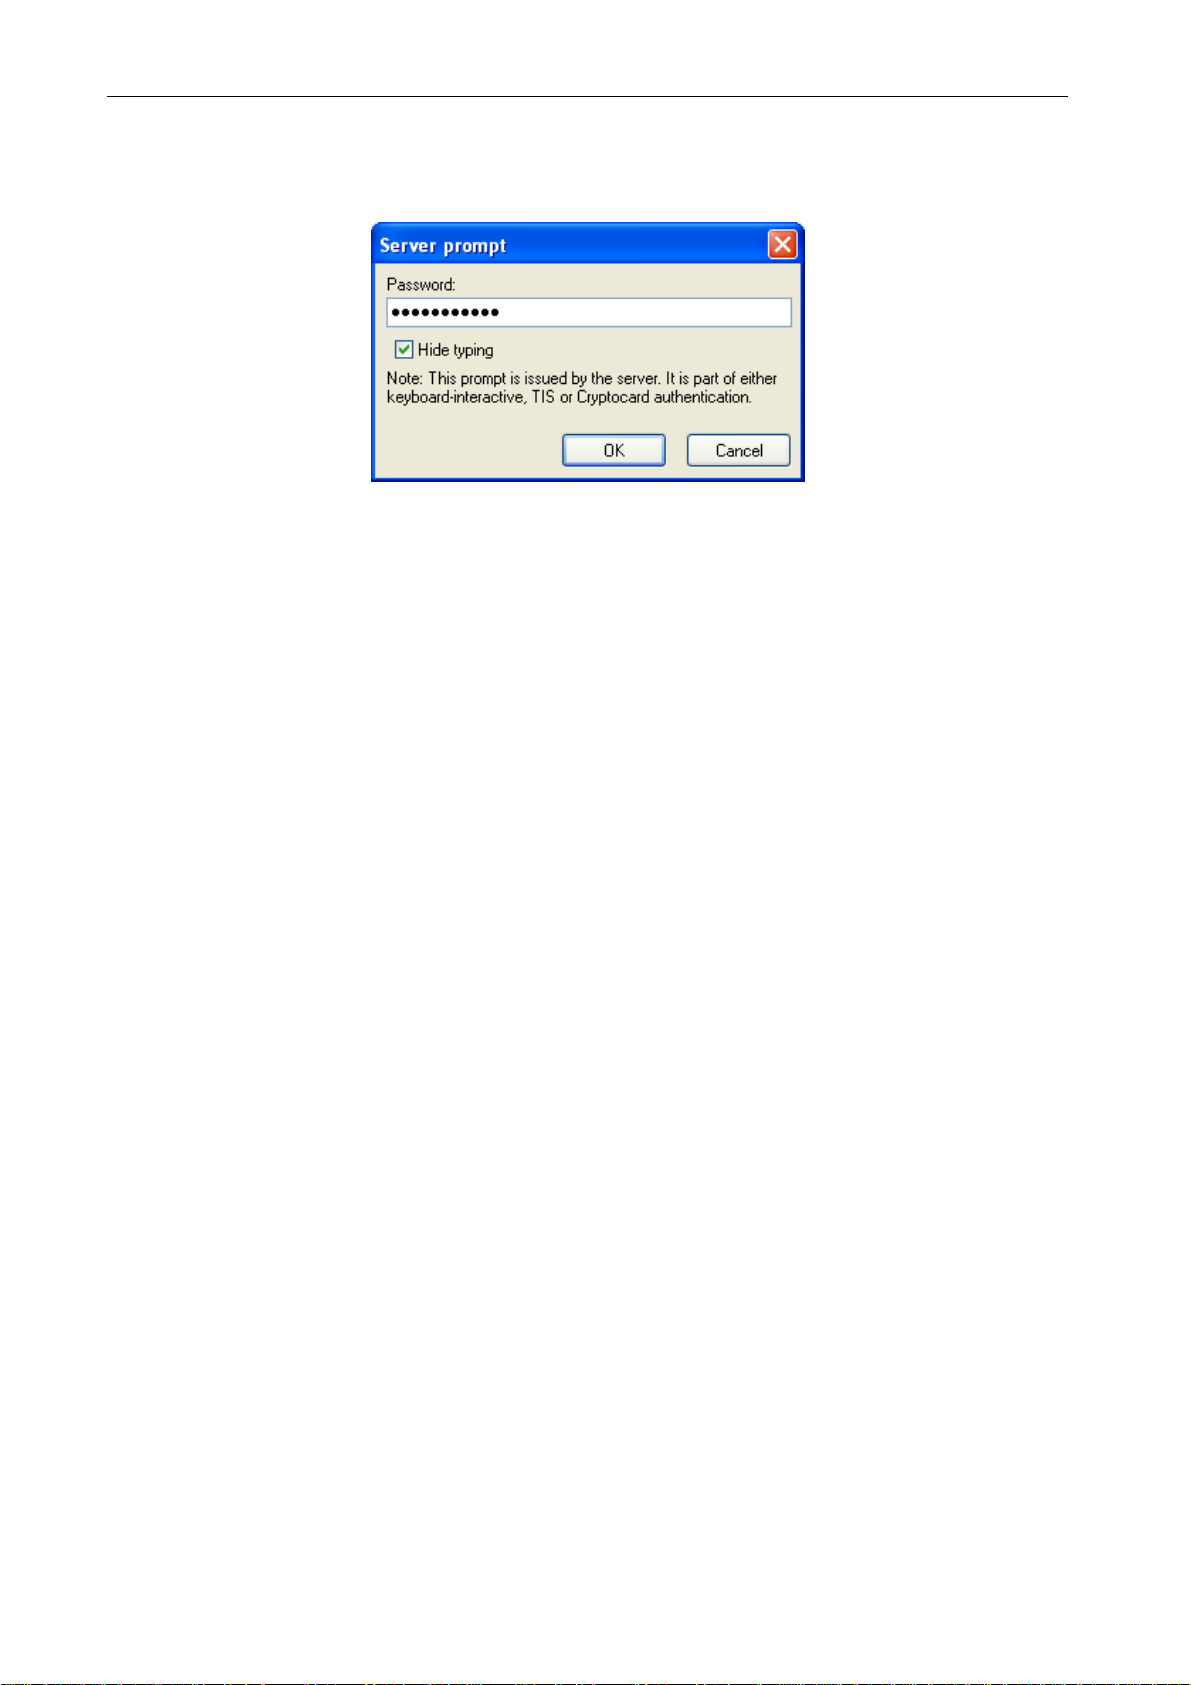
6A Server prompt screen will appear. Enter your Password in the dialog box indicated and
click OK. Refer to Figure A-3.
AD091913
Figure A-3: WinSCP Server Prompt Screen
Page 72 FlexWave microBTS Installation and Commissioning Guide
© 2009, ADC Telecommunications, Inc.
Page 19

ADCP-77-086 • Issue 2 • 04/2009 • Appendix A - Software Upgrade Procedure
AD091903
C: ADC
7 The main WinSCP will appear showing the contents of the drive on which the compressed
.gz upgrade file is located and the root directory showing the files currently contained in
the microBTS controller. Copy the upgrade files similar to FWBSSCtrl_4.0.x.x.gz
to the
root directory. Refer to Figure A-4.
Figure A-4: Main WinSCP Screen
8 Close the WinSCP window and open a PuTTY session with the BSC by entering the BSC
IP address. Login as root. Enter your password. Refer to Figure A-5.
FlexWave microBTS Installation and Commissioning Guide Page 73
© 2009, ADC Telecommunications, Inc.
Page 20

ADCP-77-086 • Issue 2 • 04/2009 • Appendix A - Software Upgrade Procedure
AD091904
Figure A-5: PuTTY Login Screen
9 At the command prompts, type the following commands:
cd /var/lib/ipaccess/support
ls -l
Refer to Figure A-6.
AD091905
Figure A-6: Entries on Command Line
Page 74 FlexWave microBTS Installation and Commissioning Guide
© 2009, ADC Telecommunications, Inc.
Page 21

ADCP-77-086 • Issue 2 • 04/2009 • Appendix A - Software Upgrade Procedure
10 At the command line, type the following commands:
cp /root/FWBSSCtrl_4.0.x.x.gz .
ls -l
Refer to Figure A-7.
Figure A-7: PuTTY Login Screen
11 Close the PuTTY window and launch BTS Configuration Manager.
12 Select Connect to BSC from the task bar.
13 Enter the IP address of the BSC and click OK. Refer to Figure A-8.
AD091906
FlexWave microBTS Installation and Commissioning Guide Page 75
© 2009, ADC Telecommunications, Inc.
Page 22

ADCP-77-086 • Issue 2 • 04/2009 • Appendix A - Software Upgrade Procedure
AD091907
Figure A-8: Connect to BSC Screen
14 Right click on the FlexWave Manager object and select Properties. The FlexWave
Manager Properties screen will appear. Verify that the nanoBTS Software Version
dialog box contains the updated software version number. Refer to Figure A-9.
will
AD091908
Figure A-9: FlexWave Manager Properties Screen Confirming the New Software Load
Page 76 FlexWave microBTS Installation and Commissioning Guide
© 2009, ADC Telecommunications, Inc.
Page 23

ADCP-77-086 • Issue 2 • 04/2009 • Appendix A - Software Upgrade Procedure
4.0.1.9
15 Return to the BSC Configuration Manager screen and find the BTS upgraded on the
configuration “tree.”
16 Right click on the site and select Properties. The microBTS Properties screen will
appear (this may take up to 10 minutes) showing the Active Software Version and the
Standby Software Version.
17 Confirm the Standby Software Version is the version loaded on this procedure. After
determining it is correct, Click OK. Refer to Figure A-10.
will
Figure A-10: microBTS Properties Screen Confirming the Active and Standby Software Loads
18 Return to the BSC Configuration Manager main screen and select BSC Control from the
menu bar as shown in Figure A-11.
19 With the FlexWave Manager Object still selected, select Activate nanoBTS Software
from the drop down menu.
20 When prompted to activate the new software click OK.
FlexWave microBTS Installation and Commissioning Guide Page 77
© 2009, ADC Telecommunications, Inc.
Page 24

ADCP-77-086 • Issue 2 • 04/2009 • Appendix A - Software Upgrade Procedure
AD091910
will
Figure A-11: Activating the nanoBTS Software From the BSC Configuration Manager Main Screen
21 The microBTS is now upgraded with the new software load. The site can now be returned
to normal operation.
A.2.2 Manual Upgrade Procedure
Upgrading of the micro controller software can be done using a procedure using linux
commands to accomplish the upgrade task. The manual upgrade method should only be used
when circumstances preclude the use of the “automatic” upgrade and should be performed by
an experienced linux operator. Use the following step-by-step procedures:
1 Launch a WinSCP session from the PC desktop and the WinSCP Login screen will
appear. Refer to Figure A-12.
2 Enter the Host name which is the IP address assigned to the micro controller unit of the
microBTS being upgraded.
3Enter
root in the User name dialog box, and your password in the Password dialog box.
Click on Login when complete.
Page 78 FlexWave microBTS Installation and Commissioning Guide
© 2009, ADC Telecommunications, Inc.
Page 25

ADCP-77-086 • Issue 2 • 04/2009 • Appendix A - Software Upgrade Procedure
AD091911
AD091912
Figure A-12: WinSCP Login Screen
4A Warning screen will appear. Select Yes. Refer to Figure A-13.
Figure A-13: WinSCP Warning Screen
5A Server prompt screen will appear. Enter your Password in the dialog box indicated and
click OK. Refer to Figure A-14.
FlexWave microBTS Installation and Commissioning Guide Page 79
© 2009, ADC Telecommunications, Inc.
Page 26
ADCP-77-086 • Issue 2 • 04/2009 • Appendix A - Software Upgrade Procedure
Figure A-14: WinSCP Server Prompt Screen
6 The main WinSCP will appear showing the contents of the drive on which the compressed
.gz upgrade file is located and the root directory showing the files currently contained in
the microBTS controller. Copy the upgrade files which will appear similar to
FWBSSCtrl_4.0.x.x.gz
to the root directory. Refer to Figure A-15.
AD091913
Page 80 FlexWave microBTS Installation and Commissioning Guide
© 2009, ADC Telecommunications, Inc.
Page 27

ADCP-77-086 • Issue 2 • 04/2009 • Appendix A - Software Upgrade Procedure
AD091903
C: ADC
Figure A-15: Main WinSCP Screen
7 Close the WinSCP window and open a PuTTY session with the BSC by entering the BSC
IP address. Login as root. Enter your password. Open a PuTTY session and login as root.
8 At the command line enter:
hcp -v
This will display the current version of the micro controller software. For example:
hcp: version 4.0.1.3
9 At the command prompt enter:
ls -l
FlexWave microBTS Installation and Commissioning Guide Page 81
© 2009, ADC Telecommunications, Inc.
Page 28

ADCP-77-086 • Issue 2 • 04/2009 • Appendix A - Software Upgrade Procedure
The output will appear similar to the following:
total 105
-rw-r--r-- 1 root root 95965 2009-03-11 01:36
FWBSSCtrl_4.0.1.9.gz
-rw-r--r-- 1 root root 1 2009-03-10 22:23 gothcp
-rw-r--r-- 1 root root 2485 2009-03-10 22:43 got_info
10 At the command line enter:
cd /usr/local/sbin
ls
Text similar to the following will appear showing the various files in the directory:
batch.pem changeHcpVersion cluster_000810164.tgz hcp
ca.pem cluster_000810156.tgz cluster-cert.pem oem.pem
certChainFile.pem cluster_000810158.tgz cluster-key.pem
11 Make a temporary directory:
mkdir tmp
12 Change to the temporary directory by entering:
cd tmp
13 At the command line enter:
To copy the upgrade file to the temporary directory
cp /root/FWBBSSCtrl_4.0.1.9.gz
14 To unpack the tar file, type:
tar -zxvf FWBSSCtrl_4.0.1.9.gz
The following output will appear:
adc.GIF
hcp
hcpInstall
microBTS
updatePod
15 Install the upgrade files by entering:
./hcpInstall
The following output will appear:
Page 82 FlexWave microBTS Installation and Commissioning Guide
© 2009, ADC Telecommunications, Inc.
Page 29

ADCP-77-086 • Issue 2 • 04/2009 • Appendix A - Software Upgrade Procedure
AD091907
ln: `/var/www/index.html': File exists
Stopping hardware control process: hcp.
16 To change directories enter:
cd ..
17 At the command line enter:
hcp -v
This will display the version number of the software upgrade loaded in this procedure. For
example:
hcp: version 4.0.1.9
18 This completes the manual upgrade procedure. Verify the new software is loaded by
Closing the PuTTY window and launching BSC Configuration Manager. Select Connect
to BSC from the task bar. Enter the IP address of the BSC and click OK. Refer to
Figure A-16.
Figure A-16: Connect to BSC Screen
19 Right click on the FlexWave Manager object and select Properties. The FlexWave
Manager Properties screen will appear. Verify that the nanoBTS Software Version
dialog box contains the updated software version number. Refer to Figure A-17.
FlexWave microBTS Installation and Commissioning Guide Page 83
© 2009, ADC Telecommunications, Inc.
Page 30

ADCP-77-086 • Issue 2 • 04/2009 • Appendix A - Software Upgrade Procedure
Figure A-17: FlexWave Manager Properties Screen Confirming the New Software Load
will
AD091908
20 Return to the BSC Configuration Manager screen and find the BTS upgraded on the
configuration “tree.”
21 Right click on the site and select Properties.
22 The microBTS Properties screen will appear showing the Active Software Version and
the Standby Software Version. Confirm the Standby Software Version is the version
loaded in this procedure.
23 After determining it is correct, Click OK. Refer to Figure A-18.
Page 84 FlexWave microBTS Installation and Commissioning Guide
© 2009, ADC Telecommunications, Inc.
Page 31
ADCP-77-086 • Issue 2 • 04/2009 • Appendix A - Software Upgrade Procedure
4.0.1.9
AD091909
will
Figure A-18: microBTS Properties Screen Confirming the Active and Standby Software Loads
24 The manual upgrade of the microBTS controller is now complete.
FlexWave microBTS Installation and Commissioning Guide Page 85
© 2009, ADC Telecommunications, Inc.
Page 32

ADCP-77-086 • Issue 2 • 04/2009 • Appendix A - Software Upgrade Procedure
AD098901
A.3 Upgrade Procedure for Micro Controller Software 3.2.x to Version 4.0.1.x.
Use the following “manual” upgrade procedure to upgrade microBTS controller software from
version 3.2.x to 4.0.1.x.
1 3.2.x versions of the micro controller software will not display IP or MAC addresses on
the BTS Installer Utility. The MAC and IP addresses for the micro controller can be found
using the following methods:
2 Launch the BTS Installer Utility as shown in Figure A-19 and click on the Find button.
Figure A-19: Selecting Find on the BTS Installer Utility
3A Select nanoBTS screen will appear. The MAC and IP addresses of the nano TRX’s
with in the microBTS will be shown. Refer to Figure A-20.
Page 86 FlexWave microBTS Installation and Commissioning Guide
© 2009, ADC Telecommunications, Inc.
Page 33

ADCP-77-086 • Issue 2 • 04/2009 • Appendix A - Software Upgrade Procedure
172.16.79.14
172.16.79.15
00:02:95:00:42:17
00:02:95:00:42:AD
1/0/0
2/0/0
AD098902
4 Confirm that the MAC addresses shown match those shown on the exterior label of the
microBTS. The IP address for the micro controller is normally one digit higher than the
highest IP address of the nano TRX’s. In the sample shown, the highest nano TRX is
172.16.79.15. It is likely that the micro controller address will be 172.16.79.16. Record
this number for use in the next step.
Figure A-20: Select nanoBTS Screen Showing the MAC and IP Addresses for the nano TRX’s
5 Use the IP address from the previous step to launch the WinSCP session in the next step. If
the IP address does not work, use Wireshark, Angry IP or similar IP discovery tool to
obtain the micro controller IP address.
6 Launch a WinSCP session from the PC desktop and the WinSCP Login screen will
appear. Refer to Figure A-21.
7Enter the Host name which is the IP address assigned to the micro controller unit of the
microBTS being upgraded.
8Enter
root in the User name dialog box, and your password in the Password dialog box.
9 Click on Login when complete.
FlexWave microBTS Installation and Commissioning Guide Page 87
© 2009, ADC Telecommunications, Inc.
Page 34

ADCP-77-086 • Issue 2 • 04/2009 • Appendix A - Software Upgrade Procedure
AD091911
AD091912
Figure A-21: WinSCP Login Screen
10 A Warning screen will appear. Select Yes. Refer to Figure A-22.
Figure A-22: WinSCP Warning Screen
11 A Server prompt screen will appear. enter your Password in the dialog box indicated and
click OK. Refer to Figure A-23.
Page 88 FlexWave microBTS Installation and Commissioning Guide
© 2009, ADC Telecommunications, Inc.
Page 35

ADCP-77-086 • Issue 2 • 04/2009 • Appendix A - Software Upgrade Procedure
AD091913
C: ADC
Figure A-23: WinSCP Server Prompt Screen
12 The main WinSCP will appear showing the contents of the drive on which the compressed
.gz upgrade file is located and the root directory showing the files currently contained in
the microBTS controller. Copy the upgrade files which will appear similar to
FWBSSCtrl_4.0.x.x.gz to the root directory. Refer to Figure A-24.
Figure A-24: Main WinSCP Screen
FlexWave microBTS Installation and Commissioning Guide Page 89
© 2009, ADC Telecommunications, Inc.
Page 36

ADCP-77-086 • Issue 2 • 04/2009 • Appendix A - Software Upgrade Procedure
AD091904
13 Close the WinSCP window and open a PuTTY session with the BSC by entering the BSC
IP address. Login as
root. Enter your password. Refer to Figure A-25.
Figure A-25: PuTTY Login Screen
14 At the command line enter:
cd /usr/local/sbin
ls
Text similar to the following will appear showing the various files in the directory:
batch.pem changeHcpVersion cluster_000810164.tgz hcp
ca.pem cluster_000810156.tgz cluster-cert.pem oem.pem
certChainFile.pem cluster_000810158.tgz cluster-key.pem
15 Make a temporary directory:
mkdir tmp
16 Change to the temporary directory by entering:
cd tmp
17 To copy the upgrade file to the temporary directory
cp /root/FWBBSSCtrl_4.0.1.x.gz
18 To unpack the tar file
tar -zxvf FWBSSCtrl_4.0.1.x.gz
Page 90 FlexWave microBTS Installation and Commissioning Guide
© 2009, ADC Telecommunications, Inc.
Page 37

ADCP-77-086 • Issue 2 • 04/2009 • Appendix A - Software Upgrade Procedure
The following output will appear:
adc.GIF
hcp
hcpInstall
microBTS
updatePod
19 Display the software version number by entering:
hcp -v
This will display the current version of the micro controller software. For example:
hcp: version 3.2.7
20 Back up /etc/inventory files by changing directory to the etc directory. In the etc
directory enter:
tar -cvf /root/inventory.tar /etc/inventory
21 At the command prompt enter:
cd /etc
22 Using a text editor such as vi modify the file in the
/etc/inittab by commenting out
the last line which should appear similar to this:
#hcp:2:respawn:/usr/local/sbin/hcp -nondaemon
If this line does not exist in the files proceed to the next step.
23 At the command prompt enter:
telinit q
This will stop the hcp (micro controller process).
24 Change the directory by entering:
cd thttpd
25 Verify the
/etc/thttpd/thttpd.conf. Using a text editor such as vi, comment out
the chroot line and changing the cgipat line at the bottom to include 2 asterisks instead of
one:
cgipat=/cgi-bin/**
26 Change the directory to by entering:
cd / var /www
27 List the contents of the directory by entering:
ls -l
28 If no directory exists, create one by entering:
FlexWave microBTS Installation and Commissioning Guide Page 91
© 2009, ADC Telecommunications, Inc.
Page 38

ADCP-77-086 • Issue 2 • 04/2009 • Appendix A - Software Upgrade Procedure
mkdir cgi-bin
29 Open the cgi-bin directory by entering:
cd cgi-bin
30 Copy the contents by entering:
cp /usr/local/sbin/tmp/* .
31 Change directories by entering:
cd /var/www
32 Create a cgi-bin subdirectory in the /var/www directory and place the three files from the
Html sub-project “
microBTS”, “updatePod”, and “adc.GIF” into the cgi-bin directory.
33 At the
:/etc/thttpd# prompt enter:
cd /var/www
34 Display the contents of the directory by entering:
ls -l
35 The screen will now show:
total 2
drwxr-xr-x 2 root root 1024 2009-04-08 01:26 cgi-bin
lrwxrwxrwx 1 root root 16 2009-04-08 01:26 index.html ->
cgi-bin/microBTS
drwxr-xr-x 2 root root 1024 2006-10-31 11:50 users
36 At the :/var/www# prompt enter:
cd cgi-bin/
37 At the :/var/www/cgi-bin# prompt enter:
ls -l
The screen will now show:
total 44
-rwxr--r-- 1 root root 1690 2009-03-10 18:36 adc.GIF
-rwxr-xr-x 1 root root 18517 2009-03-10 18:36 microBTS
-rwxr-xr-x 1 root root 21191 2009-03-10 18:36 updatePod
38 Change the privledges on the ADC gif file by entering:
chmod 744 adc.GIF
39 Change the privledges on the microBTS file by entering:
chmod 775 microBTS
Page 92 FlexWave microBTS Installation and Commissioning Guide
© 2009, ADC Telecommunications, Inc.
Page 39

ADCP-77-086 • Issue 2 • 04/2009 • Appendix A - Software Upgrade Procedure
40 Change the privledges on the updatepod file by entering:
chmod 775 updatePod
41 At the :/var/www/cgi-bin# prompt enter:
ls -l
42 The screen will now show (make sure that the files shown have the permissions as listed
below):
total 44
-rwxr--r-- 1 root root 1690 2009-03-10 18:36 adc.GIF
-rwxrwxr-x 1 root root 18517 2009-03-10 18:36 microBTS
-rwxrwxr-x 1 root root 21191 2009-03-10 18:36 updatePod
43 Change the directory by entering:
cd /etc
44 Modify the /etc/inittab back to its original state. Using a text editor such as vi works
uncomment the last line so it appears as:
45 At the command prompt enter:
cd /usr/local/sbin
ls
Text similar to the following will appear showing the various files in the directory:
batch.pem changeHcpVersion cluster_000810164.tgz
hcp
ca.pem cluster_000810156.tgz cluster-cert.pem
oem.pem
certChainFile.pem cluster_000810158.tgz cluster-key.pem
46 Make a temporary directory by entering:
mkdir tmp
47 Change to the temporary directory by entering:
cd tmp
48 Copy the upgrade package by entering:
cp /root/FWBBSSCtrl_4.0.1.x.gz .
49 Unpack the upgrade package by entering:
tar -zxvf FWBSSCtrl_4.0.1.x.gz
FlexWave microBTS Installation and Commissioning Guide Page 93
© 2009, ADC Telecommunications, Inc.
Page 40

ADCP-77-086 • Issue 2 • 04/2009 • Appendix A - Software Upgrade Procedure
The following output will appear:
adc.GIF
hcp
hcpInstall
microBTS
updatePod
50 At the command prompt enter:
./hcpInstall
The following output will appear:
ln: `/var/www/index.html': File exists
Stopping hardware control process: hcp.
51 At the command prompt enter:
hcp -v
This will display the version number of the software upgrade loaded in this procedure. For
example:
hcp: version 4.0.1.x
52 This completes the manual upgrade procedure. Verify the new software is loaded by
closing the PuTTY window and launching BTS Installation Manager.
53 Select Connect to BSC from the task bar.
54 Enter the IP address of the BSC and click OK. Refer to Figure A-26.
Page 94 FlexWave microBTS Installation and Commissioning Guide
© 2009, ADC Telecommunications, Inc.
Page 41

ADCP-77-086 • Issue 2 • 04/2009 • Appendix A - Software Upgrade Procedure
AD091907
Figure A-26: Connect to BSC Screen
55 Right click on the FlexWave Manager object and select Properties. The FlexWave
Manager Properties screen will appear. Verify that the nanoBTS Software Version
dialog box contains the updated software version number. Refer to Figure A-27.
will
AD091908
Figure A-27: FlexWave Manager Properties Screen Confirming the New Software Load
56 Return to the BSC Configuration Manager screen and find the BTS upgraded on the
configuration “tree.” Right click on the site and select Properties.
FlexWave microBTS Installation and Commissioning Guide Page 95
© 2009, ADC Telecommunications, Inc.
Page 42

ADCP-77-086 • Issue 2 • 04/2009 • Appendix A - Software Upgrade Procedure
4.0.1.9
57 The microBTS Properties screen will appear showing the Active Software Version and
the Standby Software Version. Confirm the Standby Software Version is the version
loaded in this procedure. After determining it is correct, Click OK. Refer to Figure A-28.
will
Figure A-28: microBTS Properties Screen Confirming the Active and Standby Software Loads
Page 96 FlexWave microBTS Installation and Commissioning Guide
© 2009, ADC Telecommunications, Inc.
Page 43

ADCP-77-086 • Issue 1 • 10/2008 • Back Cover
Blank
FlexWave microBTS Installation and Commissioning Guide Page 97
© 2009, ADC Telecommunications, Inc.
Page 44

PHONE:
ADCP-77-086
WRITE:
U.S.A. or CANADA
Sales: 1-800-366-3691
Extension 73000
Tech nical Assistance: 1-800-366-3891
Connectivity Extension: 73475
Wireless Extension: 73476
EUROPE
Sales Administration: +32-2-712-65 00
Tech nical Assistance: +32-2-712-65 42
EUROPEAN TOLL FREE NUMBERS
Germany: 0180 2232923
UK: 0800 960236
Spain: 900 983291
France: 0800 914032
Italy: 0800 782374
ASIA/PACIFIC
Sales Administration: +65-6294-9948
Tech nical Assistance: +65-6393-0739
ELSEWHERE
Sales Admini
stration: +1-952-938-8080
Tech nical Assistance: +1-952-917-3475
ADC Telecommunications (S’PORE) PTE, LTD;
100 Beach Road, #18-01, Shaw Towers.
Singapore 189702.
13944-P
ADC Telecommunications, INC
PO Box 1101,
Minneapolis, MN 55440-1101, USA
ADC European Customer Service, INC
Belgicastraat 2,
1930 Zaventem, Belguim
PRODUCT INFORMATION AND TECHNICAL ASSISTANCE:
connectivity.tac@adc.com
wireless.tac@adc.com
euro.tac@adc.com
asiapacific.tac@adc.com
REPRINTS:
PDF copies of manuals are available
for downloading at the following link:
www.adc.com/manuals
Contents herein are current as of the date of publication. ADC reserves the right to change the contents
without prior notice. In no event shall ADC be liable for any damages resulting from loss of data,
loss of use, or loss of profits and ADC further disclaims any and all liability for indirect, incidental,
special, consequential or other similar damages. This disclaimer of liability applies to all products,
publications and services during and after the warranty period.
ADCP Number:
Page 45

Page 46

Website: www.adc.com
 Loading...