

Page 1
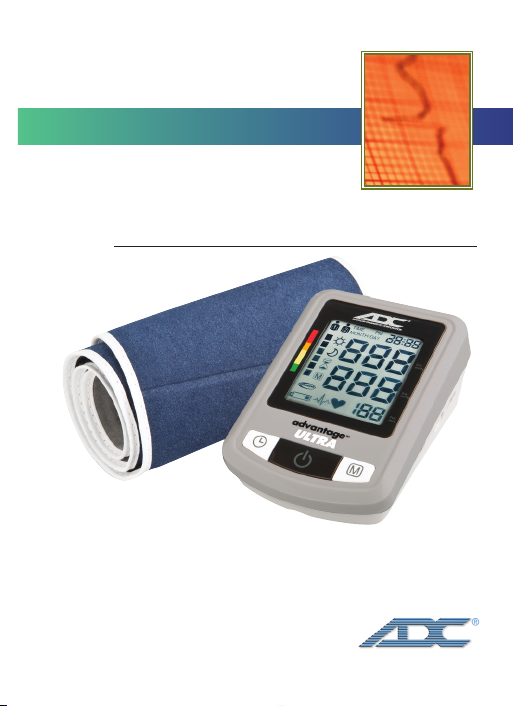
Automatic
Blood Pressure
Monitor
6021N, 6022N, 6023N
Inst ruction Ma nual
PLEASE N OTE:
THIS MEDICAL INSTRUMENT MUST BE
USED ACCORDING TO INSTRUCTIONS
TO ENSURE ACCURATE READINGS.
Questions?
Call ADC toll free
at 1-800-232-2670
6023
N
Page 2

Automatic Blood Pressure Monitor
Table of Contents
A Special Thank You 4
1. INTRODUCTION AND INTENDED USE 4
2. WARNINGS AND PRECAUTIONS 5
3. ABOUT BLOOD PRESSURE 6
3.1. What is Blood Pressure? 6
3.2. What is a Normal Blood Pressure? 7
3.3. What Influences Blood Pressure? 7
3.4. Does Blood Pressure Vary? 8
3.5. What is Hypertension? 8
3.6. Can Hypertension be Controlled? 9
3.7. Why Measure Blood Pressure at Home? 9
3.8. How is Blood Pressure Measured? 10
3.9. How Should I Record My Blood Pressure? 10
4. COMPONENTS OF YOUR BLOOD PRESSURE MONITOR 11
5. SETTING UP YOUR BLOOD PRESSURE MONITOR 12
5.1. Inserting the Batteries 12
5.2. Using the AC Power Adapter 13
5.3. Cuff Connection 13
5.4. Setting the Time and Date 13
5.5. Select the User 14
5.6. Selecting Measurement Mode (6022N, 6023N only) 15
5.7. Using MAM Advantage™ Averaging Mode (6022N, 6023N only) 15
6. MEASUREMENT PROCEDURE 16
6.1. Before Measurement 16
6.2. Common Sources of Error 16
2
Page 3

6.3. Fitting the Rigid Cuff (6023N only) 17
6.4. Fitting the D-Bar Cuff (6021N, 6022N only) 18
6.5. Measurement Procedure 19
6.6. Reading Measurement Results 20
6.7 Using the Morning/Evening Hypertension
Function (6022N, 6023N only) 20
7. SOFTWARE FUNCTIONS (6022N, 6023N MODELS ONLY) 21
7.1. PC Link Software Installation and Data Transmission 21
7.2 Installing and Using Microsoft® Healthvault™ 22
8. IRREGULAR HEARTBEAT DETECTOR 23
8.1. Traffic Light Indicator (6023N only) 24
9. MEMORY FUNCTION 24
9.1. Recall and Storage of Measurements 24
9.2. Discontinuing a Measurement 25
9.3. Delete Memory 25
10. ERROR MESSAGES/TROUBLESHOOTING 26
11. CARE AND MAINTENANCE 28
12. TECHNICAL SPECIFICATIONS 29
13. WARRANTY 30
14. QUALITY STANDARDS 30
15. SYMBOL DEFINITIONS 30
16. HOW TO CONTACT US 31
3
Page 4

A SPECIAL THANK YOU
Congratulations on your purchase of an ADC
®
Advantage™Automatic
Blood Pressure Monitor.
In hospitals and physician's offices throughout the world, where accuracy and
dependability are critical, ADC®professional diagnostic products are the
instruments of choice.
Now you, too, can enjoy the benefits of ADC®engineering and quality in the
home. This feature rich instrument was designed to simplify the measurement
of blood pressure and pulse rate at home and deliver consistent, dependable
results.
Read this booklet thoroughly before attempting to use your new ADC
Advantage™Automatic Blood Pressure Monitor.
1. INTRODUCTION AND INTENDED USE
This manual is for Advantage™(6021N), Advantage™PLUS (6022N), and
Advantage™ULTRA (6023N) models. To find the model number of your device,
look on the rating label located on the underside of the unit.
Your blood pressure monitor with ADC®Averaging Mode, Irregular Heartbeat
Detection, and PC Link Blood Pressure Analyzer Software (6023N model only) is
a fully automatic digital blood pressure measuring device for use by adults on
the upper arm at home or in your doctor’s/nurse’s office. It enables very fast
and reliable measurement of systolic and diastolic blood pressure as well as
pulse through the oscillometric method. This device offers clinically proven
accuracy and has been designed to be user friendly.
Before using, please read this instruction manual carefully and then keep it in a
safe place. Please contact your doctor for further questions on the subject of
blood pressure and its measurement.
Remember…
Only a healthcare professional is qualified to interpret blood pressure•
measurements. This device is NOT intended to replace regular medical
checkups.
4
®
Page 5

It is recommended that your physician review your procedure for using•
this device.
Blood pressure readings obtained by this device should be verified before•
prescribing or making adjustments to any medications used to control
hypertension. Under no circumstances should YOU alter the dosages of
any drugs prescribed by your doctor.
This monitor is intended for use by adults only. Consult with a physician•
before using this instrument on a child.
In cases of irregular heartbeat (Arrhythmia), measurements made with•
this instrument should only be evaluated after consultation with your
doctor.
Familiarize yourself with the section titled "About Blood Pressure". It•
contains important information on the dynamics of blood pressure
readings and will help you to obtain the best results.
2. WARNINGS AND PRECAUTIONS
Warning: The device contains sensitive electronic components.
Avoid strong electrical or electromagnetic fields in the direct vicinity of
the device (e.g., mobile telephones, microwave ovens). These can lead to
temporary impairment of the measuring accuracy.
Warning: Use of this instrument on patients under dialysis therapy or on
anticoagulant, antiplatelets, or steroids could cause internal bleeding.
Warning: Do not use cuffs, AC adapters or batteries other than those
included with this product or replacement parts supplied by the
manufacturer.
Warning: This system may fail to yield specified measurement accuracy
if operated or stored in temperature or humidity conditions outside the
limits stated in the specifications section of this manual.
Warning: This product may contain a chemical known to the state of
California to cause cancer, birth defects, or other reproductive harm.
Caution: The standard material used is latex-free.
5
Page 6

Attention: Self-measurement means control, not diagnosis or treatment.
Unusual values must always be discussed with your doctor. Under no
circumstances should you alter the dosages of any drugs prescribed by your
doctor.
Attention: The pulse display is not suitable for checking the frequency of
heart pacemakers!
Attention: In cases of irregular heartbeat, measurements made with this
instrument should only be evaluated after consultation with your doctor.
NOTE: To obtain the greatest accuracy from your blood pressure instrument,
it is recommended that the instrument be used within a temperature range
of 50°F (10°C) to 104°F (40°C), with a 15-90% relative humidity.
3. ABOUT BLOOD PRESSURE
3.1. What is Blood Pressure?
Simply put, arterial blood pressure is the force of blood exerted against the walls of
the arteries. There are two components to blood pressure —systolic and diastolic
pressure. Systolic, the higher pressure, occurs during contraction of the heart.
Diastolic, the lower pressure, occurs when the heart is at "rest."
Your level of blood pressure is determined in the circulatory center of the brain
and adjusts to a variety of situations through feedback from the nervous system.
To adjust blood pressure, the strength and frequency of the heart (Pulse), as well
as the width of circulatory blood vessels is altered. Blood vessel width is affected
by fine muscles in the blood vessel walls. Blood pressure is traditionally measured
in millimeters of mercury (mmHg).
It is recorded as systolic/diastolic. For example a systolic of 120 and
diastolic of 80 would be recorded 120/80.
Blood pressure is a dynamic vital sign — one that changes constantly
throughout the day. A person's "resting" blood pressure is the pressure that
exists first thing in the morning while a person is still at rest and before
consumption of food or drink.
6
Page 7

3.2. What is a Normal Blood Pressure?
A systolic pressure of less than 120mmHg and a diastolic pressure of under
80mmHg are recognized as normal by the Joint National Committee on
Prevention, Detection, Evaluation, and Treatment of High Blood Pressure,
2003.
NOTE: Blood pressure does increase with age, so you must check with
your doctor to find out what is “normal” for you! Even with normal blood
pressure values, a regular self-check with your blood pressure monitor is
recommended. You can detect possible changes in your values early and
react appropriately. If you are undergoing medical treatment to control your
blood pressure, keep a record of values along with time of day and date.
Show these values to your doctor. Never use the results of your
measurements to independently alter the drug doses prescribed by your
doctor.
3.3. What Influences Blood Pressure?
Blood pressure is influenced by many factors including age, weight,
physical conditioning, past illness, time of day, altitude, activity, and
climate, to name just a few. In general, blood pressure is lower in the
morning and increases throughout the day. It is lower in warm weather,
and higher in cold weather.
Physical activity can have a significant short term impact on blood
pressure. Work, exercise, smoking, eating, drinking - even talking,
laughing, or crying will all affect a person's blood pressure.
Your diet, including beverages containing caffeine or alcohol, may
affect blood pressure. Emotional stress can have a dramatic impact on your
blood pressure.
Even repeated blood pressure measurements taken without adequate rest
between readings will alter your blood pressure as the vessels in your arm
engorge with blood. Many of these influences are only temporary or short
term, though chronic (long term) exposure to some factors may result in
permanently elevated blood pressure levels.
7
Page 8
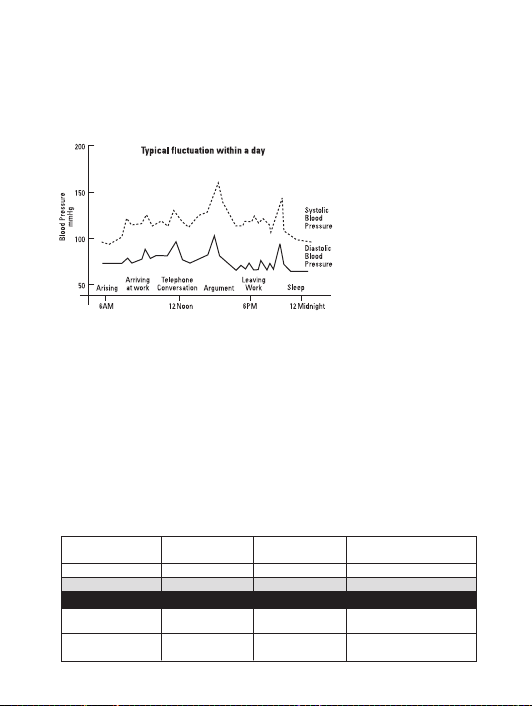
3.4. Does Blood Pressure Vary?
Constantly. An individual's blood pressure varies greatly on a daily and seasonal
basis. It changes throughout one's lifetime. It is not uncommon for systolic
pressure to vary by 40mmHg or more throughout the course of a single day!
While generally not as volatile, diastolic pressure can still vary significantly. In
hypertensive individuals,
variations are even more
pronounced. Normally,
blood pressure is at its
lowest during sleep and
rises in the morning and
throughout the day. The
chart (left) illustrates the
fluctuations that could
occur in a typical day.
3.5. What is Hypertension?
Hypertension (high blood pressure) is elevated systolic or diastolic levels. In 90
to 95 percent of the diagnosed cases, the specific causes are unknown,
although the condition is often linked with family history, and lifestyle. This is
referred to as essential hypertension. In the remaining cases, high blood
pressure is a symptom of an underlying, often treatable condition, which if
corrected, may normalize blood pressure. This less common type is known as
secondary hypertension. Hypertension, if left untreated, may contribute to kidney
disease, heart attack, stroke, or other debilitating illnesses. The following
standards for assessment of high blood pressure in adults have been established
by the Joint National Committee, 2003.
Range Systolic Diastolic Precaution
Classifications Blood Pressure Blood Pressure Measures
Normal <120 <80 Monitor regularly
Prehypertension 120 - 139 80 - 89 Contact your physician
–– H Y P E R T E N S I O N ––
Stage 1 140 - 159 90 - 99 Contact your
(Moderate) physician Immediately
Stage 2 ≥160 ≥100 Contact your
(Severe) physician URGENTLY
8
(JNC-7 report: Joint National Committee on Prevention, Detection, Evaluation and Treatment of High Blood Pressure / 2003)
Page 9

Remember, only a physician is qualified to interpret the readings obtained
from your blood pressure monitor. No attempt should ever be made at
self-diagnosis or treatment.
3.6. Can Hypertension be Controlled?
Although essential hypertension cannot be cured, it can usually be
controlled by altering lifestyle (including diet), adopting a program of
exercise, stress management and, where necessary, with medication
under a doctor's supervision.
To help reduce the risk of hypertension, or keep it under control, the
American Heart Association (AHA) recommends the following:
Don't smoke•
Reduce salt and fat intake•
Maintain proper weight•
Exercise regularly•
Have regular physical checkups•
3.7. Why Measure Blood Pressure at Home?
Clinical studies have shown improved detection and treatment of
hypertension when regular home blood pressure monitoring is done
in consultation with a physician.
Blood pressure measured in a doctor's office or hospital setting may
cause anxiety and lead to an elevated reading - a condition referred
to as "white coat hypertension."
Home measurements generally reduce the "outside" influences on
blood pressure readings, and can provide a more comprehensive and
meaningful blood pressure history.
Note: While it is important to keep an accurate record of your blood pressure
measurements, don't be overly concerned by the results of any one
measurement. Individual results may be influenced by spiking of your pressure
due to diet, anxiety, or mis-measurement resulting from excessive arm
movement, or misapplication of the cuff. Many readings taken at the same time
each day give a more comprehensive blood pressure history.
9
Page 10

Always be sure to note the date and time when recording blood pressure
and pulse measurements. For best results, and with time permitting, 3
successive measurements may be taken daily. Make sure to allow at least
5 minute intervals between measurements. Discard any reading that
appears suspect and record the average of the remaining readings.
3.8. How is Blood Pressure Measured?
Healthcare professionals traditionally use a device known as a
sphygmomanometer along with a stethoscope - essentially a professional
version of the very same instrument you have purchased. The
sphygmomanometer is a system consisting of an inflatable bladder contained
within a cuff, inflation bulb with air control valve, and pressure measuring
manometer (gauge). The gauge may be mechanical or mercurial. The cuff is
wrapped around the limb and inflated to constrict blood flow to the artery. As
pressure is released from the cuff through the deflation valve, blood flow
returns to the artery producing pulse beats known as Korotkoff sounds, which
are detected with the stethoscope. Systolic pressure is recorded at the onset
of these sounds. Diastolic pressure is generally recorded when the sounds
disappear (when blood flow to the artery returns to normal).
3.9. How should I record my blood pressure?
Record your blood pressure by setting up a simple chart in a spiral-bound
notebook as shown below, or use the included record book.
Date Time Reading Pulse
4/24 7:50AM 128/83 72
4/25 8:00AM 135/77 77
4/26 7:45AM 130/75 71
4/27 2:00PM 153/89 80
If you like you can add a column for comments about your condition at the time of
measurement, or a listing of any factors that may have influenced your readings
(such as "had a cold", or "just returned from vacation").
For best results, and with time permitting, 3 successive measurements
10
Page 11

may be taken daily. Make sure to allow at least 5 minute intervals
between measurements. Discard any reading that appears suspect and
record the average of the remaining readings. If this method is used, be
sure to note that the readings are averaged.
On the Advantage™ Ultra (6023N) model, PC Link software is available.
Records can be automatically transferred to your Windows computer. Many
smart phone and tablet apps allow you to record, cart, and share your BP
measurements. ADC®recommends Microsoft®Healthvault™.
4. COMPONENTS OF YOUR BLOOD PRESSURE MONITOR
The illustration shows your blood pressure monitor, consisting of:
Automatic Blood Pressure Monitor, Cuff, Instruction Book, Record Book,
and Carry Case.
Each model has its own specific cuff:
11
Page 12
Model Item No Description
6021N, 6022N 850-6022N Wide Range Soft Cuff
For arm circumference: 8.7−16.5” (22−42 cm)
6021NX 850-6022NX Large Adult Soft Cuff
For arm circumference: 12.5−20.4” (32−52 cm)
6021NSA 850-6021NSA Small Adult Soft Cuff
For arm circumference: 6.7−8.7” (17−22 cm)
6023N 850-6023N Wide Range Rigid Cuff
For arm circumference: 8.7−18.1” (22−46 cm)
NOTE: Arm circumference should be measured with a measuring tape in the
middle of the relaxed upper arm. Do not force cuff connection into the
opening. Make sure the cuff connection is not pushed into the AC adapter
port. If the cuff is too small, call 1-800-232-2670 for further information. You
may prefer to use one of our wrist-type monitors.
NOTE: If you ever need to buy a replacement cuff, use only ADC®brand.
5. SETTING UP YOUR BLOOD PRESSURE MONITOR
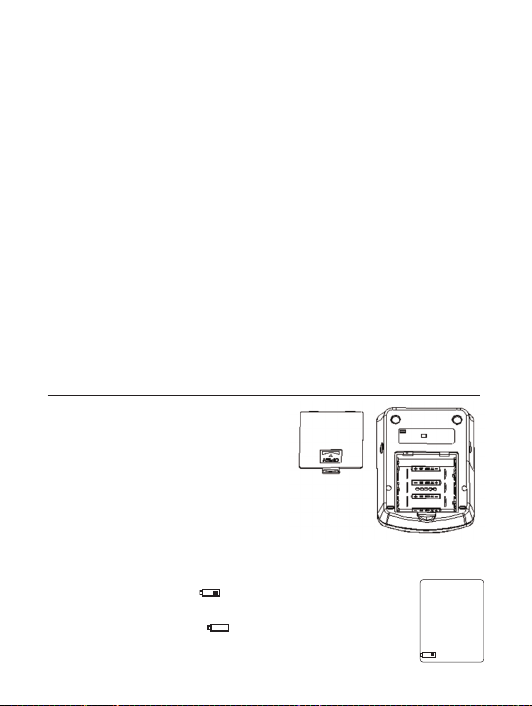
5.1. Inserting the Batteries
After you have unpacked your device,
insert the batteries. The battery
compartment is located on the underside
of the device (see illustration).
Remove cover as illustrated.a)
Insert the batteries (4 x AA, 1.5V), observing the indicated polarity.b)
Attention!
If a battery warning appears in the display, the •
batteries are almost discharged and must be replaced.
After battery warning appears, the device will not •
work until batteries have been replaced.
12
Page 13
If the blood pressure monitor is not used for long periods, remove the•
batteries from the device.
Use “AA” Long-Life or Alkaline 1.5V batteries. Do not use rechargeable•
batteries.
Functional check: Press the «MEMORY» button down to test all the•
display elements. When functioning correctly many icons will appear.
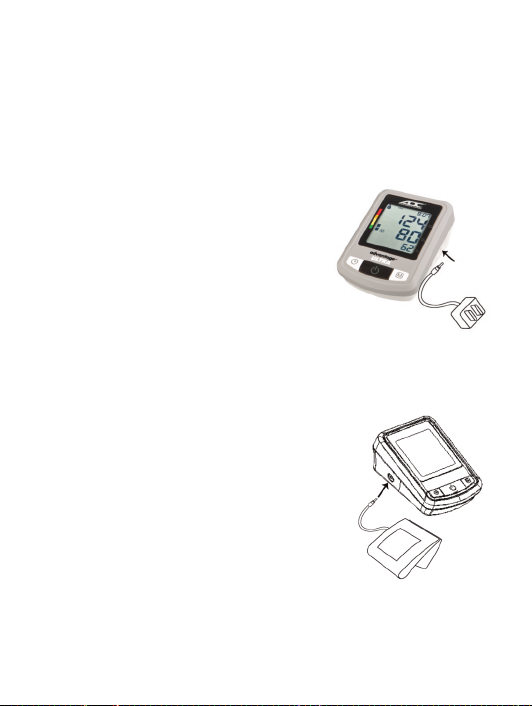
5.2. Using the AC Power Adapter
It is possible to operate the Automatic Blood
Pressure Monitor with an AC adapter.
Push the plug into the port on the right side 1.
of the device.
Plug the AC adapter into a 120V power socket.2.
The device is ready for measurement.
Test that power is available by pressing the 3.
«ON/OFF» button.
NOTE:
Use only the AC adapter provided with your device. ADC
®
is not•
responsible for the warranty servicing/repair of the monitor if any other
adapter is used.
No power is taken from the batteries while the AC•
adapter is connected to the device.
Consult ADC
the AC adapter.
®
if you have any questions relating to•
5.3. Cuff Connection
Insert the cuff tube into the opening provided on•
the left side of the device as shown in the picture.
5.4. Setting the Time and Date
This blood pressure monitor incorporates an integrated clock with date
display. The device will also store the date and time of each measurement in
its memory. After new batteries have been inserted, the device will request
the date and time to be reset.
13
Page 14

To set the date, begin with the year. The 4 characters1.
(2014) on the screen will blink. You can change the year
by pressing the «MEMORY» button. To confirm and set
the year, press the «TIME» button.
The device will automatically advance to the month. 2.
To change the month, use the «MEMORY»
button. To confirm and set the month, press
the «TIME» button.
To set the day, hour, and minutes, use the same3.
steps. Push the «MEMORY» button to change the
display value. Press the «TIME» button to confirm
and set the value.
Once you have set the minutes and pressed the «TIME» button,4.
the date and time are set and the time is displayed.
NOTE
If you want to change date and time, press and hold the «TIME» button•
down for approx. 5 seconds until the user icon flashes. Press the
«TIME» button again, and then you can enter the new values as
described above.
A single press of the «MEMORY» button or «TIME» button advances•
one operation.
Holding the button down speeds up the procedure.•
5.5. Select the User
This blood pressure monitor is designed to store
99 measurements for each of two users. Before
taking a measurement, be certain that the correct
user has been selected.
With the unit off, press and hold the «TIME»a)
button until the user icon starts blinking.
Press the «MEMORY» button to toggle between users.b)
Press the «ON/OFF» button to make your selection.c)
14
Page 15

5.6. Selecting Measurement Mode (6022N, 6023N only)
1 3
6
This instrument enables you to select either standard (single
0
measurement) or measurement averaging mode (automatic triple
2
measurement).
2
To select Standard mode, push the switch on the sidea)
N
of the instrument towards position "1."
6
To select Averaging mode, push the switch toward position "3." b)
0
Note the MAM Advantage™Averaging mode icon will
2
illuminate on the display.
3
If you select 1, then only one measurement will be taken. If you
N
select 3, the unit will inflate and deflate three times resulting in
M
one final average.
o
d
5.7. Using MAM Advantage™ Averaging Mode (6022N,
e
6023N only)
l
In MAM Advantage
s
automatically taken in succession and the result then
O
automatically analyzed and displayed. Because your blood
n
pressure constantly fluctuates, a result determined in this way is
l
more reliable than one produced by a single measurement.
y
After pressing the «ON/OFF» button, the MAM Advantage
2.
Averaging mode icon appears in the display.
The bottom right hand section of the display shows a 1, 2, or 3 to3.
indicate which of the 3 measurements is currently being taken.
There is a break of 15 seconds between the measurements (154.
seconds are adequate according to “Blood Pressure Monitoring,
2001, 6:145-147” for oscillometric instruments). A countdown
indicates the remaining time and a beep will sound 5 seconds
before the 2nd and 3rd readings will begin.
The individual results from measurements 1, 2 and 3 are not5.
initially displayed.
™
Averaging mode, three measurements are1.
™
15
Page 16

NOTE: If you want to see each of the individual readings making
up a triplicate reading, turn the unit off, then press and hold the
Memory button for 3 seconds immediately after a MAM
Advantage™Averaging Mode measurement. Note: You can only
see the individual readings one time immediately following an
Averaging Mode measurement. See section 5.6.
Do not remove the cuff between measurements.
6. MEASUREMENT PROCEDURE
6.1. Before Measurement:
Avoid eating and smoking as well as all forms of exertion directly before•
measurement. These factors influence the measurement result. Find time
to relax by sitting in an armchair in a quiet atmosphere for about ten
minutes before taking a measurement.
Remove any garment that fits closely to your upper arm.•
Always measure on the same arm (normally left).•
Always compare measurements taken at the same time of day, since blood•
pressure changes during the course of the day, as much as 20-40 mmHg.
6.2. Common Sources of Error:
NOTE: Comparable blood pressure measurements always require the same
conditions! Conditions should always be quiet.
All efforts by the user to support the arm can increase blood pressure.•
Make sure you are in a comfortable, relaxed position and do not flex any of
the muscles in the measurement arm during the measurement. Use a
cushion for support if necessary.
If the arm artery lies considerably lower or higher than the heart, an•
erroneously high or low blood pressure will be measured! Each 15cm (6
inch) difference in height between your heart and the cuff results in a
measurement error of 10 mmHg!
Cuffs that are too narrow or too short result in false measurement values.•
Selecting the correct cuff is extremely important. Cuff size is dependent
upon the circumference of the arm (measured in the center).
The permissible range is printed on the cuff. If this is not suitable for your
16
Page 17

The permissible range is printed on the cuff. If this is not suitable for your•
use, please call 1-800-232-2670.
NOTE: Only use approved ADC
®
cuffs!
A loose cuff or a sideways protruding air pocket causes false measurement•
values.
With repeated measurements, blood accumulates in the arm, which can•
lead to false results. Consecutive blood pressure measurements should be
repeated after a 1 minute pause or after your arm has been held up in order
to allow the accumulated blood to flow away. If you decide to take your
Averaging Mode measurement again, be sure to wait at least one minute
beforehand.
6.3. Fitting the Rigid Cuff (6023N only)
The cuff is pre-formed for easier use. Remove tight a)
or bulky clothing from your upper arm.
Wrap the cuff around your upper left arm.b)
The rubber tube should be on the inside of
your arm extending downward to your
hand. Make certain the cuff lies
approximately 1/2−3/4” (1−2 cm) above the elbow.
Important! The red strip on the edge of the cuff (Artery
Mark) must lie over the artery which runs down the inner
side of the arm.
To secure the cuff, wrap it around your arm and pressc)
the hook and loop closure together.
There should be little free space between your armd)
and the cuff. You should be able to fit 2 fingers
between your arm and the cuff. Cuffs that don’t fit
properly result in false measurement values. Measure
your arm circumference if you are not sure of proper fit.
Lay your arm on a table (palm upward) so the cuff is at thee)
same height as your heart. Make sure the tube is not kinked.
Remain seated quietly for at least two minutes before f)
you begin the measurement.
Left Arm
tube
17
Page 18

6.4 Fitting the D-Bar Cuff (6021N, 6022N models)
a) Pass the end of the cuff through the flat metal
Left Arm
ring so that a loop is formed. The hook and loop
closure must be facing outward.
tube
b) Place the cuff over the left upper arm so that
the tube is closer to your lower arm.
c) Lay the cuff on the arm as illustrated. Make certain
that the lower edge of the cuff lies approximately
3/4” to 1” (2 to 3cm) above the elbow and that the
tube is closer to the inner side of the arm.
Important! The small red strip (Artery Mark) on the
cuff must lie exactly over the artery which runs down the inner
side of the arm.
Artery
Mark
d) Tighten the cuff by pulling the end and close
the cuff by affixing the hook and loop closure.
To verify a correct fit, the small white triangle
on the outside of the cuff should fall between
Range
Triangle
the 2 range lines.
e) There should be little free space between the arm
and the cuff. You should be able to fit 2 fingers between your arm and the
cuff. Clothing must not restrict the arm. Any piece of clothing which does,
must be removed. Cuffs that don’t fit properly result in false measurement
values. Measure your arm circumference if you are not sure of proper fit.
Other size cuffs are available (Page 12).
f) Lay your arm on a table (palm upward) so the cuff is at the same height as
your heart. Make sure the tube is not kinked.
g) Remain seated quietly for at least two minutes before you begin the
measurement.
Comment: If it is not possible to fit the cuff to your left arm, it can also be
placed on your right arm. However, all measurements should be made using
the same arm. Comparable blood pressure measurements always require the
same conditions (Relax for several minutes before taking a measurement).
18
Page 19

6.5. Measurement Procedure
After the cuff has been appropriately positioned and
connected to the monitor, the measurement can begin:
Press the «ON/OFF» button. The built-in pump begins to1.
inflate the cuff. In the display, the increasing cuff pressure
is continually displayed.
After a suitable inflation pressure has been reached, the2.
pump stops and the pressure gradually falls, with cuff
pressures being displayed. If that inflation pressure is not
sufficient, the monitor automatically re-starts.
When the instrument detects a pulse, the heart symbol in the3.
display starts to flash and a beep is heard for every heartbeat.
When the measurement has concluded, a long beep tone sounds. The4.
systolic, and diastolic blood pressures and pulse rate now appear in the
display.
The appearance of this symbol signifies that an irregular5.
heartbeat was detected. This indicator is only a caution. It
is important that you be relaxed, remain still and do not talk
during measurements.
NOTE: We recommend contacting your physician if you see
this indicator frequently. See Section 8 (page 23) for more
information.
The measurement readings remain on the display until you switch off the6.
instrument. If no button is pressed for a period of 1 minute the instrument
switches itself off in order to preserve the batteries.
When the unit is set to the MAM setting, 3 separate measurements7.
will take place in succession after which your result is calculated and
displayed as a single, averaged measurement. There is a 15 second
resting time in-between each measurement. A countdown indicates the
remaining time and a beep will sound 5 seconds before the 2nd and
3rd readings will begin.
19
Page 20

NOTE: If one of the measurements causes an error message, it will be repeated
one more time. If any additional error occurs, the measurement will be
discontinued and an error code will be displayed.
Expanding the averaged measurement to see the three individual
readings: This function allows you to view the three individual
measurements used to calculate the ADC®Averaging Mode
Technology™measurement. After taking an averaging mode
measurement turn unit off, hold the Memory button for 3 seconds until
you hear a short beep. (Do not hold the button longer than 7 seconds or
you will delete all the readings in the memory!) Let go of the button and
watch the screen. It will automatically scroll through the three
measurements used in the measurement.
6.6. Reading Measurement Results:
When the measurement has been concluded, a long
beep tone sounds. The measured systolic
and diastolic blood pressure values, as well as
the pulse are now displayed.
The appearance of this symbol signifies
Systolic
blood
pressure
Diastolic
Blood
Pressure
Pulse
that an irregular heartbeat was detected.
This indicator is only a caution.
NOTE: We recommend contacting your physician if you see this indicator
frequently. See Section 8 (page 23) for more information.
To prolong the batteries’ life the device switches off automatically if no
button is pressed for 1 minute. Otherwise you can switch it off by pressing
the «ON/OFF» button.
6.7. Using the Morning/Evening Hypertension Function (6022N, 6023N
models)
Morning Hypertension usually occurs as a surge in blood pressure upon waking
up; this BP monitor will average readings taken between 4:00am and 11:59am.
20
Page 21

Evening Hypertension, sometimes called nocturnal hypertension, is
6
characterized by high blood pressure that persists from nighttime until
0
early morning; this BP monitor will average readings taken between
2
6:00pm and 11:59pm.
2
N
6
0
2
3
N
M
o
d
e
l
s
O
n
l
y
When the blood pressure instrument is on, press the «MEMORY»1.
button to display the average reading for the current user.
Press the «MEMORY» button twice to show the average of all2.
readings taken between 4:00AM and 11:59AM. The LCD will
display the sun icon .
Press the «MEMORY» button a third time to show the average3.
of all readings taken between 6:00PM and 11:59PM. The LCD will
display the moon icon .
After 30 seconds, the LCD will display the last taken value for that user.4.
Pressing the «MEMORY» button continuously enables you to5.
view each value individually.
7. SOFTWARE FUNCTIONS (6022N, 6023N ONLY)
®
7.1. ADC
Data Transmission
Advanced PC Link Software Installation and
This unit can be used in connection with your personal computer (PC)
running the ADC
®
Advanced PC Link
Software. Your PC will allow a
capacity of monitoring 80 patients,
each with 1000 records of data
(Note: Overuse will lower system
efficiency). The memory data can be
transferred to the PC by connecting
the monitor via the included USB
cable with your PC.
Note: The software does not work
with Mac computers.
Operating System:
Microsoft Windows XP, Vista
21
Page 22

1
--
1
--
Insert CD into CD ROM drive of your PC. The installation will starta)
6
automatically. If not, click on SETUP.EXE.
0
Connect the monitor via USB cable with the PC. Three horizontal barsb)
2
will appear on the display and last for 3 seconds.
2
N
The bars will then flash to indicate that thec)
connection between computer and device is
6
successfully made. As long as the cable is
0
plugged, the bars will keep flashing and the
2
buttons are disabled. During the connection,
3
the device is completely controlled by the
N
computer. Refer to the ‘Help’ file in the software for detailed
M
instructions.
o
d
7.2 Installing and Using Microsoft®Healthvault™on your
e
ADC®Advantage™Blood Pressure Monitor
l
The Advantage™Ultra digital blood pressure monitors are compatible
s
with the Microsoft®HealthVault™software application. HealthVault
allows you to easily store, use, and share your health information online
O
and on your mobile devices.
n
l
To use HealthVault™with your unit, follow the steps below:
y
Create a user account at www.healthvault.com.a)
Once logged in, click on “Apps & Devices.”b)
Download the “HealthVault™Connection Center” app and follow thec)
prompts on screen to guide you through installation.
Once installed, select “Select a Task -> Add Device” from withind)
the HealthVault application.
Plug in your ADC®BP monitor to your computer using the supplied USBe)
cable. HealthVault™will automatically install the device drivers and
associate your device to the HealthVault™software.
At this point, you can start taking readings with your device. Once
you have collected a reading, you can now upload the data using
22
the “HealthVault™Connection Center” app.
™
Page 23

6
0
2
2
N
6
0
2
3
N
M
o
d
e
l
s
O
n
l
y
Click “Go online to HealthVault™” and sign into your account.a)
Click the box of the user you would like to associate with thisb)
device and click “Allow Access.”
Then, click “Upload Now.” Your readings will then upload fromc)
your device to the HealthVault™service.
You can then click “View Data in HealthVault
Once you have approved a device, you will not need to perform thesee)
actions again. You can just connect your device and start with step H.
For more information on how to use HealthVault™, click “Help” at the top
right-hand corner of the page. There, you will find a detailed help
document as well as an FAQ section to help with any issues you may
have.
NOTE:
You cannot run the PC Link software and HealthVault™at the same•
time. Be sure to completely remove the PC Link software before
installing HealthVault™.
HealthVault™has a mobile app available in both the Apple®App•
Store and Microsoft®Windows®Phone marketplace.
NOTE: The Morning/Evening Hypertension function is only available on the
unit. No Morning/Evening averages will be transmitted to a computer. Only
the individual readings in memory will be transmitted.
8. IRREGULAR HEARTBEAT DETECTOR
This function indicates an allorhythmic heartbeat. If the IHD symbol
appears on the display that means that certain abnormalities in
heartbeat frequency were detected during the measurement. In this
case, the result may deviate from your normal blood pressure – repeat
the measurement. In most cases, this is no cause for concern.
However, if the symbol appears on a regular basis (e.g. several
times a week with measurements taken daily) we advise you to tell
your doctor. Please show your doctor the following explanation:
™
” to see your readings.d)
23
Page 24

>
180
160-179 100-109
140-159 90-99
130-139 85-89
120-129 80-84
>
110
120 80
DIASYS
Red
Red
Orange
Yel lo w
Yel lo w
Green
>>
Indications of a
“Normal”
Blood Pressure
Red
Orange
Yell ow
Green
Red
Orange
Yell ow
Green
Indications of a
“Pre-Hypertension”
Blood Pressure
Red
Orange
Yell ow
Green
Indications of
“Stage I Hypertension”
Blood Pressure
Red
Orange
Yell ow
Green
Indications of
“Stage 2 Hypertension”
Blood Pressure
Information for the doctor on frequent appearance of the
Irregular Heartbeat Detector
6
This instrument is an oscillometric blood pressure monitor that also analyses
0
pulse frequency during measurement. The instrument is clinically tested. The
2
symbol is displayed after the measurement, if pulse irregularities occur
3
during measurement. If the symbol appears more frequently (e.g. several times
N
per week on measurements performed daily) we recommend the patient to seek
M
medical advice. The instrument does not replace a cardiac examination, but
o
serves to detect pulse irregularities at an early stage.
d
e
8.1. Traffic Light Indicator (6023N only)
l
The bars on the left hand edge
of the display show the range
O
within which the indicated
n
blood pressure values lie.
l
Depending on the height of
y
the bar, the readout value
is either within the normal
(green), borderline (yellow),
or danger (red) range. The
classification is
based on standards
adopted from the
WHO (World Health
Organization).
Refer to the chart to the
right for details of the
classification.
Note: ESH/ESC guidelines may vary from those
indicated. Consult your physician for information
relating to guidelines in your region.
9. MEMORY FUNCTION
24
9.1 Recall and Storage of Measurements
At the end of a measurement, this monitor automatically stores each result
with date and time. This unit stores 99 memories for each of 2 users.
Page 25

Viewing the Stored Values
With the unit off, press the «MEMORY» button. The display first shows "3A",
then shows the average of all measurements stored in the unit.
NOTE: Measurements for each user are averaged and stored separately. Be
certain that you are viewing the measurements for the correct user (with no
time and date shown).
Pressing the «MEMORY»
button again displays the
previous value. To view a
particular stored memory,
press and hold the
«MEMORY» button to scroll
to that stored reading.
MR30: Value of the last measurement – MR29:
Value of the measurement before MR 30
If an irregular heartbeat is detected, the symbol is displayed including
the time and the result of the measurement.
Further information
Measurements should not occur soon after each other; otherwise, the
results will be skewed. Wait for several minutes in a relaxed position,
sitting or lying, before you repeat a measurement.
9.2. Discontinuing a Measurement
If it is necessary to interrupt a blood pressure measurement for
any reason (e.g. the patient feels unwell), the «ON/OFF» button
can be pressed at any time. The device immediately lowers the
cuff pressure automatically.
9.3. Delete Memory
Before you delete all memory readings stored, make sure you won’t need to
refer to them at a later date. Keeping a written record is prudent and may
provide additional information for your doctor’s visit.
25
Page 26

To delete stored memory readings, hold the
«MEMORY» button down until the LCD shows a
«CL». Release the button. Press the «MEMORY»
button while «CL» is flashing to complete the operation.
It is impossible to erase the values individually.
10. ERROR MESSAGES/TROUBLESHOOTING
If an error occurs during a measurement, the measurement is
discontinued and a corresponding error code is displayed
(Example: Err 2).
26
Error No.
ERR 1
ERR 2
ERR 3
ERR 5
Possible Cause(s)/Solutions
The systolic pressure was determined, but then the pressure in the cuff
went down to less than 20 mmHg (diastolic blood pressure can’t be
measured). The tube may have loosened after the systolic pressure has
been determined. Further possible reason: pulse could not be detected.
Unnatural pressure impulses influence the measurement result.
Reason: the arm was moved during the measurement.
If inflation of the cuff takes too long, the cuff is not correctly
seated or the hose connection’s not tight.
The difference between systolic and diastolic is excessive.
Measure again carefully following proper procedures. Consult
your doctor if you still get unusual results of measurements.
Page 27

Error No.
HI
LO
The pressure in the cuff is too high (over 300mmHg) or the pulse
is too high (over 200 beats per minute). Relax for 5 minutes and
repeat the measurement.
The pulse is too low (less than 40 beats per minute). Relax for
5 minutes and repeat the measurement.
Possible Cause(s)/Solutions
Other possible errors and their solutions
If problems occur when using this device, the following points should be
checked.
Malfunction
The display remains blank when
the device is switched on though
the batteries are in place.
1. Check battery installation/ polarity.
2. Remove the batteries and if the display is
unusual, then exchange them for new ones.
Remedy
The pressure does not rise
although the pump is running.
The device frequently fails to
measure, or the values
measured are too low or high.
Every measurement results in
different values, although the
device functions normally and
normal values are displayed.
Blood pressure values differ from
those measured at the doctor’s.
Check the connection of the cuff tube and
connect properly.
1. Fit the cuff correctly on the arm.
2. Before starting measurement make sure that
clothing is not exerting pressure on the arm. Take
articles of clothing off if necessary. Measure blood
pressure again in complete peace and quiet.
Refer to
Section 3. About Blood
Pressure.
Refer to Section 3.7. Why Measure
Blood Pressure at Home?
27
Page 28

NOTE: Blood pressure is subject to fluctuations even in healthy people.
Please remember that comparable blood pressure measurements
always require the same time and the same conditions! These are
normally quiet conditions. If you follow the procedure described earlier and
still get fluctuations of blood pressure of greater than 15 mmHg and/or you
repeatedly hear irregular pulse tones, consult your doctor.
Attention!
Should any technical malfunctions arise in the blood pressure monitor,
please contact the dealer where you bought the device or ADC®. Never
attempt to repair the instrument yourself! Any unauthorized opening of
the instrument invalidates all warranty claims.
11. CARE AND MAINTENANCE
Do not expose the device to either extreme temperatures, humidity,
dust or direct sunlight.
Handle the cuff carefully and avoid all types of stress through twisting
or buckling in order not to damage the sensitive air-tight bubble.
Clean the device with a soft, dry cloth. Do not use gas, thinners or
similar solvents. Spots on the cuff can be removed carefully with a
damp cloth and soapsuds. Do not submerge the cuff in water!
Handle the tubing carefully.
Keep the tube away from sharp edges.
Do not drop the monitor or treat it roughly in any way.
Never open the monitor!
This invalidates the manufacturer’s warranty.
28
Page 29

12. TECHNICAL SPECIFICATIONS
Weight: 1.07 lbs. (487 g) (6021N, 6022N with batteries,
850-6022N soft cuff)
1.14 lbs. (515 g) (6023N with batteries,
850-6023N rigid cuff)
Size: 5.35” x 3.78” x 2.28”
136mm x 96mm x 58mm (including cuff)
Storage temperature: -20 - +55 °C / -4 - +131 °F
Humidity: 15 to 90% relative maximum humidity
Operation temperature: 50°F−104°F (10°C−40°C)
Display: LCD (Liquid Crystal Display)
Measuring method: Oscillometric
Pressure sensor: Capacitive
Measuring range: Rated range of the determination - Blood Pressure
SYS: 60-255mmHg
DIA: 40-200mmHg
40 - 200 beats per minute - pulse
Cuff pressure display range: 0-299 mmHg
Memory: Automatically stores the last 99 measurements
for 2 users (198 total).
Measuring resolution: 1 mmHg
Accuracy: Pressure within ± 3 mmHg or 2% of
the reading ≥200mmHg
Pulse ± 5 % of the reading
Power Source: 4 “AA” batteries
or 1.5V AC adapter
Includes: Automatic Blood Pressure Monitor and Cuff, 4
AA batteries, Instruction Book, and Record Book.
Other cuffs are also available as a special accessory:
Item No Size Range
850-6021NSA Sm. Adult 6.7−8.7” (17−22 cm)
850-6022N Adult 8.7−16.5” (22−42 cm)
850-6022NX Lg. Adult 12.5−20.4” (32−52 cm)
850-6023N Adult 8.7−18.1” (22−46 cm)
29
Page 30

13. WARRANTY
LA
TEX
°
F
This blood pressure monitor is warranted for 5 years from date of
purchase. This warranty includes the instrument and the cuff. The warranty
does not apply to damage caused by improper handling, accidents,
improper use, or alterations made to the instrument by third parties. The
warranty is only valid after the product is registered online at
www.adctoday.com.
14. QUALITY STANDARDS
Device standard:
This device is manufactured to meet the European and United States
standards for non-invasive blood pressure monitors:
EN1060-1 / 1995 • EN1060-3 / 1997 • EN1060-4 / 2004
Electromagnetic compatibility:
Device fulfills the stipulations of the International standard IEC60601-1-2
Clinical testing:
BHS A/A Rated. Clinical performance tests were carried out in the U.K.
“Association Protocol and British HTP Protocol.”
15. SYMBOL DEFINITIONS
nition
Defi
nition
Defi
Symbol
Important Warning/Caution
This pr
contain natur
Circumference Size
oduct does not
Conforms to EU Standards
al rubber
Symbol
Authorized European
Represenative’s Information
M
latex
Temperature Limit
Humidity Limitation
anufacturer’s Information
30
Page 31

16. HOW TO CONTACT US
To register your product and obtain further detailed user
information about our products and services visit us at:
www.adctoday.com
and follow the links.
For questions, comments, or suggestions
call us toll free at:
1-800-232-2670
American Diagnostic Corporation
55 Commerce Drive, Hauppauge, New York 11788
Telephone: 631-273-9600 • Fax: 631-273-9659
Email: info@adctoday.com
31
Page 32

marking applies to models 6021N
ONBO Electronic (Shenzhen) Co., Ltd.
No. 497, Ta Laneg Nan Road, Ta Laneg Street
Baoan District, Shenzhen, China
Medpack Swiss GmbH, Tramstrasse
16, CH-9442, Berneck, Switzerland
Read instructions carefully before
using this device
Type BF applied part
, 6021NSA, 6
021N
X, and 6
022N
only.
Dist. by: ADC®
Hauppauge, NY 11788
Inspected in the USA
Made in China
tel: 631-273-9600
toll free: 1-800-232-2670
fax: 631-273-9659
www.adctoday.com
email: info@adctoday.com
IB p/n 93-6021N-00 rev 2 Printed in China
0044
 Loading...