

Page 1
11. HOW TO CONTACT US
Electronic
Detailed user information about our products
as well as services can be found at:
www.adctoday.com
Blood Pressure
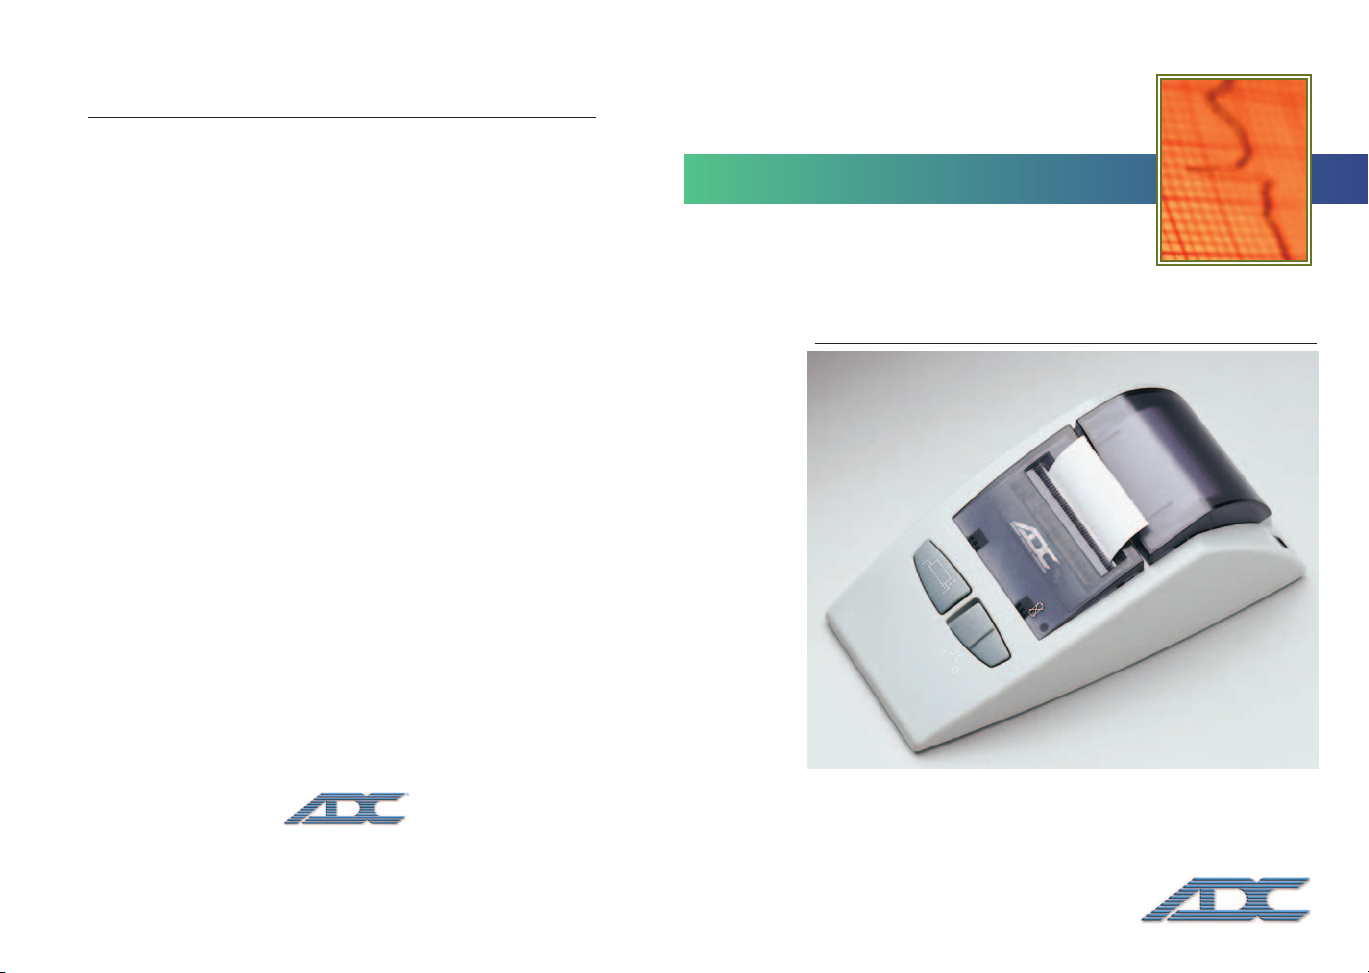
Printer
For use with ADvantageTMAdvanced Automatic
Blood Pressure Monitors; Models 6014 and 6016.
6014P
Instruction Manual
IB p/n #93-6014P-00 - rev 1
American Diagnostic Corporation
55 Commerce Drive, Hauppauge, New York 11788
Telephone: 631-273-9600
Fax: 631-273-9659
Email: service@adctoday.com
1-800-232-2670
www.adctoday.com
Call ADC
PLEASE N OTE:
Questions?
®
toll free at 1-800-232-2670
THIS MEDICAL INSTRUMENT MUST BE
USED ACCORDING TO INSTRUCTIONS
TO ENSURE ACCURATE READINGS.
®
American Diagnostic Corp.
Page 2

Diagnostic Printer
Instruction Manual
Table of Contents
1. Introduction
2. Printer Parts
3. Setting Up the Printer
3.1. Inserting the Batteries
3.2. Using an AC Adapter
3.3. Cable Connection
3.4. Inserting the Paper Roll
4. Carrying Out a Printing Operation
4.1. Power On
4.2. Paper Feeding
4.3. Printing
4.4. Low Voltage Indication
4.5. Power Off
4.6. Cutting Paper
5. How to Print the Last Stored Measurement (One Reading)
5.1. How to Print a Chart and all Readings
6. Troubleshooting
7. Care and Maintenance
8. Warranty
9. International Quality Standards
10. Technical Specifications
11. How to Contact Us
8. WARRANTY
The diagnostic printer 6014P is guaranteed for 2 years from date of purchase. The
warranty does not apply to damage caused by improper handling, accidents, improper
use, or alterations made to the device by third parties.
Batteries or damage from batteries are not covered under warranty.
9. INTERNATIONAL QUALITY STANDARDS
Meets the requirements of MDD 93/42/EEC (Europe) and U.L. (USA).
10. TECHNICAL SPECIFICATIONS
Weight:
Size: 143mm (L) x 81mm (W) x 51mm (H)
Storage temperature / Humidity: -20°C to +50°C / 15% to 90% relative humidity
Operation temperature / Humidity: 10°C to 40°C / 15% to 90% relative humidity
Print system: Thermal serial dot system
Print direction: Left to right
Printer head model no.: SII MTP102-16B
Printer head dimension: 48mm (L) x 31mm (W) x 13.8mm (L)
Printing timing: Synchronized with the tachogenerator
Home position detection: Mechanical switching system
Printing speed: Approx. 1.5 (lines/sec.)
Number of columns: 26 (columns)
Character matrix (HxW): 7x5 (dot)
Printing width / Paper width: 29.0 / 38.0 (mm)
Reliability: 500,000 (lines)
Paper roll: 1" 25mm (standard size)
Power source: 1.5V (AA) alkaline batteries x 4
Low battery: As battery is < 5.0V, LED will flash continuously
Accessories: a) 100cm cable
255g (with batteries) / .88lb
2.75” x 5.25” x 6.25”
maximum
maximum
with 3 Hz
b) PAPER, 5/Pkg
Optional: AC/DC adapter 6V DC, 600mA,
1
* Technical alterations reserved!
50-60 Hz (6013ZAC)
Batteries sold separately
10
Page 3

®
Malfunction Remedy
The LED remains flashing while
the printer is switched on
although the batteries are
good.
1. Check whether the batteries are installed with
the correct polarity.
2. If the LED is unusually flashing, remove the
batteries and re-install them or exchange them
for new ones.
Press the PRINT button on
the monitor, but nothing prints
1. Check whether the cable is connected with the
monitor and printer.
2. Examine whether the paper is positioned properly
and is ready for printing.
There’s no response for paper
feeding
1. Examine whether the paper is positioned properly.
2. Check if the paper roll has been exhausted and
needs to be replaced by a new one.
7. CARE AND MAINTENANCE
1. INTRODUCTION
The diagnostic printer 6014P is a compact unit for ADC®AdvantageTMAdvanced
Automatic Blood Pressure Monitors. The enhanced printer covers both character and
graphic print. High-reliability and high-quality print is assured due to the ultra simple
design and practicability. Key features include:
• Compact and lightweight design
• High-quality components
• Battery-powered operation
• Designed for versatile applications
• Simple mechanism ensures high-reliability
2. PRINTER PARTS
a) Front View
Top Cover
Bottom Cover
a) Do not expose the device to
extreme temperatures, humidity,
dust, or direct sunlight.
b) Clean the device with a soft, dry
cloth. Do not use gasoline, thinners, or similar solvent.
c) Do not drop the device or treat it
roughly in any way. Avoid strong
vibrations.
Never open the device!
d)
The manufacturer warranty is
invalid once the device is opened.
9
Paper Cutter
Paper
Feed
b) Back View
ON/OFF Switch
AC/DC adapter socket
(AC/DC adapter sold separately)
Paper Roll
LED
Printer port socket
2
Page 4

3. SETTING UP THE PRINTER
®
MEAN: 120-83-
78
--
--
--
-----
--
--
--
--
--
--
S RA
NGE: 1
03-
-137
D RA
NGE: 71
--
101
P RA
NGE:
61--
102
S=SY
STOLIC mm
Hg
D=D
IASTOLIC
mm
Hg
P=PU
LSE
BEAT/M
IN
A=AV
ERA
GE
R=AR
RHYTHMIA
NAME:
__
__
__
______
___
BIR
TH:_
__
__
____
__
____
JA
N•0
1•2
00
5
00:
09A
M
--
--
--
--
--
--
--
--
DATE TIM
E
S
D P
01. JA
N-01-
09:00
AM
13
0 81 89
02.
JAN-
02-0
9:01
AM
10
3 71 61
03. JA
N-03-
09:00
AM
113
81
79
04. JA
N-04-
09:00
AM
12
4 80 84
05.
JAN-
05-0
9:00
AM
13
7 90
102
05. JA
N-06-09:
00
AM
114
76
71
06. JA
N-07-09:
00
AM
12
9 89 96
07. JA
N-08-09:00
AM
11
2 8
7 6
9
08. JA
N-09-09:00
AM
114
101 76
09.
JAN-10-09:0
0AM
13
0 81
89
50
10
0
150
200
Dia
sto
lic Systo
lic
0 1
.
81
1
30
0 2
.
7
1
1
03
0 3
.
81 11
3
0 4
. 80 1
24
0 5
.
9
0
1
3
7
0 6
.
76
11
4
0 7
.
8
9
1
2
9
0 8
.
8
7
11
2
0 9
.
1
0
1
11
4
1 0
.
80
1
2
7
1 1 .
80
11
9
50
10
0
150
200
Diastolic Systoli
0 1 . 81 130
0 2 . 71 103
0 3 . 81 113
0 4 . 80 124
0 5 . 90 13
0 6 . 76 114
0 7 . 89 129
0 8 . 87 112
0 9 . 101 120
1 0 . 80 127
1 1 . 80 119
15010050
15010050
3.1. Inserting the Batteries
The battery compartment is located on the
underside of the device (See illustration).
a) Remove cover as illustrated.
b) Insert the batteries (4 x size “AA”),
thereby observing the indicated polarity.
c) If the green LED starts flashing, the batteries
are discharged and must be replaced.
Attention!
• If the green LED starts flashing,
the device will not function until the
batteries have been replaced.
• Use 'AA' Long-Life or Alkaline 1.5V
Batteries. Do not use rechargeable
batteries.
• If the printer is left unused for long
3
periods, remove the batteries from
the device.
LED flashing
5.1. How to Print a Chart and all Readings
a) Connect the printer to the monitor and switch the printer ON.
b) Press the PRINTER button of the monitor and hold it for at least 3 seconds. The
display will change from “Pr1” followed by “Pr2”. Release the PRINTER button and the
printer will print all stored measurements with a corresponding chart.
Optional
Date & Time
Pr2
Systolic, Diastolic, and
Pulse Readings
Average Reading
Reading Sequence
Bar Graph
6. TROUBLESHOOTING
If problems occur when using the printer, the following points should be checked and
if necessary, the corresponding remedies taken:
8
Page 5

4.6. Cutting Paper
SY
S 1
19 mm
Hg
DI
A 8
0 mm
Hg
PU
LSE 68
BEAT/M
IN
--
----
--
--
--
--
--
-
NAME:
__
__
__
__
____
__
_
BIRTH:_
__
__
____
__
__
__
AVERAGE M
ODE
JAN
•01
•20
05
00
:09
AM
--
--
--
--
--
--
--
--
MEAN: 120-83-
78
--
--
--
-----
--
--
--
--
--
--
S RA
NGE: 1
03-
-137
D RA
NGE: 71
--
101
P RA
NGE:
61--
102
S=SY
STOLIC mm
Hg
NAME:
__
__
__
__
____
___
BIR
TH:_
__
__
____
__
__
__
JA
N•0
1•2
00
5
00:09A
M
--
--
--
--
--
--
--
--
DATE TIM
E
S
D P
01. JA
N-01-
09:00
AM
13
0 81 89
02.
JAN-
02-0
9:01
AM
10
3 71 61
03. JA
N-03-
09:00
AM
113
81
79
04. JA
N-04-
09:00
AM
12
4 80 84
05.
JAN-
05-0
9:00
AM
13
7 90
102
05. JA
N-06-09:
00
AM
114
76
71
06. JA
N-07-09:
00
AM
12
9 89 96
07. JA
N-08-09:00
AM
11
2 8
7 6
9
08. JA
N-09-09:00
AM
114
101 76
09.
JAN-10-
09:0
0AM
13
0 81
89
Once you finish the printing job, check the paper to
see if it is easy to tear off.
• If it is not long enough to tear off, depress the
PAPER FEED button to lengthen the paper.
Note:
Don’t pull out the paper if you would like to cut it.
•
• To cut the paper, pull it forward over the paper cutter.
• The paper has to be vertical (90°) with the paper
cutter; otherwise, the paper will be difficult to tear off.
LED dark LED bright
• The print on the paper does not last forever. It fades
over time. This is normal for thermal printers such
as the ADC®diagnostic printer. The readability lasts longer the less the print is in
contact with light. If you file the printed paper in a folder, the print will last longer.
If you would like to store the values forever, we recommend you photocopy them
or transfer the data to another media.
5. HOW TO PRINT THE LAST STORED MEASUREMENT (One Reading)
a) Connect the printer to the monitor and switch the printer ON.
b) Press the PRINTER button of the monitor once. The display will show “Pr1” and
the printer will print last stored measurement for the active User (User1 or User 2)
Pr1
Optional
Single or Average Mode,
7
Date & Time
Systolic, Diastolic, and
Pulse Readings
Paper cutter
90 °
3.2. Using an AC Adapter
It is possible to operate this printer
through the ADC®AC adapter
(output 6V DC / 600mA with DIN plug). Make
certain that you use an AC adapter which fulfills the legal requirements.
a) Plug the DIN plug into the socket at the
back left of the instrument. (as shown in
diagram)
AC/DC adapter
socket
b) Plug the AC adapter into a 110V power
socket. Test that power is available by
sliding the 0/I (ON/OFF) switch.
Note:
• No power is taken from the batteries while the AC adapter is connected to the
instrument.
• If the power is interrupted during the measurement (e.g. by removal of the AC
adapter from the socket), the instrument must be reset by removing the DIN plug
from its socket.
• Consult ADC®if you have questions relating to the AC adapter.
3.3. Cable Connection
Insert one end of the cable into the printer
port socket at the back right of the
instrument (as shown in the diagram).
Connect the other end with the blood pressure monitor (both connectors are identical).
Printer port
socket
4
Page 6

3.4. Inserting the Paper Roll
• Switch the printer on by sliding the
I/O (ON/OFF) switch to the left.
• Lift the top cover by squeezing the sides
with your fingers and pulling up.
• Insert the ”under” end of paper roll into the slot
of the internal compartment.
4. CARRYING OUT A PRINTING OPERATION
4.1. Power On
Before powering the printer, check that the batteries
are inserted properly.
• Push the O/I ON/OFF switch to the left side in order
to power the printer.
• The green LED will light.
• Push the paper as deep as possible into
the slot.
• Press the PAPER FEED button until paper
appears at the Paper Cutter.
• Put paper roll into the compartment and
close the lid.
Paper roll
There is only 1 kind of paper roll used in this
®
unit. ADC
Customer Service Department for more
details.
Note:
• The paper roll is 1" thick (25mm-standard package) and 38mm wide.
• If there are problems when inserting the paper, cut the edge so that the corners of
sells extra paper rolls, contact our
the paper are square (90°, see below).
✔
4.2. Paper Feeding
Before you start the printing operation, check that
the paper is installed properly in the correct position.
If it is not, press the PAPER FEED button to feed additional
paper into the printer.
Note:
• Press the button once to advance 1 line.
• Continually depressing the button will advance
multiple lines.
4.3. Printing
• Connect the printer with the monitor as explained in Section 3.3.
• Push the print button on the monitor (for details, refer to the manual of
the related monitor).
4.4. Low Voltage Indication
When the LED is flashing under power-on operation,
it indicates that new batteries are needed.
• When the batteries are replaced the printer will
operate properly.
Note:
• If the printer is connected with an AC adapter, the low voltage indicator
will not occur.
4.5. Power Off
After you are done printing, push the O/I (ON/OFF) switch
to the right side in order to turn off the printer.
• The LED will become dark.
LED bright
LED bright
LED flashing
5
6
 Loading...