


Operation Manual / Bedienungsanleitung
English / deutsch
AX Series
A3X / A5X / A7X / A8X / A77X
A77X
Safety Instructions
Please read the following safety instructions before setting up your system. Keep the instructions for subsequent reference. Please heed the warnings and follow the instructions.
Caution
Risk of electrical shock
Do not open
Risque de shock electrique
Ne pas ouvrier
CAUTION: TO REDUCE THE RISK OF FIRE OR ELECTRIC SHOCK,
DO NOT REMOVE BACK COVER OR ANY OTHER PART.
NO USER-SERVICABLE PARTS INSIDE.
DO NOT EXPOSE THIS EQUIPMENT TO RAIN OR MOISTURE.
REFER SERVICING TO QUALIFIED PERSONNEL.
Caution: To reduce the risk of electric shock, do not open the loudspeaker. There are no user-serviceable parts inside. Refer servicing to qualified service personnel.
This product, as well as all attached extension cords, must be terminated with an earth ground three-conductor AC mains power cord like the one supplied with the product. To prevent shock hazard, all three components must always be used.
Never replace any fuse with a value or type other than those specified. Never bypass any fuse.
Check if the specified voltage matches the voltage of the power supply you use. If this is not the case do not connect the loudspeakers to a power source! Please contact your local dealer or national distributor.
Always switch off your entire system before connecting or disconnecting any cables, or when cleaning any components.
To completely disconnect from AC mains, disconnect the power supply from the AC receptacle. The monitor should be installed near the socket outlet and disconnection of the device should be easily accessible.
Protect the cord from being walked on or pinched.
Always unplug sensitive electronic equipment during lightning storms.
Always keep electrical equipment out of the reach of children.
2

Safety Instructions
Do not expose this product to rain or moisture, never wet the inside with any liquid and never pour or spill liquids directly onto this unit. Please do not put any objects filled with liquids (e.g. vases, etc.) onto the speaker.
Do not place this unit on an unstable cart, stand or tripod, bracket or table. The unit may fall, causing serious injury and/or serious damage. When cart is used, use caution when moving the cart/apparatus combination.
Always use fully checked cables. Defective cables can harm your speakers. They are a common source for any kind of noise, hum, crackling etc.
Never use flammable or combustible chemicals for cleaning audio components.
Avoid touching the speaker membranes and do not block the woofer’s ventilation ports.
Never expose this product to extremely high or low temperatures. Never operate this product in an explosive atmosphere.
High SPL’s may damage your hearing! Please do not get close to the loudspeakers when using them at high volumes.
Please note that the diaphragms build up a magnetic field. Please keep magnetically sensitive items at least 0.5 m away from the speaker.
Assure free airflow behind the speakers to maintain sufficient cooling by keeping a distance of at least 10 centimeters (4”) to the wall.
No naked flame sources, such as lighted candles, should be placed on the speaker.
Never use the device in a humid environment.
AX Manual / english |
3 |
|
|

Table of contents
|
Safety Instructions............................................. |
2-3 |
1. |
Introduction........................................................ |
5 |
2. |
Quick Start......................................................... |
6 |
2.1 |
Important Information........................................ |
6 |
2.2 |
Quick Start......................................................... |
6 |
3. |
Connecting the Speakers................................... |
7 |
3.1 |
Basic Connections.............................................. |
7 |
3.2 |
The Stereo Link.................................................. |
8 |
4. |
Speaker Placement............................................ |
8-10 |
4.1 |
Vertical set up.................................................... |
8 |
4.2 |
Horizontal set up................................................ |
8 |
4.3 |
The A77X in a stereo setup................................ |
9 |
4.4 |
Tweeter at height of ears.................................... |
9 |
4.5 |
The stereo triangle............................................. |
9 |
4.6 |
Surround placement........................................... |
10 |
4.7 |
Stand/Wall mounting......................................... |
10 |
5. |
Speaker Adjustment........................................... |
11 |
5.1 |
Controls............................................................. |
11 |
5.2 |
Tweeter Level..................................................... |
11 |
5.3 |
Room EQs.......................................................... |
11 |
6. |
Trouble Shooting................................................ |
12 |
6.1 |
No or distorted signal......................................... |
12 |
6.2 |
Parasitic noises.................................................. |
12 |
7. |
Maintenance...................................................... |
13 |
8. |
Shipping / Packaging......................................... |
13 |
9. |
Environmental Information................................. |
13 |
10. |
EU Declaration of Conformity............................. |
14 |
11. |
Limited Warranty................................................ |
15 |
11.1 |
Terms and Conditions......................................... |
15 |
11.2 |
How to claim...................................................... |
15 |
12. |
Technical Data.................................................... |
16 |
4

1. Introduction
Dear customer,
Thank you for choosing an ADAM Audio monitor of the AX-series. ADAM loudspeakers are built for maximum quality reproduction and audio perfection. With the AX-series you have selected a precise, high-resolution speaker system that allows you to both evaluate and enjoy audio recordings. This monitor meets the highest expectations in sound quality and craftsmanship.
This manual is intended to provide you with information about your new ADAMs. It contains important information regarding safety, setting up, handling, and warranty. We suggest that you read these sections carefully to ensure easy set up and prevent potential problems.
Our AX nearand midfield monitors are perfectly suited for a wide variety of stereo and multi-channel professional applications including small control rooms, desktops, mobile facilities and post-production edit bays as well as connection to your favorite mp3players and gaming consoles … in other words, in any situation where a combination of no-compromise sound reproduction and a small footprint is required.
Each loudspeaker of the AX range consists of a two-way ported active system that uses ADAM’s proprietary X-ART folded ribbon tweeter ensuring full compatibility with the latest expanded high frequency resolution media formats along with a conventional bass/midrange driver. For each section there is individual amplification with continuous output provided.
If you have any questions about this or any other of our products, please don’t hesitate to contact us – our support team will be happy to assist you in your matter.
For detailed information concerning ADAM’s technologies and products, complete reviews, and a list of worldwide ADAM users and studios, please visit our website: www.adam-audio.com
You are invited to share your experience with our products by joining us on Facebook and also, if you don’t want to miss out on the latest info on ADAM Professional Audio, come and follow us on Twitter!
We hope very much that you really enjoy your new loudspeakers, and wish you many delightful hours with them.
The ADAM Audio Team
AX Manual / english |
5 |
|
|

2. Quick Start
2.1Important Information for set up
After having unpacked your loudspeaker, please allow the system to acclimate to the temperature of the room for approximately an hour.
It is important to ensure the speakers sit firmly on a solid surface!
We recommend that you retain the original packaging, as it is the best way to guarantee safe transportation should the need to do so arise.
Please note that the loudspeakers will take some break-in time to achieve optimum sonic performance.
2.2Quick Start
a)Before connecting the loudspeakers to your audio components and the power source make sure that both the loudspeakers and your audio source are switched off and set the level controls fully counterclockwise.
b)There are two options of connection:
Basic active speaker use. Connect your sound source or mixing console to the speakers. Use either the RCA (unbalanced) or the XLR (balanced) connectors. You will find the connector wiring printed on the speaker’s rear panel (for further information, see 3.1). Stereo Link. If you want to use the Stereo Link (controlling the overall volume by one control), please see 3.2 (A3X and A5X only).
c)Check if the specified voltage matches the voltage of the power supply you use. If this is not the case do not connect the loudspeakers to a power source! Please contact your local dealer or national distributor.
If the voltages match, use the included power cables to connect the loudspeaker to the AC sockets.
d)Switch on the main on/off switches on the front panel of the loudspeakers.
e)Make sure that the line out level (volume) of your stereo is either at a low level or all the way off. Then, switch on your audio system.
f)Turn on your source of music and adjust the volume carefully.
A77X only:
Operational readiness of the A77X tweeter
Please note that for technical reasons (i.e. starting up the amplifier, stabilization of the operating voltage) the tweeter of the A77X starts up slightly delayed.
6
3. Connecting the Speakers
3.1Basic connections
For the basic speaker connection, please use mono XLR or RCA cables. In most professional applications XLR will be the best choice, while RCA is more common in HiFi applications. Each one of the two loudspeakers has to be connected to one channel of the sound source.
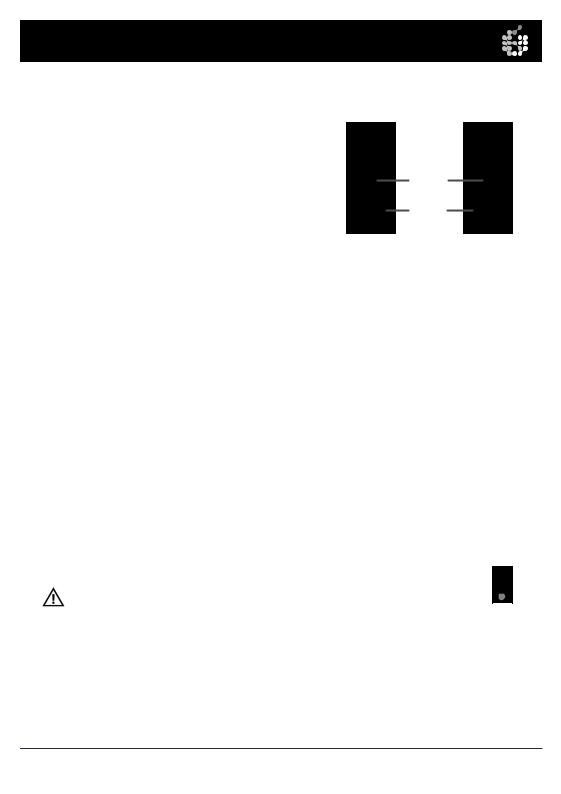
3.2The Stereo Link (A3X and A5X only)
Speaker 1 |
|
Speaker 2 |
IN-/ OUTPUTS |
|
IN-/ OUTPUTS |
OUTPUT |
|
OUTPUT |
STEREOLINK |
|
STEREOLINK |
INPUT |
|
INPUT |
|
2 x RCA |
|
UNBALANCED IN |
or |
UNBALANCED IN |
|
|
|
|
2 x XLR |
|
BALANCED IN |
|
BALANCED IN |
If you wish to use the Stereo Link that allows adjustment of the volume of both loudspeakers with a single master control, please proceed as follows:
a)First, connect Speaker 1 (that is supposed to control the overall volume) to your preamplifier, sound source, etc. by using one stereo or two mono RCA leads. Please note that the Stereo Link does not work with XLR.
When connecting your speakers via RCA please make sure the white (or black) RCA plug which leads the left stereo channel is connected to the “Unbalanced In” and the red RCA plug (that leads the right stereo channel) is connected to the “Stereo Link Input” of the left speaker, if this is the master speaker you want to control the overall volume with.
If the right speaker shall be the master please connect the red RCA plug (the right stereo channel) to the “Unbalanced In” and the white (or black) RCA plug for the left stereo channel to the “Stereo Link Input” of the right speaker.
b)Secondly, connect the “Stereo Link Output” of Speaker 1 to the “Unbalanced In” of Speaker 2 by using the provided (or another) mono RCA cable.
Please note: |
|
On the front side of the unit functioning as master, a corresponding green LED will |
|
illuminate as soon as a mono RCA plug is connected to the Stereo Link output. |
LED |
|
Unlike the common ‘master-slave-configuration’, any A3X or A5X that is connected accordingly can function as either a master or a slave unit.
For an equal volume level of both speakers please make sure that the volume knob of speaker 2 is snapped in the middle position.
AX Manual / english |
7 |
|
|

4. Speaker Placement
Please make sure that there are no obstacles in the way from the monitor to your ears. You should be able to see the speakers completely.
4.1 Vertical set up
The AX-series have been designed for a vertical set up (except the A77X). The speakers must be positioned on a solid surface or a stand. Please note that vibrating parts of nearby objects can mask the sound.

 A3X
A3X

 A3X
A3X
4.2Horizontal set up
If you choose to use your speakers in horizontal position as indicated below, please make sure that the set up is mirrored/symmetrical, i.e. that the tweeters both face either the outwards or inwards. This is crucial for a precise stereo signal.
 A3X
A3X
like this:
A3X
A3X
or like that:
 A3X
A3X
8

4. Speaker Placement
4.3The A77X in a stereo setup
The A77X has been designed for a horizontal set up. Please note that for a stereo setup consisting of two A77X monitors there are two different versions available, A and B (see label on the rear panel). The reason for the A and B versions is that although both 7“ woofers are operating in the bass domain down to 38Hz, one woofer is gradually faded out between 150Hz and 400Hz. This means that only one woofer reproduces the actual midrange in order to prevent interferences between the two drivers. For the best stereo image in a setup with two A77X it is vital to place both speakers the A/B or the B/A way, meaning that both midrange woofers should either face the inner side or both the outer side of the stereo setup mirrorsymmetrically. Should you wish to use the A77X as a center speaker in a surround setup of course the A and B versioning is of no importance.
4.4Tweeter at the height of ears
The Tweeter should be positioned approximately at the height of your ears. In case you need to position the speaker in a significant lower or higher position, the monitor should be angled accordingly.
4.5The Stereo Triangle
If the loudspeaker is going to be used for stereo applications, the optimum listening position should be at the top of an imaginary equilateral triangle with the two loudspeakers to be placed at the other two points of this triangle. The loudspeakers should be aligned with the listener’s position.
AX Manual / english |
9 |
|
|

4. Speaker Placement
4.6Surround Placement
Speaker positioning for multi-channel stereo purposes is ideally based on a circle with speakers placed at 0° (Center), 30° (Front Right), 110° (Rear Right), 250° (Rear Left), 330° (Front Left), with the listener being the circle’s center (Radius between 0.7-2.0 m). This ITU recommended configuration may vary depending on the purpose of the control room (music or film). However, it is recommended to create a symmetrical listening position with the front side and surround speaker pointing to the listener’s ear.
A3X/A5X only:
4.7Stand/Wall Mounting
On the A3X and the A5X speakers you will find two M6 (6 mm) metric screw threads for stand/wall mounting on the rear side. Further equipment for mounting is also available. Please contact us for more information.
10
 Loading...