

Page 1
TABLE OF
CONTENTS
VISUAL INDEX DRIVING
NAVIGATION
SAFET Y
INFORMATION
INSTRUMENT
PANEL
VEHICLE
CONTROLS
AUDIO AND
CONNECTIVITY
BLUE TOOTH®
HANDSFREELINK®
owners.acura.com (U.S.)
BOG04212
ACURALINK® INDEX
31T6NG00
00X31-T6N-G001
©2016 Honda Motor Co., Ltd. — All Rights Reserved
myacura.ca (Canada)
2017 Acura NSX Owner’s Guide
Printed in USA
2017
OWNER’S GUIDE
HANDLING THE
UNEXPECTED
MAINTENANCE
SPECIFICATIONS
INFORMATION
COMMAND
CLIENT
VOICE
INDEX
Page 2

TABLE OF
CONTENTS
VISUAL INDEX DRIVING
SAFET Y
INFORMATION
INSTRUMENT
PANEL
VEHICLE
CONTROLS
AUDIO AND
CONNECTIVITY
BLUE TOOTH®
HANDSFREELINK®
ACURALINK® INDEX
This Owner’s Guide is intended to help you quickly get acquainted with your 2017 Acura NSX. It
provides basic information and instructions on technology and convenience features, as well as
emergency procedures and how to get assistance.
This guide is for vehicles sold in the United States and Canada. It covers all NSX models, so you
may find descriptions of features and equipment that are not in your vehicle.
Images throughout this guide are from U.S. vehicles and represent features and equipment that
are available on some, but not all, models. Images shown in this guide should be considered
examples and used for demonstration purposes only.
This guide is not intended to be a substitute for the Owner’s Manual. The Owner Information CD
enclosed in your information kit includes the Owner’s Manual, Navigation Manual, and vehicle
and tire warranties in electronic format. This information can be viewed on a computer (PC or
Mac platform) and saved or printed for your reference. In addition, you can visit owners.acura.
com (U.S.) or myacura.ca (Canada) to view the complete and most current information.
If you are the first registered owner of your vehicle, you may request a complimentary printed
copy of the Owner’s Manual, Navigation Manual, or Vehicle Warranty within the first six months
of vehicle purchase. To request a copy, visit owners.acura.com and create or log in to your
account. In Canada, please request a copy from your authorized Acura NSX dealer.
American Honda Motor Co., Inc. strives to be proactive in protecting our environment and
natural resources. By using electronic delivery for a considerable portion of the information
typically found in a vehicle owner’s manual, we are further reducing our impact on the
environment.
TABLE OF CONTENTS
VISUAL INDEX ................................................................2
Steering Wheel and Nearby Controls ..................................2
Dashboard and Ceiling Controls ...........................................6
PHONE PAIRING QUICK START...................................8
HANDSFREE PHONE QUICK START ........................10
VOICE RECOGNITION QUICK START ....................... 11
SPORT HYBRID
SUPER HANDLING ALLWHEEL DRIVE™ .................13
SAFETY INFORMATION ..............................................14
High-Voltage System Precautions .....................................18
Seat Belts ................................................................................19
Airbags .................................................................................... 24
Child Safety ........................................................................... 33
Safety Label Locations .........................................................43
Reporting Safety Defects .................................................... 44
INSTRUMENT PANEL..................................................45
Malfunction Indicators ........................................................ 46
Condition Indicators ............................................................48
On/Off Indicators ................................................................. 50
Driver Information Interface ...............................................51
VEHICLE CONTROLS .................................................. 54
Using the Remote Transmitter ........................................... 54
Keyless Access System ......................................................... 55
Door Operation from Inside the Vehicle ...........................57
Power Window Operation .................................................. 59
Interior and Exterior Lights ................................................. 60
Wiper Operation ................................................................... 63
Intermittent (INT) wipers ................................................... 64
Adjusting the Seats .............................................................. 65
Driving Position Memory System* ....................................71
Adjusting the Mirrors ............................................................72
HomeLink® Universal Transceiver ......................................74
Climate Control System .......................................................76
Seat Heaters* .........................................................................77
Customized Features ........................................................... 78
Setting the Clock .................................................................. 79
AUDIO AND CONNECTIVITY ................................... 80
Basic Audio Operation ......................................................... 80
Operating Display Audio ..................................................... 84
Wi-Fi Connection.................................................................. 87
Apple CarPlay
Android Auto
FM Radio ............................................................................... 92
SiriusXM
USB Flash Drive .....................................................................96
Pandora
Bluetooth
BLUETOOTH® HANDSFREELINK® ............................101
Basic HFL Operation ...........................................................101
Pairing a Phone ................................................................... 103
Making a Call ....................................................................... 104
SMS Text Messaging and E-Mail ...................................... 108
™
Siri
ACURALINK®* .............................................................110
AcuraLink Messages ............................................................110
Subscription Features .........................................................112
NAVIGATION* ............................................................114
Basic Navigation Operation ..............................................114
Entering a Destination ........................................................118
Routing ..................................................................................122
™
..................................................................... 88
™
...................................................................... 90
®
Radio* .................................................................. 93
®
* ................................................................................97
®
Audio .................................................................. 99
Eyes Free ...................................................................... 109
*if equipped
NAVIGATION
HANDLING THE
UNEXPECTED
MAINTENANCE
SPECIFICATIONS
CLIENT
INFORMATION
VOICE
COMMAND
INDEX
Page 3

TABLE OF
CONTENTS
VISUAL INDEX DRIVING
SAFET Y
INFORMATION
INSTRUMENT
PANEL
VEHICLE
CONTROLS
AUDIO AND
CONNECTIVITY
BLUE TOOTH®
HANDSFREELINK®
DRIVING ......................................................................125
Before Driving.......................................................................125
High Voltage Battery Maintenance .................................127
Maximum Load Limit ..........................................................127
Starting to Drive ................................................................. 130
Shifting ..................................................................................132
Car Wash Mode ................................................................... 134
Integrated Dynamics System (IDS)................................. 135
Braking .................................................................................. 138
Automatic Brake Hold ....................................................... 140
Cruise Control ..................................................................... 142
Vehicle Stability Assist
Parking Sensor System* .................................................... 145
Multi-View Rear Camera ...................................................146
Refueling............................................................................... 147
High-Performance Driving ................................................149
Cold or Rainy Weather Driving ........................................ 154
HANDLING THE UNEXPECTED................................155
Keyless Access Remote Battery Strength .......................155
Emergency Power System Off ......................................... 156
Jump Starting .......................................................................157
Overheating ......................................................................... 159
Emergency Towing ..............................................................161
Tire Pressure Monitoring System (TPMS) ...................... 162
Tire Repair Kit ...................................................................... 165
Fuse Locations ......................................................................167
®
(VSA®) ........................................144
MAINTENANCE ..........................................................1 74
Safety Precautions ..............................................................174
Maintenance Minder
Under the Hood ...................................................................181
Under the Hatch ................................................................. 183
Engine Oil ............................................................................. 184
Engine Coolant .................................................................... 188
Inverter Coolant .................................................................. 190
Window Washer Fluid ....................................................... 190
Brake Fluid.............................................................................191
Checking the 12-Volt Battery ...........................................192
Changing Wiper Blades ..................................................... 194
Tire Information .................................................................. 196
Tire Labeling ........................................................................ 201
DOT Tire Quality Grading .................................................203
Testing of Readiness Codes ..............................................205
Long-Term Storage .............................................................206
Paint Care .............................................................................207
SPECIFICATIONS .......................................................208
CLIENT INFORMATION ............................................ 210
Frequently Asked Questions/Troubleshooting ............. 210
Contact Us ............................................................................212
Acura Total Luxury Care Roadside Assistance ............... 213
EPA Contact Information .................................................. 213
Warranty Coverages...........................................................214
Disclosures ...........................................................................215
VOICE COMMAND INDEX....................................... 218
INDEX.......................................................................... 222
™
.......................................................176
Acura Total Luxury Care Roadside Assistance
Your Acura TLC Roadside Assistance representative is here to help you 24 hours a day, 7 days
a week. Under your 4-year/50,000-mile (80,000 km) warranty, the following benefits are
available:
Towing services—full cost of towing to the closest authorized Acura NSX dealer
Roadside assistance—jump starting, fuel delivery, lockout, and flat tire
Trip planning—detailed trip routing, emergency services, and more
U.S. customers
(800) 594-8500
Canadian customers
(800) 565-7587 (Canada)
Acura Client Relations
Your authorized Acura NSX dealer should be able to answer any questions you have about your
vehicle. However, if you are dissatisfied with the information you receive, you can call Acura
Client Relations (see page 212):
U.S. customers
Main line: (800) 382-2238
NSX specialists: (844) 68-ACURA [682-2872]
Canadian customers
NAVIGATION
HANDLING THE
UNEXPECTED
MAINTENANCE
SPECIFICATIONS
CLIENT
INFORMATION
VOICE
COMMAND
INDEX
Main line: (888) 922-8729
ACURALINK® INDEX
*if equipped
NSX specialists: (844) 9MYNSX9 [969-6799]
Page 4
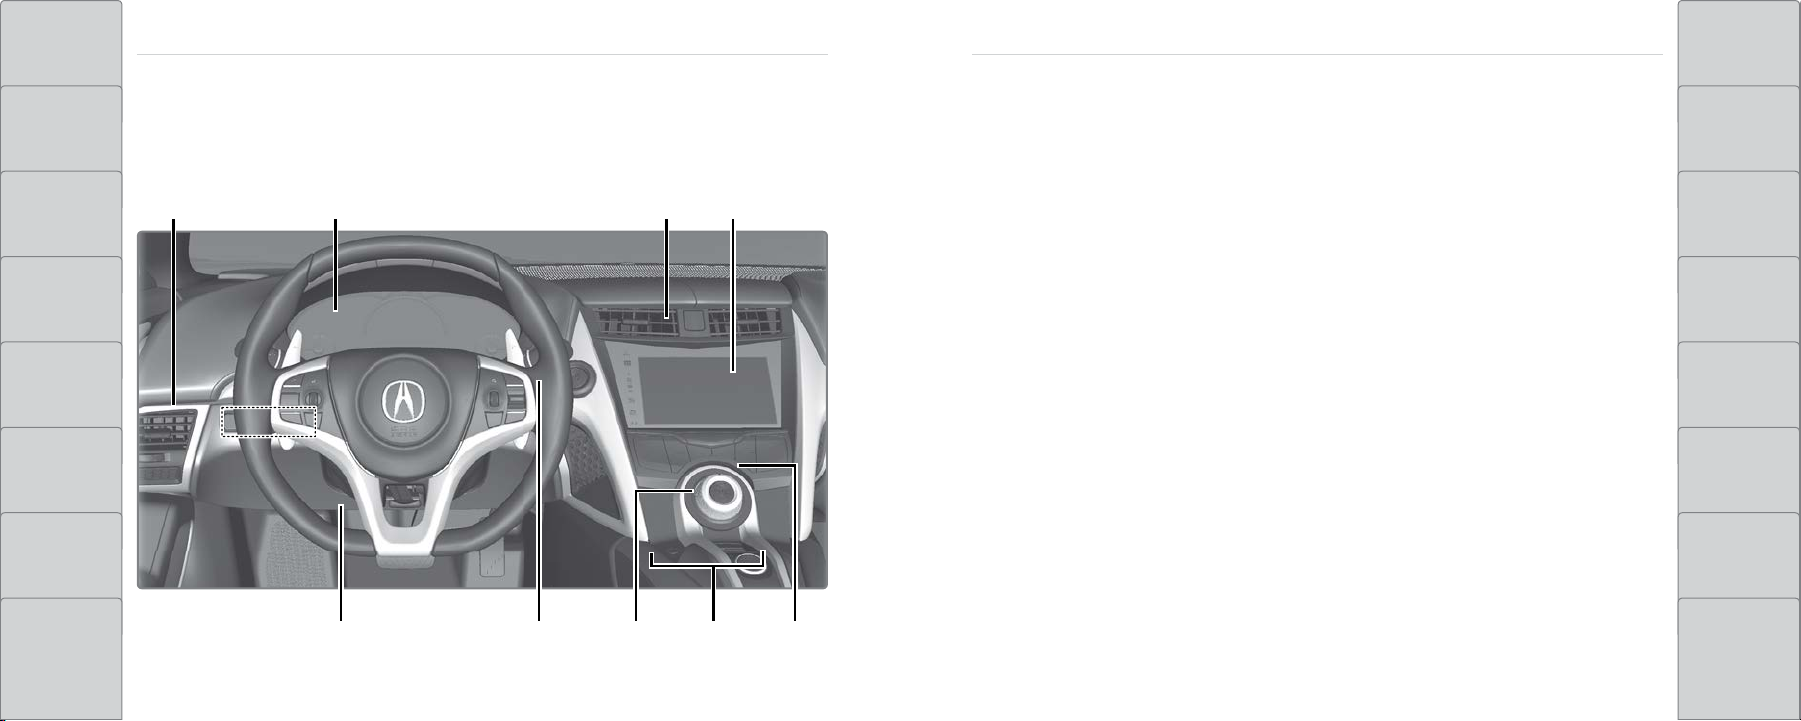
TABLE OF
CONTENTS
VISUAL INDEX
VISUAL INDEX DRIVING
SAFET Y
INFORMATION
INSTRUMENT
PANEL
Quickly locate items in the vehicle’s interior.
Steering Wheel and Nearby Controls
u v w x
Vehicle Stability Assist (VSA®) System
u
OFF) Button p. 144
Parking Sensor System Button* p. 145
System Indicators p. 45
v
Driver Information Interface p. 51
Hazard Warning Button
w
Audio System p. 80
x
Navigation System* p. 114
Steering Wheel Adjustments p. 70
y
ENGINE START/STOP Button p. 131,
z
p. 156
IDS Mode Switch p. 135
{
Seat Heater Buttons* p. 77
|
Rear Window Defogger/
}
Heated Mirror Button p. 76
Climate Control System p. 76
VISUAL INDEXVISUAL INDEX
NAVIGATION
HANDLING THE
UNEXPECTED
MAINTENANCE
VEHICLE
CONTROLS
AUDIO AND
CONNECTIVITY
BLUE TOOTH®
HANDSFREELINK®
ACURALINK® INDEX
y z { |
2 | | 3
}
*if equipped
SPECIFICATIONS
INFORMATION
COMMAND
CLIENT
VOICE
INDEX
Page 5
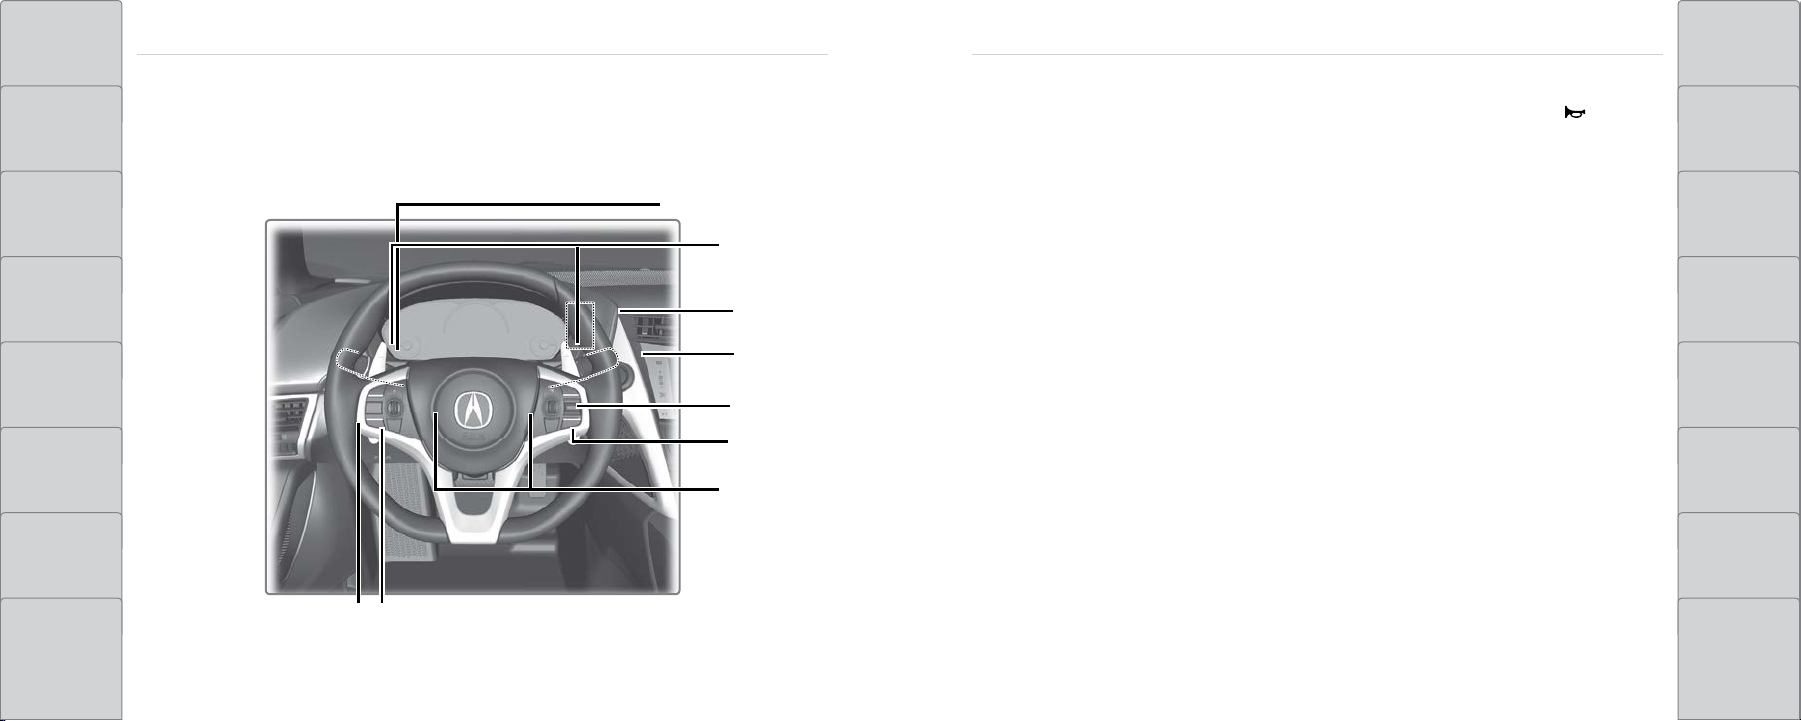
TABLE OF
CONTENTS
VISUAL INDEX DRIVING
SAFET Y
INFORMATION
Steering Wheel and Nearby Controls (continued)
u
v
Lights/turn signals p. 60, p. 62
u
Paddle Shifters p. 133
v
Brightness Control p. 61
w
Km/Mile Change Button
Wipers/Washers p. 63
x
Right Selector Wheel
y
TRIP Button p. 53
z
Horn (Press an area around )
{
Voice Control Buttons /
|
Bluetooth HandsFreeLink System
Audio Remote Controls p. 82
}
VISUAL INDEXVISUAL INDEX
NAVIGATION
p. 101
HANDLING THE
UNEXPECTED
INSTRUMENT
PANEL
w
MAINTENANCE
x
VEHICLE
CONTROLS
y
SPECIFICATIONS
z
AUDIO AND
CONNECTIVITY
BLUE TOOTH®
HANDSFREELINK®
|
}
ACURALINK® INDEX
4 | | 5
{
INFORMATION
COMMAND
CLIENT
VOICE
INDEX
Page 6
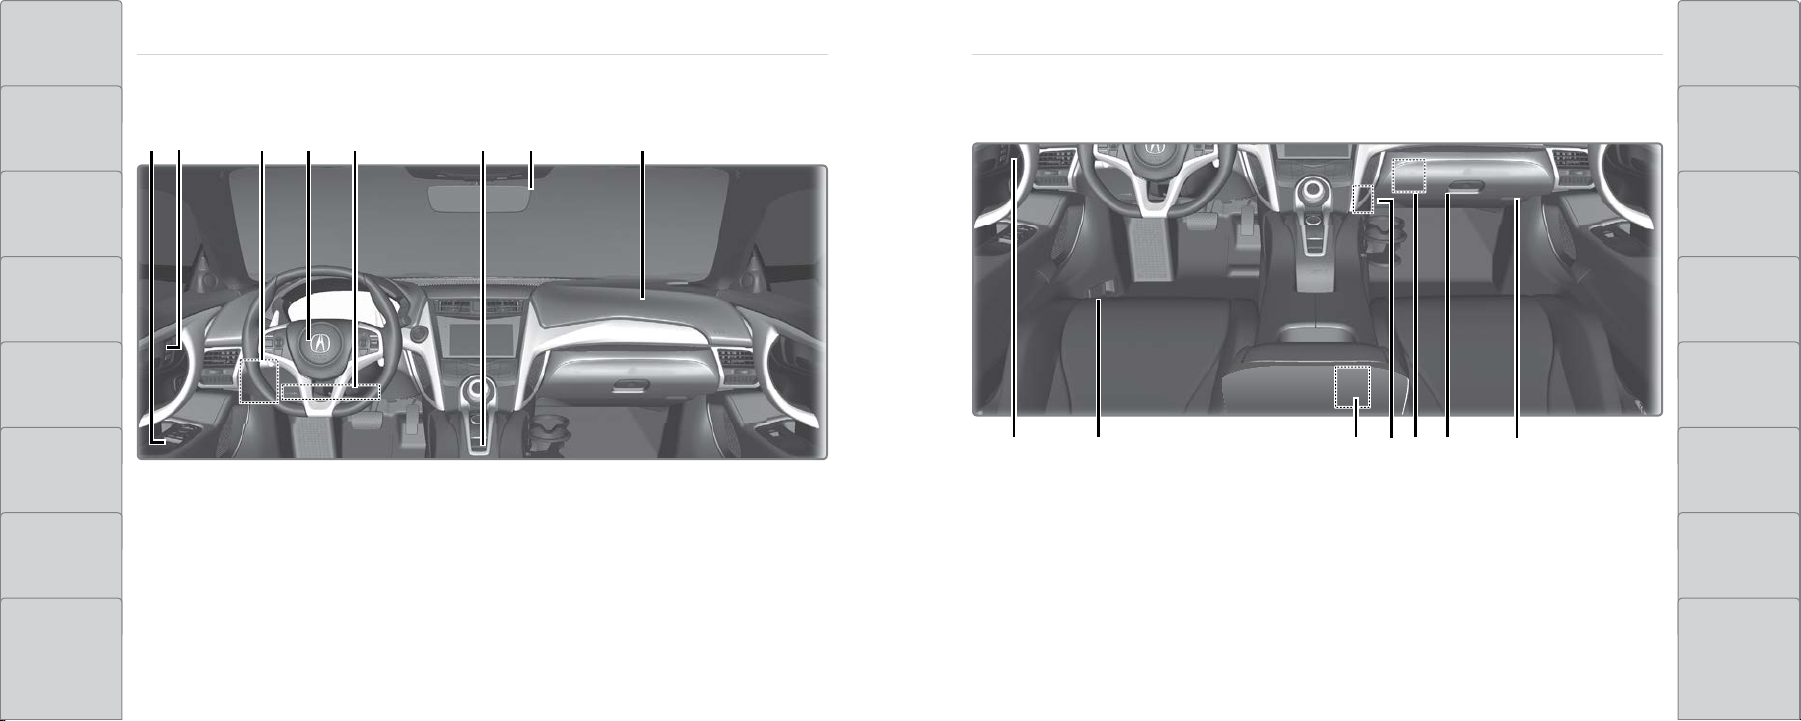
TABLE OF
CONTENTS
VISUAL INDEXVISUAL INDEX
NAVIGATION
Dashboard and Ceiling Controls
VISUAL INDEX DRIVING
SAFET Y
INFORMATION
INSTRUMENT
PANEL
VEHICLE
CONTROLS
u v w x y z { |
HANDLING THE
UNEXPECTED
MAINTENANCE
SPECIFICATIONS
u v w xy z {
AUDIO AND
CONNECTIVITY
BLUE TOOTH®
HANDSFREELINK®
ACURALINK® INDEX
Power Window Switches p. 59
u
Power Door Lock Master Switch p. 57
Door Mirror Controls p. 72
Memory Buttons* /
v
SET Button* p. 71
Driver’s Side Interior Fuse Box p. 170
w
6 | | 7
Driver’s Front Airbag p. 24
x
Driver’s Knee Airbag p. 26
y
Electric Parking Brake Switch p. 139
z
Automatic Brake Hold Button p. 140
Rearview Mirror p. 72
{
Passenger’s Front Airbag p. 24
|
*if equipped
Hatch Release Button p. 58
u
Fuel Fill Door Release Button p. 148
Hood Release Handle p. 180
v
USB Port p. 80
w
Accessory Power Socket p. 81
x
USB Port p. 80
y
Glove Box
z
Passenger’s Side Interior Fuse Box p.
{
171
CLIENT
INFORMATION
VOICE
COMMAND
INDEX
Page 7
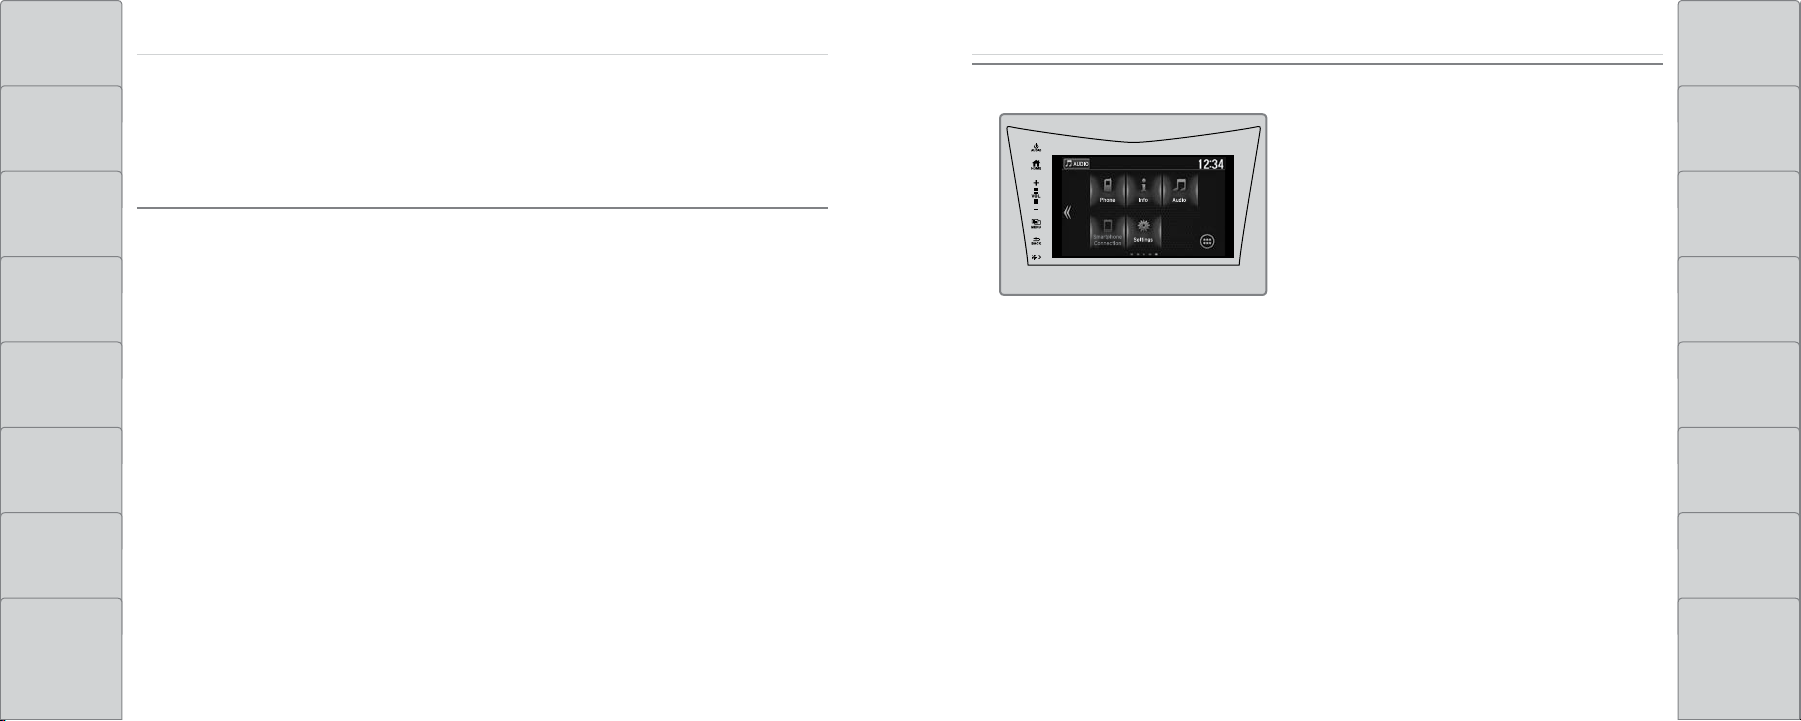
TABLE OF
shown without navigation
CONTENTS
PHONE PAIRING QUICK START
QUICK STARTQUICK START
NAVIGATION
2. Pair the Phone to the Audio System
VISUAL INDEX DRIVING
You must connect (pair) your smartphone to the vehicle to use the vehicle’s hands-free phone
function. Pairing can be done only when the vehicle is stopped.
Follow these steps to pair the first phone (no other phones have been paired).
SAFET Y
INFORMATION
INSTRUMENT
PANEL
VEHICLE
CONTROLS
1. Prepare Your Phone
For iPhone®, begin here (iOS® 7 and newer).
1. Tap Settings (in the dock)
2. Tap Bluetooth®
Ensure Bluetooth is turned on
Note the “Now discoverable as” name
below the Bluetooth switch
Keep the Bluetooth screen open
For Android™, begin here
(Version 4 and newer).
1. Tap the App Drawer (on the HOME screen)
2. Tap Settings
3. Tap Bluetooth
Ensure Bluetooth is turned on
1. Select Settings (on the HOME screen)
2. Select Phone
3. Select Bluetooth Device List
4. Select Add Bluetooth Device
5. Select Continue
HANDLING THE
UNEXPECTED
MAINTENANCE
SPECIFICATIONS
6. Select your phone in the list
AUDIO AND
CONNECTIVITY
à Compare the pairing code on the audio system and your phone–they should match
7. Complete the pairing from your phone
CLIENT
INFORMATION
8. (Optional) Enable options: AcuraLink Assist (see page 112)
BLUE TOOTH®
HANDSFREELINK®
ACURALINK® INDEX
8 | | 9
Automatic Phone Sync: Select On to import contacts and call history
9. Select HOME to exit the menu
See page 103 for expanded instructions.
VOICE
COMMAND
INDEX
Page 8
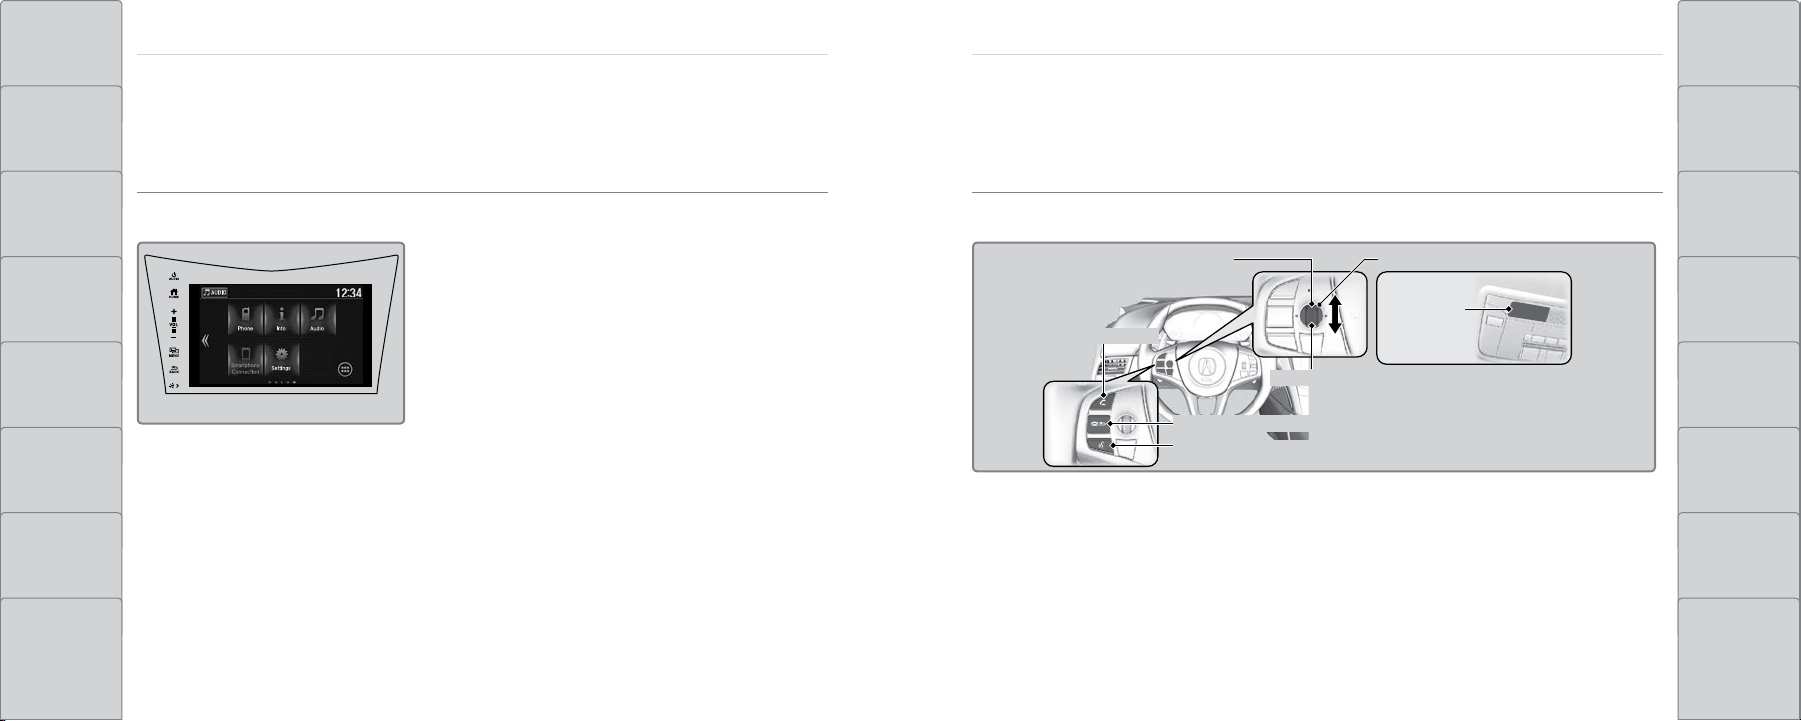
TABLE OF
Hang-up/Back Button
Talk Button
Microphone
Pick-up Button
Volume up
Volume down
Left Selector Wheel
shown without navigation
CONTENTS
HANDSFREE PHONE QUICK START
QUICK STARTQUICK START
NAVIGATION
VOICE RECOGNITION QUICK START
VISUAL INDEX DRIVING
Once a phone has been paired and its phonebook imported (see page 105), use audio-unit
controls, steering-wheel controls or voice recognition to operate the HandsFreeLink (HFL) phone
system.
SAFET Y
INFORMATION
INSTRUMENT
PANEL
VEHICLE
CONTROLS
AUDIO AND
CONNECTIVITY
BLUE TOOTH®
HANDSFREELINK®
Follow these steps to learn how to place a call.
1. Select Phone (on the HOME screen)
2. Select MENU
3. Select Phonebook
4. Select a name
Select Search to search by letter
5. Select a number
The system will then dial
There are other ways to dial, including by
voice
Use the keyboard to enter a name
ACURALINK® INDEX
10 | | 11
See page 104 for expanded instructions.
Depending on how your vehicle is equipped, you can use voice recognition to place phone calls,
adjust the audio and climate-control systems, work with the available navigation system and
more.
Use these tips for better voice recognition.
• Push the Talk button before giving a command
• The microphone is near the rear-view mirror
• Recognition works best in a quiet environment with windows closed
• Speak in a clear, natural voice, while seated normally and looking ahead
HANDLING THE
UNEXPECTED
MAINTENANCE
SPECIFICATIONS
CLIENT
INFORMATION
VOICE
COMMAND
INDEX
Page 9
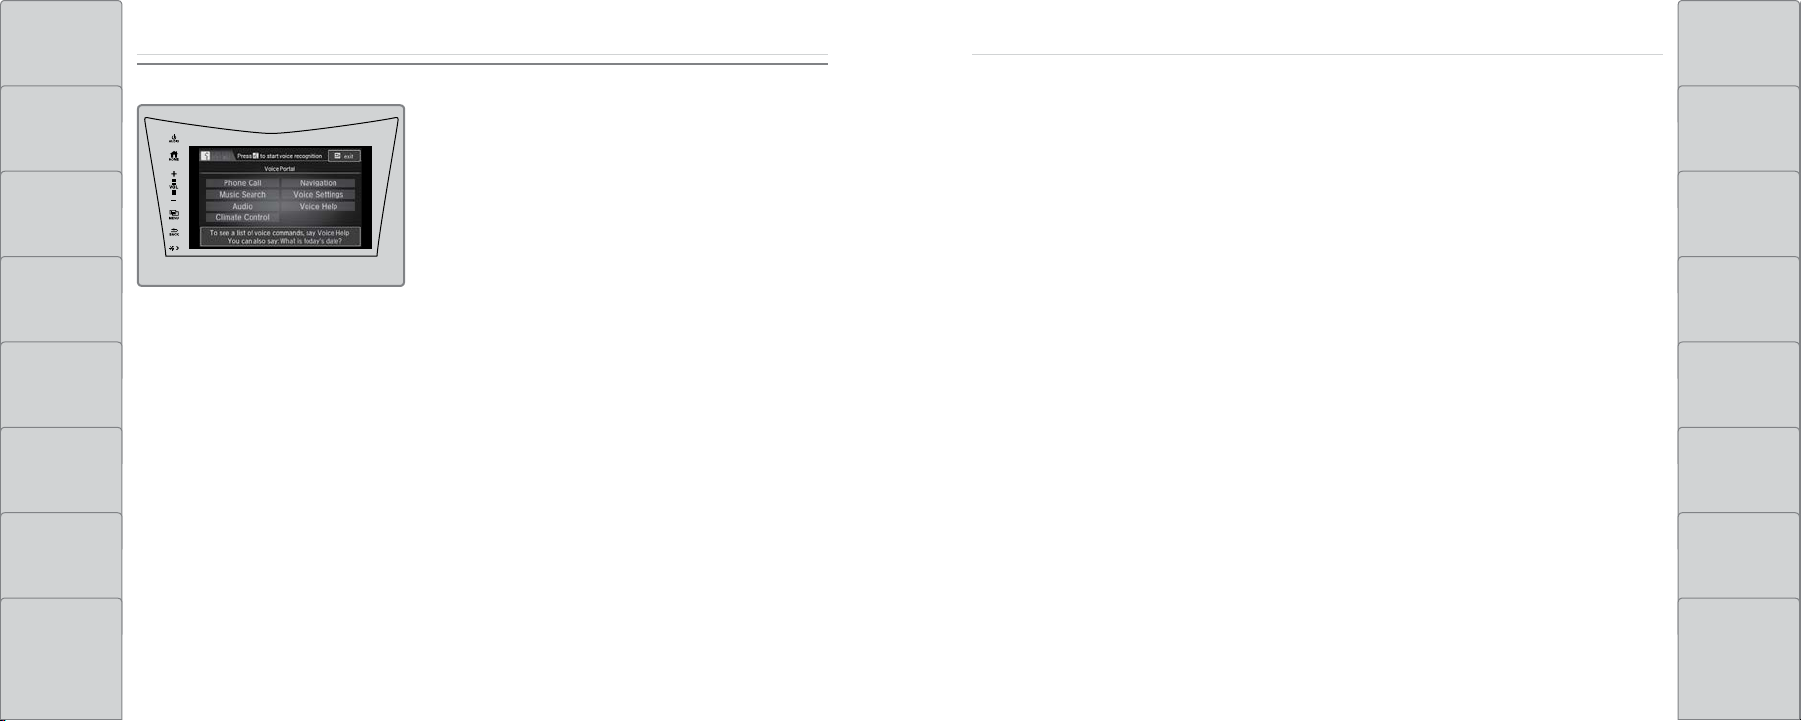
TABLE OF
shown with navigation
CONTENTS
Follow these steps to access the voice-recognition system.
QUICK STARTQUICK START
NAVIGATION
SPORT HYBRID SUPER HANDLING ALL
VISUAL INDEX DRIVING
WHEEL DRIVE™
This vehicle uses both electric motors and a gasoline engine. A High Voltage battery powers
the electric motors. The High Voltage battery is recharged by an engine-driven generator and
SAFET Y
INFORMATION
regenerative braking.
The system automatically manages the engine and motors, switching between them or blending
HANDLING THE
UNEXPECTED
them as appropriate. The gas engine will stop and start automatically during vehicle operation, as
needed to meet driving and battery conditions.
INSTRUMENT
PANEL
VEHICLE
CONTROLS
1. Press the Talk button
The Voice Portal will appear on the display
The portal displays the available categories and commands
2. Say one of the displayed items
You may have to select a sub-category or two until you get to the commands
In addition to the High Voltage battery, this vehicle includes a standard 12-volt battery to power
the airbags, the interior and exterior lights, and other 12-volt systems.
Because of the many unique systems in this vehicle, you may hear some unfamiliar sounds. You
will soon recognize them as normal.
Your driving style heavily impacts fuel efficiency and driving range. Spirited acceleration, highspeed driving, or heavy climate-control use can quickly reduce the High Voltage battery’s charge.
MAINTENANCE
SPECIFICATIONS
This can trigger the system to switch to the gasoline-powered engine.
AUDIO AND
CONNECTIVITY
BLUE TOOTH®
HANDSFREELINK®
ACURALINK® INDEX
12 | | 13
CLIENT
INFORMATION
VOICE
COMMAND
INDEX
Page 10

TABLE OF
CONTENTS
SAFETY INFORMATION
VISUAL INDEX DRIVING
SAFET Y
INFORMATION
INSTRUMENT
PANEL
VEHICLE
CONTROLS
Your safety—and the safety of others—is very important, and operating this vehicle safely is an
important responsibility. While we strive to help you make informed decisions about safety,
it is not practical or possible to warn you about all the hazards associated with operating or
maintaining your vehicle. Therefore, you must use your own good judgment.
n Important Safety Information
This guide explains many of your vehicle’s safety features and how to use them. Please read
this information carefully. Following the instructions below will also help to keep you and
your passengers safe.
n Important Safety Precautions
• Always wear your seat belt.
• Be aware of airbag hazards.
• Don’t drink and drive.
Your vehicle is not recommended for child passengers.
The National Highway Traffic Safety Administration and Transport Canada recommend that
all children ages 12 and under be properly restrained in a back seat. Since this vehicle does
not have a back seat, Acura recommends you do not carry as a passenger a child aged 12 or
under because:
• An inflating front or side airbag can injure or kill a child sitting in the passenger’s seat.
• A child in the passenger’s seat is more likely to interfere with the driver’s ability to safely
control the vehicle.
• Statistics show that children of all sizes and ages are safer when they are properly
restrained in a rear seat.
• Any child who is too small to wear a seat belt correctly must be restrained in an approved
child seat that is properly secured to the vehicle using either the lap belt portion of the lap/
shoulder belt or the lower anchors of the LATCH system.
n Safety Messages
When you see the following messages throughout this guide, pay close attention.
SAFETYSAFETY
NAVIGATION
HANDLING THE
UNEXPECTED
MAINTENANCE
SPECIFICATIONS
• Pay appropriate attention to the task of driving safely.
AUDIO AND
CONNECTIVITY
• Control your speed.
• Keep your vehicle in safe condition.
DANGER You WILL be KILLED or SERIOUSLY HURT if you don’t follow instructions.
WARNING You CAN be KILLED or SERIOUSLY HURT if you don’t follow instructions.
CLIENT
INFORMATION
Engaging in cell phone conversation or other activities that keep you from paying close
BLUE TOOTH®
HANDSFREELINK®
attention to the road, other vehicles, and pedestrians could lead to a crash. Remember,
situations can change quickly, and only you can decide when it is safe to divert some
attention away from driving.
CAUTION You CAN be HURT if you don’t follow instructions.
NOTICE
This information is intended to help you avoid damage to your vehicle,
other property, or the environment.
VOICE
COMMAND
INDEX
ACURALINK® INDEX
14 | | 15
Page 11

TABLE OF
CONTENTS
VISUAL INDEX DRIVING
n Carbon Monoxide Gas
The engine exhaust from this vehicle contains carbon monoxide, a colorless, odorless, and
highly toxic gas. As long as you properly maintain your vehicle and follow the instructions set
forth below, you will not accumulate dangerous levels of carbon monoxide gas in the vehicle
interior.
WARNING
Carbon monoxide gas is toxic. Breathing it can cause unconsciousness and even
kill you.
Avoid any enclosed areas or activities that expose you to carbon monoxide.
SAFETYSAFETY
NAVIGATION
Have the exhaust system inspected for leaks whenever:
SAFET Y
INFORMATION
• The exhaust system is making an unusual noise.
• The exhaust system may have been damaged.
An enclosed area such as a garage can quickly fill up with carbon monoxide gas. Do not run
the engine with the garage door closed. Even when the garage door is open, drive out of the
garage immediately after starting the engine.
HANDLING THE
UNEXPECTED
• The vehicle is raised for an oil change.
INSTRUMENT
PANEL
When you operate a vehicle with the hatch open, airflow can pull exhaust gas into the
interior and create a hazardous condition. If you must drive with the hatch open, open all the
MAINTENANCE
windows and set the climate control system as shown below.
VEHICLE
CONTROLS
• Select the fresh air mode.
• Select the
mode.
SPECIFICATIONS
• Set the fan speed to high.
AUDIO AND
CONNECTIVITY
• Set the temperature control to a comfortable setting.
Adjust the climate control system in the same manner if you sit in your parked vehicle with
CLIENT
INFORMATION
the engine running.
BLUE TOOTH®
HANDSFREELINK®
ACURALINK® INDEX
16 | | 17
COMMAND
VOICE
INDEX
Page 12

TABLE OF
CONTENTS
VISUAL INDEX DRIVING
SAFET Y
INFORMATION
INSTRUMENT
PANEL
VEHICLE
CONTROLS
High-Voltage System Precautions
n In Case of a Collision
• Be careful of electric shock hazard: If a severe crash damages your vehicle’s high-voltage
system, there is a possibility of electrical shock due to exposed high-voltage components
or wires. If this happens, do not touch any of the high-voltage system components or any
of its orange wires.
• Avoid contact with high-voltage battery fluid: The High Voltage battery contains a
flammable electrolyte that could leak as a result of a severe crash. Avoid any skin or eye
contact with the electrolyte, as it is corrosive. If you accidentally touch it, flush your eyes
or skin with a large quantity of water for at least five minutes and seek medical attention
immediately.
• Use a fire extinguisher for an electrical fire. Attempting to extinguish an electrical fire with
water can be dangerous.
• If the vehicle is damaged, have it repaired by an authorized Acura NSX dealer.
Seat Belts
A seat belt is your best protection in all types of collisions. Airbags are designed to supplement
seat belts, not replace them. So even though your vehicle is equipped with airbags, make sure
you and any passenger always wear your seat belts and wear them properly.
n Lap/Shoulder Seat Belts
Both seating positions are equipped with lap/shoulder seat belts with emergency locking
retractors. In normal driving, the retractor lets you move freely while keeping some tension
on the belt. During a collision or sudden stop, the retractor locks to restrain your body.
The passenger’s seat belt has a lockable retractor that must be properly activated when using
a forward-facing child seat, should you choose to disregard our recommendations and install
one.
Both seats are equipped with automatic seat belt tensioners to enhance safety. The
tensioners automatically tighten the seat belts during a moderate to severe frontal collision,
sometimes even if the collision is not severe enough to inflate the front airbags.
SAFETYSAFETY
NAVIGATION
HANDLING THE
UNEXPECTED
MAINTENANCE
SPECIFICATIONS
n Proper Use of Seat Belts
Follow these guidelines for proper use:
• All occupants should sit upright, well back in the seat, and remain in that position for the
duration of the trip. Slouching and leaning reduces the effectiveness of the belt and can
INFORMATION
AUDIO AND
CONNECTIVITY
n Emergency Shutdown System
The emergency shutdown system may activate during an impact or crash. When the system
activates, your vehicle no longer will move under its own power. To return the High Voltage
system to normal operation, consult an authorized Acura NSX dealer.
increase the chance of serious injury in a crash.
BLUE TOOTH®
HANDSFREELINK®
Do not touch the high-voltage system. It can cause severe electrical shock. If
WARNING
• Never place the shoulder part of a lap/shoulder seat belt under your arm or behind your
back. This could cause very serious injuries in a crash.
COMMAND
the high-voltage system needs maintenance or repair, have it performed by an
ACURALINK® INDEX
authorized Acura NSX dealer.
18 | | 19
CLIENT
VOICE
INDEX
Page 13

TABLE OF
CONTENTS
VISUAL INDEX DRIVING
SAFET Y
INFORMATION
INSTRUMENT
PANEL
VEHICLE
CONTROLS
• Two people should never use the same seat belt. If they do, they could be very seriously
injured in a crash.
• Do not put any accessories on the seat belts. Devices intended to improve comfort or
reposition the shoulder part of a seat belt can reduce the protective capability and increase
the chance of serious injury in a crash.
• No one should sit in a seat with an inoperative seat belt or one that does not appear
to be working correctly. Using a seat belt that is not working properly may not protect
the occupant in a crash. Have an authorized Acura NSX dealer check the belt as soon as
possible.
WARNING
Not wearing a seat belt properly increases the chance of a serious injury or death
in a crash, even though your vehicle has airbags.
Be sure you and your passenger always wear seat belts and wear them properly.
n Seat Belt Inspection
Regularly check the condition of your seat belts as follows:
Pull each belt out fully and look for frays, cuts, burns, and wear.
Check that the latches work smoothly and the belts retract easily. If a belt does not retract
easily, cleaning the belt may correct the problem. Only use a mild soap and warm water. Do
not use bleach or cleaning solvents. Make sure the belt is completely dry before allowing it to
retract.
Any belt that is not in good condition or working properly will not provide proper protection
and should be replaced as soon as possible.
A belt that has been worn during a crash may not provide the same level of protection in a
subsequent crash. Have your seat belts inspected by an authorized Acura NSX dealer after
any collision.
WARNING
Not checking or maintaining seat belts can result in serious injury or death if the
SAFETYSAFETY
NAVIGATION
HANDLING THE
UNEXPECTED
MAINTENANCE
SPECIFICATIONS
seat belts do not work properly when needed.
AUDIO AND
CONNECTIVITY
Check your seat belts regularly and have any problem corrected as soon as
possible.
CLIENT
INFORMATION
BLUE TOOTH®
HANDSFREELINK®
ACURALINK® INDEX
20 | | 21
COMMAND
VOICE
INDEX
Page 14
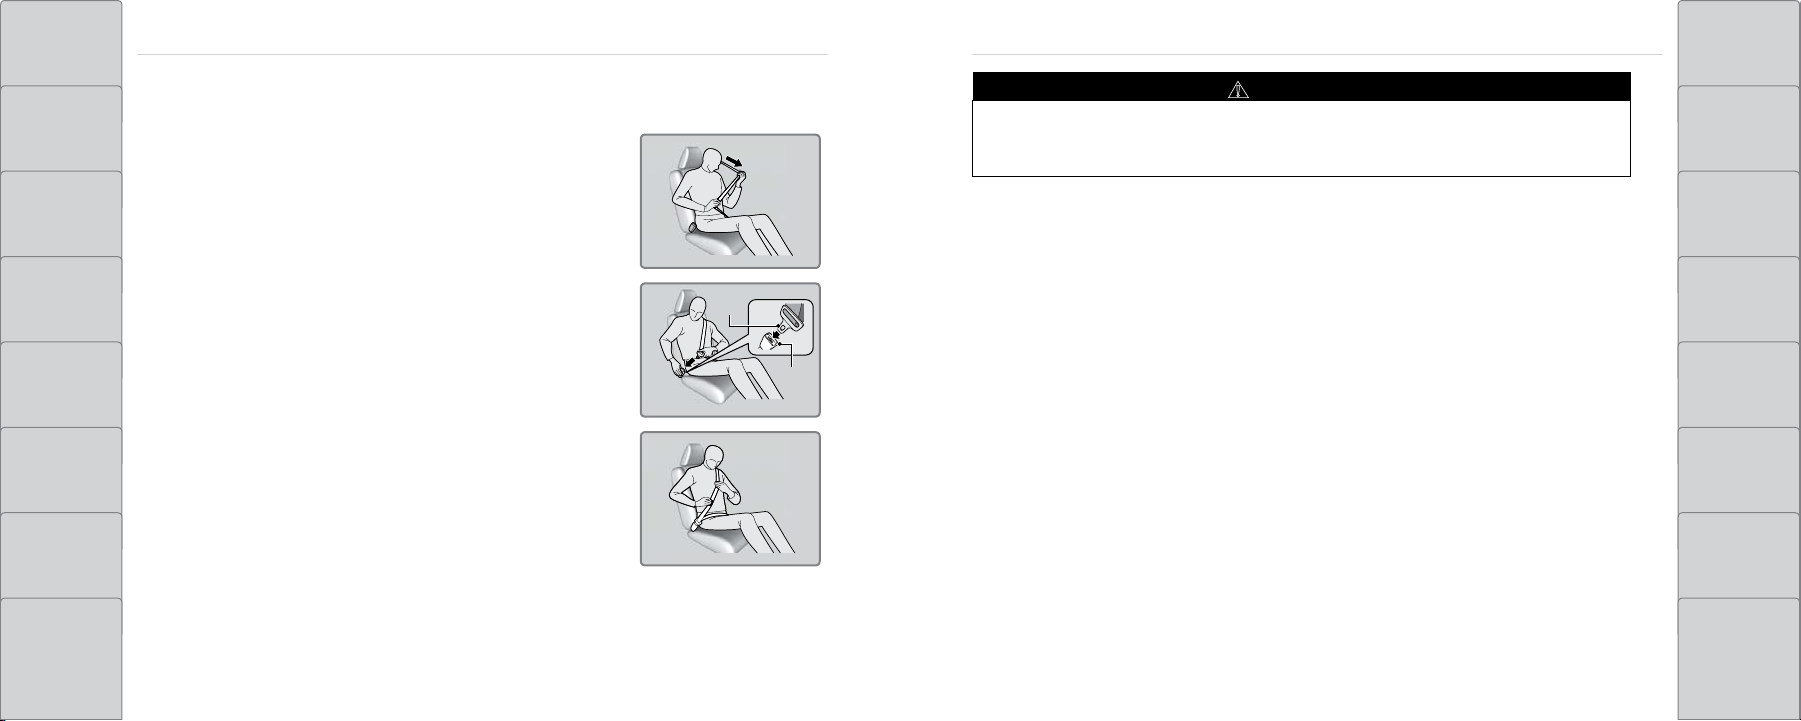
TABLE OF
Pull out slowly.
Correct
Posture.
Seated
Latch
plate
Buckle
Lap belt as low
as possible.
CONTENTS
VISUAL INDEX DRIVING
n Fastening a Seat Belt
Adjust your seat to the proper position (see page 65), and then follow the below steps.
1. Pull the seat belt out slowly.
WARNING
Improperly positioning the seat belts can cause serious injury or death in a crash.
Make sure all seat belts are properly positioned before driving.
SAFETYSAFETY
NAVIGATION
2. Insert the latch plate into the buckle, then tug on the belt
to make sure the buckle is secure. Make sure that the belt
SAFET Y
INFORMATION
is not twisted or caught on anything.
3. Position the lap part of the belt as low as possible across
HANDLING THE
UNEXPECTED
your hips, then pull up on the shoulder part of the belt
so the lap part fits snugly. This lets your strong pelvic
INSTRUMENT
PANEL
bones take the force of a crash and reduces the chance of
internal injuries.
MAINTENANCE
4. If necessary, pull up on the belt again to remove any slack,
then make sure that the belt rests across the center of
VEHICLE
CONTROLS
your chest and over your shoulder. This spreads the forces
of a crash over the strongest bones in your upper body.
SPECIFICATIONS
5. To release the belt, push the red PRESS button then guide
AUDIO AND
CONNECTIVITY
the belt by hand until it has retracted completely.
CLIENT
INFORMATION
BLUE TOOTH®
HANDSFREELINK®
ACURALINK® INDEX
22 | | 23
COMMAND
VOICE
INDEX
Page 15

TABLE OF
Passenger’s
Seat
Weight
Sensors
CONTENTS
Airbags
Your vehicle is equipped with three types of airbags: front airbags, side airbags, and side curtain
VISUAL INDEX DRIVING
SAFET Y
INFORMATION
INSTRUMENT
PANEL
VEHICLE
CONTROLS
airbags.
n Front Airbags (SRS)
The front SRS airbags inflate in a moderate-to-severe frontal collision to help protect the
head and chest of the driver and/or passenger. They are housed in the center of the steering
wheel for the driver, and in the dashboard for the passenger. Both airbags are marked SRS
AIRBAG.
SRS (Supplemental Restraint System) indicates that the airbags are designed to supplement
seat belts, not replace them. Seat belts are the occupant’s primary restraint system.
n Advanced Airbags
Your front airbags have advanced features to help reduce the likelihood of airbag-related
injuries to smaller occupants.
For both advanced front airbags to work properly:
• Do not spill any liquid on or under the seats.
• Do not put any object under the passenger’s seat.
• Make sure any objects are positioned properly on the floor. Improperly positioned objects
can interfere with the advanced airbag sensors.
• All occupants should sit upright and wear their seat belts properly.
• Do not place any cover over any part of the passenger side dashboard.
n Side Airbags
The side airbags help protect the upper torso and pelvis of the driver and passenger during
a moderate-to-severe side impact. They are housed in the outside edge of the driver’s and
passenger’s seat-backs. Both are marked SIDE AIRBAG.
n Side Curtain Airbags
The side curtain airbags help protect the heads of the driver and any passenger during a
SAFETYSAFETY
NAVIGATION
HANDLING THE
UNEXPECTED
MAINTENANCE
SPECIFICATIONS
moderate-to-severe side impact. The side curtain airbags equipped in this vehicle are also
AUDIO AND
CONNECTIVITY
The passenger’s advanced front airbag system has weight
sensors. Although Acura recommends against carrying an
infant or small child in the passenger seat, if the sensors
designed to help reduce the likelihood of partial and complete ejection of vehicle occupants
through side windows in crashes, particularly rollover crashes.
CLIENT
INFORMATION
detect the weight of a child (up to 65 lbs or 29 kg), the
BLUE TOOTH®
HANDSFREELINK®
system will automatically turn off the passenger’s front
airbag.
VOICE
COMMAND
INDEX
ACURALINK® INDEX
24 | | 25
Page 16
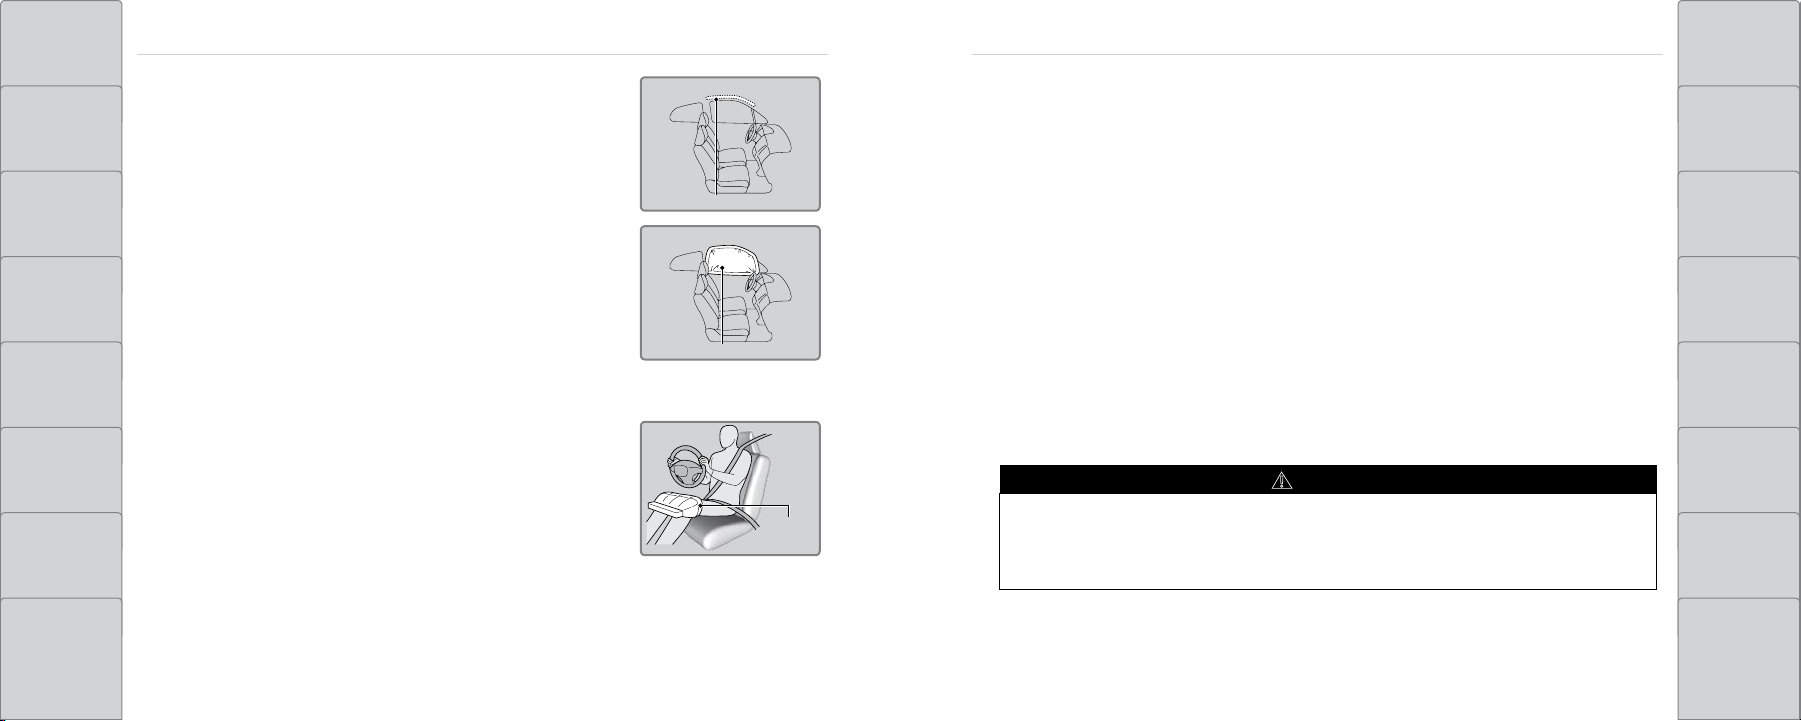
TABLE OF
Side Curtain Airbag Storage
Deployed Side Curtain Airbag
When
inflated
Airbag
Knee
CONTENTS
The side curtain airbags are located in the ceiling above the
side windows on both sides of the vehicle.
VISUAL INDEX DRIVING
The side curtain airbags are designed to deploy in a rollover
or a moderate-to-severe side impact. If the SRS control unit
senses that your vehicle is about to roll over, it immediately
deploys both side curtain airbags and activates both front
SAFET Y
INFORMATION
seat belt tensioners. If the impact is on the passenger’s side,
the passenger’s side curtain airbag deploys even if there is no
passenger in the passenger seat.
INSTRUMENT
PANEL
To get the best protection from the side curtain airbags,
occupants should wear their seat belts properly and sit
upright and well back in their seats.
Do not attach any objects to the side windows or roof pillars,
VEHICLE
CONTROLS
as they can interfere with the proper operation of the side
curtain airbags.
n Knee Airbags
n Important Facts About Your Airbags
Always wear your seat belt properly, and sit upright and as far back from the steering wheel
as possible while allowing full control of the vehicle. A passenger should move their seat as
far back from the dashboard as possible.
Do not place hard or sharp objects between yourself and a front airbag. Carrying hard
or sharp objects on your lap, or driving with a pipe or other sharp object in your mouth, can
result in injuries if your front airbag inflates.
Do not attach or place objects on the front airbag covers. Objects on the covers marked
SRS AIRBAG could interfere with the proper operation of the airbags or be propelled inside
the vehicle and hurt someone if the airbags inflate.
Do not attach accessories on or near the side airbags. They can interfere with the proper
operation of the airbags, or hurt someone if an airbag inflates.
Do not attach any objects to the side windows or roof pillars. They can interfere with the
proper operation of the side curtain airbags.
Do not cover or replace the seat-back covers. This can prevent your side airbags from
properly deploying during a side impact.
SAFETYSAFETY
NAVIGATION
HANDLING THE
UNEXPECTED
MAINTENANCE
SPECIFICATIONS
The driver’s knee SRS airbag inflates in a moderate to
AUDIO AND
CONNECTIVITY
BLUE TOOTH®
HANDSFREELINK®
severe frontal collision to help keep the driver in the
proper position and to help to maximize the benefit
provided by the vehicle’s other safety features.
WARNING
An open glove box can cause serious injury to your passenger in a crash, even if
the passenger is wearing the seat belt.
Always keep the glove box closed while driving.
CLIENT
INFORMATION
VOICE
COMMAND
INDEX
ACURALINK® INDEX
26 | | 27
Page 17
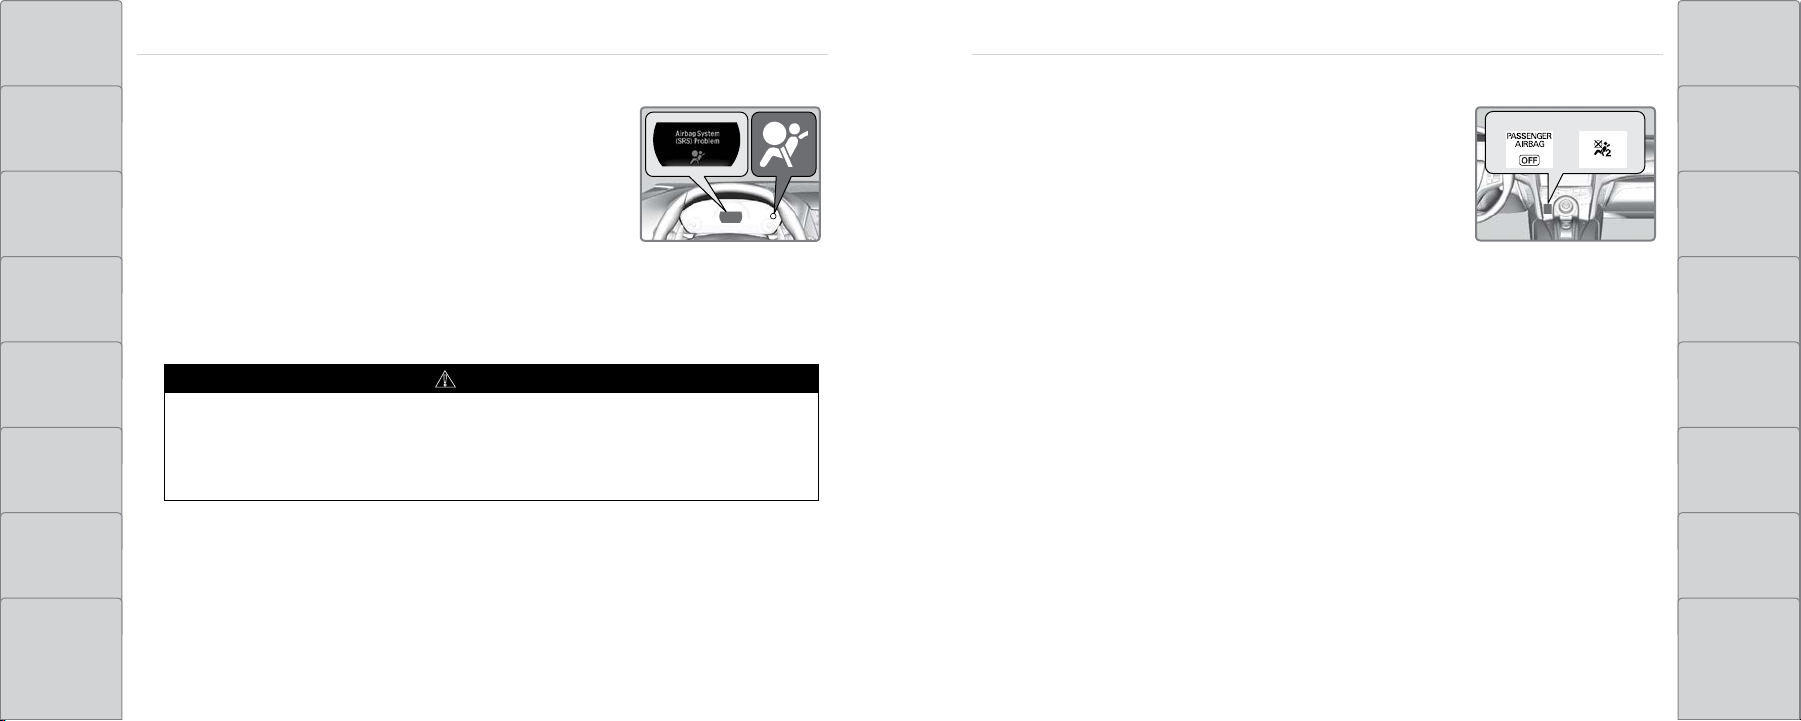
TABLE OF
U.S.Canada
CONTENTS
n Airbag System Indicators
SAFETYSAFETY
NAVIGATION
Passenger Airbag Off Indicator
If a problem occurs in the airbag system, the SRS indicator
VISUAL INDEX DRIVING
will come on and a message appears on the multiinformation display.
The indicator comes on to alert you that the passenger’s front
airbag has been turned off. This occurs when the passenger
seat weight sensors detect 65 lbs (29 kg) or less, the weight
of an infant or small child, on the seat.
SAFET Y
INFORMATION
INSTRUMENT
PANEL
SRS (Supplemental Restraint System) Indicator
If the indicator comes on at any other time besides vehicle start-up, or does not come on at
all, have the system checked by an authorized Acura NSX dealer as soon as possible. If you
don’t, your airbags and seat belt tensioners may not work properly when they are needed.
Your vehicle is not recommended for child passengers. Never put a rear-facing child seat in
this vehicle. If you decide to disregard our recommendations and transport a small child, they
should be properly restrained.
Objects placed on the seat can also cause the indicator to come on.
HANDLING THE
UNEXPECTED
MAINTENANCE
If the passenger‘s seat is empty, the passenger’s front airbag will not deploy and the indicator
VEHICLE
CONTROLS
AUDIO AND
CONNECTIVITY
WARNING
Ignoring the SRS indicator can result in serious injury or death if the airbag
systems or tensioners do not work properly.
Have your vehicle checked by an authorized Acura NSX dealer as soon as possible if
the SRS indicator alerts you to a possible problem.
will not come on.
If the indicator comes on with no occupant or objects in the passenger’s seat, something may
be interfering with the weight sensors, such as:
• An object hanging on the seat.
• An object pressing against the rear of the seat-back.
• The seat or seat-back is forced back against cargo on the floor behind it.
SPECIFICATIONS
CLIENT
INFORMATION
• An object placed under the passenger’s seat.
BLUE TOOTH®
HANDSFREELINK®
If none of these conditions exist, have your vehicle checked by an authorized Acura NSX
dealer as soon as possible.
VOICE
COMMAND
INDEX
The passenger airbag off indicator may go on and off repeatedly if the total weight on the
seat is near the airbag cutoff threshold.
ACURALINK® INDEX
28 | | 29
Page 18
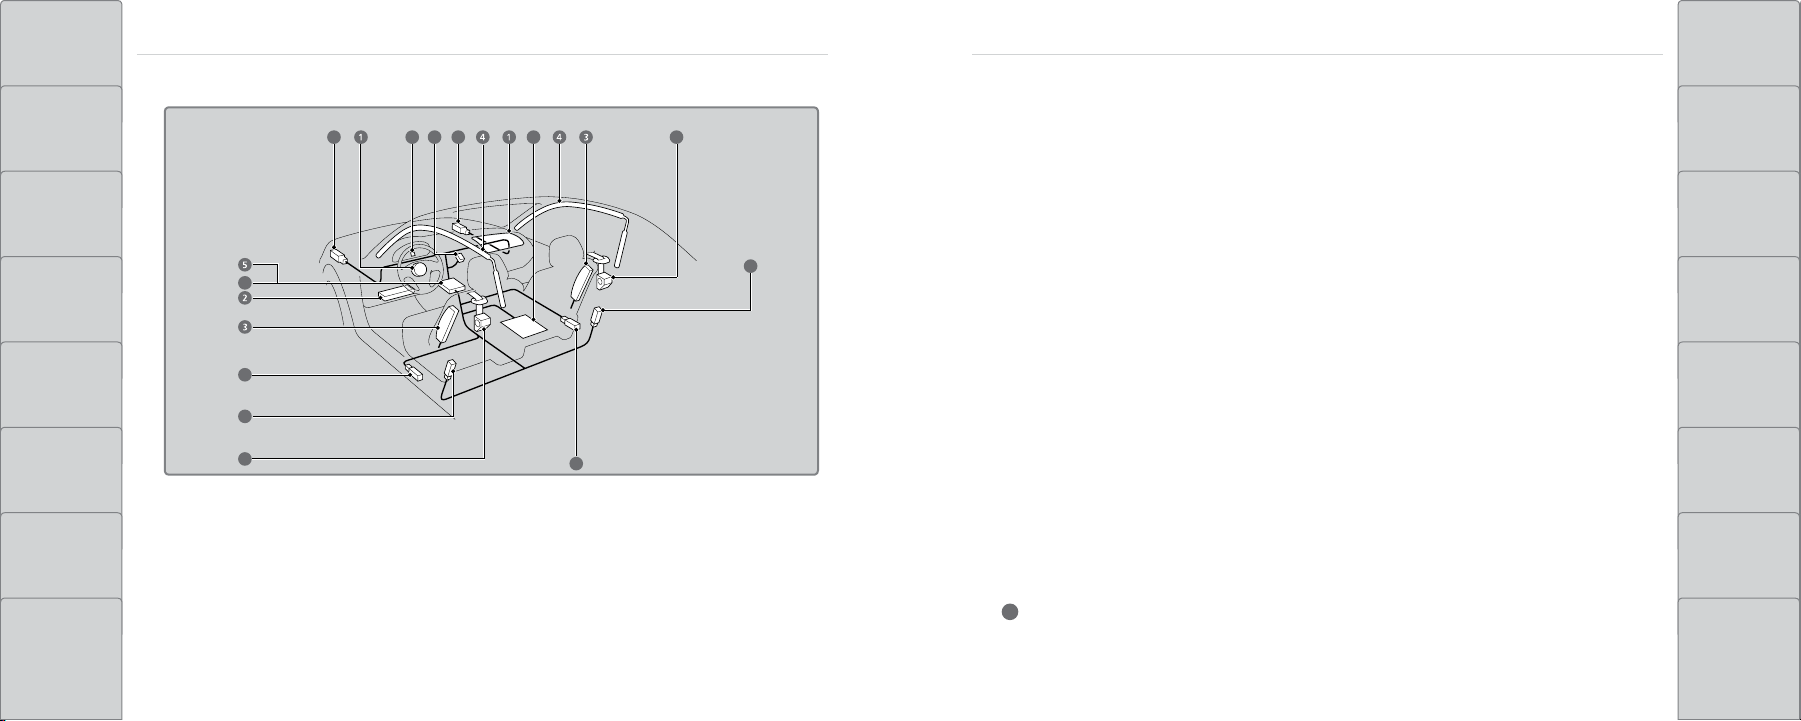
TABLE OF
8
8
8
8 10 9 8 7
6
6
8
11
11
CONTENTS
n Airbag System Components
Two SRS (Supplemental Restraint System) front airbags. The driver’s airbag is stored in
u
SAFETYSAFETY
NAVIGATION
the center of the steering wheel; the passenger’s airbag is stored in the dashboard. Both
VISUAL INDEX DRIVING
are marked SRS AIRBAG.
Driver’s knee airbag. The knee airbag is stored under the steering column. It is marked
v
SRS AIRBAG.
Two side airbags, one for the driver and one for a passenger. The airbags are stored in
w
SAFET Y
INFORMATION
the outer edges of the seatbacks. Both are marked SIDE AIRBAG.
Two side curtain airbags, one for each side of the vehicle. The airbags are stored in the
x
HANDLING THE
UNEXPECTED
ceiling, above the side windows. The front and rear pillars are marked SIDE CURTAIN
AIRBAG.
INSTRUMENT
PANEL
An electronic control unit that, when the power system is on, continually monitors
y
information about the various impact sensors, seat and buckle sensors, rollover sensor,
MAINTENANCE
airbag activators, seat belt tensioners, and other vehicle information. During a crash
VEHICLE
CONTROLS
event the unit records such information.
Automatic seat belt tensioners. In addition, the driver’s and passenger’s seat belt
z
SPECIFICATIONS
buckles incorporate sensors that detect whether or not the belts are fastened.
Weight sensors in the passenger’s seat. The passenger’s airbag will be turned off if the
{
AUDIO AND
CONNECTIVITY
BLUE TOOTH®
HANDSFREELINK®
The front, driver’s knee, side, and side curtain airbags are deployed according to the direction
and severity of impact. Both side curtain airbags are deployed in a rollover. The airbag system
includes:
weight on the seat is 65 lbs (29 kg) or less (the weight of an infant or small child).
Impact sensors that can detect a moderate-to-severe front or side impact.
|
An indicator on the dashboard that alerts you that the passenger’s front airbag has
}
been turned off.
An indicator on the instrument panel that alerts you to a possible problem with your
~
airbag system or seat belt tensioners.
A rollover sensor that can detect if your vehicle is about to roll over and signal the
CLIENT
INFORMATION
VOICE
COMMAND
INDEX
control unit to deploy both side curtain airbag.
ACURALINK® INDEX
30 | | 31
Page 19

TABLE OF
CONTENTS
VISUAL INDEX DRIVING
SAFET Y
INFORMATION
n Airbag Care
You do not need to, and should not, perform any maintenance on or replace any airbag
system components yourself. However, you should have your vehicle inspected by an
authorized Acura NSX dealer in the following situations:
When the airbags have deployed
If an airbag has inflated, the control unit and other related parts must be replaced. Similarly,
once an automatic seat belt tensioner has been activated, it must be replaced.
Child Safety
Each year, many children are injured or killed in vehicle crashes because they are either
unrestrained or not properly restrained. In fact, vehicle collisions are the number one cause of
death of children ages 12 and under.
The National Highway Traffic Safety Administration and Transport Canada recommend that
all children ages 12 and under be properly restrained in a rear seat. Some states or provinces/
territories have laws restricting where children may ride.
SAFETYSAFETY
NAVIGATION
HANDLING THE
UNEXPECTED
To reduce the number of child deaths and injuries, every state, Canadian province and territory
INSTRUMENT
PANEL
VEHICLE
CONTROLS
AUDIO AND
CONNECTIVITY
BLUE TOOTH®
HANDSFREELINK®
When the vehicle has been in a moderate-to-severe collision
Even if the airbags did not inflate, have your authorized Acura NSX dealer inspect the
following: weight sensors in the passenger’s seat, seat belt tensioners, and each seat belt that
was worn during the crash.
Do not remove or modify a seat without first consulting a dealer
This would likely disable the weight sensors in the passenger’s seat. If it is necessary to
remove or modify a seat to accommodate a person with disabilities, contact an authorized
Acura NSX dealer.
• U.S. customers
à Main line: (800) 382-2238
à NSX specialists: (844) 68-ACURA [682-2872]
• Canadian customers
à Main line: (888) 922-8729
requires that infants and children be properly restrained when they ride in a vehicle.
Since this vehicle does not have a back seat, Acura recommends you do not carry as a
passenger a child aged 12 or under because:
• An inflating front or side airbag can injure or kill a child sitting in the passenger’s seat.
• A child in the passenger’s seat is more likely to interfere with the driver’s ability to safely
control the vehicle.
• Statistics show that children of all sizes and ages are safer when they are properly restrained
in a rear seat.
• Any child who is too small to wear a seat belt correctly must be restrained in an approved
child seat that is properly secured to the vehicle using either the lap belt portion of the lap/
shoulder belt or the lower anchors of the LATCH system.
In addition:
• Never hold a child on your or any passenger’s lap because it is impossible to protect them in
the event of a collision.
MAINTENANCE
SPECIFICATIONS
CLIENT
INFORMATION
VOICE
COMMAND
INDEX
à NSX specialists: (844) 9MYNSX9 [969-6799]
ACURALINK® INDEX
32 | | 33
Page 20
TABLE OF
CONTENTS
VISUAL INDEX DRIVING
SAFET Y
INFORMATION
• Never put a seat belt over yourself or a passenger and a child. During a crash, the belt would
likely press deep into the child and cause serious or fatal injuries.
• Never let two children use the same seat belt. Both children could be very seriously injured in
a crash.
• Do not allow children to operate the doors, windows, or seat adjustments.
• Do not leave children in the vehicle unattended, especially in hot weather when the inside of
the vehicle can get hot enough to kill them. They could also activate vehicle controls, causing
it to move unexpectedly.
n Protecting Infants
An infant must be properly restrained in a rear-facing, reclining child seat until the infant
reaches the seat maker’s weight or height limit for the seat, and the infant is at least one
year old. Because rear-facing child seats should not be used in this vehicle, you should never
carry an infant in this vehicle.
WARNING
Placing a rear-facing child seat in the front seat can result in serious injury or
SAFETYSAFETY
NAVIGATION
HANDLING THE
UNEXPECTED
death during a crash.
INSTRUMENT
PANEL
WARNING
Children who are unrestrained or improperly restrained can be seriously injured or
Never install a rear-facing child seat in this vehicle.
MAINTENANCE
killed in a crash.
Any child too small for a seat belt should be properly restrained in a child seat.
VEHICLE
CONTROLS
A larger child should be properly restrained with a seat belt, using a booster seat if
necessary.
SPECIFICATIONS
AUDIO AND
CONNECTIVITY
Allowing a child to play with a seat belt or wrap one around their neck can result in
WARNING
INFORMATION
serious injury or death.
BLUE TOOTH®
HANDSFREELINK®
ACURALINK® INDEX
Instruct children not to play with any seat belt and make sure any unused seat belt a
child can reach is buckled, fully retracted, and locked.
34 | | 35
COMMAND
CLIENT
VOICE
INDEX
Page 21

TABLE OF
CONTENTS
VISUAL INDEX DRIVING
SAFET Y
INFORMATION
n Protecting Smaller Children
If a child is at least one year old and within the weight range indicated by the child seat
manufacturer, the child should be properly restrained in a firmly secured forward-facing child
seat.
Since this vehicle does not have a back seat, Acura recommends that you do not carry a child,
age 12 or under, as a passenger. This is because placing a forward-facing child seat in the
passenger’s seat can be hazardous, even with advanced front airbags that automatically turn
the passenger’s front airbag off.
n Selecting a Child Seat
Important consideration when selecting a child seat
Make sure the child seat meets the following three requirements:
• The child seat is the correct type and size for the child.
• The child seat is the correct type for the seating position.
• The child seat is compliant with Federal Motor Vehicle Safety Standard 213 or Canadian
Motor Vehicle Safety Standard 213.
SAFETYSAFETY
NAVIGATION
HANDLING THE
UNEXPECTED
If you choose to ignore our warnings and transport a small child in this vehicle, be sure
INSTRUMENT
PANEL
to move the passenger seat as far to the rear as possible, and follow the instructions and
guidelines in the following pages.
MAINTENANCE
WARNING
VEHICLE
CONTROLS
Placing a forward-facing child seat in the front seat can result in serious injury or
death if the front airbag inflates.
SPECIFICATIONS
If you must place a forward-facing child seat in front, move the vehicle seat as
far back as possible, and properly restrain the child.
AUDIO AND
CONNECTIVITY
CLIENT
INFORMATION
BLUE TOOTH®
HANDSFREELINK®
ACURALINK® INDEX
36 | | 37
COMMAND
VOICE
INDEX
Page 22
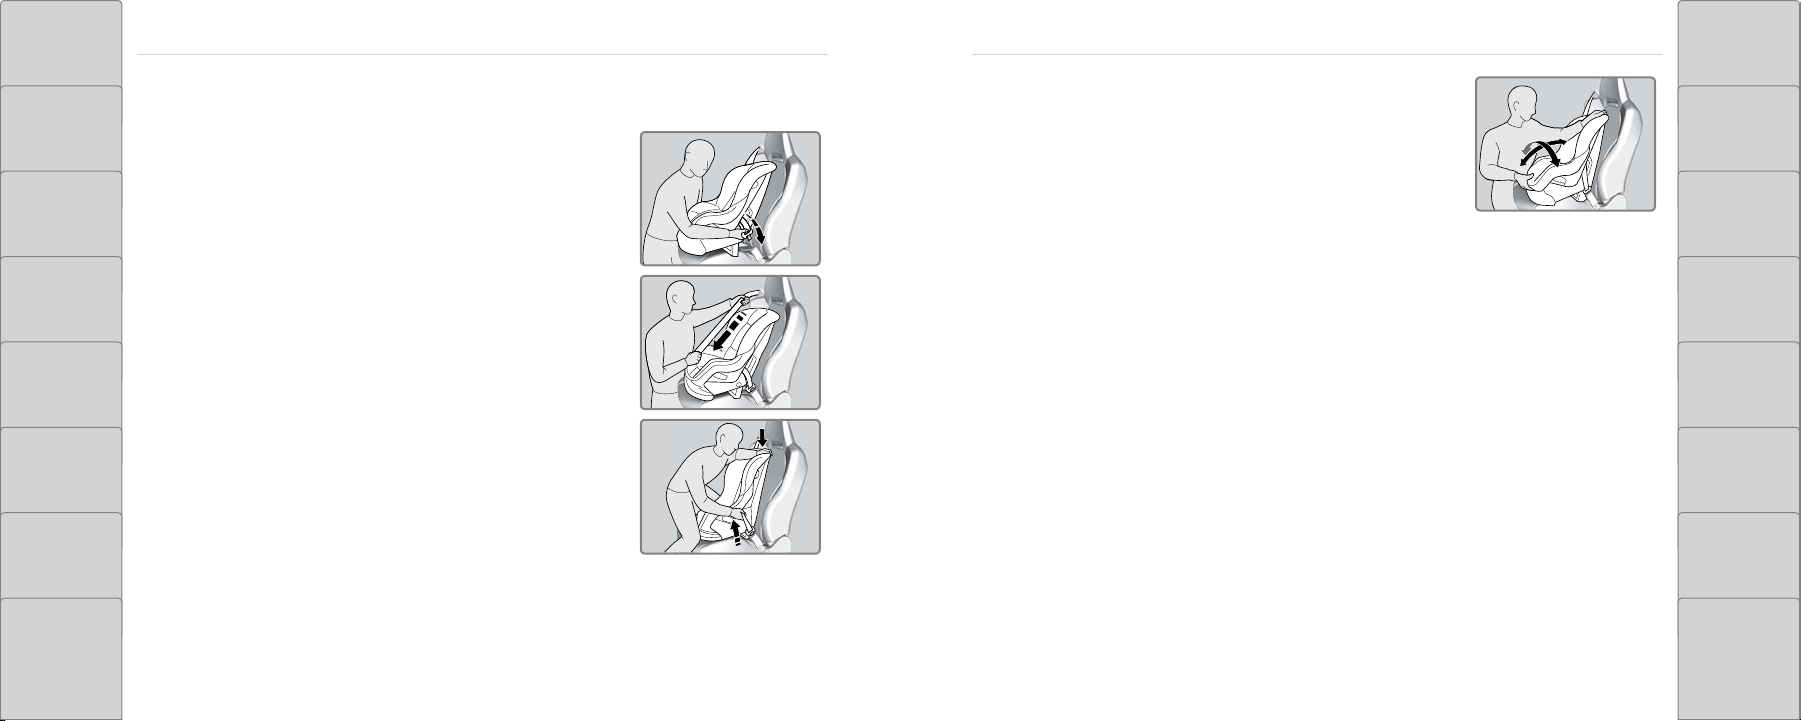
TABLE OF
CONTENTS
VISUAL INDEX DRIVING
n Installing a Child Seat
1. Move the passenger seat to the rearmost position.
2. Place the child seat on the passenger seat.
6. Grab the shoulder part of the seat belt near the buckle,
and pull up to remove any slack from the lap part of the
belt. When doing this, place your weight on the child seat
and push it into the vehicle seat.
SAFETYSAFETY
NAVIGATION
7. Make sure the child seat is firmly secured by rocking it
forward and back and side to side; little movement should
SAFET Y
INFORMATION
be felt.
To deactivate a lockable retractor, release the buckle and allow the seat belt to wind up all
HANDLING THE
UNEXPECTED
the way.
3. Route the seat belt through the child seat according to
INSTRUMENT
PANEL
the seat manufacturer’s instructions, and insert the latch
plate into the buckle. Insert the latch plate fully until it
MAINTENANCE
clicks.
4. Slowly pull the shoulder part of the belt all the way out
VEHICLE
CONTROLS
until it stops. This activates the lockable retractor.
SPECIFICATIONS
5. Let the seat belt completely wind up into the retractor,
then try to pull it out to make sure the retractor is locked.
AUDIO AND
CONNECTIVITY
If you are able to pull the shoulder belt out, the lockable
retractor is not activated. Pull the seat belt all the way
CLIENT
INFORMATION
out, and repeat steps 3–5.
BLUE TOOTH®
HANDSFREELINK®
ACURALINK® INDEX
38 | | 39
COMMAND
VOICE
INDEX
Page 23
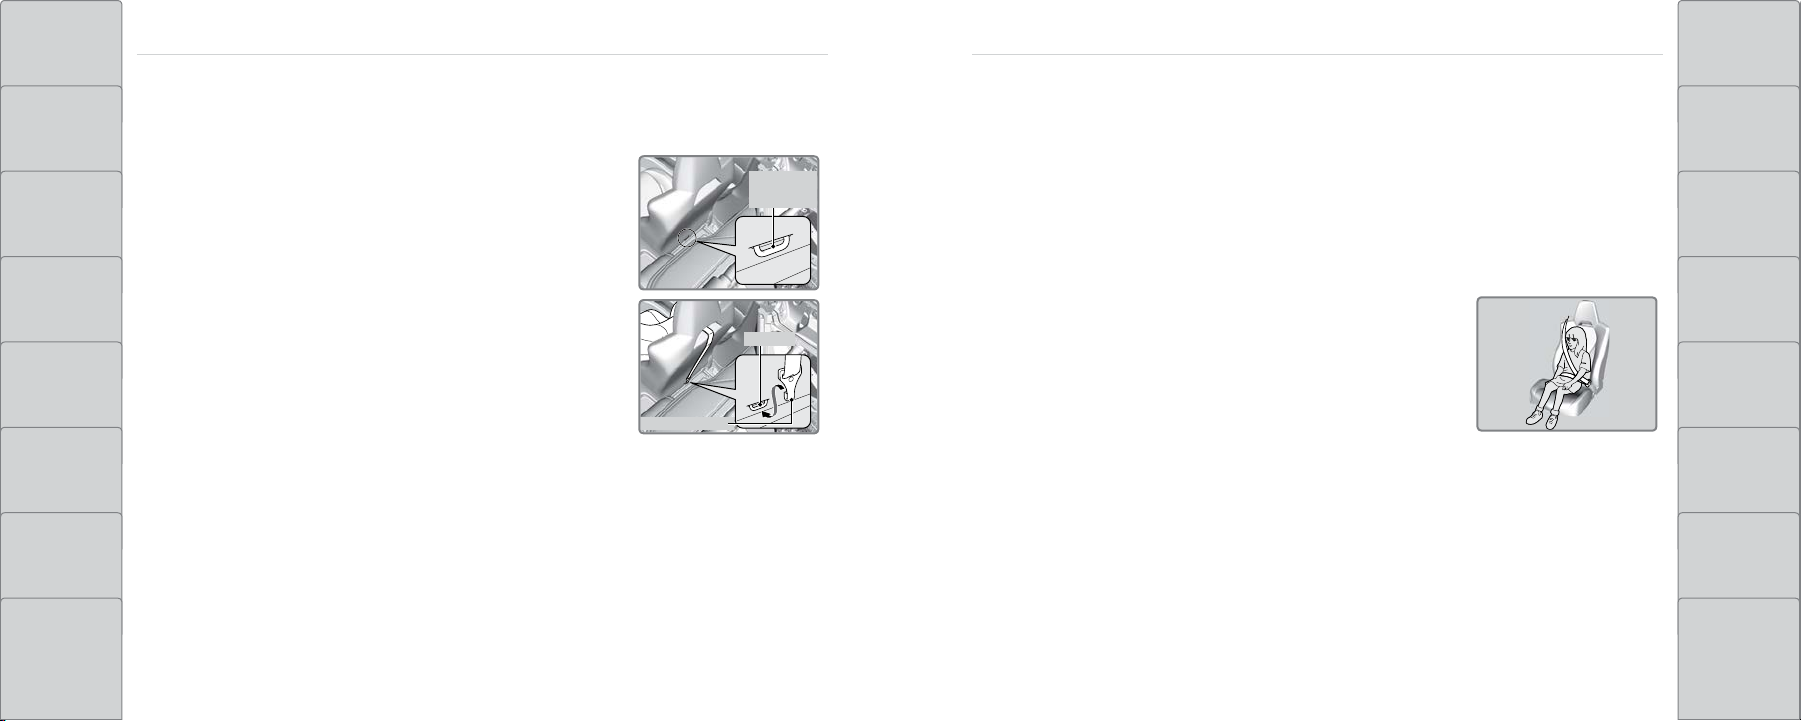
TABLE OF
Tether
Point
Anchorage
Tether Strap Hook
Anchor
CONTENTS
VISUAL INDEX DRIVING
SAFET Y
INFORMATION
n Adding Security with a Tether
A tether anchorage point is provided behind the passenger seat. A child seat with a tether can
be installed, so long as the base of the child seat is secured using a seat belt.
Using an outer anchor
1. Route the tether strap through the head restraint legs.
Make sure the strap is not twisted.
2. Secure the tether strap hook onto the anchor.
n Protecting Larger Children
Since this vehicle does not have a back seat, Acura recommends that you do not carry
a child age 12 or under as a passenger. This is because children who have outgrown child
seats are also at risk of being injured or killed by an inflating passenger’s front airbag. If a
larger child must ride in this vehicle, the information below provides guidelines to help you
decide when a given child may ride in this vehicle, and how to properly protect the child.
When a child is too big for a child seat, secure the child in the passenger’s seat using the lap/
shoulder seat belt.
SAFETYSAFETY
NAVIGATION
HANDLING THE
UNEXPECTED
Have the child sit upright and all the way back, then ensure the following:
INSTRUMENT
PANEL
3. Tighten the tether strap as instructed by the child seat
manufacturer.
• The child’s knees bend comfortably over the edge of the
seat.
MAINTENANCE
• The shoulder belt crosses between the child’s neck and
arm.
VEHICLE
CONTROLS
• The lap part of the seat belt is as low as possible, touching
SPECIFICATIONS
the child’s thighs.
• The child can stay seated for the whole trip.
AUDIO AND
CONNECTIVITY
BLUE TOOTH®
HANDSFREELINK®
ACURALINK® INDEX
40 | | 41
INFORMATION
COMMAND
CLIENT
VOICE
INDEX
Page 24

TABLE OF
Sun Visors
U.S. models
Inverter Coolant Filler
Tank Cap
Canadian models
Engine Coolant
Reserve Tank Cap
U.S. models
High Voltage System Components
Canadian models
Dashboard
U.S. models only
49kPa
NEVER OPEN WHEN HOT
Hot coolant will scald you
N’OUVREZ PAS QUAND CHAUD.
NICHT BEI HEISSEM MOTOR ÖFFNEN.
49kPa
DANGER
WARNUNG
If driving at high speeds (over 168mph/270km/h),
adjust cold tire pressure as shown below to avoid
excess heat buildup and sudden tire failure.
DRIVING SPEED TIRE COLD TIRE PRESSURE
OVER
168 mph/ 270 km/h
FRONT
REAR
260 KPA, 38 PSI
260 KPA, 38 PSI
WARNING
If driving at high speeds (over 168mph/270km/h),
adjust cold tire pressure as shown below to avoid
excess heat buildup and sudden tire failure.
Pour conduire à grande vitesse (plus de 168 mph /
270 km/h) ajuster la pression des pneus à froid, comme
indiqué ci-dessous, an d’éviter l’accumulation excessive
de chaleur et une défaillance soudaine du pneu.
DRIVING SPEED
VITESSE DE CON
DUITE
COLD TIRE PRESSURE
PRESSION DES PNEUS
À FROID
TIRE/ PNEU
FRONT/AVANT
REAR/ARRIÈRE
260 KPA, 38 PSI
260 KPA, 38 PSI
OVER/ PLUS
DE
168 mph/ 270 km/h
WARNING ATTENTION
U.S. models Canadian models
Doorjamb
2D
AAAA
CONTENTS
VISUAL INDEX DRIVING
If a lap/shoulder belt cannot be used properly, position the child in a booster seat in the
passenger’s position. For the child’s safety, check that the child meets the booster seat
manufacturer’s recommendations.
Some U.S. states and Canadian provinces/territories require children to use a booster seat
Safety Label Locations
Safety labels are in the locations shown. They warn you of potential hazards that can cause
serious injury or death. Read these labels carefully.
SAFETYSAFETY
NAVIGATION
until they reach a given age or weight (e.g., 6 years or 60 lbs). Be sure to check current laws
in the state or province/territory where you intend to drive.
SAFET Y
INFORMATION
INSTRUMENT
PANEL
WARNING
Allowing a child age 12 or under to sit in the vehicle can result in injury or death
if the passenger’s front airbag inflates.
If a larger child must ride in front, move the vehicle seat as far to the rear as
possible, then have the child sit up properly and wear the seat belt properly,
HANDLING THE
UNEXPECTED
MAINTENANCE
using a booster seat if needed.
VEHICLE
CONTROLS
SPECIFICATIONS
AUDIO AND
CONNECTIVITY
BLUE TOOTH®
HANDSFREELINK®
ACURALINK® INDEX
42 | | 43
INFORMATION
COMMAND
CLIENT
VOICE
INDEX
Page 25
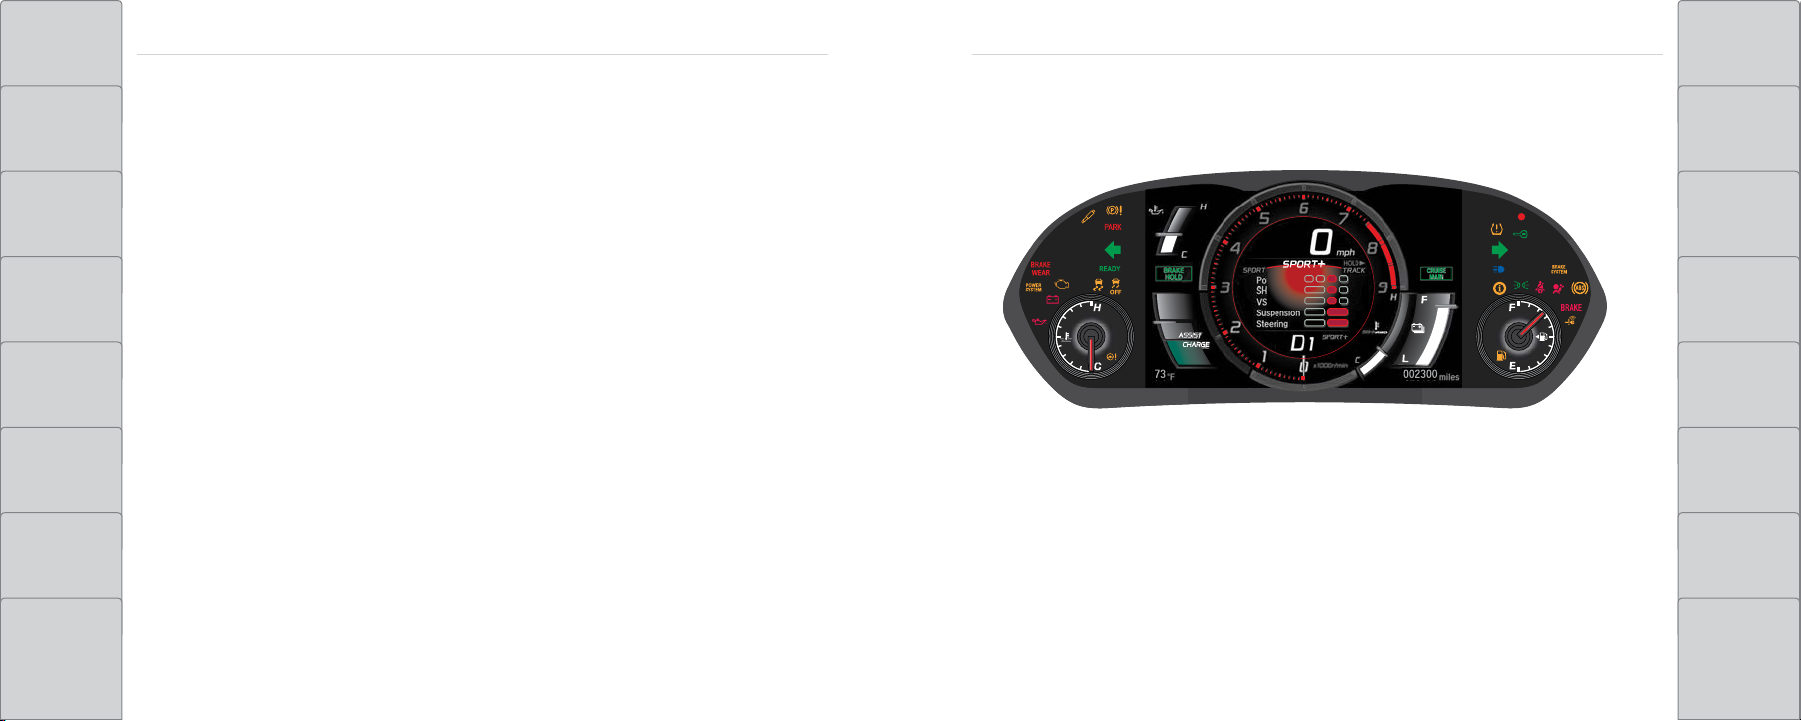
TABLE OF
Powertrain
SH-AWD
VSA
Suspension
Steering
CONTENTS
Reporting Safety Defects
INSTRUMENT PANEL
INSTRUMENT PANELSAFETY
NAVIGATION
In the U.S.
VISUAL INDEX DRIVING
If you believe that your vehicle has a defect which could cause a crash or could cause injury
Learn about the indicators, gauges, and displays related to driving the vehicle.
or death, you should immediately inform the National Highway Traffic Safety Administration
(NHTSA) in addition to notifying American Honda Motor Co., Inc.
SAFET Y
INFORMATION
If NHTSA receives similar complaints, it may open an investigation, and if it finds that a safety
defect exists in a group of vehicles, it may order a recall and remedy campaign. However, NHTSA
HANDLING THE
UNEXPECTED
cannot become involved in individual problems between you, your authorized Acura NSX dealer,
or American Honda Motor Co., Inc.
INSTRUMENT
PANEL
To contact NHTSA, you may call the Vehicle Safety Hotline toll-free at (888) 327-4236 (TTY:
1-800-424-9153); go to http://www.safercar.gov; or write to: Administrator, NHTSA, 1200 New
MAINTENANCE
Jersey Avenue, SE., Washington, DC 20590. You can also obtain other information about motor
vehicle safety from http://www.safercar.gov.
VEHICLE
CONTROLS
AUDIO AND
CONNECTIVITY
In Canada
If you believe that your vehicle has a defect which could cause a crash or could cause injury or
death, you should immediately inform Honda Canada, Inc., and you may also inform Transport
Canada.
If Transport Canada receives similar complaints, it may open an investigation, and if it finds that a
SPECIFICATIONS
Indicators briefly appear with each engine start and then go out. Red and amber indicators are
most critical. Blue and green indicators are used for general information.
CLIENT
INFORMATION
safety defect exists in a group of vehicles, it may lead to a recall and remedy campaign. However,
Transport Canada cannot become involved in individual problems between you, your authorized
BLUE TOOTH®
HANDSFREELINK®
ACURALINK® INDEX
Acura NSX dealer, or Honda Canada, Inc.
To contact Transport Canada’s Defect Investigations and Recalls Division, you may call
(800) 333-0510. For more information on reporting safety defects or about motor vehicle safety,
go to http://www.tc.gc.ca/roadsafety.
44 | | 45
VOICE
COMMAND
INDEX
Page 26

TABLE OF
CONTENTS
Malfunction Indicators
These are the most critical indicators. If they come on and stay lit while driving or at any other
VISUAL INDEX DRIVING
SAFET Y
INFORMATION
time, there may be a problem. See your authorized Acura NSX dealer if necessary.
Brake system
U.S.
Brake fluid is low, or there is a malfunction in the brake system. Press the brake pedal
Canada
lightly to check pedal pressure. If normal, check the brake fluid level when you stop.
If abnormal, take immediate action. If necessary, downshift the transmission to slow
the vehicle using engine braking. Have your vehicle repaired immediately.
Supplemental Restraint System (SRS)
There is a problem with one of the airbag systems or seat belt tensioners.
Electric Power Steering (EPS)
There is a problem with the electric power steering system.
Power system
ere is a problem with the electric vehicle system. Have you vehicle checked by a
authorized Acura NSX dealer immediately.
INSTRUMENT PANELINSTRUMENT PANEL
NAVIGATION
HANDLING THE
UNEXPECTED
Keyless Access System
INSTRUMENT
PANEL
VEHICLE
CONTROLS
AUDIO AND
CONNECTIVITY
Low oil pressure
Engine oil pressure is low. Stop in a safe place. Open the hood and check the oil level,
and add oil if necessary. If the indicator does not turn off, have your vehicle repaired
immediately.
Malfunction indicator lamp (check engine light)
(Steady) The emissions control system may have a problem. Have you vehicle
checked by a authorized Acura NSX dealer.
(Blinks) A misfire in the engine’s cylinders is detected. Stop in a safe place, and wait
for the engine to cool down.
Charging system
SYSTEM
Canada
There is a problem with the keyless access system
Vehicle Stability Assist (VSA) system
There is a problem with the VSA system.
Brake system
There is a problem with the hydraulic brake boost system or the hill start assist
U.S.
system. Have you vehicle checked by a authorized Acura NSX dealer immediately.
MAINTENANCE
SPECIFICATIONS
CLIENT
INFORMATION
The battery is not charging. Turn off all electrical items, but do not turn off the vehicle
BLUE TOOTH®
HANDSFREELINK®
to prevent further battery discharge. Have your vehicle repaired immediately.
Anti-Lock Brake System (ABS)
VOICE
COMMAND
INDEX
There is a problem with the anti-lock brake system. Your vehicle still has normal
braking ability, but no anti-lock function.
ACURALINK® INDEX
46 | | 47
Page 27
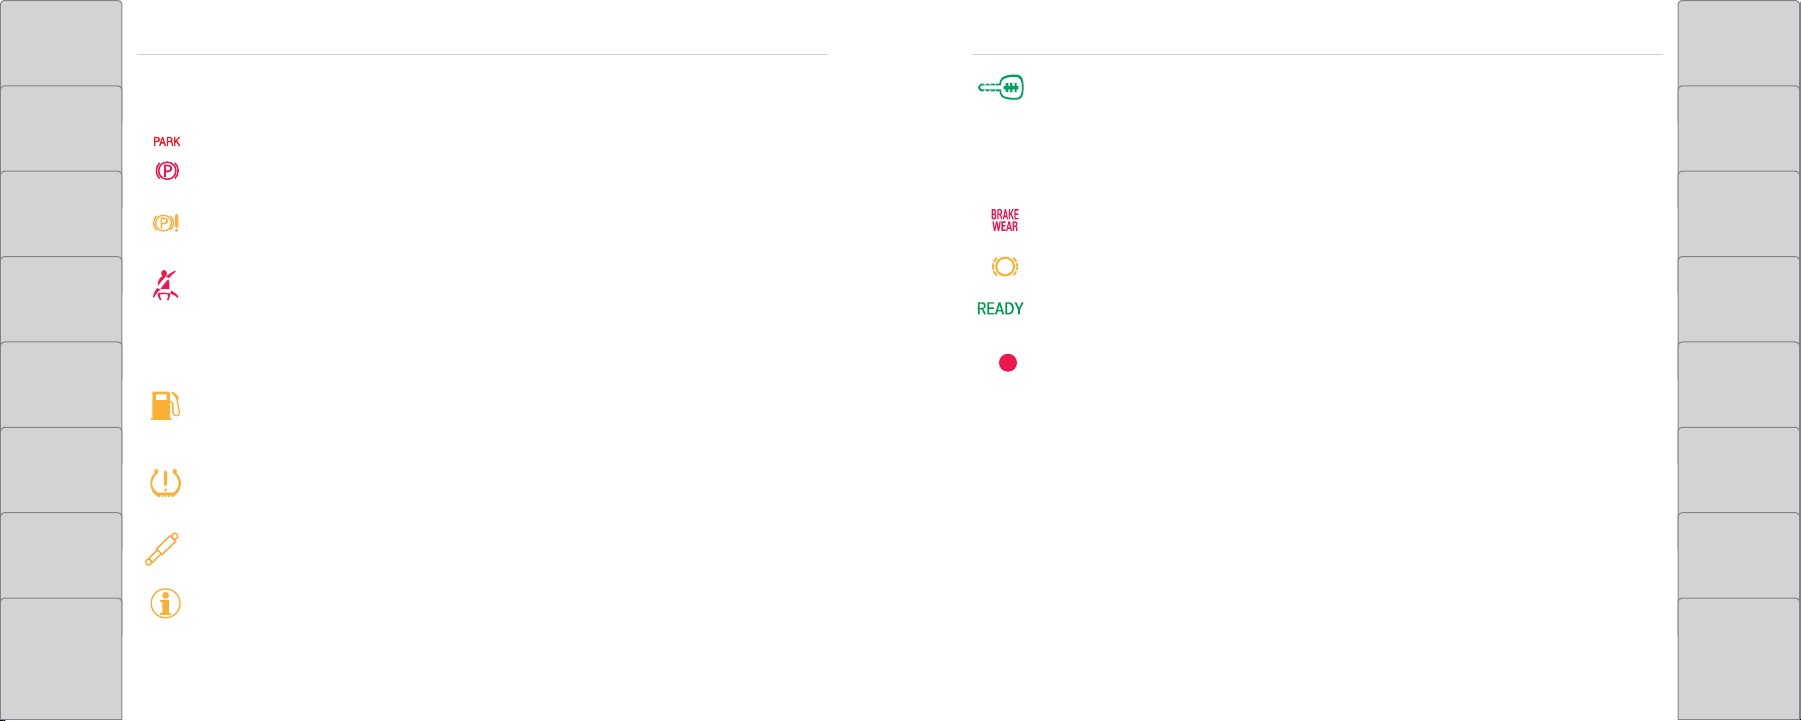
TABLE OF
U.S.
CONTENTS
Condition Indicators
These indicators may require you to perform an action.
VISUAL INDEX DRIVING
Parking brake
U.S.
If the indicator blinks, there is a problem with the electric parking brake.
Canada
Immobilizer
Your remote transmitter cannot be recognized by the vehicle. If the indicator blinks,
you may not be able to start the engine. Turn the vehicle off and then on again. If
it continues to blink, there may be a problem with the system. See your authorized
Acura NSX dealer.
INSTRUMENT PANELINSTRUMENT PANEL
NAVIGATION
Brake Wear Indicator*
SAFET Y
INFORMATION
Parking brake system
Avoid using the parking brake. Have your vehicle checked by a dealer immediately.
Brake pads are worn. Avoid high speeds and sudden braking.
Canada
HANDLING THE
UNEXPECTED
Seat belt reminder
INSTRUMENT
PANEL
VEHICLE
CONTROLS
AUDIO AND
CONNECTIVITY
Make sure seat belts are fastened for you and any passenger. The indicator blinks and
beeps sound continuously if you or your passenger has not fastened your seat belts
when you begin driving. If the indicator remains on after seat belts are fastened, see
your authorized Acura NSX dealer.
Low fuel
Refuel as soon as possible. If the indicator blinks, there is a problem with the fuel
gauge. See your authorized Acura NSX dealer.
Low tire pressure
Stop in a safe place, check tire pressures, and inflate tire(s) if necessary.
Ready Indicator
The vehicle is ready to drive.
Immobilizer/security system
Your key or remote transmitter cannot be recognized by the vehicle. If the indicator
blinks, you may not be able to start the engine. Turn the power system off, press and
hold the brake pedal, and restart the vehicle. If it continues to blink, there may be a
problem with the system. See your dealer.
Canadian models: To reset the immobilizer system, follow the steps above after the
battery has been disconnected.
MAINTENANCE
SPECIFICATIONS
CLIENT
INFORMATION
Active Damper System
BLUE TOOTH®
HANDSFREELINK®
There is a problem with the Active Damper System.
System message
ACURALINK® INDEX
48 | | 49
When a condition or malfunction indicator comes on, a message also appears on the
multi-information display. Check the display for more information.
*if equipped
VOICE
COMMAND
INDEX
Page 28
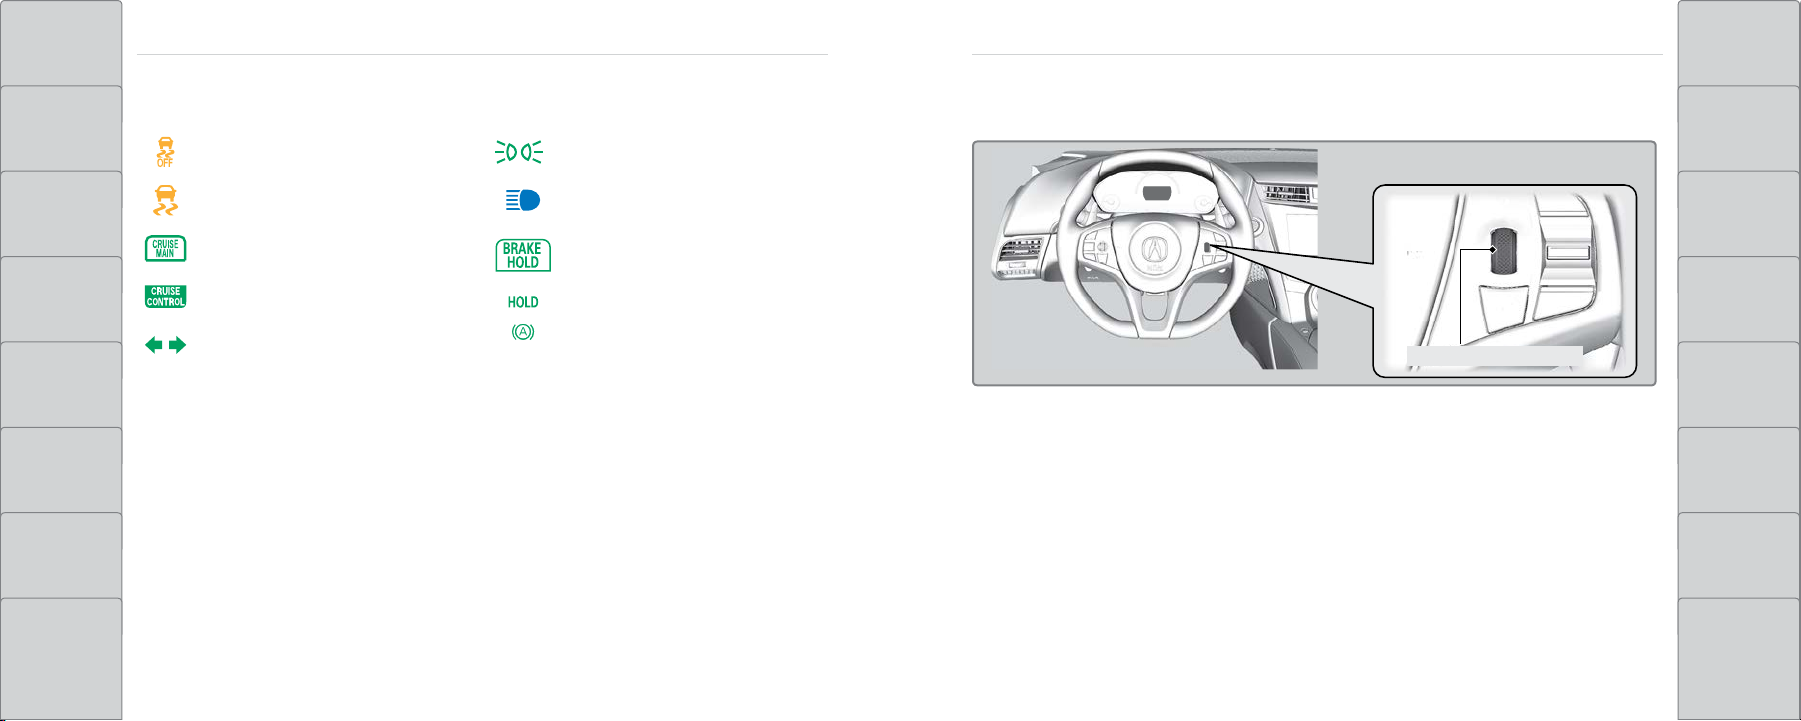
TABLE OF
Canada
Right Selector Wheel
CONTENTS
VISUAL INDEX DRIVING
On/Off Indicators
These indicators remind you when an item is on or off.
VSA off
Driver Information Interface
Consists of several displays that provide you with useful information.
Exterior lights on
INSTRUMENT PANELINSTRUMENT PANEL
NAVIGATION
VSA engaged (blinks)
SAFET Y
INFORMATION
CRUISE MAIN on
CRUISE CONTROL on
INSTRUMENT
PANEL
VEHICLE
CONTROLS
AUDIO AND
CONNECTIVITY
BLUE TOOTH®
HANDSFREELINK®
ACURALINK® INDEX
50 | | 51
Turn signals/hazards on
High beams on
Automatic brake hold on
Brake hold activated
U.S.
HANDLING THE
UNEXPECTED
MAINTENANCE
SPECIFICATIONS
INFORMATION
COMMAND
CLIENT
VOICE
INDEX
Page 29
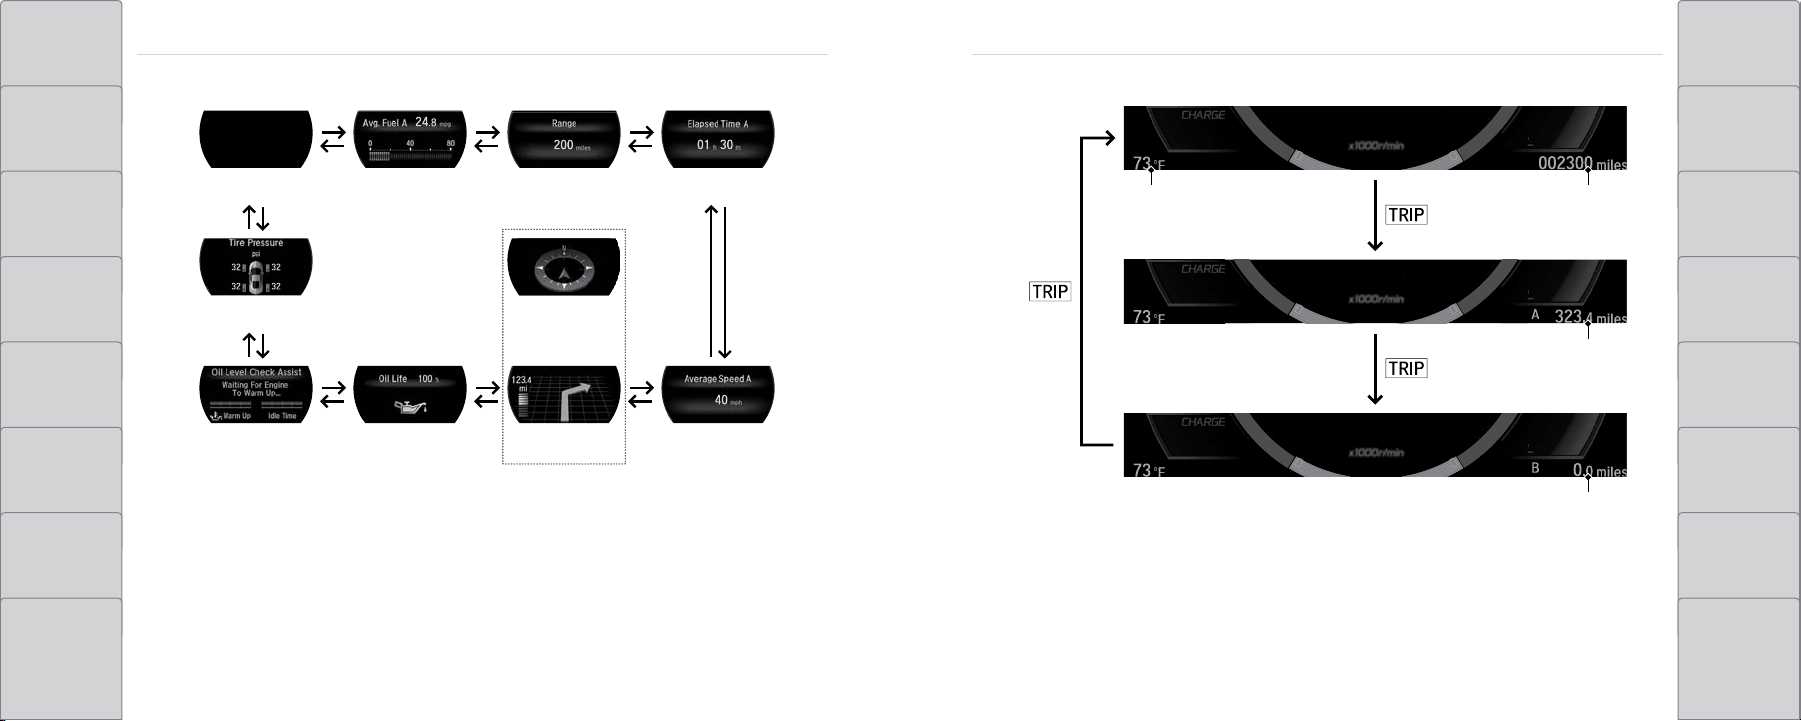
TABLE OF
CONTENTS
VISUAL INDEX DRIVING
SAFET Y
INFORMATION
n Main Displays
Blank Screen
Average/instant
fuel economy
Range
Elapsed time
n Lower Displays
Outside temperature
INSTRUMENT PANELINSTRUMENT PANEL
NAVIGATION
Odometer
HANDLING THE
UNEXPECTED
INSTRUMENT
PANEL
Tire pressure
for each tire
Compass
MAINTENANCE
Trip A
VEHICLE
CONTROLS
Oil level
Engine oil life
check assist
AUDIO AND
CONNECTIVITY
BLUE TOOTH®
HANDSFREELINK®
ACURALINK® INDEX
Turn-by-turn
directions*
Average speed
Trip B
*if equipped
SPECIFICATIONS
INFORMATION
COMMAND
52 | | 53
CLIENT
VOICE
INDEX
Page 30

TABLE OF
Main Switch
ON
OFF
CONTENTS
VEHICLE CONTROLS
Keyless Access System
VEHICLE CONTROLSVEHICLE CONTROLS
NAVIGATION
When you carry the remote transmitter (for example, in a pocket or purse) and it is outside the
VISUAL INDEX DRIVING
Learn about the various controls necessary for operating and driving the vehicle.
Using the Remote Transmitter
Lock or unlock the doors and hatch.
SAFET Y
INFORMATION
INSTRUMENT
PANEL
VEHICLE
CONTROLS
Unlock button: Press to
unlock the driver’s door. Press
again to unlock the passenger’s
door.
LED
Lock button: Press to lock the
doors and hatch. Press again
for audible verification.
vehicle and within range (about 32 inches or 80 cm), you can lock or unlock the doors and hatch
without handling the transmitter.
n Unlocking/Locking the Doors
To unlock: The door handle will pop out if both doors are
closed. If the handle fails to pop out, push on its front side.
To lock: Press the door lock button on either door handle
when the vehicle is off. If the remote transmitter is inside the
vehicle, the doors will not lock.
n Auto Pop-Out Main Switch
To disable the auto pop-out function: Use the switch in the
HANDLING THE
UNEXPECTED
MAINTENANCE
SPECIFICATIONS
glove compartment.
AUDIO AND
CONNECTIVITY
BLUE TOOTH®
HANDSFREELINK®
NOTICE
INFORMATION
COMMAND
Leaving the keyless access remote in the vehicle can result in theft or accidental movement of
the vehicle. Always take the key with you whenever you leave the vehicle unattended.
ACURALINK® INDEX
54 | | 55
CLIENT
VOICE
INDEX
Page 31

TABLE OF
To Unlock
Lock Tab
To Lock
Inner Handle
CONTENTS
VISUAL INDEX DRIVING
n Unlocking the Hatch
To unlock: Press the hatch release button on the vehicle, or
on the keyless remote.
Door Operation from Inside the Vehicle
Use several methods to lock or unlock the doors.
n Using the Lock Tab
VEHICLE CONTROLSVEHICLE CONTROLS
NAVIGATION
To unlock: Pull the lock tab rearward. When you unlock
SAFET Y
INFORMATION
either door using the lock tab, the specific door (driver’s or
passenger’s) unlocks.
HANDLING THE
UNEXPECTED
To lock: Push the lock tab forward. When you lock the door
using the lock tab on the driver’s door, both doors lock at the
INSTRUMENT
PANEL
same time. When you lock the door using the lock tab on the
passenger’s door, only that door locks.
MAINTENANCE
VEHICLE
CONTROLS
n Using the Master Door Lock Switch
SPECIFICATIONS
To unlock: Press the unlock side of the switch to unlock both
doors.
AUDIO AND
CONNECTIVITY
BLUE TOOTH®
HANDSFREELINK®
ACURALINK® INDEX
56 | | 57
To lock: Press the lock side of the switch to lock both doors.
INFORMATION
COMMAND
CLIENT
VOICE
INDEX
Page 32

TABLE OF
Inner Handle
Hatch Release Button
Main Switch
ON
OFF
ON
OFF
Lock Button
Power Window
Indicator
Driver’s
Window
Switch
Passenger’s
Window Switch
CONTENTS
VISUAL INDEX DRIVING
n Using the Front Door Inner Handle
To unlock: Pull the inner handle. The door unlocks and opens
in one motion.
To lock: Press the lock side of the switch to lock both doors.
Power Window Operation
The power windows can be opened and closed when the vehicle is on by using the switches on
the doors. The switches on the driver’s side can be used to open and close boith windows.
n Automatic Operation
VEHICLE CONTROLSVEHICLE CONTROLS
NAVIGATION
SAFET Y
INFORMATION
INSTRUMENT
PANEL
Both doors unlock when opening the driver’s door from the inside.
Do not pull an inner handle while the vehicle is moving.
n Opening the Hatch
To open: Push the switch down firmly.
To close: Pull the switch up firmly.
The window opens or closes completely. To stop the window
at any time, push or pull the switch again briefly.
HANDLING THE
UNEXPECTED
MAINTENANCE
To unlock: Press the hatch release button on the driver’s door.
n Manual Operation
VEHICLE
CONTROLS
To open: Push the switch down lightly.
SPECIFICATIONS
To close: Pull the switch up lightly.
Release the switch when the windows reach the desired position.
AUDIO AND
CONNECTIVITY
n Hatch Main Switch
n Power Window Lock
INFORMATION
Push in the power window lock button so only the driver’s window can be operated.
To disable all hatch release methods: Use the hatch main
BLUE TOOTH®
HANDSFREELINK®
ACURALINK® INDEX
switch in the glove compartment.
58 | | 59
Closing a power window on someone’s hands or fingers can cause serious injury.
Make sure your passengers are away from the windows before closing them.
WARNING
COMMAND
CLIENT
VOICE
INDEX
Page 33

TABLE OF
High Beams
Flashing the high beams
Low Beams
Off
Door Activated Position
On
(+) Button
(-) Button
CONTENTS
Interior and Exterior Lights
Operate interior and exterior lights when the vehicle is on or off.
VISUAL INDEX DRIVING
SAFET Y
INFORMATION
INSTRUMENT
PANEL
VEHICLE
CONTROLS
n Exterior Lights
Rotate the switches on the lever to operate the exterior lights. Push the lever forward to turn
on high beams. Return the lever to its original position for low beams.
Turn on all exterior lights including headlights.
OFF All exterior lights are off.
Turn on exterior lights except headlights.
AUTO Turn on the automatic lighting feature.
Headlights turn on or off depending on ambient
brightness when the vehicle is on. Headlights
automatically come on after the wipers are
engaged for a certain time.
n Interior Lights
Located on the ceiling in the front.
ON position: Interior lights remain on.
Door activated position: Interior lights come on a door is
opened, the driver’s door is unlocked, or the vehicle is turned
off.
OFF position: Interior lights remain off.
n Brightness Control
Adjust instrument panel brightness when the vehicle is on.
To brighten: Press the (+) button.
To dim: Press the (–) button.
A beep sounds when the brightness reaches minimum or
maximum.
VEHICLE CONTROLSVEHICLE CONTROLS
NAVIGATION
HANDLING THE
UNEXPECTED
MAINTENANCE
SPECIFICATIONS
AUDIO AND
CONNECTIVITY
BLUE TOOTH®
HANDSFREELINK®
ACURALINK® INDEX
60 | | 61
INFORMATION
COMMAND
CLIENT
VOICE
INDEX
Page 34

TABLE OF
Right
Left
CONTENTS
VISUAL INDEX DRIVING
n Map Lights
Press the map lights in the ceiling to turn them on or off.
Wiper Operation
The windshield wipers and washers can be used when the vehicle is on.
n Front Wipers
VEHICLE CONTROLSVEHICLE CONTROLS
NAVIGATION
Move the wiper lever up or down to the desired position.
SAFET Y
INFORMATION
INSTRUMENT
PANEL
VEHICLE
CONTROLS
n One-Touch Turn Signal
Use this quick and convenient method to signal a lane
change.
Lightly push the turn signal lever up or down for a three-blink
sequence.
For a continuous signal, push the lever up or down until it
Pull to use
washer.
MIST
OFF
INT (intermittent)
LO: Low speed wipe
HI: High speed wipe
HANDLING THE
UNEXPECTED
MAINTENANCE
SPECIFICATIONS
locks into place.
AUDIO AND
CONNECTIVITY
BLUE TOOTH®
HANDSFREELINK®
ACURALINK® INDEX
62 | | 63
INFORMATION
COMMAND
CLIENT
VOICE
INDEX
Page 35

TABLE OF
Allow sufficient
space.
Move
back.
CONTENTS
VISUAL INDEX DRIVING
Intermittent (INT) wipers
When you move the lever to the INT position, the wipers operate based on the wiper delay.
Rotate the adjustment ring to adjust the wiper delay.
Adjusting the Seats
Make seat adjustments before driving to ensure the best comfort and safety.
n Adjusting the Driver’s seat
VEHICLE CONTROLSVEHICLE CONTROLS
NAVIGATION
Adjust the driver’s seat as far back as possible while allowing
you to maintain full control of the vehicle. You should be able
to sit upright and well back in the seat, adequately press the
pedals without leaning forward, and grip the steering wheel
HANDLING THE
UNEXPECTED
SAFET Y
INFORMATION
Lower speed,
fewer sweeps
comfortably. The passenger’s seat should be adjusted so that
INSTRUMENT
PANEL
Higher speed,
more sweeps
Intermittent time adjusting ring
it is as far back from the front airbag in the dashboard as
possible.
The National Highway Traffic Safety Administration and Transport Canada recommend that
MAINTENANCE
drivers allow at least 10 inches (25 cm) between the center of the steering wheel and their
VEHICLE
CONTROLS
AUDIO AND
CONNECTIVITY
BLUE TOOTH®
HANDSFREELINK®
ACURALINK® INDEX
64 | | 65
chest.
SPECIFICATIONS
INFORMATION
COMMAND
CLIENT
VOICE
INDEX
Page 36

TABLE OF
CONTENTS
WARNING
n Manual Seat Adjustments*
VEHICLE CONTROLSVEHICLE CONTROLS
NAVIGATION
Sitting too close to a front airbag can result in serious injury or death if the front
VISUAL INDEX DRIVING
airbags inflate.
Always sit as far back from the front airbags as possible while maintaining
control of the vehicle.
SAFET Y
INFORMATION
INSTRUMENT
PANEL
WARNING
Reclining the seat-back too far can result in serious injury or death in a crash.
Adjust the seat-back to an upright position, and sit well back in the seat.
Horizontal
position
adjustment
Seat-back angle
adjustment
HANDLING THE
UNEXPECTED
MAINTENANCE
Driver’s seat is shown
SPECIFICATIONS
VEHICLE
CONTROLS
WARNING
Sitting improperly or out of position can result in serious injury or death in a
crash. Always sit upright, well back in the seat, with your feet on the floor.
AUDIO AND
CONNECTIVITY
BLUE TOOTH®
HANDSFREELINK®
ACURALINK® INDEX
66 | | 67
*if equipped
INFORMATION
COMMAND
CLIENT
VOICE
INDEX
Page 37

TABLE OF
Unlock
Lock
CONTENTS
n Power Seat Adjustments*
n Floor Mats
VEHICLE CONTROLSVEHICLE CONTROLS
NAVIGATION
Position the floor mats properly and anchor them. If they are
VISUAL INDEX DRIVING
not properly positioned, the floor mats can interfere with the
seat functions.
Do not put additional floor mats on top of the anchored
SAFET Y
INFORMATION
Horizontal
position
adjustment
mats.
HANDLING THE
UNEXPECTED
INSTRUMENT
PANEL
Seat-back angle
adjustment
MAINTENANCE
Driver’s seat is shown
VEHICLE
CONTROLS
Models with lumbar support
SPECIFICATIONS
Higher part of the
AUDIO AND
CONNECTIVITY
BLUE TOOTH®
HANDSFREELINK®
Lower part of the
Lumbar support
ACURALINK® INDEX
Lumbar support
INFORMATION
COMMAND
Lumbar support
adjustment switch
*if equipped
68 | | 69
CLIENT
VOICE
INDEX
Page 38

TABLE OF
To adjust
To lock
Lever
SET Button
Memory
Button 1
Memory
Button 2
CONTENTS
VISUAL INDEX DRIVING
SAFET Y
INFORMATION
n Adjusting the Steering Wheel
The steering wheel height and distance from your body can be adjusted so that you can
comfortably grip the steering wheel in an appropriate driving posture.
1. Pull up the steering wheel adjustment lever.
2. Move the steering wheel up or down, and in or out.
3. Push down the steering wheel adjustment lever to lock
the steering wheel in position.
Driving Position Memory System*
You can store two driver’s seat and door mirror positions into memory when the vehicle is on.
When you unlock and open the driver’s door with a remote transmitter, the seat and door mirrors
adjust automatically to the corresponding preset positions.
Adjust the seat and mirrors to your preferred positions.
1. Press SET.
2. Press and hold memory button 1 or 2. You will
VEHICLE CONTROLSVEHICLE CONTROLS
NAVIGATION
HANDLING THE
UNEXPECTED
hear two beeps when the memory is set.
INSTRUMENT
PANEL
WARNING
Press one of the memory buttons to recall previously stored
positions. Lumbar positions cannot be stored.
MAINTENANCE
Adjusting the steering wheel position while driving may cause you to lose control
of the vehicle and be seriously injured in a crash.
VEHICLE
CONTROLS
Adjust the steering wheel only when the vehicle is stopped.
SPECIFICATIONS
AUDIO AND
CONNECTIVITY
BLUE TOOTH®
HANDSFREELINK®
ACURALINK® INDEX
70 | | 71
*if equipped
INFORMATION
COMMAND
CLIENT
VOICE
INDEX
Page 39

TABLE OF
Switch
Selector
Switch
Adjustment
Slide the selector switch to left
or right to tilt down either side
door mirror.
Selector Switch
CONTENTS
Adjusting the Mirrors
Adjust the angle of the mirrors for the best visibility when you are sitting in the correct driving
VISUAL INDEX DRIVING
SAFET Y
INFORMATION
position.
n Automatic Dimming Rearview Mirror
When driving after dark, the automatic dimming function
reduces the glare in the rearview mirror (and power door
mirrors) from headlights behind you.
n Reverse Tilt Door Mirrors
The selected door mirror can tilt downward when you shift to Reverse (R), improving visibility
on the selected side of the vehicle while reversing. The mirror returns to its original position
when you shift out of Reverse.
Models with driving position memory system
Either side mirror can tilt by moving the selector switch to the
appropriate side.
VEHICLE CONTROLSVEHICLE CONTROLS
NAVIGATION
HANDLING THE
UNEXPECTED
The function cancels when the transmission is in Reverse (R).
INSTRUMENT
PANEL
VEHICLE
CONTROLS
n Power Door Mirrors
Adjust the power door mirrors using the switches on the driver’s door when the vehicle is on.
L/R selector switch: Select the left or right mirror. After
Models without driving position memory system
The passenger-side door mirror can tilt downward by moving
the selector switch to the right.
MAINTENANCE
SPECIFICATIONS
adjusting the mirror, return the switch to the center position.
AUDIO AND
CONNECTIVITY
Mirror position adjustment switch: Press the switch left,
right, up, or down to move the mirror.
CLIENT
INFORMATION
BLUE TOOTH®
HANDSFREELINK®
ACURALINK® INDEX
72 | | 73
COMMAND
VOICE
INDEX
Page 40

TABLE OF
Red Indicator
Press and hold the button on the remote
and the HomeLink button at the same
time. Then, while continuing to hold the
HomeLink button, press and release the
button on the remote every 2 seconds.
Does the LED blink at a faster rate within 20 seconds?
Press and hold the
HomeLink button
again.
Training
complete
YESNO
HomeLink indicator
flashes for 2 seconds,
then remains on.
HomeLink LED
remains on.
YESNO
YESNO
Position the remote transmitter
1–3 inches (3–8 cm) from the
HomeLink button you want to program.
1
Press and hold the desired HomeLink
button and the button on the remote
transmitter.
Does the HomeLink indicator (LED) blink at a faster
rate after about 10 seconds?
2
a
The remote has a rolling code. Press
the “learn” button on the remotecontrolled device (e.g., garage door
opener).
Press the programmed HomeLink
button again; the remote-controlled
device should operate.
Within 30 seconds, press and hold the
programmed HomeLink button for 2
seconds.
a
Press and hold the programmed
HomeLink button for about a second.
Does the device (garage door opener) work?
3
b
4
5
CONTENTS
VEHICLE CONTROLSVEHICLE CONTROLS
NAVIGATION
HomeLink® Universal Transceiver
Program your vehicle to operate up to three remote-controlled devices around your home—such
VISUAL INDEX DRIVING
SAFET Y
INFORMATION
INSTRUMENT
PANEL
VEHICLE
CONTROLS
AUDIO AND
CONNECTIVITY
as garage doors, lighting, or home security systems—using the buttons on the ceiling.
n Training a Button
Park near the system you want to program, and follow the instructions in the flowchart.
To retrain a button or erase codes, see the Owner’s Manual on the Owner Information CD or
visit owners.acura.com (U.S.) or www.myacura.ca (Canada). If you need help, call (800) 3553515 or visit www.homelink.com.
HANDLING THE
UNEXPECTED
MAINTENANCE
SPECIFICATIONS
CLIENT
INFORMATION
BLUE TOOTH®
HANDSFREELINK®
ACURALINK® INDEX
74 | | 75
HomeLink® is a register ed trademark of Gentex Corporation.
COMMAND
VOICE
INDEX
Page 41

TABLE OF
Dashboard
vents
Dashboard
and floor
vents
Floor vents Floor and MID vents
defroster
vents
CONTENTS
VISUAL INDEX DRIVING
Climate Control System
The automatic climate control system can maintain your preferred interior temperature by
selecting the proper mix of heated or cooled air and fan speed.
There is a system to cool the High Voltage battery. When that system is active, you may notice
reduced cooling capability in the cabin.
Seat Heaters*
Quickly warm the seats when the vehicle is on.
n Front Seat Heaters
Press the button for the desired setting. An indicator in the
VEHICLE CONTROLSVEHICLE CONTROLS
NAVIGATION
switch appears for the selected setting.
SAFET Y
INFORMATION
Press once: high setting (three indicators)
HANDLING THE
UNEXPECTED
Press twice: middle setting (two indicators)
Press three times: low setting (one indicator)
INSTRUMENT
PANEL
Press four times: off setting (no indicators)
The high setting cycles on and off. For continuous heat,
MAINTENANCE
choose middle or low settings.
VEHICLE
CONTROLS
AUTO button:
Press, then use
AUDIO AND
CONNECTIVITY
the temperature
control dial to set
your preferred
temperature.
BLUE TOOTH®
HANDSFREELINK®
ACURALINK® INDEX
ON/OFF
button
SYNC button:
Set the passenger’s temperature
to the same as the driver’s.
Recirculation button:
Choose recirculation or
fresh air.
Windshield
defroster button
Rear window
defogger/heated
mirror button
WARNING
Heat-induced burns are possible when using seat heaters.
Persons with a diminished ability to sense temperature (e.g., persons with
diabetes, lower-limb nerve damage, or paralysis) or with sensitive skin should
not use the seat heaters.
*if equipped
76 | | 77
SPECIFICATIONS
CLIENT
INFORMATION
VOICE
COMMAND
INDEX
Page 42

TABLE OF
Audio/Information Screen
CONTENTS
VISUAL INDEX DRIVING
Customized Features
You can easily customize many features of your vehicle. The customized settings are recalled
every time you unlock the driver’s door with the remote (Driver 1 or Driver 2). Settings are unique
to each remote.
Setting the Clock
Adjust the time in the clock display.
Models without navigation
VEHICLE CONTROLSVEHICLE CONTROLS
NAVIGATION
Select items on the touchscreen to make selections.
SAFET Y
INFORMATION
Model with navigation shown
1. From the HOME screen, select Settings.
2. Select Clock/Info.
HANDLING THE
UNEXPECTED
3. Select Clock Adjustment.
4. Adjust the hour and minute values.
INSTRUMENT
PANEL
5. Select OK when complete.
MAINTENANCE
VEHICLE
CONTROLS
AUDIO AND
CONNECTIVITY
n How to Change a Setting
The vehicle must be in Park (P) to select Vehicle Settings. Use the touchscreen to make and
Models with navigation
The time is automatically set using GPS signals.
SPECIFICATIONS
INFORMATION
enter selections. From the HOME screen:
BLUE TOOTH®
HANDSFREELINK®
1. Press the SETTINGS button.
2. Select a category (Clock/Info, Audio, Bluetooth/Wi-Fi, System, etc.).
COMMAND
3. Select a setting option, and make your preferred changes.
4. Press BACK to exit out of the menus.
ACURALINK® INDEX
78 | | 79
CLIENT
VOICE
INDEX
Page 43

TABLE OF
In the glove box
In the glove box
In the console compartment
CONTENTS
AUDIO AND CONNECTIVITY
VISUAL INDEX DRIVING
Learn how to operate the vehicle’s audio system.
n Accessory Power Socket
Located on the side of the center console. Open the socket
cover to use power when the vehicle is on.
AUDIO AND CONNECTIVITYAUDIO AND CONNECTIVITY
NAVIGATION
Basic Audio Operation
SAFET Y
INFORMATION
INSTRUMENT
PANEL
n USB Ports
Connect a USB flash drive or other audio device, such as an iPod or iPhone. One port is in the
glove box, the other in the console compartment.
1. Open the glove box and locate the USB port, on the left.
2. Install the iPod dock connector or the USB flash drive into
NOTICE
Do not insert an automotive type cigarette lighter element. This can overheat the power
socket.
HANDLING THE
UNEXPECTED
MAINTENANCE
the USB port. This port is for playing audio and device
charging.
VEHICLE
CONTROLS
AUDIO AND
CONNECTIVITY
1. Open the console compartment, then open the USB port
cover.
2. Install the iPod dock connector or the USB flash drive
into the USB port. This port is for playing audio, device
SPECIFICATIONS
INFORMATION
charging, and connecting to Apple CarPlay (see page
BLUE TOOTH®
HANDSFREELINK®
ACURALINK® INDEX
88) or Android Auto (see page 90).
COMMAND
iPod and iPhone are trademarks of Apple, Inc.
Applicable laws may prohibit the operation of handheld electronic devices while operating a vehicle.
80 | | 81
CLIENT
VOICE
INDEX
Page 44

TABLE OF
Left Selector Wheel
SOURCE Button
Left Selector Wheel
CONTENTS
n Steering Wheel Controls
Operate certain functions of the audio system using the steering wheel controls.
AUDIO AND CONNECTIVITYAUDIO AND CONNECTIVITY
NAVIGATION
n Adjusting the Sound
Make selections using the touchscreen.
VISUAL INDEX DRIVING
SOURCE button: Cycle through available audio modes.
Selector Wheel: Roll up and down to adjust volume, or press
to mute. The selector wheel has different functions based on
SAFET Y
INFORMATION
the audio source:
Radio
Left or right: Select previous or next radio preset
INSTRUMENT
PANEL
Left or right (and hold): Select previous or next strong
station
1. From the HOME screen, select Settings.
2. Select Audio.
3. Select Sound.
4. Select the tabs to change the sound mode and adjust the
setting.
5. Select OK when complete.
HANDLING THE
UNEXPECTED
MAINTENANCE
USB flash drive, iPod, Bluetooth Audio
Left or right: Restart current song, or skip to next song.
VEHICLE
CONTROLS
Left or right (and hold): Select previous or next folder
SPECIFICATIONS
Pandora*
Right: Skip to next song.
AUDIO AND
CONNECTIVITY
BLUE TOOTH®
HANDSFREELINK®
ACURALINK® INDEX
Left or right (and hold): Select previous or next station.
.
*if equipped
82 | | 83
CLIENT
INFORMATION
VOICE
COMMAND
INDEX
Page 45

TABLE OF
Select and hold.
Select and hold.
CONTENTS
Operating Display Audio
Use simple gestures—such as touching, swiping, and scrolling—to operate certain audio
VISUAL INDEX DRIVING
SAFET Y
INFORMATION
functions.
Some items may be grayed out during driving to reduce the potential for distraction. You can
select them when the vehicle is stopped.
Wearing gloves may limit or prevent touchscreen response.
You can use a microfiber cleaning cloth to remove dust or fingerprints from the touchscreen.
n Changing Icon Order
You can change the order of the icons on the HOME screen.
1. From the HOME screen, select and hold an icon to enter
the customization screen.
2. Select and hold the icon you want to move and slide it to
a different position.
3. Select OK when complete.
AUDIO AND CONNECTIVITYAUDIO AND CONNECTIVITY
NAVIGATION
HANDLING THE
UNEXPECTED
n Adding Apps or Widgets to the HOME Screen
INSTRUMENT
PANEL
Power: Turn
audio on or off.
MAP
Navigation
You can add apps or widgets to the HOME screen for easy selection.
1. From the HOME screen, select and hold an empty space.
MAINTENANCE
VEHICLE
CONTROLS
AUDIO AND
CONNECTIVITY
BLUE TOOTH®
HANDSFREELINK®
ACURALINK® INDEX
HOME
Volume
MENU: Display
menu items for
the selected
screen.
BACK: Go back to
the previous screen.
84 | | 85
button: Change
screen brightness.
Settings: Select to
customize options.
Apps: Choose an
app or widget.
Model with navigation shown
2. Select Add App or Add Widget. The Apps/Widgets screen
appears.
SPECIFICATIONS
INFORMATION
COMMAND
CLIENT
VOICE
INDEX
Page 46
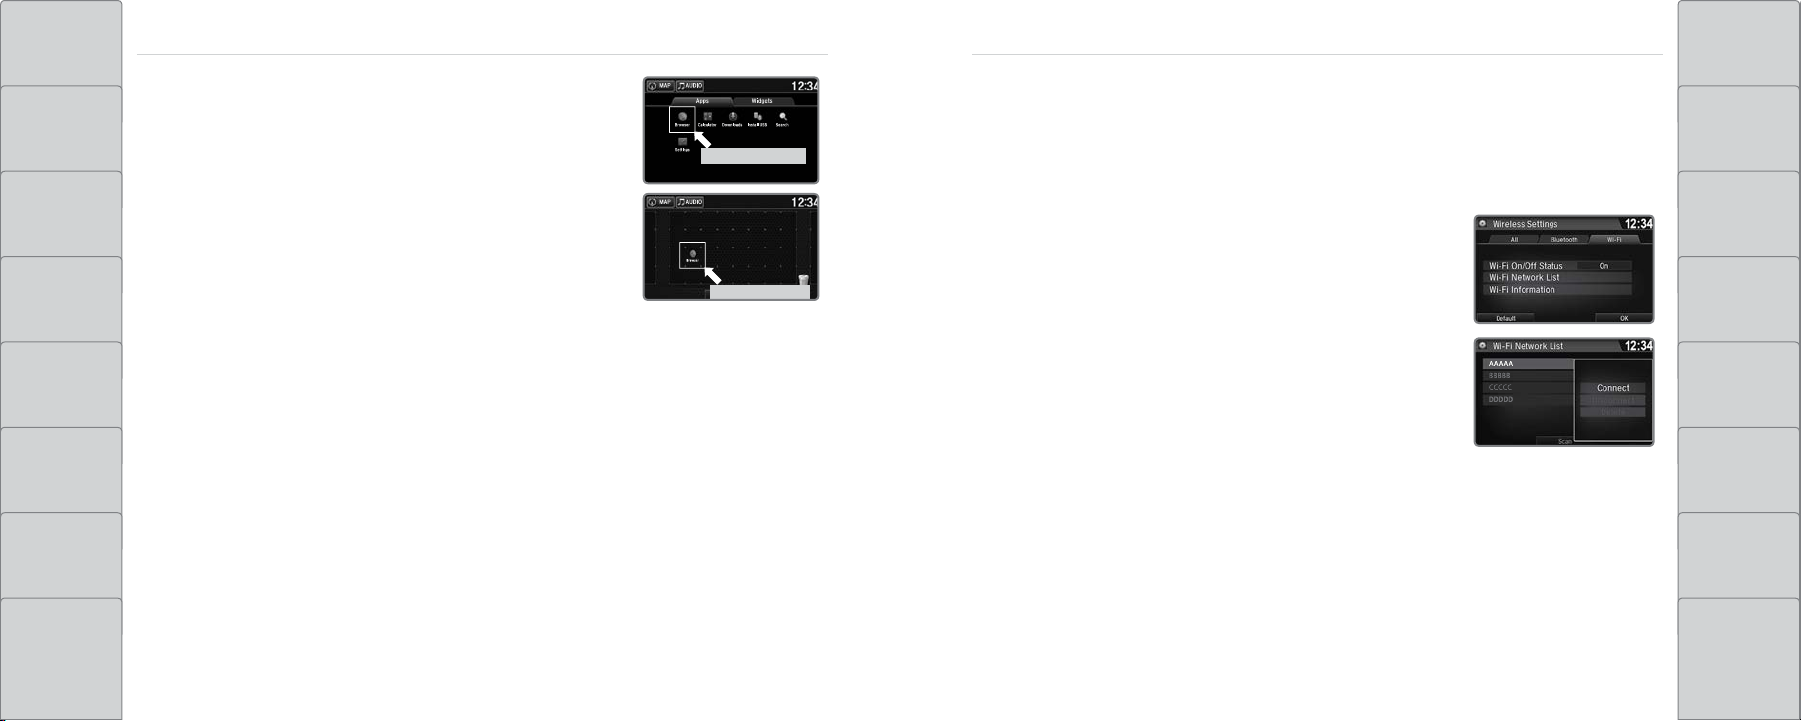
TABLE OF
Select and hold.
Select and hold.
Select and hold.
Select and hold.
Drag and drop.
CONTENTS
3. Select and hold the app or widget you want to add to the
HOME screen. The customization screen appears.
VISUAL INDEX DRIVING
Wi-Fi Connection
You can connect the audio system to the internet using Wi-Fi and use online services through
the touchscreen. If your compatible phone has hotspot capabilities, the system can be tethered
to the phone. When the vehicle is stopped, follow the steps below to set up Wi-Fi. Standard data
AUDIO AND CONNECTIVITYAUDIO AND CONNECTIVITY
NAVIGATION
rates apply with your phone service provider.
4. Select and hold the app or widget and move it to where
SAFET Y
INFORMATION
you want.
1. From the HOME screen, select Settings.
2. Select Bluetooth/Wi-Fi. Select the Wi-Fi tab.
HANDLING THE
UNEXPECTED
3. Select Wi-Fi On/Off Status, and select On.
INSTRUMENT
PANEL
5. Select OK when complete.
4. Select Wi-Fi Network List. Make sure your phone’s
Wi-Fi setting is in access point (tethering) mode.
MAINTENANCE
5. Select the phone you want to connect to the system.
VEHICLE
CONTROLS
If the phone you want to connect does not appear, select
Scan.
6. Select Connect.
SPECIFICATIONS
7. Enter a password for your phone. Select OK.
AUDIO AND
CONNECTIVITY
BLUE TOOTH®
HANDSFREELINK®
The Wi-Fi symbol is displayed on the list when connection is
successful.
CLIENT
INFORMATION
VOICE
COMMAND
INDEX
ACURALINK® INDEX
86 | | 87
Page 47

TABLE OF
Home screen
Apple CarPlay
icon
Apple CarPlay menu screen
Go back to
the Apple CarPlay
menu screen
Go back to the
home screen
CONTENTS
VISUAL INDEX DRIVING
SAFET Y
INFORMATION
INSTRUMENT
PANEL
Apple® CarPlay®
Connect an Apple CarPlay-compatible iPhone to the system. You can use the touchscreen
to make a phone call, listen to music, and more. Visit the Apple CarPlay website for more
information.
Park in a safe place before connecting your iPhone and launching any compatible apps.
1. Connect the iPhone to the USB port in the console
compartment (see page 80).
2. Apple CarPlay requires you to send vehicle information to
your iPhone. On the consent screen, select Enable Once,
Always Enable, or Cancel. Your phone may prompt you to
allow access for CarPlay to be launched.
3. From the HOME screen, select Apple CarPlay.
4. Select a menu option:
• Phone: Access your contacts, make phone calls, or listen
to voicemail. While connected to Apple CarPlay, calls can
only be made through Apple CarPlay, not through Bluetooth
HandsFreeLink.
• Music: Play music stored on your iPhone.
• Maps: View a map and operate navigation with route
guidance.
• Messages: View and reply to text messages, or have
messages read to you aloud by the system.
AUDIO AND CONNECTIVITYAUDIO AND CONNECTIVITY
NAVIGATION
HANDLING THE
UNEXPECTED
MAINTENANCE
VEHICLE
CONTROLS
AUDIO AND
CONNECTIVITY
Depending on use, Apple CarPlay can share certain vehicle information (e.g., vehicle location, speed, and other
operating conditions) with the connected iPhone. See Apple’s privacy policy for details regarding Apple’s use
SPECIFICATIONS
INFORMATION
and handling of data uploaded by CarPlay. Use of CarPlay is at user’ s own risk, and is subject to agreement to
the CarPlay terms of use, which are included as part of the Apple iO S terms of use. CarPlay vehicle integration
BLUE TOOTH®
HANDSFREELINK®
is provided “as is,” and Acura cannot guarantee CarPlay operability or functionality now or in the future due
to, among other conditions, changes in CarPlay software/Apple iOS, service interruptions, or incompatibility
or obsolescence of vehicle-int egrated hardware or software. See dealer for details. Use CarPlay only when
COMMAND
conditions allow you to do so sa fely. See your Owner’s Manual on the Owner Information CD or at owners.acura.
ACURALINK® INDEX
88 | | 89
com (U.S.) or myacura.ca (Canada) for further license and warranty terms.
CLIENT
VOICE
INDEX
Page 48

TABLE OF
Android Auto icon
CONTENTS
VISUAL INDEX DRIVING
SAFET Y
INFORMATION
INSTRUMENT
PANEL
Android Auto™
Connect a compatible Android phone to the system. You can use the touchscreen to make a
phone call, listen to music, and more. Visit the Android Auto website for more information.
Park in a safe place before connecting your smartphone and launching any compatible apps.
1. Download the Android Auto app to your phone.
2. Connect the phone to the USB port (see page 80).
The phone is automatically paired. A tutorial also appears.
3. From the HOME screen, select Android Auto.
4. Android Auto requires you to send vehicle information to
Google or its service providers. On the consent screen, select
Enable Once, Always Enable, or Cancel.
Model with navigation shown
5. Select a menu option.
A. Maps (Navigation): View Google Maps and operate
navigation with route guidance. You cannot enter
destinations using the keyboard while the vehicle is
moving.
B. Phone: Make phone calls or listen to voicemail.
While connected to Android Auto, calls can only be
made through Android Auto, not through Bluetooth
HandsFreeLink.
C. HOME (Google Now): Display useful information organized by Android Auto into
simple cards that appear only when needed.
D. Music: Play music from compatible apps. Select this icon to switch between music apps.
AUDIO AND CONNECTIVITYAUDIO AND CONNECTIVITY
A B C D E
NAVIGATION
HANDLING THE
UNEXPECTED
MAINTENANCE
E. Return to HOME screen: Go back to the vehicle system HOME screen.
VEHICLE
CONTROLS
F. Voice: Use voice commands via Google Voice Search to operate Android Auto. You can
also press and hold the Talk button on the steering wheel (see page 101) to say voice
SPECIFICATIONS
commands.
AUDIO AND
CONNECTIVITY
BLUE TOOTH®
HANDSFREELINK®
ACURALINK® INDEX
Depending on use, Android Auto can share certain vehicle information (e.g., vehicle location, speed, and other
operating conditions) with Google and its service providers. See Google privacy policy for details regarding
Google’s use and handling of data uploaded by Android Auto. Use of Android Auto is at user’s own risk, and is
subject to agreement to the Android Auto terms of use, which are presented to the user when the Android Auto
application is downloaded to the user’s Android phone. Android Auto vehicle integration is provided “as is,” and
Honda cannot guarantee Android Auto operability or functionality now or in the future due to, among other
conditions, changes in Android Auto software/Android operating system, service interruptions, or incompatibility
or obsolescence of vehicle-int egrated hardware or software. See dealer for details. Only use Android Auto when
conditions allow you to do so sa fely. See your Owner’s Manual on the Owner Information CD or at owners.honda.
com (U.S.) or myhonda.ca (Canada) for further license and warranty terms.
90 | | 91
CLIENT
INFORMATION
VOICE
COMMAND
INDEX
F
Page 49

TABLE OF
CONTENTS
VISUAL INDEX DRIVING
FM Radio
Play FM radio stations.
Source: Select the FM icon.
Open/close: Display or hide the
station list or preset list.
SiriusXM® Radio*
Available on a subscription basis only. For more information or to subscribe, contact your dealer,
or visit www.siriusxm.com (U.S.) or www.sirius.ca (Canada).
Source: Select the SiriusXM icon.
AUDIO AND CONNECTIVITYAUDIO AND CONNECTIVITY
NAVIGATION
SAFET Y
INFORMATION
INSTRUMENT
PANEL
VEHICLE
CONTROLS
AUDIO AND
CONNECTIVITY
Scan: Scan for
each station with
a strong signal.
Tune: Change
the station.
Presets: Select and hold a preset number to store the
current station. Select a preset number to select a previously
stored station.
Seek: Search
for the next or
previous station
with a strong
signal.
Scan: Scan for
each station with
a strong signal.
Category: Change
the category.
Presets: Select and hold a preset number to store
the current station. Select a preset number to select
a previously stored station.
Station Art
Open/close:
Display or hide
the channel list or
preset list.
Skip: Change the
selection. Press and
hold to skip rapidly.
Channel: Change the channel.
Press and hold to skip 10 channels
at a time.
HANDLING THE
UNEXPECTED
MAINTENANCE
SPECIFICATIONS
INFORMATION
n Selecting an HD Radio™ Subchannel
To learn about additional features—such as multi-channel preset, replay, or SportsFlash—see
your Owner’s Manual on the Owner Information CD or visit owners.acura.com (U.S.) or myacura.
ca (Canada).
COMMAND
BLUE TOOTH®
HANDSFREELINK®
1. Select Menu.
2. Select HD Radio Subchannel.
3. Select the channel number.
Not all HD Radio stations broadcast using subchannels.
ACURALINK® INDEX
92 | | 93
* If equipped. Available in the U.S. and Canada, except Hawaii, Alaska, and Puerto Rico.
XM is a registered trademark of Sirius XM Radio, Inc.
CLIENT
VOICE
INDEX
Page 50

TABLE OF
CONTENTS
iPod®
Play and operate an iPod or iPhone through the vehicle’s audio system. Connect your device to
VISUAL INDEX DRIVING
the USB port (see page 80).
Source: Select the iPod icon.
n Searching for Music (iPod)
Use the touchscreen to search for tracks stored on the iPod.
1. Use the touchscreen to search for tracks stored on the
iPod.
AUDIO AND CONNECTIVITYAUDIO AND CONNECTIVITY
NAVIGATION
2. From the audio screen, press MENU.
SAFET Y
INFORMATION
INSTRUMENT
PANEL
VEHICLE
CONTROLS
AUDIO AND
CONNECTIVITY
Cover art
MENU: Display
menu options,
including Music
Search.
Play/pause
Open/close: Display or
hide the track list (iPod
only)
Song: Change the
track. Press and hold
to move rapidly
within a track.
3. Select Music Search.
4. Select a search option.
5. Select the track you want to play.
On vehicles with navigation, you can also search for and play iPod music using Song By
Voice™ (see page 221,).
HANDLING THE
UNEXPECTED
MAINTENANCE
SPECIFICATIONS
CLIENT
INFORMATION
BLUE TOOTH®
HANDSFREELINK®
ACURALINK® INDEX
94 | | 95
Applicable laws may prohibit the operation of handheld electronic devices while operating a vehicle..
iPod is a registered trademark of Apple, Inc.
COMMAND
VOICE
INDEX
Page 51
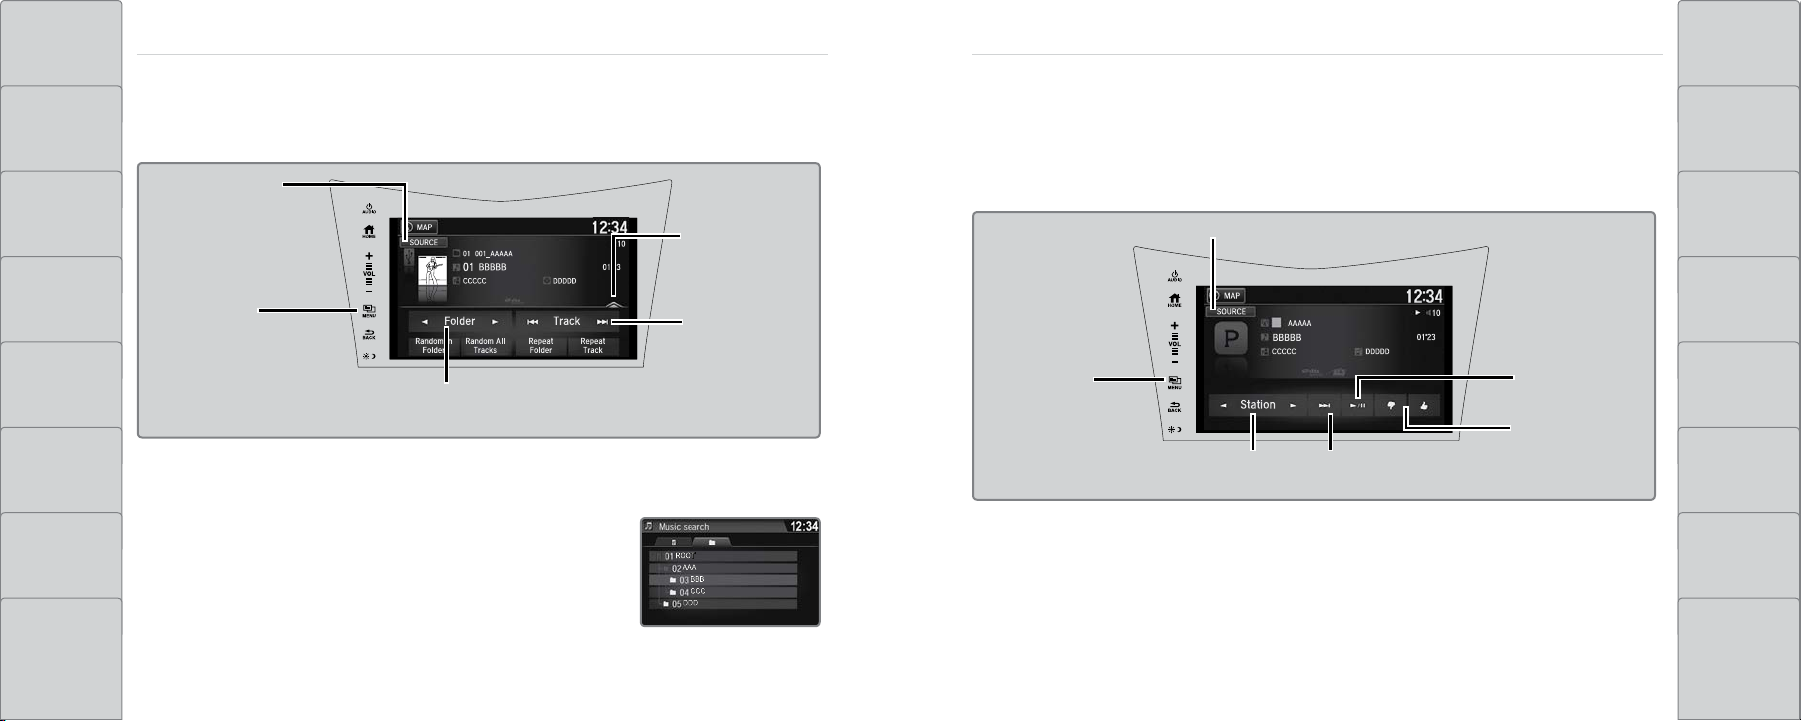
TABLE OF
CONTENTS
VISUAL INDEX DRIVING
USB Flash Drive
Play and operate a USB flash drive through the vehicle’s audio system. Connect your device to
the USB port (see page 80).
Pandora®*
Play and operate Pandora from your compatible phone through the vehicle’s audio system.
Connect your phone when the vehicle is stopped.
AUDIO AND CONNECTIVITYAUDIO AND CONNECTIVITY
NAVIGATION
Visit www.acura.com/handsfreelink (U.S.) or handsfreelink.ca (Canada) to check phone
SAFET Y
INFORMATION
INSTRUMENT
PANEL
VEHICLE
CONTROLS
AUDIO AND
CONNECTIVITY
Source: Select the
USB icon.
MENU: Display
menu options,
including Music
Search.
Folder: Change
the folder.
n Searching for Music
Use the touchscreen to search for tracks stored on the USB flash drive.
Open/close:
Display or hide
the track list.
Track: Change
the track.
compatibility. Standard data rates apply.
Source: Select the Pandora icon.
MENU: Display
menu options,
including the
Station List.
Station: Change
the station.
Skip: Go to the
next song.
HANDLING THE
UNEXPECTED
MAINTENANCE
Play/Pause
SPECIFICATIONS
Like/dislike
song
CLIENT
INFORMATION
1. From the audio screen, press MENU.
BLUE TOOTH®
HANDSFREELINK®
ACURALINK® INDEX
2. Select Music Search.
3. Select a folder.
4. Select the track you want to play.
96 | | 97
*If equipped; available in the U.S. only. Applicable laws may prohibit the operation of handheld electronic
devices while operating a vehicle. Launch streaming audio on your phone only when it is safe to do so.
VOICE
COMMAND
INDEX
Page 52

TABLE OF
CONTENTS
VISUAL INDEX DRIVING
SAFET Y
INFORMATION
INSTRUMENT
PANEL
VEHICLE
CONTROLS
AUDIO AND
CONNECTIVITY
For iPhone:
1. Connect via Bluetooth HandsFreeLink (see page 103) or USB (see page 80).
2. If you cannot operate Pandora through the audio system, it may be streaming through
Bluetooth Audio. Make sure Pandora mode on the audio system is selected.
3. If Pandora still does not operate, you may have to reconnect the cable.
4. A pop-up may appear on your phone requesting you to allow access for Pandora
to be launched.
For other compatible smartphones:
Connect via Bluetooth HandsFreeLink (see page 103).
Bluetooth® Audio
Play streaming or stored audio from your compatible phone through your vehicle’s audio system.
Connect your phone to Bluetooth HandsFreeLink (see page 103).
Visit www.acura.com/handsfreelink (U.S.) or www.handsfreelink.ca (Canada) to check phone
compatibility. Standard data rates apply.
Bluetooth indicator: Appears when
Source: Select the
Bluetooth icon.
MENU: Display
menu options,
including Music
Search.
your phone is connected to HFL
Play/pause
Group: Change
the group.
AUDIO AND CONNECTIVITYAUDIO AND CONNECTIVITY
Open/close: Display or
hide the track list.
Track: Change
the track.
NAVIGATION
HANDLING THE
UNEXPECTED
MAINTENANCE
SPECIFICATIONS
CLIENT
INFORMATION
Make sure the volume on your phone is properly adjusted.
BLUE TOOTH®
HANDSFREELINK®
ACURALINK® INDEX
98 | | 99
You may need to enable additional settings on your phone for playback.
The resume/pause function and remote audio controls are not supported on all phones.
Applicable laws may prohibit the operation of handheld electronic devices while operating a vehicle.
Launch streaming audio on your phone only when it is safe to do so.
VOICE
COMMAND
INDEX
Page 53

TABLE OF
Hang-up/Back Button
Talk Button
Microphone
Pick-up Button
Volume up
Volume down
Left Selector Wheel
CONTENTS
VISUAL INDEX
SAFET Y
INFORMATION
INSTRUMENT
PANEL
VEHICLE
CONTROLS
AUDIO AND CONNECTIVITY
n Searching for Music
Use the touchscreen to search for tracks stored on the device.
1. From the audio screen, press MENU.
2. Select Music Search.
3. Select a search category.
4. Select the track you want to play.
Music Search works with many but not all devices.
BLUETOOTH® HANDSFREELINK
BLUETOOTH® HANDSFREELINK®
Learn how to operate the vehicle’s hands-free calling system.
Basic HFL Operation
Make and receive phone calls using the vehicle’s audio system, without handling your phone.
Visit www.acura.com/handsfreelink (U.S.) or www.handsfreelink.ca (Canada) to check phone
compatibility.
n HFL Displays and Controls
Use the steering-wheel controls or touchscreen to enter information and make selections.
To reduce the potential for driver distraction, certain manual functions may be inoperable or
grayed out while the vehicle is moving. Voice commands are always available.
®
NAVIGATION
DRIVING
HANDLING THE
UNEXPECTED
MAINTENANCE
SPECIFICATIONS
AUDIO AND
CONNECTIVITY
BLUE TOOTH®
HANDSFREELINK®
ACURALINK®
100 |
Applicable laws may prohibit the operation of handheld electronic devices while operating a vehicle.
| 101
CLIENT
INFORMATION
VOICE
COMMAND
INDEX
INDEX
Page 54

TABLE OF
CONTENTS
VISUAL INDEX DRIVING
SAFET Y
INFORMATION
INSTRUMENT
PANEL
BLUETOOTH® HANDSFREELINK®
n Talk Button Tips
• For a list of phone-related voice commands, see page 219.
• When using the Talk button, wait until you hear a beep before speaking.
• To bypass the system prompts, simply press the Talk button again to say your command.
• When the Talk button is pressed, all available voice commands are highlighted in yellow.
• Speak in a clear, natural voice.
• Reduce all background noise.
• Adjust the dashboard and side vents away from the microphone in the ceiling.
• Close the windows.
Pairing a Phone
To use hands-free phone and streaming audio functions, you must first pair your phone to the
system. This can only be done when the vehicle is stopped. Use the touchscreen to make and
enter selections.
1. From the HOME screen, select Settings.
2. Select Phone.
3. Select Bluetooth Device List.
4. Select Add Bluetooth Device.
5. Make sure your phone is in discovery or search mode. Select
Continue.
BLUETOOTH® HANDSFREELINK
®
NAVIGATION
HANDLING THE
UNEXPECTED
MAINTENANCE
6. The system searches for your phone. Select your phone when
it appears on the list.
VEHICLE
CONTROLS
If your phone does not appear:
Select Refresh to try again, or select Phone Not Found and
SPECIFICATIONS
search for HandsFreeLink from your phone. Connect to HFL.
7. The system gives you a pairing code. Compare it to the code
AUDIO AND
CONNECTIVITY
that appears on your phone, and confirm. Connect to HFL
from your phone.
CLIENT
INFORMATION
8. The system asks if you want to enable phone synchronization.
BLUE TOOTH®
HANDSFREELINK®
Select On to automatically import contacts and call history
from your phone.
9. Press BACK to exit the menu.
VOICE
COMMAND
INDEX
ACURALINK® INDEX
102 | | 103
Page 55

TABLE OF
CONTENTS
VISUAL INDEX DRIVING
BLUETOOTH® HANDSFREELINK®
Making a Call
You can make calls using several methods.
n Dialing a Number
Enter a 10-digit phone number to call.
n Using the Phonebook
When your phone is paired, its entire phonebook can be automatically imported to the
system if you select On for Phone Synchronization.
Using voice commands
BLUETOOTH® HANDSFREELINK
®
NAVIGATION
1. Press the Talk button.
SAFET Y
INFORMATION
Using voice commands
1. Press the Talk button.
2. Say “Phone Call.”
2. Say “Dial by name.”
3. Say the phonebook name and phone type. For example,
“John Smith mobile.”
HANDLING THE
UNEXPECTED
3. Say “Dial by number.”
INSTRUMENT
PANEL
4. Say the phone number. For example, “3 1 0 5 5 5 1 2 3 4.”
The system begins to dial.
Using the touchscreen
MAINTENANCE
Manual operation is limited while the vehicle is moving. Voice
VEHICLE
CONTROLS
AUDIO AND
CONNECTIVITY
Using the touchscreen
Manual operation is limited while the vehicle is moving. Voice
commands are always available.
1. From the HOME screen, select Phone.
2. Select MENU.
3. Select Dial.
commands are always available.
1. From the HOME screen, select Phone.
2. Select MENU.
3. Select Phonebook.
4. Scroll through the list to find the name and number you
want to call, and select it to call.
SPECIFICATIONS
CLIENT
INFORMATION
4. Enter the phone number. Select the green phone icon to
BLUE TOOTH®
HANDSFREELINK®
call.
VOICE
COMMAND
INDEX
ACURALINK® INDEX
104 | | 105
Page 56

TABLE OF
CONTENTS
BLUETOOTH® HANDSFREELINK®
n Storing Speed Dial Entries
Store up to 20 numbers per phone for quick dialing.
BLUETOOTH® HANDSFREELINK
n Using Speed Dial and Call History
Make calls quickly using stored speed dial entries or call history numbers.
®
NAVIGATION
VISUAL INDEX DRIVING
1. From the HOME screen, select Phone.
2. Select MENU.
3. Select Speed Dial, then select New Entry.
SAFET Y
INFORMATION
4. Select an entry method.
5. If desired, you can create a voice tag for the number.
Using voice commands
1. Press the Talk button.
2. Say “Dial by name.”
3. Say the name of the stored voice tag.
4. The system begins to dial.
HANDLING THE
UNEXPECTED
Follow the prompts.
INSTRUMENT
PANEL
Using the touchscreen
MAINTENANCE
1. From the HOME screen, select Phone.
2. Scroll through the list to find the entry you want to call,
VEHICLE
CONTROLS
AUDIO AND
CONNECTIVITY
BLUE TOOTH®
HANDSFREELINK®
ACURALINK® INDEX
106 | | 107
and select it to call.
SPECIFICATIONS
CLIENT
INFORMATION
VOICE
COMMAND
INDEX
Page 57

TABLE OF
CONTENTS
VISUAL INDEX DRIVING
SAFET Y
INFORMATION
INSTRUMENT
PANEL
VEHICLE
CONTROLS
BLUETOOTH® HANDSFREELINK®
SMS Text Messaging and E-Mail
Receive and send text messages and e-mails from your compatible paired and linked phone.
Visit www.acura.com/handsfreelink (U.S.) or www.handsfreelink.ca (Canada) to check phone
compatibility. Standard message rates apply. This feature is limited while the vehicle is moving.
n Selecting an Account
If your phone has both text message and mail accounts, you can select only one of them at a
time to be active and receive notifications.
1. From the HOME screen, select Settings.
2. Select Phone.
3. Select Select Account.
4. Select Text Message or an e-mail account.
n Receiving and Responding to Messages
When you receive a new message, a pop-up appears on the touchscreen. You can view the
Siri™ Eyes Free
Activate Siri through your vehicle when an iPhone is paired to the system via Bluetooth. Visit
www.acura.com/handsfreelink (U.S.) or www.handsfreelink.ca (Canada) to check phone and iOS
compatibility.
Talk button: Press and hold to activate Siri Eyes Free mode.
The Smartphone screen appears. Say your command after you
hear the Siri tone. If you only press and release the Talk button,
the standard voice recognition system is activated.
Back button: Exit Siri Eyes Free mode, or cancel a command.
Here are some examples of Siri commands:
“Call John Smith”
“Read my new text message”
“Find a nearby sushi restaurant”
“Remind me to pick up dinner”
“Set up a meeting today at 3 p.m.”
“Play song XYZ”
BLUETOOTH® HANDSFREELINK
®
NAVIGATION
HANDLING THE
UNEXPECTED
MAINTENANCE
SPECIFICATIONS
message when the vehicle is stopped. You can also reply to it using fixed phrases or call the
AUDIO AND
CONNECTIVITY
BLUE TOOTH®
HANDSFREELINK®
sender.
1. When the prompt appears, select Read.
2. The message is displayed, and the system reads it aloud.
To reply: With the message open, select Reply, and
choose one of the six available responses. Select Send
to send the message. You cannot create a new text
Notes:
• Any requests that include visual feedback from Siri on your phone are not displayed in the
vehicle.
• Certain commands rely on the iPhone’s features and existing apps.
• To hear turn-by-turn directions or songs through the vehicle, set the audio source to
Bluetooth Audio.
CLIENT
INFORMATION
VOICE
COMMAND
INDEX
message.
ACURALINK® INDEX
108 | | 109
To call the sender: With the message open, select Call.
Siri and iPhone are trademarks of Apple, Inc.
Page 58

TABLE OF
CONTENTS
ACURALINK
ACURALINK®*
VISUAL INDEX DRIVING
Learn about Acura’s advanced connectivity services.
AcuraLink Messages
®
n Message Options
When you receive certain messages, you can take action if your phone is paired to the
system. You can call your authorized Acura NSX dealer, find the nearest authorized Acura
NSX dealer, or schedule service appointments. A current AcuraLink subscription is required to
set up this feature and modify your message preferences.
ACURALINK
®
NAVIGATION
Receive messages on vehicle features, safety and emissions recall campaigns, maintenance
SAFET Y
INFORMATION
reminders, and diagnostic information.
Some message features require a phone connection. Visit www.acura.com/handsfreelink (U.S.) or
HANDLING THE
UNEXPECTED
www.handsfreelink.ca (Canada) to check phone compatibility.
INSTRUMENT
PANEL
n Viewing Messages
When you receive a new message, an icon appears at the top of the touchscreen. Tap to make
MAINTENANCE
and enter selections. From the HOME screen:
VEHICLE
CONTROLS
1. Select AcuraLink.
2. Select Vehicle.
SPECIFICATIONS
3. Select a message category.
AUDIO AND
CONNECTIVITY
BLUE TOOTH®
HANDSFREELINK®
ACURALINK® INDEX
4. Select a message.
5. Select Voice to hear the entire message details read aloud.
*if equipped
110 | | 111
INFORMATION
COMMAND
CLIENT
VOICE
INDEX
Page 59

TABLE OF
Button
ASSIST
LINK button
CONTENTS
ACURALINK
Subscription Features
A subscription-based service that provides convenient features, such as collision notification,
VISUAL INDEX DRIVING
SAFET Y
INFORMATION
INSTRUMENT
PANEL
VEHICLE
CONTROLS
emergency assistance, online security, and important messages about your vehicle.
To subscribe or get more information, contact a dealer or visit owners.acura.com (U.S.) or
www.myacura.ca (Canada). Requires enrollment and privacy agreement.
n Emergency Assistance
®
If your vehicle’s airbags deploy or if the unit detects that
the vehicle is severely impacted, your vehicle automatically
attempts to connect to the AcuraLink operator if there is
sufficient cellular coverage. Once connected, information
about your vehicle, its positioning, and its condition will be
sent to the operator. You can also speak to the operator when
connected.
To manually connect to the operator, open the cover on the
n Security Features
To use security features, you need your user ID and personal identification number (PIN).
Some of these features are also available with the AcuraLink smartphone app. Visit owners.
acura.com/apps to download the app.
Stolen vehicle tracking: Searches and tracks down your vehicle position.
Remote door lock/unlock: Remotely lock or unlock doors.
Vehicle finder: Locate your vehicle in large areas, such as a parking lot.
Security alarm notification: If your vehicle’s security system detects tampering, the
provider notifies you.
n Operator Assistance
Connect to the AcuraLink operator when trying to find a
destination or for roadside assistance.
Press LINK to connect to an operator.
ACURALINK
®
NAVIGATION
HANDLING THE
UNEXPECTED
MAINTENANCE
SPECIFICATIONS
ceiling console and press ASSIST when the vehicle is on.
AUDIO AND
CONNECTIVITY
BLUE TOOTH®
HANDSFREELINK®
ACURALINK® INDEX
112 | | 113
INFORMATION
COMMAND
CLIENT
VOICE
INDEX
Page 60

TABLE OF
Back
button
Talk
button
CONTENTS
NAVIGATION*
VISUAL INDEX DRIVING
SAFET Y
INFORMATION
INSTRUMENT
PANEL
VEHICLE
CONTROLS
Learn how to enter a destination and operate the navigation system.
Basic Navigation Operation
A real-time navigation system uses GPS and a map database to show your current location and
help guide you to a desired destination. You can operate the system using voice commands or
the system controls.
To reduce the potential for driver distraction, certain manual functions may be inoperable or
grayed out while the vehicle is moving. Voice commands are always available.
n Steering Wheel Controls
Use the steering wheel controls to give voice commands.
Talk button: Press to give navigation commands.
Back button: Press to cancel a command or operation.
n Talk Button Tips
For a full list of navigation voice commands, see page 218.
When using the Talk button, wait for a beep before saying a command.
To bypass the system prompts, simply press the Talk button again to say your command.
When the Talk button is pressed, all available voice commands are highlighted in yellow
(except for voice command screen for navigation).
Speak in a clear, natural voice.
Reduce all background noise.
Adjust the dashboard and side vents away from the microphone in the ceiling.
Close the windows.
WARNING
Using the navigation system while driving can take your attention away from the
road, causing a crash in which you could be seriously injured or killed.
NAVIGATIONNAVIGATION
NAVIGATION
HANDLING THE
UNEXPECTED
MAINTENANCE
SPECIFICATIONS
Only operate system controls when the conditions permit you to safely do so.
AUDIO AND
CONNECTIVITY
CLIENT
INFORMATION
BLUE TOOTH®
HANDSFREELINK®
ACURALINK® INDEX
114 | | 115
*if equipped
COMMAND
VOICE
INDEX
Page 61

TABLE OF
CONTENTS
VISUAL INDEX DRIVING
n Navigation Display and Controls
Use the controls to enter information and make selections. Some manual functions are
inoperable while driving.
n System Guidance Volume
Adjust the navigation system guidance volume.
1. From the HOME screen, select Settings.
NAVIGATIONNAVIGATION
NAVIGATION
2. Select System.
3. Select the Sound/Beep tab.
SAFET Y
INFORMATION
MAP: Display the
map screen.
Navi: Display the
navigation screen.
4. Adjust the Guidance Volume level.
5. Press BACK to exit the menus.
HANDLING THE
UNEXPECTED
INSTRUMENT
PANEL
MENU: Display
MAINTENANCE
navigation options.
BACK: Go back to
VEHICLE
CONTROLS
the previous display.
SPECIFICATIONS
Traffic incident
AUDIO AND
CONNECTIVITY
icon
Search icon
INFORMATION
Traffic flow
BLUE TOOTH®
HANDSFREELINK®
Current vehicle
position
COMMAND
Map menu
ACURALINK® INDEX
116 | | 117
CLIENT
VOICE
INDEX
Page 62

TABLE OF
CONTENTS
Entering a Destination
Use several methods to enter a destination.
VISUAL INDEX DRIVING
SAFET Y
INFORMATION
INSTRUMENT
PANEL
VEHICLE
CONTROLS
n Home Address
Store your home address in the system so you can easily route to it.
1. From the map screen, select the Search icon.
2. Select MENU.
3. Select Set Home Location.
4. Select Enter My Address.
5. Select Search All.
6. Enter the street number and select Done.
7. Enter the street name and select Done. Select the street
from the list.
8. Select the address from the list. A map of the address is
n Street Address
Enter a street address using voice commands. Press the Talk button and say “Navigation” and
then “Find Address.” Follow the prompts.
You can also enter the address manually when the vehicle is stopped.
1. From the map screen, select the Search icon.
2. Select Address.
3. Select Search All.
4. Enter the street number and select Done.
5. Enter the street name and select Done. Select the street
from the list.
6. Select the address from the list.
7. Select Go!.
NAVIGATIONNAVIGATION
NAVIGATION
HANDLING THE
UNEXPECTED
MAINTENANCE
SPECIFICATIONS
shown. Select Select.
AUDIO AND
CONNECTIVITY
When your home address is stored, you can press the Talk button and say “Navigation” and
then “Go home” at any time. You can also select Go Home from the Where To? menu.
CLIENT
INFORMATION
BLUE TOOTH®
HANDSFREELINK®
ACURALINK® INDEX
118 | | 119
COMMAND
VOICE
INDEX
Page 63

TABLE OF
CONTENTS
VISUAL INDEX DRIVING
n Place Name
Enter a street address using voice commands. Press the Talk button and say “Navigation” and
then “Find Place.” Follow the prompts.
You can also enter the place manually when the vehicle is stopped.
n Saved Places
Save locations so you can quickly route to them.
Saving a location
NAVIGATIONNAVIGATION
NAVIGATION
1. From the map screen, press MENU.
SAFET Y
INFORMATION
INSTRUMENT
PANEL
1. From the map screen, press MENU.
2. Select Where To?.
3. Select Categories.
4. Select a category (and a subcategory if necessary).
5. Select a place from the list.
6. Select Go!.
2. Select Where To?.
3. Select Enter Search.
4. Enter the address or place name.
5. Select the destination name when it appears on the map
screen.
6. Select the menu icon.
HANDLING THE
UNEXPECTED
MAINTENANCE
7. Select Save.
VEHICLE
CONTROLS
8. Select OK.
SPECIFICATIONS
You can also save your current location. From the map screen, select the vehicle icon. Select
AUDIO AND
CONNECTIVITY
Select an address from a list of your 50 most recent destinations.
1. From the map screen, press MENU.
n Recent Places
BLUE TOOTH®
HANDSFREELINK®
2. Select Where To?.
3. Select Recent.
4. Select a place from the list.
5. Select Go!.
ACURALINK® INDEX
120 | | 121
Save. Enter a name for the location. Select Done. Select OK.
Routing to a saved location
1. From the map screen, press MENU.
2. Select Where To?.
3. Select Saved.
4. Select the destination from the list.
5. Select Go!.
CLIENT
INFORMATION
VOICE
COMMAND
INDEX
Page 64

TABLE OF
CONTENTS
VISUAL INDEX DRIVING
SAFET Y
INFORMATION
INSTRUMENT
PANEL
Routing
After a destination is set, you can alter or cancel your route.
n Map Legend
During route guidance
Next guidance
point
Search icon
Cancel route
Turn By Turn Directions
Shows a more detailed view of the next maneuver on the MID.
Street name of
next guidance
point
Distance to
next guidance
point
Upcoming
maneuver
Current
route
NAVIGATIONNAVIGATION
NAVIGATION
HANDLING THE
UNEXPECTED
MAINTENANCE
Speed limit
VEHICLE
CONTROLS
SPECIFICATIONS
WARNING
AUDIO AND
CONNECTIVITY
Using the navigation system while driving can take your attention away from the
road, causing a crash in which you could be seriously injured or killed.
CLIENT
INFORMATION
Operate system controls only when the conditions permit you to safely do so.
BLUE TOOTH®
HANDSFREELINK®
ACURALINK® INDEX
122 | | 123
COMMAND
VOICE
INDEX
Page 65

TABLE OF
CONTENTS
VISUAL INDEX DRIVING
n Traffic
View traffic flow and incidents in select metro areas. Traffic alerts are accompanied by an
audible beep. Pop-up messages and traffic information can be viewed when you are on the
map screen. You can also select traffic to avoid. Traffic coverage is limited in Canada.
DRIVING
Learn about preparation for driving and other features.
DRIVINGNAVIGATION
NAVIGATION
Before Driving
Viewing traffic
SAFET Y
INFORMATION
INSTRUMENT
PANEL
VEHICLE
CONTROLS
AUDIO AND
CONNECTIVITY
BLUE TOOTH®
HANDSFREELINK®
1. From the map screen, select the traffic icon.
2. Select Traffic Conditions.
3. Traffic icons are shown on the map. Select the magnifying
glass icon to display a full list of traffic delays.
To mute traffic alerts and voice guidance: From the map screen, press MENU. Select Mute. To
lower voice guidance volume, see page 117.
Avoiding traffic on your route
1. From the map screen, select the traffic icon.
2. Select Traffic on Route.
3. Select an incident to avoid from the list.
4. Select the menu icon.
5. Select Avoid.
n Break In
Avoid hard braking for the first 200 miles (300 km). You should also follow this
recommendation when the brake pads are replaced.
n Exterior Checks
Make sure there are no obstructions on the windows, door mirrors, exterior lights, or other
parts of the vehicle.
Remove any frost, snow, or ice.
Make sure the hood and hatch are securely closed.
Heat from the engine and exhaust can ignite flammable materials in the engine
compartment, causing a fire. If you’ve parked your vehicle for an extended period, inspect
and remove any debris that may have collected, such as dried grass and leaves that have
fallen or have been carried in for use as a nest by a small animal. Also check for leftover
flammable materials after you or someone else has performed maintenance on your vehicle.
Make sure the tires are in good condition.
Make sure there are no people or objects behind or around the vehicle.
HANDLING THE
UNEXPECTED
MAINTENANCE
SPECIFICATIONS
CLIENT
INFORMATION
VOICE
COMMAND
INDEX
ACURALINK® INDEX
124 | | 125
Page 66

TABLE OF
CONTENTS
NOTICE
If the doors are frozen shut, use warm water around the door edges to melt any ice. Do not
VISUAL INDEX DRIVING
try to force them open, as this can damage the rubber trim around the doors. When done,
wipe dry to avoid further freezing.
High Voltage Battery Maintenance
All batteries discharge if not used. For best battery life and capacity, drive your vehicle for at
least 30 minutes, at least once every three months. Try to avoid parking under direct summer
sun. For battery maintenance while storing the vehicle, see page 206.
DRIVINGDRIVING
NAVIGATION
SAFET Y
INFORMATION
n Interior Checks
Store or secure all items on board properly.
Do not pile items higher than the seat height.
INSTRUMENT
PANEL
Do not place anything in the footwells. Make sure to secure the floor mats.
If you have any animals on board, do not let them move freely in the vehicle.
Securely close and lock both doors.
VEHICLE
CONTROLS
Adjust your seating position, mirrors, and steering wheel properly.
Everyone in the vehicle must fasten their seat belt.
Make sure that the indicators in the instrument panel come on when you start the vehicle,
and go off soon after.
AUDIO AND
CONNECTIVITY
WARNING
Improper accessories or modifications can affect your vehicle’s handling,
BLUE TOOTH®
HANDSFREELINK®
stability, and performance, and cause a crash in which you can be seriously hurt
or killed.
Follow all instructions in the vehicle owner’s manual regarding accessories and
modifications.
ACURALINK® INDEX
126 | | 127
Maximum Load Limit
Carrying too much cargo or improperly storing it can affect your vehicle’s handling, stability,
stopping distance, and tires, and make it unsafe.
The maximum load for your vehicle is 507 lbs (230 kg). See the Tire and Loading Information
label on the driver’s doorjamb. The maximum load in the trunk is 100 lbs (45 kg).
The vehicle maximum load includes the total weight of all occupants, cargo,
accessories, and the tongue load if you are towing a trailer. Below are the steps for
determining the correct load limit:
1. Locate the statement “The combined weight of occupants and cargo should never exceed
XXX kg or XXX lbs.” on your vehicle’s placard.
2. Determine the combined weight of the driver and passengers that will be riding in your
vehicle.
3. Subtract the combined weight of the driver and passengers from XXX kg or XXX lbs.
4. The resulting figure equals the available amount of cargo and luggage load capacity. For
example, if the “XXX” amount equals 1,400 lbs. and there will be five 150 lb. passengers in
your vehicle, the amount of available cargo and luggage load capacity is 650 lbs. (1,400 - 750
(5 x 150) = 650 lbs.)
HANDLING THE
UNEXPECTED
MAINTENANCE
SPECIFICATIONS
INFORMATION
COMMAND
CLIENT
VOICE
INDEX
Page 67

TABLE OF
Load Limits Example
Example1
Max Load
507 lbs
(230 kg)
100 lbs
Passenger Weight
150 lbs x 1 + 257 lbs = 407 lbs
(68 kg x 1 + 117 kg = 185 kg) (45 kg)
Max Cargo Weight
Example2
Max Load
(230 kg)
507 lbs 100 lbs
(45 kg)
Passenger Weight
150 lbs x 2 + 107 lbs = 407 lbs
(68 kg x 2 + 49 kg = 185 kg)
Max Cargo Weight
Label Example
CONTENTS
5. Determine the combined weight of luggage and cargo being loaded on the vehicle. That
DRIVINGDRIVING
NAVIGATION
weight may not safely exceed the available cargo and luggage load capacity calculated in
step 4.
VISUAL INDEX DRIVING
6. If your vehicle will be towing a trailer, load from your trailer will be transferred to your
vehicle. Consult the Owner’s Manual to determine how this reduces the available cargo and
luggage load capacity of your vehicle.
SAFET Y
INFORMATION
In addition, the total weight of the vehicle, all occupants, accessories, cargo, and trailer
tongue load must not exceed the Gross Vehicle Weight Rating (GVWR) or the Gross
HANDLING THE
UNEXPECTED
Axle Weight Rating (GAWR). Both are on a label on the driver’s doorjamb.
INSTRUMENT
PANEL
VEHICLE
CONTROLS
WARNING
Overloading or improper loading can affect handling and stability and cause a crash
MAINTENANCE
SPECIFICATIONS
in which you can be hurt or killed.
AUDIO AND
CONNECTIVITY
BLUE TOOTH®
HANDSFREELINK®
ACURALINK® INDEX
Your vehicle is not designed to tow a trailer. Attempting to do so can void your warranties.
128 | | 129
Follow all load limits and other loading guidelines in this guide.
The headlight aim on your vehicle was set by the factory and does not need to be adjusted.
However, if you regularly carry heavy items in the cargo area, have the aiming readjusted at your
authorized Acura NSX dealer or by a qualified technician.
INFORMATION
COMMAND
CLIENT
VOICE
INDEX
Page 68

TABLE OF
Brake pedal
CONTENTS
Starting to Drive
The keyless access system allows simple push-button start.
VISUAL INDEX DRIVING
SAFET Y
INFORMATION
INSTRUMENT
PANEL
VEHICLE
CONTROLS
n Before Starting the Engine
Check that the parking brake is applied (pull up on the switch
and look for the indicator light), then depress the brake pedal.
Keep your foot firmly on the brake pedal when starting the
engine.
The engine will be harder to start in cold weather and in
thinner air found at altitudes above 8,000 feet (2,400
m). When starting the engine in cold weather, turn off all
electrical accessories such as the lights, climate control
system, and rear defogger in order to reduce battery drain.
The vehicle will not start if the High Voltage battery
temperature drops below -4F (-20C). Plan your driving and
n Changing the Power Mode
Accessory or On mode: Press the ENGINE START/STOP
button once without pressing the accelerator pedal for
Accessory mode. Press it again for On mode.
Starting the power system: Make sure the parking brake
is applied. Then, press the brake pedal while you press
the ENGINE START/STOP button once. Do not press the
accelerator.
• When IDS is in QUIET mode: Whether the engine starts
depends on the engine temperature and the charge in the
High Voltage batteries.
• When IDS is in SPORT mode: The engine will start.
Turning the power system off: Select Park (P), then press
the ENGINE START/STOP button.
DRIVINGDRIVING
NAVIGATION
HANDLING THE
UNEXPECTED
MAINTENANCE
SPECIFICATIONS
storage appropriately if you expect this to happen.
AUDIO AND
CONNECTIVITY
BLUE TOOTH®
HANDSFREELINK®
ACURALINK® INDEX
130 | | 131
INFORMATION
COMMAND
CLIENT
VOICE
INDEX
Page 69
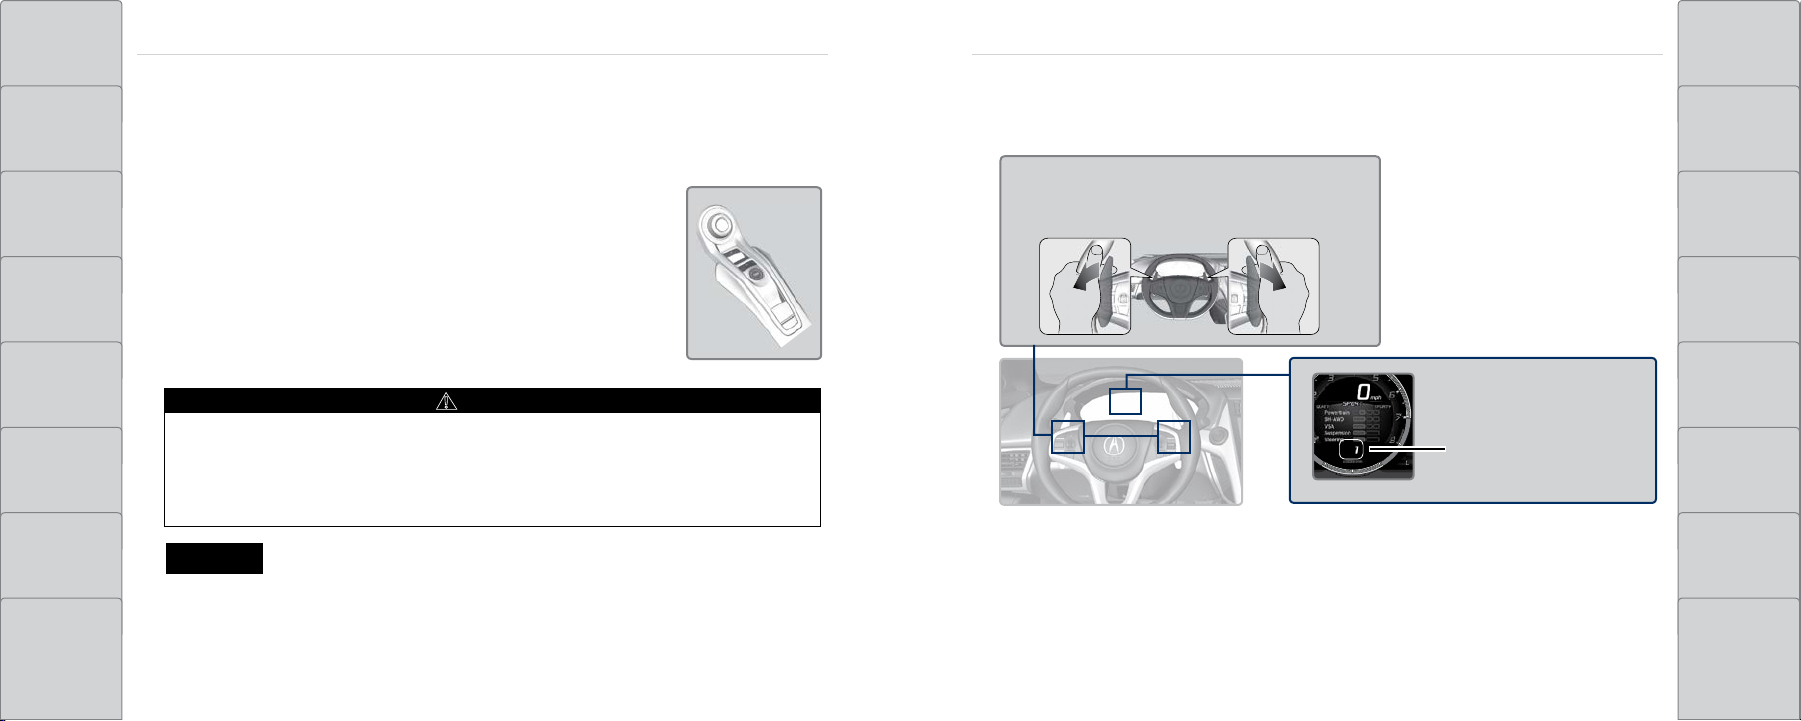
TABLE OF
CONTENTS
Shifting
Change your vehicle’s gears to begin driving.
VISUAL INDEX DRIVING
SAFET Y
INFORMATION
n Electronic Gear Selector
Park (P): Used when parking or starting the power system.
Reverse (R): Used for reversing.
Neutral (N): Used to disengage the transmission from the
n Sequential Shift Mode
Use the paddle shifters to change gears without removing your hands from the steering
wheel.
(-) Paddle shifter:
Pull to shift down to
a lower gear.
(+) Paddle shifter:
Pull to shift up to a
higher gear.
DRIVINGDRIVING
NAVIGATION
HANDLING THE
UNEXPECTED
engine and motor.
INSTRUMENT
PANEL
Drive (D/M): Toggles between Drive and Manual modes.
Drive is for automatic gear selection. Manual is for the driver
MAINTENANCE
to shift gears sequentially.
VEHICLE
CONTROLS
WARNING
SPECIFICATIONS
The vehicle can roll away if left unattended without confirming that Park is
Gear position indicator
CLIENT
INFORMATION
AUDIO AND
CONNECTIVITY
engaged.
Always keep your foot on the brake pedal until you have confirmed that (P) is
shown on the gear position indicator.
BLUE TOOTH®
HANDSFREELINK®
NOTICE
When you change from D/M to R or vice versa, come to a complete stop and keep the brake
COMMAND
pedal depressed. Do not press the accelerator. Otherwise, you may damage the transmission.
ACURALINK® INDEX
132 | | 133
VOICE
INDEX
Page 70

TABLE OF
SPORT mode SPORT+ mode
Hold
QUIET mode
IDS Mode Switch
TRACK mode
CONTENTS
VISUAL INDEX DRIVING
When the transmission is in D: The vehicle goes into sequential mode and the gear selection
indicator becomes more prominent. Sequential mode will cancel if you hold the (+) paddle
shifter for a few seconds, travel at a constant speed, come to a complete stop, or change to
another IDS mode.
Integrated Dynamics System (IDS)
Choose a driving mode for your preference based on road conditions, vehicle speed, and
handling.
DRIVINGDRIVING
NAVIGATION
Sequential mode automatically shifts if you press the accelerator pedal beyond the click, engine
speed nears the tachometer’s red zone, or engine speed reaches idle speed while decelerating.
SAFET Y
INFORMATION
When the transmission is in M: The vehicle goes into sequential mode, the gear position
indicator turns off and only the gear selection indicator is displayed. Sequential mode will cancel
HANDLING THE
UNEXPECTED
if you press the D/M button, pull the (+) paddle shifter for a few seconds, or change the IDS
mode to QUIET.
INSTRUMENT
PANEL
Sequential mode automatically shifts up from 1st to 2nd but does not automatically shift up
between 2nd and 9th gear.
MAINTENANCE
VEHICLE
CONTROLS
Car Wash Mode
Follow the procedure below to keep the transmission in (N) when the power system is switched
SPECIFICATIONS
off.
AUDIO AND
CONNECTIVITY
BLUE TOOTH®
HANDSFREELINK®
ACURALINK® INDEX
Begin with the power system on and your foot on the brake pedal.
1. Press Neutral (N). Within two seconds, press and hold (N) for two seconds.
2. Press the ENGINE START/STOP button. The vehicle goes into Accessory mode.
This mode lasts for 15 minutes before the gear changes to Park and the vehicle turns off.
We do not recommend using conveyor-style car washes.
134 | | 135
QUIET: Prioritizes EV operation and quiet sound. Engine speed is limited to 4000 rpm.
SPORT: Balances sport and touring driving performance for enjoyable everyday driving.
SPORT+: Offers heightened dynamic response. EV operation is eliminated.
TRACK: Provides maximum, consistent performance from all dynamic systems. In Sport+ mode,
turn and hold the IDS switch to engage this mode. VSA activity is reduced and the VSA indicator
lamp illuminates. This mode is for closed-course use only. See also page 149.
INFORMATION
COMMAND
CLIENT
VOICE
INDEX
Page 71

TABLE OF
CONTENTS
n Launch Control
4. Press the accelerator to the floor.
DRIVINGDRIVING
NAVIGATION
The vehicle controls the engine and transmission response for maximum acceleration from a
VISUAL INDEX DRIVING
stop. Launch control functions in TRACK mode, with VSA turned on. See also page 149. This
feature should be used only in closed-course settings.
To engage launch control:
SAFET Y
INFORMATION
1. In Sport+ mode, turn and hold the IDS Mode Switch to
engage TRACK mode.
5. When Launch Mode Ready appears in the Driver
HANDLING THE
UNEXPECTED
Information Interface, release the brake all at once.
INSTRUMENT
PANEL
To cancel Launch Mode, take your foot off the accelerator.
MAINTENANCE
2. Depress the brake pedal and change the gear selector
VEHICLE
CONTROLS
to D/M. Keep the pedal depressed.
WARNING
Using this system on public roads that are used by other vehicles and pedestrians
SPECIFICATIONS
can result in a collision involving serious injury or death.
AUDIO AND
CONNECTIVITY
3. Release the parking brake.
BLUE TOOTH®
HANDSFREELINK®
ACURALINK® INDEX
136 | | 137
INFORMATION
COMMAND
CLIENT
VOICE
INDEX
Page 72

TABLE OF
Brake pedal
Electric Parking
Brake Switch
Electric Parking
Brake Switch
Accelerator Pedal
CONTENTS
Braking
Slow down or stop your vehicle, and keep it from moving when parked.
VISUAL INDEX DRIVING
SAFET Y
INFORMATION
n Foot Brake
Press the brake pedal to slow down or stop your vehicle
from moving.
There are times you may hear brake squeal. This is a
characteristic of the high-performance braking system and is
n Parking Brake
Keep the vehicle from moving when it is parked.
To apply: Pull up the switch. The parking brake indicator
appears in the instrument panel.
To release: Press the brake pedal and make sure your seat
belt is fastened. Press the switch down to release.
You can also lightly press the accelerator pedal if your seat
belt is fastened, the vehicle is on, and not in Park or Neutral.
DRIVINGDRIVING
NAVIGATION
HANDLING THE
UNEXPECTED
not a malfunction.
INSTRUMENT
PANEL
n Brake Assist System
MAINTENANCE
During hard or emergency braking, the system increases braking force. The brake pedal may
VEHICLE
CONTROLS
move slightly or make a noise; this is normal. Continue to hold the brake pedal firmly down.
SPECIFICATIONS
n Anti-Lock Brake System (ABS)
During hard or emergency braking, the system rapidly pumps the brakes to prevent wheel
AUDIO AND
CONNECTIVITY
lockup and help you maintain steering control. Do not pump the brake pedal, and continue
to firmly hold it down.
CLIENT
INFORMATION
NOTICE
BLUE TOOTH®
HANDSFREELINK®
ACURALINK® INDEX
The ABS may not function correctly if you use an incorrect tire type and size.
138 | | 139
COMMAND
VOICE
INDEX
Page 73

TABLE OF
Accelerator Pedal
Brake Pedal
Automatic Brake
Hold Button
Off
On
On
Goes
On
On
On
U.S.
Canada
Accelerator Pedal
Brake Pedal
Off
On
Goes
On
On
On
U.S.
Canada
Accelerator Pedal
Off
Goes
On
CONTENTS
VISUAL INDEX DRIVING
SAFET Y
INFORMATION
Automatic Brake Hold
Maintains rear brake hold even after the brake pedal is released. Make sure the vehicle is on and
your seat belt is fastened when operating this feature.
1. Press the BRAKE HOLD button. The BRAKE HOLD indicator
appears in the instrument panel.
2. With the transmission in D, M, or N, press the brake pedal and
come to a complete stop. The HOLD indicator appears, and
WARNING
Using the automatic brake hold system on steep hills or slippery roads may still allow
the vehicle to move if you remove your foot from the brake pedal.
If a vehicle unexpectedly moves, it may cause a crash resulting in serious injury or
death.
Never use the automatic brake hold system or rely on it to keep a vehicle from
moving when stopped on a steep hill or slippery roads.
DRIVINGDRIVING
NAVIGATION
HANDLING THE
UNEXPECTED
brake hold is applied. Release the brake pedal.
Press the accelerator pedal to cancel brake hold and start
INSTRUMENT
PANEL
moving.
WARNING
MAINTENANCE
Using the automatic brake hold system to park the vehicle may result in the vehicle
unexpectedly moving.
VEHICLE
CONTROLS
AUDIO AND
CONNECTIVITY
To turn off brake hold: Press the brake pedal and press the BRAKE
HOLD button again.
Automatic brake hold cancels when:
If a vehicle moves unexpectedly, it may cause a crash, resulting in serious injury or
death.
Never leave the vehicle when braking is temporarily kept by automatic brake hold
and always park the vehicle by putting the transmission in Park (P) and applying the
parking brake.
• Braking is applied for more than 10 minutes.
BLUE TOOTH®
HANDSFREELINK®
ACURALINK® INDEX
• The driver’s seat belt is unfastened.
• The power system is turned off.
140 | | 141
SPECIFICATIONS
CLIENT
INFORMATION
VOICE
COMMAND
INDEX
Page 74

TABLE OF
CRUISE MAIN is on in
the instrument panel.
Cruise control is ready to
use.
Press the CRUISE button on
the steering wheel.
RES/+ /SET/− Switch
Press down and release
To increase speed
To decrease speed
Button
CANCEL
CRUISE
Button
CONTENTS
Cruise Control
Maintain a constant vehicle speed without having to keep your foot on the accelerator pedal.
VISUAL INDEX DRIVING
Use cruise control on freeways or open roads where you can travel at a constant speed with little
acceleration or deceleration.
n Activating and Setting the Vehicle Speed
Press the CRUISE button.
Accelerate to the desired speed (above 25 mph). Press the
SET/– part of the switch and take your foot off the pedal.
DRIVINGDRIVING
NAVIGATION
SAFET Y
INFORMATION
HANDLING THE
UNEXPECTED
n Adjusting the Vehicle Speed
Press the RES/+ section of the switch to increase speed or the
INSTRUMENT
PANEL
SET/– section to decrease speed.
MAINTENANCE
Each time you press the switch, the vehicle speed changes by
about 1 mph (1.6 km/h). If you keep the switch pressed, the
VEHICLE
CONTROLS
AUDIO AND
CONNECTIVITY
BLUE TOOTH®
HANDSFREELINK®
ACURALINK® INDEX
Improper use of cruise control can lead to a crash.
Use cruise control only when traveling on open highways in good weather.
142 | | 143
WARNING
vehicle speed increases or decreases until you release it.
n Canceling Cruise Control
Press either the CANCEL or CRUISE buttons, or press the
brake pedal.
After cruise control has been canceled, you can still resume
the prior set speed by pressing the RES/+ part of the switch
while driving at a speed of at least 25 mph (40 km/h).
Press the CRUISE button to turn the system off.
SPECIFICATIONS
INFORMATION
COMMAND
CLIENT
VOICE
INDEX
Page 75

TABLE OF
VSA® OFF Indicator
Within about 24 in (60 cm) or less
Front Corner Sensors
Rear Corner Sensors
Rear Center Sensors
Within about 43 in (110 cm) or less
Within about 39 in (100 cm) or less
Front Center Sensors
CONTENTS
VISUAL INDEX DRIVING
Vehicle Stability Assist® (VSA®)
Also known as Electronic Stability Control (ESC), VSA helps stabilize the vehicle during cornering
if the vehicle turns more or less than what was intended. It assists in maintaining traction on
slippery surfaces by regulating engine output and selectively applying the brakes.
Parking Sensor System*
When you are parking or backing up and the system senses nearby objects, indicators appear on
the display and a series of beeps sound. As you get closer to the objects, the beep rate increases.
DRIVINGDRIVING
NAVIGATION
n Turning VSA On or Off
SAFET Y
INFORMATION
VSA is turned on every time you turn on the vehicle, even if you previously turned it off. If
you turn VSA off, your vehicle has normal braking and cornering ability, but not VSA traction
HANDLING THE
UNEXPECTED
and stability enhancement.
INSTRUMENT
PANEL
To turn VSA on or off, press and hold the VSA OFF button
until you hear a beep. The VSA OFF indicator appears when
MAINTENANCE
the system is off.
Turning VSA off also turns off traction control. That may make
VEHICLE
CONTROLS
AUDIO AND
CONNECTIVITY
it easier to free your vehicle if it is stuck in mud or snow.
n Turning the System On or Off
Press the parking sensor button. A green indicator light
SPECIFICATIONS
INFORMATION
appears on the button when the system is on.
BLUE TOOTH®
HANDSFREELINK®
ACURALINK® INDEX
144 | | 145
*if equipped
COMMAND
CLIENT
VOICE
INDEX
Page 76

TABLE OF
CONTENTS
VISUAL INDEX DRIVING
Multi-View Rear Camera
When you shift into Reverse (R), a real-time image of the area behind your vehicle is shown in
the display, along with helpful parking guidelines.
Wide view Normal view Top down view
Refueling
Use the proper fuel and refueling procedure to ensure the best performance and safety of your
vehicle.
n Fuel Information
DRIVINGDRIVING
NAVIGATION
Unleaded premium gasoline of 93 octane maximizes the engine’s performance.
SAFET Y
INFORMATION
Unleaded premium gasoline of 91 octane or higher is recommended.
HANDLING THE
UNEXPECTED
Use of gasoline with octane less than 91 can lead to engine damage.
Acura recommends TOP TIER Detergent Gasoline where available.
INSTRUMENT
PANEL
Do NOT use gasoline containing more than 15% ethanol.
Do NOT use gasoline containing methanol.
MAINTENANCE
Do NOT use gasoline containing MMT.
VEHICLE
CONTROLS
Use the touchscreen to
toggle between views.
NOTICE
SPECIFICATIONS
We recommend quality gasoline containing detergent additives that help prevent fuel
system and engine deposits. In addition, in order to maintain good performance, fuel
AUDIO AND
CONNECTIVITY
economy, and emissions control, we strongly recommend the use of gasoline that does NOT
contain harmful manganese-based fuel additives such as MMT, if such gasoline is available.
CLIENT
INFORMATION
The rear camera view is restricted. You cannot see the corner ends of the bumper or what is
BLUE TOOTH®
HANDSFREELINK®
underneath the bumper. Its unique lens also makes objects appear closer or farther than they
actually are.
Visually confirm that it is safe to drive before backing up. Certain conditions (such as weather,
VOICE
COMMAND
INDEX
lighting, and high temperatures) may also restrict the rear view. Do not rely on the rearview
display, which does not give you all information about conditions at the rear of your vehicle.
ACURALINK® INDEX
146 | | 147
Page 77

TABLE OF
Press
CONTENTS
VISUAL INDEX DRIVING
SAFET Y
INFORMATION
n How to Refuel
The fuel fill door is located at the left rear of the vehicle. Park next to the service pump that is
most accessible. This vehicle does not use a fuel-fill cap.
Turn off the power system.
Press the fuel fill door release button.
Fuel Fill Door Release Button
High-Performance Driving
Your Acura NSX is designed, built and equipped with systems and features to provide you with
exceptional driving performance, including the ability to engage in high-performance driving.
However, due to the risks to both you and other road users, including the risk of injury or death
from a high-speed loss of control or crash, if you engage in high-performance driving, Acura
recommends you only do so where conditions are controlled, such as at a track or other closedcourse venue. When driving on public roads you should always obey the posted speed limits
and other traffic laws, reduce speed as needed for traffic and environmental conditions, and
not engage in driving behaviors (including, for instance, use of Launch Control) that may create
DRIVINGDRIVING
NAVIGATION
HANDLING THE
UNEXPECTED
heightened risks for yourself and any other road users who may be present (even if you are
INSTRUMENT
PANEL
VEHICLE
CONTROLS
Insert the filler nozzle fully. When the tank is full, the fuel
nozzle clicks off automatically.
Wait about five seconds. Remove the filler nozzle and close
the fuel fill door.
unaware of them).
NOTICE
The NSX warranty does not cover any damage or failure resulting from high-performance
driving, competitive driving of any sort whatsoever, or use on a track or similar-type venue. See
MAINTENANCE
SPECIFICATIONS
warranty book for details.
AUDIO AND
CONNECTIVITY
Gasoline is highly flammable and explosive. You can be burned or seriously
WARNING
injured when handling fuel.
Stop the engine, and keep heat, sparks, and flame away.
BLUE TOOTH®
HANDSFREELINK®
Handle fuel only outdoors.
Wipe up spills immediately.
ACURALINK® INDEX
148 | | 149
NSX T
rack Mode (see page 135), Launch Control (see page 136) and other systems are
designed for increased performance, both in terms of acceleration and handling, up to nearperformance-limit conditions. They are most appropriately used on closed courses and they
should not be used on public roads. Use of these systems may delay the intervention of vehicle
safety systems designed to minimize the risk of a loss of traction or steering control, and can
cause the NSX to handle differently than you might expect or would experience under normal
driving conditions.
INFORMATION
COMMAND
CLIENT
VOICE
INDEX
Page 78

TABLE OF
CONTENTS
VISUAL INDEX DRIVING
SAFET Y
INFORMATION
INSTRUMENT
PANEL
VEHICLE
CONTROLS
AUDIO AND
CONNECTIVITY
BLUE TOOTH®
HANDSFREELINK®
ACURALINK® INDEX
Use of these systems will not make up for a lack of appropriate driver experience and skill, and
will not allow the driver to overcome risks created by:
• A lack of proper vehicle maintenance
• Less than ideal road conditions and/or unfamiliarity with the driving environment
• Other traffic or road users
High-performance driving requires special skills, knowledge and experience, as the safety
risks are greatly increased when the NSX is operated at its upper performance abilities. As
a responsible NSX driver, you should not drive above your skill limits or training, even if the
NSX’s performance levels would otherwise allow you to do so. If you intend to engage in highperformance driving, Acura strongly recommends that:
• You first obtain appropriate, professional training
• Wear the appropriate driving clothing and gear (e.g., helmet, gloves and driving shoes)
• Be fully rested and alert (free of drugs or alcohol)
• Turn off any devices or systems that may distract you from the driving task
High-performance driving in general, and the use of Track Mode and Launch Control in particular,
puts very high loads on the NSX and its components, and results in greater wear and tear
on the vehicle. Because of these high loads, if your NSX is not in top condition or if certain
components, such as the brakes or tires, have undue wear, those components could experience
a loss of performance, or fail, when subjected to the additional loads. Therefore, Acura highly
recommends that you undertake more proactive and frequent maintenance than that required
under normal use and have your vehicle inspected at an authorized Acura NSX dealer (and all
necessary repairs or adjustments made) before you engage in any high-performance driving.
In addition to any required maintenance, there are certain NSX specific items and protocols that
you should pay special attention to before, during and after engaging in any high-performance
150 | | 151
driving. Ultimately, the decision whether to engage in high-performance driving is yours, and
depending on your NSX’s condition and prior usage, the items and protocols listed below may or
may not be sufficient to ensure a safe driving experience.
n BEFORE DRIVING
• With the vehicle parked on level ground, properly bleed brake system after replacing with
new Honda DOT 4 brake fluid or equivalent.
• Inspect brake pad thickness and replace if 6.0mm or less.
• Burnish the brake pads so that they have the performance characteristics necessary to
repeatedly and quickly slow the NSX when it is being operated at significantly high speeds.
(While the NSX’s brake pads are properly burnished for the demands expected in ordinary
day-to-day driving, high performance driving puts unique demands on the brake system
which require further burnishing.) A high performance burnish at the driving venue prior to
the first session of the day is highly recommended.
• Inspect ALL cooling openings to confirm they are open and free of debris such as leaves,
etc. Cooling openings include engine undercover ducts, heat resistance ducts, brake ducts,
radiators, and intercoolers.
• Remove Tire Repair Kit from the trunk, along with any other cargo area contents.
• Check tire wear and tire pressure, and make certain wheel lug bolts are properly torqued, as
driving at high speed puts additional strain on tires and wheels. Never use slick tires, and do
not use Summer Only tires and Ultra High Performance tires if temperatures will be lower
than 45°F (7°C).
• If you anticipate sustained driving at speeds greater than 168 mph/270 km/h, adjust the
cold tire pressure as shown on the driver door jamb warning label. This will help avoid heat
build-up and sudden tire failure.
DRIVINGDRIVING
NAVIGATION
HANDLING THE
UNEXPECTED
MAINTENANCE
SPECIFICATIONS
CLIENT
INFORMATION
VOICE
COMMAND
INDEX
Page 79

TABLE OF
CONTENTS
VISUAL INDEX DRIVING
SAFET Y
INFORMATION
INSTRUMENT
PANEL
VEHICLE
CONTROLS
AUDIO AND
CONNECTIVITY
BLUE TOOTH®
HANDSFREELINK®
• Inspect all exhaust mounts for cracks or signs of wear.
• Inspect tailpipe active exhaust valves to ensure they are functioning correctly. You can do
this by cycling the IDS switch between SPORT and TRACK modes, while the engine is idling.
n While Driving
Doorjamb
U.S. models Canadian models
WARNING
If driving at high speeds (over 168mph/270km/h),
adjust cold tire pressure as shown below to avoid
excess heat buildup and sudden tire failure.
DRIVING SPEED TIRE COLD TIRE PRESSURE
OVER
168 mph/ 270 km/h
FRONT
REAR
260 KPA, 38 PSI
260 KPA, 38 PSI
WARNING ATTENTION
If driving at high speeds (over 168mph/270km/h),
adjust cold tire pressure as shown below to avoid
excess heat buildup and sudden tire failure.
DRIVING SPEED
VITESSE DE CON
DUITE
OVER/ PLUS
DE
168 mph/ 270 km/h
Pour conduire à grande vitesse (plus de 168 mph /
270 km/h) ajuster la pression des pneus à froid, comme
indiqué ci-dessous, an d’éviter l’accumulation excessive
de chaleur et une défaillance soudaine du pneu.
COLD TIRE PRESSURE
TIRE/ PNEU
FRONT/AVANT
REAR/ARRIÈRE
PRESSION DES PNEUS
260 KPA, 38 PSI
260 KPA, 38 PSI
À FROID
WARNING
Use of slick tires/racing slicks may subject the chassis and body components to
higher dynamic loads than they were designed for.
Higher than intended dynamic loads could result in component failure, loss of
control, and serious injury or death to you or others.
Do not install slick tires on the NSX.
2D
AAAA
• You may see a brake warning message in the Driver
Information Interface (and warning message chime) and/
or experience increased brake pedal stroke. If either occurs,
immediately slow down and allow for increased stopping
distances. The message will disappear once the brakes have
cooled and the system has returned to normal operating
condition.
• After high-performance driving, it is critical to allow your vehicle to properly cool down. Do
not immediately stop your vehicle. Instead, continue driving at reduced speeds, allowing
for increased braking distances until your vehicle returns to normal operating temperatures.
Once you stop and safely park the NSX, open the hatch to aid cooling. If the engine
oil temperature reaches the H mark during high-performance driving, have your NSX
inspected by an authorized Acura NSX dealer.
n AFTER DRIVING
Check your NSX, and each of its relevant components, to make sure that it still is in a safe
operating condition (example: wheel lug bolt torque, tire pressure, etc.). We recommend you
repeat the Before Driving protocol. If any item shows excessive wear or appears to be in an
unusual condition, have it replaced, or exercise appropriate caution when driving and see
your authorized Acura NSX dealer.
For more information, please contact your authorized Acura NSX dealer, and/or Acura Client
Relations (see page 212).
DRIVINGDRIVING
NAVIGATION
HANDLING THE
UNEXPECTED
MAINTENANCE
SPECIFICATIONS
CLIENT
INFORMATION
VOICE
COMMAND
INDEX
ACURALINK® INDEX
152 | | 153
Page 80

TABLE OF
CONTENTS
Cold or Rainy Weather Driving
HANDLING THE UNEXPECTED
HANDLING THE UNEXPECTEDDRIVING
NAVIGATION
Summer-only and Ultra High Performance (UHP) tires are very sensitive to ambient
VISUAL INDEX DRIVING
temperatures and are designed to be used at temperatures above 45°F (7°C). Below that
temperature, Summer-only and UHP tires provide decreasing amounts of grip and other
performance attributes. At temperatures below -4°F (-20°C), the tire treads may become brittle,
resulting in permanent damage to the tread. A damaged tire may fail during use. Therefore, if you
SAFET Y
INFORMATION
will operate the vehicle when temperatures are below 45°F (7°C), we recommend you install
other tires (e.g., mud+snow, winter) designed to perform under the expected conditions.
WARNING
INSTRUMENT
PANEL
Use of Summer-only or Ultra High Performance tires at temperatures below 45°F
(7°C) may lead to a loss of performance and control, which could result in a crash,
serious injury or death.
Learn about what to do in critical or emergency situations.
Keyless Access Remote Battery Strength
If the battery life in your keyless access remote is weak, a
message appears in the driver information interface with
information on how to start the engine.
Touch the back of the keyless access remote to the ENGINE
START/STOP button while the indicator is flashing.
With the brake pedal pressed, press the ENGINE START/STOP
button within 10 seconds.
HANDLING THE
UNEXPECTED
MAINTENANCE
VEHICLE
CONTROLS
Your NSX is equipped with ultra-high-performance summer-only tires that, due to their
SPECIFICATIONS
decreased tread depth, are at greater risk of hydroplaning on wet roads compared to regular tires.
Exercise caution when driving on wet surfaces.
AUDIO AND
CONNECTIVITY
BLUE TOOTH®
HANDSFREELINK®
ACURALINK® INDEX
154 | | 155
INFORMATION
COMMAND
CLIENT
VOICE
INDEX
Page 81

TABLE OF
Booster Battery
Terminal Cover
CONTENTS
VISUAL INDEX DRIVING
SAFET Y
INFORMATION
Emergency Power System Off
The ENGINE START/STOP button may be used to turn off the power system due to an
emergency situation even while driving. If you must turn off the power system, choose one of the
following operations:
Press and hold the ENGINE START/STOP button for two seconds,
OR
Firmly press the ENGINE START/STOP button three times.
Jump Starting
Turn off the power to electric devices, such as audio and lights. Turn off the power system, then
open the hood.
1. Remove the maintenance cover (see page 182), then slide
the terminal cover on your 12-volt battery’s (+) terminal
2. Connect the first jumper cable to your vehicle’s 12-volt
battery (+) terminal.
HANDLING THE UNEXPECTEDHANDLING THE UNEXPECTED
NAVIGATION
HANDLING THE
UNEXPECTED
3. Connect the other end of the first jumper cable to the
booster battery (+) terminal. Use a 12-volt booster battery
INSTRUMENT
PANEL
VEHICLE
CONTROLS
Turning off the engine disables the power assist to the steering and braking systems. Thus, it will
require significantly more physical effort and time to steer and slow the vehicle. Downshift gears
and use both feet on the brake pedal, if necessary, to slow the vehicle and stop immediately in a
safe place.
Once the vehicle comes to a complete stop, the gear position automatically changes to (P) and
only.
4. Connect the second jumper cable to the booster battery (-)
terminal.
5. Connect the other end of the second jumper cable to the
front frame (as shown). Do not connect this jumper cable to
any other part.
MAINTENANCE
SPECIFICATIONS
the power mode changes to VEHICLE OFF.
AUDIO AND
CONNECTIVITY
NOTICE
CLIENT
INFORMATION
Do not press the button while driving unless it is absolutely necessary for the engine to be
BLUE TOOTH®
HANDSFREELINK®
switched off.
VOICE
COMMAND
INDEX
ACURALINK® INDEX
156 | | 157
Page 82

TABLE OF
Reserve
Tank
MAX
MIN
CONTENTS
VISUAL INDEX DRIVING
SAFET Y
INFORMATION
If your vehicle is connected to another vehicle, start the assisting vehicle’s engine and increase its
rpm slightly.
Attempt to start your vehicle’s engine. If it turns over slowly, make sure the jumper cables have
good metal-to-metal contact.
WARNING: Battery posts, terminals, and related accessories contain lead and lead compounds.
Wash your hands after handling.
Overheating
If the temperature gauge needle is at the H mark, the engine suddenly loses power, or steam or
spray comes out from under the hatch, your engine is overheating.
Immediately park the vehicle in a safe place. Turn off all accessories and turn on the hazard
warning lights. Change the gear position to (P).
If no steam or spray is present: Keep the power system on and open the hatch.
If steam or spray is present: Turn off the power system and wait until it subsides. Then, open
HANDLING THE UNEXPECTEDHANDLING THE UNEXPECTED
NAVIGATION
HANDLING THE
UNEXPECTED
the hatch.
INSTRUMENT
PANEL
VEHICLE
CONTROLS
WARNING
A battery can explode if you do not follow the correct procedure, seriously injuring
anyone nearby.
Keep all sparks, open flames, and smoking materials away from the battery.
Check that the cooling fan is operating and turn the power system off once the temperature
gauge needle comes down. If the cooling fan is not operating, immediately turn the power
system off.
Once the engine has cooled down, inspect the coolant level and
check the cooling system components for leaks. If the coolant
level in the reserve tank is low, or no coolant is in the tank, check
MAINTENANCE
SPECIFICATIONS
that the radiator is cool. Cover the reserve tank cap with a heavy
cloth and open the cap. Add coolant until it reaches the MAX
mark, and put the cap back on.
Once the engine has cooled sufficiently, turn the power system on and check the temperature
gauge. If the temperature needle has gone down, resume driving. If it has not gone down,
contact an authorized Acura NSX dealer for repairs.
CLIENT
INFORMATION
VOICE
COMMAND
INDEX
AUDIO AND
CONNECTIVITY
BLUE TOOTH®
HANDSFREELINK®
n After the Engine Starts
Once your vehicle’s engine has started, remove the jumper cables in the following order:
1. Disconnect the jumper cable from your vehicle’s ground.
2. Disconnect the other end of the jumper cable from the assisting vehicle’s (-) terminal.
3. Disconnect the jumper cable from the assisting vehicle’s (+) terminal.
4. Disconnect the other end of the jumper cable from your vehicle’s (+) terminal.
Have your vehicle inspected by a nearby service station or an authorized Acura NSX
dealer.
ACURALINK® INDEX
158 | | 159
Page 83

TABLE OF
CONTENTS
WARNING
Steam and spray from an overheated engine can seriously scald you.
VISUAL INDEX DRIVING
Do not open the hatch if steam is coming out.
Emergency Towing
This vehicle requires flat bed towing. Call a professional towing service if you need to tow your
vehicle. The operator loads your vehicle on the back of a truck.
HANDLING THE UNEXPECTEDHANDLING THE UNEXPECTED
NAVIGATION
NOTICE
SAFET Y
INFORMATION
INSTRUMENT
PANEL
WARNING
Removing the radiator cap while the engine is hot can cause the coolant to spray out,
seriously scalding you.
Always let the engine and radiator cool down before removing the radiator cap.
NOTICE
Trying to lift or tow your vehicle by the bumpers will cause serious damage. The bumpers are
not designed to support the vehicle’s weight.
Improper towing such as towing behind a motorhome or other motor vehicle can damage the
transmission.
HANDLING THE
UNEXPECTED
MAINTENANCE
Continuing to drive with the temperature gauge needle at the H mark may damage the engine.
VEHICLE
CONTROLS
SPECIFICATIONS
AUDIO AND
CONNECTIVITY
BLUE TOOTH®
HANDSFREELINK®
ACURALINK® INDEX
160 | | 161
INFORMATION
COMMAND
CLIENT
VOICE
INDEX
Page 84

TABLE OF
CONTENTS
Tire Pressure Monitoring System (TPMS)
Monitors the tire pressure while you are driving.
VISUAL INDEX DRIVING
SAFET Y
INFORMATION
If your vehicle’s tire pressure becomes significantly low, the low
tire pressure indicator comes on and a message appears on the
multi-information display. Roll the right selector wheel on the
steering wheel to view the tire pressure monitor.
n Tire Pressure Monitoring System (TPMS) - Required Federal Explanation
Each tire, including the spare (if provided), should be checked monthly when cold
and inflated to the inflation pressure recommended by the vehicle manufacturer on
the vehicle placard or tire inflation pressure label.
(If your vehicle has tires of a different size than the size indicated on the vehicle
placard or tire inflation pressure label, you should determine the proper tire
inflation pressure for those tires.)
HANDLING THE UNEXPECTEDHANDLING THE UNEXPECTED
NAVIGATION
HANDLING THE
UNEXPECTED
As an added safety feature, your vehicle has been equipped with a tire
pressure monitoring system (TPMS) that illuminates a low tire pressure
telltale when one or more of your tires is significantly under-inflated.
Accordingly, when the low tire pressure telltale illuminates, you should stop and
check your tires as soon as possible, and inflate them to the proper pressure.
Driving on a significantly under-inflated tire causes the tire to overheat and can lead
to tire failure. Under-inflation also reduces fuel efficiency and tire tread life, and
may affect the vehicle’s handling and stopping ability.
MAINTENANCE
SPECIFICATIONS
INSTRUMENT
PANEL
VEHICLE
CONTROLS
n What to Do
Stop your vehicle in a safe place. Check the tire pressure and adjust the pressure to the
specified level. The specified tire pressure is on a label on the driver’s doorjamb.
NOTICE
Driving on an extremely underinflated tire can cause it to overheat. An overheated tire can
fail. Always inflate your tires to the specified pressure.
Please note that the TPMS is not a substitute for proper tire maintenance, and it is
AUDIO AND
CONNECTIVITY
the driver’s responsibility to maintain correct tire pressure, even if under-inflation
has not reached the level to trigger illumination of the TPMS low tire pressure
CLIENT
INFORMATION
telltale.
BLUE TOOTH®
HANDSFREELINK®
VOICE
COMMAND
INDEX
ACURALINK® INDEX
162 | | 163
Page 85

TABLE OF
CONTENTS
VISUAL INDEX DRIVING
SAFET Y
INFORMATION
INSTRUMENT
PANEL
Your vehicle has also been equipped with a TPMS malfunction indicator to indicate
when the system is not operating properly. The TPMS malfunction indicator
is combined with the low tire pressure telltale. When the system detects a
malfunction, the telltale will flash for approximately one minute and then remain
continuously illuminated. This sequence will continue upon subsequent vehicle
start-ups as long as the malfunction exists.
When the malfunction indicator is illuminated, the system may not be able to
detect or signal low tire pressure as intended.
TPMS malfunctions may occur for a variety of reasons, including the installation of
replacement or alternate tires or wheels on the vehicle that prevent the TPMS from
functioning properly.
Tire Repair Kit
If a tire has a small puncture, you can use the tire repair kit to temporarily repair it. The puncture
must be smaller than 3/16-inch (4 mm) and not in the tire sidewall. Go to a authorized Acura
NSX dealer to have the full-size tire permanently repaired or replaced.
n Before Repairing the Tire
• Park the vehicle on a firm, level, and non-slippery surface.
• Make sure the vehicle is in Park (P), and apply the parking brake.
• Turn on the hazard warning lights, and turn the power system off.
HANDLING THE UNEXPECTEDHANDLING THE UNEXPECTED
NAVIGATION
HANDLING THE
UNEXPECTED
MAINTENANCE
Always check the TPMS malfunction telltale after replacing one or more tires or
wheels on your vehicle to ensure that the replacement or alternate tires and wheels
VEHICLE
CONTROLS
allow the TPMS to continue to function properly.
SPECIFICATIONS
AUDIO AND
CONNECTIVITY
BLUE TOOTH®
HANDSFREELINK®
ACURALINK® INDEX
164 | | 165
INFORMATION
COMMAND
CLIENT
VOICE
INDEX
Page 86

TABLE OF
Lid Tie Down
Tire Repair Kit
CONTENTS
VISUAL INDEX DRIVING
SAFET Y
INFORMATION
n Getting Ready to Repair the Tire
1. Open the hatch.
2. Loosen the tool box tie-downs and remove the tool box
lid.
3. Take the kit out of the tool box.
4. Place the kit face up on flat ground near the punctured
tire and away from traffic. Do not place the kit on its side.
Fuse Locations
If any electrical devices are not working, set the power mode to VEHICLE OFF (LOCK) and check
to see if any applicable fuse is blown. Fuse locations are shown on the fuse box cover. Locate the
fuse by the fuse number and box cover number.
n Hood Fuse Box A
Located near the radiator. Push the tabs to open the box.
HANDLING THE UNEXPECTEDHANDLING THE UNEXPECTED
NAVIGATION
HANDLING THE
UNEXPECTED
Follow the instructions in the kit to repair the tire.
INSTRUMENT
PANEL
NOTICE
MAINTENANCE
Do not use an unapproved puncture-repairing agent other than the one provided in the kit
VEHICLE
CONTROLS
that came with your vehicle. If a different agent is used, you may permanently damage the
tire pressure sensor.
SPECIFICATIONS
Fuses shown on next page.
AUDIO AND
CONNECTIVITY
BLUE TOOTH®
HANDSFREELINK®
ACURALINK® INDEX
166 | | 167
INFORMATION
COMMAND
CLIENT
VOICE
INDEX
Page 87

TABLE OF
8
Left Headlight Low Beam 10 A
9
Right Headlight High Beam1010 A
Right Headlight Low Beam
10 A
11
IGPS Fan 7.5 A
12 FI Main
15 A
13
FI Sub
14
20 A
Back Up 7.5A
15
SBW ECU
16
7.5 A
DBW1 15 A
17
IG Coil 15 A
18 DBW2
15 A
19
Parking Light & Headlight
Main
20 A
20 Rear Defroster
20 A
21
Front Washer 20 A
22 ISC
15 A
23
− −
24 ACC/IG2 Main 10 A
25 10 A
26
Daytime Running Lights
Horn
10 A
27
Interior Lights 7.5 A
28 IGP2
15 A
29
Audio 10 A
AmpsCircuit Protected
Circuit Protected Amps
1
70 A
50 A
40 A
20 A
30 A
200A
2
(50 A)
60 A
(60A)
(50A)
30 A
30 A
(40A)
30 A
30 A
3
(40A)
30 A
(30 A)
30 A
4
(30 A)
10 A
5
7.5A
6
10 A
7
7.5A
Left Headlight High Beam
VFP2
EPS
Cooling Fan
ABS/VSA Motor
ABS/VSA FSR
AS F/B Main
Main Fuse
−
F/B Main 1
−
−
Left Electric Parking Brake
Motor
Right Electric Parking Brake
Motor
−
Heater Motor 2
Heater Motor 1
−
E-OP
−
ADS
AMP
*
Parking Light
IGPS PCS
8
Left Headlight Low Beam 10 A
9
Right Headlight High Beam1010 A
Right Headlight Low Beam
10 A
11
IGPS Fan 7.5 A
12 FI Main
15 A
13
FI Sub
14
20 A
Back Up 7.5A
15
SBW ECU
16
7.5 A
DBW1 15 A
17
IG Coil 15 A
18 DBW2
15 A
19
Parking Light & Headlight
Main
20 A
20 Rear Defroster
20 A
21
Front Washer 20 A
22 ISC
15 A
23
− −
24 ACC/IG2 Main 10 A
25 10 A
26
Daytime Running Lights
Horn
10 A
27
Interior Lights 7.5 A
28 IGP2
15 A
29
Audio 10 A
AmpsCircuit Protected
AmpsCircuit Protected
1
60 A
−
60 A
30 A
30 A
30 A
30 A
40 A
2
30 A
3
20 A
4
7.5A
5
6
7.5A
20 A
7
8
7.5A
10 A
9
−
10
7.5A
11
12
7.5A
−
13 −
14 −
15 −
16 −
17 10 A
SBW
−
F/B Main2
Wiper
Passenger Power Window
IG Main1
Driver Power Window
ESB
IG Main2
IMA Motor
BMS
Stop
Turbo W/G
Hazard
WA/C/P
−
AEV
FI-ECU Backup
−
−
−
−
−
IMA Motor
CONTENTS
n Hood Fuse Box B
HANDLING THE UNEXPECTEDHANDLING THE UNEXPECTED
NAVIGATION
Located near the 12-volt battery. Remove the maintenance cover, then push the tabs to open
VISUAL INDEX DRIVING
the box.
SAFET Y
INFORMATION
INSTRUMENT
PANEL
VEHICLE
CONTROLS
AUDIO AND
CONNECTIVITY
BLUE TOOTH®
HANDSFREELINK®
ACURALINK® INDEX
168 | | 169
HANDLING THE
UNEXPECTED
MAINTENANCE
SPECIFICATIONS
INFORMATION
COMMAND
CLIENT
VOICE
INDEX
Page 88

TABLE OF
Circuit Protected Amps
1 10 A
2
15 A
3
7.5 A
4
−
5 20 A
6
20 A
7
15 A
8
7.5 A
9
7.5 A
10
10 A
11
10 A
12
−
13 10 A
14
7.5 A
15
(20A)
16
(7.5 A)
17
(20A)
18
10 A
19
−
20 7.5 A
21
7.5 A
22
7.5 A
23
7.5 A
Passenger’s Door Handle
Door Lock
SMART
−
Front Accessory Power
Socket
Fuel Pump
MISS SOL
ENG
VSA/ABS
SRS
Power System 2
−
Power System 1
Fuel Lid
Driver’s Power Seat
Reclining
*
−
Seat Heater
*
Driver’s Door Handle
−
Passenger’s Side Door
Unlock
Daytime Running Lights
Key Lock
Air Conditioning
24 Feed Back IG1a 7.5A
25
Instrument Panel Lights 7.5A
26
Power Lumbar Support
*
(7.5 A)
27
Parking Lights 7.5A
28
Sub Main 15 A
29 Meter 10 A
30 DR2 7.5A
31
Sub Fuel Pump 15 A
32
SRS 10 A
33
Passenger’s Side Door Lock 7.5A
34 Driver’s Door Lock 7.5A
35
Driver’s Door Unlock 7.5A
36
Driver’s Power Seat Sliding*(20A)
37
7.5A
Right Daytime Running
Light
38
7.5A
39
Left Daytime Running Light
Feed Back IG1b 7.5A
40
ACC 7.5A
41
− −
42 − −
AmpsCircuit Protected
Fuse Label
24 Feed Back IG1a 7.5A
25
Instrument Panel Lights 7.5A
26
Power Lumbar Support*(7.5 A)
27
Parking Lights 7.5A
28
Sub Main 15 A
29 Meter 10 A
30 DR2 7.5A
31
Sub Fuel Pump 15 A
32
SRS 10 A
33
Passenger’s Side Door Lock 7.5A
34 Driver’s Door Lock 7.5A
35
Driver’s Door Unlock 7.5A
36
Driver’s Power Seat Sliding*(20A)
37
7.5A
Right Daytime Running
Light
38
7.5A
39
Left Daytime Running Light
Feed Back IG1b 7.5A
40
ACC 7.5A
41
− −
42 − −
AmpsCircuit Protected
Fuse Box
Fuse Label
Clip
Under Cover
AmpsCircuit Protected
a
(20A)
b
(20A)
c
(10A)
d
−
e 7.5A
f
7.5A
g
7.5A
h
7.5A
Passenger’s Power Seat
Sliding
*
Passenger’s Power Seat
Reclining
*
−
−
Wiper
EPS
DR1
Power System 3
CONTENTS
VISUAL INDEX DRIVING
n Driver’s Side Fuse Box
Located under the dashboard.
n Passenger’s Side Fuse Box
Located below the glove box. Use a Phillips-head screwdriver to remove the clips, then open
the cover panel.
HANDLING THE UNEXPECTEDHANDLING THE UNEXPECTED
NAVIGATION
SAFET Y
INFORMATION
INSTRUMENT
CONTROLS
AUDIO AND
CONNECTIVITY
BLUE TOOTH®
HANDSFREELINK®
ACURALINK® INDEX
PANEL
VEHICLE
170 | | 171
HANDLING THE
UNEXPECTED
MAINTENANCE
SPECIFICATIONS
INFORMATION
COMMAND
*if equipped
*if equipped
CLIENT
VOICE
INDEX
Page 89

TABLE OF
Fuse Box
Circuit Protected Amps
1
HCA-2 20 A
2
− −
3 − −
4 − −
5 HCA-1 20 A
6
20 A
7
DI-INJ
−−
8 TCU 30 A
Blown fuse
Combined fuse
Fuse puller
CONTENTS
VISUAL INDEX DRIVING
n Interior Rear Fuse Box
Located near the rear-center speaker. The fuse label is the hood fuse box “A”.
n Inspecting and Changing Fuses
Set the power mode to VEHICLE OFF (LOCK). Turn off the
headlights and all accessories.
HANDLING THE UNEXPECTEDHANDLING THE UNEXPECTED
NAVIGATION
Remove the fuse box cover.
Check the large fuse in the hood.
SAFET Y
INFORMATION
If the fuse is blown, use a Phillips-head screwdriver to remove
the screws and replace the fuse with a new one. Reinstall the
HANDLING THE
UNEXPECTED
screws.
Inspect the small fuses in the hood and the vehicle interior.
INSTRUMENT
PANEL
If there is a burned out fuse, remove it with the fuse puller and
replace it with a new one.
MAINTENANCE
VEHICLE
CONTROLS
NOTICE
SPECIFICATIONS
Replacing a fuse with one that has a higher rating greatly increases the chances of damaging
AUDIO AND
CONNECTIVITY
BLUE TOOTH®
HANDSFREELINK®
ACURALINK® INDEX
172 | | 173
the electrical system.
INFORMATION
COMMAND
CLIENT
VOICE
INDEX
Page 90

TABLE OF
CONTENTS
MAINTENANCE
VISUAL INDEX DRIVING
Learn about basic maintenance that you can perform on the vehicle yourself, as well as
information about how to best maintain the vehicle.
Safety Precautions
SAFET Y
INFORMATION
INSTRUMENT
PANEL
Some of the most important safety precautions are listed below; however, we cannot warn you
of every conceivable hazard that can arise in performing maintenance. Only you can decide
whether or not you should perform a given task.
n Maintenance Safety
To reduce the possibility of fire or explosion, keep cigarettes, sparks, and flames away from
Improperly maintaining this vehicle or failing to correct a problem before driving
can cause a crash in which you can be seriously hurt or killed.
Always follow the inspection and maintenance recommendations according to
the schedules in this guide.
Failure to properly follow maintenance instructions and precautions can cause
you to be seriously hurt or killed.
Always follow the procedures and precautions in this guide.
WARNING
WARNING
MAINTENANCEMAINTENANCE
NAVIGATION
HANDLING THE
UNEXPECTED
MAINTENANCE
the battery and all fuel-related parts.
VEHICLE
CONTROLS
Never leave rags, towels, or other flammable objects in the engine compartment.
To clean parts, use a commercially available degreaser or parts cleaner, not gasoline.
SPECIFICATIONS
Wear eye protection and protective clothing when working with the battery or compressed
air.
AUDIO AND
CONNECTIVITY
Do not run the engine in confined spaces where carbon monoxide gas can accumulate.
CLIENT
INFORMATION
n Vehicle Safety
BLUE TOOTH®
HANDSFREELINK®
The vehicle must be stationary, and parked on level ground with the parking brake set and
the engine off.
Be aware that hot parts can burn you.
VOICE
COMMAND
INDEX
Be aware that moving parts can injure you.
ACURALINK® INDEX
174 | | 175
Page 91

TABLE OF
Maintenance Service Items
Remaining Engine Oil Life
Right Selector Wheel
CONTENTS
Maintenance Minder™
When maintenance is due, the system message indicator comes on and the Maintenance Minder
VISUAL INDEX DRIVING
SAFET Y
INFORMATION
appears on the multi-information display every time you turn the vehicle on. Press the Info
(p/q) buttons on the steering wheel to change displays.
See page 178 to check the indicated maintenance service(s).
Independent of the Maintenance Minder information:
• Replace the brake fluid every 3 years.
• Inspect idle speed every 160,000 miles (256,000 km).
• Adjust the valves during services A, B, 1, 2, or 3 if they are noisy.
• Inspect the fuel injection systems every 3 years.
• Inspect tire condition every 3,100 miles (5,000 km).
MAINTENANCEMAINTENANCE
NAVIGATION
HANDLING THE
UNEXPECTED
For U.S. models: Maintenance, replacement, or repair of emissions control devices and systems may
INSTRUMENT
PANEL
be done by any automotive repair establishment or individuals using parts that are certified to EPA
standards.
According to state and federal regulations, failure to perform maintenance on the maintenance main items
MAINTENANCE
marked with # will not void your emissions warranties. However, all maintenance services should be performed
in accordance with the int ervals indicated by the multi-information display.
VEHICLE
CONTROLS
SPECIFICATIONS
AUDIO AND
CONNECTIVITY
BLUE TOOTH®
HANDSFREELINK®
ACURALINK® INDEX
INFORMATION
COMMAND
176 | | 177
CLIENT
VOICE
INDEX
Page 92

TABLE OF
*1: If a message SERVICE does not appear more than 12 months after the display is reset,
CODE
change the engine oil every year.
See information on maintenance and emissions warranty.
A
Maintenance Main Items
B
Inspect exhaust system
#
Inspect fuel lines and connections
#
Inspect direct injection + port injection fuel system
Replace engine oil
*1
Replace engine oil*1 and oil filter
Inspect front and rear brakes
Check expiration date for temporary tire repair
kit bottle
Inspect tie rod ends, steering gearbox, and boots
Inspect suspension components
Inspect driveshaft boots
Inspect brake hoses and lines (Including ABS/VSA)
Inspect all fluid levels and condition of fluids
#
every year.
*4:Driving in mountainous areas at very low vehicle speeds results in higher transmission temperature.
This requires transmission fluid and clutch fluid changes more frequently than recommended by the
*2: If you drive in dusty conditions, replace the air cleaner element every 15,000 miles (24,000 km).
*3: If you drive primarily in urban areas that have high concentrations of soot in the air from industry and
from diesel-powered vehicles, replace the dust and pollen filters every 15,000 miles (24,000 km) or
Maintenance Minder. If you regularly drive your vehicle under this condition, have the transmission
fluid and clutch fluid changed every 20,000 miles (32,000 km).
*5:Driving in mountainous areas at very low vehicle speeds results in higher level of mechanical (Shear)
CODE
1
Inspect tire condition
2
Maintenance Sub Items
stress to fluid. This requires Twin Motor Unit fluid changes more frequently than recommended by the
Maintenance Minder. If you regularly drive your vehicle under these conditions, have the Twin Motor
Unit fluid changed at 7,500 miles (12,000 km), then every 15,000 miles (24,000 km).
3
Replace air cleaner element
*2
Replace dust and pollen lters
*3
4
Replace transmission uid
*4
Replace clutch uid
*4
Inspect Active Exhaust Valve function
Replace spark plugs
Inspect valve clearance
5
Replace Intake Sound Control
6
Replace engine coolant
Replace Twin Motor Unit uid
*5
CONTENTS
n Maintenance Minder Service Codes
MAINTENANCEMAINTENANCE
NAVIGATION
These codes indicate what services are due on your vehicle.
VISUAL INDEX DRIVING
SAFET Y
INFORMATION
INSTRUMENT
VEHICLE
CONTROLS
AUDIO AND
CONNECTIVITY
BLUE TOOTH®
HANDSFREELINK®
ACURALINK® INDEX
PANEL
178 | | 179
HANDLING THE
UNEXPECTED
MAINTENANCE
SPECIFICATIONS
INFORMATION
COMMAND
CLIENT
VOICE
INDEX
Page 93

TABLE OF
Pull
Hood Release Handle
Lever
Brake Fluid
(Black Cap)
Washer Fluid
(Black Cap)
12-Volt Battery
Inverter Coolant
Filler Tank
CONTENTS
n Opening the Hood
Under the Hood
MAINTENANCEMAINTENANCE
NAVIGATION
Park the vehicle on a level surface, and set the parking brake.
VISUAL INDEX DRIVING
Pull the hood release handle under the lower left corner of
the dashboard.
SAFET Y
INFORMATION
HANDLING THE
UNEXPECTED
Push the hood latch lever to release the lock mechanism, and
open the hood.
INSTRUMENT
PANEL
VEHICLE
CONTROLS
AUDIO AND
CONNECTIVITY
BLUE TOOTH®
HANDSFREELINK®
ACURALINK® INDEX
Lift the hood up most of the way. The hydraulic supports will
lift it up the rest of the way and hold it up.
When closing, lower it to approximately 12 inches (30 cm),
then press down firmly with your hands and ensure that both
left and right latches are locked in place.
180 | | 181
MAINTENANCE
SPECIFICATIONS
INFORMATION
COMMAND
CLIENT
VOICE
INDEX
Page 94

TABLE OF
Hatch
Release Button
Engine
Covers
Compartment
Engine Oil Fill Cap
Engine Coolant
Reserve Tank Cap
Reserve Tank
Engine Coolant
Engine Oil Dipstick
(Orange)
CONTENTS
n Opening the Hatch
Under the Hatch
MAINTENANCEMAINTENANCE
NAVIGATION
Park the vehicle on a level surface, and set the parking brake.
VISUAL INDEX DRIVING
Press the hatch release handle on the driver’s door.
Lift the hatch up most of the way. The hydraulic supports will
lift it up the rest of the way and hold it up.
SAFET Y
INFORMATION
When closing, lower it to approximately 12 inches (30 cm),
then press down firmly with your hands.
HANDLING THE
UNEXPECTED
INSTRUMENT
PANEL
VEHICLE
CONTROLS
n Removing the Engine Compartment Cover
Pull up on the cover to pull it off the pins.
MAINTENANCE
SPECIFICATIONS
AUDIO AND
CONNECTIVITY
BLUE TOOTH®
HANDSFREELINK®
INFORMATION
COMMAND
ACURALINK® INDEX
182 | | 183
CLIENT
VOICE
INDEX
Page 95

TABLE OF
Upper Mark
Lower Mark
Ambient Temperature
CONTENTS
VISUAL INDEX
SAFET Y
INFORMATION
MAINTENANCE
Engine Oil
We recommend you check the engine oil level each time you refuel.
n Checking the Oil
From inside the vehicle:
1. Display the Oil Level Check Assist in the driver
information interface (see page 51) .
2. Run the engine until the Warm Up gauge is full.
From outside the vehicle:
1. Remove the passenger-side engine cover (see page 182)
2. When the two-minute timer completes, remove the
dispstick (orange loop), wipe it clean, and reinsert it (flat
side of loop toward oil fill cap)
3. Remove the dipstick and check the oil level. It should be
between the upper and lower marks. Add oil if needed.
When finished, select a different display in the driver
information interface.
NAVIGATION
DRIVING
HANDLING THE
UNEXPECTED
INSTRUMENT
PANEL
VEHICLE
CONTROLS
AUDIO AND
CONNECTIVITY
BLUE TOOTH®
HANDSFREELINK®
ACURALINK®
3. Park on level ground and shift to (P). Idle the engine until
the Idle Time gauge is full and and the Ready to Check
Oil Level message appears. Do not press the accelerator
during this time.
4. Set the power mode to VEHICLE OFF (LOCK). Start a twominute timer.
5. Open the hatch
184 |
n Recommended Engine Oil
Use full synthetic, 0W-40 motor oil such as Ultimate
Full Synthetic Motor Oil, Type 3, 0W-40, available at your
authorized Acura NSX dealer.
NOTICE
Acura cannot ensure proper engine operation and durability if other engine oil is used..
MAINTENANCE
SPECIFICATIONS
CLIENT
INFORMATION
VOICE
COMMAND
INDEX
INDEX
Page 96

TABLE OF
Oil Fill Cap Flat Side
Wheel
Right Selector
CONTENTS
Use only oil that displays an API Certification Seal on the
container. This seal indicates the oil is energy conserving
VISUAL INDEX DRIVING
and that it meets the American Petroleum Institute’s latest
requirements.
n Resetting the Engine Oil Life
If you change or replace the vehicle’s engine oil yourself, you must reset the engine oil
life. Use the right selector wheel on the steering wheel to make selections in the driver
information interface.
MAINTENANCEMAINTENANCE
NAVIGATION
SAFET Y
INFORMATION
n Adding Oil
HANDLING THE
UNEXPECTED
Unscrew and remove the engine oil fill cap.
INSTRUMENT
PANEL
Add oil slowly.
Reinstall the engine oil fill cap and tighten it securely.
MAINTENANCE
Recheck the engine oil level (see page 184).
VEHICLE
CONTROLS
AUDIO AND
CONNECTIVITY
NOTICE
Do not fill the engine oil above the upper mark. Overfilling the engine oil can result in leaks
and engine damage.
Set the power mode to ON. Roll the wheel until the oil life displays in the driver information
interface.
Press the wheel for at least 10 seconds, until you enter reset mode.
Select All Items Due, then press the wheel. The maintenance items disappear, and the
engine oil life display returns to 100%.
SPECIFICATIONS
INFORMATION
NOTICE
BLUE TOOTH®
HANDSFREELINK®
Failure to reset the engine oil life after a maintenance service results in the system showing
incorrect maintenance intervals, which can lead to serious mechanical problems.
COMMAND
ACURALINK® INDEX
186 | | 187
CLIENT
VOICE
INDEX
Page 97

TABLE OF
Reserve
Tank
MAX
MIN
Reserve Tank
Cap
CONTENTS
Engine Coolant
Park the vehicle on level ground. Check the reserve tank and the coolant level in the radiator. We
VISUAL INDEX DRIVING
SAFET Y
INFORMATION
INSTRUMENT
PANEL
specify Acura Long Life Antifreeze/Coolant Type 2.
n Checking the Coolant Level
Open the hatch and remove the driver’s side engine cover (see
page 182).
If the coolant level in the reserve tank is below the MIN mark,
add the specified coolant until it reaches the MAX mark.
Inspect the cooling system for leaks.
n Adding Coolant
Make sure the engine and radiator are cool.
Turn the reserve tank cap counterclockwise and relieve any
pressure in the coolant system. Do not push the cap down
when turning.
Push down and turn the cap counterclockwise to remove it.
Pour coolant into the reserve tank until it reaches the MAX
mark. Put the cap back on the reserve tank and tighten.
MAINTENANCEMAINTENANCE
NAVIGATION
HANDLING THE
UNEXPECTED
MAINTENANCE
NOTICE
VEHICLE
CONTROLS
If temperatures consistently below −22°F (−30°C) are expected, the coolant mixture should
be changed to a higher concentration. Consult your authorized Acura NSX dealer for more
information.
WARNING
Removing the reserve tank cap while the engine is hot can cause the coolant to
SPECIFICATIONS
spray out, seriously scalding you.
AUDIO AND
CONNECTIVITY
Always let the engine and radiator cool down before removing the reserve tank
cap.
CLIENT
INFORMATION
BLUE TOOTH®
HANDSFREELINK®
NOTICE
Pour the fluid slowly and carefully so you do not spill any. Clean up any spills immediately;
COMMAND
they can damage components in the engine compartment.
ACURALINK® INDEX
188 | | 189
VOICE
INDEX
Page 98

TABLE OF
Filler
Tank
MIN
Brake Reservoir
MAX
CONTENTS
VISUAL INDEX DRIVING
SAFET Y
INFORMATION
INSTRUMENT
PANEL
Inverter Coolant
Check the inverter coolant level every time you refuel
n Checking the Inverter Coolant Level
Open the hood.
If the inverter coolant is below the MIN level, have your
vehicle serviced at an authorized Acura NSX dealer.
Window Washer Fluid
If the washer fluid is low, a message will appear on the driver information interface. Do not
MAX
MIN
Brake Fluid
The fluid level should be between the MIN and MAX marks on
the side of the reservoir. We recommend using Acura Heavy
Duty Brake Fluid DOT 4.
Pour the fluid carefully.
If the fluid level is at or below the MIN mark, have the vehicle
inspected for leaks or worn brake pads as soon as possible.
NOTICE
Brake fluid marked DOT 5 is not compatible with your vehicle’s braking system and can cause
extensive damage.
MAINTENANCEMAINTENANCE
NAVIGATION
HANDLING THE
UNEXPECTED
MAINTENANCE
overfill the reservoir.
VEHICLE
CONTROLS
SPECIFICATIONS
NOTICE
AUDIO AND
CONNECTIVITY
Do not use engine antifreeze or a vinegar/water solution in the windshield washer reservoir.
Antifreeze can damage your vehicle’s paint. A vinegar/water solution can damage the windshield
washer pump.
CLIENT
INFORMATION
BLUE TOOTH®
HANDSFREELINK®
ACURALINK® INDEX
190 | | 191
COMMAND
VOICE
INDEX
Page 99

TABLE OF
Tab
Cover
Terminal
Cover
CONTENTS
VISUAL INDEX DRIVING
SAFET Y
INFORMATION
Checking the 12-Volt Battery
Check the battery terminals for corrosion monthly.
Remove the cover by pressing the tabs. Slide the terminal cover
over the (+) terminal.
AGM-labeled batteries can be damaged if improperly charged.
See your authorized Acura NSX dealer for charging information.
WARNING
The battery gives off explosive hydrogen gas during normal operation.
A spark or flame can cause the battery to explode with enough force to kill or
seriously hurt you.
When conducting any battery maintenance, wear protective clothing and a face
shield, or have a skilled technician do it.
MAINTENANCEMAINTENANCE
NAVIGATION
HANDLING THE
UNEXPECTED
WARNING: Battery posts, terminals, and related accessories contain lead and lead compounds.
Wash your hands after handling.
INSTRUMENT
PANEL
MAINTENANCE
VEHICLE
CONTROLS
SPECIFICATIONS
For jump starting, see page 157.
AUDIO AND
CONNECTIVITY
BLUE TOOTH®
HANDSFREELINK®
ACURALINK® INDEX
192 | | 193
INFORMATION
COMMAND
CLIENT
VOICE
INDEX
Page 100

TABLE OF
Tab
Holder
Wiper
Blade
the bottom
End Cap at
CONTENTS
VISUAL INDEX DRIVING
Changing Wiper Blades
If the wiper blades leave streaks across the windshield, try cleaning them first with a paper towel
or soft cloth and wiper fluid. If the wiper blade rubber has deteriorated, you should change the
wiper blades.
4. Push to compress the wiper blade until it clears the end cap,
then pull to slide it up and out of the holder.
MAINTENANCEMAINTENANCE
NAVIGATION
1. Hold the wiper switch in MIST as you change the power
SAFET Y
INFORMATION
mode to VEHICLE OFF (LOCK). The wiper arms will move into
the service position.
5. Slide the new wiper blade into the holder and secure the end
into the cap. Slide the blade holder onto the wiper arm until
HANDLING THE
UNEXPECTED
it clicks, then lower the arm.
INSTRUMENT
PANEL
2. Lift both wiper arms.
6. Set the power mode to ON. Hold the wiper switch in MIST
until the wiper arms return to their normal position..
MAINTENANCE
VEHICLE
CONTROLS
NOTICE
SPECIFICATIONS
Avoid dropping the wiper arm, as it may damage the windshield.
AUDIO AND
CONNECTIVITY
BLUE TOOTH®
HANDSFREELINK®
ACURALINK® INDEX
3. For each wiper, press and hold the tab, then slide the wiper
blade holder out from the wiper arm.
194 | | 195
INFORMATION
COMMAND
CLIENT
VOICE
INDEX
 Loading...