

Page 1
The information and specifications included in this publication were in effect at the time of approval for printing. Honda Motor Co., Ltd., reserves the right,
however, to discontinue or change specifications or design at any time without notice and without incurring any obligation.
Accessories Precautions
The GPS antenna is located in the dashboard. Metallic front or side window tinting can seriously degrade or obstruct GPS reception.
Signal noise from devices such as radar detectors, vehicle tracking devices, remote starters, and additional amplifiers can disrupt the navigation system. If you
install any such item, install it away from the navigation display and antenna.
Important Safety Information
WARNING
Using the navigation system while driving can take your
attention away from the road, causing a crash in which you
could be seriously injured or killed.
Only operate system controls when the conditions permit you
to safely do so.
Avoid focusing on the screen or manually operating the system controls while driving.
Enter information before you begin driving or when stopped. As you drive, listen to the audible instructions and use voice commands when possible. Pull to the
side of the road if you need more time to look at the screen or operate the controls.
Route guidance may conflict with street closures, road construction, detours, and out-of-date map data.
The system itself may also have limitations. Verify route information by carefully observing roads, signs, and signals. Always use your own judgment and obey
traffic laws.
System Limitations P. 310
2
Page 2

2 System Setup P. 21
Start-up 22 Voice Control System 24 Interface Settings 27 Personal Information 38
Routing 53 Guidance 62 Map 69 Data Reset 85
On Demand Multi-Use Display™ 86
2 Navigation P. 87
Entering a Destination 88 Calculating the Route 114
Changing Your Route 128 Changing Your Destination 137 Resuming Your Trip 140
2 Audio P. 141
Audio System 142 Audio Remote Controls 148 Audio Settings 149 Playing FM/AM Radio 153
Playing XM® Radio 159 Playing a Disc 164 Playing Hard Disc Drive (HDD) Audio 171
Playing an iPod® 183 Playing Internet Radio 195 Playing a USB Flash Drive 199 Playing Bluetooth® Audio 205
2 Bluetooth® HandsFreeLink® P. 209
Bluetooth® HandsFreeLink® 210 Text Message/E-mail 242
Driving to Your Destination 116
Map Menu 122
Contents
Quick Reference Guide
System Setup
Navigation
Audio
Bluetooth® HandsFreeLink®
P.2
P.21
P.87
P.141
P.209
2 AcuraLink® P. 255
AcuraLink® 256
2 Rear Entertainment System P. 263
Rear Entertainment System 264 Rear Control Panel Operation 267
2 Other Features P. 285
Trip Computer 286 Calendar 287 Information Functions 288 Multi-view Rear Camera 290
2 Troubleshooting P. 293
Troubleshooting 294 Error Messages 300
2 Reference Information P. 307
System Initialization 308 System Limitations 310 Client Assistance 312 Legal Information 315
2 Voice Commands P. 323
Voice Commands 324
Front Control Panel Operation 278
Wireless Headphones 282
AcuraLink®
Rear Entertainment System
Other Features
Troubleshooting
Reference Information
Voice Commands
Index
P.255
P.263
P.285
P.293
P.307
P.323
P.339
Page 3

Overview—Functions at a Glance
Store home address (P46)
Register
1 home address.
Store contacts (P39)
Store up to
200 contacts in 2 address books.
Enter destination (P88)
Select your destination using
12 methods.
Select route (P115)
Set route preferences and select one of
3 routes.
Track route (P116)
Follow your route in real-time with voice guidance.
AcuraLink Real-Time Traffic™ (P126)
Bypass congestion and traffic incidents.
Subscription service
Avoid certain areas (P136)
Set streets and areas to detour around.
Add waypoints (P130)
Add up to
4 “pit stops” along your route.
Quick Reference Guide
Navigation
You can select any place/landmark as a destination by using voice control or the Interface Dial. The navigation
system gives you turn-by-turn driving directions to your destination.
2
Page 4

Audio
FM/AM Radio (P153)
XM® Radio (P159)
Compact Disc (P164)
iPod® (P183)
USB Flash Drive (P199)
Bluetooth® Audio (P205)
Hard Disk Drive (HDD) (P171)
Internet Radio (P195)
AcuraLink® (P256)
AcuraLink® provides you with important information and messages between your vehicle and
Acura.
Voice Control (P24)
Use voice commands for safer system control while driving. You can operate all key functions of
the navigation, audio, Bluetooth® HandsFreeLink®, and climate control systems.
Bluetooth® HandsFreeLink® (P210)
Pair a compatible cell phone to receive incoming and make outgoing calls. You can operate the
phone features without ever taking your hands off the wheel.
The advanced audio system provides clear, well-defined sound and makes the most of your music.
Enjoy listening to a variety of audio sources, such as:
Quick Reference Guide
Rear Entertainment System (P263)
Rear seat passengers can enjoy a completely separate entertainment source than front passengers, including movies, games, and other audio
choices.
3
Page 5
System Controls
REAR
REAR
AUDIO
FRONT
AUDIO
NAV
F
F
AAA
A
FRONTFF
AUDIOAA
A
REAR
Navigation
Audio
Rear Entertainment System
Voice Control
Bluetooth
® HandsFreeLink®
1 PHONE Button (P212)
li AUDIO Button
Models without RES
9 FRONT AUDIO Button
0 REAR AUDIO Button
(P278)
lb REAR 9 (Power) Button
Models with RES
lc Microphone (P24)
lf h (Pick-Up) Button (P210)
lg J (Hang-Up/Back)
Button
(P210)
lh d (Talk) Button (P5)
ld Left Selector
Wheel
(P148)
le SOURCE Button
(P148)
2 NAV Button (P88)
3 BACK Button
4 a (Display Mode)
Button
(P74)
5 Interface Dial/ENTER
Button
(P7)
6 INFO Button
7 MENU Button
8 SETTINGS Button
On Demand Multi-Use
Display
TM
Navigation Screen
Quick Reference Guide
4
UDIO
Page 6
Voice Control Operation
Quick Reference Guide
Voice Portal Screen
a Press and release the d (Talk) button
on the top screen of any mode.
The system prompts you to say a voice
command and gives examples. Press
and release the d (Talk) button again
to bypass this prompt.
The system beeps when ready for a
command. Press the J (Hang-Up/
Back) button to cancel.
Available voice commands are
highlighted on the screen.
b Say a voice command (e.g., Address).
After that, follow the voice prompt
and say a voice command.
The audio system is muted during voice
control mode.
You can use other voice commands on
the Voice Portal screen. Voice Command
Index (P324)
Say d “Voice Help” to enter supported
commands for the current screen. A
voice help tutorial is also available. Voice
Help (P16)
During the voice control mode, press and
hold the J (Hang-Up/Back) button to
return to the Voice Portal screen.
Set Voice Prompt to Off to bypass the
voice prompt. Voice Recognition
Settings (P26)
Carefully read the usage note for the
voice control. Voice Control System
(P24)
On the Menu Screen
a Press and release the d (Talk) button
on the menu or setting screen.
The system prompts you to say a voice
command and gives examples. Press
and release the d (Talk) button again
to bypass this prompt.
Available voice commands are
highlighted on the screen.
b Say a voice command.
Say d “Voice portal” to display the
Voice Portal on any screen.
Say d “Voice Help” to enter supported
commands for the current screen. A voice
help tutorial is also available. Voice Help
(P16)
5
Page 7
On Demand Multi-Use Display™ Basic Operation
Places (P44)
Select to change an audio
source.
Shortcuts
Audio Source
Presets
To listen to a stored station,
select 1-6 (AM) or 1-12 (FM).
Source List Icons
Select to store a station.
Select to display the menu
items.
Menu Items
Phone (P222) Audio (P146) Climate*
More
AM, FM, XM, Pandora® , Aha
TM
bn
: Select the preset station (AM/FM/Pandora®/AhaTM) or category (XM).
cx
: Select to search the selected band for a station with a strong signal. (AM/FM)
Select the channel. In channel mode, select and hold to change the channel rapidly. (XM)
Select a song (Pandora®) or a contents (AhaTM).
CD, HDD, USB flash drive, Bluetooth® Audio
bn : Select n to skip to the next folder, and b to skip to the beginnig of the previous
folder.
cx : Select to change tracks. Select and hold to move rapidly within a track.
iPod®
Album bar : Select an album.
cx : Select to change tracks. Select and hold to move rapidly within a track.
*: See the Owner's Manual.
Quick Reference Guide
6
Page 8
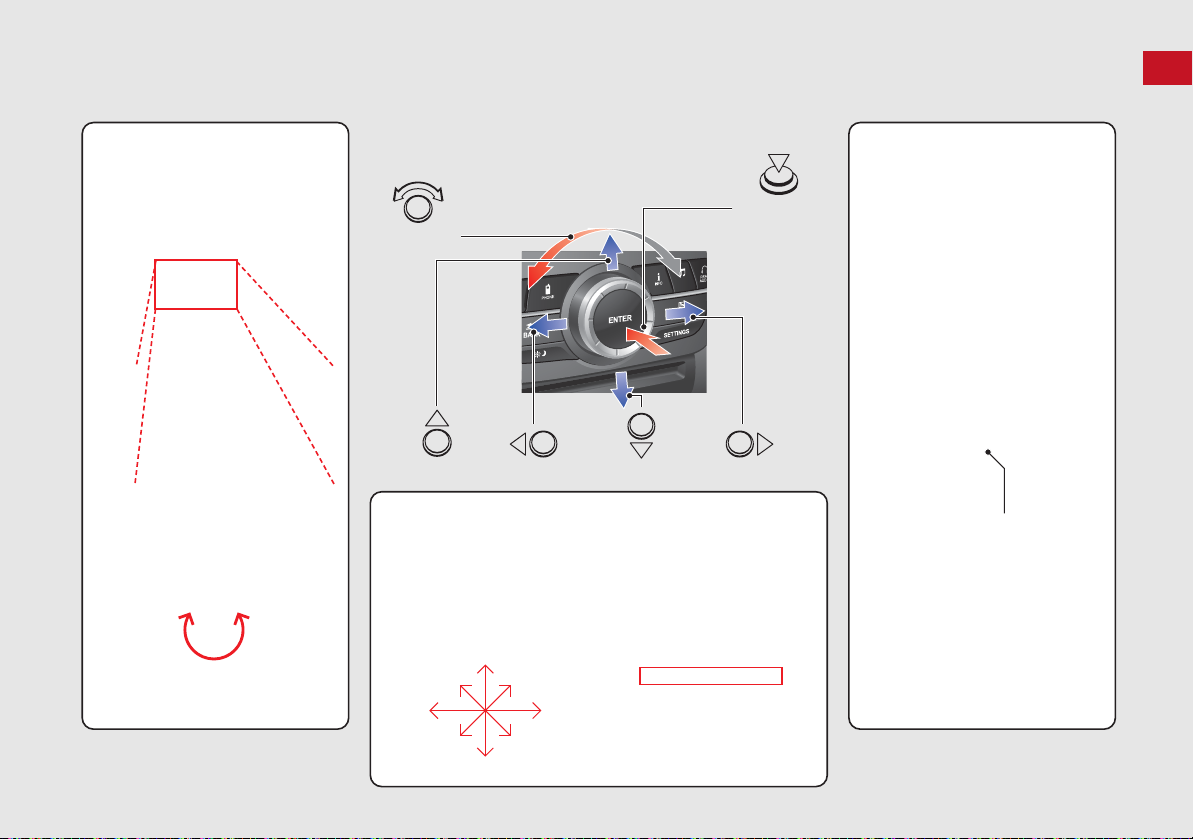
Interface Dial/ENTER Button Operation
You will see these icons in each chapter.
They represent how you can operate the Interface Dial.
Changes scale
Map screens
Highlights menu options
Menu screens
Rotate dial
Press ENTER
Move up Move left Move down Move right
Scrolls map
(8 directions)
Map screens
Selects labeled
function
Menu screens
Selects function
Selects map icon
Map screens
Selecting Icon
Selects highlighted option
Menu screens
Rotate dial i Press ENTER u
Move
e up r down w left y right
Quick Reference Guide
FRONT
AUDIO
7
Page 9
How to Enter Information
Number of Hits
On input search screens, the number of hits in the map database is
displayed. Move r to select OK to display a list of possible entries.
Quick Reference Guide
You can enter information (e.g., city names, street names, personal names, and business names comprising letters, numbers, and symbols)
when prompted on input screens by two different methods.
Using Voice Control
When you see d in this manual, voice commands are available for
that feature.
Say the letter, number, or symbol (e.g., say d “A”).
Use spelling assist (e.g., say d “Alpha” to enter the letter “A” or
d “Hyphen” to enter a hyphen).
The system beeps if you say an unavailable (grayed out) letter or
number.
If a voice command is not recognized, a list is displayed with
possible options.
On list screens:
Say the number of the list item (e.g., say d “Five” to select item
5).
Say d “Up” or d “Previous” to scroll up one page.
Say d “Down” or d “Next” to scroll down one page.
8
Using the Interface Dial
Rotate i to highlight a character.
Select to display upper/lower case characters.
Select Sym to display symbols and accented characters.
Select Edit (or move e) to edit the entered characters.
Press u to enter the highlighted character.
Move y to select Space to enter a space character.
Move w to select Delete to remove the last entered character.
You can also use the touch screen to enter information.
Scrolling through lists or tabs is limited while the vehicle is moving.
Certain screen functions are limited or inoperable while the vehicle
is moving. For these functions, use available voice commands or
pull over to proceed.
Page 10
Map Screen Legend
Map orientation (P76)
GPS signal strength
North up
Heading up
Best reception
Good reception
No icon: Poor/No reception
Current map scale
Current street name
Map scale (P80)
Current vehicle position
(P78)
Feature areas
Streets
Landmark icons (P71)
Park
Hospital
Shopping Mall
Golf Course
Airport/Business
Water Area
Cemetery
University
Freeways
State routes
Verified streets
Unverified streets
One-way streets
Acura dealer
Honda dealer
ATM
Parking lot
Parking garage
Hotel/Lodging
Gas station
Hospital
Post office
Restaurant
Freeway exit information
3D map
School
Grocery store
AcuraLink® Message icon
(P14)
AcuraLink signal
indicator
Quick Reference Guide
9
Page 11
During Route Guidance
Calculated route
(P116)
Guide to destination or
waypoint
Next guidance
indicator
Distance to the next
guidance point.
Distance to destination
(waypoint)
Distance of the actual route.
Estimated time to
destination (waypoint)
Waypoint (P130)
Destination icon
Calculated route
(unverified roads)
(P118)
Tracking dots
(P119)
Guidance indicator
Street name of
guidance point and
distance to the
guidance point.
Lane guidance
No entry icon
Guide to destination or
waypoint
Distance to destination
(waypoint)
Distance of the actual route.
Estimated time to
destination (waypoint)
Guidance point
Guidance point
Night mode
Day mode
Multi-information Display
Street name of next
guidance point
Remaining
distance
Next driving maneuver is approaching
Quick Reference Guide
During route guidance, route information is displayed on the map screen and guidance screen.
Press the NAV button to toggle between the map and guidance screen.
Map Screen
Guidance Screen
10
Day or Night Mode
Press the a (Display mode) button to
manually switch between day and night
mode.
Turn-by-Turn Directions
The next guidance point appears on the
multi-information display.
Page 12
Navigation—Home Addresses and Going Home
SETTINGS
MENU
The “Home” feature automatically routes you to your home address from any location simply by selecting Go Home, or saying d “Go
Home.”
Quick Reference Guide
Storing Your Home Address
a Press the SETTINGS
button.
b Rotate i to select Navi Settings.
Press u.
c Rotate i to select Edit Go Home.
Press u.
d Rotate i to select Name. Press u.
e Enter a name.
f Rotate i to select Address. Press u.
g Enter an address.
h Rotate i to select Phone No. Press
u.
i Enter a phone number.
j Move r and rotate i to select OK.
Press u.
Going Home
a From the map screen,
press the MENU button.
b Rotate i to select Go Home. Press
u.
Alternatively, you can say d “Go
Home” from any screen. Your home
address is displayed on the Calculate
Route screen.
c Rotate i to select Set as
Destination. Press u.
The following voice commands are
available: say d “Go Home.”
11
Page 13
Navigation—Entering a Destination
MENU
Quick Reference Guide
Enter your destination using one of several methods, then follow route guidance on the map or guidance screen to your destination. You
can also perform these steps using d voice commands.
a From the map screen,
press the MENU button.
b Rotate i to select Address. Press u.
c Rotate i to select Street. Press u.
d Enter the name of your destination
street.
e Rotate i to select your destination
street from the list. Press u.
f Enter the street number. Move r to
select OK when finished.
g If there is more than one city with the
specified street, a list of cities is
displayed. Rotate i to select the
desired city from the list. Press u.
h Rotate i to select Set as
Destination. Press u.
Route guidance to the destination
begins.
View Routes: Choose one of three
routes.
Route Preference: Choose Max or Min
for the five settings.
12
Page 14

Navigation—Changing Route or Destination
You can alter your route by adding waypoints to visit, adding streets to avoid, or changing your destination during route guidance.
Quick Reference Guide
Adding a Waypoint
(“Pit Stop”)
You can add up to four waypoints along
your route. (P130)
a From the map screen, press the MENU
button.
b Rotate i to select Destination List.
Press u.
c Rotate i to select Add New
Destination. Press u.
d Rotate i to select Find Along Route.
Press u.
e Rotate i to select location and
search method. Press u.
Search Around
Search Along: Search between two
locations.
: Search around a location.
f Select the icon category and location
to add to the Destination List when
prompted. Edit the order of
destinations if necessary.
g Move r and rotate i to select Start
Route. Press u.
Changing Your
Destination
There are four methods you can use to
specify a new destination during route
guidance.
Say d “Find Nearest…” (P137)
Searches for the nearest place/landmark
on the map screen (e.g., d “Find
nearest gas station”).
Say d “Go Home” (P11)
Routes to your home address.
Selecting an icon on the map (P138)
Scroll the map to position the cursor over
a place/landmark icon or a new area on
the map. Press u twice.
Entering a new destination (P139)
Press the MENU button. Move w to
select Destination and enter a new
destination.
Canceling Your Route
a Press the MENU button.
b Rotate i to select Cancel Route.
Press u.
From the map screen:
a Press u on the map screen.
b Rotate i to select Cancel Route.
Press u.
13
Page 15
AcuraLink®
AcuraLink Real-Time Traffic™
Displays continuously updated traffic information and recalculates your route in response to traffic flow, incidents, or road closures.
(P126)
The following features are available:
Vehicle feature guide
Operating quick tips
Safety and maintenance information
Diagnostic information
Dealer appointment and maintenance reminders
Congestion
Incident
Weather
Construction
Road Closed
Heavy
Moderate
Free-flow
Traffic incident icons
Traffic flow indicator
Traffic status indicator (P126)
Traffic information available
Traffic information off or map
scale too large
No icon: Out of coverage area
AcuraLink Real-Time Traffic™ is a subscription service. For more information, contact an Acura dealer or visit owners.acura.com.
NOTE
Quick Reference Guide
AcuraLink® Messages
AcuraLink® provides a direct communication link between you and Acura. It sends and receives several kinds of messages through the Acura
server.
14
Page 16
Rear Entertainment System (P263)
Pull down the bottom edge of
the screen.
Select the audio source.
Press the buttons to
select items.
Press the Release button to
remove the rear control panel.
(Light-up) Button
Illuminate the buttons on the
rear control panel.
9 (Power) Button
Turn the system on or off
(when rear power is turned on).
CH/FOLDER Bar
Select a channel (Radio) or a
folder (Disc/USB).
TUNE/SKIP Bar
Find stations (FM/AM). Skip to
start/end of tracks, or press
and hold to fast reverse/fast
forward (Disc/USB/DVD).
CATEGORY Bar
Select a category (XM).
(Play/Pause) Button
Play or pause the playback.
TITLE SCROLL Bar
Display track title, artist, and
other text information.
Select the audio source.
Rotate the Interface Dial
to select items.
Press the Release button to
remove the rear control panel.
Press the Open button to open
and pull down the screen.
Ultrawide RES
REAR
RES
The rear passengers can enjoy a wide array of audio/visual sources with the Rear Entertainment System (RES). The rear passengers can use
wireless headphones and operate the system with the rear control panel.
Quick Reference Guide
Overhead Screen and Rear Control Panel
Basic Operation
a Open the overhead screen.
b Press the REAR 9
(Power) button on
the front control
panel.
c Select the audio source.
RES: Press the desired button on
the rear control panel.
Ultrawide RES: Press the SOURCE
button and rotate the Interface
Dial on the rear control panel to
select an audio source. Press the
ENTER button.
15
Page 17

Voice Help
Quick Reference Guide
This navigation system comes with voice help, which shows you what command to say when using the voice command functions.
Command Help
a Press and release the d (Talk)
button.
b Say d “Voice Help.”
The voice help screen is displayed.
The d “Voice Help” command is
available on most screens.
c Press and release the d (Talk)
button.
d Say one of the options for a list of
available commands by category (e.g.,
d “Navi commands”).
e Press and release the d (Talk)
button.
f Say one of the options for a list of
available commands by category (e.g.,
d “Route commands”).
g The system displays a list of all
available commands for the category.
Press u to hear the list read aloud.
Getting Started Tutorial
a Move r and rotate i to select
Getting Started on the voice help
screen. Press u.
For “Voice Settings” and “All
Commands.” (P323)
b Press u to have the system read the
tips for the voice control.
Rotate i to read the tips.
Move w or y to display the previous/
next page.
16
Page 18

Troubleshooting For more Information (P293)
Quick Reference Guide
Why does the vehicle position icon on the map “lag” a
short distance behind my actual position, especially at
intersections?
This is normal. The navigation system is unaware of the
width of intersections. Large differences in vehicle position
can indicate a temporary loss of the GPS signal.
Why does the “time to destination” display sometimes
increase even though I am getting closer to my
destination?
The “time to destination” is based on your actual road
speed and traffic conditions to give you a better estimate
of arrival time.
How do I specify a destination when an entered city or
street could not be found?
Try entering the street first. Some cities are lumped in with
a major metro area. In rural “unverified” areas or new
subdivisions, streets may be missing or only partially
numbered.
How do I turn on the navigation system voice guidance?
1. Press the SETTINGS button. Rotate i to select System
Settings and press u. Check that Volume is not set to
0.
2. Move w or y to select Voice Rec. Set Voice Prompt
to On if you want the system to provide confirmations
and system prompts.
My battery was disconnected or went dead, and the
navigation system is asking for a code. Where do I find it?
In most cases, you do not need to enter a code. Simply
press and hold the 9 (Power) button for two seconds; the
system should reactivate.
2
System Initialization P. 308
17
Page 19
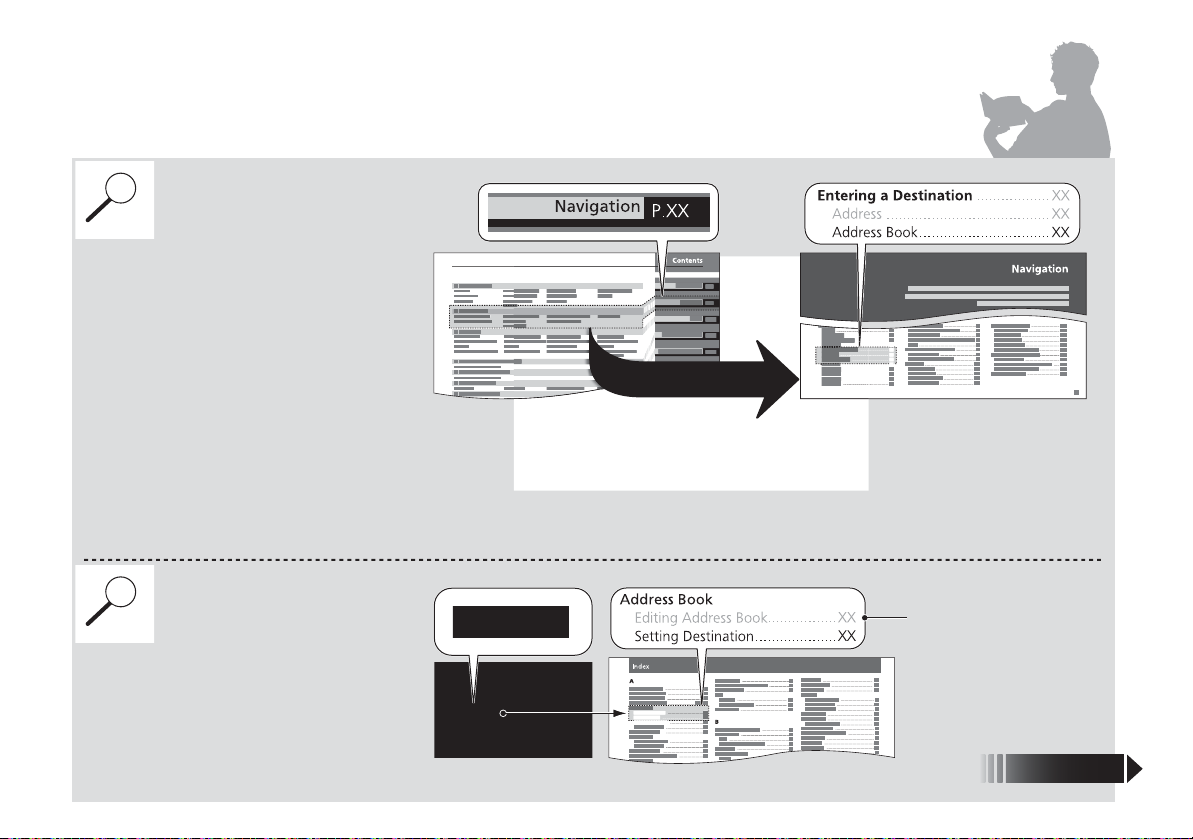
How to Use This Manual
Contents
Contents
More Detailed
Contents
Go to the
Next Page
Searching the Table of Contents
(P1)
Two types of Tables of Contents help
you find your desired information.
First, find the general chapter related to
what you are looking for (e.g., entering
a destination from the Address Book).
Then, go to that chapter to view a more
specific table of contents.
Searching the Index (P339)
Menu items displayed on the
navigation screen (e.g., Address Book)
can be found individually in the Index.
This more detailed table of contents
shows you exactly what information is
listed by section and title.
The Index consists of main
terms and sub-entries. The
sub-entries help you get to
the desired page depending
on what you are looking
for.
Table of Contents Chapter Contents
Navigation Screen Index
This section explains different methods on how you can easily find information in this manual.
18
Page 20
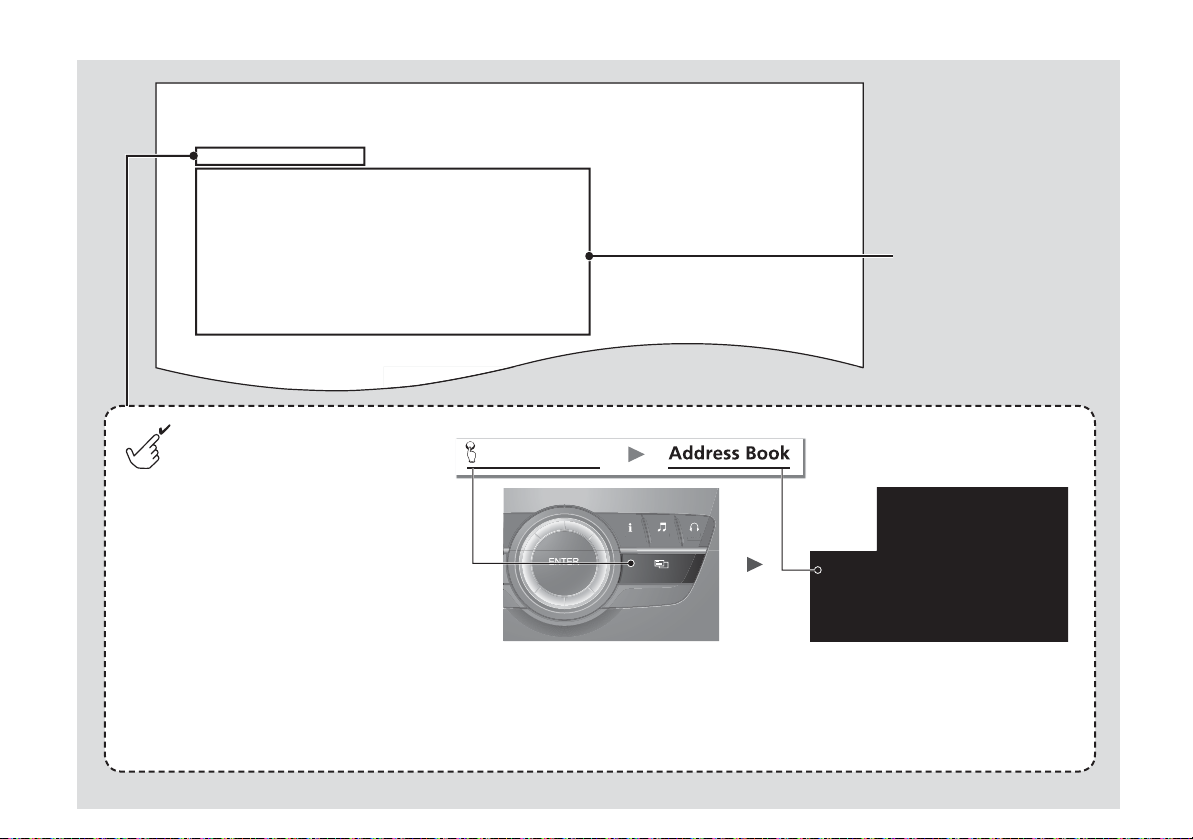
INFO FRONT
AUDIO
REAR
AUDIO
SETTINGS
MENU
S
GS
INFO
FRONT
A
O
REAR
AUDIO
MENU button
Menu Tree
The menu tree helps guide you
through the system’s menu options.
To get to your desired function, follow
the menu tree in order of the steps
shown.
NOTE:
All menu options can also be
activated with voice commands.
Press the hard button on the
system control panel.
Press the MENU button.
Select the menu option with the
Interface Dial.
Rotate i to select Address Book.
Press u.
After following the menu
tree, step-by-step
instructions explain how to
achieve the desired result.
Sample pages and images in this section may differ from the actual ones.
UDI
ETTIN
19
Page 21

20
Page 22

System Setup
This section describes the start-up procedure and the navigation and
setup functions.
Start-up .............................................................. 22
Voice Control System........................................ 24
Command Input .............................................. 24
Voice Recognition ............................................ 25
Interface Settings.............................................. 27
Personal Information ........................................ 38
Address Book................................................... 39
Home Address ................................................. 46
PIN Numbers .................................................... 47
Previous Destination......................................... 48
Category History .............................................. 49
Download POI.................................................. 50
Routing .............................................................. 53
Route Preference.............................................. 54
Unverified Routing ........................................... 56
Traffic Rerouting .............................................. 58
Edit POI Search Radius Along Route ................. 59
Avoided Area ................................................... 60
Guidance ............................................................ 62
Guidance Mode ............................................... 63
Street Name Guidance ..................................... 65
Non-map screens ............................................. 66
Guidance Point.................................................67
Estimated Time................................................. 68
Map..................................................................... 69
Showing Icons on Map.....................................71
Color................................................................ 73
View (Map Orientation) ....................................76
3D Angle Adjustment ....................................... 77
Straight Line Guide........................................... 77
Current Location .............................................. 78
Map Legend.....................................................79
Display Tracking ...............................................83
Correct Vehicle Position....................................84
Data Reset..........................................................85
Defaulting All the Settings ................................ 85
On Demand Multi-Use Display™ ..................... 86
Changing the Screen Settings .......................... 86
21
Page 23

System Setup
Start-up
1 Start-up
If the navigation system loses power at any time,
you may need to press and hold the 9 (Power)
button for more than two seconds, or you may
be prompted for the five-digit security code.
2 System Initialization P. 308
At start-up, the driver’s keyless access remote is
automatically detected and the address book
settings, setup preferences, wallpapers, and
audio settings for that driver (e.g., Driver 1) are
loaded.
“OK” on the Confirmation screen cannot be
selected by using a voice command.
The navigation system starts automatically when you set the power mode to
ACCESSORY or ON. At start-up, the following Confirmation screen is displayed.
22
1. Press u to select OK.
If you do not select OK, the map
screen is displayed after a
certain period of time.
Your current position is
displayed on the map screen.
2. Press the NAV button if a different
mode is selected.
Your current position is
displayed on the map screen.
Page 24

System Setup
■ Limitations for Manual Operation
Disabled option
Start-up
Certain manual functions are disabled
or inoperable while the vehicle is in
motion. You cannot select a grayedout option using the Interface Dial
until the vehicle is stopped.
Voice commands are still operable
while the vehicle is in motion.
23
Page 25

System Setup
Voice Control System
1 d (Talk) Button
When you press the d (Talk) button, the system
prompts you to say a voice command and gives
examples. Press and release the d (Talk) button
again to bypass this prompt and give a
command.
1 Command Input
The audio system is muted while using the voice
control system.
Your vehicle has a voice control system that allows hands-free operation of most of
the navigation system functions.
The voice control system uses the d (Talk) and J (Hang-Up/Back) buttons on
the steering wheel and a microphone near the map lights on the ceiling.
A “Getting Started” feature provides a tutorial that explains how to use the voice
control system.
Getting Started Tutorial P. 16
2
Command Input
If the system does not understand a command or you wait too long to give a
command, the system asks you to repeat the command.
When you give a command, the system generally either repeats the command as a
confirmation or asks you for further information. If you do not wish to hear this
feedback, you can turn it off. However, listening to the feedback will help familiarize
you with the way the system expects commands to be phrased.
If the system cannot perform a command or the command is not appropriate for the
screen you are on, the system beeps.
On character input screens, a list of possible characters is displayed if the system
does not recognize your command.
You can find out which voice commands are available for a particular screen using
the d “Voice Help” command. The system will display and read the list of available
commands to you.
2 Voice Help P. 16
24
Page 26

System Setup
1 Voice Recognition
The voice control system can only be used from
the driver’s seat because the microphone unit
removes noises from the front passenger’s side.
Voice Recognition
To achieve optimum voice recognition when using the navigation voice control
system:
• Make sure the correct screen is displayed for the voice command that you are
using.
2 Voice Commands P. 324
• Close the windows and moonroof.
• Adjust the dashboard and side vents so air does not blow onto the microphone on
the ceiling.
• Speak clearly in a clear, natural speaking voice without pausing between words.
• Reduce any background noise if possible. The system may misinterpret your
command if more than one person is speaking at the same time.
• Refer to the Voice Help feature.
2
Voice Help P. 16
Voice Control SystemVoice Recognition
25
Page 27

System Setup
Voice Control SystemVoice Recognition Settings
Voice Recognition Settings
H SETTINGS button System Settings Voice Rec
Rotate i to select an item. Press u.
The following items are available:
• Volume: Adjusts the voice prompt volume level.
• Voice Prompt: Turns the voice prompt on or off.
On (factory default): Provides the voice prompts.
Off: Disable the feature.
TM
• Song by Voice: Turns the Song By Voice
Song By VoiceTM (SBV) P. 190
2
• Song by Voice Phonetic Modification: Modifies a voice command of music
stored in the HDD or an iPod®.
2 Phonetic Modification P. 192
• Phonebook Phonetic Modification: Modifies a voice command for the
phonebook.
2 Phonebook Phonetic Modification P. 225
on or off.
26
Page 28

System Setup
Interface Settings
1 Display Settings
You can set separate daytime and nighttime
settings for Brightness, Contrast, and Black
Level. Adjust each setting when the display is in
either daytime or nighttime mode.
Display Settings
H SETTINGS button System Settings Display
Adjusts the screen’s preferences.
The following items are available:
• Sync Display Brightness: Selects whether the display brightness synchronizes
with the instrument panel brightness.
• Brightness: Adjusts the screen’s brightness.
• Contrast: Adjusts the screen’s contrast.
• Black Level: Adjusts the screen’s black level.
1. Rotate i to select an item. Press
u.
2. Rotate i to make the
adjustment. Press u.
27
Page 29

System Setup
1 Sound and Beep Settings
Volume
If you set Volume to 0, you will not hear route
guidance or voice command confirmations.
If you then select Voice in the Map Menu, you
will hear route guidance at the default volume.
Interface Dial Feedback
You can use this feature to minimize the need to
look at the screen while operating the Interface
Dial.
Interface SettingsSound and Beep Settings
Sound and Beep Settings
H SETTINGS button System Settings Sound/Beep
Changes the system sound and beep settings.
The following items are available:
• Volume: Adjusts the navigation system volume level.
• Interface Dial Feedback: Sets if and when the system reads aloud a selection
made using the Interface Dial.
On: Always reads the selection.
Off: Disables the feature.
Auto (factory default): Reads the selection only when the vehicle is moving.
• Message Auto Reading: Selects whether the system automatically reads out
messages, and, if selected, whether only when driving.
On: Always reads the message.
Off: Disables the feature.
Auto (factory default): Reads the message only when the vehicle is moving.
• Verbal Reminder: Turns the verbal reminders on and off.
On: Sets the verbal reminders.
Off: Disables the feature.
Rotate i to select an item. Press u.
28
Page 30

System Setup
Clock Adjustment
1 Clock Adjustment
Auto Time Zone
If you live and work in two different time zones,
you may want to turn Auto Time Zone to OFF.
When driving near a time zone boundary, the
displayed time zone may fluctuate between the
two zone times.
Auto Daylight
This function is not activated in areas that have
not adopted daylight saving time, even if you
have set Auto Daylight to ON.
You can turn the clock display in the navigation
screen on and off.
2 Header Clock Display P. 37
H SETTINGS button System Settings Clock
Set the automatic adjustment of the system clock for daylight saving and
international time zones.
The following items are available:
• Clock/Wallpaper Type: Changes the clock display type and the wallpaper type.
Setting the Clock Type P. 30
2
• Clock Adjustment: Adjust the current time manually.
2 Setting the Clock P. 30
• Clock Format: Sets the time notation to either 12-hour clock (12H, factory
default) or 24-hour clock (24H).
• Auto Time Zone: The navigation system automatically adjusts the clock when
driving through different time zones.
On (factory default): Adjusts the clock automatically.
Off: Disables the feature.
• Auto Daylight: The navigation system automatically adjusts the clock (“spring
ahead” or “fall back” by one hour) when a daylight saving time change occurs.
On (factory default): Adjusts the clock automatically.
Off: Disables the feature.
• Clock Reset: Resets the settings of all items in the Clock group.
Rotate i to select an item. Press u.
Interface SettingsClock Adjustment
29
Page 31

System Setup
Interface SettingsClock Adjustment
■ Setting the Clock Type
H SETTINGS button System Settings Clock Clock/Wallpaper Type
Clock
1. Rotate i to select an option to
change the design. Press u.
2. Move r to select OK. Press u.
■ Setting the Clock
H SETTINGS button
System Settings Clock Clock Adjustment
1. Rotate i to select an item. Press
u.
2. Rotate i to select a minute. Press
u.
30
Page 32

System Setup
Wallpaper Settings
1 Wallpaper Settings
• When importing wallpaper files, the image
must be in the USB flash drive’s root directory.
Images in a folder cannot be imported.
• The file name must be fewer than 210 bytes.
• The file format of the image that can be
imported is BMP (bmp) or JPEG (jpg).
• The individual file size limit is 6 MB.
• The maximum image size is 4,800 x 4,800
pixels. If the image size is less than 420 × 234
pixels, the image is displayed in the middle of
the screen with the extra area appearing in
black.
• Up to 10 files can be saved for each driver
(Driver1 and Driver2).
• If the USB flash drive does not have any
pictures, the No files detected message
appears.
Select, delete, and import wallpaper pictures for display on the screen.
Interface SettingsWallpaper Settings
■ Import wallpaper
H SETTINGS button
System Settings Clock Clock/Wallpaper Type
1. Connect the USB flash drive to the
USB port.
2. Move y to select Wallpaper.
The screen will change to the
wallpaper list.
3. Move r and rotate i to select
Add New Wallpaper. Press u.
4. Rotate i to select a desired
picture. Press u.
The preview is displayed on the
left side on the screen.
5. Move r and rotate i to select
Start Import. Press u.
The confirmation message will
appear. Then the display will
return to the wallpaper list.
31
Page 33

System Setup
1 Select wallpaper
From the pop-up menu, rotate to select Preview
and press to see a preview at full-size screen.
To go back to the previous screen, press to select
OK, or press the BACK button.
When the file size is large, it takes a while to be
previewed.
Interface SettingsWallpaper Settings
■ Select wallpaper
H SETTINGS button System Settings Clock Clock/Wallpaper Type
Wallpaper
1. Rotate i to select a desired
wallpaper. Press u.
The preview is displayed on the
left side on the screen.
The pop-up menu appears on
the screen.
2. Rotate i to select Set. Press u.
The display will return to the
wallpaper list.
32
Page 34

System Setup
■ Delete wallpaper
H SETTINGS button System Settings Clock Clock/Wallpaper Type
Wallpaper
1. Rotate i to select a wallpaper
that you want to delete. Press u.
The preview is displayed on the
left side on the screen.
The pop-up menu appears on
the screen.
2. Rotate i to select Delete. Press
u.
The confirmation message will
appear.
3. Rotate i to select Yes. Press u.
The display will return to the
wallpaper list.
Interface SettingsWallpaper Settings
33
Page 35

System Setup
Interface SettingsUnit Settings
Unit Settings
H SETTINGS button System Settings Others Units
Sets the map units to either miles (factory default) or kilometers (km).
Rotate i to select the map unit.
Press u.
34
Page 36

System Setup
Language Settings
1 Language Settings
Voice confirmation of cities and streets only
occurs when English is the system language.
When Français or Español is selected, some
messages continue to be displayed in English.
H SETTINGS button System Settings Others Language
Set the system language used on all screens. You can choose from three languages:
English, Français (French), Español (Spanish).
Rotate i to select the system
language. Press u.
Interface SettingsLanguage Settings
35
Page 37

System Setup
Interface SettingsBackground Color
Background Color
H SETTINGS button System Settings Others Background Color
Changes the background color of the navigation screen and the On Demand Multi-
Use Display
TM
.
Rotate i to select a desired color.
Press u.
36
Page 38

System Setup
Header Clock Display
H SETTINGS button System Settings Others Header Clock Display
Selects whether the clock display comes on.
Rotate i to select an option. Press
u.
The following options are available:
• On (factory default): The system displays the clock in the navigation screen.
• Off: Disables the feature.
Interface SettingsHeader Clock Display
37
Page 39

System Setup
Personal Information
1 Personal Information
Personal information cannot be backed up or
moved to another navigation system.
H SETTINGS button Navi Settings Personal Info
Use the personal information menu to select and set your address books, home
address, and PINs. You can also delete unwanted destinations from the list of
previously routed destinations.
The following items are available:
• Address Book: Stores new addresses or edits your address book.
2
Address Book P. 39
• Edit Go Home: Sets or edits your home address.
2 Home Address P. 46
• PIN Number: Sets or changes your PIN.
2 PIN Numbers P. 47
• Previous Destination: Deletes the destination history.
2
Previous Destination P. 48
• Category History: Deletes the place categories you recently used.
2 Category History P. 49
• Download POI: Edits and deletes the Imported POI categories.
2 Editing POI Categories P. 51
38
Rotate i to select an item. Press u.
Page 40

System Setup
Address Book
1 Address Book
Up to 200 addresses can be stored to each
address book of Driver 1 and Driver 2 separately.
If you have PIN-protected your address book,
enter your PIN when prompted. Press u to
select OK. PINs are optional.
2 PIN Numbers P. 47
Any address book categories you create are also
displayed.
2 Selecting an Address Book Category P. 42
1 Adding an Address Book Entry
If you do not give the address a name, one is
automatically assigned (e.g., Address 001). You
can re-enter, edit, or make changes to any entry.
“Address” is the only required field.
H SETTINGS button Navi Settings Personal Info Address Book
Store up to 200 address entries in two address books (Driver 1 and Driver 2). You can
add, edit, and delete information in the address books.
■ Adding an Address Book Entry
H SETTINGS button
This section explains how to enter the name and address.
Navi Settings Personal Info Address Book
Move w or y to display only the
addresses in the selected category.
Move r to change the user address
book (DRIVER 1 or DRIVER 2).
1. Move r and rotate i to select
Add New Address. Press u.
Continued
Personal InformationAddress Book
39
Page 41

System Setup
Personal InformationAddress Book
The following items are available:
• Name: Edits the name of the entry.
• Address: Edits the address of the entry.
• Phone No.: Edits the phone number of the entry.
• Category: Specifies the category of the entry.
• Alert: Alerts you when you approach the address entry.
On: Beeps and displays a message when your vehicle gets near the entry.
Off (factory default): Disables the feature.
2. Rotate i to select an item. Press
u.
3. Rotate i to select Name. Press
u.
4. Enter a name or title. Move r to
select OK.
5. Rotate i to select Address. Press
u.
6. Rotate i to select an item for
specifying the address. Press u.
40
Page 42

System Setup
The following items are available:
1 Adding an Address Book Entry
When you use Place Name or Place Category,
the phone number is automatically entered.
You can also add a phone number and category.
1 Editing an Address Book Entry
The entered contents are displayed on the Edit
address screen.
• Current Position: Select your current location.
• Address: Enter an address on the character input screen when prompted.
2
Address P. 90
• Previous Destinations: Select a previous destination.
2 Previous Destination P. 97
• Place Name: Enter the name of a place/landmark.
2
Place Name P. 102
• Local Search: Sets a destination by using Local Search.
2 Local Search P. 100
• Place Category: Select a category to search for a place/landmark (e.g., Banking,
Lodging).
2 Place Category P. 98
• More Search Methods: Displays additional search method entries.
2 Entering a Destination P. 88
■ Editing an Address Book Entry
H SETTINGS button
Navi Settings Personal Info Address Book
1. Rotate i to select the address to
edit. Press u.
2. Enter the name, address, phone
number, and category fields.
Adding an Address Book Entry
2
P. 39
3. Move r and rotate i to select
OK. Press u.
Personal InformationAddress Book
41
Page 43

System Setup
1 Selecting an Address Book Category
Up to 100 categories (including “Unfiled”) can
be stored to each address book of Driver 1 and
Driver 2 separately.
If you delete a category that is used by other
addresses, the category type for those addresses
changes to “Unfiled.”
Personal InformationAddress Book
■ Selecting an Address Book Category
H SETTINGS button Navi Settings Personal Info Address Book
1. Rotate i to select an address.
Press u.
2. Rotate i to select Category.
Press u.
3. Rotate i to select a category.
Press u.
Create a category in advance.
2 Creating a New Category
P. 42
■ Creating a New Category
1. Move r and rotate i to select New Category. Press u.
2. Enter a name and select an icon when prompted.
The created category is displayed in the list of categories.
■ Deleting or Editing a Category
1. Move r and rotate i to select Delete or Edit. Press u.
2. Delete an existing category, or change the name and icon.
The selected category to delete is indicated with a trash icon. Move r and
rotate i to select OK.
42
Page 44

System Setup
1 Deleting an Address Book Entry
When you transfer the vehicle to a third party,
delete all address book entries.
■ Deleting an Address Book Entry
H SETTINGS button Navi Settings Personal Info Address Book
1. Rotate i to select the address to
delete. Press u.
2. Move r and rotate i to select
Delete. Press u.
3. Rotate i to select Yes. Press u
to delete the address.
Personal InformationAddress Book
43
Page 45

System Setup
Personal InformationAddress Book
■ Setting Place Shortcuts
You can store up to six addresses previously stored in your Address Book, and a
home address for your preset destinations.
■ Storing an address on the Shortcut
1. Select Shortcuts.
2. Select Places.
3. Select Edit or No Entry.
If you select No Entry, go to step
6.
4. Select Add.
All six preset icons appear.
5. Select the preset number to which
you want to store an address.
The screen changes to a list of
addresses stored in your address
book.
44
Page 46

System Setup
6. Select an address you want to store
as a preset.
■ Deleting a preset address
1. Select Shortcuts.
2. Select Places.
3. Select Edit.
4. Select Delete.
5. Select the preset number with the destination you want to delete.
Personal InformationAddress Book
45
Page 47

System Setup
1 Home Addresses
If you have PIN-protected your home addresses,
enter your PIN when prompted. Press u to
select OK. PINs are optional.
2 PIN Numbers P. 47
If your home street is not in the system database,
park on the nearest verified street to your home.
When entering the “Address” field, rotate i to
select Current Position to use your current
location as the home address and press u.
You can delete a home address if necessary.
Move r and rotate i to select Clear Home
Entry. Press u. Rotate i to select Yes. Press
u.
When you transfer the vehicle to a third party,
delete all home addresses.
The home icon is shown on the map screen on
the 1/20 and 1/8 mile scales.
Personal InformationHome Address
Home Address
H SETTINGS button Navi Settings Personal Info Edit Go Home
Set a home address that you frequently use.
46
1. Edit the name, address, and phone
number the same way as an
address in the address book.
Adding an Address Book Entry
2
P. 39
2. Move r and rotate i to select
OK. Press u.
Page 48

System Setup
PIN Numbers
1 PIN Numbers
PIN
Personal Identification Number (PIN) is a
password used to access personal data.
PINs are optional. If you choose to use a PIN,
keep a note of the number in a secure location. If
you forget your PIN, a dealer will have to reset
the navigation system and all of your stored
information will be erased. The factory default is
no PIN.
If you want to stop using a PIN, move
r to select
Turn off PIN entry. Press u.
H SETTINGS button Navi Settings Personal Info PIN Number
Set a four-digit PIN for protecting personal addresses and your home address. Once
you set a PIN, you are prompted to enter it whenever you access a personal address
or a home address.
1. Rotate i to select the PIN to
create. Press u.
2. Rotate i to select a digit to
enter. Press u to select OK.
Repeat to enter a new four-digit
PIN.
3. Re-enter the new PIN, when
prompted, to confirm the number
you just entered. Press u to select
OK.
If you have not entered the
same number both times, an
“INCORRECT PIN” message is
displayed. Enter your PIN again.
Personal InformationPIN Numbers
47
Page 49

System Setup
1 Previous Destinations
Up to 50 destinations can be stored.
To cancel the selection of a previous destination,
rotate i to highlight the destination again.
Press u to de-select it.
Trash icon
Personal InformationPrevious Destination
Previous Destination
H SETTINGS button Navi Settings Personal Info Previous Destination
The navigation system maintains a list of your previously routed destinations as a
shortcut for entering the same destination in the future. You can delete some or all
of your previous destinations from the list.
1. Rotate i to select the destination
to delete. Press u.
Repeat the procedure as
necessary.
Items to be deleted are indicated
with a trash icon.
2. Move r and rotate i to select
OK to delete the selected
destinations.
48
Page 50

System Setup
Category History
1 Category History
Up to 50 categories can be stored.
To cancel the selection of a category, rotate i
to highlight the category again. Press u to deselect it.
Trash icon
H SETTINGS button Navi Settings Personal Info Category History
The navigation system maintains a list of your recently used place categories as a
shortcut for selecting the same categories in the future. You can delete some or all
of your recently used categories from the list.
1. Rotate i to select the category to
delete. Press u.
Repeat the procedure as
necessary.
Items to be deleted are indicated
with a trash icon.
2. Move r and rotate i to select
OK to delete the selected
categories.
Personal InformationCategory History
49
Page 51

System Setup
1 Importing POI Data
For more information about connecting a USB
flash drive.
2 Connecting a USB Flash Drive P. 199
POI data in csv and kml formats can be imported.
You can download POI data from various POI
websites.
If you select From AcuraLink, you can
download POI data from the AcuraLink server.
2 AcuraLink® P. 256
Personal InformationDownload POI
Download POI
Import custom Points of Interest (POI) into the navigation system and set the POI as a
destination. You can also add, edit, and delete POIs.
■ Importing POI Categories
H MENU button (on map)
More Search Methods Download POI
1. Connect a USB flash drive with
stored POI data to the USB
connector.
2. Move r and rotate i to select
Import from USB. Press u.
50
Page 52

System Setup
3. Rotate i to select a category to
import. Press u.
■ Editing POI Categories
H SETTINGS button Navi Settings Personal Info Download POI
1. Rotate i to select the
downloaded POI category to edit.
Press u.
Personal InformationDownload POI
Continued
51
Page 53

System Setup
1 Editing POI Categories
If you select From AcuraLink, you can edit Alert
only.
Personal InformationDownload POI
2. Rotate i to select an item. Press
u.
The following items are available:
• Alert Setting: Alerts you when you approach the places/landmarks in the
category.
On: Beeps and displays a message when your vehicle gets near the places/
landmarks in the category.
Off (factory default): Disables the feature.
• Delete Category: Deletes all places/landmarks and icon in the selected category.
• Edit Icon: Changes the category icon.
52
Page 54

System Setup
Routing
H SETTINGS button Navi Settings Routing
Choose various settings that determine the navigation system functionality during
route calculation.
Rotate i to select an item. Press u.
The following items are available:
• Route Preference: Changes the route preferences (calculating method).
Route Preference P. 54
2
• Unverified Routing: Sets whether you use the route guidance in unverified
areas.
2 Unverified Routing P. 56
• Traffic Rerouting: Sets whether you use automatic recalculation based on traffic
information.
2 Traffic Rerouting P. 58
• Edit POI Search Radius Along Route: Sets the distance from the route to find
waypoints.
2 Edit POI Search Radius Along Route P. 59
• Avoided Area: Specifies areas to avoid when calculating a route.
2 Avoided Area P. 60
53
Page 55

System Setup
1 Route Preference
The calculated route may be the shortest route or
the route you would choose. For safety reasons,
the system generally applies the following rules
to your route:
• Shortcuts through residential areas are
avoided.
• Right turns are favored over left turns or U-
turns.
• Time-restricted turns (turns prohibited at
certain times of the day) are not used.
Check the ferry schedule when the calculated
route includes ferry route.
ETC is short for the Electronic Toll Collection
system.
Server Route
• You can view three routes distributed from
AcuraLink.
2 Viewing the Routes P. 115
• Set to On and select Optimal route to select
your desired route.
2 Optimal Routes P. 55
RoutingRoute Preference
Route Preference
H SETTINGS button Navi Settings Routing Route Preference
Change the route preference by selecting minimum or maximum driving methods.
1. Rotate i to select an item. Press
u.
2. Rotate i to select Min or Max.
Press u.
Repeat step 1 and 2 as
necessary.
3. Move r to select OK. Press u.
54
Page 56

System Setup
■ Optimal Routes
H SETTINGS button Navi Settings Routing Route Preference
You can select desired routes by sorting the route list. The three top routes can be
displayed on the Select a route screen.
2 Viewing the Routes P. 115
1. Move r and rotate i to select
Optimal Routes. Press u.
2. Rotate i to select a list item to
move. Press u.
3. Rotate i to select a desired
location. Press u.
4. Move r and rotate i to select
OK. Press u.
RoutingRoute Preference
55
Page 57
System Setup
1 Unverified Routing
Unverified roads are found in rural areas, and
typically include residential streets away from the
center of a town. They may not be accurate, and
can contain errors in location, naming, and
address range.
Unverified roads are shown only when viewing
the map in the 1/20, 1/8, or 1/4 mile map scales.
Straight line guide
Blue-pink route line
RoutingUnverified Routing
Unverified Routing
H SETTINGS button Navi Settings Routing Unverified Routing
Receive turn-by-turn map and voice guidance in unverified areas.
Differences Off On (factory default)
On or Off? The driver wishes to manually
navigate using the navigation map
and choose the streets that lead to
the destination.
Route
calculation
Route line The route line uses verified streets
Route is usually longer, using
verified roads whenever possible.
only (when possible).
If Straight Line Guide is set to On,
a pink vector line is displayed on the
map that continually points to your
destination.
2
Straight Line Guide P. 77
Rotate i to select On or Off. Press
u.
The driver chooses to let the
navigation system suggest
possible routing, knowing that the
guidance may not be accurate.
Route is shorter, but uses
unverified (purple) streets that
may not be accurate.
A blue-pink route line highlights
suggested unverified streets on
the map while traveling to your
destination.
56
Page 58

System Setup
Differences Off On (factory default)
Cautionary
messages
Cautionary pop-up screens and
voice announcements remind you to
obey all traffic restrictions when
starting route guidance,
approaching an unverified area, and
Cautionary pop-up screens and
voice announcements remind you
to obey all traffic restrictions
when entering an unverified
street.
entering an unverified street.
Guidance
(map/voice)
There is no turn-by-turn map or
voice guidance.
Voice guidance commands end
with the phrase “if possible” to
remind you to verify all traffic
restrictions.
Directions
list
A direction list is typically not
available. However, depending on
your route, directions are provided
A direction list is provided
showing street names and turn
symbols in pink.
to help you reach the first available
verified road.
RoutingUnverified Routing
57
Page 59

System Setup
1 Traffic Rerouting
Traffic Rerouting requires an AcuraLink RealTime Traffic™ subscription.
2 AcuraLink® P. 256
Automatic traffic rerouting may not provide a
detour route depending on circumstances.
RoutingTraffic Rerouting
Traffic Rerouting
H SETTINGS button Navi Settings Routing Traffic Rerouting
A faster route can be calculated based on continuously updated traffic information.
Traffic Rerouting™ P. 126
2
The following options are available:
• On: The system reroutes automatically based on traffic information.
• Off (factory default): Disables the feature.
Rotate i to select an option. Press
u.
58
Page 60

System Setup
1 Edit POI Search Radius Along Route
The search distance does not affect the search
range used for the Find Nearest voice commands
(e.g., say
d “Find nearest gas station”).
Edit POI Search Radius Along Route
H SETTINGS button Navi Settings Routing Edit POI Search Radius
Along Route
Select the distance from your highlighted route line (on either side of your route)
that the system will search for a waypoint.
Adding Waypoints P. 130
2
You can specify a different search distance for freeways and surface streets.
1. Rotate i to select an item. Press
u.
2. Rotate i to select a search
distance. Press u.
The following items are available:
• On Freeways: 1, 2, 5, or 10 miles can be set. Factory default is 2 miles.
• On Surface Streets: 1/2, 1, 2, or 5 miles can be set. Factory default is 1/2 mile.
RoutingEdit POI Search Radius Along Route
59
Page 61

System Setup
1 Avoided Area
The maximum size of an “avoid area” is
approximately 1 square mile.
If your selected area contains a freeway, you are
asked “Do you want to avoid freeways?”
Answering “No” allows you to use a route
through an avoid area on a freeway without any
pop-up messages.
You can select areas to avoid, however you
cannot select roads or areas that you want the
system to use for routing.
You can enter up to 25 characters for the name.
RoutingAvoided Area
Avoided Area
H SETTINGS button Navi Settings Routing Avoided Area
Specify up to five areas to avoid (e.g., road construction, closures), if possible, when
the system calculates routes to your destination.
The following options are available (after an area is set):
• View Area: Displays the selected avoid area on the map.
• Delete: Deletes the selected avoid area.
1. Move r and rotate i to select
New Area, or rotate i to select
an existing area to edit.
2. Rotate i to select Name to label
the area to avoid. Press u.
3. Enter a name or title. Move r to
select OK.
4. Rotate i to select Area to define
the area to avoid. Press u.
60
Page 62

System Setup
1 Avoided Area
Avoid area can be set in the 1/20, 1/8, or
1/4 mile map scales.
Cursor
Avoid area
The following options are available:
• Address: Specify the general area by entering an address.
2
Address P. 90
• Map Input: Specify the general area by map input.
2 Map Input P. 111
5. Rotate i to select a method for
specifying the area. Press u.
6. If you select Map Input, scroll the
map to position the cursor over
your desired start point, adjusting
the map scale as necessary. Press
u to mark the start point.
To redo the area selection, press
the BACK button.
7. Scroll the map to “draw” the area.
Press u to mark the end point.
8. Press u to select OK.
The area you specify is displayed
in the list of areas to avoid.
RoutingAvoided Area
61
Page 63

System Setup
Guidance
H SETTINGS button Navi Settings Guidance
Choose various settings that determine the navigation system functionality during
route guidance.
The following items are available:
• Guidance Mode: Sets whether to display only the map screen or a split map-
guidance screen.
Guidance Mode P. 63
2
• Street Name Guidance: Sets whether to read out the street names during voice
guidance.
2 Street Name Guidance P. 65
• Non-map screens: Sets whether the guidance screen interrupts the screen
display.
2 Non-map screens P. 66
• Guidance Point: Sets whether to display the guidance information to the
destination or the next waypoint.
2 Guidance Point P. 67
• Estimated Time: Sets whether to display the remaining time or arrival time to the
guidance point.
2 Estimated Time P. 68
62
Rotate i to select an item. Press u.
Page 64

System Setup
Guidance Mode
1 Guidance Mode
The guidance mode can also be selected from
the map menu.
2 Map Menu P. 122
Press the NAV button to switch between the
map, next guidance direction, and a list of
guidance directions.
Turn-by-Turn Directions
The next guidance point appears on the multiinformation display.
2 Turn-by-Turn Directions P. 10
You can turn this feature on or off using the
multi-information display. See the Owner’s
Manual for instructions.
Near the next
guidance point
Map screen Next Maneuver screen
Next guidance point
H SETTINGS button Navi Settings Guidance Guidance mode
Select the display mode for the map and guidance screens.
The following options are available:
• Map (factory default): Displays only the map screen. When you approach a
guidance point, the next guidance point appears.
Rotate i to select an option. Press
u.
GuidanceGuidance Mode
Continued
63
Page 65

System Setup
Guidance direction list
Near the next
guidance point
Next guidance point
Direction List screen Next Maneuver screen
Next guidance point
Near the next
guidance point
Next Maneuver screen Next Maneuver screen
GuidanceGuidance Mode
• Direction List: Displays the map and direction list simultaneously on the map
screen. When you approach a guidance point, the next guidance point appears.
• Next Maneuver: Displays the map and next guidance point simultaneously on
the map screen.
64
Page 66

System Setup
Street Name Guidance
1 Street Name Guidance
This feature is only available when the system
language is set to English.
This feature may not be available in non-English
speaking areas.
H SETTINGS button Navi Settings Guidance Street Name Guidance
The navigation system includes the street names during voice guidance (e.g., “Turn
right on Main Street”).
The following options are available:
• On (factory default): Voice guidance includes the street names.
• Off: Disables the feature.
Rotate i to select an option. Press
u.
GuidanceStreet Name Guidance
65
Page 67

System Setup
GuidanceNon-map screens
Non-map screens
H SETTINGS button Navi Settings Guidance Non-map screens
The navigation system temporarily interrupts the screen display to view the guidance
screen as you approach a guidance point.
The following options are available:
• On: The guidance screen interrupts other mode screens (e.g., audio, phone, etc,
except the rear view camera mode).
• Off (factory default): Disables the feature.
Rotate i to select an option. Press
u.
66
Page 68

System Setup
Guidance Point
H SETTINGS button Navi Settings Guidance Guidance Point
Set the guidance point to display on the map screen.
Rotate i to select an option. Press
u.
The following options are available:
• Destination (factory default): Displays the remaining/arrival time and distance to
the destination.
• Next Point: Displays the remaining/arrival time and distance to the next
waypoint.
GuidanceGuidance Point
67
Page 69

System Setup
GuidanceEstimated Time
Estimated Time
H SETTINGS button Navi Settings Guidance Estimated Time
Select the estimated time to display on the screen.
The following options are available:
• Arrival: Displays the arrival time to the destination or the next waypoint.
• Remaining (factory default): Displays the remaining time to the destination or the
next waypoint.
Rotate i to select an option. Press
u.
68
Page 70

System Setup
Map
H SETTINGS button Navi Settings Map
Select the landmark icons to display on the map, change the orientation of the map,
display your current location, and learn the meaning of the icons, colors, and
symbols displayed on the map.
Rotate i to select an item. Press u.
The following items are available:
• Show Icon on Map: Selects the icons to display on the map.
2
Showing Icons on Map P. 71
• Color (Day): Selects the color of the map for the Day mode.
2 Color P. 73
• Color (Night): Selects the color of the map for the Night mode.
2 Color P. 73
• View: Selects the map orientation (North-up, Heading-up, or 3D map).
2
View (Map Orientation) P. 76
• 3D Angle Adjustment: Adjusts the viewing angle for the 3D map.
2 3D Angle Adjustment P. 77
• Straight Line Guide: Sets whether to display a straight guideline to the
destination or waypoint.
2 Straight Line Guide P. 77
Continued
69
Page 71

System Setup
MapEstimated Time
• Current Location: Displays and saves your current location.
2 Current Location P. 78
• Map Legend: Displays an overview of the map features.
2 Map Legend P. 79
• Display Tracking: Sets whether to display the tracking dots on the map.
2 Display Tracking P. 83
• Delete Tracking: Deletes the tracking dots on the map.
2
Deleting Tracking Dots P. 83
• Correct Vehicle Position: Adjusts the position of the vehicle on the map.
2 Correct Vehicle Position P. 84
• System Device Information: Views database, software, device, and vehicle
identification information.
2 System Device Information P. 288
• Map Data Update: Checks the map data update status when updating the map
database.
2 Map Data Update P. 288
70
Page 72

System Setup
1 Showing Icons on Map
You can display or hide the icons using voice
commands on the Voice Portal screen (e.g., say
d “Display hospital”).
2 Map Display Commands P. 324
If you have PIN-protected your address book,
enter your PIN when prompted. Move r to
select OK. PINs are optional.
2 PIN Numbers P. 47
Showing Icons on Map
H SETTINGS button Navi Settings Map Show Icon on Map
Select the icons that are displayed on the map.
1. Rotate i to select an item. Press
u.
2. Rotate i to select an option.
Press u.
Repeat step 1 and 2 as
necessary.
3. Move r to select OK. Press u.
MapShowing Icons on Map
The following options are available:
• All On: Displays the landmark icons.
Map Screen Legend P. 9
2
• Customize: Fine-tunes the icon display.
2 Fine-tuning the Icons P. 72
• Off: Hides the landmark icons.
71
Page 73

System Setup
MapShowing Icons on Map
■ Fine-tuning the Icons
Icons in some categories can be fine-tuned to display or hide.
1. Rotate i to select the icons to
2. Move r and rotate i to select
display on the map. Press u.
Pressing u toggles the icon
display on or off.
Repeat the procedure as
necessary.
OK. Press u.
72
Page 74

System Setup
Color
1 Color (Day)
Set to White (factory default is Beige) to obtain
the best daytime display contrast.
1 Color (Night)
Set to Black (factory default) to obtain the best
nighttime display contrast.
Set separate map colors for Day and Night modes.
MapColor
■ Color (Day)
H SETTINGS button
Navi Settings Map Color (Day)
■ Color (Night)
H SETTINGS button Navi Settings Map Color (Night)
Rotate i to select a color for the
Day mode. Press u.
Rotate i to select a color for the
Night mode. Press u.
73
Page 75

System Setup
1 Switching Display Mode Manually
A visual guide helps you see the difference
between Day and Night modes.
2 Day or Night Mode P. 10
Recommended Settings
• Select mid-range for the dash illumination.
• Select White for the map Day display and
Black for the map Night display.
MapColor
■ Switching Display Mode Manually
Set the screen brightness separately for Day and Night modes. Press the
(Display mode) button to cycle through the display modes (Day to Night to Off).
74
a
1. Press the a button.
The Brightness bar is displayed
for a few seconds.
Rotate i to adjust the
brightness. Press u.
2. Press the a button again.
Repeat the procedure to switch
the display modes.
Page 76

System Setup
MapColor
Illumination
control
Priority Operation
a button 1 Selects Day, Night, or Off display mode. This button has
the highest priority and overrides all other display control
adjustments listed below.
Remember: Once you press this button, you assume full
manual control of the display mode until the power mode
is set to VEHICLE OFF (LOCK).
Sunlight sensor
(see your
Owner’s Manual
for location)
2 If the sunlight sensor detects daylight and the headlights
are turned on, the system automatically overrides the
Night display and displays the Day display mode.
Remember: If desired, use the a button to override
this automatic choice.
Dash illumination
adjustment
buttons (see your
Owner’s Manual
for location)
3 When headlights are turned on, and you wish to have the
Day display mode, adjust the illumination to the full
brightness setting (beeps).
Remember: Adjust the dash brightness back to mid-range
to allow auto switching by sensing the headlights are on or
off.
Headlights
(Auto/On/Off)
4 When turned on, the display changes to Night display
mode. The previous three controls listed above can
“cancel” this function.
Remember: Use the a button, or adjust the dash
illumination to full brightness, to set the display to your
desired choice.
Screen color
choice
N/A The user can select the color of the screen that will be
displayed for the Day and Night display modes described
above.
Remember: For best contrast, ensure that the map color is
white for Day and black for Night.
75
Page 77

System Setup
1 View (Map Orientation)
d “Display Heading-up” (on Voice Portal
screen), d “Display North-up” (on Voice Portal
screen), d “Display 3D map” (on Voice Portal
screen)
The red arrow in the symbol always points North.
Heading-up and 3D map view switch to the
North-up view on the maximum map scale.
The bird’s eye view map switches to the
Heading-up map while scrolling the map.
The viewing angle for the bird’s eye view can be
adjusted.
2 3D Angle Adjustment P. 77
MapView (Map Orientation)
View (Map Orientation)
H SETTINGS button Navi Settings Map View
Select the map orientation.
The following options are available:
• North-Up: Displays the map with North always pointing up.
• Heading-Up: Displays the map so that the direction you are traveling is always
pointing up.
• 3D Map: Displays the bird’s eye view map.
Rotate i to select an option. Press
u.
76
Page 78

System Setup
3D Angle Adjustment
H SETTINGS button Navi Settings Map 3D Angle Adjustment
Adjust the viewing angle.
Rotate i to adjust the angle. Press
u.
Straight Line Guide
H SETTINGS button Navi Settings Map Straight Line Guide
Set whether to display a straight guideline to the destination or waypoint
Rotate i to select an option. Press
u.
Map3D Angle Adjustment
The following options are available:
• On (factory default): Displays the straight guideline on the map.
• Off: Disables the feature.
77
Page 79

System Setup
1 Current Location
d “Display Current Location” (on Voice Portal
screen)
You can also save the current location by saying
d “Register the Current Location”.
If you have PIN-protected your address book,
enter your PIN when prompted. Press u to
select OK. PINs are optional.
2 PIN Numbers P. 47
The elevation is not displayed if the system is
receiving insufficient GPS information. When
elevation is displayed, it may differ with roadside
elevation signs by ±100 feet or more.
Saving your current location does not change or
cancel your current route.
MapCurrent Location
Current Location
H SETTINGS button Navi Settings Map Current Location
Display and save your current location for future use as a destination. The address,
latitude, longitude, and elevation of your current location are displayed.
■ To save your current location in the address book:
1. Press u to select Address Book.
Move w to scroll the map as
necessary.
2. Edit the name, phone number, and
category.
2
Address Book P. 39
3. Move r and rotate i to select
OK. Press u.
78
Page 80

System Setup
1 Map Legend
A visual guide helps you see the map legend.
2 Map Screen Legend P. 9
2 AcuraLink Real-Time Traffic™ P. 14
Map Legend
H SETTINGS button Navi Settings Map Map Legend
See an overview of the map lines, areas, routes, traffic information, and navigation
icons.
Move w or y select an item.
The system displays the map
legend.
MapMap Legend
79
Page 81

System Setup
1 Map Scale and Functions
You can change the map scale using voice
commands on the Voice Portal screen (e.g., say
d “Display 2 mile scale”).
2 Map Scale Commands P. 324
You can change between miles or kilometers.
2 Unit Settings P. 34
MapMap Legend
■ Map Scale and Functions
The functions that are available from the map screen depend on the map scale.
Function page
Icon display
Landmark icon 9 ✔ ✔
Exit info. 9 ✔ ✔ ✔
One-way traffic 9 ✔
Waypoint
“flag”
Traffic incident 9 ✔ ✔ ✔ ✔ ✔ ✔ ✔
Map orientation
Heading-up 76 ✔ ✔ ✔ ✔ ✔ ✔ ✔ ✔ ✔ ✔ ✔
North-up 76 ✔ ✔ ✔ ✔ ✔ ✔ ✔ ✔ ✔ ✔ ✔ ✔
3D map 76 ✔ ✔ ✔ ✔ ✔ ✔ ✔ ✔ ✔ ✔ ✔
Others
Tracking dots 119 ✔ ✔ ✔ ✔
Unverified road 9 ✔ ✔ ✔ ✔ ✔ ✔
Map features 9 ✔ ✔ ✔ ✔ ✔ ✔ ✔ ✔ ✔ ✔ ✔
Avoid areas 60 ✔ ✔ ✔
Traffic speed 9 ✔ ✔ ✔ ✔ ✔ ✔ ✔
80
1/20 1/8 1/4 1/2 1 2 5 15 50 150 350 1000
80 200 400 800 1.6 3.2 8 24 80 240 560 1600
10 ✔ ✔ ✔ ✔ ✔ ✔ ✔ ✔ ✔ ✔ ✔ ✔
Map Scale (top: mile, bottom: metric)
Page 82

System Setup
■ Map Icons and Functions
1 Map Icons and Functions
You can display or hide the icons using voice
commands on the map screen (e.g., say d
“Display hospital”).
2 Map Display Commands P. 324
Some icons, like police stations, are not shown,
but you can still locate the nearest one with the
Find Nearest voice command (e.g., say d “Find
nearest police station”).
2 Find Place Commands P. 325
Icon display control
Icons that can be displayed or hidden using the
Interface Dial or voice command.
Icon selectable
Icons that can be selected as a destination using
the Interface Dial.
Icon searchable
Icons that can be searched using the d Find
Nearest voice command.
MapMap Legend
Display or hide all icons on the map screen, with the exception of Honda/Acura
Dealer icons which are always shown.
■ Landmark icon
Type
Honda/Acura dealer Always on Yes Yes
Hospital Yes Yes Yes
School Yes Yes Yes
ATM Yes Yes Yes
Gas station Yes Yes Yes
Restaurants Yes Yes Yes
Post office Yes Yes Yes
Grocery store Yes Yes Yes
Hotel/Lodging Yes Yes Yes
Police station No icon No Yes
Shopping, Tourist attraction, Bank No icon No Yes
Parking garage Yes Yes Yes
Parking lot Yes Yes Yes
Freeway exit info. Yes Yes No
Icon display
control
Icon
selectable
Icon
searchable
81
Page 83

System Setup
1 Traffic Incident
When you use the Interface Dial to position the
cursor (round red circle) over the traffic incident
icon, you can view the summary of the incident.
Press u on the traffic incident icon to view a
pop-up message describing the incident in detail.
MapMap Legend
■ Traffic icon
Type
Traffic incident Yes No Yes
82
Icon display
control
Icon
selectable
Icon
searchable
Page 84

System Setup
Display Tracking
1 Deleting Tracking Dots
When you transfer the vehicle to a third party,
delete the tracking dots.
H SETTINGS button Navi Settings Map Display Tracking
The navigation system can be set to display white tracking dots (“breadcrumbs”) on
the map screen.
The following options are available:
• On: The system displays the white tracking dots.
Tracking Dots P. 119
2
• Off (factory default): Disables the feature.
■ Deleting Tracking Dots
H SETTINGS button
Navi Settings Map Delete Tracking
Rotate i to select an option. Press
u.
Rotate i to select Yes. Press u.
MapDisplay Tracking
83
Page 85

System Setup
1 Correct Vehicle Position
An apparent position error can occur where
buildings, tunnels, and other objects block or
reflect the GPS signals, forcing the system to use
“dead reckoning” to determine your location
and direction.
Using this function to adjust vehicle position is
not recommended. When the system reacquires
a GPS signal, it will automatically place the
vehicle in the correct location.
If you continually have to adjust the vehicle
position, you may have problems with the GPS
reception or there may be database errors.
2 System Limitations P. 310
MapCorrect Vehicle Position
Correct Vehicle Position
H SETTINGS button Navi Settings Map Correct Vehicle Position
Manually adjust the current position of the vehicle as displayed on the map screen if
the position appears to be incorrect.
84
1. Put the vehicle in Park.
2. Rotate i to select Correct
Vehicle Position. Press u.
3. Scroll the map to position the
cursor over at your correct position.
Press u.
4. Rotate i to position the
arrowhead in the correct direction
the vehicle is facing.
5. Press u to select OK.
Page 86

System Setup
Data Reset
1 Defaulting All the Settings
When you transfer the vehicle to a third party,
reset all settings to default and delete all
personal data.
The following settings will be reset:
• Routing & Guidance: Rerouting, Unverified
Area Routing, Traffic Rerouting, Edit Waypoint
Search Area, Guidance Mode, Street Name
Guidance
• Route Preference
Defaulting All the Settings
H SETTINGS button System Settings Factory Data Reset
Reset all the menu and customized settings as the factory defaults.
1. Rotate i to select Yes. Press u.
The confirmation message will
appear.
2. Rotate i to select Yes. Press
again to reset the settings.
The confirmation message will
appear. Press to select OK.
85
Page 87

System Setup
On Demand Multi-Use Display™
1 Changing the Screen Settings
Select to go back to the previous screen.
Use the / / / icons to turn the page.
X
Changing the Screen Settings
Adjusts the screen settings of the On Demand Multi-Use Display™.
The followings are adjustable screen settings:
• Sync Display Brightness: Selects whether the screen brightness synchronizes
with the instruments panel brightness.
• Brightness: Adjusts the screen's brightness.
• Contrast: Adjusts the screen's contrast.
• Black Level: Adjusts the screen's black level.
• Display: Changes between the daytime or nighttime modes.
• Beep: Turns on or off the beep that sounds every time you touch the screen.
• Keyboard: Changes the on-screen keyboard from the alphabetical order to the
qwerty type.
• Vibration: Turns on or off the vibration when you touch the screen.
• Fade Timer: Sets the screen black out timing.
1. Select More.
2. Select Screen Settings.
3. Use N, B or other icons to adjust
the setting.
86
Page 88

Navigation
This section describes how to enter a destination, select a route to take,
and follow the route to your destination. It also describes how to change
your route or destination along the way.
Entering a Destination ........................... 88
Address ................................................. 90
Address Book......................................... 96
Previous Destination............................... 97
Place Category....................................... 98
Local Search......................................... 100
Place Name.......................................... 102
Place Phone Number............................ 105
ZAGAT................................................. 105
Download POI...................................... 108
Scenic Route ........................................ 109
Intersection.......................................... 110
Map Input............................................ 111
Coordinate .......................................... 113
Calculating the Route ............................114
Viewing the Routes...............................115
Driving to Your Destination .................116
Viewing the Route ................................116
Listening to Voice Guidance..................120
Reaching a Waypoint ............................121
Map Menu..............................................122
Displaying the Map Menu .....................122
Directions .............................................124
Traffic Rerouting™................................126
Changing Your Route............................128
Pausing the Route.................................129
Canceling the Route .............................129
Adding Waypoints ................................130
Editing the Destination List................... 134
Taking a Detour ................................... 136
Avoiding Streets................................... 136
Changing Your Destination ................. 137
Find Nearest Place ................................ 137
Selecting a Destination on the Map...... 138
Entering a New Destination.................. 139
Resuming Your Trip.............................. 140
87
Page 89

Navigation
Entering a Destination
1 Entering a Destination
d “Display Destination”, d “Display
Navigation”
If you press the MENU button when en route,
the Route Option screen is displayed.
2 Changing Your Route P. 128
Prior to departure, you can set areas along your
route to avoid.
2 Avoiding Streets P. 136
H MENU button (on map)
This section describes how to enter a destination for route guidance.
The following items are available:
• Address: Sets a destination by entering an address.
88
2 Address P. 90
• Address Book: Sets a destination by selecting an address stored in your Address
Book.
2 Address Book P. 96
• Previous Destination: Sets a destination by selecting a previous destination.
2 Previous Destination P. 97
Rotate i to select an item. Press u.
Select More Search Methods to
display additional menu entries.
Page 90

Navigation
• Go Home: Sets your home address as a destination.
1 Entering a Destination
ZAGAT provides restaurant information only in
the U.S.
2 Going Home P. 11
• Place Category: Sets a destination by selecting a place/landmark.
2 Place Category P. 98
• Local Search: Sets a destination by using Local Search.
2 Local Search P. 100
• Place Name: Sets a destination by entering a place name.
2 Place Name P. 102
• Place Phone No.: Sets a destination by entering the phone number of a place/
landmark.
2 Place Phone Number P. 105
• ZAGAT: Sets a destination (restaurant) by using ZAGAT® SURVEY Rating
information.
2 ZAGAT P. 105
• Download POI: Sets a destination by using a list of the imported POI (category
and places) data you created.
2 Download POI P. 108
• Scenic Route: Sets a destination by using a list of scenic roads for each state (U.S.
and Canada only).
2 Scenic Route P. 109
• Intersection: Sets a destination (intersection) by entering two streets.
2 Intersection P. 110
• Map Input: Sets a destination by scrolling through the map.
2 Map Input P. 111
• Coordinate: Sets a destination by entering latitude and longitude.
2 Coordinate P. 113
Entering a Destination
89
Page 91

Navigation
Entering a DestinationAddress
Address
H MENU button Address
Enter an address to use as the destination. The state or province you are currently in
is displayed (e.g., California).
Rotate i to select an item. Press u.
The following items are available:
• City: Selects your destination city.
2 Selecting a City P. 92
• Street: Selects your destination street.
2 Selecting a Street P. 93
• House Number: Enters the house number to select the street.
2 Selecting a Street by House Number P. 95
• ZIP Code: Enters the zip code to select the city.
2 Selecting a City by Zip Code P. 91
• Change State: Selects the state or province.
2 Selecting the State or Province P. 91
90
Page 92

Navigation
1 Selecting the State or Province
Move w or y to select the following areas:
• USA for the U.S. mainland, Alaska, Hawaii,
and Puerto Rico
• Canada
• Mexico
1 Selecting a City by Zip Code
If your city is not listed, it may be part of a larger
metropolitan area. Try entering the street first.
■ Selecting the State or Province
H MENU button Address Change State
■ Selecting a City by Zip Code
H MENU button
Address ZIP Code
Rotate i to select a state from the
list. Press u.
1. Enter the zip code of your
destination.
2. Move r to select OK. Press u.
Entering a DestinationAddress
Continued
91
Page 93

Navigation
1 Selecting a City
Vehicle position may not be displayed when:
• The automobile is traveling off-road.
• The vehicle position data cannot be updated.
You do not need to enter spaces or symbols
(e.g., &, -, %). Partial matches are supported
(e.g., “ANGELES” to find “LOS ANGELES”).
Using Voice Command (English only)
Say d “City” on the Find address by screen, and
the following screen is displayed:
• Say d “Current City” to select your current
location, or say the name of a different city.
2 Selecting a Street P. 93
• The Say city name screen is not displayed when
your vehicle is in Puerto Rico or Mexico.
Entering a DestinationAddress
■ Selecting a City
H MENU button
The name of the city where you are currently located is displayed.
Address City
3. Rotate i to select the destination
city from the list. Press u.
Next, you are prompted to enter
a street name.
2 Selecting a Street P. 93
1. Enter the name of a different city,
or move r to select OK for the
current city. Press u.
92
Page 94

Navigation
1 Selecting a City
If your city is not listed, it may be part of a larger
metropolitan area. Try entering the street first.
Non-detailed area mark: Try entering the
street first and then select the city.
1 Selecting a Street
When entering the names of major freeways,
you can use the following abbreviations. For
interstates, use an “I” (e.g., I-10). For U.S.
freeways, use “US” (e.g., US-18). For state
freeways, use the two-character state
designation (e.g., CA-101). For county roads, use
the appropriate designation (e.g., G-2).
Using Voice Command (English only)
Say d “Street” on the Find address by screen,
and the following screen is displayed:
• Say the name of your destination street, and
say the street number as a string of individual
numbers.
• Set the route to your destination.
2 Calculating the Route P. 114
• The Say street name screen is not displayed
when your vehicle is in Puerto Rico or Mexico.
■ Selecting a Street
H MENU button
Address Street
2. Rotate i to select your
destination city from the list. Press
u.
A list of matching hits is
automatically displayed after
you enter several letters, with
the closest match at the top of
the list. Matching letters are
highlighted.
Next, you are prompted to enter
a street name.
2 Selecting a Street P. 93
1. Enter the name of your destination
street.
Do not enter the street type
(e.g., street, road, avenue) or
direction (e.g., north, south,
east, west).
Move r to select OK to display
a list of streets. Press u.
Continued
Entering a DestinationAddress
93
Page 95

Navigation
1 Selecting a Street
If you did not select a city first and there is more
than one city with the specified street, a list of
cities is displayed.
Rotate i to select the desired city from the list.
Press u.
Entering a DestinationAddress
2. Rotate i to select your
destination street from the list.
Press u.
A list of matching hits is
automatically displayed after
you enter several letters, with
the closest match at the top of
the list. Matching letters are
highlighted.
3. Enter the street number.
Only valid street numbers can be
entered.
4. Move r to select OK. Press u.
5. Set the route to your destination.
2 Calculating the Route P. 114
94
Page 96

Navigation
■ Selecting a Street by House Number
H MENU button Address House Number
1. Enter the house number.
2. Move r to select OK. Press u.
3. Rotate i to select your
4. Set the route to your destination.
Only a valid house number can
be entered.
If you did not yet select a street
name, enter a street name when
you are prompted.
destination street from the list.
Press u.
Select a city when you are
prompted.
2 Calculating the Route P. 114
Entering a DestinationAddress
95
Page 97

Navigation
1 Address Book
If you have PIN-protected your address book,
enter your PIN when prompted. Press u to
select OK. PINs are optional.
2 PIN Numbers P. 47
Move r and rotate i to select the following
items:
• Add New Address: Adds an entry to the
address book.
2 Adding an Address Book Entry P. 39
• Sort: Selects Sort by Name or Sort by
Distance.
• Delete All: Deletes all entries in the address
book.
• Driver 1 or Driver 2: Displays the address
book for the selected user.
Entering a DestinationAddress Book
Address Book
H MENU button Address Book
Select an address stored in your address book to use as the destination.
1. Rotate i to select your
destination from the list. Press u.
2. Set the route to your destination.
2 Calculating the Route P. 114
Move w or y to display only
the entries in the categories you
have created.
2 Selecting an Address Book
Category
P. 42
96
Page 98

Navigation
Previous Destination
1 Previous Destination
If Previous Destination is grayed out, there are
no previous destinations entered.
Your home address and addresses stored in your
address book are not added to the list of
previous destinations.
Move r and rotate i to select Delete All to
delete all previous destinations.
You can delete unwanted previous destinations
from the list.
2 Previous Destination P. 48
H MENU button Previous Destination
Select an address from a list of your 50 most recent destinations to use as the
destination. The list is displayed with the most recent destination at the top.
1. Rotate i to select a destination
from the list. Press u.
2. Set the route to your destination.
2 Calculating the Route P. 114
Entering a DestinationPrevious Destination
97
Page 99

Navigation
1 Place Category
This option is convenient if you do not know the
exact name of a place or if you want to narrow
down the number of matches returned for places
with a common name.
Move y to select Category History to access
your recently used place categories. Up to 30
categories can be stored.
You can also delete your recently used place
categories.
2 Category History P. 49
Search POI Categories helps you to search the
subcategory. When you enter a keyword and
select OK, the list of appropriate subcategories is
displayed.
Entering a DestinationPlace Category
Place Category
H MENU button Place Category
Select the category of a place (e.g., Banking, Lodging, Restaurant) stored in the map
database to search for the destination.
1. Rotate i to select a category.
Press u.
98
2. Rotate i to select a subcategory.
Press u.
2 List of Categories P. 336
Page 100

Navigation
1 Place Category
The straight line distance (as the crow flies, not
driving distance) and direction to the destination
are shown for the highlighted place.
Restaurants with a z icon have a ZAGAT®
review. To display only restaurants with a
ZAGAT® review, move r to select ZAGAT
Only.
2 ZAGAT Review P. 107
ZAGAT provides restaurant information only in
the U.S.
The following items are available:
• Search by Name: Searches for a place in the subcategory by name. Enter a city
name when prompted.
• City Vicinity: Searches for a place in the subcategory within a 20-mile radius of a
specific city. Enter a city name and then a place name when prompted. Only the
first 1000 matching places/landmarks are displayed.
• Sort by Distance to Travel: Displays all the places in the subcategory sorted by
distance from your current location. The closest place is displayed at the top.
3. Rotate i to select an item. Press
u.
4. Rotate i to select a place name
from the list. Press u.
5. Set the route to your destination.
2 Calculating the Route P. 114
Entering a DestinationPlace Category
99
 Loading...