

Page 1
Wireless Display
Receiver
Model # SBWD50A
Installation Guide
This Installation Guide will walk you through the easy steps
to set up your ScreenBeam Mini Receiver. During this
process, we’ll show you how to :
Install the Receiver
A
1
Connect Using
B
Intel WiDi App
2
Connect Using
B
Windows 8.1 or Higher
Connect Using WiFi
B3
Miracast-Enabled Device
Part No: 0530-0703-000
Page 2

Welcome!
Congratulations on your purchase of a ScreenBeam Mini
Wireless Display Receiver. The Mini Wireless Display Receiver
connects to your compatible Intel WiDi or Miracast wireless
display-capable device, and displays the device’s screen on
your HDTV.
Install the Receiver
A
Step
1 Get the ScreenBeam Mini Wireless Display Receiver
and USB cable from the ScreenBeam Mini box.
Step
2 Plug the ScreenBeam Mini Display Receiver into an
available HDMI port on your HDTV.
Step
3 Plug the male connector (smaller end) of the USB
cable to the ScreenBeam Mini USB micro-port labled “Power.”
Step
4 Plug the male connector (larger end) of the USB
cable to a USB port on your HDTV.
Page 3
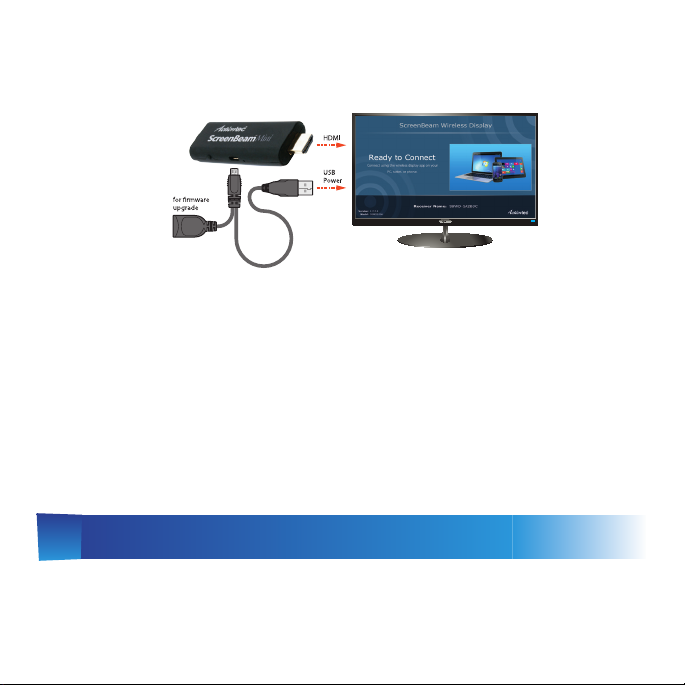
Step
5 Turn on your TV and switch the input source until
you see the Ready to Connect screen.
Note: If you cannot plug the Receiver into an HDMI port on
your TV (due to other components, or a poorly accessible
port), use the supplied HDMI cable to connect the Receiver.
The ScreenBeam Mini Receiver is now connected to your
HDTV. Proceed to one of the next three sections of this Guide
(depending on the device you are using to connect to
ScreenBeam Mini) to nish the connection procedure.
1
Connect Using Intel WiDi App
B
Note: If your device’s OS is Windows 8.1 or higher, proceed to
section B2 (“Connect Using Windows 8.1 or Higher”) for
connection instructions.
Page 4

Note: ScreenBeam Mini only supports the 2.4GHz wireless
frequency. Make sure your device is not connected to a 5GHz
wireless router prior to connecting ScreenBeam Mini.
Step
1Find the Intel Wireless Display application on the
device and launch it. To nd the application, go to Windows
Search on your device and search for “Intel WiDi” in your apps.
Step
2 The device scans for
available receivers. Select the same
receiver name as seen on the HDTV
and click Connect. (The Connect
Automatically checkbox is optional.)
Step
3 Wait until the Receiver
displays a PIN on the HDTV, and a
PIN entry box on the screen of the
WiDi device. Enter the PIN in the
PIN entry box on the WiDi device,
then click Continue.
Page 5

Step
4 The HDTV displays
messages to show the status of the
connection process.
Step
5 A Connection Successful
screen appears on your device’s
screen, as well as on the HDTV.
Display Tip: If the edges of the device screen cannot be
seen on the HDTV, adjust cropping. To do this, enter the
WiDi application and click Settings. Navigate to the “Picture
and Sound” section, click Adjust cropping…, and adjust the
HDTV picture by clicking plus (+) or minus (-).
Note: Make sure the device supports Intel Wireless Display
(WiDi) software version 3.5 or higher. To nd out what version
of Intel WiDi your device has, enter the Intel WiDi application
and click Help, then navigate to the “About WiDi” section. To
obtain the latest Intel WiDi software and drivers, go to:
http://www.intel.com/go/wirelessdisplayupdate
Page 6

2
Connect Using Windows 8.1 or Higher
B
Step
1 From the Windows desktop,
navigate to the Charms menu and
select Devices. You can also use the
shortcut keys, Windows + K.
Step
2 From the Charms menu,
click the Project icon.
Step
3 From the Project screen,
select Add a wireless display.
Step
4 Select the ScreenBeam
Receiver from the list.
Page 7

Step
5 Enter the PIN as displayed
on the television screen, then
connect and display.
Note: If you are running Windows 8.1 and the screens above
do not appear, go to http://www.actiontec.com/widi81 for
the latest software updates.
3
Connect Using Miracast-Enabled Device
B
You can connect to ScreenBeam Mini from a Miracast-enabled
Android device, such as a smartphone, tablet, or game console
(nd the wireless display feature in Settings). Also, the device
should be running the latest software for best performance.
Step
1 On a Miracast-enabled Android device, locate and
open the Wireless Display Application.
Note: The name of the Wireless Display Application depends
on the device type and model. Refer to the device’s carrier or
manufacturer user manual for more details.
Page 8

Step
2 The Wireless Display Application scans for available
receivers. Select the ScreenBeam Receiver from the list.
Step
3 Wait for the device to associate with the Receiver.
When it does, the device’s screen will be displayed on the HDTV.
Product Support & Additional Information
Go to http://www.actiontec.com/support for product
support, updates, and more information including:
• Firmware Updates • Troubleshooting • Registration • FAQs
Page 9

FCC Information and Copyright
This equipment has been tested and found to comply with the limits for a Class B digital device,
pursuant to part 15 of the FCC Rules.
These limits are designed to provide reasonable protection against harmful interference in a residential
installation. This equipment generates,
uses and can radiate radio frequency energy and, if not installed and used in accordance with the
instructions, may cause harmful interference
to radio communications. However, there is no guarantee that interference will not occur in a particular
installation. If this equipment does
cause harmful interference to radio or televi si on rece pt i on , whi ch can be determined by turning the
equipment off and on, the user is
encouraged to try to correct the interference by one or more of the following measures:
—Reorient or relocate the receiving antenna.
—Increase the separation between the equipment and receiver.
—Connect the equipment into an outlet on a circuit different from that to which the receiver is
connected.
—Consult the dealer or an experienced radio/TV technician for help.
This device complies with part 15 of the FCC Rules. Operation is subject to the
following two conditions:
(1)This device may not cause harmful interference, and
(2) this device must accept any interference received, including interference that may
cause undesired operation.
changes or modifications not expressly approved by the party responsible for compliance could
void the user's authority to operate the equipment.
This equipment complies with FCC radiation exposure limits set forth for an uncontrolled
environment .This equipment should be installed and operated with minimum distance 20cm
between the radiator& your body. This transmitter must not be co-located or operating in
conjunction with any other antenna or transmitter.
 Loading...