

Page 1
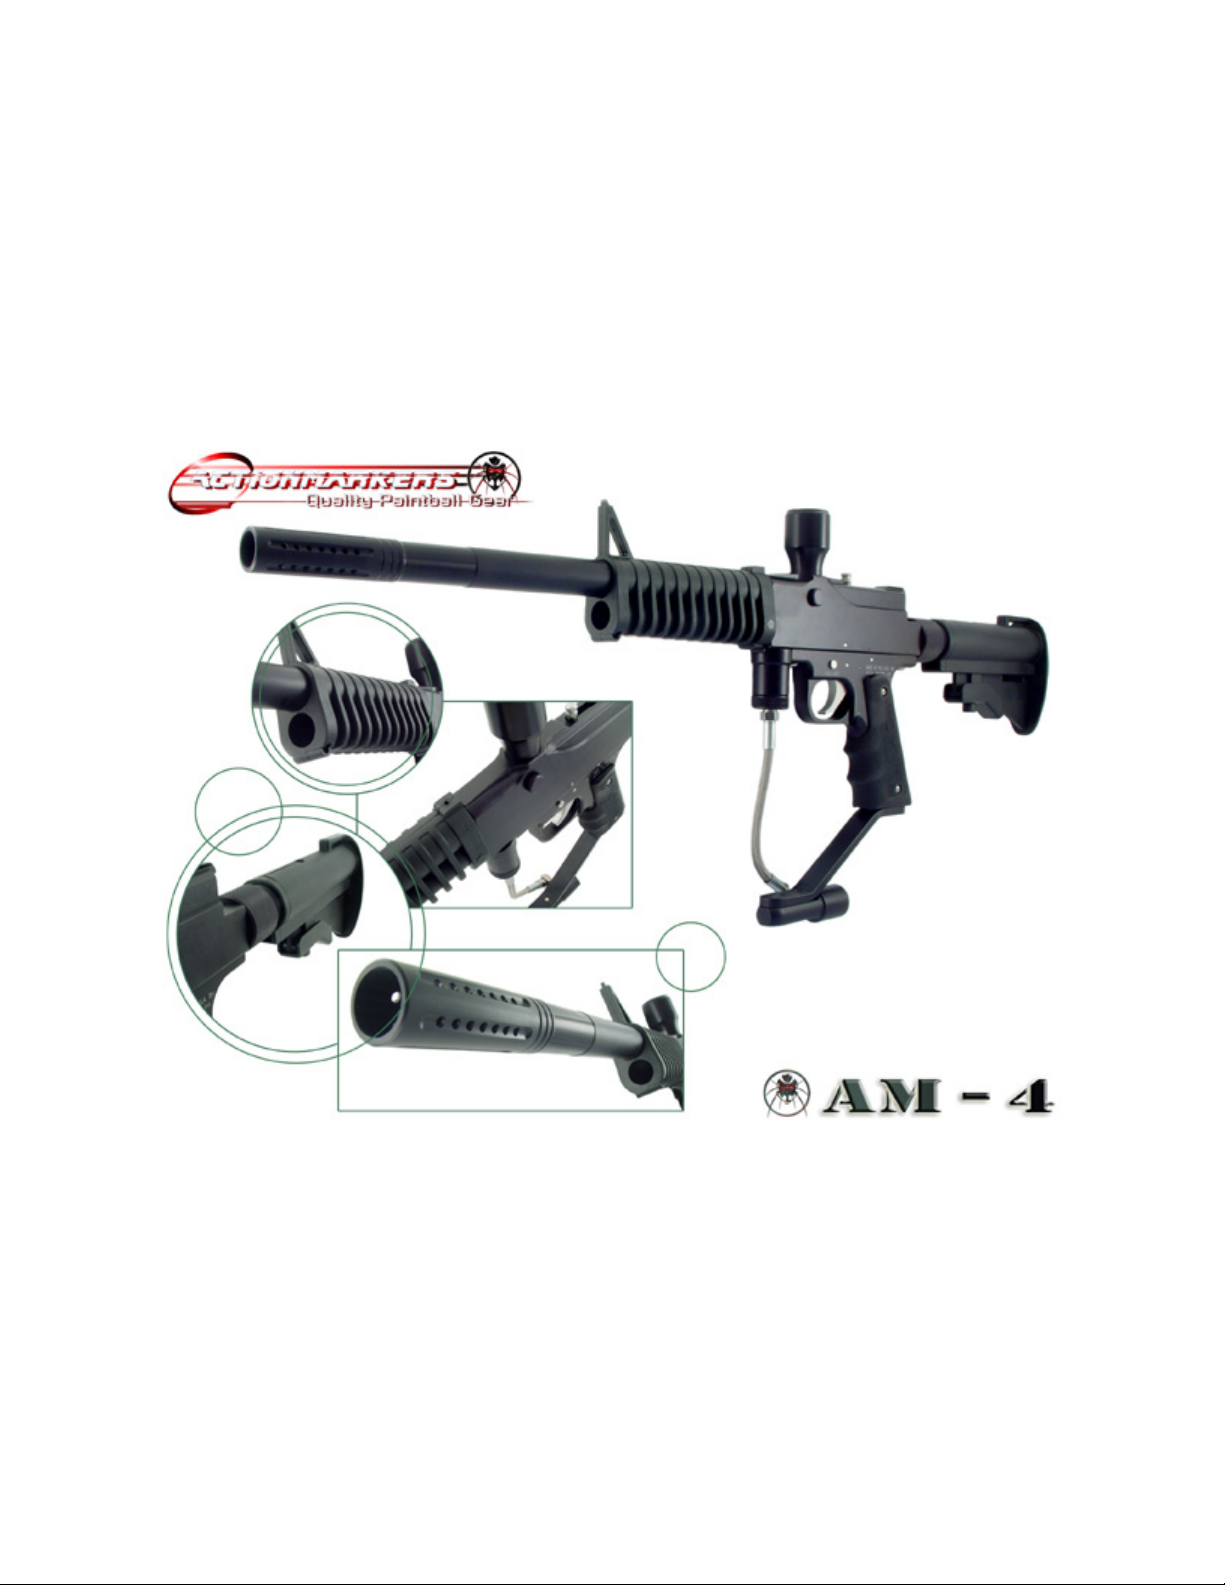
AM-4 Owner’s Manual
Page 2

WARNING:
serious injury or death. Eye protection designed specifically for paintball use must be worn to prevent injury. Read the
Owners Manual before using.
Misuse of this paintball marker, including but not limited to vandalism, may result in criminal penalties.
Use only goggles which are designed for paintball use. Goggles which are not specifically designed for paintball use
will not withstand the multiple impacts of paintballs fired from a semi-automatic paintball marker.
Never work on your marker without disconnecting the air supply.
Do not carry a paintball marker in public, unless it is concealed within a carrying case.
Do not use this marker if your safety has become damaged or excessively worn out.
The paintball marker, which you have purchased, is not a toy. Misuse or carelessness may cause
- 2 -
Page 3

Table of Contents
Warranty Policy…………………………..…………………...4
Safety…………………………………….…………………...5
Features of the AM-4………………….…………………...7
Quick Start…………………………………….……………..8
Hints and Tips…………………………………….…………10
Performance……………………………………….…………11
Maintenance………………………………………….…..…..11
Support…………………………………………………….....14
New Products and Updates………………………………......16
- 3 -
Page 4

Warranty Policy
What It Covers
We take pride in making quality parts for all of our products. We have put a great emphasis on ensuring that
the marker, which you have purchased, is made to high standards of quality. In some very rare cases, something may
have gone wrong in the process of making and delivering the marker. We offer this warranty to you in order to ensure
that you get what you paid for – a high quality, high performance paintball marker.
We offer a 90 day limited warranty from the date of original retail purchase. The purpose of this warranty is to
ensure that you get the high quality product, which you paid for. The warranty covers parts, labor, manufacturing
defects or malfunctions. We will also cover any aftermarket accessories which are manufactured by Action Markers
and are designed for use on the AM-4. In other words if there is something wrong with the marker which was in any
way our fault, we will fix the problem at our cost.
What It Does Not cover
We at Action Markers are fans of paintball and play the sport as often as possible. We also know the frustration
that sometimes accompanies the sport. We cannot afford to warranty any of the actions which may accompany this
frustration. If you feel the absolute need to throw your paintball marker at the tree which didn’t offer enough cover,
you do so at your own expense. We also do not offer any warranty for accidents such as automobile accidents or a
house fire. Any use of the marker other than that which it was intended, such as playing baseball with it, will also not
be covered by the warranty. Any 3
covered. The presence of a 3
problem. Finally we do not cover any cosmetic scratches, normal wear and tear, or any damages caused by attempted
modification of the marker.
In deciding the policies for this warranty we were faced with two somewhat conflicting desires. We want to be
able to sell our marker for as low of a price as possible. We also want to be able to give the best service to our
customers. We feel that the warranty policies which we have made give the best value to the most people
In order to process your repair work as fast as possible we require you to call us and get a return authorization
(RA) number before you send your marker in. This number allows us to begin processing the order even before we
receive your marker so that we can fix it and return it to you quickly. We will not accept any packages which come in
without an RA number on them. Any package without an RA number written clearly on the outside of the package will
be returned to the sender.
We recommend that you look on our website for technical support. It is available twenty four hours a day,
seven days a week, and doesn’t take off holidays. We will regularly post new information on the website and your
question may already be answered there. If you are unable to find what you need at our website, Technical Support is
available from 9:00 a.m. until 3:00 p.m. Eastern Time on Monday through Friday. If you need to call us have your
serial number ready so that we can find your information on our computers quickly. It will also help if you have sent in
your warranty card.
rd
rd
party modification or aftermarket accessory which causes a problem will not be
party accessory does not void the warranty if the accessory was not the cause of the
Why?
Return Authorization
Technical Support
- 4 -
Page 5

Safety
THIS PAINTBALL MARKER IS NOT A TOY!! This paintball marker should be treated with respect.
Never point the marker at a person who is not properly attired with a mask on. While paintball as a sport has a very
low injury rate, if the marker is misused or not properly maintained, it can cause serious injury, including blindness, or
even death. Please read and understand all safety instructions and directions contained in this manual before using this
paintball marker.
Adult supervision is recommended at all times whenever a minor is handling this paintball marker.
Never point at or shoot any animal with this paintball marker. Never point at or shoot this paintball marker at
any person, unless both you and your target are participating in paintball activities and are both wearing proper safety
attire. Proper safety attire includes approved paintball goggles, mask, gloves, and pads.
Follow all maintenance instructions carefully. If you have any questions regarding maintenance procedures,
contact your local dealer or if your dealer is unable to answer your question, call Action Markers directly.
Any time you have an air supply connected to your marker, it is assumed to be armed. NEVER RELY ON
THE SAFETY ALONE AS A FAIL-SAFE DEVICE. Before connecting your air supply push the safety into the on
position where the safety pin is flush with the side of the receiver marked ‘PUSH SAFE’. In addition to the safety on
the marker, a barrel plug should be used any time you are not actively playing. Disengage the safety and remove the
barrel plug only when you are on a playing field and the game has started. The safety is off and your marker is ready to
fire when the safety pin is protruding from the side of the receiver marked ‘PUSH SAFE’.
A chronograph should be used to check your paintball’s velocity before using your marker. Ensure that your
marker is firing at velocities lower than 300 feet per second before playing. Never shoot this paintball marker if the
chronograph reading is higher than 300 feet per second. Velocity adjustments should never be done on the playing
field. All changes in velocity should take place between games and be checked with a chronograph.
Remove the air supply from the paintball marker and dry fire in a safe direction before disassembling the
marker. Do not put your fingers in the breech area or down the ball feed tube while firing the paintball marker. Never
shoot at any target closer than ten feet.
Only fire this marker where it is safe and legal to do so. Do not fire at any place of residence or at any building
not specifically designated as part of a paintball field.
Never look down the barrel when it is connected to the marker. If you need to clean the barrel disconnect the
air supply and field strip the marker before cleaning.
- 5 -
Page 6

If your safety pin is worn out or loose for any reason, take your marker into your nearest dealer or service center
to be repaired. Never use a damaged marker.
Features of the AM-4
We have placed a great emphasis on designing the AM-4 to be the marker that players will want. We at Action
Markers have played the sport of paintball for years and have used almost every kind of marker available. We took our
collective experiences and combined that with a designer who has been making paintball markers for 17 years. The
end-result is the AM-4. The AM-4 and the AM-4 Custom are ultra customized versions of the Sentinel line or markers.
The AM-4 has been designed from the ground up to be the players marker. We have milled both the upper and
lower receiver out of solid aluminum to gain the strength to keep the marker in top shape. We only use state-of-the-art
machines to make the AM-4. The hammer and sear are both specially hardened to reduce the amount of wear. The
AM-4 is a high quality, precision marker that will easily withstand the high level of abuse that is standard to a paintball
marker.
Of course the marker is only good while you can still shoot it. Using a uniquely designed valve chamber,
specially selected springs for exactly the right tension, and a light upper bolt, we have made the AM-4 use a minimal
amount of air to reach the desired velocity. The end result is an amazingly high air efficiency.
To complement the air efficiency, we have made the trigger pull as light as possible. Using a three piece trigger
system, we are able to get a short, even trigger pull. The motion is fluid throughout the length of the trigger pull so
there is no jarring motion which will cause a shot to fly erratically. We have also made our trigger pads wider than
most to be more comfortable on your fingers. A wider trigger pad means that the force of pulling the trigger back is
spread across your entire finger, reducing soreness that may accompany shooting thousands of paintballs.
The trigger design also allows you to shoot the marker extremely quickly. In our experience some
markers can outshoot the loader. To reduce the chances of this happening we have used a straight down feeder. The
feeder is able to very quickly load the next paintball into the chamber.
We have switched the design of our Feed tubes from a standard attached feed tube to a standard screw in
feed tube. The threading which we use on our feed tubes is the same threading that is used on Angel Markers. We
have made this choice based upon the performance of the Feed Tube as well as the aftermarket choices that this allows
you to have.
There are a couple of things which you should know about our feed tubes. If you have bought a AM-4 Marker
your feed tube will be A simple tube for holding the hopper in place. If you have bought a TS Model your feed tube
will now have a Universal Grip Feed Tube. This Feed Tube has 3 internal o-rings which the hopper will compress to
give a snug fit, ensuring that the hopper can not come off during play. If the hopper seems to be too snug, add a drop
or two of lubricant to each o-ring.
When attaching your hopper to the marker always turn the hopper in a clockwise motion, the same way that you
turn the feed tube when putting it on. This will lock the Feed Tube in place. With the feed tube locked this way it will
not be able to come loose easily. This is a good thing. The side effect of the locking is that you will most likely not be
able to loosen the Feed Tube by Hand. If you do want to ever change your feed tube, you will need to use a nonabrasive tool to turn the feed tube loose. We recommend a rubber strap wrench.
- 6 -
Page 7
Paintball can be a messy sport. From paintballs exploding on the bunker next to you, to an emergency dive
behind a tree which lands your in a mud-puddle, there are many ways for your marker to get dirty. Any sort of foreign
object inside of your marker can damage it very quickly. A small amount of dirt inside the upper bolt can shred the Orings. We have tried to eliminate the possibility of anything that doesn’t belong in the marker, getting into the marker.
Our first step to fight the dirt is to limit the amount that gets inside the marker. We have found that when landing on
the ground or rolling away from an opponent, dirt can get into the marker through any openings on the side of the
marker. We then took this knowledge, designed the upper bolt to cock from the rear, and used a connecting pin on the
top of the marker to connect the upper and hammers. This design lowers the chance of a players contact with the
ground allowing any foreign substances to get inside the marker.
Eventually, no matter what the design of the marker is, something will get inside the marker and you will be
forced to clean it. The cleaning of a marker has been among the top of our personal frustrations with many markers.
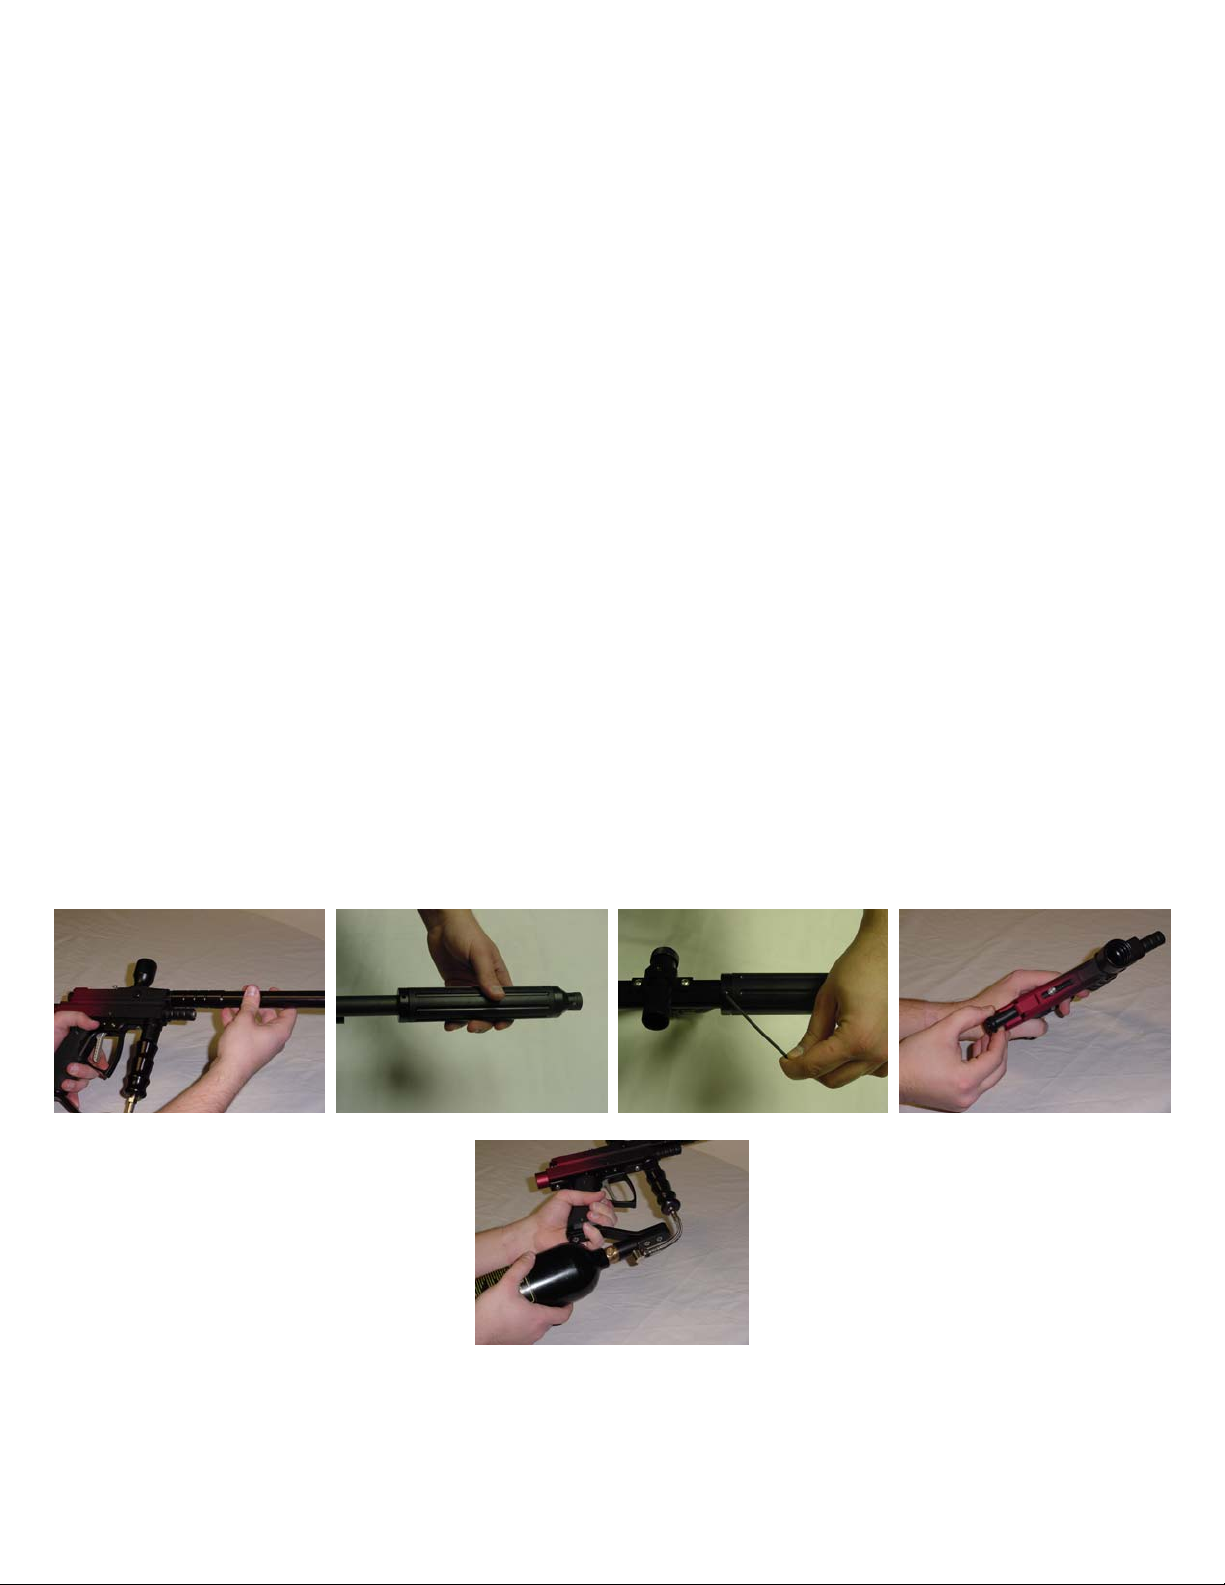
We have designed the AM-4 to be able to be ‘field stripped’ in a matter of seconds. It is a process of pulling the
connecting pin out and the pulling the upper bolt out. Cleaning the lower chamber is only slightly longer of a process,
involving unscrewing the locking knob and sliding the hammer out.
Quick Start
This section is a quick overview of how to use the AM-4.
As a note of explanation – the AM-4 Marker is a custom version of the popular Sentinel line of markers. Many
of these instructions were originally in the Sentinel Owner’s manual as well as the pictures. Any differences will be
noted.
When you are ready to play, first attach the barrel to the body of the marker (place the front shroud over the
barrel and tighten the set screw in place), grasp connecting pin and firmly pull back until it stops. The marker is now
cocked. Connect an air supply to the marker. The AM-4 will perform well with CO
The AM-4 was, however, designed as a true performance marker. Just like a high end sports car will run of f of a lower
grade of gasoline, the AM-4 will run with CO2. To truly get the best performance you should consider upgrading to a
nitro/compressed air system.
, Nitrogen, or Compressed Air.
2
You will need to also get a loader, also known as a hopper, to carry your supply of paintballs. Because most
people will want a better loader, we have chosen to not include a “cheap” loader with our marker. Attach the loader to
- 7 -
Page 8
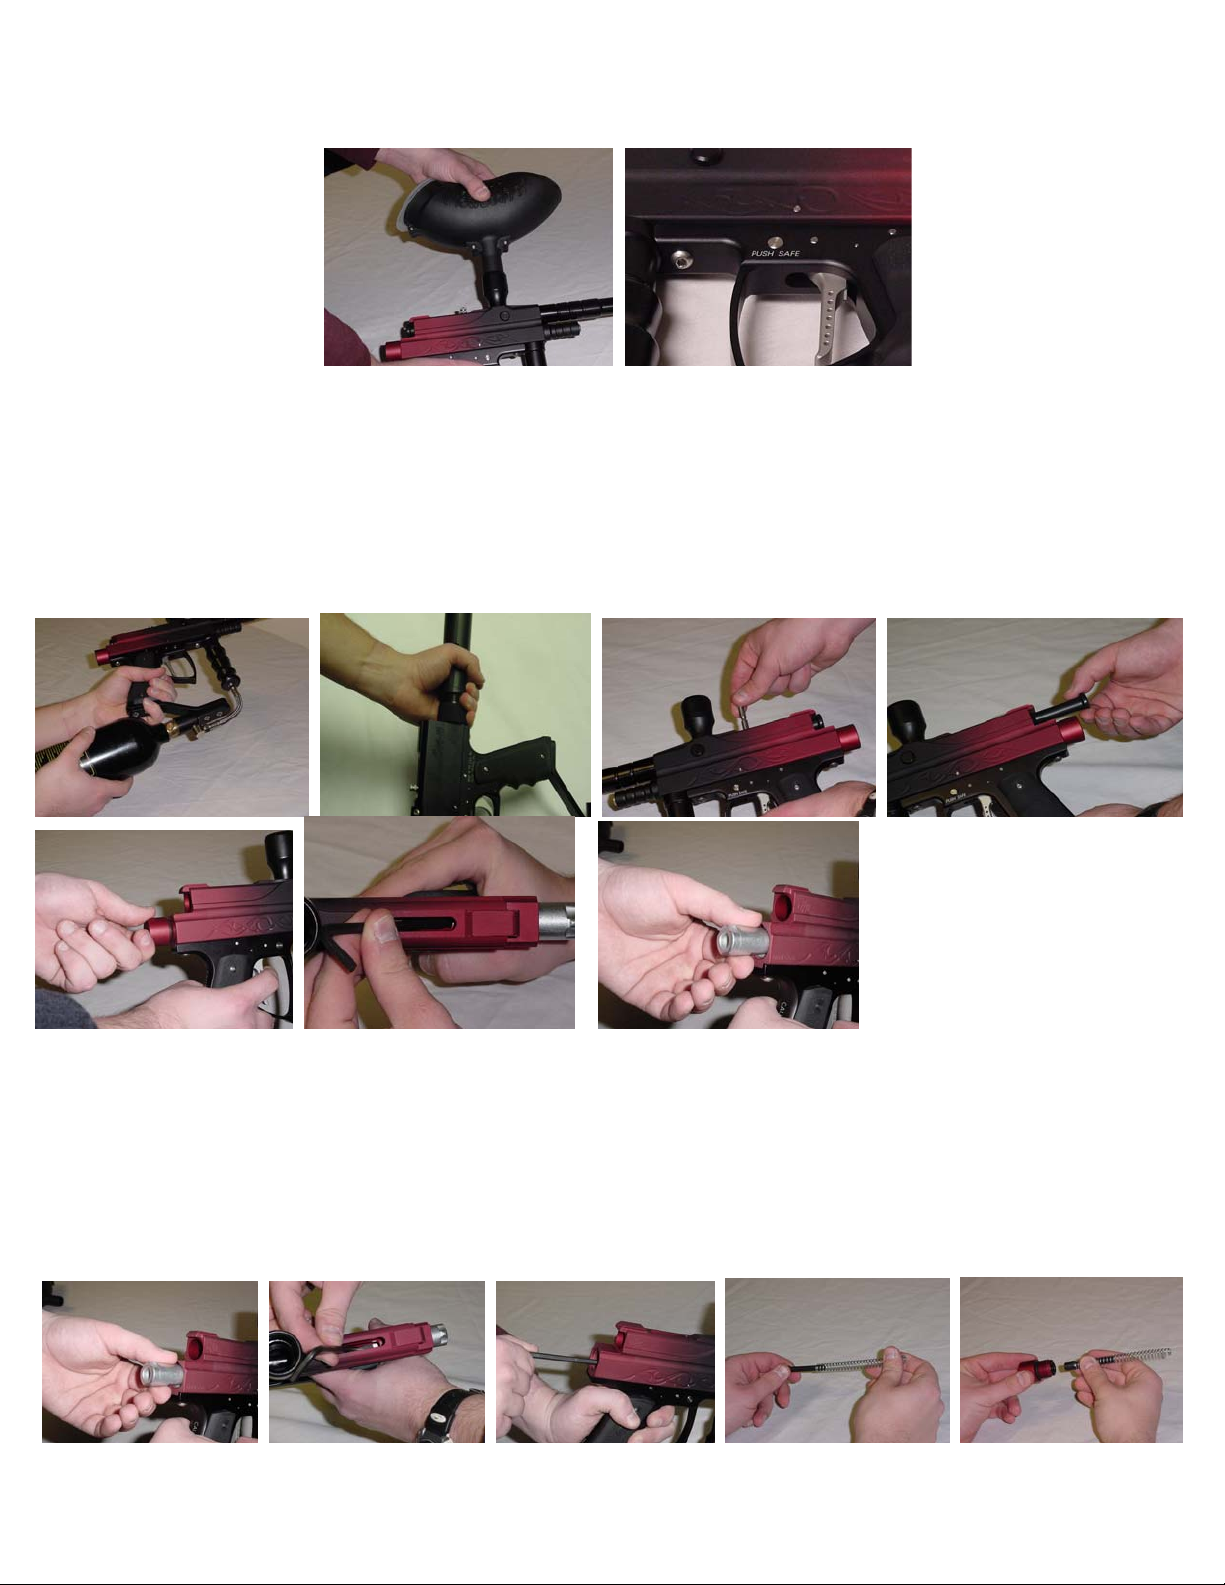
the feed tube on the top of the marker and fill the loader with paintballs. Push the safety pin in, until ready to fire. You
are now ready to fire your marker.
To field strip the AM-4 first remove any air supply from the marker and fire once or twice to remove any air
which may still be in the marker. Unscrew the butt stock from the rear of the marker. Remove the connecting pin at
the top of your marker and slide the upper bolt out of the marker. You now have access to the upper chamber and
upper bolt for cleaning. If you need to clean the hammer for any reason, unscrew the lock bolt (be careful as the lock
bolt is under pressure from a spring and may come out of the marker quickly) and slide the hammer out by inserting an
allen wrench into the top of the marker and into the connecting pin hole on the hammer and pushing towards the rear of
the marker.
To reassemble place the hammer into the lower chamber with the hole pointing towards the rear of the marker.
Gently depress the sear and push the hammer forward until it catches on the sear. Press the trigger while pushing the
hammer forward to get the hammer in position. Now put the drive spring onto the guide pin and place the base of the
guide pin inside of the locking bolt. Now replace the upper bolt into the upper chamber, making sure that the air
chamber hole is pointing downwards. Push the upper bolt forward until lined up with the hammer. Replace the
connecting pin through both the upper bolt and hammer. Tighten the locking bolt – generally the locking bolt will be
inside the butt stock – into the lower chamber. (Note: Failure to tighten the locking bolt completely into the marker
may result in permanent damage to your marker.)
- 8 -
Page 9
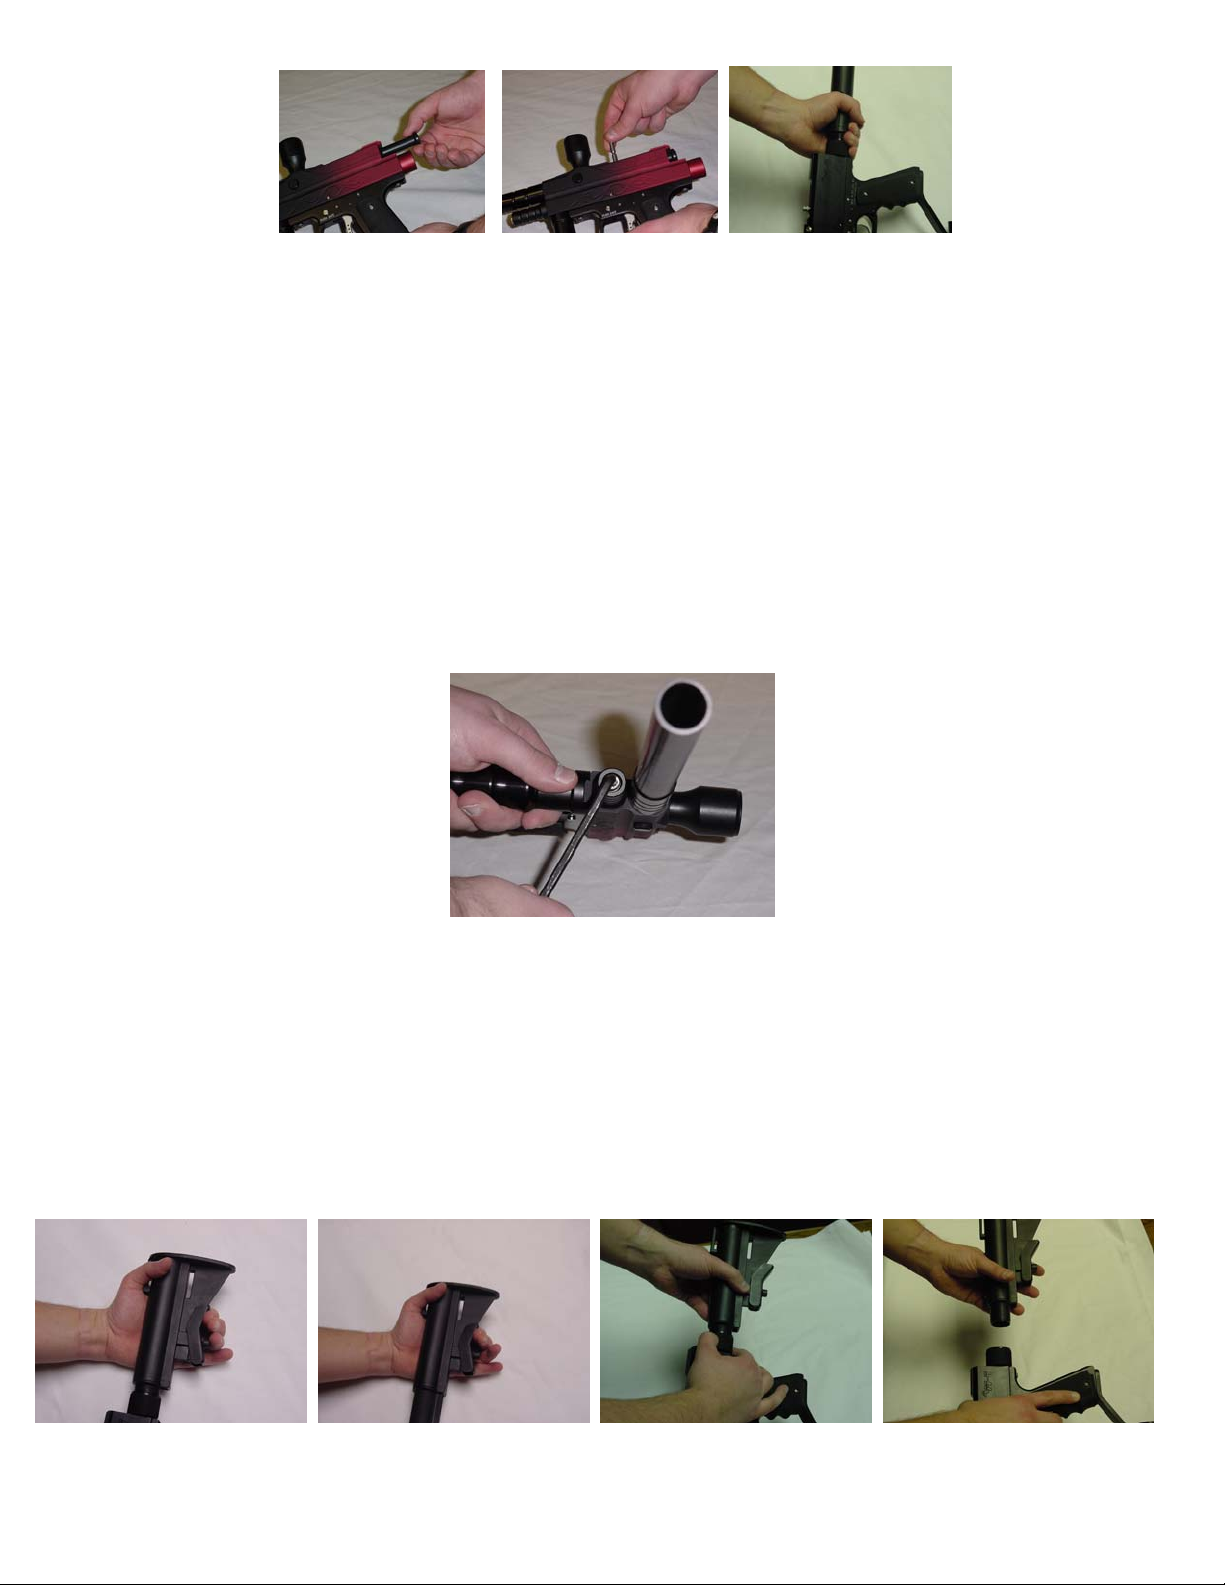
Velocity adjustment is done by turning the velocity screw which is located on the front of your marker just
under the barrel. To increase the velocity turn the screw counter-clockwise and to decrease the velocity turn the screw
clockwise. One full revolution of the screw will change the velocity significantly so be sure to re-check the velocity
after any adjustments. Fire several shots before re-checking your velocity as the pressure may not stabilize
immediately. You will want to be sure that your paintball velocity is less than 300 feet per second. Most fields are
strict with this rule and you may not be allowed to play if you are shooting too fast.
Remember that the velocity adjuster is in the front of the marker. You may be used to turning the back knob of a
marker to adjust the velocity. Since our adjuster is not in the back of the marker, adjusting the knob like this may cause
the back knob to loosen to the point of coming out of the marker. It could damage the spring or hammer or cause
injury if there is air on the marker at the time. Remember to only adjust the velocity in the front of the marker.
As a quick tip – many people have found it easiest to adjust the velocity by fully turning the velocity screw into the
marker and then adjusting it out until the velocity is up to speed.
Always use high quality paintballs. Lower quality paintballs will break more easily and will not fly as
accurately as high quality paintballs.
The shoulder stock of the AM-4 is adjustable to fit any person. To adjust the Stock grasp the lever on the
bottom of the stock and position the stock to the desired length. You may also remove the stock if you so desire. To
do this grasp the stock adapter and turn it clockwise while holding the stock steady.
- 9 -
Page 10

Hints and Tips
Paintballs are inherently inaccurate. A paintball is moving relatively slow, under 300 feet per second, and has a
relatively high surface area that wind can hit. The paintballs themselves, with a solid exterior and a liquid filled
interior, are likely to develop a curve in the air. Learn to adjust to the playing conditions of the day. A good idea is to
fire multiple shots and aim from where the first one hits.
Three round burst fire, firing three paintballs quickly and then pausing, is a good balance in conserving
paintballs and air, and ensuring a hit.
Play Hard. Put everything you have into the game. Don’t be afraid to get hit, even the best players will get shot
on occasion.
Teamwork is the key to most victories. Rambo won’t win a lot of paintball games. Learn to work with your
selected team of friends. When you have a good system down with your friends and you can communicate your
intentions nearly telepathically, learn to play with a group of people that you have never met before. Accept different
roles and don’t expect to always be the team captain.
Tell all of your friends and co-workers about the sport of paintball. It is generally more fun to play with people
that you know, and it’s a good stress reliever to be able to shoot your co-workers too.
Above all else play fair. Don’t try to wipe the paintball off of your shirt before the ref sees you. Don’t adjust
your velocity mid-game. Paintball has received some negative publicity because the markers look so much like real
weapons. We need to work together to keep paintball a clean, safe, and fun sport. Please don’t ruin the experience for
the other players.
Performance
The AM-4 should get over 700 shots from a full 12 oz. CO
changing the barrel, will change this number. Weather conditions may also affect the air usage. The paint itself plays a
large factor in air efficiency – the better the paint matches the internal diameter of the barrel the better your air
efficiency will be.
Cold weather will have a dramatic affect on performance when using CO2. Any Temperature below 50
lower the tank pressure and may not supply enough pressure to the marker for adequate velocity. If you will be playing
in cold conditions often we recommend using a high-pressure system such as compressed air or nitrogen.
The barrel, which is included in with the AM-4, is designed to accommodate all of the standard sizes of
paintballs and should work fine with any of the major paintballs on the market. We recommend that you use higher
quality paintballs to get the best performance. Performance may also be enhanced by a barrel which is specially fitted
for a specific size of paintball.
We have designed the AM-4 to have a light trigger pull and to be capable of extremely quick shooting. Care
must be taken, however, to not pull the trigger faster than the loader can feed the paintballs into the firing chamber. If
you fire paintballs faster than the loader is dropping them into the chamber you have a good chance of chopping the
paintball. If you find that you are consistently chopping paintballs it may be wise for you to invest in an automatic ball
feeder that can load the paintballs faster.
The velocity adjustment screw is coupled with a volume chamber. This volume chamber allows the AM-4 to
use the air more efficiently, providing you with an increased amount of shots for the same amount of air.
tank out of the box. Any modifications, such as
2
o
will
- 10 -
Page 11
If you are using CO2 it is important to remember that the gas is what should be shooting the paintballs – not the liquid
CO2. We recommend purchasing an in-line expansion chamber if you are having any problems with CO2.
Maintenance
** Many of the concepts listed here are talked about in other parts of the manual. Use this as a concise way of finding
reference information. **
Lubrication
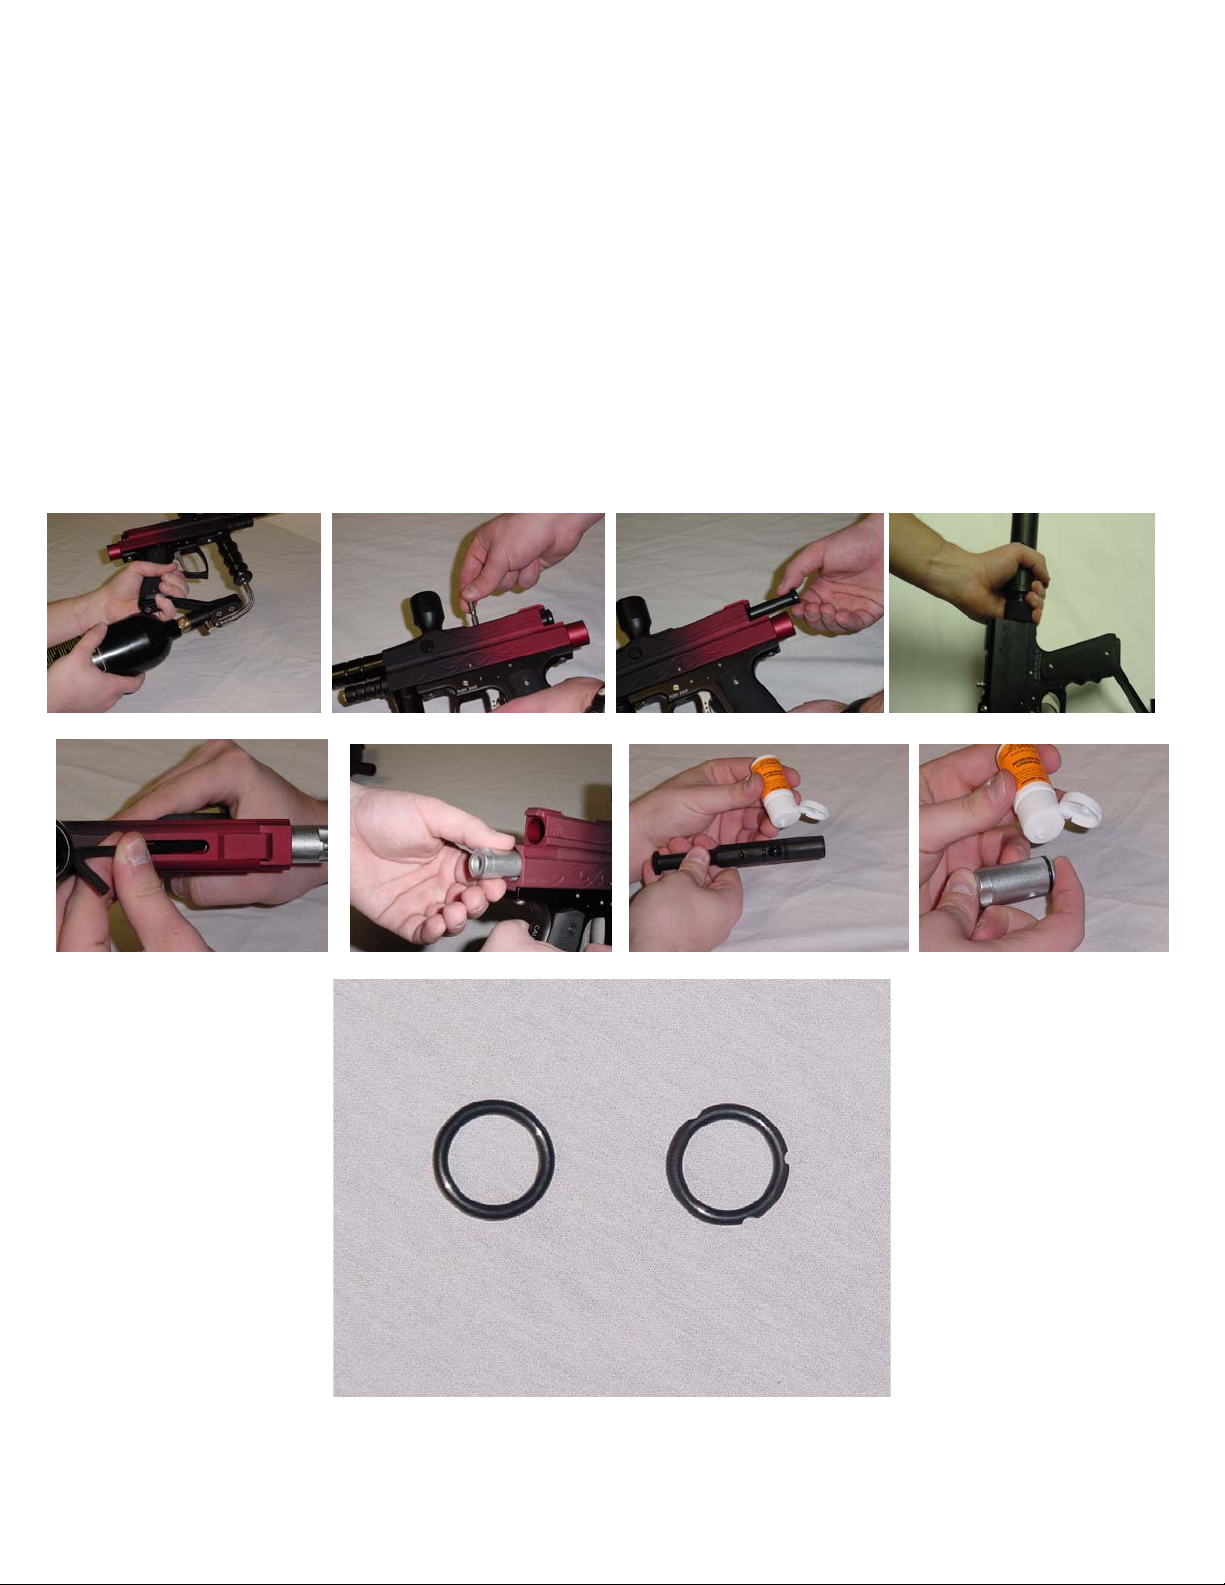
Lubrication is a key element to proper maintenance. When you fire the AM-4 the moving parts are slowly
being worn down. Lubrication slows this process. To lubricate your AM-4 properly first remove any air source from
the marker. Remove the upper bolt and the hammer as outlined above. Now drop a couple of drops of oil onto the
hammer o-ring. With the upper bolt out of the marker put a few drops onto each o-ring on the upper bolt. Always do
visual inspections of each o-ring as you oil it. A damaged or missing o-ring may cause the AM-4 to misfire. You
should lubricate your AM-4 before each day of playing.
- 11 -
Page 12
Velocity Adjustment
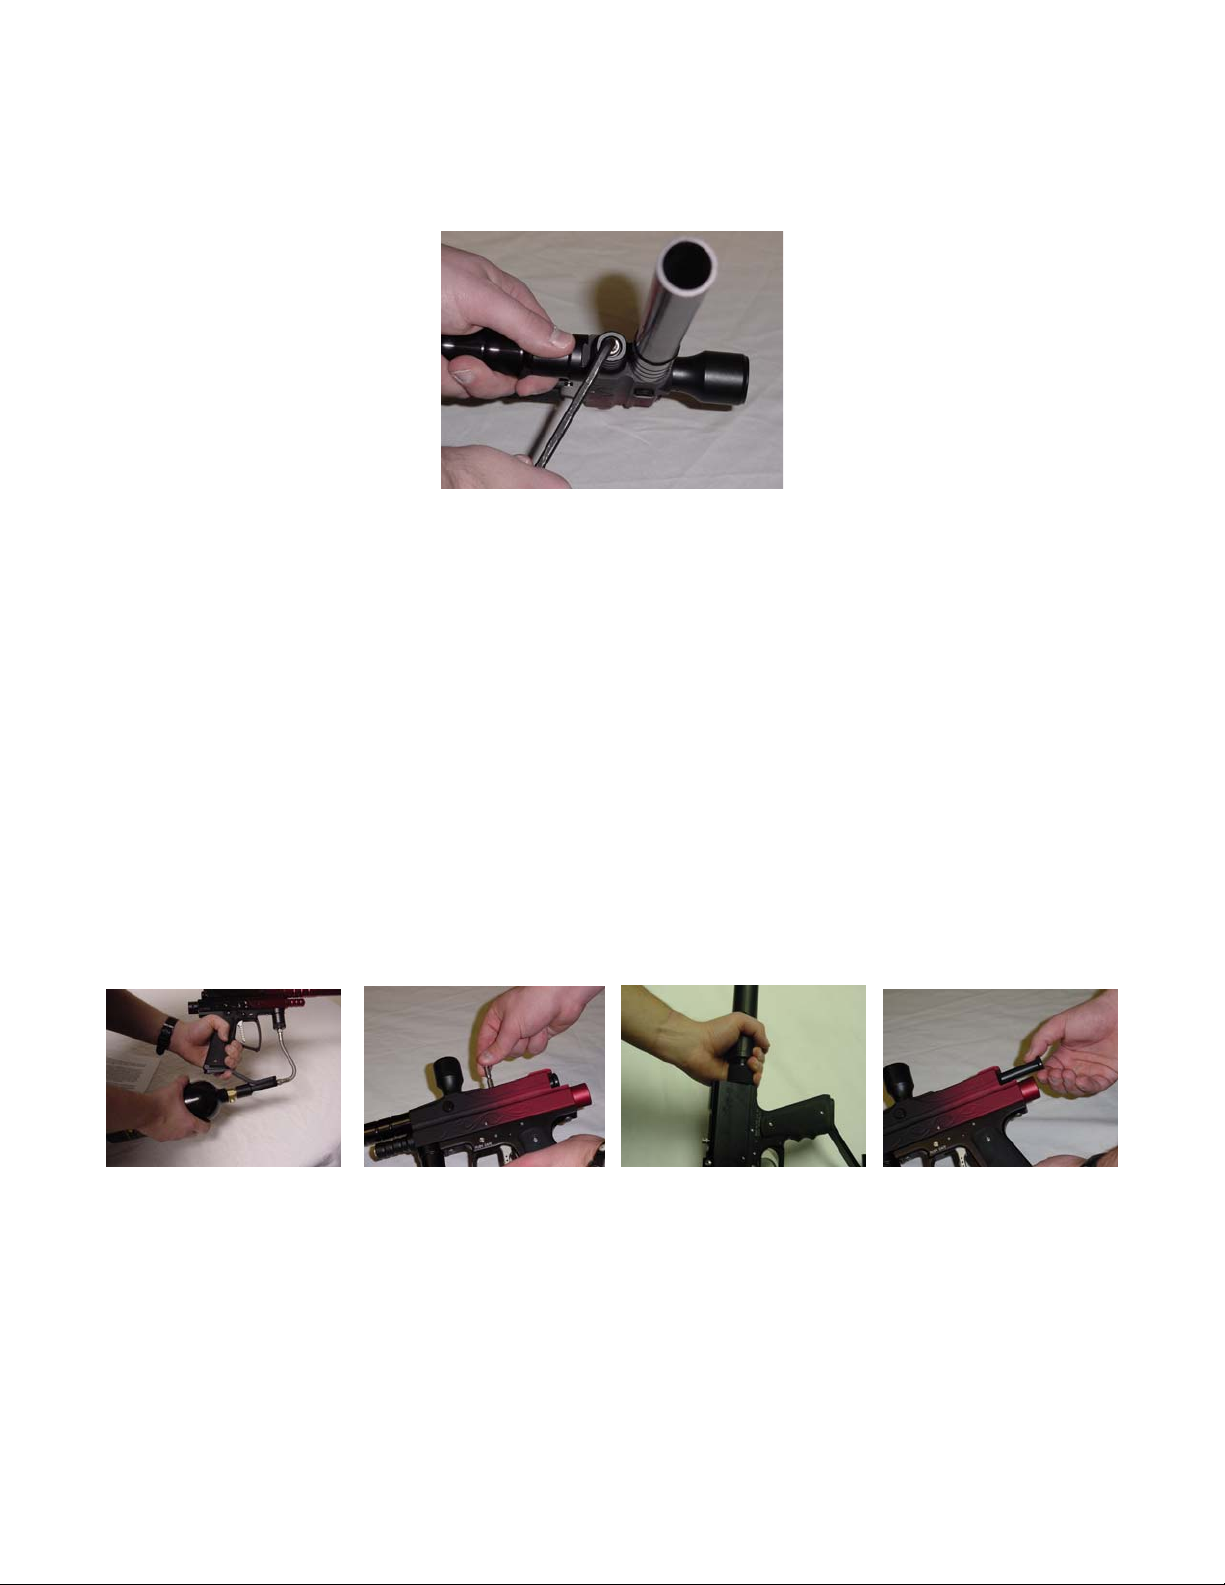
To adjust the velocity of your AM-4 you must raise or lower the volume of air released. This is done by turning
the velocity adjustment screw located just under the barrel on the front of the marker. Turning the screw clockwise
decreases the velocity. A turn counter-clockwise increases the velocity.
Remember that the velocity adjuster is in the front of the marker. You may be used to turning the back knob of
a marker to adjust the velocity. Since our adjuster is not in the back of the marker, adjusting the knob like this may
cause the back knob to loosen to the point of coming out of the marker. It could damage the spring or hammer or cause
injury if there is air on the marker at the time. Remember to only adjust the velocity in the front of the marker.
When changing the velocity of your AM-4 be sure to fire several shots to make sure that the setting is locked in.
We have found the best performance of the AM-4 is reached when the marker is firing at around 280 feet per second.
Air Tanks
The AM-4 is designed to work great with all air tanks made for paintball use. We recommend using
compressed air or Nitrogen for the most consistent velocity.
Field Stripping
Field Stripping your AM-4 is extremely easy. It is done by removing the air supply, de-cocking the bolt,
removing the locking pin from the top of your marker, and then sliding the upper bolt out the rear of the marker. This
allows you to clean the upper bolt and chamber
Cleaning
To keep your marker in top condition it should be cleaned anytime you have used it. To clean it properly,
remove any air supply from the marker and fire once or twice to remove any air remaining. Remove the barrel from
the front of the marker and clean separately. Pull the connecting pin out. Slide the upper bolt out of the rear of the
marker. Then run a squeegee through the top chamber to ensure that there is no paint in the chamber. Examine the
upper bolt and remove any traces of paint there as well. Next remove the locking bolt from the rear of the marker. The
locking bolt is under pressure from the drive spring and may come out quickly. To remove the hammer slide the
velocity adjustment tool into the upper receiver slot and push the hammer to the rear of the marker. Look for any paint
which may have leaked to the bottom and gotten on the hammer or in the lower chamber. Clean your marker with any
standard paintball cleaning equipment.
- 12 -
Page 13
Re-assembling
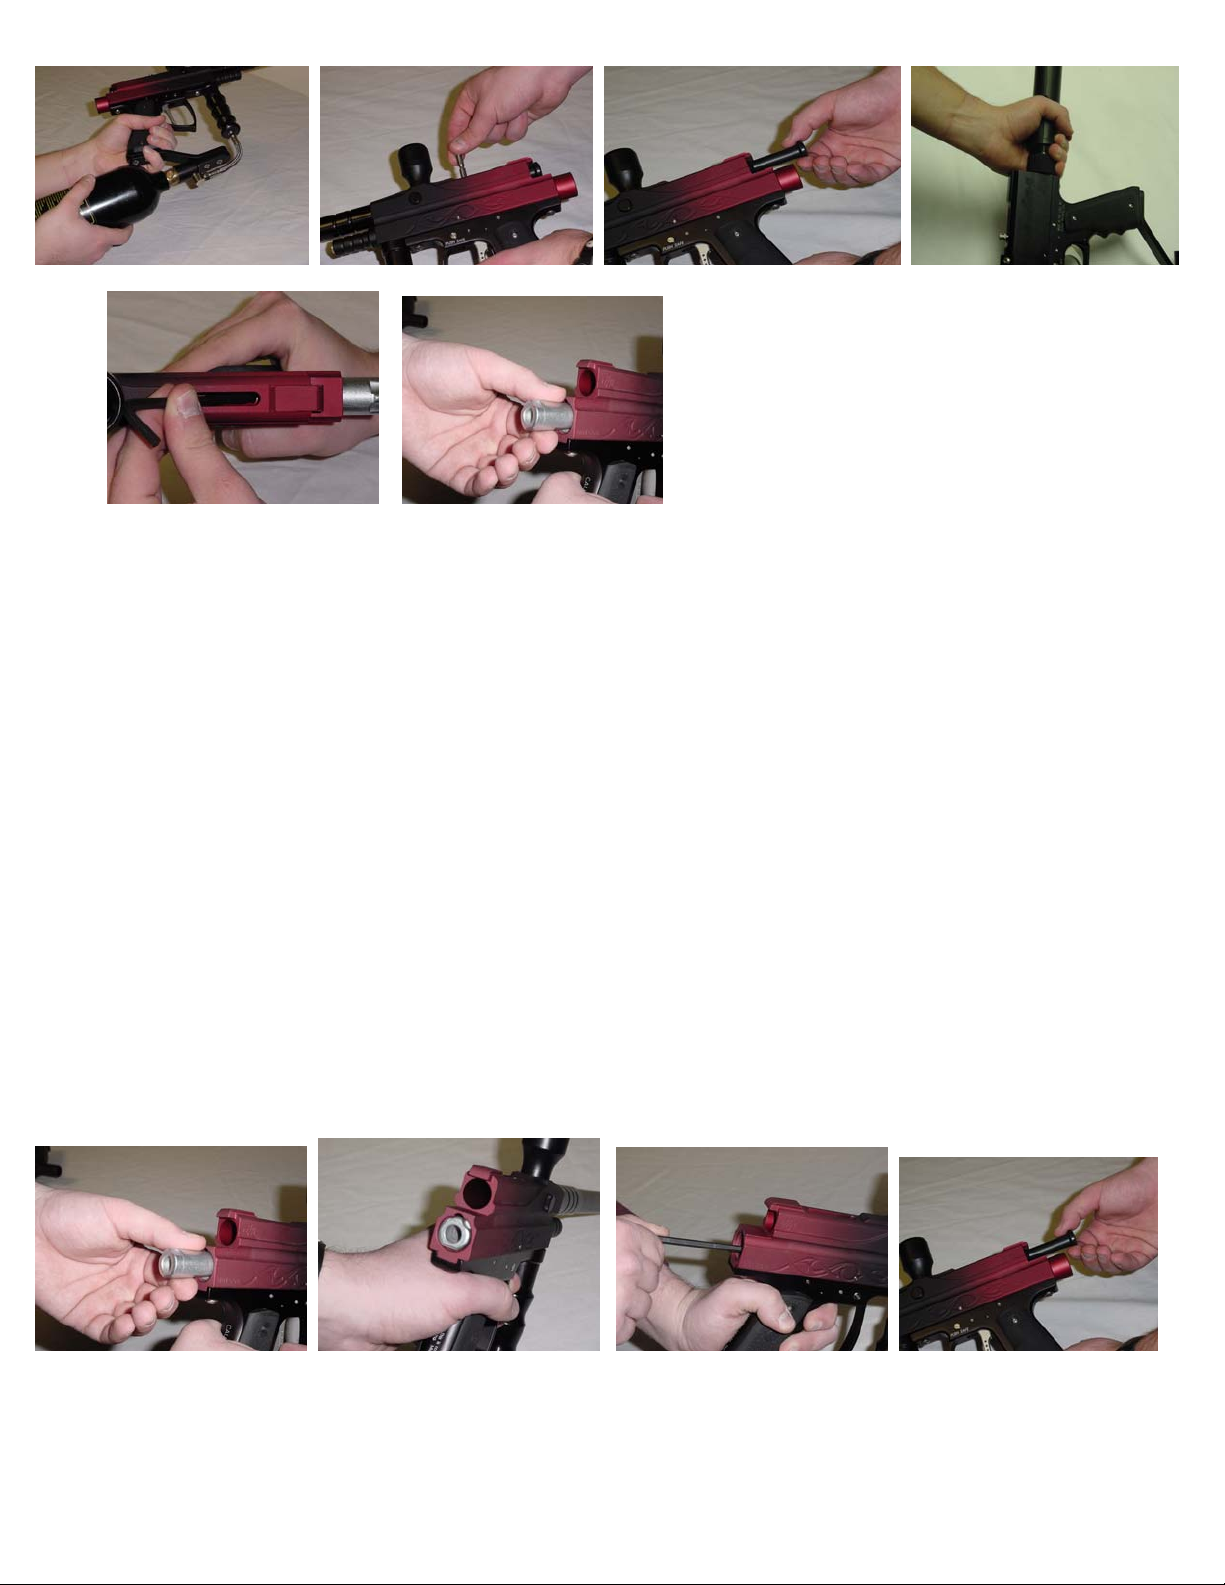
First get the velocity adjustment tool which came with the marker. Insert this wrench inside the slot on the top
of the marker and use it to gently depress the sear. Slide the hammer into the lower chamber, making sure to leave the
side of the hammer with a hole milled into it pointing towards the rear of the marker. The ‘key’ on the top of the
hammer ensures that you will not have it facing the wrong way rotationally. Take the allen-wrench and insert it into
the rear of the hammer. Apply pressure to the hammer and pull the trigger so the hammer is in the forward position.
Now put the drive spring onto the Guide Pin and place the base of the guide pin inside of the locking bolt. Tighten the
locking bolt into the lower chamber. Now replace the upper bolt into the upper chamber, making sure that the air
chamber hole is pointing downwards. The air chamber hole is in between the two ‘o’ rings towards the front of the
upper bolt. If the air hole is not pointing downward you will not be able to shoot paint out of the marker. When you
can see the connecting pin hole in the tope of the upper bolt through the slot on the top of the marker, place the
connecting pin through the upper bolt and into the hammer until it clicks into place.
It is also important to remember to always put the upper bolt in the marker with the two holes pointing down. If
the upper bolt is not placed in the marker correctly you will not be able to fire the ball with much velocity (under 100
fps.). If you are unsure if the upper bolt is placed in your marker correctly, cock the marker by pulling back on rear of
the upper bolt until the hammer catches on the sear and you hear a click. Now look down into the top slot of the
marker. If you can see a hole (other than the one that the connecting pin is located in.) the upper bolt is in upside down.
Simply remove the upper bolt, rotate it until the right side is up, and replace it into the marker.
- 13 -
Page 14
Transportation
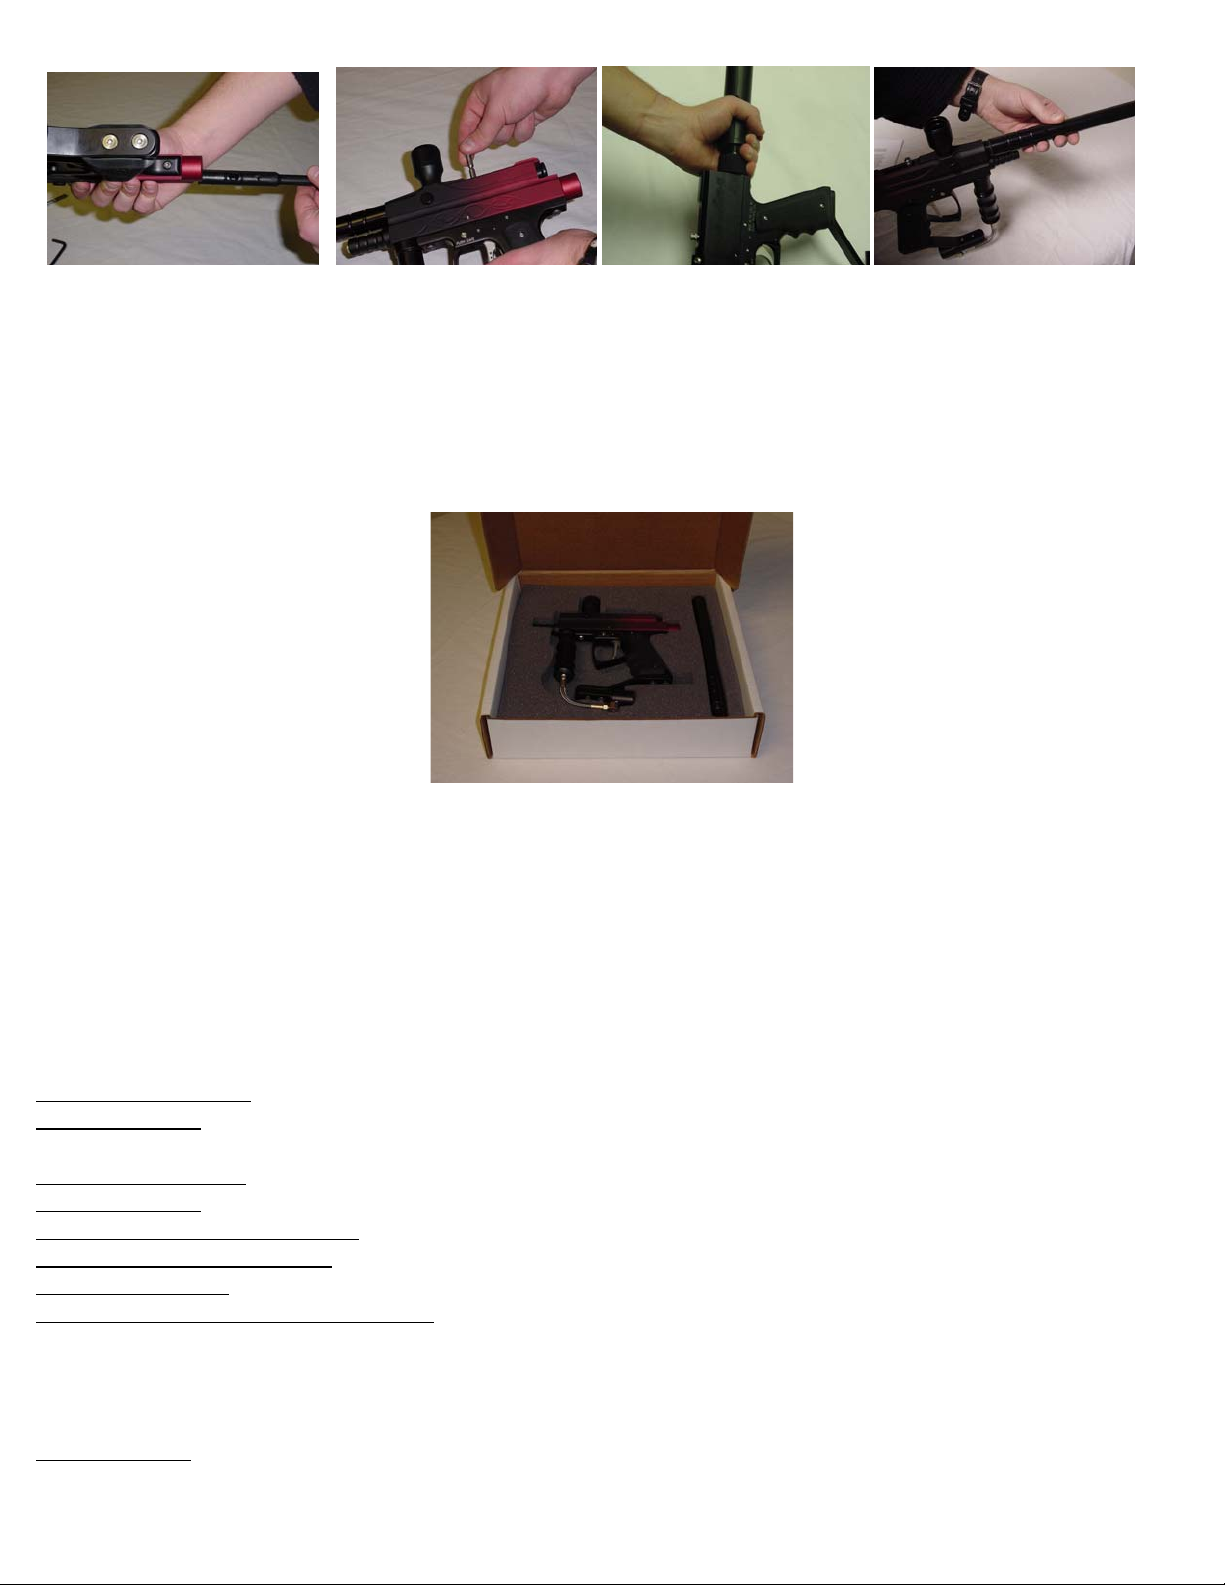
Whenever transporting your marker, be sure to use a carrying case to prevent any wear and tear. We feel that
all wear and tear should happen in the course of an actual paintball game. Dropping your paintball marker on the
sidewalk shouldn’t be a concern that you worry about. The box that your marker came in doubles as a nice case
already. As a reminder, never transport your marker in the open in public. Not everybody can recognize it as a
paintball marker.
Support
The following is a list of the most common problems you may have with paintball markers, along with their
most common solutions. The list is not intended to be comprehensive. If you are having a problem which is not listed,
please refer to www.actionmarkers.com. We will be posting new and updated Support issues through our website. If
your concern is not resolved through the website then call your dealer or call our technical support number listed under
contact information.
Double or firing full auto
Low or empty air tank – Fill or Change air Tanks
Wrong or bad oil – Use only Synthetic Oils – If damage has already occurred check for wear on all o-rings and replace
as needed
Bad or worn Hammer – Check Hammer for wear marks. If the hammer is worn too far, replace the hammer
Bad or worn sear – If the sear is worn too far to properly catch on the hammer replace the sear.
Combination of sear and rear bolt – If both look worn you may need to replace both the sear and the hammer.
Weak or damaged drive spring – Replace the drive spring
Bad hammer O-ring -- Replace the O-Ring
Weak or Damaged Sear or Trigger spring – replace with new Factory spring.
Leaks at tank connection
Bad tank o ring – Replace the O-Ring on the tank
- 14 -
Page 15
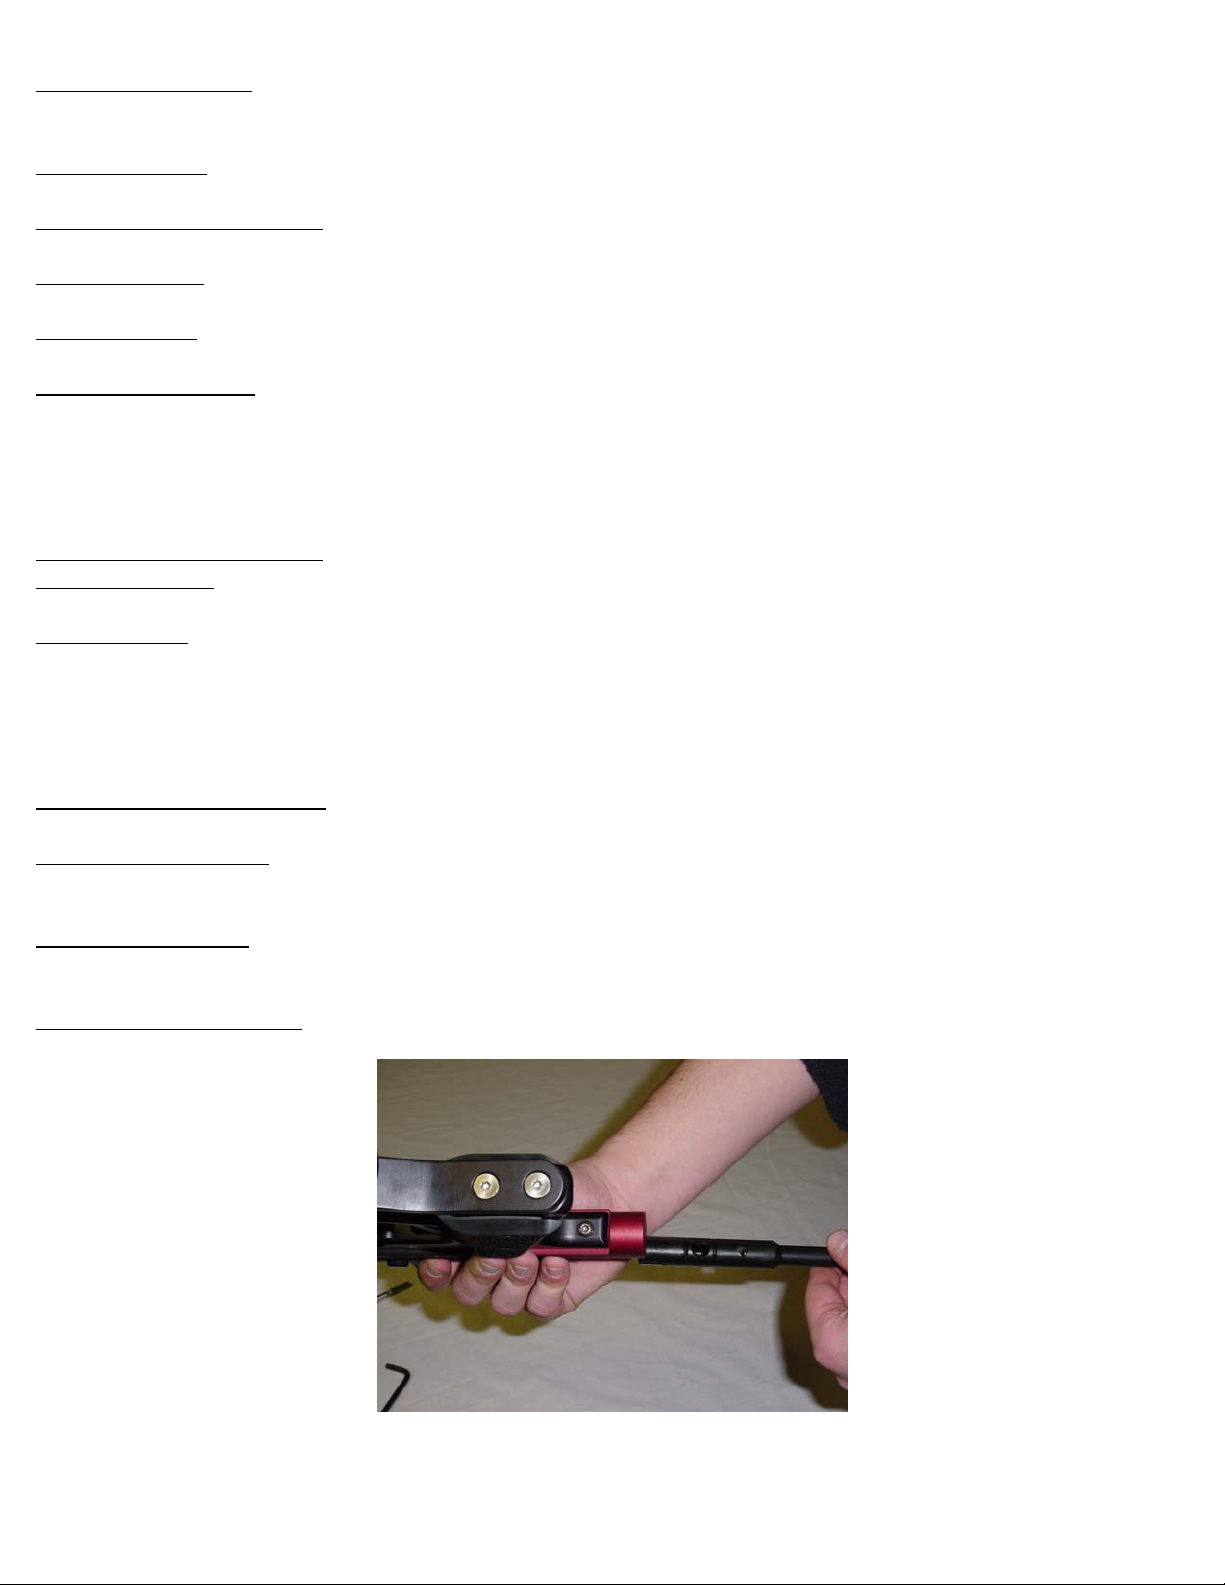
Damaged tank adapter
Poor accuracy
Wet or oily barrel – Clean the barrel out with a dry squeegee. Ensure that the barrel is completely dry. Field strip your
marker and ensure that the upper chamber is dry as well.
Bad or poor quality paintballs – This is the biggest cause of inaccuracy. Ensure that the Paintballs are not uneven or
dimpled. Use a higher quality of paintball.
Velocity too high – Re-check your velocity at a chronograph and change as needed to get your velocity down under
300 feet per second.
Velocity too low – Re-check velocity using a chronograph and change as needed. Keep your velocity under 300 feet
per second. Ensure that you are not running out of air in your air supply.
Bad or damaged barrel – Inspect your barrel for nicks or scratches on the inside of the barrel. If it is damaged in any
way you may need to replace your barrel. Check with your local dealer or look at our website,
www.actionmarkers.com, to order a new barrel.
Breaks paintballs
Bad or poor quality paintballs –Use higher quality paintballs. Ensure that your paintballs are not overly fragile.
Bad or dirty barrel – Make sure that your barrel is clean and free from all debris. If there is any damage to your barrel
you may need to get a new barrel.
Slow Feed Rate – One of the most common causes of ball breakage on the AM-4 is out shooting your hopper. If you
are consistently getting chopped paint you should consider getting a motorized ball hopper which will better keep up
with the AM-4’s Rate of Fire.
Inconsistent velocity
Bad or oval shaped paintballs – Use higher quality paintballs. Ensure that your paintballs are completely spherical
without becoming oblong.
Tank too cold or too hot – Mainly a problem with CO2. CO2 may cause problems in the winter and during any cold
weather. You could use compressed gas. If your tank is too cold from shooting, stop shooting momentarily to allow
the tank to warm up.
Bad upper bolt O-ring – Replace worn out O-rings.
Extremely Low velocity
Upper Bolt in upside down – Remove upper bolt, turn it so that the air hole is pointed downward and replace.
– Replace the Tank adapter
- 15 -
Page 16
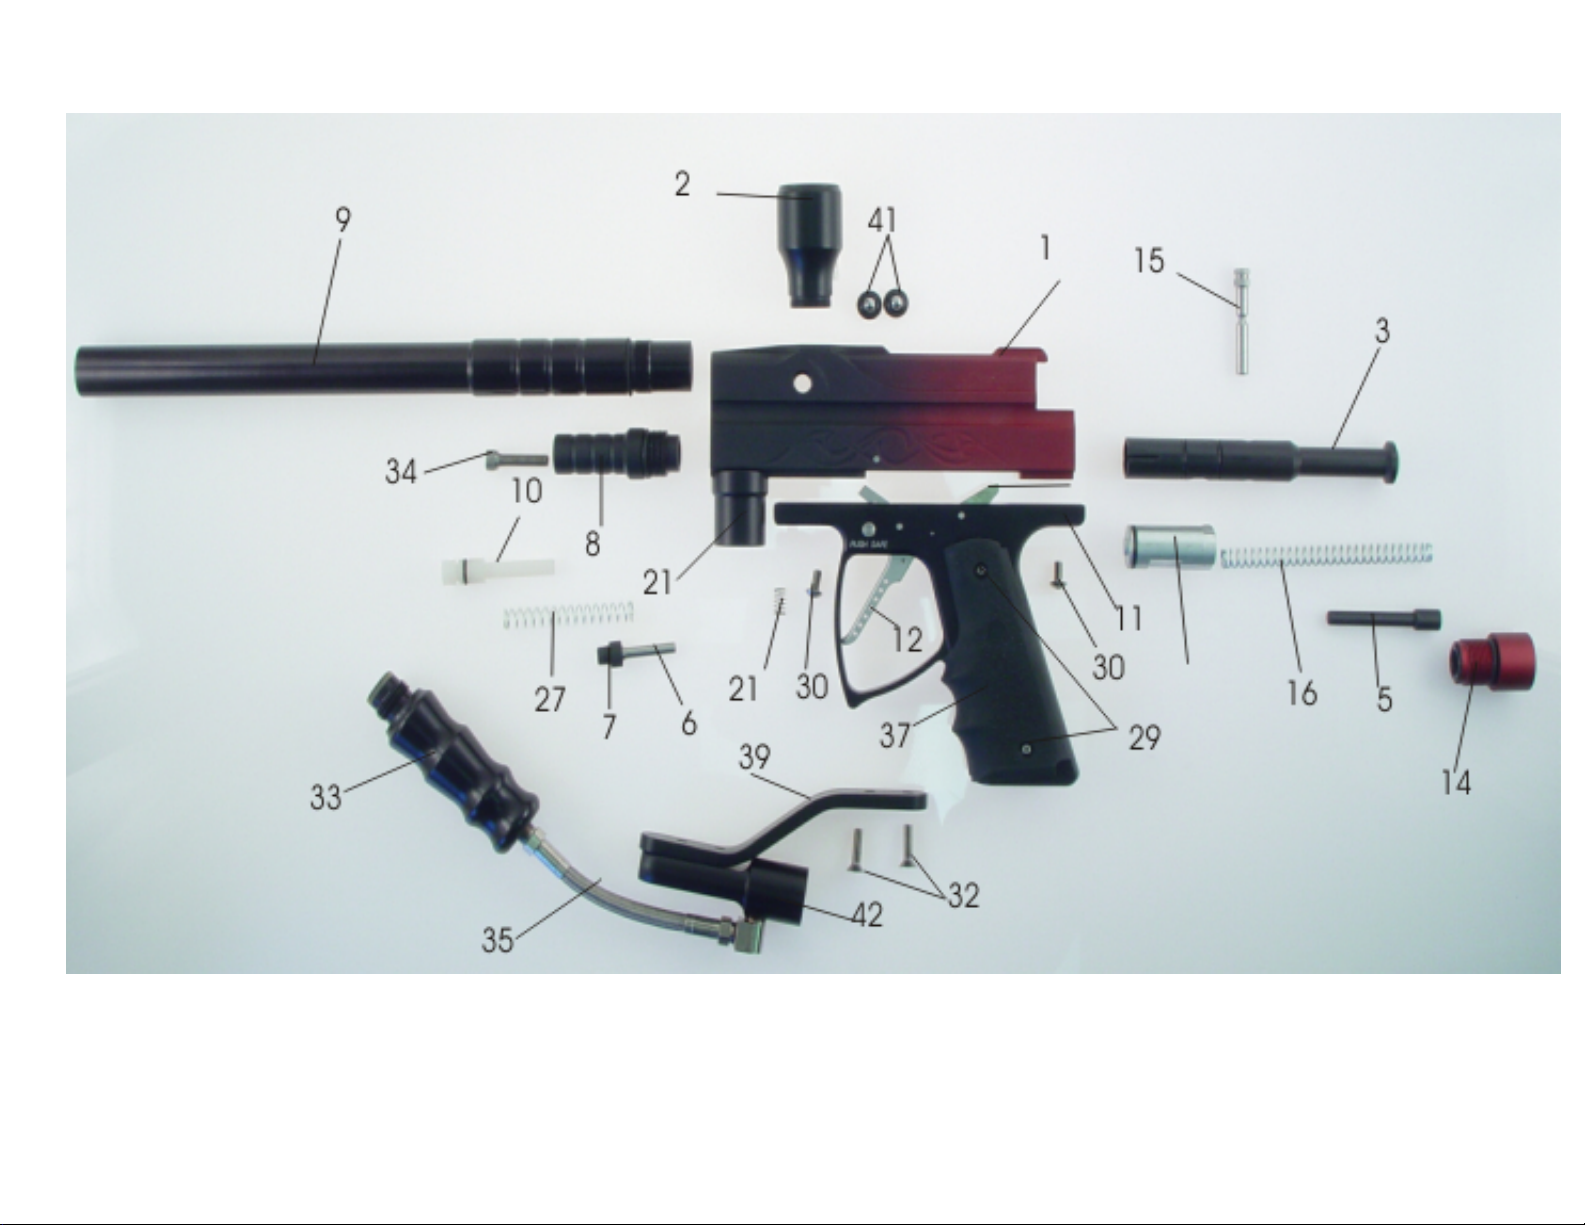
- 16 -
Page 17
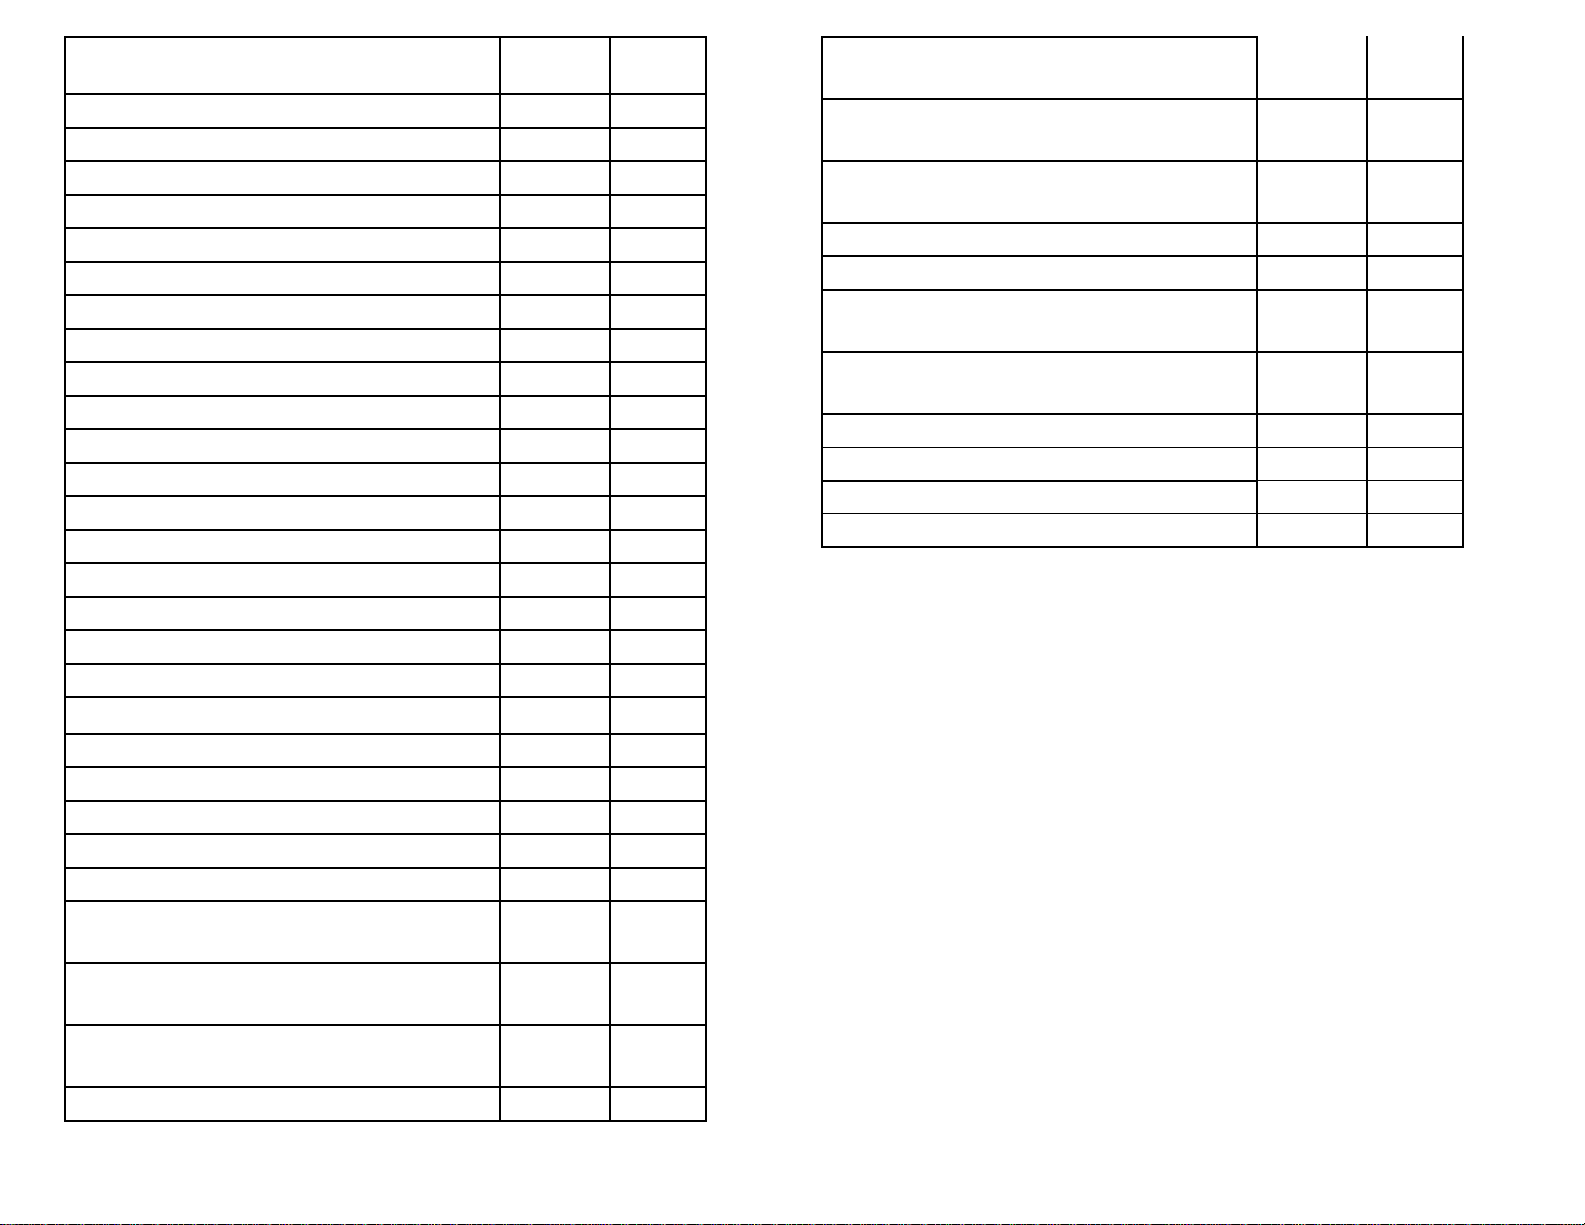
DWG
Name Part #
Upper Receiver 102001 1
Ball Retainer 102002 41
Feed Tube 102003 2
Upper Bolt 102004 3
Hammer 102005 4
Guide Pin 102007 5
Valve Pin 102009 6
Valve Seal 102010 7
Valve Chamber 102011 8
Barrel 102013 9
Velocity Pin 102014 10
ASA 102018 13
Lock Bolt 102021 14
Connecting Pin 102022 15
Drive Spring 102023 16
Safety Pin 102026 17
Vertical Tank Valve Plug 102027 18
Upper Bolt "o" Ring 102028 19
Trigger Spring 102029 20
Trigger/Sear Pin 102032 22
Sear 102033 23
Custom Barrel 102035 25
Velocity Spring 102037 26
Extended Trigger Spring 102038 27
Grip Plate Screws 102042 28
Lower Receiver Screw 102043 29
ASA Screw 102044 30
Ball Retainer Screws 102045 31
#
- 17 -
Bottom Line Adapter Screw 102049 32
Velocity Screw 102056 34
Air Hose 102057 35
Double Trigger Lower Receiver 102061 11
Trigger (Double) 102062 12
Hogue Grips 102063 37
Double Brass Safety Pin 102064
Double Trigger Spring 102065 21
Drop Forward Bent 102070 39
Gas Thru Front Grip 102080 40
Bottom Line 102085 41
Page 18

New Products and Updates
We are continually in the process of designing new products. A full line of accessories and upgrades to the
AM-4 is available. For information regarding new Products call your local dealer or Action Markers, Inc or visit us
online at www.actionmarkers.com. Many third party accessories may work with the AM-4. Action Markers does not
support any third party products and we will be unable to service them.
- 18 -
Page 19

Contact Information
If you need to contact us for any reason check out
our website at www.actionmarkers.com.
Action Markers, Inc.
3908 Fourier Dr.
Fort Wayne, Indiana 46818
Tel: (260) 426-4600
Fax: (260) 490-5300
Email: [email protected]
Website:
(cut out and return Warranty cards to the above address with your receipt.)
www.actionmarkers.com
WARRANTY REGISTRATION CARD
Purchased From__________________________________ Serial #_____________________________
Date__________________ City_____________________ State__________ Zip_____________________
Your Name (Please Print)__________________________________________________________________
Street Address __________________________________________________________________________
City___________________________________________ State___________ Zip_____________________
Phone #____________________________ Email Address_______________________________________
Why did you choose the AM-4?___________________________________________________________
How Often do you play paintball?___________________________________________________________
What other markers do you own?____________________________________________________________
Return Warranty Card
with Copy of Receipt
Visit us at
www.actionmarkers.com!!
- 19 -
 Loading...