

Acronova NB15-BR User Manual
User’s Manual
Client Unit, Nimbie Chorus
Expandable Automated Disc
Duplicating System
(Model: NB15/NB15-BR Series)
IMPORTANT SAFETY INSTRUCTIONS
For your safety, basic precautions should always be followed to reduce risk
or damage, electric shock, fire, and personal injury. This includes the
following:
Read this manual carefully and follow all warnings and instructions.
Do not expose this unit to direct sunlight, rain, moisture, water,
flammable materials, gas, dust, dirt, smoke, pollution or abrupt humidity
changes.
Place this device on a steady level surface in an air-conditioned
environment with sufficient ventilation. Do not move this device while
the power is on. Handle with care.
This device generates heat during the duplication process.
Out-of-specification or unstable power supply may cause overheating,
low productivity, increased failure rate, and damage to the device.
Only use the NimbieCable that comes with your unit to connect the
NB15 (Client unit) to the NBCH07 (Master unit).
Do not attempt to disassemble this device or touch any of the moving
parts. Refer to qualified service personnel. Unauthorized disassembly
or repair will void all warranty.
PREFACE
Congratulations on purchasing Nimbie NB15, a Client unit to connect with
Nimbie Chorus Master unit (NBCH07) for multiple-drive optical disc
duplication operation.
Nimbie NB15 is an integrated device with built-in optical disc recorder and
autoloaders. Depending on the model of your purchase, it may come with a
CD/DVD (NB15) or Blu-ray recorder (NB15-BR). Its e nclosure protects 30
discs from dust. With the lid open and the extension rods attached, it has
100-disc capacity. During operation session Nimbie NB15 can detect faulty
discs and reject them to the bottom of the unit.
Please read this manual carefully to understand the basic operations and
maintenance before using Nimbie NB15. For functional operation, refer to
the user's manual of Nimbie Chorus Master unit.
UNPACKING NIMBIE NB15
Before opening the package, carefully inspect for any damage. If there is
any sign of damage, contact the shipping company and your local deale r
immediately.
Save the packing materials in case you need to ship or return your product.
The original packaging will ensure the product is protected during
transportation. Returning goods without the original packaging may not
protect the product during transportation, and will void your warranty.
Package Contents
The items listed below should be included in the package:
One Nimbie NB15 (or NB15-BR) unit
One NimbieCable (connecting NB15 to a Nimbie Chorus Master unit)
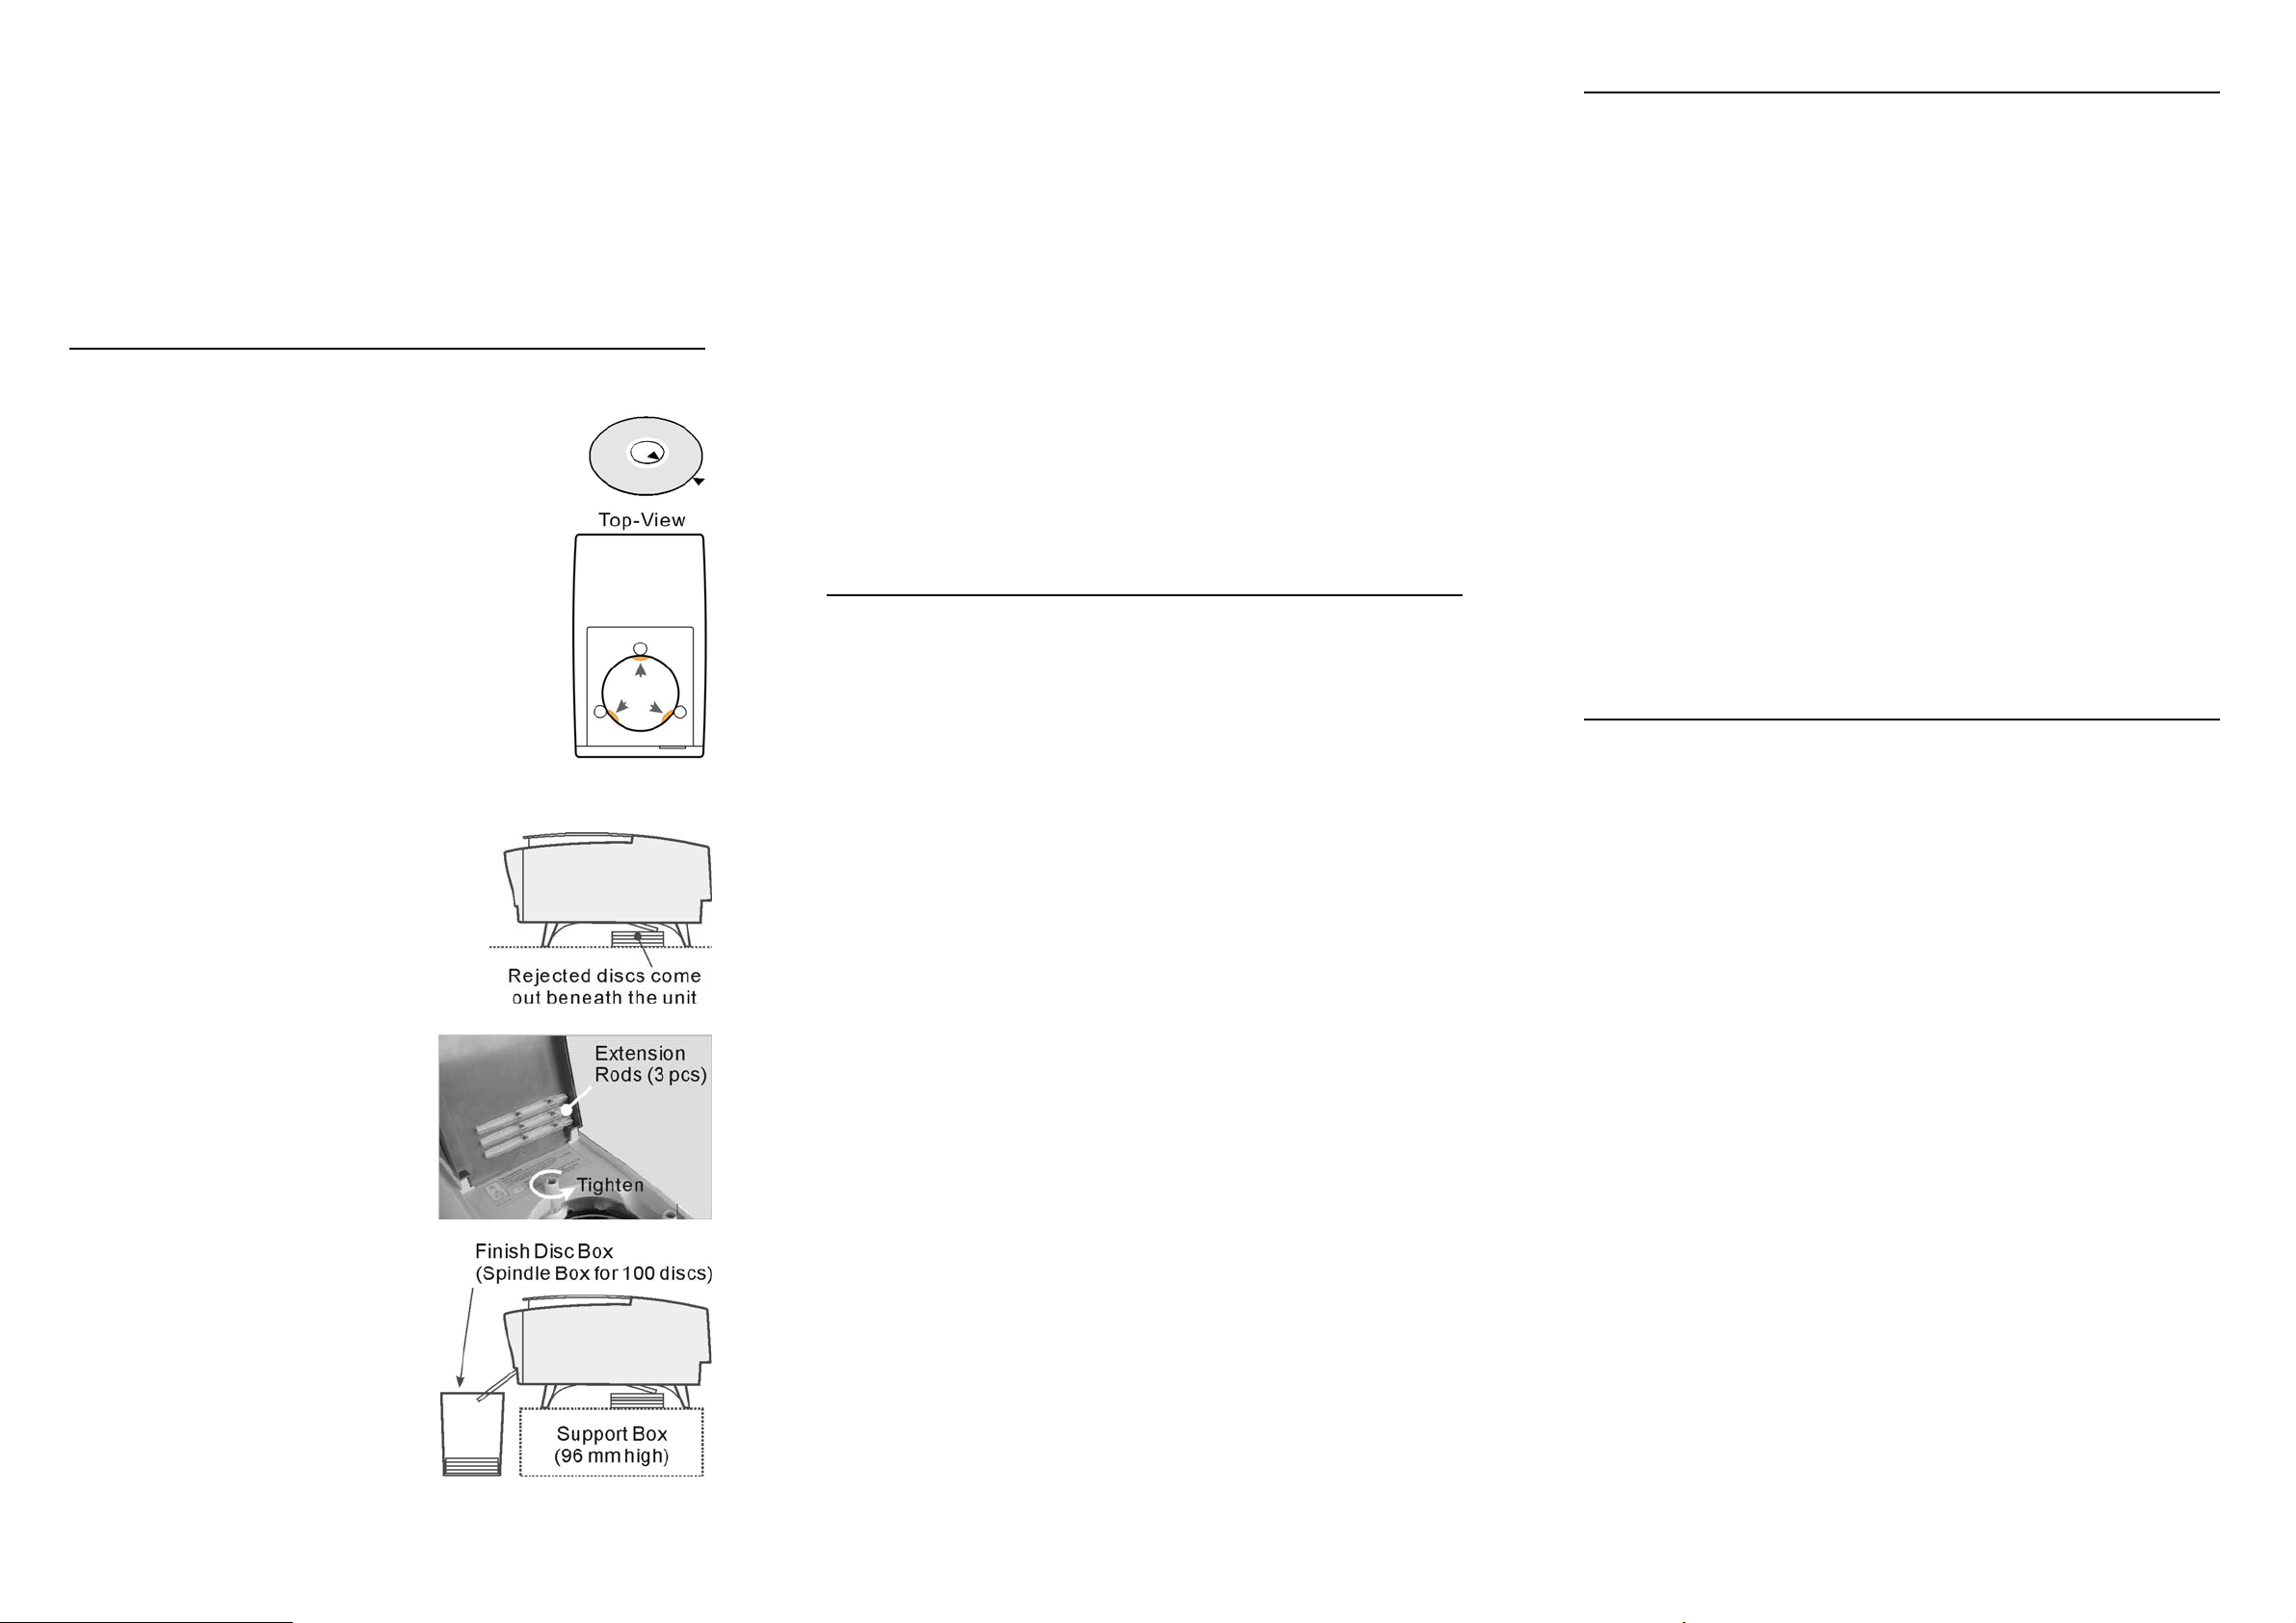
One spindle box (serves as the Finish Disc Bin)
Three extension rods (attached to the underside of Nimbie's lid)
One alignment pad (serves to locate the Finish Disc Bin)
Four detachable legs (serves to raise Nimbie unit for the room of discs)
This operation manual
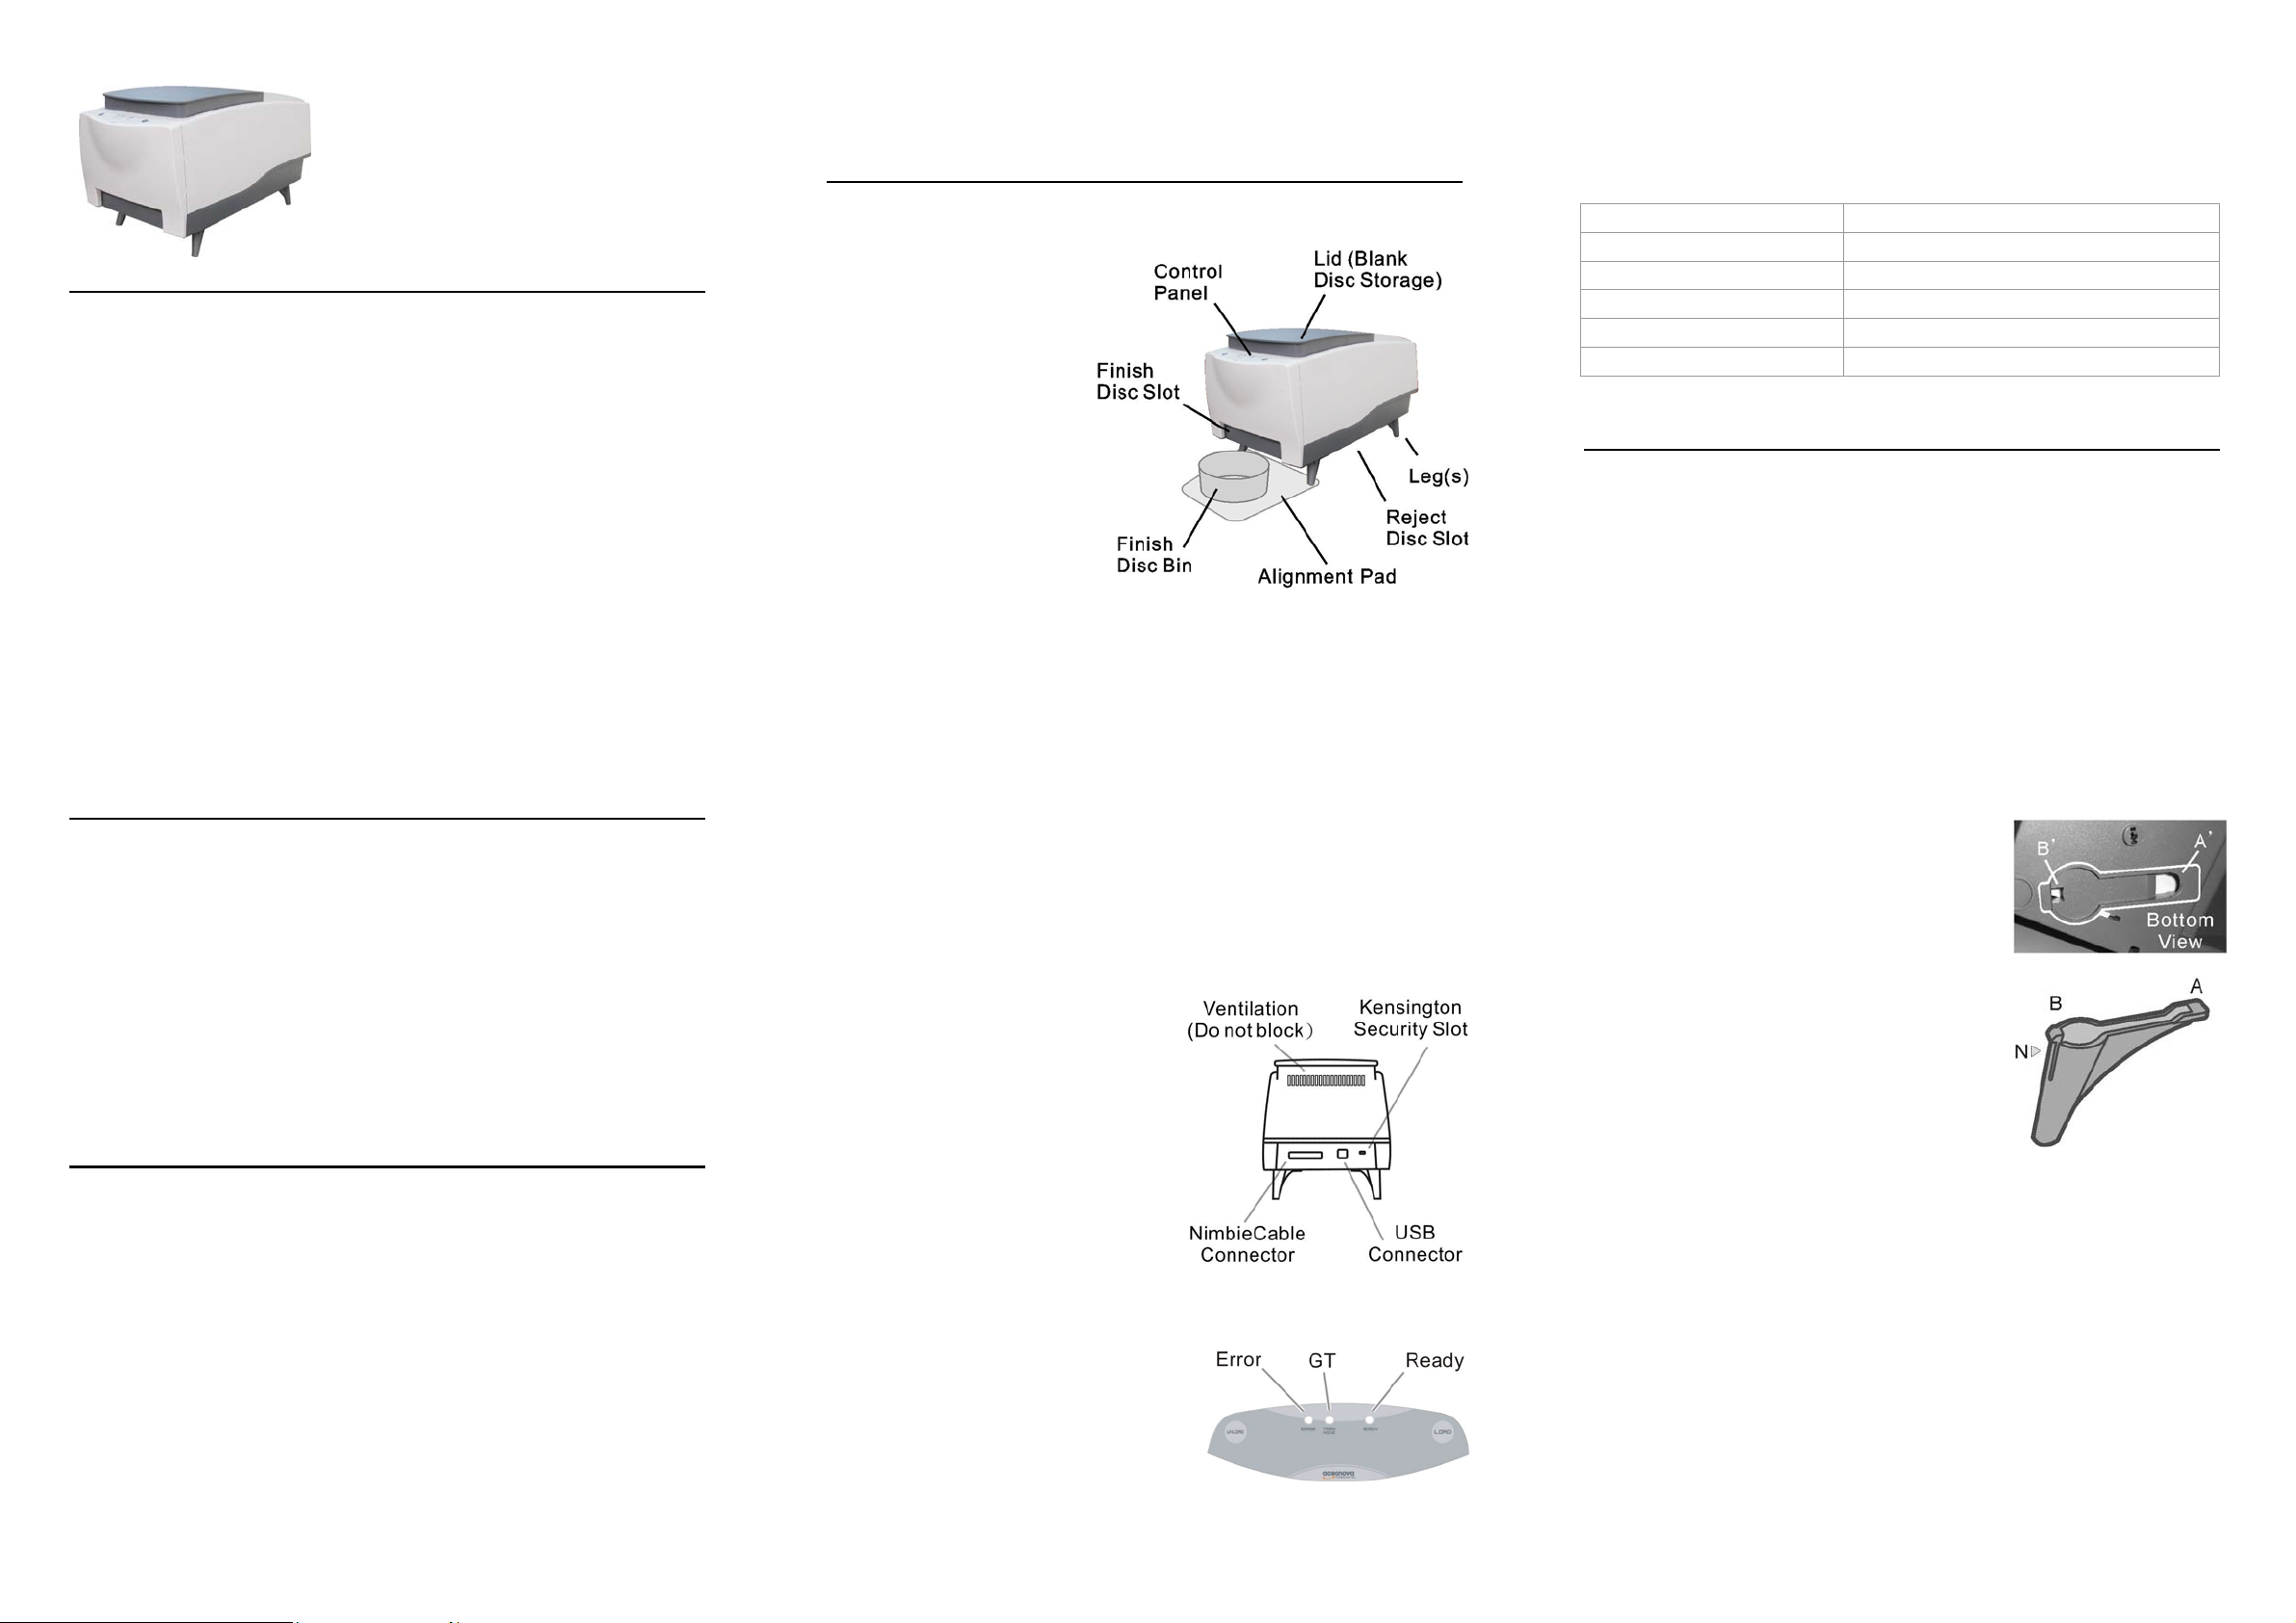
A LOOK OF NIMBIE NB15
The figure to the right shows Nimbie with a spindle box in front of it to collect
and stack finished discs.
Lid (Blank Disc Storage)
Open the lid to access
the blank disc storage
area.
Control Panel
Located on the top front
of Nimbie, the control
panel contains the LED
indicators and operation
buttons.
Detachable Legs
Use the four legs
included with your
Nimbie to provide space
underneath for rejected discs.
Reject Disc Slot
Rejected discs will slide out from the Reject Disc Slot to the bottom of
the unit. Always allow space beneath Nimbie to accommodate rejected
discs.
Finish Disc Slot
Finished discs will exit from this slot.
Finish Disc Bin
This bin serves as the storage container for receiving and stacking
completed discs. As illustrated, a spindle box serves as a Finish Disc
Bin.
Alignment Pad
Use the pad to appropriately position the Finish Disc Bin under the
Finish Disc Slot.
The Rear View
NimbieCable Connector
Plug one end of NimbieCable to this
connector and plug the other end to
the Master unit.
USB Connector
Reserved for firmware upgrade
purpose only.
Ventilation
Allow heat to release. Do not block
these holes otherwise the burning
quality may decrease or the unit
may overheat or damaged.
Kensington Security Slot
Security lock anti-theft syst em.
The Control Panel
There are operation buttons and LED
indicators on Nimbie NB15's control panel
as illustrated to the right. The Load/Unload
buttons are currently reserved for future
use.
LED Indicator Definitions
The LED indicator shows the Nimbie NB15's current statu s. Whe n turned
on, Nimbie will enter initialization indicated by a flashing green ready light.
When initialization is complete, the ready light will change to steady green.
The table below describes the meanings of the LED indicator.
Error GT Ready Description of the current status
: Lit : Off : Flash : Running
Power off
Device Initialization
Ready
No Disc in Loader
Error
NIMBIE NB15 INSTALLATION
Finding a Place for Nimbie
Nimbie should be placed on a fairly level surface, firm enough to support
the unit and discs. Always allow ample workspace for your operation, with
easy access to the blank and finished discs.
Do not expose the unit to direct sunlight or high humidity, as it may cause
the unit to malfunction.
Nimbie can be placed on a raised block to process 100 or more di scs in one
session. See the “More Than 30 Discs in One S ession” section.
Using the Detachable Legs
Nimbie is designed to work either with or without detachable legs. Without
the legs, the Reject Disc Slot (recession) on Nimbie’s base will hold up to 3
rejected discs.
If your application doesn’t involve rejected discs,
you may use Nimbie without the legs. It is,
however, recommended to use the legs when
possible.
The legs will raise Nimbie and provide a
sufficient room to accommodate additional
rejected discs, and to get easier access to
rejected discs as well.
Attaching legs to Nimbie is simple. Inserting one
leg after another on Nimbie’s base, match the
leg to Nimbie (A to A’) and gently snap the leg
into the receptacle (B to B’) until it is firmly
attached.
To remove the legs, gently press the notch (N)
and pull it outward from the receptacle (B’).
Nimbie Hardware Installation
Follow the steps below to complete Nimbie's hardware installation:
1) Place Nimbie on level surface so that it stands firmly on its legs.
2) Place the spindle box that comes with the unit in front of Nimbie. Use
the alignment pad to appropriately position the spindle box under the
Finish Disc Slot.
3) Use the NimbieCable that comes with the unit to connect Nimbie to
the Nimbie Chorus Master unit.
You have now successfully completed the installation of Nimbie device.
User’s Manual, Nimbie NB15, ver. 9A2, Part #: 711-NB15-9AC6-1
Sleep Mode of Nimbie NB15
Nimbie NB15 is designed to work under the control of Nimbie Chorus
Master unit. If the sleep mode is enabled from the Master unit, it will enter
sleep mode when the system is idle after a certain period of time. The
Master unit will wake up the Client unit when the user presses any button
on the Master unit.
You may hot-plug NB15 onto the Nimbie Chorus System; the Master unit
will detect the newly connected Client unit automatically. You may unplug
any NB15 from the Master Unit when it is working. Refer to the user manual
of Nimbie Chorus Master unit for detailed information.
APPENDIX
Tips for Handling Optical Discs
Never touch the printable or data surface of the disc, as it
may decrease quality and disc lifespan. Refer to the
arrows on the illustration to the right, always handle discs
from the outer edge or the center hole.
Important Tips for Loading Discs to Nimbie
When the disc loader is empty, do not attempt to load
many discs at once.
First, carefully load one disc into the disc loader and
assure it is firmly resting on the three wheels seen in the
illustration to the right. Then, gradually load additional
discs on top of the first one, until the loader is full.
Nimbie processes discs in a First In, First Out (FIFO)
sequence. During a duplication session, if a disc refill is
required, before the loader becomes empty, gently load additional discs.
Rejected Discs
Nimbie is designed to have Rejected Discs
come out underneath the unit. Do not block the
Reject Disc Slot.
Periodically remove rejected discs so that there
is room to accommodate more discs.
Important:
Nimbie will stop operation if rejected discs
jam the Reject Disc Slot.
More Than 30 Discs in One Session
Nimbie can process 100 or more discs
without refilling. To do this, follow the
instructions below:
1) Open the Blank Disc Storage Lid.
2) Remove the extension rods from
the lid's underside.
3) One after another insert the rods
into the three holes on the disc
loader, then, gently turn the rods
counterclockwise to make sure they
are firmly attached;
4) Use a suitable box to raise Nimbie
approximately 96 mm high to
account for the output of 100 or
more discs.
5) Use the alignment pad to
appropriately position the Finish Disc Bin below the Finish Disc Slot.
The Finish Disc Bin may be a spindle box or a container with enou gh depth
to accommodate 100 or more discs in a session.
Since Nimbie is equipped with a FIFO (First-In-First-Out) disc loader, you
may simply refill discs before the disc loader becomes empty. This will allow
an unlimited number of additional discs to be processed in one session, as
long as the Finish Disc Bin is continually emptied.
To remove the extension rods from the disc loader, turn the rods clockwise
and pull them upward vertically. When not using the rods, return them to
their original position on the lid's underside.
Nimbie Maintenance
Periodically cleaning the device will ensure proper performance. Follow the
steps below to maintain Nimbie:
Turn off the Nimbie Chorus System; the Nimbie Client unit will also be
powered off accordingly.
1) Remove all discs from the blank disc storage.
2) Clean the Nimbie unit using a lint-free cloth moistened with warm
water.
3) Dry the unit immediately with a dry lint-free cloth.
WARRANTY
Limited Warranty (North America): The information contained in this
document is subject to change without notice. Acronova T echnology Inc.
makes no warranty of any kind with respect to this information.
Acronova Technology Inc. guarantees this device for a period of one year
from the date of delivery, free from defects in material and workmanship.
In case of malfunction or fault, Acronova Technology Inc. will, at its option,
repair or replace the product.
You must return the defective product, protected in the original packaging,
with a valid RMA number, to an authorized dealer or reseller within the
warranty period accompanied with the proof of purchase.
This warranty only covers parts made by Acronova Technology Inc. For
parts made by other manufacturers, such as disc recorders, the original
manufacturer's warranty applies.
This warranty will not cover abuse, misuse, alteration, modification,
tampering, negligence, faulty installation, accidents, lack of rea sonable care,
unauthorized repairs or service, or if installed to any device not provided
with the product, or if the serial number label provided with this product has
been broken or removed.
This warranty does not cover damages that occur in shipment, due to acts
of God. All repairs and replacement services shall only be handled by
Acronova Technology Inc, and by authorized service centers. Parts used
for replacement are covered only for the remainder of the warranty period.
Acronova Technology Inc. disclaims all implied warranties on this product,
including without limitation warranties of merchantability, performance, and
fitness for a particular purpose.
In no event will Acronova Technology Inc. be liable for direct, indirect,
special, incidental, tort, economic, contingent or consequential damage s
resulting from any defect in this product or its documentation, including,
without, limitation, damages or costs relating to the loss of data, profits,
business or goodwill, even if Acronova Technology Inc., its authorized
dealers or resellers have advertised the possibilities of such damages. In
no case shall Acronova Technology Inc.'s liability exceed the amount paid
by the user of this product out of which such claim arose.
Any written or oral information or advice given by the dealer, reseller, agent,
sales representative, or employee of Acronova Technology Inc. will in no
way increase the scope of this warranty nor should you rely on such oral or
written communication.
FCC REGULATIONS
This equipment has been tested and founded to comply with the limits for a
Class A digit al device, pursuant to Part 15 of the FCC rules. These limits are
designed to provide reasonable protection against harmful interference in a
residential installation.
This equipment generates, uses, and can radiate radio frequency energy. If
this equipment is not installed and used according to the inst ruction s, it may
cause damaging to the radio communications. However, there is no
guarantee that interference will not occur in a particular installation. If this
equipment does cause harmful interference to radio or television reception,
which can be determined by turning the equipment off and on, the user is
encouraged to correct the interference by one or more of the following
measures:
Reorient or relocate the receiving antenna.
Increase separation between equipment and receiver.
Connect equipment to an outlet on a circuit different from that to which
the receiver is located.
Consult your dealer or an experienced radio/TV technician.
Any changes or modifications to this device that are not expressly approved
could void the user's authority to operate this equipment.
Use of a shielded interface cable is required to comply with the Class A
limits of Part 15 of FCC rules.
SPECIFICATIONS
Disc Recorder One CD/DVD recorder (NB15);
One Blu-ray/CD/DVD recorder (NB15-BR)
Input Capacity: 30 discs; 100 discs or more using extension rods
(increased capacity using non-stop refill)
Output Capacity: Dependent capacity (completed discs a re placed in front
of the unit, in a separate container, or Disc Storage Bi n)
Reject Disc: 3 discs without legs; 30 discs using legs
Write Speed: CD-R: 40X; CD-RW: 32X; DVD±R: 18X; DVD±R Dual:
10X; DVD-RW: 6X; DVD+RW: 8X;
(NB15-BR: Blu-ray: 4X or higher)
Control Panel: LED Status In dicators
Disc Size: 120 mm in diameter
Operation: Temperature: 42℉ to 86℉ (6℃ to 30℃)
Humidity: 5% to 85%, no condensation
Certification: CE and FCC
Dimensions: 7-3/4" x 8-1/2" x 15-3/8"; 19.5 x 21.3 x 39 cm
Weight: 2.7 kg; 6 lbs (varies upon configuration)
Power: Supplied from the Nimbie Chorus Master unit (NBCH07)
using the NimbieCable
*Specifications are subj ect to change without notice.
For technical support and assistance, firstly contact your local dealer. For additional
information regarding optical disc duplication, printing, and management please visit our
website at http://www.acronova.com. We value your comments and suggestions and thank you
for purchasing our products
©2009, Acronova Technology Inc. All rights reserved. Reproduction, adaptation, or translation
of this material without prior written permission is prohibited. Acronova, Nimbie, and
NimbieCable are the trademarks of Acronova Technology Inc. All other products, brands, and
trademarks are the property of their respective owners.
User’s Manual, Nimbie NB15, ver. 9A2, Part #: 711-NB15-9AC6-1
 Loading...