

Page 1
Operation Manual
Operation Manual
Nimbie USB Plus Disc Autoloader
Model #: NB21 Series (PC-Connected)
Serial Number: ______________________________
(The serial number is labeled on the bottom of the device.)
Page 2

Operation Manual, Nimbie USB Plus Version 1.2
PREFACE
Important Safety Instructions
For your safety, basic precautions should always be followed to
reduce risk of damage, electric shock, fire, and personal injury. This
includes the following:
Read this manual carefully and follow all warnings and
instructions.
Operate the unit with only the proper electrical specifications as
labeled on the device. Use only 3-wire extension cords that have
3-prong grounding plugs and 3-pole grounding receptacles that
accept your device's plug. Make sure the device is connected to
a known ground.
Do not expose this unit to direct sunlight, rain, moisture, water,
flammable material, gas, dust, dirt, smoke , p ol lution or abrupt
humidity changes.
Place this device on a steady level surface in an air-conditioned
environment with sufficient ventilation. Do not m ov e t his device
while the power is on. Handle with care.
This device generates heat during the duplication process. Out-
of-specification or unstable power supply may cause overheating,
low productivity, increased failure rate, and damage to the device.
Use a reliable power source with correct voltage and ample
current supply. Give this device a dedicated power outlet. Do not
share the outlet with other devices.
Please make it a habit to always unplug the power cord before
troubleshooting or performing maintenance. Always turn the
power switch to the Off position when connecting the power cord.
Do not attempt to disassemble this device or touch any of the
moving parts. Refer servicing to qualified service personnel.
Unauthorized disassembly or repair will void all warranty.
Acknowledgments
© 2012, Acronova Technology Inc. All rights reserved.
Notices: Reproduction, adaptation, or translation without prior written
permission is prohibited.
Trademarks: Acronova, Nimbie, Genii, Xymba, DupliQ, and Apus are
the trademarks of Acronova Technology Inc. All other products,
brands, and trademarks are the property of their respective owners.
2 © 2012, Acronova Technology, Inc.
Page 3

Version 1.2 Operation Manual, Nimbie USB Plus
FCC Compliance: This equipment has been te sted and found to
comply with the limits for a Class B digital device, pursuant to Part 15
of the FCC Rules. These limits are designed to provide reasonable
protection against harmful interference in a residential installation.
This equipment generates, uses, and can radiate radio frequency
energy and, if not installed and used in accordance with the
instructions, may cause harmful interference to radio communications.
However, there is no guarantee that interference will not occur in a
particular installation. If this equipment does cause harmful
interference to radio or television reception, which can be determined
by turning the equipment off and on, the user is encouraged to try to
correct the interference by one or more of the following measures:
Reorient or relocate the receiving antenna.
Increase the separation between the equipment and receiver.
Connect the equipment to an outlet on a circuit different from that
to which the receiver is connected.
Consult the dealer or an experienced radio/TV technician.
Use of shielded cables is required to comply with the Class B limits of
Part 15 of the FCC Rules. You are cautioned that any changes or
modifications not expressly approved in this manual could void your
authority to operate and/or obtain warranty service for this equipment.
Limited Warranty (North America): The information contained in this
document is subject to change without notice. Acronova Technology
Inc. makes no warranty of a ny kind with respect to this inf or mation.
Acronova Technology Inc. guarantees this device for a period of one
year from the date of delivery, free from defects in material and
workmanship. In case of malfunction or fault, Acronova Technology
Inc. will, at its option, repair or replace the product.
You must return the defective product, protected in the original
packaging, with a valid RMA number, to an authorized de aler or
reseller within the warranty period accompanied with the proof of
purchase.
This warranty only covers parts made by Acronova Technology Inc.
For parts made by other manufacturers, such as hard disks, and disc
recorders, the original manufacturer’s warranty applies.
This warranty will not cover abuse, misuse, alteration, modification,
tampering, negligence, faulty installation, accidents, lack of
reasonable care, unauthorized repairs or service, or if installed to any
© 2012, Acronova Technology, Inc. 3
Page 4

Operation Manual, Nimbie USB Plus Version 1.2
device not provided with the product, or if the serial number label
provided with this product has been broken or removed.
This warranty does not cover damages that occur in shi pment, due to
acts of God. All repairs and replacement services shall only be
handled by Acronova Technology Inc, and by authorized service
centers. Parts used for replacement are covered only for the
remainder of the warranty period.
Acronova Technology Inc. disclaims all implied warranties on this
product, including without limitation warranties of merchantability,
performance, and fitness for a particular purpose.
In no event will Acronova Technology Inc. be liable for direct, indirect,
special, incidental, tort, economic, contingent or consequential
damages resulting from any defect in this product or its
documentation, including, without, limitation, damages or costs
relating to the loss of data, profits, business or goodwill, even if
Acronova Technology Inc., its authorized dealers or resellers have
advertised the possibilities of such damages. In no case shall
Acronova Technology Inc.’s liability exceed the amount paid by the
user of this product out of which such claim arose.
Any written or oral information or advice given by the dealer, reseller,
agent, sales representative, or employee of Acro nova Technology Inc.
will in no way increase the scope of this warranty nor should you rely
on such oral or written communication.
Technical Support: For technical support and assistance, please
contact your local dealer.
For additional information regarding optical disc duplication, printing,
and management please visit our website. We value your comments
and suggestions and thank you for your purchase.
Acronova Technology, Inc.
http://www.acronova.com
4 © 2012, Acronova Technology, Inc.
Page 5

Version 1.2 Operation Manual, Nimbie USB Plus
Table of Contents
Preface................................................................................................2
Specifications....................................................................................6
Unpacking Your Package..................................................................7
Package Contents..........................................................................7
Getting Familiar with the device......................................................9
A Look at Nimbie USB Plus............................................................9
Rear View.....................................................................................10
LED Indicators .............................................................................10
Installation........................................................................................12
Finding a Place for Nimbie USB Plus..........................................12
Attaching the Legs.......................................................................12
Nimbie USB Plus Installation.......................................................13
Software Installation.....................................................................13
Before Getting Started....................................................................15
Handling Optical Discs.................................................................15
Loading Discs to Nimbie USB Plus..............................................15
Rejected Discs.............................................................................16
More Than 30 Discs in One Session...........................................16
Nimbie USB Plus Maintenance....................................................17
Choosing Reliable Blank Discs....................................................17
Disc Separation............................................................................18
Operation Quick Guide...................................................................19
Frequently Asked Questions..........................................................22
Appendix A: Tips.............................................................................23
Nimbie USB Plus Maintenance....................................................23
Choosing Reliable Blank Discs....................................................23
Disc Separation............................................................................23
Writing Speed...............................................................................24
SuperSpeed USB 3.0 ..................................................................24
Appendix B: Working with ImgBurn..............................................25
How to get Nimbie USB Plus working in ImgBurn.......................25
How to check Nimbie USB Plus in ImgBurn................................27
© 2012, Acronova Technology, Inc. 5
Page 6

Operation Manual, Nimbie USB Plus Version 1.2
SPECIFICATIONS
Disc Recorder One Blu-ray/CD/DVD recorder
Input Capacity: 30 discs; 100 discs using extension rods
(increased capacity using non-stop refill)
Output Capacity: Dependent capacity (finished discs are
placed in front of the unit, in a separate
container, or Disc Storage Bin)
Reject Disc Capacity: 5 discs without legs; 30 discs using legs
Write Speed: BD-R: 12X
DVD±R: 16X
CD-R: 40X
Interface: USB 3.0 SuperSpeed
(backward compatible with USB 2.0)
Disc Size: 120 mm in diameter
Operation Temperature: ℉℉℃℃42 to 86 (6 to 30 )
Humidity: 5% to 85%, no condensation
Certification: CE and FCC; power adapter is UL ap proved
Dimensions: 7-3/4" x 8-1/2" x 15-3/8"; 19.5 x 21.3 x 39 cm
Weight: 3 kg; 6.5 lbs (varies upon configuration)
Power: 100 to 240VAC; 50 or 60 Hz
*Specifications are subject to change without notice.
**To use Nimbie USB Plus at its MAXIMUM speed, a USB 3.0
compatible PC or Host Card is required.
6 © 2012, Acronova Technology, Inc.
Page 7

Version 1.2 Operation Manual, Nimbie USB Plus
UNPACKING YOUR PACKAGE
Congratulations on purchasing the Nimbie USB Plus Disc Autoloader.
Nimbie USB Plus is a state-of-the-art integrated system, with a built -in
single optical disc recorder, USB 3.0 interface and autoloader, which
requires a PC and software to operate.
Nimbie USB Plus has a 30 disc capacity and an enclosure that
protects discs from dust. Thanks to the first-in-first-out (FIFO)
mechanism, the capacity can be easily increased to 100 discs by
using storage extension rods. It can also detect faulty discs and
separate them from a duplication session.
SuperSpeed USB 3.0 enables Blu-ray faster read and write speeds up
to 12x. Nimbie USB Plus provides faster and more stable burning
performance. USB 3.0 is also backward compatible with USB 2.0.
In addition to burning discs, Nimbie USB Plus can also automatica lly
rip or read a stack of discs by running compatible software. Refer to
the operation manual that came with the installation disc for further
details.
Please read this manual carefully before usi ng Nimbie USB Plus.
This user guide contains all the information abou t its operation and
maintenance. For additional information regarding optical disc
duplication, printing, and management please visit our website.
We value your comments and suggestions and thank you for your
purchase.
Package Contents
Before opening the package, carefully inspect for any damage. If
there is any sign of damage, contact the shipping company and your
local dealer immediately.
Save the packing materials in case you need to ship or retu rn your
product. The original packaging will ensure the product is protected
during transportation. Returning goods without the original packagin g
may not protect the product dur in g transportation, and will void your
warranty.
Once you have removed all the parts contained in your package,
please check if any parts are missing or damaged. If any part is
missing or damaged, contact your local dealer immediately.
The items listed below should be included in the package:
© 2012, Acronova Technology, Inc. 7
Page 8

Operation Manual, Nimbie USB Plus Version 1.2
One Nimbie USB Plus Disc Autoloader
One Power Cord
One Power Adapter
One USB 3.0 Cord (backward compatible with USB 2.0)
One Spindle Box (serves as the Finish Disc Bin)
Three Extension Rods (attached to the underside of Nimbie USB
Plus' lid)
One Alignment Pad
Four Legs
One Installation Disc (includes device driver and software)
One Operation Manual
Two Software Manuals
*To use Nimbie USB Plus at its MAXIMUM speed, a USB 3.0
compatible PC or Host Card is required.
8 © 2012, Acronova Technology, Inc.
Page 9
Version 1.2 Operation Manual, Nimbie USB Plus
GETTING FAMILIAR WITH THE DEVICE
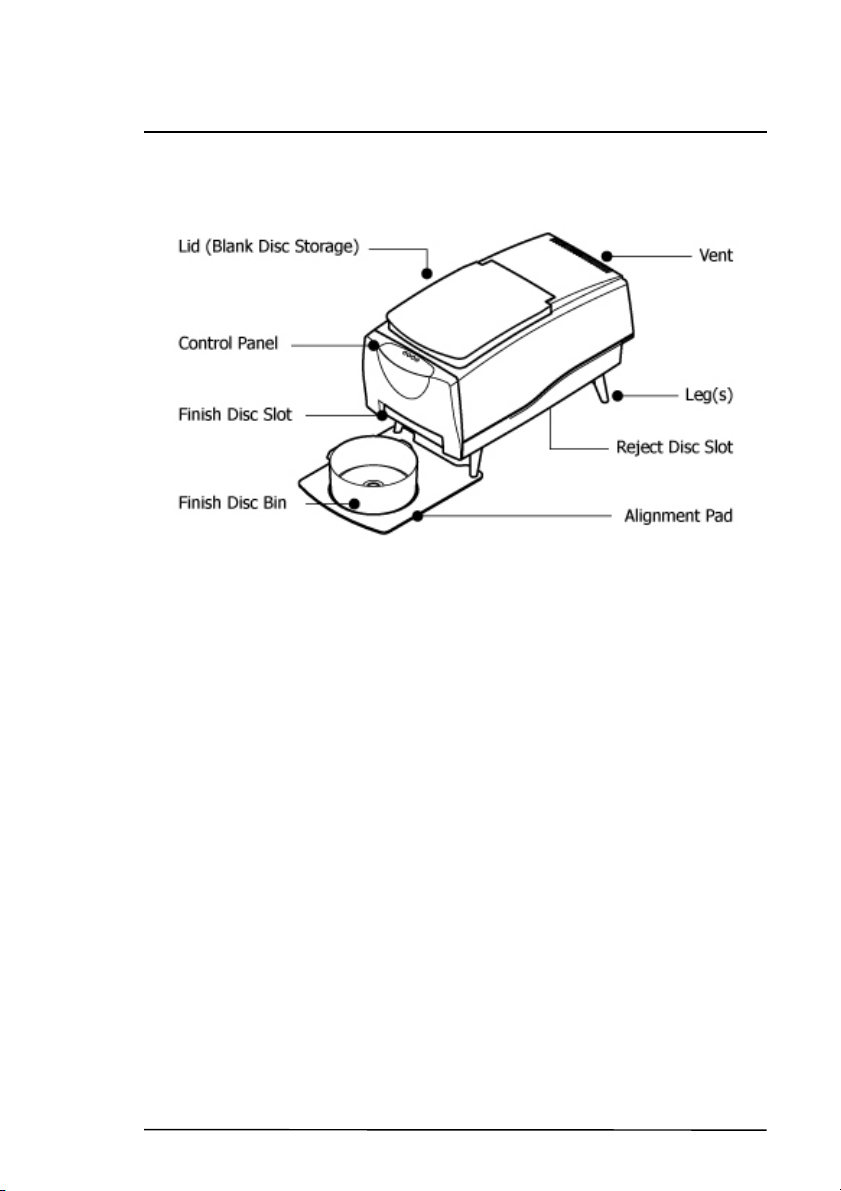
A Look a t Nimbie USB Plus
Lid (Blank Disc Storage)
Open the lid to access the blank disc storage area.
Control Panel
Located on the top front of Nimbie USB Plus, the control panel
contains the LED indicators.
Legs
Use the four legs included with your Nimbie USB Plus to provide
space underneath for rejected discs.
Reject Disc Slot
The rejected discs will slide out from the Reject Disc Slot at the
bottom of the unit. Always allow space beneath Nimbie USB Plus
to accommodate rejected discs.
Finish Disc Slot
Finished discs will exit from this slot.
Finish Disc Bin
This bin serves as the storage container for receiving and
stacking completed discs. As illustrated, a spindle box serves as
a good Finish Disc Bin.
Alignment Pad
Use the pad to appropriately position the Finish Disc Bin under
the Finish Disc Slot.
© 2012, Acronova Technology, Inc. 9
Page 10
Operation Manual, Nimbie USB Plus Version 1.2
Vent
This allows heat to escape. Do not block this otherwise the unit
may overheat.
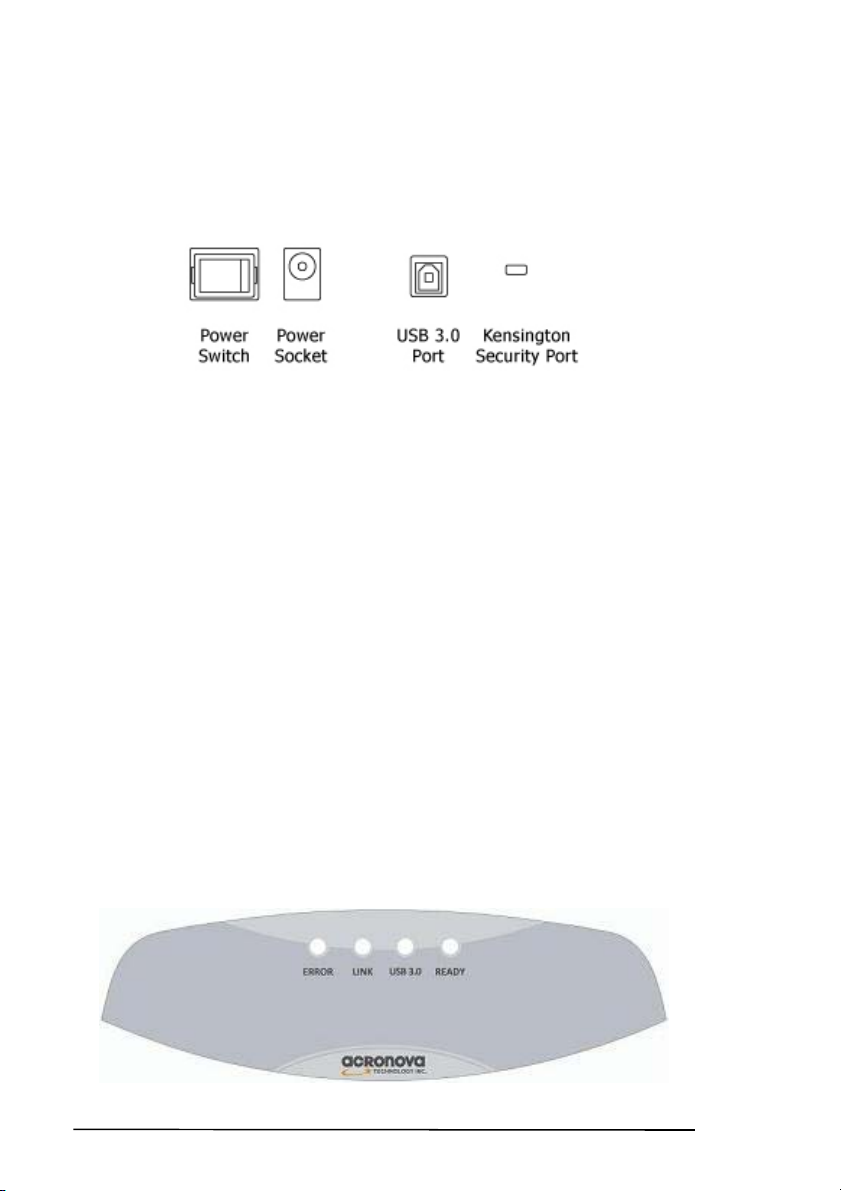
Rear View
Power Switch
Turn Nimbie USB Plus on and off.
Power Socket
Use the provided power cord to connect Nimbie USB Plus to a
wall outlet.
USB 3.0 Port
Connects Nimbie USB Plus to the host PC (required for USB 3.0
speeds or backward compatible with USB 2.0 at USB 2.0 transfer
speeds).
Kensington Security Slot
Security lock anti-theft system.
*To use Nimbie USB Plus at its MAXIMUM speed, a USB 3.0
compatible PC or Host Card is required.
LED Indicators
Nimbie USB Plus’ operation status is reflected by the LED indicators.
When turned on, it will enter initialization indicated by a flashing green
ready light. When initialization is complete, the ready light will change
to steady green. The table below describes the meanings of the LED
indicators.
10 © 2012, Acronova Technology, Inc.
Page 11

Version 1.2 Operation Manual, Nimbie USB Plus
ELURDescription
zz
z{{{
z{{
z{z{
z{z
zzz{
zzz
zzz
{{z
{zz
Initialization in progress...
USB 3.0/SuperSpeed connection established (discs in loader)
USB 3.0/SuperSpeed connection established (disc-loader empty)
USB 2.0/Hi-speed connection established (discs in loader)
USB 2.0/Hi-speed connection established (disc-loader empty)
USB connection NOT detected (discs in loader)
USB connection NOT detected (disc-loader empty)
Hardware error (no USB connection)
Hardware error (USB 3.0/SuperSpeed connection)
Hardware error (USB 2.0/Hi-speed connection)
{: Lit z: Off : Flash
© 2012, Acronova Technology, Inc. 11
Page 12
Operation Manual, Nimbie USB Plus Version 1.2
INSTALLATION
Finding a Place for Nimbie USB Plus
Nimbie USB Plus should be placed on a fairly level surface, firm
enough to support the unit and discs. Always allow ample wo rkspace
for your operation, with easy access to the blank and finished discs.
Do not expose the unit to direct sunlight or high humidity, as it may
cause the unit to malfunction.
If you desire, Nimbie USB Plus can be placed on a raised block so
there is ample room to receive discs from the Finish Disc Slot. Please
refer to the “More Than 30 Discs in One Session” section for details.
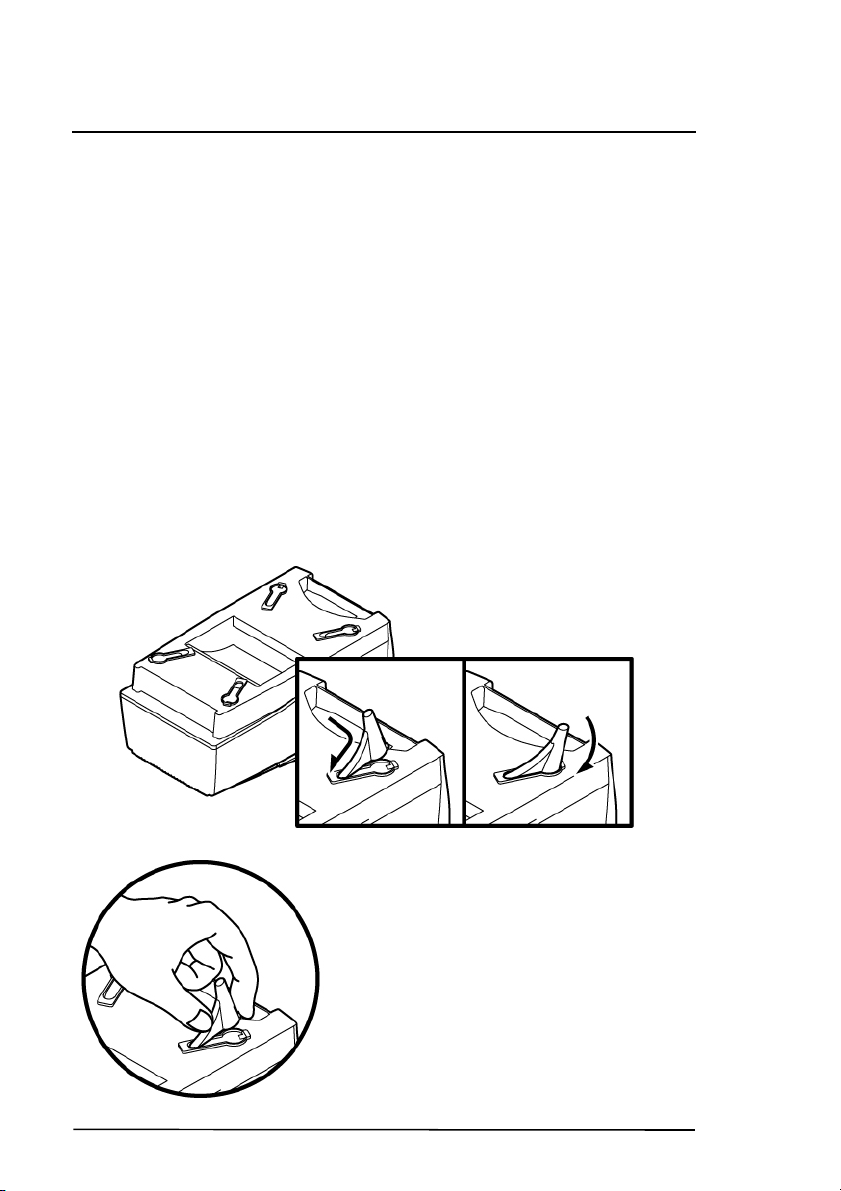
Attaching the Legs
Inserting one leg after another on Nimbie’s base, match the leg to
Nimbie and gently snap the leg into the receptacle until it is firmly
attached.
To remove the legs, gently press the
notch and pull it outward from the
receptacle.
12 © 2012, Acronova Technology, Inc.
Page 13

Version 1.2 Operation Manual, Nimbie USB Plus
Nimbie USB Plus Installation
Follow the steps below to complete Nimbie USB Plus’s hardware
installation:
1) Place Nimbie USB Plus on level surface so that it stands firmly on
its legs.
2) Place the spindle box that came with the unit in front of Nimbie
USB Plus. Use the alignment pad to appropriately position the
spindle box under the Finish Disc Slot.
3) Use the power cord that came with the unit to connect Nimbie
USB Plus to a wall outlet with a reliable power supply.
You have now su ccessfully completed the installation of Nimbie USB
Plus.
Software Installation
Nimbie USB Plus requires a device driver to be installed before it can
work properly with the application software. Before starting the
application software installation, the device driver must be installed.
System Requirements
Microsoft Windows XP / Vista / 7 or
Apple OS X 10.6 / 10.7 (for QQGetTray only)
1GB RAM or higher
Optical disc drive (to install the device driver and software from
the installation disc)
SuperSpeed USB 3.0 port (backward compatible with USB 2.0)
Device Driver Installation
Follow the steps below to complete device driver installation:
1) Connect the power cord to Nimbie USB Plus an d a wall outlet.
2) Turn on the host computer, which is connected to Nimbie USB
Plus via USB cable.
3) Insert the provided installation disc into your optical drive on PC.
4) The Windows will launch the installation application automatically.
Note:
For Windows Vista user, click Run SETUP.EXE on AutoPlay
window to start installation. When the User Account Control
screen pops up, click Continue.
5) Click “Install Driver” and follow the instruction to install.
© 2012, Acronova Technology, Inc. 13
Page 14

Operation Manual, Nimbie USB Plus Version 1.2
6) Wait patiently until the initialization is complete.
You may now proceed to install the application so ftware.
Note:
Mac system will install the driver automatically after install
the QQGetTray software .
Application Software Installation
Nimbie USB Plus application software is included in the installation
disc. Follow the steps below to complete the installation:
1) Insert the installation disc into an available optical drive on PC.
2) After the Ma in Menu is launc hed, click Install and follow the o nscreen instructions to get application software installed.
Note:
For Windows Vista user, click Run SETUP.EXE on
AutoPlay window to start installation. W hen the User
Account Control screen pops up, click Continue.
3) After the application software has been properly installed,
software shortcuts shall appear on desktop.
4) Remove the installation disc and keep it safe for future use.
14 © 2012, Acronova Technology, Inc.
Page 15
Version 1.2 Operation Manual, Nimbie USB Plus
BEFORE GETTING STARTED
Handling Optical Discs
Never touch the printable or data surface o f the discs, as it may
decrease disc quality and lifespan. Always handle discs from the outer
edge or the center hole.
Loading Discs to Nimbie USB Plus
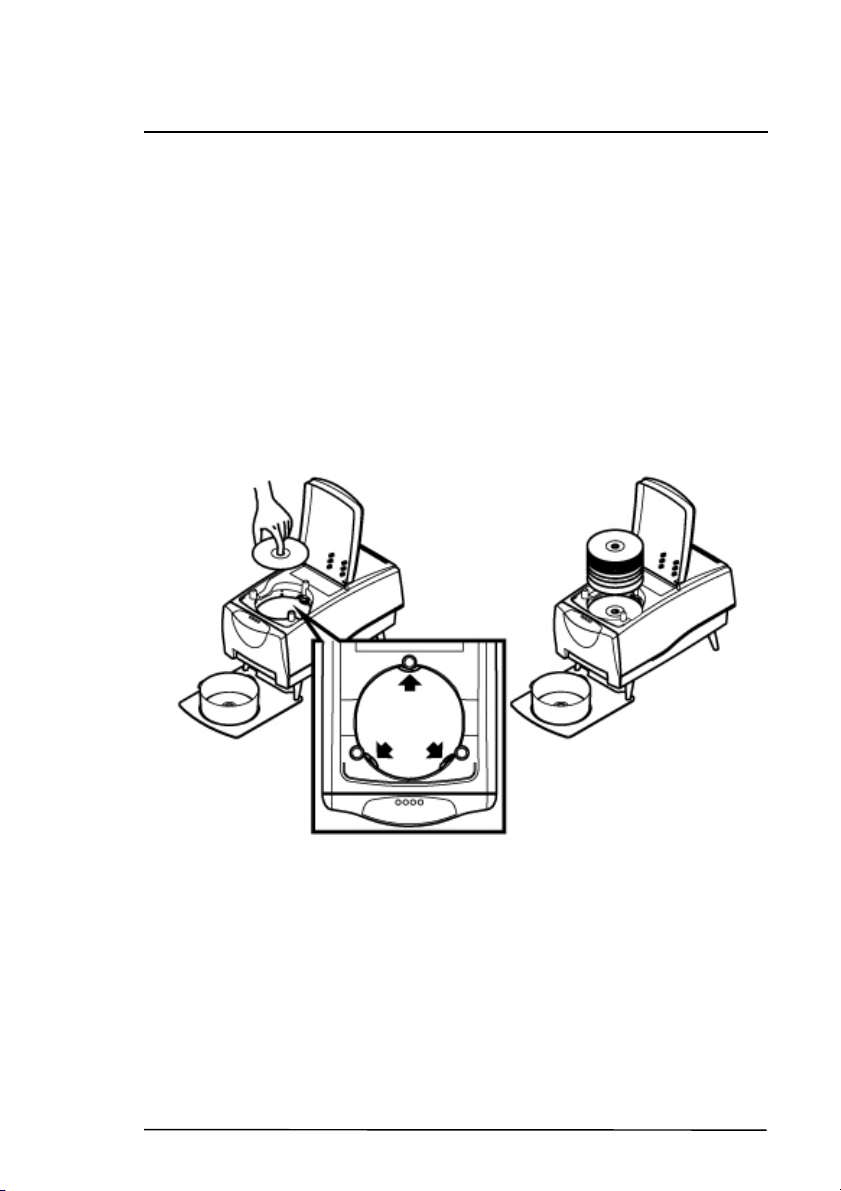
Load one disc into the disc loader first and assure it is firmly resting on
the three wheels in the illustration to the right. Then, gradually add
and stack additional discs on top of the first disc until the loader is full.
Nimbie USB Plus processes discs in a First In, First Out (FIFO)
sequence. During a job, you can gently add more disc , before the
loader becomes empty.
© 2012, Acronova Technology, Inc. 15
Page 16
Operation Manual, Nimbie USB Plus Version 1.2
Rejected Discs
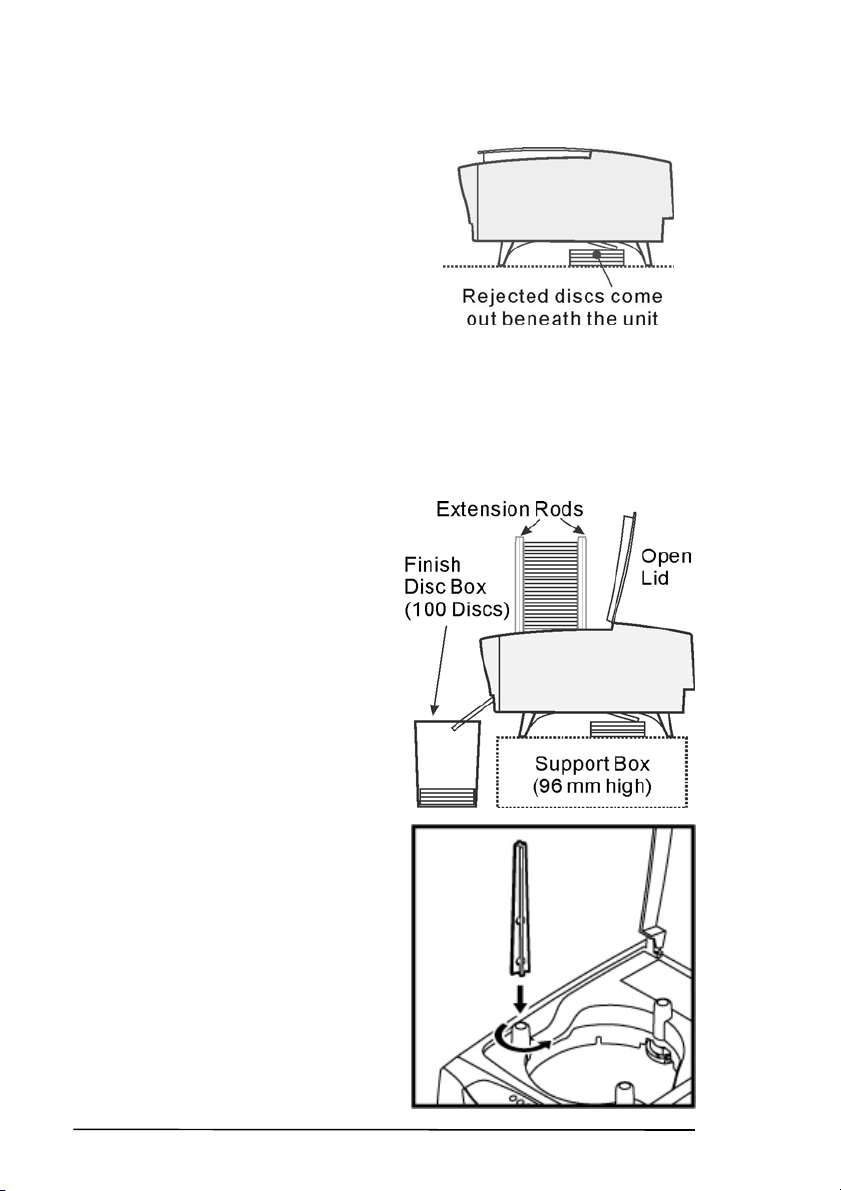
Nimbie USB Plus is designed to have
Rejected Discs come out underneath
the unit. Do not block the Reject Disc
Slot.
Periodically remove rejected disc s so
that there is room to accommodate
more discs or raise Nimbie USB Plus
using the provided legs to increase
space underneath for more discs.
Important:
Nimbie USB Plus will stop operation if rejected discs
cannot go through the Reject Disc Slot.
More Than 30 Discs in One Session
Using the extension rods, Nimbie
USB Plus can process 100 discs
without refilling. To increase
capacity to 100 discs, please
follow the instru ctions below:
1) Open the Blank Disc Storage
Lid.
2) Remove the extension rods
from the lid’s underside.
3) One after another align the
rods into the three holes on
the disc loader, then, gently
turn the rods
counterclockwise to make
sure that they are firmly
attached.
4) Use a suitable box to raise
Nimbie USB Plus
approximately 96 mm high to
accommodate for the output of
100 discs.
5) Use the alignment pad to
appropriately position the
Finish Disc Bin below the
Finish Disc Slot. The Finish
16 © 2012, Acronova Technology, Inc.
Page 17

Version 1.2 Operation Manual, Nimbie USB Plus
Disc Bin may be a spindle box or a container with enough depth
to accommodate 100 discs in a session.
Since Nimbie USB Plus is equipped with a FIFO (First-In-First-Out)
disc loader, you may simply refill discs before the disc loader becomes
empty. This will allow an unlimited number of additional discs to be
processed in one session, as long as the Finish Disc Bin is continually
emptied.
To remove the extension rods from the disc loader, turn the rods
clockwise and pull them upward vertically. When not using the rods,
return them to their original position on the lid’s underside.
Nimbie USB Plus Maintenance
Periodically cleaning the device will ensure proper performance.
Follow the steps below to maintain Nimbie USB Plus:
1) Turn the power switch to the Off position.
2) Remove the master and blank discs.
3) Unplug the power cord from the wall outlet.
4) Clean Nimbie USB Plus using a lint-free cloth moistened with
warm water.
5) Dry the unit immediately with a dry lint-free cloth.
Choosing Reliable Blank Discs
The quality of a recordable disc depends on its chemical and coating
technology. There are a variety of discs with various degrees of disc
quality available on the market. If you encounter a high failure rate,
please try a different type, speed, or brand of disc.
There are many different brands, speeds and CD/DVD recordable
media formats on the market. We do our best to test certain media
types. It is impossible for us to guarantee that all discs will be
compatible.
Please choose a blank disc that is most suitable for your application.
You may contact your local dealer for advice on the best suitable
blank disc for your system. In addition, we suggest users to test blan k
discs by using disc simulation before actually writing to discs.
Important:
As with blank discs, the quality an d the da ta format of the master
disc play a critical role in the duplication process.
© 2012, Acronova Technology, Inc. 17
Page 18

Operation Manual, Nimbie USB Plus Version 1.2
Disc Separation
Certain blank discs may tend to stick to each other or may be difficult
to separate. Avoid us ing these types of discs. Nimbie USB Plus is
equipped with a patent pending disc separator, which handles discs
that adhere to each other better than traditional autoloaders.
However, it is strongly recommended that you separate or loosen
blank discs from each other before use.
18 © 2012, Acronova Technology, Inc.
Page 19

Version 1.2 Operation Manual, Nimbie USB Plus
OPERATION QUICK GUIDE
Follow the steps below to get your Nimbie USB Plus ready.
Turning Nimbie USB Plus On
1) Connect the power cord to Nimbie USB Plus and a wall outlet.
2) Turn on the host computer, which is connected to Nimbie USB
Plus via USB 3.0 port.
3) Connect USB 3.0 cable to both Nimbie USB Plus and your PC.
4) Turn Nimbie USB Plus’s power switch to the On position.
5) Wait for the robotic initialization process to complete, then the
“ready” indi cator will light up.
6) Launch application software.
Refer to application software user's guide for operation
directions
For details on software operation, please check out application
software user's guide.
Turning Nimbie USB Plus Off
Unplug the USB cable which connects your host PC and Nimbie USB
Plus. Then, turn the power switch to the Off position. In case there is
a session underway, abort or wait until it has completed.
We recommend that you unplug the cord for safety when Nimbie USB
Plus is not used for extended periods of time.
© 2012, Acronova Technology, Inc. 19
Page 20

Operation Manual, Nimbie USB Plus Version 1.2
Start QQGetTray for Mac
QQGetTray is a software utility enables autoloader to automatically
load and unload discs with other 3rd party software applications.
Many software applications are capable of processing disc burning or
ripping jobs automatically after a disc is loaded to a CD/DVD drive and
will eject the drive tray when the job is finished. With QQGetTray
monitoring the drive tray, the autoloader can automatically unload the
disc when the tray is ejected, then close the tray automatically after
the next disc is loaded.
Set up third party software for auto-loading process
Make sure the software has been set to:
1. Auto-process when a disc is loaded into the CD/DVD drive.
2. Eject the disc after the job is done.
3. Select Nimbie USB Plus as the external drive.
Examples:
• iTunes
Set iTunes to “Import and Eject” under Edit > Pre ferences.
• Windows Media Player
Set “Rip CD Automatically When Inserted” to “Always”, and
check “Eject CD After Ripping” under “Rip Options”.
More tutorials are available on Broadex Systems' website:
http://www.broadexsystems.com/
Launch QQGetTray under OS X
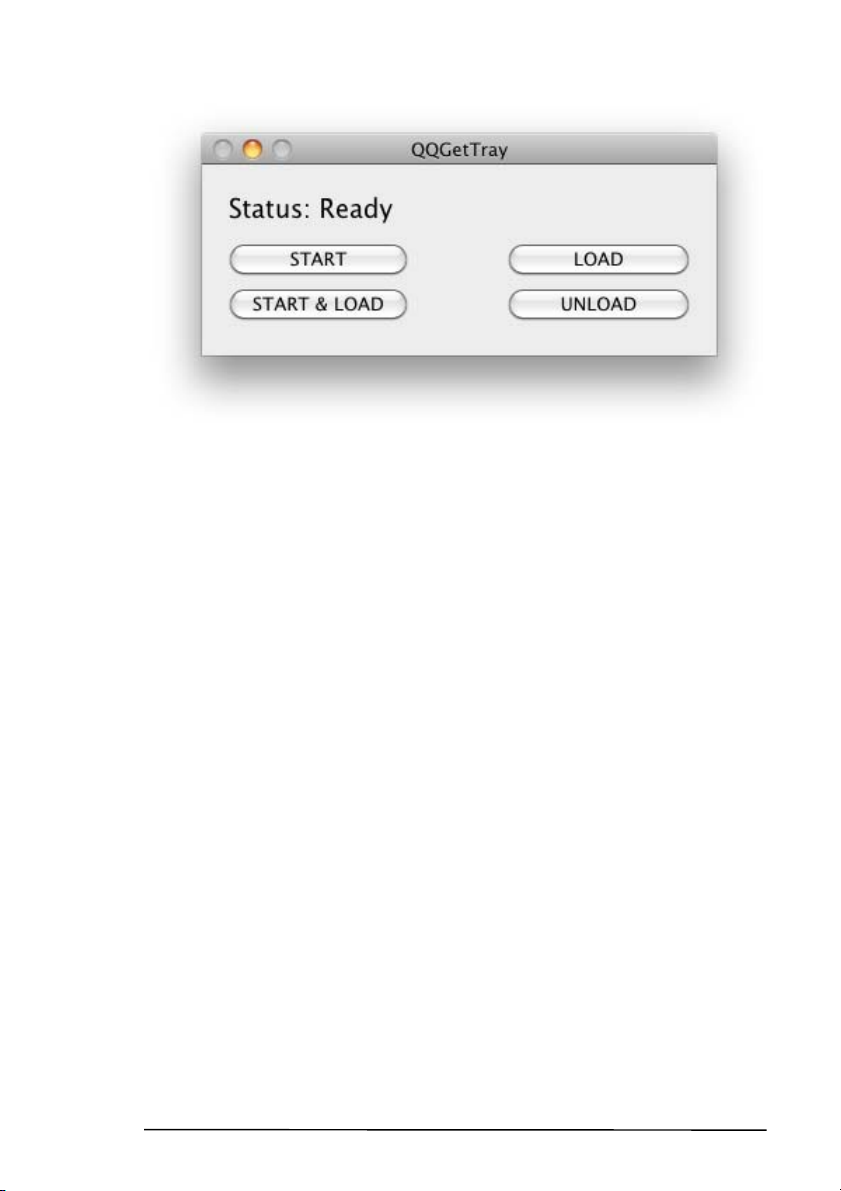
To Launch QQGetTray, click the icon in the application folder to bring
up the following screen:
20 © 2012, Acronova Technology, Inc.
Page 21
Version 1.2 Operation Manual, Nimbie USB Plus
There are 4 buttons in the main menu:
• START
Click this button to start QQGetTray, Nimbie USB Plus will
begin to monitor the disc tray and change discs automatically.
The “START” button will change to “STOP” after activation.
• START and LOAD
Click this button to start QQGetTray, Nimbie USB Plus will
load a disc into it's CD/DVD drive, then begin monitoring the
disc tray and change discs automatically. The “START and
LOAD” button will change to “STOP and UNLOAD” button
after activation.
• LOAD
Click this button to load a disc into the autoloader. This
function will be disabled if either the “START” or “START and
LOAD” is activated.
• UNLOAD
Click this button to unload a disc from the autoloader. This
function will be disabled if either the “START” or “START and
LOAD” is activated.
After “START” or “START LOAD” is activated, you can minimize the
QQGetTray window.
© 2012, Acronova Technology, Inc. 21
Page 22

Operation Manual, Nimbie USB Plus Version 1.2
FREQUENTLY ASKED QUESTIONS
What should I do when software can not detect the autoloader?
Make sure the disc autoloader is connected to PC via USB 3.0 or
USB 2.0 and the power is on.
Make sure the autoloader's LED display is on “Ready” status.
Make sure the disc autoloader's driver is installed properly. Refer
to the “Software Installation” section on how to install the driver.
Try another USB slot on PC and check the connection .
What should I do when the disc burning takes too long?
Double check the cable connection and make sure your PC
supports USB 3.0 or USB 2.0. To use Nimbie USB Plus at its
MAXIMUM speed, a USB 3.0 compatible PC or Host Card is
required.
What should I do when discs get stuck in the disc loader?
Check to see if the disc is the standard size (120mm).
Make sure discs are level in the loader.
What should I do when the autoloder dropping two or more discs
at the same time?
Check to see if the disc is the standard size (120mm).
Make sure the discs are level when inserted.
Separate or loosen the discs from each other before use.
Use the same brand of discs. Do not mix disc types or brands.
What should I do when Nimbie USB Plus is showing an error on
the LED display?
Please remove all the discs in the loader. Be sure to check for
any discs that may be stuck inside the unit.
You can also turn the power switch to the Off position and back to
the On position after waiting for 30 seconds. If this does not solve
the problem, please contact your dealer or authorized service
center.
For more information, visit Acronova Knowledge Base on the website:
http://www.acronova.com/kb/
22 © 2012, Acronova Technology, Inc.
Page 23

Version 1.2 Operation Manual, Nimbie USB Plus
APPENDIX A: TIPS
Nimbie USB Plus Maintenance
Periodically cleaning the device will ensure proper performance.
Follow the steps below to maintain Nimbie USB Plus:
1) Turn the power switch to the Off position.
2) Remove the master and blank discs.
3) Unplug the power cord from the wall outlet.
4) Clean Nimbie USB Plus using a lint-free cloth moistened with
warm water.
5) Dry the unit immediately with a dry lint-free cloth.
Choosing Reliable Blank Discs
The quality of a recordable disc depends on its chemical and coating
technology. There are a variety of discs with various degrees of disc
quality available on the market. If you encounter a high failure rate,
please try a different type, speed, or brand of disc.
There are many different brands, speeds and BD/CD/DVD recordable
media formats on the market. We do our best to test certain media
types. It is impossible for us to guarantee that all discs will be
compatible.
Please choose a blank disc that is most suitable for your application.
You may contact your local dealer for advice on the best suitable
blank disc for your system. In addition, we suggest users to test blan k
discs by using disc simulation before actually writing to discs.
Important:
As with blank discs, the quality an d the da ta format of the master
disc play a critical role in the duplication process.
Disc Separation
Certain blank discs may tend to stick to each other or may be difficult
to separate. Avoid us ing these types of discs. Nimbie USB Plus is
equipped with a patent pending disc separator, which handles discs
that adhere to each other better than traditional autoloaders.
However, it is strongly recommended that you separate or loosen
blank discs from each other before use.
© 2012, Acronova Technology, Inc. 23
Page 24

Operation Manual, Nimbie USB Plus Version 1.2
Writing Speed
The recorder will automatically adjust the writing speed according to
the disc quality. The system will monitor and automatically adjust the
writing speed as the optical laser moves from the inner ring to the
outer ring, up to the selected speed. The recorder ’s maximum spee d
may never be reached if a lower grade disc is used.
At the maximum speed, for a single recorder, duplicating a 4.7 GB
DVD should not take more than 8 minutes. Please check both the
quality of the blank and the master disc if the duplication process
takes more than 8 minutes for a single disc. Use a reliable master
disc for testing purposes. You should also try different specification
and brands of blank discs.
You should also check the power supply’s voltage and amperes.
Insufficient power supply may decrease output rate or increas e failure
rate.
As a general rule, a lower writing speed will improve quality. When
creating audio and video discs a lower writing speed is recommended
to assure quality.
SuperSpeed USB 3.0
In order to achieve the full USB 3.0 SuperSpeed, a PC with built-in
USB 3.0 ports or USB 3.0 host card installed is required.
USB 3.0 interface is backward compatible with USB 2.0, however the
transfer rate will be limited at USB 2.0.
Mac hardware currently do not support USB 3.0, Nimbie USB Plus
can only be used as a USB 2.0 device on Mac computers.
24 © 2012, Acronova Technology, Inc.
Page 25
Version 1.2 Operation Manual, Nimbie USB Plus
APPENDIX B: WORKING WITH IMGBURN
How to get Nimbie USB Plus working with ImgBurn
1. Connect Nimbie USB Plus to PC and switch it on.
2. Download and install ImgBurn burning software.
Go to ImgBurn website – http://www.imgburn.com/
3. Copy files BSRobot20.dll & winusb.dll from installation disc
\ImgBurn\ folder to where you installed ImgBurn (i.e.
C:\Program Files\ImgBurn) in the same folder as
ImgBurn.exe.
4. Launch ImgBurn burning software.
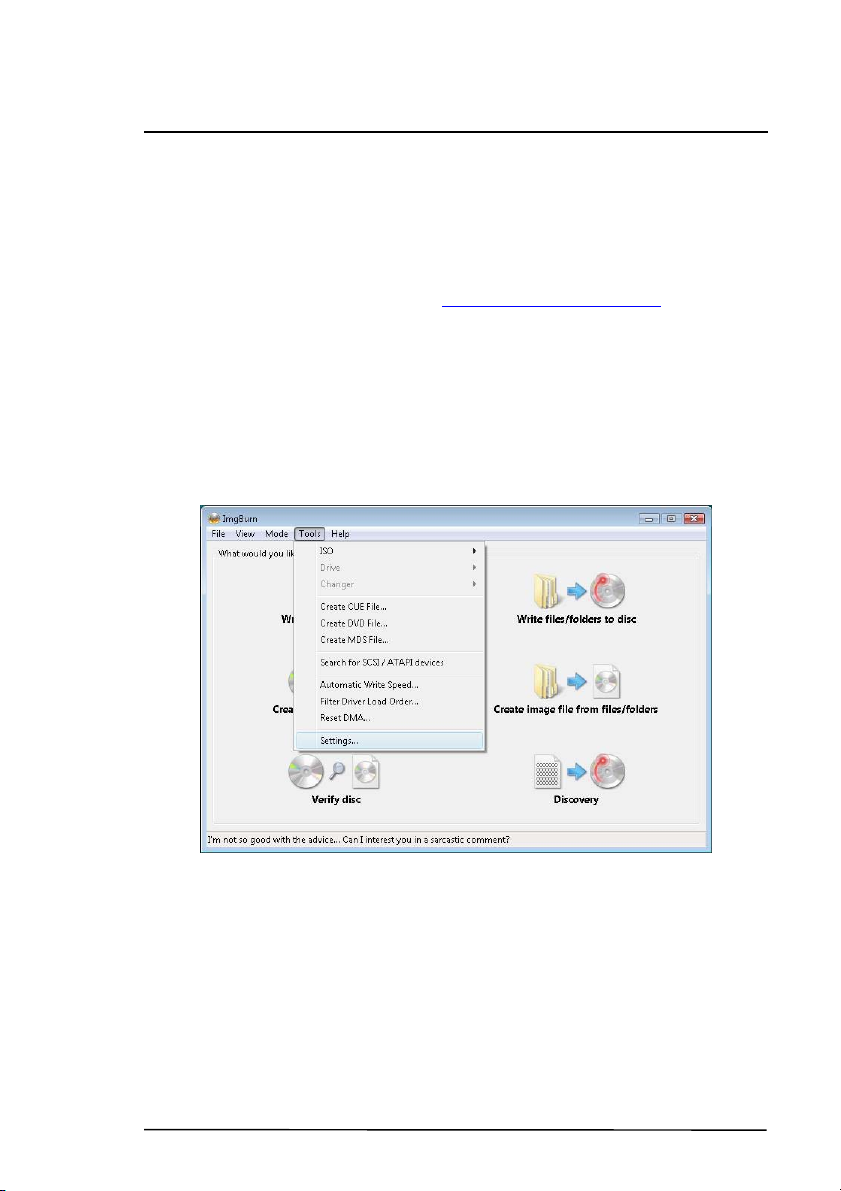
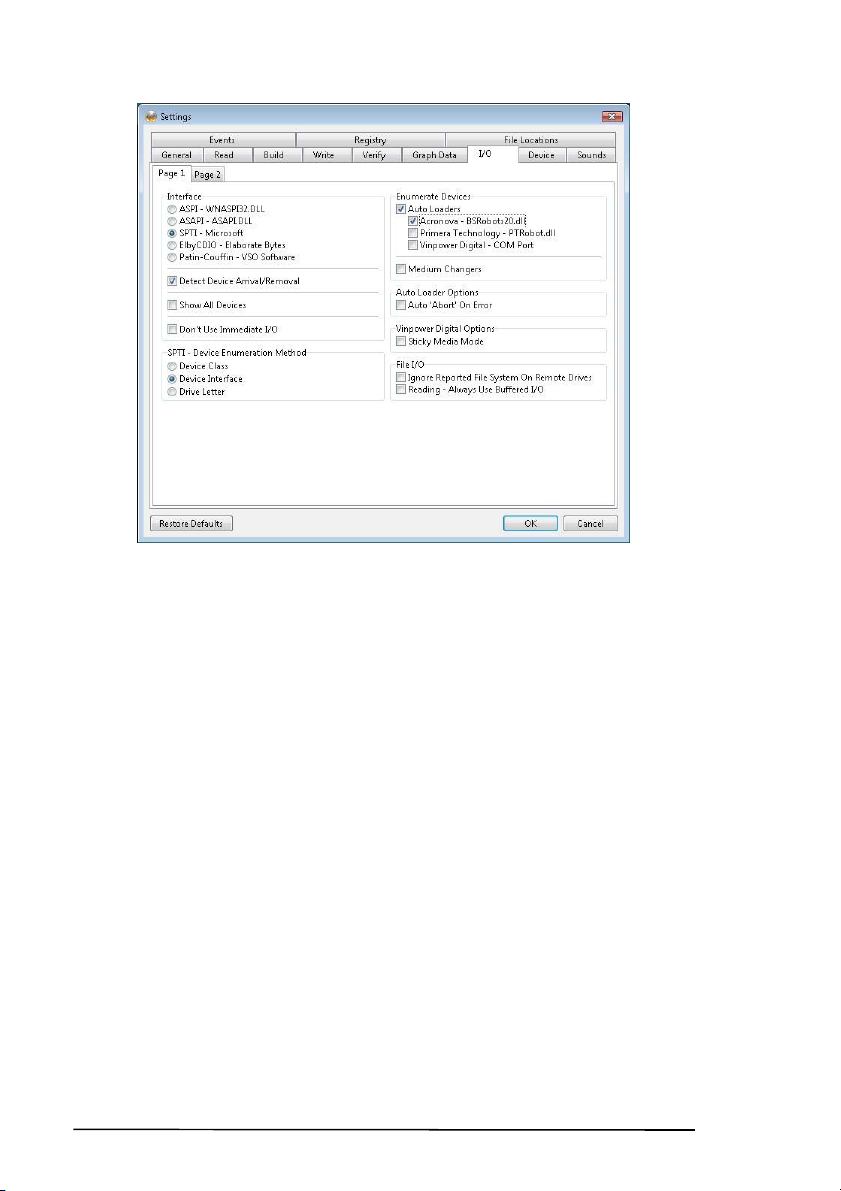
5. Click the “Tools” menu and select “Settings”.
6. Switch to the “I/O” tab, and enable the “Auto Loaders” option
and “Acronova – BSRobots20.dll” option. Then click “OK” to
finish the setting.
© 2012, Acronova Technology, Inc. 25
Page 26
Operation Manual, Nimbie USB Plus Version 1.2
7. ImgBurn will start detecting Nimbie USB Plus now.
8. If the autoloader detection did not start automatically, you can
close ImgBurn and run it again, it will automatically detect the
Nimbie USB Plus.
9. Now you can use ImgBurn with Nimbie USB Plus to unload
discs after burnt, and load the next blank disc automatically.
Reminder:
Please pick up the RW that provided by Nimbie USB Plus as the
destination in ImgBurn.
26 © 2012, Acronova Technology, Inc.
Page 27
Version 1.2 Operation Manual, Nimbie USB Plus
How to check Nimbie USB Plus in ImgBurn
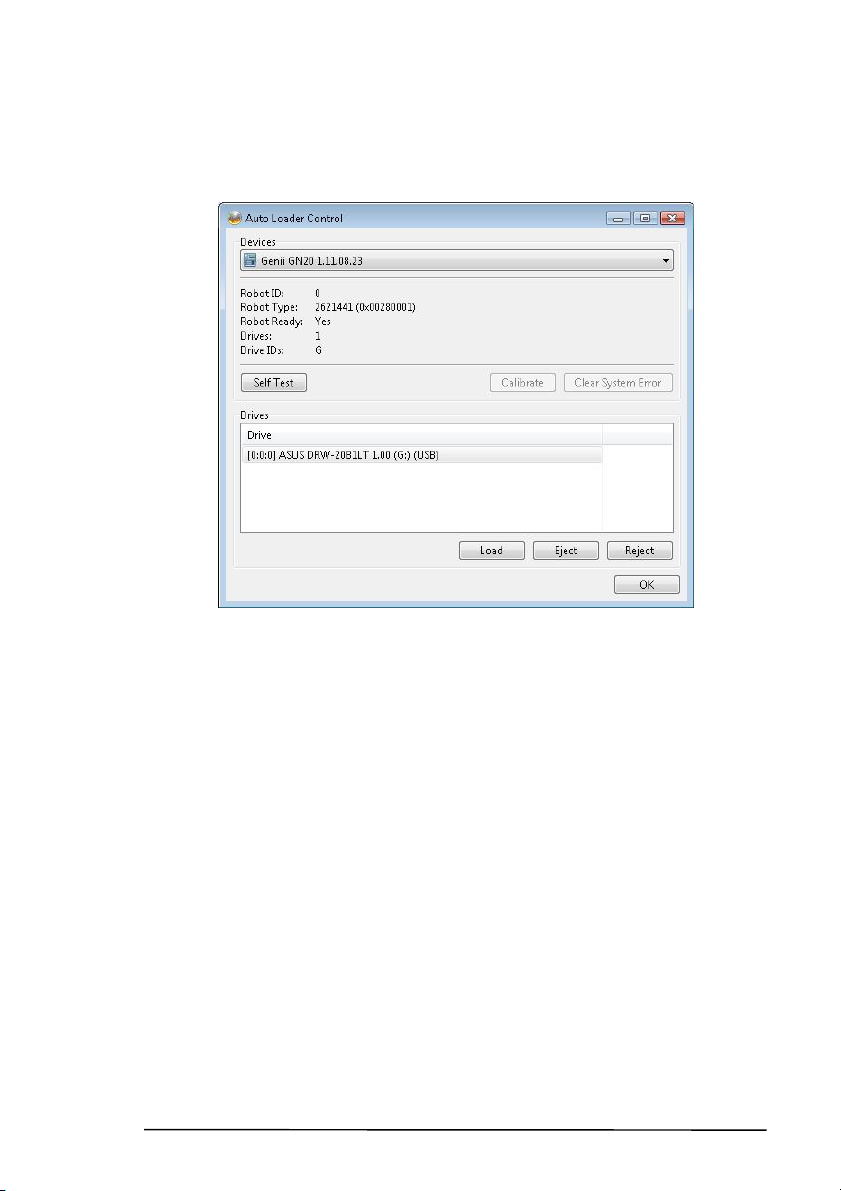
1. There is an “Auto Loader Control” function in ImgBurn and
you can use it to test the Nimbie USB Plus.
2. You can click the “Tool” menu, and select “Changer” > “Auto
Loader Control” to launch it.
© 2012, Acronova Technology, Inc. 27
Page 28

Operation Manual, Nimbie USB Plus Version 1.2
Acronova Technology , Inc.
http://www.acronova.com
Manual Ver.: 1.2, February 2012
Part #: 711-NT21-9AC6-1
28 © 2012, Acronova Technology, Inc.
 Loading...