

Page 1

1 Copyright © Acronis International GmbH, 2002-2014
Page 2

Copyright Statement
Copyright © Acronis International GmbH, 2002-2014. All rights reserved.
“Acronis” and “Acronis Secure Zone” are registered trademarks of Acronis International GmbH.
"Acronis Compute with Confidence", “Acronis Startup Recovery Manager”, “Acronis Active Restore”,
“Acronis Instant Restore” and the Acronis logo are trademarks of Acronis International GmbH.
Linux is a registered trademark of Linus Torvalds.
VMware and VMware Ready are trademarks and/or registered trademarks of VMware, Inc. in the
United States and/or other jurisdictions.
Windows and MS-DOS are registered trademarks of Microsoft Corporation.
All other trademarks and copyrights referred to are the property of their respective owners.
Distribution of substantively modified versions of this document is prohibited without the explicit
permission of the copyright holder.
Distribution of this work or derivative work in any standard (paper) book form for commercial
purposes is prohibited unless prior permission is obtained from the copyright holder.
DOCUMENTATION IS PROVIDED "AS IS" AND ALL EXPRESS OR IMPLIED CONDITIONS,
REPRESENTATIONS AND WARRANTIES, INCLUDING ANY IMPLIED WARRANTY OF MERCHANTABILITY,
FITNESS FOR A PARTICULAR PURPOSE OR NON-INFRINGEMENT, ARE DISCLAIMED, EXCEPT TO THE
EXTENT THAT SUCH DISCLAIMERS ARE HELD TO BE LEGALLY INVALID.
Third party code may be provided with the Software and/or Service. The license terms for such
third-parties are detailed in the license.txt file located in the root installation directory. You can
always find the latest up-to-date list of the third party code and the associated license terms used
with the Software and/or Service at http://kb.acronis.com/content/7696
Acronis patented technologies
Technologies, used in this product, are covered and protected by one or more U.S. Patent Numbers:
7,047,380; 7,275,139; 7,281,104; 7,318,135; 7,353,355; 7,366,859; 7,475,282; 7,603,533; 7,636,824;
7,650,473; 7,721,138; 7,779,221; 7,831,789; 7,886,120; 7,895,403; 7,934,064; 7,937,612; 7,949,635;
7,953,948; 7,979,690; 8,005,797; 8,051,044; 8,069,320; 8,073,815; 8,074,035; 8,145,607; 8,180,984;
8,225,133; 8,261,035; 8,296,264; 8,312,259; 8,347,137; 8,484,427; 8,645,748; 8,732,121 and patent
pending applications.
2 Copyright © Acronis International GmbH, 2002-2014
Page 3

Table of contents
1 Installing ..........................................................................................................................5
1.1 Requirements ............................................................................................................................ 5
1.1.1 Operating System Requirements ................................................................................................................... 5
1.1.2 Mobile Client requirements ........................................................................................................................... 5
1.1.3 Minimum Hardware Recommendation ........................................................................................................ 6
1.1.4 Network Requirements .................................................................................................................................. 6
1.1.5 Desktop Client Requirements ........................................................................................................................ 7
1.2 Installing Acronis Access Advanced on your server ................................................................... 8
1.3 Using the Configuration Utility .................................................................................................. 9
1.4 Using the Setup wizard ............................................................................................................13
1.5 Clustering Acronis Access ........................................................................................................18
1.6 Load balancing Acronis Access ................................................................................................18
2 Installing Acronis Access on a Microsoft Failover Cluster ................................................. 18
2.1 Installing Acronis Access on a Windows 2003 Microsoft Failover Cluster ..............................18
2.2 Installing Acronis Access on a Windows 2008 Microsoft Failover Cluster ..............................32
2.3 Installing Acronis Access on a Windows 2012 Microsoft Failover Cluster ..............................46
3 Upgrading ...................................................................................................................... 60
3.1 Upgrading from Acronis Access to a newer version ................................................................60
3.2 Upgrading to Acronis Access Advanced ...................................................................................61
3.3 Upgrading from mobilEcho 4.5 or earlier ................................................................................61
3.3.1 Before You Begin ........................................................................................................................................... 61
3.3.2 The Upgrade Process .................................................................................................................................... 68
3.3.3 Downgrading to mobilEcho 4.5 .................................................................................................................... 99
3.4 Upgrading from activEcho 2.7 or earlier ................................................................................100
3.4.1 Before You Begin ......................................................................................................................................... 100
3.4.2 The Upgrade Process .................................................................................................................................. 101
3.5 Upgrading Clustered Configurations .....................................................................................119
4 Upgrading Acronis Access on a Microsoft Failover Cluster ............................................. 121
5 Upgrading from mobilEcho 4.5 on a Microsoft Failover Cluster ................................... 123
5.1 Upgrading a mobilEcho server on a Windows 2003 Failover Cluster to Acronis Access .......123
5.2 Upgrading a mobilEcho server on a Windows 2008 Failover Cluster to Acronis Access .......132
5.3 Upgrading a mobilEcho server on a Windows 2012 Failover Cluster to Acronis Access .......143
6 Quick Start: Mobile Access ........................................................................................... 156
6.1 First Run .................................................................................................................................156
6.2 Configuring Your First Gateway Server and Data Source ......................................................159
6.3 Setting up a Policy ..................................................................................................................162
6.4 Installing the Access Mobile Client application .....................................................................163
6.5 Enrolling in client management .............................................................................................164
3 Copyright © Acronis International GmbH, 2002-2014
Page 4

7 Quick Start: Sync & Share ............................................................................................. 168
7.1 First Run .................................................................................................................................168
7.2 Using the web interface to access files ..................................................................................171
7.3 Using the desktop client ........................................................................................................177
4 Copyright © Acronis International GmbH, 2002-2014
Page 5

1 Installing
In this section
Requirements ............................................................................................. 5
Installing Acronis Access Advanced on your server ................................... 8
Using the Configuration Utility .................................................................. 9
Using the Setup wizard ............................................................................ 13
Clustering Acronis Access ......................................................................... 18
Load balancing Acronis Access ................................................................. 18
In this section
Operating System Requirements ............................................................... 5
Mobile Client requirements ....................................................................... 5
Minimum Hardware Recommendation ..................................................... 6
Network Requirements .............................................................................. 6
Desktop Client Requirements .................................................................... 7
1.1 Requirements
You must be logged in as an administrator before installing Acronis Access. Verify that you meet the
following requirements.
1.1.1 Operating System Requirements
Recommended:
Windows 2012 all flavors
Windows 2008 R2 64 bit
Supported:
Windows 2012 R2
Windows 2012, Standard and Datacenter editions
Windows 2008, all flavors, 32/64 bit
Note: For testing purposes, the system can be installed and runs on Windows 7 or later. These desktop class
configurations are not supported for production deployment.
1.1.2 Mobile Client requirements
The mobile client application is compatible with:
Supported devices:
Apple iPad 2nd, 3rd, 4th generation, Air, Air 2
Apple iPad Mini 1st, 2nd, 3rd generation
Apple iPhone 3GS, 4, 4S, 5, 5s, 5c, 6, 6 Plus
Apple iPod Touch 4th, 5th generation
Android Smartphones and Tablets (Devices with x86 processor architecture are not supported)
5 Copyright © Acronis International GmbH, 2002-2014
Page 6

Supported OS's:
iOS 6 or later
Android 2.2 or later (Devices with x86 processor architecture are not supported)
The Acronis Access app can be downloaded from:
For iOS http://www.grouplogic.com/web/meappstore
For Android https://play.google.com/store/apps/details?id=com.grouplogic.mobilecho
1.1.3 Minimum Hardware Recommendation
Processor: Intel/AMD
Note: Acronis Access server can be installed on virtual machines.
Memory:
Production environments: 8 GB minimum. More recommended.
Trial or Тest environments: 4 GB minimum. 8 GB or more recommended.
Disk Space:
The software installation requires 300MB of disk space.
Note: Please make sure that you have enough space to run the Acronis Access installer. 1GB of space is
required for the installer to run.
The file repository used by the Sync & Share features is installed on the local computer by
default.
Enough free space should be provided to meet testing parameters. 50 GB or more is
recommended.
1.1.4 Network Requirements
1 Static IP Address. 2 IP addresses may be needed for certain configurations.
Optional but recommended: DNS names matching the above IP addresses.
Network access to a Domain Controller if Active Directory will be used.
Network access to an SMTP server for email notifications and invite messages.
The address 127.0.0.1 is used internally by the Access Mobile Client and should not be routed
through any kind of tunnel - VPN, MobileIron, Good Dynamics and etc.
All machines running the Access Server or the Gateway Server need to be bound to the Windows
Active Directory.
There are two components that handle HTTPS traffic, the Gateway Server and the Acronis Access
Server. The Gateway Server is used by mobile clients to access both files and shares from the Data
Sources. The Access Server provides the web user interface for Sync & Share clients, and is also the
administration console for both Mobile Access and Sync & Share. It is recommended that two IP
addresses be assigned to the server along with two separate DNS entries for those addresses.
However, the server can be configured to use only one IP address with different ports for each
component. This one IP address configuration is sufficient for most Mobile Access-only installations
but two IP addresses is recommended when using Sync & Share as well.
6 Copyright © Acronis International GmbH, 2002-2014
Page 7

If you want to allow mobile devices access from outside your firewall, there are several options:
Port 443 access: Acronis Access uses HTTPS for encrypted transport, so it fits in naturally with
common firewall rules allowing HTTPS traffic on port 443. If you allow port 443 access to your
Acronis Access server, authorized iPad clients can connect while inside or outside of your firewall.
Acronis Access can also be configured to use any other port you prefer.
VPN: The Access Mobile Client supports access through a VPN connection. Both the built in iOS
VPN client and third-party VPN clients are supported. iOS management profiles can optionally be
applied to devices using Mobile Device Management (MDM) systems or the Apple iPhone
Configuration Utility to configure the certificate-based iOS “VPN-on-demand” feature, giving
seamless access to Acronis Access servers and other corporate resources.
Reverse proxy server: If you have a reverse proxy server set up, iPad clients can connect without
the need for an open firewall port or a VPN connection. The Access Mobile Client app supports
reverse proxy pass-through authentication, username / password authentication, Kerberos
constrained authentication delegation and certificate authentication. For details on adding
certificates to the Access Mobile Client app, visit the Using client certificates article.
Good Dynamics enabled Access Mobile Client app: The Access Mobile Client app includes the
ability to be enrolled in and managed by the Good Dynamics platform. In this configuration, all
network communication between Access Mobile Clients and Gateway Servers is routed through
the Good Dynamics secure communication channel and Good Proxy Server. For more details, see
the Access Mobile Client for Good Dynamics manual page.
MobileIron AppConnect enrolled Access Mobile Client app: If the Access Mobile Client
application is enrolled with MobileIron's AppConnect platform, then all network communication
between Access Mobile Client clients and Gateway Servers can be routed through the MobileIron
Sentry. For more information see the MobileIron AppConnect manual page.
Certificates:
Acronis Access ships and installs with self-signed certificates for testing purposes. Production
deployments should implement proper CA certificates.
Note: Certain web browsers will display warning messages when using self-signed certificates.
Dismissing those messages allows the system to be used without problems. Using self-signed
certificates for production conditions is not recommended.
1.1.5 Desktop Client Requirements
Supported operating systems:
Windows XP, Windows Vista, Windows 7, Windows 8 and 8.1
Note: In order to use the Acronis Access Desktop client on Windows XP, you will need to use relaxed SSL
cipher rules. For more information: Changing the Acronis Access Tomcat SSL Ciphers.
Mac OS X 10.6.8 and higher with Mac compatible with 64-bit software.
Note: When installing the Acronis Access Desktop client, make sure that the sync-folder you create is not in
a folder synchronized by another software. For a list of known conflicts visit Conflicting Software.
Supported web browsers:
Mozilla Firefox 6 and later
Internet Explorer 9 and later
7 Copyright © Acronis International GmbH, 2002-2014
Page 8

Note: You can support an unsecure version of Internet Explorer 8 if necessary by following the Changing the
Acronis Access Tomcat SSL Ciphers article. Internet Explorer 8 is not supported for Server Administration.
Note: When using Internet Explorer you have to make sure that Do not save encrypted pages to disk is
unchecked in order to be able to download files. This setting is found under Internet Options -> Advanced
-> Security.
Google Chrome
Safari 5.1.10 or later
1.2 Installing Acronis Access Advanced on your server
The following steps will allow you to perform a fresh install and test Acronis Access Advanced with
HTTPS using the provided Self Signed certificate.
Note: For upgrade instructions visit the Upgrading (p. 60) section.
Note: For instructions on installing on a cluster visit the Installing Acronis Access on a cluster (p. 18) section.
The installation of Acronis Access involves three steps:
1. Installation of the Acronis Access Server installer.
2. Configuration of the network ports and SSL certificates used by the Acronis Access Server.
3. Using the web-based setup wizard to configure the server for your use.
Installing Acronis Access
Please make sure you are logged in as an administrator before installing Acronis Access.
1. Download the Acronis Access installer.
2. Disable any anti-virus software you have or it may interrupt the installation procedure resulting
in a failed installation.
3. Double-click on the installer executable.
4. Press Next to begin.
5. Read and accept the license agreement.
6. Press Install.
8 Copyright © Acronis International GmbH, 2002-2014
Page 9

Note: If you're deploying multiple Acronis Access servers, or you are installing a non-standard configuration,
you can select which components to install from the Custom Install button.
7. Either use the default path or select a new one for the Acronis Access main folder and press OK.
8. Set a password for the user Postgres and write it down. This password will be needed for
database backup and recovery.
9. A window displaying all the components which will be installed appears. Press OK to continue.
10. When the Acronis Access installer finishes, press Exit.
11. The configuration utility will launch automatically to complete the installation.
For instructions on using the Configuration utility, visit the Using the Configuration Utility (p. 9) page.
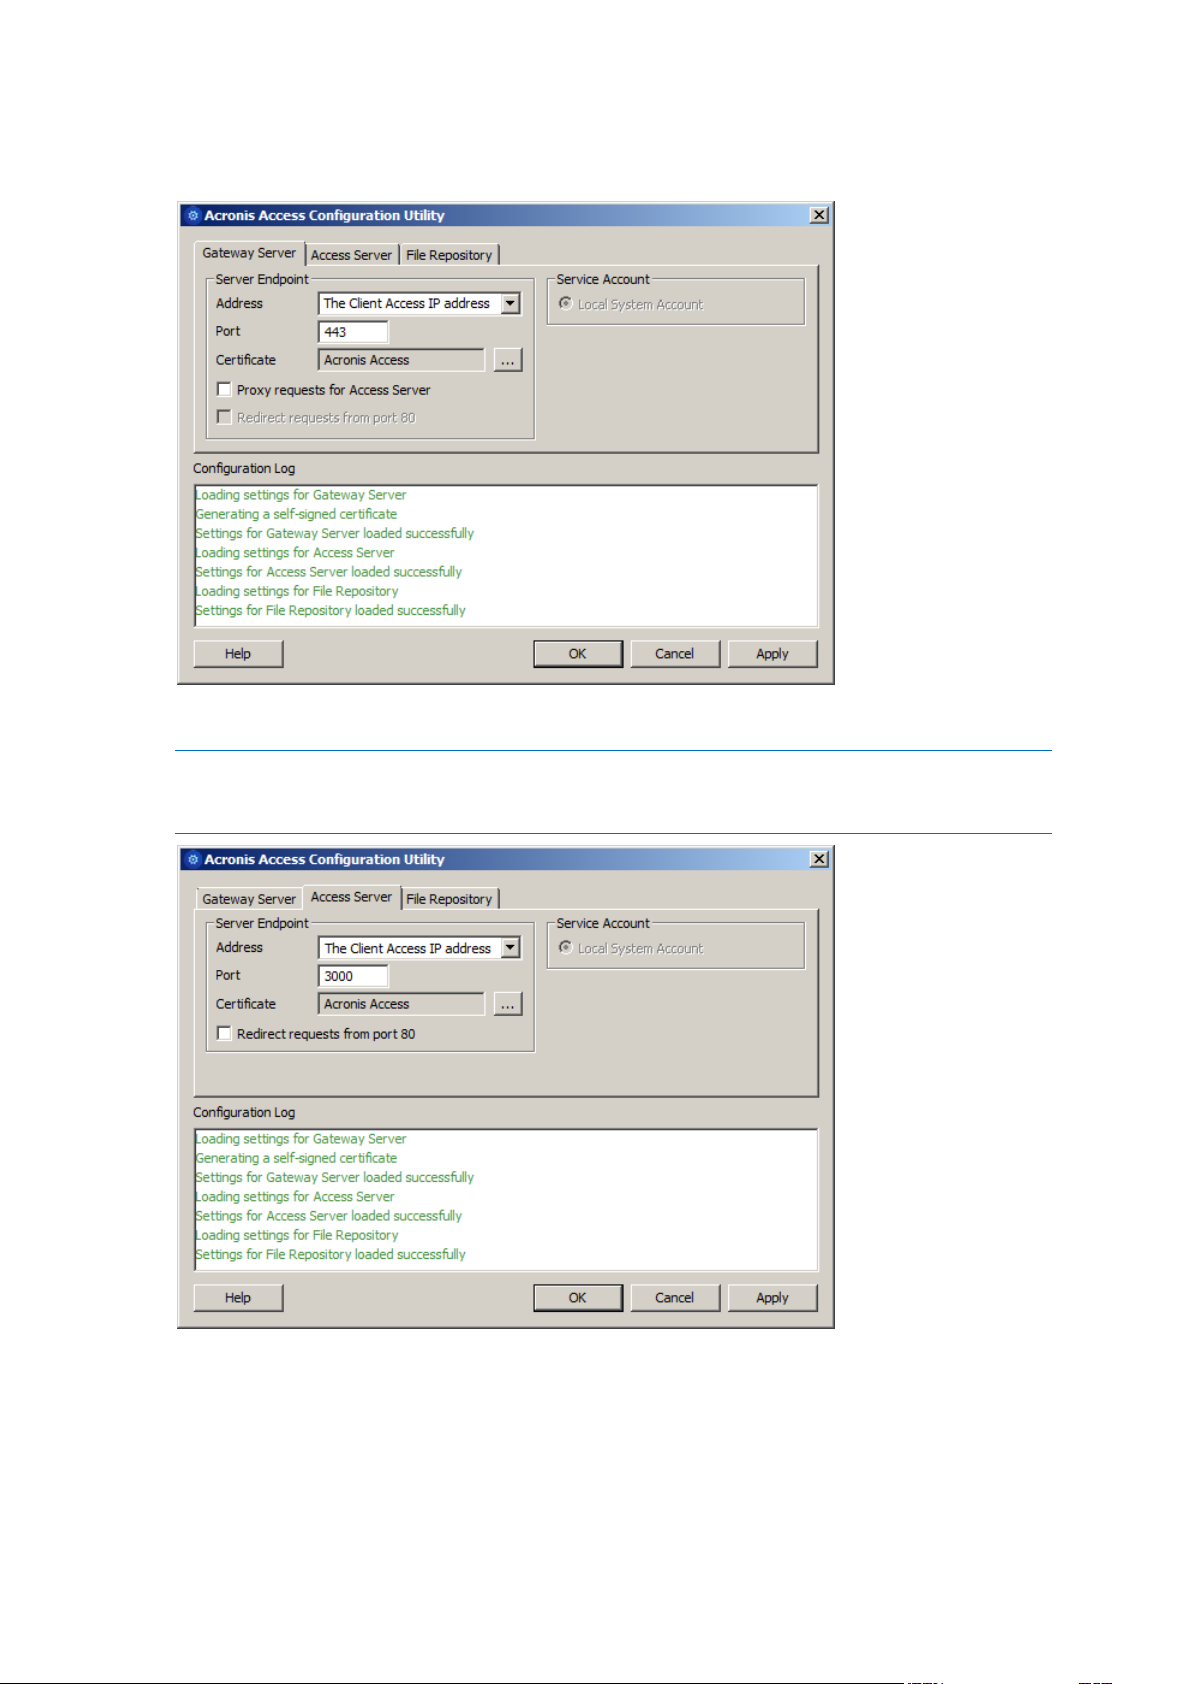
1.3 Using the Configuration Utility
The Acronis Access installer comes with configuration utility, which allows you to quickly and easily
set up the access to your Acronis Access Gateway server, File Repository and Acronis Access Server.
9 Copyright © Acronis International GmbH, 2002-2014
Page 10

The Gateway Server is used by mobile clients to access both files and shares. The Access Server
provides the web user interface for Acronis Access clients, and is also the administration console for
both Mobile Access and Sync & Share.
Note: See the Network Requirements (p. 6) section for more information on best practices for the IP address
configurations of Acronis Access.
Note: For information on adding your certificate to the Microsoft Windows Certificate Store, visit the Using
Certificates article.
Access Server Overview
The Access Server provides the web user interface for Acronis Access clients, and is also the
administration console for both Mobile Access and Sync & Share.
Address - The DNS name or IP address of your Web Interface or pick All Addresses to listen on all
interfaces.
Port - The port of your Web Interface.
Certificate - Path to the certificate for your Web Interface. You can choose a certificate from the
Microsoft Windows Certificate Store.
Redirect requests from port 80 - When selected, Tomcat will listen for incoming traffic on the
unsecure port 80 and redirect it to the HTTPS port you have specified above. If you have another
program listening on port 80, do not check this box.
Service Account - This allows the Acronis Access Server service to run in the context of another
account. This is normally not required in typical installations.
10 Copyright © Acronis International GmbH, 2002-2014
Page 11

Gateway Server Overview
The Gateway Server is used by mobile clients to access both files and shares.
Address - The DNS name or IP address of your Gateway Server or pick All Addresses to listen on
all interfaces.
Port - The port of your Gateway Server.
Certificate - Path to the certificate for your Gateway Server. You can choose a certificate from
the Microsoft Windows Certificate Store.
Service Account - This allows the Gateway Server service to run in the context of another
account. This is normally not required in typical installations.
Proxy requests for Access Server - When checked, users will connect to the Gateway Server
which will then proxy them to the Access Server. This is available on when you have an Access
Server and Gateway server installed on the same machine.
Redirect requests from port 80 - When selected, Tomcat will listen for incoming traffic on the
unsecure port 80 and redirect it to the HTTPS port you have specified above. If you have another
program listening on port 80, do not check this box.
11 Copyright © Acronis International GmbH, 2002-2014
Page 12

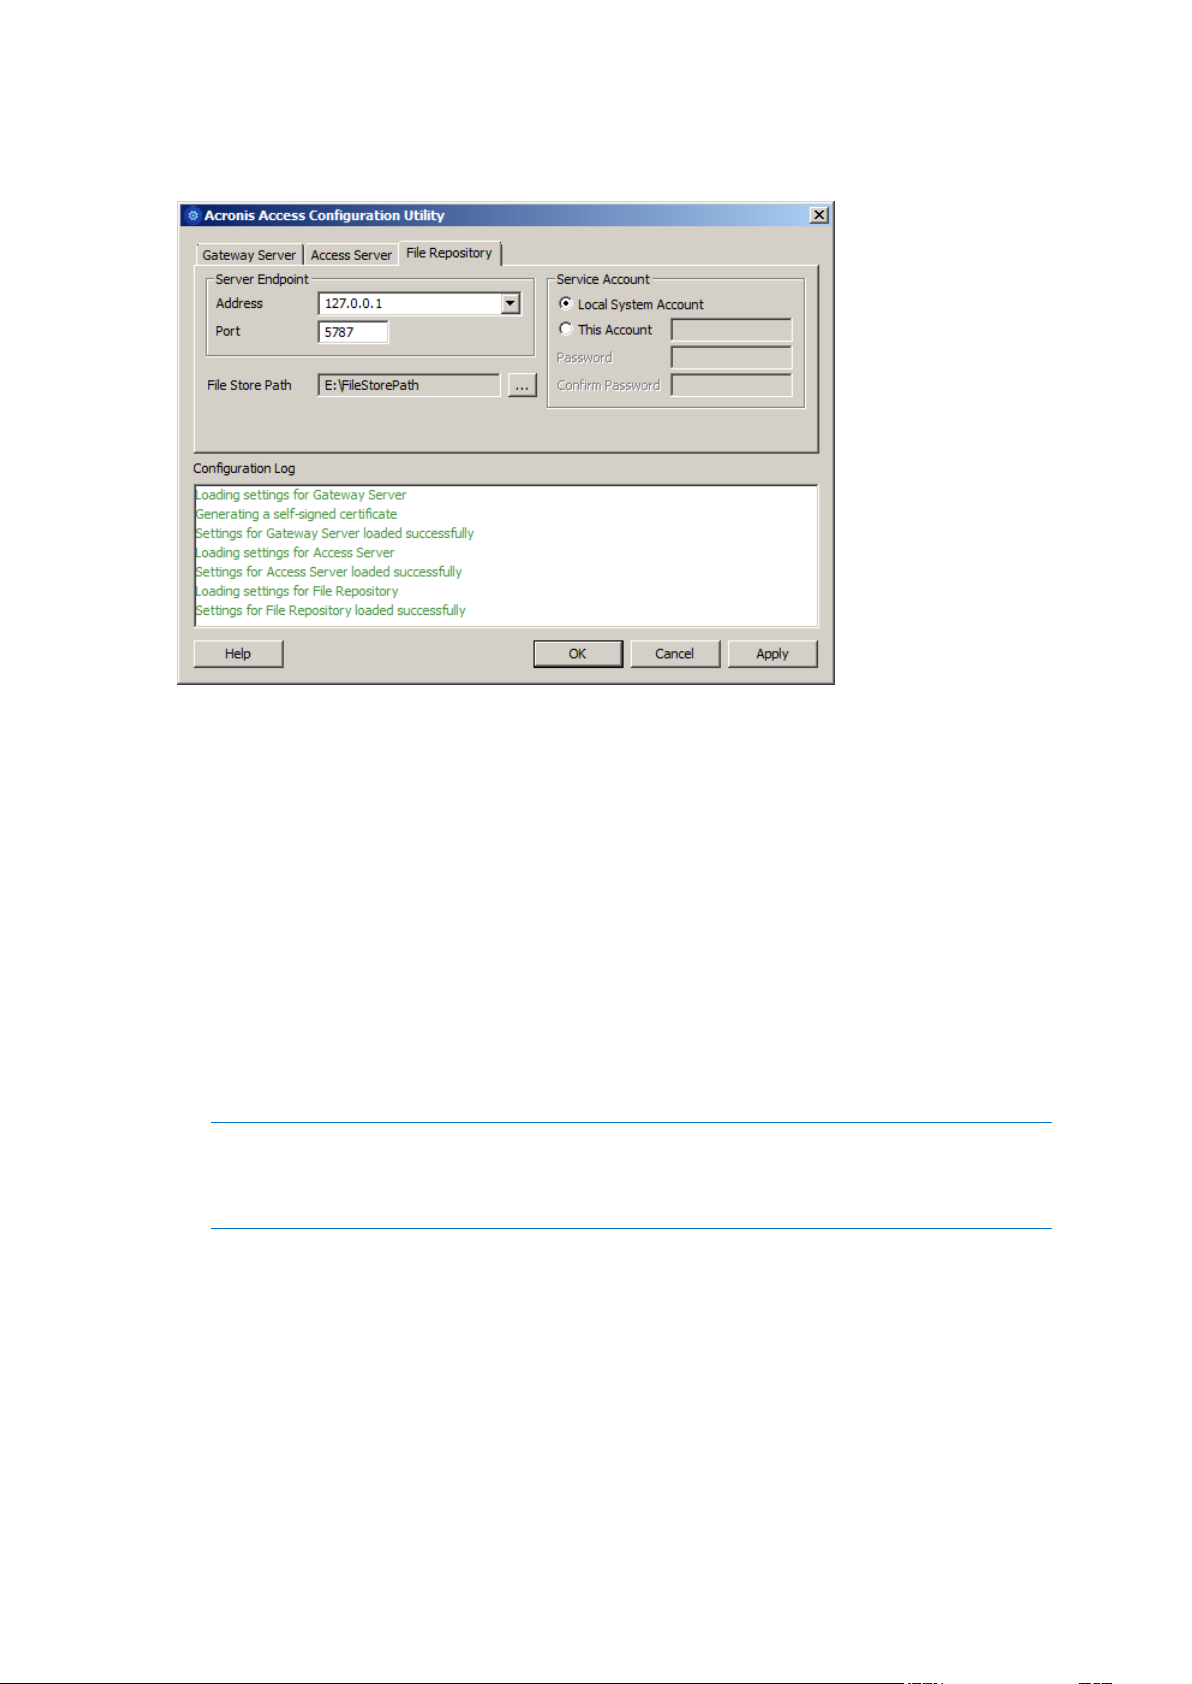
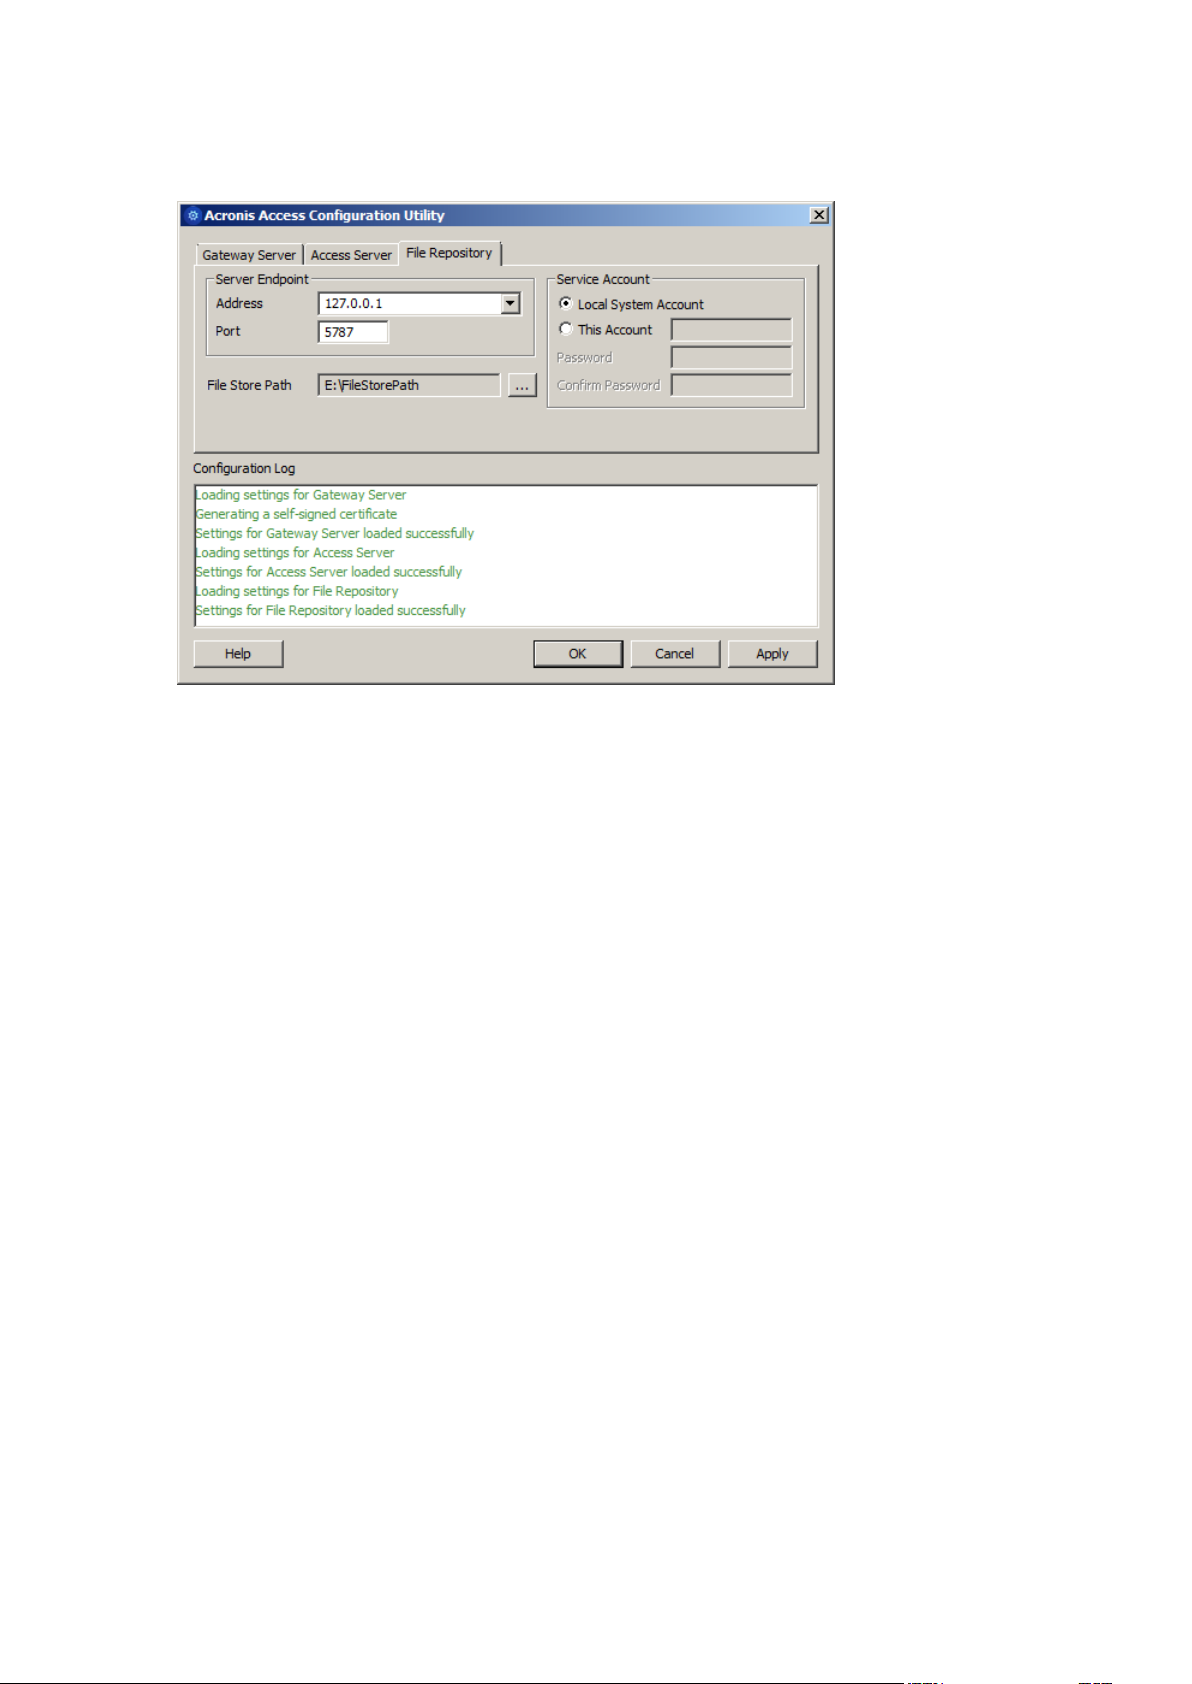
File Repository Overview
The File Repository is used by Sync & Share functionality. If you are haven't enabled Sync & Share,
you can accept the standard values. If you are using Sync & Share, the file store path should specify
the disk location to be used for storage. If you plan to use Amazon S3 for storage, then the default
values are ok.
Address - The DNS name or IP address of your File Repository or pick All Addresses to listen on
all interfaces. If you specify an IP or DNS address, the same address should also be specified in
the File Repository section of the web interface. For more information on it, visit the File
Repository article.
Port - The port of your File Repository. The same port should also be specified in the File
Repository section of the web interface. For more information on it, visit the File Repository
article.
File Store Path - UNC path to your File Store. If you change the File Store path, you MUST
manually copy any files that are already in the original File Store location to your new location.
Note: If you move the File Store to another location, you should upload a new file to make sure it is
going into the correct new location. Another thing is downloading a file that was already in the file
store to make sure all of the files that were in the original location can be accessed at the new location.
Service Account - If the file storage for the repository is on a remote network share, then the
service account should be configured to be one that has permissions to that network share. This
account must also have read and write access to the Repository folder (e.g. C:\Program Files
(x86)\Acronis\Access\File Repository\Repository) to write the log file.
After you have filled in all the necessary fields, pressing Apply or OK will restart the services you have
made changes to. It will take 30-45 seconds after the services have started before the Acronis Access
Server is available. At this point, a web browser will automatically launch and connect to the Acronis
Access's IP address and port. On the login page, set the administrator password and then the Setup
Wizard (p. 13) will guide you through the setup process.
12 Copyright © Acronis International GmbH, 2002-2014
Page 13

Note: Write down the administrator password, as it cannot be recovered if forgotten.
Note: If you need to change any of the network IP addresses/ports or certificates used by the Acronis Access
components, you can run the Configuration Utility again at any time to make these changes. It will
automatically adjust the necessary configuration files and restart the services for you.
1.4 Using the Setup wizard
After installing the software and running the configuration utility to setup network ports and SSL
certificates, the administrator now needs to configure the Acronis Access server. The Setup Wizard
takes the administrator through a series of steps to get the basic functionality of the server working.
Note: If you are upgrading from activEcho or mobilEcho, please read the Upgrading (p. 60) section before
continuing.
Note: After the configuration utility has run, it will take 30-45 seconds for the server to come up the first time.
Navigate to the Acronis Access's web interface using the IP address and port specified in the
configuration utility. You will be prompted to set the password for the default administrator account.
Note: Administrators can be configured later on, for more information visit the Server Administration section.
This wizard helps you setup the core settings for the functionality of your product.
General Settings cover settings of the web interface itself, like the language, the color scheme,
the server name used in admin notifications, licensing and administrators.
LDAP settings allow you to use Active Directory credentials, rules and policies with our product.
SMTP settings cover functionality in both Mobile Access features and Sync & Share features. For
Mobile Access, the SMTP server is used when sending enrollment invitations. Sync & Share
features use the SMTP server to send folder invitations, warnings, summaries of errors.
All of the settings you see in the Initial Configuration page will also be available after you complete it.
For more information on any of the settings, please visit the Server Administration articles.
13 Copyright © Acronis International GmbH, 2002-2014
Page 14

Going through the initial configuration process
Licensing
To start a trial:
1. Select Start Trial and press Continue.
To license your Access Server:
1. Select Enter license keys.
2. Enter your license key and mark the checkbox.
3. Press Save.
General Settings
1. Enter a Server Name.
14 Copyright © Acronis International GmbH, 2002-2014
Page 15

2. Specify the root DNS name or IP address where users can access the website (starting with
http:// or https://).
3. Specify the DNS name or IP address to which the mobile users will enroll to.
4. Select the default language for the Audit Log. The current options are English, German, French
and Japanese.
5. Press Save.
SMTP
Note: You can skip this section, and configure SMTP later.
1. Enter the DNS name or IP address of your SMTP server
2. Enter the SMTP port of your server.
3. If you do not use certificates for your SMTP server, unmark Use secure connection?.
4. Enter the name which will appear in the "From" line in emails sent by the server.
5. Enter the address which will send the emails sent by the server.
6. If you use username/password authentication for your SMTP server, mark Use SMTP
authentication? and enter your credentials.
7. Press Send Test Email to send a test email to the email address you set on step 5.
8. Press Save.
15 Copyright © Acronis International GmbH, 2002-2014
Page 16

LDAP
Note: You can skip this section, and configure LDAP later.
1. Mark Enable LDAP.
16 Copyright © Acronis International GmbH, 2002-2014
Page 17

2. Enter the DNS name or IP address of your LDAP server.
3. Enter the port of your LDAP server.
4. If you use a certificate for connections with your LDAP server, mark Use Secure LDAP
Connection.
5. Enter your LDAP credentials, with the domain. (e.g. acronis\hristo).
6. Enter your LDAP search base.
7. Enter the desired domain(s) for LDAP authentication. (i.e.to enable LDAP authentication for an
account with the email joe@glilabs.com, you would enter glilabs.com)
8. Press Save.
Local Gateway Server
Note: If you're installing both a Gateway Server and the Acronis Access Server on the same machine, the
Gateway Server will automatically be detected and administered by the Acronis Access Server. You will be
prompted to set the DNS name or IP address on which the Local Gateway Server will be reachable by clients.
You can change this address later on.
1. Set a DNS name or IP address for the local Gateway Server.
2. Press Save.
File Repository
1. Select a file store type. Use Filesystem for a file store on your computers or Amazon S3 for a file
store in the cloud.
2. Enter the DNS name or IP address for the file repository service.
Note: The Acronis Access Configuration utility is used to set the file repository address, port and file
store location. The File Store Repository Endpoint setting must match the settings in the File Repository
tab of the Configuration Utility. To view or modify these settings, run AcronisAccessConfiguration.exe,
typically located in C:\Program Files (x86)\Acronis\Configuration Utility\ on the
endpoint server.
3. Select an encryption level. Choose between None, AES-128 and AES-256.
4. Select the minimum free space available before your server sends you a warning.
5. Press Save.
17 Copyright © Acronis International GmbH, 2002-2014
Page 18

1.5 Clustering Acronis Access
In this section
Installing Acronis Access on a Windows 2003 Microsoft Failover Cluster18
Installing Acronis Access on a Windows 2008 Microsoft Failover Cluster32
Installing Acronis Access on a Windows 2012 Microsoft Failover Cluster46
Acronis Access allows the configuration of high-availability setups without needing third-party
clustering software. This is configured through the new Cluster Groups feature introduced in Acronis
Access 5.1. The setup procedure is simple, but provides high-availability for the Acronis Access
Gateway Servers as they are the component under the heaviest load. All of these configurations are
managed through the Acronis Access Server.
For more information and instructions on setting up a Cluster Group, visit the Cluster Groups article.
Although we recommend using the built-in Cluster Groups feature, Acronis Access also supports
Microsoft Failover Clustering, for more information visit the Supplemental Material section.
1.6 Load balancing Acronis Access
Acronis Access supports load balancing. For more information please visit the Load Balancing Acronis
Access and Cluster Groups articles.
2 Installing Acronis Access on a Microsoft Failover
Cluster
Warning! Acronis Access failover clustering is not supported by versions older than 5.0.3. If you're using an
older version, you will have to upgrade to version 5.0.3 or newer before proceeding with any kind of cluster
configurations.
The guides listed below will help you install Acronis Access on your cluster.
2.1 Installing Acronis Access on a Windows 2003
Microsoft Failover Cluster
Installing Acronis Access
Please make sure you are logged in as an administrator before installing Acronis Access.
1. Download the Acronis Access installer.
18 Copyright © Acronis International GmbH, 2002-2014
Page 19

2. Disable any anti-virus software you have or it may interrupt the installation procedure resulting
in a failed installation.
3. Double-click on the installer executable.
4. Press Next to begin.
5. Read and accept the license agreement.
6. Press Install.
Note: If you're deploying multiple Acronis Access servers, or you are installing a non-standard configuration,
you can select which components to install from the Custom Install button.
7. Either use the default path or select a new one for the Acronis Access main folder and press OK.
8. Set a password for the user Postgres and write it down. This password will be needed for
database backup and recovery.
19 Copyright © Acronis International GmbH, 2002-2014
Page 20

9. Choose a location on a shared disk for the Postgres Data folder and press Next.
10. A window displaying all the components which will be installed appears. Press OK to continue.
When the Acronis Access installer finishes, press Exit.
Creating the cluster group
1. Open the Cluster Administrator and open Groups.
2. Right-click on Groups and select New and then Group. Give the cluster group a proper name. (e.g.
Acronis Access, AAS Cluster)
20 Copyright © Acronis International GmbH, 2002-2014
Page 21

3. Select the machines which will be a part of this cluster group and press Finish.
Configurations on the Active node
1. Configure your Gateway Server's database to be on a location on a shared disk.
a. Navigate to C:\Program Files (x86)\Acronis\Access\Gateway Server\
b. Find the database.yml file and open it with a text editor.
c. Find this line: database_path: './database/' and replace ./database/ with the path
you want to use (e.g. database_path: 'S:/access_cluster/database/').
Note: Use slashes(/) as a path separator.
Note: You can copy the configured database.yml from the first node and paste it to the second node.
Adding all of the necessary services to the Acronis Access cluster group
Complete the following procedure for each of the following services: AcronisAccessGateway,
AcronisAccessPostgreSQL (this may be different depending on the version of Acronis Access),
AcronisAccessRepository and AcronisAccessTomcat
1. Right-click on the Acronis Access cluster group.
21 Copyright © Acronis International GmbH, 2002-2014
Page 22

2. Open New and select Resource.
3. Enter a name for the service and select the correct cluster group.
4. From the Resource Type drop down menu select Generic Service and press Next.
22 Copyright © Acronis International GmbH, 2002-2014
Page 23

5. Make sure both of your nodes are listed as Possible owners and press Next.
6. Skip the dependencies for now by pressing Next.
7. Enter the correct service name of the service you are adding (e.g. postgresql-x64-9.2) and press
Next.
8. Skip the Registry Replication window for now by pressing Next.
9. Press Finish to complete the procedure.
Setting an IP address for the cluster group
1. Right-click on the Acronis Access cluster group.
2. Open New and select Resource.
23 Copyright © Acronis International GmbH, 2002-2014
Page 24

3. Enter a name for the resource and select the correct cluster group.
4. From the Resource Type drop down menu select IP Address and press Next.
5. Make sure both of your nodes are listed as Possible owners and press Next.
6. Skip the dependencies for now by pressing Next.
7. Enter the IP address you will use for this cluster group.
8. Enter the subnet mask and press Finish.
Adding a shared disk
1. Right-click on the Acronis Access cluster group.
24 Copyright © Acronis International GmbH, 2002-2014
Page 25

2. Open New and select Resource.
3. Enter a name for the resource and select the correct cluster group.
4. From the Resource Type drop down menu select Physical Disk and press Next.
25 Copyright © Acronis International GmbH, 2002-2014
Page 26

5. Make sure both of your nodes are listed as Possible owners and press Next.
6. Skip the dependencies for now by pressing Next.
7. Select an available disk from the drop down menu and press Finish.
Configuring dependencies
For PostgreSQL and Acronis Access File Repository do the following:
1. Right-click on the appropriate service and select Properties.
2. Click on the Dependencies tab.
3. Click on Modify.
4. Select the shared disk you have added and move it to the right side.
5. Press OK.
26 Copyright © Acronis International GmbH, 2002-2014
Page 27

For PostgreSQL also do the following:
1. Click on the Registry Replication tab.
2. Press Add and enter the following:
SYSTEM\CurrentControlSet\Services\AcronisAccessPostgreSQL\(For older versions
of Acronis Access the service may be different. e.g. postgresql-x64-9.2)
For the Acronis Access Gateway Server service do the following:
1. Right-click on the appropriate service and select Properties.
2. Click on the Dependencies tab.
3. Click on Modify.
27 Copyright © Acronis International GmbH, 2002-2014
Page 28

4. Select the IP Address and Physical disk and move them to the right side.
5. Press OK.
For the Acronis Access Tomcat service do the following:
1. Right-click on the appropriate service and select Properties.
2. Click on the Dependencies tab.
3. Click on Modify.
4. Select the PostgreSQL and Acronis Access Gateway Server services and move them to the right
side.
28 Copyright © Acronis International GmbH, 2002-2014
Page 29

5. Press OK.
Bringing the cluster group online and using the Configuration Utility
1. Right-click on the cluster group and press Bring online.
2. Launch the Configuration Utility. On a clean install, this is generally located at C:\Program
Files (x86)\Acronis\Access\Configuration Utility
3. Configure the Acronis Access Gateway Server service to listen on the IP address(es) for the
Acronis Access Service group.
4. Configure the Acronis Access Server service to listen on the IP address(es) for the Acronis Access
Service group.
29 Copyright © Acronis International GmbH, 2002-2014
Page 30

Note: If Redirect requests from port 80 is selected, Tomcat will listen for incoming traffic on the unsecure
port 80 and redirect it to the HTTPS port you have specified above. If you have another program listening
on port 80, do not check this box.
5. Configure the Acronis Access File Repository to listen on localhost and change the Filestore path
to be on the shared disk. This path should be the same for both nodes.
6. Click OK to complete the configuration and restart the services.
Installation and configuration on the second node
1. Disable any anti-virus software you have or it may interrupt the installation procedure resulting
in a failed installation.
2. Install Acronis Access on the second node, but this time use the default Postgres Data location
and the same postgres user password as for the first node.
30 Copyright © Acronis International GmbH, 2002-2014
Page 31

3. Complete the installation.
4. Configure your Gateway Server's database to be on a location on a shared disk.
a. Navigate to C:\Program Files (x86)\Acronis\Access\Gateway Server\
b. Find the database.yml file and open it with a text editor.
c. Find this line: database_path: './database/' and replace ./database/ with the path
you want to use (e.g. database_path: 'S:/access_cluster/database/').
Note: Use slashes(/) as a path separator.
Note: You can copy the configured database.yml from the first node and paste it to the second node.
Note: The path should match the path set on the first node.
5. Move the cluster group to the second node. To do so, right-click on the cluster group and click on
Move Group.
6. Launch the Configuration Utility. On a clean install, this is generally located at C:\Program
Files (x86)\Acronis\Access\Configuration Utility
7. Configure the Acronis Access Gateway Server service to listen on the IP address(es) for the
Acronis Access Service group.
8. Configure the Acronis Access Server service to listen on the IP address(es) for the Acronis Access
Service group.
31 Copyright © Acronis International GmbH, 2002-2014
Page 32

Note: If Redirect requests from port 80 is selected, Tomcat will listen for incoming traffic on the unsecure
port 80 and redirect it to the HTTPS port you have specified above. If you have another program listening
on port 80, do not check this box.
9. Configure the Acronis Access File Repository to listen on localhost and change the Filestore path
to be on the shared disk. This path should be the same for both nodes.
10. Click OK to complete the configuration and restart the services.
2.2 Installing Acronis Access on a Windows 2008
Microsoft Failover Cluster
Installing Acronis Access
Please make sure you are logged in as an administrator before installing Acronis Access.
1. Download the Acronis Access installer.
32 Copyright © Acronis International GmbH, 2002-2014
Page 33

2. Disable any anti-virus software you have or it may interrupt the installation procedure resulting
in a failed installation.
3. Double-click on the installer executable.
4. Press Next to begin.
5. Read and accept the license agreement.
6. Press Install.
Note: If you're deploying multiple Acronis Access servers, or you are installing a non-standard configuration,
you can select which components to install from the Custom Install button.
7. Either use the default path or select a new one for the Acronis Access main folder and press OK.
8. Set a password for the user Postgres and write it down. This password will be needed for
database backup and recovery.
33 Copyright © Acronis International GmbH, 2002-2014
Page 34

9. Choose a location on a shared disk for the Postgres Data folder and press Next.
10. A window displaying all the components which will be installed appears. Press OK to continue.
When the Acronis Access installer finishes, press Exit.
Creating the Service group
1. Open the Failover Cluster Manager and expand your cluster.
2. Right-click on Services and Applications and select More Actions.
34 Copyright © Acronis International GmbH, 2002-2014
Page 35

3. Select the Create Empty Service or Application and press Next. Give the service group a proper
name. (e.g. Acronis Access, AAS Cluster).
Configurations on the Active node
1. Configure your Gateway Server's database to be on a location on a shared disk.
a. Navigate to C:\Program Files (x86)\Acronis\Access\Gateway Server\
b. Find the database.yml file and open it with a text editor.
c. Find this line: database_path: './database/' and replace ./database/ with the path
you want to use (e.g. database_path: 'S:/access_cluster/database/').
Note: Use slashes(/) as a path separator.
Note: You can copy the configured database.yml from the first node and paste it to the second node.
Adding all of the necessary services to the Acronis Access Service group
Complete the following procedure for each of the following services: AcronisAccessGateway,
AcronisAccessPostgreSQL (this may be different depending on the version of Acronis Access),
AcronisAccessRepository and AcronisAccessTomcat
1. Right-click on the Acronis Access service group and select Add a resource.
35 Copyright © Acronis International GmbH, 2002-2014
Page 36

2. Select Generic Service.
3. Select the proper service and press Next.
4. On the confirmation window press Next.
36 Copyright © Acronis International GmbH, 2002-2014
Page 37

5. Press Next on the Replicate Registry Settings window.
6. On the summary window press Finish.
Setting a Client Access Point
1. Right-click on the Acronis Access service group and select Add a resource.
2. Select Client Access Point.
3. Enter a name for this access point.
37 Copyright © Acronis International GmbH, 2002-2014
Page 38

4. Select a network.
5. Enter the IP address and press Next.
6. On the Confirmation window press Next.
7. On the summary window press Finish.
Adding a shared disk
1. Right-click on the Acronis Access service group and select Add a resource.
2. Select the desired shared drive.
3. On the Confirmation window press Next.
4. On the summary window press Finish.
38 Copyright © Acronis International GmbH, 2002-2014
Page 39

Configuring dependencies
1. Double click on the Acronis Access Service group.
For PostgreSQL and Acronis Access File Repository services do the following:
1. Right-click on the appropriate service and select Properties.
2. Click on the Dependencies tab.
3. Click on Resource and select the shared disk you have added.
4. Press Apply and close the window.
For PostgreSQL also do the following:
1. Click on the Registry Replication tab.
39 Copyright © Acronis International GmbH, 2002-2014
Page 40

2. Press Add and enter the following:
SYSTEM\CurrentControlSet\Services\AcronisAccessPostgreSQL\(For older versions
of Acronis Access the service may be different. e.g. postgresql-x64-9.2)
For the Acronis Access Gateway Server service do the following:
1. Right-click on the appropriate service and select Properties.
2. Click on the Dependencies tab.
40 Copyright © Acronis International GmbH, 2002-2014
Page 41

3. Click on Resource and select the shared disk you have added and the Network Name (this is the
name of the Client access point).
4. Press Apply and close the window.
For the Acronis Access Tomcat service do the following:
1. Right-click on the appropriate service and select Properties.
2. Click on the Dependencies tab.
41 Copyright © Acronis International GmbH, 2002-2014
Page 42

3. Click on Resource and select the PostgreSQL and Acronis Access Gateway Server services as
dependencies.Press Apply and close the window.
Note: If you want to run the Gateway and Access servers on different IP addresses add the second IP as a
resource to the Acronis Access Service group and set it as a dependency for the network name.
Bringing the service group online and using the Configuration Utility
1. Right-click on the Acronis Access service group and press Bring this application or service group
online.
2. Launch the Configuration Utility. On a clean install, this is generally located at C:\Program
Files (x86)\Acronis\Access\Configuration Utility
42 Copyright © Acronis International GmbH, 2002-2014
Page 43
3. Configure the Acronis Access Gateway Server service to listen on the IP address(es) for the
Acronis Access Service group.
4. Configure the Acronis Access Server service to listen on the IP address(es) for the Acronis Access
Service group.
Note: If Redirect requests from port 80 is selected, Tomcat will listen for incoming traffic on the unsecure
port 80 and redirect it to the HTTPS port you have specified above. If you have another program listening
on port 80, do not check this box.
43 Copyright © Acronis International GmbH, 2002-2014
Page 44
5. Configure the Acronis Access File Repository to listen on localhost and change the Filestore path
to be on the shared disk. This path should be the same for both nodes.
6. Click OK to complete the configuration and restart the services.
Installation and configuration on the second node
1. Disable any anti-virus software you have or it may interrupt the installation procedure resulting
in a failed installation.
2. Install Acronis Access on the second node, but this time use the default Postgres Data location
and the same postgres user password as for the first node.
3. Complete the installation.
4. Configure your Gateway Server's database to be on a location on a shared disk.
a. Navigate to C:\Program Files (x86)\Acronis\Access\Gateway Server\
b. Find the database.yml file and open it with a text editor.
c. Find this line: database_path: './database/' and replace ./database/ with the path
you want to use (e.g. database_path: 'S:/access_cluster/database/').
Note: Use slashes(/) as a path separator.
Note: You can copy the configured database.yml from the first node and paste it to the second node.
Note: The path should match the path set on the first node.
5. Move the Acronis Access service group to the second node. To do so, right-click on the service
group and click on Move to the second node.
6. Launch the Configuration Utility. On a clean install, this is generally located at C:\Program
Files (x86)\Acronis\Access\Configuration Utility
44 Copyright © Acronis International GmbH, 2002-2014
Page 45

7. Configure the Acronis Access Gateway Server service to listen on the IP address(es) for the
Acronis Access Service group.
8. Configure the Acronis Access Server service to listen on the IP address(es) for the Acronis Access
Service group.
Note: If Redirect requests from port 80 is selected, Tomcat will listen for incoming traffic on the unsecure
port 80 and redirect it to the HTTPS port you have specified above. If you have another program listening
on port 80, do not check this box.
45 Copyright © Acronis International GmbH, 2002-2014
Page 46

9. Configure the Acronis Access File Repository to listen on localhost and change the Filestore path
to be on the shared disk. This path should be the same for both nodes.
10. Click OK to complete the configuration and restart the services.
2.3 Installing Acronis Access on a Windows 2012
Microsoft Failover Cluster
Installing Acronis Access
Please make sure you are logged in as an administrator before installing Acronis Access.
1. Download the Acronis Access installer.
2. Disable any anti-virus software you have or it may interrupt the installation procedure resulting
in a failed installation.
3. Double-click on the installer executable.
4. Press Next to begin.
5. Read and accept the license agreement.
6. Press Install.
46 Copyright © Acronis International GmbH, 2002-2014
Page 47

Note: If you're deploying multiple Acronis Access servers, or you are installing a non-standard configuration,
you can select which components to install from the Custom Install button.
7. Either use the default path or select a new one for the Acronis Access main folder and press OK.
8. Set a password for the user Postgres and write it down. This password will be needed for
database backup and recovery.
9. Choose a location on a shared disk for the Postgres Data folder and press Next.
10. A window displaying all the components which will be installed appears. Press OK to continue.
When the Acronis Access installer finishes, press Exit.
Creating the role
1. Open the Failover Cluster Manager and right-click on Roles.
47 Copyright © Acronis International GmbH, 2002-2014
Page 48

2. Select Create empty role. Give the role a proper name. (e.g. Acronis Access, AAS Cluster)
Configurations on the Active node
1. Configure your Gateway Server's database to be on a location on a shared disk.
a. Navigate to C:\Program Files (x86)\Acronis\Access\Gateway Server\
b. Find the database.yml file and open it with a text editor.
c. Find this line: database_path: './database/' and replace ./database/ with the path
you want to use (e.g. database_path: 'S:/access_cluster/database/').
Note: Use slashes(/) as a path separator.
Note: You can copy the configured database.yml from the first node and paste it to the second node.
48 Copyright © Acronis International GmbH, 2002-2014
Page 49
Adding all of the necessary services to the Acronis Access role
Complete the following procedure for each of the following services: AcronisAccessGateway,
AcronisAccessPostgreSQL (this may be different depending on the version of Acronis Access),
AcronisAccessRepository and AcronisAccessTomcat
1. Right-click on the Acronis Access role and select Add a resource.
2. Select Generic Service.
49 Copyright © Acronis International GmbH, 2002-2014
Page 50

3. Select the proper service and press Next.
4. On the Confirmation window press Next.
5. On the summary window press Finish.
Setting an Access Point
1. Right-click on the Acronis Access role and select Add a resource.
50 Copyright © Acronis International GmbH, 2002-2014
Page 51

2. Select Client Access Point.
3. Enter a name for this access point.
4. Select a network.
5. Enter the IP address and press Next.
6. On the Confirmation window press Next.
51 Copyright © Acronis International GmbH, 2002-2014
Page 52

7. On the summary window press Finish.
Adding a shared disk
1. Right-click on the Acronis Access role and select Add Storage.
2. Select the desired shared drive.
Configuring dependencies
1. Select the Acronis Access role and click on the Resources tab
For PostgreSQL and Acronis Access File Repository services do the following:
1. Right-click on the appropriate service and select Properties.
2. Click on the Dependencies tab.
52 Copyright © Acronis International GmbH, 2002-2014
Page 53

3. Click on Resource and select the shared disk you have added.
4. Press Apply and close the window.
For the Acronis Access Gateway Server service do the following:
1. Right-click on the appropriate service and select Properties.
2. Click on the Dependencies tab.
3. Click on Resource and select the shared disk you have added and the Network Name (this is the
name of the Client access point).
53 Copyright © Acronis International GmbH, 2002-2014
Page 54
4. Press Apply and close the window.
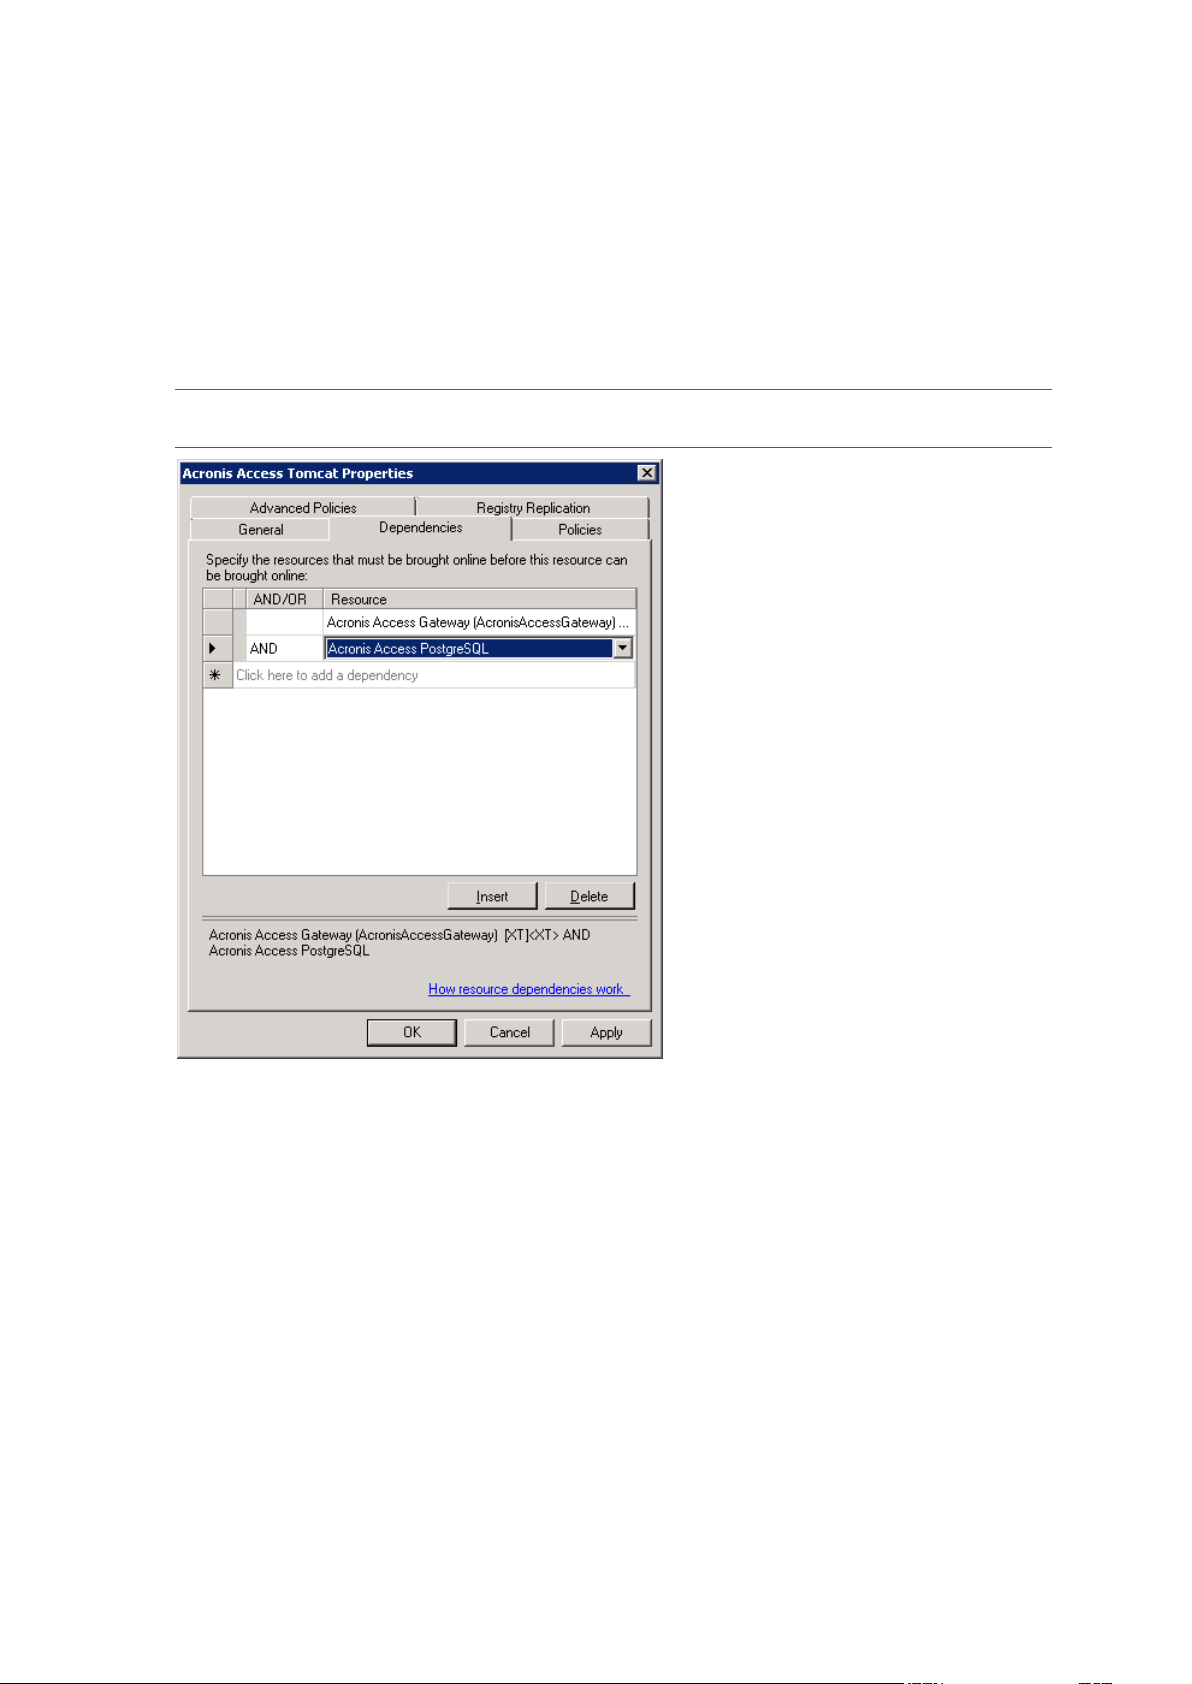
For the Acronis Access Tomcat service do the following:
1. Right-click on the appropriate service and select Properties.
2. Click on the Dependencies tab.
3. Click on Resource and select the PostgreSQL and Acronis Access Gateway Server services as
dependencies.Press Apply and close the window.
Note: If you want to run the Gateway and Access servers on different IP addresses add the second IP as a
resource to the Acronis Access role and set it as a dependency for the network name.
Starting the role and using the Configuration Utility
1. Right-click on the Acronis Access role and press Start role.
2. Launch the Configuration Utility. On a clean install, this is generally located at C:\Program
Files (x86)\Acronis\Access\Configuration Utility
54 Copyright © Acronis International GmbH, 2002-2014
Page 55

3. Configure the Acronis Access Gateway Server service to listen on the IP address(es) for the
Acronis Access Service group.
4. Configure the Acronis Access Server service to listen on the IP address(es) for the Acronis Access
Service group.
Note: If Redirect requests from port 80 is selected, Tomcat will listen for incoming traffic on the unsecure
port 80 and redirect it to the HTTPS port you have specified above. If you have another program listening
on port 80, do not check this box.
55 Copyright © Acronis International GmbH, 2002-2014
Page 56

5. Configure the Acronis Access File Repository to listen on localhost and change the Filestore path
to be on the shared disk. This path should be the same for both nodes.
6. Click OK to complete the configuration and restart the services.
Installation and configuration on the second node
1. Disable any anti-virus software you have or it may interrupt the installation procedure resulting
in a failed installation.
2. Install Acronis Access on the second node, but this time use the default Postgres Data location
and the same postgres user password as for the first node.
3. Complete the installation.
4. Configure your Gateway Server's database to be on a location on a shared disk.
a. Navigate to C:\Program Files (x86)\Acronis\Access\Gateway Server\
b. Find the database.yml file and open it with a text editor.
c. Find this line: database_path: './database/' and replace ./database/ with the path
you want to use (e.g. database_path: 'S:/access_cluster/database/').
Note: Use slashes(/) as a path separator.
Note: You can copy the configured database.yml from the first node and paste it to the second node.
Note: The path should match the path set on the first node.
For PostgreSQL you will need to manually replicate the registry:
1. Open Regedit.
2. Navigate to
HKEY_LOCAL_MACHINE\SYSTEM\CurrentControlSet\Services\AcronisAccessPostg
reSQL\
3. Open the key: ImagePath and change part of the value of the key to this: -D "The path you
selected for the PostgreSQL data location" (e.g. -D "E:/PostgreSQL/data").
56 Copyright © Acronis International GmbH, 2002-2014
Page 57

4. Open the key: DataDirectory and change the value to the path you have selected for the
PostgreSQL data folder location (e.g. E:/PostgreSQL/data).
5. Close Regedit and continue with the steps below.
6. Move the Acronis Access role to the second node.
Using the Configuration Utility on the second node
1. Launch the Configuration Utility. On a clean install, this is generally located at C:\Program
Files (x86)\Acronis\Access\Configuration Utility
57 Copyright © Acronis International GmbH, 2002-2014
Page 58

2. Configure the Acronis Access Gateway Server service to listen on the IP address(es) for the
Acronis Access Service group.
3. Configure the Acronis Access Server service to listen on the IP address(es) for the Acronis Access
Service group.
Note: If Redirect requests from port 80 is selected, Tomcat will listen for incoming traffic on the unsecure
port 80 and redirect it to the HTTPS port you have specified above. If you have another program listening
on port 80, do not check this box.
58 Copyright © Acronis International GmbH, 2002-2014
Page 59
4. Configure the Acronis Access File Repository to listen on localhost and change the Filestore path
to be on the shared disk. This path should be the same for both nodes.
5. Click OK to complete the configuration and restart the services.
59 Copyright © Acronis International GmbH, 2002-2014
Page 60

3 Upgrading
In this section
Upgrading from Acronis Access to a newer version ................................ 60
Upgrading to Acronis Access Advanced ................................................... 61
Upgrading from mobilEcho 4.5 or earlier ................................................ 61
Upgrading from activEcho 2.7 or earlier ................................................ 100
Upgrading Clustered Configurations ...................................................... 119
3.1 Upgrading from Acronis Access to a newer version
The upgrade procedure from a previous version of Acronis Access is a simplified process and requires
almost no configuration.
Backup the Apache Tomcat folder
On upgrade the Apache Tomcat may be upgraded and all of the current Tomcat configuration files
and log files will be removed. We recommend you make a copy of the Apache Tomcat folder, which
by default is found here: C:\Program Files (x86)\Acronis\Access\Common\.
Upgrade
1. Disable any anti-virus software you have or it may interrupt the installation procedure resulting
in a failed installation.
2. Double-click on the installer executable.
3. Press Next to begin.
4. Read and accept the license agreement.
5. Press Upgrade.
6. Review the components which will be installed and press Install.
7. Review the installed components and close the installer.
60 Copyright © Acronis International GmbH, 2002-2014
Page 61

8. You will be prompted to open the Configuration Utility, press OK.
In this section
Before You Begin ...................................................................................... 61
The Upgrade Process ............................................................................... 68
Downgrading to mobilEcho 4.5 ................................................................ 99
9. Verify that none of the settings in the Configuration Utility have changed. After you have verified
all of your settings are as expected, press OK to close the Configuration Utility and start the
Acronis Access services.
3.2 Upgrading to Acronis Access Advanced
In order to upgrade your Acronis Access Server to the Advanced version, all you need is a Acronis
Access Advanced license key.
To do so:
1. Open the Acronis Access Web interface as an administrator.
2. Open the General Settings tab and click on Licensing.
3. Add your license.
Adding a new license
1. Copy your license key.
2. Paste it in the Add license key field.
3. Read and accept the licensing agreement by selecting the checkbox.
4. Press Add License.
3.3 Upgrading from mobilEcho 4.5 or earlier
3.3.1 Before You Begin
Back up mobilEcho before upgrading
Please back up the data files used by your existing mobilEcho server. The Acronis Access installer
backs up these files, but to be safe, it is recommended that you have you own backup copy before
you begin the upgrade.
The process for backing up and restoring a mobilEcho 4.5 or earlier server can be found here:
http://docs.grouplogic.com/display/MobilEcho/mobilEcho+Server+Backup+and+Restoration
61 Copyright © Acronis International GmbH, 2002-2014
Page 62

Upgrade your version of mobilEcho to version 4.5 before proceeding with the upgrade to Acronis
Access.
Know your configuration
Before you proceed with the upgrade make sure you know the following:
Do you have both mobilEcho and activEcho installed?
Are they on the same computer or on separate machines?
Which ports is mobilEcho using? On which port is the File Server and on which port is the
Management server?
Which port is activEcho using? Is the File Repository on the same machine?
Enhancements
Acronis Access includes a number of enhancements that improve the configuration and management
of mobilEcho servers, as well as consolidate management of both the mobilEcho and activEcho
products into a single console. This guide will describe the architectural and functional changes you’ll
need to consider as you upgrade to Acronis Access.
In Acronis Access, you don't need to setup Network Reshare Path Mapping, because we're doing it
automatically, but you have to have a "Folder" Data Source created that points to each server
hosting home directories.
You must carefully plan for your upgrade
Acronis Access introduces extensive architectural and functional changes to mobilEcho’s software
services, database/settings locations, and administration. While these changes introduce powerful
new features and integration, the upgrade to Acronis Access requires careful consideration.
For single server deployments of mobilEcho, the process is fairly straightforward. If you are using a
reverse proxy server, a load balancer, have multiple mobilEcho servers, or are using Microsoft
Failover Clustering, it is essential that you understand the upgrade considerations in this document
for your specific scenario.
This document includes the details you need to plan for and safely upgrade to Acronis Access. It is
highly recommended that you perform this upgrade on a test environment that simulates your
unique mobilEcho deployment, before you upgrade your production mobilEcho server(s).
Load balanced mobilEcho servers and Microsoft Failover Clusters
If you have deployed multiple mobilEcho servers front-ended by a load balancer or if you are running
mobilEcho on a Microsoft Failover Cluster, you will need to upgrade to Acronis Access 5.1 or newer.
A new feature has been introduced in 5.1 that allows groups of load balanced Gateway servers to be
automatically administered from within the Acronis Access Server console. This feature eliminates
the need to replicate registry settings and script updates to your servers. Adding a new data source
(volume) to your servers is a one step process that is handled automatically by the management
console. For more information, visit the Cluster Groups article.
62 Copyright © Acronis International GmbH, 2002-2014
Page 63

Installing and upgrading mobilEcho on a Windows Failover Cluster is a complicated process. The architecture
changes introduced in mobilEcho 5.0 require change to the way mobilEcho works on Windows Failover Clusters.
For instructions on installing Acronis Access on a cluster, visit the Installing Acronis Access on a cluster (p. 18)
article.
For instructions on upgrading a mobilEcho cluster to a Acronis Access cluster, visit the Upgrading Acronis Access
on a cluster (p. 123) article.
Architectural and Terminology Changes
Acronis has consolidated the mobilEcho and activEcho products into a common software platform.
These two products continue to be licensed separately and can be used separately or together, but
they now share a common installer and administration console. This common web-based console is
called the Acronis Access Server.
mobilEcho 4.5 and earlier included two management consoles:
mobilEcho Administrator – This Windows program was used to define the file share “Volumes” that
were available to mobilEcho clients, to monitor active users, and to configure general mobilEcho File
Access Server settings.
mobilEcho Client Management Administrator – This web-based console was used to onboard,
monitor and remote wipe mobilEcho client users, to define client security and configuration policies,
and to assign the mobilEcho servers, network folder shortcuts, and synchronized folders that appear
63 Copyright © Acronis International GmbH, 2002-2014
Page 64

automatically within the mobilEcho app.
With the release of Acronis Access, these two management consoles have been combined into a
single web-based console called Acronis Access Server.
The Acronis Access Server is a web application that fills the following roles:
mobilEcho administration console
activEcho administration console
activEcho client web interface
If you are only using the mobilEcho product, your existing mobilEcho Client Management
Administrator web console (typically running on port 3000 of your mobilEcho server) will be
upgraded to an Acronis Access Server web console when you upgrade to Acronis Access.
The functions within the mobilEcho Administrator Windows program are now handled by the Acronis
Access Server web console. Upon upgrading to Acronis Access, you will no longer use the mobilEcho
Administrator to configure your mobilEcho File Access Server service and it will be removed from
your mobilEcho server.
Settings are no longer stored in the Windows Registry
64 Copyright © Acronis International GmbH, 2002-2014
Page 65

Earlier versions of mobilEcho stored mobilEcho File Access Server settings and configured Volumes in
the Windows Registry. When upgrading to Acronis Access, these settings are moved to an internal
SQL database. If you have any automated processes that add mobilEcho Volumes directly to the
Windows Registry, or that back up mobilEcho’s registry settings, these processes will need to be
modified to act on the SQL database instead.
On an upgraded server, this SQL database is located here by default:
C:\Program Files (x86)\Group Logic\mobilEcho Server\database\mobilEcho.sqlite3
If you are managing Volumes for a set of load balanced mobilEcho servers by directly editing the
registry, a new clustered mobilEcho server management feature is being introduced that will
alleviate the need to make Volume changes in the registry.
Administering your Acronis Access server
Existing settings
All existing mobilEcho 4.5 or earlier volumes, enrolled users, policies, assigned servers and folders,
and allowed apps are migrated to your Acronis Access Server during the upgrade process. Existing
mobilEcho client users will continue to connect to the server without any client side changes
necessary, and will receive the same policies and data sources. While it is recommended they
upgrade to the Acronis Access iOS client app or Acronis Access Android client app, older versions of
the client app are compatible with the Acronis Access server.
Configuring server administrators
Any existing users or groups configured as mobilEcho administrators before your upgrade to Acronis
Access continue to have full admin rights to the Acronis Access Server web console. Acronis Access
introduces new role-based admin rights that can be used to limit admin capabilities for specific users
or groups. To add or edit administrators, visit the Administrators page on the General Settings menu.
65 Copyright © Acronis International GmbH, 2002-2014
Page 66

Email Templates
If you have customized the email template used for the mobilEcho Enrollment Invitation email that is
sent to your users, this email template is not migrated when upgrading to Acronis Access. There is a
new interface for editing email templates. In the Acronis Access Console, you will need to open the
Email Templates page in the General Settings menu and modify the email template as required. For
more information, visit the Email Template Settings article.
Note: A copy of your previous mobilEcho templates can be found in the Legacy mobilEcho files folder by default
located here: C:\Program Files (x86)\Group Logic\Access Server\Legacy mobilEcho files. The
files are named invitation.html.erb and invitation.txt.erb. These files can be used as a reference when
customizing the new templates.
Data Source / Volume management
Acronis Access consolidates the server administration features of the mobilEcho Administrator
Windows program and the mobilEcho Client Management Administrator web console into a single
web interface. By doing so, the concept of Volumes is no longer required.
Giving users access to a new file share or SharePoint location is now a one step process. To do so,
click Add New Folder on the Folders tab of the Data Sources page. In this single step, you will:
1. Give the Folder a Display Name that your users will see
2. Select the Gateway Server you would like to use to provide access to this data source
3. Select the type of data source: Local folder on the Gateway Server, SMB/CIFS share, SharePoint
Site or Document Library, or activEcho server.
4. Select whether this folder is automatically synchronized to the users is it assigned to.
5. Select whether this folder is displayed in the root of the mobilEcho server, assuming your users
are configured to allow browsing the root of the server.
66 Copyright © Acronis International GmbH, 2002-2014
Page 67

6. Assign this folder to a collection of Active Directory (AD) users or groups so that it automatically
appears in their mobilEcho app.
To configure a Gateway Server to automatically appear in the mobilEcho client app, use the Gateway
Servers Visible on Clients tab. On this page you can assign AD users or groups to your Gateway
Server(s) and these users will see these servers listed in their mobilEcho app. They will be able to
view and browse into any Folders that have the “Show when browsing server” property enabled AND
that they have file permissions to access.
Start using advanced mobilEcho Client Management features
If your existing mobilEcho server did not have the mobilEcho Client Management features configured,
the Acronis Access install process will guide you though the basic configuration that will allow you to
start using these advanced features.
To get started you will be asked for LDAP settings to allow Acronis Access Server to enumerate your
Active Directory users and groups and for SMTP settings so that enrollment email invitations can be
sent to your users.
67 Copyright © Acronis International GmbH, 2002-2014
Page 68

Once this configuration is performed, you can take advantage of user and group policies, per-device
tracking and many additional features.
New Audit Logging option
Acronis Access includes a new Audit Logging feature that allows Acronis Access Gateway servers to
report all file activities back to the Acronis Access web console. These activities are stored in a
consolidated Audit Log that can be used to audit all file operations being performed by users.
Audit Logging is disabled by default on Gateway Servers. To enable audit logging on a Gateway Server,
visit the Gateway Servers page, click the Details button for the desired server, then select the Audit
Logging option on the Logging tab.
Events will then be logged into the Audit Log, accessible from the main menu of the Acronis Access
Server.
3.3.2 The Upgrade Process
Acronis Access Upgrade Process
First, please identify the type of mobilEcho deployment you will be upgrading. The instructions for
these scenarios are detailed in the next section of this document. The most common scenarios are:
1. Single mobilEcho Server without Client Management configured
A single Windows server, running the mobilEcho File Access Server service only
2. Single mobilEcho Server with Client Management
A single Windows server, running both the mobilEcho File Access Server service and the
mobilEcho Client Management service
3. Multiple mobilEcho Servers with Client Management
Multiple Windows servers running the mobilEcho File Access Server service, with one of
those Windows servers also running the mobilEcho Client Management service
4. Multiple mobilEcho Servers front-ended by a load balancer
One standalone Windows server running the mobilEcho Client Management service, and two
or more Windows servers running the mobilEcho File Access Server service only, front-ended
by a load-balancer.
5. Windows Failover Cluster
Supported in version 5.0.3 or newer.
A multi-node Windows Failover Cluster running mobilEcho on 1 or more active/active or
active/passive virtual servers.
68 Copyright © Acronis International GmbH, 2002-2014
Page 69

In this section
Upgrading a single mobilEcho server without Client Management configured 69 Upgrading a single mobilEcho server with Client Management enabled 81
Upgrading multiple mobilEcho servers with Client Management ........... 94
Upgrading a single mobilEcho server with Client Management enabled and an activEcho server 99
Important notes on Scenario 4 – Load Balanced mobilEcho File Access Servers
If you are running multiple mobilEcho File Access Servers front-ended by a load balancer, each of these
mobilEcho servers must be kept configured with identical mobilEcho Volumes, so that users can connect to any
node to access their files. The most common way to maintain identical Volumes on these sets of load balanced
servers is to replicate the mobilEcho Volumes settings, which are stored in the registry in mobilEcho 4.5 or
earlier.
In Acronis Access, the Volumes settings have been moved into a SQL database. If you upgrade to Acronis Access,
your existing scripted registry updates used when adding new volumes to your mobilEcho servers will cease to
work. A new feature has been introduced in 5.1 that allows groups of load balanced Gateway servers to be
automatically administered from within the Acronis Access Server console. This feature eliminates the need to
replicate registry settings and script updates to your servers. Adding a new data source (volume) to yo ur servers
is a one step process that is handled automatically by the management console. For more information, visit the
Cluster Groups article.
Important notes on Scenario 5 – Windows Failover Cluster
Installing and upgrading mobilEcho on a Windows Failover Cluster is a complicated process. The architecture
changes introduced in mobilEcho 5.0 require change to the way mobilEcho works on Windows Failover Clusters.
For instructions on installing Acronis Access on a cluster, visit the Installing Acronis Access on a cluster (p. 18)
article.
For instructions on upgrading a mobilEcho cluster to a Acronis Access cluster, visit the Upgrading Acronis Access
on a cluster (p. 123) article.
3.3.2.1 Upgrading a single mobilEcho server without Client Management
configured
Scenario 1 - Upgrading a single mobilEcho server without Client Management configured
In this scenario, you have a single Windows Server running just the mobilEcho File Access Server
service. With this architecture, you have not enabled the optional mobilEcho Client Management
Administrator web console and are not using mobilEcho’s policy and remote management features.
When your users set up mobilEcho, they manually enter their server name, username, and password
into the mobilEcho app.
69 Copyright © Acronis International GmbH, 2002-2014
Page 70

When upgrading to Acronis Access, your mobilEcho File Access Server is upgraded to an Acronis
Access Gateway Server. This service will continue to accept connections from mobilEcho clients and
to act as the gateway to any file server, NAS or SharePoint data sources your users are accessing.
The upgrade will also install the Acronis Access Server web console. This new console replaces the
mobilEcho Administrator Windows program previously used to administer your mobilEcho server.
The Acronis Access Server web console allows you to administer your mobilEcho servers from one
unified web interface and will allow you to take advantage of additional client management features
if you desire.
To perform an upgrade to Acronis Access:
1. Backup all of the necessary files following these guides: mobilEcho 4.5 Backup and/or activEcho
2.7 backup.
2. Disable any anti-virus software you have or it may interrupt the installation procedure resulting
in a failed installation.
3. Download the Acronis Access Server installer to your mobilEcho server and run the installer.
a. To access the latest installer, please visit: http://support.grouplogic.com/?page_id=3598
b. You will need to enter your product serial number for verification before downloading the
installer.
c. The installer file is named: AcronisAccessSetup.exe
4. Click Next on the Welcome Screen.
70 Copyright © Acronis International GmbH, 2002-2014
Page 71
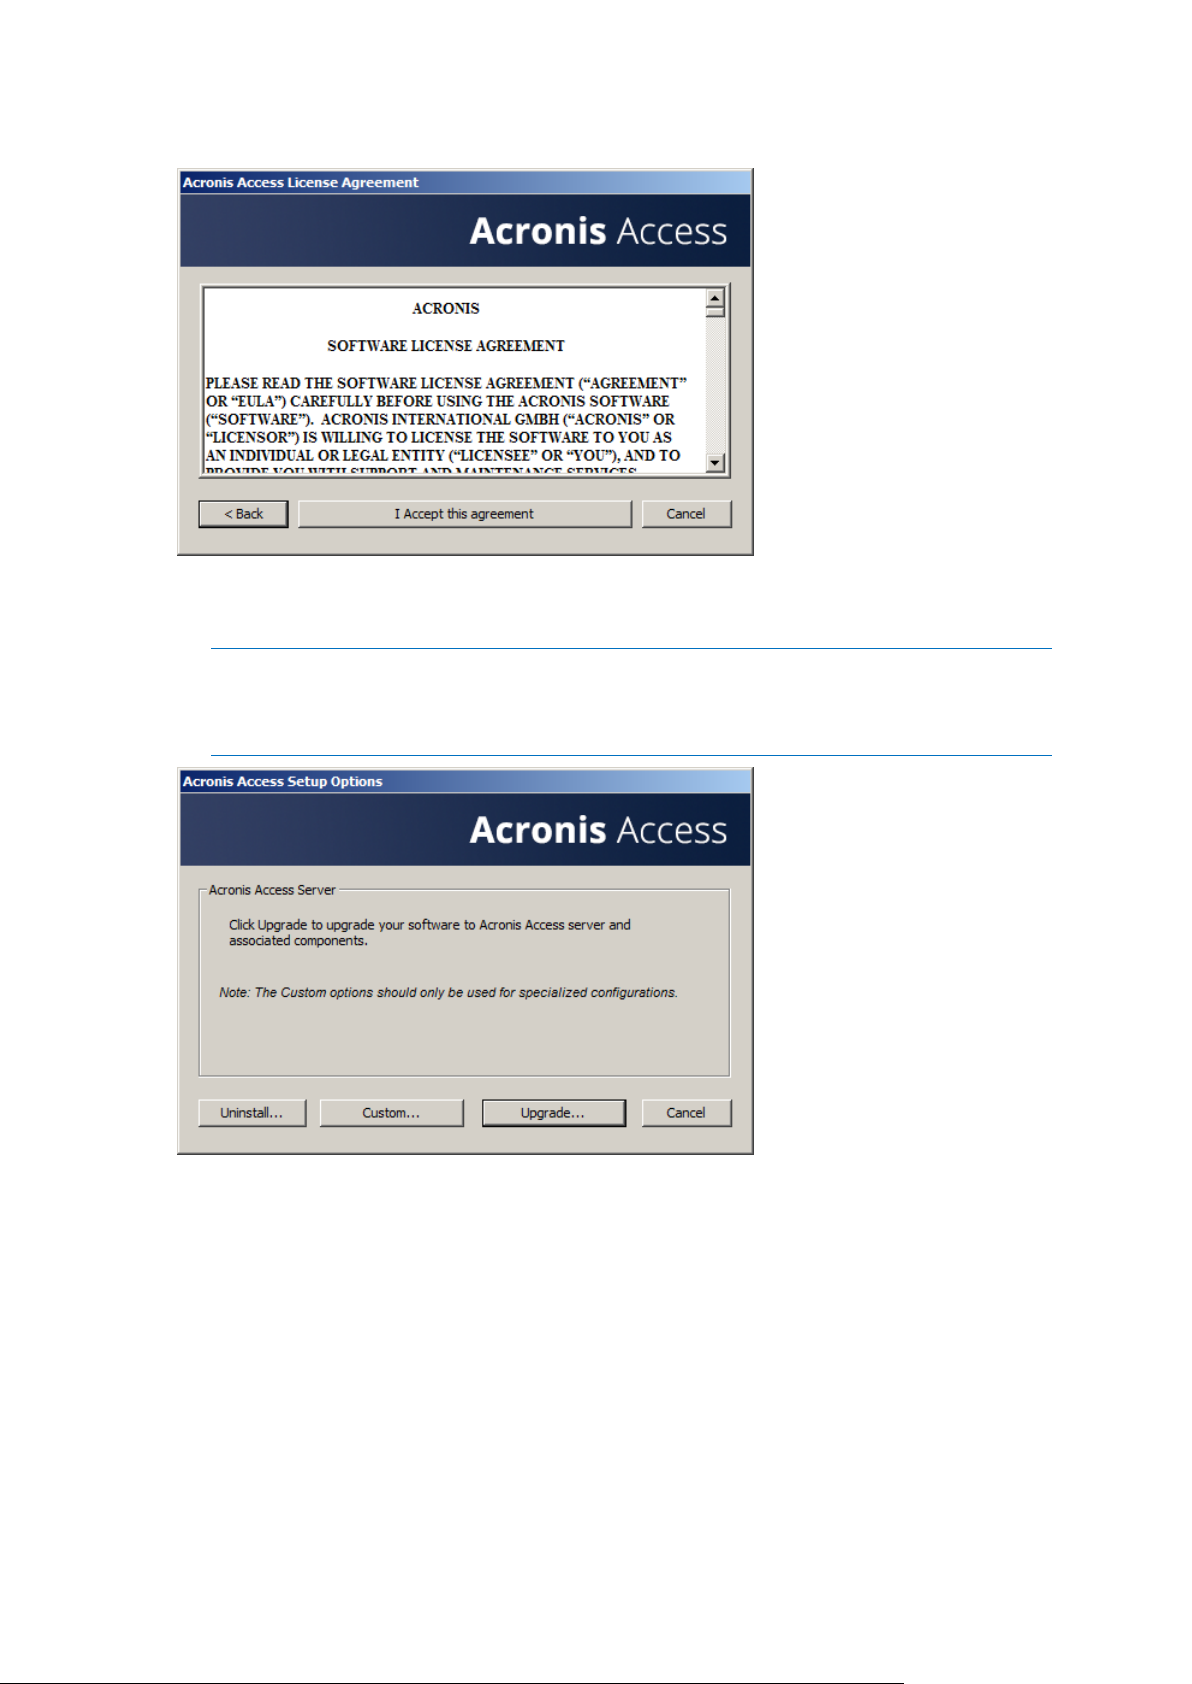
5. Please accept the license agreement.
6. Click the Upgrade option to automatically upgrade your mobilEcho File Access Server service to
an Acronis Access Gateway Server. In the upgrade process, the Acronis Access Server and its
required services will also be installed.
Note: Do not choose Custom and install only the Acronis Access Gateway Server. The Acronis Access
Server is the new web console that replaces the mobilEcho Administrator Windows program. It is
required to administer your mobilEcho server. If you do not install it, you will have no means to change
your mobilEcho settings or to give access to new file shares.
71 Copyright © Acronis International GmbH, 2002-2014
Page 72

7. Select an installation location for the Acronis Access components being installed. If you are
upgrading an existing mobilEcho server, these paths will default to your existing installation
location. We recommend you do not change these installation paths.
8. The Acronis Access Server uses a PostgreSQL database to store its settings. This database is
required and is installed automatically.
Note: Please enter and confirm a Super-User password for the “postgres” administrative account. Be
sure to record this password in a safe place.
Note: It is not recommended that you alter the PostgresSQL install location or port.
72 Copyright © Acronis International GmbH, 2002-2014
Page 73

9. Please review the services being installed and upgraded. Then click Install to begin the upgrade.
Note: All required components will be automatically installed in sequence. This may take 5 to 15
minutes depending on your server. Future upgrade installs will be quicker.
10. Once installation has completed, a summary of the components installed is shown. Click Exit to
continue.
11. At this point in the upgrade process, all necessary software has been installed, but you must now
configure the network interfaces, ports, and certificates that will be used.
73 Copyright © Acronis International GmbH, 2002-2014
Page 74
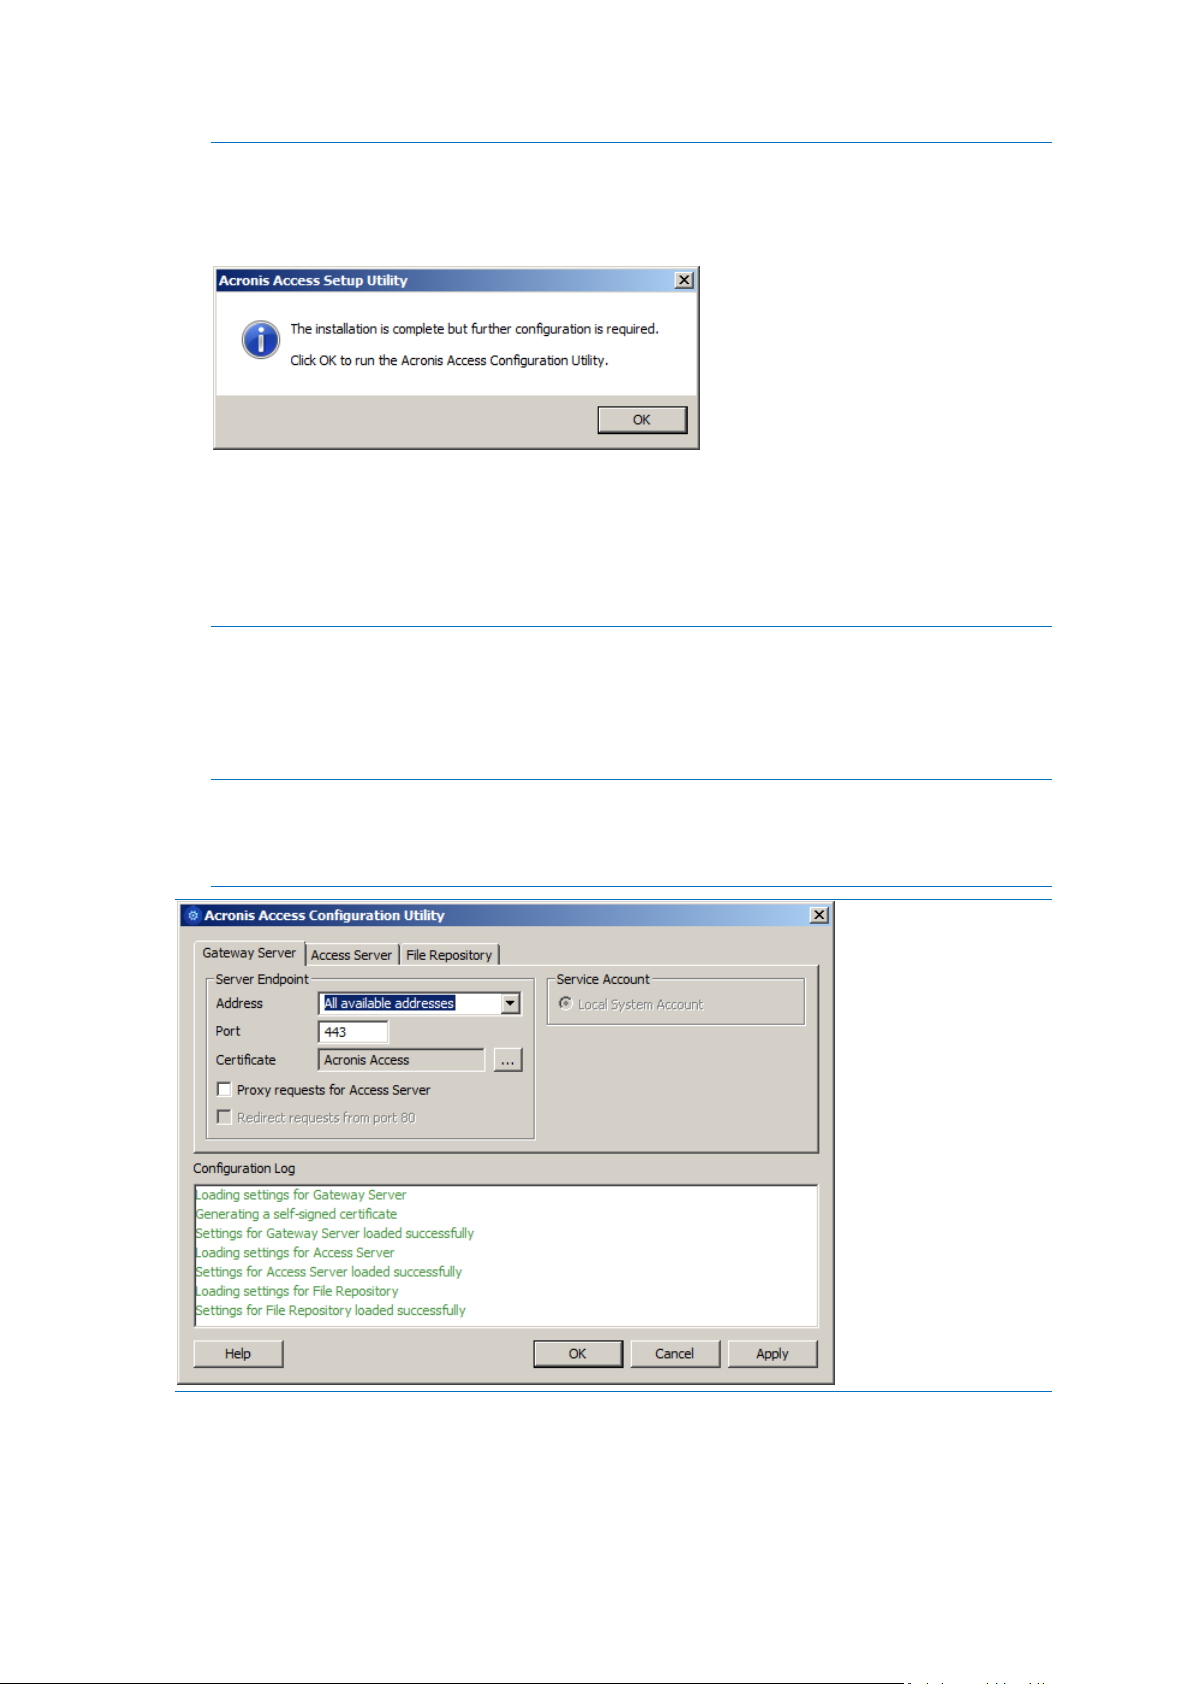
IMPORTANT NOTE: If you do not proceed with this configuration step, your mobilEcho server will not
be functional. This step is mandatory.
When exiting the installer, you will be prompted to run the Acronis Access Configuration Utility. Click
OK to continue.
If you accidently skip this step or need to change your network interfaces, ports, or certificates in the
future. You can manually run the configuration utility at any time.
On upgraded mobilEcho servers, the utility’s default location is:
C:\Program Files (x86)\Group Logic\Configuration Utility\AcronisAccessConfiguration.exe
12. Within the Configuration Utility, the Gateway Server tab is used to configure your Acronis Access
Gateway Server’s network address, port, and certificate. The Acronis Access Gateway Server is
the core mobilEcho service that your mobilEcho clients connect to and that gives access to your
file servers, NAS, and SharePoint servers. This service was called the mobilEcho File Access Server
prior to Acronis Access.
Note: You existing settings are retained. Please confirm that these settings match your existing
mobilEcho File Access Server settings. This service typically runs on all available network addresses on
port 443. If you have an existing SSL server identity certificate, it will be automatically selected. If you
do not, a self-signed certificate will be generated.
74 Copyright © Acronis International GmbH, 2002-2014
Page 75

13. The Access Server tab is used to configure your Acronis Access Server’s network address, port,
and certificate. The Acronis Access Server is the web console that is used to perform all server
administration and remote client management. This console replaces the mobilEcho
Administrator Windows program and is required.
Note: Please review the settings for the Access Server. The default settings are recommended. This web
console typically runs on all available network addresses on port 3000. If you have an existing SSL
server identity certificate, it will be automatically selected. If you do not, a self-signed certificate will be
generated.
14. Acronis Access Server requires that a File Repository location be selected. If you are using
mobilEcho only, this File Repository will not be used to store anything, but setting a location is
still required.
This repository is used by Acronis’ activEcho file sync and share features. These features will not be
enabled if you are upgrading a server that does not already have them installed, but you can chose to
enable them at a later time, if desired.
The default location for the File Repository is:
C:\ProgramData\Acronis\Access\FileStore
75 Copyright © Acronis International GmbH, 2002-2014
Page 76

If you would like to try out activEcho in the future, you may want to select a location on a data drive
instead of the C: drive. This location can be modified post-install, too.
15. Click OK to exit the Configuration Utility and apply these settings.
16. You will now log into the Acronis Access Server web console for the first time to complete your
configuration. You will be prompted to click OK to launch a web browser and complete this
configuration.
Required initial configuration of Acronis Access:
1. The Acronis Access Server web console should open automatically after completing the steps
above. It may take 30 seconds or so for the services to start up and the web page to load for the
first time.
2. If the web page does not load automatically, open a web browser and navigate to the Access
Server HTTPS address and port you selected in the Configuration Utility.
a. For example: https://mobilecho.mycompany.com:3000 or https://localhost:3000
76 Copyright © Acronis International GmbH, 2002-2014
Page 77

Note: Most of the settings in the SMTP, General Settings and LDAP pages should already be present from
your mobilEcho installation.
3. Acronis Access Server requires that a local administrator account be created. Please enter and
confirm a password for this local administrator account.
a. The username for this local administrator account is: administrator
b. Keep this local administrator password in a safe place. It will be needed to log in as an
administrator, until you configure additional administrative users.
c. Once your server is configured, you will be able to designate additional Active Directory users
or groups to act as administrators of the server.
4. You will now be presented with a setup wizard that will guide you though the remainder of the
configuration process.
5. Licensing
a) You will be prompted to enter the new type of license or continue using your old mobilEcho
license.
6. SMTP settings
77 Copyright © Acronis International GmbH, 2002-2014
Page 78
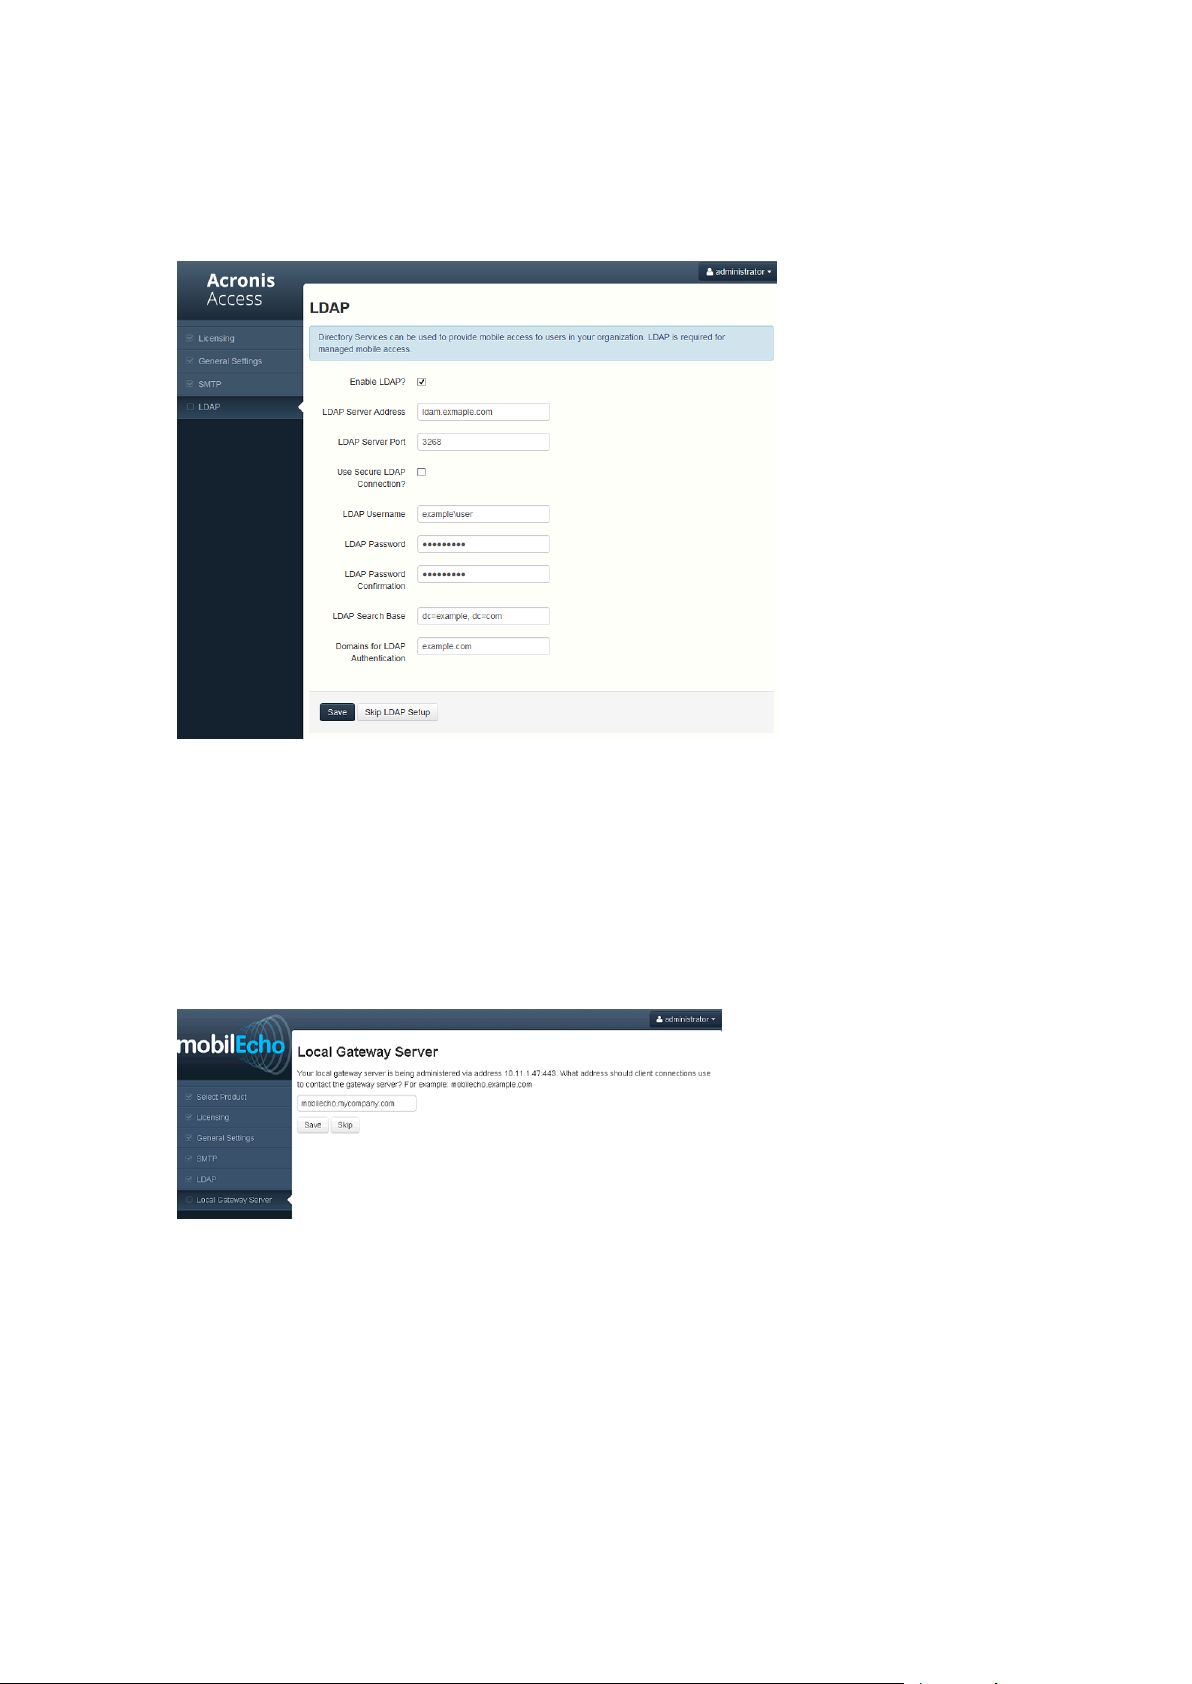
a. You will be prompted to configure the SMTP settings used by the Access Server to send email
alerts and client enrollment invitations.
b. There is an option to send a test email to confirm these settings.
7. LDAP settings
a. The Acronis Access Server needs an LDAP connection to search your Active Directory for the
users and groups you would like to assign policies and data sources to.
b. Please enter the LDAP information for an Active Directory server on your network. If you
have a multi domain network this will need to be a Global Catalog Server on port 3268 or
3269 (for SSL connections). Tool tips are provided for each field for more detail.
c. You are required to configure an LDAP username and password to be used when the server
makes request to LDAP.
d. The LDAP settings you enter will be tested when you save them.
8. Local Gateway Server – Client connection address
a. Your mobilEcho Gateway Server has been automatically paired for administration by your
Acronis Access Server web console. This connection is made by IP address by default, and can
be modified later.
b. In this step, you will need to enter the network address that your mobilEcho clients use to
connect to this mobilEcho server. This is typically a DNS address and may be the DNS address
of this server, but could be the address of a proxy server used to gain access to this server.
9. Your initial configuration is now complete.
a. Click Finish Configuration to continue.
78 Copyright © Acronis International GmbH, 2002-2014
Page 79

Working with your mobilEcho Gateway Server
Your Gateway Server is automatically registered during the setup process and will appear in the
Gateway Servers list, where you can adjust its settings and view its details and status.
When it was registered, the Volumes that existed on the mobilEcho Gateway Server prior to being
upgraded to Acronis Access were imported into the Data Sources – Folders list.
79 Copyright © Acronis International GmbH, 2002-2014
Page 80

There are no longer “Volumes” in mobilEcho 5.0. Instead of using Volumes to share data sources, you
will now create Folders. These Folders have an optional “Show when browsing server” property.
When this option is enabled, the Folder will appear when a user browses the root of the Gateway
Server in their mobilEcho app, just as Volumes were displayed in mobilEcho 4.5 or earlier.
All the Volumes from your mobilEcho 4.5 or earlier server were imported into to the Acronis Access
console as Folders with the “Show when browsing server” property enabled. So, they will continue to
appear when your users browse the root of a mobilEcho Gateway Server. Any Folders added later
can be configured to act like Volumes be enabling this setting. You can also begin using advanced
client management features, such as the ability to add Folders that automatically appear in the
mobilEcho client app for the list of Active Directory user or groups you assign them to.
As shown below, the 4 existing Volumes from this mobilEcho 4.5 server were imported into the
Folders list after Gateway Server registration, and they continue to appear when browsing the server
from the mobilEcho app.
80 Copyright © Acronis International GmbH, 2002-2014
Page 81

You can also begin to create and use client policies and officially enroll users with your server so that
they are managed by these policies. A Default policy that applies to all users can be enabled and
configured, or you can add custom policies based on Active Directory users and groups.
Once policies have been configured, you can use the Enroll Users page to send enrollment invitation
emails to your users so that they can enroll as managed users.
3.3.2.2 Upgrading a single mobilEcho server with Client Management
enabled
Scenario 2 - Upgrading a single mobilEcho server with Client Management enabled
In this scenario, you have a single Windows server that is running mobilEcho 4.5 or earlier. This
server has both the required mobilEcho File Access Server service running and the optional
mobilEcho Client Management Server service enabled.
When upgrading to Acronis Access, your mobilEcho File Access Server is upgraded to an Acronis
Access Gateway Server. This service will continue to accept connections from mobilEcho clients and
to act as the gateway to any file server, NAS or SharePoint data sources your users are accessing.
Your mobilEcho Client Management Administrator web console will be upgrade to an Acronis Access
Server web console. This new web console allows you to administer your mobilEcho servers and
clients from one unified web interface.
To perform an upgrade of Acronis Access:
1. Backup all of the necessary files following these guides: mobilEcho 4.5 Backup and/or activEcho
2.7 backup.
2. Disable any anti-virus software you have or it may interrupt the installation procedure resulting
in a failed installation.
3. Download the Acronis Access Server installer to your mobilEcho server and run the installer.
a. To access the latest installer, please visit: http://support.grouplogic.com/?page_id=3598
b. You will need to enter your product serial number for verification before downloading the
installer.
81 Copyright © Acronis International GmbH, 2002-2014
Page 82

c. The installer file is named: AcronisAccessSetup.exe
4. Click Next on the Welcome Screen.
5. Please accept the license agreement.
6. Click the Upgrade option to automatically upgrade your mobilEcho File Access Server service to
an Acronis Access Gateway Server. In the upgrade process, the Acronis Access Server and its
required services will also be installed.
82 Copyright © Acronis International GmbH, 2002-2014
Page 83

Note: Do not choose Custom and install only the Acronis Access Gateway Server. The Acronis Access
Server is the new web console that replaces the mobilEcho Administrator Windows program. It is
required to administer your mobilEcho server. If you do not install it, you will have no means to change
your mobilEcho settings or to give access to new file shares.
7. Select an installation location for the Acronis Access components being installed. If you are
upgrading an existing mobilEcho server, these paths will default to your existing installation
location. We recommend you do not change these installation paths.
8. The Acronis Access Server uses a PostgreSQL database to store its settings. This database is
required and is installed automatically.
Note: Please enter and confirm a Super-User password for the “postgres” administrative account. Be
sure to record this password in a safe place.
83 Copyright © Acronis International GmbH, 2002-2014
Page 84

Note: It is not recommended that you alter the PostgresSQL install location or port.
9. Please review the services being installed and upgraded. Then click Install to begin the upgrade.
Note: All required components will be automatically installed in sequence. This may take 5 to 15
minutes depending on your server. Future upgrade installs will be quicker.
84 Copyright © Acronis International GmbH, 2002-2014
Page 85

10. Once installation has completed, a summary of the components installed is shown. Click Exit to
continue.
11. At this point in the upgrade process, all necessary software has been installed, but you must now
configure the network interfaces, ports, and certificates that will be used.
IMPORTANT NOTE: If you do not proceed with this configuration step, your mobilEcho server will not
be functional. This step is mandatory.
When exiting the installer, you will be prompted to run the Acronis Access Configuration Utility. Click
OK to continue.
If you accidently skip this step or need to change your network interfaces, ports, or certificates in the
future. You can manually run the configuration utility at any time.
On upgraded mobilEcho servers, the utility’s default location is:
C:\Program Files (x86)\Group Logic\Configuration Utility\AcronisAccessConfiguration.exe
12. Within the Configuration Utility, the Gateway Server tab is used to configure your Acronis Access
Gateway Server’s network address, port, and certificate. The Acronis Access Gateway Server is
the core mobilEcho service that your mobilEcho clients connect to and that gives access to your
file servers, NAS, and SharePoint servers. This service was called the mobilEcho File Access Server
prior to Acronis Access.
85 Copyright © Acronis International GmbH, 2002-2014
Page 86

Note: You existing settings are retained. Please confirm that these settings match your existing
mobilEcho File Access Server settings. This service typically runs on all available network addresses on
port 443. If you have an existing SSL server identity certificate, it will be automatically selected. If you
do not, a self-signed certificate will be generated.
13. The Access Server tab is used to configure your Acronis Access Server’s network address, port,
and certificate. The Acronis Access Server is the web console that takes the place of your
mobilEcho Client Management Server web console.
Note: Please confirm the settings match your existing mobilEcho Client Management Server settings.
This web console typically runs on all available network addresses on port 3000. If you have an existing
SSL server identity certificate, it will be automatically selected. If you do not, a self-signed certificate
will be generated.
14. Acronis Access Server requires that a File Repository location be selected. If you are using
mobilEcho only, this File Repository will not be used to store anything, but setting a location is
still required.
86 Copyright © Acronis International GmbH, 2002-2014
Page 87

This repository is used by Acronis’ activEcho file sync and share features. These features will not be
enabled if you are upgrading a server that does not already have them installed, but you can chose to
enable them at a later time, if desired.
The default location for the File Repository is:
C:\ProgramData\Acronis\Access\FileStore
If you would like to try out activEcho in the future, you may want to select a location on a data drive
instead of the C: drive. This location can be modified post-install, too.
15. Click OK to exit the Configuration Utility and apply these settings.
16. You will now log into the Acronis Access Server web console for the first time to complete your
configuration. You will be prompted to click OK to launch a web browser and complete this
configuration.
Required initial configuration of Acronis Access:
1. The Acronis Access Server web console should open automatically after completing the steps
above. It may take 30 seconds or so for the services to start up and the web page to load for the
first time.
2. If the web page does not load automatically, open a web browser and navigate to the Access
Server HTTPS address and port you selected in the Configuration Utility.
a. For example: https://mobilecho.mycompany.com:3000 or https://localhost:3000
87 Copyright © Acronis International GmbH, 2002-2014
Page 88

Note: Most of the settings in the SMTP, General Settings and LDAP pages should already be present from
your mobilEcho installation.
3. Acronis Access Server requires that a local administrator account be created. Please enter and
confirm a password for this local administrator account.
a. The username for this local administrator account is: administrator
b. Keep this local administrator password in a safe place. It will be needed to log in as an
administrator, until you configure additional administrative users.
c. Once your server is configured, you will be able to designate additional Active Directory users
or groups to act as administrators of the server.
4. You will now be presented with a setup wizard that will guide you though the remainder of the
configuration process.
5. Licensing
a) You will be prompted to enter the new type of license or continue using your old mobilEcho
license.
6. SMTP settings
88 Copyright © Acronis International GmbH, 2002-2014
Page 89

a. You will be prompted to configure the SMTP settings used by the Access Server to send email
alerts and client enrollment invitations.
b. There is an option to send a test email to confirm these settings.
7. LDAP settings
a. The Acronis Access Server needs an LDAP connection to search your Active Directory for the
users and groups you would like to assign policies and data sources to.
b. Please enter the LDAP information for an Active Directory server on your network. If you
have a multi domain network this will need to be a Global Catalog Server on port 3268 or
3269 (for SSL connections). Tool tips are provided for each field for more detail.
c. You are required to configure an LDAP username and password to be used when the server
makes request to LDAP.
d. The LDAP settings you enter will be tested when you save them.
8. Your initial configuration is now complete.
a. Click Finish Configuration to continue.
Registering your mobilEcho Gateway Server(s)
When upgrading an existing mobilEcho 4.5 or earlier server, where the mobilEcho Client
Management service was configured, all the Servers that were configured on the Servers & Folders
page are imported into the Acronis Access Gateway Servers list.
These Gateway Servers are initially imported as Legacy gateway servers. This means they have not
yet been registered to be controlled and administered by the Acronis Access web console. This
registration is required to manage these Gateway servers once they have been upgraded to Acronis
Access.
In order to be registered for administration, these servers must first be upgraded to Acronis Access.
Until they are upgraded, you will continue to use the mobilEcho Administrator Windows program to
administer those servers.
As shown in the example below, the two servers in the Servers & Folder page in mobilEcho 4.5 now
appear on the Gateway Servers page.
89 Copyright © Acronis International GmbH, 2002-2014
Page 90
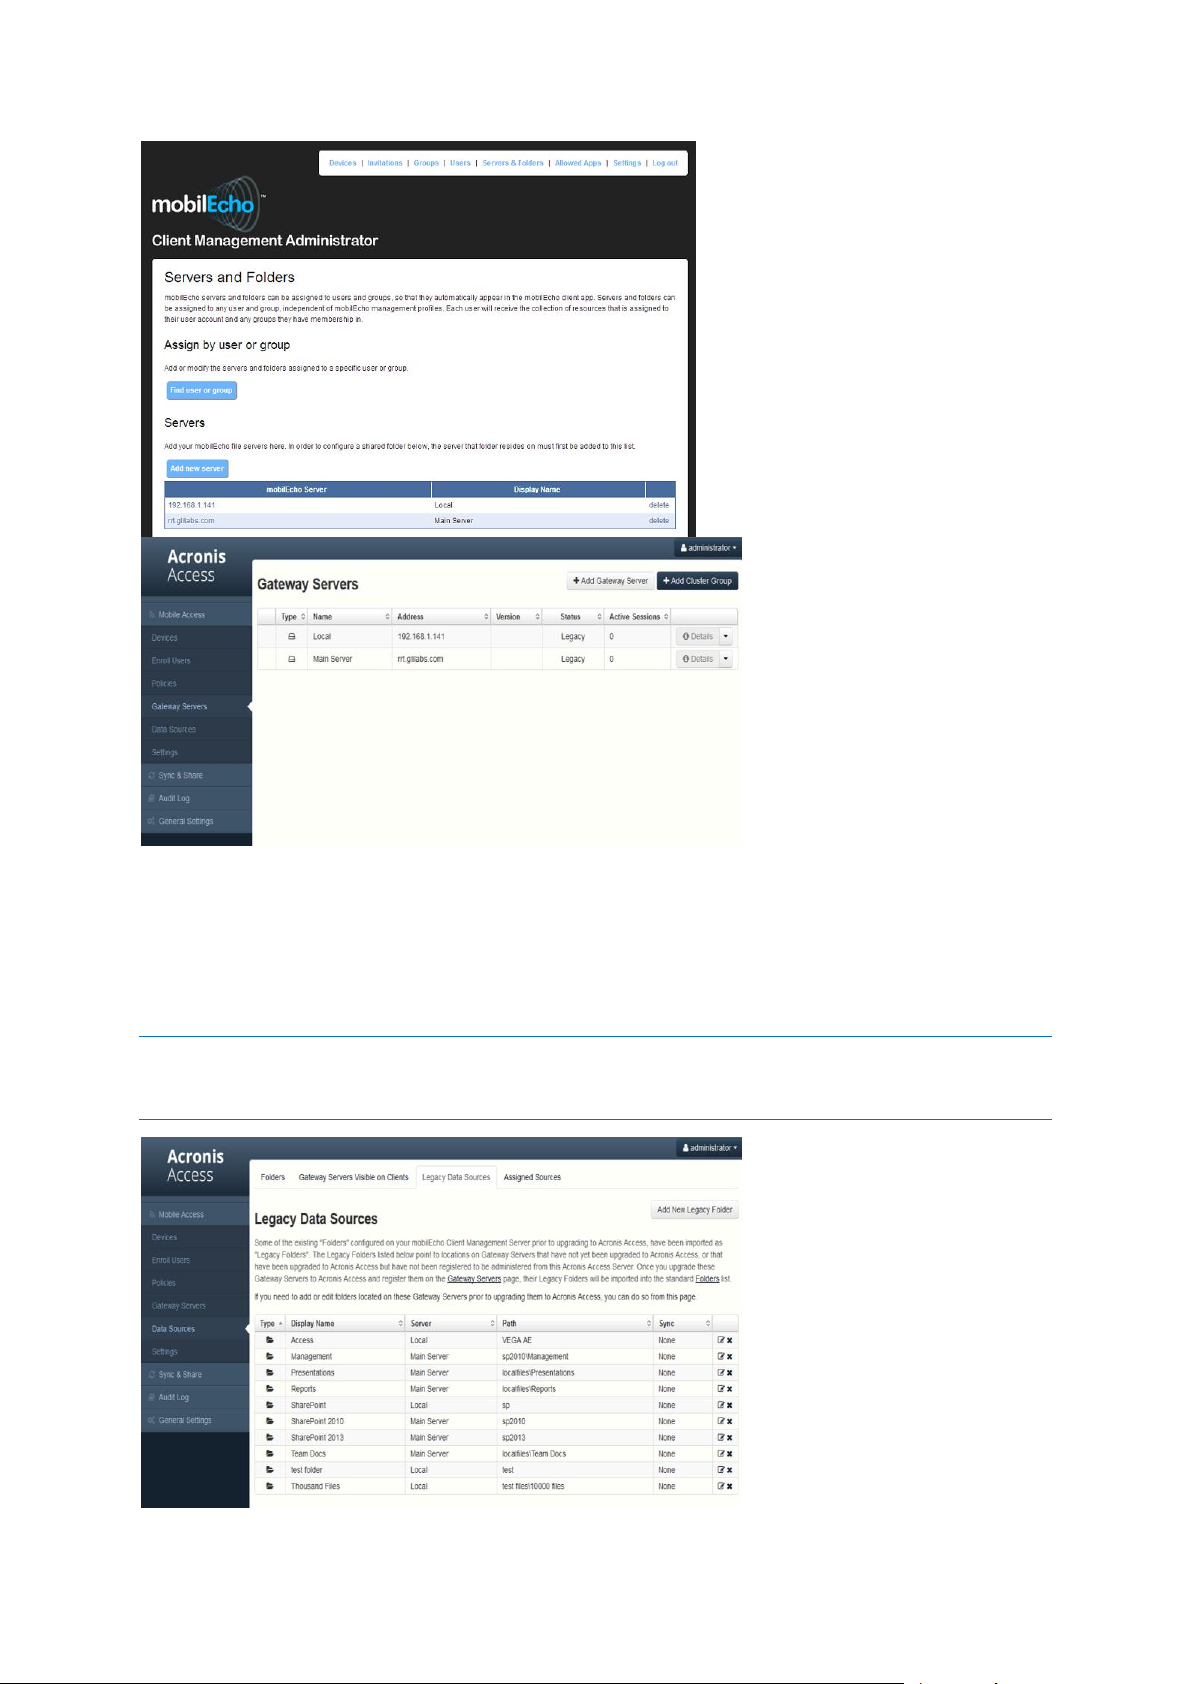
All the existing Folders configured in the mobilEcho 4.5 Client Management Administrator are first
migrated into the Legacy Data Sources tab on the Data Sources page. You can continue to add and
modify the folders on this page until you upgrade their associated Gateway Server to Acronis Access.
Once a Gateway Server is upgraded to Acronis Access and registered to be administered by this
Acronis Access server, the folders associated with that Gateway Server will be moved to the main
Folders tab on the Data Sources page.
Note: Each mobilEcho Gateway Server can only be administered by one Acronis Access console. If your
organization maintains multiple mobilEcho Client Management Servers (now called Acronis Access Servers), you
will need to deploy unique Gateway Servers for each Acronis Access Server.
90 Copyright © Acronis International GmbH, 2002-2014
Page 91

In this scenario, you should only have one Windows Server running the Acronis Access console and
the Gateway Server, so you will have just one server listed on the Gateway Servers page. This server
needs to be registered so that you can administer it.
1. Click the menu button for the Gateway Server on your Acronis Access server and select Register.
2. You will be asked if the existing network address for the server you are registering can be used to
directly access the server. The existing address is typically the network address that your mobile
device users must use to access the Gateway Server, so it’s possible this address points to a proxy
server or load balancer.
Note: If this is the case, you need to select “No” at this dialog and enter an alternate network address
that will be used by the Acronis Access server to gain direct network access to this Gateway Server
3. You will then be presented with the registration dialog.
Note: If your Gateway Server is using a self-signed SSL certificate, you will need to enable “Allow
connections from Acronis Access servers using self-signed certificates”.
Note: You will also need to enter an Administration Key, to enable the pairing with this remote server.
This is done to validate and secure the administrative relationship.
4. To obtain an Administration Key from your Gateway Server, open a new browser window or tab
and navigate to the Gateway Server’s HTTPS address. This should be the same address that is
listed in the “Address for administration and client connections” field.
Note: For security purposes, this must be done from a web browser running on the actual Windows
Server that the Gateway Server is running on. You will not be able to view your Administration Key
from a remote web browser.
91 Copyright © Acronis International GmbH, 2002-2014
Page 92

5. Enter the 12 digit Administration Key (including dashes) into the registration form and click Save.
Note: Once the server has been registered it will appear in the Gateway Servers list as registered and
you can adjust its settings and view its details and status.
When registered, the Volumes that existed on the mobilEcho Gateway Server prior to being
upgraded to Acronis Access are imported into the Data Sources – Folders list.
92 Copyright © Acronis International GmbH, 2002-2014
Page 93
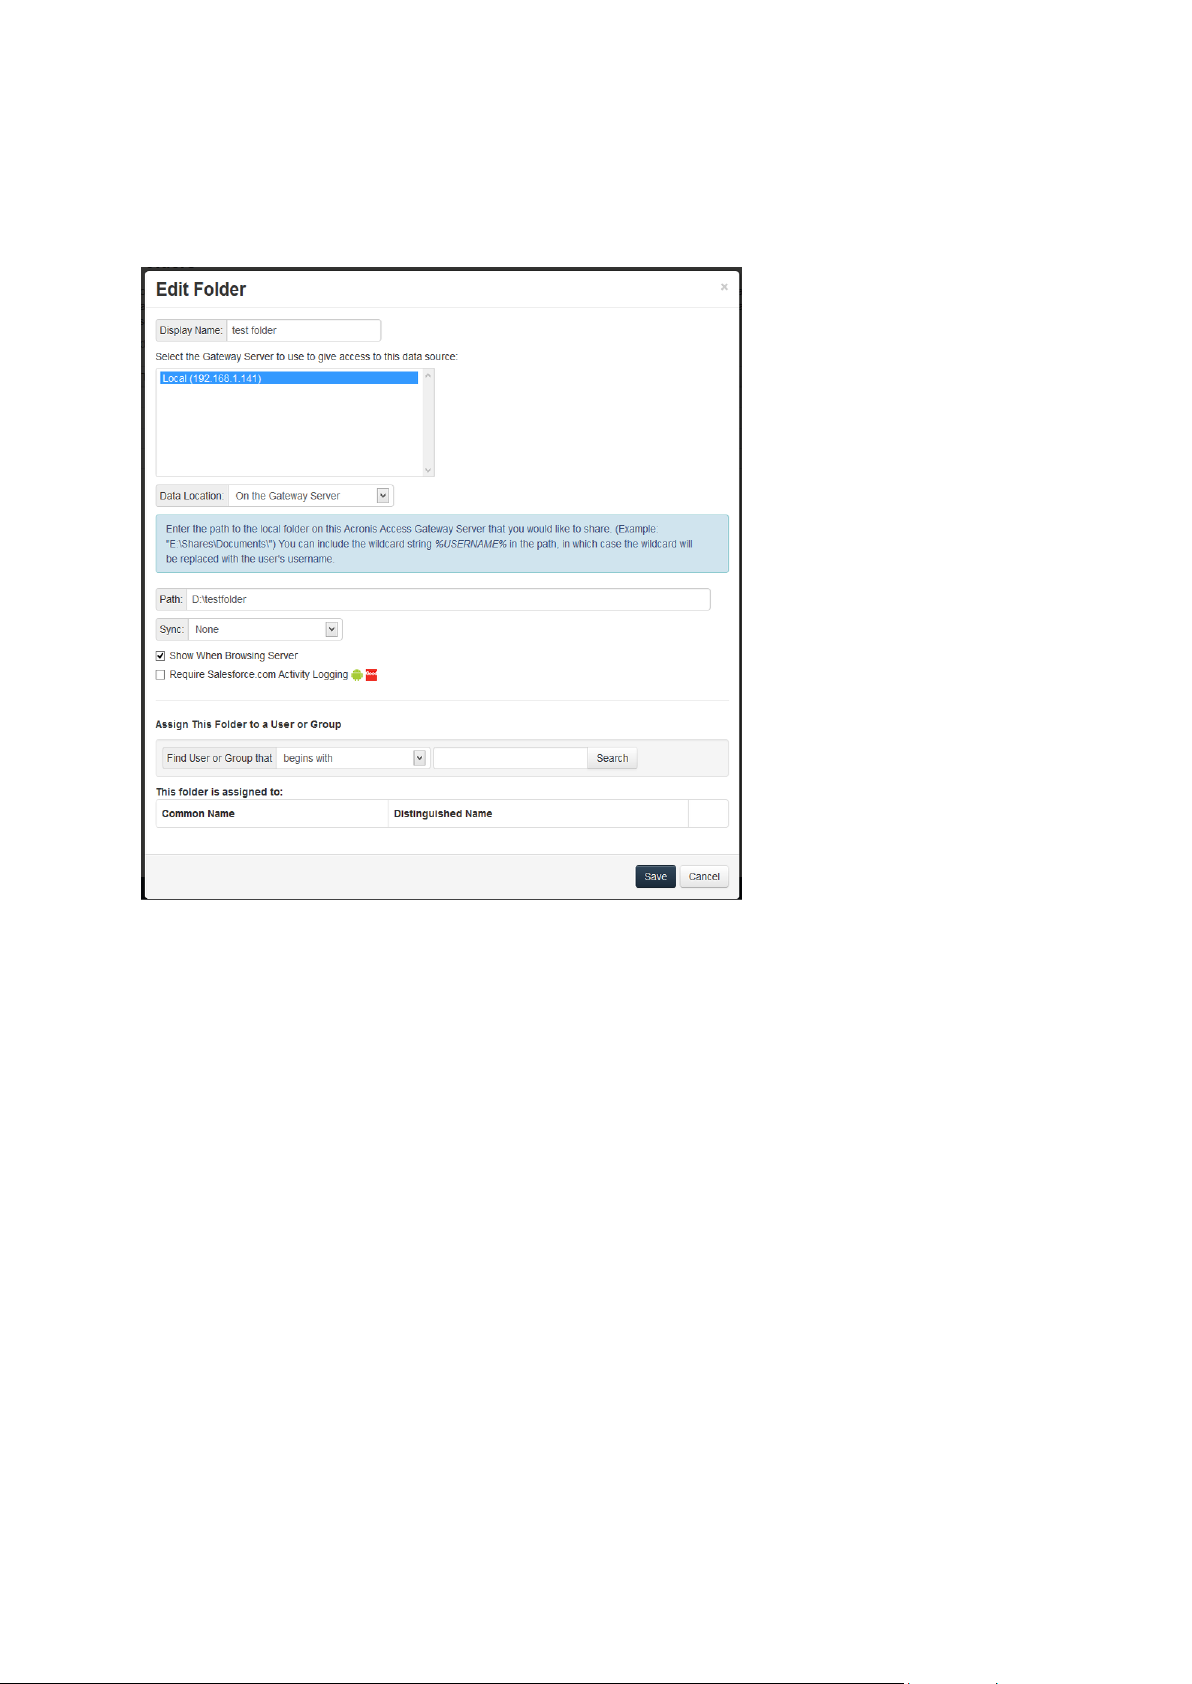
There are no longer “Volumes” in mobilEcho 5.0. Instead of using Volumes to share data sources, you
will now create Folders. These Folders have an optional “Show when browsing server” property.
When this option is enabled, the Folder will appear when a user browses the root of the Gateway
Server in their mobilEcho app, just as Volumes were displayed in mobilEcho 4.5 or earlier.
All the Volumes from your mobilEcho 4.5 or earlier server were imported into to the Acronis Access
console as Folders with the “Show when browsing server” property enabled. So, they will continue to
appear when your users browse the root of a mobilEcho Gateway Server. Any Folders added later
can be configured to act like Volumes be enabling this setting. You can also begin using advanced
client management features, such as the ability to add Folders that automatically appear in the
mobilEcho client app for the list of Active Directory user or groups you assign them to.
93 Copyright © Acronis International GmbH, 2002-2014
Page 94

As shown below, the 4 existing Volumes from this mobilEcho 4.5 server were imported into the
Folders list after Gateway Server registration, and they continue to appear when browsing the server
from the mobilEcho app.
3.3.2.3 Upgrading multiple mobilEcho servers with Client Management
Scenario 3 - Upgrading multiple mobilEcho servers with Client Management
94 Copyright © Acronis International GmbH, 2002-2014
Page 95

In this scenario, you have a multiple Windows servers running mobilEcho 4.5 or earlier. One server
has both the required mobilEcho File Access Server service running and the optional mobilEcho Client
Management Server service enabled. The other servers are just acting as mobilEcho File Access
Servers.
When upgrading to Acronis Access, your mobilEcho File Access Servers will be upgraded to Acronis
Access Gateway Servers. This service will continue to accept connections from mobilEcho clients and
to act as the gateway to any file server, NAS or SharePoint data sources your users are accessing.
The mobilEcho Client Management Administrator web console on your server acting as your
mobilEcho Client Management Server will be upgraded to an Acronis Access Server web console.
After upgrade, you will no longer use the mobilEcho Administrator Windows program on each
mobilEcho File Access Servers to administer those servers. This new web console will be used to
administer all of your mobilEcho servers and clients from one unified web interface.
To perform an upgrade of Acronis Access:
On the Windows Server acting as your mobilEcho Client Management Server:
1. Follow the instructions in Scenario 2 to upgrade the Windows Server that is acting as your
mobilEcho Client Management Server. This is the server that you connect to when you log into
the mobilEcho Client Management Administrator web console.
2. Once you complete that upgrade, you will have a functional Acronis Access Server web console
with the mobilEcho File Access Server (now called an Acronis Access Gateway Server) residing on
that Windows server registered for administration. You will also see your additional servers listed
on the Acronis Access Gateway Servers page as “Legacy” servers. In the example below, your
upgraded server “BGU2008” is registered and your yet to be upgraded server “Department
Server” has not yet been registered.
3. Next, you will upgrade each additional server that is acting as a mobilEcho File Access Server only.
Please follow the steps bellow.
On every Windows Server acting as a mobilEcho File Access Server only:
1. Backup all of the necessary files following these guides: mobilEcho 4.5 Backup and/or activEcho
2.7 backup.
95 Copyright © Acronis International GmbH, 2002-2014
Page 96

2. Run the Acronis Access installer on the desired server.
3. Press Next on the Welcome screen.
4. Read and accept the license agreement.
5. Click Custom.
96 Copyright © Acronis International GmbH, 2002-2014
Page 97

6. Select only the Acronis Access Gateway Server component and press
Next.
7. The rest of the installation and Configuration Utility steps follow what is outlined in the earlier
scenarios, with the exception that you will not need to configure the Access Server and File
Repository in the Configuration Utility.
8. When you complete the Configuration Utility process, there will be no additional web console
configuration, as the Acronis Access Server console was not installed.
9. Return to the Acronis Access Server console on the first server you performed the full installation
on. Open the Gateway Servers page and click the menu button for the additional Gateway Server
that you just upgraded to Acronis Access, and select Register.
97 Copyright © Acronis International GmbH, 2002-2014
Page 98

10. You will be asked if the existing network address for the server you are registering can be used to
directly access the server. The existing address is typically the network address that your mobile
device users must use to access the Gateway Server, so it’s possible this address points to a proxy
server or load balancer.
Note: If this is the case, you need to select “No” at this dialog and enter an alternate network address
that will be used by the Acronis Access server to gain direct network access to this Gateway Server.
11. You will then be presented with the registration dialog.
Note: If your Gateway Server is using a self-signed SSL certificate, you will need to enable “Allow
connections from Acronis Access servers using self-signed certificates”.
Note: You will also need to enter an Administration Key, to enable the pairing with this remote server.
This is done to validate and secure the administrative relationship.
12. To obtain an Administration Key from this Gateway Server, open a new browser window or tab
on the actual Windows Server that you are registering, and navigate to the Gateway Server’s
HTTPS address. This should be the same address that is listed in the “Address for administration
and client connections” field.
Note: For security purposes, this must be done from a web browser running on the actual Windows
Server that the Gateway Server is running on. You will not be able to view your Administration Key
from a remote web browser.
13. Enter the 12 digit Administration Key (including dashes) into the registration form and click Save.
Note: Once the server has been registered it will appear in the Gateway Servers list as registered and
you can adjust its settings and view its details and status.
Note: When registered, the Volumes that existed on this mobilEcho Gateway Server prior to being
upgraded to Acronis Access are imported into the Data Sources – Folders list. The will behave just as
explained in the prior upgrade scenarios.
98 Copyright © Acronis International GmbH, 2002-2014
Page 99

14. All management of this Gateway Server is now done from within Acronis Access Server web
console. When creating new Folders on the Data Sources page, this Gateway Server will now
appear in the list of Gateway Servers available to give access to the new Folder.
15. If you have any additional Gateway Servers to upgrade and register, please follow the same
procedure as above.
3.3.2.4 Upgrading a single mobilEcho server with Client Management
enabled and an activEcho server
For this procedure, please visit the Upgrading an activEcho server with a mobilEcho Client
Management Server (p. 105) article.
3.3.3 Downgrading to mobilEcho 4.5
Downgrading Acronis Access to mobilEcho 4.5 is a complicated procedure and should not be
attempted unless absolutely necessary. Make sure you make proper backups and place them in safe
locations.
To downgrade Acronis Access to mobilEcho 4.5:
Warning: Do not add any licenses to the mobilEcho Administrator until you've completed the whole
procedure. Do not edit the registry while performing this procedure!
In order for this procedure to work you need to have a made a successful upgrade to Acronis Access.
1. Before you begin, make a backup of the file settings_backup and the folder Legacy mobilEcho
files.
Note: The file is located here: C:\Program Files (x86)\Group Logic\mobilEcho Server
and the folder here: C:\Program Files (x86)\Group Logic\Access Server\Legacy mobilEcho files
2. Download the mobilEcho 4.5 installer and the Acronis Access installer.
3. Run the Acronis Access installer.
4. Press Next on the Welcome screen.
5. Accept the license agreement.
6. Click Uninstall to begin the downgrade procedure.
7. Press OK on the warning popup.
8. Select Uninstall all Acronis Access components.
9. Review the selected components and press Uninstall.
10. On the PostgreSQL Uninstallation popup press Yes. Some files and settings will remain.
11. Review everything uninstalled and press Exit.
12. Run the mobilEcho 4.5 installer.
13. Read and accept the license agreement and press Next.
14. Select the folders where mobilEcho was installed previously. If they were the defaults, you can
use these defaults as well.
15. Press Install to begin the mobilEcho 4.5 installation. Once the installation is complete unselect
Launch the File Server Administrator and press Finish.
16. Run the settings_backup file you backed up.
17. Open the Legacy mobilEcho files folder you backed up.
99 Copyright © Acronis International GmbH, 2002-2014
Page 100

a. Copy the invitation.html.erb and invitation.txt.erb files to: C:\Program Files (x86)\Group
In this section
Before You Begin .................................................................................... 100
The Upgrade Process ............................................................................. 101
Logic\mobilEcho Server\ManagementUI\app\views\user_mailer
b. Copy the mobilEcho_manager file to: C:\Program Files (x86)\Group Logic\mobilEcho
Server\ManagementUI
c. Copy the production.sqlite3 file to: C:\Program Files (x86)\Group Logic\mobilEcho
Server\ManagementUI\db
d. There may be a 4th file called priority.txt, if present, copy it to C:\Program Files (x86)\Group
Logic\mobilEcho Server\Management. You will have to create the Management folder
manually.
Note: It is highly recommended to delete the old file first, and then place the new one.
18. Start the mobilEcho File Access service and start the mobilEcho Management service.
Note: You will have to manually re-enable all of your user and group profiles.
3.4 Upgrading from activEcho 2.7 or earlier
3.4.1 Before You Begin
Back up activEcho before upgrading
Please back up the data files used by your existing activEcho server.
The process for backing up and restoring an activEcho 2.7 or earlier server can be found here:
http://docs.grouplogic.com/display/ActivEcho/Maintenance+Tasks
Note: All customizations of the activEcho web interface will be lost on upgrade.
Update your version of activEcho to version 2.7 before upgrading to Acronis Access.
Backup Tomcat before upgrading
On upgrade the Apache Tomcat may be upgraded and all of the current Tomcat configuration files,
certificates and log files will be removed. We recommend you make a copy of the Apache Tomcat
folder, which by default is found here: C:\Program Files (x86)\Group Logic\Common\.
Know your configuration
Before you proceed with the upgrade make sure you know the following:
Do you have both mobilEcho and activEcho installed?
Are they on the same computer or on separate machines?
Which ports is mobilEcho using? On which port is the File Server and on which port is the
Management server?
100 Copyright © Acronis International GmbH, 2002-2014
 Loading...