

Page 1

Page 2

Copyright Statement
Copyright © Acronis International GmbH, 2002-2014. All rights reserved.
“Acronis” and “Acronis Secure Zone” are registered trademarks of Acronis International GmbH.
"Acronis Compute with Confidence", “Acronis Startup Recovery Manager”, “Acronis Active Restore”,
“Acronis Instant Restore” and the Acronis logo are trademarks of Acronis International GmbH.
Linux is a registered trademark of Linus Torvalds.
VMware and VMware Ready are trademarks and/or registered trademarks of VMware, Inc. in the
United States and/or other jurisdictions.
Windows and MS-DOS are registered trademarks of Microsoft Corporation.
All other trademarks and copyrights referred to are the property of their respective owners.
Distribution of substantively modified versions of this document is prohibited without the explicit
permission of the copyright holder.
Distribution of this work or derivative work in any standard (paper) book form for commercial
purposes is prohibited unless prior permission is obtained from the copyright holder.
DOCUMENTATION IS PROVIDED "AS IS" AND ALL EXPRESS OR IMPLIED CONDITIONS,
REPRESENTATIONS AND WARRANTIES, INCLUDING ANY IMPLIED WARRANTY OF MERCHANTABILITY,
FITNESS FOR A PARTICULAR PURPOSE OR NON-INFRINGEMENT, ARE DISCLAIMED, EXCEPT TO THE
EXTENT THAT SUCH DISCLAIMERS ARE HELD TO BE LEGALLY INVALID.
Third party code may be provided with the Software and/or Service. The license terms for such
third-parties are detailed in the license.txt file located in the root installation directory. You can
always find the latest up-to-date list of the third party code and the associated license terms used
with the Software and/or Service at http://kb.acronis.com/content/7696
Acronis patented technologies
Technologies, used in this product, are covered and protected by one or more U.S. Patent Numbers:
7,047,380; 7,275,139; 7,281,104; 7,318,135; 7,353,355; 7,366,859; 7,475,282; 7,603,533; 7,636,824;
7,650,473; 7,721,138; 7,779,221; 7,831,789; 7,886,120; 7,895,403; 7,934,064; 7,937,612; 7,949,635;
7,953,948; 7,979,690; 8,005,797; 8,051,044; 8,069,320; 8,073,815; 8,074,035; 8,145,607; 8,180,984;
8,225,133; 8,261,035; 8,296,264; 8,312,259; 8,347,137; 8,484,427; 8,645,748; 8,732,121 and patent
pending applications.
2 Copyright © Acronis International GmbH, 2002-2014
Page 3

Table of contents
1 Mobile Access ..................................................................................................................6
1.1 Concepts .................................................................................................................................... 6
1.2 Policies ....................................................................................................................................... 8
1.2.1 User & Group Policies ..................................................................................................................................... 8
1.2.2 Allowed Apps ................................................................................................................................................. 21
1.2.3 Default Access Restrictions ........................................................................................................................... 24
1.3 On-boarding Mobile Devices ...................................................................................................25
1.3.1 Server-side Management Enrollment Process ........................................................................................... 26
1.3.2 User-side Management Enrollment Process .............................................................................................. 29
1.4 Managing Gateway Servers .....................................................................................................33
1.4.1 Registering new Gateway Servers ............................................................................................................... 34
1.4.2 Server Details ................................................................................................................................................. 36
1.4.3 Editing Gateway Servers ............................................................................................................................... 37
1.4.4 Licensing Gateway Servers ........................................................................................................................... 44
1.4.5 Cluster Groups ............................................................................................................................................... 44
1.5 Managing Data Sources ...........................................................................................................46
1.5.1 Folders ............................................................................................................................................................ 47
1.5.2 Assigned Sources ........................................................................................................................................... 50
1.5.3 Gateway Servers Visible on Clients .............................................................................................................. 51
1.5.4 Legacy Data Sources...................................................................................................................................... 52
1.6 Settings ....................................................................................................................................53
2 Sync & Share .................................................................................................................. 55
2.1 Sharing Restrictions .................................................................................................................55
2.2 LDAP Provisioning ....................................................................................................................56
2.3 Quotas ......................................................................................................................................56
2.4 File Purging Policies .................................................................................................................57
2.5 User Expiration Policies ...........................................................................................................58
2.6 File Repository .........................................................................................................................59
2.7 Acronis Access Client ...............................................................................................................60
3 Server Administration .................................................................................................... 62
3.1 Administering a Server.............................................................................................................62
3.2 Administrators and Privileges ..................................................................................................63
3.3 Audit Log ..................................................................................................................................66
3.3.1 Log .................................................................................................................................................................. 66
3.3.2 Settings ........................................................................................................................................................... 67
3.4 Server .......................................................................................................................................67
3.5 SMTP ........................................................................................................................................69
3.6 LDAP .........................................................................................................................................70
3.7 Email Templates .......................................................................................................................71
3.8 Licensing ..................................................................................................................................74
3.9 Debug Logging .........................................................................................................................75
3.10 Monitoring ...............................................................................................................................76
3 Copyright © Acronis International GmbH, 2002-2014
Page 4

4 Maintenance Tasks ........................................................................................................ 78
4.1 Disaster Recovery guidelines ...................................................................................................78
4.2 Backing up and Restoring Acronis Access ................................................................................80
4.3 Tomcat Log Management on Windows ...................................................................................83
4.4 Automated Database Backup ..................................................................................................87
4.5 Increasing the Acronis Access Tomcat Java Maximum Memory Pool .....................................88
5 Supplemental Material .................................................................................................. 90
5.1 Conflicting Software ................................................................................................................90
5.2 Load balancing Acronis Access ................................................................................................90
5.3 Third-party Software for Acronis Access .................................................................................96
5.3.1 PostgreSQL ..................................................................................................................................................... 96
5.3.2 Apache Tomcat .............................................................................................................................................. 97
5.3.3 New Relic ....................................................................................................................................................... 97
5.4 Using Acronis Access with Microsoft Forefront Threat Management Gateway (TMG) ..........97
5.4.1 Overview ........................................................................................................................................................ 97
5.4.2 Introduction ................................................................................................................................................... 98
5.4.3 Install the SSL Server Certificate ................................................................................................................. 101
5.4.4 Create a New Web Listener ........................................................................................................................ 102
5.4.5 Create a New Web Site Publishing Rule .................................................................................................... 107
5.4.6 Configure an External DNS Entry for the Acronis Access Gateway Server ............................................. 113
5.4.7 Using the Access Mobile Client with a TMG reverse proxy server .......................................................... 113
5.4.8 Using the Access Desktop Client with a TMG reverse proxy server. ....................................................... 113
5.5 Unattended desktop client configuration .............................................................................114
5.6 Monitoring Acronis Access with New Relic ...........................................................................115
5.7 Using trusted server certificates with Acronis Access ...........................................................116
5.8 Creating a Drop Folder ...........................................................................................................118
5.9 Customizing the web interface ..............................................................................................120
5.10 How to support different Access Desktop Client versions ....................................................120
5.11 How to move the FileStore to a non-default location. ..........................................................121
5.12 Acronis Access for Good Dynamics ........................................................................................121
5.12.1 Introduction ................................................................................................................................................. 121
5.12.2 Testing a trial version of Acronis Access for Good Dynamics .................................................................. 122
5.12.3 Requesting and configuring Acronis Access within Good Control .......................................................... 123
5.12.4 Good Dynamics Policy Sets and Acronis Access........................................................................................ 127
5.12.5 Granting Acronis Access access to a Good Dynamics User or Group ...................................................... 128
5.12.6 Enrolling the Acronis Access client app in Good Dynamics ...................................................................... 130
5.13 MobileIron AppConnect support ...........................................................................................133
5.13.1 Introduction ................................................................................................................................................. 133
5.13.2 Testing a trial version of Acronis Access with AppConnect ..................................................................... 133
5.13.3 Creating an AppConnect configuration and policy for Acronis Access on your MobileIron VSP .......... 134
5.13.4 Activating the Acronis Access iOS client with AppConnect ...................................................................... 138
5.13.5 Ongoing AppConnect management of Access Mobile Clients ................................................................ 139
5.13.6 Using AppConnect with Kerberos Constrained Delegation ..................................................................... 139
4 Copyright © Acronis International GmbH, 2002-2014
Page 5

6 Configuring an AppConnect tunnel between the Access Mobile client and the Access
server via username/password authentication........................................................................... 142
7 Adding Kerberos Constrained Delegation Authentication .............................................. 153
7.1.1 Advanced Delegation Configurations ........................................................................................................ 161
7.2 Installing Acronis Access on a Microsoft Failover Cluster .....................................................162
7.2.1 Installing Acronis Access on a Windows 2008 Microsoft Failover Cluster .............................................. 162
7.2.2 Installing Acronis Access on a Windows 2012 Microsoft Failover Cluster .............................................. 176
7.3 Upgrading from mobilEcho 4.5 on a Microsoft Failover Cluster ........................................189
7.3.1 Upgrading a mobilEcho server on a Windows 2008 Failover Cluster to Acronis Access ....................... 189
7.3.2 Upgrading a mobilEcho server on a Windows 2012 Failover Cluster to Acronis Access ....................... 200
7.4 Upgrading Acronis Access on a Microsoft Failover Cluster ...................................................212
7.5 Changing the Acronis Access Tomcat SSL Ciphers .................................................................214
8 What's New ................................................................................................................. 216
8.1 What's New in Acronis Access Server ....................................................................................216
8.2 What's New in the Acronis Access app ..................................................................................230
8.3 Previous Releases ..................................................................................................................231
8.3.1 activEcho ...................................................................................................................................................... 231
8.3.2 mobilEcho .................................................................................................................................................... 242
5 Copyright © Acronis International GmbH, 2002-2014
Page 6

1 Mobile Access
In this section
Concepts ..................................................................................................... 6
Policies ....................................................................................................... 8
On-boarding Mobile Devices ................................................................... 25
Managing Gateway Servers ..................................................................... 33
Managing Data Sources ........................................................................... 46
Settings ..................................................................................................... 53
This section of the web interface covers all the settings and configurations affecting mobile device
users.
1.1 Concepts
Access Mobile Clients connect directly to your server rather than utilizing a third-party service,
leaving you in control. Acronis Access server can be installed on existing file servers, allowing iPads,
iPhones and Android devices to access files located on that server. These are typically the same files
already available to PCs using Windows file sharing and Macs using ExtremeZ-IP File Server.
Clients access Acronis Access servers using their Active Directory user account. No additional
accounts need to be configured within Acronis Access. The Access Mobile Client also supports file
access using local computer accounts configured on the Windows server Acronis Access is running on,
in the event you need to give access to non-AD users. The client management features described
below require AD user accounts.
A minimal deployment consists of a single Windows server running a default installation of Acronis
Access. This default installation includes the Acronis Access Server component installed and the local
Acronis Access Gateway Server with a license installed. This scenario allows devices running the
Access Mobile Client application to connect to this single file server, and allows for client
management. If client management is not needed, Data Sources can be setup on the local Gateway
Server and the Access Mobile Clients will be able to access these Data Sources, but the users will be
in control of their app settings.
Fig 1. Single Gateway server, many Access Mobile Clients
6 Copyright © Acronis International GmbH, 2002-2014
Page 7

Any number of Gateway Servers can later be added to the network and configured for access from
the client app.
Note: Details on installing Acronis Access are included in the Installing section of this guide. Configuration of
Gateway Servers and Data Sources is explained in the Mobile Access (p. 6) section.
If you wish to remotely manage your Access Mobile Clients, Acronis Access Client Management
allows you to create policies per Active Directory user or group. These policies can:
Configure general application settings
Assign servers, folders, and home directories to be displayed in the client app
Restrict what can be done with files
Restrict the other third party apps that Access Mobile Client files can be opened into
Set security requirements (server login frequency, application lock password, etc.)
Disable the ability to store files on the device
Disable the ability to include Access Mobile Client files in iTunes backups
Remotely reset a user's application lock password
Perform a remote wipe of the Access Mobile Client app's local data and settings
And many additional configuration and security options
Only one Acronis Access Server is required.
A typical network employing client management includes one server with the Acronis Access Server
and Acronis Access Gateway Server components installed and several additional Gateway Servers
acting as file servers. In this scenario, all mobile clients are configured to be managed by the Acronis
Access Server, and will contact this server each time the Access Mobile Client application is started,
to check for any changed settings and to accept application lock password resets and remote wipe
commands if necessary.
Access Mobile Client clients can be assigned a list of servers, specific folders within shared volumes,
and home directories in their management policy. These resources will automatically appear in the
Access Mobile Client app and the client app will contact these servers directly as needed for file
access.
Note: Details on enabling and configuring the client management are included in the Policies (p. 8) and
Managing Mobile Devices section of this guide.
7 Copyright © Acronis International GmbH, 2002-2014
Page 8

In this section
User & Group Policies ................................................................................ 8
Allowed Apps ........................................................................................... 21
Default Access Restrictions ...................................................................... 24
Fig 2. One Gateway Server, one Gateway Server + Acronis Access Server, many clients
1.2 Policies
1.2.1 User & Group Policies
Acronis Access Client Management allows policies to be assigned to Active Directory groups. Group
policies will usually address most or all of your client management requirements. The group policies
list is displayed in order of precedence, with the first group in the list having the highest priority.
When a user contacts the Acronis Access server, their settings are determined by the single highest
priority group policy they are a member of.
User policies are used when you want to enforce specific settings on a user regardless of the groups
he is in, as User policies have a higher priority than Group policies. User policies will override all
Group policies.
Group Management Tips
8 Copyright © Acronis International GmbH, 2002-2014
Page 9

If you would like all or most of your users to receive the same policy settings, you can enable the Default group
In this section
Adding a New Policy ................................................................................... 9
Exceptions for policy settings .................................................................. 11
Modifying Policies .................................................................................... 11
Creating a Blocked Path list ..................................................................... 11
Security Policy .......................................................................................... 13
Application Policy ..................................................................................... 15
Sync Policy ................................................................................................ 18
Home Folders ........................................................................................... 19
Server Policy ............................................................................................. 20
policy. If it' s enabled all users which are not members of a group policy and do not have an explicit user policy,
will become members of the Default group. The Default group is disabled by default. If you would like to deny a
group of users access to Acronis Access management, ensure that they are not members of any configured
group policies. As long as a user account does not match any group policies, they will be denied the ability to
enroll in Acronis Access client management.
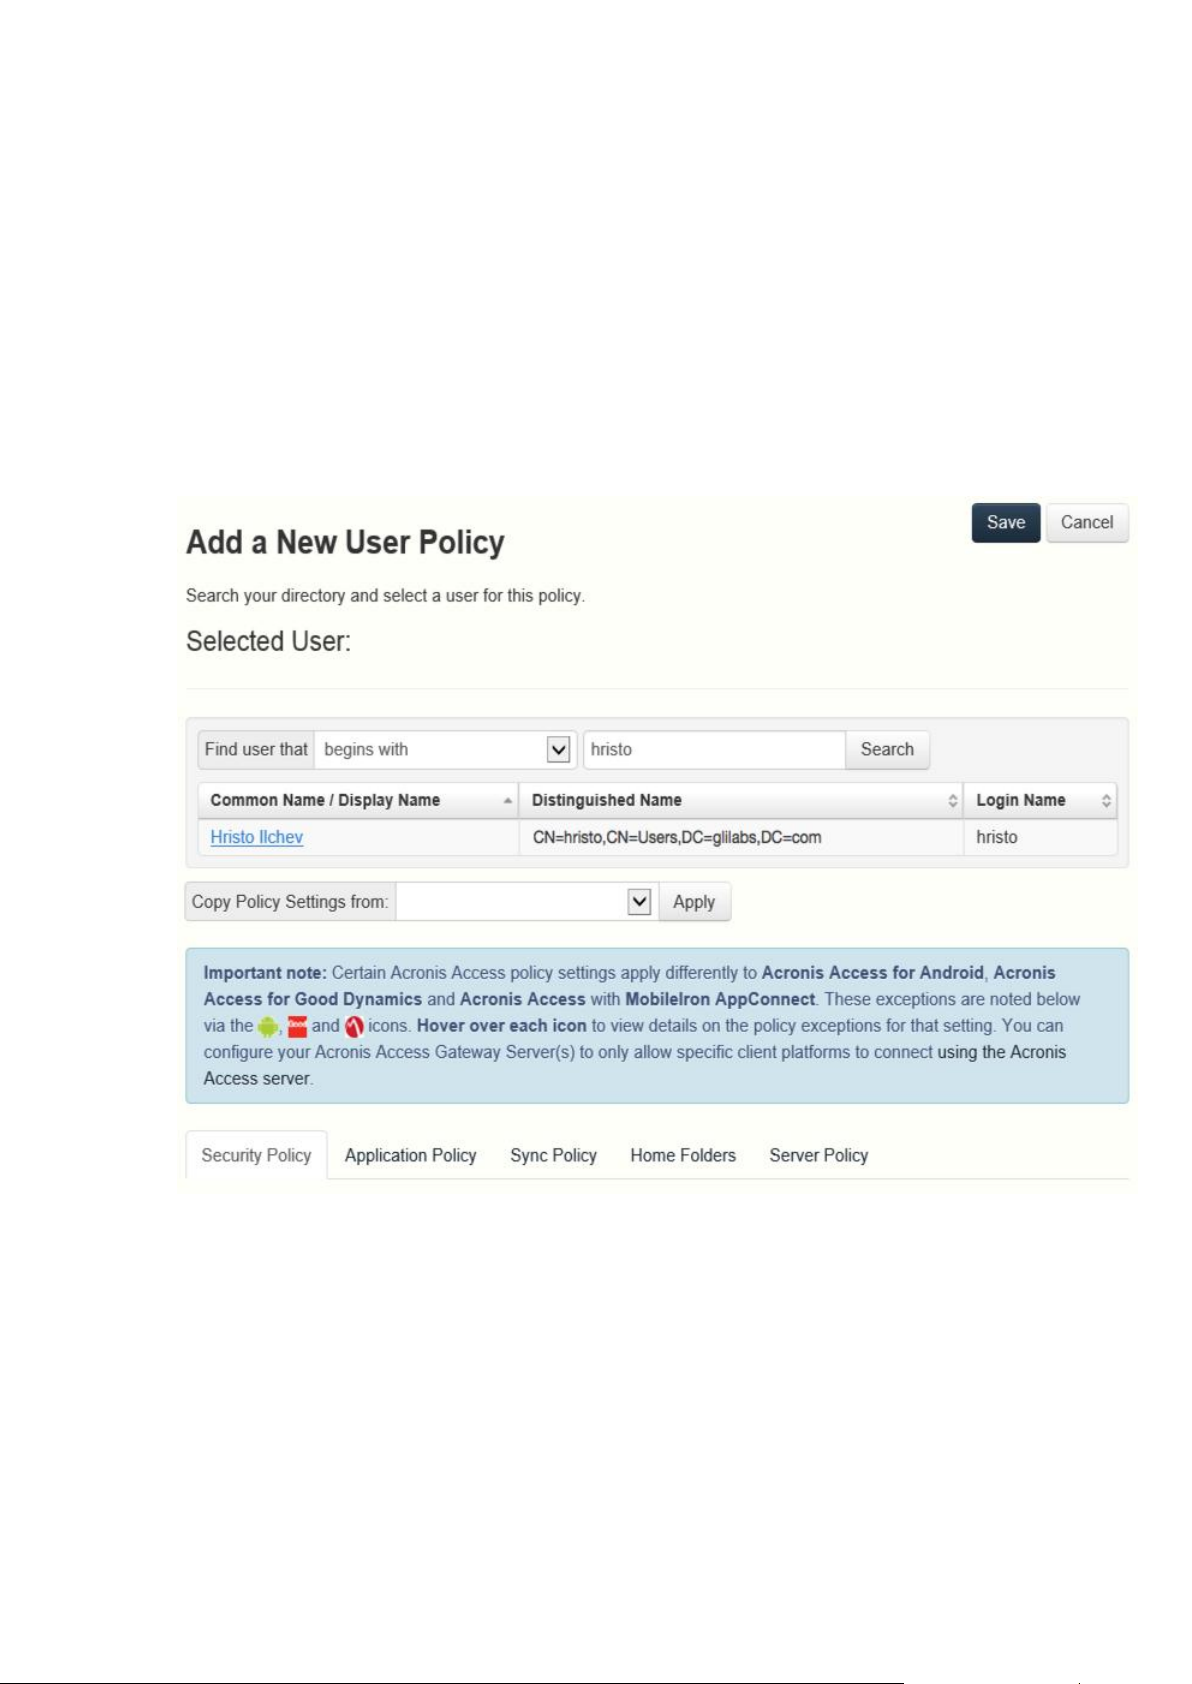
1.2.1.1 Adding a New Policy
To add a new group policy:
1. Open the Group Policies tab.
2. Click the Add new policy button to add a new group policy. This will open the Add a new group
policy page.
9 Copyright © Acronis International GmbH, 2002-2014
Page 10
3. In the Find group field, enter the partial or complete Active Directory group name for which
you'd like to create a policy. You can perform 'begins with' or 'contains' searches for Active
Directory groups. Begins with search will complete much faster than contains searches.
4. Click Search and then find and click the group name in the listed results.
5. Make the necessary configurations in each of the tabs (Security (p. 13), Application (p. 15), Sync
(p. 18), Home Folders (p. 19) and Server (p. 20)) and press Save.
To add a new user policy:
1. Open the User policies tab.
2. Click the Add new policy button to add a new user policy. This will open the Add a new user
policy page.
3. In the Find user field, enter the partial or complete Active Directory user name for which you'd
like to create a policy. You can perform 'begins with' or 'contains' searches for Active Directory
users. Begins with search will complete much faster than contains searches.
4. Click Search and then find and click the user name in the listed results.
5. Make the necessary configurations in each of the tabs (Security (p. 13), Application (p. 15), Sync
(p. 18), Home Folders (p. 19) and Server (p. 20)) and press Save.
10 Copyright © Acronis International GmbH, 2002-2014
Page 11

1.2.1.2 Exceptions for policy settings
For users running the Access Mobile Client for Android, Access Mobile Client for Good Dynamics
(iOS) and Access Mobile Client with Mobile Iron AppConenct apps, there are some exceptions to
the way Acronis Access management policies are applied to the Access Mobile Client app. In the case
of Android, a few of the features of the iOS client are not yet supported, so the related policies do
not apply. In the case of Good Dynamics, a few of the standard Access Mobile Client policy features
are deferred to the Good Dynamics system and the Good Dynamics policy set that you have
configured on your Good Control server. With MobileIron, a few of the standard Acronis Access
policy features are deferred to the MobileIron AppConnect platform. These exceptions are noted on
the Acronis Access policy configuration pages. Hover over the Good, Android and MobileIron logos
for more details on the individual policy exceptions.
1.2.1.3 Modifying Policies
Existing policies can be modified at any time. Changes to policies will be applied to the relevant
Access Mobile Client users the next time they launch the mobile app.
Connectivity requirements
Acronis Access clients must have network access to the Acronis Access server in order to receive profile updates,
remote password resets, and remote wipes. If your client is required to connect to a VPN before they can access
Acronis Access, they will also need to connect to the VPN before management commands will be accepted.
To modify a group policy
1. Click the Groups Policies option in top menu bar.
2. Click on the group you would like to modify.
3. Make any changes necessary on the Edit Group Policy page and press Save.
4. To temporarily disable a policy, uncheck the check box in the Enabled column for the desired
group. This change takes effect immediately.
5. To change a group's priority, click the up or down arrow in the Manage Groups Profiles list. This
will move the profile up or down one level.
To modify a user policy:
1. Open the User Policies tab.
2. Click on the user you would like to modify.
3. Make any changes necessary on the Edit User Policy page and press Save.
4. To temporarily disable a policy, uncheck the check box in the Enabled column for the desired
user.This change takes effect immediately.
1.2.1.4 Creating a Blocked Path list
You can create blacklists for paths you do not want your users to be able to self-provision from
mobile devices. These lists must be assigned to a User or Group policy and are valid only for
self-provisioned paths. When the list has been created and assigned to the proper Users and/or
11 Copyright © Acronis International GmbH, 2002-2014
Page 12

Groups, you need to enable the Block access to specific network paths for every User/Group policy
that you want it to affect.
To create a list:
1. Open the web interface as an administrator.
2. Open the Policies (p. 8) page.
3. Click on the desired User policy or Group policy.
4. Open the Server Policy (p. 20) tab.
5. Select the Block access to specific network paths check box.
Note: You must perform this step for each User/Group policy that you want to assign the blacklist to.
6. Press Add/Edit lists.
7. On the Blocked Path Lists page press Add List.
8. Enter a name for the list.
9. Enter a path or list of paths that will be blacklisted. Each entry should be on a new line.
10. Open the Apply to User or Group tab.
11. Assign the list to the desired user(s)/group(s).
12. Press Save.
To enable the blacklist for a User or Group policy:
1. Open the web interface as an administrator.
2. Open the Policies (p. 8) page.
3. Click on the desired User policy or Group policy.
4. Open the Server Policy (p. 20) tab.
5. Select the Block access to specific network paths check box.
Note: You must perform this step for each User/Group policy that you want to assign the blacklist to.
6. Select the desired list from the drop-down menu.
Note: Pressing Refresh lists will refresh the options in the drop-down menu.
7. Press Save to save and exit the policy.
12 Copyright © Acronis International GmbH, 2002-2014
Page 13
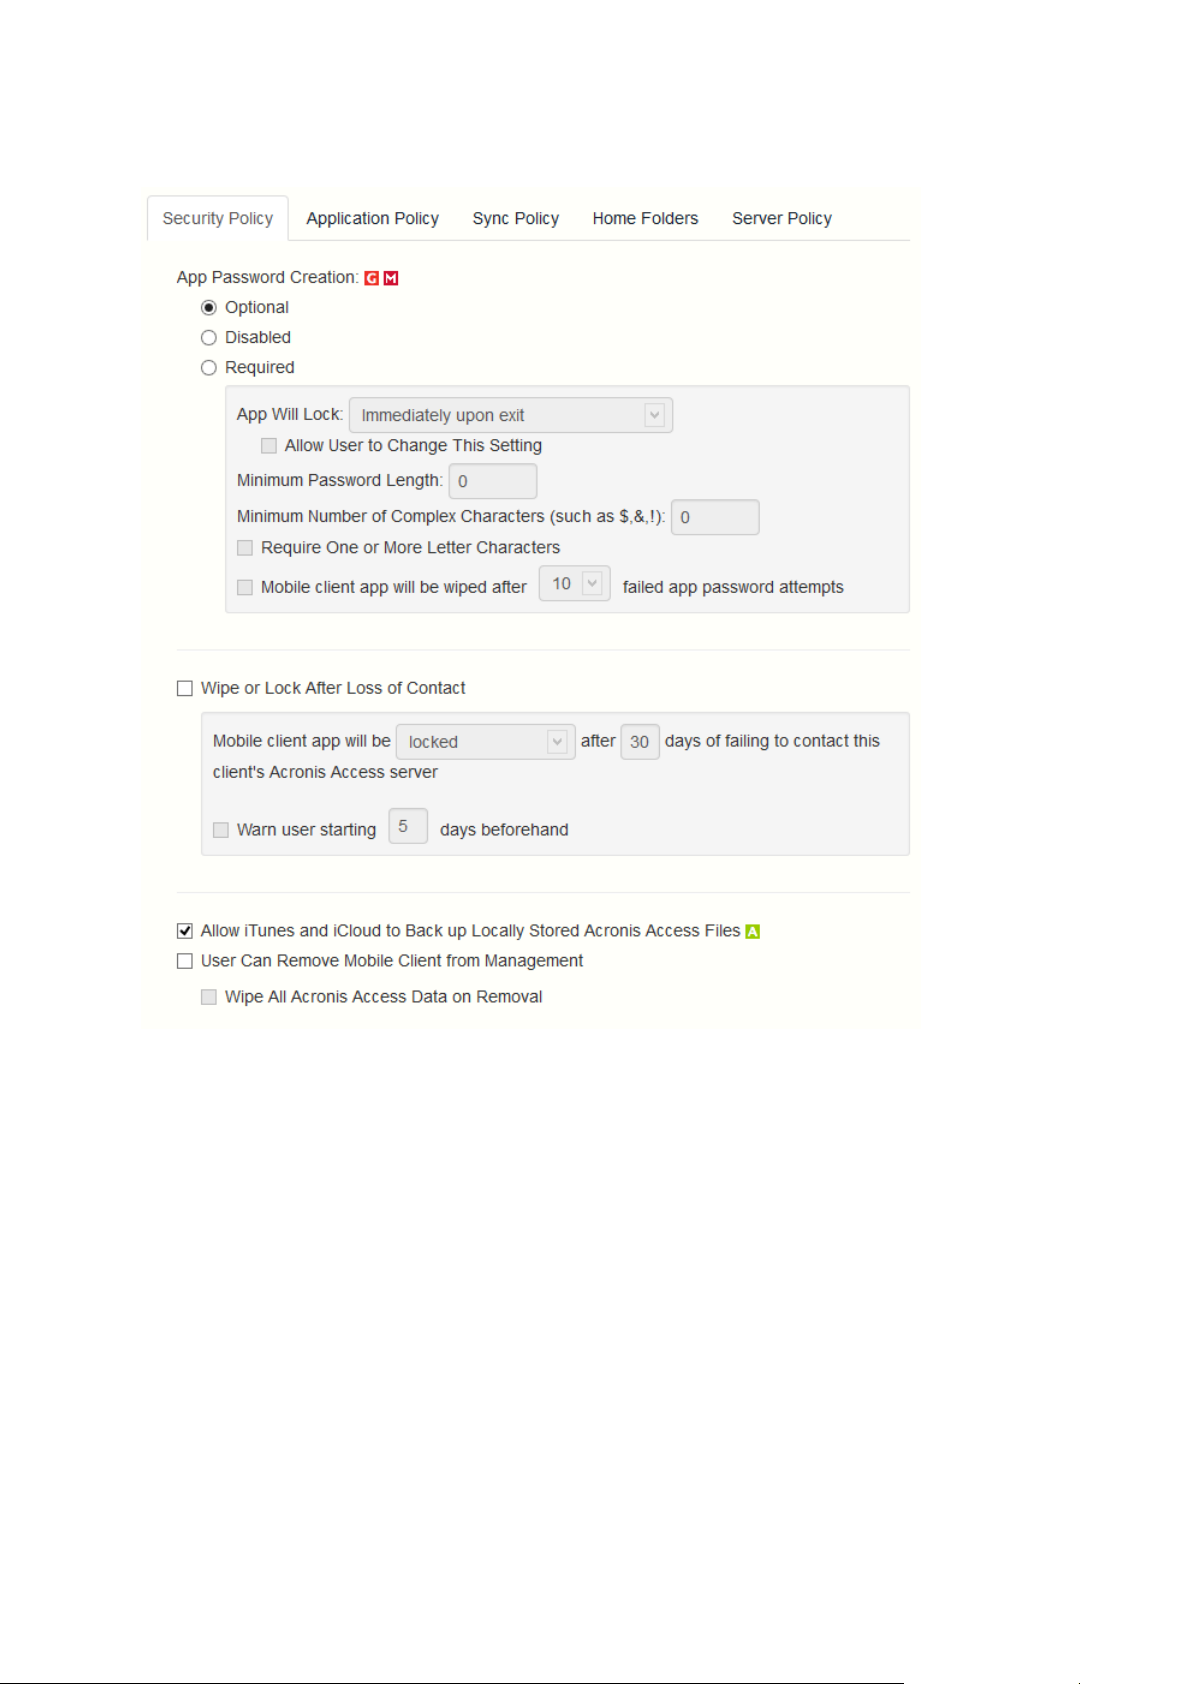
1.2.1.5 Security Policy
App password creation - The Access Mobile Client application can be set with a lock password
that must be first entered when launching the application.
Optional - This setting will not force the user to configure an application lock password, but
they will be able to set one from the Settings menu within the app if they desire.
Disabled - This setting will disable the ability to configure an application lock password from
the Settings menu within the app. This might be useful in the case of shared mobile devices
where you prefer that a user cannot set an app password and will lock other users out of the
Access Mobile Client.
Required - This setting will force the user to configure an application lock password if they do
not already have one. The optional application password complexity requirements and failed
password attempt wipe setting only apply when App password creation is set to Required.
App will lock - This setting configures the application password grace period. When a
user switches from the Access Mobile Client to another application on their device, if
they return to the Access Mobile Client before this grace period has elapsed, they will
not be required to enter their application lock password. To require that the password is
entered every time, choose Immediately upon exit. If you would like the user to be able
13 Copyright © Acronis International GmbH, 2002-2014
Page 14

to modify their App will lock setting from within the Access Mobile Client settings, select
Allow user to change this setting.
Minimum password length - The minimum allowed length of the application lock
password.
Minimum number of complex characters - The minimum number of non-letter,
non-number characters required in the application lock password.
Require one or more letter characters - Ensures that there is at least one letter character
in the application password.
Mobile Client app will be wiped after X failed app password attempts - When this
option is enabled, the settings and data in the Access Mobile Client app will be wiped
after the specified number of consecutive failed app password attempts.
Wipe or lock after loss of contact- Enable this setting if you would like the Access Mobile Client
app to automatically wipe or lock in the case that it has not made contact with this Acronis
Access server in a certain number of days. Locked clients will automatically unlock in the event
that they later contact the server successfully. Wiped clients immediately have all the local files
stored in the Mobile Client app deleted, their client management policy removed, and all settings
reset to defaults. Wiped clients will have to be re-enrolled in management to gain access to
gateway servers.
Mobile Client app will be locked/wiped after X days of failing to contact this client's
Acronis Access server - Set the default action after the client fails to contact this Acronis
Access server for a number of days.
Warn user starting [ ] days beforehand - The Access Mobile Client app can optionally warn
the user when a 'loss of contact' wipe or lock is going to happen in the near future. This gives
them the opportunity to reestablish a network connection that allows the Access Mobile
Client app to contact it's Acronis Access Server and prevent the lock or wipe.
User can remove Mobile Client from management- Enable this setting if you would like your
Acronis Access users to be able to uninstall their management policy from within Acronis Access.
Doing so will return the application to full functionality and restore any configuration that was
changed by their policy.
Wipe all Acronis Access data on removal - When user removal of policies is enabled, this
option can be selected. If enabled, all data stored locally within the Access Mobile Client
application will be erased if it is removed from management, ensuring that corporate data
does not exist on a client not under management controls.
Allow iTunes to back up locally stored Acronis Access files - When this setting is disabled, the
Access Mobile Client will not allow iTunes to back up its files. This will ensure that no files within
Acronis Access' secure on-device storage are copied into iTunes backups.
14 Copyright © Acronis International GmbH, 2002-2014
Page 15
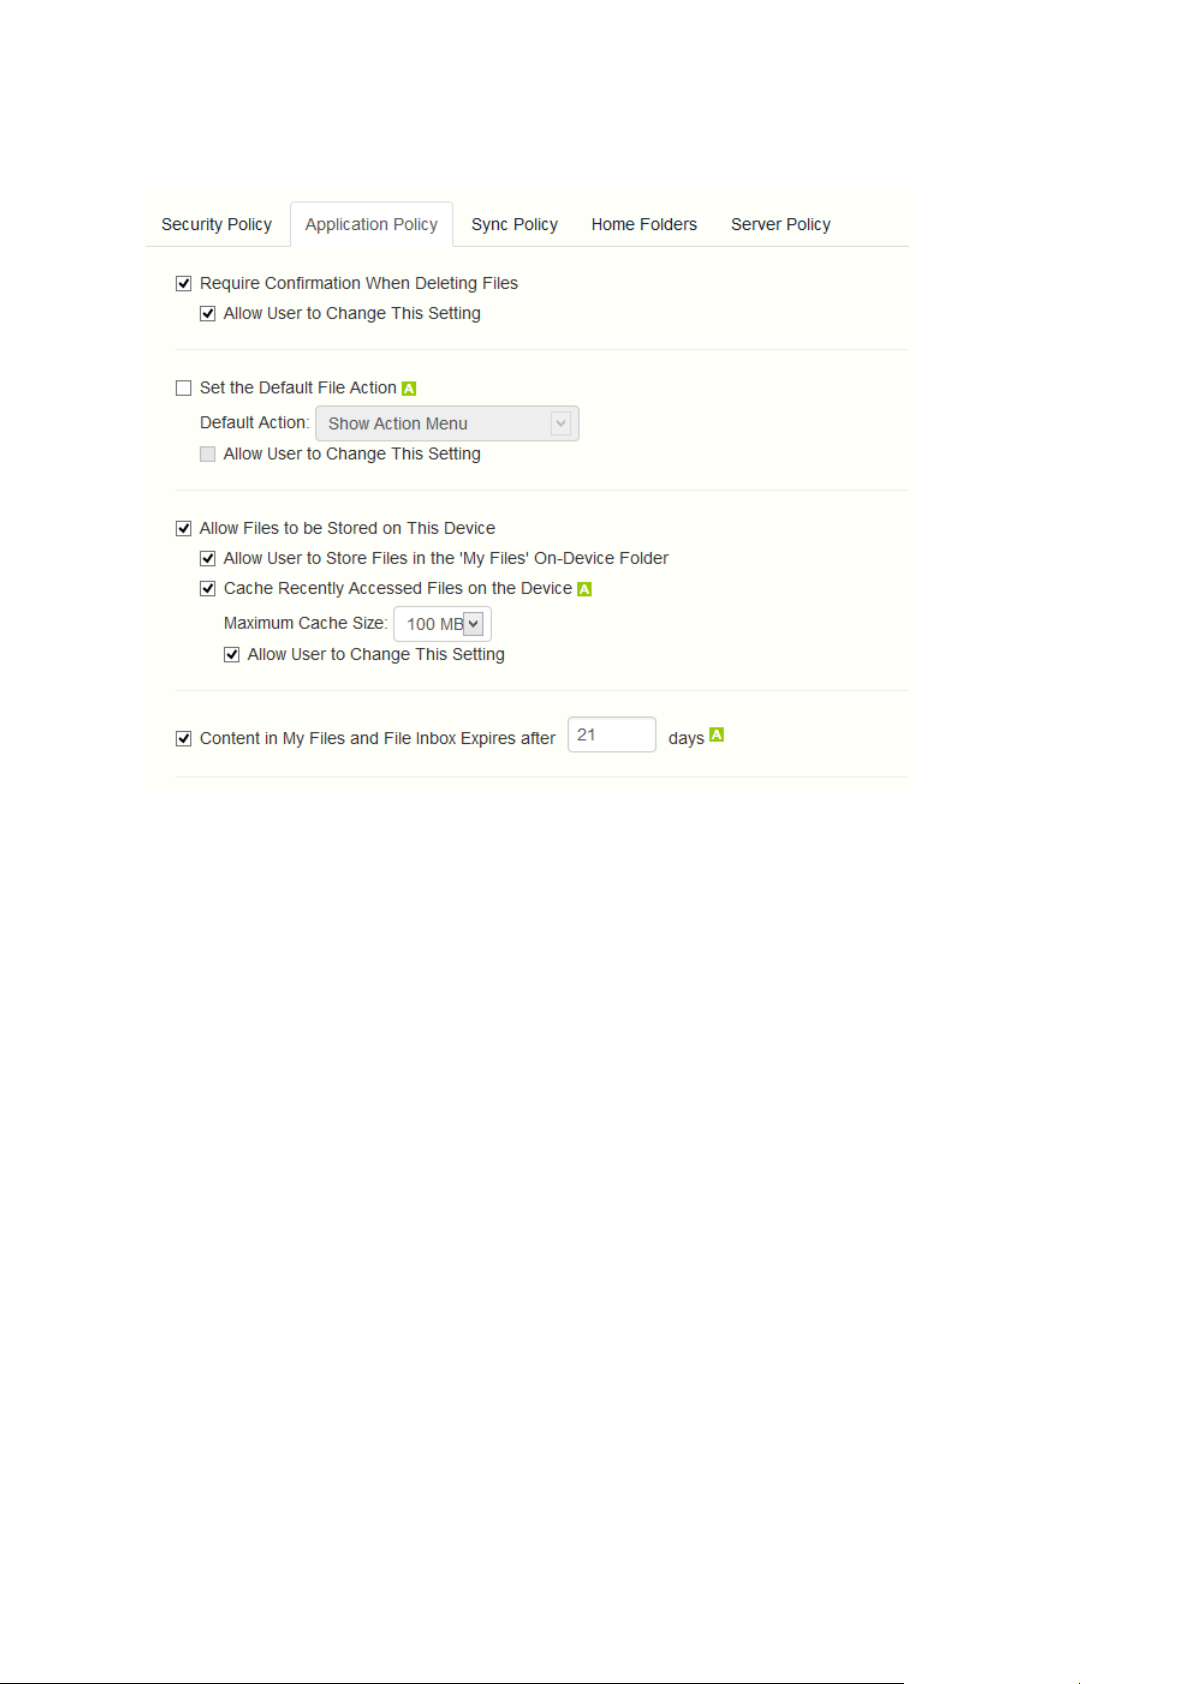
1.2.1.6 Application Policy
Require Confirmation When Deleting Files - When enabled, the user will be asked for
confirmation each time they delete a file. If you would like the user to be able to later modify this
setting, select Allow user to change this setting.
Set the Default File Action - This option determines what will happen when a user taps a file in
the Access Mobile Client application. If this is not set, the client application defaults to Action
Menu. If you would like the user to be able to later modify this setting, select Allow user to
change this setting.
Allow Files to be Stored on the Device - This setting is enabled by default. When enabled, files
will be permitted to remain on the device, within Acronis Access' sandboxed storage. Individual
features that store files locally (My Filesfolder, sync folders, recently accessed file caching) can be
enabled or disabled using additional policy settings. If this option is disabled, no files will be
stored on the device, ensuring that no corporate data is on the device if it is lost or stolen. If this
setting is disabled, the user will not be able to save or sync files for offline use, cache files for
improved performance, or send files from other applications to the Access Mobile Client using
the "Open In" function.
Allow User to Store Files in the 'My Files' On-Device Folder - If enabled, files can be copied
into the 'My Files' folder for offline access and editing. This is a general purpose storage area
within Acronis Access' on-device storage sandbox.
Cache Recently Accessed Files on the Device - If enabled, server-based files that have been
recently access will be saved in a local cache on the device, for use if they are accessed again
and have not changed, providing performance and bandwidth conservation benefits.
Maximum Cache Size can be specified and the user can optionally be allowed to change this
setting.
Display Thumbnail Previews for Server-Side Files - When enabled, thumbnail previews will be
displayed instead of filetype icons when browsing Data Sources and Gateway Servers.
15 Copyright © Acronis International GmbH, 2002-2014
Page 16

Thumbnail Cache Size: - Sets how much space will be reserved for thumbnails.
Only Download Thumbnail Previews on WiFi Networks - When enabled, thumbnails will be
available only if the user is connected to a WiFi network.
Content in My Files and File Inbox Expires after X days - If this option is enabled, files in the File
Inbox and in My Files will be deleted from the device after the set number of days.
Allow
These settings can be used to disable certain Access Mobile Client application features and
capabilities. All copy, create, move, rename, and delete settings apply to files or folders located on
Gateway servers. Files in the mobile client's local My Files folder are stored on the device and are not
affected. All other settings apply to any files in Acronis Access, both server-based and locally stored
on the client.
File Operations
File Copies / Creation - If this option is disabled, the user will not be able to save files from other
applications or from the iPad Photos library to a Gateway Server. They will also be unable to copy
or create new files or folders on the Gateway Server server Gateway Server. This setting
supersedes any NTFS permissions that client may have that allow file creation.
16 Copyright © Acronis International GmbH, 2002-2014
Page 17

File Deletes - If this option is disabled, the user will not be able to delete files from the Gateway
Server. This setting supersedes any NTFS permissions that client may have that allow file
deletion.
File Moves - If this option is disabled, the user will not be able to move files from one location to
another on the Gateway Server, or from the server to the Access Mobile Client application's local
My Files storage. This setting supersedes any NTFS permissions that client may have that allow
file or folder moves.
File Renames - If this option is disabled, the user will not be able to rename files from the
Gateway Server. This setting supersedes any NTFS permissions that client may have that allow
file renames.
Folder Operations
Folder Copies - If this option is disabled, the user will not be able to copy folders on or to the
Gateway Server. This setting supersedes any NTFS permissions that client may have that allow
folder creation. File copies / creation must be enabled for this setting to be enabled.
Folder Deletes - If this option is disabled, the user will not be able to delete folders from the
Gateway Server. This setting supersedes any NTFS permissions that client may have that allow
folder deletion.
Folder Moves - If this option is disabled, the user will not be able to move folders from one
location to another on the Gateway Server, or from the server to the Access Mobile Client
application's local My Files storage. This setting supersedes any NTFS permissions that client may
have that allow file or folder moves. Folder copies must be enabled for this setting to be
enabled.
Folder Renames - If this option is disabled, the user will not be able to rename or folders from
the Gateway Server. This setting supersedes any NTFS permissions that client may have that
allow folder renames.
Adding New Folders - If this option is disabled, the user will not be able to create new, empty
folders on the Gateway Server.
Allow Bookmarking Folders - If this option is disabled, the user will not be able to bookmark
on-device or on-server Acronis Access folders for quick shortcut access.
'mobilEcho' File Links
Emailing 'mobilEcho' File Links - If this option is disabled, users will not be able to send
mobilEcho:// URLs to Acronis Access files or folders to other Acronis Access users. These links are
only functional if opened from a device where the recipient has the Access Mobile Client
installed and configured with a server or assigned folder that has access to the link location. The
user must also have file/folder-level permission to read the item.
Opening 'mobilEcho' File Links - If this option is disabled, users will not be allowed to open
mobilEcho:// URLs to Acronis Access files or folders.
Data Leakage Protection
Opening Acronis Access Files in Other Applications - If this option is disabled, the Access Mobile
Client application will omit the Open In button and not allow files in Acronis Access to be opened
in other applications. Opening a file in another application results in the file being copied to that
application's data storage area and outside of Acronis Access control.
17 Copyright © Acronis International GmbH, 2002-2014
Page 18

App Whitelist/Blacklist - Select a predefined whitelist or blacklist that restricts that third
party apps that Acronis Access files can be opened into on the device. To create a whitelist or
blacklist, click Allowed Apps in the top menu bar.
Sending Files to Acronis Access from Other Apps - If this option is disabled, the Access Mobile
Client application will not accept files sent to it from other applications' Open In feature.
Sending Files to Acronis Access Using Quickoffice 'Save Back' - If this option is disabled, the
Acronis Access application will not accept files sent to it from the Quickoffice app's Save Back
feature.
Emailing Files from Acronis Access - If this option is disabled, the Access Mobile Client
application will omit the Email File button and not allow files in Acronis Access to be emailed
from the application.
Note: The Android platform does not have a built-in email app or function that can be disabled. To
block users from moving files into emails, you must instead disable Opening Acronis Access files into
Other Applications.
Printing Files from Acronis Access - If this option is disabled, the Access Mobile Client application
will omit the Print button and not allow files in Acronis Access to be printed.
Copying text From Opened Files - If this option is disabled, the Access Mobile Client will not
allow the user to select text in opened documents for copy/paste operations. This will prevent
data from being copied into other applications.
Annotation and Editing
Allow PDF annotation - If this option is disabled, the Access Mobile Client will not be allowed to
annotate PDFs.
Editing & Creation of Office files - If this option is disabled, users will not be allowed to edit
documents using the integrated SmartOffice editor.
Editing & Creation of Text files - If this option is disabled, users will not be allowed to edit .txt
files using the built-in text editor.
1.2.1.7 Sync Policy
18 Copyright © Acronis International GmbH, 2002-2014
Page 19

Allow User to Create Sync Folders - Allows the user to create their own sync folders.
Client is Prompted to Confirm Before Synced Files are Downloaded - Select the conditions under
which the user must confirm before files in synced folders are downloaded. Options are: Always,
While on cellular networks only, and Never. If Allow User to Change This Setting is enabled,
clients will be able to change the confirmation options.
Only Allow File Syncing While Device is on WiFi Networks - When this option is enabled, Acronis
Access will not allow files to be synced over cellular connections. If Allow User to Change This
Setting is enabled, clients will be able to enable or disable automatic file syncing while on WiFi
networks.
Auto-Sync Interval - When this option is enabled, Acronis Access will automatically sync never,
on app launch only or on several time intervals.
Allow User to Change This Setting - When this option is enabled, the users will be able to
change the time interval from the Access Mobile Client app.
Only Allow File Auto-Syncing While Device is on WiFi Networks - When this option is
enabled the auto-sync will not occur unless the user is connected via WiFi.
1.2.1.8 Home Folders
Display the user's home folder- This option causes a user's personal home directory to appear in
the Access Mobile Client app.
Display name shown on client - Sets the display name of the home folder item in the Access
Mobile Client app.
Active Directory assigned home folder - The home folder shown in the Access Mobile Client
app will connect the user to the server/folder path defined in their AD account profile. The
Home Folder will be accessible via the selected Gateway.
19 Copyright © Acronis International GmbH, 2002-2014
Page 20

Custom home directory path - The home folder shown in the Access Mobile Client app will
connect the user to the server and path defined in this setting. The %USERNAME% wildcard
can be used to include the user's username in the home folder path. %USERNAME% must be
capitalized.
Sync – This option selects the type of sync of your Home Directory.
1.2.1.9 Server Policy
Required login frequency for resources assigned by this policy- sets the frequency that a user
must log into the servers that are assigned to them by their policy.
Once only, then save for future sessions - The user enters their password when they are
initially enrolled in management. This password is then saved and used for any file server
connections they later initiate.
Once per session - After launching the Access Mobile Client, the user is required to enter
their password at the time they connect to the first server. Until they leave the Access
Mobile Client application, they can then connect to additional servers without having to
reenter their password. If they leave the Access Mobile Client for any period of time and then
return, they will be required to enter their password again to connect to the first server.
20 Copyright © Acronis International GmbH, 2002-2014
Page 21

For every connection - The user is required to enter their password each time they connect
to a server.
Allow user to add individual servers - If this option is enabled, users will be able to manually add
servers from within the Access Mobile Client application, as long as they have the server's DNS
name or IP address. If you want the user to only have their policy Assigned Servers available,
leave this option disabled.
Allow saved passwords for user configured servers - If a user is allowed to add individual
servers, this sub-option determines whether they are allowed to save their password for
those server.
Allow File Server, NAS and Sharepoint Access From the Web Client - When enabled, Web Client
users will be able to see and access mobile Data Sources as well.
Allow User to Add Network Folders by UNC path or URL - When enabled, the mobile client users
will be able to add and access network folders and SharePoint sites not assigned to them or not
accessible through the existing Data Sources. The selected Gateway Server must have access to
those SMB shares or SharePoint sites.
Block access to specific network paths - When enabled, allows the administrator to create
and use blacklists of network paths which the users shouldn't be allowed to self-provision.
Only allow this Mobile Client to connect to servers with third-party signed SSL certificates - If
this option is enabled, the Access Mobile Client will only be permitted to connect to servers with
third-party signed SSL certificates.
Note: If the management server does not have a third-party certificate, the client will be unable to reach
the management server after it's initial configuration. If you enable this option, ensure you have third-party
certificates on all your Gateway Servers.
Warn client when connecting to servers with untrusted SSL certificates - If your users are
routinely connecting to servers that will be using self-signed certificates, you may choose to
disable the client-side warning dialog message they will receive when connecting to these
servers.
Client timeout for unresponsive servers - This option sets the client login connection timeout for
unresponsive servers. If your clients are on especially slow data connections, or if they rely on a
VPN-on-demand solution to first establish a connection before a Gateway Server is reachable,
this timeout can be set to a value greater than the 30 second default. If you want the client to be
able to change this through the Access Mobile Client app, check Allow user to change this
setting.
1.2.2 Allowed Apps
Acronis Access Client Management allows you to create whitelists or blacklists that restrict the
Access Mobile Client's ability to open files into other apps on a mobile device. These can be used to
ensure that any files accessible through the Access Mobile Client can only be opened into secure,
trusted apps.
21 Copyright © Acronis International GmbH, 2002-2014
Page 22

In this section
Adding Apps Available for Lists ................................................................ 22
Finding an app's bundle identifier by browsing the files on your device 23
Finding an app's bundle identifier in an iTunes Library ........................... 23
Whitelists - allow you to specify a list of apps that Acronis Access files are allowed to be opened into.
All other apps are denied access.
Blacklists - allow you to specify a list of apps that Acronis Access files are not allowed to be opened
into. All other apps are allowed access.
In order for Acronis Access to identify a particular app, it needs to know the app's Bundle Identifier.
A list of common apps, and their bundle identifiers, are included in the Acronis Access Web Interface
by default. If the app you need to whilelist or blacklist is not included, you will need to add it to the
list.
Note: App whitelisting and blacklisting are not currently supported by the Access Mobile Client for Android.
Lists
Add whitelists and blacklists. Once created, whitelists and blacklists can be assigned to any Acronis
Access user or group policy. They will only apply to the user or group policies you specify.
Name - Shows the name of the list set by the administrator.
Type - Shows the type of the list (whitelist/blacklist)
Add List - Opens the Add a New Whitelist or Blacklist menu.
1.2.2.1 Adding Apps Available for Lists
To add an app to be included on a whitelist or blacklist:
1. Click Allowed Apps in the top menu bar.
2. Click Add app in the Apps Available for Lists section.
3. Enter the App name. This can be the name of the app as it appears in the App Store, or an
alternate name of your choosing.
4. Enter the app's Bundle identifier. This must match the intended apps bundle identifier exactly, or
it will not white or blacklisted.
5. Click Save.
22 Copyright © Acronis International GmbH, 2002-2014
Page 23

You can find the bundle identifier either by browsing the files on your device (p. 23) or you can view
it in an iTunes Library (p. 23).
1.2.2.2 Finding an app's bundle identifier by browsing the files on your
device
If you use software that allows browsing the contents of your device's storage, you can locate a app
on the device and determine its bundle identifier . One app that can be used for this is iExplorer .
1. Connect your device to your computer with USB and open iExplorer or a similar utility.
2. Open the Apps folder on the device and locate the app you require.
3. Open that app's folder and locate its iTunesMetadata.plist file.
4. Open this PLIST file in a text editor.
5. Find the softwareVersionBundleId key in the list.
6. The string value below it is the bundle identifier value that you will need to enter for the app in
Acronis Access. These are commonly formatted as: com.companyname.appname
1.2.2.3 Finding an app's bundle identifier in an iTunes Library
If you sync your device with iTunes and the app you desire is either on your device, or was
downloaded through iTunes, it will exist on your computer's hard drive. You can locate it on your
hard drive and look inside the app to find the bundle identifier.
1. Navigate to your iTunes Library and open the Mobile Applications folder.
2. On a Mac, this is typically in your home directory, in ~/Music/iTunes/Mobile Applications/
3. On a Windows 7 PC, this is typically in C:\Users\username\My Music\iTunes\Mobile
Applications/
4. If you have recently installed the app on your device, make sure you have performed an iTunes
sync before you continue.
5. Locate the app that you require in the Mobile Applications folder.
6. Duplicate the file and rename the extension to .ZIP
7. Unzip this newly created ZIP file and you'll end up with a folder with the application name.
8. Inside that folder is a file called iTunesMetadata.plist
9. Open this PLIST file in a text editor.
10. Find the softwareVersionBundleId key in the list.
23 Copyright © Acronis International GmbH, 2002-2014
Page 24

11. The string value below it is the bundle identifier value that you will need to enter for the app in
Acronis Access. These are commonly formatted as: com.companyname.appname
1.2.3 Default Access Restrictions
This section allows you to set restrictions for clients contacting the management server and these
restrictions are also the default restrictions for Gateway Servers.
Note: For information on setting custom access restrictions for your Gateway Servers visit the Editing Gateway
Servers (p. 37) article in the Managing Gateway Servers section.
Configure the client enrollment status, client app types and authentication methods that can be used
to connect to this Acronis Access server and any Gateway Servers configured to use the default
access restrictions.
Require that client is enrolled with an Acronis Access server - If you select this option, all Access
Mobile Clients connecting to this server are required to be managed by a Acronis Access server
that is listed under Allowable Acronis Access servers. This option ensures that all clients accessing
the server have the settings and security options you require. The server name entered must
match the management server name configured in the Access Mobile Client app. Partial names
24 Copyright © Acronis International GmbH, 2002-2014
Page 25

may also be used to allow multiple client management servers in a domain, for instance. Partial
names do not need wildcard symbols.
Allow Client Certificate Authentication - If you uncheck this option, users will not be able to
connect via certificate and will be able to connect via client username and password or smart
card.
Allow Username/Password Authentication - If you uncheck this option, users will not be able to
connect via username and password and will be able to connect via client certificate or smart
card.
Allow Smart Card Authentication - If you uncheck this option, users will not be able to connect
via smart card and will be able to connect via client username and password or certificate.
Allow Acronis Access Android clients to access this server – If you uncheck this option, Android
devices will not be able to connect to the Acronis Access server and you won't be able to access
management as well. If you select this option, you can further set which clients can connect by
the options below.
Allow standard Acronis Access Android client - If you select this option, this Acronis Access
server will allow users running the standard Android Acronis Access client app to connect. If
you do not want to allow Android users to access this Acronis Access server, you can uncheck
this setting.
Allow AppConnect managed Acronis Access Android client - If you select this option, this
Acronis Access server will allow Android users with Acronis Access clients enrolled in
MobileIron. If you do not want to allow Android users enrolled in MobileIron to access this
Acronis Access server, you can uncheck this setting.
Allow Acronis Access iOS clients to access this server – If you uncheck this option, iOS devices
will not be able to connect to the Acronis Access server and you won't be able to access
management as well. If you select this option, you can further set which clients can connect by
the options below.
Allow Standard Acronis Access iOS Client – If you select this option, this Acronis Access
server will allow users running the standard iOS Access Mobile Client app to connect. If you
do not want to allow iOS users to access this Acronis Access server, you can uncheck this
setting.
Allow Good Dynamics managed Acronis Access iOS clients – If you select this option, this
Acronis Access server will allow users using the iOS Access Mobile Client Good Dynamics
managed client to connect. If you do not want to allow users with the iOS Access Mobile
Client Good Dynamics client to access this Acronis Access server, you can uncheck this
setting.
Allow AppConnect managed Acronis Access iOS clients – If you select this option, this
Acronis Access server will allow iOS users with Access Mobile Client enrolled in MobileIron. If
you do not want to allow iOS users enrolled in MobileIron to access this Acronis Accessserver,
you can uncheck this setting.
1.3 On-boarding Mobile Devices
To get started with the Acronis Access mobile client, users need to install the Access Mobile Client
application through the Apple App Store. If your company is using client management, the users also
need to enroll the Access Mobile Client app on their device with the Acronis Access Server. Once
enrolled, their mobile client configuration, security settings, and capabilities are controlled by their
Acronis Access user or group policy.
25 Copyright © Acronis International GmbH, 2002-2014
Page 26

In this section
Server-side Management Enrollment Process ......................................... 26
User-side Management Enrollment Process ........................................... 29
The Access Mobile Client application settings and features controlled by the management policy
include:
Requiring a Access Mobile Client application lock password
App password complexity requirements
Ability to remove the Access Mobile Client app from management
Allow emailing and printing files from the Access Mobile Client
Allow storing files on the device
Allow Access Mobile Client on-device files to be included in iTunes backups
Allow sending files to the Access Mobile Client from other applications
Allow opening Access Mobile Client files in other applications
Restrict the other applications that Access Mobile Client files are allowed to be opened into
Allow PDF annotation
Allow file and folder creation, renames and deletes
Allow moving files
Require confirmation when deleting
Servers, folders, and home directories can be assigned so they automatically appear in the
Access Mobile Client app
Assigned folders can be configured to perform 1-way to 2-way syncing with the server
1.3.1 Server-side Management Enrollment Process
Selecting an enrollment mode
1. Open the Acronis Access web interface.
2. Log in as an administrator.
3. Open the Mobile Access tab.
4. Open the Settings tab.
5. Select the desired device enrollment requirements
26 Copyright © Acronis International GmbH, 2002-2014
Page 27

Acronis Access includes two device enrollment mode options. This mode is used for all client
enrollments. You will need to select the option that fits your requirements:
PIN number + Active Directory username and password - In order to activate their Acronis
Access app and gain access to Acronis Access servers, a user is required to enter an expiring,
one-time use PIN number and a valid Active Directory username and password. This option
ensures that a user can only enroll one device, and only after receiving a PIN number issued by
their IT administrator. This option is recommended when the enhanced security of two-factor
device enrollment is required.
Active Directory username and password only - A user can activate their Acronis Access app
using only their Active Directory username and password. This option allows a user to enroll one
or more devices at any point in the future. Users just need to be given the name of their Acronis
Access Client Management server, or a URL pointing to their Acronis Access Client Management
server, which can be posted on a web site or emailed, simplifying the rollout of Acronis Access to
large numbers of users. This option is preferred in environments where two-factor enrollment is
not required and many users may need access to Acronis Access at any time, such as student
deployments.
Inviting a user to enroll
Users are typically invited to enroll with the Acronis Access Server with an email that is sent from an
Acronis Access Administrator. If required by the server, this email contains a one-time use PIN
number that is valid for a configurable number of days. The PIN number can be used to enroll the
Access Mobile Client app on one device only. If a user has multiple devices, they will need to be sent
one invitation email for each device that needs access. This email includes a link to the Access Mobile
Client app in the Apple App Store, in the case the app first needs to be installed. It also includes a
second link that, when tapped while on the device, will open the Access Mobile Client and
auto-complete the client enrollment form with the Acronis Access Server's name, the unique
enrollment PIN number, and the user's username. By using this link, a user simply enters their
account password to complete client enrollment.
Once an enrollment invitation is generated, the invited users are displayed on the Enrollment
Invitations page. Each user's PIN number is listed, in the case that you need to communicate it by
a means other than the automatic email.
Once a user successfully enrolls their Access Mobile Client using their one-time use PIN number,
they will no longer appear in this list.
To revoke a user's invitation PIN number, press delete to remove them from the list.
Filter by - The invitations list can be filtered by Username, Display Name, or Email Address.
27 Copyright © Acronis International GmbH, 2002-2014
Page 28
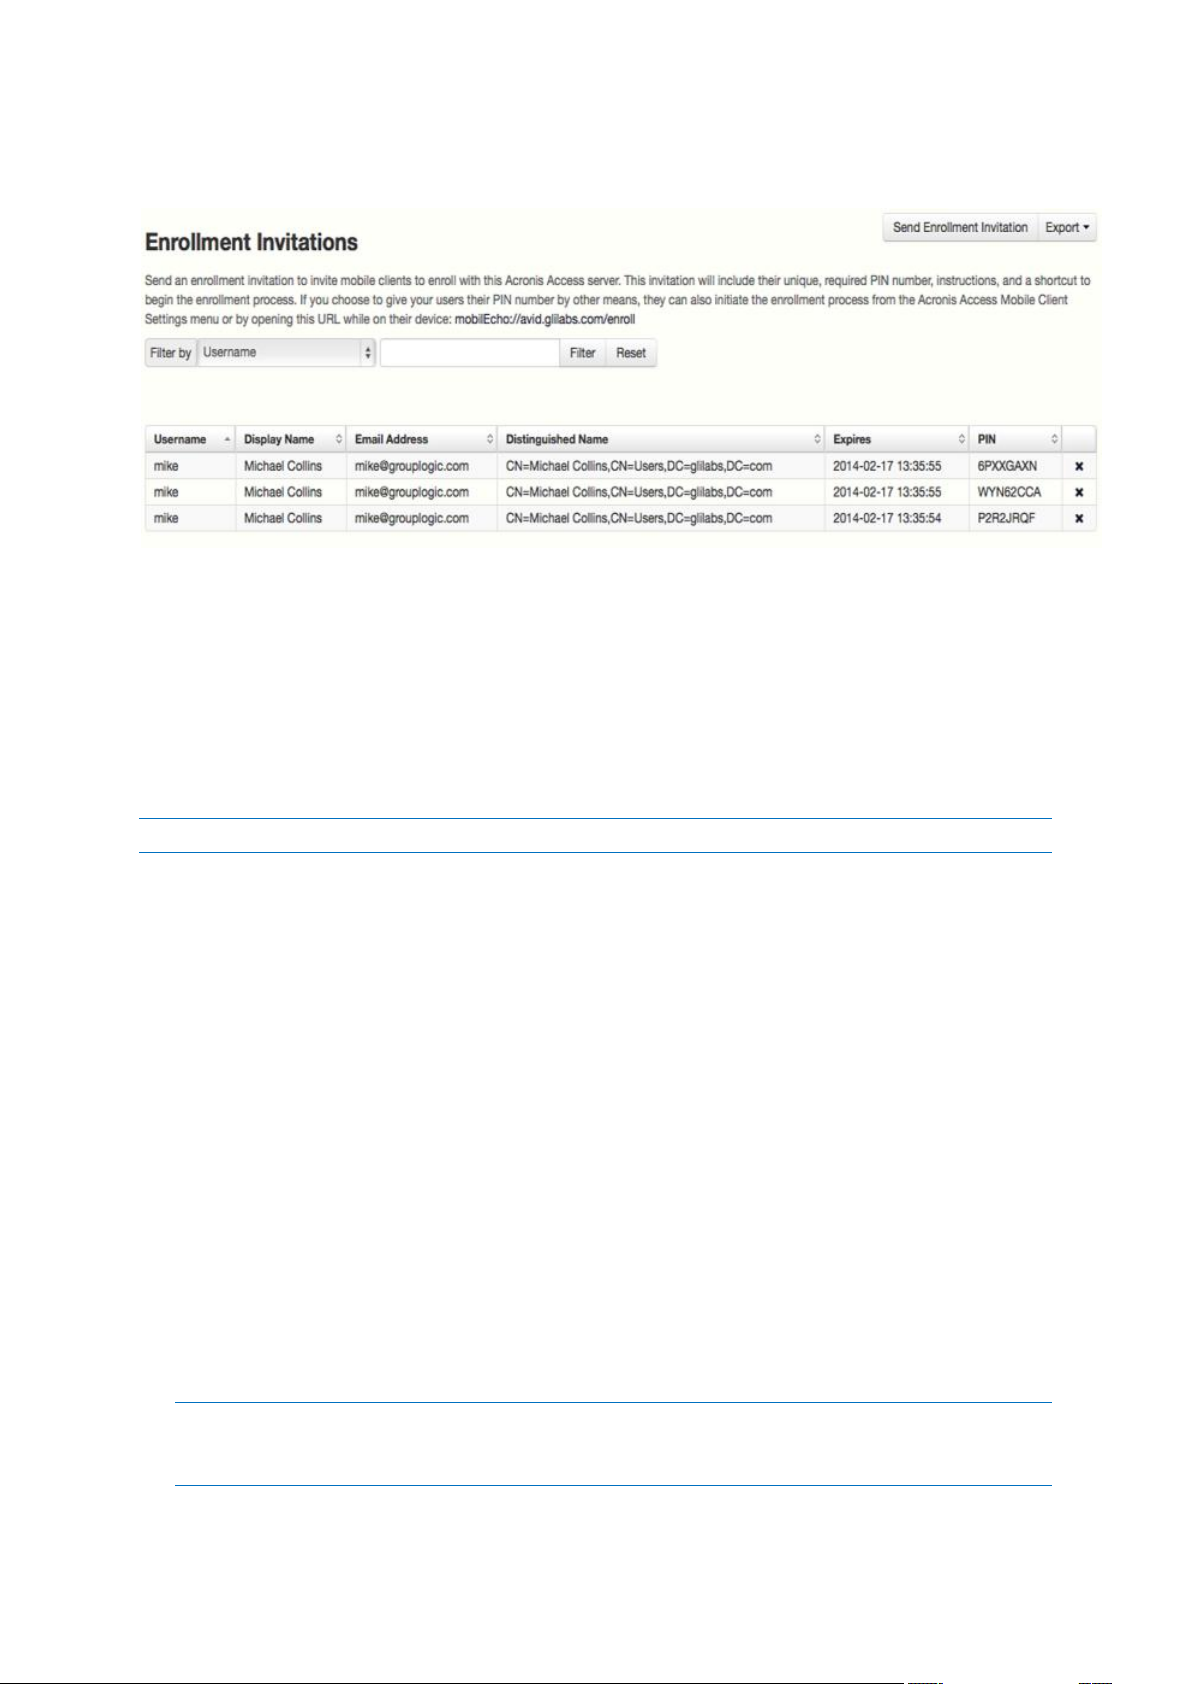
Download enrollment invitations as CSV - The entire or filtered invitations list can be exported to
a CSV file and opened in Excel or imported into a custom process.
Using basic URL enrollment links when PIN numbers are not required:
If your server is configured to not require PIN numbers for client enrollment, you can give your users
a standard URL that will automatically start the enrollment process when tapped from the mobile
device.
To determine the enrollment URL for your management server, open the Mobile Access tab and
open the Enroll Users tab. The URL is displayed on this page.
Note: For more information on the two modes, visit the Settings (p. 53) section.
To generate a Acronis Access enrollment invitation:
1. Open the Mobile Access tab and open the Enroll Users tab
2. Press the Send Enrollment Invitation button.
3. Enter an Active Directory user name or group name and click Search. If a group is chosen, you can
press Add to show each email address in that group in the Users to invite list. This will allow you
to batch invite all members in a group. You can optionally remove one or more of those group
members before sending the invitations. You can perform 'begins with' or 'contains' searches for
Active Directory groups. Begins with search will complete much faster than contains searches.
4. Once you've added your first user or group, you can issue a new search and continue to add
additional users or groups to the list.
5. Review the list of Users to invite. You can Delete any users you would like to remove them from
the list.
6. If a user does not have an email address associated with their account, you will see No email
address assigned - click here to edit in the Email Address column. You can click any of these
entries to manually enter an alternate email address for that user. If a user is left with No email
address assigned, a PIN number will still be generated for them, and will be visible on the Enroll
Users page. You will need to convey this PIN number to the user by another means before they
can enroll their Access Mobile Client.
Note: If you prefer to manually communicate enrollment PIN numbers to the users, you can uncheck the
Send an enrollment invitation email to each user with a specified address option. Each PIN number will be
visible on the Enrollment Invitations page.
28 Copyright © Acronis International GmbH, 2002-2014
Page 29

7. Choose the number of days you'd like the invitation to be valid for in the Number of days until
invitation expires field.
8. Choose the number of PINs you'd like to send to each user on the invitations list. This can be
used in cases where a user may 2 or 3 devices. They will receive individual emails containing each
unique one-time-use PIN.
Note: Acronis Access licensing allows each licensed user to activate up to 3 devices, each additional device
beyond 3 is counted as a new user for licensing purposes.
9. Choose the version or versions of the Access Mobile Client that you would like your users to
download and install on their device. You may choose iOS, Android, or Both. If you are using
Acronis Access for Good Dynamics, you can select that option and your users will only be
directed to download the Good Dynamics version of the Access Mobile Client.
10. Press Send.
Note: If you get an error message when sending, confirm that the SMTP settings in the SMTP tab under
General Settings are correct. Also, if you're using Secure connection, verify that the certificate you are using
matches the host name of your SMTP server.
Inviting users previously enrolled by mobilEcho 4.5 or earlier
mobilEcho 2.X did not require a PIN number to enroll a client in the Client Management system.
There are two options for migrating mobilEcho 2.X clients to the Acronis Access management system.
By default, mobilEcho servers that are upgraded from 2.X allow clients previously managed by the
2.X server to auto-enroll and appear in the Acronis Access Devices list without having to enter a PIN
number. If you would like to ensure that all devices accessing the system have enrolled with a PIN
number, you can disable this setting. In that case, if the user doesn't have User can remove Mobile
Client from management privileges, the user will need to delete Acronis Access from their device
and reinstall a new copy from the App Store before they can enroll using a PIN number.
Also note that when this auto-enroll setting is enabled, it will be possible to do an iTunes backup of a
device running a managed version of mobilEcho 2.X or 3.0, restore that backup to a new device, and
as long as the user has the active directory username and password for the associated account, that
new device can be automatically enrolled in client management without a PIN number.
It is recommended that you disable the auto-enroll setting after your previously managed clients
have all accessed the management server for the first time. They will appear in the Devices list when
this happens.
To allow mobilEcho clients that were already enrolled in mobilEcho 2.X Client Management to
automatically enroll after your mobilEcho Client Management server is upgraded to the Acronis
Access Server, enable the Allow mobilEcho clients previously managed by 2.X servers and managed
mobilEcho clients restored to new devices to auto-enroll without PIN setting.
1.3.2 User-side Management Enrollment Process
Each user sent a management enrollment invitation will receive an email that contains:
A link to install the Access Mobile Client from the Apple App Store.
A link used to launch the Access Mobile Client app and automate the enrollment process.
A one-time use PIN number.
Their management server address.
29 Copyright © Acronis International GmbH, 2002-2014
Page 30

The email guides them through the process of installing the Access Mobile Client and entering
their enrollment information.
If the Access Mobile Client app has already been installed, and the user taps the "Tap this link to
automatically begin enrollment..." option while viewing this email on their device, Acronis Access will
automatically launch and the enrollment form will be displayed. The user's server address, PIN
number, and username are also encoded in this URL, so these fields are auto-completed in the
enrollment form. At this point, the user simply has enters their password to complete the enrollment
process.
The username and password required are the user's Active Directory username and password. These
credentials are used to match them to the proper user or group management policy, for access to
Gateway servers and if their management policy allows it, the saving of their credentials for Acronis
Access server logins.
30 Copyright © Acronis International GmbH, 2002-2014
Page 31

If their management policy requires an application lock password, they will be prompted to enter
one. All password complexity requirements configured in their policy will be enforced for this initial
password, and for any change of their application lock password in the future.
If their policy restricts the local storage of files on their device, they will be warned that existing files
will be removed and allowed to cancel the management setup process if there are files they need to
deal with before they are removed.
To enroll in management
Enroll automatically via enrollment email
1. Open the email sent to you by your IT administrator and tap the click here to install the Acronis
Access link if you have not yet installed Acronis Access.
2. Once Acronis Access is installed, return to the invitation email on your device and tap Click this
link to automatically begin enrollment in step 2 of the email.
3. An enrollment form will be displayed. If you used the link in the invitation email to start the
enrollment process, your Server Address, PIN, and Username will be automatically filled out.
Note: If your server does not require a PIN number, it will not be displayed in the enrollment form.
4. Enter your password and tap Enroll Now to continue.
Note: The Username and Password are your standard company username and password. This is likely the
same as you use to log into your computer or to your email.
5. After completing the entire form, tap the Enroll button.
6. Depending on the configuration of your company's server, you may be warned that your
management server's security certificate is not trusted. To accept this warning and proceed, you
can click Proceed Always.
7. If a application lock password is required for your Access Mobile Client app, you will be asked to
set one. Password complexity requirements may apply and will be displayed if needed.
8. A confirmation window may appear if your management policy restricts the storage of files in
Acronis Access or disables your ability to add individual servers from within the Access Mobile
Client app. If you have files stored locally in the Access Mobile Client app, you will be asked to
confirm that any files in your My Files local file storage will be deleted. If you select No, the
management enrollment process will be canceled and your files will remain unchanged.
Manual enrollment
1. Open the Acronis Access app.
2. Open Settings.
3. Tap Enroll
4. Fill in your server's address, your PIN (if required), username and password.
5. After completing the entire form, tap the Enroll button.
6. Depending on the configuration of your company's server, you may be warned that your
management server's security certificate is not trusted. To accept this warning and proceed, you
can click Proceed Always.
7. If a application lock password is required for your Access Mobile Client app, you will be asked to
set one. Password complexity requirements may apply and will be displayed if needed.
31 Copyright © Acronis International GmbH, 2002-2014
Page 32

A confirmation window may appear if your management policy restricts the storage of files in Acronis
Access or disables your ability to add individual servers from within the Access Mobile Client app. If
you have files stored locally in the Access Mobile Client app, you will be asked to confirm that any
files in your My Files local file storage will be deleted. If you select No, the management enrollment
process will be canceled and your files will remain unchanged.
Ongoing Management Updates
After the initial management setup, Access Mobile Clients will attempt to contact the management
server each time the client app is started. Any settings changes, server or folder assignment changes,
application lock password resets, or remote wipes will be accepted by the client app at that time.
Connectivity requirements
Acronis Access clients must have network access to the Acronis Access server in order to receive profile updates,
remote password resets, and remote wipes. If your client is required to connect to a VPN before they can access
Acronis Access, they will also need to connect to the VPN before management commands will be accepted.
Removing Management
There are two options to remove your Access Mobile Client from management:
Turn Off the Use Management option (if allowed by your policy)
Remove the Access Mobile Client application
Depending on your Acronis Access management policy settings, you may have the right to remove
the Access Mobile Client from management. This will likely result in you not being able to access
corporate files servers. If you are allowed to do so, follow these steps to unmanage your device:
To unmanage your device follow the steps below:
1. Tap the Settings menu.
2. Turn OFF the Use Management option.
3. Your profile may require that your Access Mobile Client data is wiped when removing the device
from management. You can cancel the process at this point if you don't want to be wiped.
4. Confirm removing Acronis Access from management by tapping YES in the confirmation window.
Note: If your Acronis Access management profile does not allow you to unmanage your client, the Use
Management option will not be displayed on the Settings menu. In this case the only way to remove the device
from management is by uninstalling the Access Mobile Client application. Uninstalling the application will erase
all existing Access Mobile Client data and settings and will return the user to default application settings after
reinstalling.
To uninstall the Access Mobile Client app, follow the steps below:
1. Hold your finger on the Access Mobile Client app icon until it starts shaking.
2. Tap the "X" button on the Access Mobile Client application and confirm the uninstall process.
3. To reinstall the Access Mobile Client app, visit http://www.grouplogic.com/web/meappstore
32 Copyright © Acronis International GmbH, 2002-2014
Page 33

1.4 Managing Gateway Servers
The Acronis Access Gateway Server is the server contacted by the Access Mobile Clients that handles
accessing and manipulating files and folders in file servers, SharePoint respositories, and/or Sync &
Share volumes. The Gateway Server is the "gateway" for mobile clients to their files.
The Acronis Access Server can manage and configure one or more Gateway Servers from the same
management console. The Gateway Servers under management appear in the Gateway Servers
section of the Mobile Access menu.
Type - Shows the type of the gateway, at the moment it can only be of the Server type.
Name - Cosmetic name given to the gateway when you create it.
Address - DNS name or IP address of the gateway.
Version - Shows the version of the Acronis Access Gateway Server.
Status - Shows whether the server is Online or Offline.
Active Sessions - Number of currently active sessions to this Gateway Server.
Licenses Used - Number of licenses used and the number of available licenses.
License - Shows the current type(s) of license(s) used by the Gateway Server.
You can register new Gateway Servers using the Add new Gateway Server button. From the actions
menu for each Gateway Server the administrator can get more details on a server and its
performance, edit its configuration, change the access restrictions for the server, change licensing for
the server, or remove the Gateway Server.
Search
Index local data sources for filename search
By default, indexed searching is enabled on all Gateway Servers. You can disable or enable indexed
searching for each Gateway Server in the Gateway’s Edit Server dialog.
Default path
By default on a standalone server, Acronis Access stores index files in the Search Indexes directory in
the Acronis Access Gateway Server application folder. If you would like to locate the index files in a
different location, enter the path to a new folder.
Support content search using Microsoft Windows Search where available
33 Copyright © Acronis International GmbH, 2002-2014
Page 34

Support for content search of shared is enabled by default, and can be enabled or disabled by
In this section
Registering new Gateway Servers............................................................ 34
Server Details ........................................................................................... 36
Editing Gateway Servers .......................................................................... 37
Licensing Gateway Servers ....................................................................... 44
Cluster Groups ......................................................................................... 44
checking this option. You can enable or disable content searching for each Gateway Server in the Edit
Server dialog.
In addition to enabling this setting, content search requires that the Microsoft Windows Search
application be installed on the Acronis Access Gateway server and be configured to index any data
source where content search is enabled. Windows Search is built into Windows Vista and no
additional installation is required. It is also built into Windows Server 2008, but it is not enabled by
default. To enable it add the Role called File Services in the Server Manager, and have the Windows
Search Service enabled. Windows Search can be configured to index the necessary data sources by
right clicking the Windows Search icon in the Start bar and selecting Windows Search Options. You
can do Windows content searches on Windows reshares but the remote machine(s) must be in the
same domain as the Gateway Server.
Note: The Data Source's volume path must be a hostname or a fully qualified name in order to use content
search on Windows Reshares. IP addresses are not supported by Windows Search.
SharePoint
Entering these credentials is optional for general SharePoint support, but required to enumerate site
collections. For example, say you have two site collections: http://sharepoint.example.com and
http://sharepoint.example.com/SeparateCollection. Without entering credentials, if you create a
volume pointing to http://sharepoint.example.com, you will not see a folder called
SeparateCollection when enumerating the volume. The account needs to have Full Read access to
the web application.
1.4.1 Registering new Gateway Servers
With the exception of automatic registration of a Gateway Server running on the same machine as
the management web application, registration of Gateway Servers is a multi-step, manual process.
1. Go to the computer on which you have the Gateway Server installed.
2. Open https://localhost/gateway_admin.
34 Copyright © Acronis International GmbH, 2002-2014
Page 35

Note: The port 443 is the default port. If you have changed the default port, add your port number after
localhost.
3. Write down the Administration Key.
4. Open the Acronis Access Web Interface.
5. Open the Mobile Access tab.
6. Open the Gateway Servers page.
7. Press the Add New Gateway Server button.
8. Enter a Display Name for your Gateway Server.
9. Enter the DNS name or IP address of your Gateway Server.
Note: If your mobile clients connect to the gateway by going through a reverse proxy server or
loadbalancer you should enable Use alternate address for client connections and enter the DNS name or IP
address of your reverse proxy server or loadbalancer.
10. Enter the Administration Key.
11. If required, allow connections with self-signed certificates to this gateway by enabling Allow
connections from Acronis Access servers using self-signed certificates.
12. Press the Save button.
After you've registered your Gateway Server, you may want to configure custom access restrictions
for this Gateway Server. For more information on this, visit the Editing Gateway Servers (p. 37)
section.
35 Copyright © Acronis International GmbH, 2002-2014
Page 36

1.4.2 Server Details
Opening the Details page of a Gateway Server gives you a lot of useful information about that
specific server and its users.
Status
The Status section gives you information about the Gateway Server itself. Information like the
operating system, the type of the license, number of licenses used, version of the Gateway Server
and more.
Active Users
36 Copyright © Acronis International GmbH, 2002-2014
Page 37

Displays a table of all users currently active in this Gateway Server.
User - Shows the user's Active Directory (full) name.
Location - Shows the IP address of the device.
Device - Shows the name given to the device by the user.
Model - Shows the type/model of the device.
OS - Shows the operating system of the device.
Client Version - Shows the version of the Acronis Access app installed on the device.
Policy - Shows the policy for the account used by the device.
Idle Time - Shows the time the user has spent connected to the gateway.
1.4.3 Editing Gateway Servers
Access Restrictions
You can use the default access restrictions set in the Policies (p. 8) section or you can set custom
access restrictions for each Gateway Server.
Setting custom access restrictions for this Gateway Server
1. Press the Down arrow next to the Details button.
2. Select Access Restrictions.
3. Open the Use Custom settings tab.
4. Select the specific access restrictions you want for this Gateway Server.
5. Press Apply.
General Settings
Display Name - Sets the display name of the Gateway Server.
Address for administration - Sets the address on which the Gateway Server is reachable by the
Acronis Access Server.
Address for client connections - Sets the address on which mobile clients will connect to the
Gateway Server.
37 Copyright © Acronis International GmbH, 2002-2014
Page 38

Logging
The Logging section allows you to control whether the logging events from this specific Gateway
Server will be shown in the Audit Log and allows you to enable Debug logging for this server.
To enable Audit Logging for a specific gateway server:
1. Open the web interface.
2. Log in as an administrator.
3. Open the Mobile Access tab.
4. Open the Gateway Servers tab.
5. Find the server for which you want to enable Audit Logging.
6. Press the Details button.
7. In the Logging section check Audit Logging.
8. Press the Save button.
To enable Debug Logging for a specific gateway server:
Note: The default location for the debug logs is: C:\Program Files (x86)\Acronis\Access\Gateway
Server\Logs\AcronisAccessGateway
1. Open the web interface.
2. Log in as an administrator.
3. Open the Mobile Access tab.
4. Open the Gateway Servers tab.
5. Find the server for which you want to enable Debug Logging.
6. Press the Details button.
7. In the Logging section check Debug Logging.
8. Press the Save button.
38 Copyright © Acronis International GmbH, 2002-2014
Page 39

Search
Index local data sources for filename search
By default, indexed searching is enabled on all Gateway Servers. You can disable or enable indexed
searching for each Gateway Server in the Gateway’s Edit Server dialog.
Default path
By default on a standalone server, Acronis Access stores index files in the Search Indexes directory in
the Acronis Access Gateway Server application folder. If you would like to locate the index files in a
different location, enter the path to a new folder.
Support content search using Microsoft Windows Search where available
Support for content search of shared is enabled by default, and can be enabled or disabled by
checking this option. You can enable or disable content searching for each Gateway Server in the Edit
Server dialog.
In addition to enabling this setting, content search requires that the Microsoft Windows Search
application be installed on the Acronis Access Gateway server and be configured to index any data
source where content search is enabled. Windows Search is built into Windows Vista and no
additional installation is required. It is also built into Windows Server 2008, but it is not enabled by
default. To enable it add the Role called File Services in the Server Manager, and have the Windows
Search Service enabled. Windows Search can be configured to index the necessary data sources by
right clicking the Windows Search icon in the Start bar and selecting Windows Search Options. You
can do Windows content searches on Windows reshares but the remote machine(s) must be in the
same domain as the Gateway Server.
Note: The Data Source's volume path must be a hostname or a fully qualified name in order to use content
search on Windows Reshares. IP addresses are not supported by Windows Search.
39 Copyright © Acronis International GmbH, 2002-2014
Page 40

SharePoint
Entering these credentials is optional for general SharePoint support, but required to enumerate site
collections. For example, say you have two site collections: http://sharepoint.example.com and
http://sharepoint.example.com/SeparateCollection. Without entering credentials, if you create a
volume pointing to http://sharepoint.example.com, you will not see a folder called
SeparateCollection when enumerating the volume. The account needs to have Full Read access to
the web application.
To give your account Full Read permission, follow these steps (for SharePoint 2010):
1. Open the SharePoint Central Administration.
2. Click on Application Management.
40 Copyright © Acronis International GmbH, 2002-2014
Page 41

3. Under Web Applications click on Manage web applications.
4. Select your web application from the list and click on User Policy.
5. Select the checkbox of the user you want to give permissions to and click on Edit Permissions of
Selected Users. If the user is not in the list, you can add him by clicking on Add Users.
41 Copyright © Acronis International GmbH, 2002-2014
Page 42

6. From the Permission Policy Levels section, select the checkbox for Full Read - Has Full read-only
access.
7. Press the Save button.
42 Copyright © Acronis International GmbH, 2002-2014
Page 43

Advanced
Note: It is recommended that these settings only be changed at the request of a customer support
representative.
Hide inaccessible items - When enabled, files and folders for which the user does not have the
Read permission will not be shown.
Hide inaccessible items on reshares - When enabled, files and folders located on a network
reshare for which the user does not have the Read permission will not be shown.
Note: Enabling this feature can have a significant negative impact while browsing folders.
Hide inaccessible SharePoint sites - When enabled, SharePoint sites for which the user does not
have the necessary permissions will not be shown.
Minimum Android client version - When enabled, users connecting to this Gateway will be
required to have this or a later version of the Acronis Access Android client app.
Minimum iOS client version - When enabled, users connecting to this Gateway will be required
to have this or a later version of the Acronis Access iOS client app..
Use Kerberos for SharePoint Authentication - If your SharePoint server requires Kerberos
authentication, you should enable this setting. You will also need to make an update to the
Active Directory computer object for the Windows server or servers that are running the
Gateway server software. The Acronis Access Windows server needs to be given permission to
43 Copyright © Acronis International GmbH, 2002-2014
Page 44

present delegated credentials to your SharePoint server on behalf of you users. Enabling the
Acronis Access Windows server to perform Kerberos Delegation:
1. In Active Directory Users and Computers, locate the Windows server or servers that you
have the Gateway Server installed on. They are commonly in the Computers folder.
2. Open the Properties window for the Windows server and select the Delegation tab.
3. Select Trust this computer for delegation to specified services only
4. Select Use any authentication protocol, this is required for negotiation with the SharePoint
server.
5. You must now add any SharePoint servers that you would like your users to be able to access
using Acronis Access . If your SharePoint implementation consists of multiple load balanced
nodes, you will need to add each SharePoint/Windows node to this list of permitted
computers. Click Add... to search for these Windows computers in AD and add them. For
each, you will need to select the "http" service type only.
Note: Please allow 15 to 20 minutes for these change to propagate through AD and be applied before
testing client connectivity. They will not take effect immediately.
Allow connections to SharePoint servers using self-signed certificates - When enabled, allows
connections from this Gateway to SharePoint servers using self-signed certificates.
Allow connections to Acronis Access servers with self signed certificates - When enabled, allows
connections from this Gateway to Acronis Access servers using self-signed certificates.
Allow connections from Acronis Access servers with self signed certificates - When enabled,
allows connections to this Gateway from Acronis Access servers using self-signed certificates.
Show hidden SMB Shares - When enabled, shows hidden system SMB shares to the users.
Client session timeout in minutes - Sets the time before an inactive user is kicked out of the
Gateway Server.
Use user principal name (UPN) for authentication with SharePoint Servers - When enabled,
users will authenticate to SharePoint servers via their user principal name (e.g.
hristo@glilabs.com), otherwise they will authenticate with domain/username (e.g.
glilabs/hristo).
1.4.4 Licensing Gateway Servers
For more information on licensing your Gateway Servers, visit the Licensing (p. 74) section.
1.4.5 Cluster Groups
In Acronis Access version 5.1 or newer, you have the ability to create a cluster group of Gateway
Servers.
A cluster group is a collection of Gateway Servers that share the same configuration. This allows you
to control all of the Gateways in that group at once instead of having to configure the same settings
on every Gateway individually. Typically these servers are placed behind a load balancer to provide
high availability and scalability for mobile clients.
For a clustered gateway setup, you need a load balancer, two or more gateways and an Acronis
Access Server. All of your Gateway Servers should be added to a Cluster Group in the Acronis Access
web interface and placed behind the load balancer. Your Acronis Access Server acts as both your
management server and the server with which mobile clients enroll in client management. Its role is
44 Copyright © Acronis International GmbH, 2002-2014
Page 45

to manage all policies, devices and settings while the gateways' role is to provide access to the file
shares.
To create a cluster group:
Please make sure that you have already configured a correct Address for Administration on each
Gateway before proceeding. This is the DNS or IP address of the Gateway server.
1. Open the Acronis Access Web Interface.
2. Open the Mobile Access tab.
3. Open the Gateway Servers page.
4. Press the Add Cluster Group button.
5. Enter a display name for the group.
6. Enter the DNS name or IP address of the load balancer.
7. Mark the checkbox for each Gateway you want to be in the group.
8. Select the Gateway which will control the group's settings. All of the existing settings on that
Gateway (including assigned Data Sources and excluding the address for administration) will be
copied to every Gateway in the group.
45 Copyright © Acronis International GmbH, 2002-2014
Page 46

9. Press Create.
Editing a cluster group:
Editing cluster groups does not differ from editing regular Gateways. For more information visit the
Editing Gateway Servers (p. 37) article.
Adding members to an existing cluster group:
1. Open the web interface and navigate to Mobile Access -> Gateway Servers.
2. Open the action menu for the desired cluster group and select Add Cluster Members from the
available actions.
3. Select the desired Gateway Servers from the list and press Add.
1.5 Managing Data Sources
You can share NTFS directories located on your Windows server or on a remote SMB/CIFS file share
for access by Access Mobile Client users. When Access Mobile Client users connect they see these
directories as file share volumes. You can create Data Sources that provide access to an Sync & Share
server.
Access to SharePoint 2007, 2010, 2013, 365 content
Acronis Access can provide access to files residing in document libraries on SharePoint 2007, 2010,
2013 and 365 servers. An Acronis Access SharePoint data source can point to an entire SharePoint
server, a specific SharePoint site or subsite, or a specific document library. These files can be opened,
PDF annotated, edited, and synced, just like files that reside in traditional file server or NAS storage.
Acronis Access also supports Check Out and Check In of SharePoint files.
SharePoint authentication methods supported
Acronis Access supports SharePoint servers that allow client authentication using NTLMv1, NTLMv2,
Claims based and Kerberos. If your SharePoint server requires Kerberos authentication, you will need
to make an update to the Active Directory computer object for the Windows server or servers that
are running the Acronis Access server software. The Acronis Access Windows server needs to be
given permission to present delegated credentials to your SharePoint server on behalf of you users.
Claims based authentication involves authenticating with an authentication server, obtaining an
authentication token, and providing that token to the SharePoint server, rather than authenticating
with the SharePoint server directly. Acronis Access supports claims based authentication to Office
365 SharePoint sites. To authenticate, the gateway server first contacts Microsoft Online to
determine the location of the authentication server. This server may be hosted by Microsoft Online,
or may be within the corporate network (via Active Directory Federated Services). Once
authentication is complete and an binary security token is obtained, this token is sent to the
SharePoint server, which returns an authentication cookie. This cookie is then provided to
SharePoint in lieu of other user credentials.
46 Copyright © Acronis International GmbH, 2002-2014
Page 47

In this section
Folders ...................................................................................................... 47
Assigned Sources ...................................................................................... 50
Gateway Servers Visible on Clients .......................................................... 51
Legacy Data Sources................................................................................. 52
Changing Permissions for Shared Files and Folders
Acronis Access uses the existing Windows user accounts and passwords. Because Acronis Access
enforces Windows NTFS permissions, you should normally use Windows’ built-in tools for adjusting
directory and file permissions. The standard Windows tools provide the most flexibility for setting up
your security policy.
Acronis Access Data Sources that reside on another SMB/CIFS file server are accessed using an
SMB/CIFS connection from the Gateway Server to the secondary server or NAS. In this case, access to
the secondary server is performed in the context of the user logged into the Access Mobile Client app.
In order for that user to have access to files on the secondary server, their account will need both
"Windows Share Permissions" and NTFS security permissions to access those files.
Permissions to files residing on SharePoint servers are regulated in accordance to the SharePoint
permissions configured on the SharePoint server. Users receive the same permissions through
Acronis Access as they receive when they access SharePoint document libraries using a web browser.
1.5.1 Folders
In addition to Gateway Servers, Folders can also be assigned to Acronis Access user and group
policies, allowing them to automatically appear in a user's Acronis Access Mobile client application.
Folders can be configured to point to any Acronis Access Gateway Server, or even a subdirectory
within a shared volume. This allows you to give a user direct access to any folders that might be
important to them. By doing so, they don't have to navigate to the folder by knowing the exact
server, shared volume name, and path to the folder.
Folders can point to any type of content that Acronis Access is providing access to. They simply refer
to locations in Gateway Servers that have already been configured within the Acronis Access
management. This can be a local file share volume, a "network reshare" volume providing access to
files on another file server or NAS, a DFS share or a SharePoint volume.
Note: When creating a DFS Data Source you need to add the full path to the DFS like so:
\\company.com\namespace\share
Folders can optionally be configured to sync to the client device. The Access Mobile Client folder sync
options include:
None - The folder will appear as a network-based resource in the Acronis Access client app and
can be accessed and worked with just like a Gateway server.
1-Way - The folder will appear as a local folder in the Acronis Access client app. Its complete
contents will be synced from the server to the device and it will be kept up to date if files on the
server are added, modified, or deleted. This folder is intended to give local/offline access to a set
of server-based files and appears as read-only to the user.
47 Copyright © Acronis International GmbH, 2002-2014
Page 48

2-Way - The folder will appear as a local folder in the Acronis Access client app. Its complete
contents will initially be synced from the server to the device. If files in this folder are added,
modified, or deleted, either on the device or on the server, these changes will be synced back to
the server or device.
Require Salesforce activity logging
Acronis has partnered with Salesforce to offer an option for logging access to files shown to
customers using Acronis Access. Enabling this option will require any user who has this folder
assigned to their management policy to log a customer activity in Saleforce before they can open any
file in the folder. This is done completely within the Access Mobile Client app.
All items in this folder will be restricted from being emailed, printed, copied or moved outside
this folder, or opened in other apps on the device.
This feature requires a Acronis Access client and server of version 5.0 or later.
Acronis Access for Android clients does not support this Salesforce integration.
SharePoint Sites and Libraries
You can give easy access to SharePoint sites and libraries to your Access Mobile Client users by
creating a Data Source. There are a couple of ways to create SharePoint Data Sources depending on
your SharePoint configuration:
Creating a Data Source for a whole SharePoint site or subsite
When creating a Data Source for a SharePoint site or subsite, you only need to fill in the URL field.
This should be address of your SharePoint site or subsite.
e.g. https://sharepoint.mycompany.com:43222
e.g. https://sharepoint.mycompany.com:43222/subsite name
Creating a Data Source for a SharePoint Library
When creating a Data Source for a SharePoint Library, you need to fill both the URL and Document
Library Name fields. In the URL field you enter the address of your SharePoint site or subsite and for
the Document Library Name field you enter the name of your Library.
e.g. URL: https://sharepoint.mycompany.com:43222
e.g. Document Library Name: My Library
Creating a Data Source for a specific folder within a SharePoint Library
When creating a Data Source for a specific folder within a SharePoint Library, you will have to fill in
all fields. In the URL field you enter the address of your SharePoint site or subsite, for the Document
Library Name field you enter the name of your Library and for the Subpath field you enter the name
of the desired folder.
e.g. URL: https://sharepoint.mycompany.com:43222
e.g. Document Library Name: Marketing Library
e.g. Subpath: Sales Report
Note: When creating a Data Source pointing to a SharePoint resource using a Subpath, you cannot enable the
Show When Browsing Server option.
The Access Mobile Client supports NTLM, Kerberos Constrained Delegation, Claims based and
SharePoint 365 authentication. Depending on your SharePoint setup, you may need to make some
48 Copyright © Acronis International GmbH, 2002-2014
Page 49

additional configurations to the Gateway Server used to connect to these Data Sources. For more
information visit the Editing Gateway Servers (p. 37) article.
Note: Make sure you have at least 1 Gateway Server available.
Creating a Data Source
To create a Data source:
1. Open the Acronis Access Web Interface.
2. Open the Mobile Access tab.
3. Open the Data Sources tab.
49 Copyright © Acronis International GmbH, 2002-2014
Page 50

4. Go to Folders.
5. Press the Add New Folder button.
6. Enter a display name for the folder.
7. Select the Gateway Server which will give access to this folder.
8. Select the location of the data. This can be on the actual Gateway Server, on another SMB server,
on a SharePoint Site or Library or on a Sync & Share server.
Note: When selecting Sync & Share, make sure to enter the full path to the server with the port number.
e.g.: https://mycompany.com:3000
9. Based on your choice of location, enter the path to that folder, server, site or library.
10. Select the Sync type of this folder.
11. Enable Show When Browsing Server if you want this Data Source to be visible when Acronis
Access mobile clients browse the Gateway Server.
12. Select if the folder should require Salesforce activity logging.
13. Find and select the User or Group the folder will be assigned to.
14. Press the Save button.
Note: On a clean installation of Acronis Access, if you have enabled Sync & Share and you have a Gateway
Server present, you will have a Sync & Share Data Source created automatically. It points to the URL you set in
the Server section of the initial configuration. This folder allows your mobile users to access your Sync & Share
files and folders.
1.5.2 Assigned Sources
On this page, you can search for a User or Group to find which resources are assigned to them. The
resources are listed in 2 tables - Servers and Folders.
The Servers table lists the Gateway Server's display name, DNS name or IP address and the policies to
which this server is assigned.
The Folders table lists the Data Source's display name, Gateway Server, sync type, path and the
policies to which this Data Source is assigned.
50 Copyright © Acronis International GmbH, 2002-2014
Page 51

By pressing the Edit resources assigned to button, the administrator can quickly edit the assignments
for this policy.
1.5.3 Gateway Servers Visible on Clients
Gateway Servers can be assigned to User or Group policies and can be used as Data Sources. This
page displays all Gateway Servers displayed on the user's Acronis Access Mobile client and if those
Gateway Servers are assigned to a User or Group policy. You can also edit these assignment here.
When the Access Mobile Client users browse into a Gateway Server, they will see the Data Sources
which have the Show When Browsing Gateway Server option enabled.
To edit the current assignment of a server:
1. Press the Edit button on that server.
If you want to unassign this server from a user, press the X for that user.
If you want to assign a new User or Group to this server, find the User/Group name and press
it.
51 Copyright © Acronis International GmbH, 2002-2014
Page 52

2. Press the Save button.
1.5.4 Legacy Data Sources
If you have updated to Acronis Access from a previous mobilEcho installation, all of your assigned
folders will carry over automatically and will be put in this section. If you're still using a mobilEcho 4.5
server or older, you can also create a volume in the mobilEcho Administrator, and add it to the
Legacy Data Sources from this page.
Adding a new legacy folder
1. Press the Add New Legacy Folder button.
2. Enter a Display Name. This name will be shown in the mobilEcho client application.
3. Select the mobilEcho server that contains the mobilEcho volume where the folder is located.
4. Enter the folder's Path. The path must begin with the mobilEcho shared volume name. If the path
of the folder specific doesn't start with a mobilEcho volume name, the folder will not function
when users try to access it. If you would like to give access to a subfolder in that shared volume,
include the full path to that subfolder in the Path field.
You can include the wildcard string %USERNAME% in the path. This wildcard will be replaced
with the user's account username.
SharePoint sites and document libraries are displayed when browsing in the mobilEcho app
using their "Title". It is possible for a site's title to be different from the site's URL name. For
example, http://sharepoint.company.com/testsite might have a title of "Test Site". You may
use either the URL path or the Title when configuring Folders that point to SharePoint
locations. The entire path that you specify must use either the titles or URL names of any
sites, subsites, and document libraries referenced in the path.
5. Choose a Sync option. None, 1-way, or 2-way.
6. Optionally, enable Require Salesforce activity logging.
7. Search for an Active Directory User and Group you'd like to assign this new folder to, and click
the user or group name. This will result in the folder automatically appearing in that user's or
group's mobilEcho app.
8. Press the Save button.
52 Copyright © Acronis International GmbH, 2002-2014
Page 53

To move your Legacy Data Sources to the new system:
1. Find the mobilEcho File Server on which the Data Source resides.
2. Upgrade the mobilEcho File Server to the Acronis Access Gateway server.
3. Open the Acronis Access web interface and log in as an administrator.
4. Open the Gateway Servers tab.
5. Add your server to the list of Gateway Servers. For more information on this process, visit the
Managing Gateway Servers (p. 33) section.
6. Add a license for the Gateway Server.
7. Repeat this process for every Legacy data source.
After these steps, the Legacy Data Sources tab will disappear and all of your Legacy Data Sources will
be moved to the Folders section.
1.6 Settings
Enrollment Settings
Mobile Client Enrollment Address - specifies the address which mobile clients should use when
enrolling in client management.
Note: It is highly recommended to use a DNS name for the mobile client enrollment address. After
successfully enrolling in Client Management, the Access Mobile Client app stores the address of the
management server. If that address is an IP address and it changes, the users cannot reach the server, the
app cannot be unmanaged and the users will have to delete the whole app and enroll in management
again.
Allow mobile clients restored to new devices to auto-enroll without PIN – when enabled,
allows users managed by older versions of Access Mobile Client to enroll to your new server
without needing a PIN.
Use user principal name (UPN) for authentication to Gateway Servers - when enabled, users will
authenticate to Gateway Servers with their UPN (e.g. user@company.com). When disabled,
users will authenticate with their domain name and username (e.g. domain/user).
Device Enrollment Requires:
PIN number + Active Directory username and password - In order to activate their Acronis
Access app and gain access to Acronis Access servers, a user is required to enter an expiring,
one-time use PIN number and a valid Active Directory username and password. This option
ensures that a user can only enroll one device, and only after receiving a PIN number issued by
53 Copyright © Acronis International GmbH, 2002-2014
Page 54

their IT administrator. This option is recommended when the enhanced security of two-factor
device enrollment is required.
Active Directory username and password only - A user can activate their Acronis Access app
using only their Active Directory username and password. This option allows a user to enroll one
or more devices at any point in the future. Users just need to be given the name of their Acronis
Access Client Management server, or a URL pointing to their Acronis Access Client Management
server, which can be posted on a web site or emailed, simplifying the rollout of Acronis Access to
large numbers of users. This option is preferred in environments where two-factor enrollment is
not required and many users may need access to Acronis Access at any time, such as student
deployments.
54 Copyright © Acronis International GmbH, 2002-2014
Page 55

2 Sync & Share
In this section
Sharing Restrictions ................................................................................. 55
LDAP Provisioning .................................................................................... 56
Quotas ...................................................................................................... 56
File Purging Policies .................................................................................. 57
User Expiration Policies ............................................................................ 58
File Repository.......................................................................................... 59
Acronis Access Client................................................................................ 60
This section of the Web Interface is available only if you have enabled Sync & Share functionality.
Otherwise you will see a button Enable sync & share support.
2.1 Sharing Restrictions
Allow Collaborators to Invite Other Users - If this setting is disabled, the checkbox Allow
collaborators to invite other collaborators will not appear when inviting users to folders. This will
prevent invited users from inviting other users.
Single File Sharing Expiration
Prevent User from Sharing Files with Infinite Expiration - If this setting is disabled, user will be able
to share single files and the link will never expire. If enabled, users sharing single files must set
expiration days for each link.
Minimum Expiration Time - Controls the minimum amount of time (in days) that the users
can set.
Maximum Expiration Time - Controls the maximum amount of time (in days) that the users
can set.
Whitelist
If the whitelist is enabled, only users in the configured LDAP groups or with the email domains (like
example.com) specified in the list can login. Wildcards can be used for domains (e.g. *.example.com).
LDAP groups must be specified by their distinguished names, such as
CN=mygroup,CN=Users,DC=mycompany,DC=com.
Blacklist
Users in LDAP groups or with the email domains (like example.com) specified in the blacklist will not
be permitted to log into the system, even if they are in the whitelist. Wildcards can be used for
domains (e.g. *.example.com). LDAP groups must be specified by their distinguished names, such as
CN=mygroup,CN=Users,DC=mycompany,DC=com.
Note: Wildcard entries can only contain one star and it should be always at the beginning of the string and
followed by a period, (e.g. *.example.com, *.com).
55 Copyright © Acronis International GmbH, 2002-2014
Page 56

2.2 LDAP Provisioning
Members of groups listed here will have their user accounts automatically created at first login.
LDAP Group
This is the list of currently selected groups.
Common Name / Display Name - The display name given to the user or group.
Distinguished Name - The distinguished name given to the user or group. A distinguished name is
a unique name for an entry in the Directory Service.
2.3 Quotas
Administrators can set the amount of space dedicated to each user in the system.
There are distinct deault settings for external (ad-hoc) and internal (Active Directory - LDAP) users.
Administrators can also assign different quota values based on individual users or Active Directory
group membership.
Enable Quotas? - If enabled, limits the maximum space a user has by a quota.
56 Copyright © Acronis International GmbH, 2002-2014
Page 57

Ad-hoc User Quota - Sets the quota for Ad-Hoc users.
LDAP User Quota - Sets the quota for LDAP users.
Enable admin-specific quotas? - If enabled, administrators will have a separate quota
applied to them.
Admin Quota - Sets the quota for administrators.
Note: If a user is a member of multiple groups, only the biggest quota is applied.
Note: Quotas can be specified for individual users. Individual quota settings override all other quota settings. To
add individual user quotas for other users, please edit the user on the Users page.
2.4 File Purging Policies
In Acronis Access, documents, files and folders are normally preserved in the system unless explicitly
eliminated. This allows users to recover deleted files and maintain previous versions of any
document. Acronis Access allows administrators to define policies to determine how long deleted
files will be preserved, the maximum number of revisions to keep and when older revisions will be
deleted.
Acronis Access can automatically purge old revisions or deleted files from the file repository based on
the policies below. This can be used to manage the amount of storage used by Acronis Access.
Purged files cannot be restored.
Note: The most recent non-deleted revision of each file is never purged, regardless of these settings.
Purge deleted files after - If enabled, files older than this setting will be purged.
Purge previous revisions older than - If enabled, file revisions older than this setting will be
purged.
57 Copyright © Acronis International GmbH, 2002-2014
Page 58

Keep at least X revisions per file, regardless - If enabled, keeps a minimum number of
revisions per file, regardless of their age.
Only keep X revisions per file - If enabled, limits the maximum number of revisions per file.
Note: Pushing the Save button will start a purge immediately, otherwise a regular scan runs every 60 minutes.
2.5 User Expiration Policies
Users who expire will lose access to all their data. You can reassign the data from the Manage
Deleted Users page.
Delete passkeys after X days - If enabled, deletes all passkeys after a set number of days.
Delete pending invitations after X days - If enabled, deletes all pending invitations after a set
number of days.
Send email notification about expiration X days before the invite is due to expire - If
enabled, sends a notification a set number of days before the invite is due to expire.
Delete adhoc users who have not logged in for X days - If enabled, deletes adhoc users who
have not logged in for a set number of days.
Send email notification about expiration X days before the user is due to expire - If enabled,
sends a notification a set number of days before the adhoc user is due to expire.
Remove sync and share access for LDAP users who have not logged in for X days - If enabled,
removes sync and share access for LDAP users who have not logged in for a set number of days.
Send email notification about expiration X days before the user is due to expire - If enabled,
58 Copyright © Acronis International GmbH, 2002-2014
sends a notification a set number of days before the user is due to expire.
Page 59

2.6 File Repository
These settings determine where files uploaded for syncing and sharing will be stored. In the default
configuration, the file system repository is installed on the same server as the Acronis Access Server.
The File Repository is used to store Acronis Access Sync & Share files and previous revisions. The
Acronis Access Configuration utility is used to set the file repository address, port and file store
location. The File Store Repository Endpoint setting below must match the settings in the File
Repository tab of the Configuration Utility. To view or modify these settings, run
AcronisAccessConfiguration.exe, typically located in C:\Program Files (x86)\Acronis\Configuration
Utility\ on the endpoint server.
File Store Type - Select the storage location you would like to use for the virtual file system's
repository. The options are File System and Amazon S3.
File Store Repository Endpoint - Set the URL address of the file system repository endpoint.
Encryption Level - Specify the type of encryption that should be used to encrypt files stored in
the virtual file system's repository. The options are None, AES-128 and AES-256. The default is
AES-128.
File Store Low Disk Space Warning Threshold - After the free space goes below this threshold,
the administrator will receive notifications of low disk space.
59 Copyright © Acronis International GmbH, 2002-2014
Page 60

2.7 Acronis Access Client
These settings are for the Access Desktop Client.
Force Legacy Polling Mode - Forces the clients to poll the server instead of being asynchronously
notified by the server. You should only enable this option if instructed to do so by Acronis
support.
Client Polling Time - Sets the time intervals in which the client will poll the server. This option
is available only when Force Legacy Polling Mode is enabled.
Minimum Client Update Interval - Sets the minimum time (in seconds) the server will wait
before re-notifying a client that updated content is available.
Client Notification Rate Limit - Sets the maximum number of client update notifications the
server will send per minute.
Show Client Download Link - If enabled, web users will be shown a link to download the desktop
client.
Minimum Client Version - Sets the minimum client version that can connect to the server.
Prevent Clients from Connecting - If enabled, Access Desktop Clients will not be able to connect
to the server. In general, this should be enabled only for administrative purposes. This does not
prevent connections to the web interface.
Allow Client Auto-update to Version - Sets the Access Desktop Client version that will be
deployed to all Access Desktop Clients via auto-update checks. Select Do not allow updates to
prevent clients from auto-updating at all.
60 Copyright © Acronis International GmbH, 2002-2014
Page 61

61 Copyright © Acronis International GmbH, 2002-2014
Page 62

3 Server Administration
In this section
Administering a Server ............................................................................. 62
Administrators and Privileges .................................................................. 63
Audit Log .................................................................................................. 66
Server ....................................................................................................... 67
SMTP ........................................................................................................ 69
LDAP ......................................................................................................... 70
Email Templates ....................................................................................... 71
Licensing ................................................................................................... 74
Debug Logging .......................................................................................... 75
Monitoring ............................................................................................... 76
3.1 Administering a Server
If you are an administrator logging in to the web interface takes you directly to into Administration
mode. After you log in you can switch between Administration and User modes.
To switch between modes, do the following:
1. Open the web interface and log in as an administrator.
To exit administration, press the Leave Administration button at the top-right. This takes you to
the user side of the web interface.
To go back into administration, press the Administration button at the top-right. This will take
you back into administration mode.
Note: Administrators have access to the API documentation. You can find the link in the footer of the Access
web interface.
62 Copyright © Acronis International GmbH, 2002-2014
Page 63

3.2 Administrators and Privileges
Provisioned LDAP Administrator Groups
This section allows you to manage your administrative groups. Users in these groups will
automatically receive the group's administrative privileges. All of the rights are shown in a table, the
ones that are currently enabled have a green mark.
Using the Actions button you can delete or edit the group. You can edit the group's administrative
rights.
To add a provisioned LDAP administrator group:
1. Press the Add Provisioned Group.
2. Mark if the group should have Sync & Share functionality.
63 Copyright © Acronis International GmbH, 2002-2014
Page 64

3. Mark all of the administrative rights you want your group users to have.
4. Find the group.
5. Click on the group name.
6. Press Save.
Administrative Users
This section lists all your Users with administrative rights, their authentication type (Ad-Hoc or LDAP),
whether they have Sync & Share rights and their status (Disabled or Enabled).
You can invite a new user with full or partial administrative rights using the Add Administrator
button. Using the Actions button you can delete or edit the user. You can edit his administrative
rights, status, email address and password.
Inviting a single administrator
1. Open the Acronis Access Web Interface.
2. Log in with an administator account.
3. Expand the General Settings tab and open the Administrators page.
4. Press the Add Administrator button under Administrative Users.
5. Select either the Active Directory/LDAP or Invite by Email tab depending on what type of user
you are inviting and what you want them to administer. LDAP users without emails cannot be
given Sync & Share functionality.
a) To invite via Active Directory/LDAP do the following:
1. Search for the user you want to add in the Active Directory and then click on their Common
Name to select a user.
Note: The LDAP User and Email fields will fill in automatically.
2. Enable/Disable the Sync & Share functionality.
3. Select which administrative rights the user should have.
4. Press Add.
b) To invite by Email do the following:
1. Enter the email address of the user you want to add as an administrator.
Note: Ad-hoc users invited by email will always have Sync & Share functionality.
2. Select whether this user should be licensed.
3. Select which administrative rights the user should have.
4. Select the language of the Invitation email.
5. Press Add.
64 Copyright © Acronis International GmbH, 2002-2014
Page 65

Administrative rights
Full administrative rights - Gives the user full administrative rights.
Can manage users - Gives the user the right to manage users. This includes inviting new users,
LDAP group provisioning, sending Acronis Access enrollment invitations and managing the
connected mobile devices.
Can manage mobile Data Sources - Gives the user the right to manage the mobile Data Sources.
This includes adding new Gateway Servers and Data Sources, managing the assigned sources,
gateways visible on clients and legacy Data Sources.
Can manage mobile policies - Gives the user the right to manage the mobile policies. This
includes managing user and group policies, allowed apps and default access restrictions.
Can view audit log - Gives the user the right to view the audit log.
Note: New users who are in both a LDAP provisioned administrators group and a LDAP provisioned sync & share
group will get the combined permissions.
To give a user administrative rights:
1. Open the Sync & Share tab
2. Open the Users tab
3. Press the Actions button for the User you want to edit.
4. Press Edit.
5. Mark all of the administrative rights you want your user to have.
6. Press Save.
To give an administrator specific rights:
1. Press the Actions button for the User you want to edit.
2. Press Edit.
3. Mark all of the administrative rights you want your user to have.
4. Press Save.
65 Copyright © Acronis International GmbH, 2002-2014
Page 66

3.3 Audit Log
3.3.1 Log
Here you can see all of the recent events (depending on your purging policy, the time limit might be
different), the users from which the log originated and a message explaining the action.
Filter by User – filters the logs by User. You can select All, No user or choose one of the available
users.
Filter by Shared Projects – filters the logs by Shared Project. You can select All, Not shared or
choose one of the available Shared Projects.
Filter by Severity – filters the logs by type. The types are All, Info, Warning, Error and Fatal.
From/To – filter by date and time.
Search for Text – filter by log message contents.
Timestamp – shows the date and time of the event.
Type – shows the level of severity of the event.
User – shows the user account responsible for the event.
Message – shows information on what happened.
If you have enabled Audit logging on a Gateway Server, you will also see the activity of your mobile
clients. If you have allowed Desktop and Web clients to access mobile Data Sources, they will also be
reflected in the log.
Device Name – name of the connected device.
Device IP – shows the IP address of the connected device.
Gateway Server – shows the name of the Gateway Server to which the device is connected.
Gateway Server Path – shows the path to the data source on that Gateway Server.
To enable Audit Logging for a specific gateway server:
1. Open the web interface.
2. Log in as an administrator.
3. Open the Mobile Access tab.
4. Open the Gateway Servers tab.
5. Find the server for which you want to enable Audit Logging.
6. Press the Details button.
7. In the Logging section check Audit Logging.
8. Press the Save button.
To enable Debug Logging for a specific gateway server:
66 Copyright © Acronis International GmbH, 2002-2014
Page 67

Note: The default location for the debug logs is: C:\Program Files (x86)\Acronis\Access\Gateway
Server\Logs\AcronisAccessGateway
1. Open the web interface.
2. Log in as an administrator.
3. Open the Mobile Access tab.
4. Open the Gateway Servers tab.
5. Find the server for which you want to enable Debug Logging.
6. Press the Details button.
7. In the Logging section check Debug Logging.
8. Press the Save button.
3.3.2 Settings
Acronis Access can automatically purge old logs and export them to files based on certain policies.
Automatically purge log entries more than X Y old - When enabled, logs older than a number of
days/weeks/months will be automatically purged.
Export log entries to file as X before purging - When enabled, exports a copy of the logs
before purging them in either CSV, TXT or XML.
Export file path - Sets the folder where the exported logs will go.
3.4 Server
Server Settings
Server Name – cosmetic server name used as the title of the web site as well as identifying this
server in admin notification email messages.
Web Address – specify the root DNS name or IP address where users can access the website
(starting with http:// or https://). Do not use 'localhost' here; this address will also be used in
email invitation links.
Audit Log Language – select the default language for the Audit Log. The current options are
English, German, French and Japanese. The default is English.
67 Copyright © Acronis International GmbH, 2002-2014
Page 68

Session timeout in minutes – sets the length of the user session.
Enable Sync and Share Support - this checkbox enables/disables the Sync and Share features.
Notification Settings
Email administrator a summary of errors? – If enabled, a summary of errors will be sent to
specified email addresses.
Email Addresses – one or more email addresses which will receive a summary of errors.
Notification Frequency – frequency for sending error summaries. Sends emails only if errors
are present.
68 Copyright © Acronis International GmbH, 2002-2014
Page 69

3.5 SMTP
Acronis Access Server uses the configured SMTP server to send emails to invite users to share or
enroll mobile devices, as well as notify users and administrators of server activity.
SMTP server address - enter the DNS name of an SMTP server that will be used to send email
invitations to your users.
SMTP server port - enter your SMTP server port. This setting defaults to port 587.
Use secure connection? - enable the option to use a secure SSL connection to your SMTP server.
This setting is enabled by default. Uncheck the box to disable secure SMTP.
From Name - this is the username that appears in the "From" line in emails sent by the server.
Use SMTP authentication? - enable to connect with a SMTP username and password or disable
to connect without them.
SMTP username - enter a username for SMTP authentication.
SMTP password - enter a password for SMTP authentication.
SMTP password confirmation - re-enter the SMTP password to confirm it.
Send Test Email - sends an email to ensure all configurations are working as expected
69 Copyright © Acronis International GmbH, 2002-2014
Page 70

3.6 LDAP
Microsoft Active Directory can be used to provide mobile access and sync and share access to users
in your organization. LDAP is not required for unmanaged mobile access or sync and share support,
but is required for managed mobile access. Other Active Directory products (i.e. Open Directory) are
not supported at this time.
70 Copyright © Acronis International GmbH, 2002-2014
Page 71

Enable LDAP? - If enabled, you will be able to configure LDAP.
LDAP server address - enter the DNS name or IP address of the Active Directory server you
would like to use for regulating access.
LDAP server port - the default Active Directory port is 389. This will likely not need to be
modified.
Note: If you're supporting multiple domains you should probably use the global catalog port.
Use LDAP secure connection? - disabled by default. Check the box to connect to Active
Directory using secure LDAP.
LDAP username / password - this login credentials will be used for all LDAP queries. Ask your
AD administrator to find out if you have designated service accounts that should be used.
LDAP Search Base - enter the root level you would like searches for users and groups to
begin. If you would like to search your entire domain, enter "dc=domainname,
dc=domainsuffix".
Domains for LDAP authentication - users with email addresses whose domains are in this
comma-delimited list must authenticate against LDAP. (i.e.to enable LDAP authentication
for an account with the email joe@glilabs.com, you would enter glilabs.com). Users in other
domains will authenticate against the Acronis Access database.
Require exact match - When enabled, only users from the domains entered in Domains
for LDAP authentication will be treated as LDAP users. Users that are members of other
domains and sub-domains will be treated as Ad-hoc.
LDAP information caching interval - sets the interval in which Acronis Access is caching the
Active Directory structure.
Proactively resolve LDAP email addresses - When this setting is enabled, Acronis Access will
search Active Directory for the user with the matching email address on login and invite
events. This allows users to log in with their email addresses and get immediate feedback on
invitations, but may be slow to execute if the LDAP catalog is very large. If you encounter any
performance problems or slow response on authentication or invite, uncheck this setting.
Use LDAP lookup for type-ahead suggestions for invites and download links - LDAP lookup
for type-ahead will search LDAP for users with matching email addresses. This lookup may be
slow against large LDAP catalogs. If you encounter performance problems with type-ahead,
uncheck this setting.
3.7 Email Templates
Acronis Access makes extensive use of email messages to provide dynamic information to users and
administrators. Each event has an HTML and text associated template. You can click the Email
Template pull down menu to select an event and edit both templates.
All emails sent by the Acronis Access server can be customized to meet your needs. For each email,
you will need to provide both HTML and text-formatted email templates. Template bodies must be
written in ERB, embedded Ruby. Please review the default templates to determine how best to
customize your templates.
Note: If you are using custom images in the email templates, these images should be hosted and must be
somewhere accessible on the internet.
If you have upgraded from mobilEcho, the customizations you have done to the email templates are
not migrated and you will need to customize the new templates. A copy of your previous mobilEcho
71 Copyright © Acronis International GmbH, 2002-2014
Page 72

templates can be found in the Legacy mobilEcho files folder by default located here: C:\Program
Files (x86)\Group Logic\Access Server\Legacy mobilEcho files. The files are named
invitation.html.erb and invitation.txt.erb.
Select Language - Select the default language of the invitation emails.
Note: When sending an enrollment invitation or an invitation to a share or sharing a single file, you can
select another language in the invitation dialog.
Select Email Template - Select the template you want to view or edit. Each template is used for a
specific event (e.g. Enrolling a user for mobile access, resetting a user's password).
Available Parameters - The available parameters are different for each template and will change
based on the template you've selected.
Email Subject - The subject of the invitation email. Pressing the View Default link will show you
the default subject for that language and email template.
HTML Email template - Shows the HTML-coded email template. If you enter valid HTML code, it
will be displayed.Pressing the Preview button will show you a preview of how your current
template looks.
Text Email template - Shows the text-based email template. Pressing the Preview button will
show you a preview of how your current template looks.
Note: Always remember to click the Save Templates button when you finished modifying your templates.
72 Copyright © Acronis International GmbH, 2002-2014
Page 73

Note: Editing a template in English does not edit the other languages. You need to edit each template
separately for each language.
Notice that templates allow you to include dynamic information by including parameters. When a
message is delivered these parameters are replaced with the appropriate data. Different events have
different available parameters.
Note: Pressing the View Default button will show you the default template.
Make sure you click the Save Templates button when you finished modifying your templates.
73 Copyright © Acronis International GmbH, 2002-2014
Page 74

3.8 Licensing
You will see a list of all your licenses.
License - Type of the license (Trial, subscription etc).
Clients - Maximum number of allowed licensed users.
Current Licensed Client Count - Number of currently used user licenses.
Current Free Client Count - Number of free users currently in the system.
Adding a new license
1. Copy your license key.
2. Paste it in the Add license key field.
3. Read and accept the licensing agreement by selecting the checkbox.
4. Press Add License.
Note: If your licenses have the same unique ID, the number of allowed users will be summed.
Note: Only Acronis Access Advanced licenses will be accepted. Acronis Access licenses will not work.
Adding a new license for a Gateway Server
Starting from Acronis Access version 6.0, the Acronis Access server and the Gateway servers share
the same license. This means that you will not have to manually add licenses to your Gateway
servers.
If you are still using Gateway servers with an older version, you will also see the Legacy mobilEcho
Licenses section
74 Copyright © Acronis International GmbH, 2002-2014
Page 75

To license them, you will need a mobilEcho license. Follow the steps below:
1. Open the web interface and log in as an administrator.
2. Open the General Settings tab and open the Licensing page.
3. In the Legacy mobilEcho Licenses section you have a list of all Gateway servers using the old
licensing.
4. Press Add License for the desired Gateway and enter your license key.
5. Press Save.
3.9 Debug Logging
Settings in this page are designed to enable extended logging information that might be useful when
configuring and troubleshooting Acronis Access. It is recommended that these settings only be
changed at the request of a customer support representative. Additional debug logging can be useful
in troubleshooting problems on the server.
Note: For information on enabling/disabling debug logging for a specific Gateway Server visit the Server Details
(p. 36) article.
75 Copyright © Acronis International GmbH, 2002-2014
Page 76

As of version 7.0 of the Acronis Access Server, the exceptions module has been removed from the list
of available modules and is enabled at all times by default. Users that have upgraded from a previous
version of Acronis Access may still see the exceptions module in the list. Once you make a change to
the logging options and press Save, it will disappear.
Warning: These settings should not be used during normal operation and production conditions.
General Debug Logging Level - Sets the main level you want to be logged (Info, Warnings, Fatal
errors etc.)
Note: Enabled debug modules always log at the debug level, regardless of the general debug logging level
above.
Available Debug Modules - Shows a list of available modules.
Enabled Debug Modules - Shows the active modules.
Note: In the cases where the product was updated and not a new installation, the log files will be in C:\Program
Files (x86)\Group Logic\Common\apache-tomcat-7.0.42\logs.
Note: On a clean installation of Acronis Access, the log files will be in C:\Program Files
(x86)\Acronis\Access\Common\apache-tomcat-7.0.42\logs
3.10 Monitoring
The performance of this server can be monitored using New Relic. If you would like to monitor this
server, please enable monitoring and provide the path to your New Relic YML file. To obtain a New
Relic YML file, you will need to create an account with New Relic.
Note: It is highly recommended not to put your New Relic YML file into the Acronis Access server directories to
avoid having your file accidentally removed or altered on upgrade or uninstall.
Note: If you make changes to your New Relic YML file, or change New Relic YML files, you will need to restart
the Acronis Access Tomcat service for the changes to take effect.
Enable New Relic monitoring? - If enabled, you are required to provide a path to the New Relic
configuration file (newrelic.yml)
Installing New Relic
This type of installation will let you monitor your Acronis Access Server application, not the actual
computer on which it is installed.
76 Copyright © Acronis International GmbH, 2002-2014
Page 77

1. Open http://newrelic.com/ http://newrelic.com/ and create a New Relic account.
2. For Application type select Mobile app.
3. For Platform mark Ruby.
4. Finish creating your account and log in.
5. Go to Applications, leave the ruby bundle(step 1) as is and continue to the next step.
6. Download the New Relic script - newrelic.yml.
7. Open your Acronis Access web UI.
8. Go to Settings and click on Monitoring.
9. Enter the path to the newrelic.yml including the extension (e.g C:\software\newrelic.yml).
We recommend you put this file in a folder outside of the Acronis Access folder so that it will not
be removed or altered on upgrade or uninstall.
10. Click Save and wait a couple of minutes or until the Active application(s) button becomes active
on the New Relic site.
11. If more than 10 minutes pass, restart your Acronis Access Tomcat service and wait a couple of
minutes. The button should be active now.
12. You should be able to monitor you Acronis Access server via the New Relic website.
All the information the Acronis Access server logs about trying to connect to New Relic and set up monitoring is
in a file called newrelic_agent.log found here - C:\Program Files
(x86)\Acronis\Common\apache-tomcat-7.0.34\logs. If you have any problems, you can find
information in the log file.
There is frequently a warning/error that starts like this:
WARN : DNS Error caching IP address: Errno::ENOENT: No such file or directory - C:/etc/hosts which
That's a side effect of the code used to patch another New Relic bug and is innocuous.
If you want to monitor the actual computer as well
1. Open http://newrelic.com/ http://newrelic.com/ and log in with your account.
2. Press Servers and download the New Relic installer for your operating system.
3. Install the New Relic monitor on your server.
4. The New Relic server monitor requires Microsoft .NET Framework 4. The link the New Relic
installer takes you to is only for the Microsoft .NET Framework 4 Client Profile. You will need to
go to the Microsoft Download Center and download the entire .NET 4 Framework from the
internet and install it before running the New Relic Server Monitor installer.
Wait until New Relic detects your server.
77 Copyright © Acronis International GmbH, 2002-2014
Page 78

4 Maintenance Tasks
In this section
Disaster Recovery guidelines ................................................................... 78
Backing up and Restoring Acronis Access ................................................ 80
Tomcat Log Management on Windows ................................................... 83
Automated Database Backup .................................................................. 87
Increasing the Acronis Access Tomcat Java Maximum Memory Pool ..... 88
To backup all of Acronis Access's elements and as part of your best practices and backup procedures, you may
want to read the Disaster Recovery guidelines (p. 78) article.
4.1 Disaster Recovery guidelines
High availability and fast recovery is of extreme importance for mission critical applications like
Acronis Access. Due to planned or unplanned circumstances ranging from local hardware failures to
network disruptions to maintenance tasks, it may be required to provision the means for restoring
Acronis Access to a working state in a very short period of time.
Introduction:
For mission critical applications like Acronis Access, high availability is of extreme importance. Due to
various circumstances ranging from local hardware failures to network disruptions to maintenance
tasks, it may be required to provision the means for restoring Acronis Access to a working state in a
very short period of time.
There are different ways to implement disaster recovery, including backup-restore, imaging,
virtualization and clustering. We will describe the backup-restore approach in the following sections.
Description of the Acronis Access elements:
Acronis Access is a solution composed of several discrete but interconnected elements:
Acronis Access Gateway Server
Note: Normally located here: C:\Program Files (x86)\Acronis\Access\Gateway Server
Acronis Access Server
Note: Normally located here: C:\Program Files (x86)\Acronis\Access\Access Server
Acronis Access Configuration Utility
Note: Normally located here: C:\Program Files (x86)\Acronis\Access\Configuration Utility
File Store
The location of the File Store is set during the installation when you first use the Configuration
Utility.
78 Copyright © Acronis International GmbH, 2002-2014
Page 79

Note: The FileStore structure contains user files and folders in encrypted form. This structure can be copied or
backed up using any standard file copy tool (robocopy, xtree). Normally this structure should be located in a
high availability network volume or NAS so the location may differ from the default.
PostGreSQL database. This is a discrete element running as a Windows service, installed and used by
Acronis Access. The Acronis Access database is one of the most critical elements because it maintains
all configurations, relationships between users and files, and file metadata.
All those components are needed in order to build a working instance of Acronis Access.
Resources needed to implement a fast recovery process
The resources needed to fulfill the disaster recovery process are:
Appropriate hardware to host the operating system, application and its data. The hardware must
meet the system and software requirements for the application.
A backup and restore process in place to ensure all software and data elements are available at
the time the switch is needed.
Network connectivity, including internal and external firewall and routing rules that permit users
to access the new node with no or minimal need to change client side settings.
Network access for Acronis Access to contact an Active Directory domain controller and SMTP
server.
Fast or automated DNS switching ability to redirect incoming request to the secondary node.
The process
Backup Setup
The recommended approach to provide a safe and fast recovery scenario can be described like this:
1. Have an installation of Acronis Access, including all elements in the secondary, restore, node. If
this is not possible, a full (source) machine backup or image is a good alternative. In virtualized
environments, periodic snapshots prove to be effective and inexpensive.
2. Backup the Acronis Access server software suite (all elements mentioned above, including the
entire Apache Software branch) regularly. Use any standard, corporate class backup solution for
the task.
3. Backup the FileStore as frequently as possible. A standard backup solution can be used, but an
automated differential copy tool is a good and sometimes preferred alternative due to the
amount of data involved. A differential copy minimizes the time this operation takes by updating
what is different between the source and target FileStores.
4. Backup the Acronis Access database as frequently as possible. This is performed by an automated
database dump script triggered by Windows Task Scheduler. The database dump should then be
backed up by a standard backup tool.
Recovery
Provided the conditions described in the section above have been met and implemented, the process
to bring online the backup resources is relatively simple:
79 Copyright © Acronis International GmbH, 2002-2014
Page 80

1. Boot up the recovery node. Adjust any network configuration like IP Address, Host Name if
needed. Test Active Directory connectivity and SMTP access,
2. If needed restore the most recent Acronis Access software suite backup.
3. Verify that Tomcat is not running (Windows Control Panel/Services).
4. If needed, restore the FileStore. Make sure the relative location of the FileStore is the same as it
was in the source computer. If this is not the case, the location will need to be adjusted by using
the Configuration Utility.
5. Verify that the PostgreSQL service is running (Windows Control Panel/Services).
6. Restore the Acronis Access database.
7. Start the Acronis Access Tomcat service.
8. Migrate DNS to point to the new node.
9. Verify Active Directory and SMTP are working
4.2 Backing up and Restoring Acronis Access
In case you need to upgrade, update or maintain your Acronis Access server. This article will give you
the basics of backing up your database and restoring it.
Backing up your databases
Backing up your Acronis Access's database
The following method creates an *.sql file containing a text representation of the source database.
1. Open a Command Prompt window and navigate to the 9.2\bin folder located in the PostgreSQL
installation directory.
e.g. cd "C:\PostgreSQL\9.2\bin"
2. Once your current Command Prompt directory is the bin folder, enter the following line:
pg_dump -U postgres -f mybackup.sql acronisaccess_production
where mybackup.sql is the desired file name for the produced backup file. It can include a full
path to the location where you want the backup file to be created, for instance:
D:\Backups\mybackup.sql
Note: acronisaccess_production must be entered exactly as shown as it is the name of the Acronis
Access database
3. A "Password: " line appears. Enter the postgres password that you set during the Acronis Access
installation process.
Note: Typing the password will not result in any visual changes in the Command Prompt window.
4. Your backup file will appear in the bin folder by default unless the output file specification
contains a full path to a different directory.
Note: If you want to backup the entire PostgreSQL database set you can use the following command:
pg_dumpall -U postgres > alldbs.sql
Where alldbs.sql will be the generated backup file. It can include a full path specification, for instance
D:\Backups\alldbs.sql
For full syntax on this command see: http://www.postgresql.org/docs/9.2/static/app-pg-dumpall.html
http://www.postgresql.org/docs/9.1/static/app-pg-dumpall.html
80 Copyright © Acronis International GmbH, 2002-2014
Page 81

Info: For more information on PostgreSQL backup procedures and command syntax please read this:
http://www.postgresql.org/docs/9.2/static/backup.html
http://www.postgresql.org/docs/9.1/static/backup.html
Backing up your Gateway Server's database
1. Go to the server on which you have your Acronis Access Gateway Server installed.
2. Navigate to the folder containing the database.
Note: The default location is: C:\Program Files (x86)\Acronis\Access\Gateway
Server\database
3. Copy the mobilEcho.sqlite3 file and paste it in a safe location.
Restoring Acronis Access
Restoring your Acronis Access's database
The database restore process is similar to the backup process.
1. Prior to executing the command to restore your database, make sure the source backup file is
located in a directory or location where it can be accessed by the logged in user.
2. Open a Command Prompt window and navigate to the 9.2\bin folder located in the PostgreSQL
installation directory.
cd "C:\PostgreSQL\9.2\bin"
Note: This directory may be different if you installed PostgreSQL in a custom location.
3. You need to remove the old database first. To do so, stop the Acronis Access Tomcat service and
enter the following line:
Warning! Do not continue with this step unless you are certain you have made a successful backup.
Dropping the database is an irreversible process which deletes the entire database. All information is lost.
dropdb -U postgres acronisaccess_production
A "password for user postgres: " message may appear. If that happens, enter the postgres
password that you set during the Acronis Access installation process.
acronisaccess_production must be entered exactly as shown. This is the Acronis Access
database name.
4. Once the operation finishes, enter the following line:
createdb -U postgres acronisaccess_production
A "password for user postgres: " message may appear. If that happens, enter the postgres
password that you set during the Acronis Access installation process.
acronisaccess_production must be entered exactly as shown. This is the Acronis Access
database name.
5. To fill the newly created database with the information from your backup, enter the following
line:
psql -U postgres -d acronisaccess_production -W -f mybackup.sql
Replace mybackup.sql with the fully qualified name of the backup file, for instance:
D:\Backups\mybackup.sql
81 Copyright © Acronis International GmbH, 2002-2014
Page 82

A "password for user postgres: " message may appear. If that happens, enter the postgres
password that you set during the Acronis Access installation process.
acronisaccess_production must be entered exactly as shown. This is the Acronis Access
database name.
6. Once the process has completed successfully, restart the postgres service and start the Acronis
Access Tomcat service.
Note: Typing the password will not result in any visual changes in the Command Prompt window.
Info: For full psql command syntax, please visit http://www.postgresql.org/docs/9.2/static/app-psql.html
http://www.postgresql.org/docs/9.0/static/app-psql.html
Restoring your Gateway Server's database
1. Copy the mobilEcho.sqlite3 file you have backed up.
2. Go to the server on which you have your Acronis Access Gateway Server installed.
3. Navigate to the folder containing the database and paste the mobilEcho.sqlite3 file.
Note: The default location is: C:\Program Files (x86)\Acronis\Access\Gateway
Server\database
4. Restart the Acronis Access Gateway Server service.
Restoring Acronis Access to a new instance
1. Complete the Backup procedure explained above and move the alldbs.sql and mobilEcho.sqlite3
files to the new server.
2. On the new server, complete the Database restoration procedure explained above.
3. Start the Acronis Access services.
4. Complete the following procedure:
Configurations on the new instance
Note: It is highly recommended that you do not change the DNS names used by Acronis Access, only the IP
addresses they are pointing to. The following instructions assume you are re-using the DNS names of the
previous instance of Acronis Access
1. Open the Acronis Access web interface and login.
2. Navigate to Mobile Access -> Gateway Servers.
3. Press on the down arrow next to the Details button and select Edit.
4. Click on the SharePoint tab and enter the SharePoint administrator's credentials.
5. If the Address for administration is set as an IP address, change it to the new IP you set for the
Acronis Access Server.
6. Press Apply.
7. Repeat these steps for all Gateway Servers and Cluster Groups that provide access to SharePoint
sites or libraries.
If you do not intend to use the same IP address as the previous instance, change the IP entries for the
DNS names used by the Acronis Access and Gateway Server(s).
82 Copyright © Acronis International GmbH, 2002-2014
Page 83

4.3 Tomcat Log Management on Windows
As part of its normal operation Tomcat creates and writes information to a set of log files.
Unless periodically purged, these files accumulate and consume valuable space. It is commonly
accepted by the IT community that the informational value those logs provide degrades rapidly.
Unless other factors like regulations or compliance with certain policies play, keeping those log files
in the system a discrete number of days is what is required.
Introduction:
As part of its normal operation Tomcat creates and writes information to a set of log files. On
Windows, these files are normally located in the following directory:
“C:\Program Files (x86)\Acronis\Access\Common\apache-tomcat-7.0.34\logs”
Acronis Access saves it's own logs in the same directory as separate files.
Acronis Access's log files are named acronisaccess_date.
There are many tools capable of automating the task of deleting unneeded log files. For our example,
we will use a built-in Windows command called ForFiles.
Info: For information on ForFiles, syntax and examples visit
http://technet.microsoft.com/en-us/library/cc753551(v=ws.10).aspx
http://technet.microsoft.com/en-us/library/cc753551(v=ws.10).aspx
A sample process:
The sample process described below automates the process of purging log files older than a certain
number of days. Inside the sample batch file, this number is defined as a parameter so it can be
changed to fit different retention policies.
Info: The sample script (batch) file is designed to work on Windows 2008. Click here to download the script.
Optionally you could copy and paste the script code into an empty text document and save it as
“AASTomcatLogPurge.bat”
Click here for the full batch script code...
ECHO OFF
REM Script: aETomcatLogsPurge.bat
REM 2012-05-12: Version: 1.0: MEA: Created
ECHO This script will delete files older than a number of days from a directory
ECHO Run it from the command line or from a scheduler
ECHO Make sure the process has permissions to delete files in the target folder
REM ===== CONFIGURATIONS ===================================================
REM Note: all paths containing spaces must be enclosed in double quotes
REM Edit this file and set LogPath and NumDays below
REM Path to the folder where all Tomcat logs are
set LogPath="C:\Program Files (x86)\Group Logic\Common\apache-tomcat-7.0.34\logs"
83 Copyright © Acronis International GmbH, 2002-2014
Page 84

REM NumDays - Log files older than NumDays will be processed
set NumDays=14
REM ===== END OF CONFIGURATIONS ======================
ECHO
ECHO ===== START ============
REM ForFiles options:
REM "/p": the path where you want to delete files.
REM "/s": recursively look inside other subfolders present in the folder
mentioned in the batch file path
REM "/d": days for deleting the files older than the present date. For instance
"/d -7" means older than 7 days
REM "/c": command to execute to actually delete files: "cmd /c del @file".
forfiles /p %LogPath% /s /d -%NumDays% /c "cmd /c del @FILE"
:End
ECHO ===== BATCH FILE COMPLETED ============================================
Warning: We provide this example as a guideline so you can plan and implement your own process based on
the specifics of your deployment. The example is not meant nor tested to apply to all situations and
environments so use it as a foundation and at your own risk. Do not use it in production environments without
comprehensive offline testing first.
Steps:
1. Copy the script to the computer running Acronis Access (Tomcat) and open it with Notepad or a
suitable plain text editor.
2. Locate the section illustrated in the picture below and edit the LogPath and NumDays variables
with your specific paths and retention settings:
In Acronis Access the log files are stored in the same folder as Tomcat's. (C:\Program Files
(x86)\Acronis\Access\Common\apache-tomcat-7.0.34\logs)
3. Save the file.
84 Copyright © Acronis International GmbH, 2002-2014
Page 85

4. To automate the process, open Task Scheduler and create a new task. Define a name and a
description for the task.
5. Set the task to run daily.
6. Define at what time the task should start. It is recommended to run this process when the
system is not under extreme load or other maintenance processes are running.
85 Copyright © Acronis International GmbH, 2002-2014
Page 86

7. Set the action type to “Start a program”.
8. Click the Browse button, locate and select the script (batch) file.
9. When done, click Finish.
10. In the tasks list you may want to right click on the task, select properties and verify the task will
run whether a user is logged on or not, for unattended operation.
11. You can verify the task is properly configured and running properly by selecting the task, right
clicking on it and selecting “Run”. The scheduler’s log should report start, stop and any errors.
86 Copyright © Acronis International GmbH, 2002-2014
Page 87

4.4 Automated Database Backup
With the help of the Windows Task Scheduler, you can easily setup an automated backup schedule
for your Acronis Access database.
Creating the database backup script
1. Open Notepad (or another text editor) and enter the following:
@echo off
for /f "tokens=1-4 delims=/ " %%i in ("%date%") do (
set dow=%%i
set month=%%j
set day=%%k
set year=%%l
)
set datestr=%month%_%day%_%year%
echo datestr is %datestr%
set BACKUP_FILE=AAS_%datestr%_DB_Backup.sql
echo backup file name is %BACKUP_FILE%
SET PGPASSWORD=password
echo on
bin\pg_dumpall -U postgres -f %BACKUP_FILE%
move "%BACKUP_FILE%" "C:\destination folder"
2. Replace "password" with the password for user postgres you have entered when you installed
Acronis Access.
3. Replace C:\destination folder with the path to the folder where you want to save your backups.
4. Save the file as DatabaseBackup.bat (the extension is important!) and select All Files for the file
type.
5. Move the file to the PostgreSQL installation folder in the version number directory (e.g. \9.3\).
Creating the scheduled task
1. Open the Control Panel and open Administrative Tools.
2. Open the Task Scheduler.
3. Click on Action and select Create Task.
On the General tab:
87 Copyright © Acronis International GmbH, 2002-2014
Page 88

1. Enter a name and description for the task (e.g. AAS Database Backup).
2. Select Run whether user is logged in or not.
On the Triggers tab:
1. Click New.
2. Select On a schedule for Begin the task.
3. Select daily and select the time when the script will be run and how often the script should be
rerun (how often you want to backup your database).
4. Select Enabled from the Advanced settings and press OK.
On the Actions tab:
1. Click New.
2. Select Start a program for Action.
3. For Program/Script press Browse, navigate to and select the DatabaseBackup.bat file.
4. For Start in (optional), enter the path to the folder in which the script resides. e.g. If the path to
the script is C:\Program Files (x86)\Acronis\Access\Common\PostgreSQL\9.3\PSQL.bat enter
C:\Program Files (x86)\Acronis\Access\Common\PostgreSQL\9.3\
5. Press OK.
Configure any additional settings on the other tabs and press OK.
You will be prompted for the credentials for the current account.
4.5 Increasing the Acronis Access Tomcat Java
Maximum Memory Pool
By default, the Acronis Access Tomcat's Java Maximum Memory Pool setting on a 64 bit operating
system is 4GBs. Depending on your deployment, you may need more.
Note: On a 32bit operating system, the maximum memory pool is 1GB.
To increase the maximum memory pool:
1. Click on the Start menu and navigate to All Programs -> Acronis Access.
88 Copyright © Acronis International GmbH, 2002-2014
Page 89

2. Click on the Acronis Access Tomcat Configuration tool shortcut.
3. Open the Java tab.
4. Change the Maximum memory pool to the desired size and press OK.
5. Restart the Acronis Access Tomcat service.
89 Copyright © Acronis International GmbH, 2002-2014
Page 90

5 Supplemental Material
In this section
Conflicting Software ................................................................................. 90
Load balancing Acronis Access ................................................................. 90
Third-party Software for Acronis Access .................................................. 96
Using Acronis Access with Microsoft Forefront Threat Management Gateway (TMG) 97
Unattended desktop client configuration .............................................. 114
Monitoring Acronis Access with New Relic ............................................ 115
Using trusted server certificates with Acronis Access ........................... 116
Creating a Drop Folder ........................................................................... 118
Customizing the web interface .............................................................. 120
How to support different Access Desktop Client versions ..................... 120
How to move the FileStore to a non-default location. .......................... 121
Acronis Access for Good Dynamics ........................................................ 121
MobileIron AppConnect support ........................................................... 133
Installing Acronis Access on a Microsoft Failover Cluster ...................... 162
Upgrading from mobilEcho 4.5 on a Microsoft Failover Cluster ........ 189
Upgrading Acronis Access on a Microsoft Failover Cluster.................... 212
Changing the Acronis Access Tomcat SSL Ciphers ................................. 214
5.1 Conflicting Software
There are some software products that may cause problems with Acronis Access. The currently
known conflicts are listed below:
VMware View™ Persona Management - This application will cause issues with the Acronis
Access desktop client syncing process and issues with deleting files. Placing the Acronis Access
sync folder outside of the Persona Management user profile should avoid the known conflicts.
5.2 Load balancing Acronis Access
There are two main ways you can load balance Acronis Access:
Load balancing only the Gateway Servers
This configuration ensures that the components under the heaviest loads, the Gateway Servers, are
load balanced and always accessible for your mobile clients. The Access Server is not behind the load
balancer as it is not required in order to connect to the Gateway Servers for unmanaged access. For
more information visit the Cluster Groups (p. 44) article.
Load balancing all of Acronis Access
This configuration load balances all of Acronis Access' components and ensures high-availability for
all users. You will need at least two separate machines in order to test this setup. Many of the
settings when configuring load balancing differ between different software and hardware so they will
not be covered in this guide.
90 Copyright © Acronis International GmbH, 2002-2014
Page 91

In the setup example we will use three separate machines. One of them will act as our File Repository
and Database and the other two as both Access and Gateway servers. Below you can see a guide on
how to configure this setup.
This guide will provide the details necessary to properly load balance the Acronis Access product in
your environment.
On the server that will be hosting your PostgreSQL database and File Repository,
perform the following steps:
1. Start the Acronis Access installer and press Next. Read and accept the license agreement.
2. In the Access installer, choose Custom, and select Acronis Access File Repository and PostgreSQL
Database Server and press Next.
3. Select where the File Repository and Configuration Utility will be installed.
4. Select where PostgreSQL should be installed and enter a password for the superuser postgres.
5. Open TCP port 5432. You will be using it to access the PostgreSQL database from the remote
machines.
91 Copyright © Acronis International GmbH, 2002-2014
Page 92

6. After finishing the installation procedure, proceed with going through the Configuration Utility.
a. You will be prompted to open the Configuration Utility. Press OK.
b. Select the address and port on which your File Repository will be accessible.
Note: You will need to set the same address and port in the Acronis Access web interface. For more
information visit the Using the Configuration Utility and File Repository (p. 59) articles.
c. Select the path to the File Store. This is where the actual files will reside.
d. Click OK to apply changes and close the Configuration Utility.
7. Navigate to the PostgreSQL installation directory (e.g. C:\Program Files\PostgreSQL\9.2\data\ )
and edit pg_hba.conf with a text editor.
8. Include host entries for each of your Access servers using their internal addresses and save the
file.The pg_hba.conf (HBA stands for host-based authentication) file controls client
authentication and is stored in the database cluster's data directory. In it you specify which
servers will be allowed to connect and what privileges they will have. e.g.:
# TYPE DATABASE USER ADDRESS METHOD
# Loadbalancer1 (First Acronis Access & Gateway server)
host all all 10.27.81.3/32 md5
# Loadbalancer2 (Second Acronis Access & Gateway server)
host all all 10.27.81.4/32 md5
In these examples all users connecting from 10.27.81.3/32 and 10.27.81.4/32
can access the database with full privileges (except the replication
privilege) via a md5 encrypted connection.
9. Open the pgAdmin tool, connect to your local server, select Databases, and either right-click or
select New Database from the Edit -> New Object menu to create a new database. Name it
acronisaccess_production.
On the two servers that will be acting as both Access and Gateway servers, perform
the following steps:
1. Start the Acronis Access installer and press Next. Read and accept the license agreement.
92 Copyright © Acronis International GmbH, 2002-2014
Page 93

2. In the Access installer, choose Custom, and select only Acronis Access Server and Acronis Access
Gateway Server and continue with the installation procedure.
3. After finishing the installation procedure, proceed with going through the Configuration Utility.
a. You will be prompted to open the Configuration Utility. Press OK.
b. On the Access Server tab:
Enter the address and port on which your Acronis Access management server will be
reachable (i.e. 10.27.81.3 and 10.27.81.4).
Select your certificate. This should be the same SSL certificate that is tied to the DNS
address of the load balancer.
Press Apply.
Note: If you don't have a certificate, a self-signed certificate will be created by Acronis Access. This
certificate should NOT be used in production environments.
c. On the Gateway Server tab:
Enter the address and port on which your Gateway Server will be reachable (i.e.
10.27.81.10 and 10.27.81.11).
Select your certificate.This should be the same SSL certificate that is tied to the DNS
address of the load balancer.
Press Apply.
93 Copyright © Acronis International GmbH, 2002-2014
Page 94

Note: If you don't have a certificate, a self-signed certificate will be created by Acronis Access. This
certificate should NOT be used in production environments.
4. Navigate to the Acronis Access installation directory (e.g. C:\Program Files
(x86)\Acronis\Access\Access Server\ ) and edit acronisaccess.cfg with a text editor.
5. Set the username, password, and internal address of the server that will be running the
PostgreSQL database and save the file. This will configure your Access Server to connect to your
remote PostgreSQL database. e.g.:
DB_DATABASE =acronisaccess_production
DB_USERNAME =postgres
DB_PASSWORD =password123
DB_HOSTNAME =10.27.81.2
DB_PORT =5432
6. Open Services.msc and restart the Acronis Access services.
On one of your Access and Gateway servers, perform the following steps:
This is the server which you will configure first and it's settings will be replicated across all other
servers. After the settings get replicated, all servers will be identical. It does not matter which server
you choose.
1. Open Services.msc and restart the Acronis Access Tomcat service. This will populate the
database you have created.
2. Visit https://myaccess (i.e. https://10.27.81.3 or https://10.27.81.4) in your web browser and
complete the Setup Wizard.
a. Under the Licensing tab:
Enter your license key, mark the checkbox and press Continue.
b. Under the General Settings tab:
Enter a Server Name.
The Web Address should be the external address of your load balancer (i.e.
mylb.company.com). If you are not using port 443 you will have to write the port as well.
94 Copyright © Acronis International GmbH, 2002-2014
Page 95

The Client Enrollment Address should be the external address of your load balancer (i.e.
mylb.company.com).
Select your Color Scheme.
Select the language for the Audit Log messages.
c. Under the SMTP tab:
Enter the DNS name or IP address of your SMTP server
Enter the port of your SMTP server.
If you do not use certificates for your SMTP server, unmark Use secure connection?.
Enter the name which will appear in the "From" line in emails sent by the server.
Enter the address which will send the emails sent by the server.
If you use username/password authentication for your SMTP server, mark Use SMTP
authentication? and enter your credentials.
Press Save.
d. Under the LDAP tab:
Mark Enable LDAP.
Enter the DNS name or IP address of your LDAP server.
Enter the port of your LDAP server.
If you use a certificate for connections with your LDAP server, mark Use Secure LDAP
Connection.
Enter your LDAP credentials, with the domain. (e.g. acronis\hristo).
Enter your LDAP search base.
Enter the desired domain(s) for LDAP authentication. (i.e.to enable LDAP authentication
for an account with the email joe@glilabs.com, you would enter glilabs.com)
Press Save.
e. Under the Local Gateway tab:
Note: If you're installing both a Gateway Server and the Acronis Access Server on the same machine,
the Gateway Server will automatically be detected and administered by the Acronis Access Server.
Set a DNS name or IP address for the local Gateway Server. This is an internal address
behind the load balancer (i.e. 10.27.81.10).
Press Save.
f. Under the File Repository tab:
The File Repository Address should be the internal address of the server you have
created for the file repository role (i.e. 10.27.81.2).
3. Once you've completed the Setup Wizard, press Finish and navigate to Mobile Access ->
Gateway Servers.
4. It is time to register your second Gateway server:
a. Enter a Display name for the second Gateway.
b. The Address For Administration should be an internal address behind the load balancer (i.e.
10.27.81.11).
c. Enter the Administration Key. You can obtain it by going to the machine on which the
Gateway you are adding is installed, navigating to https://mygateway:443 (i.e.
https://10.27.81.10 or https://10.27.81.11) and the key will be displayed there. For more
information visit the Registering new Gateway Servers (p. 34) article.
d. Press Save.
95 Copyright © Acronis International GmbH, 2002-2014
Page 96

5. Create a Cluster Group and add all of your Gateway servers to it. Your primary server should be
In this section
PostgreSQL ............................................................................................... 96
Apache Tomcat ........................................................................................ 97
New Relic.................................................................................................. 97
the one you have already gone through the Setup Wizard on. For more information visit the
Cluster Groups (p. 44) article.
Note: Please make sure that you have already configured a correct Address for Administration on each
Gateway before proceeding. This is the DNS or IP address of the Gateway server.
a. Expand the Mobile Access tab.
b. Open the Gateway Servers page.
c. Press the Add Cluster Group button.
d. Enter a display name for the group.
e. Enter the internal DNS name or IP address of the load balancer (i.e. 10.27.81.1).
f. Mark the checkbox for each Gateway you want to be in the group.
g. Select the Gateway which will control the group's settings. This should be the Gateway which
you configured first. All of the existing settings on that Gateway (including assigned Data
Sources and excluding the address for administration) will be copied to every Gateway in the
group.
On the load balancer:
1. Enable duration-based session stickiness (or your load balancer's equivalent) on your load
balancer and configure it to not expire.
2. If a health-check is required (looking for an HTTP status of 200 to be returned), a ping to
https://INTERNALSERVERNAME:MANAGEMENTPORT/signin will satisfy it (i.e.
https://myaccessserver1.company.com/signin and
https://myaccessserver2.company.com/signin).
Using a browser, open https://mylb.company.com to verify the configuration is working.
5.3 Third-party Software for Acronis Access
5.3.1 PostgreSQL
Acronis Access Server uses PostgreSQL as it's database storage.
Documentation on the latest PostgreSQL http://www.postgresql.org/docs/9.2/interactive/index.html
(for other versions visit this site http://www.postgresql.org/docs/manuals/).
List of error codes http://www.postgresql.org/docs/9.2/interactive/errcodes-appendix.html.
When installing Acronis Access server, by default you also install pgAdmin. It provides a graphical
user interface to PostgreSQL. For documentation on all versions of pgAdmin visit this site
http://www.pgadmin.org/docs/.
Useful information can be found at the PostgreSQL Wiki http://wiki.postgresql.org/wiki/Main_Page,
including a troubleshooting guide http://wiki.postgresql.org/wiki/Troubleshooting_Installation.
For anti-virus related problems check this article
96 Copyright © Acronis International GmbH, 2002-2014
Page 97

http://wiki.postgresql.org/wiki/Running_&_Installing_PostgreSQL_On_Native_Windows#Antivirus_s
In this section
Overview .................................................................................................. 97
Introduction ............................................................................................. 98
Install the SSL Server Certificate ............................................................ 101
Create a New Web Listener ................................................................... 102
Create a New Web Site Publishing Rule ................................................. 107
Configure an External DNS Entry for the Acronis Access Gateway Server113
Using the Access Mobile Client with a TMG reverse proxy server ........ 113
Using the Access Desktop Client with a TMG reverse proxy server. ..... 113
oftware.
For information on backing up a PostgreSQL database: PostgreSQL backup.
5.3.2 Apache Tomcat
Acronis Access Server uses ApacheTomcat for its web server. Acronis Access 2.7 and later installs its
own version of Tomcat into the Group Logic\Common or Acronis\Common folder.
Troubleshooting Tomcat Wiki https://wiki.openmrs.org/display/docs/Troubleshooting+Tomcat.
Troubleshooting from the Apache website
http://commons.apache.org/logging/troubleshooting.html.
5.3.3 New Relic
New Relic is an on-demand application monitoring and optimization solution that can identify and
resolve performance issues for Ruby, JRuby, Java, PHP and .NET applications. Monitor, troubleshoot
and tune production web apps 24×7. New Relic includes Real User Monitoring (RUM) to analyze user
requests in real time, offering insights about user experience including page load times, time in
request queue, how long a page takes to render, and Apdex score. In addition, New Relic includes
dashboard to visualize performance metrics by geography, by longest time in queue, throughput, and
so on.
By using New Relic, you can monitor your Acronis Access server's activity in real time in an easy and
user friendly way.
For more information visit http://newrelic.com/ http://newrelic.com/
For information on installing New Relic for your Acronis Access server, visit the Monitoring Acronis
Access with New Relic (p. 115) section.
5.4 Using Acronis Access with Microsoft Forefront Threat
Management Gateway (TMG)
5.4.1 Overview
Info: This document covers the case when TMG is used as an Edge Firewall. If your organization uses TMG in a
different network topology please contact
Acronis for specific instructions.
If you are using Microsoft Forefront Threat Management Gateway (TMG) to dedicate and protect
your internal network from Internet threats and viruses, you need to make certain configurations to
97 Copyright © Acronis International GmbH, 2002-2014
Page 98

your TMG server to get it working with Acronis Access. To use TMG as reverse proxy and firewall for
In this section
Understanding Forefront Threat Management Gateway (TMG) Network Topology 99
Understanding Forefront Threat Management Gateway authentication100
your Acronis Access server you need to create two separate networks on your TMG computer:
internal and external. The two TMG network adapters should be properly configured, one with a
private (internal IP address) and one with a public (external IP address). The Acronis Access server
should be part of the internal network.
To use Acronis Access with TMG you need to complete the steps described in this document:
Obtain an SSL server certificate and install it to your Acronis Access server and to the TMG server
computer.
Create a web listener in TMG.
Create new web site publishing rule for the Acronis Access Gateway server, so that the clients
from outside your network can connect to Acronis Access.
Create an external DNS record in your DNS server.
The Access Mobile Client app supports these forms of authentication with a reverse proxy server:
Pass-through authentication
HTTP authentication (username & password)
Certificate authentication
5.4.2 Introduction
Acronis Access clients connect to the Acronis Access server running inside your firewall securely via
HTTPS and need to traverse your firewall via either VPN, HTTP reverse proxy or an open HTTPS port.
This article provides step by step instructions that enable connections by your user running the
Acronis Access desktop or mobile client from outside your network using the "reverse proxy"
functions of the Microsoft Forefront Threat Management Gateway (TMG) software, which is the
successor to ISA Server 2006.
Forefront Threat Management Gateway (TMG) is a secure web gateway that enables safe employee
web use through comprehensive protection against malware, malicious web sites and vulnerabilities.
Building on its predecessor, ISA Server 2006, TMG provides new URL filtering, anti-malware, and
intrusion-prevention technologies to protect businesses against the latest web-based threats. These
technologies are integrated with core network protection features such as firewall and VPN to create
a unified, easy-to-manage gateway.
The Forefront TMG solution includes two separately licensed components:
Forefront TMG server that provides URL filtering, antimalware inspection, intrusion prevention,
application- and network-layer firewall and HTTP/HTTPS inspection in a single solution.
Forefront TMG Web Protection Service that provides the continuous updates for malware
filtering and access to cloud-based URL filtering technologies aggregated from multiple Web
security vendors to protect against the latest Web-based threats.
98 Copyright © Acronis International GmbH, 2002-2014
Page 99

5.4.2.1 Understanding Forefront Threat Management Gateway (TMG)
Network Topology
Forefront TMG includes four different network templates, that can fit in your existing network
topology. It is important to choose the most appropriate for your organization option. After installing
TMG, the Getting Started Wizard will appear, where you need to make initial configuration to your
TMG. The first menu of the Getting Started Wizard is Configure Network Setting, where you need to
make your choice about what network template to use. See bellow the available options.
Edge Firewall - In this topology, Forefront TMG is located at the network edge, where it serves as
the organization’s edge firewall, and is connected to two networks: the internal network and the
external network (usually the Internet).
3-Leg Perimeter - This topology implements a perimeter (DMZ) network. Forefront TMG is
connected to at least three physical networks: the internal network, one or more perimeter
networks and the external network.
Back/Front Firewall - In this topology, Forefront TMG is located at the network’s back-end. Use
this topology when another network element, such as a perimeter network or an edge security
device, is located between Forefront TMG and the external network. Forefront TMG is connected
to the internal network and to the network element in front of it.
99 Copyright © Acronis International GmbH, 2002-2014
Page 100

Single Network Adapter - This topology enables limited Forefront TMG functionality. In this
topology, Forefront TMG is connected to one network only, either the internal network or a
perimeter network. Typically, you would use this configuration when Forefront TMG is located in
the internal corporate network or in a perimeter network, and another firewall is located at the
edge, protecting corporate resources from the Internet.
Info:
For more information about how to install and configure TMG visit:
http://technet.microsoft.com/en-us/library/cc441445.aspx
http://technet.microsoft.com/en-us/library/cc441445.aspx.
For TMG minimum systems requirements visit:
http://www.microsoft.com/forefront/threat-management-gateway/en/us/system-requirements.aspx
http://www.microsoft.com/forefront/threat-management-gateway/en/us/system-requirements.aspx.
For pricing details visit:
http://www.microsoft.com/forefront/threat-management-gateway/en/us/pricing-licensing.aspx
http://www.microsoft.com/forefront/threat-management-gateway/en/us/pricing-licensing.aspx.
5.4.2.2 Understanding Forefront Threat Management Gateway
authentication
TMG provides 3 general methods of authenticating users and they are:
100 Copyright © Acronis International GmbH, 2002-2014
 Loading...