

Page 1

Cover page Install And AdminCopyright Statement
Copyright © Acronis International GmbH, 2002-2014. All rights reserved.
“Acronis” and “Acronis Secure Zone” are registered trademarks of Acronis International GmbH.
"Acronis Compute with Confidence", “Acronis Startup Recovery Manager”, “Acronis Active Restore”,
“Acronis Instant Restore” and the Acronis logo are trademarks of Acronis International GmbH.
Linux is a registered trademark of Linus Torvalds.
VMware and VMware Ready are trademarks and/or registered trademarks of VMware, Inc. in the
United States and/or other jurisdictions.
Windows and MS-DOS are registered trademarks of Microsoft Corporation.
All other trademarks and copyrights referred to are the property of their respective owners.
Distribution of substantively modified versions of this document is prohibited without the explicit
permission of the copyright holder.
Distribution of this work or derivative work in any standard (paper) book form for commercial
purposes is prohibited unless prior permission is obtained from the copyright holder.
DOCUMENTATION IS PROVIDED "AS IS" AND ALL EXPRESS OR IMPLIED CONDITIONS,
REPRESENTATIONS AND WARRANTIES, INCLUDING ANY IMPLIED WARRANTY OF MERCHANTABILITY,
FITNESS FOR A PARTICULAR PURPOSE OR NON-INFRINGEMENT, ARE DISCLAIMED, EXCEPT TO THE
EXTENT THAT SUCH DISCLAIMERS ARE HELD TO BE LEGALLY INVALID.
Third party code may be provided with the Software and/or Service. The license terms for such
third-parties are detailed in the license.txt file located in the root installation directory. You can
always find the latest up-to-date list of the third party code and the associated license terms used
with the Software and/or Service at http://kb.acronis.com/content/7696
Acronis patented technologies
Technologies, used in this product, are covered and protected by one or more U.S. Patent Numbers:
7,047,380; 7,275,139; 7,281,104; 7,318,135; 7,353,355; 7,366,859; 7,475,282; 7,603,533; 7,636,824;
7,650,473; 7,721,138; 7,779,221; 7,831,789; 7,886,120; 7,895,403; 7,934,064; 7,937,612; 7,949,635;
7,953,948; 7,979,690; 8,005,797; 8,051,044; 8,069,320; 8,073,815; 8,074,035; 8,145,607; 8,180,984;
8,225,133; 8,261,035; 8,296,264; 8,312,259; 8,347,137; 8,484,427; 8,645,748; 8,732,121 and patent
pending applications.
1 Copyright © Acronis International GmbH, 2002-2014
Page 2

Table of contents
1 Installing ..........................................................................................................................5
1.1 Requirements ............................................................................................................................ 5
1.1.1 Operating System Requirements ................................................................................................................... 5
1.1.2 Mobile Client requirements ........................................................................................................................... 5
1.1.3 Minimum Hardware Recommendation ........................................................................................................ 6
1.1.4 Desktop Client Requirements ........................................................................................................................ 6
1.1.5 Network Requirements .................................................................................................................................. 7
1.2 Installing Acronis Access on your server .................................................................................... 7
1.3 Using the Configuration Utility .................................................................................................. 9
1.4 Using the Setup wizard ............................................................................................................10
2 Maintenance Tasks ........................................................................................................ 18
2.1 Disaster Recovery guidelines ...................................................................................................18
2.2 Backing up and Restoring Acronis Access ................................................................................20
2.3 Tomcat Log Management on Windows ...................................................................................23
2.4 Automated Database Backup ..................................................................................................27
2.5 Increasing the Acronis Access Tomcat Java Maximum Memory Pool .....................................29
3 Mobile Access ................................................................................................................ 31
3.1 Concepts ..................................................................................................................................31
3.2 Policies .....................................................................................................................................33
3.2.1 Group Policy ................................................................................................................................................... 33
3.2.2 Default Access Restrictions ........................................................................................................................... 43
3.3 On-boarding Mobile Devices ...................................................................................................43
3.3.1 Server-side Management Enrollment Process ........................................................................................... 44
3.3.2 User-side Management Enrollment Process .............................................................................................. 45
3.4 Managing Your Gateway Server ..............................................................................................48
3.4.1 Server Details ................................................................................................................................................. 50
3.4.2 Editing Gateway Servers ............................................................................................................................... 53
3.5 Managing Data Sources ...........................................................................................................60
3.5.1 Folders ............................................................................................................................................................ 62
4 Settings ......................................................................................................................... 66
5 Quick Start: Mobile Access ............................................................................................. 67
5.1 First Run ...................................................................................................................................67
6 Configuring your Group Policy ........................................................................................ 72
6.1 Installing the Access Mobile Client application .......................................................................72
6.2 Enrolling in client management ...............................................................................................72
7 Quick Start: Sync & Share ............................................................................................... 77
7.1 First Run ...................................................................................................................................77
8 Web Client ..................................................................................................................... 82
8.1 Using the desktop client ..........................................................................................................89
2 Copyright © Acronis International GmbH, 2002-2014
Page 3

9 Server Administration .................................................................................................... 94
9.1 Administering a Server.............................................................................................................94
9.2 Administrators and Privileges ..................................................................................................95
9.3 Audit Log ..................................................................................................................................97
9.3.1 Log .................................................................................................................................................................. 97
9.3.2 Settings ........................................................................................................................................................... 98
9.4 Server .......................................................................................................................................99
9.5 SMTP ......................................................................................................................................101
9.6 LDAP .......................................................................................................................................102
9.7 Email Templates .....................................................................................................................104
9.8 Licensing ................................................................................................................................106
9.9 Debug Logging .......................................................................................................................107
9.10 Monitoring .............................................................................................................................108
10 Supplemental Material ........................................................................................... 110
10.1 Conflicting Software ..............................................................................................................110
10.2 Using trusted server certificates with Acronis Access ...........................................................110
10.3 Changing the Acronis Access Tomcat SSL Ciphers .................................................................112
10.4 How to support different Access Desktop Client versions ....................................................113
10.5 Customizing the web interface ..............................................................................................113
10.6 Creating a Drop Folder ...........................................................................................................114
10.7 Monitoring Acronis Access with New Relic ...........................................................................115
10.8 Third-party Software for Acronis Access ...............................................................................116
10.8.1 PostgreSQL ................................................................................................................................................... 116
10.8.2 Apache Tomcat ............................................................................................................................................ 117
10.8.3 New Relic ..................................................................................................................................................... 117
11 Sync & Share .......................................................................................................... 118
11.1 Sharing Restrictions ...............................................................................................................118
11.2 LDAP Provisioning ..................................................................................................................118
11.3 Quotas ....................................................................................................................................119
11.4 File Purging Policies ...............................................................................................................119
11.5 User Expiration Policies .........................................................................................................121
11.6 File Repository .......................................................................................................................122
11.7 Acronis Access Client .............................................................................................................123
12 Upgrading .............................................................................................................. 125
12.1 Upgrading from Acronis Access to a newer version ..............................................................125
13 Users&Devices ....................................................................................................... 127
13.1 Managing Mobile Devices ......................................................................................................127
13.1.1 Performing Remote Application Password Resets ................................................................................... 128
13.1.2 Performing Remote Wipes ......................................................................................................................... 129
13.2 Managing Users .....................................................................................................................130
3 Copyright © Acronis International GmbH, 2002-2014
Page 4

14 What's New ........................................................................................................... 134
14.1 What's New in Acronis Access Server ....................................................................................134
14.2 What's New in the Acronis Access app ..................................................................................148
14.3 Previous Releases ..................................................................................................................149
14.3.1 activEcho ...................................................................................................................................................... 149
14.3.2 mobilEcho .................................................................................................................................................... 160
4 Copyright © Acronis International GmbH, 2002-2014
Page 5

1 Installing
In this section
Requirements ............................................................................................. 5
Installing Acronis Access on your server .................................................... 7
Using the Configuration Utility .................................................................. 9
Using the Setup wizard ............................................................................ 10
In this section
Operating System Requirements ............................................................... 5
Mobile Client requirements ....................................................................... 5
Minimum Hardware Recommendation ..................................................... 6
Desktop Client Requirements .................................................................... 6
Network Requirements .............................................................................. 7
1.1 Requirements
You must be logged in as an administrator before installing Acronis Access. Verify that you meet the
following requirements.
1.1.1 Operating System Requirements
Recommended:
Windows 2012 all flavors
Windows 2008 R2 64 bit
Supported:
Windows 2012 R2
Windows 2012, Standard and Datacenter editions
Windows 2008, all flavors, 32/64 bit
Note: For testing purposes, the system can be installed and runs on Windows 7 or later. These desktop class
configurations are not supported for production deployment.
1.1.2 Mobile Client requirements
The mobile client application is compatible with:
Supported devices:
Apple iPad 2nd, 3rd, 4th generation, Air, Air 2
Apple iPad Mini 1st, 2nd, 3rd generation
Apple iPhone 3GS, 4, 4S, 5, 5s, 5c, 6, 6 Plus
Apple iPod Touch 4th, 5th generation
Android Smartphones and Tablets (Devices with x86 processor architecture are not supported)
Supported OS's:
iOS 6 or later
5 Copyright © Acronis International GmbH, 2002-2014
Page 6

Android 2.2 or later (Devices with x86 processor architecture are not supported)
The Acronis Access app can be downloaded from:
For iOS http://www.grouplogic.com/web/meappstore
For Android https://play.google.com/store/apps/details?id=com.grouplogic.mobilecho
1.1.3 Minimum Hardware Recommendation
Processor: Intel/AMD
Note: Acronis Access server can be installed on virtual machines.
Memory:
Production environments: 8 GB minimum. More recommended.
Trial or Тest environments: 4 GB minimum. 8 GB or more recommended.
Disk Space:
The software installation requires 300MB of disk space.
Note: Please make sure that you have enough space to run the Acronis Access installer. 1GB of space is
required for the installer to run.
The file repository used by the Sync & Share features is installed on the local computer by
default.
Enough free space should be provided to meet testing parameters. 50 GB or more is
recommended.
1.1.4 Desktop Client Requirements
Supported operating systems:
Windows XP, Windows Vista, Windows 7, Windows 8 and 8.1
Note: In order to use the Acronis Access Desktop client on Windows XP, you will need to use relaxed SSL
cipher rules. For more information: Changing the Acronis Access Tomcat SSL Ciphers (p. 112).
Mac OS X 10.6.8 and higher with Mac compatible with 64-bit software.
Note: When installing the Acronis Access Desktop client, make sure that the sync-folder you create is not in
a folder synchronized by another software. For a list of known conflicts visit Conflicting Software (p. 110).
Supported web browsers:
Mozilla Firefox 6 and later
Internet Explorer 9 and later
Note: You can support an unsecure version of Internet Explorer 8 if necessary by following the Changing the
Acronis Access Tomcat SSL Ciphers (p. 112) article. Internet Explorer 8 is not supported for Server
Administration.
Note: When using Internet Explorer you have to make sure that Do not save encrypted pages to disk is
unchecked in order to be able to download files. This setting is found under Internet Options -> Advanced
-> Security.
6 Copyright © Acronis International GmbH, 2002-2014
Page 7

Google Chrome
Safari 5.1.10 or later
1.1.5 Network Requirements
1 Static IP Address.
Optional but recommended: DNS name matching the above IP address.
Network access to a Domain Controller if Active Directory will be used.
Network access to an SMTP server for email notifications and invite messages.
The address 127.0.0.1 is used internally by the Access Mobile Client and should not be routed
through any kind of tunnel (e.g. VPN).
The machine running Acronis Access needs to be bound to the Windows Active Directory.
Note: It is recommended to bind the server to the domain. Mobile clients will not be able to access Data sources
unless the server is bound to the domain.
If you want to allow mobile devices access from outside your firewall, there are several options:
Port 443 access: Acronis Access uses HTTPS for encrypted transport, so it fits in naturally with
common firewall rules allowing HTTPS traffic on port 443. If you allow port 443 access to your
Acronis Access server, authorized iPad clients can connect while inside or outside of your firewall.
Acronis Access can also be configured to use any other port you prefer.
VPN: The Access Mobile Client supports access through a VPN connection. Both the built in iOS
VPN client and third-party VPN clients are supported. iOS management profiles can optionally be
applied to devices using the Apple iPhone Configuration Utility to configure the certificate-based
iOS “VPN-on-demand” feature, giving seamless access to Acronis Access servers and other
corporate resources.
Reverse proxy server: If you have a reverse proxy server set up, iPad clients can connect without
the need for an open firewall port or a VPN connection. The Access Mobile Client app supports
reverse proxy pass-through authentication and username / password authentication.
Note: If you want to use a mobile device management like Good Dynamics or MobileIron, you will need to
upgrade to Acronis Access Advanced.
Certificates:
Acronis Access ships and installs with self-signed certificates for testing purposes. Production
deployments should implement proper CA certificates.
Note: Certain web browsers will display warning messages when using self-signed certificates. Dismissing those
messages allows the system to be used without problems. Using self-signed certificates for production
conditions is not recommended.
1.2 Installing Acronis Access on your server
Installing Acronis Access
Please make sure you are logged in as an administrator before installing Acronis Access.
7 Copyright © Acronis International GmbH, 2002-2014
Page 8
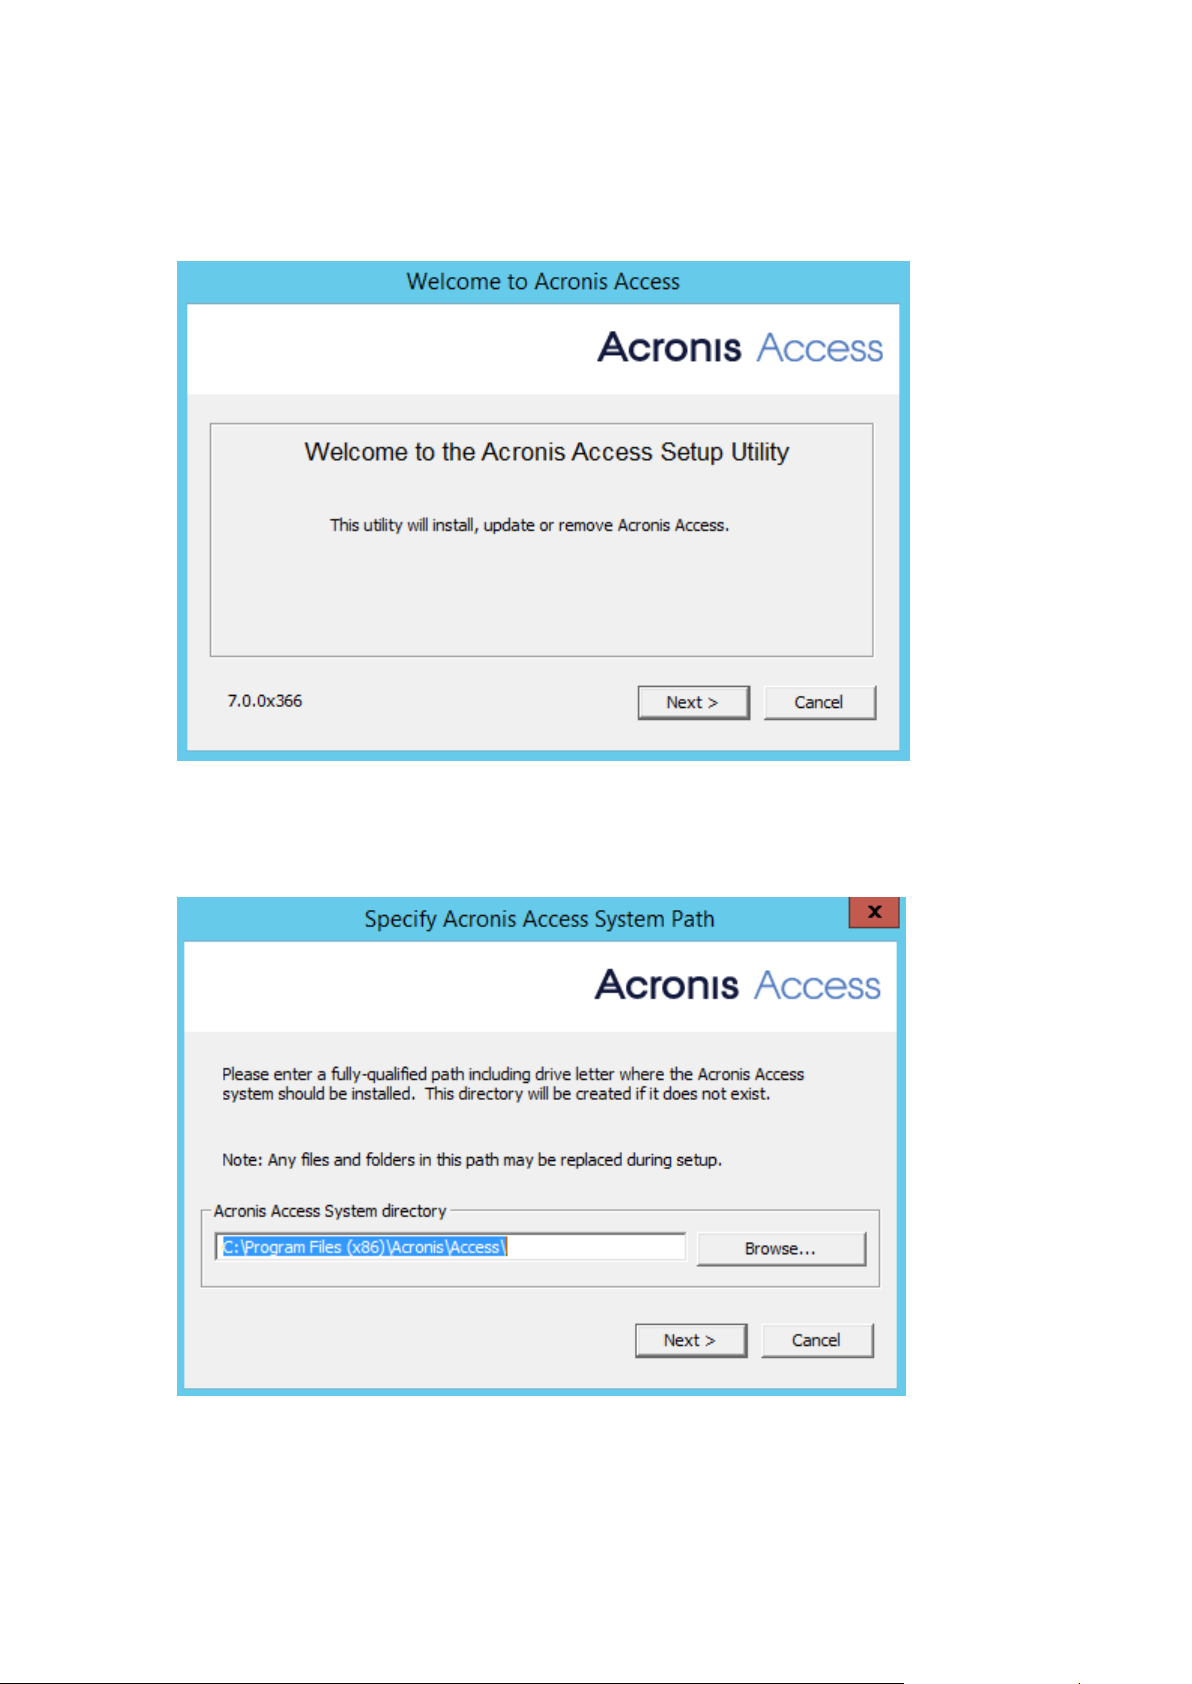
1. Download the Acronis Access installer.
2. Disable any anti-virus software you have or it may interrupt the installation procedure resulting
in a failed installation.
3. Double-click on the installer executable.
4. Press Next to begin.
5. Read and accept the license agreement.
6. Press Install.
7. Select where the product will be installed and press Next.
8. Review the components which will be installed and press Install.
8 Copyright © Acronis International GmbH, 2002-2014
Page 9

9. Press Exit to close the installer.
The Configuration Utility will launch automatically to complete the installation
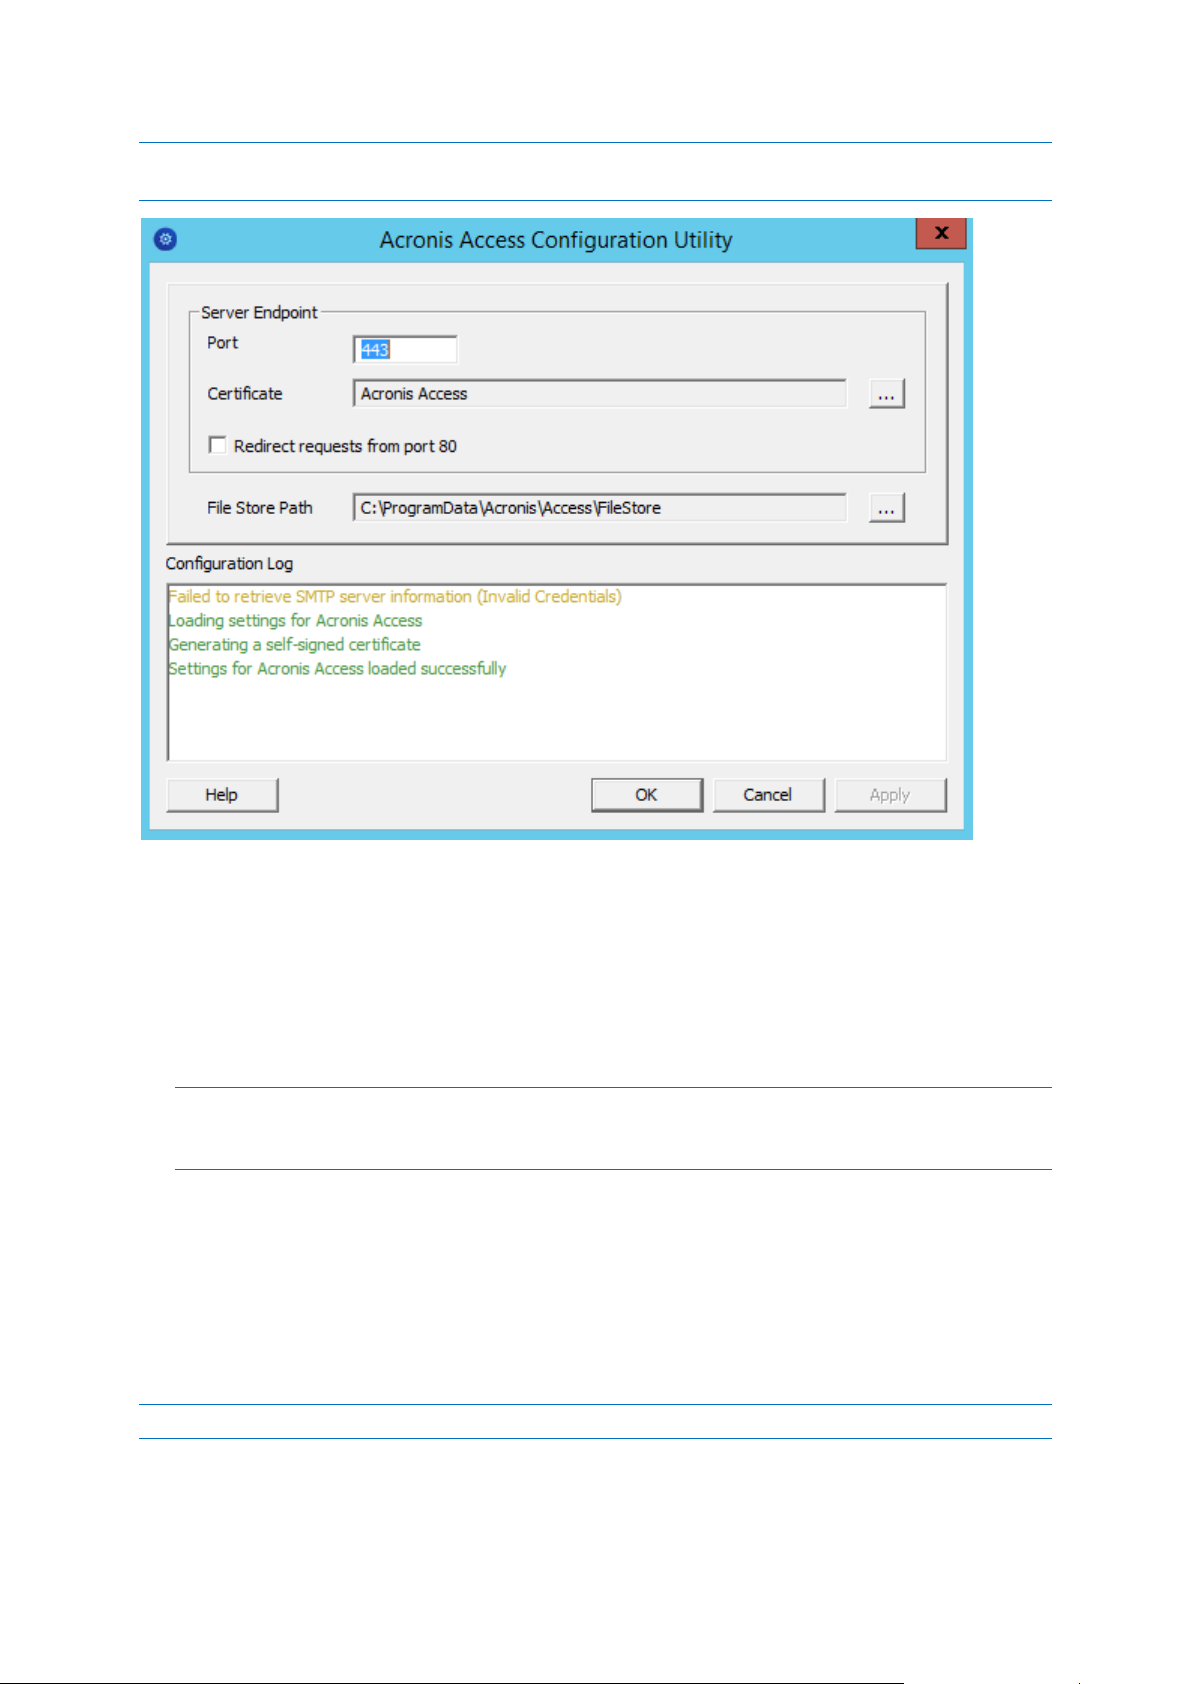
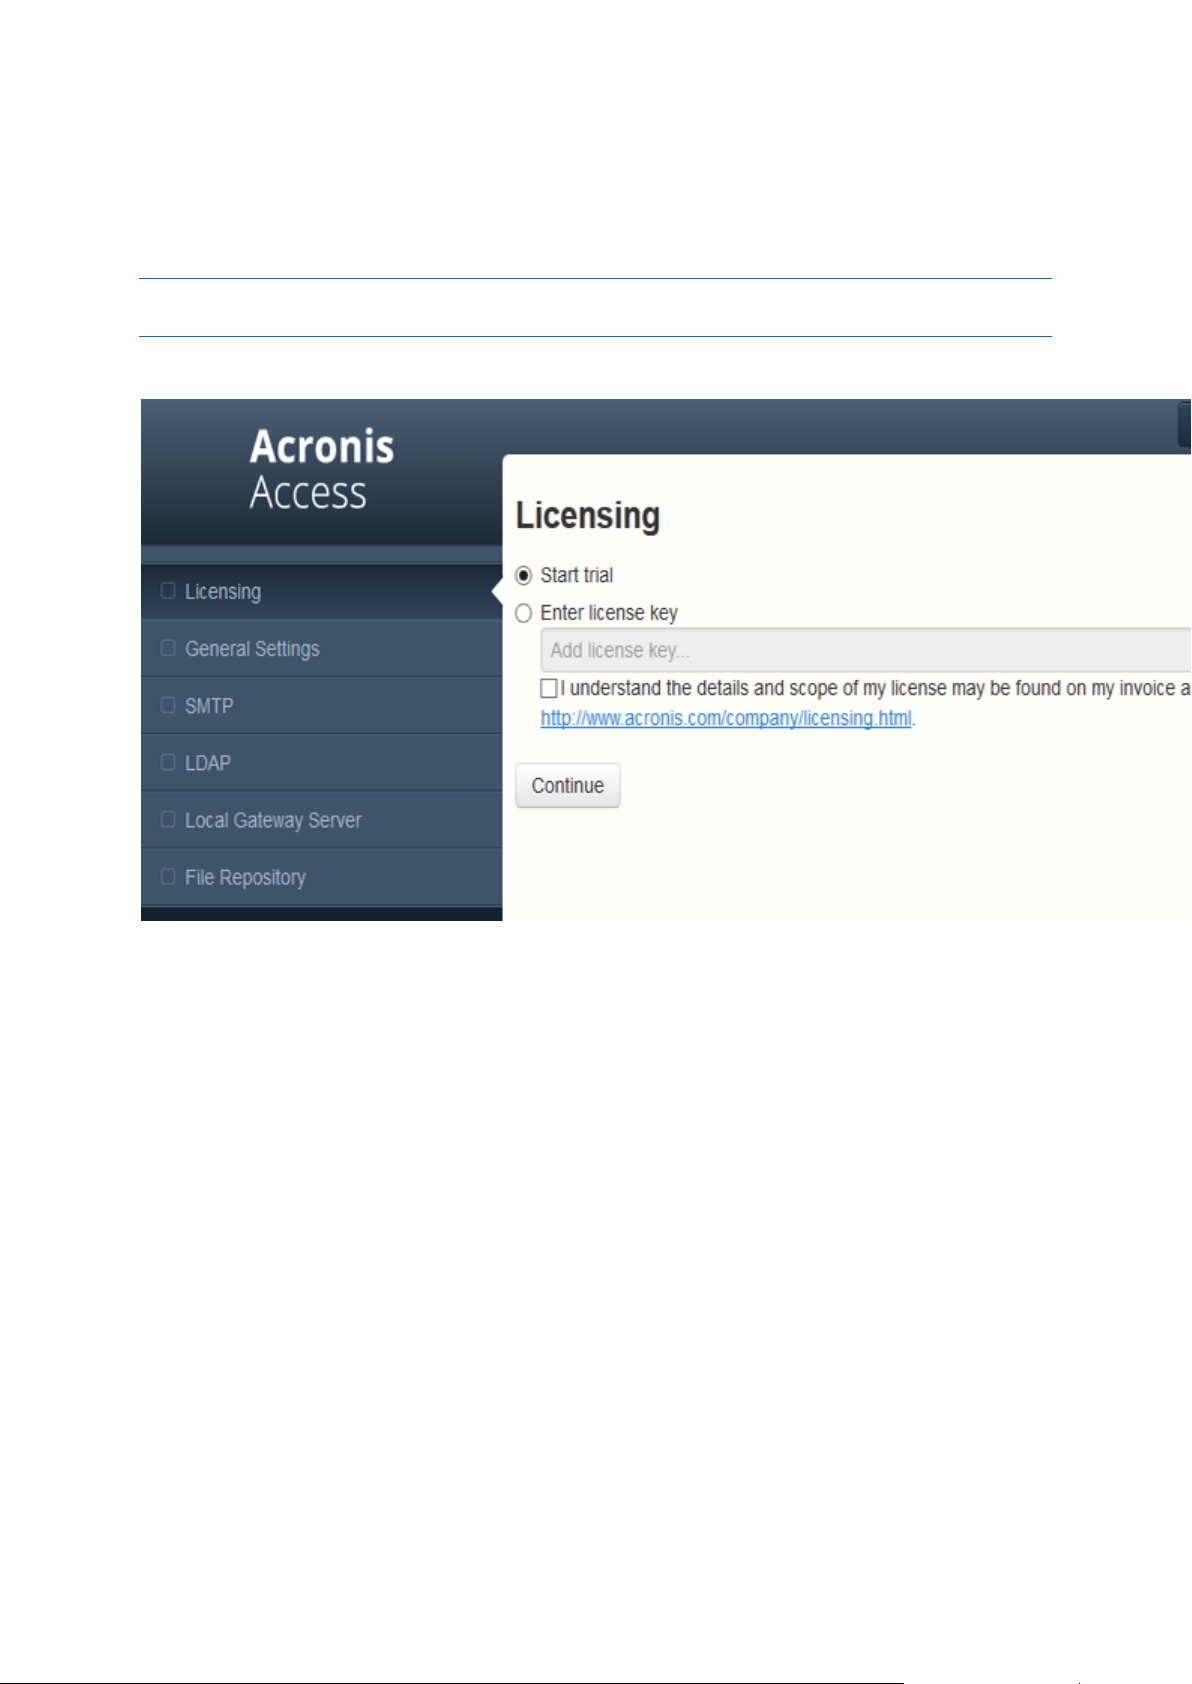
1.3 Using the Configuration Utility
The Acronis Access installer comes with a configuration utility, which allows you to quickly and easily
set up the access to your Acronis Access Gateway server, File Repository and Acronis Access Server.
Note: See the Network Requirements (p. 7) section for more information on best practices for the IP address
configurations of Acronis Access.
9 Copyright © Acronis International GmbH, 2002-2014
Page 10
Note: For information on adding your certificate to the Microsoft Windows Certificate Store, visit the Using
Certificates (p. 110) article.
Port - The port of your Web Interface and Gateway Server.
Certificate - SSL certificate for your Web Interface and Gateway Server. You can choose a
certificate from the Microsoft Windows Certificate Store.
Redirect requests from port 80 - When selected, Tomcat will listen for incoming traffic on the
unsecure port 80 and redirect it to the HTTPS port you have specified above. If you have another
program listening on port 80, do not check this box.
File Store Path - Local path to your File Store. If you change the File Store path, you MUST
manually copy any files that are already in the original File Store location to your new location.
Note: If you move the File Store to another location, you should upload a new file to make sure it is going
into the correct new location. Another thing is downloading a file that was already in the file store to make
sure all of the files that were in the original location can be accessed at the new location.
1.4 Using the Setup wizard
After installing the software and running the configuration utility to setup the network port and SSL
certificate, the administrator now needs to configure the Acronis Access server. The Setup Wizard
detects most of the necessary settings (LDAP, Server and SMTP) automatically to help you get the
basic functionality of the server working. You can still change all of these settings manually before
proceeding.
Note: After the configuration utility has run, it will take 30-45 seconds for the server to come up the first time.
10 Copyright © Acronis International GmbH, 2002-2014
Page 11
Navigate to the Acronis Access's web interface using any of the available IP addresses and the port
specified in the configuration utility. You will be prompted to set the password for the default
administrator account.
Note: Administrators can be configured later on, for more information visit the Server Administration (p. 94)
section.
This wizard helps you setup the core settings for the functionality of your product.
General Settings cover settings of the web interface itself, like the language, the color scheme,
the server name used in admin notifications, licensing and administrators.
LDAP settings allow you to use Active Directory credentials, rules and policies with our product.
SMTP settings cover functionality in both Mobile Access features and Sync & Share features. For
Mobile Access, the SMTP server is used when sending enrollment invitations. Sync & Share
features use the SMTP server to send folder invitations, warnings, summaries of errors.
All of the settings you see in the Initial Configuration page will also be available after you complete it.
For more information on any of the settings, please visit the Server Administration (p. 94) articles.
11 Copyright © Acronis International GmbH, 2002-2014
Page 12

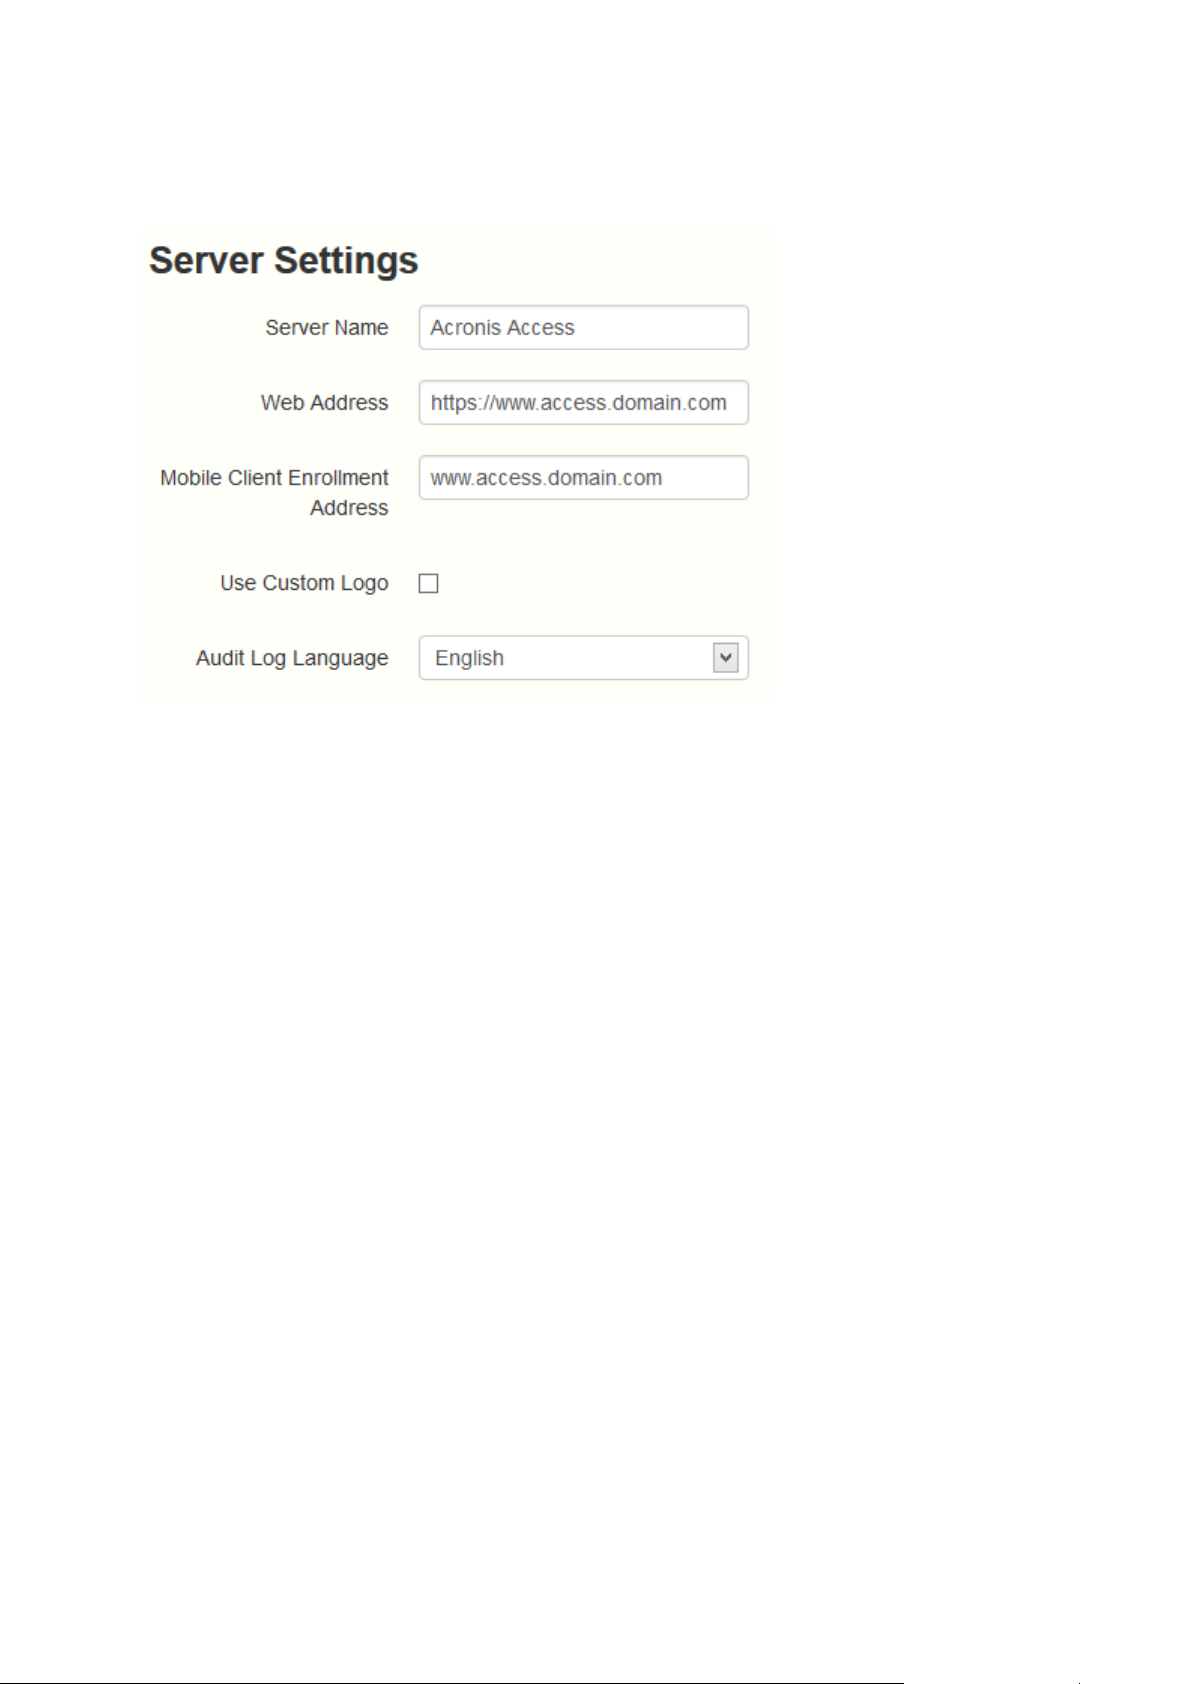
Going through the initial configuration process
Licensing
To start a trial:
1. Select Start Trial and press Continue.
To license your Access Server:
1. Select Enter license keys.
2. Enter your license key and mark the checkbox.
3. Press Save.
12 Copyright © Acronis International GmbH, 2002-2014
Page 13
General Settings
1. Enter a Server Name.
2. Specify the root DNS name or IP address where users can access the website (starting with
http:// or https://).
3. Specify the DNS name or IP address to which the mobile users will enroll to.
4. Select the default language for the Audit Log. The current options are English, German, French
and Japanese.
5. Press Save.
13 Copyright © Acronis International GmbH, 2002-2014
Page 14
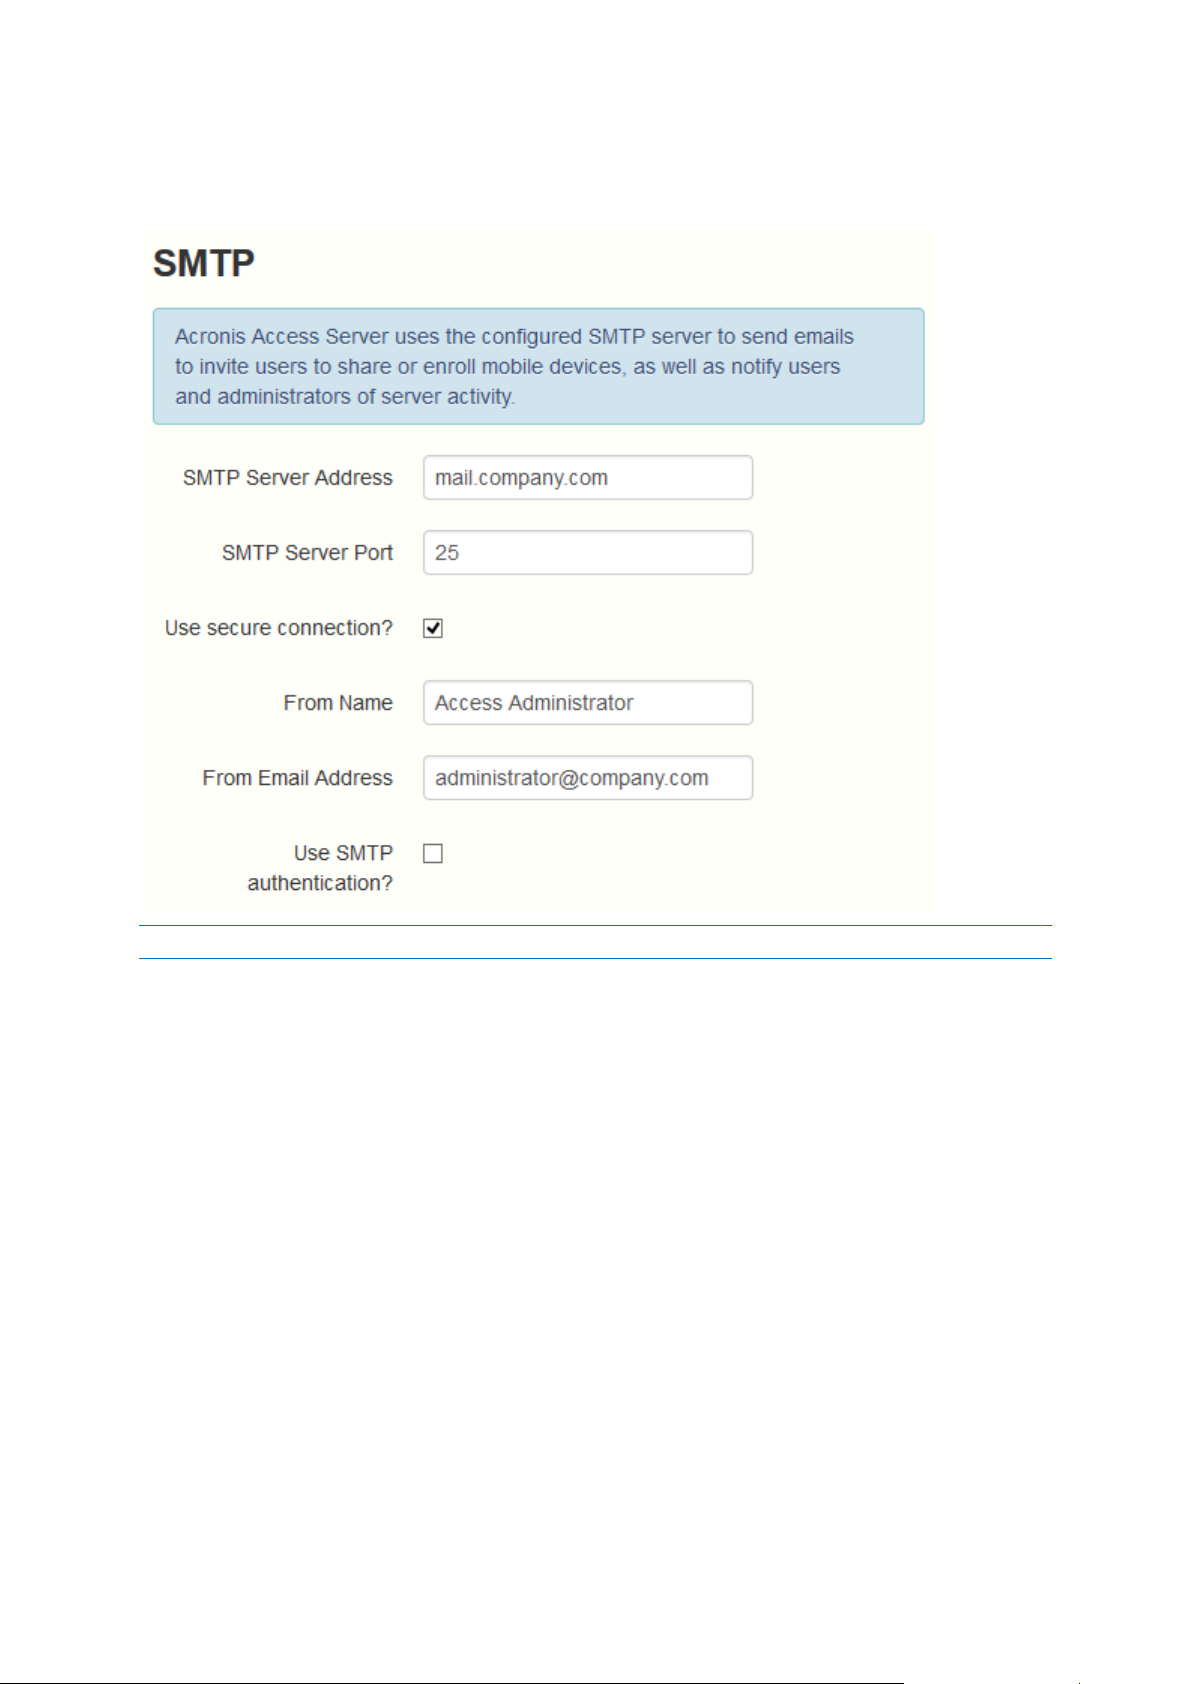
SMTP
Note: You can skip this section, and configure SMTP later.
1. Enter the DNS name or IP address of your SMTP server
2. Enter the SMTP port of your server.
3. If you do not use certificates for your SMTP server, unmark Use secure connection?.
4. Enter the name which will appear in the "From" line in emails sent by the server.
5. Enter the address which will send the emails sent by the server.
6. If you use username/password authentication for your SMTP server, mark Use SMTP
authentication? and enter your credentials.
7. Press Send Test Email to send a test email to the email address you set on step 5.
8. Press Save.
14 Copyright © Acronis International GmbH, 2002-2014
Page 15

LDAP
15 Copyright © Acronis International GmbH, 2002-2014
Page 16

16 Copyright © Acronis International GmbH, 2002-2014
Page 17

Note: You can skip this section, and configure LDAP later.
1. Mark Enable LDAP.
2. Enter the DNS name or IP address of your LDAP server.
3. Enter the port of your LDAP server.
4. If you use a certificate for connections with your LDAP server, mark Use Secure LDAP
Connection.
5. Enter your LDAP credentials, with the domain. (e.g. acronis\hristo).
6. Enter your LDAP search base.
7. Enter the desired domain(s) for LDAP authentication. (i.e.to enable LDAP authentication for an
account with the email joe@glilabs.com, you would enter glilabs.com)
8. Press Save.
17 Copyright © Acronis International GmbH, 2002-2014
Page 18

2 Maintenance Tasks
In this section
Disaster Recovery guidelines ................................................................... 18
Backing up and Restoring Acronis Access ................................................ 20
Tomcat Log Management on Windows ................................................... 23
Automated Database Backup .................................................................. 27
Increasing the Acronis Access Tomcat Java Maximum Memory Pool ..... 29
To backup all of Acronis Access's elements and as part of your best practices and backup procedures, you may
want to read the Disaster Recovery guidelines (p. 18) article.
2.1 Disaster Recovery guidelines
High availability and fast recovery is of extreme importance for mission critical applications like
Acronis Access. Due to planned or unplanned circumstances ranging from local hardware failures to
network disruptions to maintenance tasks, it may be required to provision the means for restoring
Acronis Access to a working state in a very short period of time.
Introduction:
For mission critical applications like Acronis Access, high availability is of extreme importance. Due to
various circumstances ranging from local hardware failures to network disruptions to maintenance
tasks, it may be required to provision the means for restoring Acronis Access to a working state in a
very short period of time.
There are different ways to implement disaster recovery, including backup-restore, imaging,
virtualization and clustering. We will describe the backup-restore approach in the following sections.
Description of the Acronis Access elements:
Acronis Access is a solution composed of several discrete but interconnected elements:
Acronis Access Gateway Server
Note: Normally located here: C:\Program Files (x86)\Acronis\Access\Gateway Server
Acronis Access Server
Note: Normally located here: C:\Program Files (x86)\Acronis\Access\Access Server
Acronis Access Configuration Utility
Note: Normally located here: C:\Program Files (x86)\Acronis\Access\Configuration Utility
File Store
The location of the File Store is set during the installation when you first use the Configuration
Utility.
18 Copyright © Acronis International GmbH, 2002-2014
Page 19

Note: The FileStore structure contains user files and folders in encrypted form. This structure can be copied or
backed up using any standard file copy tool (robocopy, xtree). Normally this structure should be located in a
high availability network volume or NAS so the location may differ from the default.
PostGreSQL database. This is a discrete element running as a Windows service, installed and used by
Acronis Access. The Acronis Access database is one of the most critical elements because it maintains
all configurations, relationships between users and files, and file metadata.
All those components are needed in order to build a working instance of Acronis Access.
Resources needed to implement a fast recovery process
The resources needed to fulfill the disaster recovery process are:
Appropriate hardware to host the operating system, application and its data. The hardware must
meet the system and software requirements for the application.
A backup and restore process in place to ensure all software and data elements are available at
the time the switch is needed.
Network connectivity, including internal and external firewall and routing rules that permit users
to access the new node with no or minimal need to change client side settings.
Network access for Acronis Access to contact an Active Directory domain controller and SMTP
server.
Fast or automated DNS switching ability to redirect incoming request to the secondary node.
The process
Backup Setup
The recommended approach to provide a safe and fast recovery scenario can be described like this:
1. Have an installation of Acronis Access, including all elements in the secondary, restore, node. If
this is not possible, a full (source) machine backup or image is a good alternative. In virtualized
environments, periodic snapshots prove to be effective and inexpensive.
2. Backup the Acronis Access server software suite (all elements mentioned above, including the
entire Apache Software branch) regularly. Use any standard, corporate class backup solution for
the task.
3. Backup the FileStore as frequently as possible. A standard backup solution can be used, but an
automated differential copy tool is a good and sometimes preferred alternative due to the
amount of data involved. A differential copy minimizes the time this operation takes by updating
what is different between the source and target FileStores.
4. Backup the Acronis Access database as frequently as possible. This is performed by an automated
database dump script triggered by Windows Task Scheduler. The database dump should then be
backed up by a standard backup tool.
Recovery
Provided the conditions described in the section above have been met and implemented, the process
to bring online the backup resources is relatively simple:
19 Copyright © Acronis International GmbH, 2002-2014
Page 20

1. Boot up the recovery node. Adjust any network configuration like IP Address, Host Name if
needed. Test Active Directory connectivity and SMTP access,
2. If needed restore the most recent Acronis Access software suite backup.
3. Verify that Tomcat is not running (Windows Control Panel/Services).
4. If needed, restore the FileStore. Make sure the relative location of the FileStore is the same as it
was in the source computer. If this is not the case, the location will need to be adjusted by using
the Configuration Utility.
5. Verify that the PostgreSQL service is running (Windows Control Panel/Services).
6. Restore the Acronis Access database.
7. Start the Acronis Access Tomcat service.
8. Migrate DNS to point to the new node.
9. Verify Active Directory and SMTP are working
2.2 Backing up and Restoring Acronis Access
In case you need to upgrade, update or maintain your Acronis Access server. This article will give you
the basics of backing up your database and restoring it.
Backing up your databases
Backing up your Acronis Access's database
The following method creates an *.sql file containing a text representation of the source database.
1. Open a Command Prompt window and navigate to the PostgreSQL\bin folder located in the
PostgreSQL installation directory.
e.g. cd "C:\Program Files (x86)\Acronis\Access\Common\PostgreSQL\bin"
2. Once your current Command Prompt directory is the bin folder, enter the following line:
pg_dump -U postgres -f mybackup.sql acronisaccess_production
where mybackup.sql is the desired file name for the produced backup file. It can include a full
path to the location where you want the backup file to be created, for instance:
D:\Backups\mybackup.sql
Note: acronisaccess_production must be entered exactly as shown as it is the name of the Acronis
Access database
3. A "Password: " line appears. Enter the postgres password that you set during the Acronis Access
installation process.
Note: Typing the password will not result in any visual changes in the Command Prompt window.
4. Your backup file will appear in the bin folder by default unless the output file specification
contains a full path to a different directory.
Note: If you want to backup the entire PostgreSQL database set you can use the following command:
pg_dumpall -U postgres > alldbs.sql
Where alldbs.sql will be the generated backup file. It can include a full path specification, for instance
D:\Backups\alldbs.sql
For full syntax on this command see: http://www.postgresql.org/docs/9.2/static/app-pg-dumpall.html
http://www.postgresql.org/docs/9.1/static/app-pg-dumpall.html
20 Copyright © Acronis International GmbH, 2002-2014
Page 21

Info: For more information on PostgreSQL backup procedures and command syntax please read this:
http://www.postgresql.org/docs/9.2/static/backup.html
http://www.postgresql.org/docs/9.1/static/backup.html
Backing up your Gateway Server's database
1. Go to the server on which you have Acronis Access installed.
2. Navigate to the folder containing the database.
Note: The default location is: C:\Program Files (x86)\Acronis\Access\Gateway
Server\database
3. Copy the mobilEcho.sqlite3 file and paste it in a safe location.
Restoring Acronis Access
Restoring your Acronis Access's database
The database restore process is similar to the backup process.
1. Prior to executing the command to restore your database, make sure the source backup file is
located in a directory or location where it can be accessed by the logged in user.
2. Open a Command Prompt window and navigate to the PostgreSQL\bin folder located in the
PostgreSQL installation directory.
cd "C:\Program Files (x86)\Acronis\Access\Common\PostgreSQL\bin"
Note: This directory may be different if you installed PostgreSQL in a custom location.
3. You need to remove the old database first. To do so, stop the Acronis Access Tomcat service and
enter the following line:
Warning! Do not continue with this step unless you are certain you have made a successful backup.
Dropping the database is an irreversible process which deletes the entire database. All information is lost.
dropdb -U postgres acronisaccess_production
A "password for user postgres: " message may appear. If that happens, enter the postgres
password that you set during the Acronis Access installation process.
acronisaccess_production must be entered exactly as shown. This is the Acronis Access
database name.
4. Once the operation finishes, enter the following line:
createdb -U postgres acronisaccess_production
A "password for user postgres: " message may appear. If that happens, enter the postgres
password that you set during the Acronis Access installation process.
acronisaccess_production must be entered exactly as shown. This is the Acronis Access
database name.
5. To fill the newly created database with the information from your backup, enter the following
line:
psql -U postgres -d acronisaccess_production -W -f mybackup.sql
Replace mybackup.sql with the fully qualified name of the backup file, for instance:
D:\Backups\mybackup.sql
21 Copyright © Acronis International GmbH, 2002-2014
Page 22

A "password for user postgres: " message may appear. If that happens, enter the postgres
password that you set during the Acronis Access installation process.
acronisaccess_production must be entered exactly as shown. This is the Acronis Access
database name.
6. Once the process has completed successfully, restart the postgres service and start the Acronis
Access Tomcat service.
Note: Typing the password will not result in any visual changes in the Command Prompt window.
Info: For full psql command syntax, please visit http://www.postgresql.org/docs/9.2/static/app-psql.html
http://www.postgresql.org/docs/9.0/static/app-psql.html
Restoring your Gateway Server's database
1. Copy the mobilEcho.sqlite3 file you have backed up.
2. Go to the server on which you have Acronis Accessinstalled.
3. Navigate to the folder containing the database and paste the mobilEcho.sqlite3 file.
Note: The default location is: C:\Program Files (x86)\Acronis\Access\Gateway
Server\database
4. Restart the Acronis Access Gateway Server service.
Restoring Acronis Access to a new instance
1. Complete the Backup procedure explained above and move the alldbs.sql and mobilEcho.sqlite3
files to the new server.
2. On the new server, complete the Database restoration procedure explained above.
3. Start the Acronis Access services.
4. Complete the following procedure:
Configurations on the new instance
Note: It is highly recommended that you do not change the DNS names used by Acronis Access, only the IP
addresses they are pointing to. The following instructions assume you are re-using the DNS names of the
previous instance of Acronis Access
1. Open the Acronis Access web interface and login.
2. Navigate to Mobile Access -> Gateway Servers.
3. Press on the down arrow next to the Details button and select Edit.
4. Click on the SharePoint tab and enter the SharePoint administrator's credentials.
5. If the Address for administration is set as an IP address, change it to the new IP you set for the
Acronis Access Server.
6. Press Apply.
If you do not intend to use the same IP address as the previous instance, change the IP entries for the
DNS names used by the Acronis Access and Gateway Server.
22 Copyright © Acronis International GmbH, 2002-2014
Page 23

2.3 Tomcat Log Management on Windows
As part of its normal operation Tomcat creates and writes information to a set of log files.
Unless periodically purged, these files accumulate and consume valuable space. It is commonly
accepted by the IT community that the informational value those logs provide degrades rapidly.
Unless other factors like regulations or compliance with certain policies play, keeping those log files
in the system a discrete number of days is what is required.
Introduction:
As part of its normal operation Tomcat creates and writes information to a set of log files. On
Windows, these files are normally located in the following directory:
“C:\Program Files (x86)\Acronis\Access\Common\apache-tomcat-7.0.34\logs”
Acronis Access saves it's own logs in the same directory as separate files.
Acronis Access's log files are named acronisaccess_date.
There are many tools capable of automating the task of deleting unneeded log files. For our example,
we will use a built-in Windows command called ForFiles.
Info: For information on ForFiles, syntax and examples visit
http://technet.microsoft.com/en-us/library/cc753551(v=ws.10).aspx
http://technet.microsoft.com/en-us/library/cc753551(v=ws.10).aspx
A sample process:
The sample process described below automates the process of purging log files older than a certain
number of days. Inside the sample batch file, this number is defined as a parameter so it can be
changed to fit different retention policies.
Info: The sample script (batch) file is designed to work on Windows 2008. Click here to download the script.
Optionally you could copy and paste the script code into an empty text document and save it as
“AASTomcatLogPurge.bat”
Click here for the full batch script code...
ECHO OFF
REM Script: aETomcatLogsPurge.bat
REM 2012-05-12: Version: 1.0: MEA: Created
ECHO This script will delete files older than a number of days from a directory
ECHO Run it from the command line or from a scheduler
ECHO Make sure the process has permissions to delete files in the target folder
REM ===== CONFIGURATIONS ===================================================
REM Note: all paths containing spaces must be enclosed in double quotes
REM Edit this file and set LogPath and NumDays below
REM Path to the folder where all Tomcat logs are
set LogPath="C:\Program Files (x86)\Group Logic\Common\apache-tomcat-7.0.34\logs"
23 Copyright © Acronis International GmbH, 2002-2014
Page 24

REM NumDays - Log files older than NumDays will be processed
set NumDays=14
REM ===== END OF CONFIGURATIONS ======================
ECHO
ECHO ===== START ============
REM ForFiles options:
REM "/p": the path where you want to delete files.
REM "/s": recursively look inside other subfolders present in the folder
mentioned in the batch file path
REM "/d": days for deleting the files older than the present date. For instance
"/d -7" means older than 7 days
REM "/c": command to execute to actually delete files: "cmd /c del @file".
forfiles /p %LogPath% /s /d -%NumDays% /c "cmd /c del @FILE"
:End
ECHO ===== BATCH FILE COMPLETED ============================================
Warning: We provide this example as a guideline so you can plan and implement your own process based on
the specifics of your deployment. The example is not meant nor tested to apply to all situations and
environments so use it as a foundation and at your own risk. Do not use it in production environments without
comprehensive offline testing first.
Steps:
1. Copy the script to the computer running Acronis Access (Tomcat) and open it with Notepad or a
suitable plain text editor.
2. Locate the section illustrated in the picture below and edit the LogPath and NumDays variables
with your specific paths and retention settings:
In Acronis Access the log files are stored in the same folder as Tomcat's. (C:\Program Files
(x86)\Acronis\Access\Common\apache-tomcat-7.0.34\logs)
3. Save the file.
24 Copyright © Acronis International GmbH, 2002-2014
Page 25
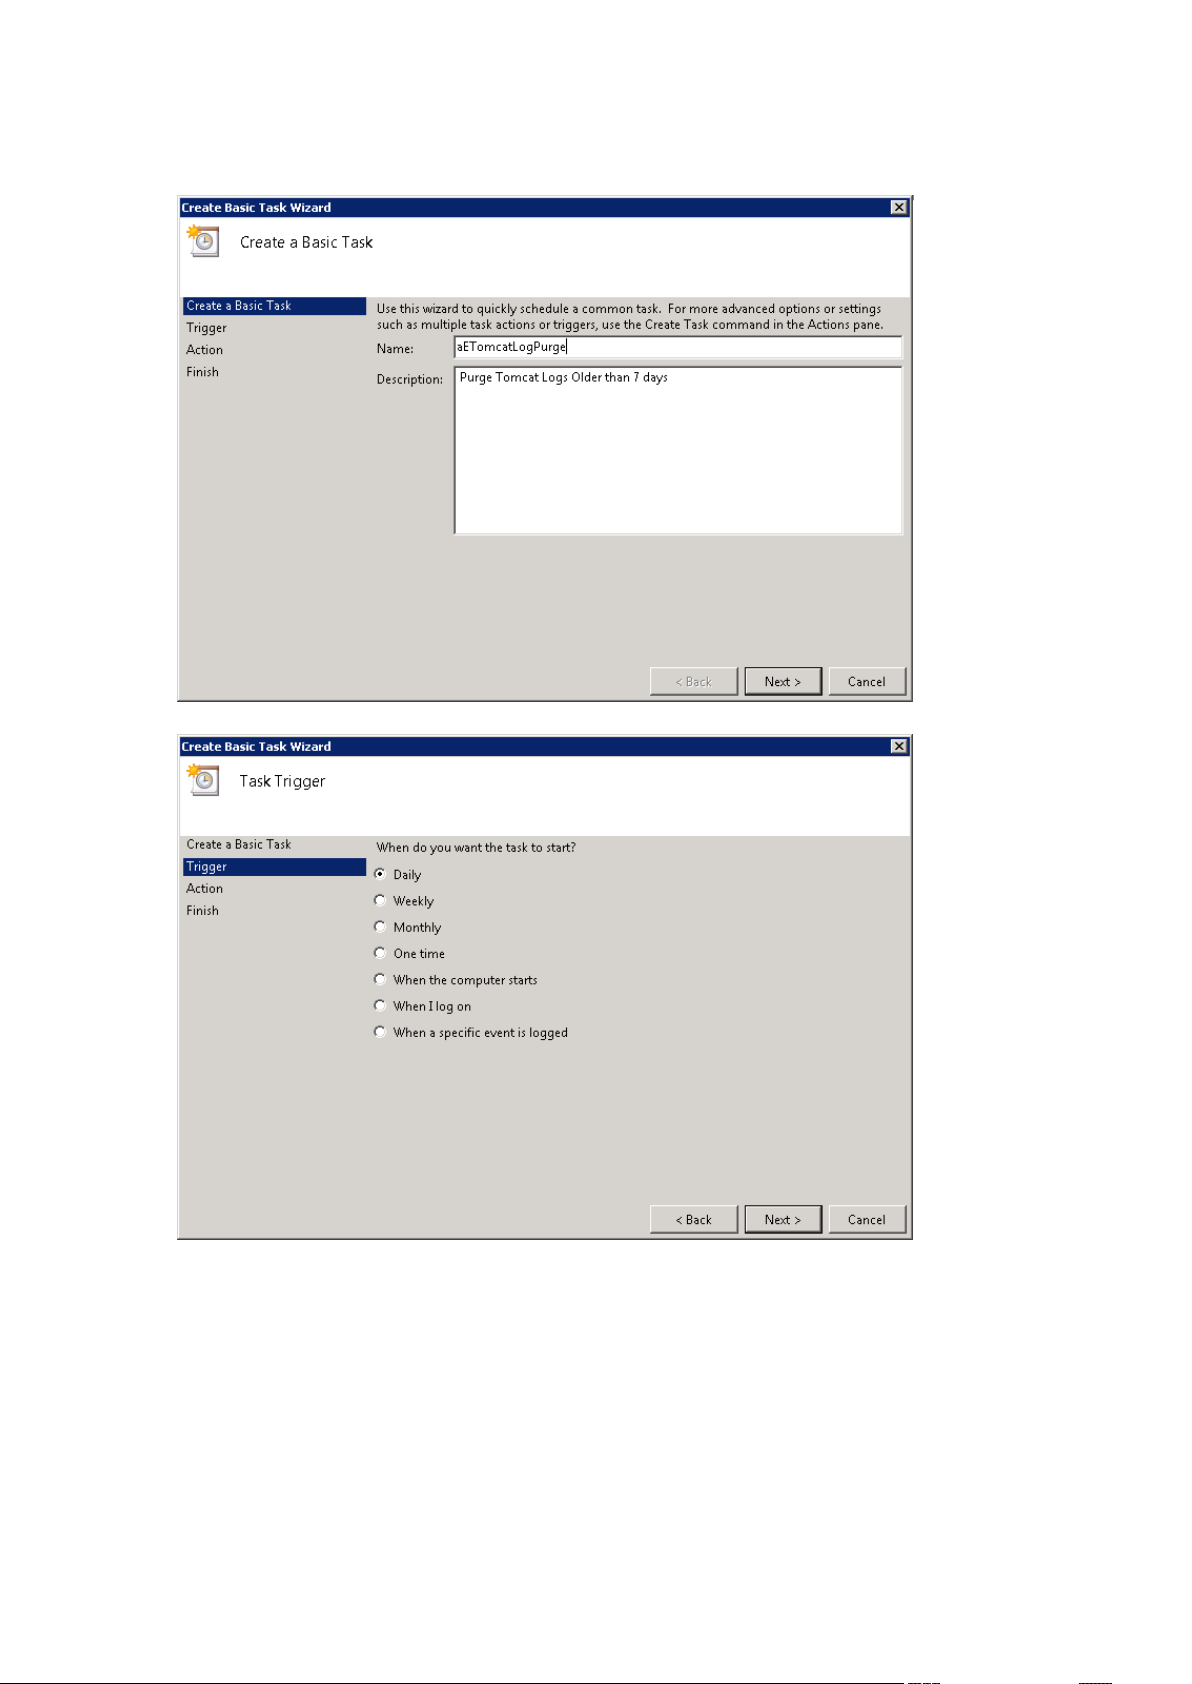
4. To automate the process, open Task Scheduler and create a new task. Define a name and a
description for the task.
5. Set the task to run daily.
25 Copyright © Acronis International GmbH, 2002-2014
Page 26

6. Define at what time the task should start. It is recommended to run this process when the
system is not under extreme load or other maintenance processes are running.
7. Set the action type to “Start a program”.
26 Copyright © Acronis International GmbH, 2002-2014
Page 27

8. Click the Browse button, locate and select the script (batch) file.
9. When done, click Finish.
10. In the tasks list you may want to right click on the task, select properties and verify the task will
run whether a user is logged on or not, for unattended operation.
11. You can verify the task is properly configured and running properly by selecting the task, right
clicking on it and selecting “Run”. The scheduler’s log should report start, stop and any errors.
2.4 Automated Database Backup
With the help of the Windows Task Scheduler, you can easily setup an automated backup schedule
for your Acronis Access database.
27 Copyright © Acronis International GmbH, 2002-2014
Page 28

Creating the database backup script
1. Open Notepad (or another text editor) and enter the following:
@echo off
for /f "tokens=1-4 delims=/ " %%i in ("%date%") do (
set dow=%%i
set month=%%j
set day=%%k
set year=%%l
)
set datestr=%month%_%day%_%year%
echo datestr is %datestr%
set BACKUP_FILE=AAS_%datestr%_DB_Backup.sql
echo backup file name is %BACKUP_FILE%
SET PGPASSWORD=password
echo on
bin\pg_dumpall -U postgres -f %BACKUP_FILE%
move "%BACKUP_FILE%" "C:\destination folder"
2. Replace "password" with the password for user postgres you have entered when you installed
Acronis Access.
3. Replace C:\destination folder with the path to the folder where you want to save your backups.
4. Save the file as DatabaseBackup.bat (the extension is important!) and select All Files for the file
type.
5. Move the file to the PostgreSQL installation folder in the version number directory (e.g. \9.3\).
Creating the scheduled task
1. Open the Control Panel and open Administrative Tools.
2. Open the Task Scheduler.
3. Click on Action and select Create Task.
On the General tab:
1. Enter a name and description for the task (e.g. AAS Database Backup).
2. Select Run whether user is logged in or not.
28 Copyright © Acronis International GmbH, 2002-2014
Page 29

On the Triggers tab:
1. Click New.
2. Select On a schedule for Begin the task.
3. Select daily and select the time when the script will be run and how often the script should be
rerun (how often you want to backup your database).
4. Select Enabled from the Advanced settings and press OK.
On the Actions tab:
1. Click New.
2. Select Start a program for Action.
3. For Program/Script press Browse, navigate to and select the DatabaseBackup.bat file.
4. For Start in (optional), enter the path to the folder in which the script resides. e.g. If the path to
the script is C:\Program Files (x86)\Acronis\Access\Common\PostgreSQL\9.3\PSQL.bat enter
C:\Program Files (x86)\Acronis\Access\Common\PostgreSQL\9.3\
5. Press OK.
Configure any additional settings on the other tabs and press OK.
You will be prompted for the credentials for the current account.
2.5 Increasing the Acronis Access Tomcat Java
Maximum Memory Pool
By default, the Acronis Access Tomcat's Java Maximum Memory Pool setting on a 64 bit operating
system is 4GBs. Depending on your deployment, you may need more.
Note: On a 32bit operating system, the maximum memory pool is 1GB.
To increase the maximum memory pool:
1. Click on the Start menu and navigate to All Programs -> Acronis Access.
29 Copyright © Acronis International GmbH, 2002-2014
Page 30

2. Click on the Acronis Access Tomcat Configuration tool shortcut.
3. Open the Java tab.
4. Change the Maximum memory pool to the desired size and press OK.
5. Restart the Acronis Access Tomcat service.
30 Copyright © Acronis International GmbH, 2002-2014
Page 31

3 Mobile Access
In this section
Concepts ................................................................................................... 31
Policies ..................................................................................................... 33
On-boarding Mobile Devices ................................................................... 43
Managing Your Gateway Server............................................................... 48
Managing Data Sources ........................................................................... 60
Settings ..................................................................................................... 66
This section of the web interface covers all the settings and configurations affecting mobile device
users.
3.1 Concepts
Access Mobile Clients connect directly to your server rather than utilizing a third-party service,
leaving you in control. Acronis Access server can be installed on existing file servers, allowing iPads,
iPhones and Android devices to access files located on that server. These are typically the same files
already available to PCs using Windows file sharing and Macs using ExtremeZ-IP File Server.
Clients access Acronis Access servers using their Active Directory user account. No additional
accounts need to be configured within Acronis Access. The Access Mobile Client also supports file
access using local computer accounts configured on the Windows server Acronis Access is running on,
in the event you need to give access to non-AD users. The client management features described
below require AD user accounts.
The deployment consists of a single Windows server running an installation of Acronis Access. This
includes the Acronis Access Server component installed and the Acronis Access Gateway Server
installed. This scenario allows devices running the Access Mobile Client application to connect to this
single file server, and allows for client management.
31 Copyright © Acronis International GmbH, 2002-2014
Page 32

If client management is not needed, Data Sources can be setup on the local Gateway Server and the
Access Mobile Clients will be able to access these Data Sources. Each user will be in control of his
own app settings.
Fig 1. Single Gateway server, many Access Mobile Clients
Note: Details on installing Acronis Access are included in the Installing (p. 5) section of this guide. The
configuration of Data Sources is explained in the Mobile Access (p. 31) section.
If you wish to remotely manage your Access Mobile Clients, Acronis Access allows you to use a group
policy. This policy can:
Configure general application settings
Assign servers, folders, and home directories to be displayed in the client app
Restrict what can be done with files
Restrict the other third party apps that Access Mobile Client files can be opened into
Set security requirements (server login frequency, application lock password, etc.)
Disable the ability to include Access Mobile Client files in iTunes backups
Remotely reset a user's application lock password
Perform a remote wipe of the Access Mobile Client app's local data and settings
And many additional configuration and security options
Only one Acronis Access Server is allowed.
A typical network employing client management includes one server with the Acronis Access Server
and Acronis Access Gateway Server components installed. In this scenario, all mobile clients are
managed by the Acronis Access Server, and will contact this server each time the Acronis Access
application is started, to check for any changed settings and to accept application lock password
resets and remote wipe commands if necessary.
32 Copyright © Acronis International GmbH, 2002-2014
Page 33

Acronis Access clients can be assigned a list of servers, specific folders within shared volumes, and
In this section
Group Policy ............................................................................................. 33
Default Access Restrictions ...................................................................... 43
home directories in their management policy. These resources will automatically appear in the
Acronis Access app and the client app will contact these servers directly as needed for file access.
Note: Details on enabling and configuring the client management are included in the Policies (p. 33) and
Managing Mobile Devices (p. 127) section of this guide.
3.2 Policies
3.2.1 Group Policy
Acronis Access uses a single Group Policy to manage all of your mobile users.
3.2.1.1 Exceptions for policy settings
Acronis Access does not support the Acronis Access for Good Dynamics and Acronis Access with
Mobile Iron AppConenct apps.
3.2.1.2 Modifying the Policy
Changes to the policy will be applied to the relevant Acronis Access client users the next time they
launch the app.
Connectivity requirements
Acronis Access clients must have network access to the Acronis Access server in order to receive profile updates,
remote password resets, and remote wipes. If your client is required to connect to a VPN before they can access
Acronis Access, they will also need to connect to the VPN before management commands will be accepted.
To modify the Group policy
1. Click on the default group.
2. Make any changes necessary on the Edit Group Policy page and press Save.
33 Copyright © Acronis International GmbH, 2002-2014
Page 34

3.2.1.3 Security Policy
App password creation - The Access Mobile Client application can be set with a lock password
that must be first entered when launching the application.
Optional - This setting will not force the user to configure an application lock password, but
they will be able to set one from the Settings menu within the app if they desire.
Disabled - This setting will disable the ability to configure an application lock password from
the Settings menu within the app. This might be useful in the case of shared mobile devices
34 Copyright © Acronis International GmbH, 2002-2014
Page 35

where you prefer that a user cannot set an app password and will lock other users out of the
Access Mobile Client.
Required - This setting will force the user to configure an application lock password if they do
not already have one. The optional application password complexity requirements and failed
password attempt wipe setting only apply when App password creation is set to Required.
App will lock - This setting configures the application password grace period. When a
user switches from the Access Mobile Client to another application on their device, if
they return to the Access Mobile Client before this grace period has elapsed, they will
not be required to enter their application lock password. To require that the password is
entered every time, choose Immediately upon exit. If you would like the user to be able
to modify their App will lock setting from within the Access Mobile Client settings, select
Allow user to change this setting.
Minimum password length - The minimum allowed length of the application lock
password.
Minimum number of complex characters - The minimum number of non-letter,
non-number characters required in the application lock password.
Require one or more letter characters - Ensures that there is at least one letter character
in the application password.
Mobile Client app will be wiped after X failed app password attempts - When this
option is enabled, the settings and data in the Access Mobile Client app will be wiped
after the specified number of consecutive failed app password attempts.
User can remove Mobile Client from management- Enable this setting if you would like your
Acronis Access users to be able to uninstall their management policy from within Acronis Access.
Doing so will return the application to full functionality and restore any configuration that was
changed by their policy.
Wipe all Acronis Access data on removal - When user removal of policies is enabled, this
option can be selected. If enabled, all data stored locally within the Access Mobile Client
application will be erased if it is removed from management, ensuring that corporate data
does not exist on a client not under management controls.
Allow iTunes to back up locally stored Acronis Access files - When this setting is disabled, the
Access Mobile Client will not allow iTunes to back up its files. This will ensure that no files within
Acronis Access' secure on-device storage are copied into iTunes backups.
35 Copyright © Acronis International GmbH, 2002-2014
Page 36

3.2.1.4 Application Policy
Require Confirmation When Deleting Files - When enabled, the user will be asked for
confirmation each time they delete a file. If you would like the user to be able to later modify this
setting, select Allow user to change this setting.
Set the Default File Action - This option determines what will happen when a user taps a file in
the Access Mobile Client application. If this is not set, the client application defaults to Action
Menu. If you would like the user to be able to later modify this setting, select Allow user to
change this setting.
Display Thumbnail Previews for Server-Side Files - When enabled, thumbnail previews will be
displayed instead of filetype icons when browsing Data Sources and Gateway Servers.
Thumbnail Cache Size: - Sets how much space will be reserved for thumbnails.
Only Download Thumbnail Previews on WiFi Networks - When enabled, thumbnails will be
available only if the user is connected to a WiFi network.
36 Copyright © Acronis International GmbH, 2002-2014
Page 37

Allow
These settings can be used to disable certain Access Mobile Client application features and
capabilities. All copy, create, move, rename, and delete settings apply to files or folders located on
Gateway servers. Files in the mobile client's local My Files folder are stored on the device and are not
affected. All other settings apply to any files in Acronis Access, both server-based and locally stored
on the client.
File Operations
File Copies / Creation - If this option is disabled, the user will not be able to save files from other
applications or from the iPad Photos library to a Gateway Server. They will also be unable to copy
37 Copyright © Acronis International GmbH, 2002-2014
Page 38

or create new files or folders on the Gateway Server server Gateway Server. This setting
supersedes any NTFS permissions that client may have that allow file creation.
File Deletes - If this option is disabled, the user will not be able to delete files from the Gateway
Server. This setting supersedes any NTFS permissions that client may have that allow file
deletion.
File Moves - If this option is disabled, the user will not be able to move files from one location to
another on the Gateway Server, or from the server to the Access Mobile Client application's local
My Files storage. This setting supersedes any NTFS permissions that client may have that allow
file or folder moves.
File Renames - If this option is disabled, the user will not be able to rename files from the
Gateway Server. This setting supersedes any NTFS permissions that client may have that allow
file renames.
Folder Operations
Folder Copies - If this option is disabled, the user will not be able to copy folders on or to the
Gateway Server. This setting supersedes any NTFS permissions that client may have that allow
folder creation. File copies / creation must be enabled for this setting to be enabled.
Folder Deletes - If this option is disabled, the user will not be able to delete folders from the
Gateway Server. This setting supersedes any NTFS permissions that client may have that allow
folder deletion.
Folder Moves - If this option is disabled, the user will not be able to move folders from one
location to another on the Gateway Server, or from the server to the Access Mobile Client
application's local My Files storage. This setting supersedes any NTFS permissions that client may
have that allow file or folder moves. Folder copies must be enabled for this setting to be
enabled.
Folder Renames - If this option is disabled, the user will not be able to rename or folders from
the Gateway Server. This setting supersedes any NTFS permissions that client may have that
allow folder renames.
Adding New Folders - If this option is disabled, the user will not be able to create new, empty
folders on the Gateway Server.
Bookmarking Folders - If this option is disabled, the user will not be able to bookmark on-device
or on-server Acronis Access folders for quick shortcut access.
Data Leakage Protection
Opening Acronis Access Files in Other Applications - If this option is disabled, the Access Mobile
Client application will omit the Open In button and not allow files in Acronis Access to be opened
in other applications. Opening a file in another application results in the file being copied to that
application's data storage area and outside of Acronis Access control.
38 Copyright © Acronis International GmbH, 2002-2014
Page 39

3.2.1.5 Sync Policy
Client is Prompted to Confirm Before Synced Files are Downloaded - Select the conditions under
which the user must confirm before files in synced folders are downloaded. Options are: Always,
While on cellular networks only, and Never. If Allow User to Change This Setting is enabled,
clients will be able to change the confirmation options.
Auto-Sync Interval - When this option is enabled, Acronis Access will automatically sync never,
on app launch only or on several time intervals.
Allow User to Change This Setting - When this option is enabled, the users will be able to
change the time interval from the Access Mobile Client app.
Only Allow File Syncing While Device is on WiFi Networks - When this option is enabled,
Acronis Access will not allow files to be synced over cellular connections. If Allow User to
Change This Setting is enabled, clients will be able to enable or disable automatic file syncing
while on WiFi networks.
39 Copyright © Acronis International GmbH, 2002-2014
Page 40

3.2.1.6 Home Folders
Display the user's home folder- This option causes a user's personal home directory to appear in
the Access Mobile Client app.
Display name shown on client - Sets the display name of the home folder item in the Access
Mobile Client app.
Active Directory assigned home folder - The home folder shown in the Access Mobile Client
app will connect the user to the server/folder path defined in their AD account profile. The
Home Folder will be accessible via the selected Gateway.
Custom home directory path - The home folder shown in the Access Mobile Client app will
connect the user to the server and path defined in this setting. The %USERNAME% wildcard
can be used to include the user's username in the home folder path. %USERNAME% must be
capitalized.
Sync – This option selects the type of sync of your Home Directory.
40 Copyright © Acronis International GmbH, 2002-2014
Page 41

3.2.1.7 Server Policy
Required login frequency for resources assigned by this policy- sets the frequency that a user
must log into the servers that are assigned to them by their policy.
Once only, then save for future sessions - The user enters their password when they are
initially enrolled in management. This password is then saved and used for any file server
connections they later initiate.
Once per session - After launching the Access Mobile Client, the user is required to enter
their password at the time they connect to the first server. Until they leave the Access
Mobile Client application, they can then connect to additional servers without having to
reenter their password. If they leave the Access Mobile Client for any period of time and then
return, they will be required to enter their password again to connect to the first server.
41 Copyright © Acronis International GmbH, 2002-2014
Page 42

For every connection - The user is required to enter their password each time they connect
to a server.
Allow user to add individual servers - If this option is enabled, users will be able to manually add
servers from within the Access Mobile Client application, as long as they have the server's DNS
name or IP address. If you want the user to only have their policy Assigned Servers available,
leave this option disabled.
Allow saved passwords for user configured servers - If a user is allowed to add individual
servers, this sub-option determines whether they are allowed to save their password for
those server.
Allow File Server, NAS and Sharepoint Access From the Web Client - When enabled, Web Client
users will be able to see and access mobile Data Sources as well.
Allow User to Add Network Folders by UNC path or URL - When enabled, the mobile client users
will be able to add and access network folders and SharePoint sites not assigned to them or not
accessible through the existing Data Sources. The selected Gateway Server must have access to
those SMB shares or SharePoint sites.
Block access to specific network paths - When enabled, allows the administrator to create
and use blacklists of network paths which the users shouldn't be allowed to self-provision.
Only allow this Mobile Client to connect to servers with third-party signed SSL certificates - If
this option is enabled, the Access Mobile Client will only be permitted to connect to servers with
third-party signed SSL certificates.
Note: If the management server does not have a third-party certificate, the client will be unable to reach
the management server after it's initial configuration. If you enable this option, ensure you have third-party
certificates on all your Gateway Servers.
Warn client when connecting to servers with untrusted SSL certificates - If your users are
routinely connecting to servers that will be using self-signed certificates, you may choose to
disable the client-side warning dialog message they will receive when connecting to these
servers.
Client timeout for unresponsive servers - This option sets the client login connection timeout for
unresponsive servers. If your clients are on especially slow data connections, or if they rely on a
VPN-on-demand solution to first establish a connection before a Gateway Server is reachable,
this timeout can be set to a value greater than the 30 second default. If you want the client to be
able to change this through the Access Mobile Client app, check Allow user to change this
setting.
42 Copyright © Acronis International GmbH, 2002-2014
Page 43

3.2.2 Default Access Restrictions
This section allows you to set whether mobile clients need to be enrolled with the management
server.
3.3 On-boarding Mobile Devices
To get started with the Acronis Access app, users need to install it through the Apple App Store (iOS)
or the Google Play Store (Android). Depending on your company's deployment of Acronis Access, the
users may also need to enroll the Access Mobile app on their device with the Acronis Access Server.
Once enrolled, their mobile client configuration, security settings, and capabilities are controlled by
their Acronis Access management policy.
The Acronis Access application settings and features controlled by the management policy include:
Requiring an application lock password
App password complexity requirements
Ability to remove the Acronis Access app from management
Allow Acronis Access on-device files to be included in iTunes backups
Allow opening Acronis Access app files in other applications
43 Copyright © Acronis International GmbH, 2002-2014
Page 44

Allow file and folder creation, renames and deletes
In this section
Server-side Management Enrollment Process ......................................... 44
User-side Management Enrollment Process ........................................... 45
Allow moving files
Require confirmation when deleting
Servers, folders, and home directories can be assigned so they automatically appear in the
Access Mobile Client app
Assigned folders can be configured to perform 1-way to 2-way syncing with the server
3.3.1 Server-side Management Enrollment Process
Inviting a user to enroll
Users are typically invited to enroll with the Acronis Access Server with an email that is sent from an
Acronis Access Administrator. If a user has multiple devices, they will need to be sent one invitation
email for each device that needs access.
This email includes a link to the Acronis Access app in the Apple App Store or Google Play Store, in
the case the app first needs to be installed. It also includes a second link that, when tapped while on
the device, will open Acronis Access and auto-complete the client enrollment form with the Acronis
Access Server's name and the user's username. By using this link, a user simply enters their account
password to complete client enrollment.
Using basic URL enrollment links:
You can give your users a standard URL that will automatically start the enrollment process when
tapped from the mobile device.
To determine the enrollment URL for your management server, open the Mobile Access tab and
open the Enroll Users tab. The URL is displayed on this page.
To generate a Acronis Access enrollment invitation:
1. Open the Mobile Access tab and open the Enroll Users tab
2. Press the Send Enrollment Invitation button.
3. Enter an Active Directory user name or group name and click Search. If a group is chosen, you can
press Add to show each email address in that group in the Users to invite list. This will allow you
44 Copyright © Acronis International GmbH, 2002-2014
Page 45

to batch invite all members in a group. You can optionally remove one or more of those group
members before sending the invitations. You can perform 'begins with' or 'contains' searches for
Active Directory groups. Begins with search will complete much faster than contains searches.
4. Once you've added your first user or group, you can issue a new search and continue to add
additional users or groups to the list.
5. Review the list of Users to invite. You can Delete any users you would like to remove them from
the list.
6. If a user does not have an email address associated with their account, you will see No email
address assigned - click here to edit in the Email Address column. You can click any of these
entries to manually enter an alternate email address for that user.
7. Choose the number of days you'd like the invitation to be valid for in the Number of days until
invitation expires field.
Note: Acronis Access licensing allows each licensed user to activate up to 3 devices, each additional device
beyond 3 is counted as a new user for licensing purposes.
8. Choose the version or versions of the Access Mobile Client that you would like your users to
download and install on their device. You may choose iOS, Android, or Both.
9. Press Send.
Note: If you get an error message when sending, confirm that the SMTP settings in the SMTP tab under
General Settings are correct. Also, if you're using Secure connection, verify that the certificate you are using
matches the host name of your SMTP server.
3.3.2 User-side Management Enrollment Process
Each user sent a management enrollment invitation will receive an email that contains:
A link to install the Access Mobile Client from the Apple App Store.
A link used to launch the Access Mobile Client app and automate the enrollment process.
Their management server address.
45 Copyright © Acronis International GmbH, 2002-2014
Page 46

The email guides them through the process of installing the Access Mobile Client and entering
their enrollment information.
If the Access Mobile Client app has already been installed, and the user taps the "Tap this link to
automatically begin enrollment..." option while viewing this email on their device, Acronis Access
will automatically launch and the enrollment form will be displayed. The user's server address and
username are also encoded in this URL, so these fields are auto-completed in the enrollment form. At
this point, the user simply has to enter their password to complete the enrollment process.
46 Copyright © Acronis International GmbH, 2002-2014
Page 47

The username and password required are the user's Active Directory username and password. These
credentials are used to match them to the group policy, to access the Gateway server and if the
policy allows it, the saving of their credentials for Acronis Access server logins.
If their management policy requires an application lock password, they will be prompted to enter
one. All password complexity requirements configured in their policy will be enforced for this initial
password, and for any change of their application lock password in the future.
To enroll in management
Enroll automatically via enrollment email
1. Open the email sent to you by your IT administrator and tap the click here to install the Acronis
Access link if you have not yet installed Acronis Access.
2. Once Acronis Access is installed, return to the invitation email on your device and tap Click this
link to automatically begin enrollment in step 2 of the email.
3. An enrollment form will be displayed. If you used the link in the invitation email to start the
enrollment process, your Server Address and Username will be automatically filled out.
4. Enter your password and tap Enroll Now to continue.
Note: The Username and Password are your standard company username and password. This is likely the
same as you use to log into your computer or to your email.
5. After completing the entire form, tap the Enroll button.
6. Depending on the configuration of your company's server, you may be warned that your
management server's security certificate is not trusted. To accept this warning and proceed, you
can click Proceed Always.
7. If a application lock password is required for your Access Mobile Client app, you will be asked to
set one. Password complexity requirements may apply and will be displayed if needed.
Manual enrollment
1. Open the Acronis Access app.
2. Open Settings.
3. Tap Enroll
4. Fill in your server's address, your username and password.
5. After completing the entire form, tap the Enroll button.
6. Depending on the configuration of your company's server, you may be warned that your
management server's security certificate is not trusted. To accept this warning and proceed, you
can click Proceed Always.
If a application lock password is required for your Access Mobile Client app, you will be asked to set
one. Password complexity requirements may apply and will be displayed if needed.
Ongoing Management Updates
After the initial management setup, Access Mobile Clients will attempt to contact the management
server each time the client app is started. Any settings changes, server or folder assignment changes,
application lock password resets, or remote wipes will be accepted by the client app at that time.
47 Copyright © Acronis International GmbH, 2002-2014
Page 48

Connectivity requirements
Acronis Access clients must have network access to the Acronis Access server in order to receive profile updates,
remote password resets, and remote wipes. If your client is required to connect to a VPN before they can access
Acronis Access, they will also need to connect to the VPN before management commands will be accepted.
Removing Management
There are two options to remove your Access Mobile Client from management:
Turn Off the Use Management option (if allowed by your policy)
Remove the Access Mobile Client application
Depending on your Acronis Access management policy settings, you may have the right to remove
the Access Mobile Client from management. This will likely result in you not being able to access
corporate files servers. If you are allowed to do so, follow these steps to unmanage your device:
To unmanage your device follow the steps below:
1. Tap the Settings menu.
2. Turn OFF the Use Management option.
3. Your profile may require that your Access Mobile Client data is wiped when removing the device
from management. You can cancel the process at this point if you don't want to be wiped.
4. Confirm removing Acronis Access from management by tapping YES in the confirmation window.
Note: If your Acronis Access management profile does not allow you to unmanage your client, the Use
Management option will not be displayed on the Settings menu. In this case the only way to remove the device
from management is by uninstalling the Access Mobile Client application. Uninstalling the application will erase
all existing Access Mobile Client data and settings and will return the user to default application settings after
reinstalling.
To uninstall the Access Mobile Client app, follow the steps below:
1. Hold your finger on the Access Mobile Client app icon until it starts shaking.
2. Tap the "X" button on the Access Mobile Client application and confirm the uninstall process.
3. To reinstall the Access Mobile Client app, visit http://www.grouplogic.com/web/meappstore
3.4 Managing Your Gateway Server
The Acronis Access Gateway Server is the server contacted by the Access Mobile Clients that handles
accessing and manipulating files and folders in file servers, SharePoint respositories, and/or Sync &
Share volumes. The Gateway Server is the "gateway" for mobile clients to their files.
The Acronis Access Server manages the Gateway Server from the same management console. The
Gateway Servers under management appear in the Gateway Servers section of the Mobile Access
menu.
Type - Shows the type of the gateway, at the moment it can only be of the Server type.
Name - Cosmetic name given to the gateway when you create it.
Address - DNS name or IP address of the gateway.
48 Copyright © Acronis International GmbH, 2002-2014
Page 49

Version - Shows the version of the Acronis Access Gateway Server.
Status - Shows whether the server is Online or Offline.
Active Sessions - Number of currently active sessions to this Gateway Server.
Licenses Used - Number of licenses used and the number of available licenses.
License - Shows the current type(s) of license(s) used by the Gateway Server.
Search
Index local data sources for filename search
By default, indexed searching is enabled on all Gateway Servers. You can disable or enable indexed
searching for each Gateway Server in the Gateway’s Edit Server dialog.
Default path
By default on a standalone server, Acronis Access stores index files in the Search Indexes directory in
the Acronis Access Gateway Server application folder. If you would like to locate the index files in a
different location, enter the path to a new folder.
Support content search using Microsoft Windows Search where available
Support for content search of shared is enabled by default, and can be enabled or disabled by
checking this option. You can enable or disable content searching for each Gateway Server in the Edit
Server dialog.
In addition to enabling this setting, content search requires that the Microsoft Windows Search
application be installed on the Acronis Access Gateway server and be configured to index any data
source where content search is enabled. Windows Search is built into Windows Vista and no
additional installation is required. It is also built into Windows Server 2008, but it is not enabled by
default. To enable it add the Role called File Services in the Server Manager, and have the Windows
Search Service enabled. Windows Search can be configured to index the necessary data sources by
right clicking the Windows Search icon in the Start bar and selecting Windows Search Options. You
can do Windows content searches on Windows reshares but the remote machine(s) must be in the
same domain as the Gateway Server.
49 Copyright © Acronis International GmbH, 2002-2014
Page 50

Note: The Data Source's volume path must be a hostname or a fully qualified name in order to use content
In this section
Server Details ........................................................................................... 50
Editing Gateway Servers .......................................................................... 53
search on Windows Reshares. IP addresses are not supported by Windows Search.
SharePoint
Entering these credentials is optional for general SharePoint support, but required to enumerate site
collections. For example, say you have two site collections: http://sharepoint.example.com and
http://sharepoint.example.com/SeparateCollection. Without entering credentials, if you create a
volume pointing to http://sharepoint.example.com, you will not see a folder called
SeparateCollection when enumerating the volume. The account needs to have Full Read access to
the web application.
3.4.1 Server Details
Opening the Details page of a Gateway Server gives you a lot of useful information about that
specific server and its users.
50 Copyright © Acronis International GmbH, 2002-2014
Page 51

Status
The Status section gives you information about the Gateway Server itself. Information like the
operating system, the type of the license, number of licenses used, version of the Gateway Server
and more.
51 Copyright © Acronis International GmbH, 2002-2014
Page 52

Active Users
Displays a table of all users currently active in this Gateway Server.
User - Shows the user's Active Directory (full) name.
Location - Shows the IP address of the device.
Device - Shows the name given to the device by the user.
Model - Shows the type/model of the device.
OS - Shows the operating system of the device.
Client Version - Shows the version of the Acronis Access app installed on the device.
Policy - Shows the policy for the account used by the device.
Idle Time - Shows the time the user has spent connected to the gateway.
52 Copyright © Acronis International GmbH, 2002-2014
Page 53

3.4.2 Editing Gateway Servers
General Settings
Display Name - Sets the display name of the Gateway Server.
Address for administration - Sets the address on which the Gateway Server is reachable by the
Acronis Access Server.
Address for client connections - Sets the address on which mobile clients will connect to the
Gateway Server.
53 Copyright © Acronis International GmbH, 2002-2014
Page 54

Logging
The Logging section allows you to control whether the logging events from this specific Gateway
Server will be shown in the Audit Log and allows you to enable Debug logging for this server.
To enable Audit Logging for a specific gateway server:
1. Open the web interface.
2. Log in as an administrator.
3. Open the Mobile Access tab.
4. Open the Gateway Servers tab.
5. Find the server for which you want to enable Audit Logging.
6. Press the Details button.
7. In the Logging section check Audit Logging.
8. Press the Save button.
To enable Debug Logging for a specific gateway server:
Note: The default location for the debug logs is: C:\Program Files (x86)\Acronis\Access\Gateway
Server\Logs\AcronisAccessGateway
1. Open the web interface.
2. Log in as an administrator.
3. Open the Mobile Access tab.
4. Open the Gateway Servers tab.
5. Find the server for which you want to enable Debug Logging.
6. Press the Details button.
54 Copyright © Acronis International GmbH, 2002-2014
Page 55

7. In the Logging section check Debug Logging.
8. Press the Save button.
Search
Index local data sources for filename search
By default, indexed searching is enabled on all Gateway Servers. You can disable or enable indexed
searching for each Gateway Server in the Gateway’s Edit Server dialog.
Default path
By default on a standalone server, Acronis Access stores index files in the Search Indexes directory in
the Acronis Access Gateway Server application folder. If you would like to locate the index files in a
different location, enter the path to a new folder.
Support content search using Microsoft Windows Search where available
Support for content search of shared is enabled by default, and can be enabled or disabled by
checking this option. You can enable or disable content searching for each Gateway Server in the Edit
Server dialog.
In addition to enabling this setting, content search requires that the Microsoft Windows Search
application be installed on the Acronis Access Gateway server and be configured to index any data
source where content search is enabled. Windows Search is built into Windows Vista and no
additional installation is required. It is also built into Windows Server 2008, but it is not enabled by
default. To enable it add the Role called File Services in the Server Manager, and have the Windows
Search Service enabled. Windows Search can be configured to index the necessary data sources by
right clicking the Windows Search icon in the Start bar and selecting Windows Search Options. You
can do Windows content searches on Windows reshares but the remote machine(s) must be in the
same domain as the Gateway Server.
Note: The Data Source's volume path must be a hostname or a fully qualified name in order to use content
search on Windows Reshares. IP addresses are not supported by Windows Search.
55 Copyright © Acronis International GmbH, 2002-2014
Page 56

SharePoint
Entering these credentials is optional for general SharePoint support, but required to enumerate site
collections. For example, say you have two site collections: http://sharepoint.example.com and
http://sharepoint.example.com/SeparateCollection. Without entering credentials, if you create a
volume pointing to http://sharepoint.example.com, you will not see a folder called
SeparateCollection when enumerating the volume. The account needs to have Full Read access to
the web application.
To give your account Full Read permission, follow these steps (for SharePoint 2010):
1. Open the SharePoint Central Administration.
2. Click on Application Management.
56 Copyright © Acronis International GmbH, 2002-2014
Page 57

3. Under Web Applications click on Manage web applications.
4. Select your web application from the list and click on User Policy.
5. Select the checkbox of the user you want to give permissions to and click on Edit Permissions of
Selected Users. If the user is not in the list, you can add him by clicking on Add Users.
57 Copyright © Acronis International GmbH, 2002-2014
Page 58

6. From the Permission Policy Levels section, select the checkbox for Full Read - Has Full read-only
access.
7. Press the Save button.
58 Copyright © Acronis International GmbH, 2002-2014
Page 59

Advanced
Note: It is recommended that these settings only be changed at the request of a customer support
representative.
Hide inaccessible items - When enabled, files and folders for which the user does not have the
Read permission will not be shown.
Hide inaccessible items on reshares - When enabled, files and folders located on a network
reshare for which the user does not have the Read permission will not be shown.
Note: Enabling this feature can have a significant negative impact while browsing folders.
Hide inaccessible SharePoint sites - When enabled, SharePoint sites for which the user does not
have the necessary permissions will not be shown.
Minimum Android client version - When enabled, users connecting to this Gateway will be
required to have this or a later version of the Acronis Access Android client app.
59 Copyright © Acronis International GmbH, 2002-2014
Page 60

Minimum iOS client version - When enabled, users connecting to this Gateway will be required
to have this or a later version of the Acronis Access iOS client app..
Use Kerberos for SharePoint Authentication - If your SharePoint server requires Kerberos
authentication, you should enable this setting. You will also need to make an update to the
Active Directory computer object for the Windows server or servers that are running the
Gateway server software. The Acronis Access Windows server needs to be given permission to
present delegated credentials to your SharePoint server on behalf of you users. Enabling the
Acronis Access Windows server to perform Kerberos Delegation:
1. In Active Directory Users and Computers, locate the Windows server or servers that you
have the Gateway Server installed on. They are commonly in the Computers folder.
2. Open the Properties window for the Windows server and select the Delegation tab.
3. Select Trust this computer for delegation to specified services only
4. Select Use any authentication protocol, this is required for negotiation with the SharePoint
server.
5. You must now add any SharePoint servers that you would like your users to be able to access
using Acronis Access . If your SharePoint implementation consists of multiple load balanced
nodes, you will need to add each SharePoint/Windows node to this list of permitted
computers. Click Add... to search for these Windows computers in AD and add them. For
each, you will need to select the "http" service type only.
Note: Please allow 15 to 20 minutes for these change to propagate through AD and be applied before
testing client connectivity. They will not take effect immediately.
Allow connections to SharePoint servers using self-signed certificates - When enabled, allows
connections from this Gateway to SharePoint servers using self-signed certificates.
Allow connections to Acronis Access servers with self signed certificates - When enabled, allows
connections from this Gateway to Acronis Access servers using self-signed certificates.
Allow connections from Acronis Access servers with self signed certificates - When enabled,
allows connections to this Gateway from Acronis Access servers using self-signed certificates.
Show hidden SMB Shares - When enabled, shows hidden system SMB shares to the users.
Client session timeout in minutes - Sets the time before an inactive user is kicked out of the
Gateway Server.
Use user principal name (UPN) for authentication with SharePoint Servers - When enabled,
users will authenticate to SharePoint servers via their user principal name (e.g.
hristo@glilabs.com), otherwise they will authenticate with domain/username (e.g.
glilabs/hristo).
3.5 Managing Data Sources
You can share NTFS directories located on your Windows server or on a remote SMB/CIFS file share
for access by Acronis Access users. When Acronis Access mobile users connect, they see these Data
Sources as folders. You can create Data Sources that provide access to an Sync & Share server.
Note: With Acronis Access, you can have a total of 3 Data Sources located on remote locations. These locations
include SharePoint sites, SharePoint libraries and SMB/CIFS shares.
60 Copyright © Acronis International GmbH, 2002-2014
Page 61

In this section
Folders ...................................................................................................... 62
Access to SharePoint 2007, 2010, 2013, 365 content
Acronis Access can provide access to files residing in document libraries on SharePoint 2007, 2010,
2013 and 365 servers. An Acronis Access SharePoint data source can point to an entire SharePoint
server, a specific SharePoint site or subsite, or a specific document library. These files can be opened,
PDF annotated, edited, and synced, just like files that reside in traditional file server or NAS storage.
Acronis Access also supports Check Out and Check In of SharePoint files.
SharePoint authentication methods supported
Acronis Access supports SharePoint servers that allow client authentication using NTLMv1, NTLMv2,
Claims based and Kerberos. If your SharePoint server requires Kerberos authentication, you will need
to make an update to the Active Directory computer object for the Windows server or servers that
are running the Acronis Access server software. The Acronis Access Windows server needs to be
given permission to present delegated credentials to your SharePoint server on behalf of you users.
Claims based authentication involves authenticating with an authentication server, obtaining an
authentication token, and providing that token to the SharePoint server, rather than authenticating
with the SharePoint server directly. Acronis Access supports claims based authentication to Office
365 SharePoint sites. To authenticate, the gateway server first contacts Microsoft Online to
determine the location of the authentication server. This server may be hosted by Microsoft Online,
or may be within the corporate network (via Active Directory Federated Services). Once
authentication is complete and an binary security token is obtained, this token is sent to the
SharePoint server, which returns an authentication cookie. This cookie is then provided to
SharePoint in lieu of other user credentials.
Changing Permissions for Shared Files and Folders
Acronis Access uses the existing Windows user accounts and passwords. Because Acronis Access
enforces Windows NTFS permissions, you should normally use Windows’ built-in tools for adjusting
directory and file permissions. The standard Windows tools provide the most flexibility for setting up
your security policy.
Acronis Access Data Sources that reside on another SMB/CIFS file server are accessed using an
SMB/CIFS connection from the Gateway Server to the secondary server or NAS. In this case, access to
the secondary server is performed in the context of the user logged into the Access Mobile Client app.
In order for that user to have access to files on the secondary server, their account will need both
"Windows Share Permissions" and NTFS security permissions to access those files.
Permissions to files residing on SharePoint servers are regulated in accordance to the SharePoint
permissions configured on the SharePoint server. Users receive the same permissions through
Acronis Access as they receive when they access SharePoint document libraries using a web browser.
61 Copyright © Acronis International GmbH, 2002-2014
Page 62

3.5.1 Folders
In addition to Gateway Servers, Folders can also be assigned to Acronis Access user and group
policies, allowing them to automatically appear in a user's Acronis Access Mobile client application.
Folders can be configured to point to any Acronis Access Gateway Server, or even a subdirectory
within a shared volume. This allows you to give a user direct access to any folders that might be
important to them. By doing so, they don't have to navigate to the folder by knowing the exact
server, shared volume name, and path to the folder.
Folders can point to any type of content that Acronis Access is providing access to. They simply refer
to locations in Gateway Servers that have already been configured within the Acronis Access
management. This can be a local file share volume, a "network reshare" volume providing access to
files on another file server or NAS, a DFS share or a SharePoint volume.
Note: When creating a DFS Data Source you need to add the full path to the DFS like so:
\\company.com\namespace\share
Folders can optionally be configured to sync to the client device. The Access Mobile Client folder sync
options include:
None - The folder will appear as a network-based resource in the Acronis Access client app and
can be accessed and worked with just like a Gateway server.
1-Way - The folder will appear as a local folder in the Acronis Access client app. Its complete
contents will be synced from the server to the device and it will be kept up to date if files on the
server are added, modified, or deleted. This folder is intended to give local/offline access to a set
of server-based files and appears as read-only to the user.
2-Way - The folder will appear as a local folder in the Acronis Access client app. Its complete
contents will initially be synced from the server to the device. If files in this folder are added,
modified, or deleted, either on the device or on the server, these changes will be synced back to
the server or device.
SharePoint Sites and Libraries
You can give easy access to SharePoint sites and libraries to your Access Mobile Client users by
creating a Data Source. There are a couple of ways to create SharePoint Data Sources depending on
your SharePoint configuration:
Creating a Data Source for a whole SharePoint site or subsite
When creating a Data Source for a SharePoint site or subsite, you only need to fill in the URL field.
This should be address of your SharePoint site or subsite.
e.g. https://sharepoint.mycompany.com:43222
e.g. https://sharepoint.mycompany.com:43222/subsite name
Creating a Data Source for a SharePoint Library
When creating a Data Source for a SharePoint Library, you need to fill both the URL and Document
Library Name fields. In the URL field you enter the address of your SharePoint site or subsite and for
the Document Library Name field you enter the name of your Library.
e.g. URL: https://sharepoint.mycompany.com:43222
e.g. Document Library Name: My Library
62 Copyright © Acronis International GmbH, 2002-2014
Page 63

Creating a Data Source for a specific folder within a SharePoint Library
When creating a Data Source for a specific folder within a SharePoint Library, you will have to fill in
all fields. In the URL field you enter the address of your SharePoint site or subsite, for the Document
Library Name field you enter the name of your Library and for the Subpath field you enter the name
of the desired folder.
e.g. URL: https://sharepoint.mycompany.com:43222
e.g. Document Library Name: Marketing Library
e.g. Subpath: Sales Report
Note: When creating a Data Source pointing to a SharePoint resource using a Subpath, you cannot enable the
Show When Browsing Server option.
The Access Mobile Client supports NTLM, Kerberos Constrained Delegation, Claims based and
SharePoint 365 authentication. Depending on your SharePoint setup, you may need to make some
additional configurations to the Gateway Server used to connect to these Data Sources. For more
information visit the Editing Gateway Servers (p. 53) article.
63 Copyright © Acronis International GmbH, 2002-2014
Page 64

Creating a Data Source
64 Copyright © Acronis International GmbH, 2002-2014
Page 65

To create a Data source:
1. Open the Acronis Access Web Interface.
2. Open the Mobile Access tab.
3. Open the Data Sources tab.
4. Go to Folders.
5. Press the Add New Folder button.
6. Enter a display name for the folder.
7. Select the Gateway Server which will give access to this folder.
8. Select the location of the data. This can be on the actual Gateway Server, on another SMB server,
on a SharePoint Site or Library or on a Sync & Share server.
Note: When selecting Sync & Share, make sure to enter the full path to the server with the port number.
e.g.: https://mycompany.com:3000
9. Based on your choice of location, enter the path to that folder, server, site or library.
10. Select the Sync type of this folder.
11. Enable Show When Browsing Server if you want this Data Source to be visible when Acronis
Access mobile clients browse the Gateway Server.
12. Press the Save button.
Note: On a clean installation of Acronis Access, if you have enabled Sync & Share and you have a Gateway
Server present, you will have a Sync & Share Data Source created automatically. It points to the URL you set in
the Server section of the initial configuration. This folder allows your mobile users to access your Sync & Share
files and folders.
65 Copyright © Acronis International GmbH, 2002-2014
Page 66

4 Settings
Enrollment Settings
Mobile Client Enrollment Address - specifies the address which mobile clients should use when
enrolling in client management.
Note: It is highly recommended to use a DNS name for the mobile client enrollment address. After
successfully enrolling in management, the Acronis Access app stores the address of the mana gement server.
If that address is an IP address and it changes, the users cannot reach the server, the app cannot be
unmanaged and the users will have to delete the whole app and enroll in management again.
66 Copyright © Acronis International GmbH, 2002-2014
Page 67

5 Quick Start: Mobile Access
In this section
First Run ................................................................................................... 67
Configuring your Group Policy ................................................................. 72
Installing the Access Mobile Client application ....................................... 72
Enrolling in client management ............................................................... 72
This guide provides the essential steps for configuring your Group Policy, adding a Data Source and
installing the Access Mobile Client app. For more detailed instructions on configuring the Acronis
Access Gateway Server and the management components, see the Mobile Access (p. 31) section.
5.1 First Run
If you haven't done so already, install and configure Acronis Access. For more information on doing
so, check the Installing (p. 5) and Configuration Utility sections.
When you first open the web interface, you will have to set a password for the default administrator
account and after you log in, you will be greeted by the Setup Wizard.
Warning! Please do not forget your administrator password as the support department cannot recover this
password for you
Note: It may take 30-45 seconds until the application becomes available after starting it from the Configuration
Utility.
Once you have completed the above, you are ready to go through the Initial Configuration described
below.
General Settings
1. Enter a Server Name.
67 Copyright © Acronis International GmbH, 2002-2014
Page 68

2. Specify the root DNS name or IP address where users can access the website (starting with
http:// or https://).
3. Specify the DNS name or IP address to which the mobile users will enroll to.
4. Select the default language for the Audit Log. The current options are English, German, French
and Japanese.
5. Press Save.
SMTP
Note: You can skip this section, and configure SMTP later.
1. Enter the DNS name or IP address of your SMTP server
2. Enter the SMTP port of your server.
3. If you do not use certificates for your SMTP server, unmark Use secure connection?.
4. Enter the name which will appear in the "From" line in emails sent by the server.
5. Enter the address which will send the emails sent by the server.
6. If you use username/password authentication for your SMTP server, mark Use SMTP
authentication? and enter your credentials.
7. Press Send Test Email to send a test email to the email address you set on step 5.
8. Press Save.
68 Copyright © Acronis International GmbH, 2002-2014
Page 69

LDAP
69 Copyright © Acronis International GmbH, 2002-2014
Page 70

70 Copyright © Acronis International GmbH, 2002-2014
Page 71

Note: You can skip this section, and configure LDAP later.
1. Mark Enable LDAP.
2. Enter the DNS name or IP address of your LDAP server.
3. Enter the port of your LDAP server.
4. If you use a certificate for connections with your LDAP server, mark Use Secure LDAP
Connection.
5. Enter your LDAP credentials, with the domain. (e.g. acronis\hristo).
6. Enter your LDAP search base.
7. Enter the desired domain(s) for LDAP authentication. (i.e.to enable LDAP authentication for an
account with the email joe@glilabs.com, you would enter glilabs.com)
8. Press Save.
71 Copyright © Acronis International GmbH, 2002-2014
Page 72

6 Configuring your Group Policy
With the Group Policy, you can administer what your users can do with files and what they have
access to.
Configuring your Group Policy:
1. Open the Policies tab.
2. Click on the Default policy.
3. Make the necessary configurations in each of the tabs (Security (p. 34), Application (p. 36), Sync
(p. 39), Home Folders (p. 40) and Server (p. 41)) and press Save.
6.1 Installing the Access Mobile Client application
1. Browse to Acronis Access in the Apple App Store or Google Play store
From your iOS device, visit the Apple App Store and search for Acronis Access, or follow this
link: http://www.grouplogic.com/web/meappstore
From your Android device, visit the Google Play store and search for Acronis Access, or follow
this link: https://play.google.com/store/apps/details?id=com.grouplogic.mobilecho
2. Install the Acronis Access app and tap it to launch it.
3. At the Welcome screen, tap Continue.
Tap the “+” icon on iOS to add a server.
On Android, open the Settings menu and tap Add Server.
4. Enter the Server Name or IP address of the server you installed Acronis Access on. You can
optionally enter a Display Name for this server, which will appear in the server list.
5. Enter a Username that has access to the Gateway Server. Acronis Access uses standard NTFS
permissions to regulate access.
6. Toggle Save Password to ON if you would like to save your password, then enter and confirm
your password.
7. Tap Save to commit the server settings.
8. Tap the server listed in the left hand pane to connect and browse available volumes.
9. For full details on the Access Mobile Client application’s settings and features, visit the Mobile
Client page.
6.2 Enrolling in client management
After installing Acronis Access with Mobile Access enabled, you can use the Access Mobile Client in
two ways:
If your organization centrally manages the Access Mobile Client's access and settings, you will need
to request access to Acronis Access from your IT department. You will receive an enrollment email
once you have been granted access. The email includes the information and instructions you will
need to start using the Access Mobile Client.
72 Copyright © Acronis International GmbH, 2002-2014
Page 73

If your Acronis Access server allows access without your Access Mobile Client being centrally
managed, you can get started by simply entering your Acronis Access server's name along with your
username and password.
Each user sent a management enrollment invitation will receive an email that contains:
A link to install the Access Mobile Client from the Apple App Store.
A link used to launch the Access Mobile Client app and automate the enrollment process.
Their management server address.
73 Copyright © Acronis International GmbH, 2002-2014
Page 74

The email guides them through the process of installing the Access Mobile Client and entering
their enrollment information.
If the Access Mobile Client app has already been installed, and the user taps the "Tap this link to
automatically begin enrollment..." option while viewing this email on their device, Acronis Access
will automatically launch and the enrollment form will be displayed. The user's server address and
username are also encoded in this URL, so these fields are auto-completed in the enrollment form. At
this point, the user simply has to enter their password to complete the enrollment process.
74 Copyright © Acronis International GmbH, 2002-2014
Page 75

The username and password required are the user's Active Directory username and password. These
credentials are used to match them to the group policy, to access the Gateway server and if the
policy allows it, the saving of their credentials for Acronis Access server logins.
If their management policy requires an application lock password, they will be prompted to enter
one. All password complexity requirements configured in their policy will be enforced for this initial
password, and for any change of their application lock password in the future.
To enroll in management
Enroll automatically via enrollment email
1. Open the email sent to you by your IT administrator and tap the click here to install the Acronis
Access link if you have not yet installed Acronis Access.
2. Once Acronis Access is installed, return to the invitation email on your device and tap Click this
link to automatically begin enrollment in step 2 of the email.
3. An enrollment form will be displayed. If you used the link in the invitation email to start the
enrollment process, your Server Address and Username will be automatically filled out.
4. Enter your password and tap Enroll Now to continue.
Note: The Username and Password are your standard company username and password. This is likely the
same as you use to log into your computer or to your email.
5. After completing the entire form, tap the Enroll button.
6. Depending on the configuration of your company's server, you may be warned that your
management server's security certificate is not trusted. To accept this warning and proceed, you
can click Proceed Always.
7. If a application lock password is required for your Access Mobile Client app, you will be asked to
set one. Password complexity requirements may apply and will be displayed if needed.
Manual enrollment
1. Open the Acronis Access app.
2. Open Settings.
3. Tap Enroll
4. Fill in your server's address, your username and password.
5. After completing the entire form, tap the Enroll button.
6. Depending on the configuration of your company's server, you may be warned that your
management server's security certificate is not trusted. To accept this warning and proceed, you
can click Proceed Always.
If a application lock password is required for your Access Mobile Client app, you will be asked to set
one. Password complexity requirements may apply and will be displayed if needed.
Ongoing Management Updates
After the initial management setup, Access Mobile Clients will attempt to contact the management
server each time the client app is started. Any settings changes, server or folder assignment changes,
application lock password resets, or remote wipes will be accepted by the client app at that time.
75 Copyright © Acronis International GmbH, 2002-2014
Page 76

Connectivity requirements
Acronis Access clients must have network access to the Acronis Access server in order to receive profile updates,
remote password resets, and remote wipes. If your client is required to connect to a VPN before they can access
Acronis Access, they will also need to connect to the VPN before management commands will be accepted.
Removing Management
There are two options to remove your Access Mobile Client from management:
Turn Off the Use Management option (if allowed by your policy)
Remove the Access Mobile Client application
Depending on your Acronis Access management policy settings, you may have the right to remove
the Access Mobile Client from management. This will likely result in you not being able to access
corporate files servers. If you are allowed to do so, follow these steps to unmanage your device:
To unmanage your device follow the steps below:
1. Tap the Settings menu.
2. Turn OFF the Use Management option.
3. Your profile may require that your Access Mobile Client data is wiped when removing the device
from management. You can cancel the process at this point if you don't want to be wiped.
4. Confirm removing Acronis Access from management by tapping YES in the confirmation window.
Note: If your Acronis Access management profile does not allow you to unmanage your client, the Use
Management option will not be displayed on the Settings menu. In this case the only way to remove the device
from management is by uninstalling the Access Mobile Client application. Uninstalling the application will erase
all existing Access Mobile Client data and settings and will return the user to default application settings after
reinstalling.
To uninstall the Access Mobile Client app, follow the steps below:
1. Hold your finger on the Access Mobile Client app icon until it starts shaking.
2. Tap the "X" button on the Access Mobile Client application and confirm the uninstall process.
To reinstall the Access Mobile Client app, visit http://www.grouplogic.com/web/meappstore
76 Copyright © Acronis International GmbH, 2002-2014
Page 77

7 Quick Start: Sync & Share
In this section
First Run ................................................................................................... 77
Web Client ................................................................................................ 82
Using the desktop client .......................................................................... 89
This guide provides the essential steps for setting up Sync & Share, using the web interface to access
files and using the Acronis Access desktop client. For more detailed instructions on configuring these
components, see the Sync & Share and Desktop Client sections.
7.1 First Run
If you haven't done so already, install and configure Acronis Access. For more information on doing
so, check the Installing (p. 5) and Configuration Utility sections.
When you first open the web interface, you will have to set a password for the default administrator
account and after you log in, you will be greeted by the Setup Wizard.
Warning! Please do not forget your administrator password as the support department cannot recover this
password for you
Note: It may take 30-45 seconds until the application becomes available after starting it from the Configuration
Utility.
Once you have completed the above, you are ready to go through the Initial Configuration described
below.
General Settings
1. Enter a Server Name.
77 Copyright © Acronis International GmbH, 2002-2014
Page 78

2. Specify the root DNS name or IP address where users can access the website (starting with
http:// or https://).
3. Specify the DNS name or IP address to which the mobile users will enroll to.
4. Select the default language for the Audit Log. The current options are English, German, French
and Japanese.
5. Press Save.
SMTP
Note: You can skip this section, and configure SMTP later.
1. Enter the DNS name or IP address of your SMTP server
2. Enter the SMTP port of your server.
3. If you do not use certificates for your SMTP server, unmark Use secure connection?.
4. Enter the name which will appear in the "From" line in emails sent by the server.
5. Enter the address which will send the emails sent by the server.
6. If you use username/password authentication for your SMTP server, mark Use SMTP
authentication? and enter your credentials.
7. Press Send Test Email to send a test email to the email address you set on step 5.
8. Press Save.
78 Copyright © Acronis International GmbH, 2002-2014
Page 79

LDAP
79 Copyright © Acronis International GmbH, 2002-2014
Page 80

80 Copyright © Acronis International GmbH, 2002-2014
Page 81

Note: You can skip this section, and configure LDAP later.
1. Mark Enable LDAP.
2. Enter the DNS name or IP address of your LDAP server.
3. Enter the port of your LDAP server.
4. If you use a certificate for connections with your LDAP server, mark Use Secure LDAP
Connection.
5. Enter your LDAP credentials, with the domain. (e.g. acronis\hristo).
6. Enter your LDAP search base.
7. Enter the desired domain(s) for LDAP authentication. (i.e.to enable LDAP authentication for an
account with the email joe@glilabs.com, you would enter glilabs.com)
8. Press Save.
81 Copyright © Acronis International GmbH, 2002-2014
Page 82

8 Web Client
1. Launch you web browser and navigate to: https://myserver https://myserver, where myserver is
the URL or IP address of the computer running the Acronis Access server.
2. Login with your credentials.
a. If you have just installed the Acronis Access server, login as administrator with the password
you set after the installation process. If this is the first time you open the web interface, you
will be asked to set the password now.
b. If you received an email inviting you to Acronis Access you may need to set your own
personal password at this point or log in using your Active Directory credentials.
c. If your Acronis Access server has been configured to use Active Directory for authentication
and user account provisioning you should be able to login using valid network credentials.
Note: If you are logged in as the default administrator, you won't have access to the Web Client. You must use
an account different from the default administrator.
Creating a folder
1. Click the Create Folder button and enter a name for the new folder. In this example we will use
Marketing Project.
82 Copyright © Acronis International GmbH, 2002-2014
Page 83

2. Press the Save button.
Uploading files
1. Navigate into the new folder by clicking its name.
2. Click the Upload Files button, click the Add Files... button and select a file or files from your
computer.
3. The file(s) will be uploaded to the folder you are in. Press Done.
83 Copyright © Acronis International GmbH, 2002-2014
Page 84

Another way of uploading files is simply dragging and dropping them to the web page:
84 Copyright © Acronis International GmbH, 2002-2014
Page 85

Clicking on a file or folder shows the available actions in the right sidebar.
Downloading a file
If you want to download a file, simply click on its name. You can also click on the row to the right of
the file or folder name and press Download from the sidebar.
Note: When using Internet Explorer you have to make sure that Do not save encrypted pages to disk is
unchecked in order to be able to download files. This setting is found under Internet Options -> Advanced ->
Security.
Copying a file or folder
If you want to copy a file or folder, do the following:
1. Click on the row to the right of the file or folder name and select Copy.
2. In the new lightbox, navigate to the folder where you want to paste the file and press Copy.
Moving a file or folder
1. Click on the row to the right of the file or folder name and select Move.
2. In the new lightbox, navigate to the folder where you want to move the file and press Move.
85 Copyright © Acronis International GmbH, 2002-2014
Page 86
Sharing a Folder
Note: If you want to share a file or folder that was shared with you by another user, you need to have the
permissions to invite other users to that share. If you do not have the permissions to invite other users, you will
not be able to share the files and folders with another user. The option Sharing in the right sidebar will not be
visible as well.
To share a folder with a colleague or business partner, do the following:
1. Click on Sync&Share.
2. Click on the folder you want to share and select Sharing from the sidebar.
86 Copyright © Acronis International GmbH, 2002-2014
Page 87

3. In the Sharing lightbox, enter an email address and an appropriate text message. An email
containing your information and access instructions will be generated and sent to the recipient.
Note: If the Allow editing and deletion check box is disabled, invited users can only download and read
documents included in the shared folder.
Sharing a single file
Note: If you want to share a file or folder that was shared with you by another user, you need to have the
permissions to invite other users to that share. If you do not have the permissions to invite other users, you will
not be able to share the files and folders with another user. The option Sharing in the right sidebar will not be
visible as well.
1. Open the Acronis Access Web Interface.
2. If you've logged in with an administrator account, press Leave Administration in the upper right
corner.
3. Locate the desired file and click on the row next to its name.
a) Sending a link via email
a. Select Send Link from the sidebar.
b. Enter the desired expiration time and language for the invitation.
c. Enter the email address(es) of the user(s) you want to receive the download link.
d. Press Send.
b) Sending a link via other methods
a. Select Get Link from the sidebar.
b. Enter the desired expiration time and language for the invitation.
87 Copyright © Acronis International GmbH, 2002-2014
Page 88

c. Press Copy Link.
d. Share the link via whatever method you prefer.
Subscribing to email notifications
You can subscribe to email notification alerts for folders shared with you.
1. To do so, simply enter the shared folder and click on Notifications in the sidebar.
2. Select the conditions you want to be notified for and press Save.
88 Copyright © Acronis International GmbH, 2002-2014
Page 89

You can look at the history of events by opening the Log tab. Search and filter options are available.
Event importance is marked with different colors.
8.1 Using the desktop client
First Steps
Note: If you haven't installed your Acronis Access Desktop Client yet, you can do so by following the Client
Installation and Configuration guide.
1. Open the folder you selected for syncing during the configuration process. This is just a normal
folder, so instead of calling it Sync Folder you should use more regular names. In this example we
named it My Projects.
2. Create a folder named Marketing Campaign inside My Projects.
3. Create a text document inside My Projects, fill it with text, and then save and close it.
89 Copyright © Acronis International GmbH, 2002-2014
Page 90

4. Create another folder inside My Projects with a name Collaterals.
5. Place some files into it by copying them from your computer.
6. Now it’s time to share a folder with a colleague. You can do this in two different ways: directly
from Windows Explorer or using your web browser. Follow step 7 to share content from your
desktop using Windows Explorer, or follow step 8 to share content using your preferred web
browser.
Note: You can also share just a single file as described at the bottom of this article.
7. If you want to do it right from your desktop, select the Marketing Campaign folder
90 Copyright © Acronis International GmbH, 2002-2014
Page 91

a. Right Click on it.
b. From the context menu, select Share with Acronis Access
c. This will launch a web browser and show you the invite dialog.
d. In the Invite others dialog enter an email address and an appropriate text message.
91 Copyright © Acronis International GmbH, 2002-2014
Page 92

If you prefer to use your web browser instead:
1. Open https://server.com/ https://server.com/, where server.com is the Acronis Access server
address, and log in using your username and password credentials.
2. Click on Sync&Share.
3. Click on the folder you want to share and select Sharing from the sidebar.
92 Copyright © Acronis International GmbH, 2002-2014
Page 93

4. In the Sharing lightbox, enter an email address and an appropriate text message. An email
containing your information and access instructions will be generated and sent to the recipient.
Note: If the Allow editing and deletion check box is disabled, invited users can only download and read
documents included in the shared folder.
Regardless of the method used to invite a person, the recipient will then receive one or two emails,
depending on whether he is an internal (Active Directory) or external user.
a. For an external user, the first email with subject You have been invited to Acronis Access.
contains a link to set a personalized password.
b. The second email with subject You have been given access to Marketing Campaign contains
your message and a link for accessing the shared files.
Once the invited user clicks on the link to access the system (and set his password if needed) you and
your colleague will share access over the files in the Marketing Campaign folder.
Make sure you tell your colleague about the Access Desktop Client, so you can synchronize files
automatically among your computers.
1. Note: The maximum path length is different between Mac OS X and Windows which can lead to
syncing errors in cross platform deployments. On Windows there is an OS limitation of 260
characters (MAX_PATH) total for the entire path, including the "C:\mysharefolder\" part. So
on Windows the max filename length will be 260 - [share folder path length] - 1 (for NULL
terminator).
e.g. The user is sharing C:\my_shared_documents and is trying to download a file into
C:\my_shared_documents\this_is_a_folder\ the max file name length of that subdirectory would
be 260 - 40 - 1 = 219 characters. The Mac OS X limit is 1024 characters.
93 Copyright © Acronis International GmbH, 2002-2014
Page 94

9 Server Administration
In this section
Administering a Server ............................................................................. 94
Administrators and Privileges .................................................................. 95
Audit Log .................................................................................................. 97
Server ....................................................................................................... 99
SMTP ...................................................................................................... 101
LDAP ....................................................................................................... 102
Email Templates ..................................................................................... 104
Licensing ................................................................................................. 106
Debug Logging ........................................................................................ 107
Monitoring ............................................................................................. 108
9.1 Administering a Server
If you are an administrator logging in to the web interface takes you directly to into Administration
mode. After you log in you can switch between Administration and User modes.
To switch between modes, do the following:
1. Open the web interface and log in as an administrator.
To exit administration, press the Leave Administration button at the top-right. This takes you to
the user side of the web interface.
To go back into administration, press the Administration button at the top-right. This will take
you back into administration mode.
Note: Administrators have access to the API documentation. You can find the link in the footer of the Access
web interface.
94 Copyright © Acronis International GmbH, 2002-2014
Page 95

9.2 Administrators and Privileges
Provisioned LDAP Administrator Groups
This section allows you to manage your administrative groups. Users in these groups will
automatically receive administrative privileges.
Using the Actions button you can delete or edit the group.
95 Copyright © Acronis International GmbH, 2002-2014
Page 96

To add a provisioned LDAP administrator group:
1. Press the Add Provisioned Group.
2. Mark if the group should have Sync & Share functionality.
3. Find the group.
4. Click on the group name.
5. Press Save.
Administrative Users
This section lists all your Users with administrative rights, their authentication type (Ad-Hoc or LDAP),
whether they have Sync & Share rights and their status (Disabled or Enabled).
You can invite a new user with full using the Add Administrator button. Using the Actions button you
can delete or edit the user. You can edit his administrative rights, status, email address and
password.
Inviting a single administrator
1. Open the Acronis Access Web Interface.
2. Log in with an administator account.
3. Expand the General Settings tab and open the Administrators page.
96 Copyright © Acronis International GmbH, 2002-2014
Page 97

4. Press the Add Administrator button under Administrative Users.
5. Select either the Active Directory/LDAP or Invite by Email tab depending on what type of user
you are inviting and what you want them to administer. LDAP users without emails cannot be
given Sync & Share functionality.
a) To invite via Active Directory/LDAP do the following:
1. Search for the user you want to add in the Active Directory and then click on their Common
Name to select a user.
Note: The LDAP User and Email fields will fill in automatically.
2. Enable/Disable the Sync & Share functionality.
3. Select which administrative rights the user should have.
4. Press Add.
b) To invite by Email do the following:
1. Enter the email address of the user you want to add as an administrator.
Note: Ad-hoc users invited by email will always have Sync & Share functionality.
2. Select whether this user should be licensed.
3. Select the language of the Invitation email.
4. Press Add.
To give a user administrative rights:
1. Open the Sync & Share tab
2. Open the Users tab
3. Press the Actions button for the User you want to edit.
4. Press Edit.
5. Mark all Full Administrative Rights?.
6. Press Save.
9.3 Audit Log
9.3.1 Log
Here you can see all of the recent events (depending on your purging policy, the time limit might be
different), the users from which the log originated and a message explaining the action.
Filter by User – filters the logs by User. You can select All, No user or choose one of the available
users.
Filter by Shared Projects – filters the logs by Shared Project. You can select All, Not shared or
choose one of the available Shared Projects.
Filter by Severity – filters the logs by type. The types are All, Info, Warning, Error and Fatal.
From/To – filter by date and time.
Search for Text – filter by log message contents.
97 Copyright © Acronis International GmbH, 2002-2014
Page 98

Timestamp – shows the date and time of the event.
Type – shows the level of severity of the event.
User – shows the user account responsible for the event.
Message – shows information on what happened.
If you have enabled Audit logging on a Gateway Server, you will also see the activity of your mobile
clients. If you have allowed Desktop and Web clients to access mobile Data Sources, they will also be
reflected in the log.
Device Name – name of the connected device.
Device IP – shows the IP address of the connected device.
Gateway Server – shows the name of the Gateway Server to which the device is connected.
Gateway Server Path – shows the path to the data source on that Gateway Server.
To enable Audit Logging for a specific gateway server:
1. Open the web interface.
2. Log in as an administrator.
3. Open the Mobile Access tab.
4. Open the Gateway Servers tab.
5. Find the server for which you want to enable Audit Logging.
6. Press the Details button.
7. In the Logging section check Audit Logging.
8. Press the Save button.
To enable Debug Logging for a specific gateway server:
Note: The default location for the debug logs is: C:\Program Files (x86)\Acronis\Access\Gateway
Server\Logs\AcronisAccessGateway
1. Open the web interface.
2. Log in as an administrator.
3. Open the Mobile Access tab.
4. Open the Gateway Servers tab.
5. Find the server for which you want to enable Debug Logging.
6. Press the Details button.
7. In the Logging section check Debug Logging.
8. Press the Save button.
9.3.2 Settings
Acronis Access can automatically purge old logs and export them to files based on certain policies.
98 Copyright © Acronis International GmbH, 2002-2014
Page 99

Automatically purge log entries more than X Y old - When enabled, logs older than a number of
days/weeks/months will be automatically purged.
Export log entries to file as X before purging - When enabled, exports a copy of the logs
before purging them in either CSV, TXT or XML.
Export file path - Sets the folder where the exported logs will go.
9.4 Server
Server Settings
Server Name – cosmetic server name used as the title of the web site as well as identifying this
server in admin notification email messages.
Web Address – specify the root DNS name or IP address where users can access the website
(starting with http:// or https://). Do not use 'localhost' here; this address will also be used in
email invitation links.
Audit Log Language – select the default language for the Audit Log. The current options are
English, German, French and Japanese. The default is English.
Session timeout in minutes – sets the length of the user session.
Enable Sync and Share Support - this checkbox enables/disables the Sync and Share features.
99 Copyright © Acronis International GmbH, 2002-2014
Page 100

Notification Settings
Email administrator a summary of errors? – If enabled, a summary of errors will be sent to
specified email addresses.
Email Addresses – one or more email addresses which will receive a summary of errors.
Notification Frequency – frequency for sending error summaries. Sends emails only if errors
are present.
100 Copyright © Acronis International GmbH, 2002-2014
 Loading...