


1282CLASSIC
Instruction manual
1282 CLASSIC
Safety Information
Important - Please read these instructions fully before installing
or operating
Power source
• Opening or removing covers may expose you to
dangerous voltages or other hazards.
• Use suitable power sources - Plug the product into a
suitable power source, as described in the operating
instructions or as marked on the product.
• The supply voltage should be the same as that
indicated in the technical specifications and the
appliance rating plate.
• Do not bend, stretch or pull the supply cable in order
to avoid electric shock.
• Do not allow the product to be submerged in
water. Do not expose headphone socket or battery
compartment to water, as water entering the set may
cause major damage.
Moisture and water
• Do not use this apparatus near water or moisture.
• Do not use this product near a bathtub, washbowl, kitchen
sink, and laundry tub, in a wet basement, near a swimming
pool, or anywhere else that water or moisture is present.
Heat sources and flames
• Batteries shall not be exposed to excessive heat such
as sun, fire or the like.
Servicing and repairs
• Refer all servicing to qualified service personnel
• Servicing is required when the apparatus has been
damaged in any way: such as liquid has been spilled or
objects have fallen into the apparatus; the apparatus
has been exposed to rain or moisture, does not operate
normally, or has been dropped.
Getting to know your portable
mp3 player
Please read these instructions carefully. They contain important
information which will help you get the best from your product
and ensure safe and correct installation and operation.
If you require any further assistance, our technical experts are
happy to help. For full details, refer to the product support
section at the end of these instructions.
Accessories
1. 1282 CLASSIC player
2. USB charging cable
3. Earphones (with 2 extra sleeves)
4. Instruction manual
Track1.FLAC
002 02:37
48KHz
1024KBPS 004 03:37
EQ
Functions and controls
1
2
3
4
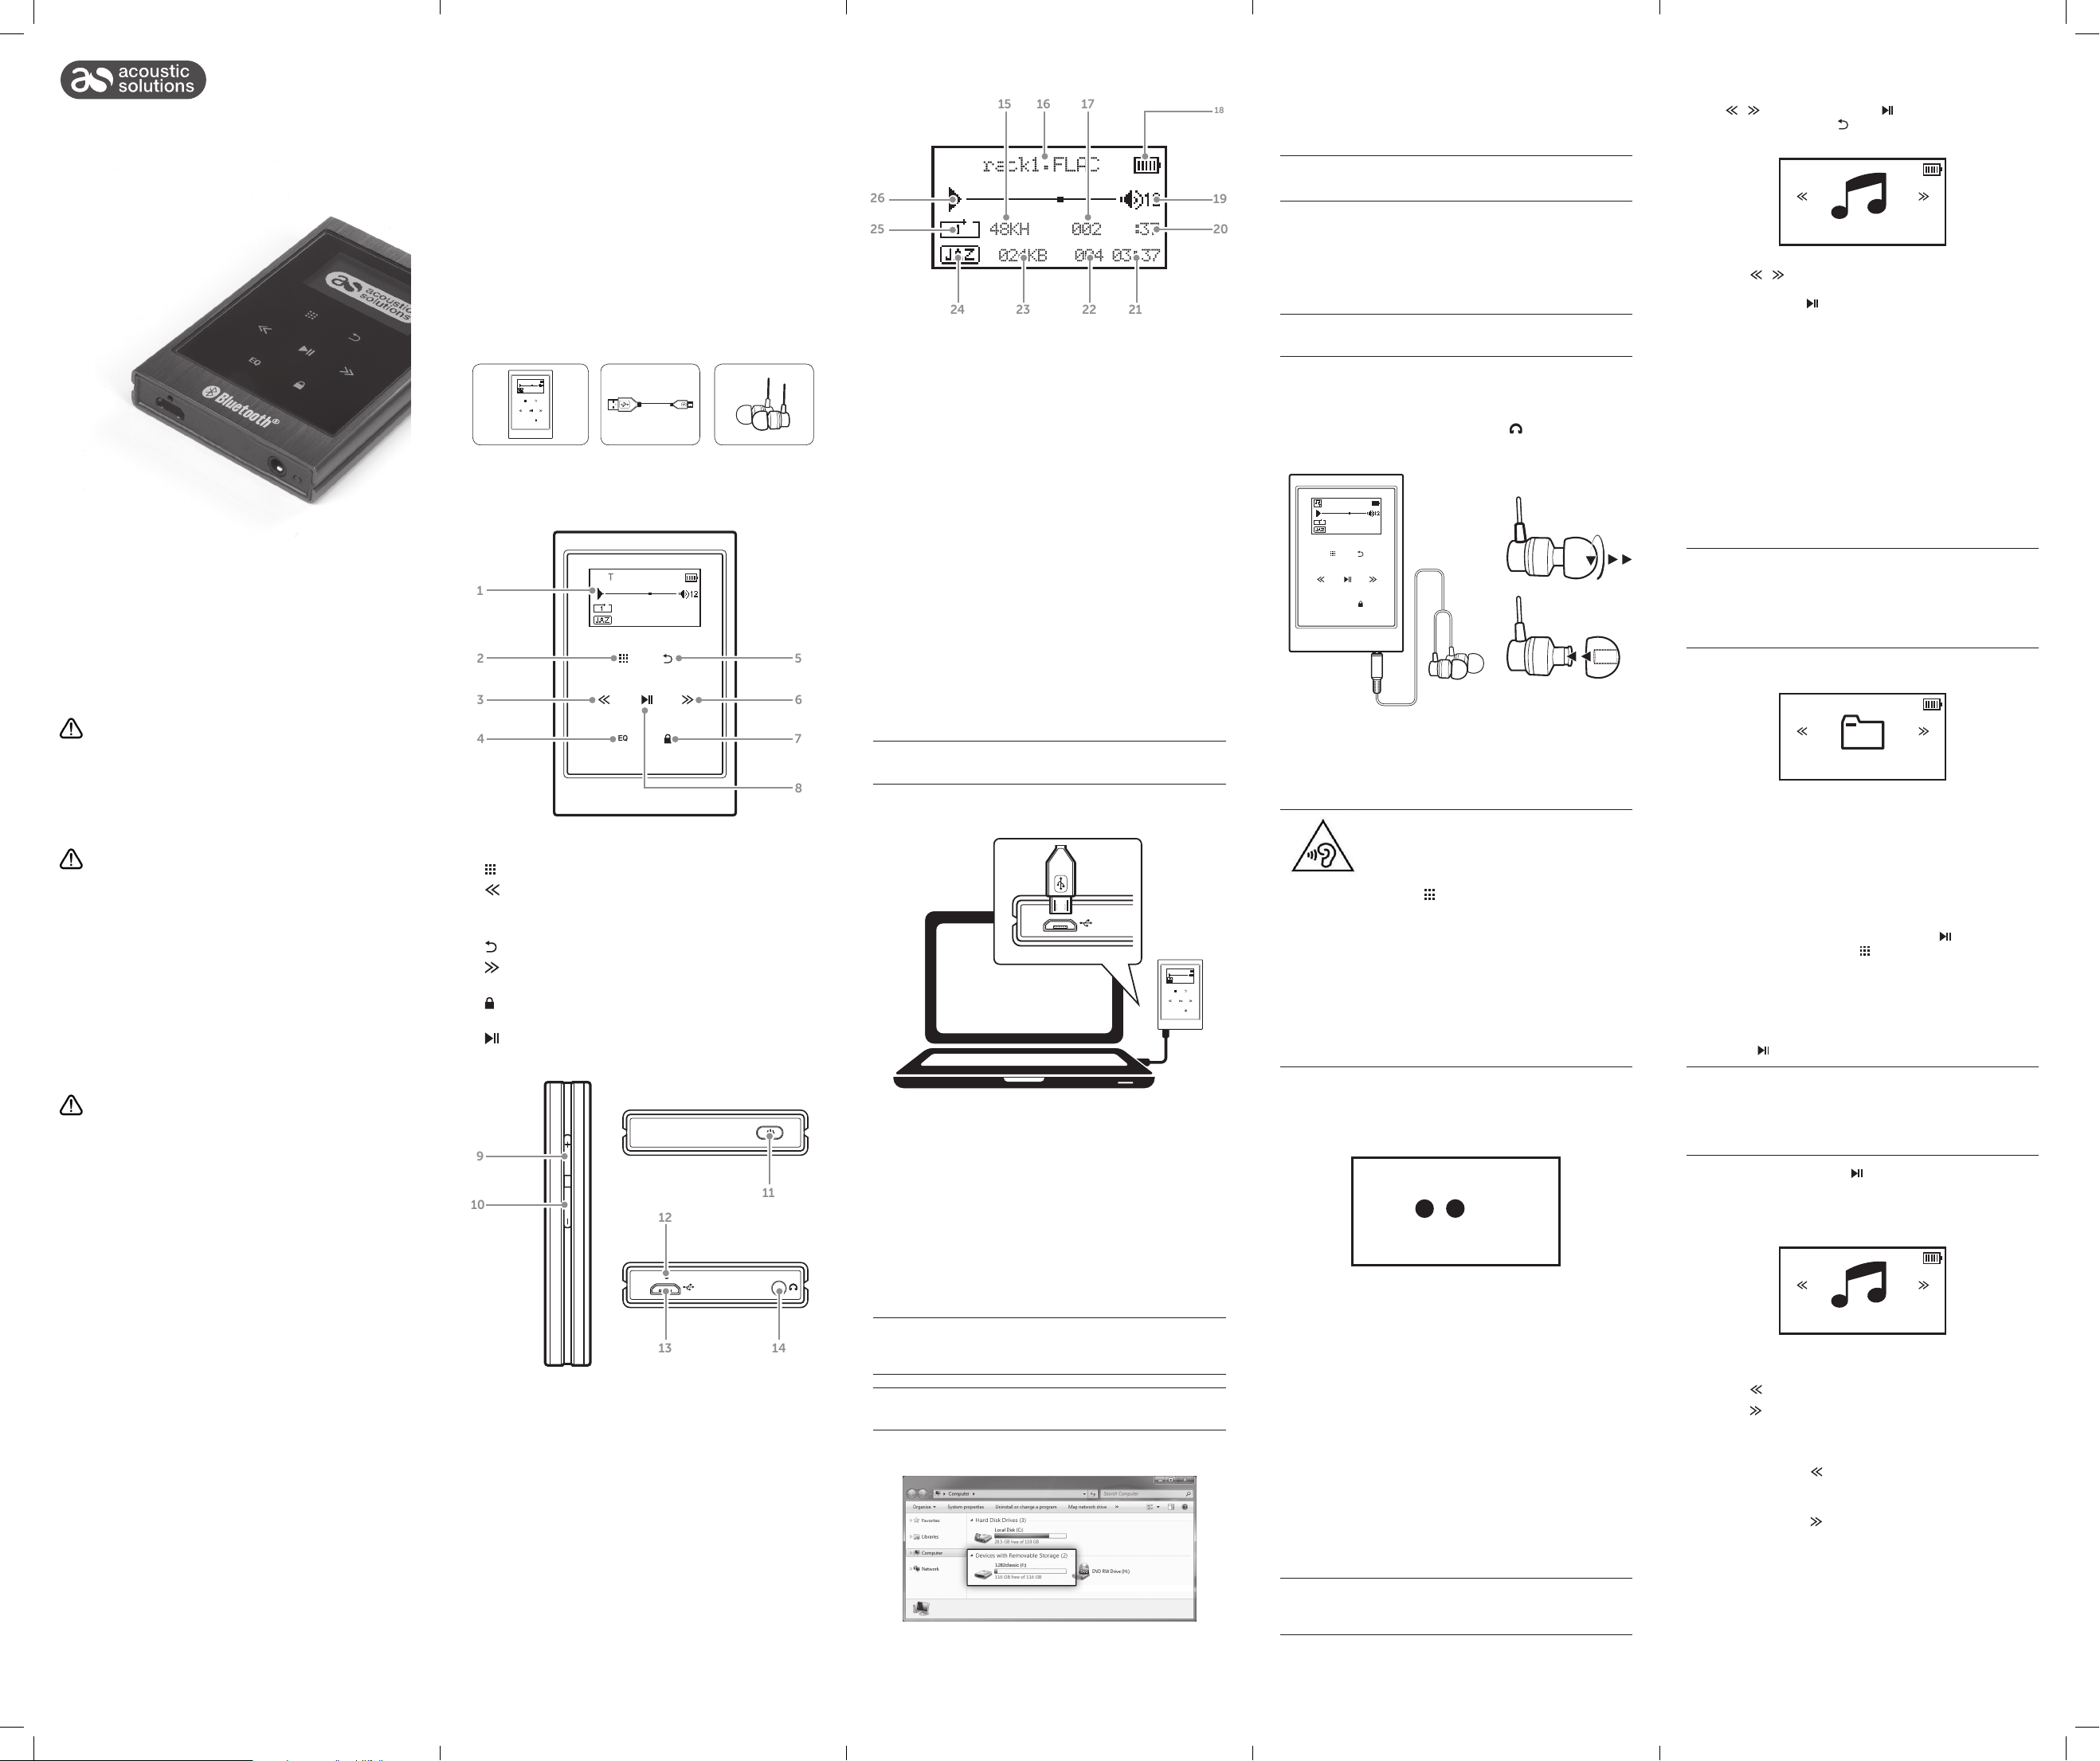
1. OLED display
2.
MENU: Press for function options
3.
SKIP BACKWARDS/SCROLL UP: Press to skip to a
previous track or to scroll upwards through menus.
4. EQ: Press to enter EQ selection menu.
BACK: Press to return to the previous screen.
5.
6.
SKIP FORWARDS/SCROLL DOWN: Press to skip to the
next track or to scroll downwards through menus.
7.
KEYPAY LOCK: Press to disable the keypad buttons being
pressed.
8.
PLAY/PAUSE/SELECT: Press for play and pause functions
and select.
9
10
Track1.FLAC
002 02:37
48KHz
1024KBPS 004 03:37
EQ
12
5
6
7
8
11
Functions and controls continued
1615 17
Track1.FLAC
26
25
48KHz
002 02:37
1024KBPS 004 03:37
22
24
23
15. FREQUENCY: Displays the frequency of each audio track.
16. TRACK NAME: Displays the track name from the ID3 tag.
17. TRACK NUMBER: Displays the track number.
18. BATTERY LEVEL: Displays the charge level of the internal
battery.
19. VOLUME LEVEL: Displays the volume level.
20. TIMECODE: Displays the timecode of the current track.
21. TRACK LENGTH: Displays the total length of the current
track.
22. TOTAL TRACKS IN FOLDER: Displays the total number of
tracks in the selected folder.
23. BIT RATE: Displays the bit rate of the current track.
24. EQ MODE: Displays the current EQ setting.
25. PLAY MODE: Displays the playback mode setting.
26. PLAY/PAUSE: Displays the PLAY or PAUSE icon depending
on the status.
21
Using your portable mp3 player
Getting started
Follow the below steps to charge the player.
The player requires charging fully before use to ensure
battery longevity.
1. Take the supplied USB cable and connect the MICRO USB
end into the charge socket on the bottom of the player.
Track1.FLAC
48KHz
002 02:37
1024KBPS 004 03:37
EQ
2. Connect the other end of the USB cable to a USB port on a
PC/ laptop and power up.
3. As the mp3 player receives power the loading screen will
be displayed and the battery charge icon will slowly fill to
indicate the charge level.
4. After power up the mp3 player will connect to the
PC/ laptop and a storage device will appear in the ‘My
Computer’ drive list named ‘1282classic’.
Transferring music to the mp3 player
18
19
20
Transferring music to the mp3 player continued
2. Double click ‘My Computer’ Or ‘Computer’ on some
operating systems. Look for ‘Removable disks or storage’
option and locate the device named ‘1282classic’ and
double click.
Do not disconnect the USB cable at any time when copying
data to or from the device.
3. Drag and drop media files into the removable device. You
can create additional folders using the operating system
installed on your PC/ laptop.
4. Close the removable device window and disconnect
the player from your pc/ laptop after data transfer has
completed.
If you are charging the mp3 player while transferring files
DO NOT disconnect the player until fully charged.
Connecting earphones
1. Insert the 3.5mm jack in to the earphone socket on the
bottom of the player marked with the symbol. (Fig 1)
2. Ensure the jack is pushed in far enough to click into place.
Track1.FLAC
002 02:37
48KHz
1024KBPS 004 03:37
EQ
Fig 2.
Fig 3.
Fig 1.
3. The earphones are supplied with small, medium and large
sound isolating sleeves. Twist and pull to remove from each
earphone. (Fig 2)
4. Push each sleeve onto the earphone as shown (Fig 3).
Ensure each sleeve is secure.
To prevent possible hearing damage, do not
listen at high volume levels for long periods.
When the volume is adjusted to 85dB the
above icon will appear on the display.
Press the ‘ ’ button to continue.
If you hear no sound during playback, do not turn the
volume up as the music may suddenly begin at a high
volume.
Excessive sound pressure from earphones and headphones
can cause hearing loss.
To avoid damaging your ears, adjust the volume to the
lowest safe level before playing, and turn up to the desired
level when playback has started.
Power On/ Off
1. Press and hold the POWER button on top of the player until
all three digits light up and the player powers off.
1 2 3
Navigating the music library continued
1. Navigate to the MUSIC option from the main menu using
the / buttons. Pressing the button will select a
highlighted option. The button will return to the previous
menu.
Music
2. Use the
/ buttons to navigate the library options from:All Songs, Artists, Albums, Genres, Playlists and Update
Playlists. Press the button to select.
• All Songs Displays all tracks in an alpha numeric
order.
• Artists Displays a list of folders named by Artist.
When selected each album is presented
as folders.
• Albums Displays all albums as folders in an alpha
numeric order.
• Genres Displays a list of genres generated from
the transferred files ID3 tags.
• Playlists Displays a list of playlists.
• Update playlists See ‘Update playlist’ section overleaf.
Artist, Album & Genre selection is intended for light users.
Tracks will be sorted and selections available up to a
maximum of 4000 in total.
Experienced users with larger music collections should use
the ‘File browser’ from the main menu.
File browser
Browser
As an alternative viewing option to the music library you can
browse files as they are stored on the internal memory. So files
in folders will be displayed in folders and files not in folders will
be displayed as such.
The operational functions are the same as the music library.
Playing music
1. After highlighting a song to play, press the button to
begin playback or press the button and select ‘Play’ from
the list.
2. After the song has played the next song in the alpha
numeric list will play automatically, unless there is only one
song found in the folder.
3. To play an album/ folder; select the first track in the list and
press the
The default play mode is REPEAT ALL. When all tracks in
an album/ folder have played, playback will repeat starting
from track 01.
See ‘Playback modes’ for more information.
4. During playback press the
track. Press again to resume.
5. To return to the currently playing track at any time select the
NOW PLAYING option from the main menu.
button.
button to pause the current
Getting started
You’ll soon be enjoying your new Portable mp3 jukebox.
It all begins here, with your instructions. Don’t worry, there’s
nothing too technical coming up. Just simple, step-by-step
guidance to get you up and running quickly. Sound good?
Then let’s get started.
Help and Guidance
We’re here to help you get the most from your Portable mp3
jukebox. Should you require any guidance, a simple solution
can often be found online at:
www.argos-support.co.uk
If you still require further assistance, call one of our experts on
0345 600 3021.
13
14
9. VOLUME +: Press to increase the volume output.
10. VOLUME -: Press to decrease the volume output.
11. POWER: Press to dim the display or press and hold to
power off the player.
12. RESET: Press to reset the player.
13. USB PORT: Used for charging and file transfer.
14. EARPHONE PORT: Connect earphones with 3.5mm jack.
Follow the below steps to copy audio tracks from your PC or
MAC to the internal memory of the mp3 player.
WARNING: Audio tracks with digital copy protection can
ONLY be played back by the hardware/software they where
purchased from and will not function on this device.
Audio tracks can be transferred during the charge process;
but could result in a slightly longer charge process.
1. Follow the steps in ‘Getting Started’ to connect to a PC/
laptop and load the internal storage device.
2. To power the player on press and hold the POWER button
for 2 seconds.
Backlight dim
1. Press the POWER button on top of the player when
powered on to dim the backlight.
2. Press once more to illuminate the backlight.
Using your portable mp3 player
Navigating the music library
Once the player is fully charged, and you have copied music
to the device follow the below instructions to begin browsing
your music.
After copying lots of files to the player, there may be a delay
after disconnecting from a PC/ laptop while the software
organises the files.
Now Playing
Skipping tracks
1. Use the button to skip to the previous track.
2. Use the
button to skip to the next track.
Fast searching tracks
1. Press and hold the button to fast rewind the current
playing track. Release the button to resume normal
playback.
2. Press and hold the
playing track. Release the button to resume normal
playback.
button to fast forward the current
 Loading...