

Acoustic Research AW-871 User Manual
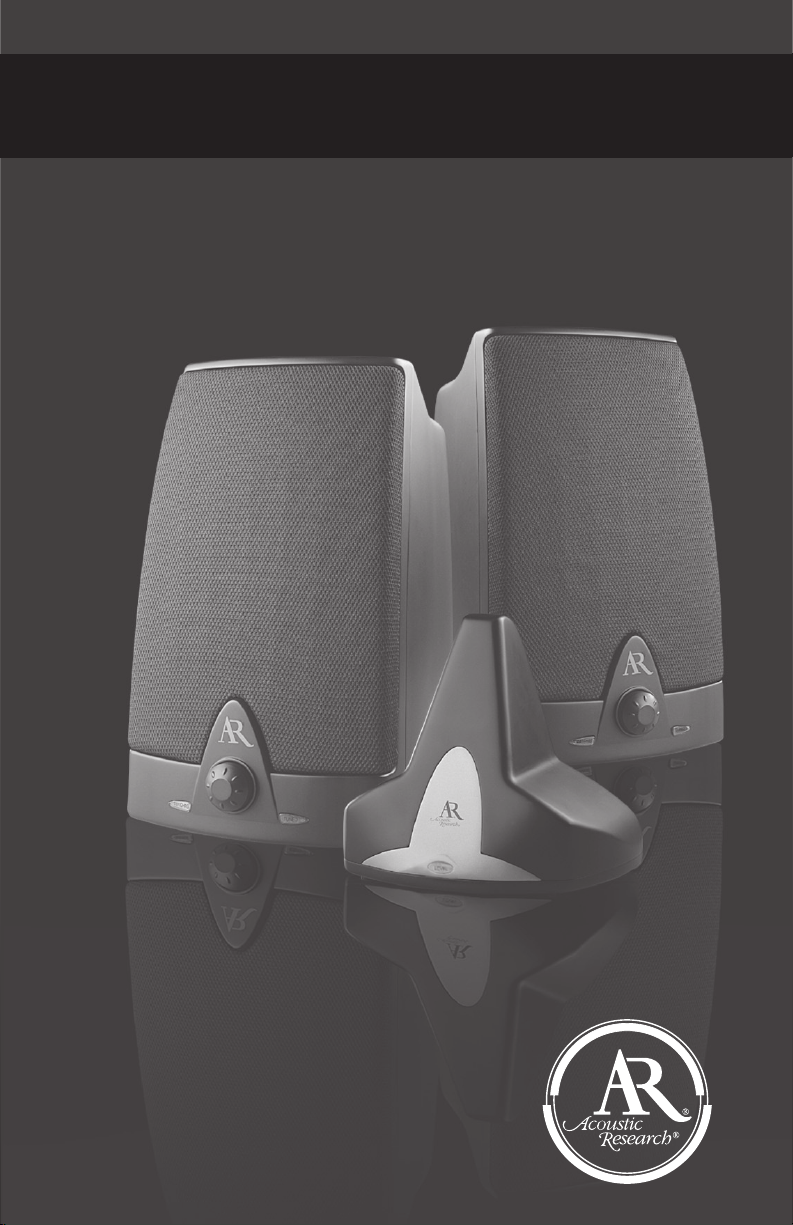
900MHz WIRELESS STEREO SPEAKERS
Model AW871
Installation
and Operation Manual

Table of Contents
I. Location of functions………..……………………………………………. 2
II. Connecting the speaker system………..……………………………….. 3
III. Adjusting the transmitter………..………………………………………. 5
IV. Tuning the speakers………..…………………………………………….. 6
V. Turning the speakers off………..………………………………………... 7
VI. Recharging the batteries………..……………………………………….. 7
VII. More helpful information ………..……………………………………… 7
VIII. Troubleshooting………..……………………………………………........ 9
IX. Specifications & Features ………..……………………………………… 10
X. Warranty ………..…………………………………………….................. 11
Introduction
AR Wireless Stereo Speakers eliminate the hardest part of adding
speakers to almost any location in your home – running and hiding
hundreds of feet of speaker wire. Like FM radio, the AR Wireless Speaker
System’s 900MHz signal travels with ease through walls, floors, ceilings
and other obstacles, delivering high-quality stereo sound virtually
anywhere inside the house or out. With drift- and static-free reception
along with outstanding range – up to 300 feet* – the possibilities for
enjoying your AR Wireless Speaker System are nearly unlimited.
AR Wireless Stereo Speakers are compatible with most audio sources,
such as TVs, DVD players, VCRs, A/V receivers/amps, stereos,
computers, and portable devices (CD players, cassette players, MP3,
players, etc.).
This manual covers various connection options and detailed operating
instructions for making AR Wireless Speakers a valued part of your
lifestyle. If, after having reviewed the instructions, you have any
questions, please contact our Customer Service Department at
1-800-732-6866.
*Range may vary according to environment.
1
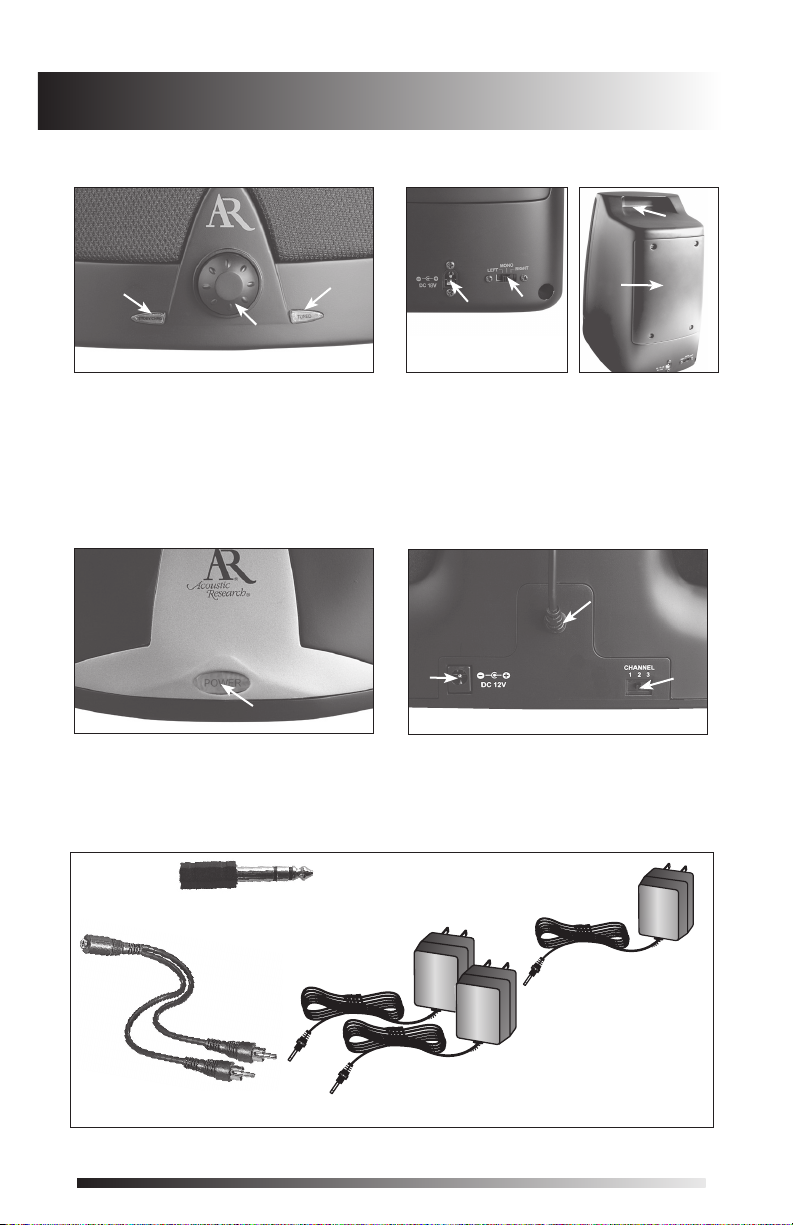
I. Location of Functions
Speaker Front View:
B
C
A. Tuning indicator light (tuned)
B. Standby/Charging indicator
light (stdby/chrg)
C. Power/volume/scan control
A
Transmitter Front View:
H
Speaker Back View:
F
E
D. Battery compartment cover
E. Speaker power input jack
F. Left/mono/right switch
G. Carrying handle
D
Transmitter Back View:
J
I
G
K
H. Power indicator light
Accessories:
1
O.
/
4” headphone adapter
N. “Y” adapter cable
I. Transmitter power input jack
J. Audio input cable
K. Channel select switch
IMPORTANT: These power units are
intended to be correctly inserted in a
vertical or floor mount position.
L. Transmitter AC
power adapter
- 12V DC
M. Speaker AC power
adapter (x2) - 18V DC
2
Audio Output
Audio Output
Sortie audio
AW811
Audio Output
Audio Output
Audio Output
Audio Output
Sortie audio
II. Connecting the Speaker System
Sortie audio
Audio Output
Audio Output
Audio Output
Sortie audio
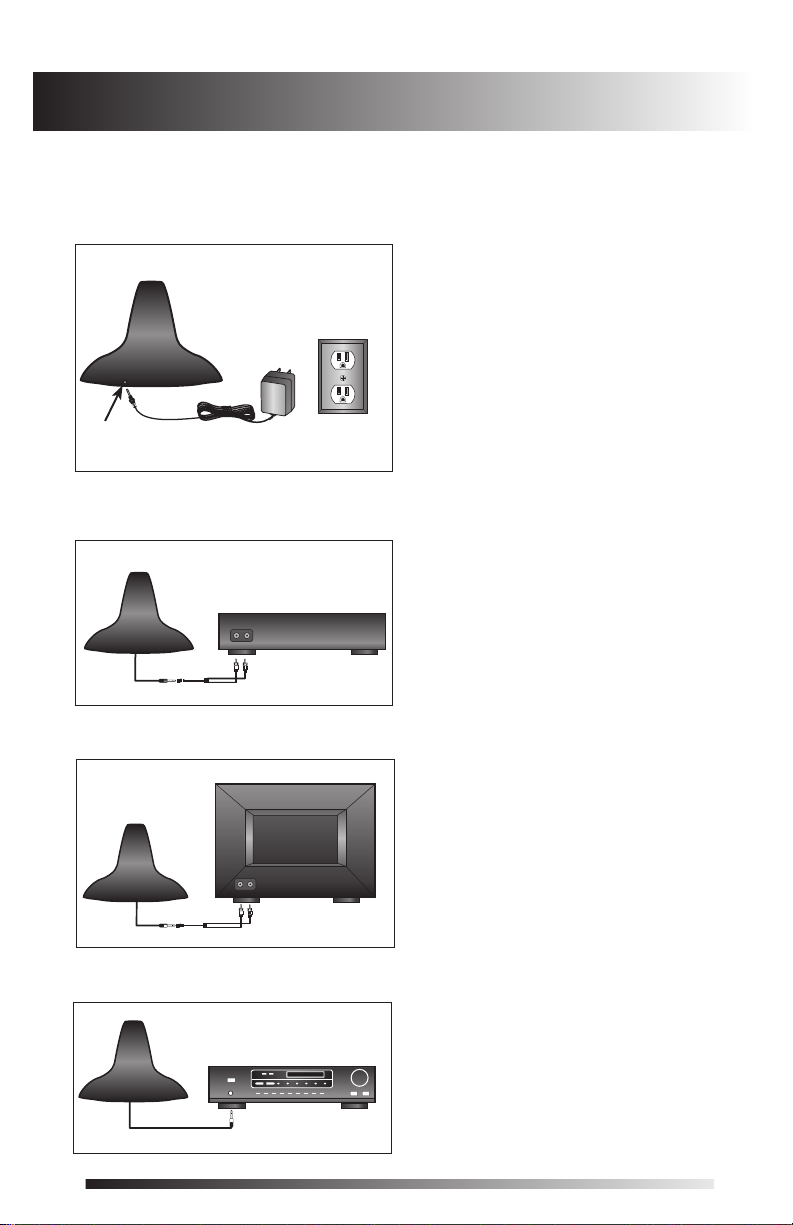
I. Powering the Transmitter
Connect the small, round plug from the transmitter AC power adapter (L) to
the transmitter power input jack (I) and plug the other end of the transmitter
AC power adapter (L) into any standard 120V AC wall outlet.
Transmitter
Note: Be sure to use the AC power
adapter rated 12V DC 100 mA.
120V AC
wall
outlet
Note: There is no transmitter ON/OFF
switch. The transmitter is designed to be
left plugged in and powered at all times.
If you do not intend to use the AW871
for an extended period of time, you may
I
AC Power
Adapter (L)
wish to unplug the transmitter AC power
adapter.
II. Connecting to an Audio Source:
i. Connecting to an A/V Receiver:
Transmitter
Audio Input Cable (J)
A/V Receiver
“Y” adapter cable (N)
ii. Connecting to a TV:
Transmitter
Audio Input Cable (J)
iii. Connecting to a Stereo or a Computer:
Transmitter
Audio Input Cable (J)
TV
“Y” adapter cable (N)
Stereo
1/4” headphone
adapter (O)
1. Connect the included “Y” adapter
cable (N) to the 3.5mm mini plug
cable coming out of the
transmitter.
2. Connect the RCA-type left (white)
and right (red) audio plugs on the
”Y” adapter cable to the
corresponding left and right audio
outputs of your A/V receiver, amp
or other audio source.
1. Connect the included “Y” adapter
cable (N) to the 3.5mm mini plug
cable coming out of the
transmitter.
2. Connect the RCA-type left (white)
and right (red) audio plugs on the
“Y” adapter cable to the
corresponding left and right audio
outputs on the TV.
Plug the cable coming out of the
transmitter into the headphone output
of your stereo or the audio output jack
on your computer. Use the included
headphone adapter (P) to convert the
3.5mm plug to a 1/
4” plug as needed.
1
/
4”
3
 Loading...